

Page 1
SAMSON SPLICING INSTRUCTIONS
12-Strand Class I End-For-End Splice
Class I 12-strand ropes are made from any or all of the following bers:
olen, polyester, or nylon.
This end-for-end splice may be performed on new or used rope. This
is an all-purpose splice technique designed for people who generally
splice used rope as frequently as new rope. By following the procedure
below, the splice can retain from 90% to 100% of average new rope
strength and in used rope up to the same proportion of residual used
rope strength.
Note: Some small sizes of 12-strand products have been converted to an
8-strand single braid.
Finished splice
1
step
2
step
step
3
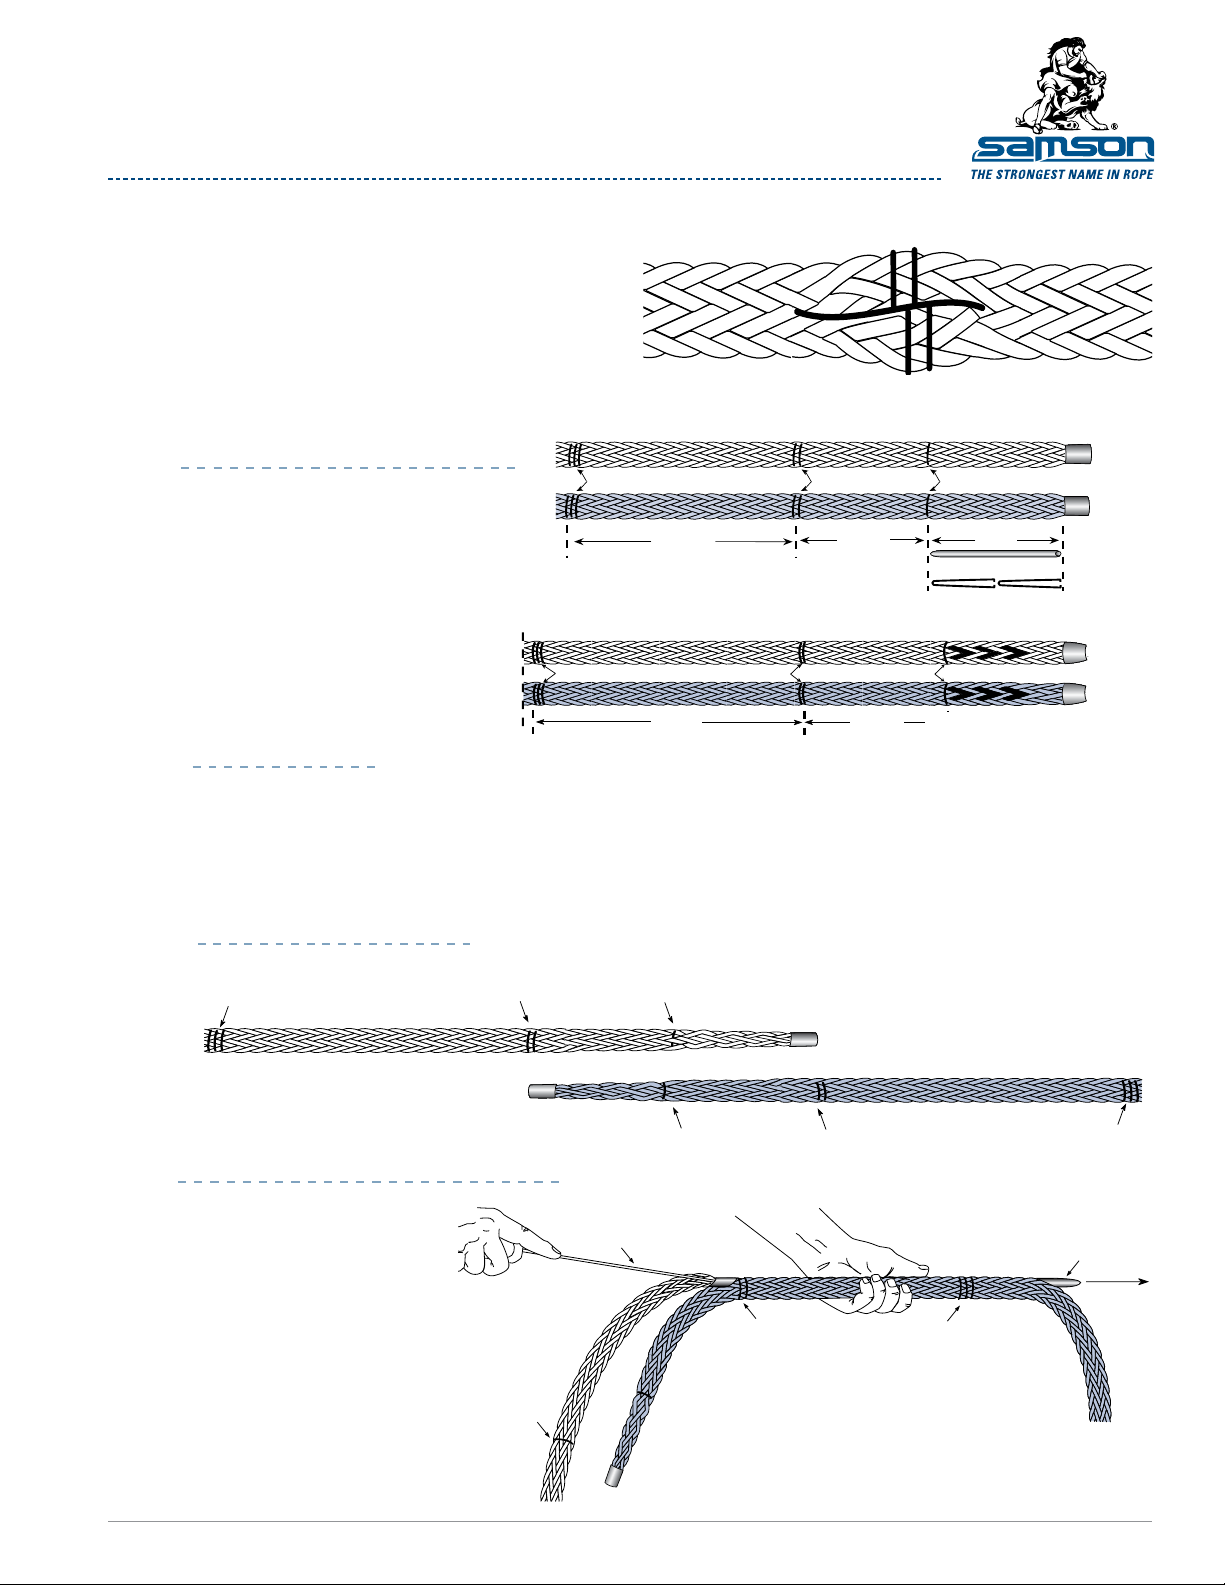
MEASURING AND MARKING
Tape ends of line to be spliced. Lay 2 ropes to
be spliced side-by-side and measure 1 tubular
d length, (or 2 wire d lengths because wire
ds are half the size) from taped end of each
line and mark. This is Mark 1.
From Mark 1 measure 1 tubular d lengths
and make Mark 2 on both lines.
From Mark 2 measure 3 tubular d lengths
(6 wire d lengths) and make Mark 3
on both lines.
Mark 3 Mark 2
3 fids 1 fid 1 fid
Mark 3 Mark 2 Mark 1
3 fids 1 fid
TAPERING TAIL
From Mark 1, in the direction of the taped end of the line, mark every 2nd
right and left strand* for 3 strands.**
Pull every marked strand out of line and cut off (tape at end can cause
resistance and may have to be removed in order to pull out cut strands.)
Tapered end will now have only 6 strands remaining (or 4 strands for an
8-strand braid.) Tape tapered tail tightly to keep from unbraiding.
REPOSITIONING ROPES
Reposition ropes for splicing according to diagram below.
Mark 3 Mark 2 Mark 1
Rope A
Mark 1
Rope B
or
2 wire fids
Rope A
tapered tail
Rope B
3 pair of strands
pulled out and cut off
*Some rope diameters may have pairs of strands in
right and left direction. In this case, treat the pairs of
strands as a single strand, marking and cutting both in
each direction as described above.
**For an 8-strand construction, mark every 3rd left and
right strand for 2 strands.
Tapered tail
Rope A
step
4
SamsonRope.com | Email CustServ@SamsonRope.com | Tel +1.360.384.4669
BURYING ROPE A INTO ROPE B
Attach d to tapered end of Rope
A and insert d into Rope B at
Mark 2. Bring out past Mark 3,
then remove d.
4A
Tie off the tail of Rope
A to a stationary object,
then use both hands and
weight of your body to
smooth Rope B toward
Rope A to bury Rope A up
to its own Mark 2. Leave
tail sticking out.
Tapered tail
pusher
Tapered tail
Mark 1
Rope A
Mark 1 Mark 2
Mark 2
Rope B
Mark 3
Rope B
Mark 3
fid
Rope B
PAGE 1 OF 2
Page 2
SAMSON SPLICING INSTRUCTIONS
12-Strand Class I End-For-End Splice
step
5
6
step
7
step
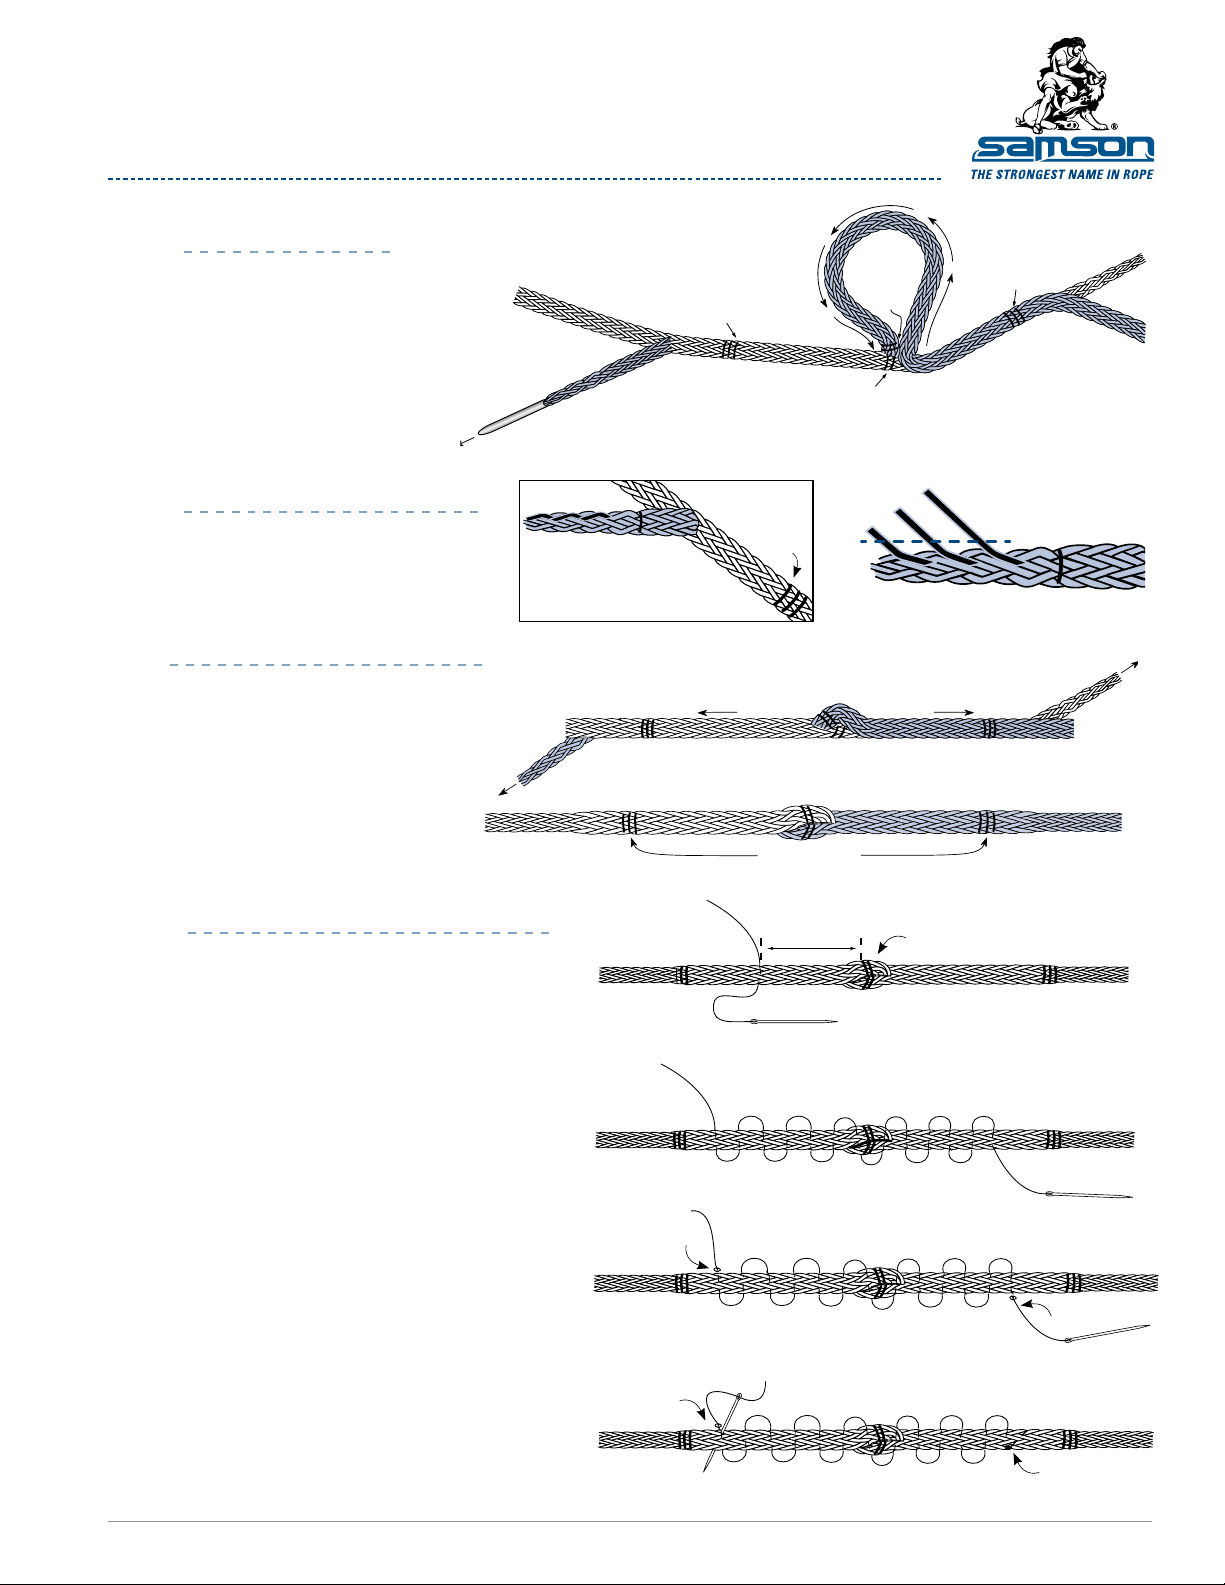
FINISH BURYING
Attach tapered tail of Rope B to d.
Insert the d into Rope A at Mark 2,
approximately the diameter of the line
away from insertion point of Rope A
into Rope B. Bring d and tail out at
Mark 3 of Rope A. Following same
procedures as Step 4A bury Rope
B up to its own Mark 2. Leave tail
sticking out.
TAPERING SECOND TAIL
Mark 3 consecutive strands as shown.
Pull out all 3 and cut off.
SMOOTHING OUT SPLICE
Pull both tails to tighten the crossover.
Now, using both hands and the weight
of your body, smooth the cover slack
from the crossover towards Mark 3 in
both directions. The tails will disappear
into the rope, and a smooth, gradual
taper should result. Lock stitching
should be done on both sides of
the crossover of the buried tails to
prevent the splice from pulling out.
Rope A
Rope B
fid
Tapered tail
Mark 3 consecutive strands
Rope A
Pull
Tail B
Mark 3
Rope A
Mark 3
Smooth
Finished splice
Buried tails
Mark 2
Mark 2
crossover
Rope B
Smooth
Mark 3
Rope B
Tapered tail
Pull out marked strands
and cut off
Tail A
Rope B
Pull
step
8
step
9
DOCUMENT 12Strand_C1_End_For_End.pdf
SamsonRope.com | Email CustServ@SamsonRope.com | Tel +1.360.384.4669
© 2012 Samson Rope Technologies, Inc. All rights reserved. S/WD #108294 7/2012
From Mark 2 at crossover, count 8
picks in either direction and insert
stitching twine.
Working towards the crossover, stitch
twine back and forth through splice until
a minimum of 3 complete stitches have
been made on each side of crossover.
Tie an overhand knot in each end
9A
of the twine, as close to its exit
point as possible.
Insert tail of stitching twine at
9B
exact location where twine
emerges. Using needle or small
d, pull (or push) through rope at
a slight angle. Pull hard on the
end of the twine so that the knot
disappears inside the rope. Trim
off the remaining twine close to
the rope. Repeat on other end of
the twine.
knot
LOCK STITCHING PROCEDURE
knot
8 picks
Mark 2
crossover
knot
knot
PAGE 2 OF 2
 Loading...