

Page 1

HDV-3232
HD/SD SDI routing switcher 32x32
Copyright © 1999 - 2014 Sams elektronik d.o.o.
Published: 20. february 2013.
Updated: 26. november 2014.
Z10-3 edition 1
Code: 003.641
ENGLISH
Sams elektronik d.o.o.
48 Zivka Davidovica st.
11050 Belgrade
Serbia
Tel/Fax: +381 11 3806 253
+381 11 2402 212
sams@sams.rs
www.sams.rs
Read the instructions before using the device.
Keep this manual for periodic usage.
USER MANUAL FOR USE AND MAINTENANCE
Page 2

HDV
Routing switchers
elektronik
Sams elektronik d.o.o. • sams@sams.rs • www.sams.rs
2
Dear User,
Thank you very much for purchasing our product.
Your purchase is a wise investment. The equipment you have purchased is manufactured with great care from
high-quality parts and materials. It is designed to fully meet the needs according to specications, if properly
installed, used and maintained according to the enclosed instructions.
Any technical failure or deciency that occurs during the warranty period specied on the invoice of the
purchased equipment will be inspected and serviced by Sams elektronik doo or an authorized service center of
the manufacturer, with the conditions set out in the warranty statement.
THIS DEVICE IS INTENDED FOR PROFESSIONAL USE.
WARRANTY STATEMENT
1. Product has declared characteristics. Within the warranty period, manufacturer ensures the removal of
technical failures, product defects or replacement of products if declared characteristics of the product are
changed.
2. If the goods are not delivered as specied with the contract, the consumer has the right to request from the
manufacturer / service provider to eliminate the lack of conformity, without charge, repair or replacement,
or to request an appropriate price reduction or terminate the contract.
3. Any repair or replacement must be made within a reasonable time without signicant inconvenience to
the consumer, taking into account the nature and the purpose for which the consumer has purchased the
product.
4. The consumer has the right to terminate the contract, if he can realize the right to repair or replacement,
or if the manufacturer / servicer has not completed repair or replacement within a reasonable time or if
the manufacturer / servicer did not perform repair or replacement without signicant inconvenience to the
consumer.
5. The consumer may not terminate the contract if the lack of conformity of the product is negligible.
6. The product will function properly when used in accordance with the user manual.
7. Period of servicing the product is 6 years from the launch on the market.
The product purchased outside the territory of Serbia does not fall under the terms of this warranty, only to 1
year factory warranty from date of purchase.
TERMS OF WARRANTY
1. The warranty period begins on the date of sale referred in the invoice.
2. The buyer loses the right to warranty if the defect cause failure from not following the user manual
instructions, improper installation, comes to mechanical damage during use, repairs and modications by
unauthorized persons, installation of non-genuine spare parts, and if the buyer does not comply with all
warnings listed in the user manual.
3. The warranty is voided if the device is damaged during the disturbances from the environment, natural
disasters (oods, hail, etc.), suffered an electric shock or lightning strike.
IMPORTANT NOTES
1. Be sure to thoroughly read the user manual.
If you have any doubts about the instructions, contact the technical support of the manufacturer.
2. Before contacting for technical help, please make sure that are provided with all necessary conditions for
normal operation.
3. If the malfunction or defect in the device does not eliminate within a reasonable time from the date of
failure, the warranty period shall be extended for as many days as the unit is in service.
4. For all maintenance interventions shall solely be authorized services listed in this Warranty Certicate.
WARRANTY
Page 3
HDV
Routing switchers
Sams elektronik d.o.o. • sams@sams.rs • www.sams.rs
elektronik
3
IMPORTANT SAFEY
WARNING
TO AVOID RISK OF FIRE OR ELECTRIC SHOCK
DO NOT EXPOSE THE UNIT TO MOISTURE OR RAIN
The symbol “lightning in a triangle” is to alert the user to the presence of
high voltage. In poor conditions the user may be exposed to shock.
The symbol “exclamation mark in a triangle” is to alert the user to comply by
the terms of use in user’s manual, which is supplied with the device.
SAFETY WARNINGS
ELECTRICAL SHOCK HAZA RD
DO N OT O PEN
CAUTION
RIZIK OD S TRUJNOG UDARA
NE O TVARATI
DOK JE P OD N APONOM
UPOZORENJE
Page 4

HDV
Routing switchers
elektronik
Sams elektronik d.o.o. • sams@sams.rs • www.sams.rs
4
TECHNICAL SUPPORT AND SERVICE
Sams elektronik has made every effort to ensure that the equipment works in perfect condition. In
the event that problems that occur can not be resolved, or if you have any questions regarding this
equipment or information about other products produced from Sams elektronik, contact your local sales
representative or call Sams elektronik directly through one of the ways listed below:
Sales: +381 11 3806 254
Technical support: +381 11 2402 212
Service: +381 11 4056 051
Email:
Sales - sasa@sams.rs
Technical support and service - sams@sams.rs
Web site: www.sams.rs
Address:
SAMS ELEKTRONIK d.o.o.
48 Zivka Davidovica st
11050 Belgrade
Serbia
WARNING
TO AVOID ELECTRIC SHOCK, DO NOT OPEN COVER.
DEVICE MAINTENANCE REQUIRES PROFESSIONAL PERSON AUTHORIZED BY THE MANUFACTURER.
1. Read all safety and operating instructions before using the device.
2. Keep all safety and operating instructions.
3. Follow the instructions from the user manual.
4. Do not upgrade device, except in the case advised by the manufacturer.
5. Do not use the device in the presence of water and / or moisture.
6. Do not pour water or moisten the device with any type of liquid.
7. Openings on device are provided for ventilation.
8. Do not block air ow through the ventilation openings.
9. This product is powered by AC ~ 230V ± 10%, 50Hz.
10. This product is equipped with a three-wire cord with grounding.
11. This device is equipped with a protective fuse in the power outlet. Do not bypass fuse.
12. Do not replace the fuse. Replacement can be made by a person authorized by the manufacturer.
13. Do not bend the power cord so that it can be damaged.
14. Connect connectors as in the enclosed instructions. Deviations from the allowed values predicted
for the inputs and outputs of the device can cause severe damage and warranty void.
15. Do not use the device in an environment that contains ammable or explosive materials in any
physical state.
16. Turn off the power corde before cleaning. Do not use liquid, aerosol or ammable cleaners. Use
only a dry cloth.
17. Servicing is performed by a qualied person. Removing the cover user is exposed to high
voltages.
18. Never use the device when the cover is open and the device is powered on.
19. Do not expose to extreme high or low temperatures.
20. Do not expose to sudden temperature changes.
21. Call service in the following cases:
- The power cord or plug is damaged
- Liquid or foreign objects is inside the device
- The machine is exposed to water and moisture
- The device does not function according to specication
- The unit has been dropped or damaged
- The characteristics are signicantly changed
22. Use only specied replacement parts.
23. Professional person authorized by the manufacturer must check the device after completion of
service.
24. Allow a free rack unit (1RU) above and below the device for ventilation or put rack fan under the
device.
Pictures and drawings listed in this user manual are for information purposes only and may differ
from the actual device. Design and specications of the device may change without prior notice.
Page 5

HDV
Routing switchers
Sams elektronik d.o.o. • sams@sams.rs • www.sams.rs
elektronik
5
UNPACKING AND INSTALLATION ....................................................................................6
MAINTENANCE ..............................................................................................................6
REMOVAL AND STORAGE ...............................................................................................6
DESCRIPTION ...............................................................................................................7
INSTALLATION .............................................................................................................. 8
POWER SUPPLY PSU-1 ...................................................................................................8
CP-3232, MASTER REMOTE CONTROL 32X32 ..................................................................9
CP-32, SLAVE REMOTE CONTROL 32X1 ..........................................................................10
CONFIGURATION AND CONNECTION, GRAPHIC EXAMPLE ...............................................11
CONNECTORS ...............................................................................................................12
ADDRESSING REMOTE CONTROLS ................................................................................. 12
NETWORK SETUP .......................................................................................................... 13
NETWORK ACCESS AND DEVICE CONTROL ..................................................................... 13
PROBLEMS AND SOLUTIONS IN A NETWORK ENVIRONMENT ..........................................15
SOFTWARE SUPPORT .................................................................................................... 17
SOFTWARE ................................................................................................................... 18
CONFIGURATION SOFTWARE FOR SLAVE COMMANDS ....................................................23
NOTES .........................................................................................................................28
PageDescription
TABLE OF CONTENTS
Page 6
HDV
Routing switchers
elektronik
Sams elektronik d.o.o. • sams@sams.rs • www.sams.rs
6
UNPACKING AND INSTALLATION
REMOVAL AND STORAGE
MAINTENANCE
The box contains:
- Device
- Power corde
- Master / Slave remote control (optional)
- Power supply (optional)
- User manual (optional)
Before use, check the contents of the box. For any deciency report to the seller or the manufacturer
of the product.
DEVICE IS INSULATED BY PROTECTIVE WRAP AND PACKED IN A CARDBOARD BOX.
DEVICE IS SENSITIVE TO SHAKES AND DROPS. HANDLE WITH CARE DURING TRANSPORT
AND ASSEMBLY.
Check if the product is damaged during transport.
1. Before dismantling the device, switch off the power, remove
the power cord and remove all other connectors.
2. Remove the four screws for fastening.
3. Remove the device from rack cabinet.
4. Wrap the machine in the foil to protect it from dust. Package
it in a box.
5. The device must be stored in a room without moisture.
The system maintains only person authorized by Sams elektronik
doo.
Any voluntarily opening device, upgrading or servicing is strictly
prohibited and is subject to warranty void, and the possibility of
injury.
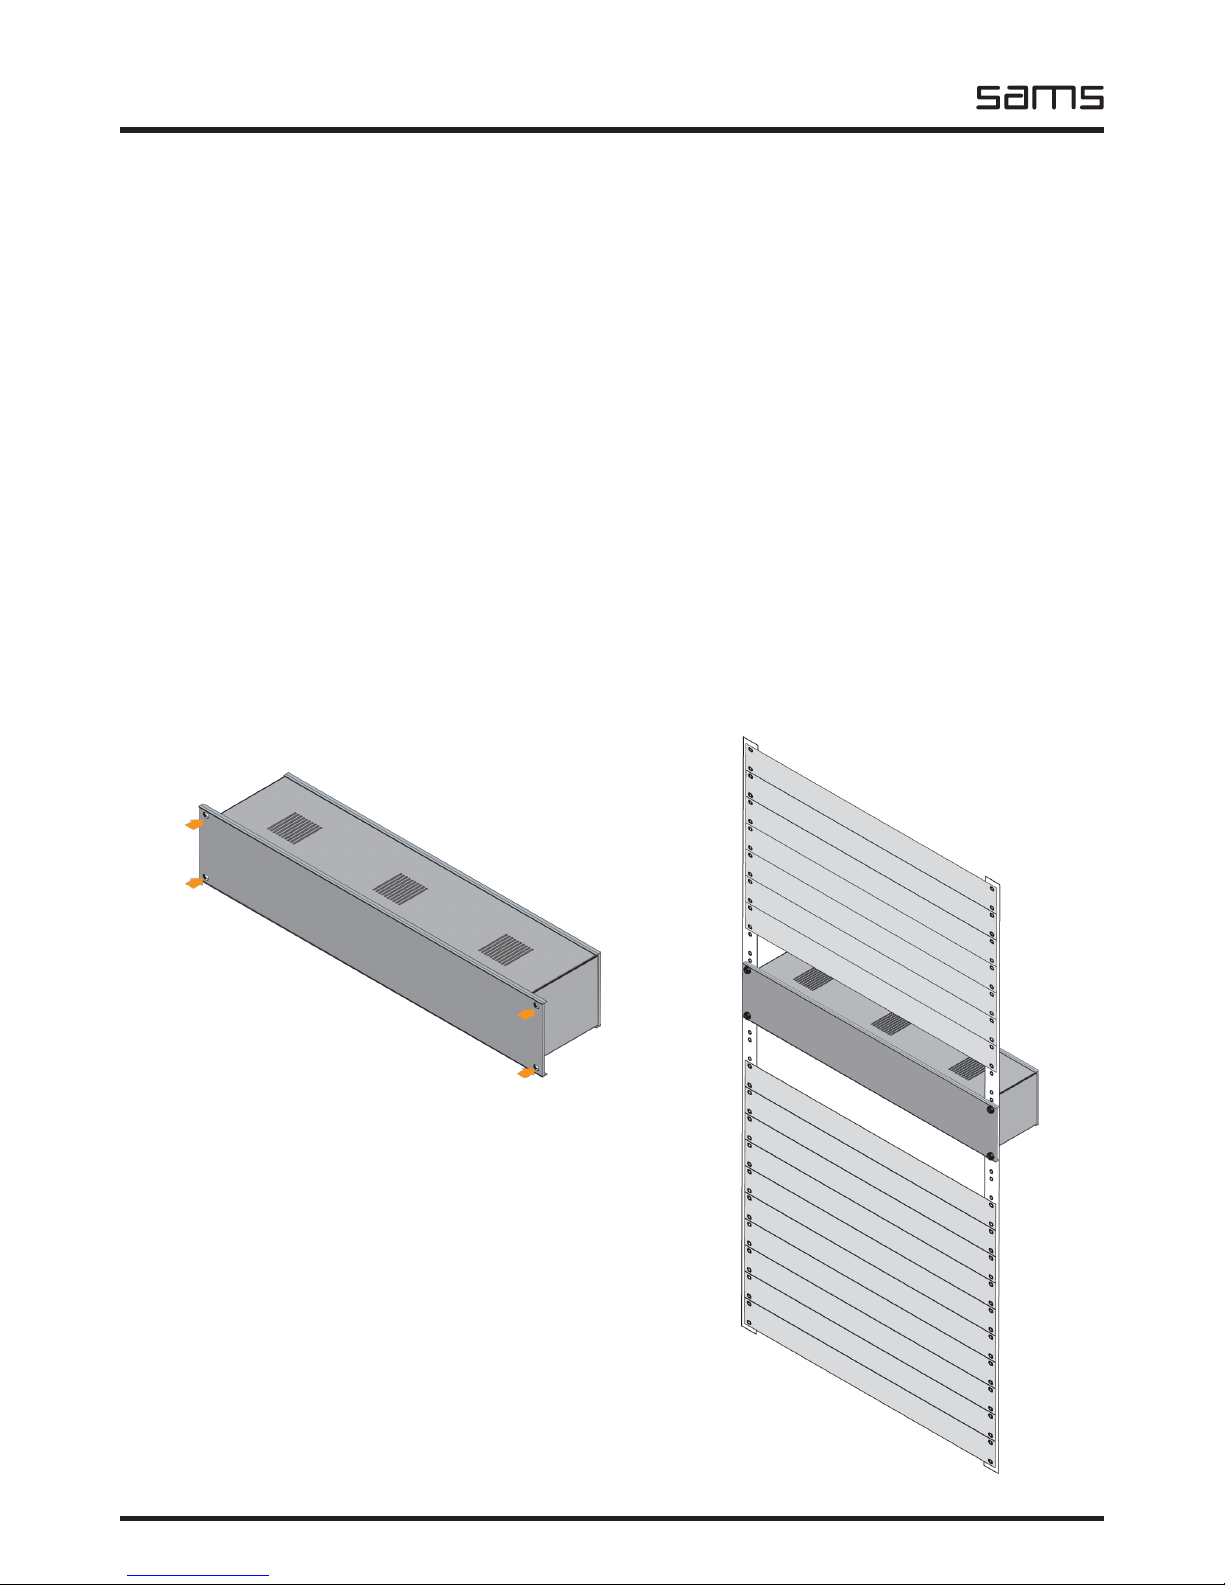
Places for fastening
PROCEDURES FOR SAFE USE OF THE DEVICE:
1. - Remove the protective wrap from the chassis.
- For devices that are AC 230V / 50Hz powered, the device is supplied with power cord.
- Use only power corde that comes with the device.
2. Device is mounted in a 19“ special-purpose rack cabinets designed for this type of device. Screw
device with four screws. Screws for fastening are not supplied with the device.
3. The device must be connected to ground. A device that is not connected to the grounding does
not function properly according to factory declarations and can cause adverse effects on users and
other equipment.
4. Strictly comply to all steps for proper connection of devices in the system.
Illustration - mounted device
Page 7
HDV
Routing switchers
Sams elektronik d.o.o. • sams@sams.rs • www.sams.rs
elektronik
7
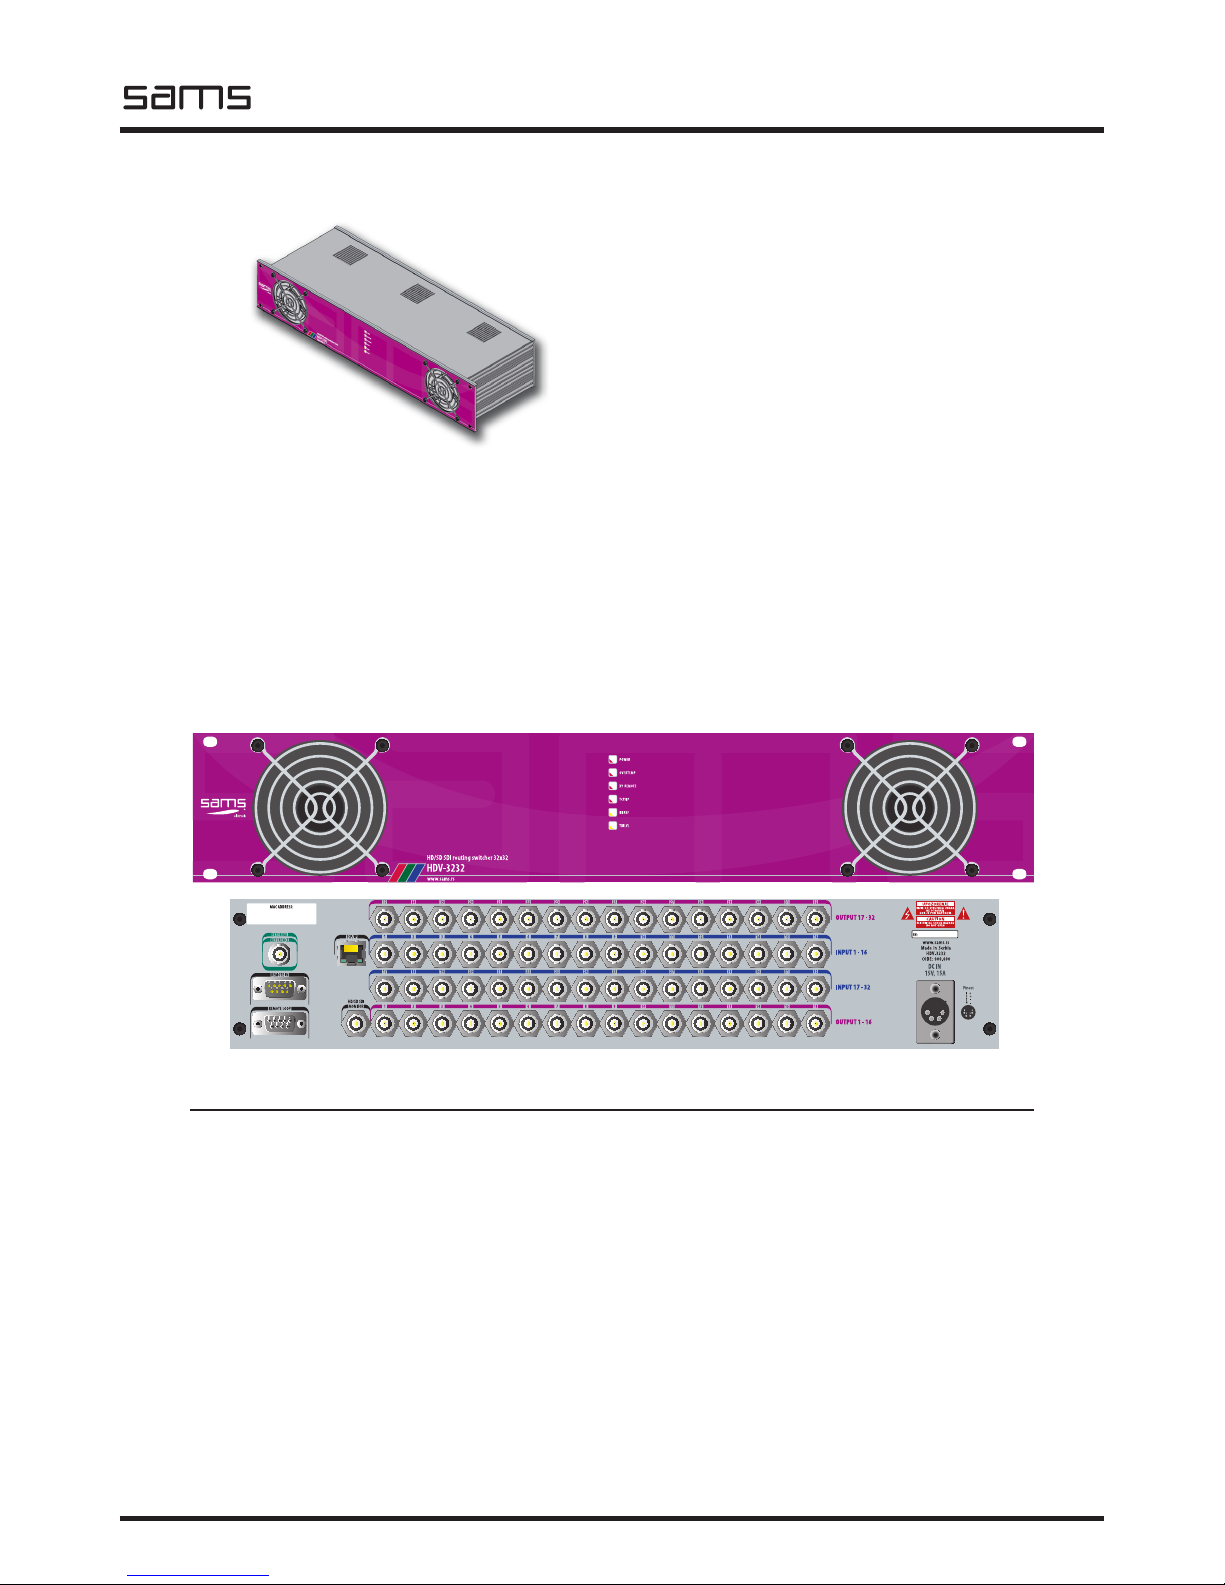
DESCRIPTION
HD/SD SDI ROUTING SWITCHERS
• Sams elektronik d.o.o. • 48 Zivka Davidovica st. • 11050 Belgrade • Serbia •
• +381 11 3806 253; +381 11 2402 212 • sams@sams.rs • www.sams.rs •
HDV-3232 is a compact 32x32 HD / SD SDI matrix which
allows up to 1.5Gb/sec. HDV series is based on the latest
technology that supports HD. Device has LED detection of
type of reference signal. It also has automatic rekloking
and equalization offset length up to 100m of 1694A cable.
Uses the standard CP-3232 Remote Control, but can also
be controlled from web browser over TCP / IP or over PC
software. HD / SD SDI output monitoring simplies the
view of inputs / outputs to monitor and control is done
via the remote control. Integrated fans provide optimal
cooling, and the LED on the front panel warns if device
goes into overheating. The device can be combined with
analog or digital audio matrix 32x32.
TECHNICAL SPECIFICATIONS
GENERAL INFORMATION
- Code: ....................................................................003.641
- Weight: ...................................................................... 3 Kg
- Type: ......................................................... 2RU rack frame
- Dimensions: ........................................ 2RU x 19” x 150mm
- Required: remote control CP-3232, cable for connection with
remote control, DC power supply PSU-1
- Delivery includes: ................................. device, user manual
INPUT
- Number: ........................................................................ 32
- Signal type: ....................................HD/SDI to SMPTE 292M
- EQ: .............................Automatic to 100m with 1694A cable
- Impedance: .................................................................75Ω
- Connectors: ................................................................ BNC
Specications and designs are subject to change without notice
HDV-3232
HD/SD SDI routing switcher 32x32
- HD/SD SDI routing switcher 32x32 with monitoring
output
- Master remote CP-3232 with programmable slave
control panels
- Compact routing switcher in 2RU frame
- Switching HD/SD signals
- Auto EQ and reclocking
- Vertical interval switching per SMPTE RP 168-1993
- Can function independently or be linked with other
32x32 routing switchers
- Power down memory recovery
- Automatic recognition of reference standard signal
- Control via TCP-IP
- PC control via RS-232
- HD/SD SDI video monitoring
- Built-in fans provide optimum cooling
- LED warning due to overheating
- External power supply 15V via “PSU-1”
ORDERING INFORMATION
Code Name Description
003.641 HDV-3232 HD/SD SDI routing switcher 32x32
003.911 CP-3232 Remote control 32x32
front side
rear side
OUTPUT
- Number: ................................................. 32 + 1 monitoring
- Connectors: ................................................................ BNC
- Impedance: .................................................................75Ω
- Output level: ...............................................800mV ± 10%
- Jitter: .................................................... < 0.2UI at 100KHz
REFERENCE INPUT
- Number: ......................... 1, BNC (Black Burst / 3-level sync)
TCP-IP
- Number: ................................................................1, RJ-45
POWER
- Voltage: ........................................................DC 15V / 15A
TEMPERATURE
- Performance: .......................................................... 5-40°C
- Operating: .............................................................. 0-50°C
Page 8
HDV
Routing switchers
elektronik
Sams elektronik d.o.o. • sams@sams.rs • www.sams.rs
8
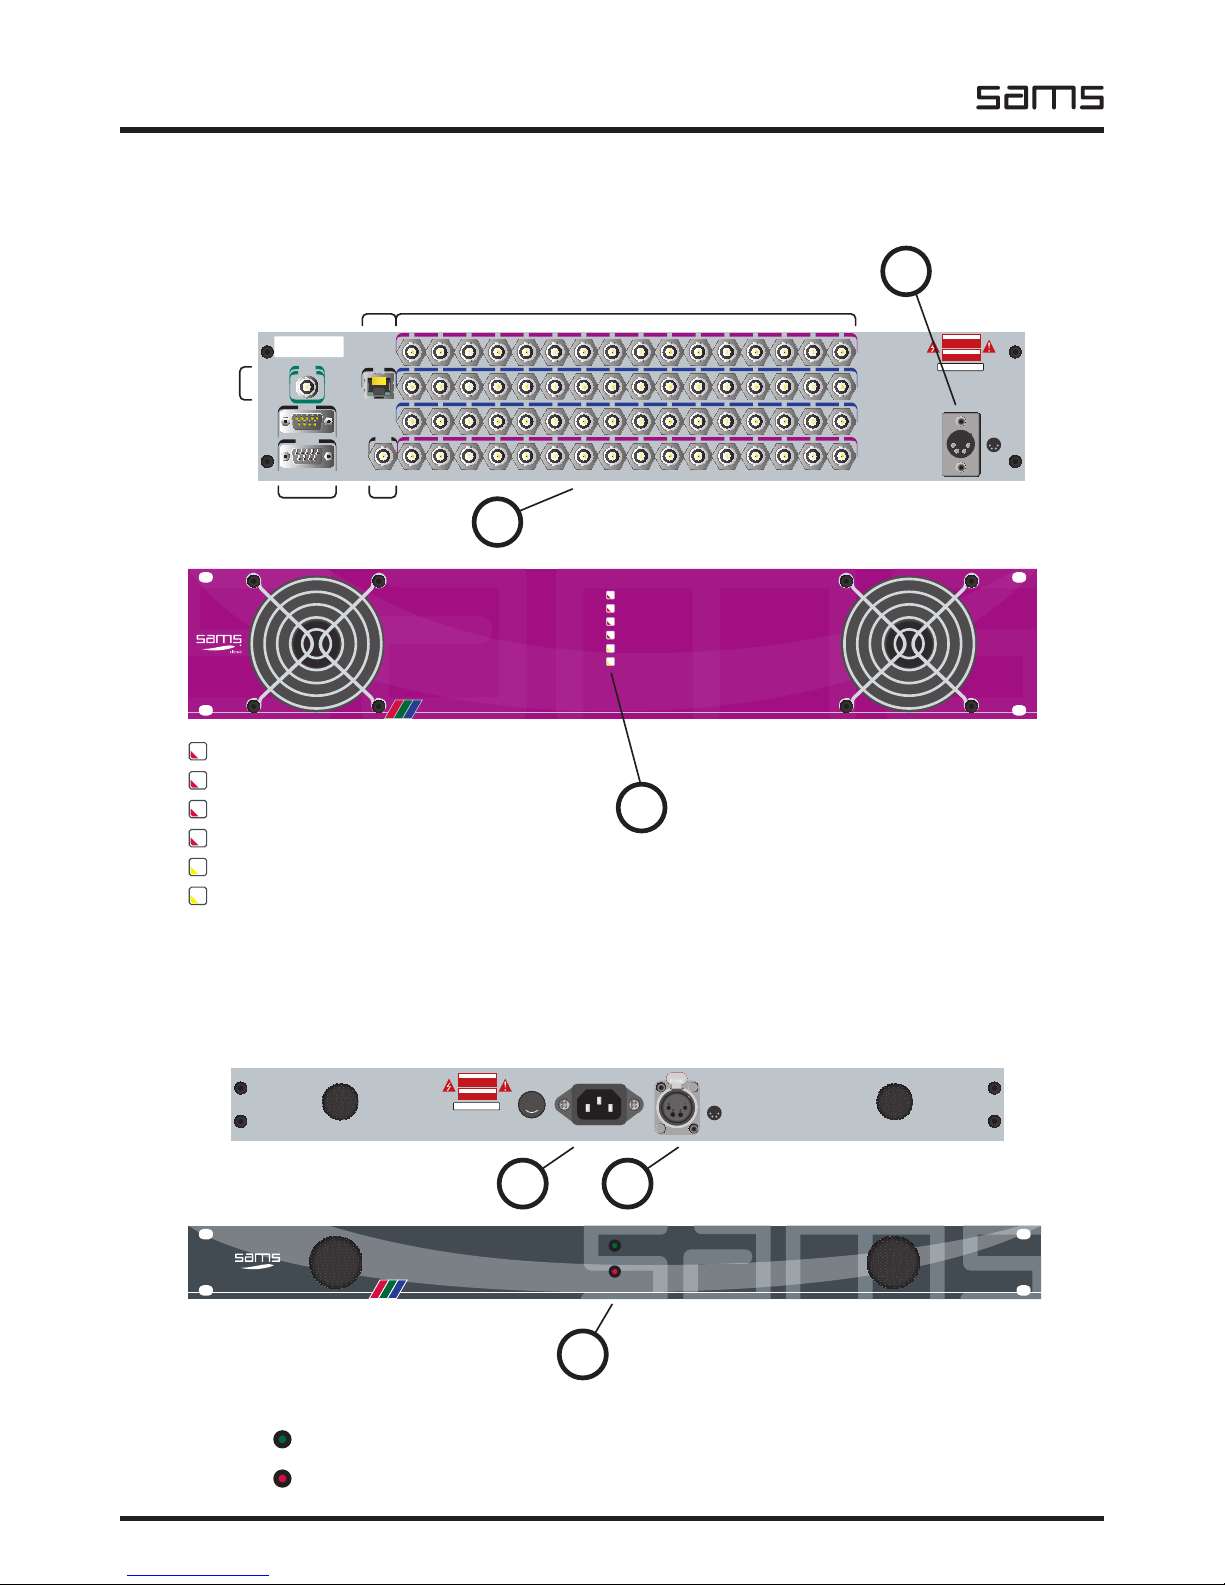
POWER SUPPLY PSU-1
TCP/IP
HD/SD SDI
MONITOR
OUTPUT 17 - 32
17 18 19
EXTERNAL
REFERENCE
REMOTE IN
REMOTE LOOP
20 21 22 23 24 25 26 27 28 29 30 31 32
MAC ADDRESS:
INPUT 17 - 32
17 18 19 20 21 22 23 24 25 26 27 28 29 30 31 32
INPUT 1 - 16
1 2 3 4 5 6 7 8 9 10 11 12 13 14 15 16
OUTPUT 1 - 16
1 2 3 4 5 6 7 8 9 10 11 12 13 14 15 16
DC IN
15V, 8A
Pinout
1 +
2 +
3 –
4 –
1 4
2 3
www.sams.rs
Made in Serbia
HDV-3232
CODE: 000.000
SN:
ELECTRICAL SHOCK HAZARD
DO NOT OPEN
CAUTION
RIZIK OD STRUJNOG UDARA
NE OTVARATI
DOK JE POD NAPONOM
UPOZORENJE
1
2
video outputs 17-32
video inputs 1-16
video inputs 17-32
video outputs 1-16
TCP-IP
external
reference
connection
with
remote
control
HD/SD SDI
monitoring
output
HDV-162, rear side
Connect the 4pin power cord.
The device works only with PSU-1.
Connect all necessary connectors
before the unit is turned on.
HDV-3232
www.sams.rs
HD/SD SDI routing switcher 32x32
POWER
OVERTEMP
XY REMOTE
TCP/IP
BBREF
TRILVL
3
RED LED - indication of the presence of power supply
RED LED - overtemperature processor indication
GREEN LED - indication of the presence of remote control
GREEN LED - indication of communication in the local network
YELLOW LED - indication of the presence of Black Burst reference
YELLOW LED - indication of the presence of Tri-Level Sync reference
HDV-3232, front side
Status is represented by LEDs on the front side
POWER
OVERTEMP
XY REMOTE
TCP/IP
BBREF
TRILVL
4
Connect the 4pin power cord
attached to the matrix
5
6
Status is represented by LEDs on the front panel
GREEN LED - indication of the presence of power supply.
RED LED - indication of a faulty fuse. The device does not work. Replace the fuse.
POWER
OK
FUSE
ERROR
Power Supply Unit
PSU-1
www.sams.rs
FUSE
ERROR
POWER
OK
FUSE: 1A
AC ~230V/50Hz
www.sams.rs
Made in Serbia
PSU-1
CODE: 000.000
SN:
ELECTRICAL SHOCK HAZARD
DO NOT OPEN
CAUTION
RIZIK OD STRUJNOG UDARA
NE OTVARATI
DOK JE POD NAPONOM
UPOZORENJE
DC 12V, 13A
POWER OUTPUT
Pinout
1 +
2 +
3 –
4 –
4 1
3 2
FUSE
Connect the power cord.
The device works only on AC ~ 230 V / 50 Hz.
NOTE: DO NOT INSERT OBJECTS THROUGH THE FAN!
THE ROOM IN WHICH THE DEVICE IS MUST BE AIRCONDITIONED!
INSTALLATION
For best signal quality, use:
- Belden 1694A coaxial cable for SDI
Page 9
HDV
Routing switchers
Sams elektronik d.o.o. • sams@sams.rs • www.sams.rs
elektronik
9
INPUTS OUTPUTS VIDEO
UNDO
CONNECTION TO SLAVE REMOTE CONTROLS
CONNECTION
TO PC
CONNECTION
TO ROUTING
SWITCHER
POWER
SWITCH
POWER
SOCKET
LOCK PAN EL
LOCK
AUDIO 2 PREVIEW
AUDIO 1
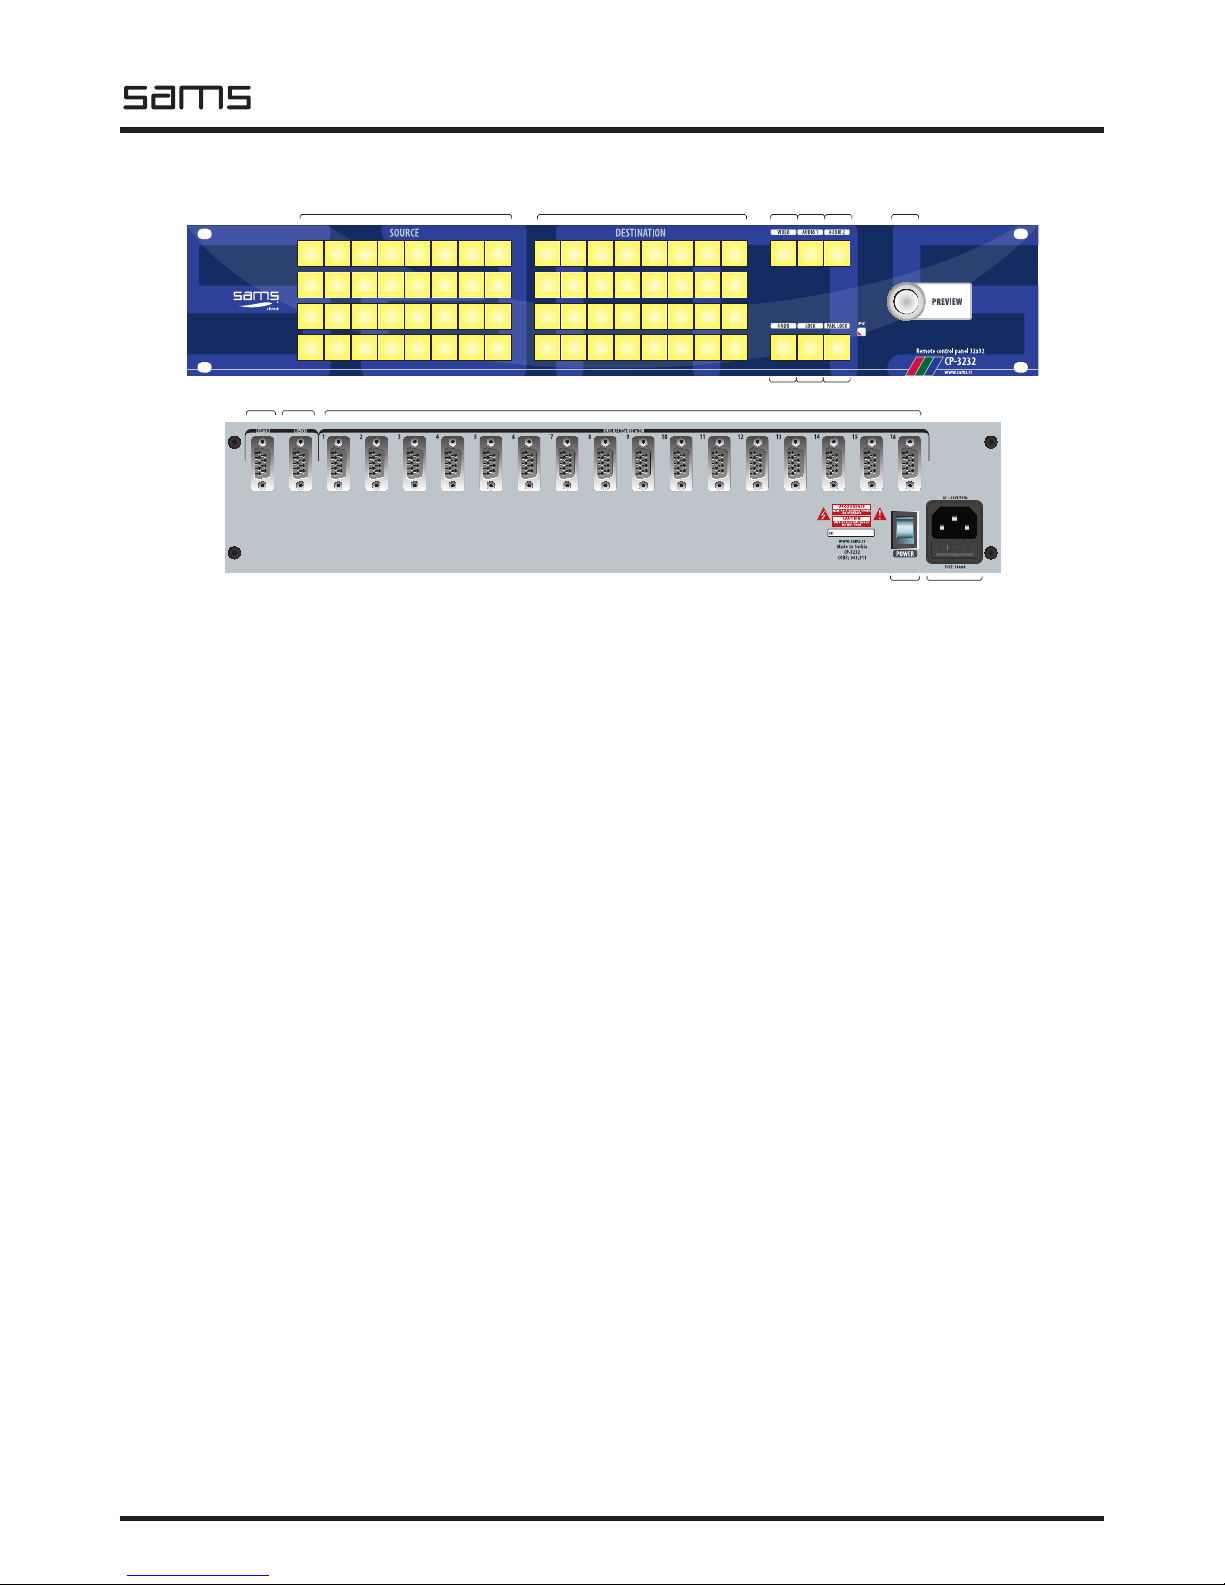
CP-3232, MASTER REMOTE CONTROL 32X32
INPUTS - source keys
OUTPUTS - destination keys
VIDEO - control of video router
AUDIO 1 - control of audio 1 router
AUDIO 2 - control of audio 2 router
UNDO - one step back
LOCK - destination lock
PANEL LOCK - remote control lock
PREVIEW - key to call input/output to preview
output
SLAVE REMOTE CONTROLS - to connect slave
remote controls
PC - connection to PC
ROUTER - connection to routing switcher
CP-3232 is master remote control for video, audio and data routing switchers 32x32.
CONNECTIONS TO X-Y COMMAND
On the front panel there are buttons to select the type of signal (audio, video, data). The command
connects in three levels, therefore press if necessary VIDEO-AUDIO1-AUDIO2 (DATA) ENABLE button.
If the button is illuminated, you can use this audio, video, or data source. When the VIDEO and AUDIO
ENABLE buttons are included, routing switcher operate in either an audio-follow-video. To link the
source and destination, rst press and hold the desired destination, and then press the desired source.
Connection can be made also vice versa.
If you notice that the LOCK button is illuminated when you press a destination, that destination is locked
for use. To connect a source to a destination you have to unlock it rst.
The keys are numerically dened. It can connect one source to multiple destinations (except in the
case of the DATA matrix, which connects one source to a single destination. To check that the source is
connected to that destination, simply press the desired source and destination buttons will illuminate. If
the destination is not illuminated, that source is not used. In the same way, you can press a destination
and check to which the source is connected. Before checking ensure it is turned on the appropriate
video, audio or data signal level. In a system where are slave controls, the master command has control
over all destinations and can connect and those destinations that are assigned to slave commands.
LOCK
Use this option when you want to lock destination. To lock the destination, press and hold the desired
destination it then press LOCK. In the same way, it unlocks the destination. From that moment that
destination button ashes, which indicates that it is locked. On that destination nothing else can be
brought as a source until destination is unlocked.
Destinations that are assigned to slave commands and which are locked, can be unlocked with any
remote controls in the system using the same destination as well as through the software on the PC.
UNDO
Use this option if you want to restore the previous state of the connection. When you press a destination
and if UNDO button is illuminated, then it is possible to return to the previous state of the connection.
UNDO option saves only one step in all three levels (Video Audio1-Audio2 / data) and each level can
be called independent. UNDO option may not be called if the routing switcher powered on for the rst
time. Remote control saves the previous state connections in the event of a power failure or deliberate
Page 10

HDV
Routing switchers
elektronik
Sams elektronik d.o.o. • sams@sams.rs • www.sams.rs
10
INPUTS VIDEO AUDIO 2
AUDIO 1
CONNECTION
TO MASTER
REMOTE
UNDO LOCK PANEL
LOCK
CP-32, SLAVE REMOTE CONTROL 32X1
CP-32 is slave remote control for video, audio and data routing switchers 32x32 and they have one
destination.
Connect slave command to master. In order to subsequently assign sources and destination as well as
their arrangement via software command must have its own address. Press and hold for a few seconds
PANEL LOCK key. While hold PANEL LOCK select address by pressing SOURCE. The keys are numerically
dened and should press single number from 1 to 16 (the total number of additional commands).
Make sure that the selected address does not match with the already selected in another previously,
addressed slave commands. Pressed button starts ashing. In this way, you will notice that selected
address will be used for this command. After selecting release PANEL LOCK key.
LOCK
Use this option when you want to lock destination. Since this type of commands uses only one destination,
to lock after source selection, press LOCK. From that moment LOCK button lights up. Pressing the key
LOCK unlocks destination. On that destination nothing else can be brought as a source until destination
is unlocked.
Destination that is assigned to slave commands and which is locked, can be unlocked with any remote
controls in the system using the same destination as well as through the software on the PC.
UNDO
Use this option if you want to restore the previous state of the connection. Since this type of commands
shutdown. In a system where two or more commands can control the same destination, return to the
previous state can be made with any such command.
PANEL LOCK
Use this option when you want to lock the entire panel.
PC ENABLE
LED ashes when the PC software is active. Control from the PC is used to connect XY and has the same
functions as the master command.
PREVIEW
PREVIEW button is used for video monitoring of sources and destinations, as well as their connections.
Press the desired level (VIDEO AUDIO ENABLE). Hold PREVIEW button and press the desired source. On
the monitor will display video content from that source and destination buttons that are related to that
source will blink rapidly. Conversely, press PREVIEW button and the desired destination will be displayed
video content, and source from where the content is coming will blink rapidly.
INPUTS - source keys
OUTPUTS - destination keys
VIDEO - control of video router
AUDIO 1 - control of audio 1 router
AUDIO 2 - control of audio 2 router
UNDO - one step back
LOCK - destination lock
PANEL LOCK - remote control lock
REMOTE - connection to master remote control
Page 11

HDV
Routing switchers
Sams elektronik d.o.o. • sams@sams.rs • www.sams.rs
elektronik
11
uses only one destination if UNDO button is illuminated, then it is possible to return to the previous state of the
connection. UNDO option saves only one step in all three levels (Video Audio1-Audio2 / data) and each level
can be called independent. UNDO option may not be called if the routing switcher powered on for the rst time.
Remote control saves the previous state connections in the event of a power failure or deliberate shutdown. In
a system where two or more commands can control the same destination, return to the previous state can be
made with any such command.
PANEL LOCK
Use this option when you want to lock the entire panel.
PC ENABLE
LED ashes when the PC software is active.
CONFIGURATION AND CONNECTION, GRAPHIC EXAMPLE
TCP-IP, ethernet
RS-232, control via PC
External reference, BB or
Tri-level sync
Power supply
AC230V/50Hz
Page 12

HDV
Routing switchers
elektronik
Sams elektronik d.o.o. • sams@sams.rs • www.sams.rs
12
ADDRESSING REMOTE CONTROLS
Connect slave command to master. In order to subsequently assign sources and destination as well as
their arrangement via software command must have its own address. Press and hold for a few seconds
PANEL LOCK key. While hold PANEL LOCK select address by pressing SOURCE. The keys are numerically
dened and should press single number from 1 to 16 (the total number of additional commands).
Make sure that the selected address does not match with the already selected in another previously,
addressed slave commands. Pressed button starts ashing. In this way, you will notice that selected
address will be used for this command. After selecting release PANEL LOCK key.
CONNECTORS
Routing Switcher - Remote (male/female) SUB D9 pin
Remote - PC (male/female) SUB D9 pin
1
1
5
5
9
9
6
6
G G
V+ V+
TXTXRX RX
female male
1
1
5
5
9
9
6
6
GND
female male
PC TX
PC RX
2 3 4
7
8
2 3 4
7
8
2 3 4
7
8
2 3 4
7
8
Page 13

HDV
Routing switchers
Sams elektronik d.o.o. • sams@sams.rs • www.sams.rs
elektronik
13
NETWORK ACCESS AND DEVICE CONTROL
The device can be congured through the web browser. First, the device must be found in the local
network. To do this, start the Sams Netnder software double clicking on the icon. The software rst
scans for devices.
Sams Netnder: scan for devices
When the search is completed, a new window will open showing found devices.
NETWORK SETUP
To change the settings, consult your network administrator.
The default IP address is 192.168.0.200. If there is a DHCP server, the device will be assigned a new
address.
If there is a problem with connecting the device, check the rewall and allow UDP port 3040.
Sams Netnder: found devices
Click on the desired device and press the “Web Browser” located on the left side of the software.
Browser will display the conguration options.
NOTE:
The device will be found from across the network only if the device was connected to a network cable
before turning on.
If the program NETFINDER does not nd the device on the network, try the following:
- Connect the inserter directly to the computer;
- The computer set with xed IP address, as follows:
IP ADDRESS 192.168.0.15
SUBMASK IP 255.255.255.0
IP GATEWAY left blank;
- Set REPAIR network card, in order to fully accept the new settings (alternatively RELEASE / RENEW
scenario);
- Try NETFINDER;
- The device must be seen;
- Write down the MAC ADDRESS and consult with the network administrator.
NOTE:
Do not use simultaneously with multiple places control over the network!
Just enter the correct value in the permitted range.
The manufacturer does not guarantee the validity of the results of irresponsible use of the device.
Page 14

HDV
Routing switchers
elektronik
Sams elektronik d.o.o. • sams@sams.rs • www.sams.rs
14
NOTE:
All changes across the network are not visible on the remote commands.
Web browser
ONLINE - The device communicates with the Web page only when the ONLINE letters changed from
large to small. Once it stop, the communication is interrupted.
REF:
- Green - 720p / 1080p
- Red - check cable or source references
- Yellow - Pal / NTSC
Each number represents the buttons on the incoming signal. Each row represents a destination and
these are identied by name. Pressing the button in one of rows connects selected input to a destination
from that row.
After a few seconds, the page will open.
Page 15

HDV
Routing switchers
Sams elektronik d.o.o. • sams@sams.rs • www.sams.rs
elektronik
15
If the software NETFINDER is not able to locate the device in the network try the following:
1. Right click on Local Area Connection
2. Select option “Change Windows Firewall settings”
3. When a window “Windows Firewall” opens select tab “Exceptions”
4. Click on button “Add program”
PROBLEMS AND SOLUTIONS IN A NETWORK ENVIRONMENT
Page 16

HDV
Routing switchers
elektronik
Sams elektronik d.o.o. • sams@sams.rs • www.sams.rs
16
5. Click button “Browse”.
6. Select application NETFINDER.
8. Click “Open”, and “OK”. “OK” and “OK”
If the above solution does not help, try the following:
1. Download from address “http://www.softcab.com/dhcp-server/index.php” Tiny DHCP server*.
2. Before installation, note down the MAC address of the device.
3. Turn off the UTP cable, and if your computer has another network access, BT, WiFi etc. - disable
them.
4. Network card on your computer set to a xed address 192.168.0.1, subnet mask 255.255.255.0,
default gateway and DNS leave blank.
5. Turn off all kinds of rewalls completely.
6. Install Tiny DHCP server.
7. In Tray icon will appear in the form of two shaking hands.
8. Click on that icon.
9. In the opened window, click the button “Add new”.
10. Enter the MAC address of the device (MAC address is entered without dashes, dots and spaces) and
press OK.
11. If the eld is not marked with the MAC address of the device, click on it.
12. In the right part of the window in the drop down menu instead of “Ask me” choose “Automaticallz
process the request”.
13. In the IP Address eld enter 192.168.0.200 (can be some other IP)
14. Connect the UTP cable to the computer and the other side to the device.
15. Turn on device.
16. Wait the computer to show “10mb connected...”
Page 17

HDV
Routing switchers
Sams elektronik d.o.o. • sams@sams.rs • www.sams.rs
elektronik
17
The device supports the development of specic software for customer needs, for remote conguration
of software for playout systems, sending specic commands to the device IP address.
Commands are sent in the format:
http://router_ip_address/get_data?cmd=value
LIST OF COMMANDS:
dstXX=n connect output XX on input n
XX - output with values from 0-31 (outputs from 1-32)
n - inputs with values from 0-31 (inputs from 1-32)
ref - send feedback about status of reference. Enter in form “ref=”. 0-no ref, 1-PAL, 2-NTSC, 3-480p,
4-576p, 5-720p, 6-1080i, 7-1080p
lnk - Enter in form “lnk=”. For each command CGI counts in the range 0-6
EXAMPLE:
IP address of router is 192.168.0.14
input 1 to output 1,
input 2 to output 2,
input 3 to output 3,
input 4 to output 4,
input 5 to output 5,
input 6 to output 6,
input 7 to output 7,
input 8 to output 8,
input 9 to output 9,
input 10 to output 10,
input 11 to output 11,
input 12 to output 12,
input 13 to output 13,
input 14 to output 14,
input 15 to output 15,
input 16 to output 16,
http://192.168.0.14/get_data?dst00=0&dst01=1&dst02=2&dst03=3&dst04=4&dst05=5&dst06=6&ds
t07=7&dst08=8&dst09=9&dst10=10&dst11=11&dst12=12&dst13=13&dst14=14&dst15=15
NOTE:
- If you use a web browser for programming, we recommend that it be Mozilla Firefox®, with desabled
options to cache the page.
17. If the “tray” icon of DHCP server has not changed its color when you turn the device, turn the unit
off, wait for a while and turn it on again.
18. Start application NETFINDER.
* Tiny DHCP server is free software, which is owned by the publisher SoftCab, Inc.
SOFTWARE SUPPORT
PC
Building 1
TCP IP TCP IP
Inserter
Building 2
INTERNET
Page 18

HDV
Routing switchers
elektronik
Sams elektronik d.o.o. • sams@sams.rs • www.sams.rs
18
SOFTWARE
COMPUTER CONFIGURATION
The program is used exclusively on the Windows® OS. It is recommended to be used on newer types of
computers (Pentium or higher, or AMD compatible with min 256MB RAM, 3Mb free space on the HDD).
To view the entire program window minimum screen resolution must be 1600x1200px (19 “monitor
minimum).
Also, the computer must have a free serial port (RS-232) to communicate with the matrix.
INSTALLATION
Insert the installation CD into the CD-ROM. If the installation itself does not start, open the contents
of the disc and click the left mouse button twice on setup.exe and follow up the instructions displayed
during the installation:
1. Introductory message advising that it is
necessary turn off all open programs. Press
OK to continue the installation or EXIT
SETUP.
2. Press the button with the computer to
continue the installation. Optionally you can
press the CHANGE DIRECTORY to change the
installation path, or abort with EXIT SETUP.
3. If you want, you can change the name
of the folder in the start menu. Press
CONTINUE. If you want to cancel installation
press CANCEL.
4. Installation is complete. Press OK. Find
the icon for the software in the start menu.
Page 19

HDV
Routing switchers
Sams elektronik d.o.o. • sams@sams.rs • www.sams.rs
elektronik
19
ICONS
OPEN: Load status of matrix
SAVE: Save status of matrix
PROPERTIES: Congure the com port and selects type of signal that will be controlled
LOCK PANEL: Locks software
UNDO: Returns a step backward state of matrix for the selected destination
LOCK: Locks destination
VIDEO: Controls whether this kind of signal interconnect
AUDIO 1 (AUDIO 1 - AUDIO2): Controls whether this kind of signal interconnect
AUDIO 2 (DATA): Controls whether this kind of signal interconnect
SOURCE NAME: Name of input
DESTINATION NAME: Name of output
SOFTWARE
At start, there will be an indicator of communication with the master command. If communication is
realized, at the intersection of XY axes are displayed connections as icons:
VIDEO:
AUDIO 1 (AUDIO 1 - AUDIO 2): - red icon
AUDIO 2 (DATA): - green icon
If the indicator of communication retain more than one minute:
1. The communication parameters are not set
2. The main remote control is not powered on or connected to a PC.
GETTING STARTED
Software RS-6464 is designed to control the matrix. It has the same features as the master command.
The advantage of the software is that the status of the matrix can be seen at the same time for all
connections in the form of intersection of X and Y axes.
Start the program.
indicator of communication
Page 20

HDV
Routing switchers
elektronik
Sams elektronik d.o.o. • sams@sams.rs • www.sams.rs
20
PROPERTIES
Press the “Properties” button or keyboard shortcut Ctrl + P to set the communication parameters.
It is very important to choose the correct serial port to COM selection. Here you can set which types of
signals will be used: Video-Audio1-Audio2 or Video-Audio1/2-Data. After setting, press OK. If the correct
port is selected and if the command is connected to the PC, in the top right corner of the main window,
there will be an indicator “connected” with green background. Will not be displayed properly unless you
do not connect, or if the the master remote control is turned off.
Properties menu Choosing the serial port
The connection is established
NAMING OF SOURCES
Each source can get their name based on the conditions of the matrix. This feature is very useful
for subsequent conguration of additional commands, but to get a clearer insight into what actually
connects.
Double click the left mouse button over the default names of the sources, a window opens where you
can rename the source. After renaming press OK.
Type a new name in the eld
Page 21

HDV
Routing switchers
Sams elektronik d.o.o. • sams@sams.rs • www.sams.rs
elektronik
21
NAMING OF DESTINATIONS
Each destination can get their name based on the conditions of the matrix. This feature is
very useful for subsequent conguration of additional commands, but to get a clearer insight into what
actually connects.
Double click the left mouse button over the default names of the destination, a window opens where
you can rename the destination. After renaming press OK.
Type a new name in the eld
LINKING
Depending on the conguration of signal types, parameters for crossing will occur in the central part of
the main menu options: VIDEO - AUDIO 1 / AUDIO 2 - DATA or VIDEO - AUDIO 1 - AUDIO 2. Click the
icon activates the signal type. Then shall these icon turns yellow. Reconnection will be made only for
those types of signals whose icon is active (yellow).
For those who need to accurately see the section, press the “X” on the keyboard (picture below). The
intersection of horizontal and vertical lines will be bold red line.
Place the arrow at the intersection (XY) and press the left mouse button. If you want to connect
this connection, press the OK button. Otherwise, press CANCEL. If you pressed OK, the connection is
established and it can be seen on the screen. Move your mouse over the icon that is connected, it will
display the “tool tip text”, which explains what kind of signal, from which source and the destination
that goes. If there are multiple types of signals in this section, on each icon will be explained what is
connected.
The intersection and text for
explanation
V i d e o
off
(grey)
Video
on
(yellow)
Audio 1
off
(grey)
Audio 1
on
(yellow)
Audio 2
off
(grey)
Audio 2
on
(yellow)
Audio1-2
off
(grey)
Audio1-2
on
(yellow)
Data
off
(grey)
Data
on
(yellow)
Page 22

HDV
Routing switchers
elektronik
Sams elektronik d.o.o. • sams@sams.rs • www.sams.rs
22
UNDO
Pressing the UNDO icon, return to the previous state of the connection. If the icon is not
displayed, it means that such a connection has not previously been linked. UNDO option you can call
independently for the three existing types of signals. Option UNDO returns only one step back for every
type of signal. UNDO icon turns off only when all types of signals at the destination returns step back.
LOCK
Each individual destination can be locked at the current connected condition by pressing a
DESTINATION LOCK button. In this case, DESTINATION LOCK button turns red. Unlocks by pressing the
button again.
LOCK PANEL
You can lock the PC panel if you press the menu button LOCK PANEL.
Unlocking is done closing the window UNLOCK at center of the screen.
Panel is locked
SAVE
If you want to save your connection status press SAVE button (Ctrl + S). This option is useful,
because in this way can be saved combinations of useful status of connections that will be loaded as
needed. SAVE option is turned off, if at startup the program determines that the communication with
the main command is disabled.
Saving status as a document on your computer
LOAD
If you want to load some of saved status of connection, press LOAD button (Ctrl + O). LOAD
option is turned off, if at startup program determines that the communication with the main command
is disabled.
Loading status as a document from your computer
Page 23

HDV
Routing switchers
Sams elektronik d.o.o. • sams@sams.rs • www.sams.rs
elektronik
23
CONFIGURATION SOFTWARE FOR SLAVE COMMANDS
Conguring slave commands can be performed during operation of the system, but can also be while
commands are turned off. The software is for programming slave commands. If the user has previously
described software, and if the names of the sources and destinations was renamed, this software will
print the names. Be sure to turn off the previous software before starting the program.
On the main page you can nd places to rename the sources and destinations.
NAMING OF SOURCES
Each source can get their name based on the conditions of the matrix. This feature is very useful
for subsequent conguration of additional commands, but to get a clearer insight into what actually
connects.
Double click the left mouse button over the default names of the sources, a window opens where you
can rename the source. After renaming press OK.
Type a new name in the eld
NAMING OF DESTINATIONS
Each destination can get their name based on the conditions of the matrix. This feature is very useful
for subsequent conguration of additional commands, but to get a clearer insight into what actually connects.
Double click the left mouse button over the default names of the destination, a window opens where you can
rename the destination. After renaming press OK.
Type a new name in the eld
Page 24

HDV
Routing switchers
elektronik
Sams elektronik d.o.o. • sams@sams.rs • www.sams.rs
24
INITIALIZATION
Pressing button Chage Control Panel window opens to congure additional commands.
At the time of opening, the program communicates with the commands, searching, which has an
address 1. During this time, all the buttons in the window are locked.
ADDRESS
If there is a command at the address 1 in the window will show that it is a command. The names
of sources and destinations that have been renamed in the main window will be displayed in the
conguration of slave command. In the case shown in the gure that is an slave command CP-48
(48x1). If the software is detected at this address, it will display the command in the menu Panel Type,
which is then locked for a change. If the software does not nd the remote control at that address, Panel
Type menu is unlocked and can then be selected type of command.
ICONS:
- LOAD FROM FILE: Loading a previously congured panel that is recorded as a document
on your computer.
- SAVE TO FILE: Saving conguration of slave command as document on your computer.
- LOAD FROM PANEL: Loading current state of addressed remote control for further
conguration.
- PANEL TYPE: Selecting the type of remote control.
- PANEL ADDRESS: Selecting the addresses of slave control.
- WRITE TO PANEL: Saving the conguration in remote control.
- SOURCE BUTTON: Source buttons of selected remote control.
- DESTINATION BUTTON: Destination button of selected remote control.
Page 25

HDV
Routing switchers
Sams elektronik d.o.o. • sams@sams.rs • www.sams.rs
elektronik
25
By changing the address in the window, you can see one slave command that is addressed.
This means that the command that carries that address is connected to the main command. Picture
(above) shows an example where at 11 is slave command CP-32 (32x1). Display in software of slave
command is the same as it looks that command, which greatly simplies further conguration and
orientation control.
If you choose address of command that is not connected to the system, it is possible to access the dropdown menu Panel Type but LOAD FROM PANEL as well as WRITE TO PANEL are not available.
The picture (below) shows an example where at the address 32 is not slave command, so that it is
selected CP-3232 (32x32) for conguration and saving as a document on your computer.
DOWNLOAD BUTTON LAYOUT WITH CONTROLS - LOAD FROM PANEL
When opening the window for conguring the panel, it shows the factory state of commands,
where the rst source is the rst key, the second to second, etc., and also the destination. By pressing
LOAD FROM PANEL, downloads arrangement of keys with the selected remote control. Then WRITE TO
PANEL button goes off and does not appear until you change the downloaded conguration.
COMMAND CONFIGURATION
Each slave command in and out of the system can be congured by unique button layout.
Each command in the system has its own address. Choose the command that you want to recongure
in drop-down menu Panel Address. In the example shown in the gure (below), was selected slave
command with address 1. In this case, the command CP-48 (48x1) is connected to the system.
Page 26

HDV
Routing switchers
elektronik
Sams elektronik d.o.o. • sams@sams.rs • www.sams.rs
26
CONFIGURING THE SLAVE COMMAND WITH SOURCE SELECTION AND THEIR LAYOUT
By pressing the left mouse button over one source (SRC 1) opens a drop-down menu, where
you choose which source will be on that key (picture below).
Click the left mouse button on the newly selected source. The menu will close (picture below).
Then press the ENTER key, which conrms the selected source, otherwise press ESC. In the same way
other sources can be recongured.
The drop-down menu to select the
source on the key
The selected source is on the key
CONFIGURING THE SLAVE COMMAND WITH DESTINATION SELECTION AND THEIR LAYOUT
Choosing destinations is done as well as with the selection of sources and their arrangement. In
this case of commands, there is only one destination. Pressing the button opens the destination drop-
down menu to select (picture below).
Click the left mouse button to a new destination, a drop down menu closes (picture below). Then press
the ENTER key, which conrms the selected destination (picture below). For commands that have more
than one destination, in the same way can be recongured.
The drop-down menu to select the
destination on the key
The selected destination is on the key
Page 27

HDV
Routing switchers
Sams elektronik d.o.o. • sams@sams.rs • www.sams.rs
elektronik
27
SAVING CONFIGURATION ON THE SLAVE COMMANDS - WRITE TO PANEL
After conguring commands, pressing a button WRITE TO PANEL, uploads the desired
conguration in the command. From that moment button layout on the slave command is changed to
one that is determined by the conguration software.
SAVING CONFIGURATION OF SLAVE COMMANDS ON COMPUTER - SAVE TO FILE
When you congure the state of the keys on slave commands, it can be saved as a document
on your computer. This is very useful, especially if you congure the commands that are not connected
to the system, and for later upload. Also for commands that are in the system, can be individually saved
as a document or make various styles intended for the same conguration panel, which will be used in
the future. Pressing the button SAVE TO FILE window opens for saving (picture below).
LOADING A CONFIGURATION OF SLAVE COMMANDS FROM COMPUTER - LOAD FROM FILE
Congured state of the keys on slave commands can be loaded as a document to your computer.
Pressing the button LOAD FROM FILE window opens for loading (picture below).
Page 28

HDV
Routing switchers
elektronik
Sams elektronik d.o.o. • sams@sams.rs • www.sams.rs
28
NOTES
 Loading...