

Page 1
User’s Guide
506100-02-01-W-E-012506-01
Page 2

Copyright
© 2006, NewSoft Technology Corp. All Rights Reserved. No portion of this document may be
copied or reproduced in any manner without prior written permission from NewSoft
Technology Corp. (NewSoft)
NewSoft has no warranties to this documentation and disclaims any implied warranty of
merchantability or fitness for a particular purpose. All information contained herein is subject to
change without notice.
All sample images and electronic files included in the documentation and distribution materials
are copyrighted by their respective photographers and are not to be copied or reproduced in
any manner.
Trademarks
Windows 2000 and Windows XP are registered trademarks of Microsoft Corporation.
Pentium is a registered trademark of Intel Corporation.
All other trademarks are the properties of their respective owners.
Federal Communication Commission Interference Statement
This equipment has been tested and found to comply with the limits for a Class B digital
device, pursuant to Part 15 of the FCC Rules. These limits are designed to provide reasonable
protection against harmful interference in a residential installation.
This equipment generates, uses and can radiate radio frequency energy and, if not installed
and used in accordance with the instructions, may cause harmful interference to radio
communications. However, there is no guarantee that interference will not occur in a particular
installation. If this equipment does cause harmful interference to radio or television reception,
which can be determined by turning the equipment off and on, the user is encouraged to try to
correct the interference by one of the following measures:
• Reorient or relocate the receiving antenna.
• Increase the separation between the equipment and receiver.
• Connect the equipment into an outlet on a circuit different from that to which the
receiver is connected.
• Consult the dealer or an experienced radio/TV technician for help.
FCC Caution: To assure continued compliance, any changes or modifications not expressly
approved by the party responsible for compliance could void the user's authority to operate
this equipment. (Example - use only shielded interface cables when connecting to computer or
peripheral devices).
ii
Page 3

FCC Radiation Exposure Statement
This equipment complies with FCC RF radiation exposure limits set forth for an uncontrolled
environment. This equipment should be installed and operated with a minimum distance of 20
centimeters between the radiator and your body.
This device complies with Part 15 of the FCC Rules. Operation is subject to the following two
conditions:
(1) This device may not cause harmful interference, and (2) This device must accept any
interference received, including interference that may cause undesired operation.
This transmitter must not be co-located or operating in conjunction with any other antenna or
transmitter.
The antennas used for this transmitter must be installed to provide a separation distance of at
least 20 cm from all persons and must not be co-located or operating in conjunction with any
other antenna or transmitter.
U-NII device that operates in the band 5.15-5.25GHz band will be restricted to indoor
operations to reduce any potential for harmful interference to co-channel MSS operation.
www.newsoftinc.com
www.newsoft.com.tw
www.newsoft.co.jp
www.newsoft.eu.com
www.newsoft.com.cn
iii
Page 4

Contents
Chapter 1 Introducing WVR 100A 1
Features.......................................................................................... 2
System Requirements ................................................................... 2
Important Safety Instructions ....................................................... 3
Package Contents.......................................................................... 4
Front Panel ..................................................................................... 5
Rear Panel ...................................................................................... 6
Chapter 2 Setting Up and Connecting a WVR System 8
Examples of Ways to Use Presto! WVR....................................... 8
Setup to Watch TV....................................................................... 8
Setup to Watch Video ................................................................ 10
Troubleshooting a Wireless Connection ................................... 11
Installing Presto! WVR ................................................................ 11
Uninstalling Presto! WVR............................................................ 14
Using the Uninstall Presto! WVR Wizard ................................... 14
Using the Windows to Uninstall Presto! WVR............................ 14
Programming the Firmware on the WVR 100A Device ............. 14
Initializing the WVR 100A Device................................................ 15
Using the Settings Wizard........................................................... 15
Refreshing the Program List....................................................... 17
Chapter 3 Using Presto! WVR 20
Starting Presto! WVR................................................................... 21
Getting to Know the Screen........................................................ 23
Control Panel................................................................................ 23
Choosing a Program to Watch.................................................... 24
iv
Page 5

Channel Surfing ........................................................................... 25
Recording a Program .................................................................. 25
Time Shifting ................................................................................ 26
Adjusting the Volume .................................................................. 27
Taking Snapshots ........................................................................ 27
Using MTS .................................................................................... 27
Chapter 4 Menus and Settings in Presto! WVR 28
Screen Menu................................................................................. 28
Settings......................................................................................... 29
Device........................................................................................ 30
Program ..................................................................................... 31
Video.......................................................................................... 32
Record ....................................................................................... 33
Advanced................................................................................... 34
History .......................................................................................... 35
Chapter 5 Setting Up and Updating the Firmware 36
Connecting to the Firmware........................................................ 36
Viewing the Status ....................................................................... 39
Adjusting the Setup ..................................................................... 40
Using Maintenance ...................................................................... 42
Appendix 43
Keyboard Shortcuts..................................................................... 43
Wireless Channels Specifications.............................................. 44
Glossary ....................................................................................... 46
The screen shots used in this manual are only example
images.
v
Page 6
Chapter1 Introducing WVR 100A
Chapter 1 Introducing WVR 100A
WVR 100A is a system that can enhance your multimedia experience by
combining the WVR 100A device with the Presto! WVR program. The WVR
100A device transmits wireless television signals to a computer equipped
with a wireless LAN card while Presto! WVR acts as a video recorder for the
computer. Presto! WVR takes the television signals and records them onto
the hard drive and lets you edit and burn them to a disc. You have all the
convenience of a VCR (recording, playback, fast forwarding, and pausing)
without having to rewind any tape. Here are the requirements and features
of WVR 100A.
Features
System Requirements
Important Safety Instructions
Package Contents
1
Page 7

Front Panel
Chapter1 Introducing WVR 100A
Rear Panel
Features
• Receive analog TV programs.
• Record programs to your hard disk and watch them later.
• Easily play the shows that you have already recorded. Just look in
the History section.
• Pause the program while watching (to do things like answering the
door or making a sandwich) and then resume watching without
missing any of the show.
• Watch video in a resizable window. Choose to freely resize or
retain the original
preview will reflect the adjustments as they are being made.
• Take snapshots of your favorite TV moments.
• Browse many programs in one window with Tile mode.
• Edit recorded programs with Edit Video.
• Burn the finished video onto disc with Create Video Disc.
ratio. Adjust the brightness and color. The
System Requirements
• Operating System: Microsoft Windows 2000 or XP.
You must have administrator privileges for the
Windows operating system. Limited privileges aren't
sufficient.
• Processor: A Pentium III, 800 MHz or higher processor is a
minimum for capturing video. A Pentium 4, 2.0 GHz or higher
processor is needed for Time Shifting, a Pentium 4, 2.4 GHz or
higher processor is required for recording.
• RAM: At least 256 MB RAM is needed, but more is preferred.
2
Page 8

Chapter1 Introducing WVR 100A
• Available hard disk space: A least 200 MB of hard disk space is
required for running the program. An additional 500 MB of space
will be needed working with files, although it is better to have more
than 6 GB available.
• Display card: True Color or HiColor display card supporting
DirectX 9.0 or above.
• Monitor resolution: At least 16-bit high color mode and 800 x 600
pixel resolution. (1024 x 768 is recommended.) A
Windows-compatible sound card and speakers will also be
needed.
• WVR 100A device: This device transfers the wireless TV signals
and is the hardware portion of WVR 100A.
• Others:
A wireless LAN card that complies with the IEEE 802.11b, IEEE
802.11g, or IEEE 802.11a standards. The card must support WEP
encryption. (For a wireless LAN connection.)
When using Windows 2000, a WLAN card with NDIS 5.1
certification is recommended.
A 10Base-T or 100Base-TX LAN connector. (For connecting to a
wired LAN for firmware maintenance.)
Important Safety Instructions
• Do not use the WVR 100A device in extremely hot, cold, dusty, or
wet environments.
• Dot not put anything on top of the WVR 100A device.
• Do not rub or impact the WVR 100A device with hard things. This
can cause surface scratches or hardware damage.
• Do not disconnect the WVR 100A device when it is being used. It
may lead to program errors.
• Unplug the WVR 100A device before cleaning it.
• Follow the directions on the power adaptor and use the WVR 100A
device with the proper current and voltage range.
3
Page 9
Chapter1 Introducing WVR 100A
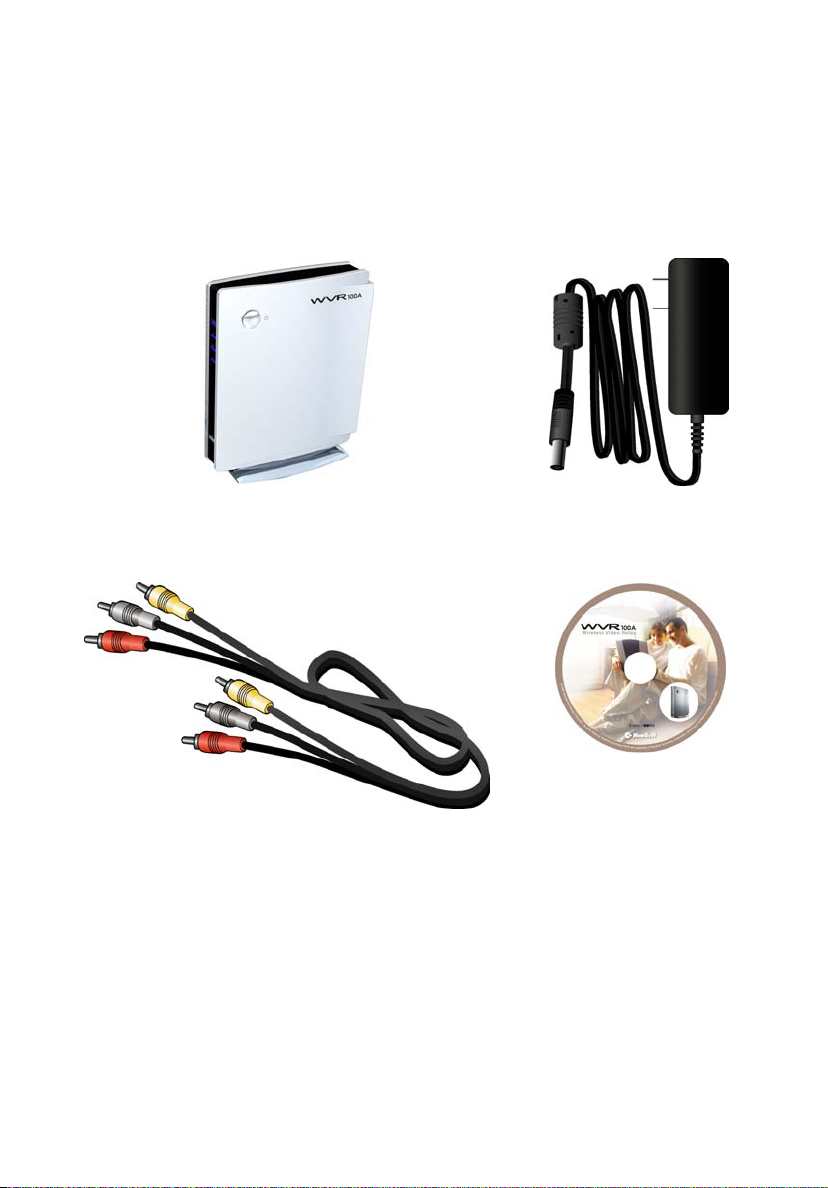
Package Contents
When you open your WVR 100A product package, you should find the
following items.
• WVR 100A device • AC Power Adaptor
• Audio/Video Cable • Presto! WVR Software
CD-ROM
• Quick Guide • Warranty Card
4
Page 10

Front Panel
Chapter1 Introducing WVR 100A
Power Button
Push to turn the WVR 100A
device on and off.
Power Indicator
Lights when the power is on.
TV Reception Indicator
Lights when the WVR 100A
device is receiving TV signals.
AV1 Indicator
Lights when the WVR 100A
device is receiving video and
audio from an external device
through the AV1 terminals.
AV2 Indicator
Lights when the WVR 100A
device is receiving video and
audio from an external device
through the AV2 terminals.
5
Page 11
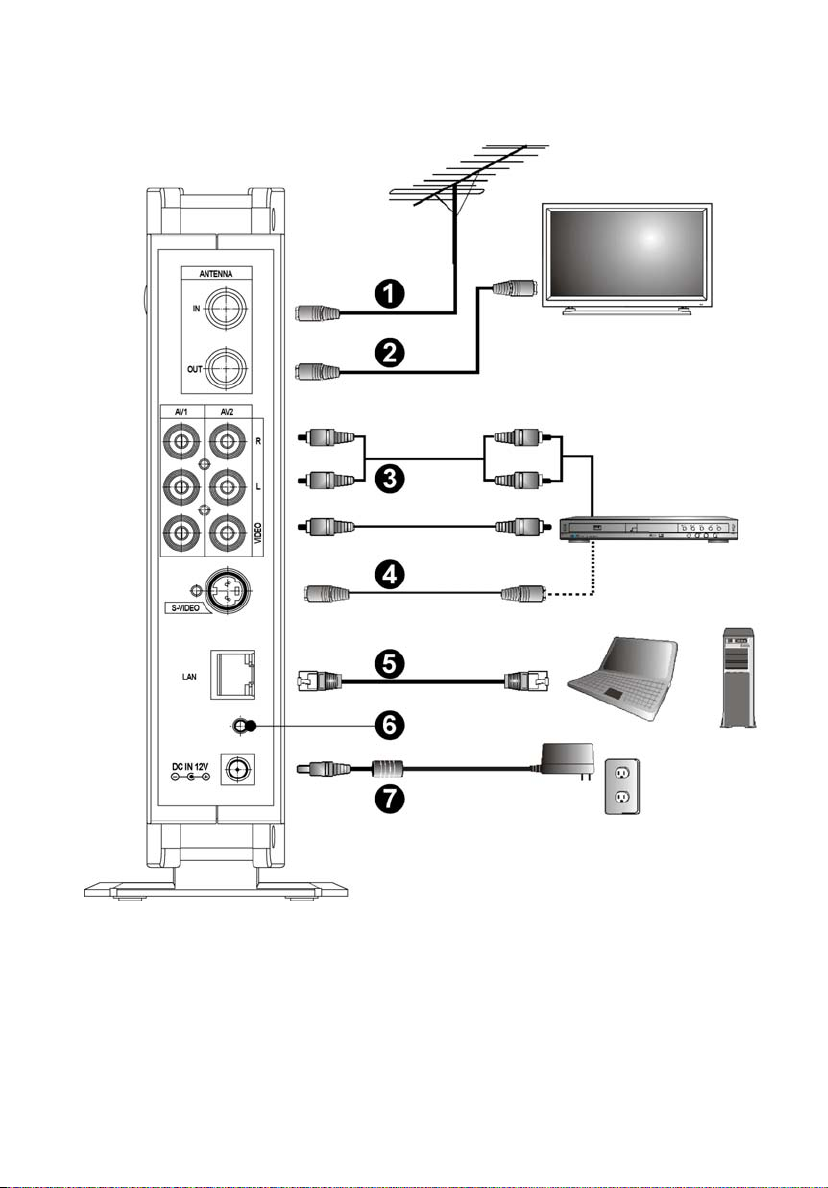
Rear Panel
Chapter1 Introducing WVR 100A
6
Page 12

Chapter1 Introducing WVR 100A
Antenna Cable
Connect the antenna to IN to receive analog TV signals.
TV Antenna Cable
The OUT jack is for sending antenna signals to the TV.
Audio/Video Cable
Connect devices, such as VCR, DVR, and DVD players that feature
an A/V output terminal to the WVR 100A device. The two input
terminals are labeled AV1 and AV2.
S-Video Cable
Connect devices that feature S-video output jacks to the WVR 100A
S-video input jack.
Ethernet Cable
Connect a laptop or desktop computer through the LAN port with an
Ethernet cable for Firmware update.
Reset Button
Initializes all settings on the WVR 100A device and restore them to
factory defaults.
AC Adapter
The DC IN 12V jack is used to connect the AC power adapter to the
WVR 100A device.
7
Page 13

Chapter2 Setting Up and Connecting a WVR System
Chapter 2 Setting Up and Connecting a
WVR System
It's not so difficult. Here are some guides and examples to help you get set
up to enjoy Presto! WVR 100A.
Examples of Ways to Use Presto! WVR
Troubleshooting a Wireless Connection
Installing Presto! WVR
Uninstalling Presto! WVR
Programming the Firmware on the WVR 100A Device
Initializing the WVR 100A Device
Using the Settings Wizard
Refreshing the Program List
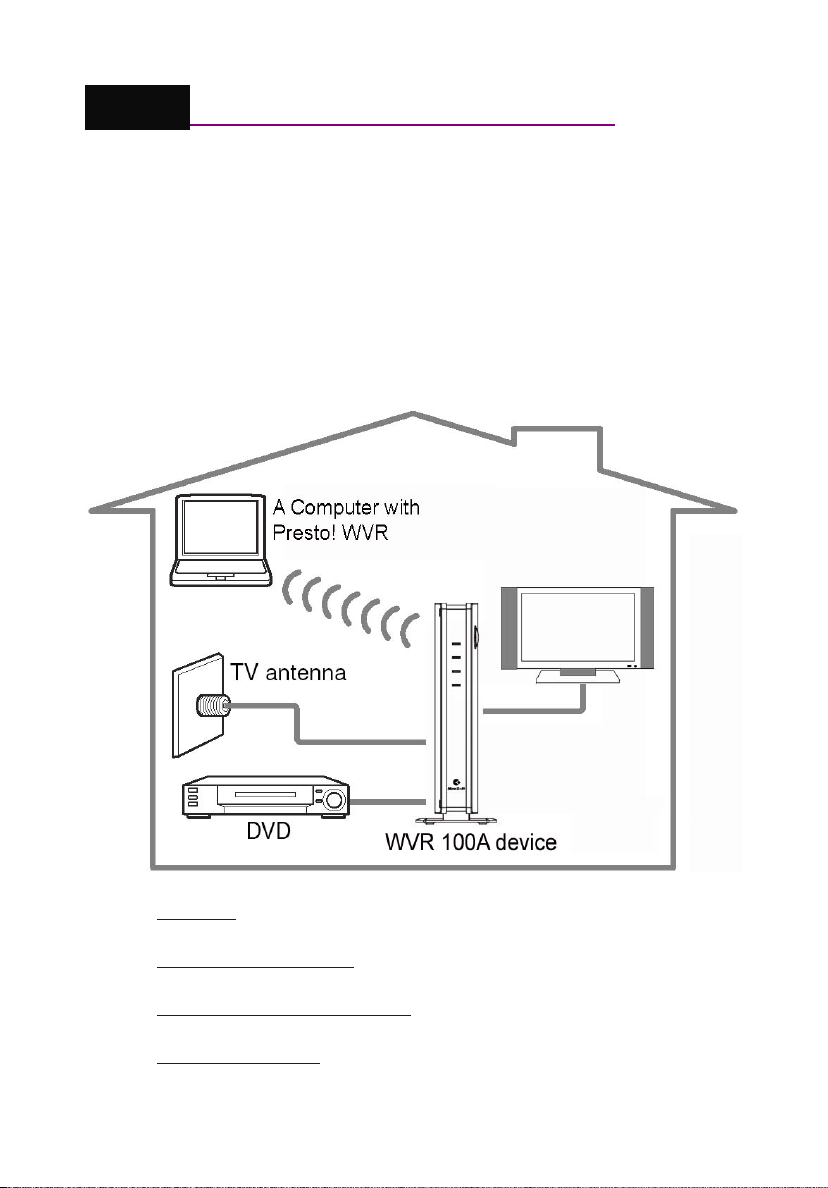
Examples of Ways to Use Presto! WVR
There are several ways to hook up and use the WVR 100A program and
hardware. Here are just two.
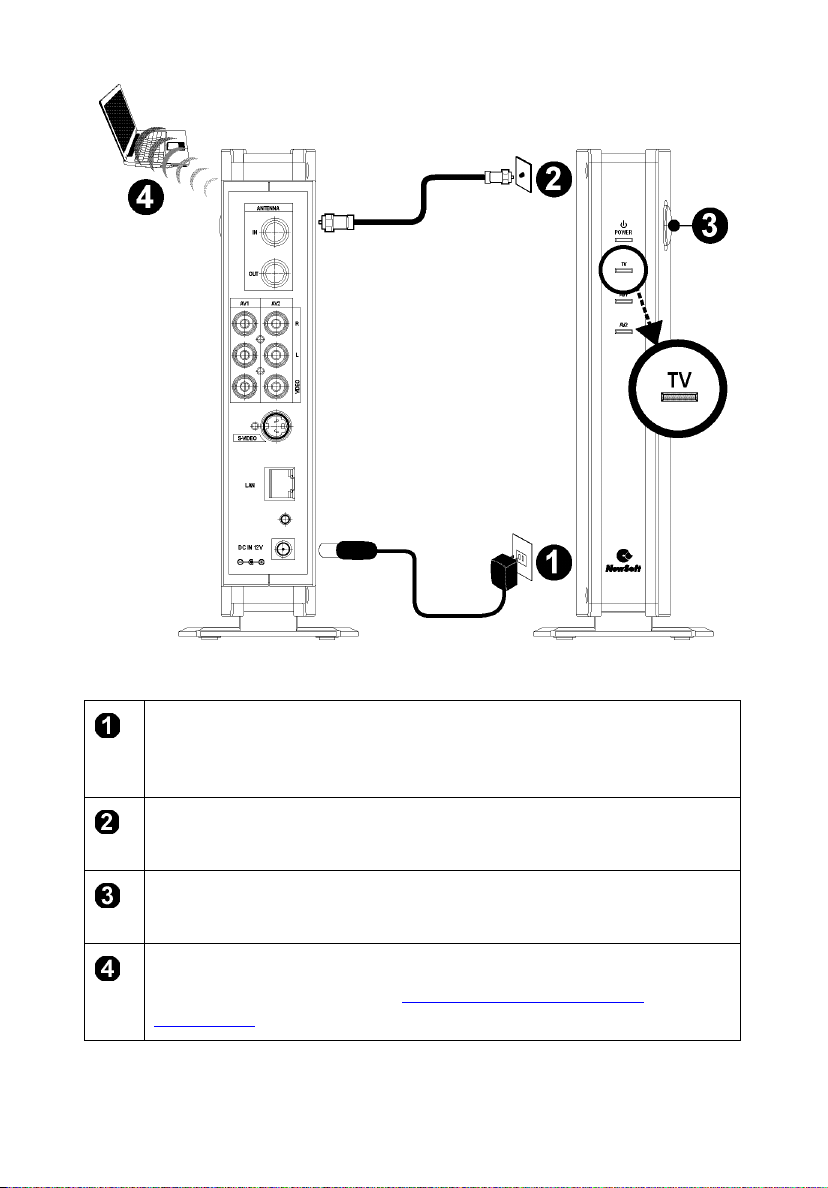
Setup to Watch TV
This is how you hook it up to watch TV from the antenna cable.
8
Page 14
Chapter2 Setting Up and Connecting a WVR System
Connect the AC power adapter to the DC IN 12V jack on the WVR
100A device, and then plug the power cord into an electrical
outlet.
Connect the antenna cable to the IN jack on the WVR 100A
device.
Turn on the WVR 100A device by pressing the power button. The
power indicator will light.
Connect a computer that has Presto! WVR installed on it to the
WVR 100A device. See the Troubleshooting a Wireless
Connection section for details.
9
Page 15
Chapter2 Setting Up and Connecting a WVR System
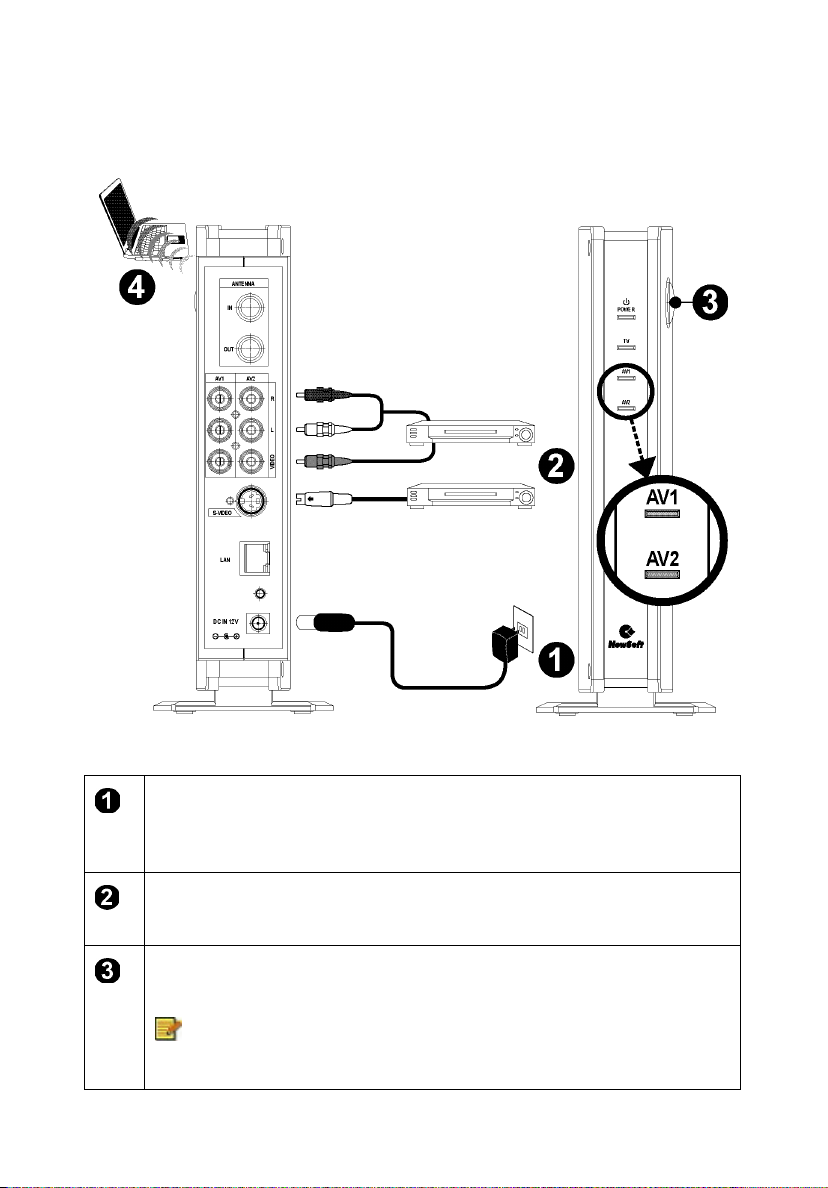
Setup to Watch Video
This is how to hook it up to watch video from a DVD player.
Connect the AC power adapter to the DC IN 12V jack on the WVR
100A device, and then plug the power cord into an electrical
outlet.
Connect the A/V or S-video cables to the AV1, AV2, or S-video
input jacks on the WVR 100A device.
Turn on the WVR 100A device by pressing the power button. The
power indicator on the front panel will light.
The AV1 indicator will light when the input source is
S-video.
10
Page 16

Chapter2 Setting Up and Connecting a WVR System
Connect a computer with Presto! WVR installed to the WVR 100A
device. See the Troubleshooting a Wireless Connection
section
for details.
You can connect the antenna cable, A/V signal lines, and
the S-video cable to the WVR 100A device, and then switch
between these three input sources by clicking to open
the Settings dialog box, clicking the Device tab, and then
choosing an input source from the Source selection box.
Troubleshooting a Wireless Connection
Presto! WVR automatically detects the wireless signal sent out by the WVR
100A device. All you need to do is to select the Wireless LAN card
connected to your computer or laptop, and then scan for TV channels or
select other input sources.
If you are having trouble creating a wireless connection, perform the
following checks.
1. Make sure the driver for your Wireless LAN card has been correctly
installed. For details, refer to the instruction manual for your Wireless
LAN card.
2. Check your Wireless LAN card’s utility and the transmitter’s firmware
settings to see which IEEE wireless connectivity standards (820.11a, b,
and g) are supported. Make sure that both your Wireless LAN card and
the transmitter support and employ the same wireless connectivity
standards.
Installing Presto! WVR
Before you begin, make sure that the antenna has been connected to WVR
100A.
You must have administrator privileges to install this
program on the Windows operating system.
11
Page 17
Chapter2 Setting Up and Connecting a WVR System
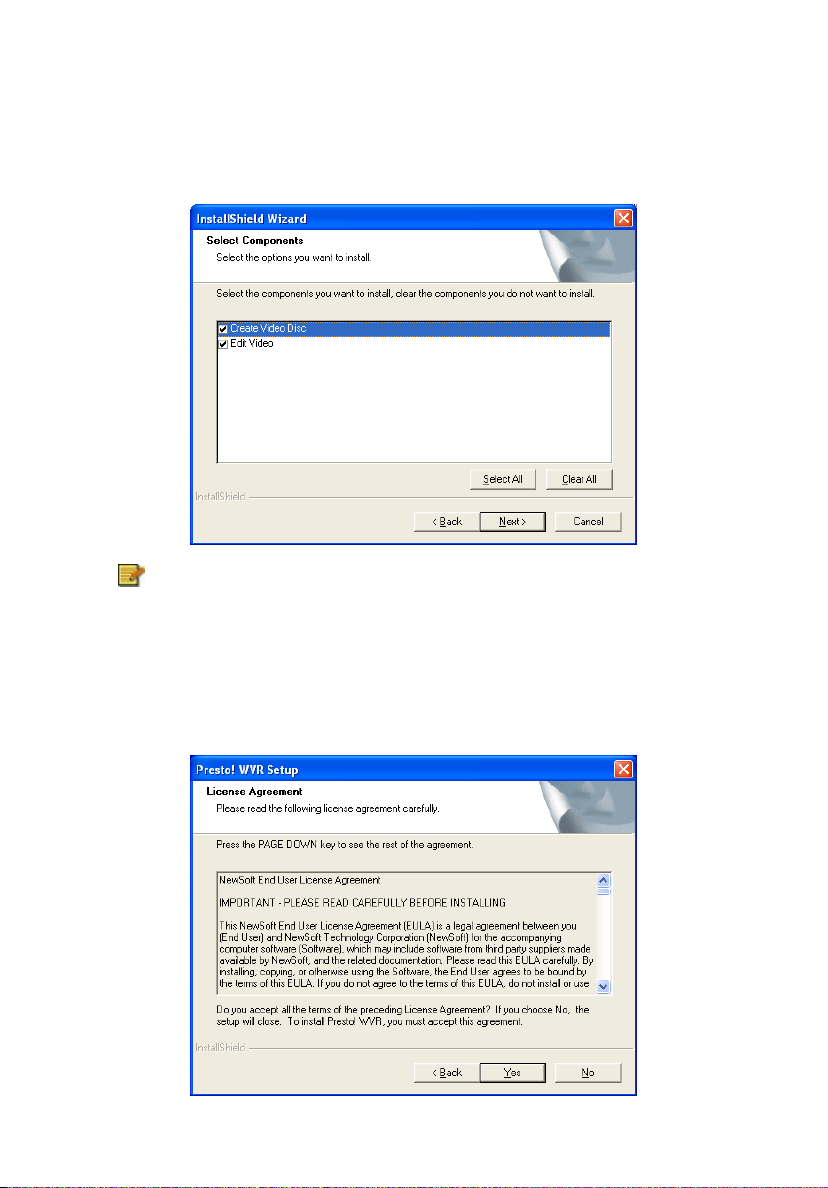
1. Insert the Presto! WVR disc into your computer disc drive. If the
installation wizard does not start, locate the "setup.exe" file on the
installation CD and double-click it.
2. Select the components you want to install, and then click Next.
It is recommended that you select both Create Video Disc
and Edit Video during installation for authoring and editing
purposes. Otherwise, the Presto! WVR features related to
these two programs will be unavailable.
3. A welcome screen will open, click Next, read the license agreement, and
accept the terms by clicking Yes.
12
Page 18

Chapter2 Setting Up and Connecting a WVR System
4. Type your name, company name, serial number, and then click Next.
You can find the serial number on the warranty card
included in the product package, and you may also find
the serial number sticker affixed to the back of the
software CD case. If you can’t locate it, contact our
customer service personnel for assistance.
5. Confirm the installation folder and click Next. If you want to change the
folder in which Presto! WVR will be installed, click Browse.
6. Click Next to start the installation, and when complete, click Finish.
13
Page 19

Chapter2 Setting Up and Connecting a WVR System
Your Presto! WVR program is now ready to use. Double-click the program
icon
on the desktop to start using it.
Uninstalling Presto! WVR
There are two ways to remove Presto! WVR from a computer.
The following descriptions are based on Windows XP.
Using the Uninstall Presto! WVR Wizard
1. Click the Start button and point to All Programs. Point to NewSoft,
and then click Uninstall Presto! WVR.
2. Click Finish when the wizard completes the uninstallation process.
Using the Windows to Uninstall Presto! WVR
1. Click the Start button and then Control Panel. Click Add or Remove
Programs, and then select Presto! WVR under Change or Remove
Programs.
2. The Windows uninstaller will remove all the features and objects
associated with Presto! WVR.
3. Click Finish when the wizard completes the uninstallation process.
It is recommended that you use the Uninstall Presto! WVR
wizard for complete removal of the program.
Programming the Firmware on the WVR 100A Device
You can achieve scalability or flexibility and optimize performance by
programming the firmware. Please see the Chapter 5 Setting Up and
Updating the Firmware section for more information.
14
Page 20

Chapter2 Setting Up and Connecting a WVR System
Initializing the WVR 100A Device
If you initialize the WVR 100A device, all settings are reset to factory
defaults.
Using the Settings Wizard
Turn on the
sender box by
pressing the
power button.
Hold down the
reset button
for until the
source
indicators (TV)
blinks (5
seconds).
When running Presto! WVR for the first time, use the Settings Wizard to
configure your devices.
1. Make a selection from the Device list.
To change a device, select another one from the list, and
then click Apply.
2. Select TV from the source box.
15
Page 21

Chapter2 Setting Up and Connecting a WVR System
3. Click Next, and then the Scan button. The program starts scanning
channels.
4. Click Finish.
16
Page 22

Chapter2 Setting Up and Connecting a WVR System
Refreshing the Program List
To update the scanned program list, connect the antenna to the Presto!
WVR device and make the proper settings.
1. Click
tab.
2. Choose a device from the Device list, and then choose the source.
to open the Settings dialog box, and then click the Device
17
Page 23

Chapter2 Setting Up and Connecting a WVR System
3. Click the Program tab on the Settings dialog box, and then click Scan
to search for programs. If a program is found, it will be included in the
program list. When finished, you can choose a program and change its
name.
18
Page 24

Chapter2 Setting Up and Connecting a WVR System
4. Close the Settings dialog box and watch the program.
19
Page 25

Chapter3 Using Presto! WVR
Chapter 3 Using Presto! WVR
This program has everything a personal video recorder needs—preview,
full screen view, snapshot, channel selection, channel surfing, recording,
time shifting, settings, help, and a link to our website. Here are explanations
of how to perform the most common tasks.
Starting Presto! WVR
Getting to Know the Screen
Control Panel
20
Page 26

Choosing a Program to Watch
Chapter3 Using Presto! WVR
Channel Surfing
Recording a Program
Time Shifting
Adjusting the Volume
Taking Snapshots
Using MTS
Starting Presto! WVR
After double-clicking the program icon , select the wireless LAN card
from the Select Network Interface Card dialog box, and then click OK.
The program will scan for supported wireless networks in range and check
for TV senders.
21
Page 27

Chapter3 Using Presto! WVR
Presto! WVR will take a couple of second to search for wireless
networks in range.
Select a TV sender from the Sender List dialog box, and then click OK.
The application will make a choice automatically if a
preferred sender is not selected within 10 seconds.
22
Page 28

Getting to Know the Screen
Chapter3 Using Presto! WVR
Program
Viewer
Control Panel
Control Panel
23
Page 29

Chapter3 Using Presto! WVR
No. Description No. Description
Record
Pause/Time Shifting
Stop
Fast Forward
/Backward
Snapshot
History
Volume
Mute/Mute Off
Channel Changer
Previous Channel
MTS (Multichannel Television
Sound)
Settings
Help
Source
Status
Sender
Free Space
Minimize
Exit
Choosing a Program to Watch
After you have installed Presto! WVR and scanned for programs, you can
click a program to watch it and click
Click to go to the last program on the list.
You can browse all the TV programs from the Channel Surfing window.
Presto! WVR provides different options for tiling the programs in
thumbnails. You can play a program by clicking the thumbnail.
or to switch between programs.
24
Page 30

Chapter3 Using Presto! WVR
To change the Channel Surfing window settings, click
and choose the Advanced tab.
Channel Surfing
Right-click the program viewer and select Channel Surfing from the
screen menu to tile the programs in thumbnails. You can play a program by
double-clicking the thumbnail. To quit this function, click Esc. You will
return to the live program.
Recording a Program
When you find a good show, click to start recording. The button will
change to
. The recorded program will be saved in the working folder.
25
Page 31

Chapter3 Using Presto! WVR
You can click to pause recording. If you click while you are
watching, recording will stop and the preview screen will return to the live
program.
When recording, you can go to full screen, minimize, and
restore, but you cannot change programs, or close the
program.
Time Shifting
Time Shifting means that you can pause a program while watching the big
game, click the pause button, and then go get another bag of chips without
missing any of the action. When you come back and click the play button,
you will resume watching from the point at which you paused.
1. Click
to the play
to start time shifting. (The time shifting button will change
button.) The preview screen will freeze, but the recording
will continue.
2. Wait for a couple of seconds and then click
from the point at which it was paused.
3. Click
or to play the recorded program forward or backward.
The and buttons will be available only for controlling
recorded programs.
4. Click
to stop time shifting and return to the live program.
When you pause, you can change the screen size and
adjust the volume, but you cannot change programs, take
snapshots, change the configuration, or close the program.
to watch the program
26
Page 32

Chapter3 Using Presto! WVR
Adjusting the Volume
Use the buttons to increase, decrease, and mute the volume.
The indicator will reflect the changes. Clicking on the speaker button will
turn the sound on and off.
Taking Snapshots
Click to capture the screen at that moment. The snapshots will be
saved in the working folder.
Using MTS
MTS is the short for Multichannel Television Sound. If the program provides
the mutichannel feature, click
to switch soundtracks.
27
Page 33

Chapter4 Menus and Settings in Presto! WVR
Chapter 4 Menus and Settings in
Presto! WVR
For all that it does, Presto! WVR is very easy to use. There are only a few
menus and settings that you need to worry about. Here they are in their
entirety.
Screen Menu
Settings
History
Screen Menu
When you right-click your Presto! WVR screen when a video is playing, you
will see the following menu. This will give you quick control over how you
watch the program.
Aspect Ratio: This selects the ratio of width and height for your Presto!
WVR screen. You can choose Original Ratio, Free Ratio, 4:3 or 16:9.
Choosing Free Ratio will allow you to distort your TV picture by dragging
the lower-right corner of the screen. If you have chosen Original Ratio, the
ratio will not change as you resize the picture.
28
Page 34

Chapter4 Menus and Settings in Presto! WVR
Size: Click to restore the display window to the original size.
Full Screen: Click to see the program in the entire video screen. Press the
ESC key to restore the screen to the most recently selected size.
Soundtrack: If the program has multiple sound tracks, you can switch
them here.
Mute: Click to turn the audio off and on.
Channel Surfing: Click to browse TV programs in a tiled window.
Exit: Click to close the program.
About Presto! WVR: Click to display the program version information.
Settings
Click to see the Settings dialog box to help you personalize your
Presto! WVR program.
Device
Program
Video
Record
29
Page 35

Chapter4 Menus and Settings in Presto! WVR
Advanced
Device
On the Device tab, you can select how to control the Presto! WVR device.
Device Available Presto! WVR devices are listed here. Other settings on
this tab will be disabled unless you select a device. If you click Rescan, a
message will warn that the current connection will be lost.
Source You can select TV, AV, or S-Video as the source type.
30
Page 36

Chapter4 Menus and Settings in Presto! WVR
You can also click on the main panel to select the
source type.
If the source type is AV or S-Video, the main control panel
can be only used for the recording and time shifting features,
but not for controlling the source playback.
Program
On the Program tab, you can set the scanning parameters and rename
programs.
Device type, Lowest channel, Highest channel: These settings will
show the range of the acceptable channels. The total number of channels
will be adjusted according to the country option.
31
Page 37

Chapter4 Menus and Settings in Presto! WVR
Country: Select the country you are in to have the television reception
properly formatted.
Tuner Type: Choose the source of the television signals.
Scan: This will look for all available programs and list them.
Export, Import: You can use these two functions to export or import the
program list file so that you don’t need to rescan when using other
computers.
Program Number, Program Name: You can edit the name for each
program. Type a name that may help you identify what kind of program it is.
Video
On the Video tab, you can adjust the brightness and the color in the picture.
The preview window changes while the adjustments are made so you can
tell when the picture is as you like it.
32
Page 38

Chapter4 Menus and Settings in Presto! WVR
Record
This tab will let you adjust your recording preferences.
Recording You can choose a different folder for saving your recorded files
and snapshots, and adjust the Auto cut file size.
Auto cut file size: This will set a threshold file size for your recorded
programs. Drag the slider to fix an upper limit for the size of the
captured video file. The video will be automatically cut into separate
files when the limit is reached. If your disk file system is FAT32, the
maximum size of each file will be 4 GB. If your disk file system is NTFS,
it will be equal to the space available on the specified disk.
The estimated recording time will be displayed at the bottom
of this dialog box as Maximum recording time.
33
Page 39

Chapter4 Menus and Settings in Presto! WVR
Snapshot You can change the format for saving snapshot images. By
default, the images will be saved in the JPEG format.
Time Shifting Use this control to set up the buffer for time shifting. This will
determine how long you can pause a program and not miss any of it. The
buffer can be set for up to 60 minutes. When the limit is reached, time
shifting will continue, but the buffer will be overwritten and you may lose
part of the program.
Advanced
In this tab, you can check for product updates and news. You can also
select the video quality and the display mode for TV program channel
surfing.
34
Page 40

Chapter4 Menus and Settings in Presto! WVR
History
Click to see the programs you have recorded, with the most recent
listed first. The first frame of the selected recording will be shown in the
preview area.
• Click Burn to put the selected programs on a disc. You can
select several files. The Create Video Disc burning program will
start automatically.
• Click Edit to modify the selected programs. (You can select
several files.) Edit Video will start for editing the programs.
The Burn and Edit buttons will be only available when
Create Video Disc and Edit Video are installed.
• Click Play to watch the selected program.
• Click Delete to erase a selected program from the hard disk.
• Click Cancel to close the History dialog box.
35
Page 41

Chapter5 Setting Up and Updating the Firmware
Chapter 5 Setting Up and Updating the
Firmware
The firmware is the programming that is built into the hardware. Here is a
description of how to program the firmware.
Connecting to the Firmware
Viewing the Status
Adjusting the Setup
Using Maintenance
Connecting to the Firmware
Connect the
AC power
adapter to the
DC IN 12V jack
on the WVR
100A device,
and then plug
the power cord
into an
electrical
outlet.
Turn the power
on and wait for
10 seconds.
36
Connect the
LAN port to a
laptop or
desktop
computer with
an Ethernet
cable.
Page 42

Chapter5 Setting Up and Updating the Firmware
You must set the network adapter to the same network
segment before connecting to the WVR 100A device. The
adapter cannot use a DHCP client since the WVR 100A
device supports DHCP clients but not DHCP servers.
From the Windows Control Panel, open Network Connections, click
Local Area Connection, and then click Properties. You will see the
following dialog box.
Click Internet Protocol (TCP/IP) and change the IP address to a
number between 192.168.168.1 and 192.168.168.253. (Don't use
192.168.168.21 or 192.168.1.22).
Type 255.255.255.0 for the Subnet mask.
37
Page 43

Chapter5 Setting Up and Updating the Firmware
Example of an IP Address
Use your Internet browser to open http://192.168.168.21/ to see the
configuration page for the WVR 100A device. (This is the designated IP
address for the WVR 100A device.) Type "admin" as User name, and
"1234" for Password.
You must disable your firewall and proxy settings. If the
configuration page doesn't open, turn the device off and on
to reset it.
38
Page 44

Chapter5 Setting Up and Updating the Firmware
Viewing the Status
Under Status, you can view the current settings of the Ethernet LAN or
WLAN.
Click LAN to see the Device Information and LAN Settings, including MAC
and IP addresses.
WLAN settings can be seen by clicking WLAN.
• The Link Status may be Up, indicating that it is connected to a
Presto! WVR, or Down, indicating that it is available for connecting.
• SSID is the acronym for Service Set Identification, which is
sometimes referred to as the name of a wireless network.
• Channel and Transmit Rate represent the transmission speed.
Channels higher than 36 are for 802.11a (5 GHz). Transmission
rates faster than 24 Mbps indicate that you can use 802.11a and
802.11g modes.
• BSSID is one type of SSID. It is a six-byte address that is used to
identify the name of an ad hoc wireless network.
• If Radio is On, it means wireless signals are being sent by the
transmitter.
39
Page 45

Chapter5 Setting Up and Updating the Firmware
Adjusting the Setup
Under Setup, you can choose LAN or WLAN.
LAN is used to choose DHCP or static IP address.
• If you select DHCP, you have to find the IP address by using
another tool or by asking your MIS department if you ever need to
reconfigure. An alternative would be to push and hold the Reset
button on the WVR 100A device for more than 5 seconds to revert
to the factory default IP address (192.168.168.21).
• If you change to another network segment, remember to configure
the computer to the same network segment.
40
Page 46

Chapter5 Setting Up and Updating the Firmware
Use WLAN to change these settings.
• SSID is defaulted to use WVR 100A.
• Channel & Transmission rate is used to identify the transmission
speed. Channels higher than 36 are for 802.11a (5 GHz).
Transmission rates faster than 24 Mbps indicate that you can use
802.11a and 802.11g modes.
Some WLAN cards don’t support the 802.11g Ad hoc
mode and will use the IEEE standard 802.11b instead,
which results in lower performance.
• If the channel is changed, a new Web page will open for the
settings. When finished, click Apply.
• The default settings are ad hoc mode, channel 165, 802.11a, and
Ad-hoc mode.
41
Page 47

Chapter5 Setting Up and Updating the Firmware
Using Maintenance
Click to change username and password for security control, upgrade
firmware, or restore to factory default settings.
42
Page 48

Appendix
Appendix
Here you can find some useful information for Presto! WVR. Click an item
below to jump to a topic.
Keyboard Shortcuts
Wireless Channels Specifications
Glossary
Keyboard Shortcuts
While you are enjoying your programs, you can use the following shortcut
keys to manipulate the program.
Keyboard Shortcuts
0 ~ 9 TV channel number from 0 to 9
CTRL+SHIFT+T Use the time shifting function
CTRL+L Go back to the last TV channel you watched
CTRL+P Pause the playback
CTRL+SHIFT+S Use the snapshot function
CTRL+R Start recording
Description
< Rewind the time shifting function
CTRL+SHIFT+P Start playing program
> Fast forward the time shifting function
CTRL+S Stop the playback
CTRL+F Switch between normal and full screen mode
43
Page 49

Appendix
F8 Turn off the sound
F10 ( + ) Increase the volume
F9 ( - ) Decrease the volume
PAGE DOWN View the previous TV channel
PAGE UP View the next TV channel
Wireless Channels Specifications
The Wireless LAN specifications follow the 802.11 related standards. For
802.11a, it uses 5 GHz, and for 802.11 b and g, it is 2.4 GHz. This is the
channel list for 802.11 b and g:
Channel No. Frequency USA-Canada Europe Japan
1 2412 MHz X X X
2 2417 MHz X X X
3 2422 MHz X X X
4 2427 MHz X X X
5 2432 MHz X X X
6 2437 MHz X X X
7 2442 MHz X X X
8 2447 MHz X X X
9 2452 MHz X X X
10 2457 MHz X X X
11 2462 MHz X X X
44
Page 50

Appendix
12 2467 MHz X X
13 2472 MHz X X
14 2484 MHz X
For 802.11a, there are 3 segments of channel allocation. The list is shown
below:
Channel No. Frequency USA-Canada Europe Japan
34 5170 MHz X
36 5180 MHz X X X
38 5190 MHz X
40 5200 MHz X X X
42 5210 MHz X
44 5220 MHz X X X
46 5230 MHz X
48 5240 MHz X X X
52 5260 MHz X X X
56 5280 MHz X X X
60 5300 MHz X X X
64 5320 MHz X X X
100 5500 MHz X
104 5520 MHz X
108 5540 MHz X
45
Page 51

Appendix
112 5560 MHz X
116 5580 MHz X
120 5600 MHz X
124 5620 MHz X
128 5640 MHz X
132 5660 MHz X
136 5680 MHz X
140 5700 MHz X
149 5745 MHz X
153 5765 MHz X
157 5785 MHz X
161 5805 MHz X
A 20 MHz bandwidth is required for each WLAN medium.
Thus there can be only 3 non-overlapping channels in
802.11 b and g. (4 in Japan because of channel 14). For
802.11a in the USA area, there can be 12 clean
non-overlapping channels. The frequencies from the
802.11a standards are defined to be 5.15~5.25 Hz and
5.725~5.825 Hz. That translates to supported channels
36~48 and 149~161.
Glossary
2.4 GHz frequency band: The range of frequencies recognized by
international regulatory agencies for unlicensed radio operations. Products
that use these frequencies do not require user licensing.
46
Page 52

Appendix
Ad hoc mode: A wireless network framework in which wireless devices
communicate directly with one another. This arrangement contrasts with an
infrastructure network, in which all devices communicate through an
access point.
Aspect Ratio: The aspect ratio is the relationship of the width of an image
to its height. Normal TV's aspect ratio is 4:3, HDTV's aspect ratio is 16:9,
and Cinemascope movies' aspect ratio is 2.35:1.
Bits per second (bps): An unit that is used to measure the data
transmission speed over a communication line based on the number of bits
sent or received per second.
BSSID: An acronym for Basic Service Set Identifier, which is the identifying
name of an ad hoc wireless network. BSSID is one type of SSID, with the
other being ESSID.
Channel: A portion of the available radio spectrum that devices on a
wireless network use to communicate.
Ethernet: The most popular industry standard network hardware
specification (802.3) developed by IEEE for wired LANs. It provides a
variety of transmission speeds ranging from 10 Mbps to 10,000 Mbps.
Firewall: A system of software and/or hardware that resides between two
networks to prevent access by unauthorized users. The most common use
of a firewall is to provide security between a local network and the Internet.
Firewalls monitor and control the flow of data in and out of computers on
both wired and wireless networks.
Firmware: programming that is inserted into programmable read-only
memory (programmable ROM), thus becoming a permanent part of a
computing device. Unlike random access memory (RAM), read-only
memory stays intact in the absence of electrical power. Startup routines
and low-level input and output instructions are stored in firmware.
GHz: Gigahertz, a unit of frequency.
IEEE: Institute of Electrical and Electronics Engineers. A global technical
professional society and standards-setting organization serving the public
interest and its members in electrical, electronics, computer, information
and other technologies.
47
Page 53

Appendix
IEEE 802.11: One family of specifications for wireless networking, first
published by IEEE in 1997. The original specification allows for speeds up
to 2 Mbps and operates in the 2.4-GHz frequency range using both
frequency hopping and direct sequence spread spectrum technologies.
IEEE 802.11a: An IEEE specification for wireless networking that operates
in the 5 GHz frequency range and uses orthogonal frequency division
multiplexing (OFDM) technology. The 802.11a specification allows for
speeds up to 54 Mbps. The 5 GHz frequency band allows for more radio
channels, which helps to avoid radio and microwave interference.
IEEE 802.11b: The most commonly used standard for wireless networking.
Ratified in 1999 by IEEE and also known as Wi-Fi, the 802.11b
specification operates in the 2.4 GHz frequency range with a maximum 11
Mbps data transfer rate. Microwave ovens, cordless phones, and Bluetooth
devices all work within the 2.4 GHz frequency band.
IEEE 802.11g: The latest specification for wireless networking from IEEE. It
operates in the 2.5-GHz frequency range and uses orthogonal frequency
division multiplexing technology. Like 801.11a, 802.11g allows for speeds
up to 54 Mbps.
Local Area Network (LAN): A group of computers typically networked in
the same office, building, or campus. Computers on a LAN are connected
together through cables or access points in order to share applications,
data, peripherals, or other resources.
MAC Address: A unique 12-digital hexadecimal number applied to a
network adapter at the factory. A MAC address, also known as hardware
address or physical address, uniquely identifies an adapter on a LAN.
DHCP: An acronym for Dynamic Host Configuration Protocol, which is a
protocol that enables an individual device on an IP network to retrieve its IP
address and other settings from a server on demand. This dynamically
assigned IP address is granted on a lease basis. Once a lease expires on a
device, a new IP address may or may not be assigned the next time that
device attempts to connect to the network.
Gateway: A hardware or software device that provides access to the
Internet for multiple computers or networks. In the wireless world, a
gateway is an access point providing additional features, such as NAT,
DHCP, roaming, firewalls, and various levels of security.
48
Page 54

Appendix
Internet Protocol (IP): The established standard protocol for transmitting
and receiving packets over the Internet. IP is a fundamental part of the
TCP/IP protocol suite.
Network Segment: A group of hosts and nodes forming a network that is
also part of a larger network. A local area network may be split into several
network segments (subnets) in order to reduce traffic.
Proxy: A technique used to improve network operations and security. The
proxy server receives requests intended for another server to prevent direct
communication between two or more networks. The proxy server forwards
allowable data requests to remote servers and/or responds to data
requests directly from stored remote server data.
SSID: An acronym for Service Set Identification, sometimes referred to as
the name of a wireless network.
Time Shifting: The recording of TV programs to some storage medium or
buffer to be viewed at a time more convenient to the consumer. The buffer
in WVR can be set up to a maximum of 60 minutes.
WLAN: Wireless Local Area Network. A type of local area network in which
data is sent and received through high-frequency radio waves rather than
cables or wires.
49
 Loading...