


Contents
1. Product Structure
2. Button Description
3. Connection of External Suction Cup
4. Specification
5. Operation Instruction
6. Menu Setup
7. General Troubleshooting
8. Description of Recording Preview Mode
9. GPS Track Player Software Instructions
10. APP Installation & Operation Instructions
11. Dash Cam Installation Steps
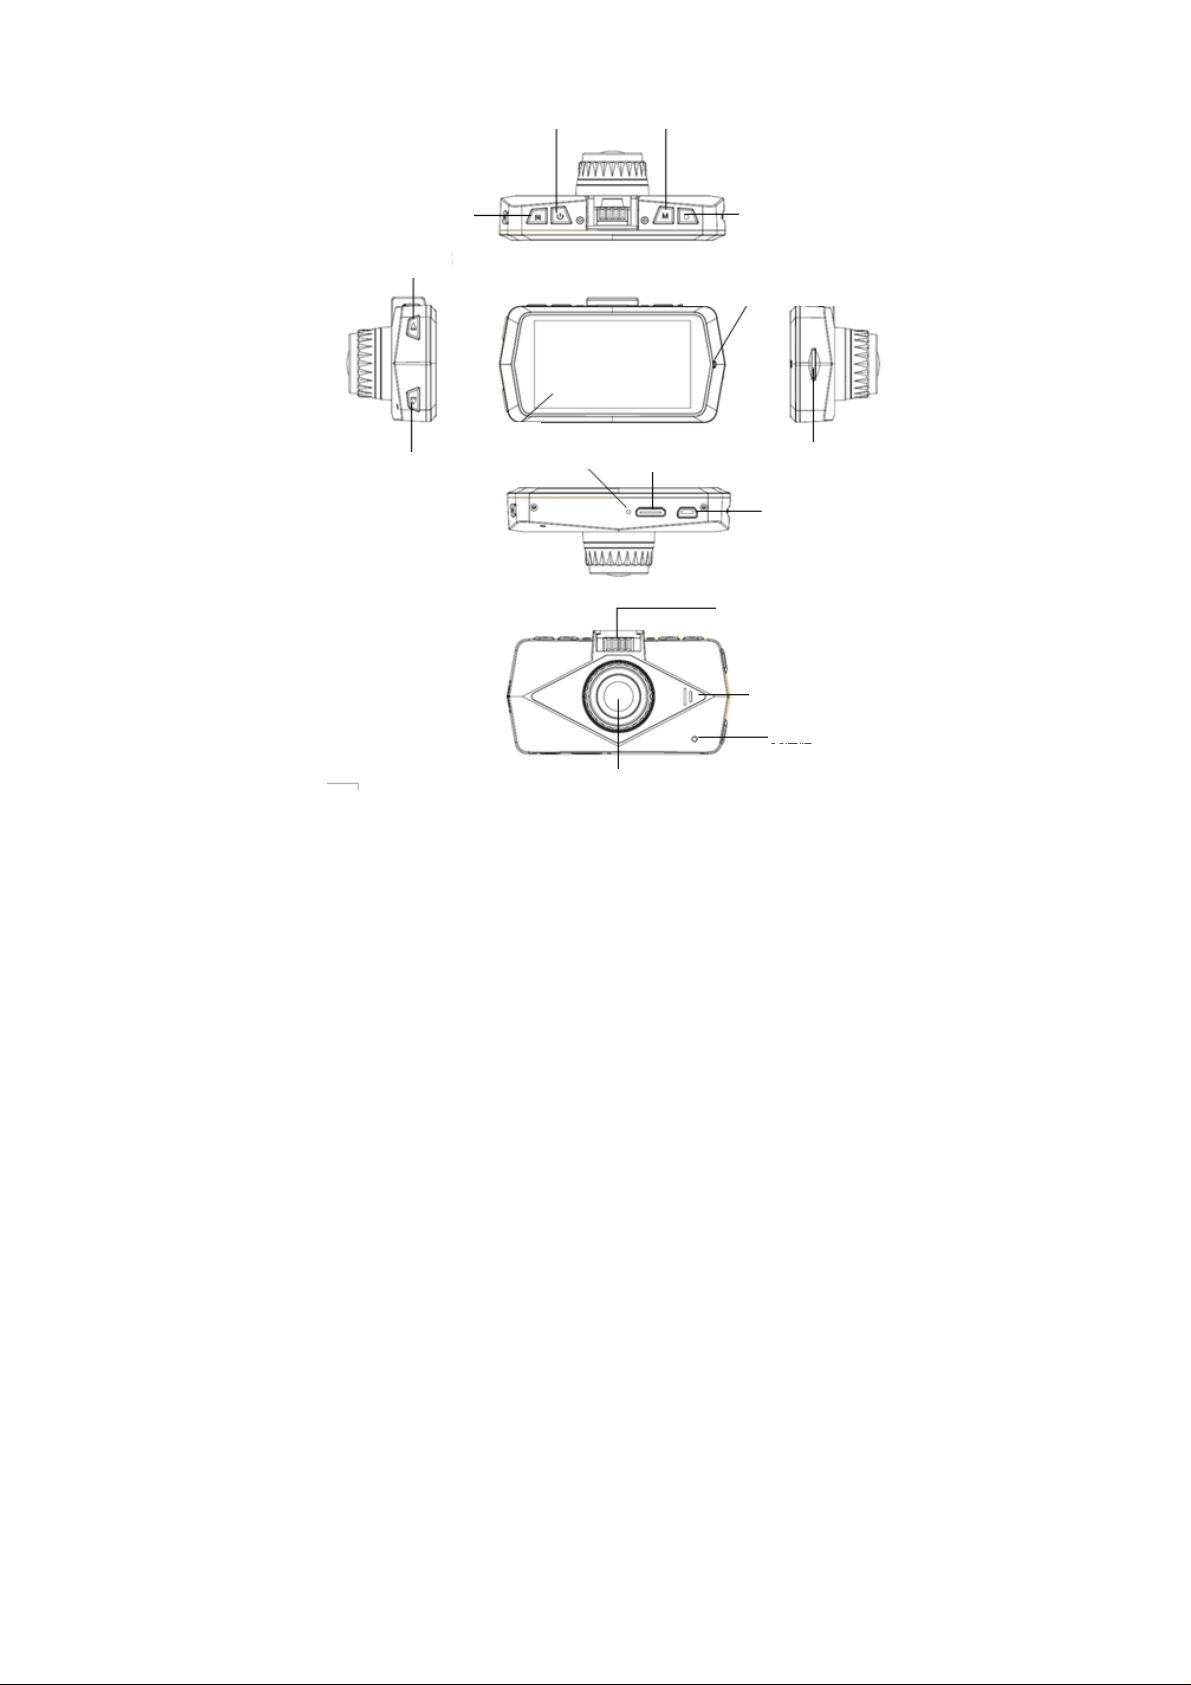
Product Structure
Menu/Snapshot Button
Up/ Rewind/ Microphone
Button
Power
Button
MODE (Selector)/ Locking
Button
Recording/Photographing
Charging Indicator Light
/OK Button
Down/Forward/
Screen Off Button
Display
Screen
Microphone
Lens
HDMI Output
TF Card Slot
USB Output
External Suction
Cup Interface
Horn
Reset Button

Button Description
MODE button: Press it to select recording, photographing or 9-segment screen mode; during
recording, press this button for locking.
Menu/Snapshot button: At recording, photographing or file bro wse mode, press this button to
open or close the menu; during recording mode, press this b utton for snapshot; during p layback
of video files at file browse mode, press M button to stop pl a yback, an d pres s the Menu but ton t o
open or close the menu.
Scroll up/down button: At menu screen, press this button to select options in the menu; at
9-segment screen mode, press this button to browse pictures or videos; during playback of videos,
press Scroll up or down button for rewind or fast forward; at recording mode, press Scroll up
button to turn on or off the microphone, and press Scroll down button to turn on or off the screen;
Power button: Press and hold this button for 2 seconds to power on or off the dashboard
camera.
Recording/Photographing/OK button: At recording mode, press this button for recording; at
photographing mode, press this button for photographing; at menu screen, press this button to
confirm menu settings; during playback of videos, press this button for playback or pause.
Reset button: Press this button to restart the dash camera automatically in the case of power-on,
and to stop it automatically in the case of power-off.
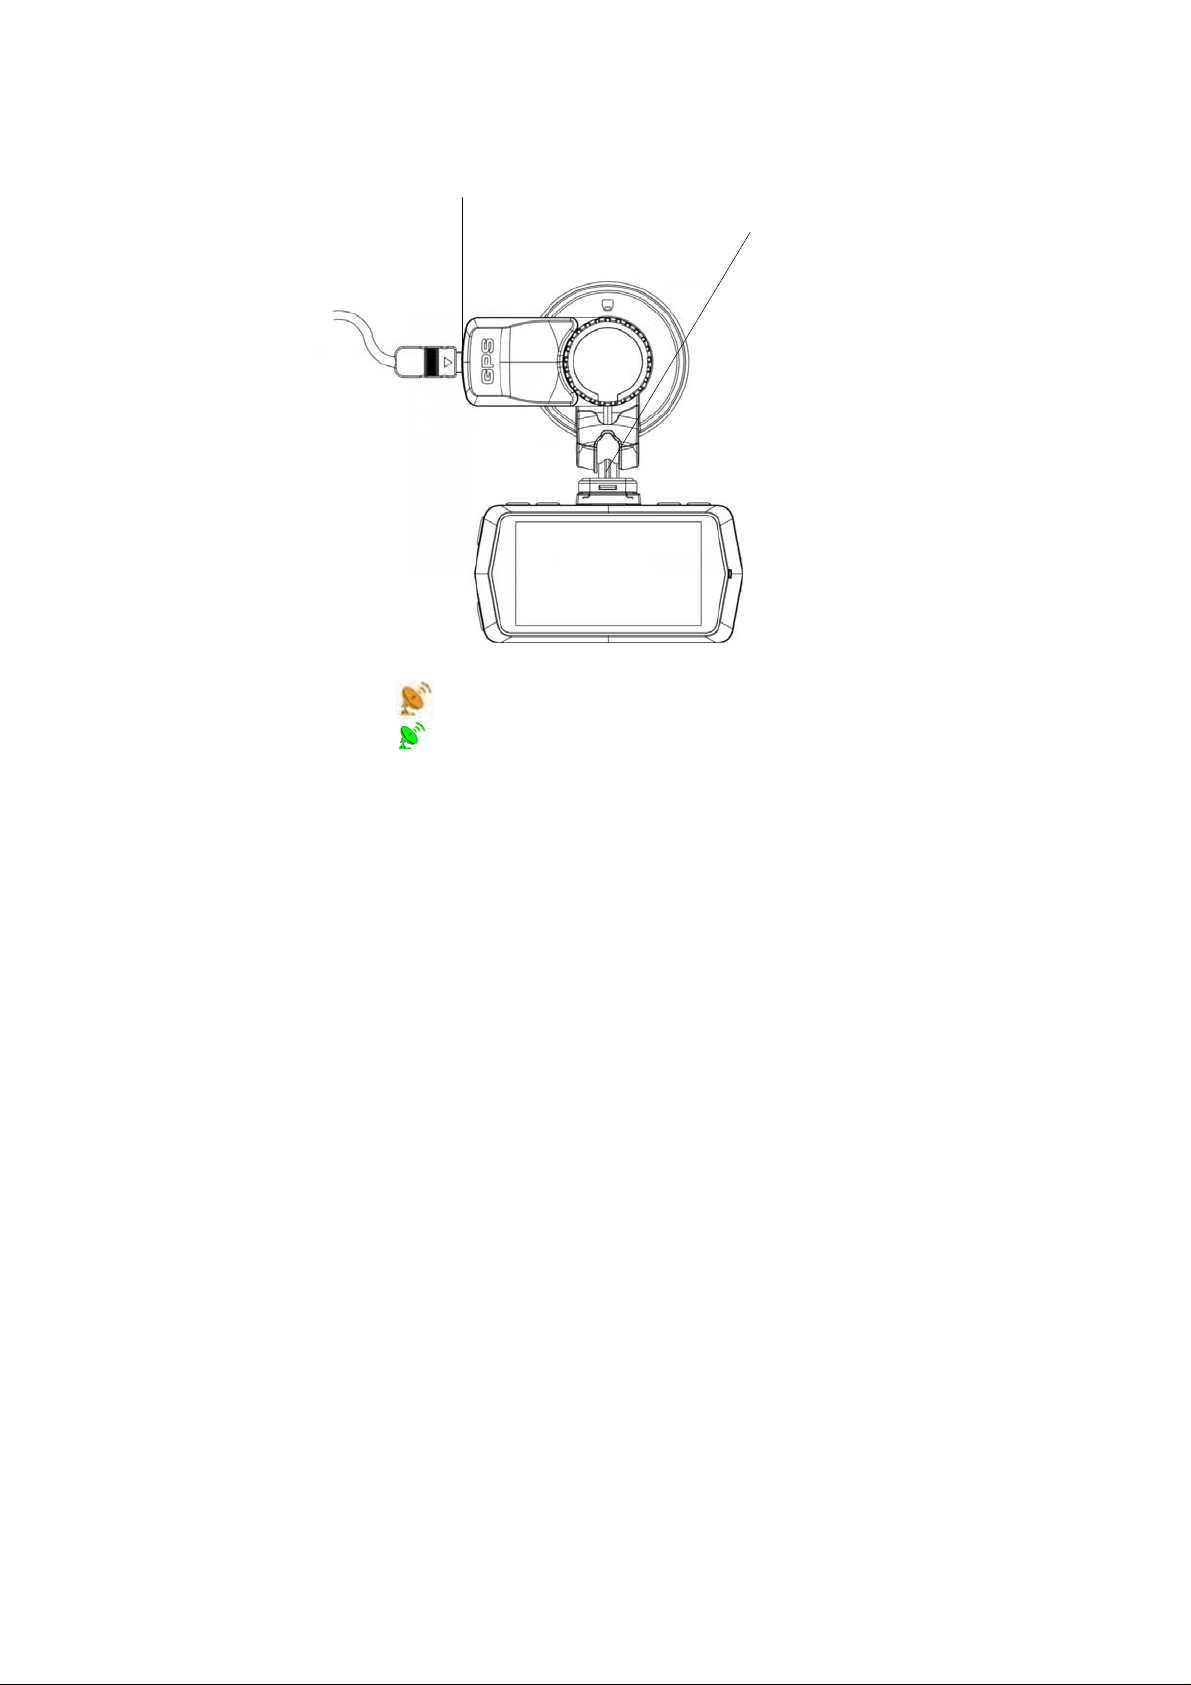
Connection of external suction cup
The external suction cup is connected as show n belo w:
Connect the USB
interface of on-board
charger
Slide rail + clip: To install the external suction
cup, align it with the slide rail and then push it
in until it is locked; to remove the external
suction cup, press upwards the clip and pull
out the suction cup.
Tips:
After power-on, the GPS will search satellites automatically. If GPS funct ion is not activated,
yellow icon“ ” will be shown on the left of LCD screen; and if GPS function is activated, a
green icon “ ” shown on the left of the screen. (Optional)

Specification
Sensor 4M CMOS sensor with 1/3 in sensing area
Lens 6-layer glass prime lens with aperture of f/1.8 and focus of (2.3±5%)mm
LCD 2.7-In 16:9 TFT LCD
Video Output HD TV interface
Photo JPG file format
H.264 compressed format
2560 x 1440, 30 fps
Video Recording
Audio Built-in microphone/horn (PCM)
Memory External medium: SDHC card (supporting up to 128G TF card)
Battery Model PL 402023
Battery Type Li-ion
Battery Voltage 3.7 V
Battery Capacity 130 mAh (0.481 Wh)
Working Temperature -30+75 degrees
Storage Temperature -20+85 degrees
Tips: This dashboard camera must be charged for mo re than 1 hour before first use to
prevent restoration of default system time due to exhausted battery.
1920 x 1080, 60 fps
1920 x 1080, 30 fps
1280 x 720, 30 fps
Operation Instruction
Installation and removal of memory card:
1. Please check if TF card is inserted in correct direction; incorrect insertion may cause damage
to TF card and the dashboard camera.
2. Please use high-speed IT card conforming to SDHC and bearing the mark of class C10 and

above.
3. If the memory card is incompatible with this dashboard ca mera, failure to read the card may
occur. In that case, format the TF card with the formatting function of this dashboard camera.
Power-on, power-off and automatic power-off of dashboard camera:
1. Press and hold the Power button for power-on, and press and hold the butt on for 2 s for
power-off.
2. To save battery power, the time for automatic power-off can be set in the setup menu. When no
operation is done within the set time, the dashboard camera will be powered off automatically.
Setup of parking mode:
With the “Parking mode” function activated through the recording menu, the dashboard cam era
will enter the parking mode automatically upon detection of immobilizat ion of car within 5 min. A t
the parking mode, the dashboard camera will start recording automatically upon de tection of an y
movable object in front of the lens, and stop recording automatically if no movable object is
detected within 10 s. The dashboard camera will exit the parking mode and start normal loop
recording upon detection of start of car engine.
Manual recording:
Press “Recording/Photographing” button to start recording and press this button again to stop
recording. During recording, the red indicator light will flash, and red icon “ ” will flash on the
display screen.
Photographing:
At photographing preview mode, press Recording/Photographing button for photographing.
Turning on and off of microphone:
During recording preview and recording, press Scroll up button to turn on or off the microphone.
Automatic file lock and protection triggered by G-sensor:
In violent crash, the built-in G-sensor of the dashboard camera will trigger the function of

automatic file locking and protection. Protected video files cannot be deleted. For protected video
files, the symbol
When the size of the locked and protected file accounts for 2 5% of the capacity of the memory
card, former files should be deleted manually so that the protection function can work again.
To activate this function, please refer to the “G-sensor” option in the system setup menu.
Function of indicator lights:
Green indicator light: This indicator light will flash during recording, stay on when the dashboard
camera is idle, and flash during upgrading;
Red indicator light: This indicator light will come on during power supply and b e off after full
charging.
will be shown in the middle of the screen.
Menu Setup
Playback of video and photos:
1. File browse: Press MODE button to enter playback mode at which currently taken videos or
photos will be displayed on the screen. Then press Scroll up/down button to browse the files, and
press Recording/Photographing button to play them.
2. Video play: Press Recording/Photogr aphing button for playback or pause, press Scroll up or
down button for fast forward or rewind, and press MODE (selector) button to stop playback.
3. Delete: To delete files in pla yback interface, press Menu bu tton, then deletion menu (deletion
of individual file and all files) will pop up. And then press Recording/Photograp hing button for
deletion.
Locked files cannot be deleted and must be unlocked for delete, For a protected video file or
photo, a locking mark
is shown in the upper part of the screen.

Entry of menu setup:
1. At recording preview mode (namely the menu after recording is stopped), press Menu button to
enter the recording setup menu; then press Menu button to go to the setup menu;
2. Press Scroll up/down button to select the option to be set;
3. Press Recording/Photographing button to confirm selected option;
4. After menu setup, press Menu button to return to the recording preview mode.
Description of recording mode menu options:
Resolution: This option is used to set following levels o f resolution for the dashboard camera:
1440P, 1080P 60FPS, 1080P, 720P.
Loop recording: This option is used to set the loop recording file splitting time. At recording mode,
when the size of record file is up to the set max. limit of capacity of TF card, the old est recor d wil l
be overlaid.

G-sensor: This option is used to set the sensitivity for G-Sensor to trigger the file protectio n
function in order to monitor the car crash. In this way, the protection function will be triggered
automatically in a crash. For protected file, a locking icon
the screen. Protected files cannot be deleted during loop recording.
Audio recording: This option is used to turn on or off the microphone.
Parking mode: This option is used to activate the parking m ode function, so th at the dashboard
camera can enter parking mode automatically upon detection of immobilization of car within 5 min.
At parking mode, the dashboard camera will start recording automatically upon detection of any
movable object in front of the lens, and stop recording automatically if no movable object is
detected within 10 s. The dashboard camera will exit the parking mode and start normal loop
recording upon detection of start of car engine.
Exposure: This option is used to set exposure values for dif ferent modulated light sources in
order to make the video image clearer.
Number Plate: This option is used to set the plate number . Press Scroll up/down button to
increase or decrease the number, and press OK button for confirmation.
Stamp: This option is used to set time, number plate, speed and GPS stamps.
Rotate Display: This option is used to activate and deactivate the image flip function.
Time Lapse: This option is used to set the time lapse, namely the photographin g time interval,
such that the same scene or object can be taken at this s et time interval automatically and
continuously for a long period of time, forming a continuous frame composed of thousan ds of
pictures, which will then be automatically processed into an animation video. In this way, the long
process can be presented by a video lasting for a few minutes, avoiding long-time recording.
Power Off Delay: When the dashboard camera is connected to the on-board charger, it will be
powered off 5 s after the car engine is shut down.
Photographing mode menu options:
is shown at the right upper corner of

Resolution: This option is used to set the following si ze of photo taken at photographing mode:
16M, 12M, 10M, 8M, 5M, 4M.
Exposure: This option is used to set exposure values for dif ferent modulated light sources in
order to make the photo clearer.
Time & Date Stamp: This option is used to set the time and data stamp of photo.
Language: This option is used to set language. (Multiple languages can be selected)
Format: This option is used to format the memory or TF card.
Time & Date: This option is used to set the system time and date during recording.
Time Zone/ DST: This option is used to set the time zone of local place, which may be the
accurately corrected time after activation of GPS function.
Speed Unit: This option is used to set the speed measuring unit as KMH or MPH.
Auto LC D O ff: T his option is used to set the tim e for automatic turning off of L CD. In this case,

pressing any button can turn on the LCD, and a flashing red indicator light indicates recording.
Device Sound: This option is used to eliminate the button pressing sound.
Non-Use Auto Power Off: This option is used to set the time for automatic power-off of the
dashboard camera not in use, which is 3 min by default.
Frequency: This option is used to select the frequency of power line (50 Hz by default in China).
Incorrect light source frequency will cause image interference like transverse stripe.
System Info: This option is used to display the version of system.
Default settings: This option is used to restore the system parameters to default settings.
General Troubleshooting
1. Loop recording failure
Check if the TF card has enough memory space. Loop recording requires wi de memory space,
and cannot work effectively if TF card does not have enough memory space. Please check if TF
card has enough effective memory space. If necessary, delet e some files manu ally or format th e
TF card.
2. Automatic pause in process of recording
High-definition video contains enormous data; thus please use high-speed TF card conforming to
SDHC and bearing the class mark of C6 or C10.
3. “Incorrect file” prompt appears during playback of pictures and videos
This condition is caused by incorrect data storage due to individual damaged memory space of IT
card resulted from poor quality or aging of the card. In this cas e, pleas e for m at th e T F card again
with the formatting function of this dashboard recorder.
4. No image is displayed on the HD TV screen.
Please check if the HDMI cable connector is connected correctly and the TV is set to corre ct

HDMI status.
5. Recorded image is not clear
This condition is caused by dirty lens. Please check if there is dirt or fingerprint on the lens and
clean the lens with cloth regularly.
6. Image interference like transverse stripe occurs during indoor recording
This condition is caused by incorrect light source frequency. Please set the light source frequency
as 50 Hz or 60 Hz according to the local commercial frequency.
7. Difficulty in positioning with GPS
In some cars, the receiving antennas of the built-in navigator are also installed at the
windshield. If they are very close to the d ashboard camer a, the GP S signals will be disturbed . In
that case, install the dashboard camera away from the antennas, or turn off the car navigator.
Description of recording preview mode
1 2
3
4
5
7
8
6
9
10
11
13
12
front

1. Recording icon 7. Exposure compensation
2. Resolution 8. Memory card
3. Loop time 9. Time display
4. Recording time 10. Date display
5. Time lapse photography 11. Charging icon
6. GPS icon 12. Microphone
13. WDR icon
GPS track player software instructions
1. Software installation
Please install the software “Cardv Player.exe” provided on the website.
2. Software operation
Double click the file “Player.exe” to play the file. (T he recorde d track can be displayed b y adding
file into the player)

u
ctions
APP Installation & Operation Instructions
1. Download Android APP: Visit Google Play website and search for “DashCamDV”. Then
download and install the applicable Android APP;
2. Download IOS APP: Visit APP store website and search for “DashCamDV”. Then download
and install the applicable IOS APP;
3. After the car engine is started, the dash camera will be powered on automatically, and the Wi-Fi
function activated automatically. SSID is Cardv xxx and default password is 123456789. Please
connect Wi-Fi and start to operate dashboard camera APP.
Dash Cam Installation Steps
Step 1
Fix the dashboard camera near the rearview
mirror with the suction cup mount to the extent that
the vision is unobstructed.
Step 2
Insert the USB port of the on-board charger cable
into the USB interface of the dashboard camera
mount, and put down the on-board charger cable
towards the concealed wire naturally. Then insert
the cable into the ceiling from left to right manually.

Step 3
When laying the cable at the right upper corner
towards the door of the car, pull apart the body
side panel slightly manually and insert the cable
into it. This operation will not damage the car and
can be done in every car.
Step 4
At the edge of door, pull out the door moulding and
insert the cable into it manually. Then lay the cable
along the moulding.
Step 5
At the bottom of the glove box handle, insert the
cable into the gap, and measure the distance from
the cigar lighter plug to the cigar lighter. Then
conceal the redundant cable here as much as
possible.
Step 6
Insert the cigar lighter, then the dashboard camera
can be powered on or off automatically.
FCC Radiation Exposure Statement:
This equipment complies with FCC radiation exposure limits set forth for an uncontrolled
environment. This equipment should be installed and op erated with minimum distance 20cm
between the radiator & your body.

FCC Warning
This device complies with Part 15 of the FCC Rules. O peration is subject to the following two
conditions:
(1) This device may not cause harmful interference, and (2) this device must accept any
interference received, including interference that may cause undesired operation.
NOTE 1: This equipment has been tested and found to comply with the limits for a Class B digital
device, pursuant to part 15 of the FCC Rules. Thes e limits are designed to provide reasonable
protection against harmful interference in a residential installation. This equipme nt generates,
uses and can radiate radio frequency energy and, if not installed and used in accordance with the
instructions, may cause harmful interference to radio communications. However, there is no
guarantee that interference will not occur in a particular i nstallation. I f this equ ipment doe s caus e
harmful interference to radio or television reception, which can be determined by turning the
equipment off and on, the user is encouraged to try to correct the interference b y one or more of
the following measures:
- Reorient or relocate the receiving antenna.
- Increase the separation between the equipment and receiver.
-Connect the equipment into an outlet on a circuit di fferent from that to which the receiver is
connected.
-Consult the dealer or an experienced radio/TV technician for help.

NOTE 2: Any changes or modifications to this unit not expressly approved by the party
responsible for compliance could void the user's authority to operate the equipment.
 Loading...