

Salus WQ610, WQ610RF User Manual
2
679
10
13
12
11
1
3
4
5
8
Technical Specication
Button Functions
WQ610 / WQ610RF
Quick Guide
Introduction
The SALUS Quantum WQ610 and WQ610RF thermostats are Boiler Plus compatible
thermostats, designed specically to control central heating boilers and in the case of the RF
versions, electrical panel heaters also. They have our new load compensation (ITLC) software
with Volt free switch and also Opentherm 4.0 connections, so you can choose the method
of control to suit your boiler / installation. Please note that the Boilers need to have an
OpenTherm Association license to be fully compatible with WQ610 range (should you wish
to connect to the OpenTherm terminals A and B). Please verify if this requirement is met with
your Boiler Manufacturer.
Product Compliance
This product complies with the essential requirements and other relevant provisions of the
following EU Directives: RED:2014/53/EU and RoHS 2011/65/EU. Full text of the EU Declaration
of Conformity is available on: www.saluslegal.com
WQ610RF: 2405-2480MHz; <14dBm
WQ610 Thermostat WQ610RF Thermostat
Thermostat supply 230VAC Lithium Battery (Rechargable)
Thermostat rating max 3 (1) A -
OpenTherm terminals A / B -
Outputs
Temperature range 5°C – 35°C 5°C – 35°C
Thermostat display accuracy 0.5°C 0.5°C
ErP control class Class V Class V
Radio Frequency -- 2.4 GHz
Dimension [mm] 86 x 86 x 27 [mm] 86 x 86 x 11[mm]
Receiver supply 230 V AC
Receiver rating max 16 (5) A
OpenTherm terminals A / B
Outputs Voltage free NO / COM terminals
Radio frequency 2.4 GHz
Dimension [mm] 98 x 98 x 32[mm]
Voltage free
NO / COM terminals
WQ610 Receiver
-
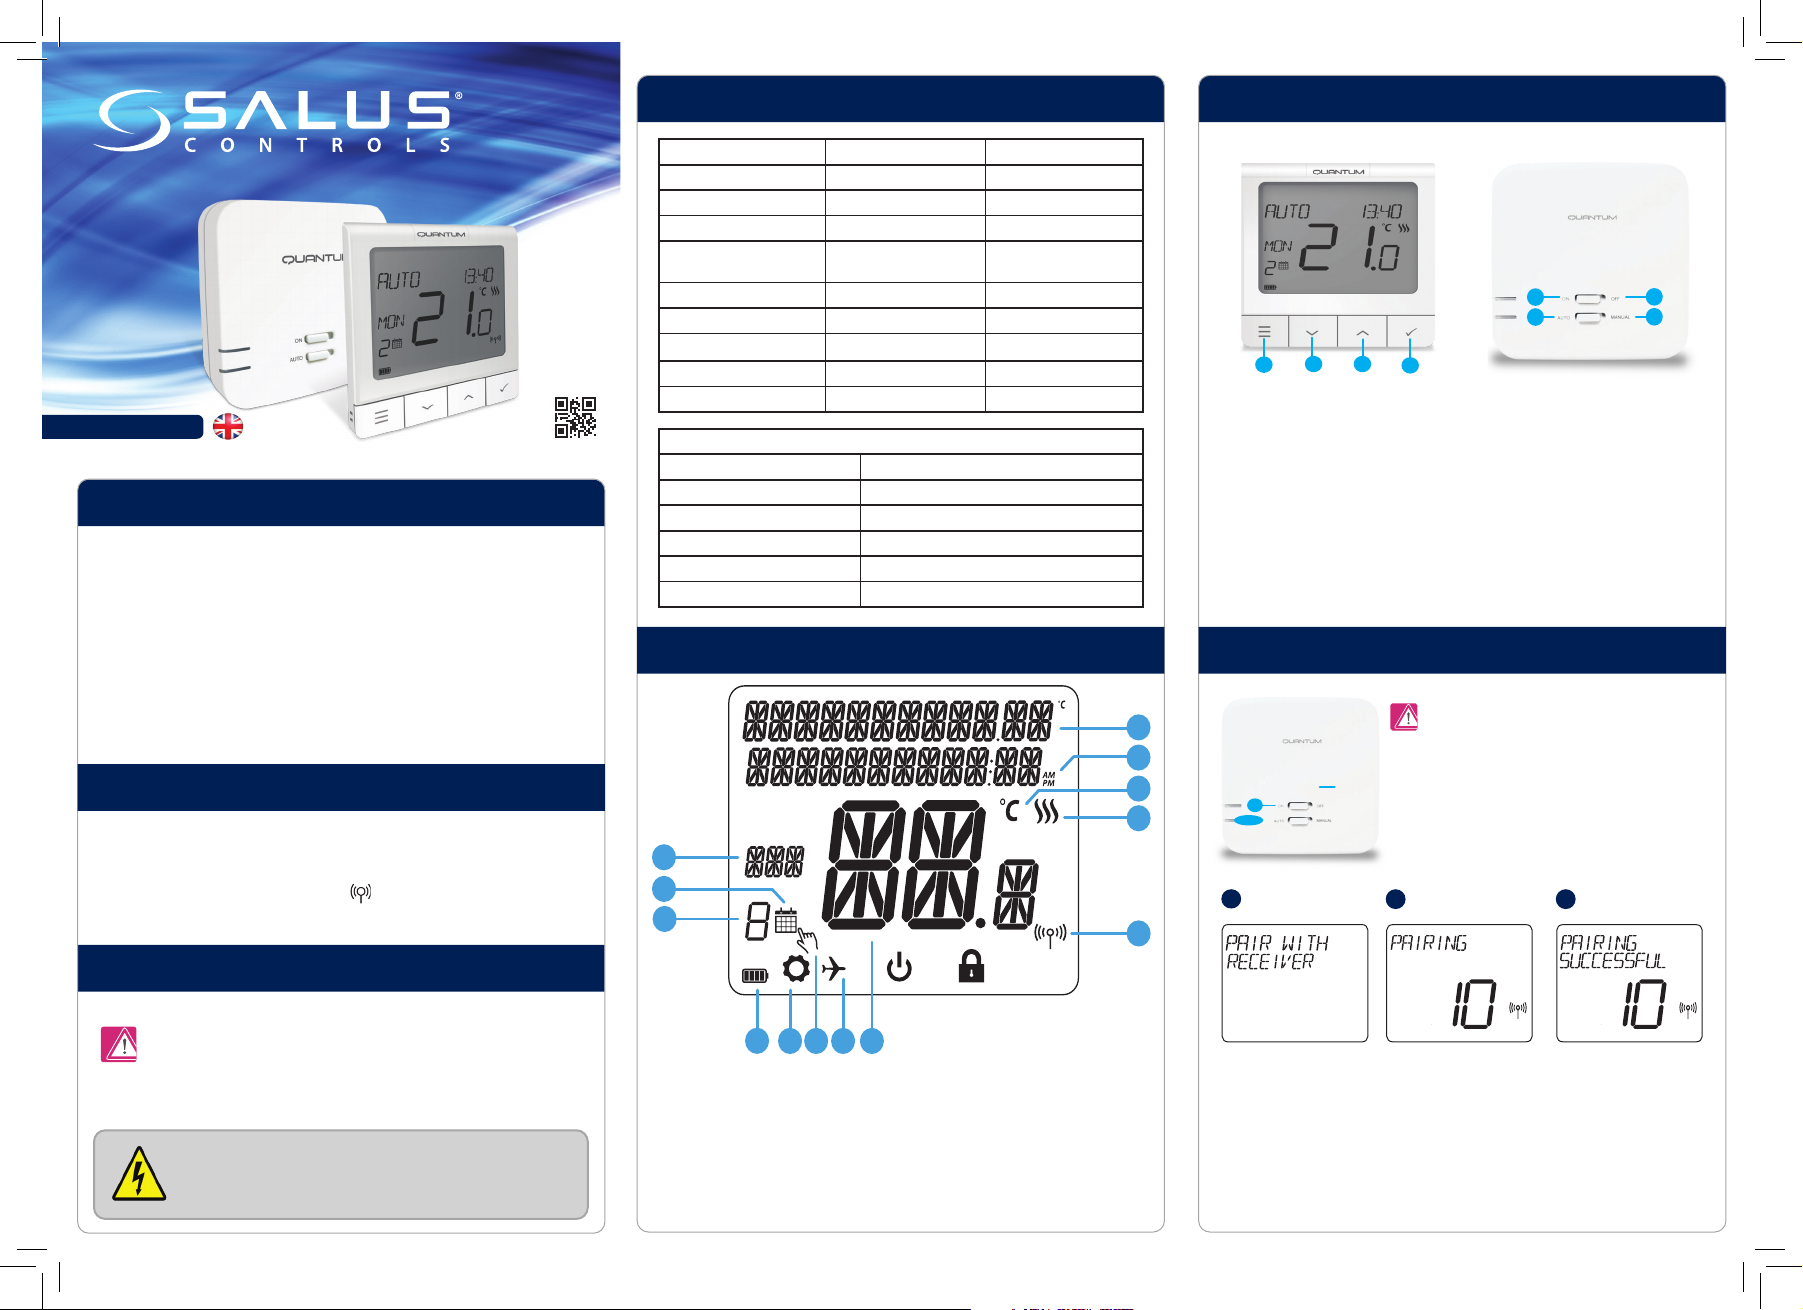
LCD Icon Description
WQ610 / WQ610RF Thermostat WQ610RF Receiver
5
7
2 3
1
1. MENU - enter the menu options, press and hold
for 3 seconds to return to main screen without
saving changes.
2. DOWN - decrease the temperature and move
through the menus.
3. UP - increase the temperature and move through
the menus.
4. TICK - conrm changes and enter menus.
Press and hold for 3 seconds to exit User Menu
and save changes. Press and hold to cancel
BOOST feature or temporary override (whilst in
normal screen).
WQ610RF: Pairing with the Receiver
1
ON
AUTO
1
4
5. ON - When in Manual Mode, ON will
turn the boiler on.
6. OFF - When in Manual Mode, OFF
will turn the boiler o.
7. AUTO - Receiver operates in automatic
mode according to the thermostat.
8. MANUAL - Receiver output is
controlled by the On/O slide switch.
The pairing between the thermostat and the receiver is
already done at the factory. However, should you need
to re-pair the units then this can be done using the User
Menu. The link may also be tested from the User Menu
to show pairing link has been successful. Before pairing,
the receiver should be unplugged, then plugged back in.
During the pairing process, the distance between the
Thermostat and the receiver should be at least 1m.
2
6
8
3
Safety Information
Use in accordance with national and EU regulations. Use the device as intended,
keeping it in a dry condition. Product is for indoor use only. Installation must be
carried out by a qualied person in accordance with national and EU regulations.
WARNING! Always ensure the AC mains power is switched off before
installing or working on any components.
1. Menu/S ettings description
2. Clock 24hr/AM/PM
3. Temperature unit
4. Heating indicator (icon is animating
when there is heating demand)
5. RF Connection indicator
6. Current Temperature / Setpoint
Temperature
7. Holiday mode indicator
8. Temporary override mode
9. S ettings icon
10. Battery indicator
11. Schedule program number
12. Schedule mode icon
13. Day indicator/ SET information
Turn the receiver OFF and
ON twice to reset. Ensure
receiver switches are ON and
AUTO. Red LED should be
ashing. Enter thermostat
MENU and scroll down until
you see the “PAIR WITH
RECEIVER” option. Select YES
to proceed with Pairing.
Now your thermostat is
looking for the receiver. A 10
minute counter will appear on
the screen.
Upon connecting to the
receiver, the thermostat will
display the message “PAIRING
SUCCESSFUL” and return to
normal operation afterwards.
The red LED will stop ashing
when the pairing is successful.
1e
MENU /
GRAB
TOP
AND
BOTTOM
TO OPEN
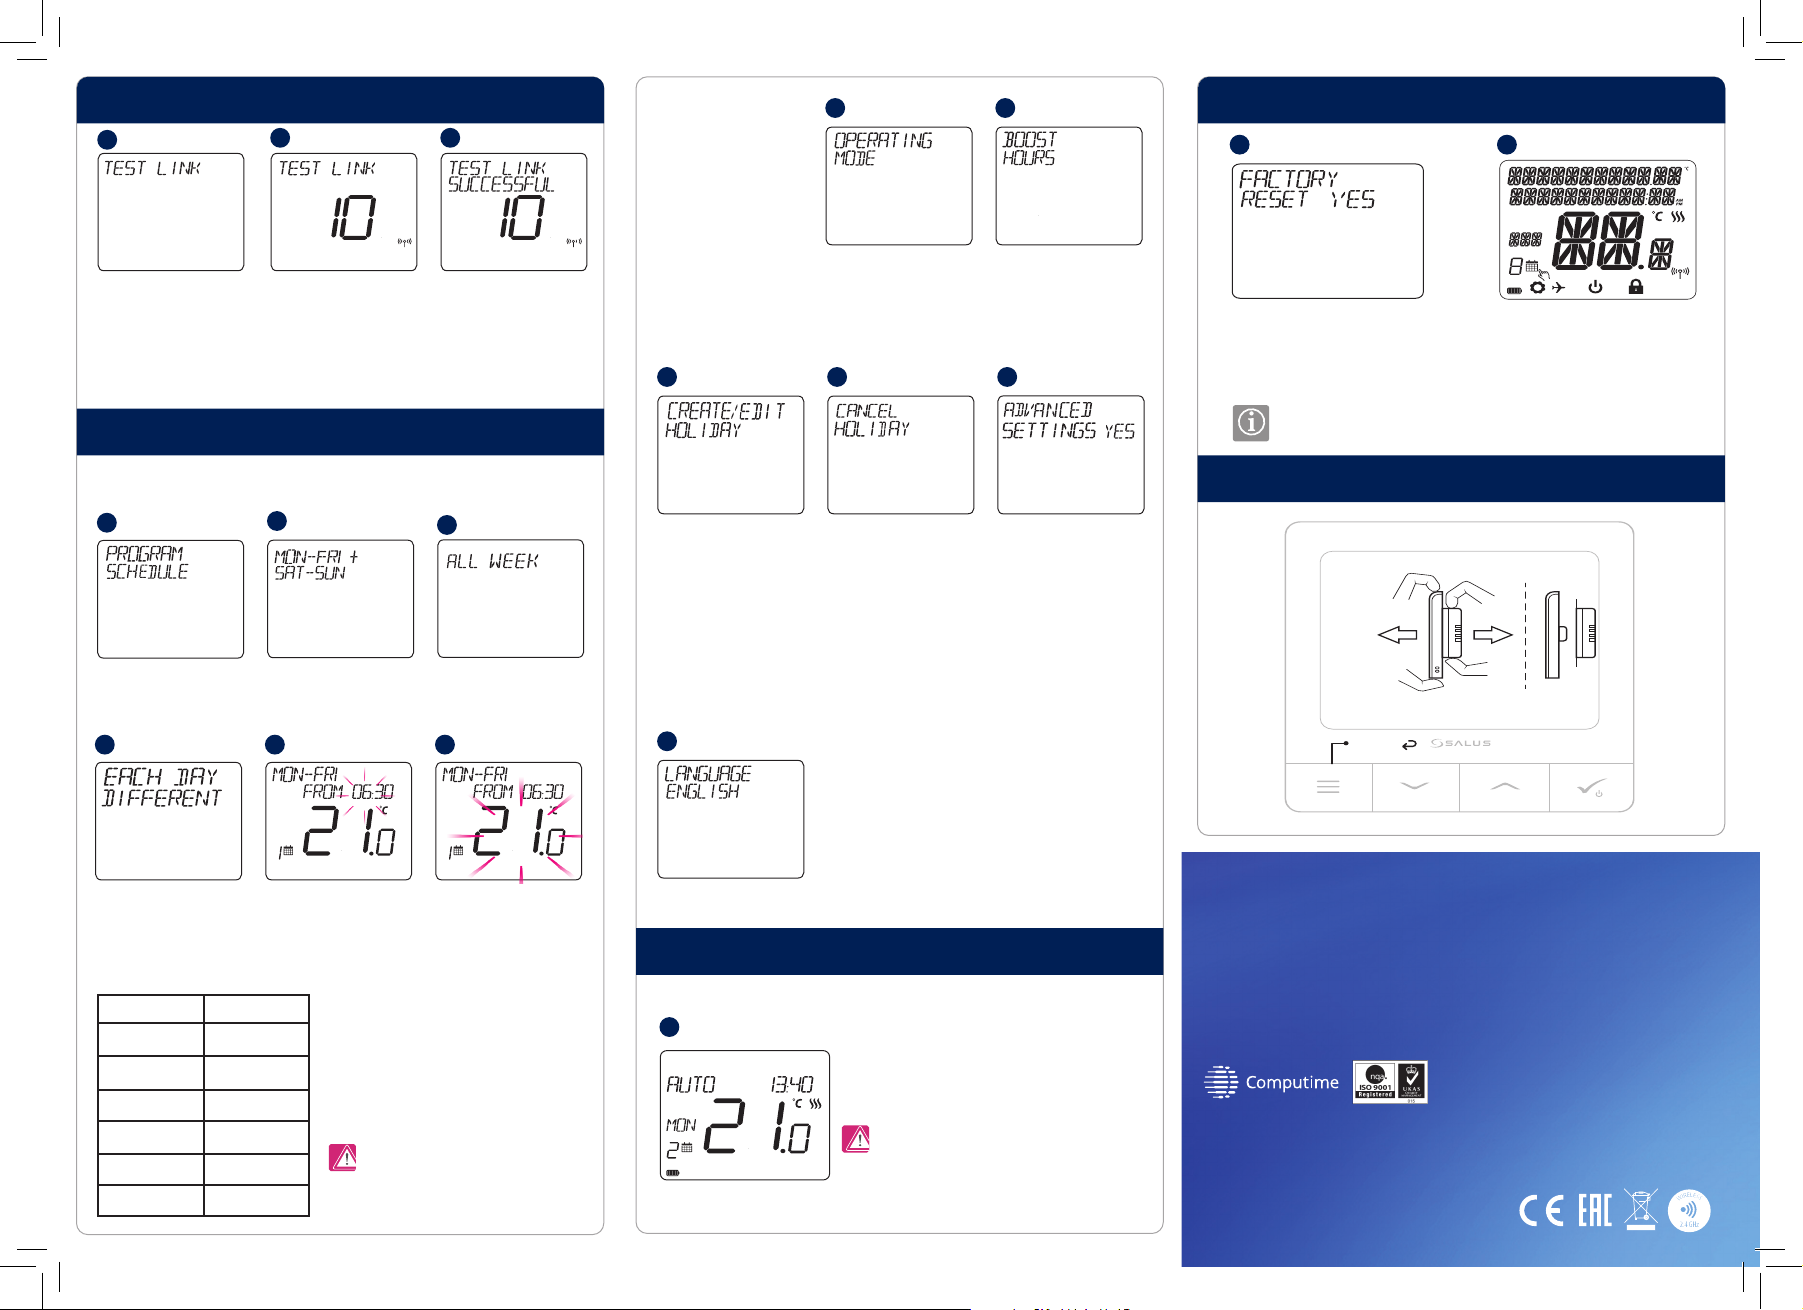
WQ610RF: Testing Link
1
Enter MENU and scroll down
until you will nd the “TEST
LINK” option. Press TICK
button to continue.
2 3
Now your thermostat is
sending a TEST message to the
receiver with the expectation
of receiving a response. While
testing, both red and green
LED will be intermittently
ashing.
Your thermostat will indicate
that the connection has been
tested successfully and will
return to normal operation.
To access the following option,
you need to press the MENU
button and go DOWN until you
see OPERATING MODE and press
TICK to enter the OPERATING
MODE menu. To access the
BOOST HOURS menu, follow the
same steps as shown above.
4 5
2 3
Can choose:
AUTO - follow schedule
ON 24/7 - MANUAL
OFF (FROST MODE)
You can boost heating for up
to 9 hours. Only available in
AUTO and FROST mode.
6
Factory Reset
1
Press and hold UP and DOWN arrow
keys for 5 seconds. Select YES to
perform Factory Reset and conrm
with TICK Key.
2
The thermostat will now restart itself
restoring factory settings. You may now
proceed with initial conguration of the
thermostat.
Programming - AUTO Mode
In this mode, the user can set the schedules for the thermostat (temperature setpoints
for specic periods of time). Programmed schedules should use all time periods.
1
To access this option, press the
MENU button once and then
press TICK to conrm.
1c
Individual (set a daily
schedule). Press TICK to
confirm.
TIME: TEMPERATURE:
06.00 21 °C
10.00 14 °C
12.00 21 °C
14.00 14 °C
18.00 21 °C
21.00 14 °C
1a
Using UP or DOWN, select the
program type between: 5 & 2.
1d
Using UP or DOWN, set the
hour and then press TICK,
which will then move to
minutes, that can be changed
in the same way.
This is an example for your weekly
schedule. High temperature should
be used for the ON times and low
temperature for the OFF times.
1b
All (set one schedule for
the entire week)
Using UP or DOWN, set the
temperature and then press
TICK to confirm. Repeat this
process for all 6 programs.
Press MENU, navigate DOWN
until you see the HOLIDAY
menu and then press TICK
to CREATE/EDIT HOLIDAY.
HOLIDAY MODE is a program
that will use FROST TEMP for
the selected period when you
are going away on holiday.
7
Also, in this menu you can
cancel a previously set up
holiday and go back to normal
operating mode. To cancel
holiday, press TICK to conrm.
Press the MENU button, then press the UP button and the TICK
button to set your language. ENGLISH is the default language but
it can be changed by using UP or DOWN and navigate through the
language options, then press TICK to select and conrm.
Temporary Manual Override
1
Press MENU, then using
DOWN, navigate until you
see the Advanced Settings
submenu and press TICK.
For more details about this
submenu, please check the
Installer’s Guide.
For overriding the schedule to bring the HEAT on, use
the UP button to increase the temperature and press
TICK to conrm.
This setting will be valid until the next
scheduled program.
FACTORY RESET will require PIN code if locked.
Additional installation notes for WQ610:
SALUS Controls plc
SALUS House
Dodworth Business Park South,
Whinby Road, Dodworth,
Barnsley S75 3SP, UK
E: sales@salus-tech.com
E: techsupport@salus-tech.com
www.salus-controls.com
SALUS Controls is a member of the Computime Group.
Maintaining a policy of continuous product development SALUS Controls plc reserve the right to change
specification, design and materials of products listed in this brochure without prior notice.
Issue Date: Nov 2019
V005
 Loading...