

Salton YM7 Owner's Manual
OWNER’S MANUAL
Model No. YM7
Salton
®
YOGURT MAKER

IMPORTANT SAFEGUARDS
When using electrical appliances, basic safety precautions
should always be followed including the following:
1. Read all instructions.
2. Do not touch hot surfaces. Use handles or knobs.
3. To protect against electrical shock do not immerse cord,
plugs, or appliance in water or other liquid.
4. Close supervision is necessary when any appliance is
used by or near children.
5. Unplug from outlet when not in use and before cleaning.
Allow to cool before putting on or taking off parts.
6. Do not operate any appliance with a damaged cord or plug
or after the appliance malfunctions or has been damaged
in any manner. Contact Consumer Service for examination,
repair or adjustment.
7. The use of accessory attachments not recommended by
the appliance manufacturer may cause injuries.
8. Do not use outdoors.
9. Do not let cord hang over edge of table or counter, or
touch hot surfaces.
10. Do not place on or near a hot gas or electric burner, or in a
heated oven.
11. Extreme caution must be used when moving an appliance
containing hot oil or other hot liquids.
12. To disconnect, turn any control to OFF, then remove plug
from wall outlet.
13. Do not use appliance for other than intended use.
SAVE THESE INSTRUCTIONS
FOR HOUSEHOLD USE ONLY
2.

ADDITIONAL IMPORTANT SAFEGUARDS
CAUTION HOT SURFACES: This appliance generates heat
during use. Proper precautions must be taken to prevent the
risk of burns, fires, or other injury to persons or damage to
property.
1. A person who has not read and understood all operating
and safety instructions is not qualified to operate this
appliance. All users of this appliance must read and
understand this Owner’s Manual before operating or
cleaning this appliance.
2. If this appliance falls or accidentally becomes immersed in
water, unplug it from the wall outlet immediately. Do not
reach into the water!
3. When using this appliance, provide adequate air space
above and on all sides for air circulation. Do not operate
this appliance while it is touching or near curtains, wall
coverings, clothing, dishtowels or other flammable
materials.
4. To reduce the risk of fire, do not leave this appliance
unattended during use.
5. If this appliance begins to malfunction during use,
immediately unplug the cord. Do not use or attempt to
repair a malfunctioning appliance!
6. The cord to this appliance should only be plugged into a
120V AC electrical wall outlet.
7. Do not use this appliance in an unstable position.
3.

ELECTRIC/CORD/PLASTICIZER
INFORMATION
Polarized Plug
This appliance has a polarized plug (one blade is wider than the
other). To reduce the risk of electric shock, this plug is intended to
fit into a polarized outlet only one way. If the plug does not fit fully
in the outlet, reverse the plug. If it still does not fit, contact a
qualified electrician. Do not attempt to modify the plug in any way.
Short Power Supply Cord
A short power-supply cord is provided to reduce the risk
resulting from becoming entangled in or tripping over a longer
cord.
Do not use an extension cord with this product.
Electric Power
If the electrical circuit is overloaded with other appliances, your
appliance may not operate properly. It should be operated on a
separate electrical circuit from other appliances.
Plasticizer Warning
CAUTION: To prevent Plasticizers from migrating from the
finish of the countertop or tabletop or other furniture, place
NON-PLASTIC coasters or placemats between the appliance
and the finish of the countertop or tabletop.
Failure to do so may cause the finish to darken, permanent
blemishes may occur or stains can appear.
4.
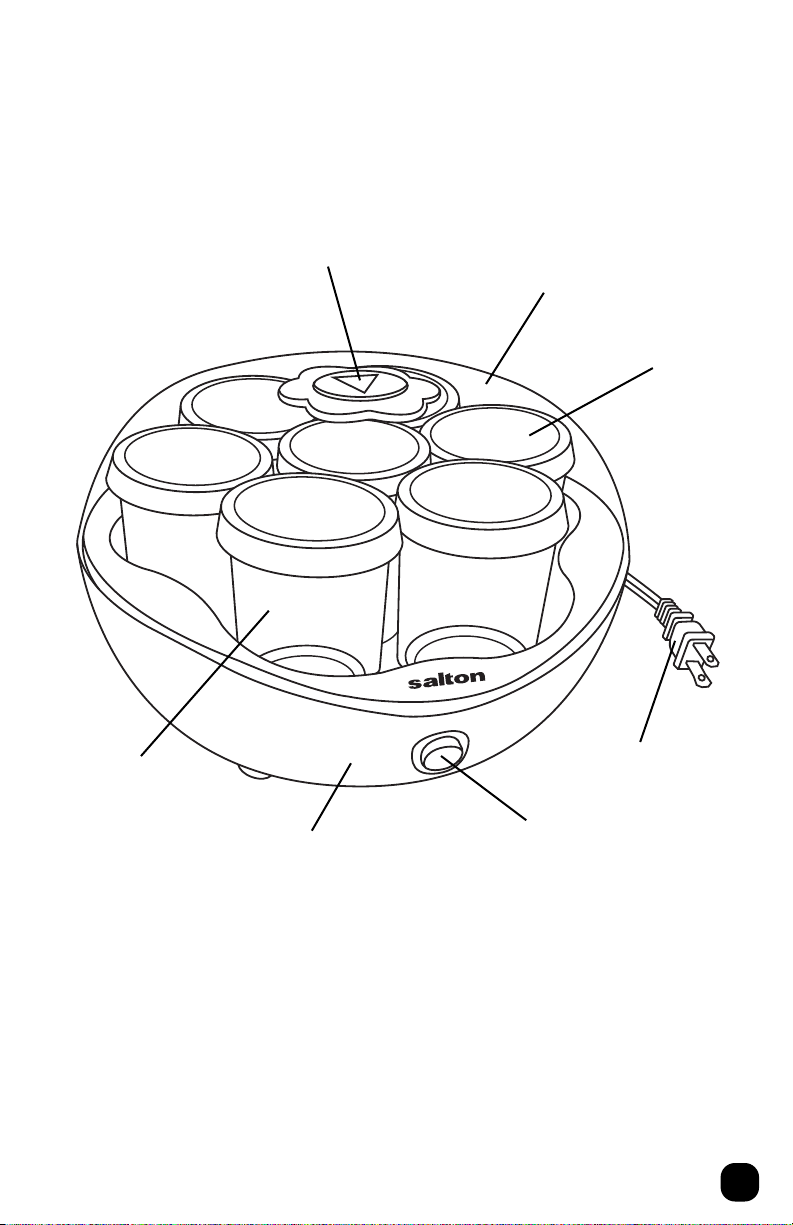
Getting To Know Your
YM7 Yogurt Maker
1
2
3
4
5
1. Manual Timer (P/N 40278)
2. Yogurt Maker Lid (P/N 40279)
3. Jar Lid (P/N 40280)
4. Yogurt Jar (P/N 40281)
5. Yogurt Maker Base
6. Power Switch
7. Power Cord
7
6
5.

Operating Instructions
Before First Use
CAUTION: To protect against electrical shock, do not immerse
the Yogurt Maker or allow AC cord to come into contact with
water or other liquids.
1. Remove all packing material from the inside and outside of
the Yogurt Maker.
2. Before preparing yogurt in your new Yogurt Maker,
thoroughly clean the Yogurt Jars, Jar Lids and Yogurt Maker
Lid in hot, sudsy water. Rinse and dry. and Yogurt Maker Lid
in hot, sudsy water. Wipe Base with a damp cloth. Do not
use metal scouring pads or abrasive cleansers.
3. Replace disassembled parts.
How To Make Yogurt
Ingredients:
4 cups (1 quart) milk (whole, 2%, 1% or skim)
1/4 to 1/2 cup instant non-fat dry milk powder
1/2 cup plain yogurt or yogurt starter
1. In a saucepan, combine milk and dry milk, heat over
medium heat, stirring frequently to just below the boiling
point. DO NOT ALLOW MILK TO BOIL. Remove milk from
the heat and allow to cool until lukewarm (between 100°F
and 110°F.) To cool the milk quickly, place the saucepan into
the refrigerator or sink of cold water, stirring occasionally to
cool evenly. This should take about 20 minutes.
Milk can also be heated in a microwave oven. In a
microwave safe container, heat milk and dry milk at full
power (high) for 8 to 10 minutes or to just below the
boiling point. DO NOT ALLOW MILK TO BOIL. Carefully
remove container from microwave and allow to cool as
directed above.
2. Add plain yogurt or yogurt starter to lukewarm milk mixture
and mix thoroughly. DO NOT BEAT OR WHIP.
6.
 Loading...