

Page 1
instructions and warranty
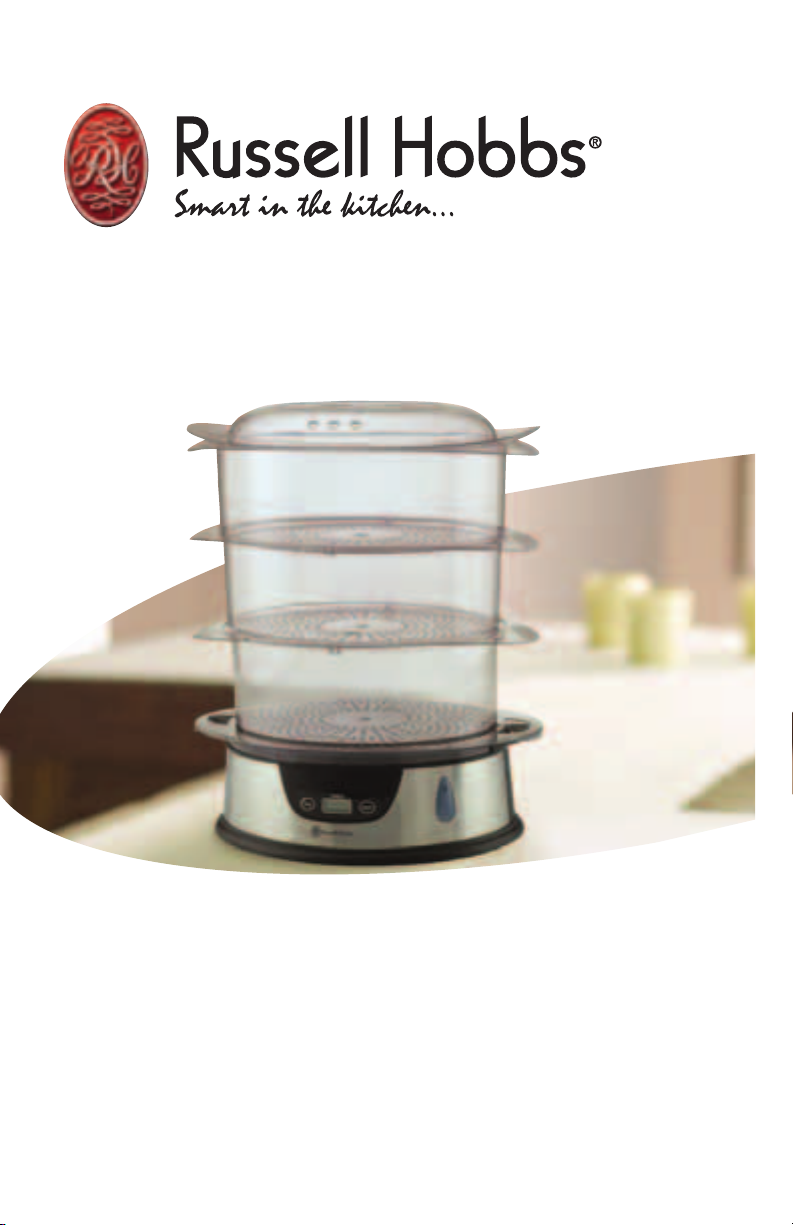
3 tier digital
stainless steel steamer
model RHST3
Page 2

1
IMPORTANT SAFEGUARDS
When using electrical appliances, basic safety precautions should
always be followed, including the following:
1. Read all instructions.
2. Do not touch hot surfaces. Use handles or knobs.
3. To protect against electrical shock, do not immerse cord, plugs
or steamer base in water or other liquid.
4. Close supervision is necessary when any appliance is used by or
near children.
5. Unplug from outlet when not in use and before cleaning. Allow
to cool before putting on or taking off parts.
6. Do not operate any appliance with a damaged cord or plug or
after the appliance malfunctions, or has been damaged in any
manner. Contact Consumer Service for examination, repair or
adjustment.
7. The use of accessory attachments not recommended by the
appliance manufacturer may cause injuries.
8. Do not use outdoors.
9. Do not let cord hang over edge of table or counter, or touch
hot surfaces.
10. Do not place on or near a hot gas or electric burner, or in a
heated oven.
11. Extreme caution must be used when moving an appliance
containing hot oil or other hot liquids.
12. To disconnect, press START/OFF button, then remove the plug
from wall outlet.
13. Do not use appliance for other than intended use.
SAVE THESE INSTRUCTIONS
This product is for household use only
Page 3

2
Additional Important Safeguards
CAUTION HOT SURFACES: This appliance generates heat and escaping
steam during use. Proper precautions must be taken to prevent
the risk of burns, fires, or other injury to persons or damage
to property.
1. A person who has not read and understood all operating and safety
instructions is not qualified to operate this appliance. All users of
this appliance must read and understand this instruction manual
before operating or cleaning this appliance.
2. If this appliance falls or accidentally becomes immersed in water,
unplug it from the wall outlet immediately. Do not reach into
the water!
3. When using this appliance, provide adequate air space above and on
all sides for air circulation. Do not operate this appliance while it is
touching or near curtains, wall coverings, clothing, dishtowels or
other flammable materials.
4. To reduce the risk of fire, do not leave this appliance unattended
during use.
5. If this appliance begins to malfunction during use, immediately
unplug the cord. Do not use or attempt to repair the malfunctioning
appliance!
6. The cord to this appliance should only be plugged into a 120V AC
electrical wall outlet.
7. Do not use this appliance in an unstable position.
8. Do not use the food steamer if the drip tray or steamer base, or if
any steamer bowl is cracked or damaged.
9. Make sure the food steamer is unplugged and the steaming water has
cooled before transporting or cleaning.
10. Never plug the food steamer in until you: snap the steam ring into
position around the heat element. Next, fill the steamer base with
water and then place the drip tray inside the steamer base.
11. To avoid burns, keep hands and face clear of the lid’s steam vents
during cooking.
WARNING: Steam is hot and can cause burns. Keep hands and face
away from vents in the lid. Use protective oven mitts to remove
steamer bowls from the base and to lift the lid. When removing
the lid after steaming, always tilt lid away from your face to avoid
burns caused from steam.
12. The steamer base and components are not for use in ovens
(microwave, convection or conventional) or on stove-top.
CAUTION: While steaming, make sure the food steamer is placed in a
secure area that will not be bumped or pushed or disturbed in any
manner.
13. Make sure the bottom (B) steamer bowl is securely sitting in position
on the steamer base. Make sure the bottom of every stacked bowl is
securely locked into the tabs and grooves along the top rim of the
steamer bowl below it, and that the food is contained and evenly
distributed within each bowl. Make sure the lid is properly affixed
before pressing the START/OFF button to begin steaming.
Page 4

3
polarized plug
This appliance has a polarized plug (one blade is wider than the
other). To reduce the risk of electric shock, this plug is intended to fit
into a polarized outlet only one way. If the plug does not fit fully in
the outlet, reverse the plug. If it still does not fit, contact a qualified
electrician. Do not attempt to modify the plug in any way.
short cord instructions
A short power-supply cord is provided to reduce the risk resulting from
becoming entangled in or tripping over a longer cord.
Do not use an extension cord with this product.
plasticizer warning
CAUTION: To prevent plasticizers from migrating from the
finish of the countertop or tabletop or other furniture, place
NON-PLASTIC coasters or placemats between the appliance
and the finish of the countertop or tabletop.
Failure to do so may cause the finish to darken, permanent blemishes
may occur or stains can appear.
electric power
If the electrical circuit is overloaded with other appliances, your
appliance may not operate properly. It should be operated on a
separate electrical circuit from other appliances.
Page 5
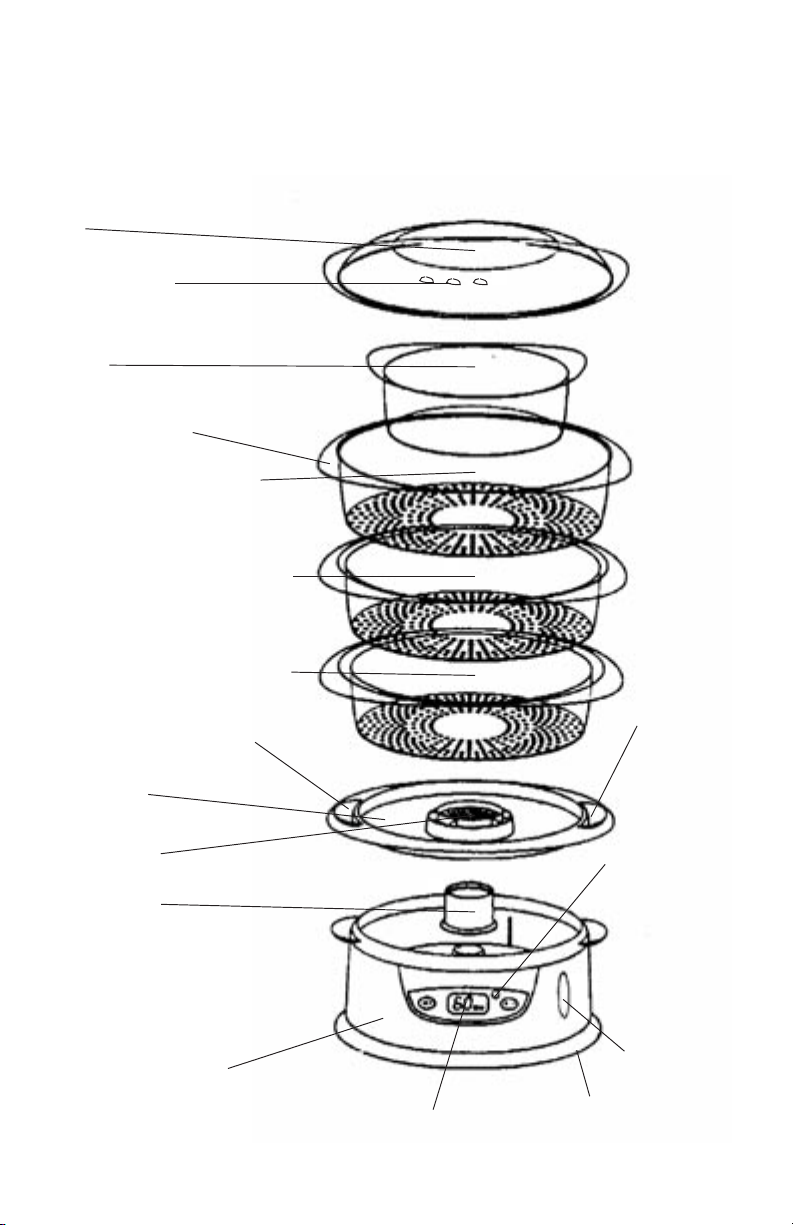
getting to know your Russell Hobbs®
3 tier digital steamer
product may vary slightly from illustrations
4
lid
(P/N 22557)
steam holes
top (T) steamer bowl
(P/N 22559)
middle (M) steamer bowl
(P/N 22560)
bottom (B) steamer bowl
(P/N 22561)
rice cooking
bowl
(P/N 22558)
steamer bowl
handle
water
fill hole
water
fill hole
drip tray
(P/N 22562)
water
level lens
cord storage
on bottom
(not shown)
indicator
light
steamer base with
heat element
control panel with
LCD digital display
steamer base
carry handle
Herbs Tray
removable
steam ring
(P/N 22563)
Page 6

5
before using for the first time
IMPORTANT: Never place lid, rice cooking bowl, steamer bowls or drip
tray on a hot stove or in a microwave.
Before using your 3 tier digital steamer for the first time, we suggest
you become familiar with all of its parts. Read all instructions and
cautions carefully.
1. Unpack your food steamer and accessories. Remove any labels from
the outer stainless steel surfaces.
2. Before steaming foods, clean lid, rice cooking bowl, steamer
bowls and drip tray in mild dishwashing detergent. Rinse thoroughly
and dry.
CAUTION: Do not immerse cord, plug, or steamer base with heat
element in water or other liquids.
3. We recommend placing a large heat-resistant tray, protective mat or
kitchen towel on your countertop to serve as a resting area to place
steamer bowls when checking cooking progress.
operating instructions
1. Make sure the steamer is unplugged.
2. Place unit on a flat sturdy surface with adequate clearance.
Keep children away from the steamer.
3. Place the steam ring around the heat element. The 3 holes in the
steam ring fit over 3 tabs on the floor of the steamer base. Press
down firmly until the steam ring snaps into position.
4. Place the drip tray onto the steamer base making sure that it fits
correctly onto the base and it is level. Both water fill holes in the
drip tray handles will fit perfectly into the steamer base handles.
With a measuring cup or any spouted vessel, fill the steamer base to
the MAX mark (5 cups) on the water level lens. Other liquids, such
as wine or broths and additional ingredients such as salt, pepper or
spices may be added to the water. When cooking is completed,
finish seasoning steamed food to taste. This amount of water/liquid
will steam for about 1 hour.
5. To enhance the flavor of steamed foods, add fresh or dried herbs,
spices or fresh ginger to the herb tray in the center of the drip tray.
NOTE: When steaming foods for longer than 1 hour, it may be
necessary to refill the steamer base during steaming. Use a
spouted vessel and add water through either water fill hole.
6. There are 3 steamer bowls. Use the markings on the steamer bowl
handles to identify the bottom (B), middle (M), and top (T) steamer
bowls and their positions. (See illustrations on next page.)
Place foods to be cooked into the various steamer bowls.
7. The bottom of every stacked bowl locks into the tabs and grooves
along the top rim of the steamer bowl below it.
Page 7
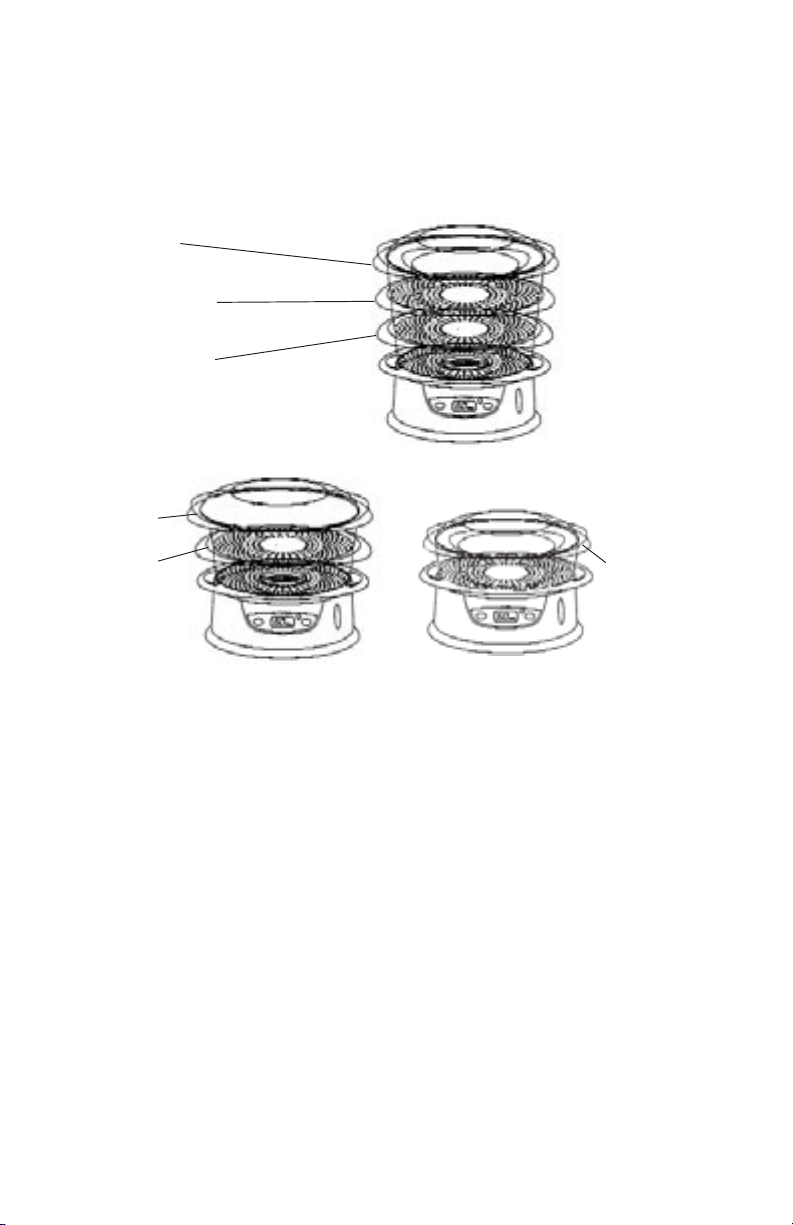
8. When using a single steamer bowl, use only the bottom (B) bowl.
When using 2 tiers (dual steamer bowls), use the bottom (B) bowl
and rest the middle (M) bowl with lid on top.
NOTE: It is important that food is contained and evenly distributed
within each bowl.
CAUTION: Make sure the bottom steamer bowl is securely sitting in
position on the steamer base. Make sure the bottom of every
stacked bowl is securely sitting inside the rim of the steamer
bowl below it, and that the food is evenly distributed within
each bowl.
CAUTION: While steaming, make sure the food steamer is placed in
a secure area that will not be bumped or pushed or disturbed in
any manner or where steam could damage upper cabinets,
curtains, etc.
CAUTION: ALWAYS REPLACE THE BOTTOM STEAMER BASKET ONTO
THE STEAMER BASE.
6
middle (M)
bottom (B)
steamer bowls
2 tiers 1 tier
w/ rice cooking bowl
3 tiers
operating instructions (continued)
top (T)
middle (M)
bottom (B)
steamer bowls
bottom
(B)
steamer
bowl
Page 8

9. Place the denser foods that need to cook the most in the bottom
steamer bowl, closest to the steam. To ensure all pieces in the
steamer bowl will be cooked within the same time frame, cut food
in each bowl to a uniform size and distribute food evenly
throughout the bowl.
10. When cooking in multiple steamer bowls with foods requiring
various steaming times, place the food to be finished first in the
top steamer bowl.
11. When the steamer and steamer bowls and lid are properly set up,
plug the unit into a 120V AC electric outlet. The indicator light
will illuminate and “00 MIN” will appear on the LCD display.
12. Press the TIME button. A signal will sound and “05 MIN” will appear
on the LCD display.
13. Press the TIME Button again; a signal will sound and “10 MIN” is
displayed. Each time the button is pressed, a signal will sound and
the time will advance in increments of 5 minutes to a maximum
preset time of 60 minutes.
(Hint: Hold down the button to fast
advance.)
14. When cooking with multiple steamer bowls, set the timer to the
shortest steaming time. When the first steaming time is reached,
the indicator light will turn off and the steamer will beep as an
alert. The beeping will continue until either the START/OFF button
is pushed or the cord is removed from the outlet. Press the
START/OFF button to stop steaming. Use protective oven mitts to
remove the lid. Check the top (T) bowl food for desired doneness.
If the top (T) bowl’s food is finished cooking, remove it and
replace the lid onto the middle steamer bowl.
15. Press the TIME button to reset the timer to the desired cooking
time (in 5 minute increments). Press the START/OFF button to
begin steaming. The indicator light will illuminate. The time on
the control panel will count down until it reaches 00:00. The
steamer will turn itself off. The indicator light will turn off and
the steamer will beep as an alert. The beeping will continue until
either the START/OFF button is pushed or the cord is removed
from the outlet. Press the START/OFF button to stop the beeping.
operating instructions (continued)
0000
MM II NN
TIMER
START/
OFF
TIME
Page 9

8
WARNING: Steam is hot and can cause burns. Keep hands and face
away from vents in the lid. Use protective oven mitts to remove
steamer bowls from the base and to lift the lid. When removing
the lid after steaming, always tilt lid away from your face to
avoid burns caused from steam.
16. To check the food in the bottom (B) steamer bowl, remove the
middle (M) bowl and lid and place onto a large heat-resistant tray,
protective mat or place onto a kitchen towel spread out over your
countertop. If it still requires more steaming time, replace the
middle steamer bowl on top of the bottom (B) steamer bowl. Make
sure the bowls are securely in position over the steamer base.
Replace the lid.
17. Press the TIME Button and reset the timer for the desired cooking
time of the remaining food. Press the START/OFF button and
continue steaming until all food is cooked to your satisfaction.
18. If, after checking, you are ready to serve the food, press the
START/OFF button to turn the unit OFF. The indicator light will turn
off. Unplug the food steamer from the outlet.
CAUTION: NEVER PLACE EITHER THE middle steamer bowl or the top
steamer bowl directly onto the steamer base.
suggestion: Place an outstretched kitchen towel, large heat-resistant
tray, or protective mat onto the counter next to the food steamer.
This will become a useful surface to place steamer bowls when
checking for doneness or removing bowls from the stack.
to refill the steamer base with water during steaming
1. When steaming foods for long periods of time, (more than
approximately 1 hour) it will be necessary to replenish the water in
the steamer base.
WARNING: When cooking foods for more than 1 hour, check the water
level lens. Since the food steamer cannot operate properly when
the water level is too low, you must refill when water reaches
below the MINIMUM marking.
2. Use a spouted vessel and add water through either water fill hole
to refill the steamer base during steaming . Make sure that the
water reaches the MAX line. Add more water as necessary.
3. NOTE: When steaming for extended periods of time, it may be
necessary to remove water from the drip tray. Using protective
oven mitts, remove bowl(s) and lid. Using a heat-resistant long
handled ladle or spoon, remove the majority of the water from the
drip tray, making sure that the water level always remains close to
the MAX line. Replace the bowl(s) with lid and continue cooking.
operating instructions (continued)
Page 10

9
using the rice cooking bowl to steam rice
Use the rice cooking bowl to prepare light and fluffy rice: cook brown
or white rice, and even wild rice.
1. Add the rice and water amounts listed on the rice steaming chart
to the rice bowl. The amount of water will be less than listed on
the rice package because the steamer will retain moisture.
2. Place the rice cooking bowl into the bottom steamer bowl. Add NO
MORE THAN 1 cup of rice plus the amount of water and other
ingredients suggested on the rice steaming chart. The amount of
water will vary depending on the type of rice or grain.
3. Place the steamer bowl securely onto the steamer base for
cooking, then add the lid.
4. Press the TIME button to set the timer to steam rice for the
amount of time suggested on the rice steaming chart below. Press
the START/OFF button. The indicator light will illuminate and the
unit will begin steaming.
5. Note that if the cooking time is longer than 1 hour, it will be
necessary to replenish the water in the steamer base. Consult the
operating instructions for detailed refilling procedures.
6. When the steaming time is reached, the steamer will turn itself
off. The indicator light will turn off and the steamer will beep as
an alert. The beeping will continue until either the START/OFF
button is pushed or the cord is removed from the outlet. Press the
START/OFF button to stop the beeping.
7. Use protective oven mitts to remove the lid. Always tilt lid away
from your face when removing.
If excess liquid remains in the
rice cooking bowl after rice is done, then use a spoon or ladle to
remove the excess water, a little at a time. Replace the lid and
press the TIME button and set timer to allow the steamer to
continue to cook for an additional 5 minutes. Press the START/OFF
button. The indicator light will illuminate and the unit will begin
steaming. Take care not to let the steamer base or the grains boil
dry.
Page 11

10
hints for steaming rice
1. There are many types of rice. Follow specific directions for the
variety used.
2. For softer rice, increase the amount of water indicated in the
chart by 1 to 2 tablespoons. For firmer rice, decrease the amount
of water added to the rice cooking bowl by 1 to 2 tablespoons.
3. At the end of the suggested cooking time specified on the chart,
use protective oven mitts to remove the lid. Always tilt lid away
from your face when removing to avoid burns. Be careful not to
allow condensed water to spill into the rice cooking bowl since this
would reduce the quality and flavor of the steamed rice. Stir the
rice in the rice cooking bowl and check its doneness and
consistency.
4. Rice may be seasoned with salt, pepper, or butter after steaming.
rice steaming chart
type of rice amount amount suggested
grain of raw rice of cold water cooking time*
White rice, short, regular, 1 cup 1-1/4 cups 35 to 45 min.
Long, or extra long
Brown rice, regular, 1 cup 1-1/4 cup 50 to 60 min.
Long, or short grain
Long grain & wild rice 1 cup 1-2/3 cups 55 to 60 min.
Rice mix (1 package) 5 to 7 oz. 1-2/3 cups 45 to 50 min.
*approximate times are offered as guidelines only. Cooking times may vary.
NOTE: Do not remove lid until ready to serve.
Page 12

11
hints for best results
1. When placing food into the steamer bowls, make certain not to
block all of the steam holes. This is especially important when
cooking with multiple steamer bowls. There must be adequate air
circulation around the food to ensure even steaming on all levels.
WARNING: DO NOT OVERFILL STEAMING BASKETS AS THIS WILL
IMPAIR THE STEAMING ABILITY OF THE APPLIANCE. ONLY FILL
BASKETS APPROXIMATELY HALF FULL WITH FOOD.
NOTE: When steaming large quantities of food, it may become
necessary to rearrange the food. Use protective oven mitts to
remove the lid. Always tilt lid away from your face when
removing to avoid burns caused from steam. Gently move food;
then replace lid immediately when finished.
2. Experiment with various vegetables and combinations. Using the
recipes and the Cooking Guide supplied in this booklet, you may
experiment and adjust your cooking times to your personal taste.
3. When steaming foods for long periods of time (more than
1 hour) use a cup with a spout filled with water to refill food
steamer when necessary. Consult the operating instructions for
detailed refilling procedures.
steaming fresh vegetables
1. Clean vegetables thoroughly. Cut off stems; peel or chop if
necessary. Smaller pieces steam faster than larger ones.
2. Quantity, quality, freshness and size/uniformity may affect
steaming times. Adjust steaming time as desired.
WARNING: When cooking foods for more than 1 hour, check the
water level lens. At the MAX water level, the steamer will
operate for approximately 60 minutes. At the MIN water level,
the steamer will run approximately 15 minutes. You must refill
when water reaches the MINIMUM marking. Follow the waterfilling instructions previously described in this instruction
manual.
Page 13

12
user maintenance instructions
WARNING: TO REDUCE THE RISK OF FIRE OR ELECTRIC SHOCK, DO NOT
REMOVE THE BOTTOM COVER. NO USER-SERVICEABLE PARTS
ARE INSIDE. REPAIR SHOULD BE DONE BY AUTHORIZED
SERVICE PERSONNEL ONLY.
descaling
We recommend that you descale your 3 tier steamer after every
7 to 10 uses because mineral deposits can form a coating on the steam
ring, drip tray, heat element, and in the steamer base, causing longer
steaming times and possibly an off flavor in the foods.
1. Fill the steamer base using equal parts of water and vinegar: approximately 2 cups water + 2 cups vinegar. Make sure the steam ring is in
place. Add the drip tray.
2. Follow steaming instructions except do not add steamer bowls or lid.
3. Set the timer for 20 to 25 minutes. Unplug steamer when timer
sounds. Wait until the steamer and vinegar solution has cooled down
before attempting to empty the drip tray and steamer base.
4. Rinse steamer base, steam ring and drip tray several times with
fresh, cold water. Hand wash thoroughly to remove all traces
of the vinegar.
5. Wipe exterior with a damp cloth.
Page 14

13
care and cleaning
CAUTION: Unplug and allow steamer and water to cool completely
before emptying water from the drip tray and steamer base and
before cleaning.
IMPORTANT: Always empty the steamer base and drip tray and
clean the steam ring after each use. Fill with clean water
before each use.
1. Press the START/OFF button to turn the steamer OFF. The indicator
light will turn OFF.
2. Unplug and allow steamer, steam ring, drip tray and water to cool
completely before cleaning.
3. Use the 2 handles on the drip tray to carefully lift the drip tray
out of the steamer base. Raise it up high enough to clear the heat
element under the drip tray.
4. Remove the steam ring to clean.
5. The steamer lid, steamer bowls, drip tray and steam ring are top
rack dishwasher safe or they can be washed by hand in warm,
soapy water. Rinse thoroughly. Dry the steamer base and all
accessories after each cleaning.
6. Clean the stainless steel outside of the steamer with a soft,
damp cloth.
CAUTION: DO NOT IMMERSE CORD, PLUG OR STEAMER UNIT IN
WATER OR OTHER LIQUID.
to store
Unplug the 3 tier steamer from the wall outlet and clean all parts.
Be sure all parts are dry before storing. The 3 steamer bowls, in
position, and the rice cooking bowl, nest themselves inside each other
for easy storage.
Store appliance in its box or in a clean, dry place. Never store it while
it is hot, wet or still plugged in. Use the cord storage area located on
the bottom of the unit. Never wrap power cord around the appliance.
Page 15

14
fresh vegetable steaming chart
The times in the steaming chart are approximate. Set the timer
and check for doneness at the suggested cooking time; continue
cooking if necessary. The size and shape of the food, as well as
personal taste, may call for adjustments. If you want softer
vegetables, add more water if necessary, and steam for additional
time. Do not allow the water in the steamer base to boil dry.
NOTE: Foods that steam in the top (T) or middle (M) bowl(s) may
require additional cooking time.
vegetable amount suggested
(approximate) cooking time*
Artichoke, whole 3 medium, tops trimmed 50 to 55 min.
Asparagus, spears 1 lb. 20 to 25 min.
Beans, green/wax,
cut or whole 1 lb. 45 to 55 min.
Broccoli, spears 1/2 to 1 lb. 35 to 45 min.
florets 1/2 to 1 lb. 20 to 25 min.
Brussels sprouts 1 lb. 25 to 30 min.
Cabbage, 1/8 wedges 1 head 45 to 50 min.
Carrots, 2-inch chunks 1 lb. 25 to 30 min.
Cauliflower 1 medium head chunked 35 to 40 min.
florets 1/2 to 1 lb. 35 to 40 min.
Corn on the cob 3 small 35 to 45 min.
Mushrooms, whole 1 lb. 10 to 15 min.
Parsnips, whole 1 lb. 40 to 50 min.
Potatoes, new, Whole 2 lb. 45 to 55 min.
Rutabaga, quartered 1 lb. 55 to 65 min.
Spinach 12 oz. 10 to 15 min.
Summer squash:
Yellow and Zucchini,
1/2-inch slices 1 lb. 10 to 15 min.
Turnips, halved 1 lb. 45 to 60 min.
Winter squash, cut in half,
or to fit in bowl, skin up 1 squash 30 to 50 min.
*Approximate times are offered as guidelines only. Cooking times may vary.
Page 16

15
steaming fish, poultry & pre-cooked meats
1. The steaming times listed in the chart are for fresh or frozen (fully
thawed) fish or shellfish. Before steaming, clean and prepare fresh
seafood.
2. Use lettuce leaves under fish fillets and fish steaks to catch some
of the juice and to make removing the fish easier.
3. Clams, oysters and mussels may open at different times. Check the
shells to avoid over-cooking.
4. Marinate fish to impart flavors before cooking. Serve steamed
seafood plain or use seasoned butter or margarine, lemon or add
your favorite sauces after steaming.
5. Adjust steaming times accordingly to suit your personal taste.
NOTE: Foods that steam in the top (T) or middle (M) bowl(s) may
require additional cooking time.
fish steaming chart
fish / shellfish weight or suggested
nu. of pieces (approximate) cooking time)*
Clams in shell
littlenecks 6 15 to 20 min.
cherrystones 4 20 to 25 min.
Crab, pre-cooked king crab, legs/claws 6 20 to 25 min.
Lobster tails 2 20 to 30 min.
Oysters in shell 6 20 to 25 min.
Scallops
bay (shucked) 12 15 to 20 min.
sea (shucked) 12 15 to 20 min.
Shrimp, medium, in shell 12 5 to 10 min.
Fish
whole trout 2 small 15 to 20 min.
fillets 3 15 to 22 min.
steaks 2 20 to 25 min.
*Approximate times are offered as guidelines only. Cooking times may vary.
pre-cooked meat & poultry steaming chart
meat/poultry weight or suggested
number of pieces cooking time*
Chicken breasts, boneless, skinless to fit in bowl 30 to 40 min.
Hot dogs 1 package 15 to 20 min.
Pre-cooked sausage 1 lb. 15 to 20 min.
*Approximate times are offered as guidelines only. Cooking times may vary.
Page 17

16
boiled egg steaming chart
boiled eggs number of suggested
in shell large eggs cooking time
Soft boiled 1 to 6 10 min.
Medium boiled 1 to 6 15 min.
Hard boiled 1 to 6 20 min.
boiled eggs, in cup
1. Place 1 raw egg into each custard cup coated with butter.
Season with salt and pepper, if desired. Place custard cup(s)
into bottom steamer bowl.
2. Cover with lid.
boiled eggs number of suggested
in cup large eggs cooking time
Soft boiled 1 to 4 custard cups 10 to 15 min.
Hard boiled 1 to 4 custard cups 15 to 20 min.
scrambled eggs
1. In a small bowl, beat 6 eggs together. Add 2 tablespoons milk
and seasonings.
2. Coat rice cooking bowl with butter. Add egg mixture.
3. Stir eggs about halfway through cooking, when the eggs start to
set around the edge.
scrambled eggs number of suggested
large eggs cooking time
Scrambled 6 20 to 25 min.
Page 18

17
Recipes
delicious classic egg salad with dill
Makes about 2-1/2 cups, enough for 4 sandwiches
6 large hard-boiled eggs, peeled and diced into 3/8” cubes
1/4 cup mayonnaise
2 tablespoons minced red onion
3 tablespoons chopped fresh dill
1 medium celery stalk, chopped finely
3 to 6 Claussen® dill hamburger sliced pickles, chopped
1 tablespoon ground mustard
1 garlic clove, minced
1/2 teaspoon salt
red pepper flakes to taste
1. Allow eggs to cool, then peel off the shells.
2. Combine all ingredients in large mixing bowl. Add additional
seasonings after tasting.
Page 19

18
3 tier meal:
Asian glazed salmon with
steamed asparagus and pea pods
2 (4-oz.) salmon fillets, skin removed
1/4 cup sesame oil
1/4 cup soy sauce
1/4 cup brown sugar
1/4 cup chopped green onions
1 tablespoon grated ginger
1 garlic clove, minced
2 large lettuce leaves
1 lb. asparagus spears (very thin)
1 lb. snow peas
Fresh cut ginger for herb tray
1. Combine the sesame oil, soy sauce, brown sugar, green onions,
ginger and garlic together in a locking plastic bag. Place the
salmon into the marinade and refrigerate at least 30 minutes.
2. Place fresh ginger into the herb tray.
3. Place the lettuce leaves in the bottom (B) bowl and lay the salmon
fillets on top of the lettuce leaves. Set securely in place on the
base.
4 Place the asparagus in the middle (M) bowl and place securely on
top of the bottom (B) bowl.
5. Place the snow peas in the top (T) bowl and place securely on top
of the middle (M) bowl.
6. Set the timer for 15 to 20 minutes. Check all foods for doneness.
Continue cooking if necessary.
Arrange salmon on a platter with vegetables, garnish with additional
fresh chopped green onions, sprinkle with sesame seeds and serve.
NOTE: Use very thin-stalked asparagus if possible. If asparagus are
thick, peel woody outside (with potato peeler) first.
Snow Peas
Asparagus
Salmon
Page 20

19
3 tier meal:
smoked turkey sausage with cabbage,
onions and peppers
1 (14 to 16 oz.) package smoked turkey sausage,
cut into 6 pieces
1/2 head cabbage, cut into 1-inch chunks
1 onion, cut into 1-inch chunks
1 green pepper, cut into 1-inch chunks
1 red pepper, cut into 1-inch chunks
1. Separate cabbage leaves and place into the bottom (B) bowl.
Set securely in place on the base and add the lid. Set the timer
for 10 minutes.
2. While the cabbage is cooking, place the onions and peppers in
the middle (M) bowl. When timer sounds, remove lid, hold
onto the bowl handle and stir cabbage. Then set the middle
(M) bowl securely in place on top of the bottom (B) bowl and
add the lid. Set the timer for another 10 minutes.
3. Cut the sausage and place into the top (T) bowl. When the
timer sounds, remove the lid, hold onto the bowl handle and
stir the onions and peppers. Then set the top (T) bowl firmly
on top of the middle (M) bowl, and add the lid. Set the timer
for 20 minutes.
4. Check to make sure sausages are heated through. Continue
cooking if necessary.
Sausages
Onions and Peppers
Cabbage
Page 21

20
3 tier meal:
sweet & dour chicken breast dinner
2 chicken breasts, boneless and skinless
Lawrey’s® Seasoning Salt
1 cup long grain white rice
1-1/4 cups water
1/2 medium onion, thinly sliced
1/2 green pepper, sliced
4 oz. mushrooms, sliced
1 can water chestnuts, drained
1/2 cup fresh bean sprouts (or 5 oz. canned bean sprouts, drained)
1 cup candied dried pineapple
sweet & sour sauce
1 cup chili sauce
1/2 cup grape jelly
1. Season chicken breasts with seasoning salt and add to bottom (B)
bowl. Set securely in place on the base.
2. Place the rice and water into the rice cooking bowl. Place the
middle (M) bowl securely on top of the bottom (B) bowl and add
the rice cooking bowl.
3. Place onion, green pepper, mushrooms, water chestnuts, bean
sprouts, and dried pineapple in the top (T) bowl. Set the top (T)
bowl securely on top of the middle (M) bowl and add the Lid.
4. Set the timer for 45 minutes. Check foods for doneness. Continue
cooking if necessary.
5. Combine the chili sauce and grape jelly. Heat in the microwave
until hot. Mix thoroughly.
6. Arrange rice on a platter. Add chicken breasts and vegetables. Pour
hot sweet/sour sauce over the top to serve. Sprinkle 3 tablespoons
sesame seeds over top, if desired.
Veggies & Pineapple
Rice Cooking Bowl
Chicken
Page 22

LIMITED ONE YEAR PRODUCT WARRANTY
Warranty: This Russell Hobbs®product is warranted to be free from defects in materials and
workmanship for a period of one (1) year from the original purchase date. This product
warranty covers only the original consumer purchaser of the product.
Warranty Coverage: This warranty is void if the product has been damaged by accident in
shipment, unreasonable use, misuse, neglect, improper service, commercial use, repairs by
unauthorized personnel, normal wear and tear, improper assembly, installation or maintenance
abuse or other causes not arising out of defects in materials or workmanship. This warranty is
effective only if the product is purchased and operated in Canada, and does not extend to any
units which have been used in violation of written instructions furnished with the product or to
units which have been altered or modified or to damage to products or parts thereof which
have had the serial number removed, altered, defaced or rendered illegible.
Implied Warranties: ANY WARRANTIES IMPLIED WHICH THE PURCHASER MAY HAVE ARE
LIMITED IN DURATION TO ONE (1) YEAR FROM THE DATE OF PURCHASE. Some states and
provinces do not allow limitations on how long an implied warranty lasts, so the above
limitation may not apply to you.
Warranty Performance: During the above one-year warranty period, a product with a
defect will be either repaired or replaced with a comparable model (at the store’s option)
when the product is returned to the place of purchase. The repaired or replacement product
will be in warranty for the balance of the one-year warranty period and an additional onemonth period. No charge will be made for such repair or replacement within the warranty
period.
Important Notice: If any parts are missing or defective, return this product to the place of
purchase.
For Out of Warranty Service and any other questions or comments please direct them to the
Consumer Relations Department. Please write to, call or email:
Consumer Relations Dept.
P. O. Box 6916
Columbia, MO 65205-6916
USA
1(800) 233-9054
Email: salton@saltonusa.com
www.esalton.com
Limitation of Remedies:
No representative or person is authorized to assume for us any
other liability in connection with the sale of our products. There shall be no claims for defects
or failure of performance or product failure under any theory of tort, contract or commercial
law including, but not limited to negligence, gross negligence, strict liability, breach of
warranty, and breach of contract. Repair, replacement or refund shall be the sole remedy of
the purchaser under this warranty, and
in no event shall Russell Hobbs®be liable for
any incidental or consequential damages, losses or expenses.
Some states and
provinces do not allow the exclusion or limitation of incidental or consequential damages, so
the above limitation or exclusion may not apply to you.
Legal Rights: This warranty gives you specific legal rights, and you may also have other
rights which vary from state to state/province.
©2004 Salton, Inc. All rights reserved. P/N 61522
Made in China 5/04
 Loading...