

Page 1

4-Slice Belgian
®
Waffle Maker
OWNER’S MANUAL & RECIPE GUIDE
Model RHBW4 and RHBW4CAN
Page 2

IMPORTANT SAFEGUARDS
When using electrical appliances, basic safety precautions should
always be followed including the following:
1. Read all instructions.
2. Do not touch hot surfaces. Use handles or knobs. Use oven
mitts or potholders.
3. To protect against electrical shock, do not immerse cord, plugs
or the appliance in water or other liquid.
4. Close supervision is necessary when any appliance is used by
or near children.
5. Unplug from outlet when not in use and before cleaning. Allow
to cool before putting on or taking off parts, and before cleaning the appliance.
6. Do not operate any appliance with a damaged cord or plug or
after the appliance malfunctions, or has been damaged in any
manner. Contact Consumer Service for examination, repair or
adjustment.
7. The use of accessory attachments not recommended by the
appliance manufacturer may cause injuries.
8. Do not use outdoors.
9. Do not let cord hang over edge of table or counter, or touch
hot surfaces.
10. Do not place on or near a hot gas or electric burner, or in a
heated oven.
11. Extreme caution must be used when moving an appliance containing hot oil or other hot liquids.
12. To disconnect, turn any control to "OFF", then remove plug
from wall outlet.
13. Do not use appliance for other than intended use.
SAVE THESE INSTRUCTIONS
FOR HOUSEHOLD USE ONLY
2
Page 3

Additional Important
Safeguards
CAUTION HOT SURFACES: This appliance generates heat
and escaping steam during use. Proper precautions must be
taken to prevent the risk of burns, fires or other damage to
persons or property.
CAUTION: This appliance is hot during operation and
retains heat for some time after turning off. Always use oven
mitts when handling hot materials and allow metal parts to
cool before cleaning. Do not place anything on top of the
appliance while it is operating or while it is hot.
1. All users of this appliance must read and understand this
Owner’s Manual before operating or cleaning this appliance.
2. The cord to this appliance should be plugged into a 120V AC
electrical outlet only.
3. If this appliance begins to malfunction during use, immediately
unplug the cord. Do not use or attempt to repair the malfunctioning appliance.
4. Do not leave this appliance unattended during use.
3
Page 4

Polarized Plug
RHBW4
This appliance has a polarized plug (one blade is wider than the other). As
a safety feature to reduce the risk of electrical shock, this plug is intended
to fit in a polarized outlet only one way. If the plug does not fit fully into the
outlet, reverse the plug. If it still does not fit, contact a qualified electrician.
Do not attempt to defeat this safety feature.
3-Prong Plug
RHBW4CAN
This appliance is equipped with a grounded-type 3-wire cord (3-prong
plug). This plug will only fit into an electrical outlet made for a 3-prong
plug. This is a safety feature. If the plug should fail to fit the outlet, contact
an electrician to replace the obsolete outlet. Do not attempt to defeat this
safety feature.
Short Cord Instructions
RHBW4/RHBW4CAN
A short power-supply cord is provided to reduce the risk resulting from
becoming entangled in or tripping over a longer cord. The use of an
extension cord is not recommended.
Electric Power
If the electric circuit is overloaded with other appliances, your appliance
will not operate. It should be operated on a separate electrical circuit from
other appliances.
Plasticizer Warning
CAUTION: To prevent Plasticizers to migrate from the finish of the
counter top or table top or other furniture, place NON-PLASTIC coasters
or place-mats between the appliance and the finish of the counter top or
table top.
Failure to do so may cause the finish to darken, permanent blemishes may occur or stains can appear.
4
Page 5

Introduction
Congratulations on your purchase of the Russell Hobbs
RHBW4/RHBW4CAN Waffle Maker. This Waffle Maker, with its
classic looks and styling, represents a significant step up in design,
featuring push button programming, a sleek brushed diecast exterior and a non-stick baking surface. A blend of advanced performance with stylistic appeal that will prepare perfectly baked waffles
- made to your particular taste. Push button programming means
each and every waffle will be baked to perfection - no guess work
involved. The non-stick baking surface makes clean-up a snap.
®
Before Using for the First Time
1. Carefully unpack the Waffle Maker.
2. Make sure the unit is unplugged and then wipe all surfaces with
a slightly damp, soft cloth and dry thoroughly. Never immerse
the Waffle Maker in water or any other liquid. Do not use steel
wool, scouring pads or abrasive cleansers as they will damage
the finish.
3. To burn off residue on the cooking plates, it will be necessary to
operate the unit for a few minutes before initial use. You will
notice smoke and a slight odor while the residue burns off.
4. Allow the waffle maker to operate until smoke and odor disap-
pear. Then, unplug waffle maker and allow it to cool. Be care-
ful, the Cooking Plates will be hot!
Note: Some odor may still be detected during initial use. This is
normal and should disappear after one or two uses.
5
Page 6
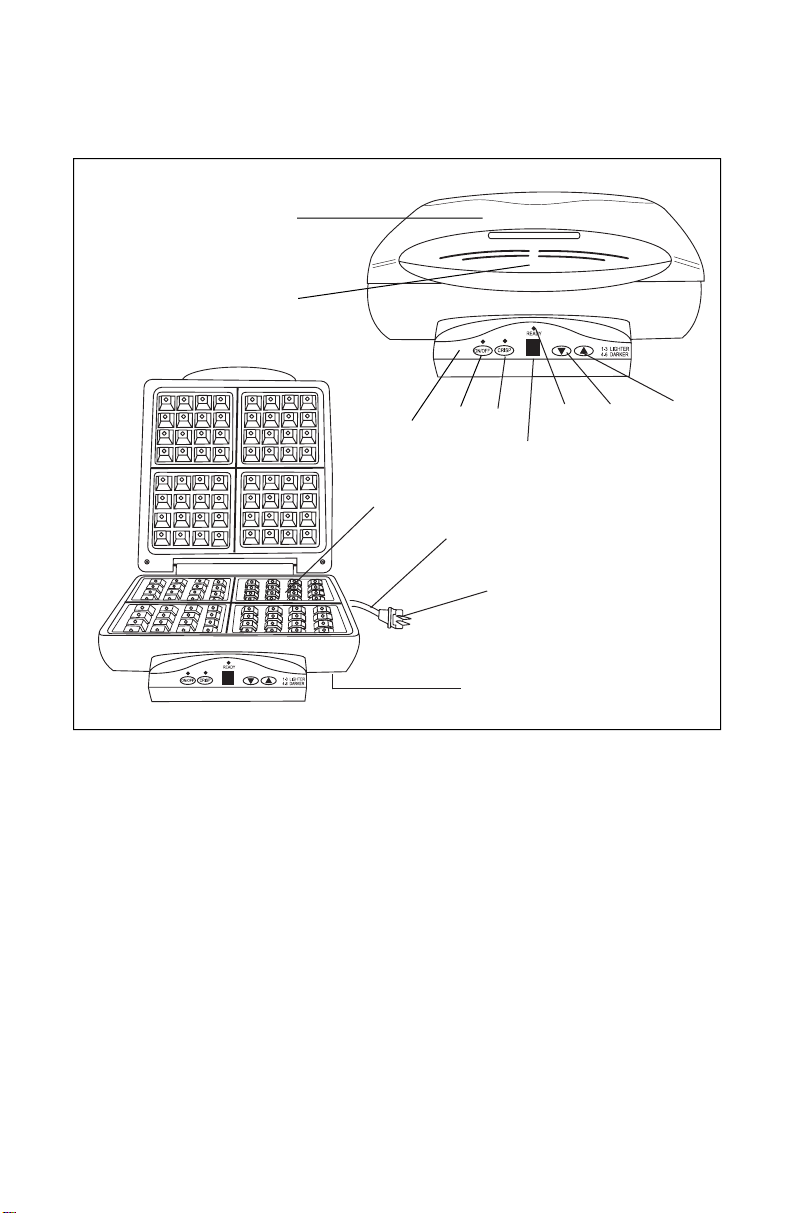
Russell Hobbs®RHBW4/RHBW4CAN
Waffle Maker Features
1
2
1. Brushed Diecast Exterior -
Attractive and easy to clean.
2. Rubberized Handle
3. Control Panel
4. "ON/OFF" Button
5. "CRISP" Button - Select for
crisp exterior and moist interior
waffles.
6. LED Display -
7. Ready Light - The green ready
light will illuminate when the unit
has reached the proper operating temperature.
4
3
10
8. Down Color Control Arrow -
9. Up Color Control Arrow -
10. Cooking Plates - Extra large to
11. Cord
12. Polarized Plug - RHBW4
13. Cord Storage Wrap - Cord
5
6
11
12
13
Press this button to go to a
lighter waffle setting.
Press this button to go to a
darker waffle setting.
make 4-4 ¹⁄₂" waffles at a time.
3 Prong Plug - RHBW4CAN
wraps around storage compartment on bottom of Waffle
Maker.
8
7
9
6
Page 7

Instructions for Use
CAUTION: This appliance generates heat and steam during
operation and retains heat for some time after turning off.
Always use oven mitts when handling hot materials and
allow metal parts to cool before cleaning. Do not place anything on top of the Waffle Maker while it is operating or
while it is hot.
To bake waffles with the RHBW4/RHBW4CAN Waffle Maker, follow
the steps below:
1. Make sure the Cooking Plates are clean, dry and free from
dust. If necessary, wipe with a damp cloth and dry thoroughly.
2. Set the Waffle Maker on a dry, clean and flat countertop sur-
face.
3. Raise the lid. When using the Waffle Maker for the first time,
brush the cooking plates with oil, butter, or margarine. This will
help to protect and condition the non-stick cooking surfaces.
Do not use spray-on oils, grease, or shortening as these can
cause build up on the cooking plates.
4Close the lid and plug the Waffle Maker into a 120V AC wall
outlet. A green bar will illuminate in the LED display. This is an
indication that the appliance is receiving power and ready for
programming.
5. Press the "ON/OFF" button. A red light above the button will
illuminate and the LED display will show number "3" - the
default setting of the Waffle Maker.
6. For first time use, we recommend baking on the number three
setting. This setting will produce lightly browned waffles and
allow you to decide the proper setting for future use. Pressing
the UP or DOWN arrows will change the cooking level. The
higher the number the darker the waffle.
7. While the appliance is preheating, prepare your favorite recipe.
Preheating takes approximately 5-8 minutes, depending upon
the selected cooking level. When the proper temperature has
been reached the appliance will beep 4 times and the green
ready light above the LED display will illuminate. This indicates
that the Waffle Maker is preheated and ready to begin baking.
8. NOTE: During this initial preheat period, any residue on the
cooking plates will burn off. You may notice smoke and a slight
odor. This is normal and should disappear after the first or second time you use the Waffle Maker.
7
Page 8

Instructions for Use (Cont.)
9. Your Waffle Maker has a CRISP selector button that will bake
waffles with a crisp exterior and a moist interior. To select this
setting, simply press the CRISP button. A yellow light above the
button will illuminate. The Waffle Maker will beep 4 times when
the crisp temperature has been reached.
10. To deselect "CRISP", press the CRISP button again. The yellow
indicator light will go out and the Waffle Maker will beep 4 times
when it reaches the number "3" default setting.
11. Open the Waffle Maker and pour batter evenly to cover the bot-
tom Cooking Plate. Be careful not to pour too much batter, as
excess batter will seep out of Cooking Plates. The green Ready
Light will go out.
12. Carefully close the waffle maker. Do not force shut. Steam will
be released between the Cooking Plates. DO NOT let hands
come into contact with the steam.
13. Allow waffles to bake completely. Waffles are done when the
unit beeps 4 times and the green Ready Light illuminates. Avoid
opening the waffle maker before the unit beeps, since doing so
may cause waffles to stick, split or bake poorly.
14. When the waffles are cooked, remove them by using a plastic
or wooden spatula. Do not use metal tongs or knives, as these
may damage the non-stick coating.
15. Keep the lid closed to preserve the heat until ready for the next
batch of waffles.
16. After you are finished using the Waffle Maker, press the
"ON/OFF" button and unplug it from the electrical outlet.
17. If waffles are not to be consumed immediately, place the waf-
fles on a paper napkin to absorb moisture. To keep hot, place
on a rack in an ovenproof dish and warm in the oven at about
200˚ - 250˚ F. Waffles will keep for about 20 minutes and then
begin to dry out.
8
Page 9

Helpful Hints and Tips
•Sift all dry ingredients.
• Egg yolks should be separated from egg whites before mixing.
•Beating egg whites separately, and then folding into batter, will
create lighter and crispier waffles.
• Egg whites should be beaten until they form stiff peaks. Stir 1/4
of beaten egg whites into batter to lighten it; then, gently fold
the rest of the egg whites into the batter (there should be white
streaks in the batter). Do not over-mix batter when adding egg
whites.
• It is not necessary to beat egg yolks and milk separately; just
add them to the combined flour mixture and use a whisk or
hand mixer to blend.
• Do not open the waffle maker during the first minute of baking,
or waffles will separate. Completely bake waffles before removing them from the unit.
• When waffles are done, the unit will beep 4 times and the lid
should lift open easily. Lift the lid gently. If lid pulls, wait another
minute and try lifting it open again.
•Waffles can be made ahead of time, then refrigerated or frozen.
When ready to eat, just heat waffles in oven or toaster. This is
ideal when serving waffles to several people at once.
FOR LOW-FAT, LOW-CHOLESTEROL WAFFLES:
•All recipes work equally well with skim milk.
• Leave out the egg yolks altogether. All leavening properties
come from beaten egg whites.
• Use liquid vegetable oils like canola, corn or sunflower, instead
of butter.
FOR HIGHER-FIBER WAFFLES:
• Substitute 1/2-cup, or more, of whole wheat flour for white flour.
•Substitute 1/4-cup of wheat or oat bran for white flour.
FOR SUGARLESS WAFFLES:
• Substitute 1 Tablespoon of thawed all-natural white grape or
apple juice, from concentrate, for each teaspoon of sugar. If
adding more than 1 Tablespoon of juice from concentrate, add a
little less milk.
9
Page 10

User Maintenance Instructions
This Russell Hobbs®RHBW4/RHBW4CAN Waffle Maker requires
little maintenance. It contains no user-serviceable parts. Any servicing requiring disassembly must be performed by a qualified appliance repair technician.
CAUTION: Do not immerse Waffle Maker, Cord, or Plug in
water or any other liquid.
Cleaning
To keep your Waffle Maker operating properly, clean regularly.
1. Unplug the Waffle Maker and allow it to cool completely before
cleaning.
2. Never immerse the waffle maker in water or any other liquid.
3. Wipe the exterior with a soft, damp cloth. Dry thoroughly.
4. To remove any remaining batter on the Cooking Plates, wipe
with a soft, damp cloth or absorbent paper towel. Dry thoroughly.
5. Do not use steel wool, scouring pads, or abrasive cleaners, as
they will damage the finish.
Storage
1. Clean the Waffle Maker as instructed above.
2. Wrap Cord around Cord Storage Wrap on bottom of Waffle
Maker. Never wrap cord tightly around the appliance. Do
not put any stress on the cord where it enters the unit, as it
could cause the cord to fray and break.
3. Store Waffle Maker in its original box in a clean, dry location.
10
Page 11

Recipes
Basic Waffles
1 ³⁄₄ cups all-purpose flour
2 teaspoons baking powder
¹⁄₂ teaspoon salt
3 eggs, separated
2 tablespoons sugar
1 ¹⁄₂ cups milk
¹⁄₂ cup vegetable oil
1. Condition and preheat waffle maker on any color setting.
2. Sift flour, baking powder, and salt together in a bowl.
3. Use an electric mixer to beat the egg whites until soft peaks
form. Sprinkle in the sugar and continue to beat until stiff.
4. Use the mixer to blend the egg yolks, milk, and vegetable oil
together.
5. Pour the milk mixture into the dry ingredients and whisk togeth-
er until just mixed.
6. Gently fold egg white mixture into batter.
7. Pour batter onto the center of each conditioned and preheated
waffle grid. Close the lid and bake. Repeat with remaining batter.
Makes 10 4 ¹⁄₂ - inch waffles
Corn Waffles
2 8 ¹⁄₂ - ounce packages corn muffin mix
2 eggs
¹⁄₄ cup vegetable oil
1 ¹⁄₂ cups milk
1 15-ounce can, whole kernel corn, drained
2 4-ounce cans chopped green chilies, drained
2 cups grated American cheese
1. Condition and preheat waffle maker on color setting 1-3.
2. Use a spoon to stir corn muffin mix, eggs, vegetable oil, and
milk together. The batter will be slightly lumpy.
3. Stir in corn, chilies and cheese.
4. Pour 2 cups of batter using an “X” pattern onto the conditioned
and preheated waffle grid.
Makes 12 4 ¹⁄₂ - inch waffles
11
Page 12

Belgian Waffles
Recipes (Cont.)
2 ²⁄₃ cups all-purpose flour
2 ¹⁄₄ teaspoons RED STAR
1 teaspoon salt
2 tablespoons sugar
1 ³⁄₄ cups milk
¹⁄₄ cup water
¹⁄₄ cup butter
3 eggs, separated
1. Sift flour, yeast, salt, and sugar together in a bowl.
2. In a microwave or double boiler, heat milk, water, and butter
until very warm 120˚-130˚ F. Butter does not need to melt.
3. Use an electric mixer to blend the eggs into the milk mixture.
4. Pour the milk mixture into the dry ingredients and use the mixer
to mix thoroughly.
5. Cover the bowl tightly with plastic wrap or foil and refrigerate for
at least 6 hours or overnight.
6. Condition and preheat the waffle maker on any color setting
7. Pour batter onto the center of each conditioned and preheated
waffle grid. Close the lid and bake. Repeat with remaining batter.
Makes 12 4 ¹⁄₂ - inch waffles
®
‚ Active Dry Yeast
12
Page 13

Crisp Waffles
1 ¹⁄₂ cups all-purpose flour
¹⁄₂ cup cornstarch
1 teaspoon baking powder
¹⁄₂ teaspoon baking soda
1 teaspoon salt
2 eggs, separated
2 tablespoons sugar
1 teaspoon vanilla
1 ¹⁄₂ cups buttermilk
¹⁄₂ cup milk
³⁄₄ cup vegetable oil
1. Condition and preheat waffle maker on color setting 3-6. Press
the CRISP button, the yellow light will come on.
2. Sift flour, cornstarch, baking powder, baking soda, and salt
together in a bowl.
3. Use an electric mixer to beat egg whites until soft peaks form.
Sprinkle in sugar and continue to beat until stiff. Blend in vanilla.
4. Use the mixer to blend the egg yolks, buttermilk, milk, and veg-
etable oil together.
5. Pour the buttermilk mixture into the dry ingredients and whisk
together until just mixed.
6. Gently fold egg white mixture into batter.
7. Pour batter onto the center of each conditioned and preheated
waffle grid. Close the lid and bake. Repeat with remaining batter.
Makes 12 4 ¹⁄₂ - inch waffles
13
Page 14

Recipes (Cont.)
Craisins
1 ³⁄₄ cups all-purpose flour
2 teaspoons baking powder
¹⁄₂ teaspoon salt
3 eggs, separated
2 tablespoons sugar
1 teaspoon vanilla
1 ¹⁄₂ cups milk
¹⁄₂ cup vegetable oil
1 cup Craisins (sweetened dried cranberries)
1 cup chopped pecans
1. Condition and preheat the waffle maker on any color setting.
2. Sift flour, baking powder, and salt together in a bowl.
3. Use an electric mixer to beat the egg whites until soft peaks
form. Sprinkle in the sugar and continue to beat until stiff. Blend
in vanilla.
4. Use the mixer to blend the egg yolks, milk, and vegetable oil
together.
5. Pour the milk mixture into the dry ingredients and whisk togeth-
er until just mixed.
6. Gently fold egg white mixture, Craisins, and pecans into batter.
7. Pour batter onto the center of each conditioned and preheated
waffle grid. Close the lid and bake. Repeat with remaining batter.
®
and Pecan Waffles
Makes 12 4 ¹⁄₂ - inch waffles
14
Page 15

Chocolate Chip Waffles
1 ³⁄₄ cup all-purpose flour
2 teaspoons baking powder
¹⁄₂ teaspoon salt
3 eggs, separated
2 tablespoons sugar
1 ¹⁄₂ cups milk
¹⁄₂ cup vegetable oil
1 cup semi-sweet mini chocolate chips
1. Condition and preheat waffle maker on color setting 3-6.
2. Sift flour, baking powder, and salt together in a bowl.
3. Use an electric mixer to beat the egg whites until soft peaks
form. Sprinkle in the sugar and continue to beat until stiff.
4. Use the mixer to blend the egg yolks, milk, and vegetable oil
together.
5. Pour the milk mixture into the dry ingredients and whisk togeth-
er until just mixed.
6. Gently fold egg white mixture and chocolate chips into batter.
7. Pour batter onto the center of each conditioned and preheated
waffle grid. Close the lid and bake. Repeat with remaining batter.
Makes 10 4 ¹⁄₂ - inch waffles
15
Page 16

Recipes (Cont.)
Peanut Butter Waffles
2 cups all-purpose flour
4 teaspoons baking powder
1 teaspoon salt
2 eggs, separated
2 tablespoons sugar
1 teaspoon vanilla
2 cups milk
1 tablespoon vegetable oil
¹⁄₂ cup peanut butter
1. Condition and preheat waffle maker on any color setting.
2. Sift flour, baking powder, and salt together in a bowl.
3. Use an electric mixer to beat the egg whites until soft peaks
form. Sprinkle in the sugar and continue to beat until stiff. Blend
in vanilla.
4. Use the mixer to blend the egg yolks, milk, vegetable oil, and
peanut butter together.
5. Pour the milk mixture into the dry ingredients and whisk togeth-
er until just mixed.
6. Gently fold egg white mixture into batter.
7. Pour batter onto the center of each conditioned and preheated
waffle grid. Close the lid and bake. Repeat with remaining batter.
Makes 10 4 ¹⁄₂ - inch waffles
16
Page 17

Chocolate Waffles
¹⁄₄ cup butter
3 1-ounce squares semi-sweet chocolate
2 cups all-purpose flour
2 teaspoons baking powder
¹⁄₂ teaspoon salt
2 eggs, separated
4 teaspoons sugar
1 ¹⁄₂ teaspoons vanilla
1 ¹⁄₃ cups milk
1. Condition and preheat the waffle maker on color setting 3-6.
2. Melt butter and chocolate together in microwave or double boil-
er.
3. Sift flour, baking powder, and salt together in a bowl.
4. Use an electric mixer to beat the egg whites until soft peaks
form. Sprinkle in the sugar and continue to beat until stiff. Blend
in vanilla.
5. Use the mixer to blend the egg yolks and milk together.
6. Pour the milk mixture and chocolate mixture into the dry ingre-
dients and whisk together until just mixed.
7. Gently fold egg white mixture into batter.
8. Pour batter onto the center of each conditioned and preheated
waffle grid. Close the lid and bake. Repeat with remaining batter.
Makes 8 4 ¹⁄₂ - inch waffles
17
Page 18

Recipes (Cont.)
Whole Wheat Waffles
1 cup whole wheat flour
1 cup all-purpose flour
4 teaspoons baking powder
¹⁄₂ teaspoon salt
2 eggs, separated
4 teaspoons sugar
2 cups milk
¹⁄₂ cup vegetable oil
1. Condition and preheat the waffle maker on any color setting.
2. Sift whole wheat flour, all-purpose flour, baking powder, and salt
together in a bowl.
3. Use an electric mixer to beat the egg whites until soft peaks
form. Sprinkle in the sugar and continue to beat until stiff.
4. Use the mixer to blend the egg yolks, milk, and vegetable oil
together.
5. Pour the milk mixture into the dry ingredients and whisk togeth-
er until just mixed.
6. Gently fold egg white mixture into batter.
7. Pour batter onto the center of each conditioned and preheated
waffle grid. Close the lid and bake. Repeat with remaining batter.
Makes 10 4 ¹⁄₂ - inch waffles
18
Page 19

Whole Wheat Banana Nut Waffles
1 cup whole wheat flour
1 cup all-purpose flour
2 teaspoons baking powder
¹⁄₂ teaspoon salt
2 eggs, separated
2 tablespoons sugar
1 teaspoon vanilla
1 ¹⁄₂ cups milk
¹⁄₄ cup melted butter
2 medium bananas, mashed
1 cup chopped walnuts
1. Condition and preheat the waffle maker on any color setting.
2. Sift whole wheat flour, all-purpose flour, baking powder, and salt
together in a bowl.
3. Use an electric mixer to beat the egg whites until soft peaks
form. Sprinkle in the sugar and continue to beat until stiff. Blend
in vanilla.
4. Use the mixer to blend the egg yolks, milk, and butter together.
5. Pour the milk mixture into the dry ingredients and whisk togeth-
er until just mixed.
6. Stir in bananas and nuts.
7. Gently fold egg white mixture into batter.
8. Pour batter onto the center of each conditioned and preheated
waffle grid. Close the lid and bake. Repeat with remaining batter.
Makes 10 4 ¹⁄₂ - inch waffles
19
Page 20

LIMITED ONE YEAR WARRANTY
Warranty: This Russell Hobbs®product is warranted by Salton, Inc. to be free from defects in
materials or workmanship for a period of (1) year from the original purchase date. This product
warranty covers only the original consumer purchaser of the product.
Warranty Coverage: This warranty is void if the product has been damaged by accident in shipment, unreasonable use, misuse, neglect, improper service, commercial use, repairs by unauthorized personnel, normal wear and tear, improper assembly, installation or maintenance abuse or
other causes not arising out of defects in materials or workmanship. This warranty is effective only
if the product is purchased and operated in the USA, and does not extend to any units which have
been used in violation of written instructions furnished with the product or to units which have
been altered or modified or to damage to products or parts thereof which have had the serial number removed, altered, defaced or rendered illegible.
Implied Warranties: ANY IMPLIED WARRANTIES WHICH THE PURCHASER MAY HAVE ARE LIMITED IN DURATION TO ONE (1) YEAR FROM THE DATE OF PURCHASE. Some states do not
tations on how long an implied warranty lasts, so the above limitation may not apply to you.
Warranty Performance: During the above one-year warranty period, a product with a defect will
be either repaired or replaced with a reconditioned comparable model (at our option) when the
product is returned to the Repair Center, or the purchase price refunded. The repaired or replacement product will be in warranty for the balance of the one-year warranty period and an additional
one-month period. No charge will be made for such repair or replacement.
Service and Repair: Should the appliance malfunction, you should first call toll-free 1 (800) 2339054 between the hours of 9:00 am and 5:00 pm Central Standard Time and ask for CONSUMER
SERVICE stating that you are a consumer with a problem. Please refer to model number
RHBW4/RHBW4CAN when you call.
In-Warranty Service (USA): For an appliance covered under the warranty period, no charge is
made for service or postage. Call for return authorization (1 800 233-9054).
Out-of Warranty Service: A flat rate charge by model is made for out-of-warranty service. Include
$10.00 (U.S.) for return shipping and handling. We will notify you by mail of the amount of the
charge for service and require you to pay in advance for the repair or replacement.
For Products Purchased in the USA, but Used in Canada: You may return the product insured,
packaged with sufficient protection, and postage and insurance prepaid to the USA address listed
below. Please note that all customs duty / brokerage fees, if any, must be paid by you and we will
require you to pay the cost of customs duty / brokerage fees to us in advance of our performing
any service.
Risk During Shipment: We cannot assume responsibility for loss or damage during incoming shipment. For your protection, carefully package the product for shipment and insure it with the carrier.
Be sure to enclose the following items with your appliance: any accessories related to your problem, your full return address and daytime phone number, a note describing the problem you experienced, a copy of your sales receipt or other proof of purchase to determine warranty status. C.O.D.
shipments cannot be accepted.
To return the appliance, ship to: To contact us, please write to, call, or email:
Attn: Repair Center Salton, Inc.
Salton, Inc. P.O. Box 7366
708 South Missouri Street Columbia, MO 65205-7366
Macon, MO 63552 1 800 233-9054
Email: Salton@Saltonusa.com
Limitation of Remedies: No representative or person is authorized to assume for Salton, Inc. any
other liability in connection with the sale of our products. There shall be no claims for defects or
failure of performance or product failure under any theory of tort, contract or commercial law
including, but not limited to negligence, gross negligence, strict liability, breach of warranty and
breach of contract. Repair, replacement or refund shall be the sole remedy of the purchaser under
this warranty, and in no event shall Salton be liable for any incidental or consequential damages,
losses or expenses. Some states do not allow the exclusion or limitation of incidental or consequential damages, so the above limitation or exclusion may not apply to you.
Legal Rights: This warranty gives you specific legal rights, and you may also have other rights
which vary from state to state.
For more information on Salton products: Visit our website: http://www.eSalton.com
“© 2003 Salton, Inc. P/N 61304
All Rights Reserved” Printed in China
allow limi-
 Loading...