

Page 1
SPECIAL SELECT
USE & CARE INSTRUCTIONS
16-SPEED STAND MIXER
FOR MODELS: FSM126EM (White), FSM126RM (Red),
FSM126BKM (Black), FSM126CBM (Cobalt Blue),
FSM126BRXM (Bronze)
Page 2

IMPORTANT SAFEGUARDS
When using electrical appliances, basic safety precautions should
always be followed including the following:
1. Read all instructions.
2. To protect against risk of electrical shock do not put cord, plugs,
or appliance in water or other liquid.
3. Close supervision is necessary when any appliance is used by or
near children.
4. Unplug from outlet when not in use, before putting on or taking
off parts, and before cleaning.
5. Avoid contacting moving parts.
6. Do not operate any appliance with a damaged cord or plug or
after the appliance malfunctions, or is dropped or damaged in
any manner. Contact Consumer Service for examination, repair
or electrical or mechanical adjustment.
7. The use of attachments not recommended or sold by the
manufacturer may cause fire, electric shock, or injury.
8. Do not use outdoors.
9. Do not let cord hang over edge of table or counter.
10. Do not let cord contact hot surface, including the stove.
11. Keep hands, hair, clothing, as well as spatulas and other utensils
away from Beaters, Cookie Dough Hooks or Whisk during
operation to reduce the risk of injury to persons and/or damage
to the Mixer.
12. Remove Beaters, Cookie Dough Hooks or Whisk from Mixer
before washing.
SAVE THESE INSTRUCTIONS
FOR HOUSEHOLD USE ONLY
1
Page 3

ADDITIONAL IMPORTANT SAFEGUARDS
1. All users of this appliance must read and understand this
Owner’s Manual before operating or cleaning this appliance.
2. The cord to this appliance should be plugged into a 120V AC
electrical outlet only.
3. Do not leave this appliance unattended during use.
4. If this appliance begins to malfunction during use, immediately
press the ON/OFF Button to turn the unit off and unplug the
cord. Do not use or attempt to repair the malfunctioning
appliance.
5. If this appliance falls or accidentally becomes immersed in
water, unplug it immediately. Do not reach into the water!
Do not use this appliance after it has fallen into or becomes
immersed in water.
6. To reduce the risk of injury to persons or property, never use
this appliance in an unstable position.
7. Do not use this appliance for other than its intended use.
2
Page 4

POLARIZED PLUG
This appliance has a polarized plug (one blade is wider than the
other). To reduce the risk of electric shock, this plug is intended to
fit into a polarized outlet only one way. If the plug does not fit fully
in the outlet, reverse the plug. If it still does not fit, contact a
qualified electrician. Do not attempt to modify the plug in any way.
SHORT CORD INSTRUCTIONS
A short power-supply cord is provided to reduce the risk resulting
from becoming entangled in or tripping over a longer cord.
Do not use an extension cord with this product.
PLASTICIZER WARNING
CAUTION: To prevent Plasticizers from migrating from the
finish of the countertop or tabletop or other furniture, place
NON-PLASTIC coasters or placemats between the appliance
and the finish of the countertop or tabletop.
Failure to do so may cause the finish to darken, permanent
blemishes may occur or stains can appear.
ELECTRIC POWER
If the electrical circuit is overloaded with other appliances, your
appliance may not operate properly. It should be operated on a
separate electrical circuit from other appliances.
3
Page 5
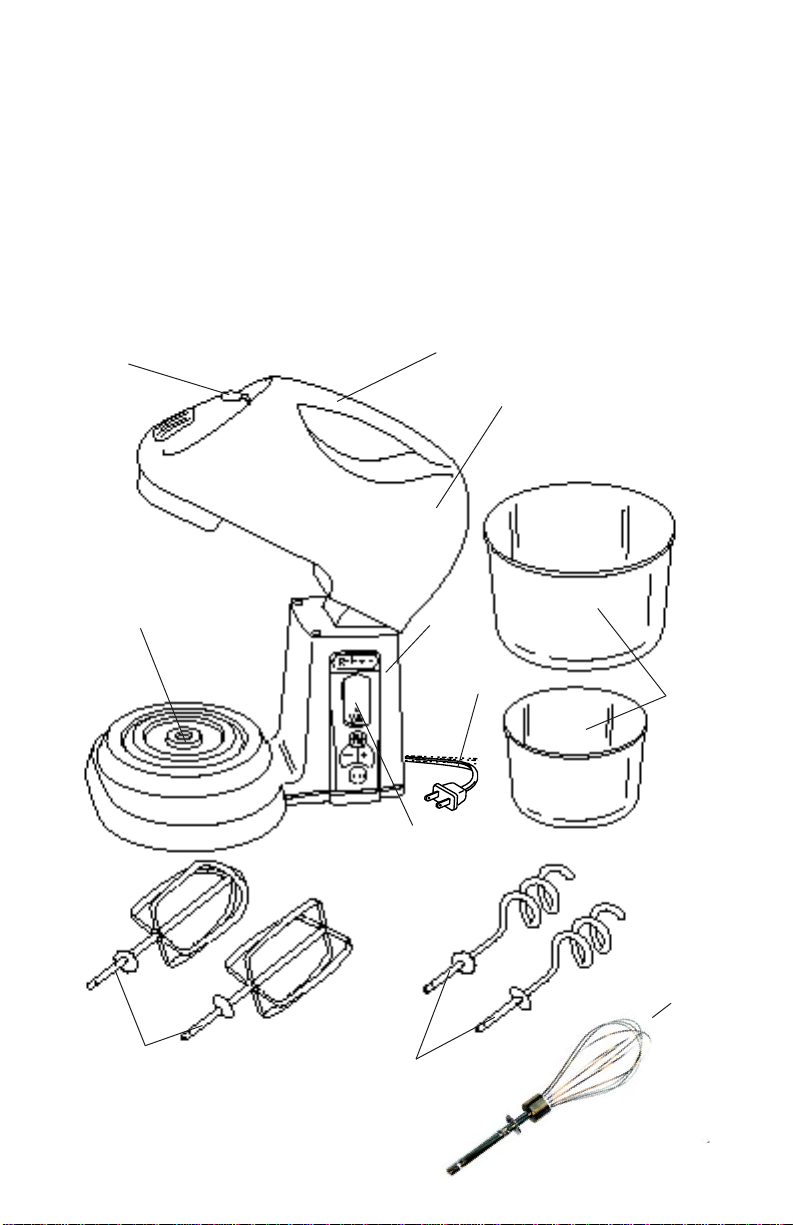
GETTING TO KNOW YOUR
FARBERWARE
®
FSM126EM (White),
FSM126RM (Red), FSM126BKM (Black),
FSM126CBM (Cobalt Blue),
FSM126BRXM (Bronze)
16-SPEED STAND MIXER
PRODUCT MAY VARY SLIGHTLY FROM ILLUSTRATION
Ejector
Button
Turntable
(P/N 70512 White)
(P/N 70512BK, Black)
(P/N 70512R, Red)
(P/N 70512CB, Cobalt Blue)
Handle
Mixer
Stand
Retractable
Cord
Control
Panel
Motor
Housing
Mixing
Bowls
Beaters
Whisk
Cookie Dough
Hooks
4
Page 6

BEFORE USING YOUR FARBERWARE
®
16-SPEED STAND MIXER
1. Carefully unpack Mixer.
2. Wash Beaters, Cookie Dough Hooks, Whisk and Mixing Bowls
with warm, soapy water. Rinse well and dry thoroughly.
CAUTION: To protect against electric shock, never immerse the
Motor Housing or Base in water or any other liquid.
CAUTION: Use this product with the proper AC voltage rating
only. Be sure to unplug the power cord when Stand Mixer is
not in use.
INSERTING BEATERS, COOKIE DOUGH
HOOKS, OR WHISK
CAUTION: Use matching attachment pairs only: use both Beaters
both Cookie Dough Hooks, or one Whisk. Do not attempt to
use one Cookie Dough Hook with one Beater or one Whisk.
This could damage the Mixer.
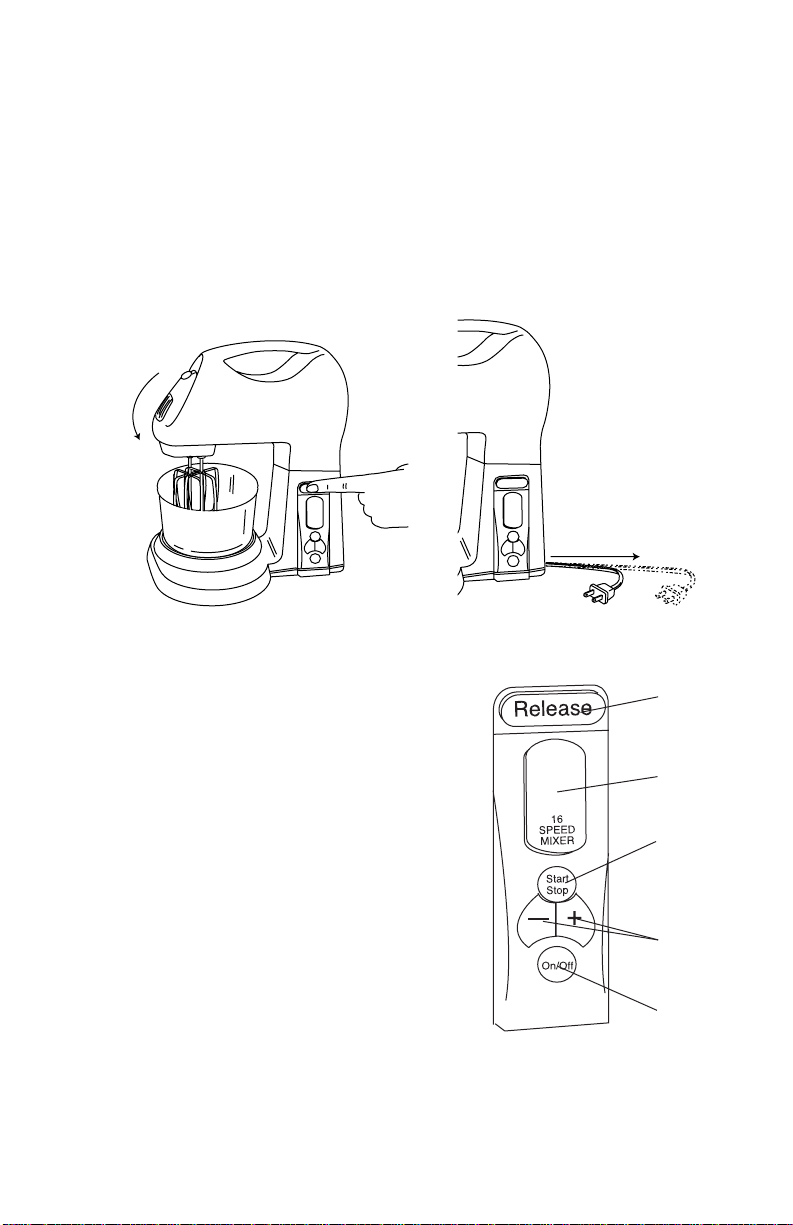
1. Place Stand Mixer on a dry, level surface. Make sure Mixer is
not plugged in.
2. Press Head Release Button while pivoting Mixer Head upwards.
See Figure 1.
CAUTION: DO NOT attempt to pivot Mixer Head without first
pressing Head Release Button. This could damage the Mixer.
NOTE: Beaters and Cookie Dough Hooks have two types of stem
disks: round and hexagonal.
NOTE: There is only one Whisk and its Stem is round.
5
R
—
Figure 1
16
SPEED
MIXER
Start
Stop
+
On/Off
Page 7

INSERTING BEATERS,HOOKS,WHISK (Continued)
3. Insert Beater or Cookie Dough Hook, one at a time, into holes on
underside of Motor Housing. See Figure 2. Insert Beater or
Cookie Dough Hook with round stem disk into round hole;
hexagonal stem disk into hexagonal hole. See Figure 2A. Push in
firmly and twist slightly to lock each Beater or Cookie Dough
Hook into place.
4. Insert Whisk Stem (round stem disk) into round hole. Push in
firmly and twist slightly to lock Whisk into place.
Figure 2A
Figure 2
MIXING
1. Place desired ingredients into large or small Mixing Bowl.
NOTE: Maximum capacity of the large Mixing Bowl is 4 quarts; the
small Mixing Bowl is 1-1/2 quarts. Do not fill Mixing Bowl more
than half full with ingredients.
2. Lift Turntable up and off of the Base. Note Small and Large
Mixing Bowl placement as marked on the Base. Replace
Turntable at desired location.
3. Place filled Mixing Bowl (large or small) onto Turntable. See
Figure 3. Be sure to align
rim on underside of Mixing
Bowl with corresponding
rim on Turntable. When
Bowl is placed properly, it
will spin freely on Turntable.
Release
16
SPEED
MIXER
Start
Stop
+
—
On/Off
Figure 3
6
Page 8
MIXING (Continued)
Release
Start
Stop
—
+
On/Off
16
SPEED
MIXER
R
Start
Stop
—
+
On/Off
16
SPEED
MIXER
4. With Beaters, Cookie Dough Hooks, or Whisk properly in
place, press Head Release Button while pivoting Mixer Head
downward until it rests firmly in place. See Figure 4.
5. Gently pull plug and power cord out from rear of unit. See
Figure 5. Pull power cord to desired length only. DO NOT
allow any extra cord length than necessary. Plug power cord
into a standard 120V AC household electrical outlet.
Figure 4
CONTROL PANEL
6, Press ON/OFF Button once. The
number "1" will flash green in the
LED Display. This indicates the
Mixer is turned ON and in Standby
Mode. If the LED does not
illuminate, the Mixer is not in
Standby Mode. Press Power ON/OFF
Button a second time to re-set the
Mixer.
7. Press either of the Speed Control
Buttons to increase (+) or decrease
(-) the mixing speed. See
Recommended Speed Guide on
page 11 for detailed information.
Press Speed Control Button once to
change speed by one setting. Hold Speed Control Button down
to increase
or decrease speed rapidly.
Figure 5
Head
Release
Button
LED Display
START/STOP
Button
Speed
Control
Buttons
ON/OFF
Button
7
Page 9

MIXING (Continued)
NOTE: Always start mixing with a slow speed setting. Then,
increase the speed setting to match consistency of the
ingredients.
8. Press START/STOP Button once to begin mixing. The LED will
stop flashing and show the speed setting in a constant green.
Upon start-up, the Mixer Motor starts slowly and gently
increases its speed to the selected speed setting. This prevents
ingredients from splattering.
Additional ingredients can be added slowly to the Mixing Bowl
during operation.
NOTE: Never fill the Mixing Bowl(s) more than half full.
CAUTION: Keep hands, hair, clothing, as well as utensils out of
Mixing Bowl and away from Attachment during operation to
reduce the risk of sever injury to persons or damage to the
Stand Mixer.
9. Press either Speed Setting Button to increase speed setting (+) or
decrease speed setting (-) as desired.
10. Press START/STOP Button once. The Speed Setting will flash
and the Mixer will change to Standby Mode. The Mixer will
stop mixing and stay in Standby Mode (speed setting will flash).
Use a rubber or plastic spatula to scrape sides and bottom of
Mixing Bowl, as desired. Press START/STOP Button once to
continue mixing until ingredients reach the desired consistency.
CAUTION: DO NOT scrape sides or bottom of Mixing Bowl while
Mixer is in operation.
11. Once all ingredients have reached the desired consistency,
press START/STOP Button to stop mixing. The green LED will
flash to indicate the Mixer is in Standby Mode.
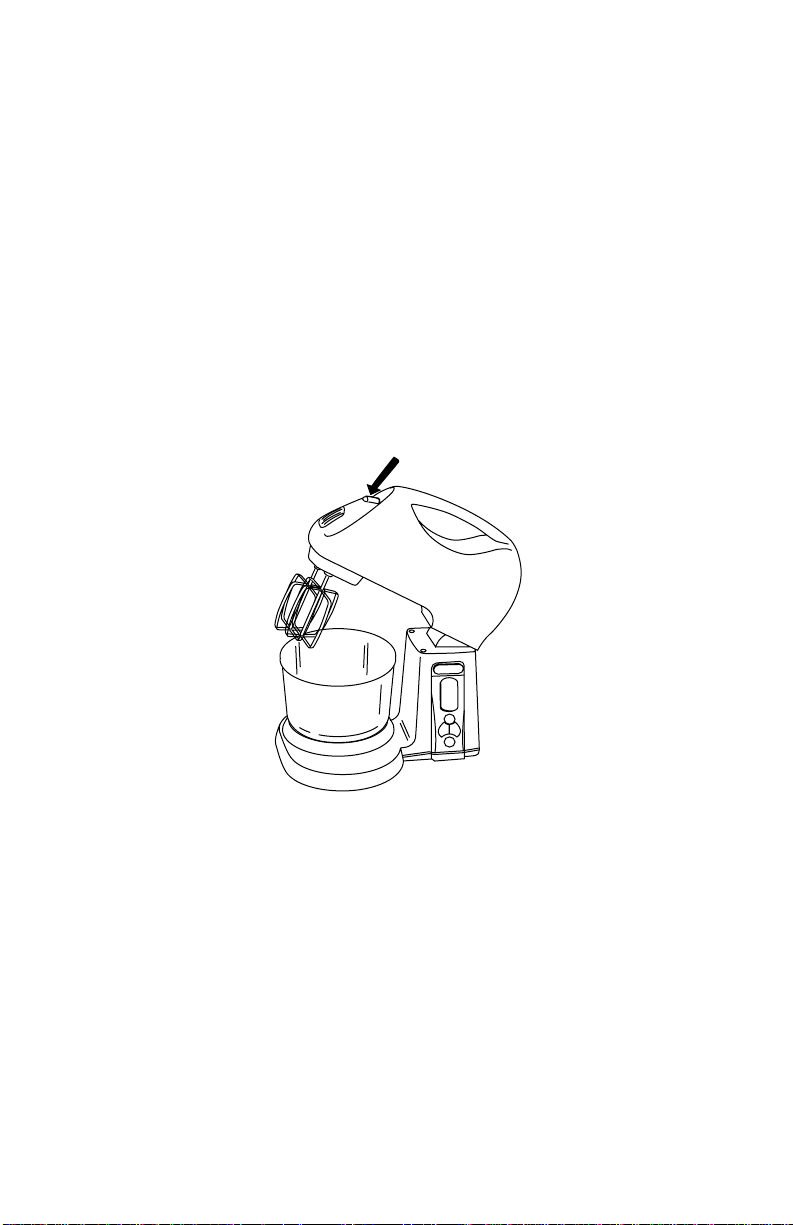
12. Press ON/OFF Button to
turn the Mixer OFF.
13. Remove plug from
electrical outlet. Gently tug
the cord to fully retract the
cord into the Mixer Stand.
14. Press the Head Release
Button and carefully raise
the Mixer Head.
See Figure 6.
TILT RELEASE
16
14
12
10
8
6
4
2
START
STOP
LOW HIGH
ON/OFF
Figure 6
8
Page 10
MIXING (Continued)
Release
Start
Stop
—
+
On/Off
16
SPEED
MIXER
15.Press the Ejector Button while grasping the Beaters, Cookie
Dough Hooks, or Whisk to release them from the Mixer. See
Figure 7.
16. Gently scrape excess batter from Beaters, Cookie Dough
Hooks, or Whisk with a rubber or plastic spatula. Do not strike
Beaters, Cookie Dough Hooks, or Whisk against Mixing Bowl
to remove excess batter. This could damage the Mixer parts.
17. Carefully remove Mixing Bowl from Turntable. Pour batter from
Mixing Bowl into another container. Use only a rubber or
plastic spatula to remove batter from Mixing Bowl.
Figure 7
9
Page 11

IMPORTANT HINTS AND INSTRUCTIONS
•During first use of your Mixer, you may notice an odor from the
Motor. This is normal and will cease with continued operation.
•Never fill Mixing Bowl more than 1/2 full — the mixing action
will cause the ingredients to rise in the Mixing Bowl. Mix large
recipes in several batches.
• Do not attempt to knead more than 8 ounces of heavy dough or
batter (heavy cookie dough or candy batter) at one time.
•Aself-protection circuit automatically switches the Mixer to
Standby Mode during overload. Reduce the amount of batter or
adjust the speed setting higher, to a more suitable setting. Press
the START/STOP Button to begin again.
• Always retract cord into Mixer Stand when operation is
completed and when storing Mixer.
•To prevent the possibility of severe personal injury and/or
damage to the Mixer, keep hands and utensils out of Mixing
Bowl during operation.
• Always be sure ON/OFF Button is OFF and Mixer is unplugged
before inserting or removing Beaters, Cookie Dough Hooks,
or Whisk.
• Use the Whisk to stir/combine sauces and gravies, etc.
• Use the Whisk to whip potatoes, egg whites, cream; whip some
cake mixes, etc.
10
Page 12

RECOMMENDED SPEED GUIDE
SPEED SETTING 1 -2 • Combine dry ingredients
• Fold delicate creams and egg
whites into batter
• Add nuts, chips, dried fruit to
cookie dough/batter
• Stir sauces and gravies
SPEED SETTING 3 - 4 • Add dry ingredients to batter/
cookie dough
• Mash potatoes/vegetables
• Cream cold (not frozen) butter
and sugar.
SPEED SETTING 5 - 6 • Cream softened butter and sugar
• Start mixing cake mixes
• Add dry ingredients alternately
with liquid ingredients
SPEED SETTING 7 - 8 • Whip potatoes
• Add eggs to batter/cookie dough
SPEED SETTING 9 - 10 • Whip cream
• Complete beating butter cream
frostings
• Mix thin batters
SPEED SETTING 11 - 12 • Add sugar to whipped egg whites
SPEED SETTING 13 - 14 • Beat egg yolks
SPEED SETTING 15 - 16 • Whip egg whites
11
Page 13

USER MAINTENANCE INSTRUCTIONS
This appliance requires little maintenance. It contains no userserviceable parts. Do not try to repair it yourself. Any servicing
requiring disassembly other than cleaning must be performed by a
qualified appliance repair technician.
TO CLEAN
CAUTION: Never immerse Motor Housing or Mixer Stand in
water. This could damage the product.
1. Wash all accessories (Mixing Bowls, Beaters, Cookie Dough
Hooks, Whisk) with hot water and a mild detergent. Rinse all
parts and dry thoroughly. Accessories are also dishwasher safe.
DO NOT allow accessories to soak in water for extended
periods of time. This could damage the finish.
2. Wipe Motor Housing, Mixer Stand, and Turntable with a damp
cloth or sponge. Dry completely with a soft cloth. Lift out
Turntable to clean any drippings. Replace Turntable after
cleaning.
TO STORE
Unplug and clean unit. Retract power cord into Mixer Stand by
gently pulling cord—the power cord will recoil into the Base. Store
in original box or in a clean, dry place. Never store Stand Mixer
while it is hot or plugged in.
12
Page 14

RECIPES
APPLE CAKE
Cake Topping
3 cups all-purpose flour 1/3 cup butter, softened
1-1/2 teaspoons cinnamon 1/2 cup brown sugar
1-1/2 teaspoons baking powder 1/4 cup quick cooking oats
1-1/2 teaspoons baking soda 1/4 cup all-purpose flour
1/4 teaspoons salt 1 teaspoon cinnamon
3/4 cup butter, softened
1-3/4 cups sugar Glaze
3 eggs 2 tablespoons milk
3 cups apples, peeled, grated 1/2 cup powdered sugar
1 cup walnuts, chopped
2 teaspoon vanilla
Yield: 12 servings
Temperature: 325°F/163°C
Bake Time: 1 hour and 15 minutes
Sift together flour, cinnamon, baking powder, baking soda, and salt in a
bowl to create flour mixture and set aside. Attach Beaters and cream
butter and sugar on Speed 3 for 2-3 minutes. Continue beating and add
the eggs, one at a time, beating well after each addition. Add the apples,
walnuts, and vanilla extract while mixing.
Slowly add flour mixture and beat on Speed 3 for 2-3 minutes. Pour into
10-inch greased tube pan. Tap pan on countertop several times to
eliminate air bubbles.
For topping, combine all topping ingredients and mix on Speed 3 until
crumbly. Sprinkle topping over top of batter. Bake as directed and allow
to cool.
Mix glaze ingredients together and drizzle over cake.
13
Page 15

POUND CAKE
All ingredients should be at room temp. before mixing.
3 cups all-purpose flour
1 teaspoon baking powder
1 cup butter
1/4 cup shortening
3 cups sugar
5 eggs
1 cup milk
2 Tablespoon vanilla extract
1 teaspoon lemon extract
1 teaspoon orange extract
Glaze
1/4 cup butter
1/4 cup milk
1 cup powdered sugar
Yield: 12 servings
Do not preheat oven
Te mperature: 350°F/177°C
Bake Time: 1-1/2 hours
Combine flour and baking powder in a separate bowl to create flour
mixture and set aside.
Attach Beaters and begin to cream together butter, shortening, and sugar
on Speed 3 for 3 minutes. Continue beating and add the eggs one at a
time alternating them with the flour mixture, beating on Speed 7 after
each addition. Add remaining ingredients and beat together on Speed 5
for 2-3 minutes. Pour batter into greased and floured 10-inch tube pan.
Tap pan on countertop several times to eliminate air bubbles. Bake as
directed and allow to cool.
For glaze, melt butter over low heat. Add milk and stir in powdered sugar.
Continue heating until slightly thickened. Drizzle over cake.
14
Page 16

PINEAPPLE UPSIDE DOWN CAKE
Topping
1/2 cup butter, melted
1 cup brown sugar
1/2 cup pecans, chopped
8 pineapple slices
1/2 cup maraschino cherries, halved
Cake
3 eggs
1/3 cup applesauce
2 teaspoons pineapple flavoring
1 cup, plus 2 tablespoons water
18.25 oz. pineapple or yellow cake mix
Yield: 12 servings
Te mperature: 350°F/177°C
Bake Time: 50-60 minutes
Layer topping ingredients in a 10-inch greased and floured tube pan in the
order listed. Arrange maraschino cherry halves, cut side up, in the center
of and between pineapple slices.
For cake, attach Beaters and mix all cake ingredients together on Speed 5
for 3-4 minutes. Pour the batter into pan over toppings. Bake as directed.
Allow to cool 5 minutes, then invert onto a heat-resistant plate with a rim.
15
Page 17

RASPBERRY ANGEL FOOD CAKE WITH RASPBERRY SAUCE
Cake
1 cup cake flour
2 tablespoons cornstarch
1-1/4 cups powdered sugar
1/2 teaspoon salt
1 pkg. raspberry unsweetened Kool-Aid® (or any other flavor)
1-1/2 cups egg whites (about 12), room temp.
1-1/2 teaspoons cream of tartar
1 teaspoon vanilla extract
1/2 cup sugar
Raspberry Sauce
1-1/2 cups raspberry preserves, seedless
2 teaspoons cornstarch
Yield: 12 servings
Te mperature: 350°F/177°C
Bake Time: 40-50 minutes
Sift together the cake flour, cornstarch, powdered sugar, salt and Kool-Aid®
in a bowl and set aside.
Attach Beaters and beat the egg whites and cream of tartar on Speed 15 until
stiff peaks form. Add the vanilla and sugar, one tablespoon at a time while
beating on Speed 11-12.
Fold the flour mixture, 1/4 cup at a time, into the egg white mixture. Pour
into a 10-inch greased and floured tube pan. Remove large air bubbles by
gently cutting through mixture with a knife and bake as directed.
Prepare the raspberry sauce while the cake is baking. Cook raspberry
preserves and cornstarch over low heat until thickened. Spoon sauce over
cake, either while warm or after it has cooled.
16
Page 18

THREE LAYER FRENCH VANILLA COFFEE CAKE
Cake
2-1/2 cups all-purpose flour
1/2 teaspoon salt
1 teaspoon baking soda
2 teaspoons instant coffee granules
1 cup buttermilk or sour milk
(sour milk is made by adding 1 teaspoon vinegar to 1 cup milk)
1 cup butter, softened
1-1/3 cups sugar
1/2 cup French-Vanilla Cafe (Parisian style flavored instant coffee)
2 teaspoons vanilla extract 3 eggs
Frosting Topping
1/2 cup butter pecans
1 cup brown sugar
1/2 cup milk
2 teaspoons instant coffee granules
1 teaspoon vanilla extract
1 lb. powdered sugar
Yield: 12 servings
Temperature 350°F/177°C
Bake Time: 30-40 minutes
Sift together the flour, salt, baking soda and coffee granules in a bowl to
create a flour mixture and set aside.
Attach the Beaters and cream the butter, sugar, and French Vanilla Cafe
together on Speed 5 for 2-3 minutes. Continue beating and add the vanilla
and eggs one at a time, beating well after each addition. Add the flour
mixture alternating with the buttermilk while beating on Speed 5 for 2-3
minutes. Beat for an additional 2-3 minutes on Speed 5. Pour into three 8inch greased and floured pans. Bake as directed.
For frosting, melt butter in a saucepan over low heat. Stir in the
brown sugar, milk, and instant coffee granules. Bring to a boil and
simmer for 5 minutes, while constantly stirring. Remove from the
heat and add the vanilla extract. Pour the mixture into the Mixing
Bowl. Gradually add the powdered sugar and beat on Speed 2 for
2-3 minutes until the frosting reaches a spreading consistency.
Spread warm frosting over layered cakes. (Cooled frosting is stiff
and hard to spread.) Top with pecans.
17
Page 19

LEMON TORTE
For a wonderful, reduced-fat dessert, add the Yogurt Cheese Frosting to the
Lemon Torte. Prepare the yogurt cheese ahead of time.
Cake
18.25 oz. lemon cake mix
1/4 cup butter, softened
1/4 cup applesauce
1 cup water
2 teaspoons lemon zest, grated
1 teaspoon lemon extract
4 whole eggs, plus 4 egg whites OR 6 eggs
Yogurt Cheese Frosting
64 oz. (2 quarts) low-fat vanilla yogurt
1 pkg unflavored gelatin
1/4 cup water
1 cup powdered sugar
3.5 oz. pkg. instant lemon pudding & pie filling
1 pkg. whipped topping mix
2 teaspoons lemon extract
2 teaspoons lemon zest, grated
Cream Cheese Frosting (alternative)
24 oz. cream cheese, softened
1 cup powdered sugar
1 cup lemon pie filling
1 teaspoon lemon zest, grated
Decoration
1-1/2 cups almonds, sliced
1 cup raspberry preserves, seedless OR raspberry spreadable fruit
Yield: 12 servings
Te mperature: 350°F/177°C
Bake Time: 30-35 minutes
18
Page 20

To make yogurt cheese for the Yogurt Cheese Frosting, drain yogurt for
at least 4 hours or overnight. Insert two coffee filters or a cheesecloth in
a strainer. Place strainer in a pitcher or bowl and pour yogurt in the
strainer. Refrigerate until completely strained (1/2 of the liquid will drain
off). Discard the liquid, reserve strained yogurt (yogurt cheese) and
refrigerate until ready to use.
For cake, attach Beaters and mix together cake ingredients (except eggs
and egg whites) on Speed 5 for 2 minutes. Add the eggs and egg whites,
one at a time, mixing thoroughly after each addition on Speed 7. Pour
into two 9-inch greased and floured cake pans. Bake as directed and
allow to cool.
To make the yogurt cheese frosting, place the gelatin and water in a
small saucepan and set aside to soften for a few minutes. Attach Beaters
and mix the yogurt cheese and remaining ingredients on Speed 2 for 2-3
minutes and set aside. Dissolve the gelatin by heating over low heat for
1-2 minutes. Mix the gelatin into the frosting on Speed 2 for 30 seconds.
Refrigerate until needed.
To save time, cream cheese frosting (alternative) may be used instead of
the yogurt cheese frosting. For the cream cheese frosting, attach Beaters
and beat together the cream cheese and powdered sugar on Speed 5 for
2-3 minutes. Add the pie filling and lemon peel while beating.
Refrigerate until needed.
Cut each cake in half horizontally using a serrated knife. Place one cake
layer, cut side up, on a plate. Spread this layer with 1/4 cup preserves
and 3/4 cup frosting. Top this with the second cake layer, cut side up.
Repeat for remaining cake layers. Spread the top and sides with the
remaining preserves and frosting. Decorate with almonds and chill until
the frosting is set, about two hours. Store in refrigerator.
19
Page 21

MINI CHEESECAKES
Crust
30 vanilla wafers
Filling
32 oz. cream cheese, softened
1 cup plus 2 tablespoons sugar
3 tablespoons cornstarch
4 large eggs, room temp.
1-1/4 teaspoon lemon extract
2-1/4 teaspoon orange extract
3/4 teaspoon vanilla extract
1/4 cup whipping cream
Glaze
1 cup orange marmalade
2 teaspoons cornstarch
Topping
raspberries or maraschino cherry halves
walnuts
Yield: 30 cheesecakes
Te mperature: 250°F/121°C
Bake Time: 40-50 minutes
Attach Beaters and mix together the cream cheese, sugar and cornstarch
on Speed 3 for 2-3 minutes. Add the eggs, one at a time, beating after
each addition on Speed 7. Add remaining ingredients and beat together
for 1 minute on Speed 5. Line muffin pans with 2-1/2 inch muffin baking
cups. Place one vanilla wafer, flat side down, in each muffin baking cup
and pour 1/4 cup of filling over each. Bake as directed. Chill overnight.
Combine glaze ingredients in a saucepan and cook over low heat until
slightly thickened. Place 1 teaspoon of glaze on top of each cheesecake.
Top with raspberries and nuts. Store in refrigerator.
20
Page 22

CARAMEL CHOCOLATE CHUNK CHEESECAKE
Crust
1/4 cup butter, melted
3/4 cup quick rolled oats
3/4 cup walnuts, chopped
3/4 cup brown sugar
1/2 teaspoon cinnamon
Attach Beaters and mix together crust ingredients on Speed 5 for
23 minutes. Press into a 9-inch greased cheesecake pan. Bake crust as
directed. While crust is baking, prepare filling.
Yield: 12 servings
Te mperature: 350°F/177°C
Bake Time: 18-20 minutes
Filling
24 oz. cream cheese, softened
1/3 cup brown sugar
2 tablespoons cornstarch
1/3 cup dark corn syrup
1-1/2 teaspoons vanilla extract
3 large eggs, room temp.
1 egg yolk, room temperature
Topping
1 cup milk chocolate chips
Temperature and Bake Time:
350°F/177°C for 15 minutes then reduce to 200°F/93°C and bake for an
additional 1 hour.
Attach the Beaters and mix together cream cheese, brown sugar,
cornstarch, corn syrup and vanilla extract on Speed 5 for 2-3 minutes.
Add the eggs and yolk one at a time, beating after each addition on
Speed 7.
Pour into the baked crust. Bake as directed.
Remove the cheesecake from the oven and sprinkle the chocolate chips
over the top. Return to the oven and bake for 5 minutes. Chill overnight.
Store in refrigerator.
21
Page 23

CHOCOLATE CARAMEL PECAN CHEESECAKE
Crust
1/3 cup butter, melted
17 chocolate sandwich cream filled cookies, crushed
2 tablespoons pecans, chopped
Filling
24 oz. cream cheese, softened
1/3 cup brown sugar
2 tablespoons cornstarch
1/4 cup dark corn syrup
3 large eggs, room temperature (yolks and whites)
1 egg yolk, room temperature
1/3 cup sour cream, room temperature
1-1/4 teaspoons vanilla extract
1-1/4 teaspoons butter flavoring
11.5 oz. milk chocolate chips
1/3 cup pecans, chopped
Topping
3 tablespoons sour cream, room temperature
4 oz. milk chocolate chunks, melted
2 tablespoons pecans, chopped
Decoration
pecans, whole
10 individually wrapped caramel candies, melted
3 tablespoons sour cream, room temp.
Yield: 12 servings
Temperature and Bake Time: 350°F/177°C for 15 minutes, then reduce to
200°F/93°C and bake for an additional 2 hours
22
Page 24

Mix crust ingredients together and press into a 9-inch greased
cheesecake pan. Attach the Beaters and mix together cream cheese,
brown sugar, cornstarch and corn syrup on Speed 5 for 2-3 minutes.
Continue beating and add the eggs and yolk, one at a time, beating after
each addition on Speed 7. Add the sour cream, vanilla extract and butter
flavoring and mix on Speed 2 for 1 minute. Add the remaining ingredients
and stir on Speed 1 for 1-2 minutes. Pour into the crust. Bake as directed.
Chill overnight.
For topping, stir ingredients together and spread on top of cake while the
topping is still warm. Decorate with pecans. Stir the melted caramels and
the sour cream together; drizzle over the cheesecake. Store in refrigerator.
PIE CRUST
1-1/4 cups all-purpose flour
1/2 teaspoon salt
1/3 cup plus 2 tablespoons shortening
1/4 cup cold water
Yield: 9-10 inch pie crust
Te mperature: 400°F/205°C
Time: 17-20 minutes
Attach Cookie Dough Hooks and place flour, salt, and shortening in
Mixing Bowl. Mix on Speed 2 for 2-3 minutes. Add water and continue to
mix for 2-3 minutes on Speed 3 or until dough clings to Cookie Dough
Hook. If dough is too crumbly or dry, add water, 1 teaspoon at a time. If
dough is too wet or sticky, add 1 tablespoon of flour at a time. Roll crust
to fit 9 or 10-inch pie pan. Flute edges of crust by pressing crust to pan.
Prick bottom with a fork several times. Bake as directed and allow to cool
23
Page 25

CHOCOLATE ALMOND MACAROON PIE
Crust
17 coconut macaroon cookies, crushed
1/3 cup butter, melted
Filling
2 cups whipping cream
2 pkg. whipped topping mix
1/2 cup powdered sugar
3 tablespoons chocolate liqueur
Chocolate
1-1/4 cups milk chocolate chips
Topping
1/2 cup almonds, sliced
Yield: 8 servings
Mix crust ingredients together and press into the bottom and sides
of a 10-inch greased pie pan. Attach Beaters and mix together the filling
ingredients on Speed 9 for 1 minute, then whip on Speed 11 for 3-4
minutes until stiff.
Melt the chocolate chips on very low heat stirring constantly. Cool slightly
at room temperature for 5 minutes. Slowly pour into filling while stirring
on Speed 1. Continue to stir on Speed 1 for 2 minutes. Pour the filling into
the pie crust and sprinkle the nuts over the top, chill.
24
Page 26

GERMAN CHOCOLATE FUDGE PIE
Crust
17 chocolate sandwich creme filled cookies, crushed
1/3 cup butter, melted
Filling
8 oz. cream cheese, softened
1 small box instant chocolate pudding & pie filling
1-1/2 cups milk
4 oz. German's® sweet chocolate bar
11.5 oz. milk chocolate chips
1 cup sour cream
1/2 cup pecans, chopped
Topping
1/4 cup pecans, chopped
Yield: 8-10 servings
Mix crust ingredients together and press into the bottom and sides of a
10-inch greased pie pan. Attach Beaters, blend together cream cheese,
instant pudding and milk on Speed 5 for 3-4 minutes. Melt the German
chocolate, chocolate chips, and sour cream together in a small saucepan
over low heat, stirring frequently. Add to pudding mixture and blend
together on Speed 5 for 3-4 minutes. Spread the mixture over the cookie
crust and top with pecans, chill.
25
Page 27

BUTTER COOKIES
Dough
6 cups all-purpose flour
1 tablespoons baking powder
1 teaspoon salt
2 cups butter, softened
2 cups brown sugar
2 eggs
1/4 cup plus 2 tablespoons milk
2 teaspoons vanilla extract
Topping
1/4 cup sugar
1-1/2 teaspoons cinnamon
Yield: 4 dozen cookies or 3 cookie bars
Te mperature: 350°F/177°C
Bake Time: 12-15 minutes
Combine flour, baking powder and salt in a bowl and set aside. Attach the
Beaters and cream the butter on Speed 5 for 2 minutes.
Add brown sugar; mix on Speed 5 for 2 minutes. Add eggs, milk and
vanilla and continue to mix on Speed 5 for 2 minutes. Eject Beaters and
attach Cookie Dough Hooks. Add half of the flour mixture and beat on
Speed 3, gradually adding remaining flour mixture, allow to mix on Speed
3 for 2 minutes. Drop one teaspoon at a time onto a lightly greased cookie
sheet. Flatten and sprinkle with topping. Bake as directed.
26
Page 28

CHOCOLATE CHIP DELIGHT
1-1/2 cups all-purpose flour
3/4 teaspoon salt
3/4 teaspoon baking soda
3/4 teaspoon baking powder
1-1/2 cups shortening
3/4 cup brown sugar
3/4 cup white sugar
2 eggs
1-1/2 teaspoons vanilla extract
3/4 cup coconut
2-1/4 cups quick or old fashioned oats
12 oz. semi-sweet or milk chocolate chips
Yield: 4 dozen cookies or 2 cookie bars
Te mperature: 350°F/177°C
Bake Time: 12-15 minutes
Combine flour, salt, baking soda, and baking powder in a small bowl to
create a flour mixture and set aside. Attach the Beaters, place shortening
in the Mixing Bowl and beat on Speed 5 for 2 minutes. Add both sugars
and cream on Speed 5 for 2 minutes. Add eggs and vanilla extract and
continue to mix on Speed 7 for 1 minute.
Remove Beaters and attach Cookie Dough Hooks. Add the flour mixture
and beat on Speed 5 until combined. Add coconut and half of the
oatmeal, mix on Speed 5 for 2 minutes. Add remaining oatmeal and mix
on Speed 5 until mixed.
Drop by teaspoon onto lightly greased cookie sheet and bake as directed.
27
Page 29

CHOCOLATE FUDGE
8 oz. cream cheese, softened
4 cups powdered sugar
2 teaspoons vanilla extract
12 oz. chocolate chips*
1 cup pecans or walnuts, chopped
* Semi-sweet chocolate, white chocolate, or
milk chocolate (11.5 to 12 oz. bag)
Yield: 25 pieces
Attach Beaters and beat cream cheese, powdered sugar, and vanilla on
Speed 5 for 2 to 3 minutes. Set aside. Melt chocolate chips in a saucepan
on very low heat. Wait 2 to 3 minutes for chocolate to cool slightly. Add
the chocolate to the cream cheese mixture and stir on Speed 1 for 2
minutes. Increase Mixer’s speed to Speed 3 for 2 minutes. Reduce to
Speed 1, stir in the nuts and mix for 1 minute. Spread the fudge in a 8 x 8inch greased pan. Once fudge has firmed, cut into 1 inch pieces. Store in
refrigerator.
28
Page 30

CHOCOLATE SUGAR COOKIES
5-1/2 cups all-purpose flour
2 teaspoons baking powder
2/3 cup cocoa
2 cups butter, softened
1-1/2 cups sugar
4 eggs
1 tablespoons vanilla extract sugar
Yield: 4 dozen cookies or 2 cookie bars
Te mperature: 350°F/177°C
Bake Time: 12-15 minutes
Combine flour, baking powder and cocoa in a bowl and set aside. Attach
the Beaters and cream butter on Speed 5 for 2 minutes. Add sugar and
beat on Speed 5 for 2 minutes. Add eggs and vanilla and continue to mix
on Speed 5 for 2 minutes. Eject Beaters and attach Cookie Dough Hooks.
Add half of the flour mixture and beat on Speed 3, gradually adding
remaining flour mixture. Mix on Speed 3 for 2 minutes. Shape into
1-1/2inch balls and roll in sugar. Place onto a lightly greased cookie sheet
and bake as directed.
29
Page 31

OATMEAL RAISIN COOKIES
2 cups all-purpose flour
3/4 teaspoon salt
1-1/2 teaspoons baking soda
1/2 cups butter, softened
1-1/2 cups brown sugar
3/4 cup sugar
2 eggs
4 cups quick or old fashioned oats
1-1/2 cups raisins
Yield: 4 dozen cookies or 3 cookie bars
Te mperature: 350°F/177°C
Bake Time: 12-15 minutes
Combine flour, salt, and baking soda in a bowl and set aside. Attach the
Beaters and cream the butter on Speed 5 for 2 minutes.
Add both sugar and beat on Speed 5 for 2 minutes. Add eggs and
continue to beat on Speed 7 for 2 minutes. Eject Beaters and attach
Cookie Dough Hooks. Add half of flour mixture and mix on Speed 3 for
2 to 3 minutes. Add remaining flour mixture and mix on Speed 3 for 2
minutes. Add 1-1/2 cups oatmeal and mix on Speed 5, gradually adding
remaining oatmeal until well mixed. Allow to mix for 2 minutes. Reduce
to Speed 1, add raisins, and stir until mixed.
Drop by teaspoon onto greased cookie sheet and bake as directed.
30
Page 32

ONE-YEAR LIMITED WARRANTY
Warranty: This Farberware® product is warranted by Salton, Inc. to be free from defects in materials or
workmanship for a period of (1) year from the original purchase date. This product warranty covers only
the original consumer purchaser of the product.
Warranty Coverage: This warranty is void if the product has been damaged by accident in shipment,
unreasonable use, misuse, neglect, improper service, commercial use, repairs by unauthorized personnel,
normal wear and tear, improper assembly, installation or maintenance abuse or other causes not arising
out of defects in materials or workmanship. This warranty is effective only if the product is purchased and
operated in the USA, and does not extend to any units which have been used in violation of written
instructions furnished with the product or to units which have been altered or modified or to damage to
products or parts thereof which have had the serial number removed, altered, defaced or rendered
illegible.
Implied Warranties: ANY IMPLIED WARRANTIES WHICH THE PURCHASER MAY HAVE ARE LIMITED IN
DURATION TO ONE (1) YEAR FROM THE DATE OF PURCHASE. Some states do not allow limitations on how
long an implied warranty lasts, so the above limitation may not apply to you.
Warranty Performance: During the above one-year warranty period, a product with a defect will be
either repaired or replaced with a reconditioned comparable model (at our option) when the product is
returned to the Repair Center, or the purchase price refunded. The repaired or replacement product will
be in warranty for the balance of the one-year warranty period and an additional one-month period. No
charge will be made for such repair or replacement.
SERVICE AND REPAIR: SHOULD THE APPLIANCE MALFUNCTION, YOU SHOULD FIRST CALL TOLL-FREE
1 (888) 881-8101 BETWEEN THE HOURS OF 9:00 AM AND 5:00 PM CENTRAL STANDARD TIME AND ASK
FOR CONSUMER SERVICE STATING THAT YOU ARE A CONSUMER WITH A PROBLEM. PLEASE REFER TO
MODEL NUMBER: FSM126EM (White), FSM126RM (Red), FSM126BKM (Black), FSM126CBM (Cobalt Blue) or
FSM126BRXM (Bronze) WHEN YOU CALL.
In-Warranty Service (USA): For an appliance covered under the warranty period, no charge is made for
service or postage. Call for return authorization 1 (888) 881-8101.
Out-of Warranty Service: A flat rate charge by model is made for out-of-warranty service. Include
$10.00 (U.S.) for return shipping and handling. We will notify you by mail of the amount of the charge for
service and require you to pay in advance for the repair or replacement.
For Products Purchased in the USA, but Used in Canada: You may return the product insured,
packaged with sufficient protection, and postage and insurance prepaid to the USA address listed below.
Please note that all customs duty / brokerage fees, if any, must be paid by you and we will require you to
pay the cost of customs duty / brokerage fees to us in advance of our performing any service.
Risk During Shipment: We cannot assume responsibility for loss or damage during incoming shipment.
For your protection, carefully package the product for shipment and insure it with the carrier. Be sure to
enclose the following items with your appliance: any accessories related to your problem, your full return
address and daytime phone number, a note describing the problem you experienced, a copy of your sales
receipt or other proof of purchase to determine warranty status. C.O.D. shipments cannot be accepted.
To return the appliance, ship to: To contact us, please write to, call, or email:
ATTN: Repair Center Salton, Inc.
Salton, Inc. P.O. Box 7366
708 South Missouri Street Columbia, MO 65205-7366
Macon, MO 63552 1-888-881-8101
Limitation of Remedies: No representative or person is authorized to assume for Salton, Inc. any other
liability in connection with the sale of our products. There shall be no claims for defects or failure of
performance or product failure under any theory of tort, contract or commercial law including, but not
limited to negligence, gross negligence, strict liability, breach of warranty and breach of contract. Repair,
replacement or refund shall be the sole remedy of the purchaser under this warranty, and in no event
shall Salton be liable for any incidental or consequential damages, losses or expenses. Some
states do not allow the exclusion or limitation of incidental or consequential damages, so the above
limitation or exclusion may not apply to you.
Legal Rights: This warranty gives you specific legal rights, and you may also have other rights which
vary from state to state.
For more information on Salton products, visit our website: www.eSalton.com
©2004 Salton, Inc. All rights reserved.
FARBERWARE® is a registered trademark of Farberware Inc.®
Manufactured and sold pursuant to a license from Farberware Inc.®
07/04 PRINTED IN CHINA REV. 1 P/N 61531
E-mail: Farberware-electric@Saltonusa.com
 Loading...