

Saltillo CF10 User Manual

User’s Guide
Saltillo Corporation
2143 Township Road 112
Millersburg, OH 44654
www.saltillo.com
00000 Version 1.0

Chat Editor CD
INSTALLATION AND USE RIGHTS.
Chat Fusion and VocabPC are trademarks of Saltillo Corporation.
Android and Google Play are trademarks of Google Inc.
Microsoft and Windows are registered trademarks of Microsoft Corporation in the United States
and/or other countries.
Ivona is Copyright © 2001-2010, IVO Software Sp.z o.o.
Acapela is a trademark of Acapela Group
PCS Symbols illustrations are copyright of Mayer-Johnson Co.
Symbol Stix is copyright of News2You. "The Library of Character/Logo Symbols contained in this
software is included free of charge, may be used solely for communication purposes and may not be
sold, copied or otherwise exploited for any type of profit."
WordPower and ChatPower are trademarks of Inman Innovations, Inc.
My QuickChat 12 Adult is copyright of Talk To Me Technologies
My QuickChat 12 Child is copyright of Talk To Me Technologies
My QuickChat 8 Adult is copyright of Talk To Me Technologies
My QuickChat 8 Child is copyright of Talk To Me Technologies
My QuickChat 4 Child is copyright of Talk To Me Technologies
Chat Editor, owned by Saltillo Corporation
Microsoft Voices, owned by Microsoft Corporation
Microsoft's agreement states:
computer on your premises that you use to exchange data and software with portable devices
powered by a Microsoft operating system.
Saltillo grants permission for the use of Chat Editor on each computer used to exchange data with
the Chat Fusion devices.
You may install and use one copy of the software on each
Attention! Consult accompanying documents.
Warnings!
Device not intended to be an emergency call device or sole communication device.
When operating this device in a medical environment, do not use with any product that is not
medically approved.
Do not use the Chat Fusion close to sources of RF radiation or you may encounter interference.
Move away, if possible, from the source of the interference.
Any mounts used should be fitted by a qualified person. Failure to install the mounting system
according to the manufacturer's instructions may result in an injury to the user.
Analysis of positioning by a qualified person is required to prevent repetitive stress injuries to the
user.
Chat Fusion Use r ’s Guide Page 2

Implantable Medical Devices
Saltillo Corporation assumes no responsibility for any loss or claims by third parties which may arise
through the use of this product.
Saltillo Corporation assumes no responsibility for any damage or loss caused by the deletion of data
as a result of malfunction repairs or battery replacement. Be sure to back up all important data on
other media (computer) to protect against its loss.
Cords and straps are potential strangulation hazards. Please consider this prior to placing
these items with device users.
A minimum separation of six (6) inches should be maintained between a handheld wireless mobile
device and an implantable medical device, such as a pacemaker or implantable cardioverter
defibrillator, to avoid potential interference with the device.
Persons who have such devices:
• Should ALWAYS keep the mobile device more than six (6) inches from their implantable
medical device when the mobile device is turned ON;
• Should not carry the mobile device in a breast pocket;
• Should turn the mobile device OFF immediately if there is any reason to suspect that
interference is taking place
• Should read and follow the directions from the manufacturer of your implantable
medical device. If you have any questions about using your wireless mobile device with
an implantable medical device, consult your health care provider.
Chat Fusion Use r ’s Guide Page 3

Table of Contents
Welcome to Chat Fusion ................................................................................................... 9
What’s Included............................................................................................................... 10
Charging the Device Battery using the Standard Char ger ............................................... 11
Charging the Device Battery using the Wireless Charger ................................................ 13
Checking Battery Status .................................................................................................. 14
Checking Battery Status U sing Menus ....................................................................... 14
Checking Battery Status Using a Button ..................................................................... 14
Turning the Device On and Off ....................................................................................... 16
Chat Fusion 10 Device Features ...................................................................................... 17
Controlling Volume ......................................................................................................... 19
Positioning the Stand ....................................................................................................... 20
Removing and Reattaching the Stand .............................................................................. 21
Removing the Stand .................................................................................................... 21
Reattaching the Stand ................................................................................................. 21
Removing the Handle ...................................................................................................... 22
Attaching a Strap ............................................................................................................. 23
Using the Touchscreen .................................................................................................... 24
Using the Stylus ............................................................................................................... 25
Cleaning and Disinfecting Your Device .......................................................................... 26
Routine Cleaning and Disinfecting ............................................................................. 26
Disinfecting a Device for Use by Multiple Clients ..................................................... 26
Using the Home Screen ................................................................................................... 28
Using the Status Bar ................................................................................................... 28
Adding Shortcuts ........................................................................................................ 29
Opening and Closing the Application .............................................................................. 30
Using the Application Screen .......................................................................................... 31
Using Application Menus ................................................................................................ 32
Choosing a Vocabulary File ............................................................................................ 33
Considering the Device’ s A ccess Capabilities ............................................................ 33
Considering the User’s Cognitive Capabilities ........................................................... 33
Additional Considerations .......................................................................................... 34
Exploring Vocabulary Files ............................................................................................. 35
Available Vocabulary Fil es ............................................................................................. 36
WordPower ................................................................................................................. 36
WordPower20 Simply ................................................................................................. 36
WordPower24 ............................................................................................................. 36
WordPower24 w it h Phr a s e s ........................................................................................ 37
WordPower30 ............................................................................................................. 37
WordPower42 ............................................................................................................. 37
WordPower42 Basic ................................................................................................... 37
Chat Fusion Use r ’s Guide Page 4

WordPower48 ............................................................................................................. 37
WordPower60 ............................................................................................................. 37
WordPower80 ............................................................................................................. 38
WordPower108 ........................................................................................................... 38
MultiChat 15 ............................................................................................................... 38
VocabPC ..................................................................................................................... 38
myQuickChat .............................................................................................................. 38
myCore ....................................................................................................................... 39
Spelling ....................................................................................................................... 39
4-Basic ........................................................................................................................ 39
Essence ....................................................................................................................... 39
Chat Editor ...................................................................................................................... 40
Installing Chat Editor .................................................................................................. 40
Configuring Chat Editor ............................................................................................. 41
Opening Chat Editor ................................................................................................... 41
Using Vocabulary Files with the Editor ...................................................................... 42
Device and Editor Differen ces .................................................................................... 42
Using Chat Editor to Create Instructional Materials ................................................... 43
Turning Edit Mode On .................................................................................................... 45
Creating a Customized Vocabulary File .......................................................................... 46
Creating a Copy using the Device in Edit Mode ......................................................... 46
Creating a Copy from the Device Library ................................................................... 46
Creating a Copy using Chat Editor ............................................................................. 46
Modifying Button Text .................................................................................................... 47
Displaying the Button Text to Edit ............................................................................. 47
Editing the Button Text ............................................................................................... 48
Using Images with No Text ........................................................................................ 48
Adding or Modifying a Button Image ............................................................................. 49
Finding an Image from the Devi ce Library ................................................................. 50
Searching for an Image in the Device Library ............................................................ 50
Using Your Own Image .............................................................................................. 51
Transferring Images ......................................................................................................... 52
Hiding Buttons ................................................................................................................ 53
Hiding a Button ........................................................................................................... 53
Hiding or Showing Multiple Buttons .......................................................................... 54
Saving Hidden Button Settings ................................................................................... 54
Hiding and Showing Button Images ........................................................................... 54
Modifying Button Styles ................................................................................................. 55
Modifying a Button Style............................................................................................ 55
Modifying Button Color Saturation ............................................................................ 56
Modifying a Page Button Style ................................................................................... 56
Modifying a V ocabulary Button Style ........................................................................ 57
Chat Fusion Use r ’s Guide Page 5

Overriding a Button Style ........................................................................................... 57
Modifying a Button Arrow Link ...................................................................................... 58
Adding or Modifying a Button Action............................................................................. 59
Available Button Actions ................................................................................................ 60
Using Navigate, Visit, and Jump to Page .................................................................... 62
Copying Buttons .............................................................................................................. 63
Copying and Pasting a Button ..................................................................................... 63
Copying and Reusing the Same Button ...................................................................... 63
Copying and Pasting a Button Style............................................................................ 63
Using a Button in Multiple Places .............................................................................. 63
Prioritizing Buttons ......................................................................................................... 64
Rearranging Buttons ................................................................................................... 64
Resizing a Button ........................................................................................................ 64
Creating a Page ................................................................................................................ 65
Creating a New Page ................................................................................................... 65
Creating a Copy of a Page .......................................................................................... 65
Creating a Page from a Template ................................................................................ 65
Copying a Page from a Different Vocabular y File ...................................................... 66
Animating Page Transitions ........................................................................................ 66
Adding a Grid to Pages ............................................................................................... 66
Using Keyboards ............................................................................................................. 67
Choosing a Different Keyboard .................................................................................. 67
Linking a Button to a Keyboard .................................................................................. 67
Working with Gestures .................................................................................................... 68
Turning Gestures On or Off ........................................................................................ 68
Creating a Gesture for a Page ..................................................................................... 68
Creating a Gesture for All Pages ................................................................................. 69
Working with Speech ...................................................................................................... 70
Selecting a Synthesizer an d Voice .............................................................................. 70
Adding a Pause between Words .................................................................................. 71
Adding Words to the Pronunciation Dictionary .......................................................... 72
Configuring Spee ch Modes ......................................................................................... 72
Setting Access Options .................................................................................................... 73
Activating Buttons on Touch or Release..................................................................... 73
Setting a Time for Button Activation .......................................................................... 73
Setting a Time to Prevent Selection of a Button Twice .............................................. 74
Setting up a Beep when a Button is Pressed ............................................................... 74
Setting up a Visual Indication when a Button is Selected ........................................... 74
Using the Speech Displ ay Bar ......................................................................................... 75
Changing Functional SDB Settings ............................................................................ 75
Changing SDB Style Settings ..................................................................................... 76
Changing Device Orientation Settings............................................................................. 77
Chat Fusion Use r ’s Guide Page 6

Changing Orientation Settings .................................................................................... 77
Using Orientation Tilt with the SDB .......................................................................... 78
Switch Scanning .............................................................................................................. 79
Configuring Switches ................................................................................................. 79
Selecting Scan Mode .................................................................................................. 80
Configuring SDB and Empty Area Scans ................................................................... 80
Setting Scan Speed...................................................................................................... 81
Configuring Re-scans ................................................................................................. 81
Setting Activation Delay ............................................................................................. 81
Setting Cursor Color ................................................................................................... 81
Setting Auditory Prompts ........................................................................................... 82
Choosing a Voice ........................................................................................................ 82
Adding Row Prompts .................................................................................................. 83
Using Touchscreen Scanning ...................................................................................... 83
Using Word Finder .......................................................................................................... 84
Setting up Word Finder ............................................................................................... 84
Finding Specific Words .............................................................................................. 85
Using Text Options .......................................................................................................... 86
Adding, Modifying, and Deleting Abbreviations ........................................................ 86
Enabling Word Prediction ........................................................................................... 87
Enabling Automatic Capitalization ............................................................................. 87
Restricting Access ........................................................................................................... 88
Blocking Access to Application Settings .................................................................... 88
Blocking Access to the Operating System and Apps .................................................. 88
Blocking Access to Application Settings, the Operating System, and Apps ............... 89
Creating and Loading Profiles ......................................................................................... 90
Creating a Profile ........................................................................................................ 90
Loading a Profile ........................................................................................................ 90
Deleting a Profile ........................................................................................................ 91
Restoring Default Profile Settings .............................................................................. 91
Changing Languages and Voices ..................................................................................... 91
Changing Display Settings .............................................................................................. 91
Setting the Date and Time ............................................................................................... 92
Changing Date and Time Setti ngs .............................................................................. 92
Creating a Date/Time Button ...................................................................................... 92
Adjusting Audible Feedback ........................................................................................... 93
Analyzing Language Development.................................................................................. 94
Using the Realize Language Website ......................................................................... 94
Turning on Da ta Logging on Your Device ................................................................. 95
Uploading Data for Analysis....................................................................................... 96
Configuring Data Uploading ....................................................................................... 96
Setting up Automatic Data Uploads ............................................................................ 97
Chat Fusion Use r ’s Guide Page 7

Initiating an Immediate Data Upload .......................................................................... 98
Disconnecting the Device from Your Realize Language Account .............................. 98
Managing Your Realize Language Account ............................................................... 99
Adding a User to Your Realize Language Account .................................................... 99
Changing Your Realize Language Account Password .............................................. 100
Saving Data to a File to Analyze Manually .............................................................. 101
Changing Your Data Logging Password ................................................................... 102
Clearing Usage Data ................................................................................................. 103
Taking Pictures .............................................................................................................. 104
Updating the Application ............................................................................................... 105
Backing Up and Restor in g Vocabulary Files ................................................................. 107
Backing up a Library in the Editor ............................................................................ 107
Backing up a Library on th e D evi ce ......................................................................... 107
Restoring a Library to the Editor .............................................................................. 107
Restoring a Library to th e D evi ce ............................................................................. 107
Transferring Vocabulary Files ....................................................................................... 108
Copying Vocabulary Files from the Device to the Editor ......................................... 109
Copying Vocabulary Files from the Editor to the Device ......................................... 109
Troubleshooting ............................................................................................................. 110
Clearing and Restoring Customizations ......................................................................... 111
Removing Downloaded Apps and Files ........................................................................ 112
Care and Maintenance ................................................................................................... 113
Warranty ........................................................................................................................ 114
Index .............................................................................................................................. 115
Chat Fusion Use r ’s Guide Page 8

Welcome to Chat Fusion
This user’s guide offers step-by-step instructions for most operations
available with your Chat Fusion device. Additional information is
available as follows:
Support articles can be found on the Saltillo website:
http://saltillo.com/support/
Training opportunities can be found on the Saltillo website:
http://saltillo.com/webinars
Contact Saltillo for Operational or Technical support at:
Phone: 1-800-382-8622
Email: service@saltillo.com
Trouble Tickets:
http://saltillo.com/tt/
For Realize Language™ website support:
support@realizelanguage.com
Chat Fusion Use r ’s Guide Page 9
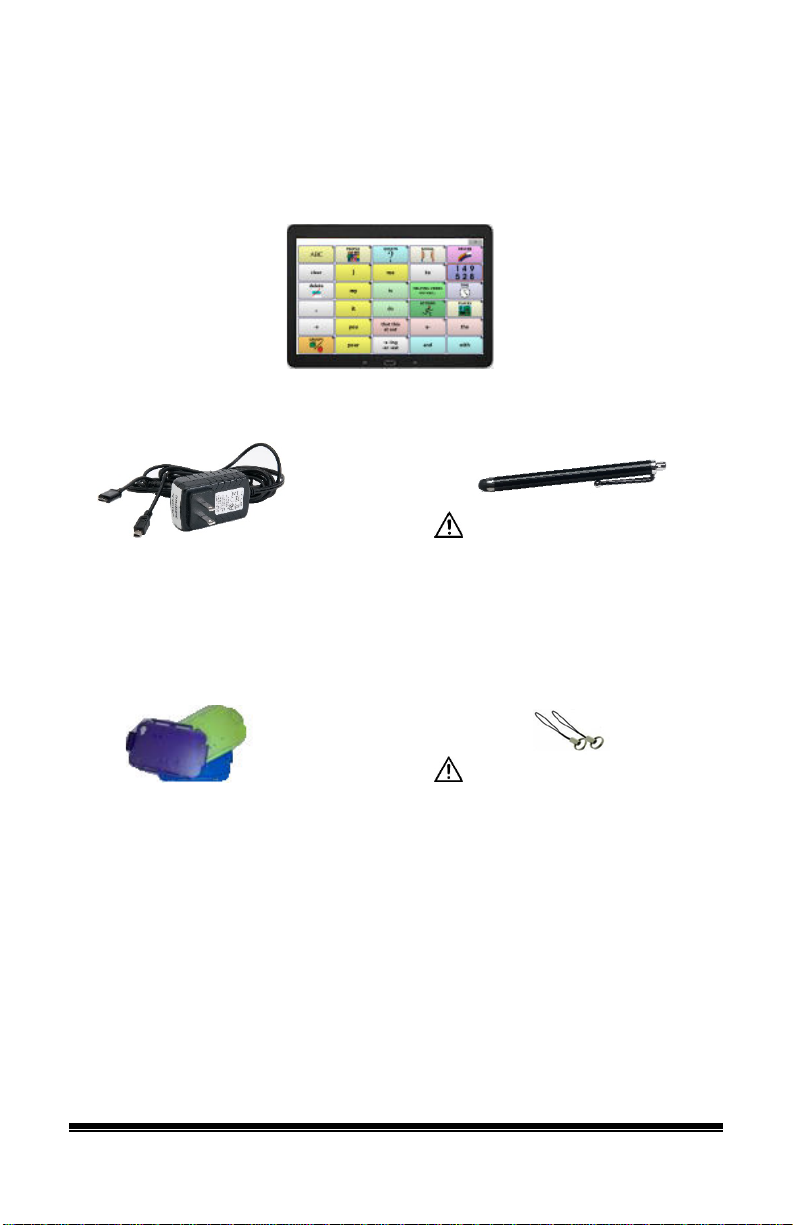
Your Chat Fusion Device
Battery Charger
Stylus
Colored Cases
Strap Attachments
Purple, Gray
Chat Editor Install CD
Includes a user manual and VocabPC Tour Guide
Chat Fusion Recovery Disk
This User’s Guide
Note: We suggest that you keep your packaging materials.
What’s Included
The stylus is a potential hazard
for choking or for poking the eye.
Chat Fusion Use r ’s Guide Page 10
Blue, Green,
The strap attachments are a
potential choking hazard.
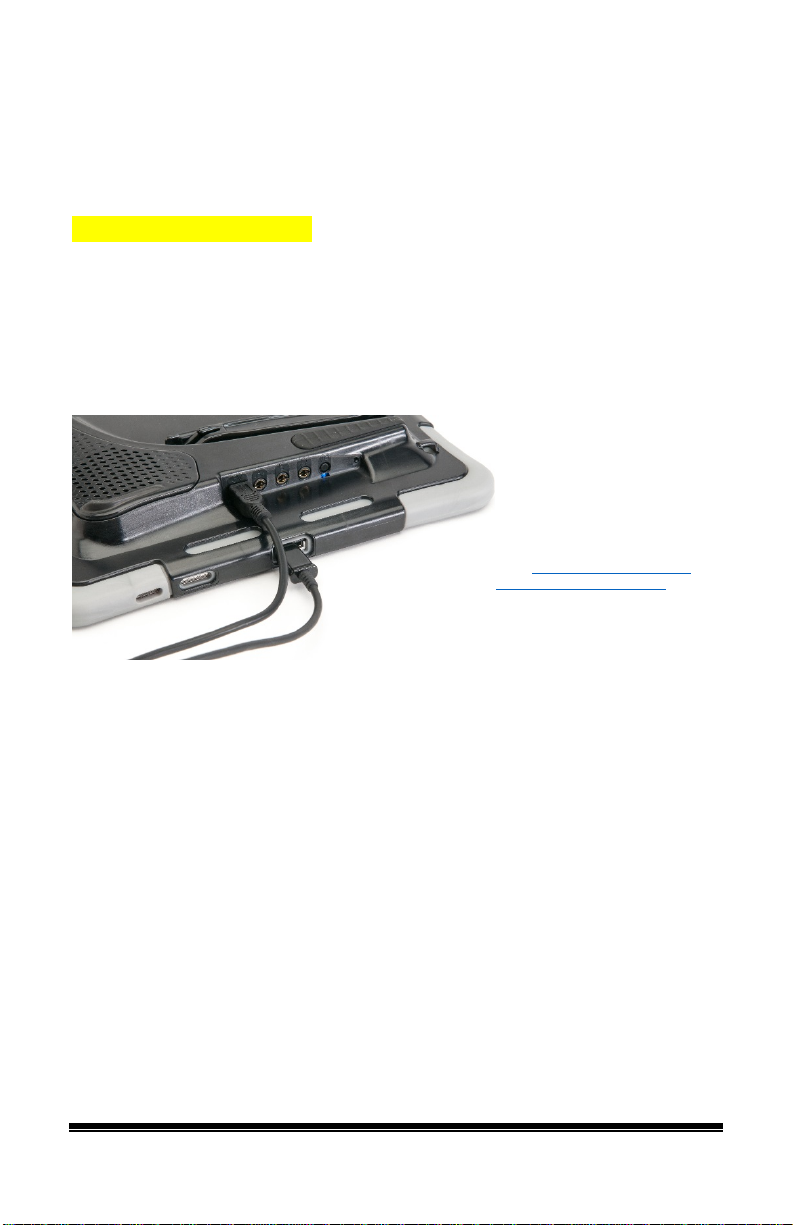
Charging the Device Battery using the Standard Charger
A battery charger was included in the box with your device. We suggest
charging the battery each night.
[photo of standard charger]
To connect the charger:
1. Tap the device’s power button to turn off the display.
2. Plug the charger into a wall outlet—a surge protector is
recommended.
3. Plug the charger cable into the charging port on the device.
See “
Close-up of the C har g er
Cable-to-Port Connection”.
Chat Fusion Use r ’s Guide Page 11
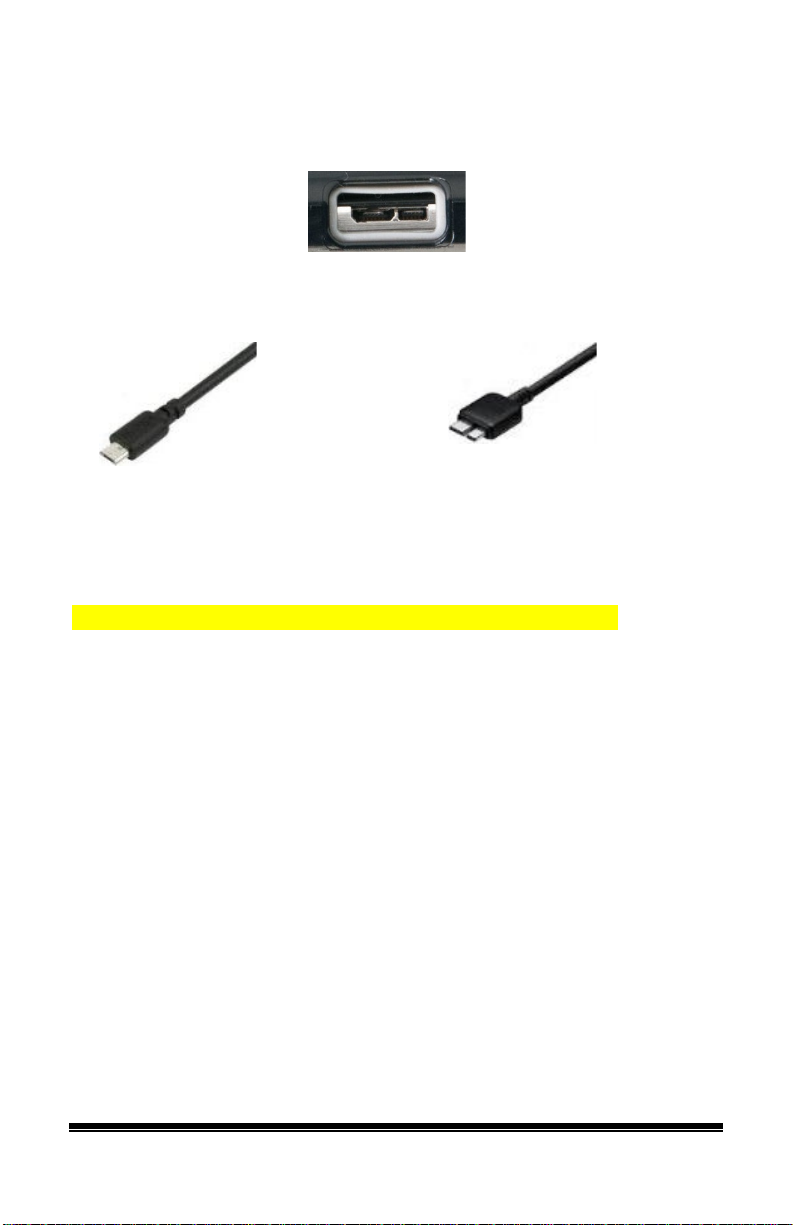
Device USB charging port
If you insert a USB 2.0 Micro cable (with
the port. It will not fill the entire port.
If you insert a USB 3.0 Micro B cable, the
Close-up of the Charger Cable-to-Port Connection
(back of device facing up)
the back of the device facing up), the
connector will insert into the left side of
connector will fill the entire port.
While the battery is charging:
The battery indicator, located on the front of the device at the top, will
glow red during charging and turn blue when the battery is fully charged.
[cropped view of top front of device with indicator called out]
When the battery is fully charged:
1. Unplug the connector from the device.
2. Unplug the charger from the wall outlet (optional).
3. Tap the device’s power button to turn the display on.
Chat Fusion Use r ’s Guide Page 12

Charging the Device Battery using the Wireless Charger
Charge your device in a well-ventilated area.
If you purchased the optional wireless charger, you can charge the device
battery with the charger stand open and the unit sitting upright or with
the stand closed and the unit lying flat.
[side view of device in charger in both positions]
We suggest charging the battery each night.
1. Plug the charger into a wall outlet—a surge protector is
recommended.
2. Position the device stand against the back of the device.
3. Center the device on the charger with the back of the device against
the charger.
4. The battery indicator, located on the front of the device at the top,
should glow red. If the indicator does not illuminate, adjust the
position of the device in the charger.
[cropped view of top front of device with indicator called out]
5. The battery indicator will continue to glow red during charging and
turn blue when the battery is fully charged.
When the device is fully charged:
1. Remove the device from the charger.
2. Unplug the charger from the wall outlet (optional).
3. Tap the device’s power button to turn the display on.
Chat Fusion Use r ’s Guide Page 13

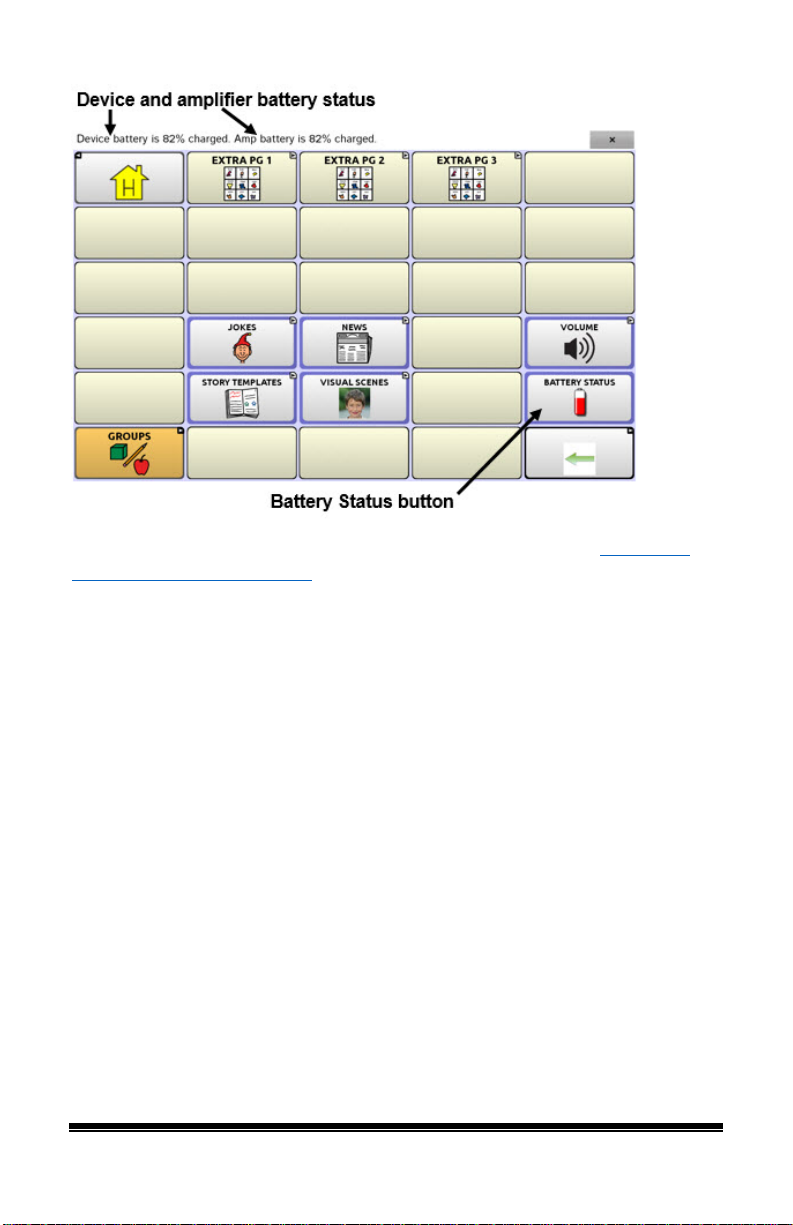
Checking Battery Status
You can check the battery status of the device by navigating menus or by
having a button on a vocabulary page that checks the status.
Checking Battery Status Using Menus
You can check the battery status of the device by navigating menus.
Choose Menu
The screen will show the battery charging status and charge level.
> Settings > System > About Device.
Checking Battery Status Using a Button
Some Saltillo-provided vocabulary files already include buttons for
checking the battery status. For example: WordPower™ offers t he o ption
from the last page of Groups, and MultiChat 15 of fers the button on the
Device Tools page from the second page of “Things”.
To create a button that checks the battery status of the dev ice, create a
button on a vocabulary page that contains the action “Battery Status”.
1. Press and hold on the button you want to modify. (Right-click the
button if you are using Chat Editor.)
2. Choose Edit Button to display the Button Properties.
3. Choose the Actions tab.
4. Use the drop-dow n list to select the Battery status action.
5. Choose OK.
Any time you choose this button, the application will speak the battery
status of the device and display the information in the Speech Display
Bar (SDB).
Chat Fusion Use r ’s Guide Page 14
For additional information on creating a button action, see “
Modifying a Button Action” on page 59.
Adding or
Chat Fusion Use r ’s Guide Page 15

Turning the Device On and Off
The power button is located on the top edge of the device.
To turn your device on from a complete power-down:
Press and hold the power button.
To turn your device off for storage:
1. Press and hold the power button.
2. At the prompt, choose Power off.
3. Choose OK to confirm.
To turn the screen on and off for daily use:
When using the device on a daily basis, tap the power button quickly to
turn just the screen on and off. We suggest tapping (not holding) the
power button to turn off the screen. Tap the power button to wake up the
screen.
To change the screen timeout setting:
The screen is set up to power down automatically after a specified period
of no activity. To change the period of delay between the last key press
or screen touch and the automatic screen timeout:
Choose Menu
> Settings > System > Display Settings > Screen
Timeout and choose the appropriate setting.
Chat Fusion Use r ’s Guide Page 16

Chat Fusion 10 Device Features
Front View
Headset jack (3.5 mm)
1
Power button: Press and hold to turn the device on or off
2
Volume button: Press to turn the volume up or down
3
Microphone
4
Light sensor
5
Camera lens
6
Display screen: Displays the application screens
7
USB port: Connect a US B cab le for charging the device or transferring
8
vocabulary
Back: Tap to return to the previous screen or menu. Press and hold to display an
9
option to restart the application.
Home: Press to go to the home screen
10
Menu: Tap to display menus that allow you to select a vocabulary file, enable or
11
disable augmentative options, set how and when to speak messages, and
configure a wide variety of additional options.
Chat Fusion Use r ’s Guide Page 17

Side and Back View
USB port for charging the device or transferring vocabulary
1
Switch jack A
2
Switch jack B
3
Headset jack
4
Handle
5
USB port for a USB mouse or keyboard
6
Screw holes for optional wheelchair mounting plate
7
Stand
8
Chat Fusion Use r ’s Guide Page 18

Controlling Volume
To prevent possible hearing damage, do not listen to earphones at high
volume levels for long periods.
The volume button is located on the edge of the device. Press the ends of
the button to increase or decrease volume.
In addition to using the volume button, you can add volume controls to
buttons within vocabulary pages. For details, see “
a Button Action” on page 59.
Adding or Modifying
Chat Fusion Use r ’s Guide Page 19
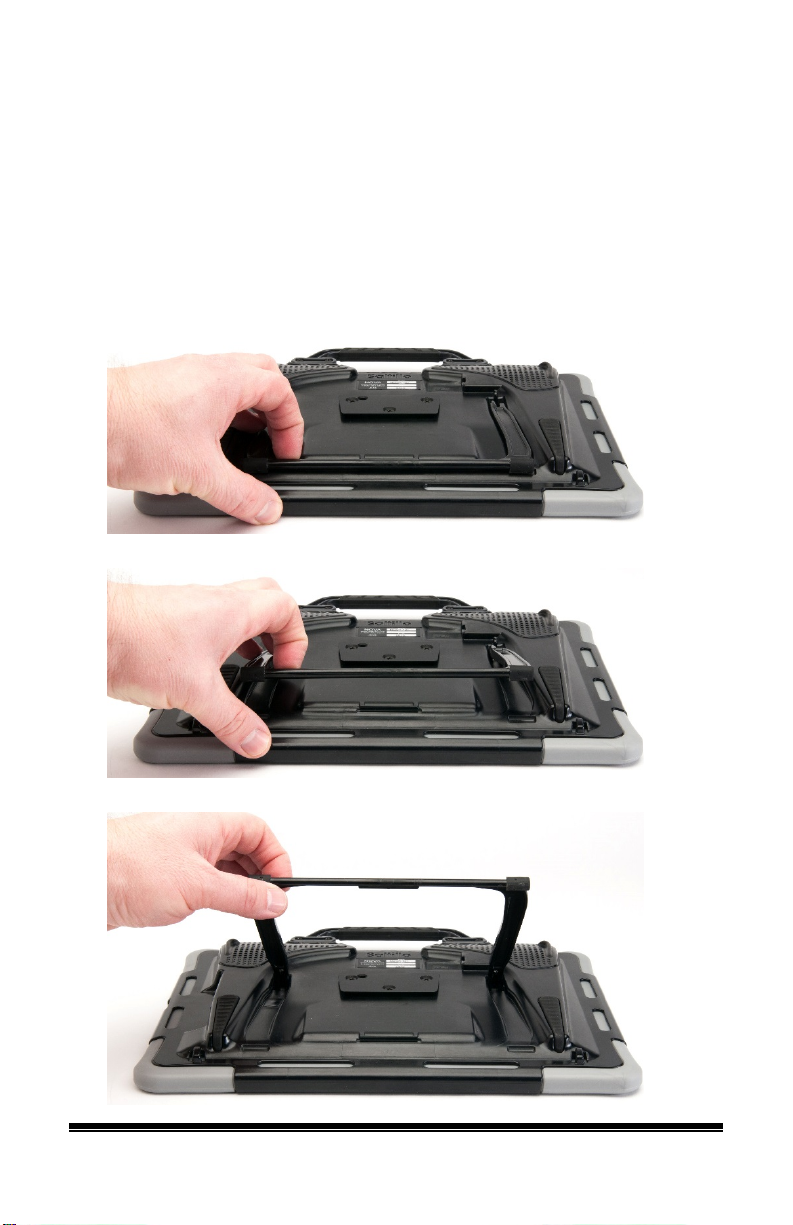
Positioning the Stand
To position the device at an angle for easy viewing of the screen, do the
following:
1. Place the device face-down on a flat surface.
2. While holding your thumb on the edge of the device below the
stand’s bottom support, press on the inside of the support with the tip
of your index finger (or the tips of several fingers) to pull the support
away from the latch.
3. Lift the support away from the back of the device …
4. until the legs latch in to place.
Chat Fusion Use r ’s Guide Page 20
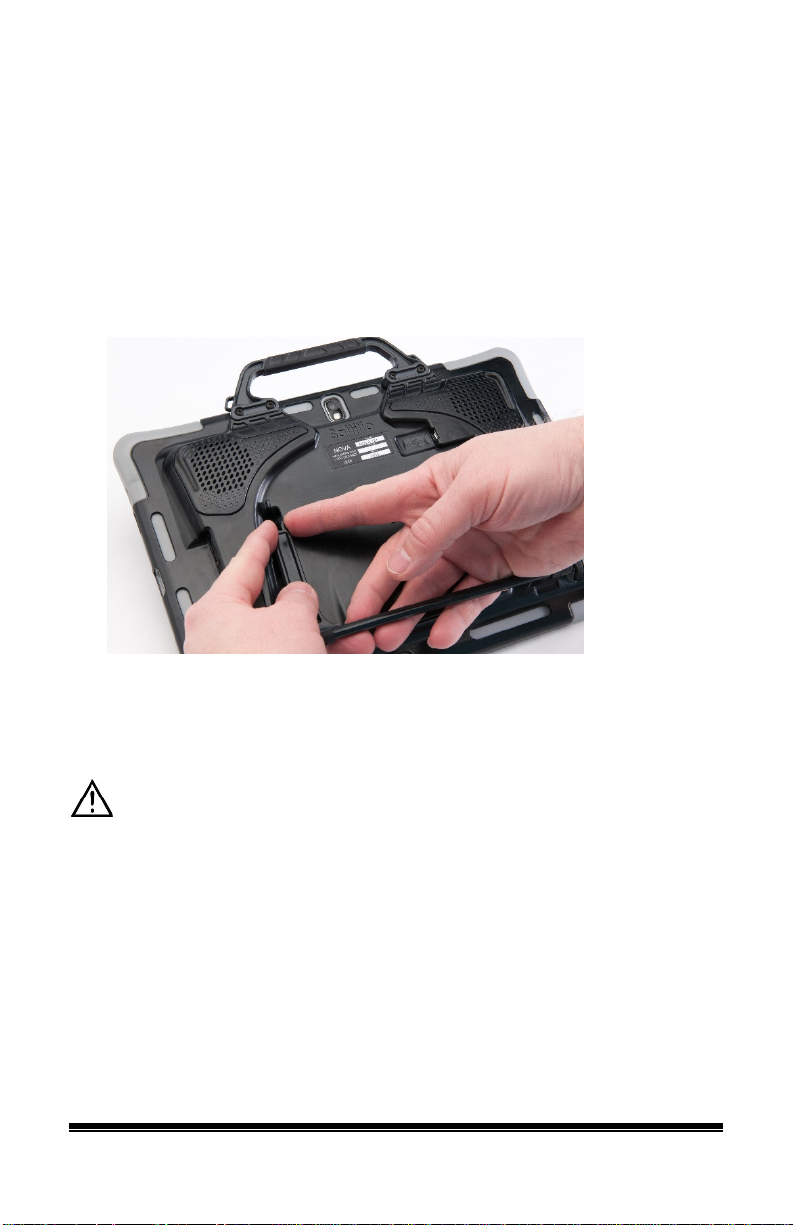
Removing and Reattaching the Stand
If you do not want to use the stand, you can remove it from the back of
the device. You can reattach it easily at any time.
Removing the Stand
1. Position the stand so that it is not latched in place.
2. Squeeze near the end of one leg with your fingers until the small peg
disengages from the holder.
3. Pull the leg up until it is completely out of the holder.
4. Repeat for the other leg.
Note: Be sure to store the stand in a safe location in case you want to
reattach it later.
When the stand is removed, it becomes a potential hazard for choking
or for poking the eye.
Reattaching the Stand
1. Squeeze near the end of one leg of the stand with your thumb and
index finger.
2. Push the leg into the holder until the small peg snaps into place.
3. Repeat for the other leg.
Chat Fusion Use r ’s Guide Page 21

Removing the Handle
If you do not plan to use the handle, you can remove it by removing the
four screws that hold it in place.
The handle and screws are potential choking hazards. Store them in a
safe location.
Chat Fusion Use r ’s Guide Page 22

For hands-free transport, loops for attaching a
Attach two loops to the appropriate holders as shown.
1
2
3
4
Note: Do not attach a strap directly to the plastic case as this may dam age
Attaching a Strap
strap were provided in your Chat Fusion
package. For convenience, there are two sets
of strap holders—one set on the handle and
another set on the bottom edge of the device.
Note: If you remove the handle, simply attach the strap to the bottom
holders.
the device.
The loops are a potential choking hazard.
Chat Fusion Use r ’s Guide Page 23

Using the Touchscreen
Your device comes with a capacitive touchscreen. It responds best to a
light touch from the pad of your finger. You can also use the stylus that
was provided with your device. See “Using the Stylu s
Important! Using excessive force or a metallic object when pressing on
the touchscreen may damage the tempered glass surface and void the
warranty.
”.
Note: To clean the touchscreen, see “Routine Cleaning and Disinfecting
on page 26. If your device will be used by more than one client, see
“Disinfecting a Device for Use by Multiple Clients” on page 26
.
”
Chat Fusion Use r ’s Guide Page 24

Using the Stylus
A compatible stylus was provided with your device. If you prefer to
purchase a different stylus, be sure it is compatible with a capacitive
touchscreen.
Note: The stylus provided has an opening on the end and can be attached
to an individual or the device using a chain, string, or lanyard.
The stylus is a potential hazard for choking or for poking the eye.
Chat Fusion Use r ’s Guide Page 25

Cleaning and Disinfecting Your Device
If your device will only be used by one client, routine cleaning and
disinfecting should be sufficient. If, however, multiple clients will be
using the device, take additional measures to clean and disinfect the
device after it has been used by one client before allowing it to be used
by another client.
Routine Cleaning and Disinfecting
To clean your device case and screen, turn the device off, wipe with a
soft, lint-free cloth slightly dampened with water, and dry with another
soft, lint-free cloth. Do not spray or splash liquid directly on the device.
To disinfect the case, moisten a clean cloth in a solution of 1/4 cup of
vinegar and 1 cup of water. Do not use vinegar and water on the display.
Disinfecting a Device for Use by Multiple Clients
Note: This section applies only when multiple clients will be using the
same device. In that situation, it’s vital to effectively disinfect the device
and accessories that have been used by a client before handling and use
by another client.
First Step: Put on protective gloves
Next Step: Clean the device and accessories
1. Wipe down the device and accessories with disinfectant wipes
(Virucidal, Bactericidal, Pseudomonacidal, Tuberculocidal,
Fungicidal)—Metrex CaviWipes
manufacturer’s instructions for cleaning.
2. Take a Q-tip with cleaner applied (for example, Windex® or another
commercial cleaner) and clean inside all cracks and crevices. You
may want to use a toothbrush or similar brush.
3. Blow the device off with an air hose, or wipe it dry.
™
. Follow the disinfectant product
Important! Make sure all soil is removed from the device and
accessories. This is vital before proceeding to disinfecting th
quipment.
e
Chat Fusion Use r ’s Guide Page 26
e

Next Step: Disinfect the device and accessories
1. Wipe down the device and accessories with a new disinfectant wipe
(Virucidal, Bactericidal, Pseudomonacidal, Tuberculocidal,
Fungicidal)—Metrex CaviWipes. Follow the disinfectant product
manufacturer’s instructions for disinfecting.
2. Make sure to clean inside all cracks and corners, and wipe more than
once if necessary to keep the device wet for a minimum of three (3)
minutes.
3. Allow the device and accessories to dry.
Final Step: Wipe the touchscreen
1. When the device and accessories are dry, wipe down the viewing
area (touchscreen, keyguard, etc.) with glass cleaner, so the screen
doesn’t discolor.
2. Allow the equipment to dry.
Chat Fusion Use r ’s Guide Page 27

Using the Home Screen
The home screen allows you to place shortcuts, widgets, and other items
to customize the device to your needs.
To display the home screen, press Home on the device.
Note: Dedicated (locked) devices do not have access to the home screen.
Unless stated otherwise, instructions in this user’s guide start with the
device unlocked and running the application.
Using the Status Bar
The home screen’s status bar displays icons to show notifications, battery
power, and connection details.
Pulling down on the status bar displays options for viewing notifications
and quickly turning on or off some commonly-used operating system
settings.
Chat Fusion Use r ’s Guide Page 28

Adding Shortcuts
The home screen provides shortcuts to applications. Shortcuts to the
application and the camera are provided initially. You can add shortcuts
as you need them.
To add a shortcut to an app or widget:
1. Press and hold on an empty area of the home screen. The Home
Screen menu opens.
2. Choose Apps and widgets. The Apps tab is displayed. If you want
to add a widget, choose the Widgets tab.
3. Press and hold on the item for which you’re creating the shortcut.
The shortcut is placed on the home screen automatically.
To remove a shortcut:
1. Press and hold on the shortcut until Remove appears.
2. Drag the shortcut to Remove.
Chat Fusion Use r ’s Guide Page 29

Application shortcut
Opening and Closing the Application
To open the application from the home screen, tap the application
shortcut.
When the application is open, pressing Home
application and display the operating system’s home screen.
will minimize the
To close the application, press and hold Back
and confirm by
choosing Yes.
Using the power button to turn off the device will also close the
application and all open apps. Turning the device on from a full powerdown will restart the application automatically.
Note: For the best performance of the application, close any apps that are
running in the background. Press and hold Home
, choose Task
Manager, and close the apps.
Chat Fusion Use r ’s Guide Page 30
 Loading...