

Salora PL-4215TN Instruction Manual
PL-4215TN
42” PLASMA TV
Instruction Manual
SALORA CTV100 42"PLAS ING 9/5/06 9:49 Page 1

DEAR CUSTOMER . . . . . . . . . . . . . . . . . . . . . . . . . . . . . . . . . . . . . .3
WHAT TO DO FOR THE TV SET'S SAFETY . . . . . . . . . . . . . . . . . . .4
FUNCTIONS OF THE TV PARTS . . . . . . . . . . . . . . . . . . . . . . . . . . .6
REMOTE CONTROL . . . . . . . . . . . . . . . . . . . . . . . . . . . . . . . . . . . .8
AERIAL CONNECTION . . . . . . . . . . . . . . . . . . . . . . . . . . . . . . . . .10
VIDEO, COMPUTER AND DECODER CONNECTION . . . . . . . . . .11
PC / DVI SETUP (MENUS) . . . . . . . . . . . . . . . . . . . . . . . . . . . . . . .15
TV SWITCHING ON AND OFF . . . . . . . . . . . . . . . . . . . . . . . . . . .16
TV FUNCTIONS . . . . . . . . . . . . . . . . . . . . . . . . . . . . . . . . . . . . . .17
TV FUNCTIONS (MENUS) . . . . . . . . . . . . . . . . . . . . . . . . . . . . . . .19
AUTOMATIC SEARCH . . . . . . . . . . . . . . . . . . . . . . . . . . . . . . . . . .19
MANUAL SEARCH . . . . . . . . . . . . . . . . . . . . . . . . . . . . . . . . . . . .20
NAMING . . . . . . . . . . . . . . . . . . . . . . . . . . . . . . . . . . . . . . . . . . .21
DELETING PROGRAMS / PROGRAM TABLE . . . . . . . . . . . . . . . . . .22
MOVING THE PROGRAMS . . . . . . . . . . . . . . . . . . . . . . . . . . . . . .23
PICTURE SETTINGS . . . . . . . . . . . . . . . . . . . . . . . . . . . . . . . . . . . .24
SOUND SETTING . . . . . . . . . . . . . . . . . . . . . . . . . . . . . . . . . . . . .25
FEATURES . . . . . . . . . . . . . . . . . . . . . . . . . . . . . . . . . . . . . . . . . . .27
LOCK FUNCTIONS . . . . . . . . . . . . . . . . . . . . . . . . . . . . . . . . . . . .28
BURN PROTECT . . . . . . . . . . . . . . . . . . . . . . . . . . . . . . . . . . . . . .29
TELETEXT . . . . . . . . . . . . . . . . . . . . . . . . . . . . . . . . . . . . . . . . . . .30
BEFORE CALLING SERVICE . . . . . . . . . . . . . . . . . . . . . . . . . . . . . .32
TECHNICAL SPECIFICATIONS . . . . . . . . . . . . . . . . . . . . . . . . . . . .33
CONTENTS
2
SALORA CTV100 42"PLAS ING 9/5/06 9:49 Page 2

CCoonnggrraattuullaattiioonnss!!
You have made an excellent choice. Your new TV set will turn your
home into a happier place. But before using and positioning it, please
read this manual carefully and keep it for future reference.
TThhee ffeeaattuurreess ooff yyoouurr TTVV::
• Your color TV is remote controlled
• You can adjust all commands regarding display and voice using the
menus on the screen (On Screen display)
• You can adjust the menu language to whatever option you want.
• You may register 200 channels in the VHF, UHF and S bands
• Suitable for receiving cable broadcast
• It is easy to find the channel you want with the automatic search
system, you may register and name them (ATS)
• You can set the TV for automatic switching off periods from 1 to 999
minutes intervals
• 5 minutes after ending of the broadcasting, the TV automatically
switches off and shifts to Stand by (Auto Shut off)
DEAR CUSTOMER
3
SALORA CTV100 42"PLAS ING 9/5/06 9:49 Page 3
FFiirrsstt wwaarrnniinngg
To prevent contact or fire risk, protect your TV from rain and
humidity
* There is a high voltage in your TV set. So, please do not open its
cover
* Only apply to an authorized service, where necessary
MMeeaassuurreess
* Opertat your TV at 220 V AC 50 Hz, city network voltage
* Please pay attention to the power cable of your TV. It must be
attached to the grounded plug.
* Immediately switch off your TV set if any liquid flows or an
objects falls, remove the plug from the outlet and apply to
authorized service
* Do not remove the plug by pulling its cable. Hold the plug body
PPoossiittiioonniinngg
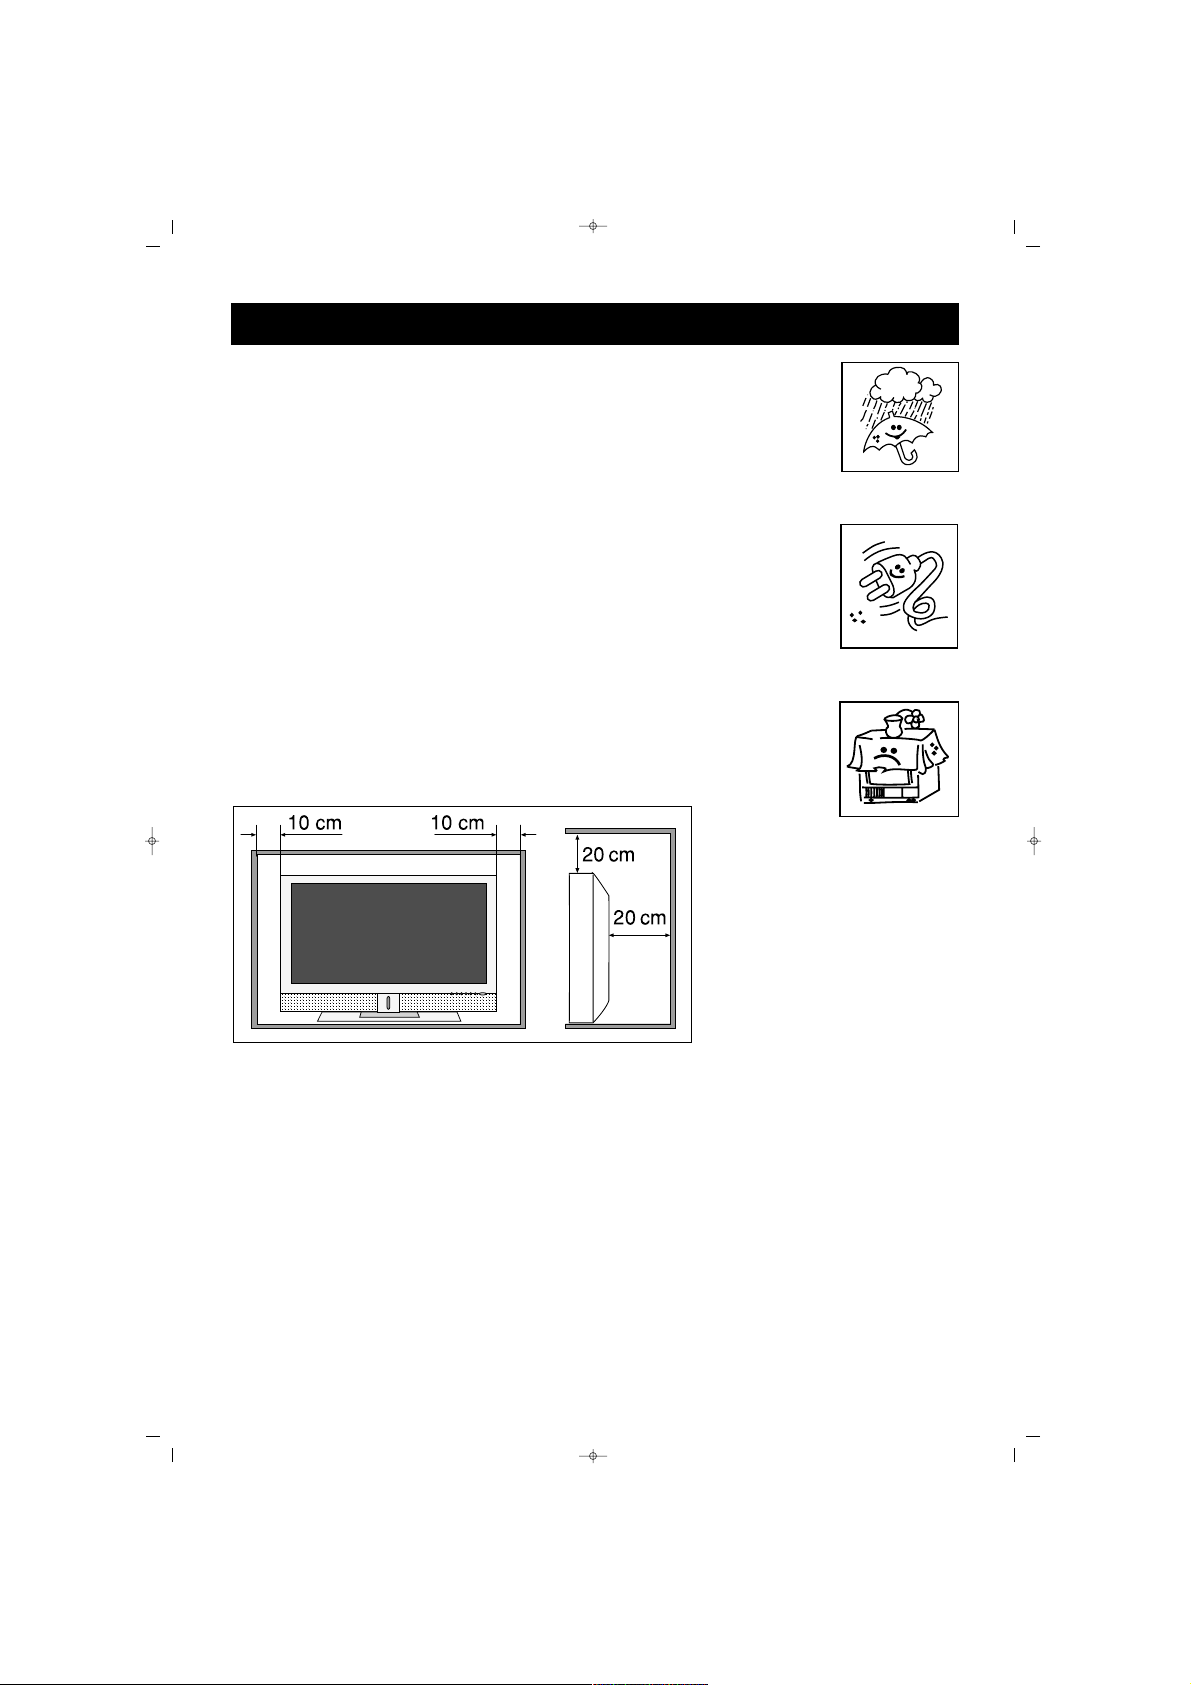
* Do not position your TV set near a heat source or humid,
dusty, mechanically vibrating or direct sun light receiving places
* Take care of leaving space in the periphery of the TV set. Do
not cover it with cloth etc.
* Do not place vases etc. containing water on your TV set
* Do not position your TV set near a fire source
CClleeaanniinngg
Do not use chemical or mechanical cleaners that may impair its outer paint
and the panel.
RReeppaacckkaaggiinngg
Keep the original cardboard box and packing materials to reuse where
necessary
WHAT TO DO FOR YOUR TV'S SAFETY?
4
SALORA CTV100 42"PLAS ING 9/5/06 9:49 Page 4

5
WARNING!
DO NOT LEAVE THE SCREEN WITH A FREEZED PICTURE FOR A
LONG TIME.
PREVENT LONG TIME FIXED DISPLAY
OTHERWISE, THE FIXED DISPLAY MAY LEAVE PERMANENT MARKS
ON THE SCREEN
EXAMPLE:
AFTER WATCHING THE SAME CHANNEL FOR A LONG TIME, A
PERMANENT MARK MAY BE LEFT ON THE SCREEN BECAUSE OF
THE LOGO'S FIXED POSITION. LIKEWISE, ALSO PREVENT
REMAINING OF A TELETEXT PAGE ON THE SCREEN FOR A LONG
TIME.
DO NOT LEAVE THE SET SWITCHED ON FOR A LONG TIME WITH
SUCH BROADCASTING OPEN.
WHAT TO DO FOR YOUR TV'S SAFETY?
SALORA CTV100 42"PLAS ING 9/5/06 9:49 Page 5
6
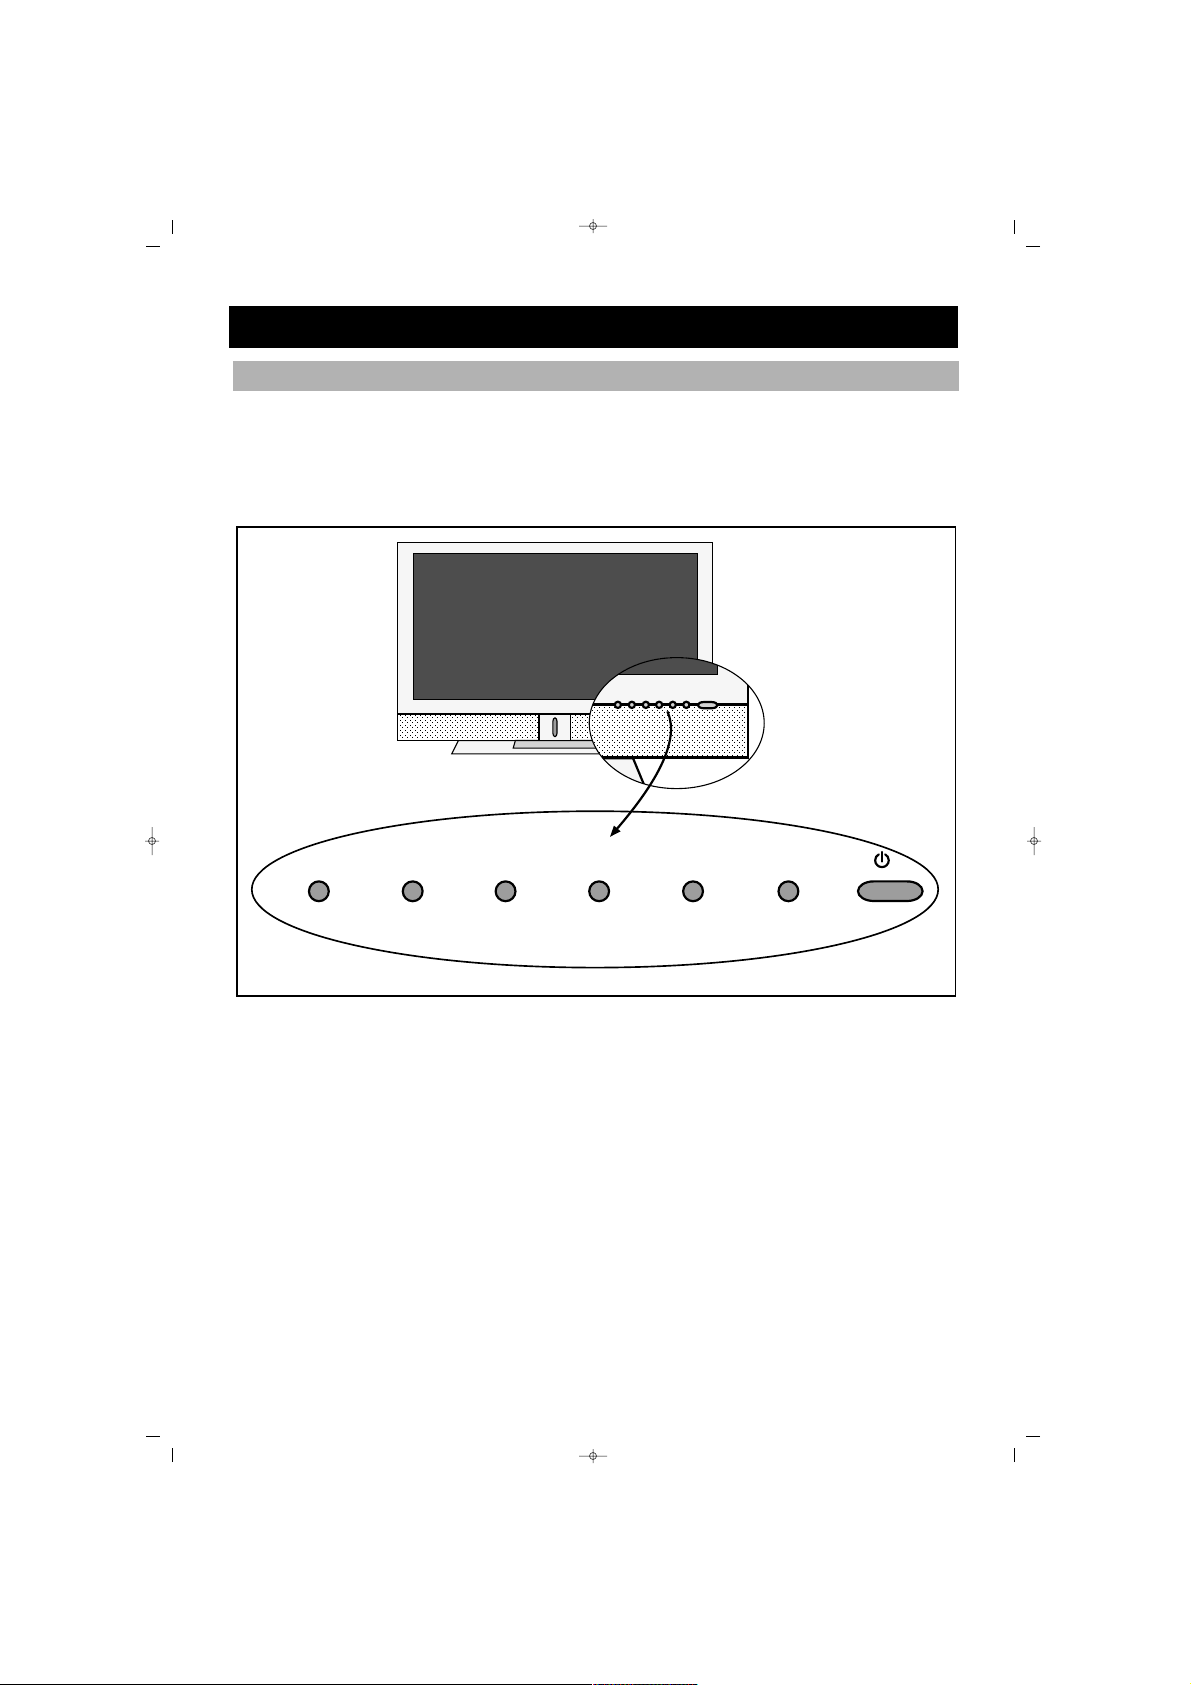
FRONT VIEW
On the right bottom part of the PLASMA TV are Switch
oonn//ooffff,, VV++//VV--,, PP++//PP--,,
MMEENNUU aanndd SSEELL
buttons while there is the
RReecceeiivveerr EEyyee
and
LLeedd
on the right
bottom corner.
FUNCTIONS OF THE TV PARTS
SALORA CTV100 42"PLAS ING 9/5/06 9:49 Page 6
V+V–MENU P– P+SEL
‹Ç‹NDEK‹LER
7
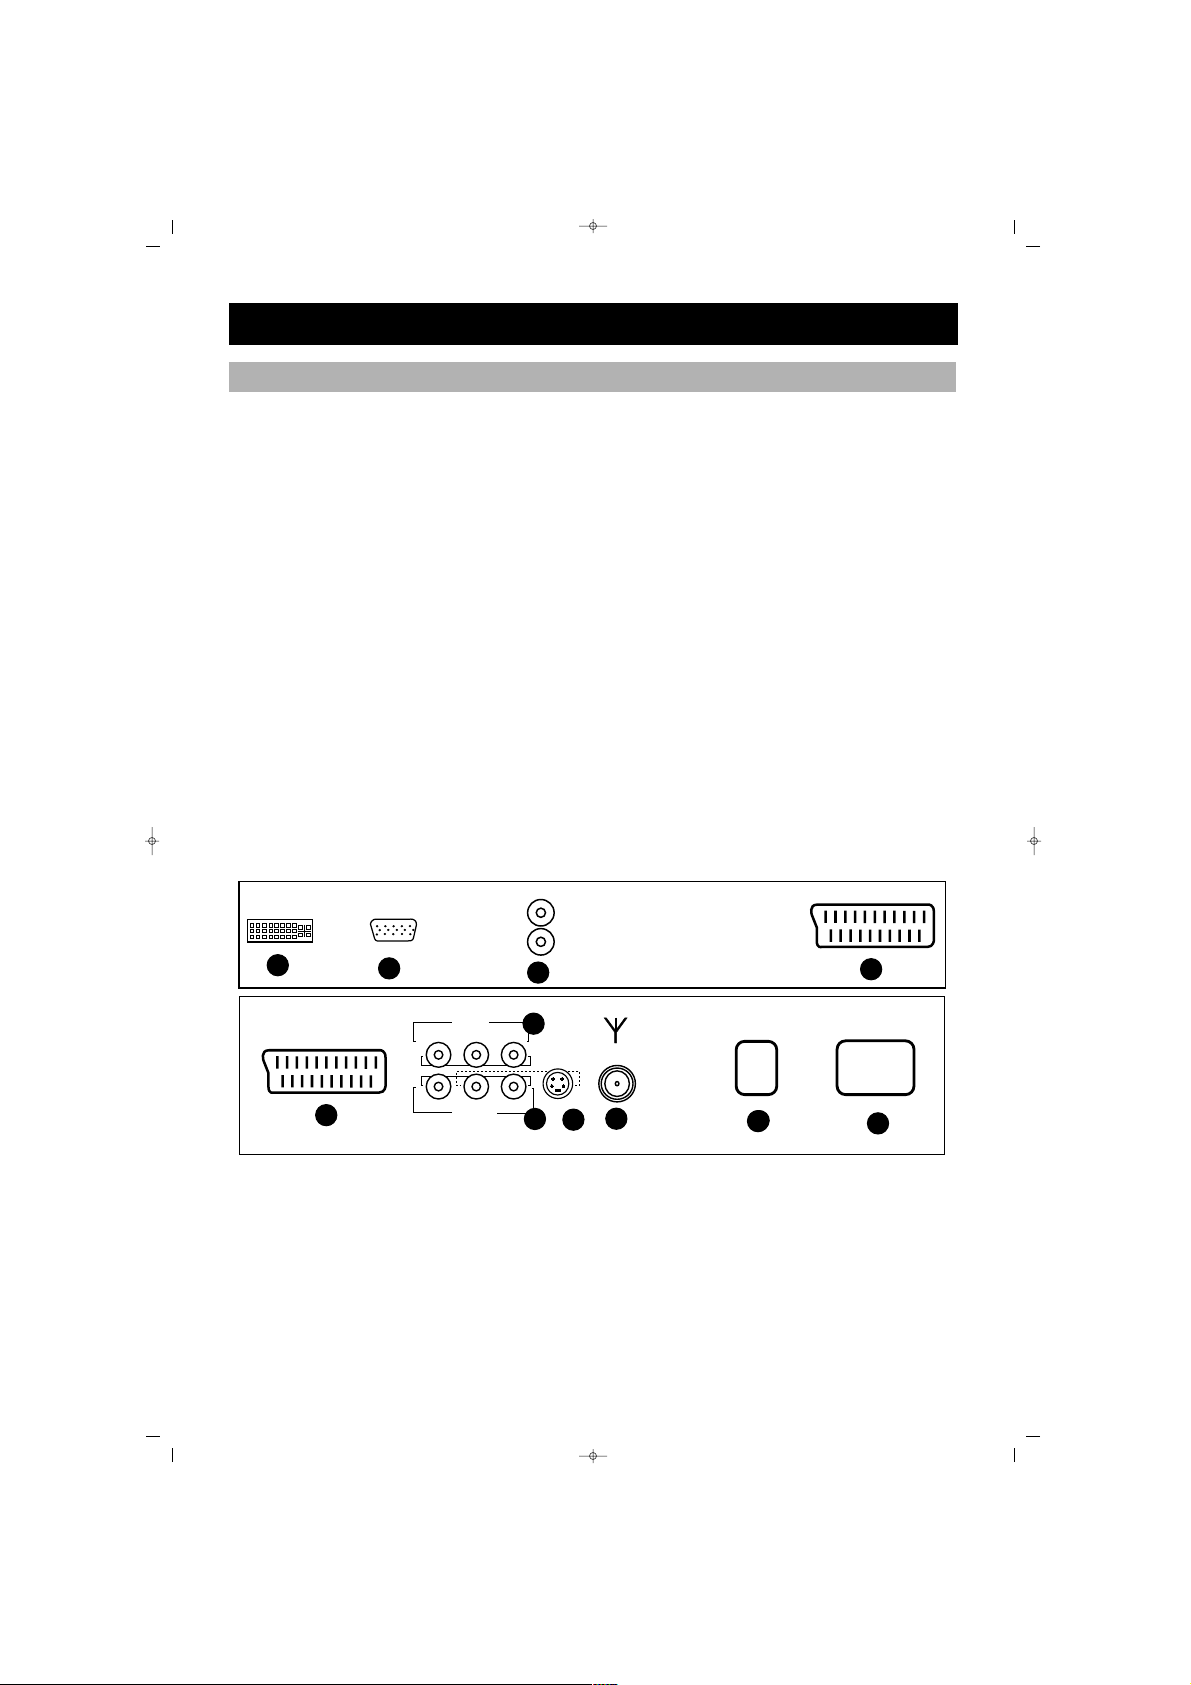
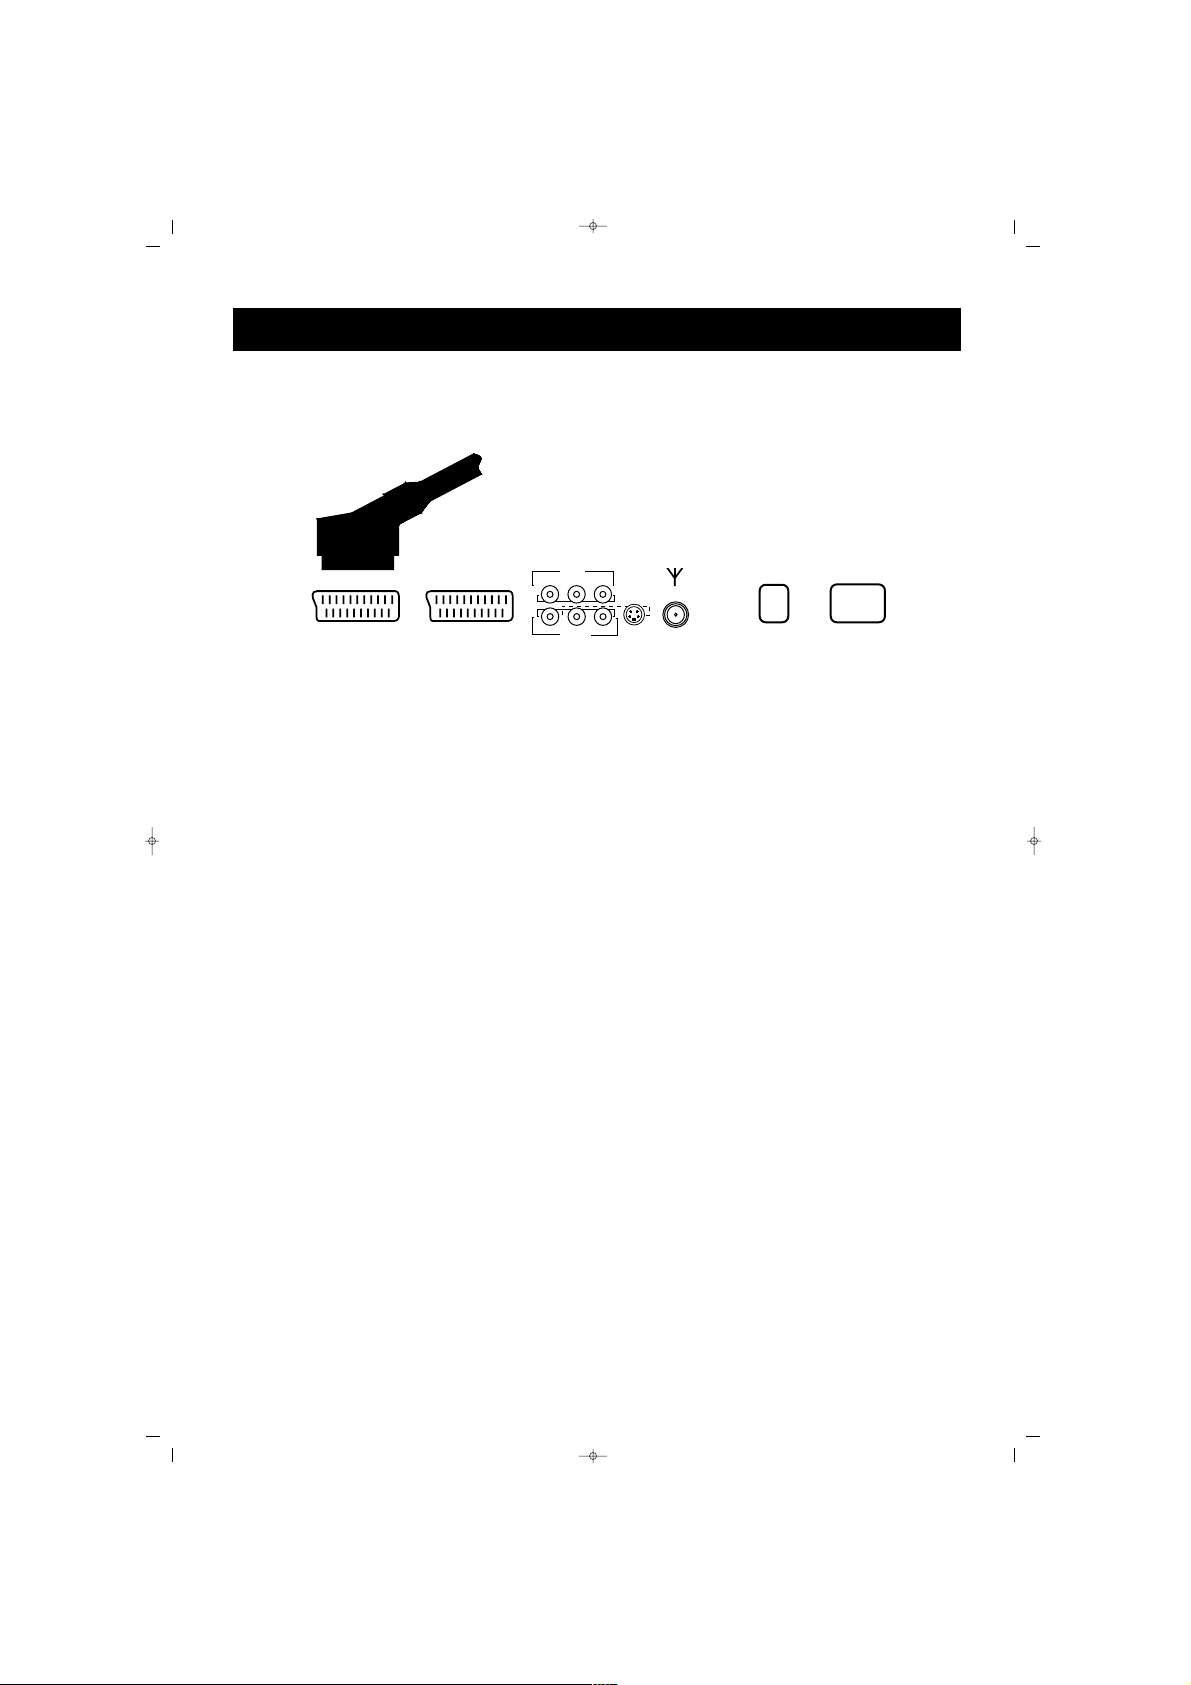
REAR VIEW
In the rear part of your Plasma TV:
1. PC
2. DVI (for PC, Set top Box)
3. Speakers (PC/DVI Sound input)
4. ON/OFF Key
5. SCART 1 (Euroconnector) For VCR, DVD Set top box
6. SCART 2 (Euroconnector) For VCR, DVD Set Top Box
7. S-Video (For DVD, Set top box and S-VHS)
8. AV Input 1 (For VCR, DVD or Set top box)
9. AV Input 2 (For VCR, DVD or Set top box)
10. TV Antenna Input (For TV antenna cable) (continental)
11. AC power cable inlet
POWER
SCART 2
ON
OFF
S-Video
LRCVBS
AV
6
7
8
9
10
11
12
ANT.IN
SCART 1
AUDIO
R
L
1
2
3
5
FUNCTIONS OF THE TV PARTS
4
SALORA CTV100 42"PLAS ING 9/5/06 9:49 Page 7
‹Ç‹NDEK‹LER
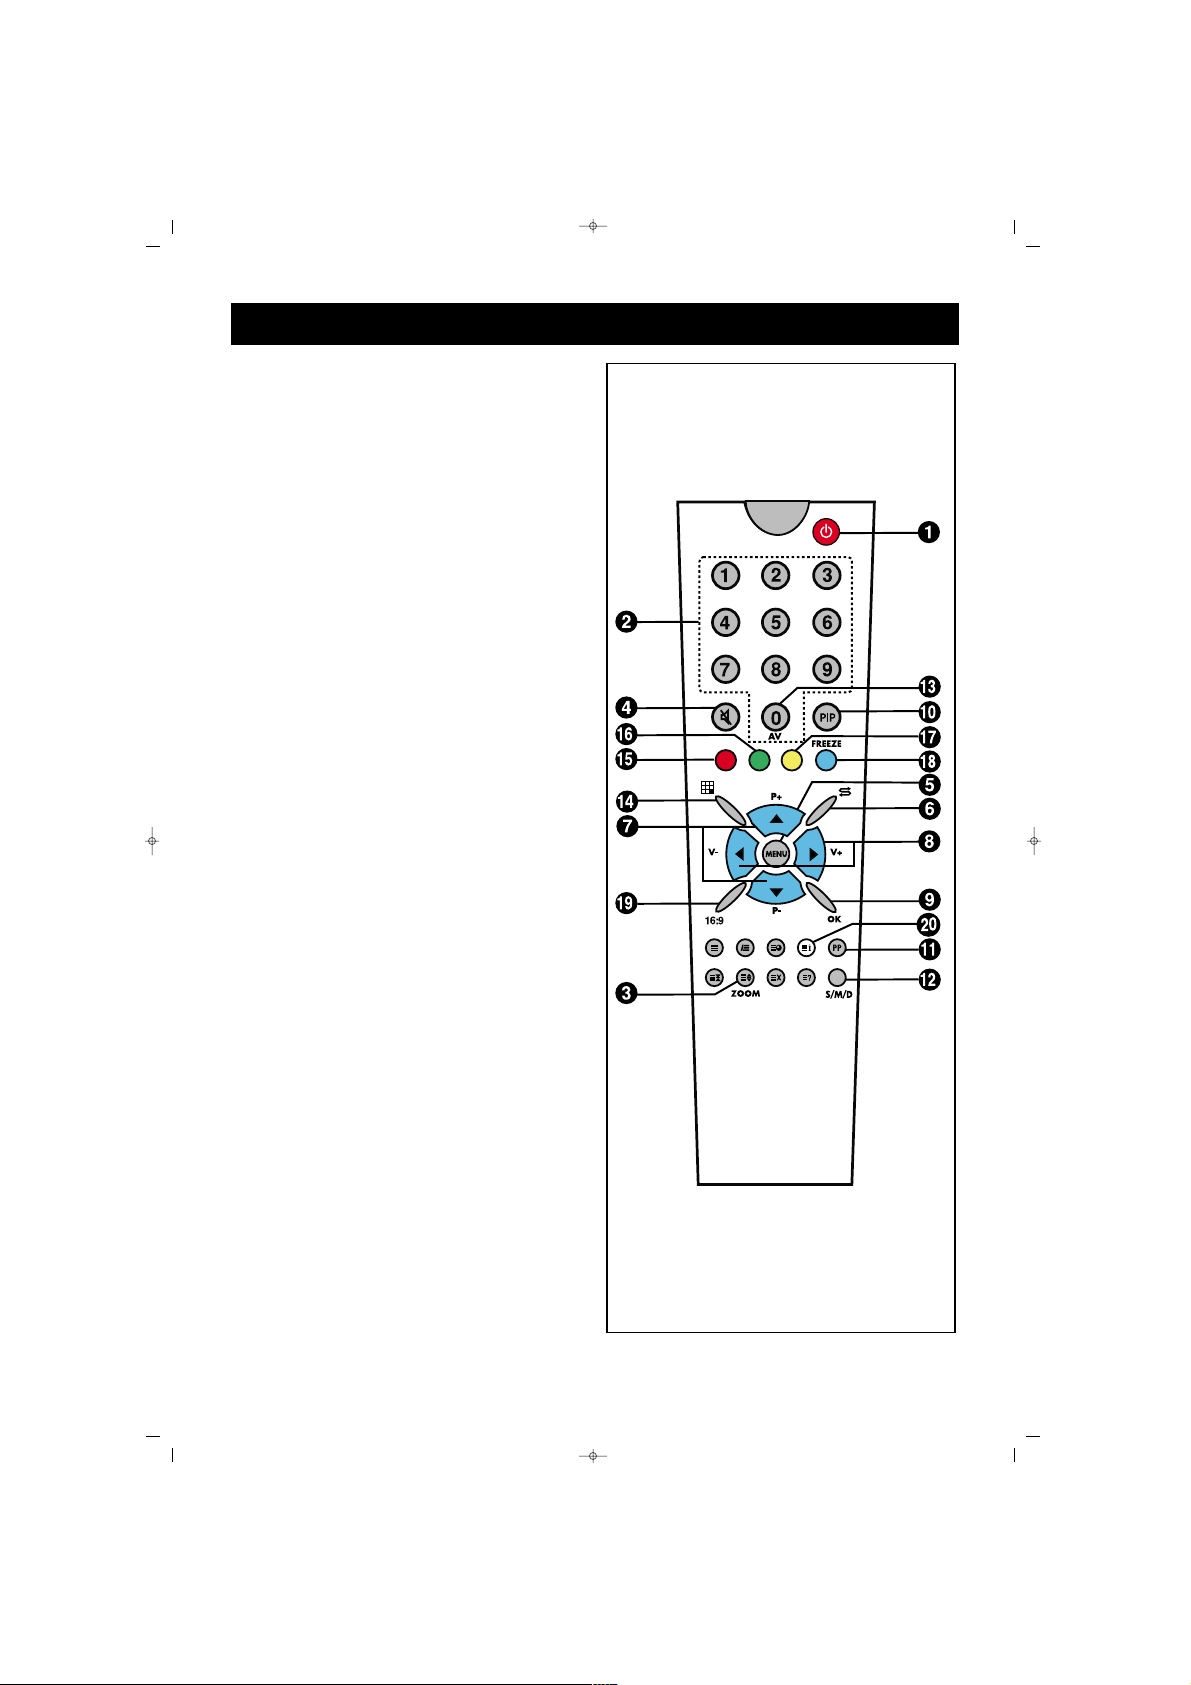
8
11..
Off (stand by) button
22..
Direct program selection buttons
33..
Zoom button (non-functional)
44..
Mute button (3 step)
55..
Menu selection button
66..
Swap button
77..
Upward (+) or downward (-) move
of program in TV mode, or of
page number in teletext mode,
upward (+) and downward (-)
move in menus
88..
Volume increasing (+) or reducing
(-) and menu adjustment buttons
99..
Channel switch in mosaic mode,
confirmation or cancellation for
menus
1100..
PIP button (At some models)
1111..
Personal preference
1122..
Sound select button DUALI,
DUALII, Stereo, Mono (DUALI, II,
ST/MONO)
1133..
AV button (To view source menu)
1144..
Mosaic Screen button
1155..
Red button (To change PIP
dimension (A/V at models W/PIP)
& to go back to TV mode from
PC and DVI modes).
1166..
Green button (To change PIP
position (A/V at models W/PIP) &
to enter PC mode, while in TV
mode).
1177..
Yellow button (To enter DVI mode
while in TV mode).
1188..
Blue button (freezing button)
1199..
Picture format selection
2200..
Provides information on the
current channel.
NNOOTTEE::
For using the other button
functions given in the menus, please
refer to the remote control figure
shown in the TELETEXT section
REMOTE CONTROL
SALORA CTV100 42"PLAS ING 9/5/06 9:49 Page 8
‹Ç‹NDEK‹LER
9
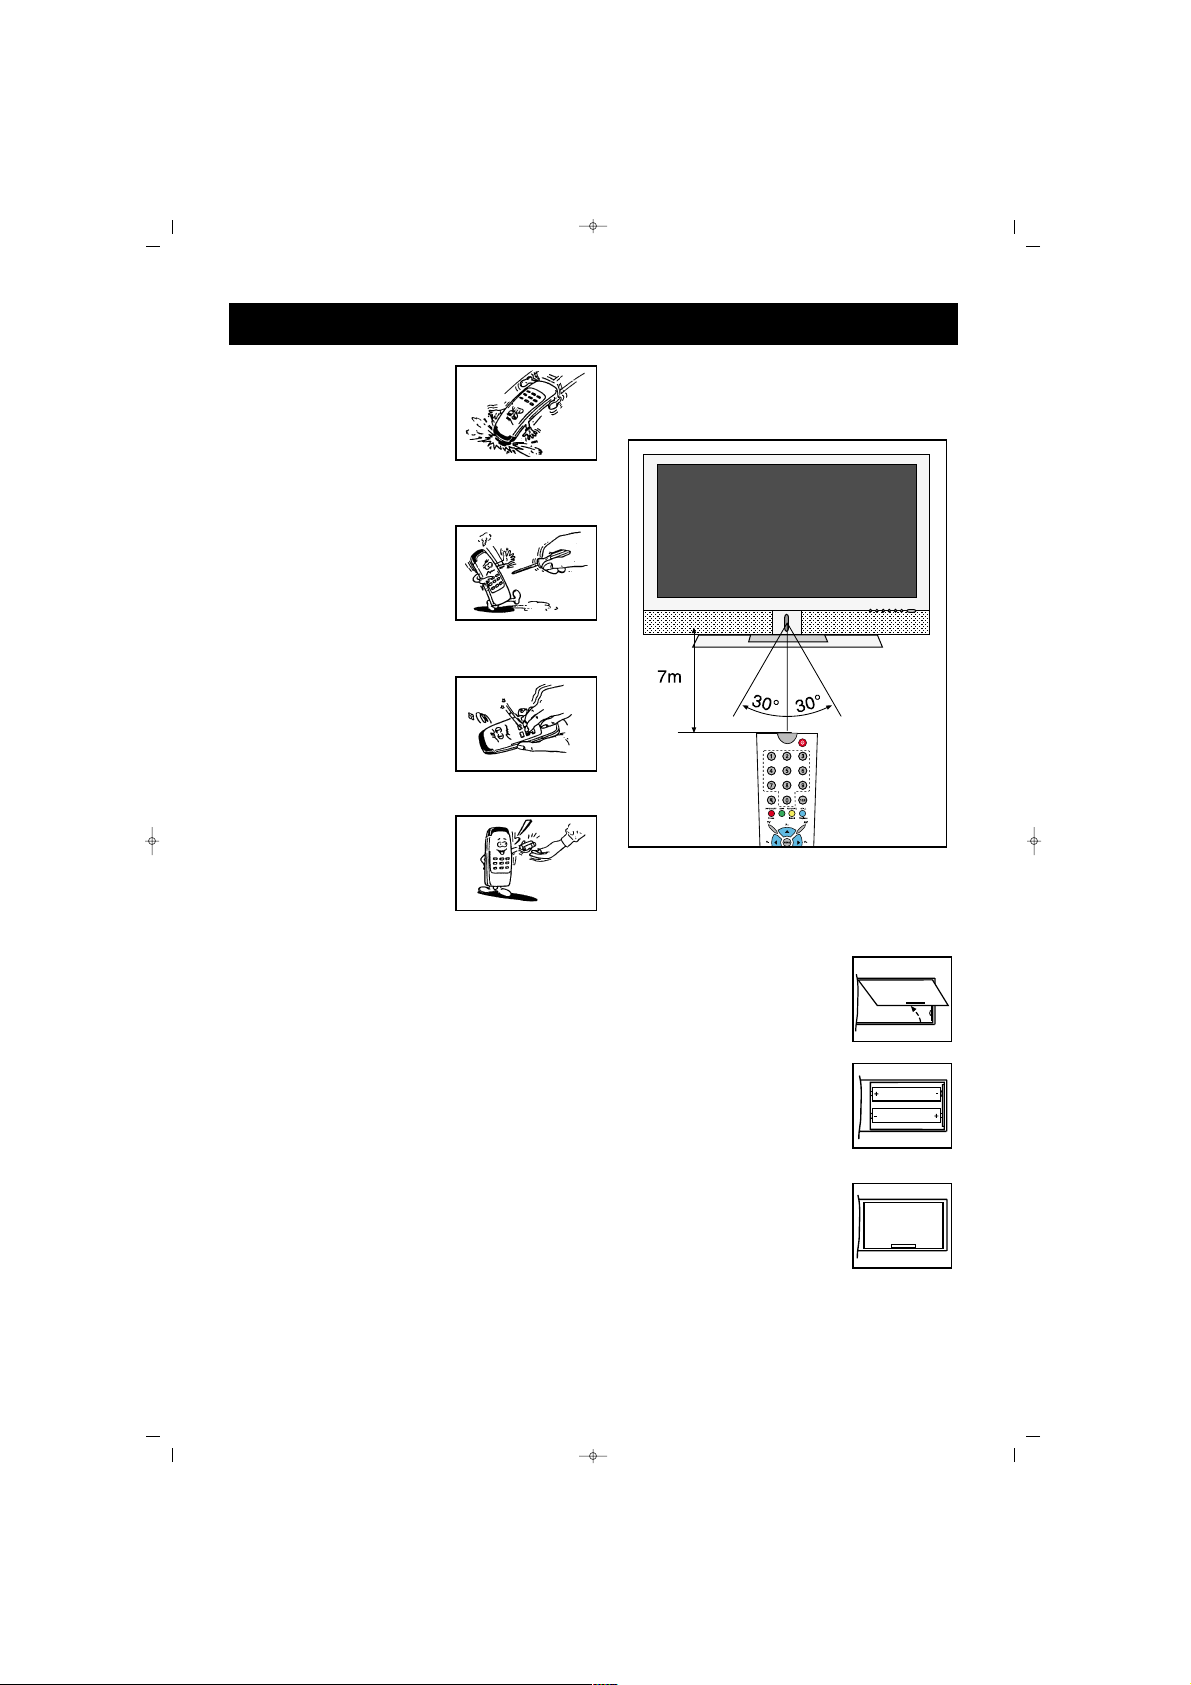
REMOTE CONTROL
Never drop your RC to
the floor.
Never try to disassemble
your RC
Do not press two
buttons on the RC at the
same time
Please remove the
batteries if you are not
going to use the RC for
a long time.
NNoottee::
The RC is effective at a
maximum distance of 7 m and an
angle of 30°
PPllaacciinngg tthhee BBaatttteerriieess ((11..55VV AAAAAA xx 22))
* Open the battery cover in the direction of arrow
* Place the batteries paying attention to the poles
* Close the cover
SALORA CTV100 42"PLAS ING 9/5/06 9:49 Page 9
‹Ç‹NDEK‹LER
10
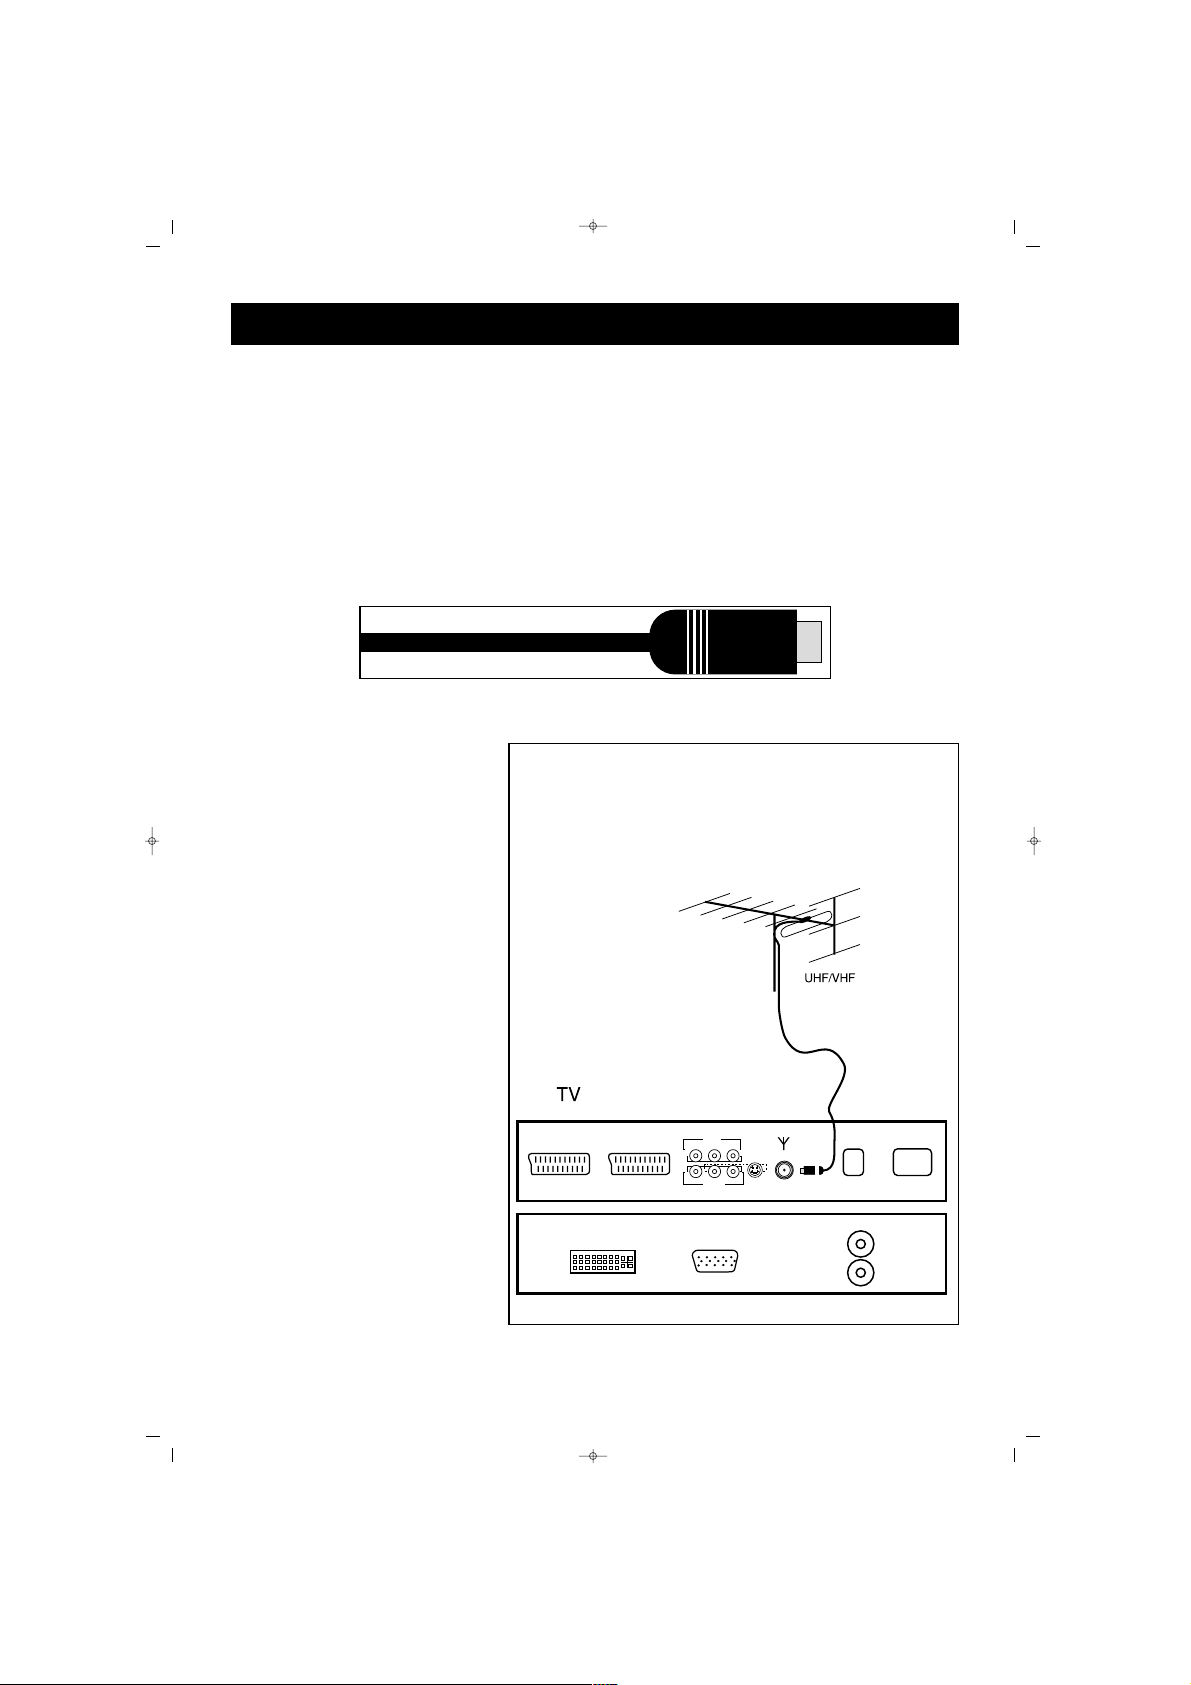
AAeerriiaall CCoonnnneeccttiioonn
First, select the aerial connection. The below given aerials are suitable for your TV
* VHF antenna
* VHF / UHF joint antenna
* UHF Antenna
While connecting one of those antennas to your TV set, you should use 75 Ohm
rounded "coaxial" cable and unplug your TV from the outlet.
If the cable is a 300 ohm
(double wire flat cable), an
adapter converting 300 ohm
to 75 ohm should be installed
to the TV antenna inlet. For
watching the cable broadcast,
the cable broadcasting line
should be connected to
antenna inlet. Motor vehicles,
energy and communication
lines create noise. Please
firmly install your antenna far
from these and metal surfaces.
Do not install the antenna
cable longer than necessary
neither roll it. As antenna and
cable may be affected by
environmental conditions such
as rain, wind, smoke or
humidity, check your antenna
and equipment periodically.
AERIAL CONNECTION
SALORA CTV100 42"PLAS ING 9/5/06 9:49 Page 10
SCART 1
SCART 2
LRCVBS
AV
S-Video
ANT.IN
L
R
ON
OFF
AUDIO
POWER
VIDEO, COMPUTER AND DECODER CONNECTION
11
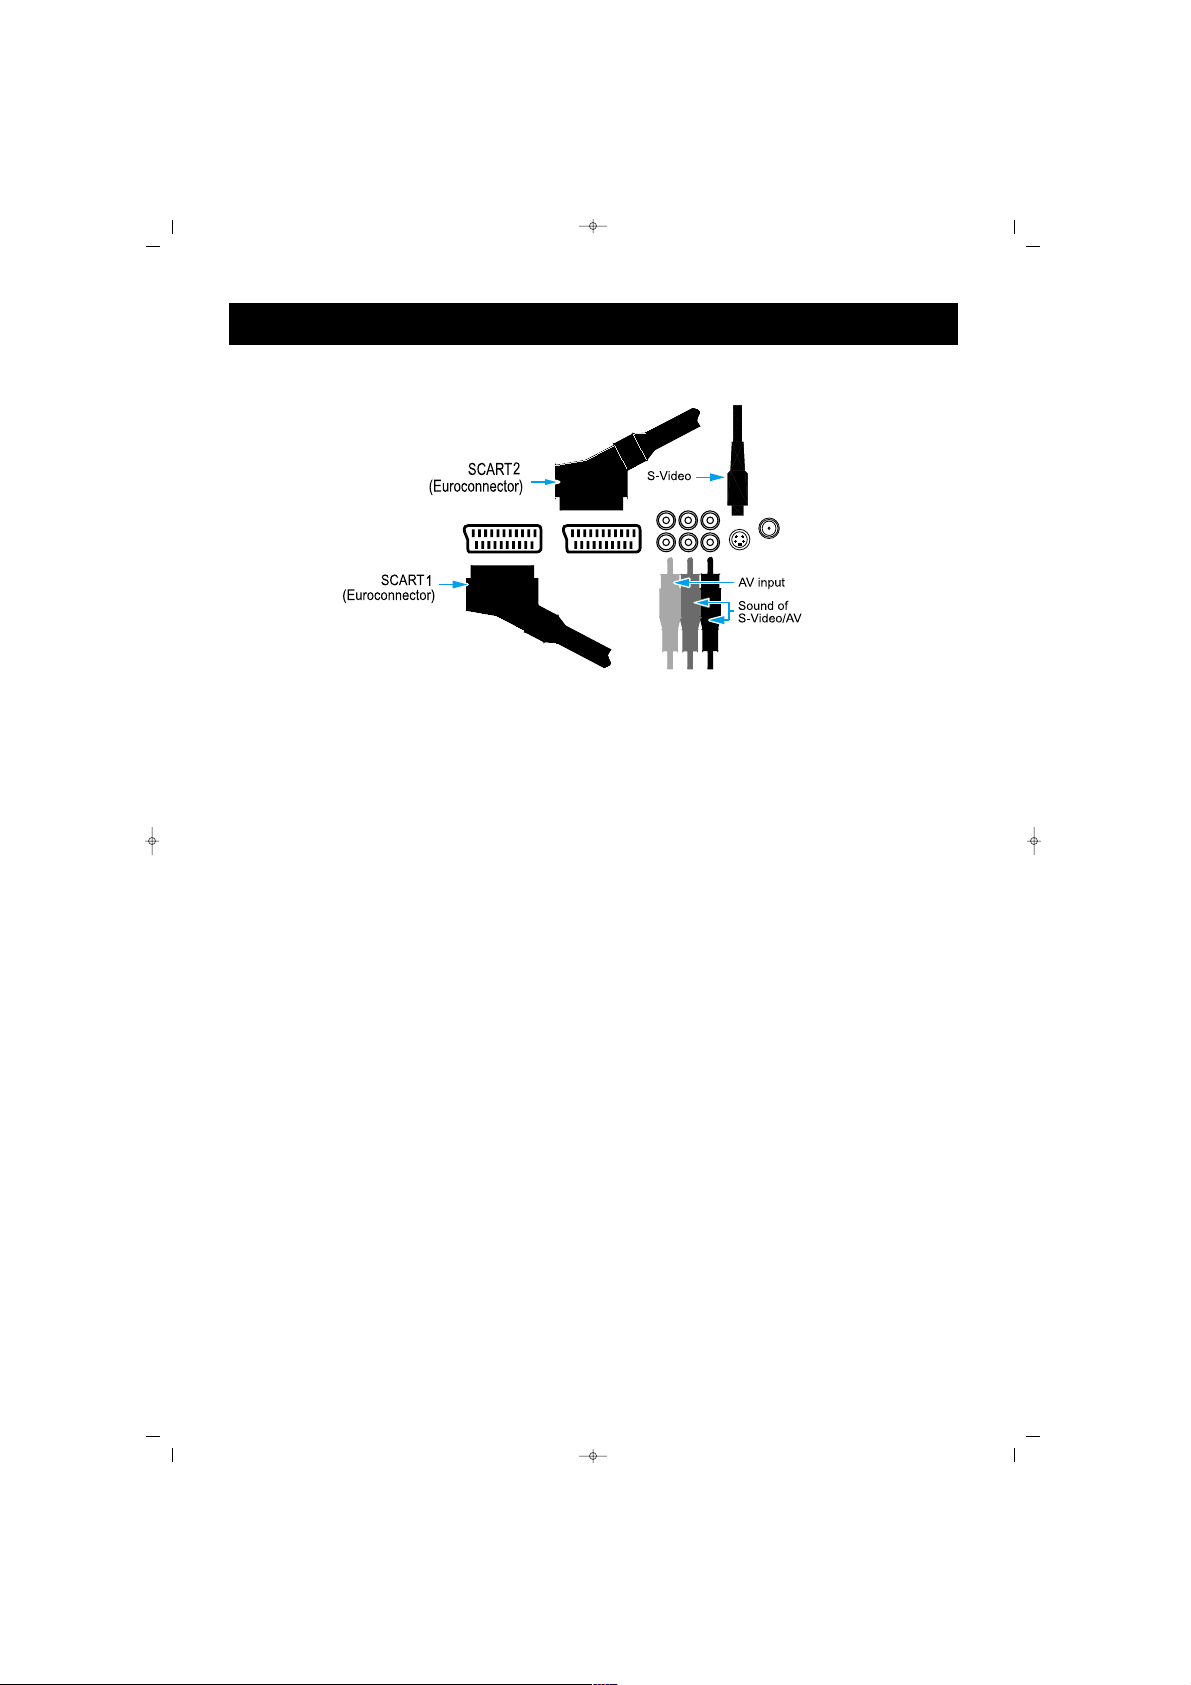
WWaattcchhiinngg vviiddeeoo
MMaakkiinngg aa ccoonnnneeccttiioonn
SSCCAARRTT ((EEuurrooccaabbllee))
Attach the SCART cable to the SCART outlets of the video player and TV
SS--VViiddeeoo
Connect S-Video cable to the S-Video inlets of the video device and TV
Connect the L (white) and R (red) sound cable (RCA) to the sound inlets of the
video device
AAVV IInnlleett
Connect the Audio Video cable to the TV and Video inlets of the video player.
Connect the L (white) and R (red) sound cable (RCA) to the sound inlets of the TV
set.
WWaattcchhiinngg VViiddeeoo
1. Press the AV button on the remote control and select Video Sources
2. Insert video cassette into the video player and press PLAY
NNoottee::
To prevent visual interference, leave sufficient distance between the video player
and monitor (more than 3 m)
* While connecting the TV to outer equipment, be careful that the colors of the
connection ports are the same (for example, Video-yellow, Sound (left) white,
Sound (right) red)
* If your video device is a mono one, connect the sound cable of the device to the
AUDIO (L/MONO) inlet of the TV
* If you connect the S-VHS Video device to the S-VIDEO inlet socket, you can
obtain a display better than normal video inlet (AV)
** TTaakkee ccaarree tthhaatt aa ffiixxeedd ddiissppllaayy ddooeess nnoott rreemmaaiinn oonn tthhee ssccrreeeenn ffoorr lloonngg ttiimmeess..
Generally, these are fixed displays or program information in VCR 4:3 display format.
SCART 2
SCART 1
CVBS L R
AV
S-VIDEO
ANT.IN
SALORA CTV100 42"PLAS ING 9/5/06 9:49 Page 11
12
WWaattcchhiinngg DDVVDD
CCoonnnneeccttiioonn
* Please connect the DVD player via scart cable to Scart 1
UUssaaggee
1. Start the DVD player
2. Press AV button on the remote control of TV and select Scart 1
POWER
SCART 1
SCART 2
ON
OFF
S-Video
LRCVBS
ANT.IN
VIDEO, COMPUTER AND DECODER CONNECTION
SALORA CTV100 42"PLAS ING 9/5/06 9:49 Page 12
13
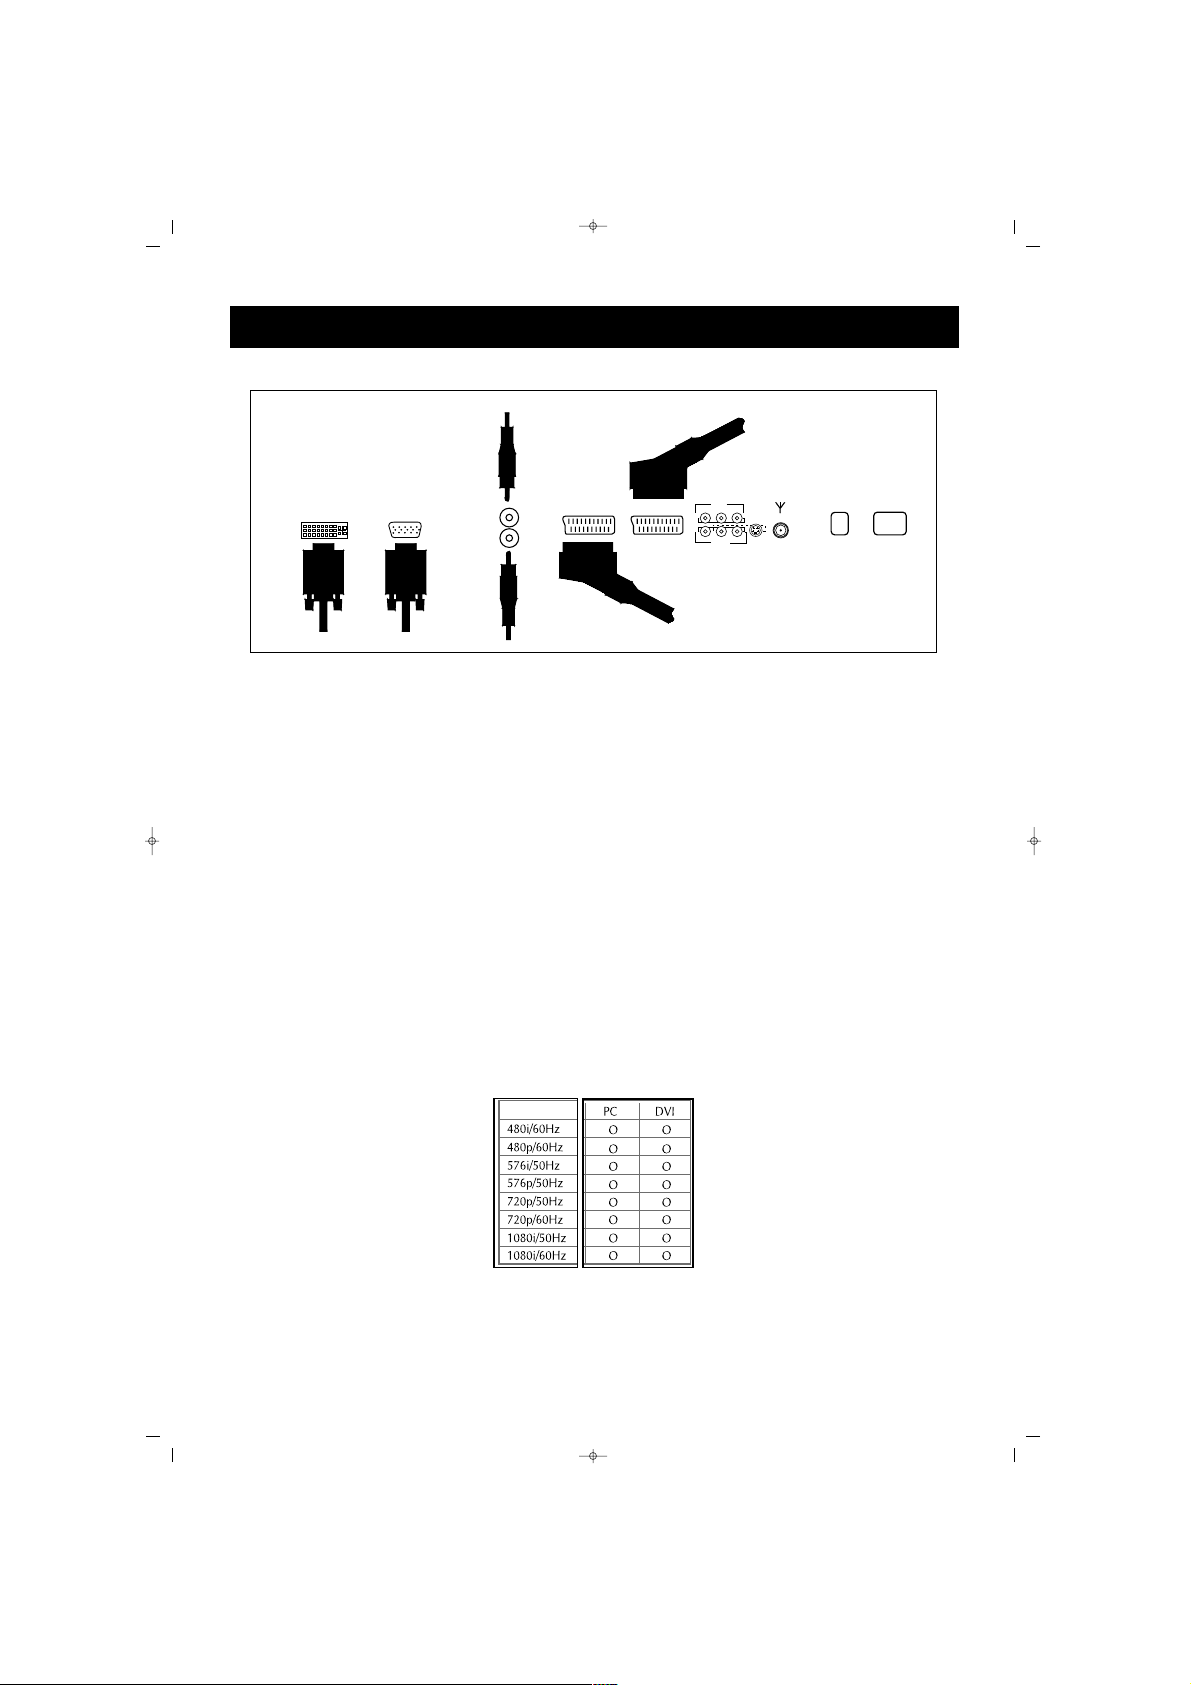
WWaattcchhiinngg SSeett TToopp BBooxx ((SSTTBB))
CCoonnnneeccttiioonn
Connect the Set Top Box display connectors to SCART, CHINCH, PC or DVI inlets
of the TV. Connect the sound inlets to the sound sockets next to the L(white) and R
(Red)
UUssaaggee
1. Operate the set top box
2. Select PC or DVI on the remote control of PDP
CCoonnnneeccttiioonn
UUssiinngg SSCCAARRTT ((EEuurrooccaabbllee))
Connect the SCART cable to the SCART connectors of STB and PDP
RRGGBB oorr DDVVII
Connect D-Sub or DVI cable to the AV display outlets of STB and PDP. Connect L
(White) and R (Red) sound cables (RCA) to the sound outlets of STB and PDP.
NNoottee::
* Only one of the component PC and DVI ports can send video signal. If one sends
a video signal, the other sockets cannot be used.
AUDIO
R
L
POWER
SCART 1
SCART 2
ON
OFF
S-Video
LRCVBS
ANT.IN
VIDEO, COMPUTER AND DECODER CONNECTION
CCoommppoonneennttssssiiggnnaall
SALORA CTV100 42"PLAS ING 9/5/06 9:50 Page 13
14
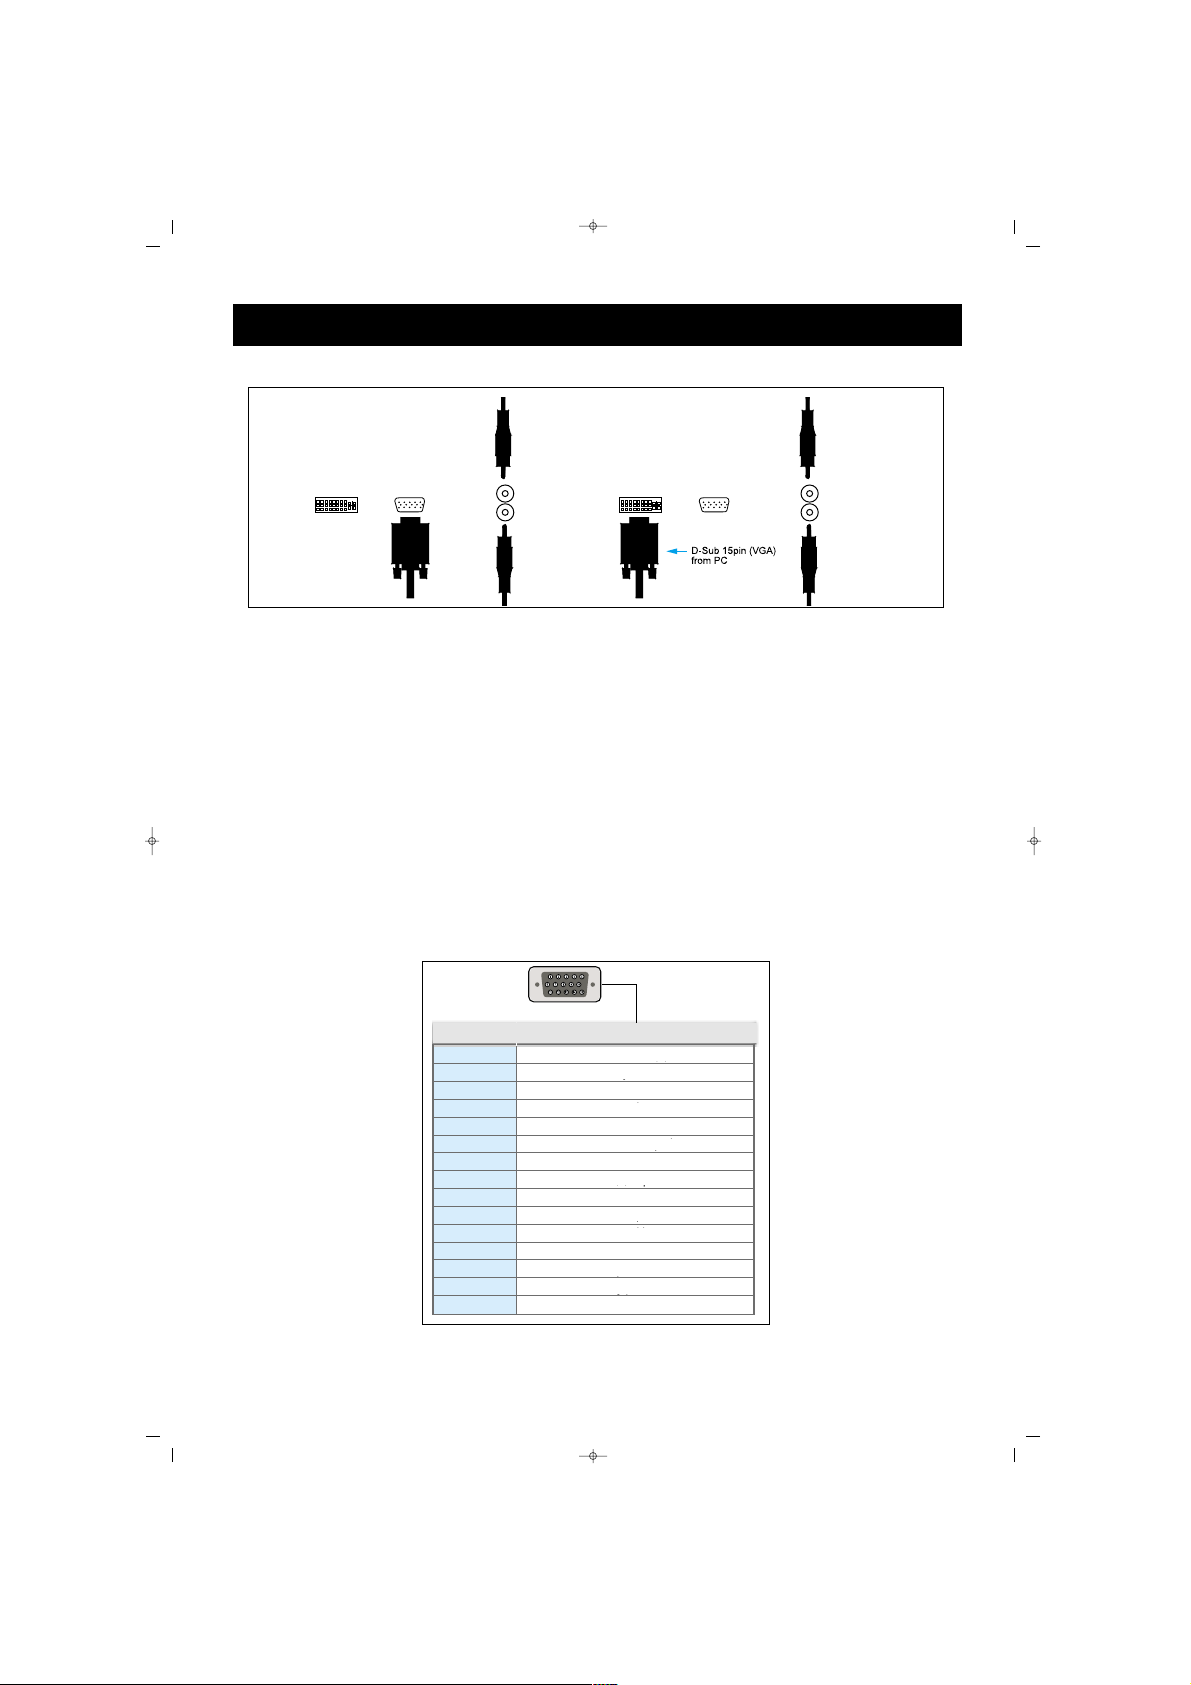
CCoonnnneeccttiioonn ooff PPCC,, DD SSuubb aanndd DDVVDD
** CCoonnnneeccttiioonn ooff PPCC aanndd TTVV
Connect a PC video cable (15 pin) on the Video Outlet Port on PC
and PC port on TV.
** PPiinn CCoonnffiigguurraattiioonn
15 Pin Signal Cable (based on grooved pin)
** PPiinn CCoonnffiigguurraattiioonn
1. Switch on the TV set and press AV button to select PC mode
2. Start the PC and check PC requirements
3. Adjust the PC screen in the Geometry menu
1
2
3
4
5
6
7
8
9
10
11
12
13
14
15
K›rm›z› (R)
Yeflil (G)
Mavi (B)
Toprak
Toprak (DDC)
K›rm›z› (R) Toprak
Yeflil (G) Toprak
Mavi (B) Toprak
Rezerve
Senk. Topraklama
Topraklama
Veri (DDC)
Yatay senk.
Düfley senk.
Saat (DDC)
Pin No. Tan›m›
AUDIO
R
L
AUDIO
R
L
VIDEO, COMPUTER AND DECODER CONNECTION
PPiinn NNrr.. DDeessccrriippttiioonn
RReedd ((RR))
GGrreeeenn ((GG))
GGrroouunndd
GGrroouunndd ((DDDDCC))
RReedd ((RR)) GGrroouunndd
GGrreeeenn ((GG)) GGrroouunndd
BBlluuee ((BB)) GGrroouunndd
BBlluuee ((BB))
RReesseerrvvee
SSeennccrr.. GGrroouunndd
GGrroouunndd
TTiimmee ((DDDDCC))
VVeerrtt.. SSeennccrr..
HHoorr.. SSeennccrr..
DDaattaa ((DDDDCC))
SALORA CTV100 42"PLAS ING 9/5/06 9:50 Page 14
15
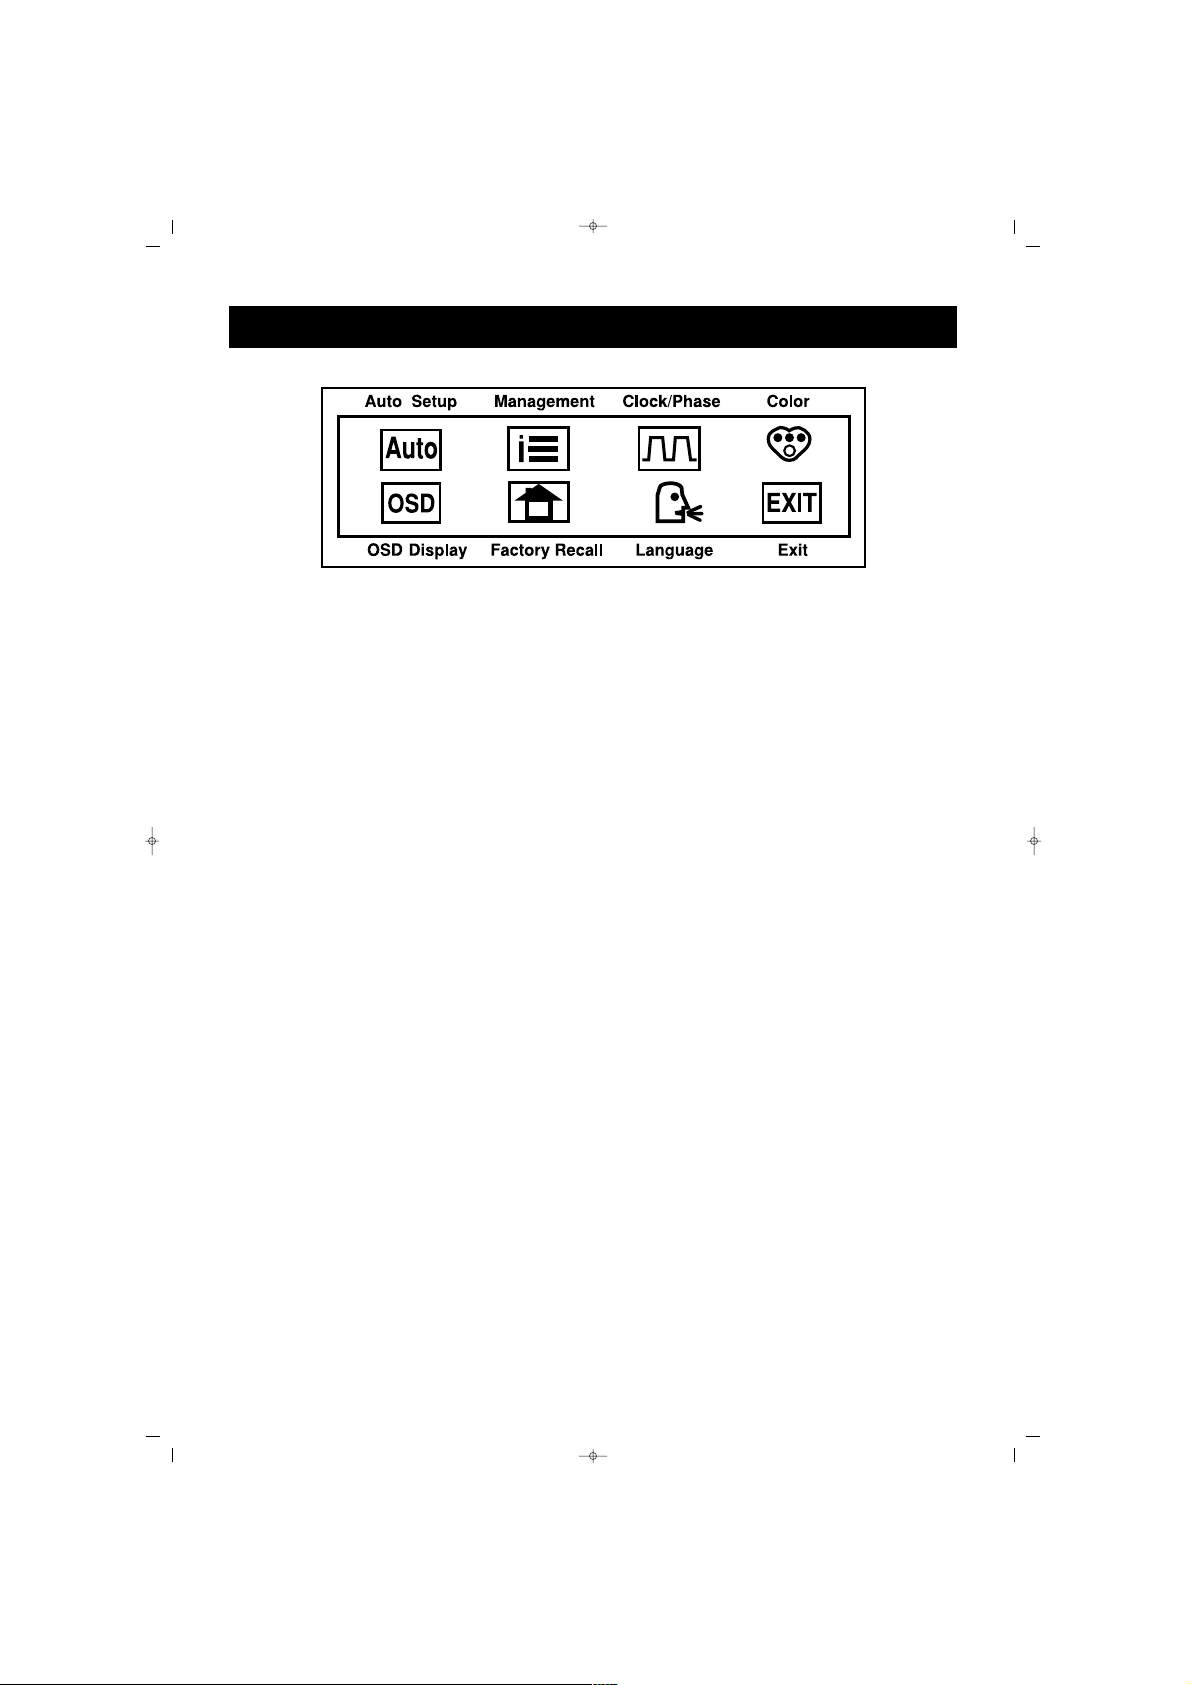
Press the menu button to open SETUP Menu at PC & DVI modes.
AAuuttoo SSeettuupp::
Automatic adjusment can be done by using auto Setup. (Not
available at DVI mode)
MMaannaaggeemmeenntt::
Following adjustments can be done on Management Sub-
menu.
BBrriigghhttnneessss
CCoonnttrraasstt
HH.. PPoossiittiioonn
VV.. PPoossiittiioonn
** CClloocckk//PPhhaassee::
By means of auto setup, all channels are set to bestavailable
resolution. If you want to change the adjustment manually, you can use
this option.Some graphic cards may need extra adjustment.
CCoolloorr::
Red, Green, Blue levels can be adjusted to setup color in PC mode.
RR
GG
BB
** OOSSDD DDiissppllaayy::
No function
** FFaaccttoorryy RReeccaallll::
By using this option , you can return all picture & sound
settings to original factory values .
LLaanngguuaaggee::
Language of PC Setup menu can be changed.
EEnngglliisshh
FFrraannççaaiiss
DDeeuuttsscchh
‹‹ttaalliiaannoo
EEssppaaññooll
EExxiitt::
To exit from PC Setup Menu.
**
These Sub-menus are inaccesable.
PC / DVI SETUP (MENUS)
SALORA CTV100 42"PLAS ING 9/5/06 9:50 Page 15
‹Ç‹NDEK‹LER
16
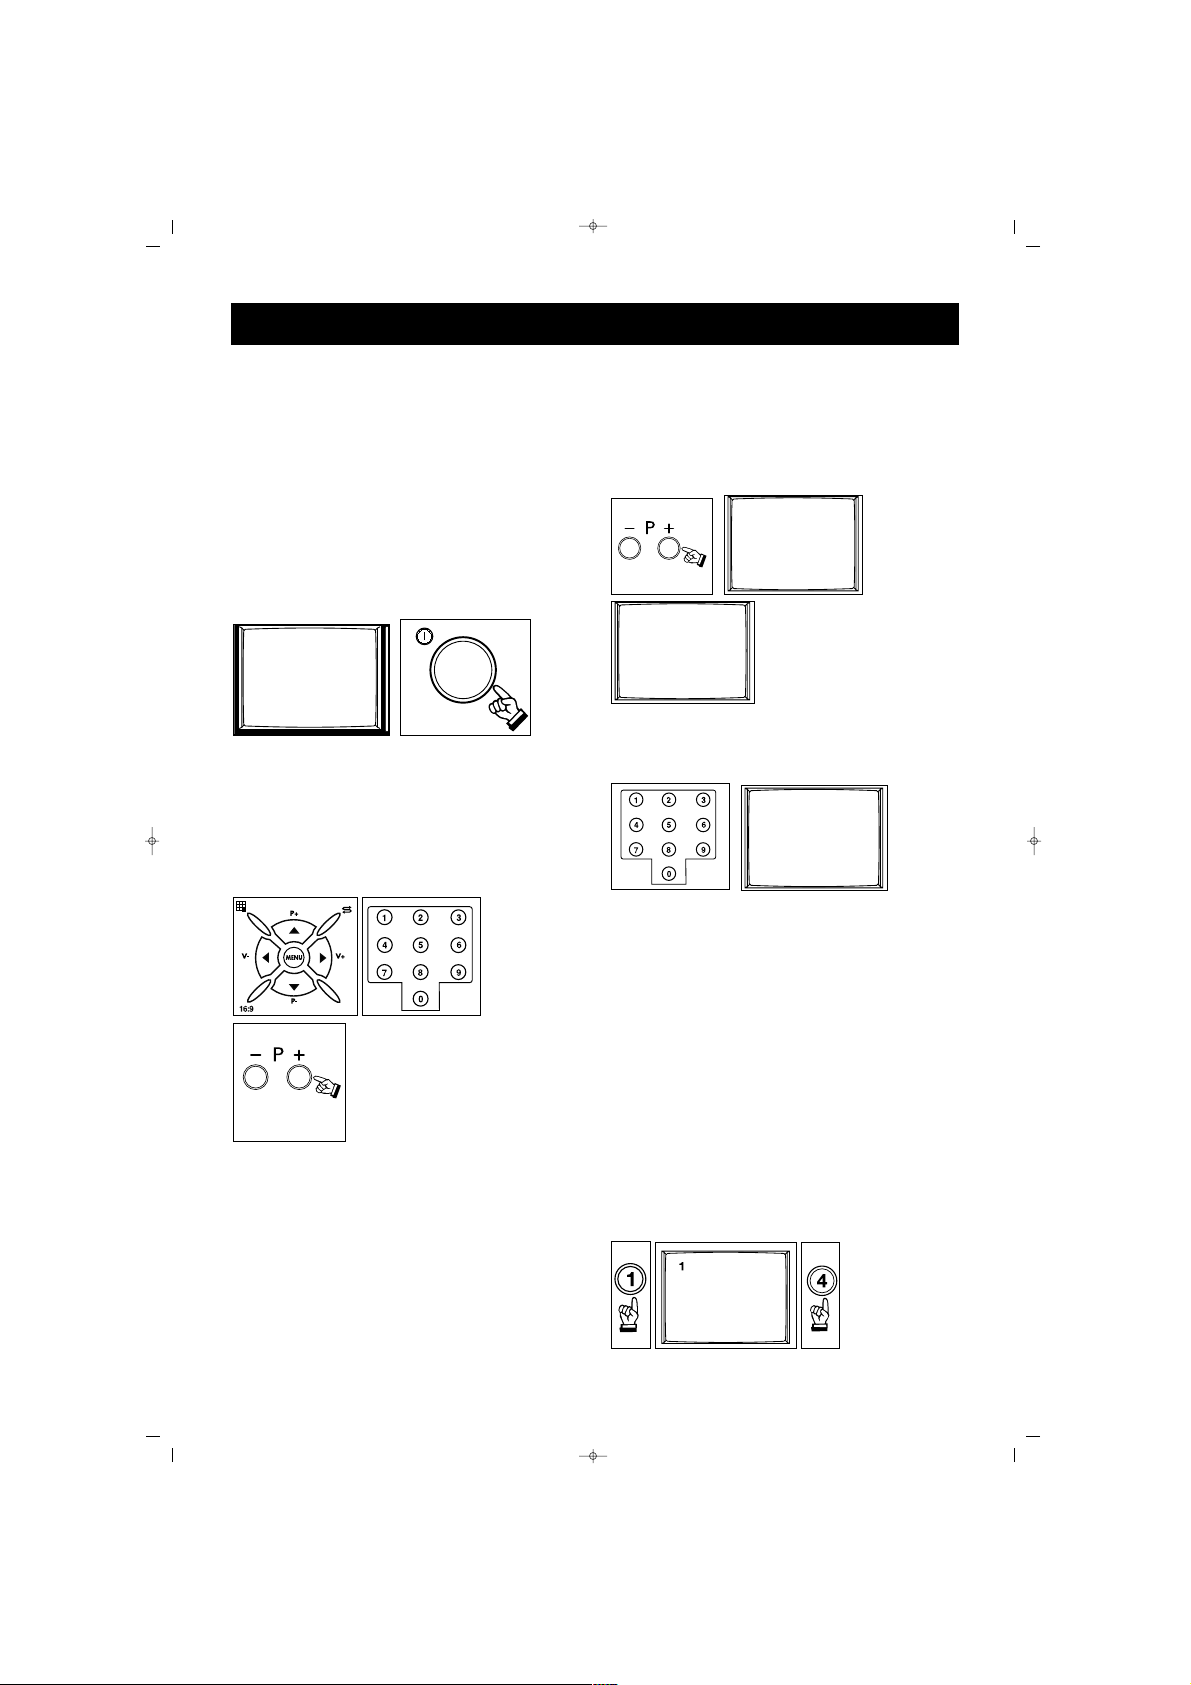
SSwwiittcchhiinngg OOnn
Please Press ON/OFF button at the
back of your TV.
NNOOTTEE:: RRCC iiss aann aabbbbrreevviiaattiioonn ooff
RReemmoottee CCoonnttrrooll
11.. SSwwiittcchhiinngg OOnn
aa.. SSwwiittcchhiinngg OOnn tthhee TTVV
Please press the on/ off button and
then wait to turn on your TV.
bb..SSttaanndd bbyy mmooddee
While the TV is in the stand by
mode, you may switch on
pressing the program selection
buttons on the Remote
Control (RC) from 1 to 9 or P+ / Pbutton on the TV.
22.. SSwwiittcchhiinngg OOffff
aa.. SSwwiittcchhiinngg OOffff tthhee TTVV
When you want to switch off the
TV, press the On/ Off button.
bb..SSttaanndd bbyy mmooddee
For switching off the TV set for a
short time, press the Stand By button
on the RC.
11.. SSEELLEECCTTIINNGG TTHHEE PPRROOGGRRAAMM
NNUUMMBBEERR
• On the TV control panel use P+ /
P- to increase or reduce the program
number to select the program you
want.
• When you select a program from
1 to 9, press the
corresponding button on the RC.
• For choosing a program from 10
to 200, the two numbers are pressed
without any delay.
EExxaammppllee::
To switch to the program 200, first
press 2. With this, you see “2---“
on the right corner of the screen. If
you keep pressing the button, the
TV switches to the program No. 2.
As long as this message remains
on the screen, the TV switches to
the program No. 0 again in case 2
is not pressed.
2--
001
1--
OK
TV SWITCHING ON AND OFF
SALORA CTV100 42"PLAS ING 9/5/06 9:50 Page 16
17
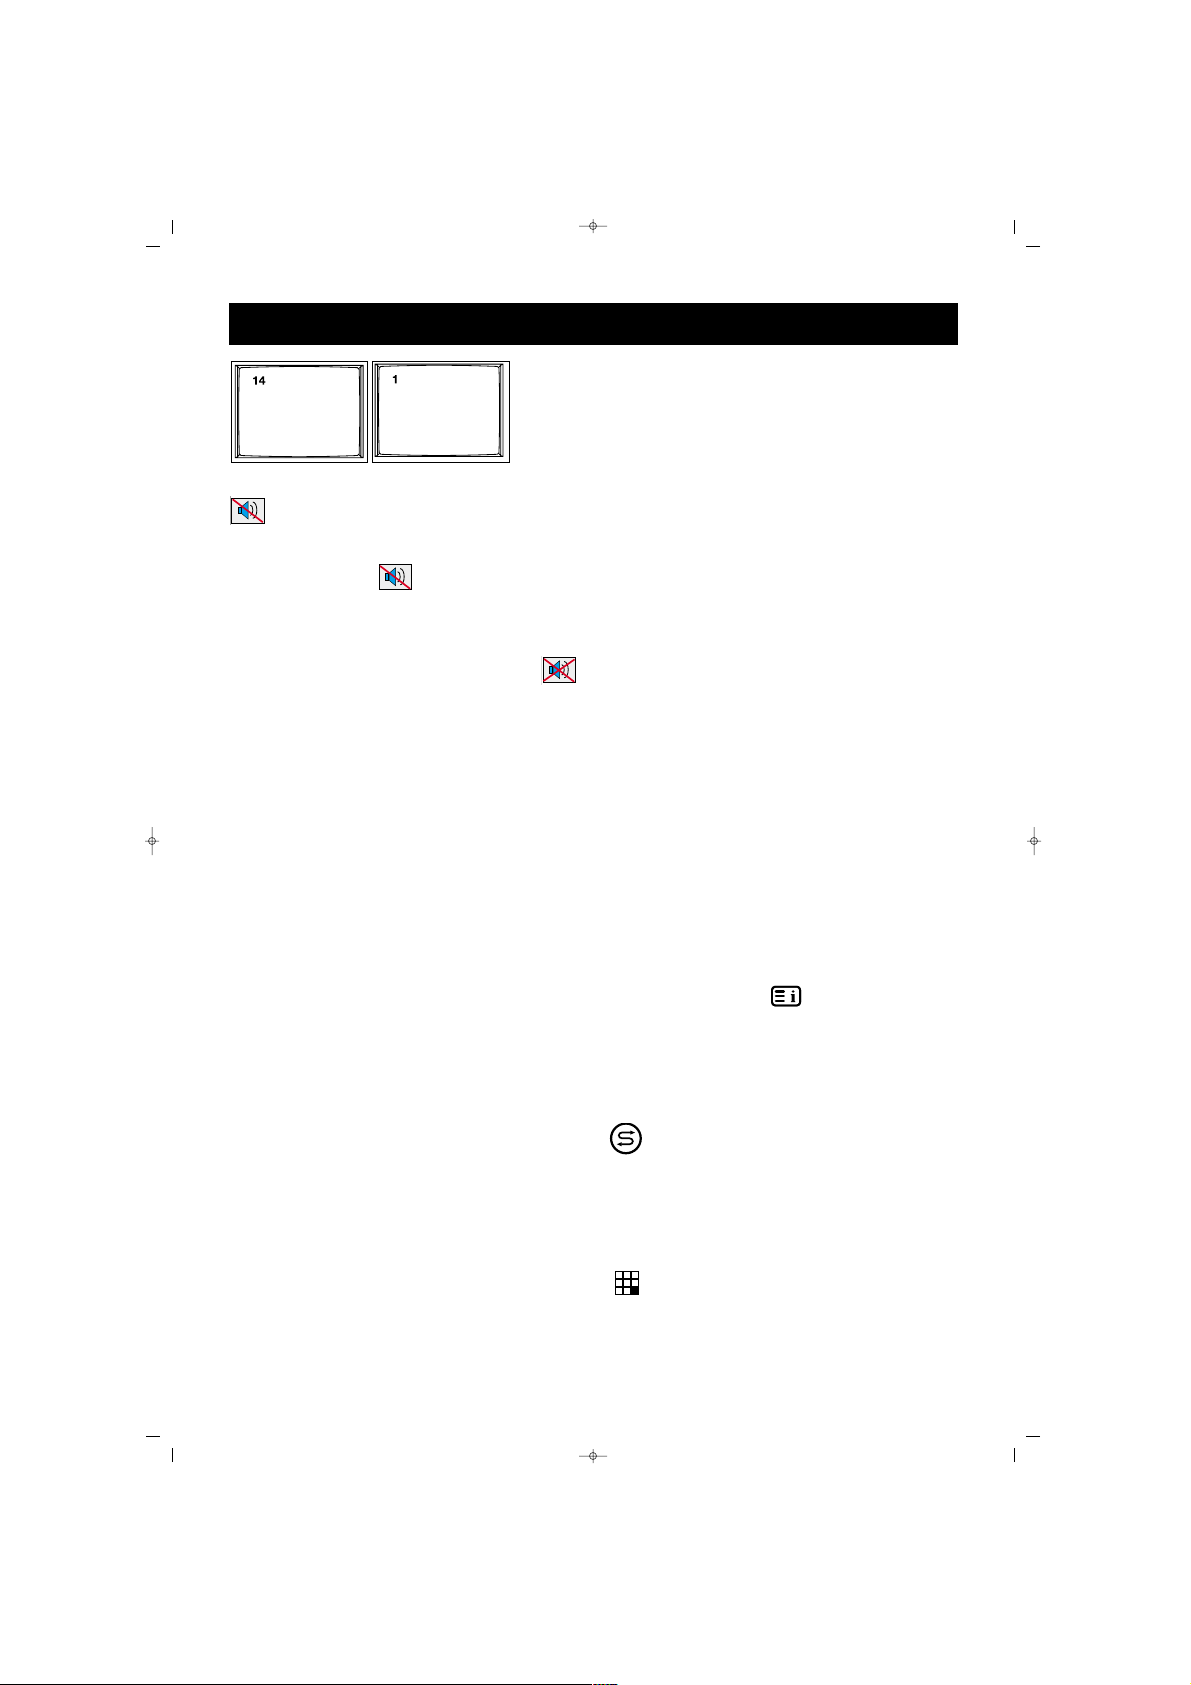
22.. MMUUTTEE ((33 sstteeppss))
Press MUTE button. On the
right corner of the screen, the
HALF MUTE symbol will be
displayed and the sound will be
half muted. Pressing this button
again, the FULL MUTE
symbol will be displayed and the
sound will be entirely muted. 3rd
time pressing the button will
restore the sound.
33.. 1166::99 BBUUTTTTOONN..
This is used for
changing the picture size. It is
possible to reach the picture
formats
44::33,, 1144::99 CCiinneemmaa,,
PPaannoorraammiicc,, ZZoooomm,, AAuuttoo
and
1166::99
Picture Formats can be reached by
means of a single button.
44.. PPPP::
When you press this button,
your personal settings (Picture and
Audio Settings) appear on the
right bottom corner of the screen
as "Personal Settings". If you press
this button repeatedly, you can
store preset values in the memory.
You can see "Settings Recorded"
message on the screen.
55.. SS//MM//DD BBuuttttoonn::
It is used for
mono, stereo or Dual 1, Dual 2
audio output.
NNoottee:: IItt ddooeess nnoott ffuunnccttiioonn aatt MMoonnoo
bbrrooaaddccaasstt
66.. AAVV::
To select video source press
the AV button on the R/C.
Following modes can be selected
in source menu “TV, SCART 1,
SCART 2, S-SCART, AV-IN 1, AVIN 2, SVHS, DVI, PC INPUT”.
* Source Menu can’t be displayed
while in PC and DVI modes, so to
return back to TV in DVI and PC
modes, press red (TV) button.
While menu is on the screen, you
can’t switch the set to AV mode.
77.. AAuuttoommaattiicc SSwwiittcchhiinngg OOffff::
Your
TV will automatically shift to stand
by 5 minutes after the broadcast
has gone.
NNOOTTEE::
If you leave your TV in the
AV mode, the unit will not switch
to Stand-by mode after 5 minutes
even the broadcast has gone.
88.. OOKK BBuuttttoonn::
In the Mosaic
mode, it is for switching to a
channel. It is used to Confirm or
Cancel the changes in the menus
99.. IInnffoo BBuuttttoonn (( ))::
The channel
number, channel name (if entered),
Audio type, Picture, Teletext, Alarm
time and Closing hour (if set) can
be seen by pressing this button
SSwwaapp::
By pressing Swap
button, you can return to the
previous channel you watched
NNoottee::
This is non-functional if
there is a menu on the screen
MMoossaaiicc::
When you press
Mosaic button, your TV set will
TV FUNCTIONS
SALORA CTV100 42"PLAS ING 9/5/06 9:50 Page 17

18
show the display of the channels
from 1 to 200 in a 12 square
mosaic window (12/24/36.....).
The display of each channel
appearing on the screen is mobile,
you can watch that channel
pressing OK button.
Furthermore, you can select any
channel you would like to watch,
while the channels are being
displayed by pressing P± or V±
buttons and confirming by OK button.
RReedd bbuuttttoonn::
It provides to pass
through the TV mode
GGrreeeenn bbuuttttoonn::
It provides to pass
through the PC mode
YYeellllooww bbuuttttoonn::
It provides to pass
through the DVI mode
BBlluuee bbuuttttoonn // FFrreeeezzee::
Freezes the
picture you are watching
PPIIPP ((ooppttiioonnaall))::
When you press the
PIP button on the RC, a small
picture appears while the TV
picture is on the screen. You can
change the channels in this smaller
screen (PIP) using P± buttons,
change the size of PIP on the
screen pressing red button and
change its position pressing the
green button. If you want to
change the picture in the main
display, you can use the buttons
from 0 to 9 on the RC. If you want
to swap the smaller picture with
the larger one, you can press Swap
and press PIP button again to leave
PIP.
((TToo sshhiifftt ttoo AAVV mmooddee iinn tthhee PPIIPP
mmooddee,, pprreessss AAVV bbuuttttoonn.. YYoouu ccaann
aallssoo uussee AAVV bbuuttttoonn ffoorr ppaassssiinngg ttoo
ootthheerr AAVV ppoossiittiioonnss))
TThhee ffuunnccttiioonnss ooff ccoolloouurreedd bbuuttttoonnss
iinn PPIIPP ffeeaattuurree::
RReedd bbuuttttoonn::
To change the
dimension of the PIP window.
(At some models)
GGrreeeenn bbuuttttoonn::
Changes the
position of the PIP window on the
screen (Each time you press, it
goes to another corner of the
screen)
(At some models)
TV FUNCTIONS
SALORA CTV100 42"PLAS ING 9/5/06 9:50 Page 18
19
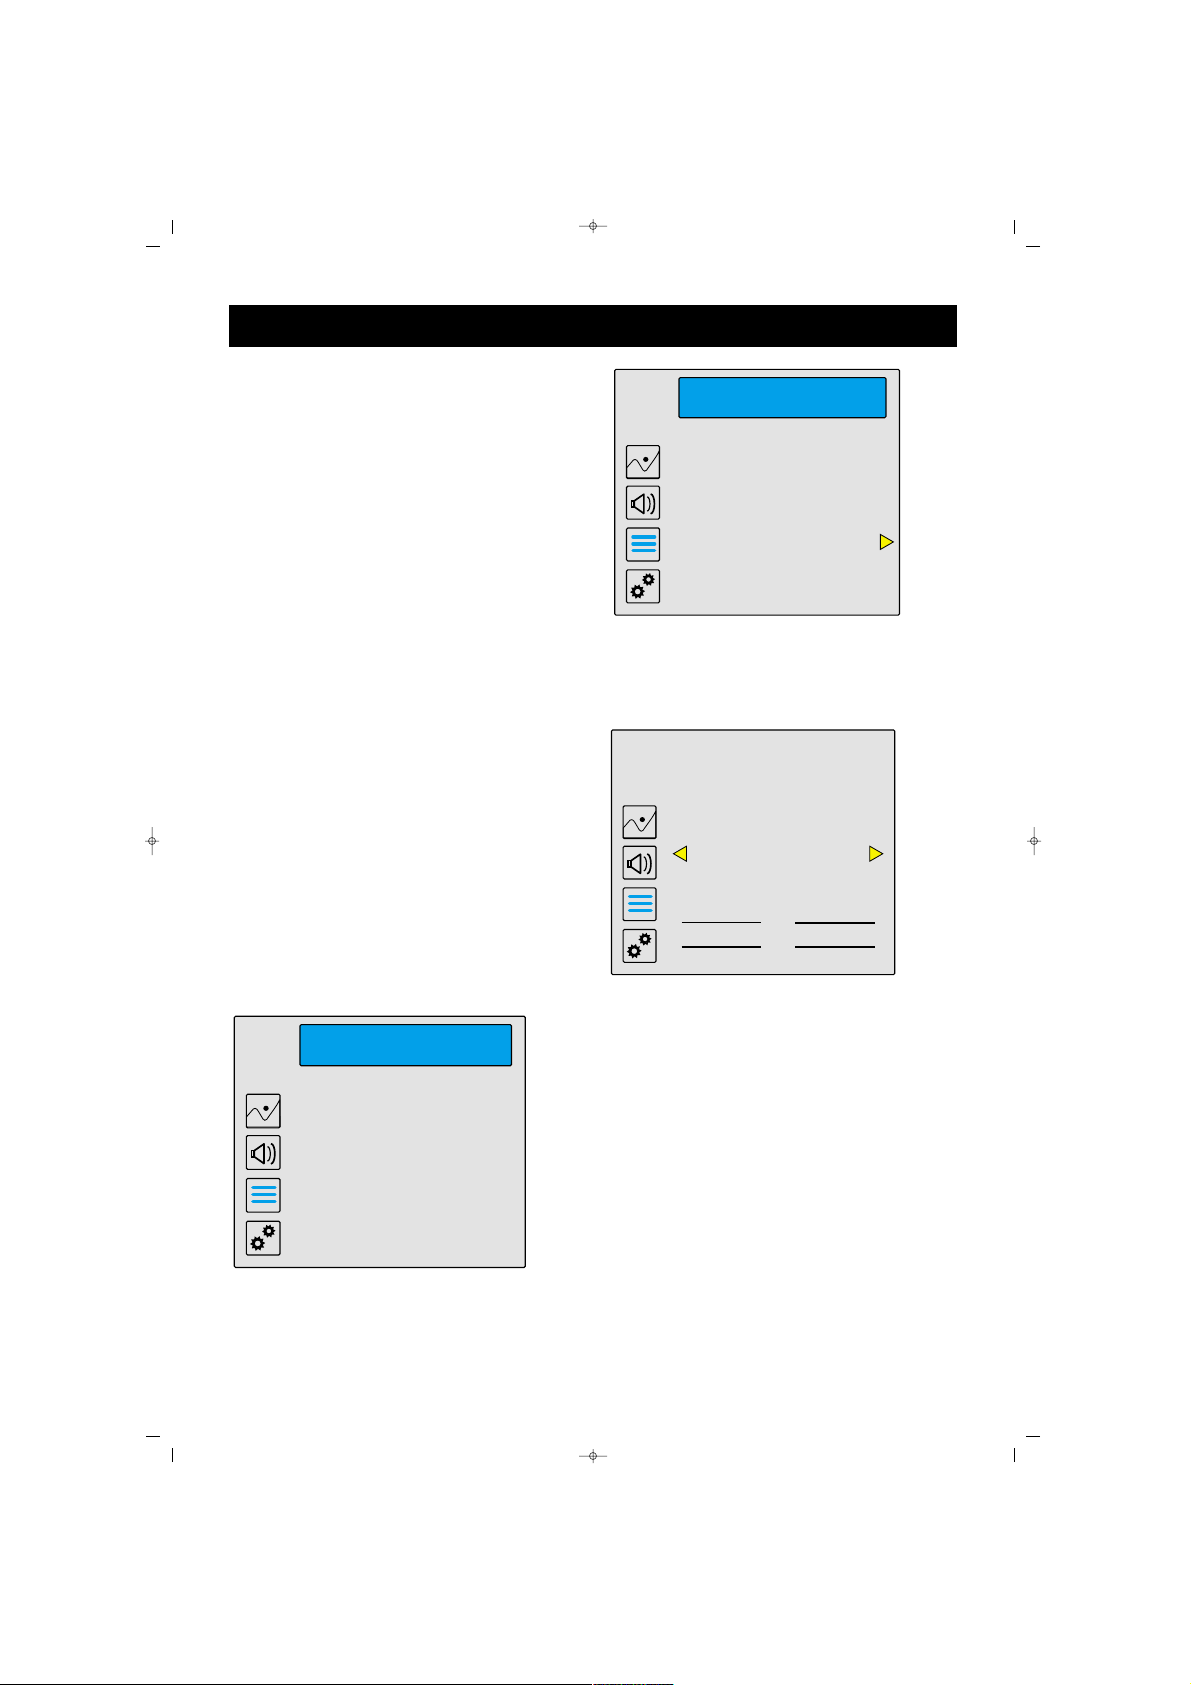
SSCCRROOLLLLIINNGG IINN TTHHEE MMEENNUUSS
When you press the menu button,
Picture menu appears. Pressing
the P- button, you can access to
Audio, Programs and Functions
menus. You can return to the first
menu using P+ button. Press V+
button to move within the menus.
Select the menu bar you want to
change using the arrows and P±
buttons. You can make the changes
as you want using V± buttons or
access to submenus. After
performing the changes in the
menus, you can leave the menus
using MENU button.
NNoottee:: PPrreessss tthhee bbuuttttoonnss iinn tthhee
ddiirreeccttiioonn ooff tthhee aarrrrooww wwiitthhiinn tthhee
mmeennuu bbaarrss..
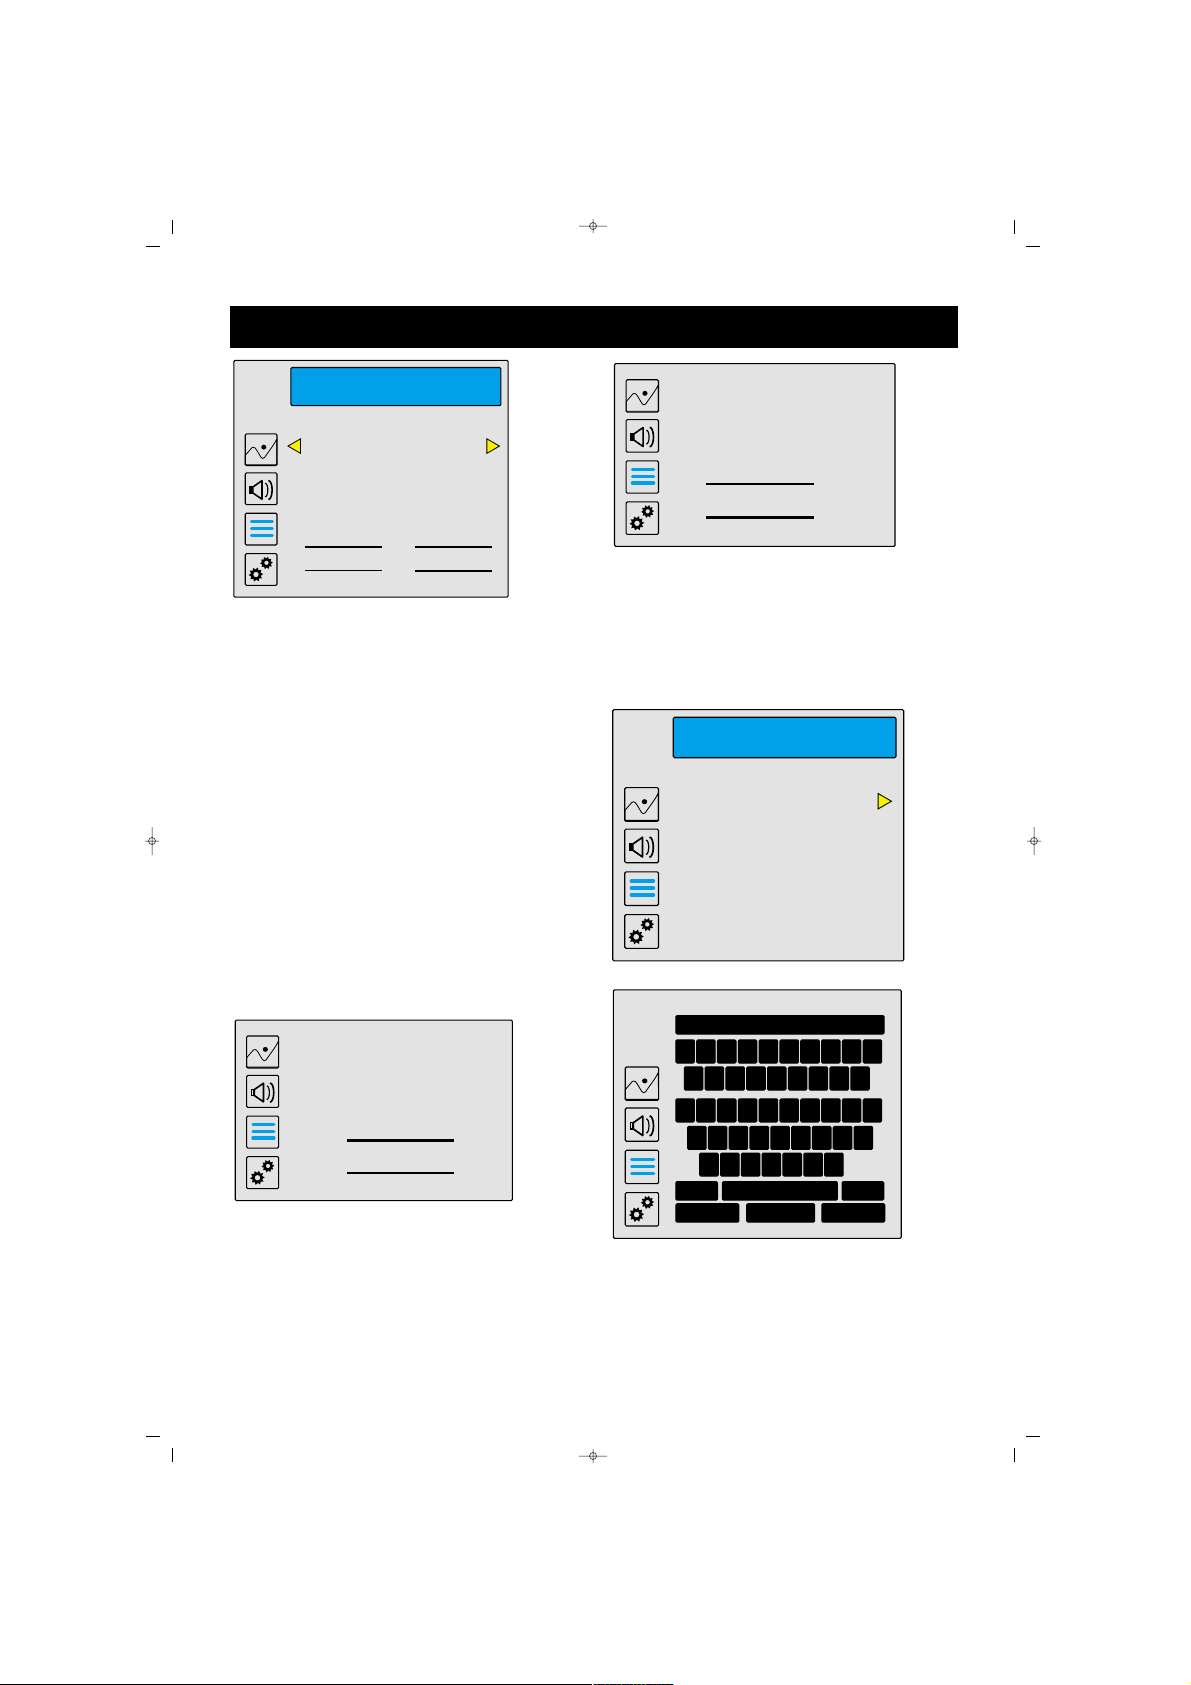
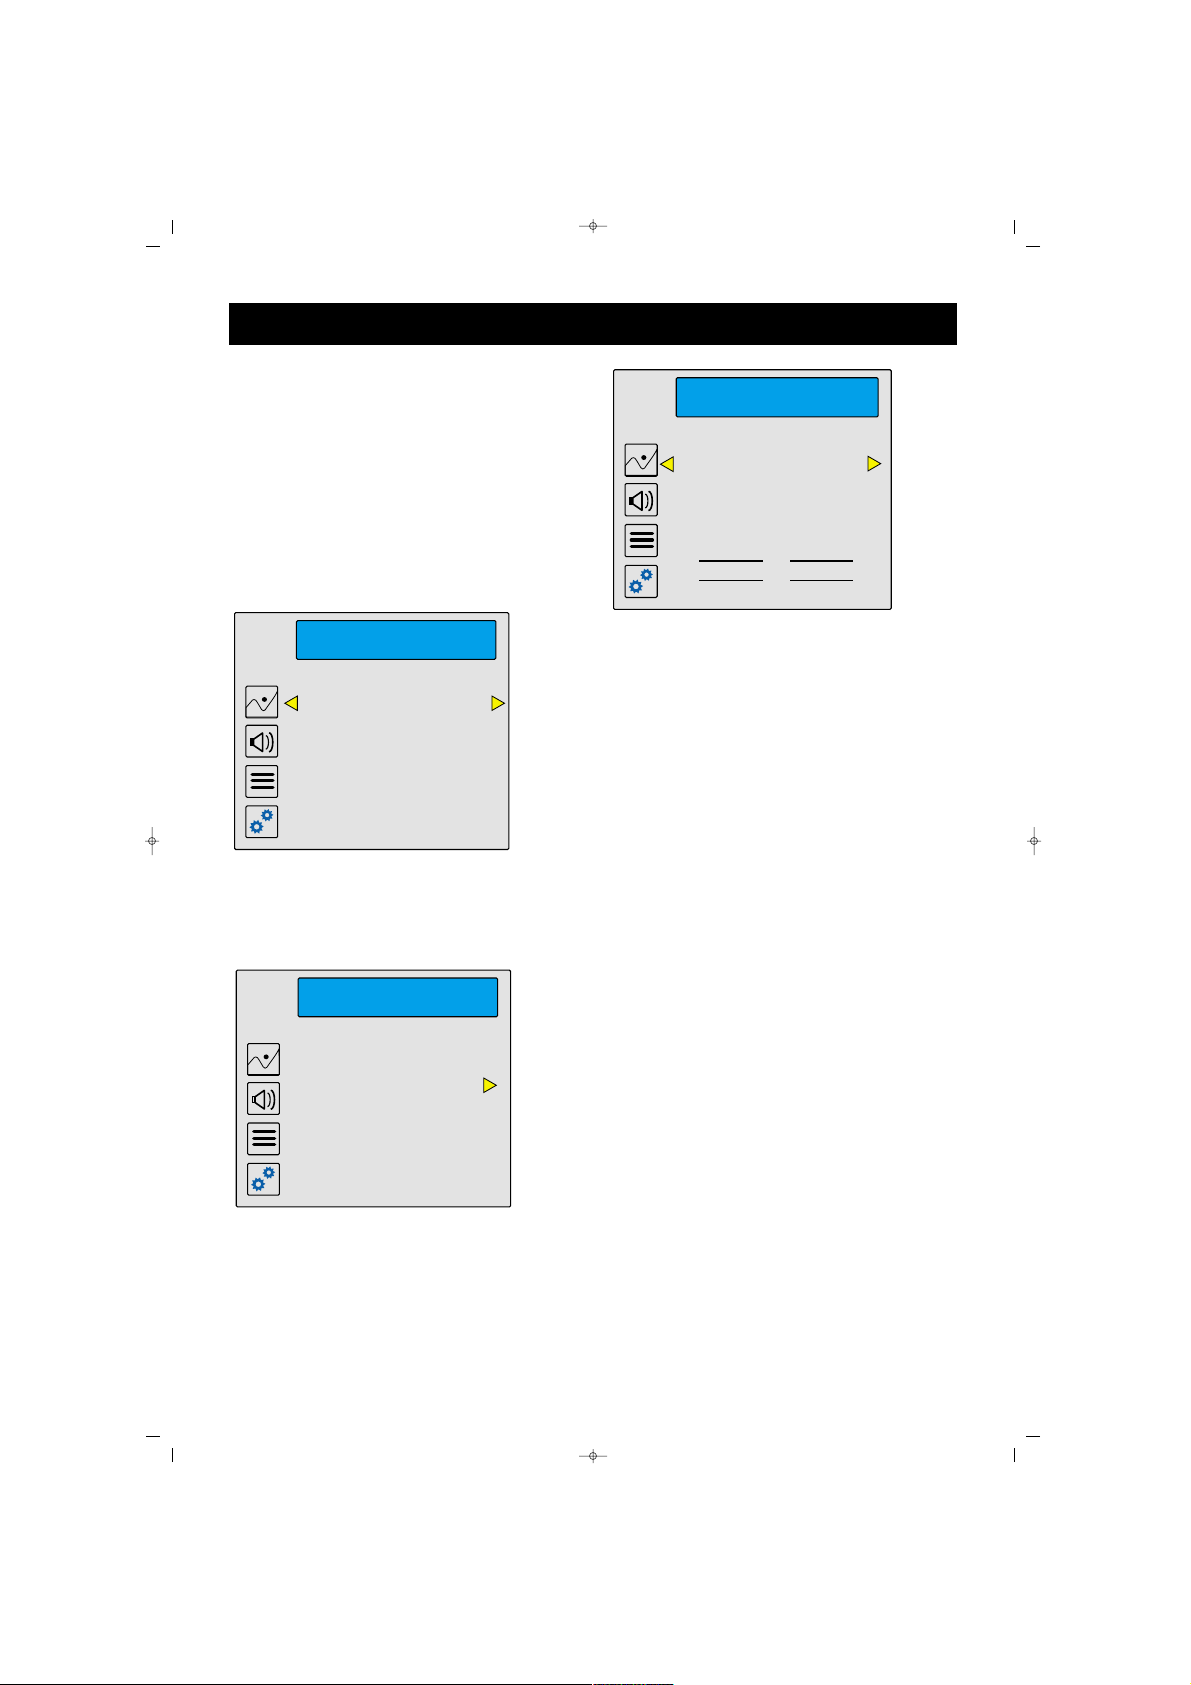
AAUUTTOOMMAATTIICC SSEEAARRCCHH
11..
Using MENU and P- buttons,
access to PROGRAMS menu.
Using V+ and P- buttons select
Automatic Search and press V+
button again.
A new menu will appear. Before
starting automatic search, select
your Country and pressing P-,
select OK and confirm.
Along with a new menu, Searching
is displayed on the screen. The
channels so found are
automatically stored.
TV FUNCTIONS (MENUS)
SALORA CTV100 42"PLAS ING 9/5/06 9:50 Page 19
PROGRAMS
PROGRAMS
Program Table
Program Moving
Program Setup
Auto Programming
Please Select the country then
press OK button to start the
installation
Country
Sort By
OK
UK
Quality
Cancel
Program Table
Program Moving
Program Setup
Auto Programming
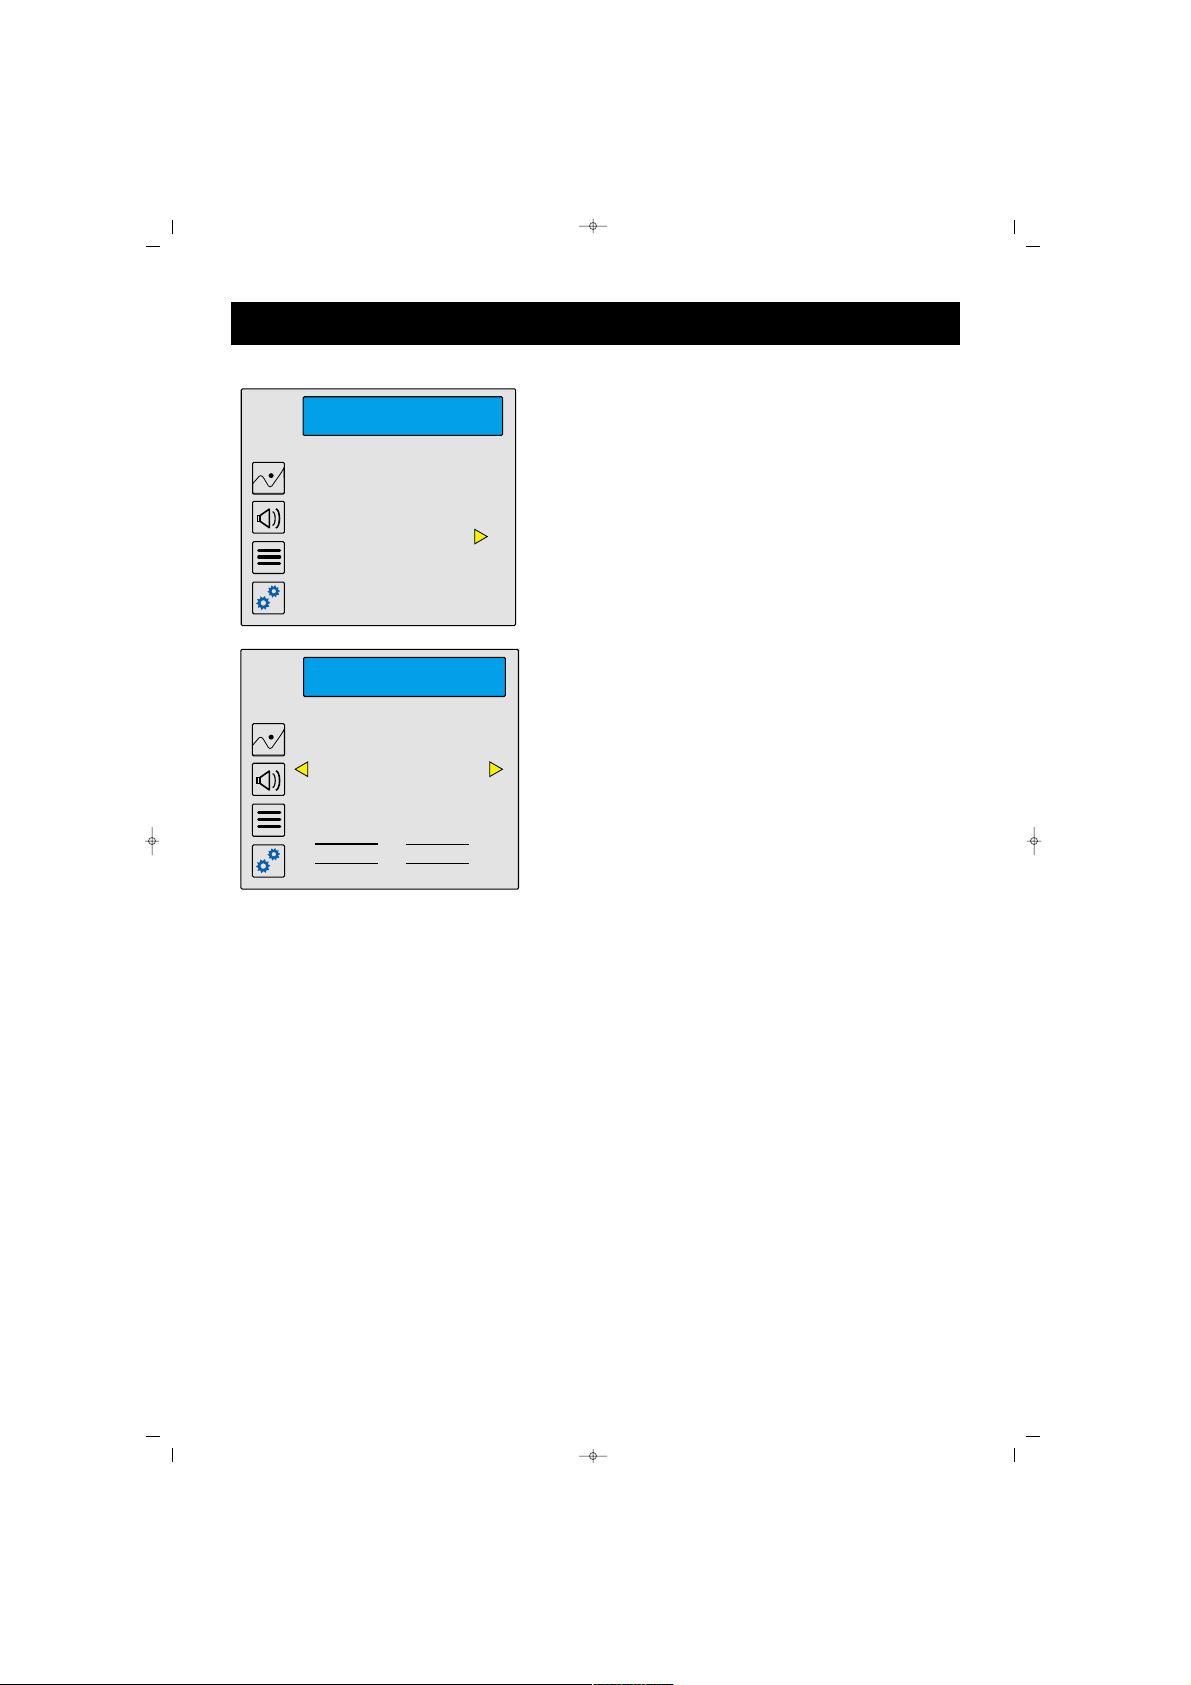
20
TV FUNCTIONS (MENUS)
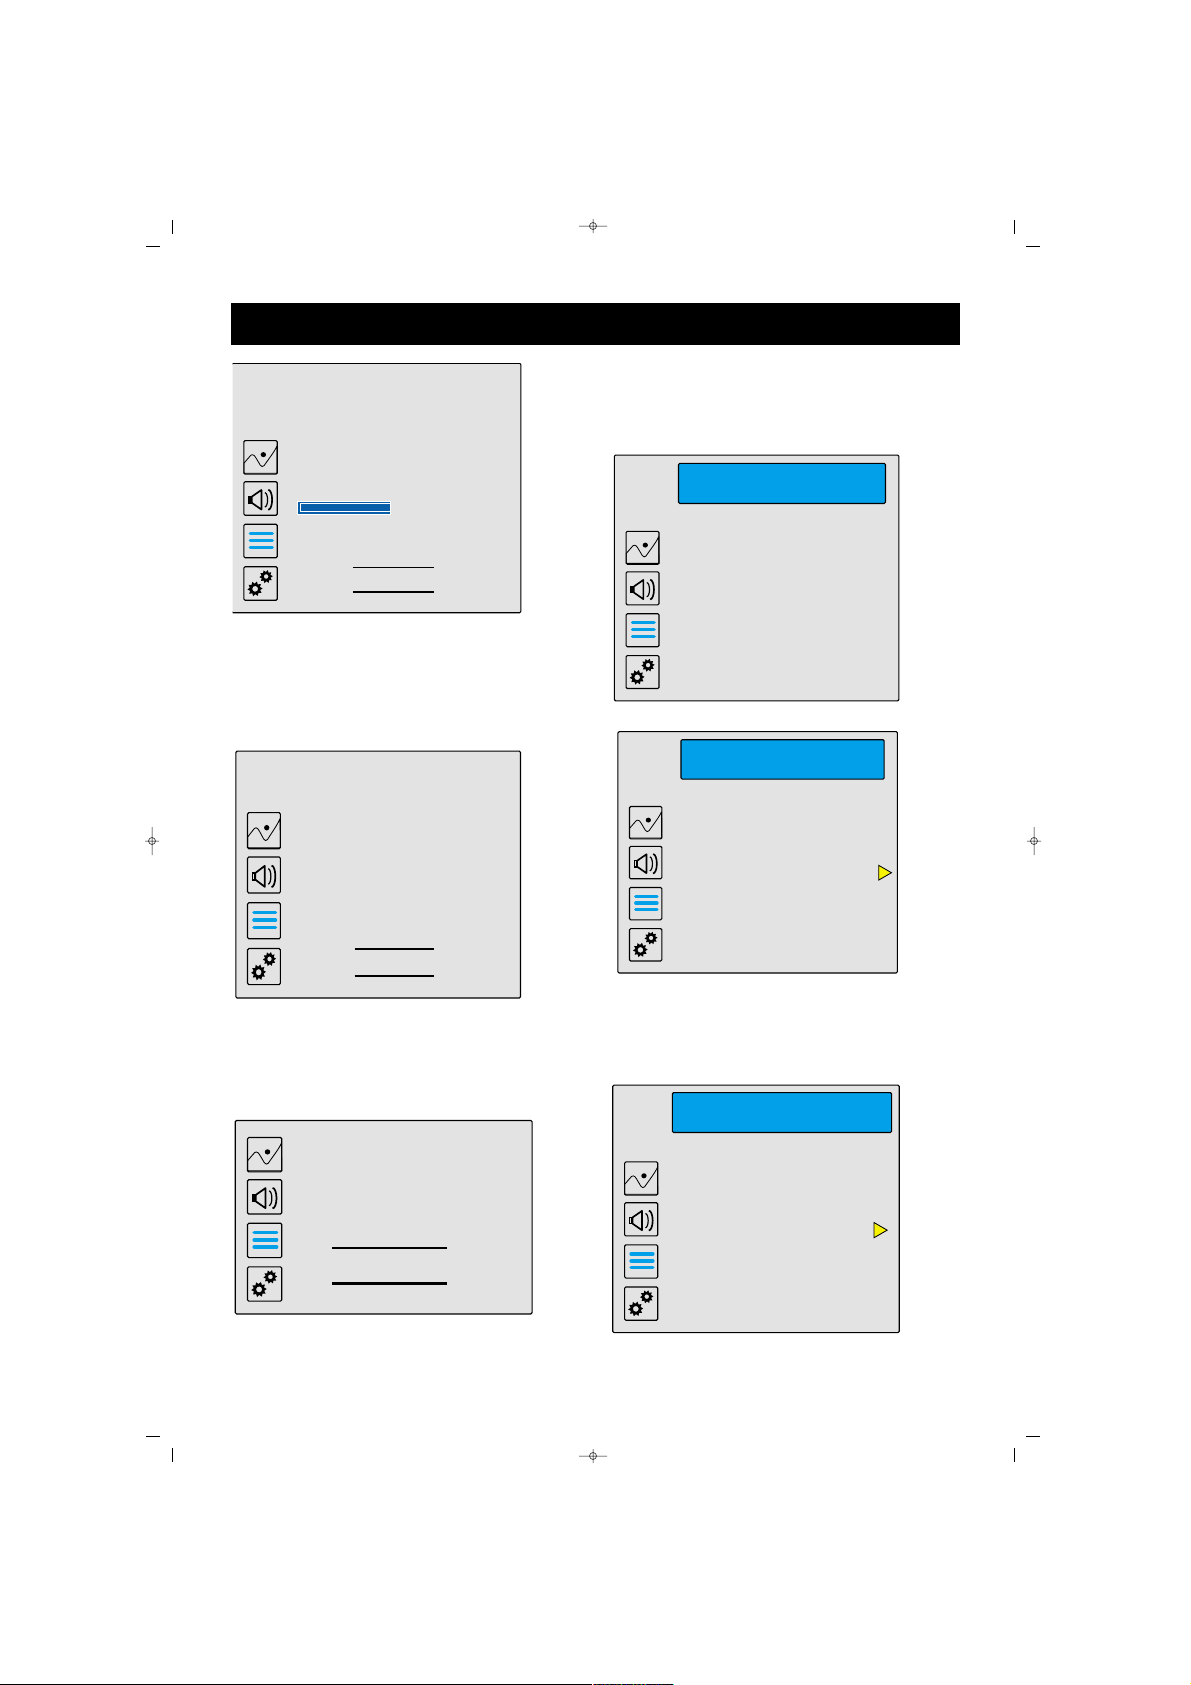
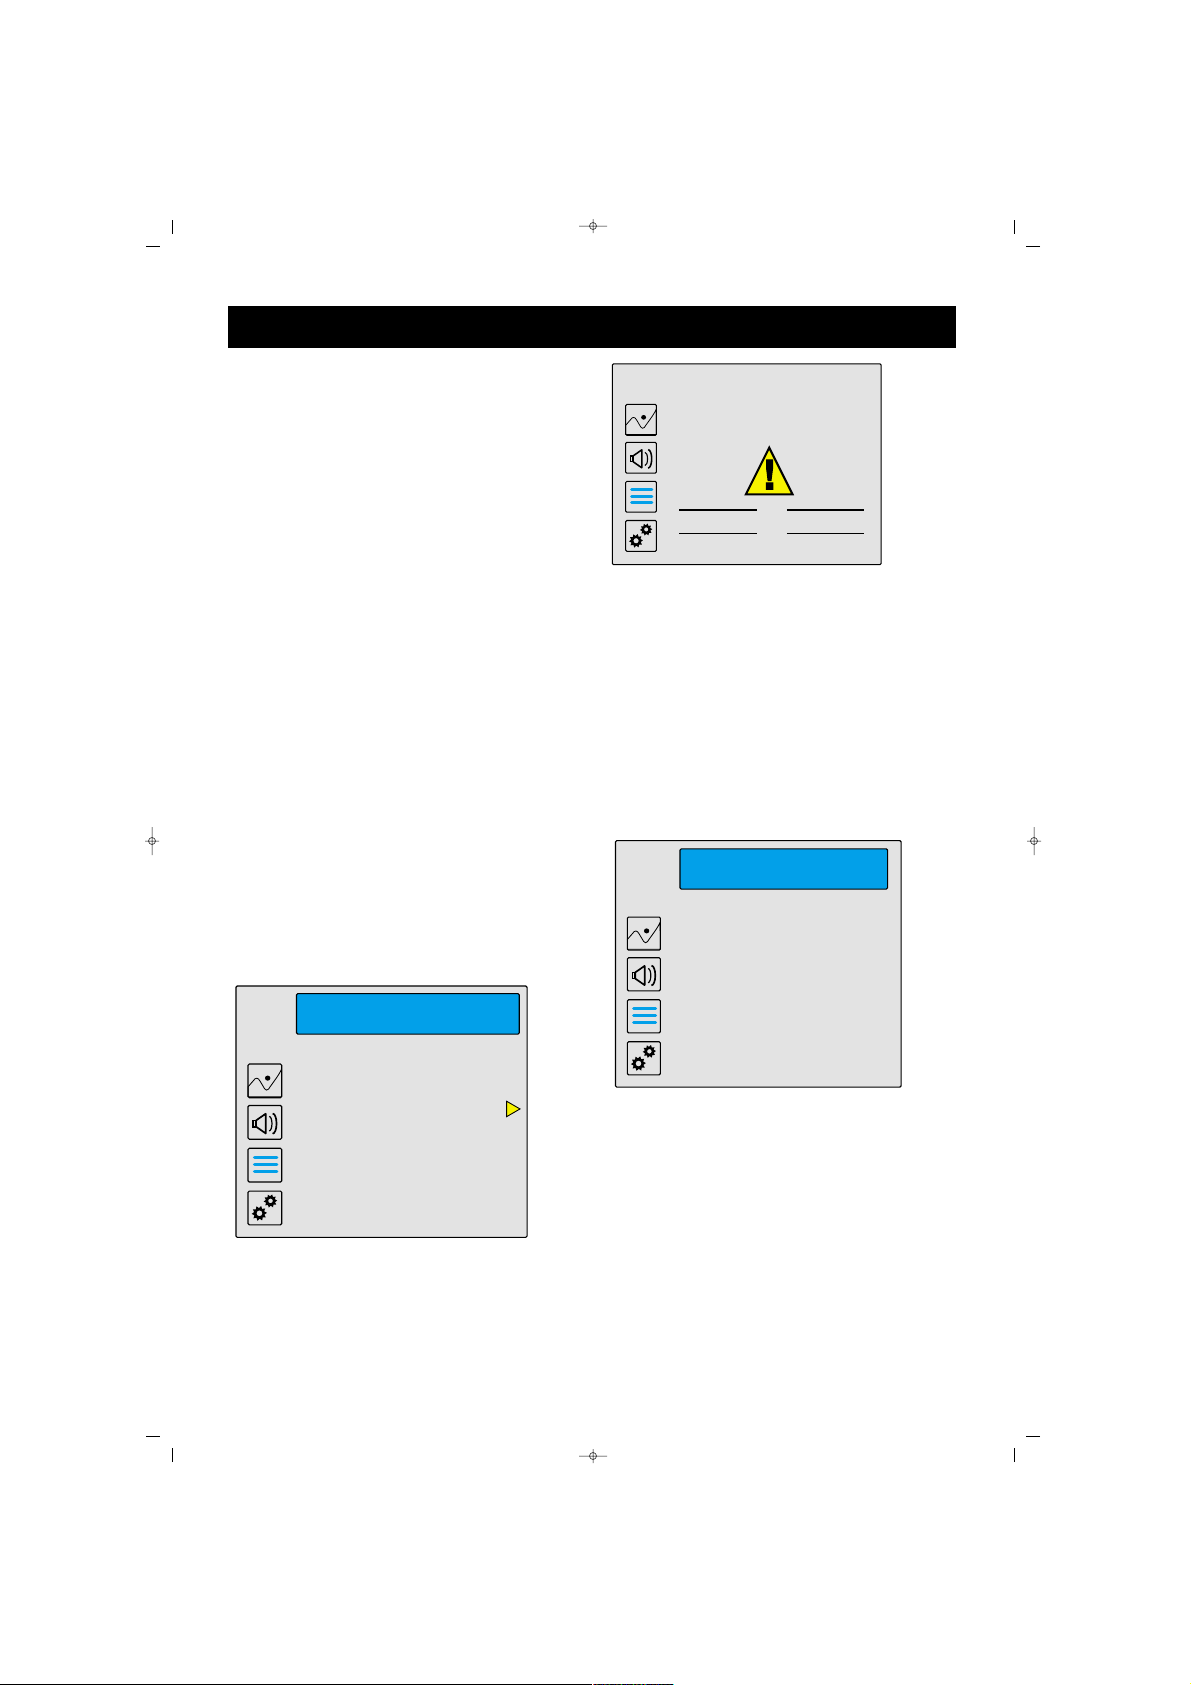
After completing the channel
search, the number of channels
within a new menu appears. You
can store the channels using OK
button.
Confirm the Cancel script in
automatic search, pressing OK, to
cancel the action. A menu showing
cancellation will appear.
MMaannuuaall SSeeaarrcchh
Select PROGRAM SETTINGS line
from the PROGRAMS menu.
In the new menu, select Frequency
Setting line pressing P- button and
press V+ button. Frequency setting
menu is displayed.
SALORA CTV100 42"PLAS ING 9/5/06 9:50 Page 20
SEARCHING...
To cancel searching process
press Cancel button...
Found Programmes number: 25
43%
Programs are sorted. Found
Cancel
Autosearch is completed.
Programmes number : 48
OK
PROGRAMS
Program Table
Program Moving
Program Setup
Auto Programming
PROGRAMS
Program Table
Program Moving
Program Setup
Auto Programming
Cancelled
OK
PROGRAM SETUP
Change Name
Delete Programme
Manual Tuning
21
PPrrooggrraamm NNoo::
You can enter the
program number to be stored.
FFrreeqquueennccyy::
You can enter the
number of the program you want
to watch using numerical buttons
and find the previous / following
channel pressing V± buttons.
FFiinnee TTuunniinngg::
You can fine tune the
channel using V± buttons.
CCoouunnttrryy::
The modulation setting
should be europe in countries
other than France. France selection
is used for Secam L broadcasting.
You can confirm the setting by
selecting OK with P- button or
cancel it. In both cases, the
following menus will be displayed:
You can return to
PPRROOGGRRAAMM
SSEETTTTIINNGGSS
menu.
NNAAMMIINNGG
You can name the channels found
after automatic or manual search.
When you select naming line from
the PROGRAM SETTINGS menu,
a table containing letters and
TV FUNCTIONS (MENUS)
SALORA CTV100 42"PLAS ING 9/5/06 9:50 Page 21
MANUAL TUNING
Program No
Frequency 154
Fine Tuning 0
Country Europe
OK
Completed
OK
001
Cancelled
OK
Cancel
PROGRAM SETUP
Change Name
Delete Programme
Manual Tuning
MTV
1 2 3 4 5 6 7 8 9 0
= - { } “ : . , ?
Q W E R T Y U I O P
A S D F G H J K L
Z X C V B N M
Shift
OK Clear
BS
Cancel
22
numbers will be displayed. You
can select the boxes in this table
or the boxes of the name or
number you want to write using
V± or P± buttons and write after
confirming with OK buttons. You
can use 8 digits at the maximum.
You can write the letters in capital
pressing Change button or use
other symbols. You can delete,
cancel or confirm the script. At
the end of these "name changed"
OK and "action cancelled" OK
will confirm or you can cancel
them.
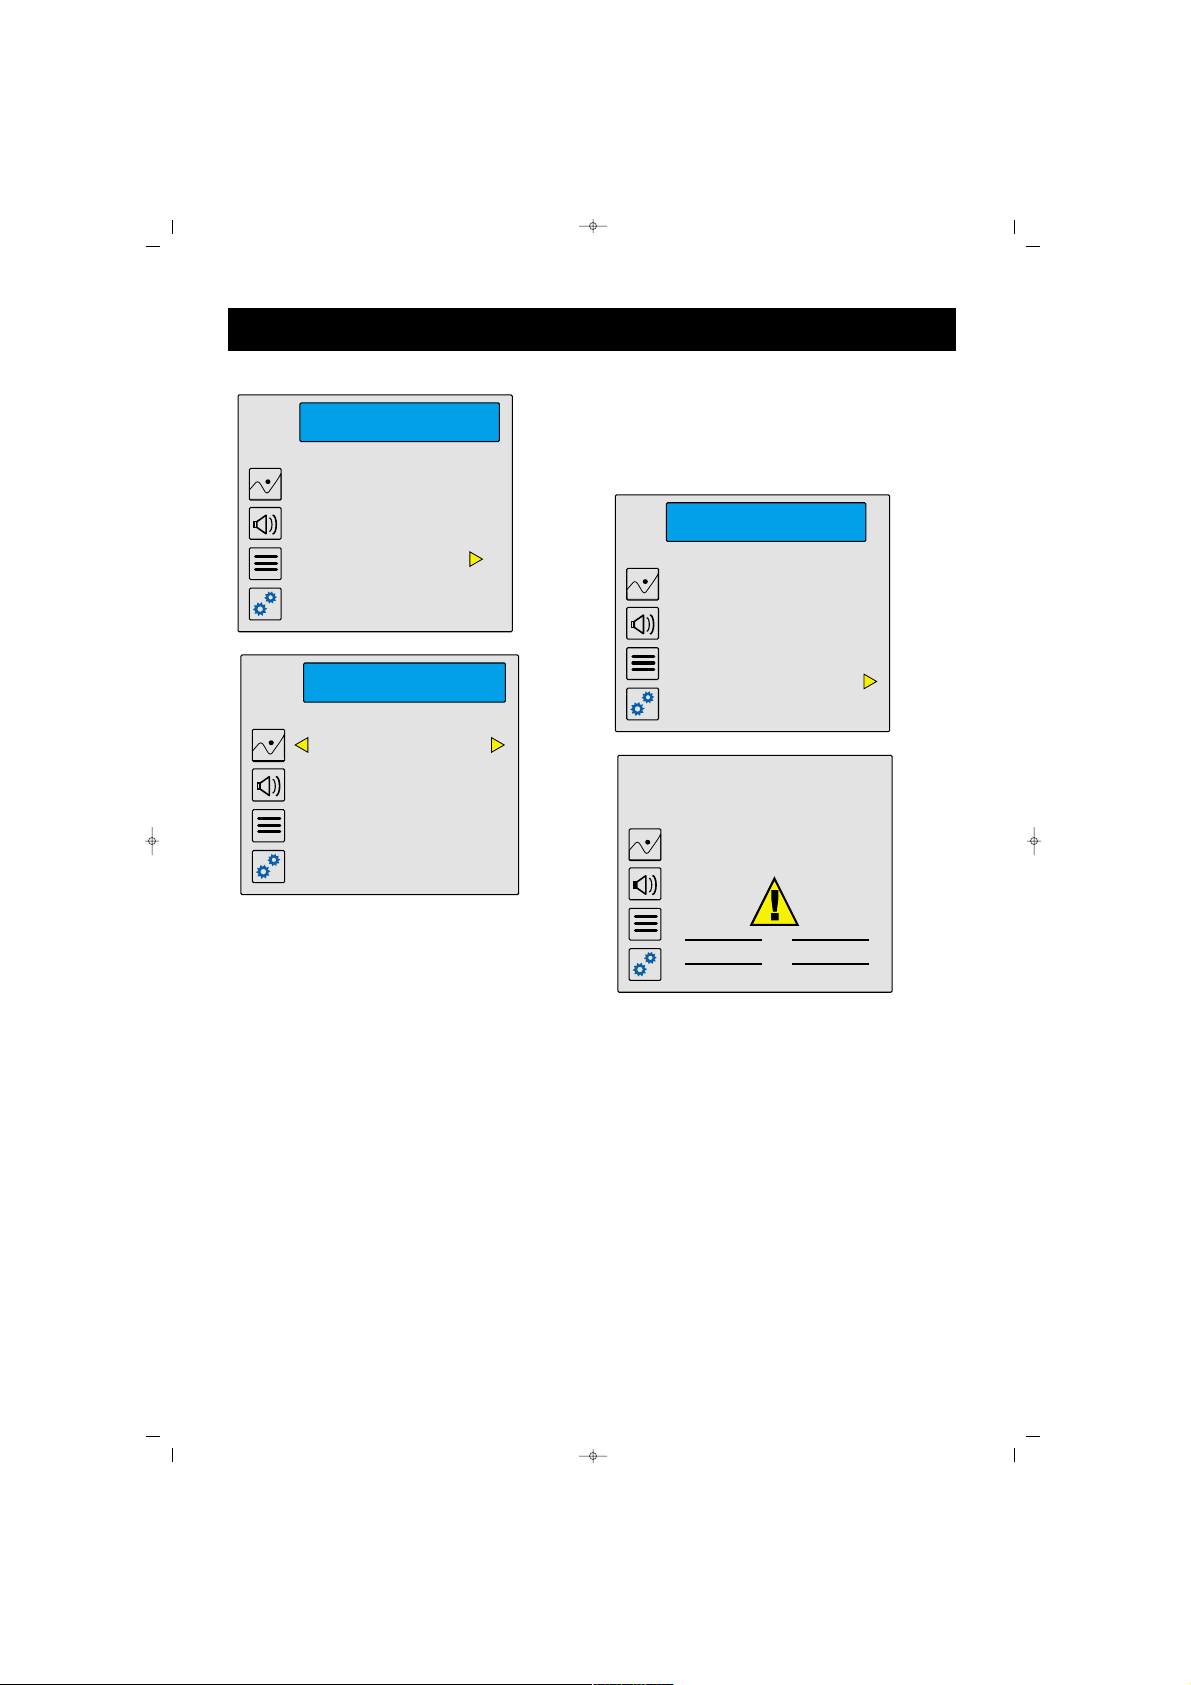
DDEELLEETTIINNGG PPRROOGGRRAAMMSS
Press V+ button in the
PROGRAMS menu to select
Program Table line. The Program
Table showing 20 programs is
displayed, you can select the
required channel using P±, V±
and numerical buttons and return
to PROGRAMS menu using the
MENU button.
PPRROOGGRRAAMM TTAABBLLEE
Press V+ button in the
PROGRAMS menu to select
Program Table line. The Program
Table showing 20 programs is
displayed, you can select the
required channel using P±, V±
and numerical buttons and return
to PROGRAMS menu using the
MENU button.
TV FUNCTIONS (MENUS)
SALORA CTV100 42"PLAS ING 9/5/06 9:50 Page 22
PROGRAM SETUP
Change Name
Delete Programme
Manual Tuning
This Programme will be
deleted..!
PROGRAMS
Program Table
Program Moving
Program Setup
Auto Programming
CancelOK

23
MMOOVVIINNGG TTHHEE PPRROOGGRRAAMMSS
Press V+ and P- buttons in the
PROGRAMS menu and select
Program Move line.
A Program Table showing 10
programs is displayed.
Highlight the program to be moved
and drag it to the right space using
V+ button first.
When you are at the line of the
program to be moved, using P±
button, the number of the program
to be moved will be displayed as
the program moved by you and a
space will be opened at the left
side where the programs are
located. Press V- button to draw
the program to be moved to that
space and press MENU button.
TV FUNCTIONS (MENUS)
SALORA CTV100 42"PLAS ING 9/5/06 9:50 Page 23
PROGRAMS
Program Table
Program Moving
Program Setup
Auto Programming
001----- 011 ----002----- 012 ----003 MTV 013 ----004----- 014 ----005----- 015 ----006----- 016 ----007----- 017 ----008----- 018 ----009----- 019 ----010----- 020 -----
001----002----003 MTV
004----005----006----007----008----009----010----V+ Select the Prog.
001----002-----
003 MTV
004----005----006----007----008----009----010----P+,P- Move
PROGRAMS
Program Table
Program Moving
Program Setup
Auto Programming
24
The menus Please Wait and then
Program Moved menus will
appear on the screen. When you
confirm pressing OK button, the
Program is moved.
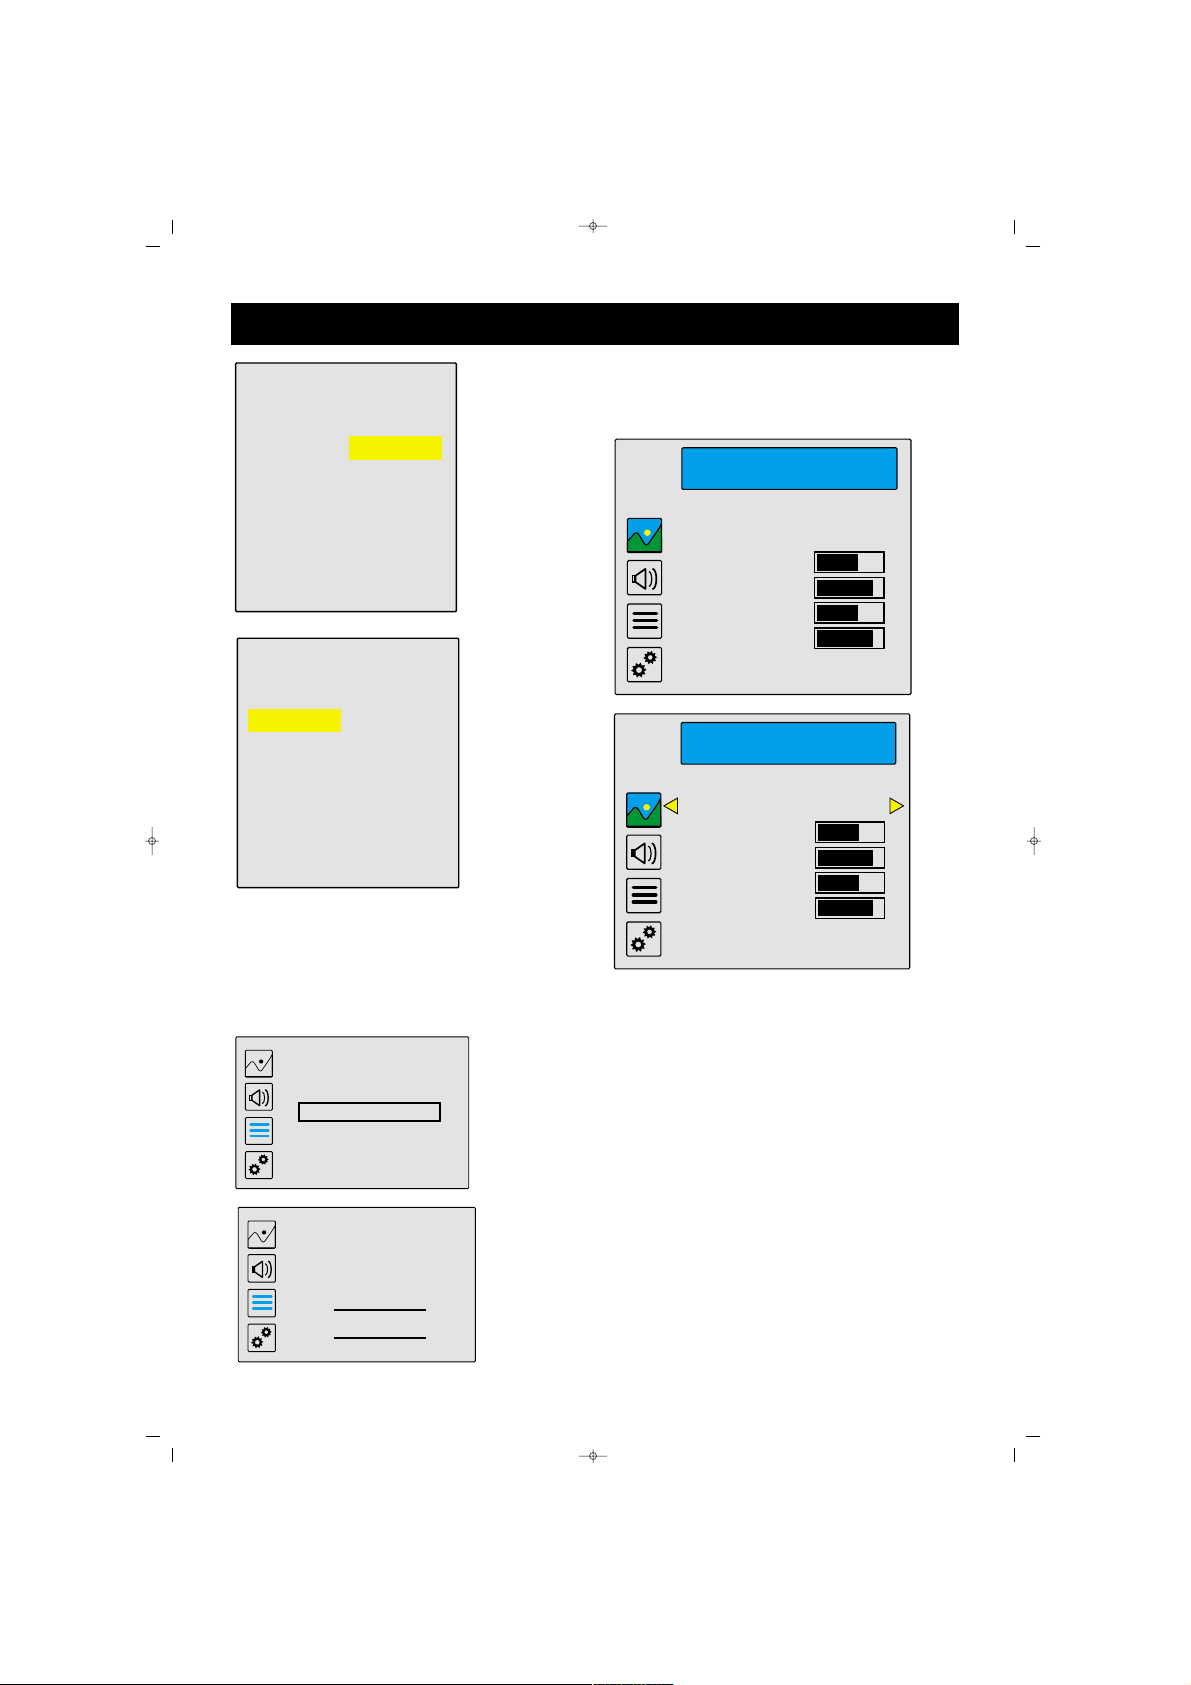
PPIICCTTUURREE SSEETTTTIINNGGSS
Press Menu button. Picture mode
will be displayed.
Press V+ button to make the first
selection. Select the setting line
using P± button and perform the
setting using V± button.
TThhee sseettttiinnggss tthhaatt ccaann bbee mmaaddee iinn
tthhee PPiiccttuurree MMeennuu
BBrriigghhttnneessss ::
To adjust brightness
of the picture
CCoonnttrraasstt ::
To adjust light and
darkness tone in the picture
CCoolloorr ::
To adjust color
SShhaarrppnneessss ::
To adjust sharpness
TV FUNCTIONS (MENUS)
SALORA CTV100 42"PLAS ING 9/5/06 9:50 Page 24
001----002----003-----
004 MTV
005----006----007----008----009----010----V- End Move
001----002----003----004 MTV
005----006----007----008----009----010-----
V+ Select the Prog.
PICTURE
Picture Preset Personal
Brightness
Contrast
Color
Sharpness
More...
PICTURE
Picture Preset Personal
Brightness
Contrast
Color
Sharpness
More...
Please wait...
IIIIIIII
Completed
OK
25
SSuubbmmeennuu ::
Press V+ button to
enter to the Picture Submenu in
the Picture menu.
PPIICCTTUURREE SSUUBBMMEENNUU
The operations in the Picture
submenu
CCoonnttrraasstt++::
For the color tone
(black str, white str, gray str,
automatic and Off)
LLeessss NNooiissee::
To increase the picture
quality
(Min, Medium, Max, Automatic
and Off)
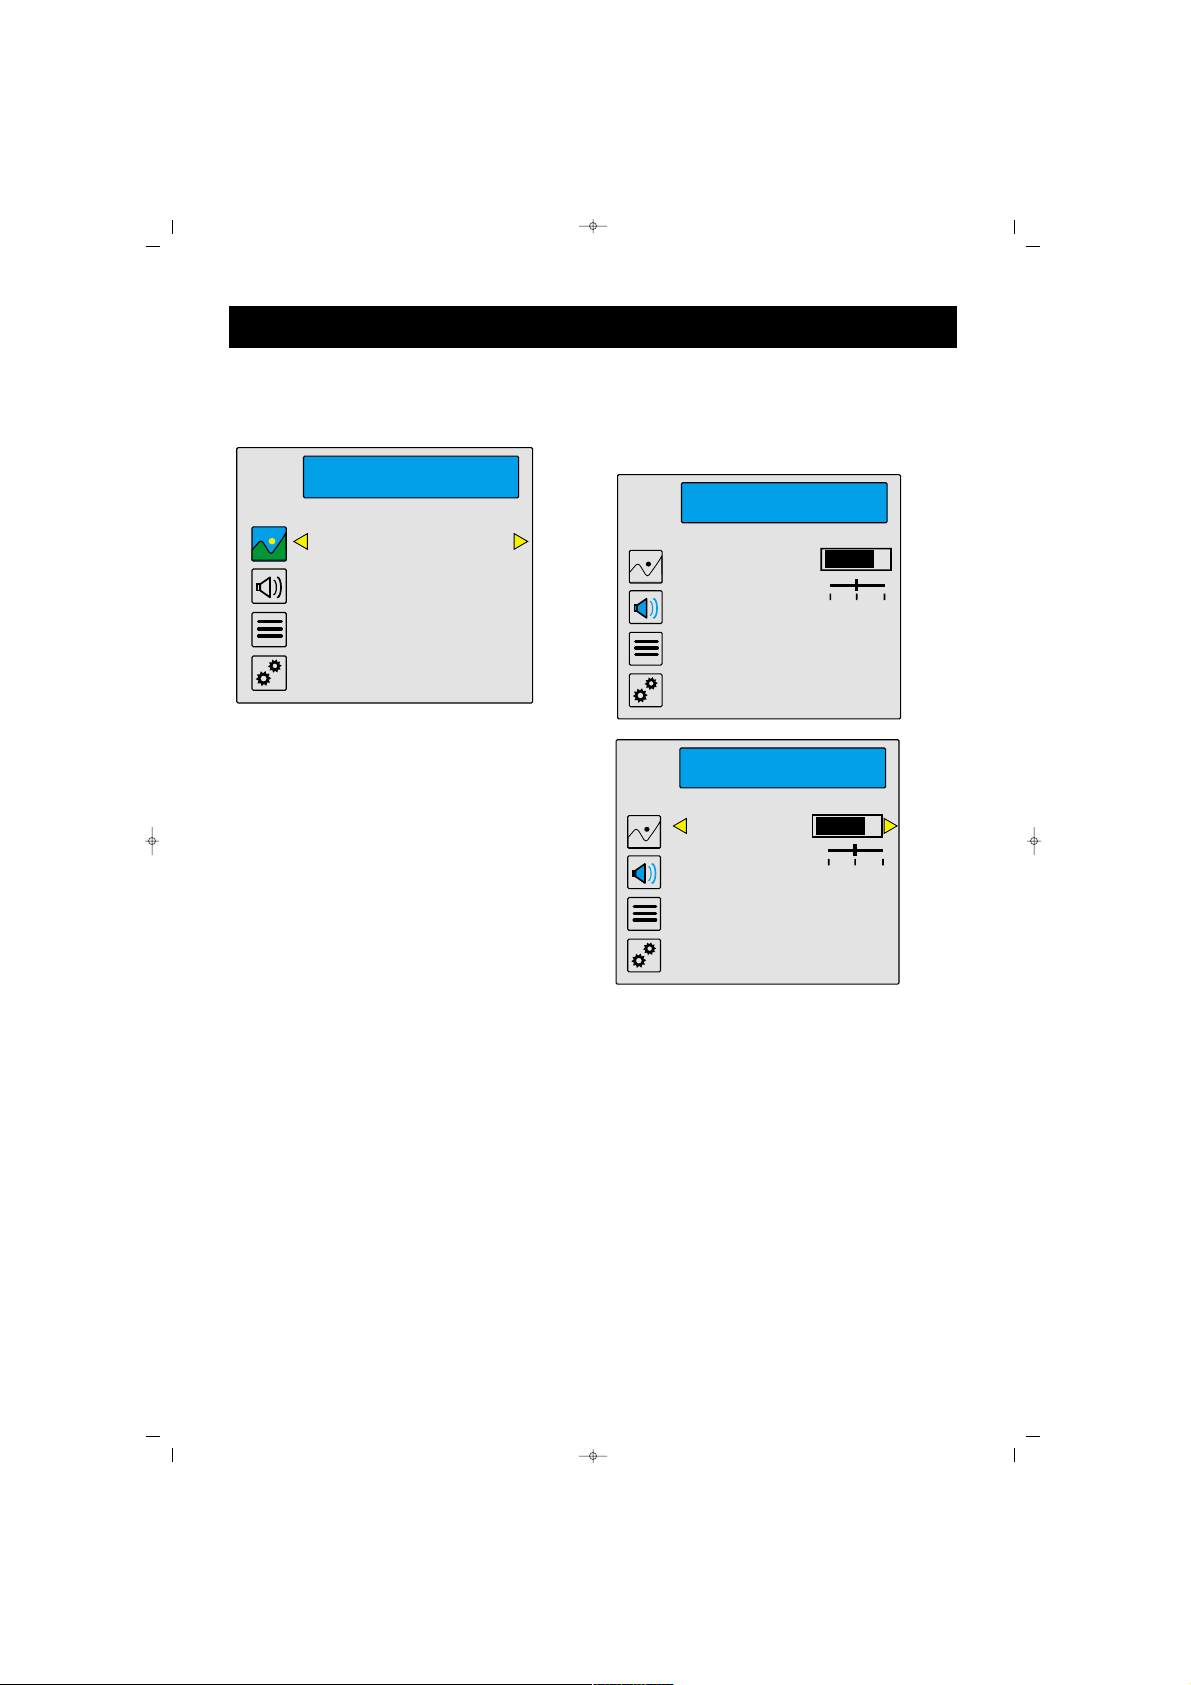
SSOOUUNNDD SSEETTTTIINNGG
Press Menu Button. Picture menu
will appear.
Press P- to select SOUND menu.
Press V+ to make the first
selection. Select the setting line
using P± buttons and make the
setting using V± buttons.
TThhee sseettttiinnggss iinn tthhee SSoouunndd MMeennuu
VVoolluummee ::
To adjust the sound
level
BBaallaannccee ::
To adjust distribution of
sound between left and right
speakers
LLoouuddnneessss
: You can adjust loudness
as ON or OFF
TV FUNCTIONS (MENUS)
SALORA CTV100 42"PLAS ING 9/5/06 9:50 Page 25
MORE...
AUDIO
Contrast+ OFF
Noise Red. OFF
Volume
Balance
Loudness OFF
Equalizer
More...
AUDIO
Volume
Balance
Loudness OFF
Equalizer
More...

26
EEqquuaalliizzeerr::
Press V+ in the
Equalizer line to select one of the
equalizer settings (Flat, Hall,
Music, Movie, Personal). For
personal equalizer settings use P±
and V± buttons.
SSuubbmmeennuu
In the sound menu, highlight the
Submenu selection and press V+
button to access Sound Submenu.
SSoouunndd MMoodd::
Stereo-Mono (Dual 1-
2) sound selection
SSpp.. EEffffeecctt::
If you set the sound
effect as Off, you listen to normal
sound. You can also set Wide
Music or Wide Movie using V±
buttons.
TV FUNCTIONS (MENUS)
SALORA CTV100 42"PLAS ING 9/5/06 9:50 Page 26
AUDIO
AUDIO
Volume
Balance
Loudness OFF
Equalizer
More...
EQUALIZER
Preset Personal
100 Hz
330 Hz
1 KHz
3.3 KHz
6.6 KHz
Volume
Balance
Loudness OFF
Equalizer
More...
MORE...
Sound Mode Mono
Sp.Effect OFF
27
FFEEAATTUURREESS
Press Menu button. Picture menu
will be displayed. Use P- button to
select FEATURES Menu. The
options are (Language, Timer, Lock
and Burn Protect).
LLaanngguuaaggee::
Select the menu
language.
TTiimmeerr FFuunnccttiioonnss::
Use V+ button
in this option and access to Time
Function menu.
((UUssiinngg tthhee bbuuttttoonnss 00 ttoo 99 oonn tthhee
RRCC))
CCuurrrreenntt TTiimmee::
Select the current
time
SSwwiittcchh TTiimmee::
Adjust the time of
opening of the TV (24 hours scale,
00.00)
SSwwiittcchh TToo::
Enter the default
program number of the TV set at
the opening (you can select
between 001 to 200 or AV). If you
adjust these operations when your
TV is on, TV will pass through
your desired program at the
determined hour automatically
SSlleeeepp TTiimmeerr::
Enter the minute to
switch off the TV (001 to 999)
TV FUNCTIONS (MENUS)
SALORA CTV100 42"PLAS ING 9/5/06 9:50 Page 27
FEATURES
Language English
Timer
Lock
Burn Protect
Picture&Sound F.Reset
TIMER
Current Time 12:15
Switch Time --:-Switch To --Sleep Timer ---
OK
Cancel
FEATURES
Language English
Timer
Lock
Burn Protect
Picture&Sound F.Reset
28
LLOOCCKK FFUUNNCCTTIIOONNSS
Please select lock function from
the function menu then use V+
button for entering to the lock
menu. First lock status and new
pin option will appear on the
screen. You can determine your
new pin number by using
numerically buttons 0...9.
On the screen " enter new pin "
notice will be appear. Please enter
your new pin number again. Thus
your new pin will be set up. You
can change the lock status as on,
off or determine it again "Lock
Function" can be changed by using
direction buttons on the remote
control and PIN code can be
entered by using the numeric
buttons on the remote controls.
If you set the lock function as
"ON", your TV will ask PIN code
when it is turned on during the
stand by mode.
Because of that, please do not
forget you Lock PIN code which
you will enter in the same menu
again.
In order to cancel the lock function
you may enter to lock menu and
set the lock function as OFF.
----------------------------------------------------------------------------------------
WWAARRNNIINNGG
In case of the PIN code forget, by
using your remote control, you
should enter the numbers “66“,
“55”, “99”, “44”, “00” to the place
where "lock" code must be
entered. So, lock function will be
set as "New Pin".
----------------------------------------------------------------------------------------
TV FUNCTIONS (MENUS)
SALORA CTV100 42"PLAS ING 9/5/06 9:50 Page 28
FEATURES
Language English
Timer
Lock
Burn Protect
Picture&Sound F.Reset
LOCK
Be sure you know the pin before
lock TV...
Lock Status OFF
- - - - -
OK
Cancel
29
BBUURRNN PPRROOTTEECCTT
BBuurrnn PPrrootteecctt::
By the Burn Protect
Function you can prevent image
sticking problem coused by
current plasma technology that
appered when displaying a costant
picture or a logo too long time.
Burn protection function will swap
the display picture 2 pixel left,
right and up, down to minimize
the image sticking problem at your
device. Therefore we strongly
recommend you to keep Burn
Protect function on at all modes
as TV, PC, by adjusting swap time
from 15 to 450 seconds.
PPIICCTTUURREE&&SSOOUUNNDD FF..RREESSEETT::
By
using this option , you can return all
picture & sound settings to original
factory values .
(At some models)
TV FUNCTIONS (MENUS)
SALORA CTV100 42"PLAS ING 9/5/06 9:50 Page 29
FEATURES
Language English
Timer
Lock
Burn Protect
Picture&Sound F.Reset
BURN PROTECT
Swap Time 135
TV ON
PC Input ON
FEATURES
Language English
Timer
Lock
Burn Protect
Picture&Sound F.Reset
Picture and Sound ad justments
will turn to factory defaults!!!
CancelOK
30
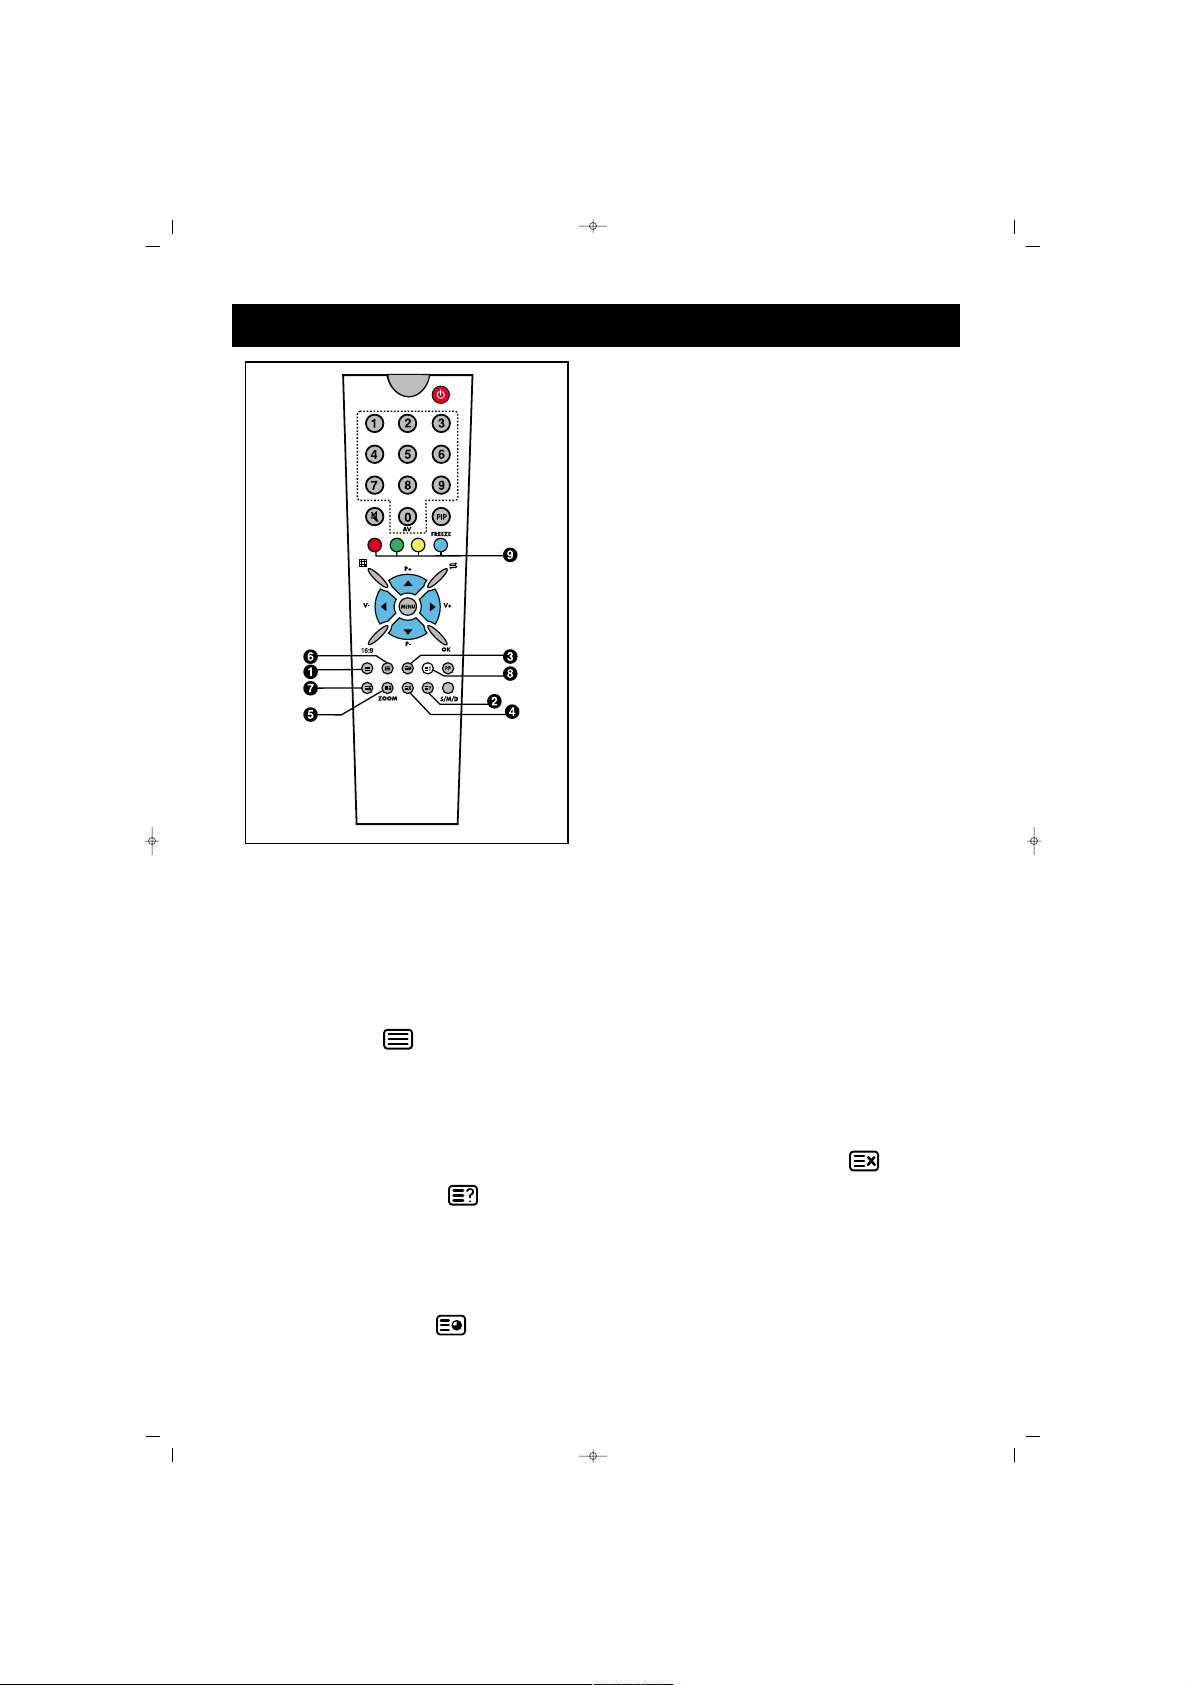
TTEELLEETTEEXXTT MMooddee
If the channel you are watching
has a teletext broadcast, you can
use the said buttons to access
teletext mode and perform various
actions.
11.. TTeelleetteexxtt
: Switches to
teletext broadcasting in the
channel you are watching.
Pressing 2nd time, it enters to
mix. When you press 3rd time,
TV is selected.
22.. RReevveeaall // CCoonncceeaall::
: Provides
revealing or re-concealing of some
information concealed in the text
broadcast while in Teletext mode.
33.. TTeelleetteexxtt TTiimmeerr
: Displays
the time from the teletext of the
channel you are watching in the
TV mode, on the upper right
corner of the screen.
Pressing this button when the
teletext page is active, the subpage
of the teletext (if exists) is displayed
on the lower part of the screen
and those pages can be changed
using P± button. Press the same
button to exit.
44.. CCaanncceell ((UUppddaattiinngg))
: If you
press this button in the teletext
mode, the TV broadcasting will be
displayed. But teletext is still active
and page search will continue if a
new page number is entered.
When the requested page is found,
TELETEXT
1. Teletext button
2. Reveal/Conceal button
3. Teletext timer button
4. Cancel button (Updating)
5. Size (Page Enlarging) button
6. Mix (Combined TV and
Teletext) button
7. Hold (Subpage holding)
button
8. Index (Main Page) button
9. Color (Red, Green, Yellow
and Blue) button
SALORA CTV100 42"PLAS ING 9/5/06 9:50 Page 30
 Loading...