

Page 1

GEBRUIKSAANWIJZING
MODE D'EMPLOI
OPERATING INSTRUCTIONS
LCD3731FH
KLEURENTELEVISIE MET AFSTANDSBEDIENING
TELEVISEUR COULEUR A TELECOMMANDE
COLOUR TELEVISION WITH REMOTE CONTROL
Page 2

Inhoudopgave
Kenmerken ............................................................. 3
Accessoires ............................................................ 3
Inleiding .................................................................. 4
Voorbereiding .........................................................4
Veılıgheıdsvoorschrıften ......................................... 4
Voedingsbron ......................................................4
Netsnoer ............................................................. 4
Vocht en water ....................................................4
Reinigen..............................................................4
Hitte en vlammen ................................................4
Bliksem ............................................................... 5
Vervangstukken ..................................................5
Onderhoud .......................................................... 5
Afvalverwerking .................................................. 5
Informatie voor gebruikers in de lidstaten van de
Europese Unie. ................................................... 5
Het toestel loskoppelen ......................................5
Volume hoofdtelefoon .........................................5
Installatie.............................................................5
LCD-scherm........................................................5
Waarschuwing ....................................................5
Overzicht van de afstandsbediening ......................6
LCD-TT en bedieningstoetsen ................................ 7
De aansluitingen bekijken – Aansluitingen
achterin ................................................................... 8
De aansluitingen bekijken – Zijdelingse
aansluitingen ........................................................ 10
Stroomaansluiting ..................................................11
Antenne-aansluiting ...............................................11
De LCD-TT aansluiten op een PC ........................ 12
Aansluiten op een DVD-speler ............................. 13
Het gebruik van de zijdelingse AV-aansluitingen .. 14
Het gebruik van andere aansluitingen .................. 15
Andere apparatuur aansluiten via SCART ...........16
Batterijen aanbrengen in de afstandsbediening ... 17
Bedieningsbereik van de afstandsbediening ........ 17
De TV in/uitschakelen ........................................... 17
De TV inschakelen ............................................ 17
De TV uitschakelen ........................................... 17
Eerste installatie ................................................... 17
Ingangselectie ...................................................... 18
Basisbedieningen ................................................. 18
Bediening met de toetsen op de TV .................18
Volume instelling ........................................... 18
Zenderselectie .............................................. 18
Het hoofdmenu weergeven ........................... 18
AV-modus ...................................................... 18
Bediening met de afstandsbediening ...............18
Volume instelling ........................................... 18
Zenderselectie (Voorgaand of volgend
zender) .......................................................... 18
Zenderselectie (directe toegang) .................. 18
Navigeren in het TV menusysteem ......................19
Menusysteem ....................................................... 19
Beeldmenu........................................................19
Modus ........................................................... 19
Helderheid/Contrast/Kleur/Scherpte/Kleurscha-
kering ............................................................ 19
Kleurtemp ..................................................... 19
Ruisreductie .................................................. 19
Filmmodus .................................................... 19
Spel Modus
Beeld scherpstellen ......................................20
Reset ............................................................ 20
Bewaren ........................................................ 20
Geluidsmenu.....................................................20
Volume ..........................................................20
Equalizer ....................................................... 20
Balans ........................................................... 20
Koptelefoon ................................................... 20
Volume....................................................21
Bewaren .................................................21
Geluidsmodus ............................................... 21
AVL ............................................................... 21
Spdif uit ......................................................... 21
Effect .............................................................21
Bewaren ........................................................ 21
Functiemenu ..................................................... 21
Pip-Pap ......................................................... 21
Pip-Pap ...................................................22
Pip-grootte ..............................................22
PIP-positie ..............................................22
Bron ........................................................22
Kanaal ....................................................22
Wisselen .................................................22
Slaaptimer ..................................................... 22
Kinderslot ...................................................... 22
T aal ...............................................................22
Standaard zoom ...........................................22
Blauwe achtergrond ...................................... 22
Menu achtergrond ......................................... 22
Achtergrond verlichting ................................. 22
Menu time-out ............................................... 23
T eleteksttaal .................................................. 23
Volledige modus (optioneel) ...................23
Ext uit ............................................................ 23
Installatiemenu .............................................. 23
Kanaal ........................................................... 23
Band ............................................................. 23
Kanaal ........................................................... 23
Kleursysteem ................................................ 23
Geluidssysteem ............................................ 23
Fijnafstemmen .............................................. 23
Zoeken .......................................................... 23
Bewaren ........................................................ 24
Installatiemenu in AV Modi ............................ 24
Kleursysteem ..........................................24
Bewaren ........................................................ 24
Zendertabel ................................................... 24
Naam ......................................................24
(optioneel) ................................. 20
Nederlands - 1 -
01_[NL]_SSM_MB35_37883W_1800UK_ANALOG_BRONZE2_10064230_50151923.indd 101_[NL]_SSM_MB35_37883W_1800UK_ANALOG_BRONZE2_10064230_50151923.indd 1 29.07.2009 13:20:4229.07.2009 13:20:42
Page 3

Verplaatsen (Move) ................................24
Wissen ....................................................24
APS (Automatisch
Programmeersysteem) ...........................24
Land......................................................25
Bronmenu ......................................................... 25
PC-modus menusysteem ..................................... 25
PC Positiemenu ................................................ 25
Autopositie .................................................... 25
H (Horizontale) positie ..................................25
V (Verticale) positie ....................................... 26
Fase .............................................................. 26
Pixelfrequentie .............................................. 26
PC-beeldmenu .............................................. 26
Geluidsmenu ................................................. 26
Functiemenu ................................................. 26
Bronmenu ..................................................... 26
Mediabrowser menu .....................................26
TV-informatie weergeven......................................26
Geluid dempen functie.......................................... 26
Beeld-in-beeld (PIP) en Beeld-en-beeld (PAP)
Modi ...................................................................... 26
Beeldmodus selectie ............................................27
Beeld bevriezen .................................................... 27
Zoommodi............................................................. 27
Auto .................................................................. 27
16:9 ................................................................... 27
4:3 ..................................................................... 27
Panoramisch ..................................................... 27
14:9 ................................................................... 27
Bioscoop ........................................................... 27
Ondertitel .......................................................... 28
Zoom.................................................................28
T eletekst ...............................................................28
Tips .......................................................................29
Zorg voor het scherm........................................29
Beeldnawerking ................................................ 29
Geen stroom ..................................................... 29
Zwakke beeldkwaliteit ....................................... 29
Geen beeld ....................................................... 29
Geluid ............................................................... 29
Afstandsbediening ............................................ 29
Invoerbronnen...................................................29
Bijlage A: PC-invoer normale weergavemodi ....... 30
Bijlage B: Ondersteunde DVI-resoluties ............... 31
Bijlage C: AV en HDMI-signaalcompatibiliteit (In-
gang signaaltypes) ...............................................32
Bijlage D: Pin-specifi caties ...................................33
SCART aansluitpin specifi caties ....................... 33
HDMI aansluitpin specifi caties .......................... 33
Signaalinvoer .................................................... 33
PC RGB-terminal (D-sub 15-pin
aansluiting) ..................................................33
Bijlage E: PIP/PAP-modus combinaties ............... 34
Technische kenmerken ......................................... 35
Nederlands - 2 -
01_[NL]_SSM_MB35_37883W_1800UK_ANALOG_BRONZE2_10064230_50151923.indd 201_[NL]_SSM_MB35_37883W_1800UK_ANALOG_BRONZE2_10064230_50151923.indd 2 29.07.2009 13:20:4329.07.2009 13:20:43
Page 4
Kenmerken
• Kleuren LCD -TV met afstandsbediening.
• HDMI-aansluitingen voor digitale video en
geluid. Deze verbinding is ook compatibel met
hoge defi nitie signalen.
• 200 zenders van VHF, UHF.
• OSD-menusysteem.
• Twee scart-aansluitingen voor externe
apparaten (zoals video, videospelletjes,
geluidsset, etc.)
• Stereo geluidssysteem. (Duits+Nicam)
• Teletekst, fastext, TOP-tekst.
• Hoofdtelefoonaansluiting.
• Automatisch programmeersysteem
• Voorwaartse of achterwaartse handmatige
afstemming.
• Sluimertimer.
• Kinderslot.
• Automatisch geluid dempen indien geen
uitzending.
• NTSC-weergave.
• PIP / PAP / PAT-functies.
• AVL (Automatische volumebegrenzing).
• Indien geen geldig signaal gedetecteerd wordt,
schakelt de TV na vijf minuten automatisch
over op de stand-by modus.
• PLL (Frequentie zoeken)
• PC-ingang.
• Plug&Play voor Windows 98, ME, 2000, XP,
Vista.
• Geluid lijnuitgang.
• Spel Modus
(optioneel).
Accessoires
MENU
M
ABC
1
JKL
4
STU
7
PRESETS
SWAP
SCREEN
Afstandsbediening
-
TV
LANG
OK
SELECT
DEF GHI
2
MNO
5
VWX
8
0
P+
P-
DTV
FAV
SUBTITLE
EPG
+
INFO /
3
PQR
6
YZ
9
RETURN
SOURCE
SLEEP
/
Batterijen
2 X AAA
Gebruikshandleiding
Nederlands - 3 -
01_[NL]_SSM_MB35_37883W_1800UK_ANALOG_BRONZE2_10064230_50151923.indd 301_[NL]_SSM_MB35_37883W_1800UK_ANALOG_BRONZE2_10064230_50151923.indd 3 29.07.2009 13:20:4329.07.2009 13:20:43
Page 5
Inleiding
Dank u wel dat u dit product hebt gekozen. Deze
handleiding helpt u bij de correcte
bediening van uw TV. Lees deze
handleiding grondig door voor u de
TV in gebruik neemt.
Bewaar deze handleiding op een
veilige plaats voor een eventuele
raadpleging in de toekomst.
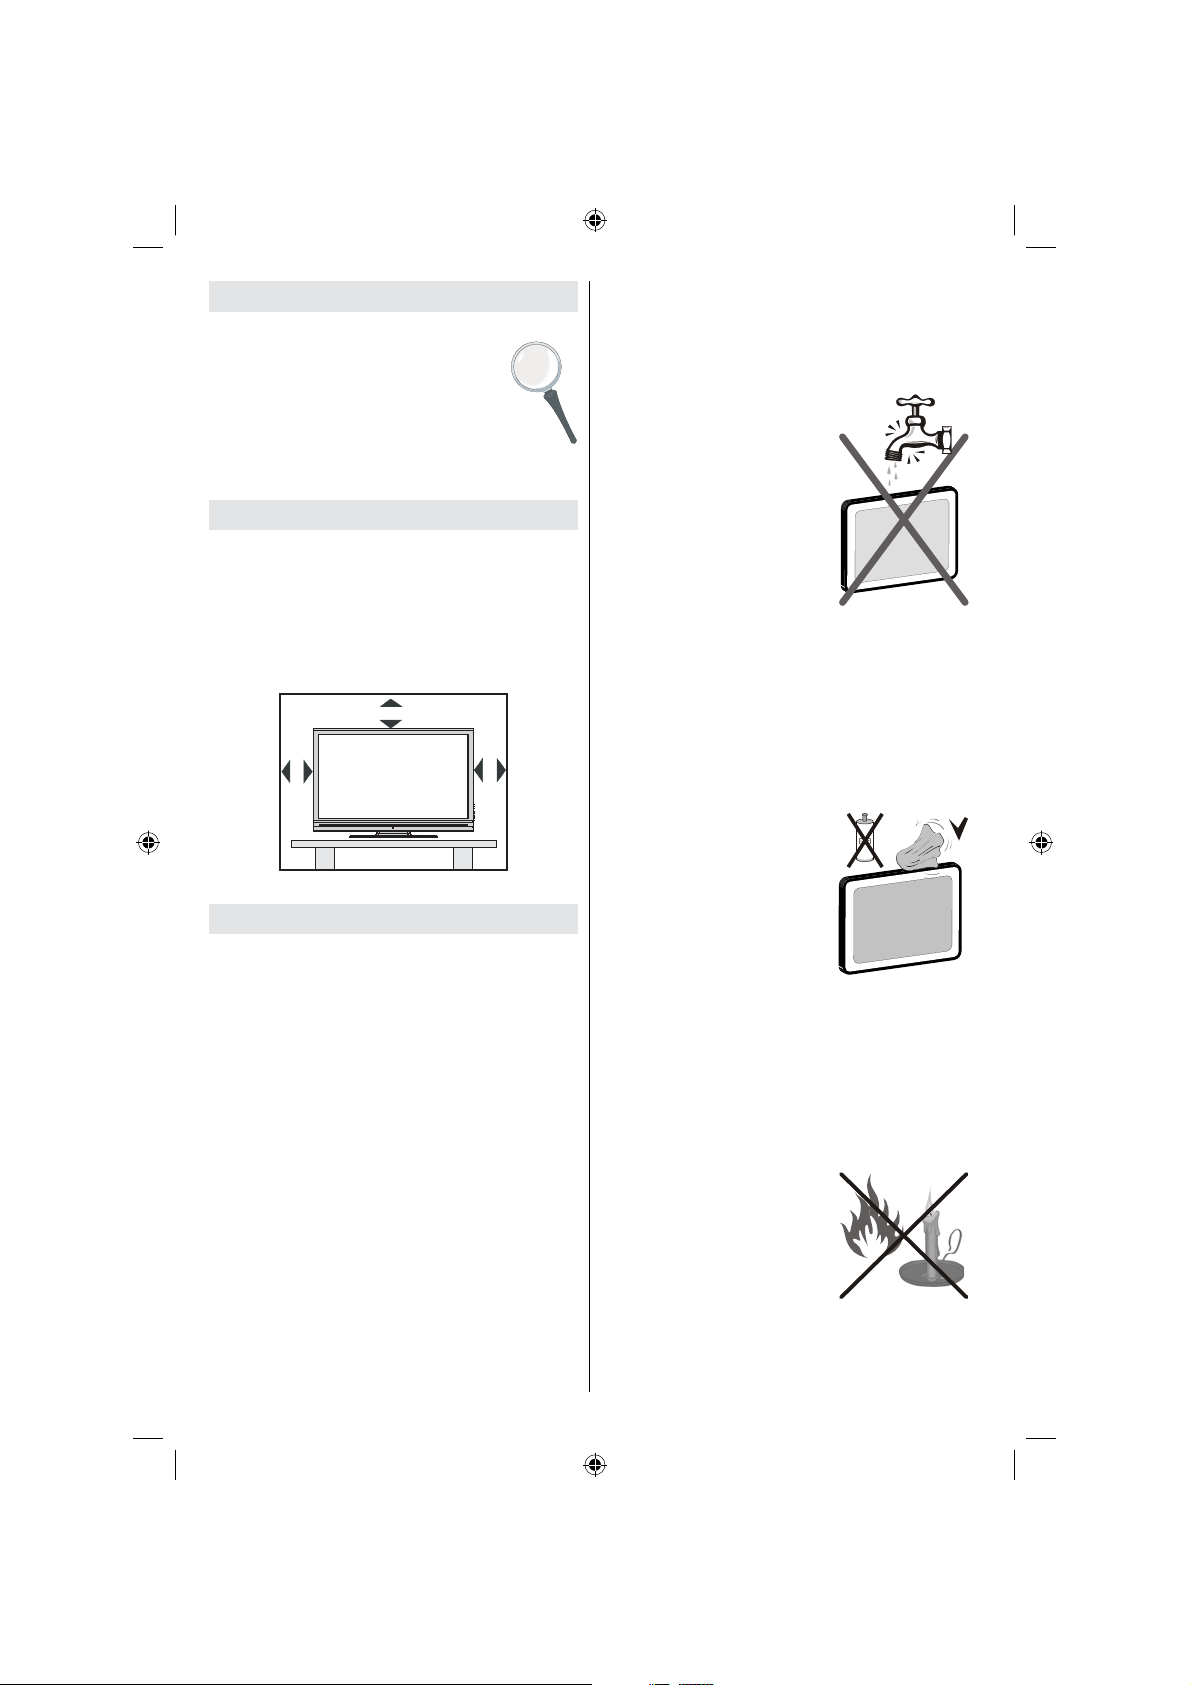
Voorbereiding
Voor een correcte ventilatie moet u minimum
10 cm vrije ruimte laten rond het toestel. Om
defecten en onveilige situaties te voorkomen
mag u geen voorwerpen op het toestel
plaatsen.
Gebruik dit apparaat in een gematigd klimaat.
10 cm
10 cm
10 cm
Veılıgheıdsvoorschrıften
Lees deze aanbevolen
veiligheidsvoorschriften zorgvuldig voor
uw veiligheid.
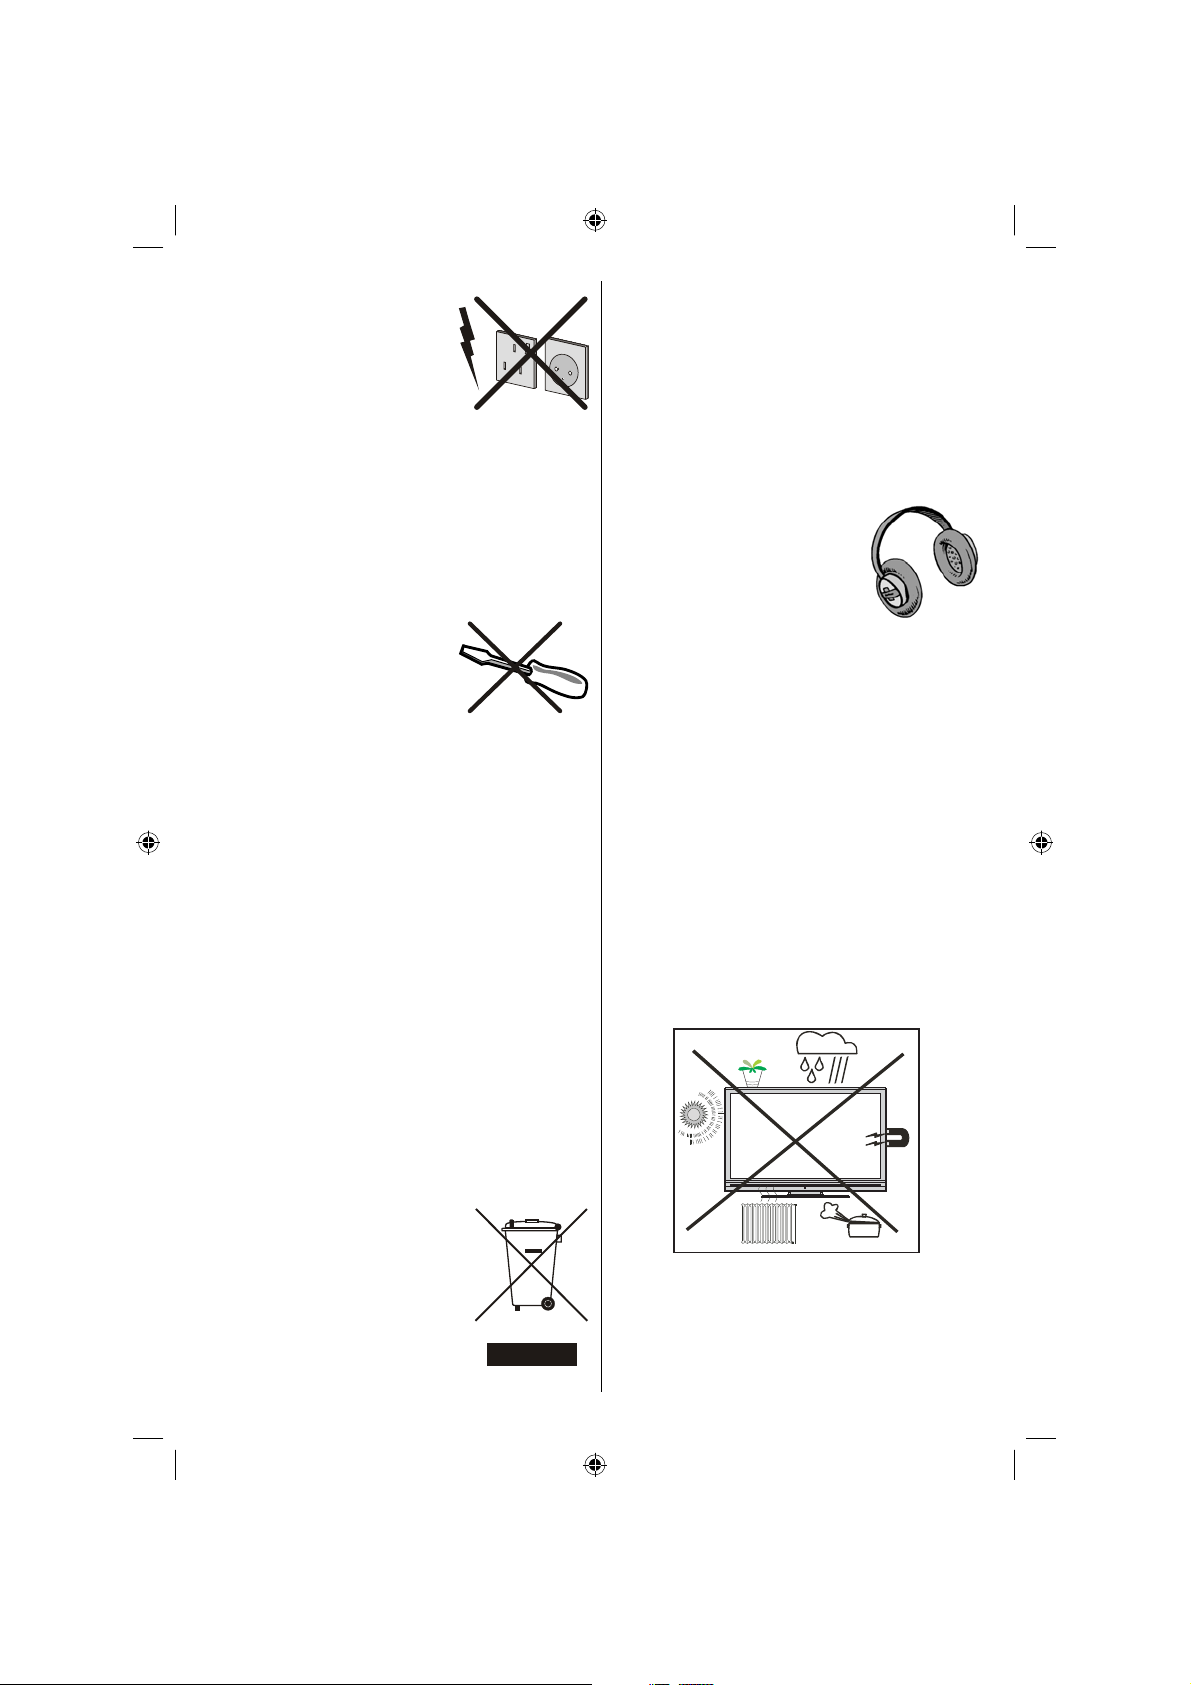
Voedingsbron
Dit televisietoestel mag enkel aangesloten
worden op een stroomvoorziening van 220240V, 50 Hz. Zorg ervoor dat u de correcte
spanning instelling selecteert.
Netsnoer
Plaats het toestel, meubelstuk etc. niet op
het netsnoer (elektriciteitsnet) of klem het
netsnoer niet af. Hanteer het netsnoer aan
de stekker. Verwijder de stekker niet uit het
stopcontact door aan de draad te trekken en
raak het netsnoer nooit met natte handen aan,
dit zou een kortsluiting of elektrische schok
kunnen veroorzaken. Leg geen knopen in
het snoer of bind het niet samen met andere
snoeren. De netsnoeren moeten zo geplaatst
worden dat er niet op gestapt kan worden.
Nederlands - 4 -
Een beschadigd snoer kan brand veroorzaken
of u een elektrische schok geven. Indien het
beschadigd is en vervangen moet worden,
moet dit door een bekwaam persoon uitgevoerd
worden.
Vocht en water
Gebruik dit toestel niet in een
vochtige en natte omgeving
(vermijd badkamers, de
gootsteen in de keuken,
en in de buurt van een
wasmachine). Stel dit toestel
niet bloot aan water of regen
want dit kan gevaarlijk zijn.
U mag ook geen voorwerpen
op het toestel plaatsen die
water bevatten (zoals vazen). Vermijd druppels
of spatten.
Indien er een voorwerp of vloeistof in de kast
terecht komt, moet u de stekker van de TV uit
het stopcontact verwijderen en het toestel door
deskundigen laten nakijken voor u het opnieuw
in gebruik neemt.
Reinigen
V oor u het toestel schoonmaakt,
moet u de stekker van
de TV verwijderen uit het
wandstopcontact. Gebruik geen
vloeibare schoonmaakmiddels
of spuitbussen om het toestel
schoon te maken. Gebruik
een zachte en droge vod.
Ventilatie
De sleuven en openingen in de TV zijn
als ventilatie bedoeld en verzekeren een
betrouwbare werking. Om oververhitting
te vermijden, mogen deze openingen niet
geblokkeerd of afgesloten worden.
Hitte en vlammen
Het toestel mag niet in de
nabijheid van open vlammen
en intense hitte, zoals een
elektrische verwarmer,
geplaatst worden. Let erop dat
er geen open vlambronnen,
zoals aangestoken kaarsen,
op de TV geplaatst worden. Batterijen mogen
niet blootgesteld worden aan warmtebronnen
zoals zonlicht, vuur of andere
01_[NL]_SSM_MB35_37883W_1800UK_ANALOG_BRONZE2_10064230_50151923.indd 401_[NL]_SSM_MB35_37883W_1800UK_ANALOG_BRONZE2_10064230_50151923.indd 4 29.07.2009 13:20:4429.07.2009 13:20:44
Page 6
Bliksem
Indien er onweer en bliksem is
of wanneer u op vakantie gaat,
moet u het netsnoer verwijderen
uit het stopcontact.
Vervangstukken
Indien er vervangstukken nodig zijn, moet
u controleren dat de onderhoudstechnicus
vervangstukken gebruikt die aangegeven
worden door de fabrikant of die dezelfde
specifi caties hebben als de originele stukken.
Niet-geautoriseerde vervangstukken kunnen
brand, elektrische schokken of andere gevaren
veroorzaken.
Onderhoud
Laat het onderhoud uitvoeren
door een deskundige.
Verwijder het deksel nooit
zelf want dit kan elektrische
schokken veroorzaken.
Afvalverwerking
Instructies voor afvalverwerking:
• De verpakking en hulpverpakking zijn
recycleerbaar en moeten gerecycleerd
worden. Verpakkingsmateriaal zoals plastic
zakken moeten buiten het bereik van kinderen
gehouden worden.
• Batterijen, inclusief deze die geen zware
metalen bevatten, mogen niet samen
met het huishoudelijk afval afgehandeld
worden. Verwijder deze oude batterij op
een milieuvriendelijke wijze. Achterhaal de
wetgeving met betrekking tot uw regio.
• De koude kathode fl uorescerende lamp in het
LCD-paneel bevat een kleine hoeveelheid
kwik. U moet de lokale wetgeving naleven als
u zich wilt ontdoen van het apparaat.
Informatie voor gebruikers in de
lidstaten van de Europese Unie.
Dit symbool op het product
of op de verpakking wijst
aan dat uw elektrische en
elektronische apparaten
aan het einde van hun
levensduur afzonderlijk
van uw huishoudelijk afval
afgehandeld moeten worden.
Er bestaan afzonderlijke inzamelingsystemen
voor recyclage in de EU.
Voor meer informatie kunt u contact opnemen
met de lokale autoriteit of de verdeler waar u
het product hebt aangekocht.
Het toestel loskoppelen
De hoofdschakelaar dient om het TV -toestel los
te koppelen van het elektriciteitsnet en moet
daarom gemakkelijk bedienen zijn.
Volume hoofdtelefoon
Overtollige geluidsdruk van een
koptelefoon kan gehoorverlies
veroorzaken.
Installatie
Om het risico op letsels te
voorkomen, moet dit apparaat stevig bevestigd
zijn aan de muur volgens de installatierichtlijnen
(indien deze optie beschikbaar is).
LCD-scherm
Het LCD-paneel is een spitstechnologisch
produkt met ongeveer een miljoen dunne
fi lmtransistors. Dit levert heel fi jne beelddetails
op. Het is soms mogelijk dat een aantal inactieve
pixels als een onbeweeglijk blauw, groen of rood
punt op het scherm verschijnen. Merkt u a.u.b.
op dat dit geen invloed heeft op de prestaties
van uw toestel.
Waarschuwing
Laat uw TV niet in stand-by of operationele
modus wanneer u uw huis verlaat.
Nederlands - 5 -
01_[NL]_SSM_MB35_37883W_1800UK_ANALOG_BRONZE2_10064230_50151923.indd 501_[NL]_SSM_MB35_37883W_1800UK_ANALOG_BRONZE2_10064230_50151923.indd 5 29.07.2009 13:20:4429.07.2009 13:20:44
Page 7
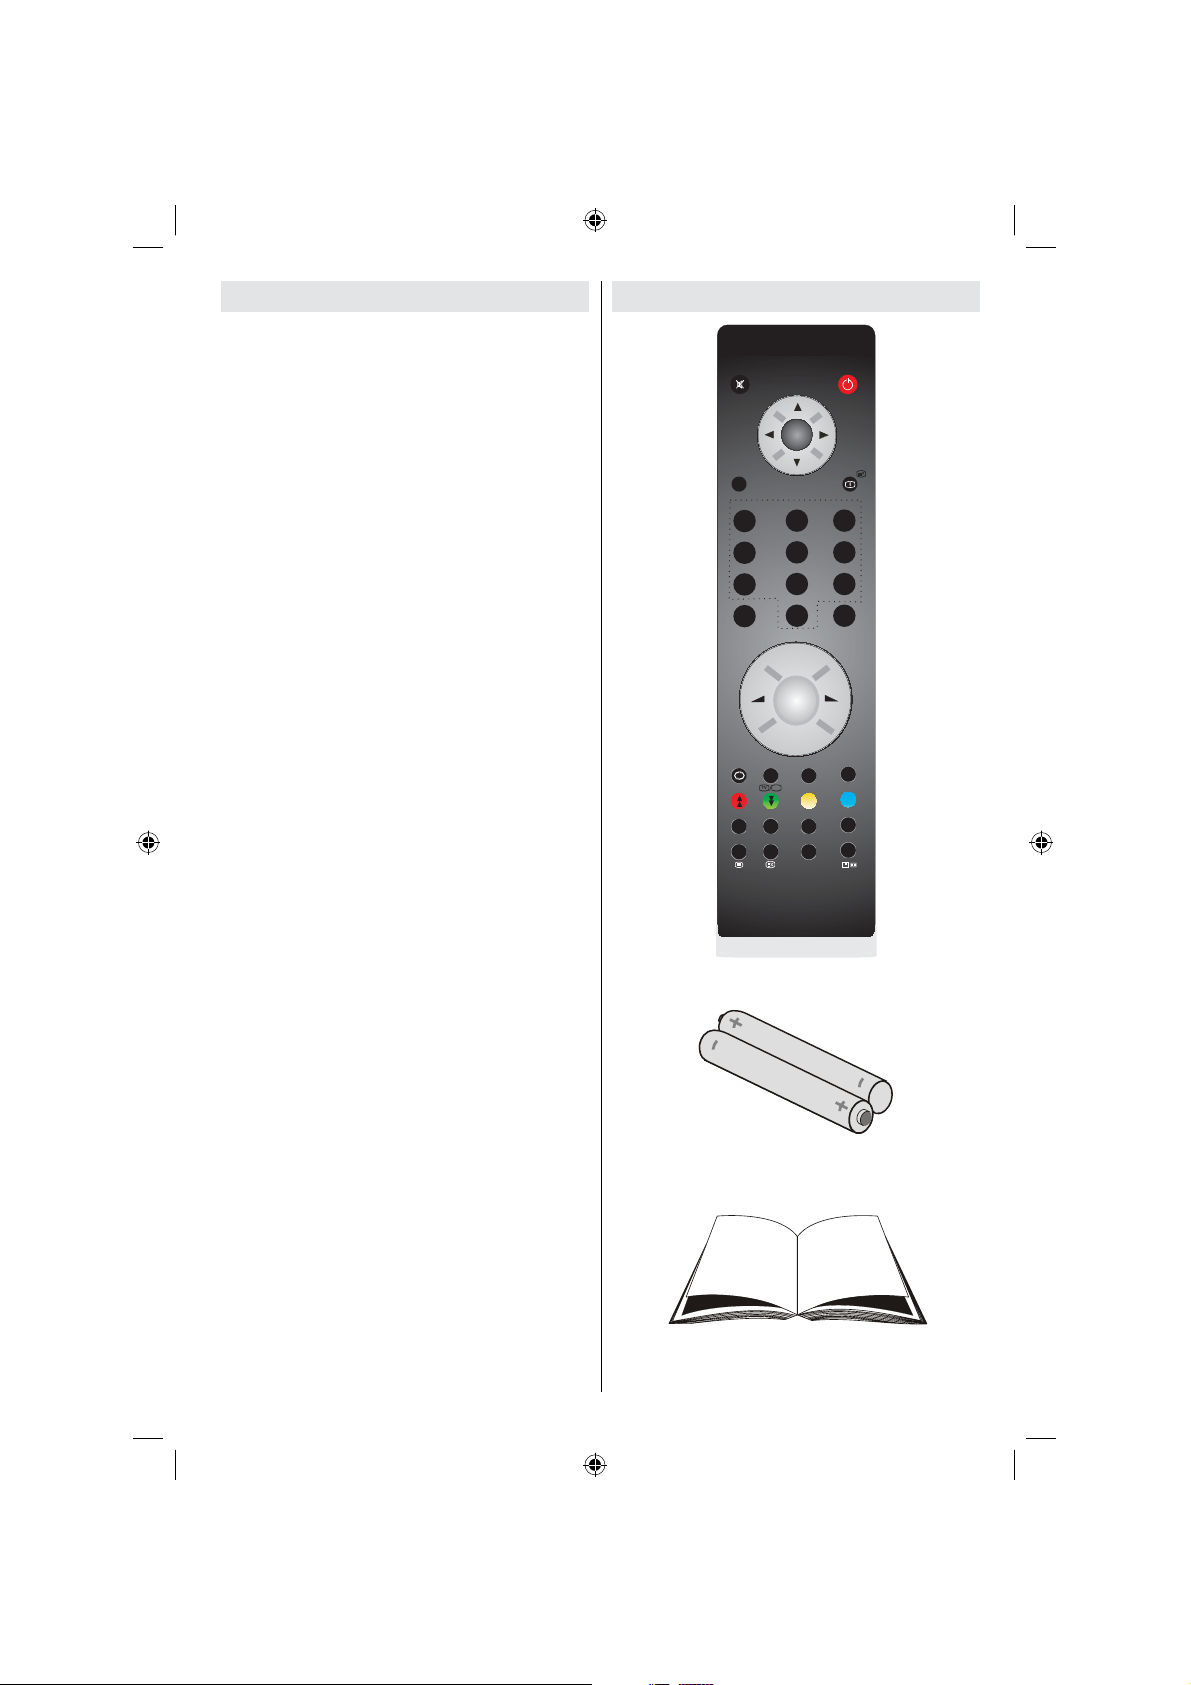
Overzicht van de afstandsbediening
Stand-by1.
Cursor omhoog/ Pagina omlaag (in TXT-2.
modus)
Cursor rechts / Subpagina (in TXT-modus)3.
Info / Openbaren (in TXT-modus)4.
Numerieke toetsen5.
Terugkeren / Indexpagina (in TXT-modus)6.
Programma omhoog7.
Volume hoger8.
Geen functie9.
AV / Bronselectie10.
Geel / Functiemenu11.
Blauw / Installatiemenu12.
Teletekst ondertiteling13.
Slaap timer14.
PIP/PAP-modus15.
Geen functie16.
Update (in Tkst-modus)17.
Teletekst / Mengen / PAT18.
Beeldgrootte / Uitpakken (in Tkst modus)19.
Mono-Stereo/Dual I-II20.
Rood / Geluidsmenu21.
Groen / Beeldmenu22.
Vorige zender/SWAP23.
Tv-toets24.
Programma omlaag25.
Volume lager26.
Beeldmodus selectie27.
Menu aan-uit28.
Cursor omhoog/ Pagina omlaag (in TXT-29.
modus)
Cursor links30.
OK / Beeld bevriezen / Houden (in TXT-31.
modus)
Geluid dempen32.
32
31
30
29
28
27
26
25
24
23
22
21
20
19
18
17
MENU
M
ABC
1
JKL
4
STU
7
PRESETS
SWAP
SCREEN
-
TV
LANG
OK
SELECT
DEF GHI
2
MNO
5
VWX
8
0
P+
P-
DTV
FAV
SUBTITLE
EPG
RETURN
+
INFO /
3
PQR
6
YZ
9
SOURCE
SLEEP
1
2
3
4
5
6
7
8
9
10
11
12
13
14
/
15
16
Nederlands - 6 -
01_[NL]_SSM_MB35_37883W_1800UK_ANALOG_BRONZE2_10064230_50151923.indd 601_[NL]_SSM_MB35_37883W_1800UK_ANALOG_BRONZE2_10064230_50151923.indd 6 29.07.2009 13:20:4429.07.2009 13:20:44
Page 8
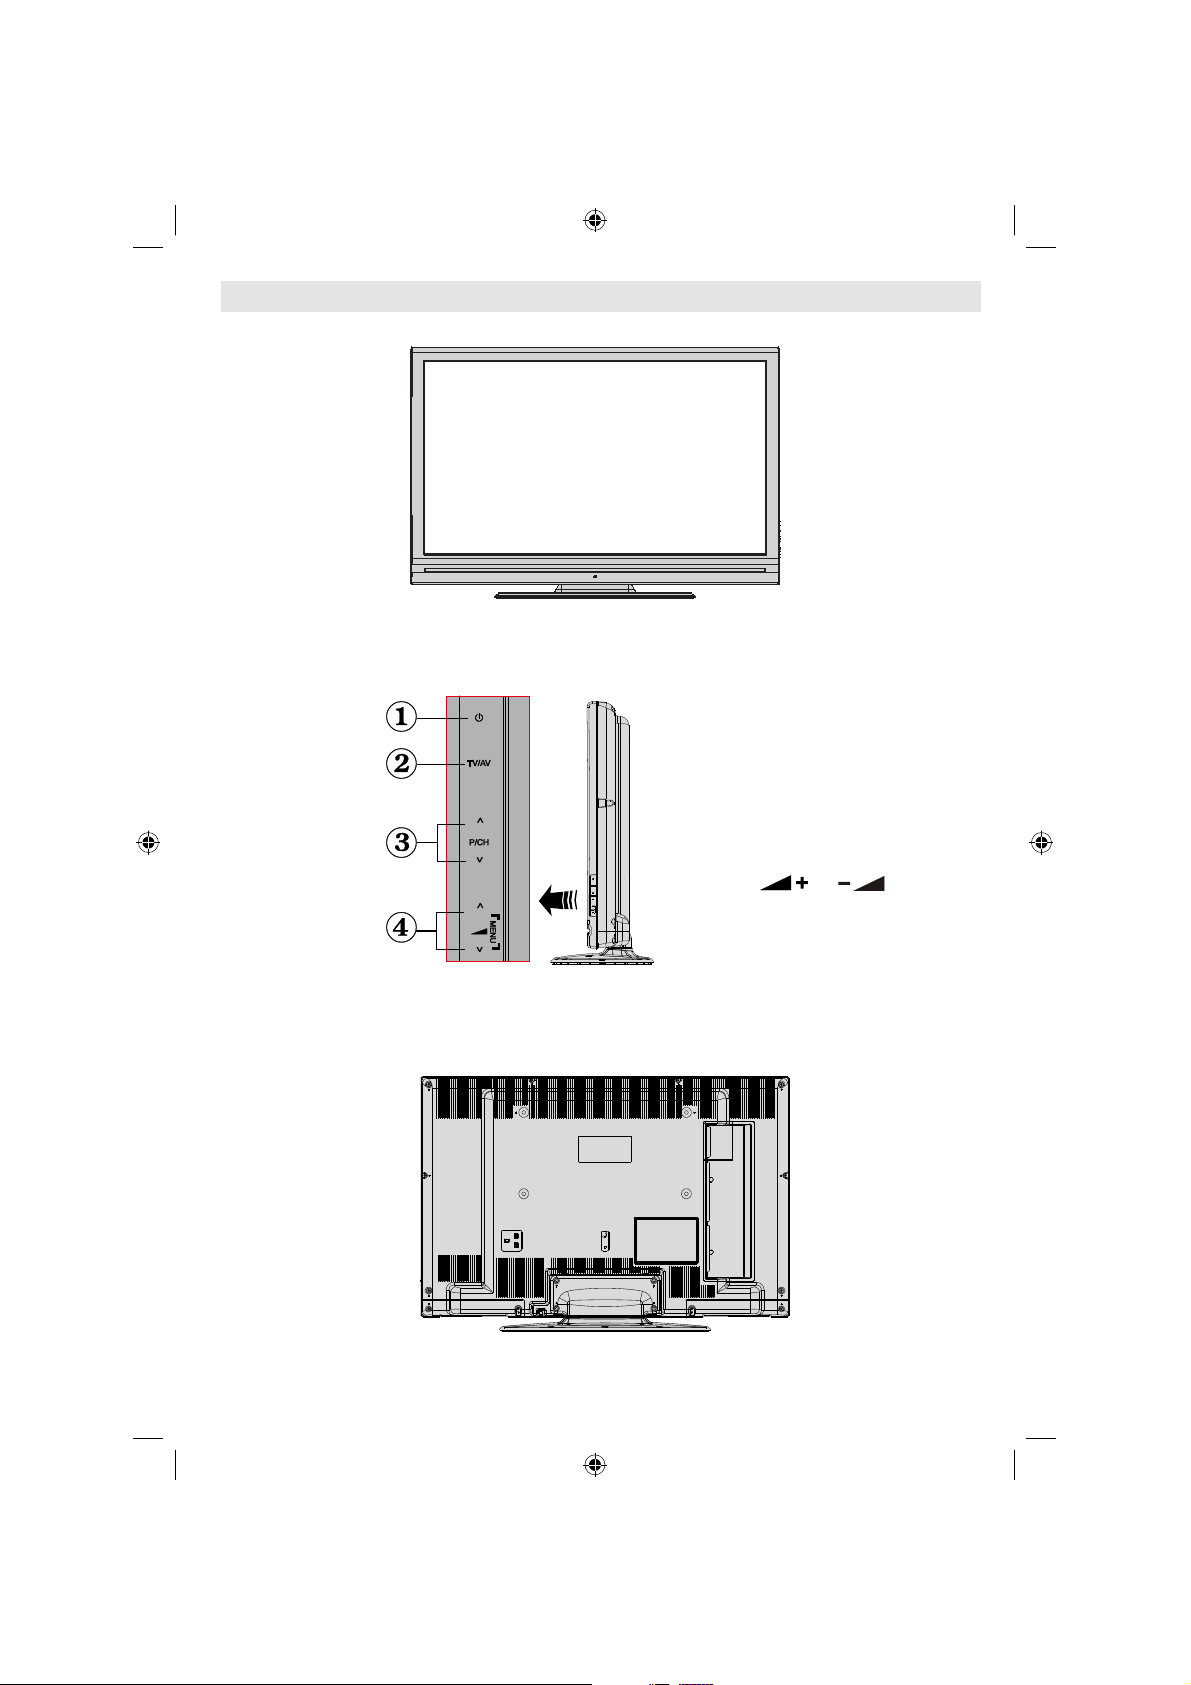
LCD-TT en bedieningstoetsen
VOORAANZICHT
De toets Stand-by1.
TV/AV-toets2.
De toetsen 3.
Programma
omhoog/omlaag
De toetsen Volume 4.
omhoog/omlaag
Opmerking: Druk gelijktijdig
op de “ ” /“ ”
toetsen om het hoofdmenu
te openen.
ZIJAANZICHT
ACHTERAANZICHT
Nederlands - 7 -
01_[NL]_SSM_MB35_37883W_1800UK_ANALOG_BRONZE2_10064230_50151923.indd 701_[NL]_SSM_MB35_37883W_1800UK_ANALOG_BRONZE2_10064230_50151923.indd 7 29.07.2009 13:20:4429.07.2009 13:20:44
Page 9
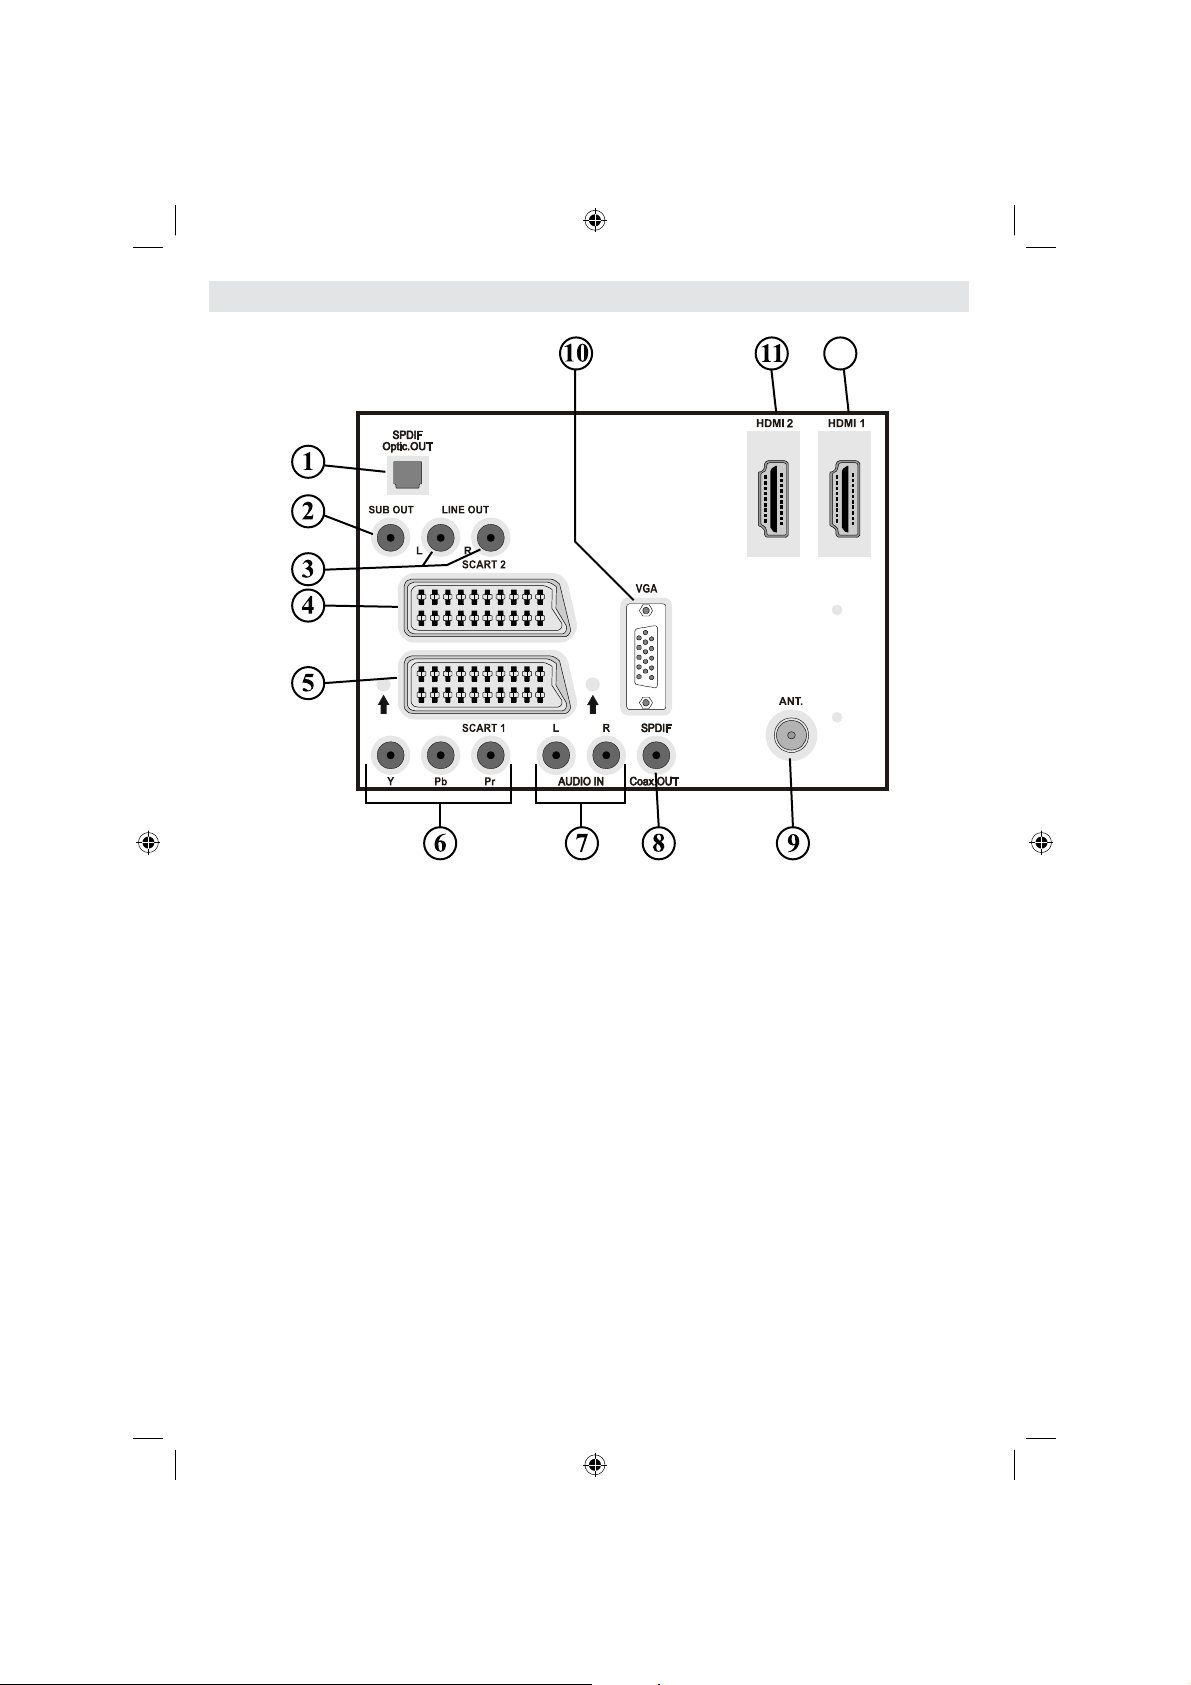
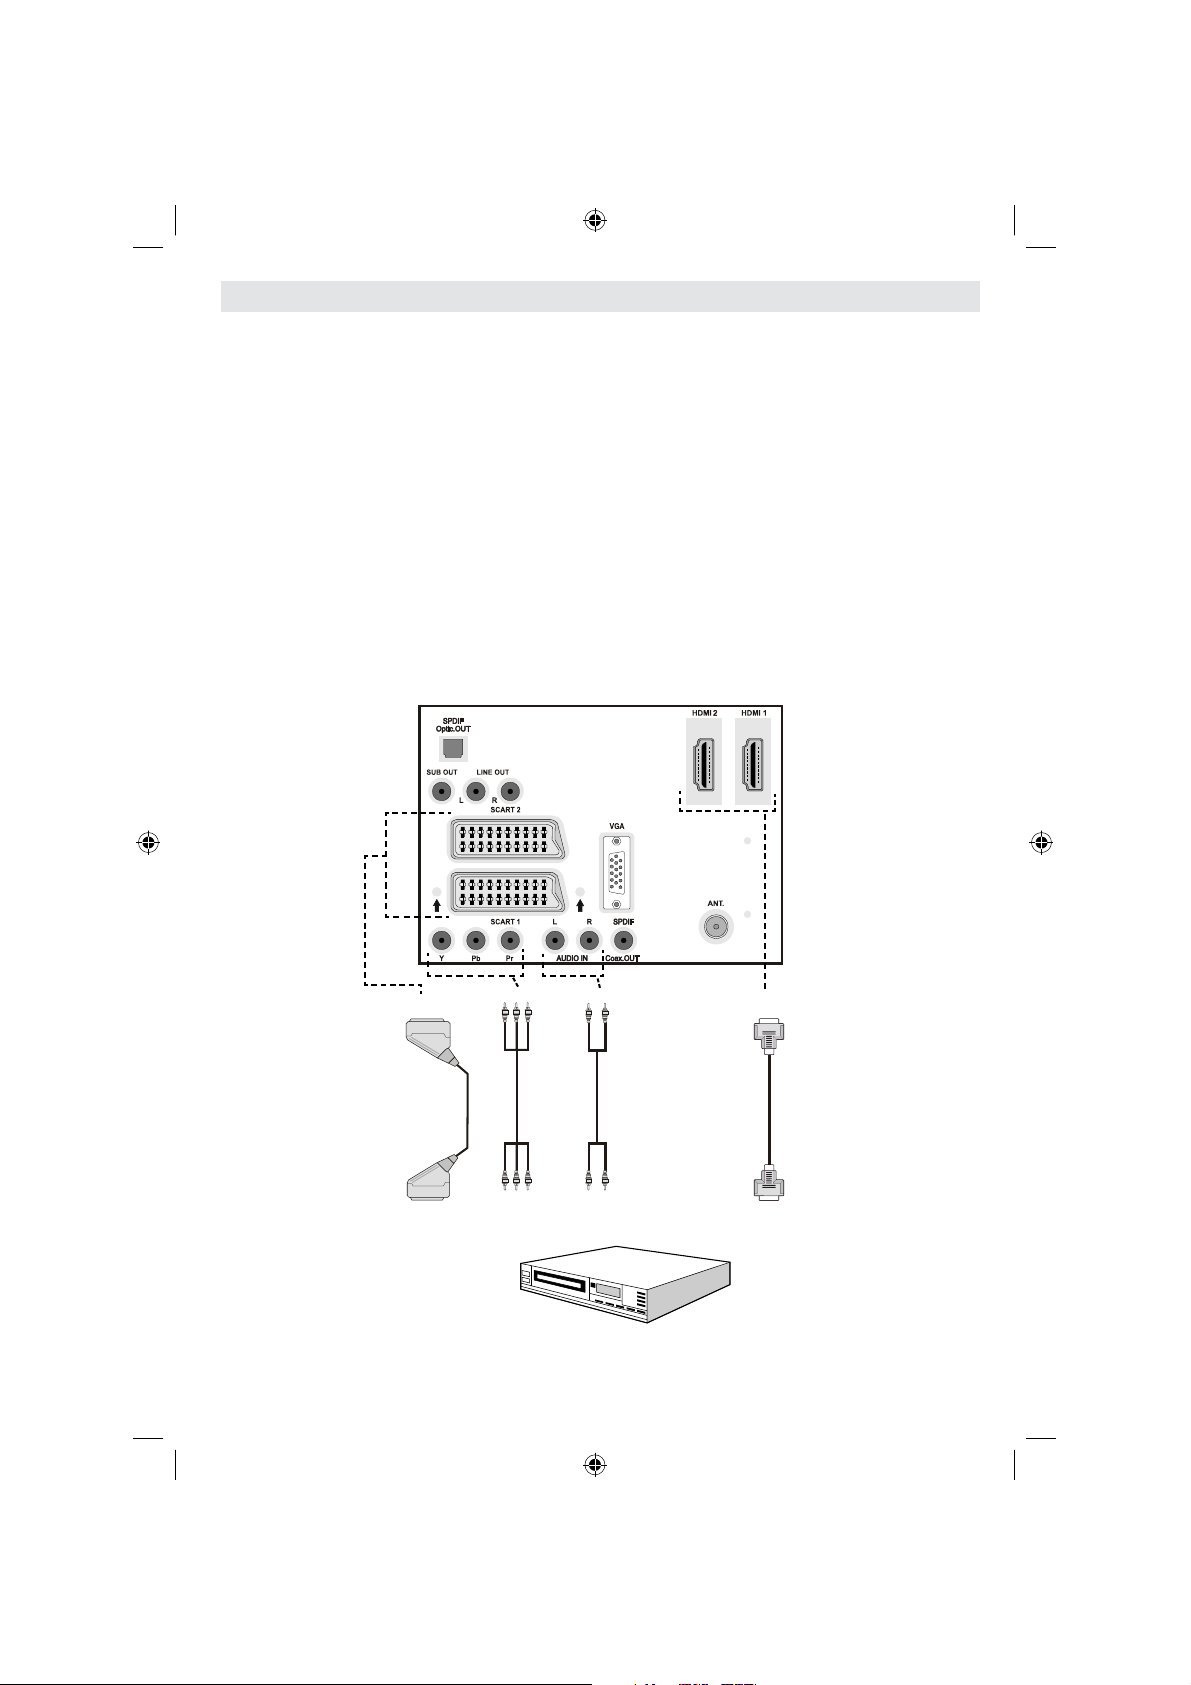
De aansluitingen bekijken – Aansluitingen achterin
12
1. S/PDIF Digital Out voert digitale audiosignalen uit naar de huidige bekeken bron.
Gebruik een digitale optische kabel om audiosignalen naar een toestel dat een S/PDIFinvoer heeft over te brengen.
2. Subwoofer uit dient om een externe, actieve subwoofer op het toestel aan te sluiten voor
een veel dieper lage tonen effect.
Gebruik een geschikte RCA-kabel om het toestel aan te sluiten op een subwoofer.
Geluid lijn uit 3. voeren geluidsignalen uit naar een extern toestel zoal een optioneel
geluidssysteem.
Om de externe luidsprekers aan te sluiten op uw TV kunt u de AUDIO LIJN UIT van de TV
gebruiken met een geluidskabel.
4. SCART 2 ingangen of –uitgangen voor randapparaten.
Verbind de5. SCART-kabel tussen een SCART-aansluitingen op de TV en een SCART
aansluiting op uw extern toestel (zoals een decoder, een videorecorder of een DVD-speler) .
Opmerking: Als een extern apparaat verbonden is via de SCART-aansluiting schakelt
de TV automatisch over op de AV-modus. Indien beide aansluitingen gelijktijdig worden
gebruikt, zal SCART1 SCART 2 opheffen tenzij handmatig geselecteerd.
Opmerking: U moet de decoder aansluiten op EXT-1 als u van plan bent een gecodeerde
zender te bekijken. Het is mogelijk dat de decoder niet correct werkt als u de decoder niet
aansluit op de Scart 1 (Ext-1) aansluiting.
6. Componente Video-invoeren (YPbPr) worden gebruikt om componente audio te
verbinden. U kunt de componente video en geluids-ingangen aansluiten op een toestel
dat een componente uitgang heeft. Verbind de componente videokabels tussen de
Nederlands - 8 -
01_[NL]_SSM_MB35_37883W_1800UK_ANALOG_BRONZE2_10064230_50151923.indd 801_[NL]_SSM_MB35_37883W_1800UK_ANALOG_BRONZE2_10064230_50151923.indd 8 29.07.2009 13:20:4529.07.2009 13:20:45
Page 10

COMPONENTE VIDEO INGANGEN op de TV en de componente video-uitgangen van
uw toestel. Tijdens de verbinding moet u ervoor zorgen dat de letters op uw Tv, “Y”, “Pb”,
“Pr” overeenkomen met de aansluitingen van uw toestel.
7. PC/YPbPr geluidsingangen worden gebruikt voor het aansluiten van geluidsignalen van
een PC of toestel dat aangesloten is op de TV via YPbPr.
Sluit de Pc audiokabel aan tussen de GELUIDSINGANGEN op de Tv en de geluidsuitgang
van uw PC om PC-geluid in te schakelen.
Sluit de geluidskabel aan tussen de GELUIDSINGANGEN op de TV en de geluidsuitvoer
van uw toestel om component geluid mogelijk te maken.
8. S/PDIF coaxiaal uit voert digitale geluidsignalen uit naar de momenteel weergegeven
bron.
Gebruik een SPDIF coaxiale kabel om geluidsignalen over te dragen naar een toestel met
een S/PDIF-ingang.
9. RF-ingang sluit aan op een antenne of een kabel.
Merk op dat als u gebruik maakt van een decoder of een media recorder het van het
allergrootste belang is dat de antennekabel met een geschikte kabel aangesloten wordt via
het toestel op de televisie, zoals weergegeven op onderstaande afbeelding.
10. PC-ingang dient om een computer met het TV toestel te verbinden.
Verbind de PC-kabel tussen de PC-INGANG op de TV en de PC-uitgang op uw PC.
11. HDMI 2: HDMI-ingang
HDMI Invoeren dienen om te verbinden met een toestel dat een HDMI-aansluiting heeft. Uw
LCD Televisie kan Hoge defi nitie afbeeldingen weergeven van op apparaten zoals een Hoge
Defi nitie Satelliet Ontvanger of een DVD speler. Deze apparaten moeten aangesloten worden
via de HDMI-aansluitingen of Component aansluiting. Deze aansluitingen kunnen zowel 720p
als 1080i signalen ontvangen. Er is geen geluidsverbinding nodig voor een HDMI- naar HDMIaansluiting.
HDMI-1: 12. HDMI-ingang
Nederlands - 9 -
01_[NL]_SSM_MB35_37883W_1800UK_ANALOG_BRONZE2_10064230_50151923.indd 901_[NL]_SSM_MB35_37883W_1800UK_ANALOG_BRONZE2_10064230_50151923.indd 9 29.07.2009 13:20:4529.07.2009 13:20:45
Page 11
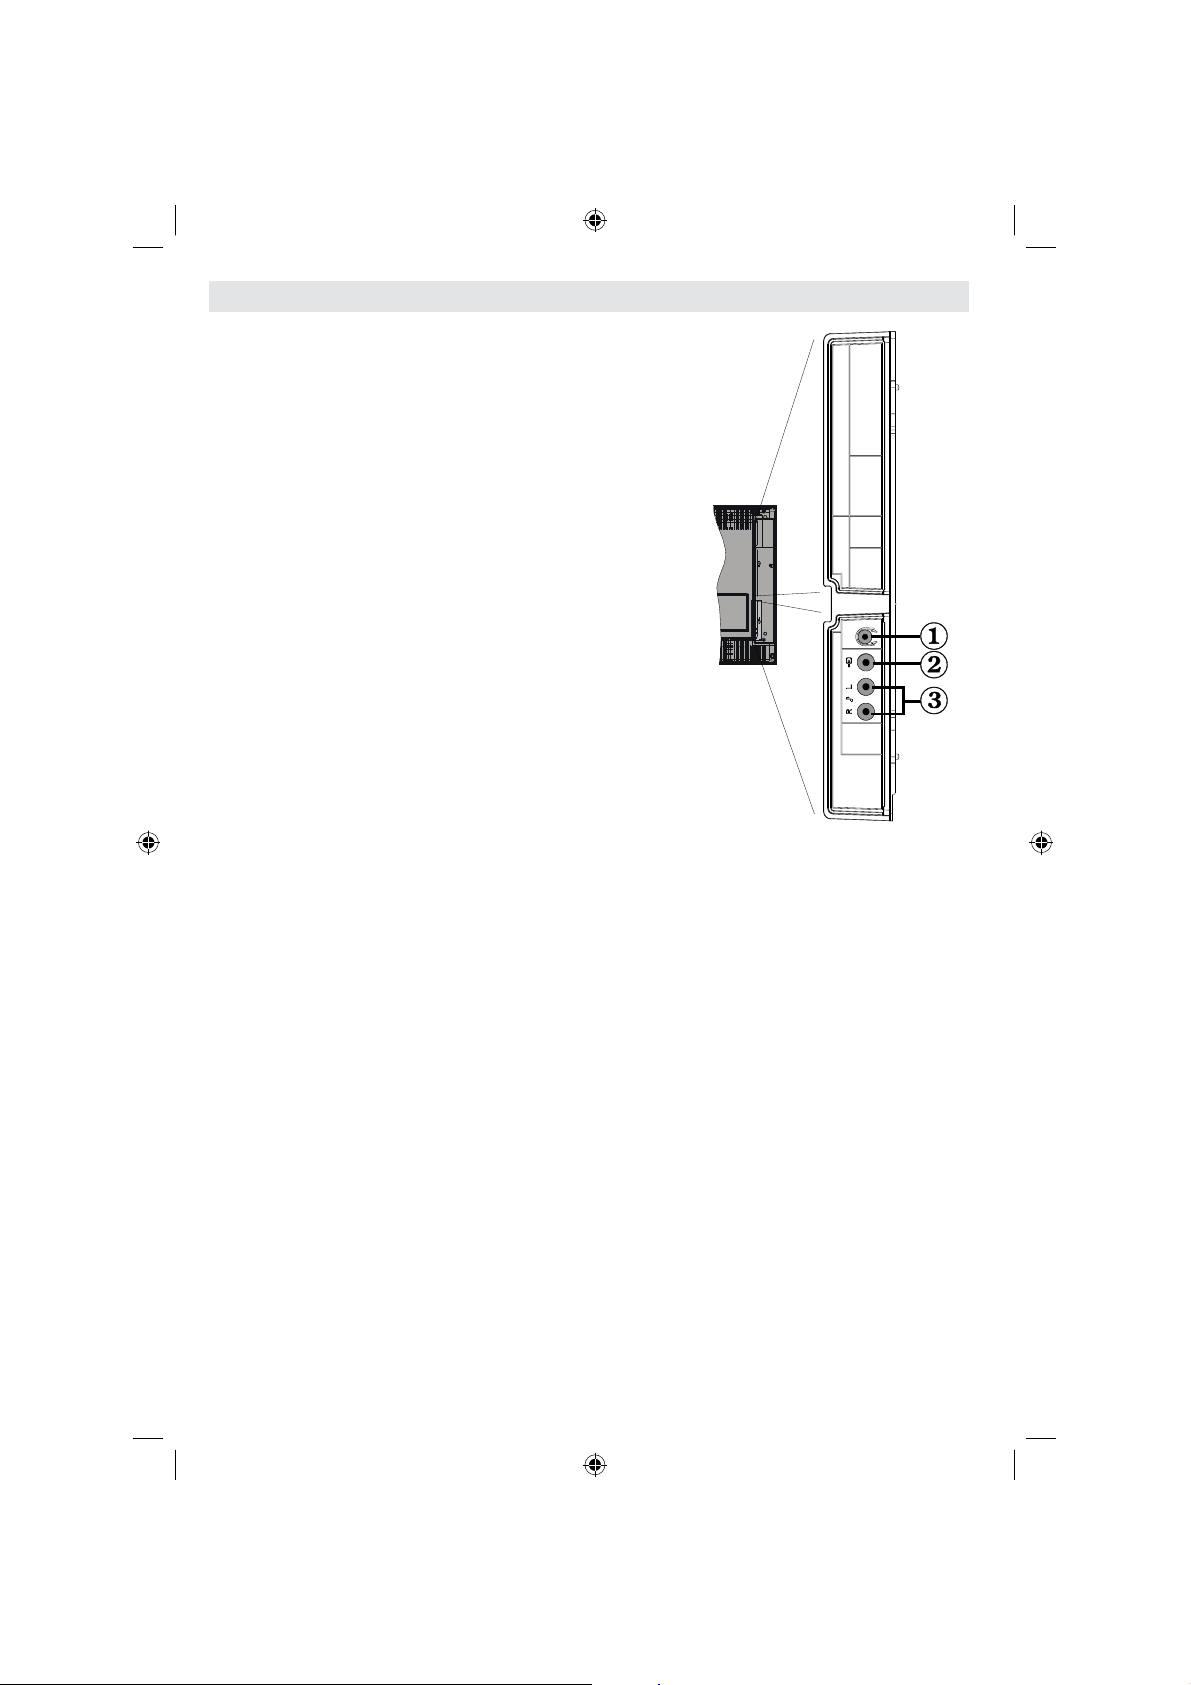
De aansluitingen bekijken – Zijdelingse aansluitingen
De hoofdtelefoonaansluiting wordt gebruikt om een 1.
externe koptelefoon aan te sluiten op uw systeem. Sluit
aan op de KOPTELEFOON aansluiting om geluid van de
TV te beluisteren via de hoofdtelefoon (optioneel).
De Video-ingang wordt gebruikt voor de aansluiting van 2.
videosignalen of externe toestellen. Sluit de videokabel
aan tussen de VIDEO IN aansluiting van de TV en de
VIDEO UIT aansluiting op uw apparaat.
De geluidsingangen worden gebruikt om geluidsignalen 3.
van externe toestellen aan te sluiten. Verbind de
geluidskabel tussen de GELUIDSINGANGEN van de TV
en de GELUIDSUITGANG aansluitingen van uw toestel.
Opmerking: Als u een toestel aansluit op de TV via
VIDEO-INGANG moet u ook uw toestel aansluiten met
een geluidskabel naar de GELUIDSINGANGEN van de
TV om geluid in te schakelen .
Nederlands - 10 -
01_[NL]_SSM_MB35_37883W_1800UK_ANALOG_BRONZE2_10064230_50151923.indd 1001_[NL]_SSM_MB35_37883W_1800UK_ANALOG_BRONZE2_10064230_50151923.indd 10 29.07.2009 13:20:4529.07.2009 13:20:45
Page 12
Stroomaansluiting
BELANGRIJK : Het TV-toestel is ontworpen voor een bediening met 220-240AC wisselstroom,
50 Hz.
• Nadat u de TV uitgepakt hebt, moet u het toestel de tijd gunnen op kamertemperatuur te komen
voor u het op het elektriciteitsnet aansluit.
• Voer het netsnoer in het stopcontact .
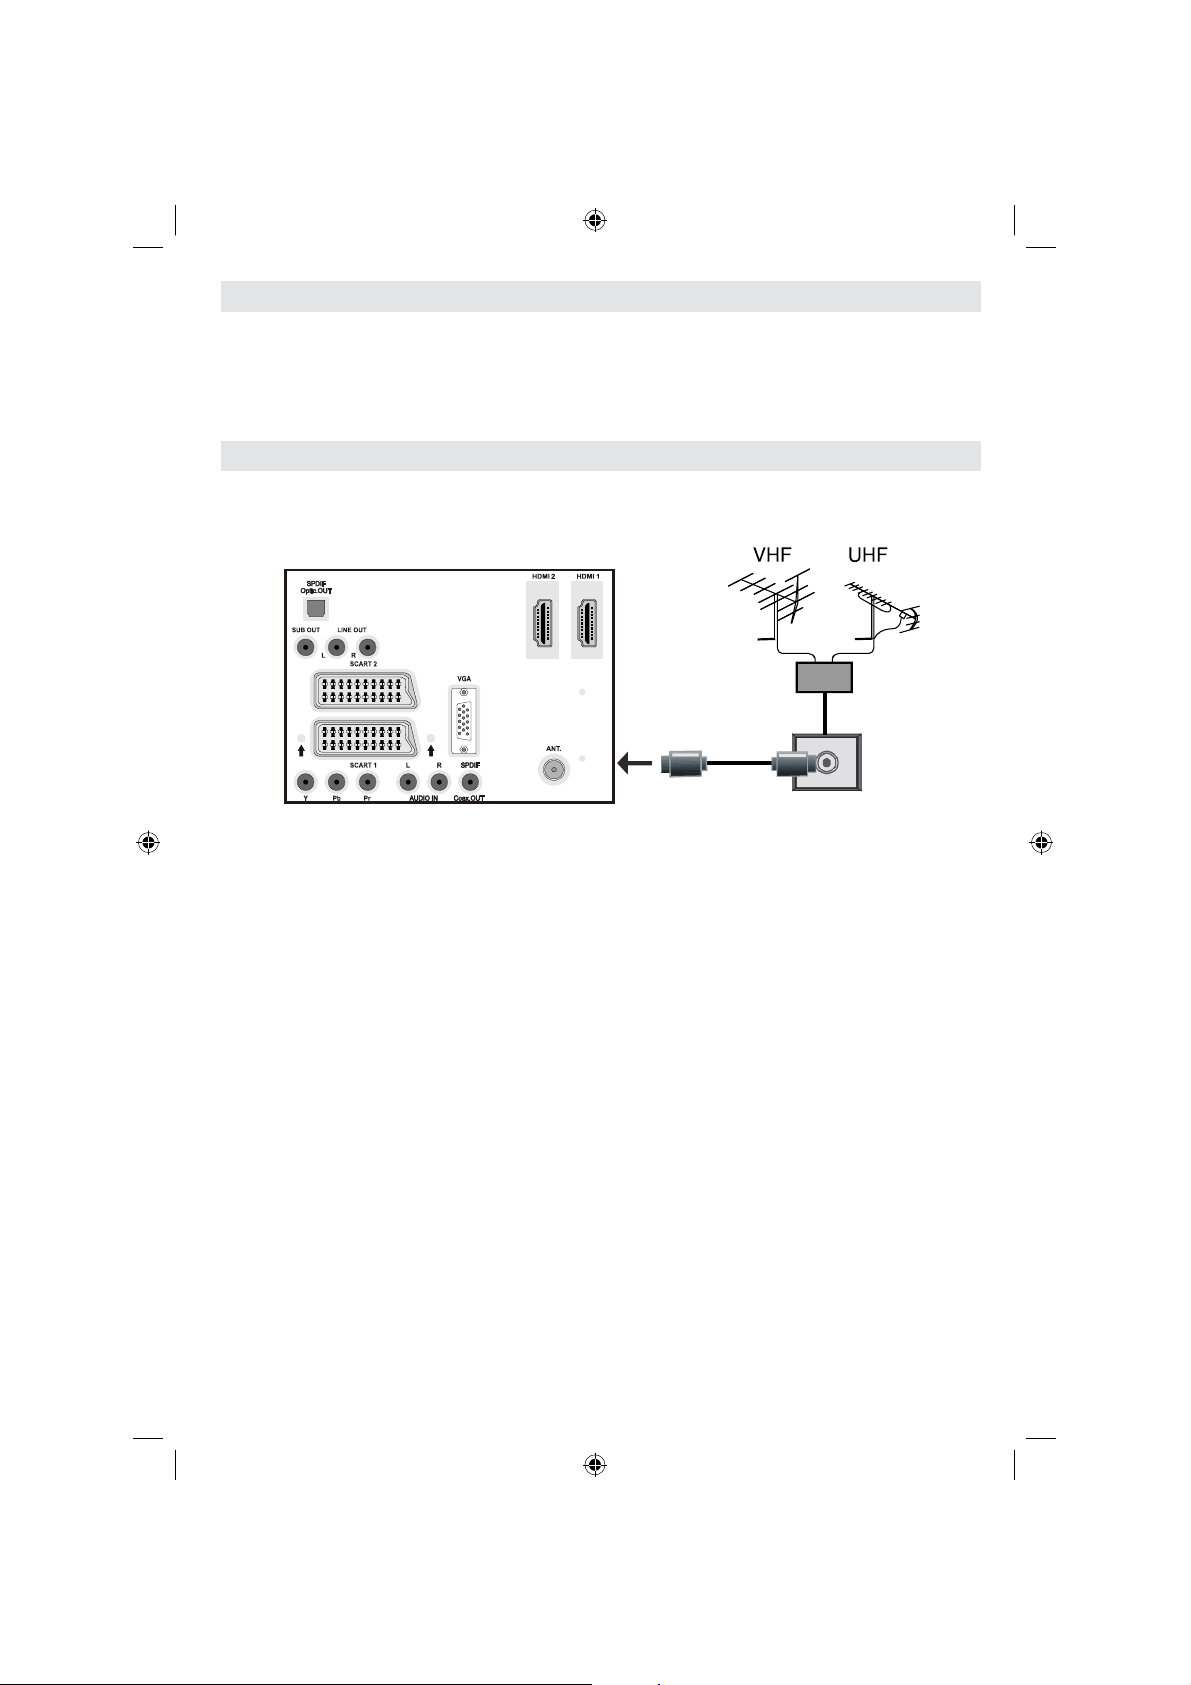
Antenne-aansluiting
• Sluit de antenne of de kabel-TV stekker aan op de ANTENNE INGANG aan de achterzijde van
de TV .
ACHTERAANZICHT
Nederlands - 11 -
01_[NL]_SSM_MB35_37883W_1800UK_ANALOG_BRONZE2_10064230_50151923.indd 1101_[NL]_SSM_MB35_37883W_1800UK_ANALOG_BRONZE2_10064230_50151923.indd 11 29.07.2009 13:20:4629.07.2009 13:20:46
Page 13

De LCD-TT aansluiten op een PC
Om het beeld van uw computer op uw LCD-TV weer te geven, kunt u uw computer aansluiten
op het TV-toestel.
• Schakel zowel de computer als het scherm uit voor u een aansluiting tot stand brengt.
• Gebruik de 15-pin D-sub weergavekabel om een PC aan te sluiten op de LCD TV.
• Wanneer de verbinding gemaakt werd, schakelt u over naar PC-bron. Raadpleeg hiervoor de
“Ingangselectie” sectie.
• Stel de gewenste resolutie in. U vindt informatie met betrekking tot de resolutie in de bijlagen.
ACHTERAANZICHT
Geluidsingangen
PC audiokabel
(niet geleverd)
naar
GELUIDSINGANGEN
van de TV
PC-ingang
PC RGB kabel
(niet geleverd)
naar PC-ingang
Nederlands - 12 -
01_[NL]_SSM_MB35_37883W_1800UK_ANALOG_BRONZE2_10064230_50151923.indd 1201_[NL]_SSM_MB35_37883W_1800UK_ANALOG_BRONZE2_10064230_50151923.indd 12 29.07.2009 13:20:4629.07.2009 13:20:46
Page 14
Aansluiten op een DVD-speler
Als u een DVD-speker wenst aan te sluiten op uw LCD-Tv, kunt u de aansluitingen van het
TV-toestel gebruiken. DVD-spelers kunnen verschillende aansluitingen hebben. Raadpleeg de
gebruikshandleiding van uw DVD-speler voor bijkomende informatie. Schakel zowel het toestel
als de TV uit voor u een aansluiting tot stand brengt.
Opmerking: De Kabels in de afbeelding worden niet geleverd.
• Indien uw DVD-speler een HDMI-aansluiting heeft, kunt u aansluiten via HDMI. Wanneer
u aansluit naar DVD-speler moet u overschakelen naar HDMI-bron. Raadpleeg hiervoor de
“Ingangselectie” sectie.
• De meeste DVD-spelers worden via COMPONENTE AANSLUITINGEN verbonden. Gebruik een
componte videokabel om video-ingang te verbinden. Om het geluid in te schakelen, gebruikt u
een componente geluidskabel, zoals hieronder weergegeven. Wanneer de verbinding tot stand
gebracht is, schakelt u over naar YPbPr-bron. Raadpleeg hiervoor de “Ingangselectie” sectie.
• U kunt ook een verbinding tot stand brengen via de SCART 1 of SCART 2. Gebruik een SCAR T -
kabel, zoals hieronder weergegeven.
Opmerking : Deze drie verbindingsmethodes voeren dezelfde functie uit, maar met een verschillend
kwaliteitsniveau. Het is niet nodig een verbinding tot stand te brengen via al deze drie methoden.
Scart-aansluitingen
Componente
video-ingangen
Componente
geluidsingangen
DVD-speler
HDMI-ingangen
ACHTERAANZICHT
Nederlands - 13 -
01_[NL]_SSM_MB35_37883W_1800UK_ANALOG_BRONZE2_10064230_50151923.indd 1301_[NL]_SSM_MB35_37883W_1800UK_ANALOG_BRONZE2_10064230_50151923.indd 13 29.07.2009 13:20:4729.07.2009 13:20:47
Page 15
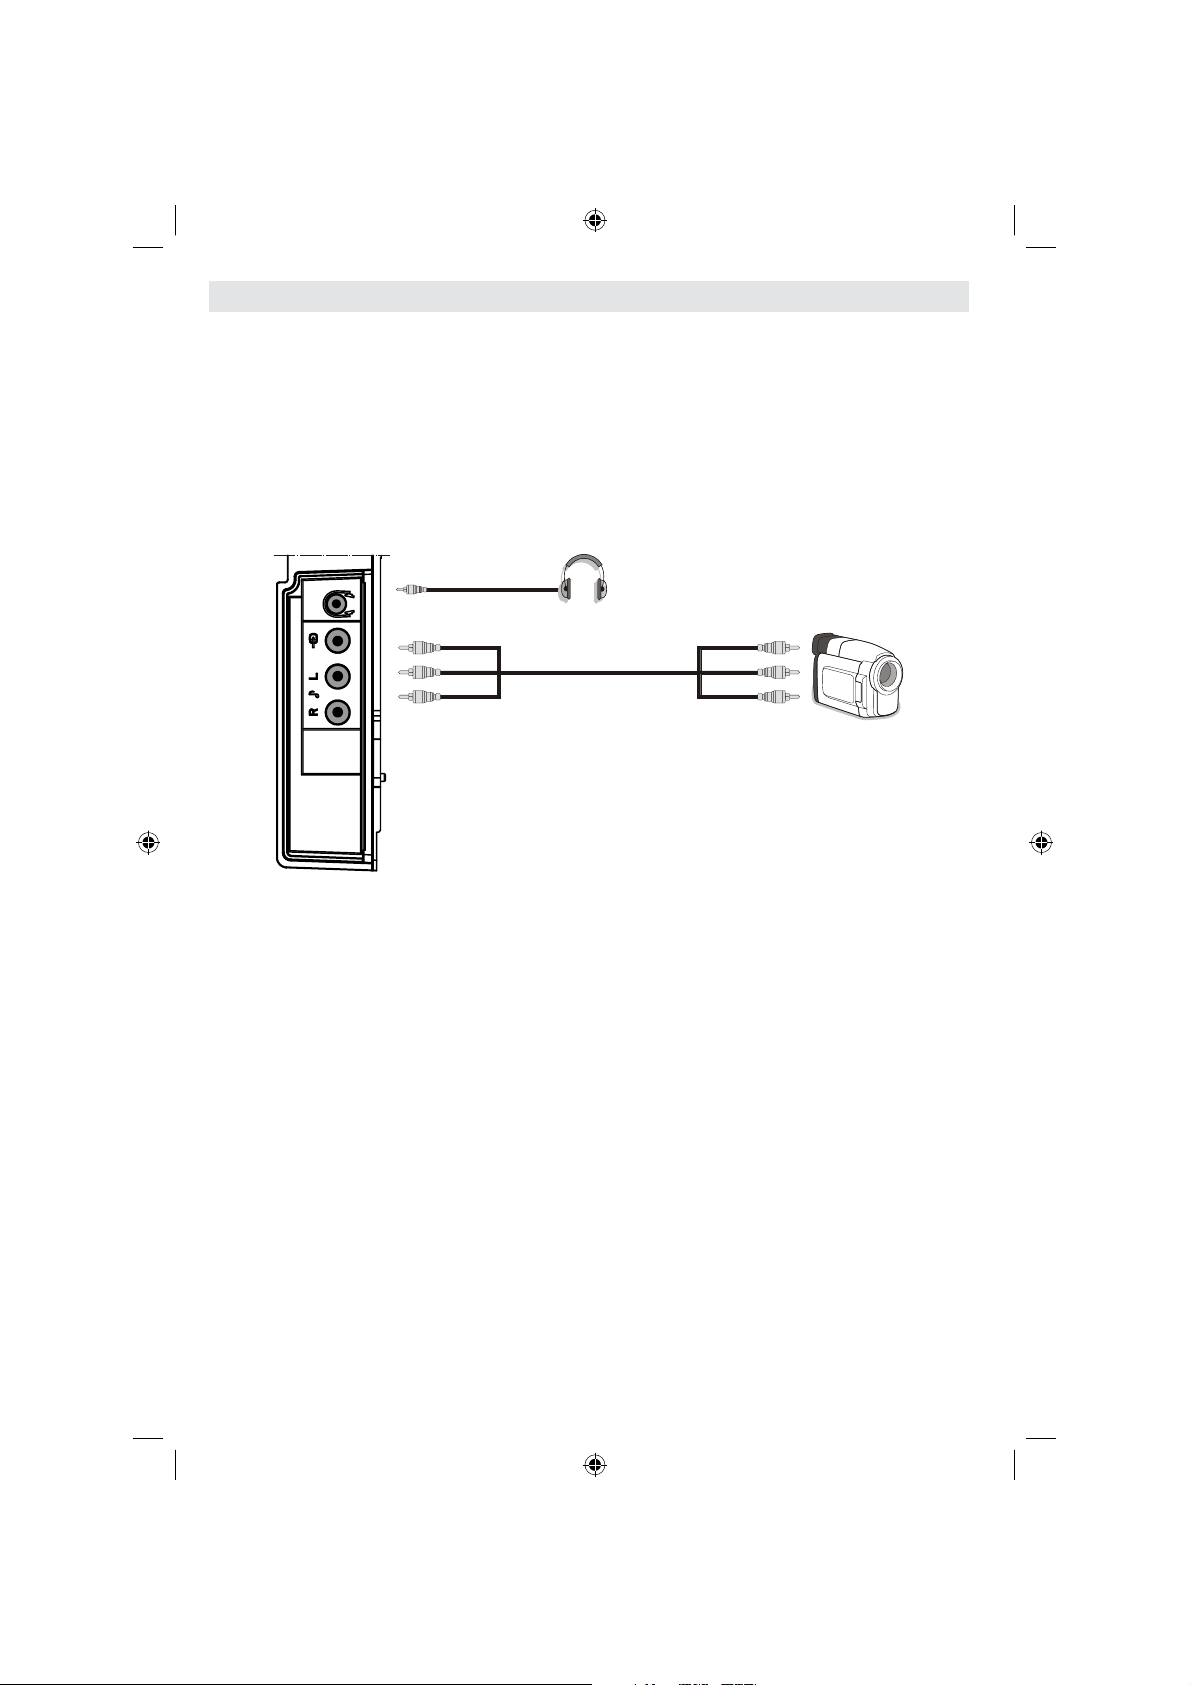
Het gebruik van de zijdelingse AV-aansluitingen
U kunt uiteenlopende optionele apparaten aansluiten op uw LCD-TV. Mogelijke verbindingen
worden hieronder weergegeven. Merk op dat de kabels in de afbeelding niet geleverd worden.
• Om een camcorder aan te sluiten of, verbind met de VIDEO IN en de AUDIO AANSLUITINGEN.
Verbind de camcorder niet op het zelfde moment met VIDEO-IN aansluiting, aangezien het
geluid in het beeld kan veroorzaken. Om de betrokken bron te selecteren, verwijzen wij u naar
de “Ingangselectie” in de volgende delen.
• Om geluid van uw hoofdtelefoon te beluisteren, sluit u aan op de KOPTELEFOON aansluiting
van de TV .
Hoofdtelefoon
Camcorder
ZIJAANZICHT
Nederlands - 14 -
01_[NL]_SSM_MB35_37883W_1800UK_ANALOG_BRONZE2_10064230_50151923.indd 1401_[NL]_SSM_MB35_37883W_1800UK_ANALOG_BRONZE2_10064230_50151923.indd 14 29.07.2009 13:20:4729.07.2009 13:20:47
Page 16
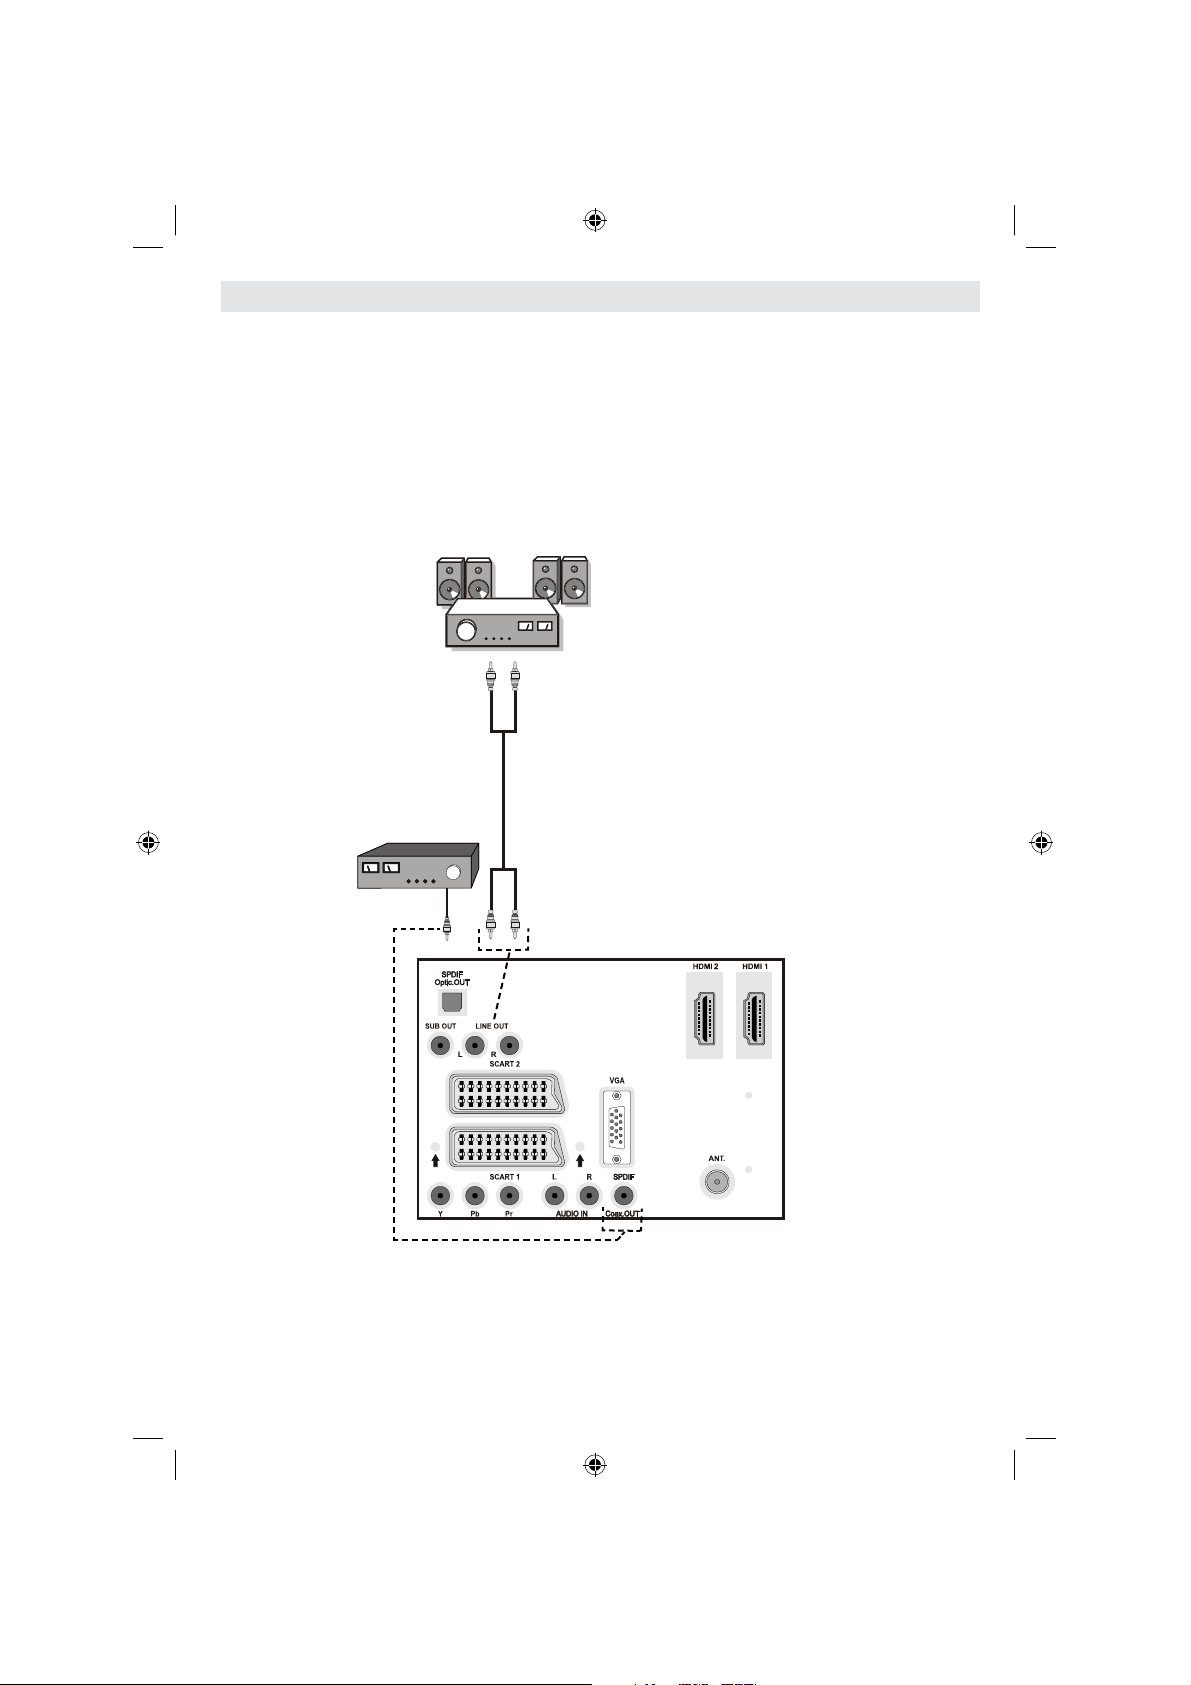
Het gebruik van andere aansluitingen
U kunt uiteenlopende optionele apparaten aansluiten op uw LCD-TV. Mogelijke verbindingen
worden hieronder weergegeven. Merk op dat de kabels in de afbeelding niet geleverd worden.
• Gebruik een geluidskabel om een verbinding te maken met externe luidsprekers. Haal de GELUID
LINKS en GELUID RECHTS aansluitingen nooit door elkaar. Schakel de LCD-TV en de externe
luidspreker pas in nadat alle verbindingen uitgevoerd werden. Raadpleeg de handleiding van
uw luidsprekers voor bijkomende informatie.
• Om een verbinding tot stand te brengen met een apparaat dat ondersteuning biedt voor SPDIF
moet u een geschikte SPDIF-kabel gebruiken om de geluidsaansluiting in te schakelen.
Externe luidsprekers
Een toestel dat
het
SPDIF-signaal
ondersteunt
ACHTERAANZICHT
Nederlands - 15 -
01_[NL]_SSM_MB35_37883W_1800UK_ANALOG_BRONZE2_10064230_50151923.indd 1501_[NL]_SSM_MB35_37883W_1800UK_ANALOG_BRONZE2_10064230_50151923.indd 15 29.07.2009 13:20:4829.07.2009 13:20:48
Page 17

Andere apparatuur aansluiten via SCART
De meeste toestellen ondersteunen SCART-aansluiting. U kunt een DVD-recorder, een
videorecorder of een decoder aansluiten op uw LCD-TV via de SCART-aansluitingen. Merk op
dat de kabels in de afbeelding niet geleverd worden.
Schakel zowel de toestellen als de TV uit voor u een aansluiting tot stand brengt.
Raadpleeg de gebruikshandleiding van uw toestel voor bijkomende informatie.
ACHTERAANZICHT
Scart-aansluitingen
DVD-recorder Videorecorder
Decoder
Nederlands - 16 -
01_[NL]_SSM_MB35_37883W_1800UK_ANALOG_BRONZE2_10064230_50151923.indd 1601_[NL]_SSM_MB35_37883W_1800UK_ANALOG_BRONZE2_10064230_50151923.indd 16 29.07.2009 13:20:4829.07.2009 13:20:48
Page 18

Batterijen aanbrengen in de
afstandsbediening
• Verwijder het deksel van het batterijcompartiment
aan de achterzijde van de afstandsbediening
door van het aangeduide deel zachtjes
achterwaarts te trekken.
• Voer twee AA/R3 of equivalente batterijen in.
Plaats de batterijen in de correcte richting en
breng het deksel van het batterijcompartiment
opnieuw aan .
Opmerking : Verwijder de batterijen uit de
afstandsbediening als u niet van plan bent ze te
gebruiken gedurende een lange periode. Zoniet,
kan dit schade veroorzaken door lekkage van de
batterijen.
Bedieningsbereik van de
afstandsbediening
• Richt de bovenkant van de afstandbediening
naar de LED-afstandsbedieningsensor van de
TV terwijl u op een toets drukt.
De TV in/uitschakelen
De TV inschakelen
• Sluit het netsnoer aan op 220-240V
wisselstroom 50 Hz.
• Druk op de STAND-BY toets. De stand-by
LED-indicator licht op.
• De TV inschakelen vanuit stand-by modus:
• Druk op de “
” toets, P+ / P- of een numeriek
toets van de afstandsbediening.
• Druk op de -P/CH of P/CH+ toets van de TV.
De Tv schakelt in .
Opmerking : Indien u de Tv inschakelt met de ZENDER
OMHOOG/OMLAAG toetsen van de afstandsbediening
of op de TV zal de laatst weergegeven zender opnieuw
geselecteerd worden.
Op beide manieren kunt u de TV inschakelen.
De TV uitschakelen
• Druk op de “ ” toets van de afstandsbediening
of de STAND-BY toets van de TV om de TV
over te schakelen naar stand-by modus.
• Om de TV volledig uit te schakelen, verwijdert
u het netsnoer uit het stopcontact .
Eerste installatie
När du startar TV:n för första gången
visas nedanstående meny för
förstagångsinstallation:
30
30
OK
SELECT
MENU
INFO/
M
ABC
DEF GHI
2
3
1
JKL
MNO
PQR
5
4
6
VWX
STU
YZ
8
7
9
0
RETURN
PRESETS
P+
+
-
P-
SOURCE
DTV
TV
SWAP
FAV
SLEEP
SUBTITLE
LANG
SCREEN
/
EPG
Het bereik van de afstandsbediening is ongeveer
7m.
Selecteer uw land, taal en teksttaal met de “ ”
of “ ” en “ ” of “ ” toetsen. Druk op de OK of
RODE toets om door te gaan. Het onderstaande
menuscherm verschijnt tijdens de automatische
afstemming:
Nederlands - 17 -
01_[NL]_SSM_MB35_37883W_1800UK_ANALOG_BRONZE2_10064230_50151923.indd 1701_[NL]_SSM_MB35_37883W_1800UK_ANALOG_BRONZE2_10064230_50151923.indd 17 29.07.2009 13:20:4829.07.2009 13:20:48
Page 19
Druk op de BLAUWE toets om te annuleren.
Voor meer informatie over deze procedure,
verwijzen wij u naar de “Installatiemenu” (Install
Menu) sectie.
Ingangselectie
Van zodra u externe systemen hebt aangesloten
op uw Tv kunt u overschakelen naar verschillende
ingangsbronnen.
• Druk op de “SOURCE” toets van uw
afstandsbediening om de bronnen rechtsreeks
te veranderen.
of,
• Selecteer de “Bron” optie in het hoofdmenu met
” of “ ” toetsen. Gebruik daarna de “ ” of
de “
“ ” toetsen om een ingang te markeren en
druk op de “ ” toets om te selecteren.
Opmerking : U kunt de gewenste signaalbronopties
markeren door de OK toets in te drukken. Om die
reden zijn enkel de gemarkeerde signaalbronopties
beschikbaar als de “SOURCE” toets ingedrukt wordt
(behalve voor de TV-bron)..
Basisbedieningen
U kunt uw TV zowel met de afstandsbediening
als de toetsen op het toestel bedienen.
Bediening met de toetsen op de TV
Volume instelling
• Druk op de “
te verlagen of op de “ ” toets om het
volume te verhogen. Centraal onderin in
beeld verschijnt een schuifregelaar voor het
volumeniveau.
” toets om het volume
Zenderselectie
• Druk op de “ P/CH + ” toets om de volgende
zender te selecteren of op de “ P/CH - ” toets
om de vorige zender te selecteren.
Het hoofdmenu weergeven
Druk gelijktijdig op de “ ” /“ ”
•
toetsen om het hoofdmenu te openen.In het
hoofdmenu kunt u submenu’s selecteren met
de “ P/CH - ” of “ P/CH + ” toetsen. Ga naar het
submenu met de “
Raadpleeg de menusysteem secties in uw
handleiding om het gebruik van de menu’s
aan te leren.
AV-modus
• Druk op de “TV/ AV” toets in het bedieningspaneel
van de TV om de TV over te schakelen naar
de TV- of AV-modi.
” of “ ” toetsen.
Bediening met de afstandsbediening
• De afstandbediening van uw TV is ontworpen
alle functies van het model dat u geselecteerd
hebt te bedienen. De functies worden
beschreven op basis van het menusysteem
van uw TV.
• De functies van het menusysteem worden in
de volgende secties beschreven .
Volume instelling
• Druk op de “
verhogen. Druk op de “ ” toets om het
volume te verlagen. Een schuifregelaar voor
het volumeniveau verschijnt op het scherm.
Zenderselectie (Voorgaand of volgend
zender)
• Druk op de “ P - ” toets om de vorige zender
te selecteren.
• Druk op de “ P + ” toets om de volgende zender
te selecteren.
Zenderselectie (directe toegang)
• Druk op de numerieke toetsen van de
afstandsbediening om zenders tussen 0 en
9 te selecteren. De TV schakelt automatisch
over op de geselecteerde zender. Om
zenders tussen 10-199 te selecteren, drukt
u herhaaldelijk op de numerieke toetsen
(bijv. voor zender 27, drukt u eerst op 2 en
daarna op 7). Wanneer de indruktijd voor het
tweede cijfer verstreken is, wordt enkel de
” toets om het volume te
Nederlands - 18 -
01_[NL]_SSM_MB35_37883W_1800UK_ANALOG_BRONZE2_10064230_50151923.indd 1801_[NL]_SSM_MB35_37883W_1800UK_ANALOG_BRONZE2_10064230_50151923.indd 18 29.07.2009 13:20:5029.07.2009 13:20:50
Page 20
zender die overeenstemt met het eerste cijfer
weergegeven. De tijdslimiet is 3 seconden.
• Druk het zendernummer rechtstreeks in
om zenders met één cijfer opnieuw te
selecteren .
Navigeren in het TV
menusysteem
Voor navigatie
Menuopties
weergeven
Uw keuzes bevestigen.
• Druk op de “ M ” om het hoofdmenu weer te
geven.
• Druk de “
” of “ ” toetsen om een pictogram
te selecteren.
• Gebruik de “
” of “ ” toetsen om te
markeren.
• Gebruik de “ ” of “ ” toetsen om de instellingen
te wijzigen.
• Druk op “
” voor meer opties.
• Druk op OK om te bewaren.
• Om het menu te verlaten of terug te keren
van het sub-menu scherm drukt u op de “M”
toets.
Opmerking : Deze verklaringen gelden voor de
navigatie in het TV menusysteem. Om opties te
selecteren die beschreven worden in de volgende
secties verwijzen wij u naar “Menusysteem”.
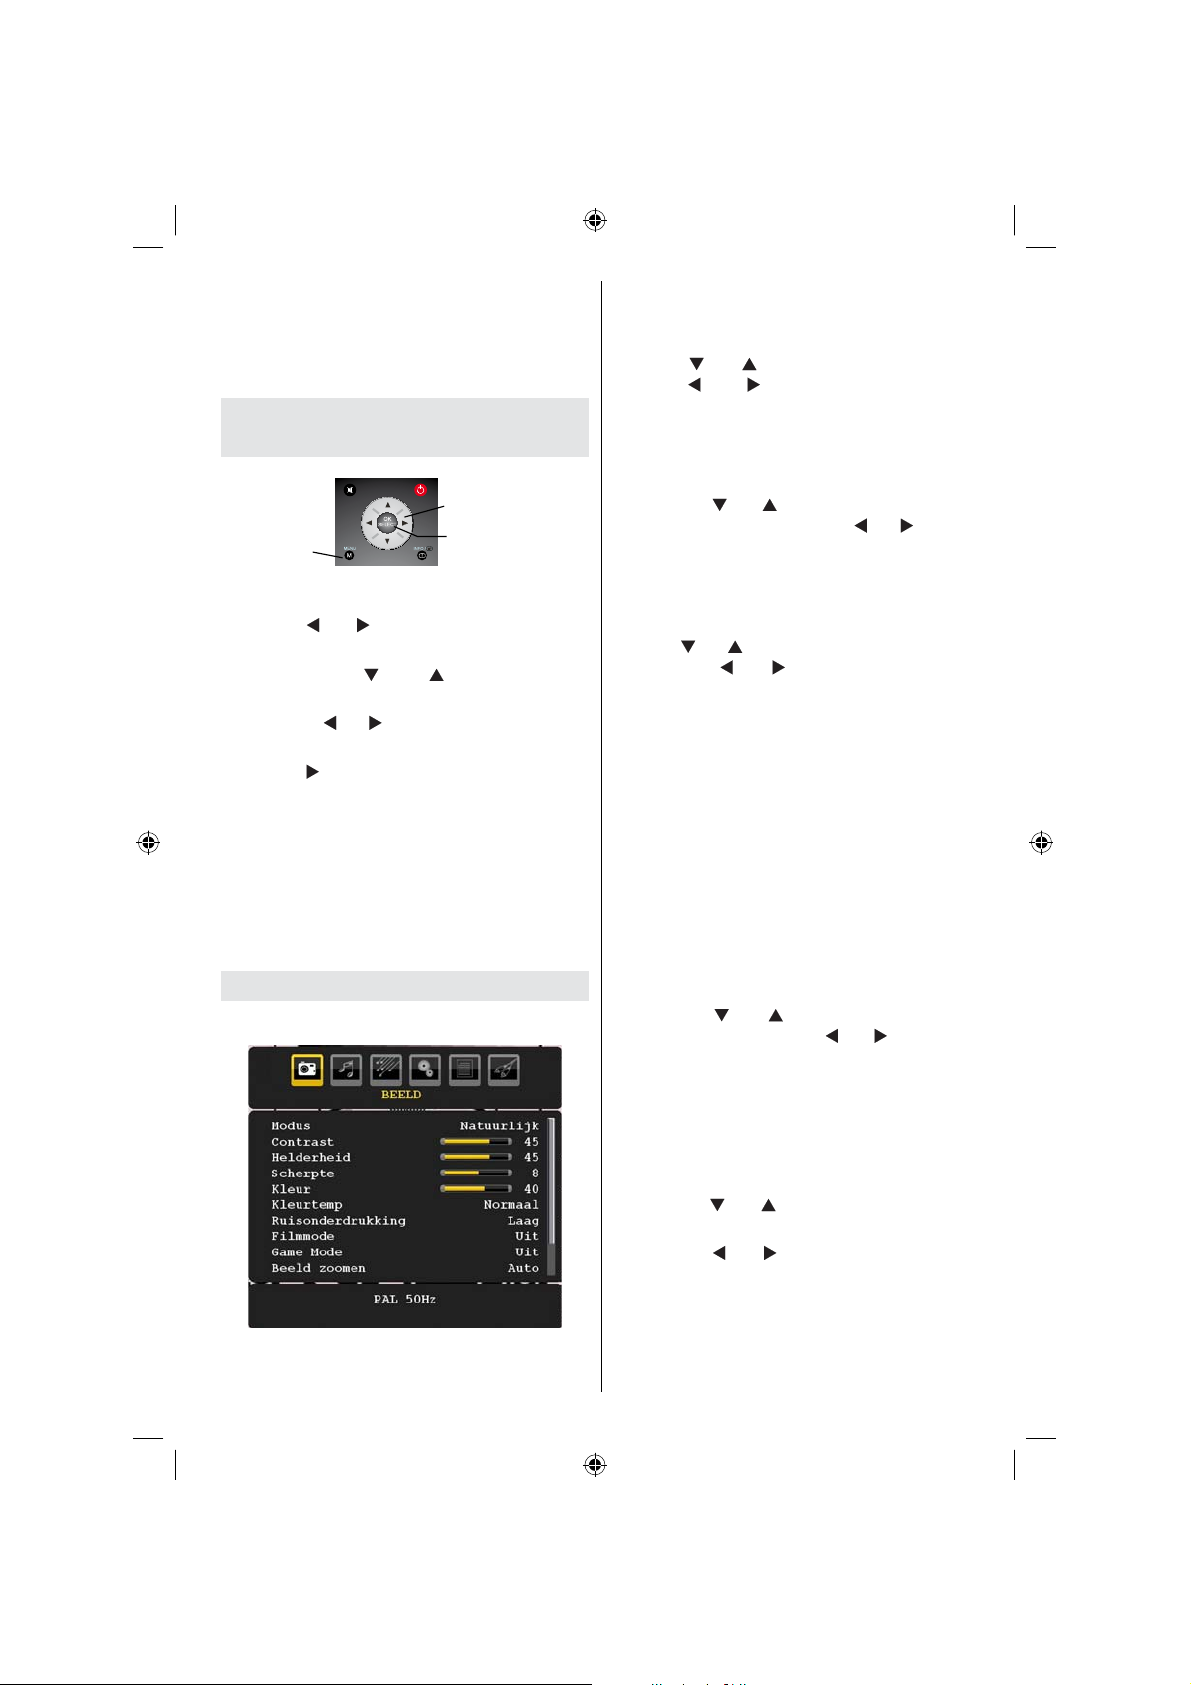
Menusysteem
Beeldmenu
Modus
V oor uw weergavevereisten kunt u de verwante
modusoptie instellen.
Als u op “
Met de “
” of “ ” drukt, selecteert u Modus.
” of “ ” toetsen kunt u één van
de volgende opties selecteren: Cinema ,
dynamisch en natuurlijk .
Helderheid/Contrast/Kleur/Scherpte/
Kleurschakering
Druk op de “
” of “ ” toetsen om de gewenste
optie te selecteren. Druk op de “ ” of “ ” toetsen
om het niveau in te stellen.
Opmerking : De Tint optie kan enkel zichtbaar zijn
wanneer de TV een NTSC-signaal ontvangt.
Kleurtemp
Als u op “ ” of “ ” drukt, selecteert u Kleurtemp.
Druk op de “ ” of “ ” toets om u één van de
volgende opties te selecteren: Koel, Normaal
en Warm .
Opmerking :
• De koel optie instellen geeft witte kleuren een blauwe
accentuering.
• De Warm optie instellen geeft witte kleuren een
rode accentuering.
• Voor normale kleuren, selecteert u de Normaal
optie.
Ruisreductie
Indien het uitzendsignaal zwak is en het
beeld ruis bevat, kunt u de Ruisreductie
instelling gebruiken om de hoeveelheid ruis te
onderdrukken.
Druk op de “ ” of “ ” toets om Ruisreductie
te selecteren. Druk op de “ ” of “ ” toets om u
één van de volgende opties te selecteren: Laag,
gemiddeld, hoog of uit .
Filmmodus
Films worden aan een ander aantal frames
per seconde opgenomen dan normale
televisieprogramma’s.
Druk op de “
” of “ ” toets om de Filmmodus
te selecteren.
Druk op de “
” of “ ” toets om deze functie in
of uit te schakelen.
Schakel deze functie aan wanneer u films
bekijkt om de snelle animatiescènes duidelijk
te kunnen zien.
Nederlands - 19 -
01_[NL]_SSM_MB35_37883W_1800UK_ANALOG_BRONZE2_10064230_50151923.indd 1901_[NL]_SSM_MB35_37883W_1800UK_ANALOG_BRONZE2_10064230_50151923.indd 19 29.07.2009 13:20:5029.07.2009 13:20:50
Page 21
Spel Modus (optioneel)
Selecteer de Spelmodus met de “
Druk op de “
” of “ ” toets om de Spelmodus
” of “ ” toets.
In of uit te schakelen. Wanneer de Spel Modus
ingeschakeld is, worden specifi eke instellingen
voor de spel modus, die geoptimaliseerd zijn
voor betere videokwaliteit, geladen.
De Beeldmodus, Contrast, Helderheid, Scherpte,
Kleur en Kleurtermperatuur instellingen zijn
onzichtbaar en uitgeschakeld wanneer de
Spelmodus ingeschakeld is.
Opmerking :
De Beeldmodus selectietoets op de afstandsbediening heeft
geen functie waneer de Spelmodus ingeschakeld is.
Indien de TV overgeschakeld wordt naar de PIP/
PAP-modus wordt de Spelmodus uitgeschakeld en
verwijderd uit het Beeldmenu.
Beeld scherpstellen
Selecteer Beeld scherpstellen met de “ ” of
“ ” toets.
Met de “
” of “ ” toetsen kunt u de scherpstelling
van het beeld wijzigen in Automatisch ,
16:9 , 4:3 , Panaromisch , 14:9 , Cinema ,
Ondertiteling of Zoomen .
Reset
Druk op de “ ” of “ ” toets om Reset te
selecteren. Druk de “ ” of “ ” of de OK toets in
om de fabrieksinstellingen van de beeldmodus
te herstellen.
Bewaren
Druk op de “
” of “ ” toets om Bewaren te
selecteren. Druk op “ ” of OK om de instellingen
te bewaren. “ Bewaard... ” verschijnt op het
scherm .
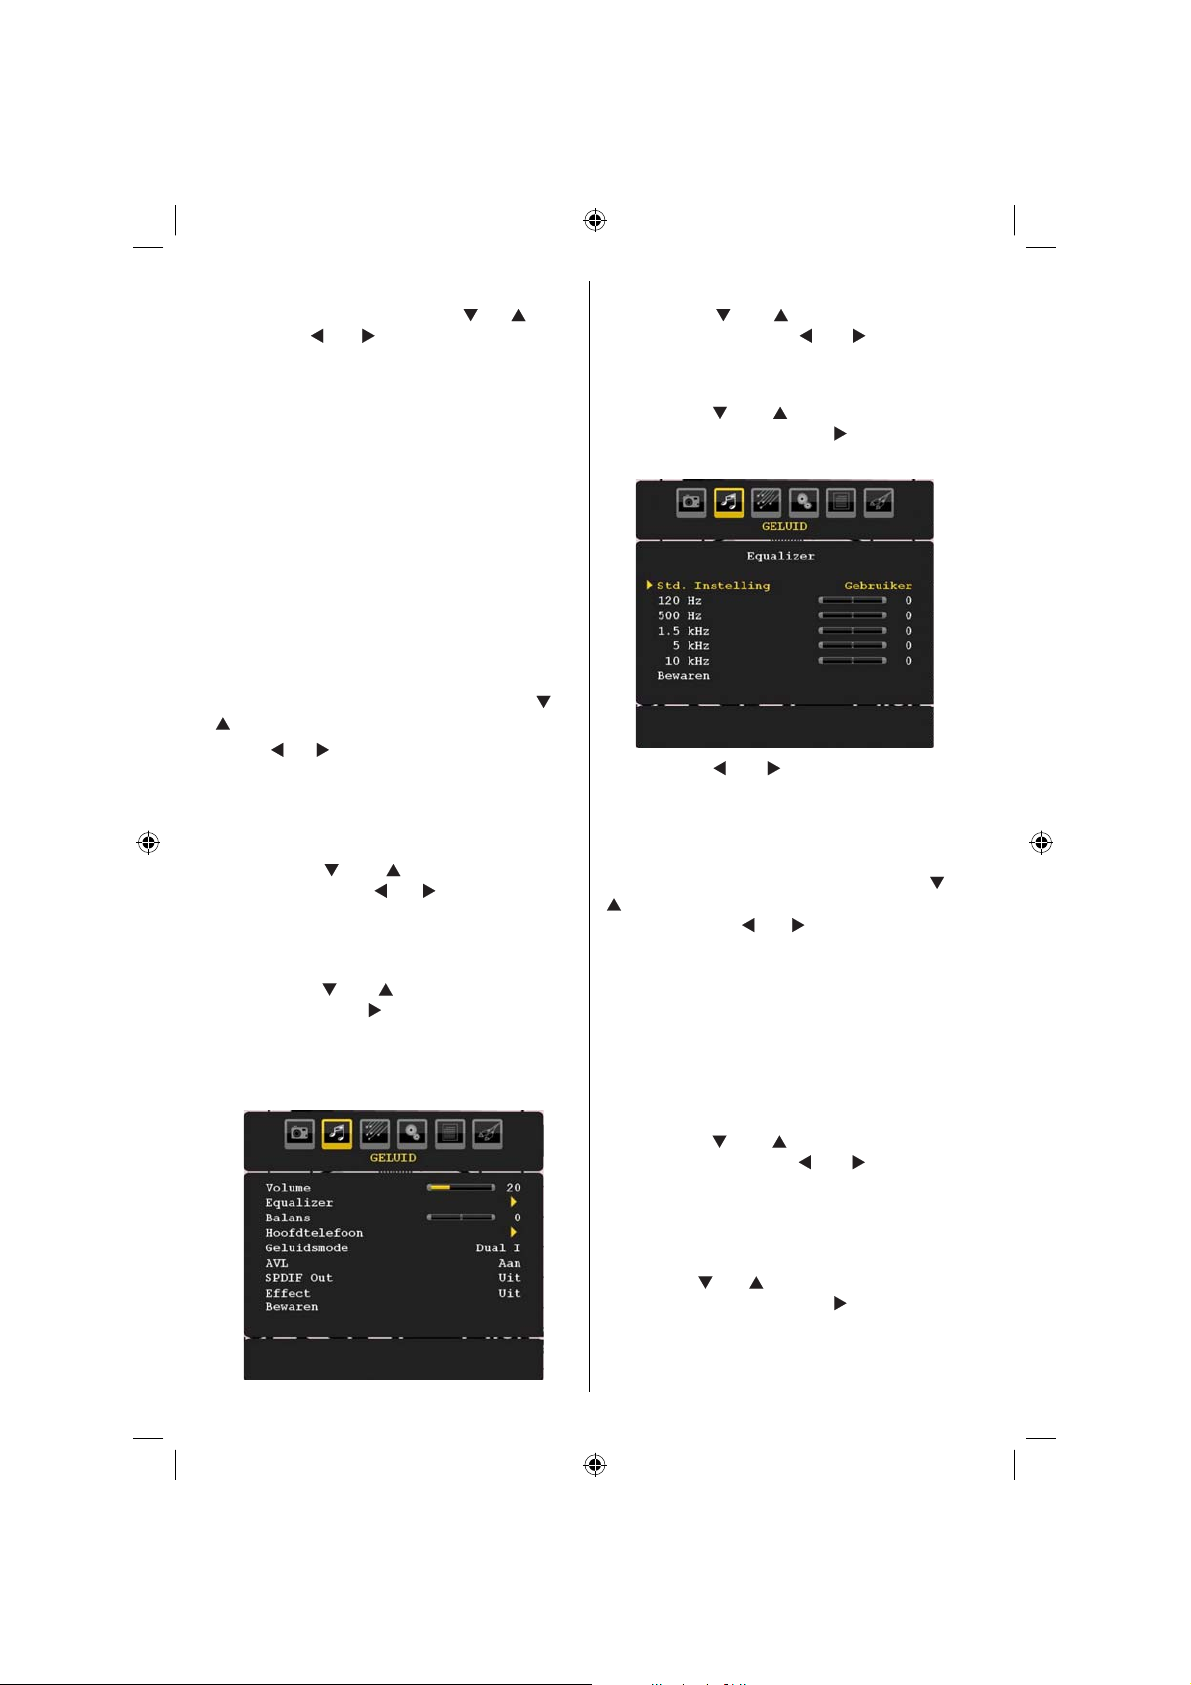
Geluidsmenu
Nederlands - 20 -
Volume
Druk op de “
selecteren. Druk op de “
” of “ ” toets om Volume te
” of “ ” toetsen om
het volumeniveau te wijzigen.
Equalizer
Druk op de “
te selecteren. Druk op de “
” of “ ” toets om Equalizer
” toets om het
equalizer menu weer te geven.
Druk op de “
” of “ ” toetsen om de vooraf
ingestelde waarde te wijzigen. In het equalizer
menu, kan de voorinstelling gewijzigd worden
in Muziek , Film , Spraak , Vlak , Klassiek en
Persoonlijk .
Selecteer de gewenste frequentie met de “ ” of
“ ” toetsen en verhoog of verlaag de frequentie
toename met de “ ” of “ ” toetsen.
Druk op de “M” toets om terug te keren naar
het vorige menu.
Opmerking : De equalizer menu instellingen kunnen
uitsluitend gewijzigd worden wanneer de Equalizer
modus op Gebruiker staat.
Balans
Deze instelling wordt gebruikt om de linkse of
rechtse luidspreker meer te benadrukken.
Druk op de “
” of “ ” toets om Balans te
selecteren. Gebruik de “ ” of “ ” toetsen om
het niveau van de Balans te wijzigen. Het
balansniveau kan aangepast worden tussen
-32 en +32.
Koptelefoon
Druk op de “
te selecteren. Druk op de “
” of “ ” toets om Hoofdtelefoon
” toets om het
hoofdtelefoonmenu weer te geven.
De hoofdetelefoon submenu-opties worden hier
onder beschreven:
01_[NL]_SSM_MB35_37883W_1800UK_ANALOG_BRONZE2_10064230_50151923.indd 2001_[NL]_SSM_MB35_37883W_1800UK_ANALOG_BRONZE2_10064230_50151923.indd 20 29.07.2009 13:20:5029.07.2009 13:20:50
Page 22
Volume
Druk op de “
selecteren. Druk op de “
” of “ ” toets om Volume te
” het volumeniveau
van de hoofdtelefoon te verhogen. Druk op
“ ” om het volumeniveau van de hoofdtelefoon
te verlagen. Het volumeniveau van de
hoofdtelefoon kan aangepast worden tussen
0 en 63 .
Bewaren
Druk op de “ ” of “ ” toets om Bewaren te
selecteren. Druk op “
” of OK om de instellingen
te bewaren. “ Bewaard... ” verschijnt op het
scherm
Geluidsmodus
Druk op de “
” of “ ” toets om de Geluidsmodus
te selecteren. Met de “ ” of “ ” toets kunt
u de Mono, Stereo, Dual I of Dual II modus
selecteren, uitsluitend als de geselecteerde
zender deze modus ondersteunt.
AVL
De Automatische volumebegrenzing (AVL)
functie past het geluid aan om een vast
uitvoerniveau tussen programma’s te
krijgen (Bijvoorbeeld, het volumeniveau van
reclame is geneigd luider te zijn dan dat van
programma’s).
Druk op de “
” of “ ” toets om AVL te
selecteren. Druk op de “ ” of “ ” toets om de
AVL functie in of uit te schakelen.
Spdif uit
Druk op de “ ” of “ ” toets om Spdif uit te
selecteren. Druk op de “ ” of “ ” toets om de
Spdif uit . functie in of uit te schakelen.
Opmerking : Indien Spdif uit ingeschakeld is, wordt
de hoofdtelefoon uitgeschakeld.
Effect
Wanneer u een mono uitzending bekijkt, kunt u
Effect inschakelen voor een beter geluidseffect
dat meer stereoachtig is. Als het huidige
geluidssysteem in Stereo staat, geeft het
inschakelen van dit effect het geluid een meer
ruimtelijk effect.
Druk op de “
” of “ ” toets om Effect te
selecteren. Druk op de “ ” of “ ” toets om deze
functie in of uit te schakelen.
Nederlands - 21 -
Bewaren
Druk op de “
selecteren. Druk op “
” of “ ” toets om Bewaren te
” of OK om de instellingen
te bewaren. “ Bewaard... ” verschijnt op het
scherm
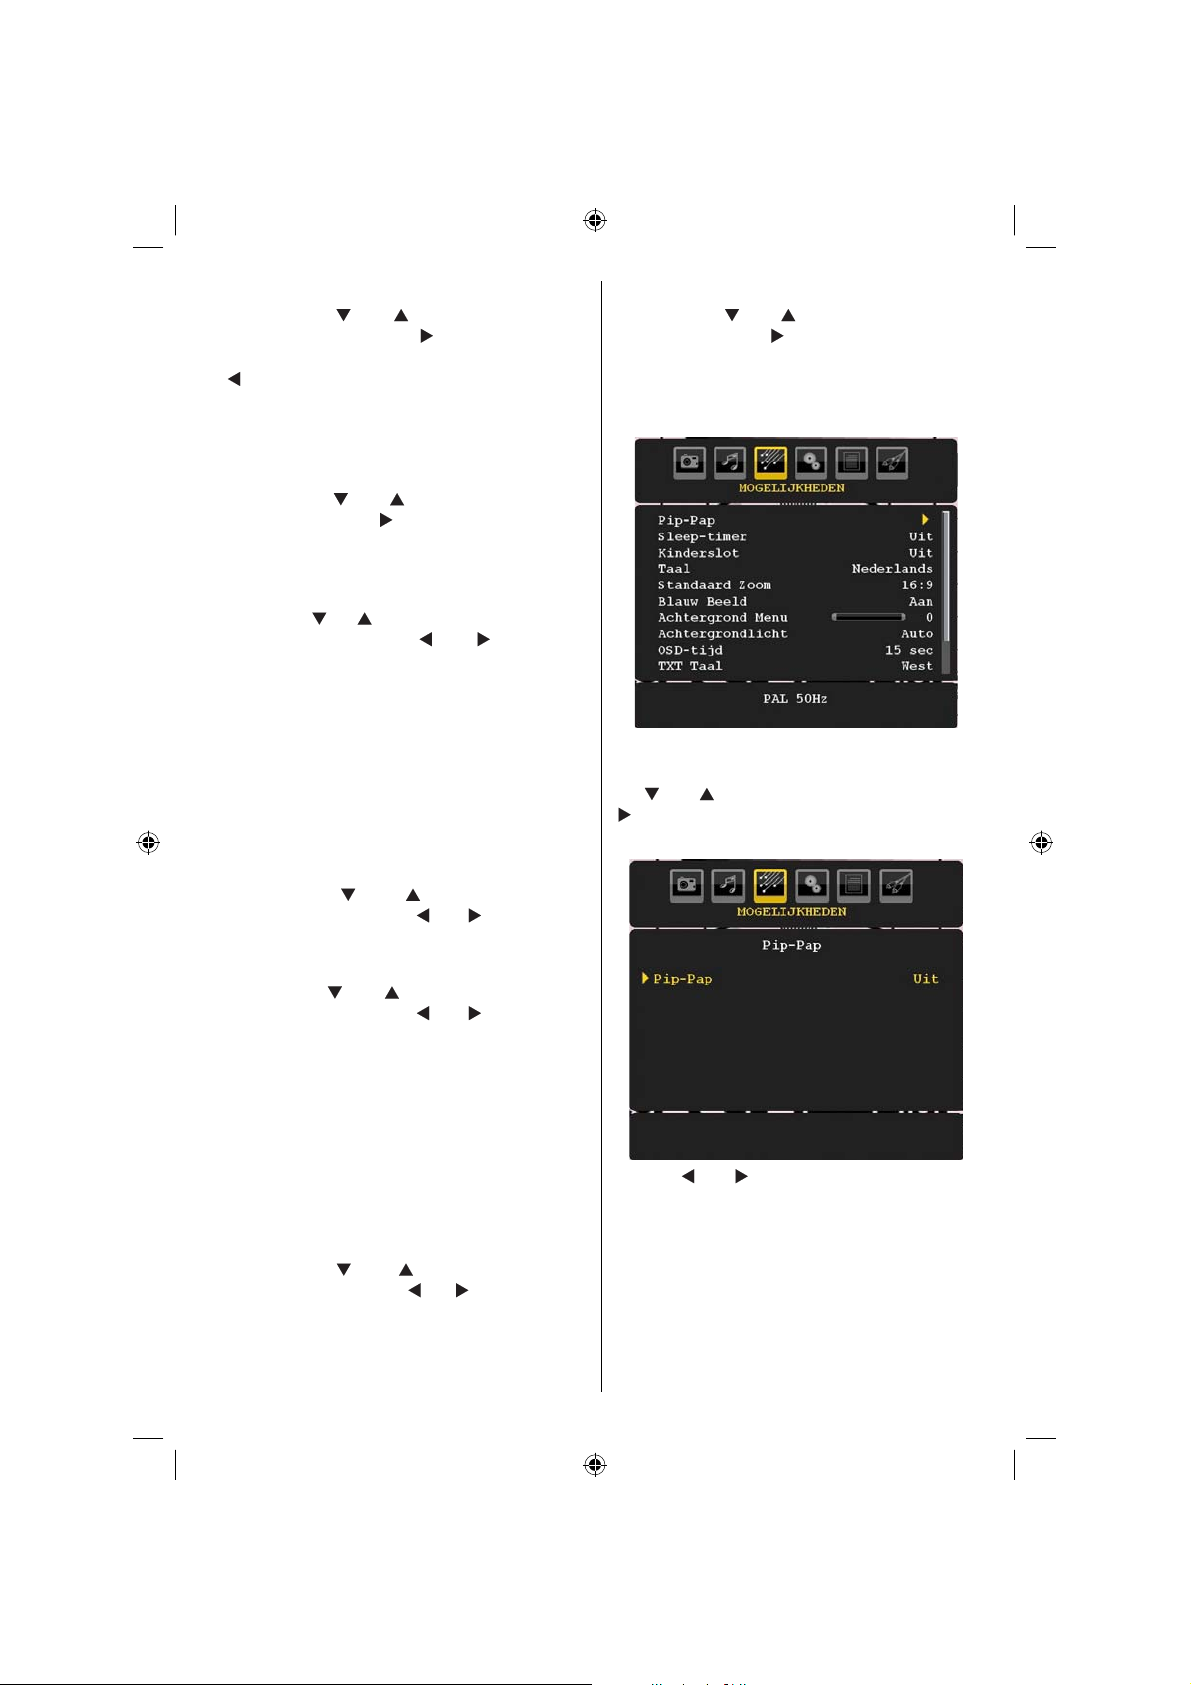
Functiemenu
Pip-Pap
In het Functiemenu markeert u PIP door op
de “
” of “ ” toetsen te drukken. Druk op de
“ ” toets om toegang te krijgen tot het PIPsubmenu:
Met de “
” of “ ” toets kunt u overschakelen
naar de PIP-, PAP-modus of de functie
uitschakelen.
Als de TV overgeschakeld is naar de PIP- of
P AP-modus wijzigt ook het Pip-Papmenu en de
volgende instellingen verschijnen op hetzelfde
menuscherm.
Merk op dat als u overschakelt op de PAP-modus
met de Pip-Pap-instelling enkel de Bron en Wisselenopties actief zijn in de menu-instellingen.
01_[NL]_SSM_MB35_37883W_1800UK_ANALOG_BRONZE2_10064230_50151923.indd 2101_[NL]_SSM_MB35_37883W_1800UK_ANALOG_BRONZE2_10064230_50151923.indd 21 29.07.2009 13:20:5129.07.2009 13:20:51
Page 23

Pip-Pap
De lijn controleert de Pip/Pap-modi. Gebruik de
“
” of “ ” toetsen om de TV over te schakelen
op Pip , Pap of Uit .
Pip-grootte
Met deze instelling kunt u de grootte van het
Pip-venster instellen. Druk op de “
” of “ ” toets
om het Pip-grootte item te markeren. Gebruik de
“ ” of “ ” toets om de Pip-grootte in te stellen
op Klein of Groot.
Opmerking : Deze instelling is inactief als de TV
ingesteld is op de Pap-modus.
PIP-positie
Deze instelling wordt gebruikt om het subbeeld
te verplaatsen.
Selecteer het PIP-bron item met de “ ” of
“ ” toetsen. Druk de “ ” of “ ” toetsen in om
de PIP-positie aan te passen.
Beschikbare Posities zijn: Onderin rechts, onderin
links, bovening links en boveninrechts.
Bron
De PIP-bron instelling biedt u de mogelijkheid
de bron van het subbeeld te selecteren.
Selecteer het PIP-bron item met de “
” of “ ” toetsen. Druk de “ ” of “ ” toetsen in
om de PIP-bron aan te passen.
Kanaal
Deze instelling is niet beschikbaar.
Wisselen
Selecteer het Wisselen item met de “
” of “
” toetsen. Gebruik de “ ” of “ ” toets om in
te stellen. Deze functie laat u toe te schakelen
tussen het hoofd- en het PIP-beeld.
Opmerking : Zie bijlage B voor alle PIP/PAP Modi.
Slaaptimer
Druk op de “ ” of “ ” toets om de Sluimertimer
te selecteren. Gebruik de “ ” of “ ” toetsen om
de Sluimertimer in te stellen.
De timer kan tussen Uit en 120 minuten
geprogrammeerd worden in stappen van 10
minuten.
Als de Sluimertimer geactiveerd wordt,
schakelt de TV automatisch over op de standby modus op het einde van de geselecteerde
tijdsduur.
Nederlands - 22 -
Kinderslot
Druk op de “
” of “ ” toets om Kinderslot te
selecteren.
Druk op de “
” of “ ” toets om de Kinderslot
functie in of uit te schakelen. Als Aan
geselecteerd is, kan de TV enkel bediend
worden via de afstandsbediening. In dat geval
werken de toetsen van het bedieningspaneel
niet (behalve de Stand-by toets).
Als een van deze toetsen ingedrukt wordt,
verschijnt de boodschap “Kinderslot AAN” op
het scherm als het menuscherm niet zichtbaar
is.
Taal
Druk op de “
” of “ ” toets om Taal te
selecteren. Gebruik de “ ” of “ ” toetsen om
de Taal te selecteren.
Standaard zoom
Met de zoommodus ingesteld op AUTOMATISCH
zal de TV de zoommodus volgens het signaal
van de uitzending instellen. Indien er geen
WSS of beelverhoudinginformatie beschikbaar
is, zal de TV deze instelling toepassen. Druk
op de “ ” of “ ” toets om de Standaard zoom
te selecteren. U kunt de Standaard zoom
instellen op Panoramisch , 16:9 , 4:3 of 14:9
zoom instellen met de “ ” of “ ” toetsen.
Blauwe achtergrond
Indien het signaal zwak of afwezig is, schakelt
de TV automatisch naar een blauw scherm.
Om deze functie in te schakelen, schakelt u de
Blauwe achtergrond in.
Druk op “
” of “ ” om de Blauwe achtergrond
te selecteren. Druk op de “ ” of “ ” toets om
de Blauwe achtergrond functie in of uit te
schakelen.
Menu achtergrond
Druk op de “
” of “ ” toets om Menu
achtergrond te selecteren. U kunt het
achtergrondniveau van het menu instellen met
de “ ” of “ ” toets.
Achtergrond verlichting
Deze instelling bedient het
achtergrondverlichtingsniveau. Selecteer
de Achtergrondverlichting met de “
” of “
” toets. Druk op de “ ” of “ ” toets om de
Achtergrondverlichting in te stellen op Auto,
Gemiddeld , Maximum of Minimum .
01_[NL]_SSM_MB35_37883W_1800UK_ANALOG_BRONZE2_10064230_50151923.indd 2201_[NL]_SSM_MB35_37883W_1800UK_ANALOG_BRONZE2_10064230_50151923.indd 22 29.07.2009 13:20:5229.07.2009 13:20:52
Page 24
Menu time-out
Om een bepaalde scherm time-out in te stellen
voor menuschermen moet u een waarde
instellen voor deze optie.
Druk op de “
” of “ ” toets om Menu time-out
te selecteren. Druk op de “ ” of “ ” toets om
de menu time-out te wijzigen in 15 sec , 30 sec
of 60 sec .
Teleteksttaal
Druk op de “
” of “ ” toets om de Teleteksttaal .
te selecteren. Druk op de “ ” of “ ” toets om de
Teleteksttaal te wijzigen in West, Oost , Turk/
Gre , Cyrillisch, Arabisch of perzisch .
HDMI PC Full-Modus (optioneel)
Als u het PC-scherm wilt weergeven in HDMImodus via de externe aansluiting moet de HDMI
PC FULL MODE optie ingeschakeld worden om
de beeldverhouding correct bij te regelen. In
sommige resoluties kan het inactief zijn.
Opmerking: Als u een HDMI-apparaat aansluit en
de TV overschakelt op HDMI-modus is deze functie
zichtbaar (behalve voor 1080i/1080P resolutie).
Volledige modus (optioneel)
Als u een apparaat aansluit via HDMI- of
YpbPr-connectoren en 1080i/1080P resoluties
instelt, is het Volledige modus item zichtbaar.
U kunt de Volledige modus instellen als 1:1 of
Normaal met het “ ” of “ ”. Als u 1:1 selecteert,
wordt de schermverhouding correct aangepast.
Als u Normaal instelt, is het mogelijk dat de
schermverhouding uitgebreid wordt.
Ext uit
Druk op de “
” of “ ” toets om Ext uit te
selecteren. Druk op de “ ” of “ ” toets om de
Ext Out functie in of uit te schakelen.
Opmerking :
Om een kopie te maken van een DVD- of VCR-toestel
moet u de gewenste bron selecteren in het bron menu
en EXT uit inschakelen in het functiemenu.
Opmerking: Als u geen Tunier video uitgang wenst
van Scart 1 of Scart 2 moet u Ext uit uitschakelen, zo
niet kunt u het inschakelen.
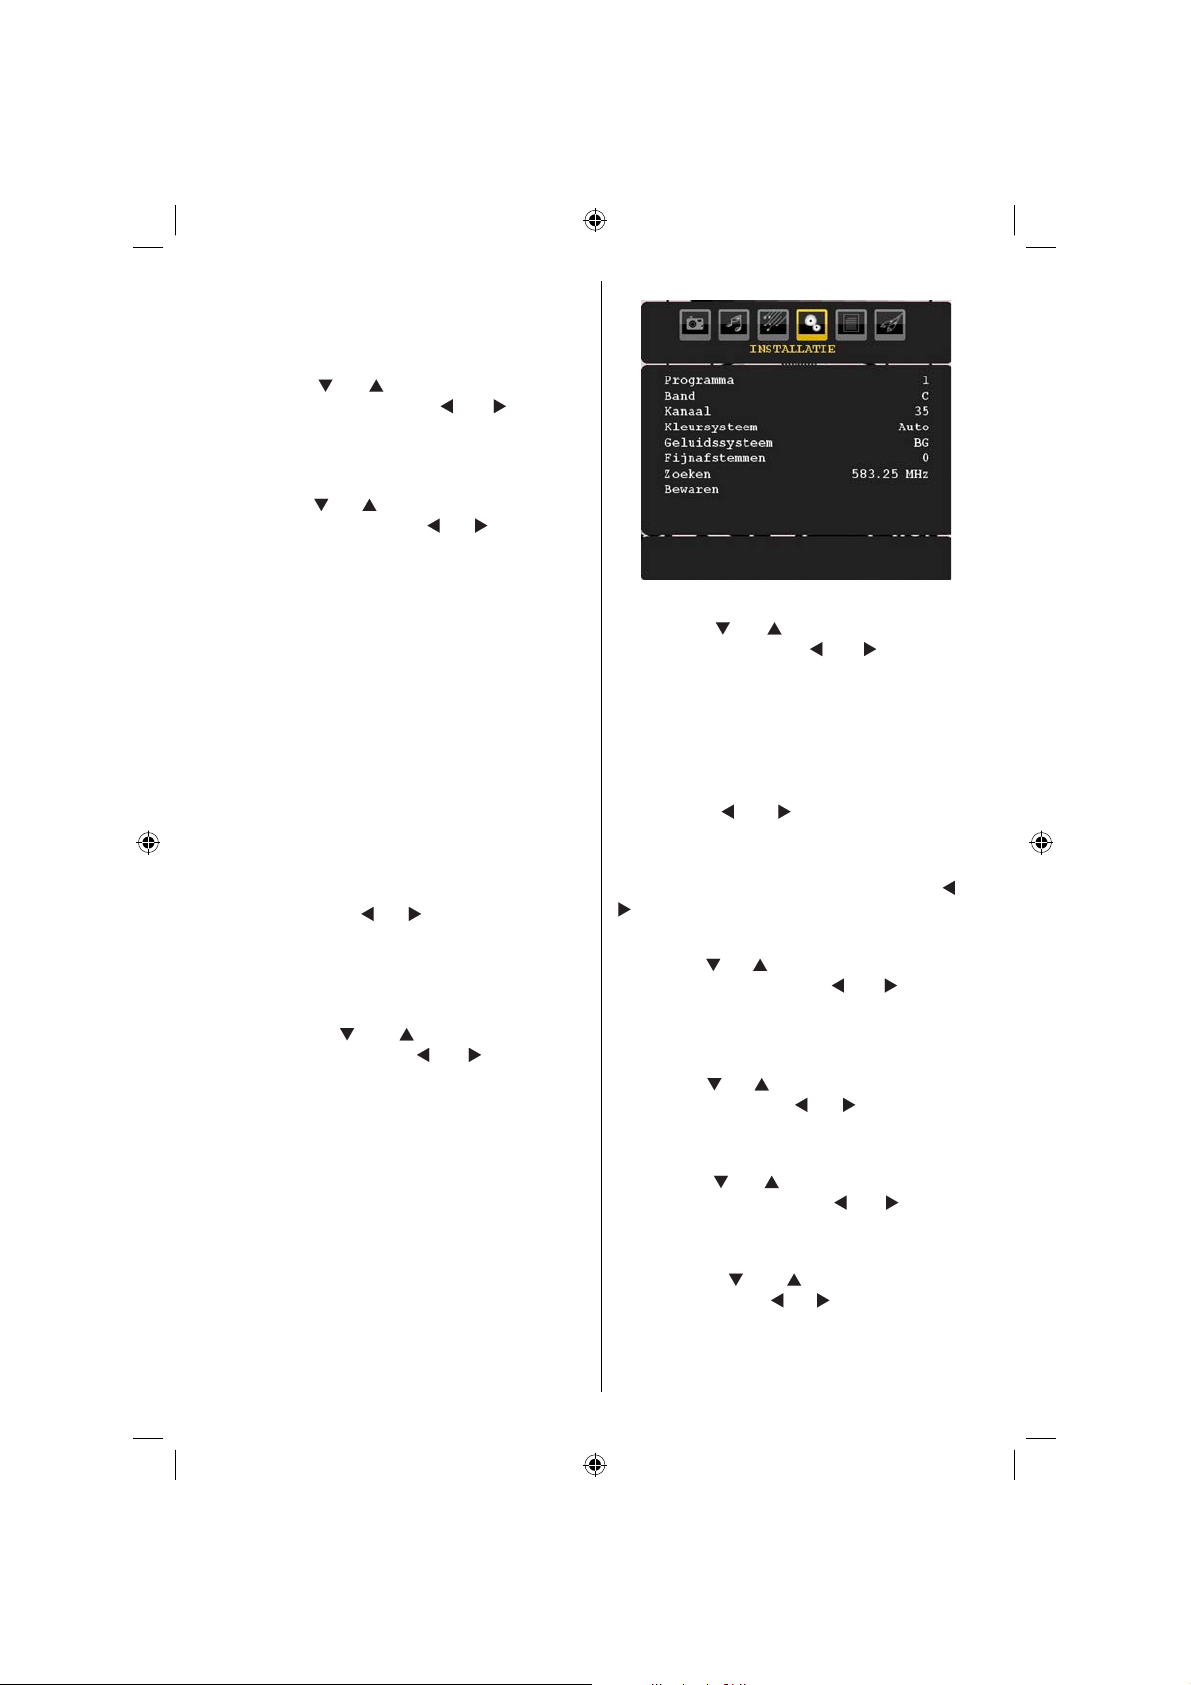
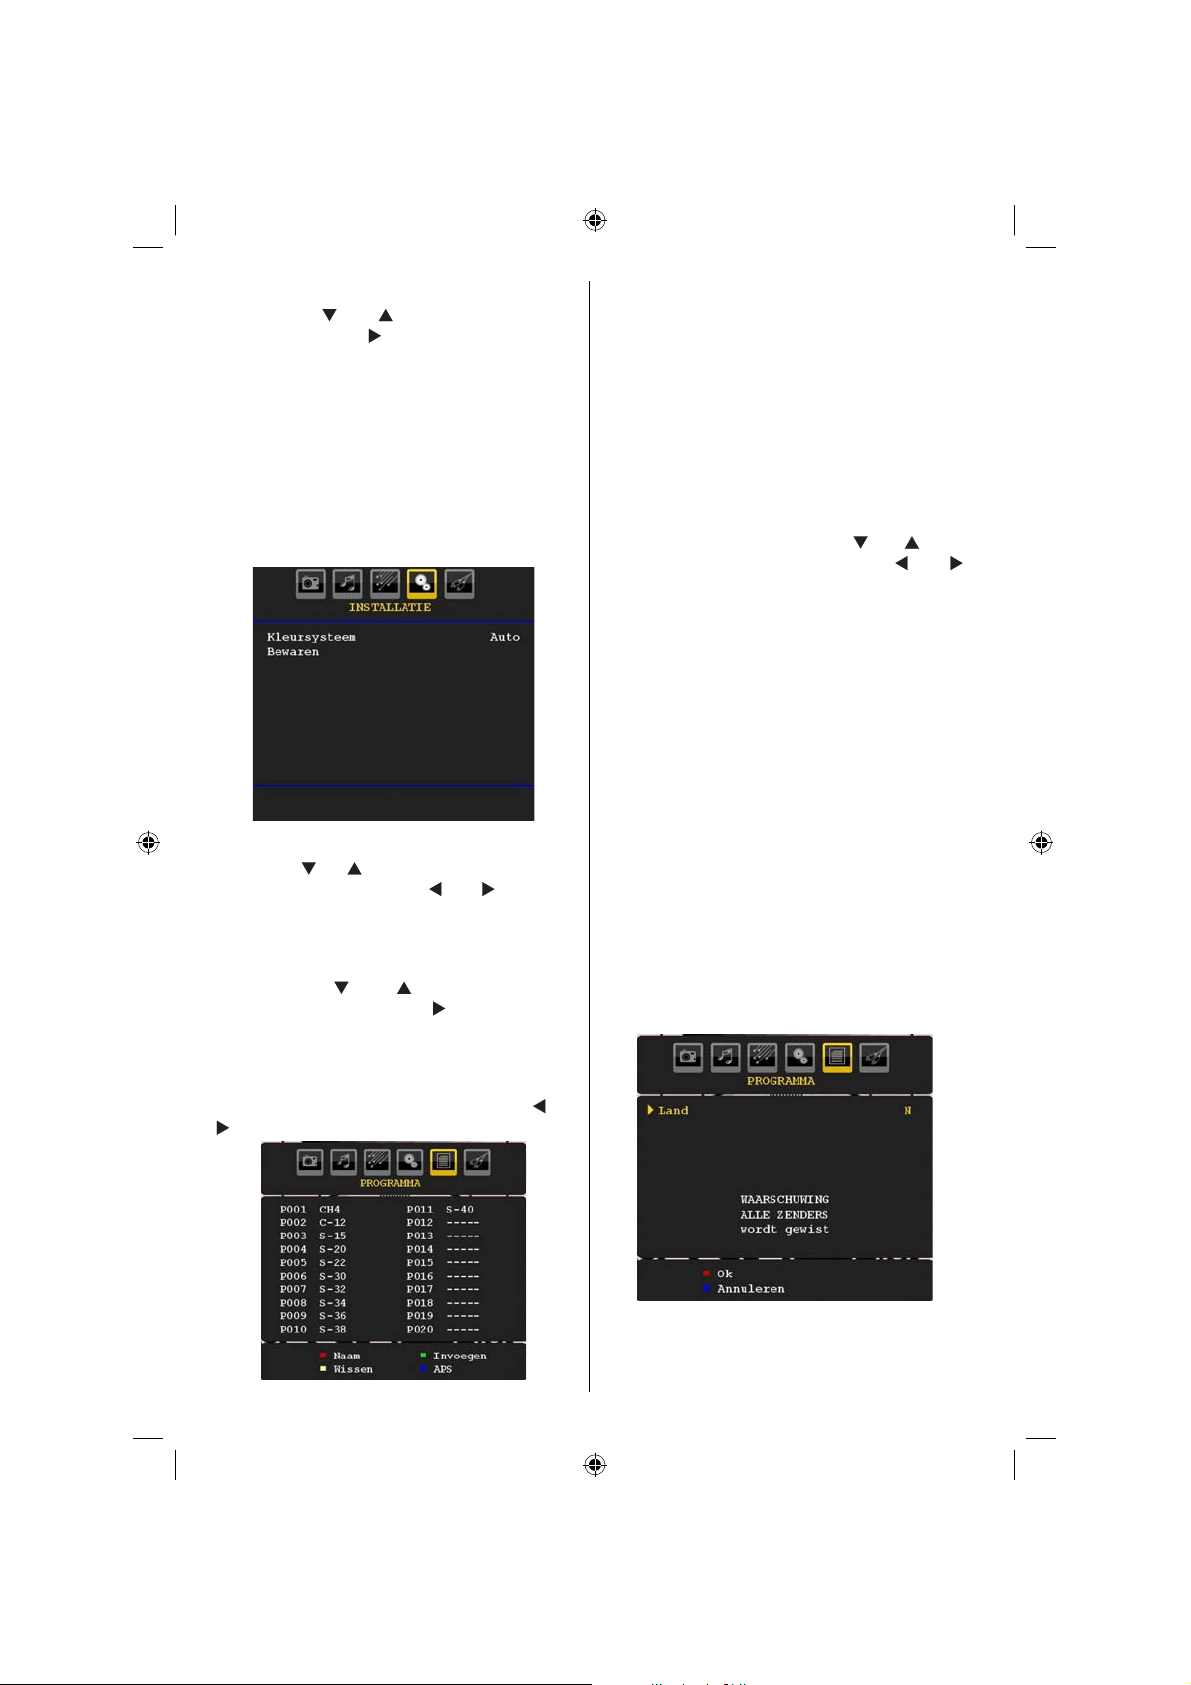
Installatiemenu
Kanaal
Druk op de “
selecteren. Gebruik de “
” of “ ” toets om Programma te
” of “ ” toetsen om
het zendernummer te selecteren. U kunt ook
een nummer invoeren met de cijfertoetsen op
de afstandsbediening. Er is ruimte voor 200
zenders tussen 0 en 199.
Band
Band kan geselecteerd worden als C of S.
Druk op de “ ” of “ ” toets om de Band te
selecteren.
Kanaal
Het Kanaal kan gewijzigd worden met de “
” of
“ ” toets of de numerieke toetsen.
Kleursysteem
Druk op de “ ” of “ ” toets om het Kleursysteem
te selecteren. Druk op de “ ” of “ ” toets om
het kleursysteem te wijzigen in PAL, PAL 60,
SECAM of AUTOMATISCH.
Geluidssysteem
Druk op de “
” of “ ” toets om het Kleursysteem
te selecteren. Druk de “ ” of “ ” toets in om het
geluidsysteem te wijzigen in BG, I, L, L’, DK.
Fijnafstemmen
Druk op de “
” of “ ” toets om Fijnafstemmen
te selecteren. Druk op de “ ” of “ ” toets om
de afstemming aan te passen.
Zoeken
Druk op de “ ” of “ ” toets om Zoeken te
selecteren. Druk op “ ” of “ ” om de programma
zoekopdracht te starten. U kunt ook de gewenste
frequentie invoeren met de numerieke toetsen
terwijl het Zoekitem gemarkeerd is.
Nederlands - 23 -
01_[NL]_SSM_MB35_37883W_1800UK_ANALOG_BRONZE2_10064230_50151923.indd 2301_[NL]_SSM_MB35_37883W_1800UK_ANALOG_BRONZE2_10064230_50151923.indd 23 29.07.2009 13:20:5229.07.2009 13:20:52
Page 25
Bewaren
Druk op de “
selecteren. Druk op “
” of “ ” toets om Bewaren te
” of OK om de instellingen
te bewaren. “ Bewaard... ” verschijnt op het
scherm
Installatiemenu in AV Modi
Het volgende scherm verschijnt in het
installatiemenu wanneer de TV in AV-modi is.
Merk op dat er maar beperkte opties beschikbaar
zijn. Schakel over naar de TV-modus om de
volledige versie van het Installatiemenu te
bekijken.
Kleursysteem
Druk op de “
” of “ ” toets om het Kleursysteem
te selecteren. Druk op de “ ” of “ ” toets om
het kleursysteem te wijzigen in PAL, SECAM,
PAL60, AUTO, NTSC 4,43 of NTSC 3,58.
Bewaren
Druk op de “
” of “ ” toets om Zender
bewaren . Druk op de “ ” of OK om de
instellingen te bewaren. “ Bewaard... ” verschijnt
op het scherm
Zendertabel
Selecteer de Zendertabel met de “
” of
“ ” t oets.
Als u de cursor in de vier richtingen verplaatst,
kunt u 20 programma’s bereiken op dezelfde
pagina. U kunt doorheen de pagina’s bladeren
met de navigatietoetsen om alle zenders weer te
geven in TV-modus (behalve voor de AV modi).
Als de cursor geactiveerd wordt, gebeurt de
programmaselectie automatisch.
Naam
Om de naam van de pagina te wijzigen, selecteer
de zender en druk op de RODE toets.
De eerste letter van de geselecteerde naam
wordt gemarkeerd. Druk op de “
” of “ ” toets
om die letter te wijzigen en op de “ ” of “ ”
toets om de andere letters te selecteren. Met
de RODE toets kunt u de naam opslaan.
Verplaatsen (Move)
Selecteer de zender die u wenst in te voegen
met de navigatietoetsen. Druk op de GROENE
toets. Verplaats de geselecteerde zender naar
de gewenste locatie met de navigatietoetsen en
druk opnieuw op de GROENE toets.
Wissen
Om een zender te verwijderen, drukt u op
de GELE toets. Als u opnieuw op de GELE
toets drukt, kunt u de geselecteerde zender
verwijderen uit de lijst en de programma’s één
lijn omhoog verschuiven.
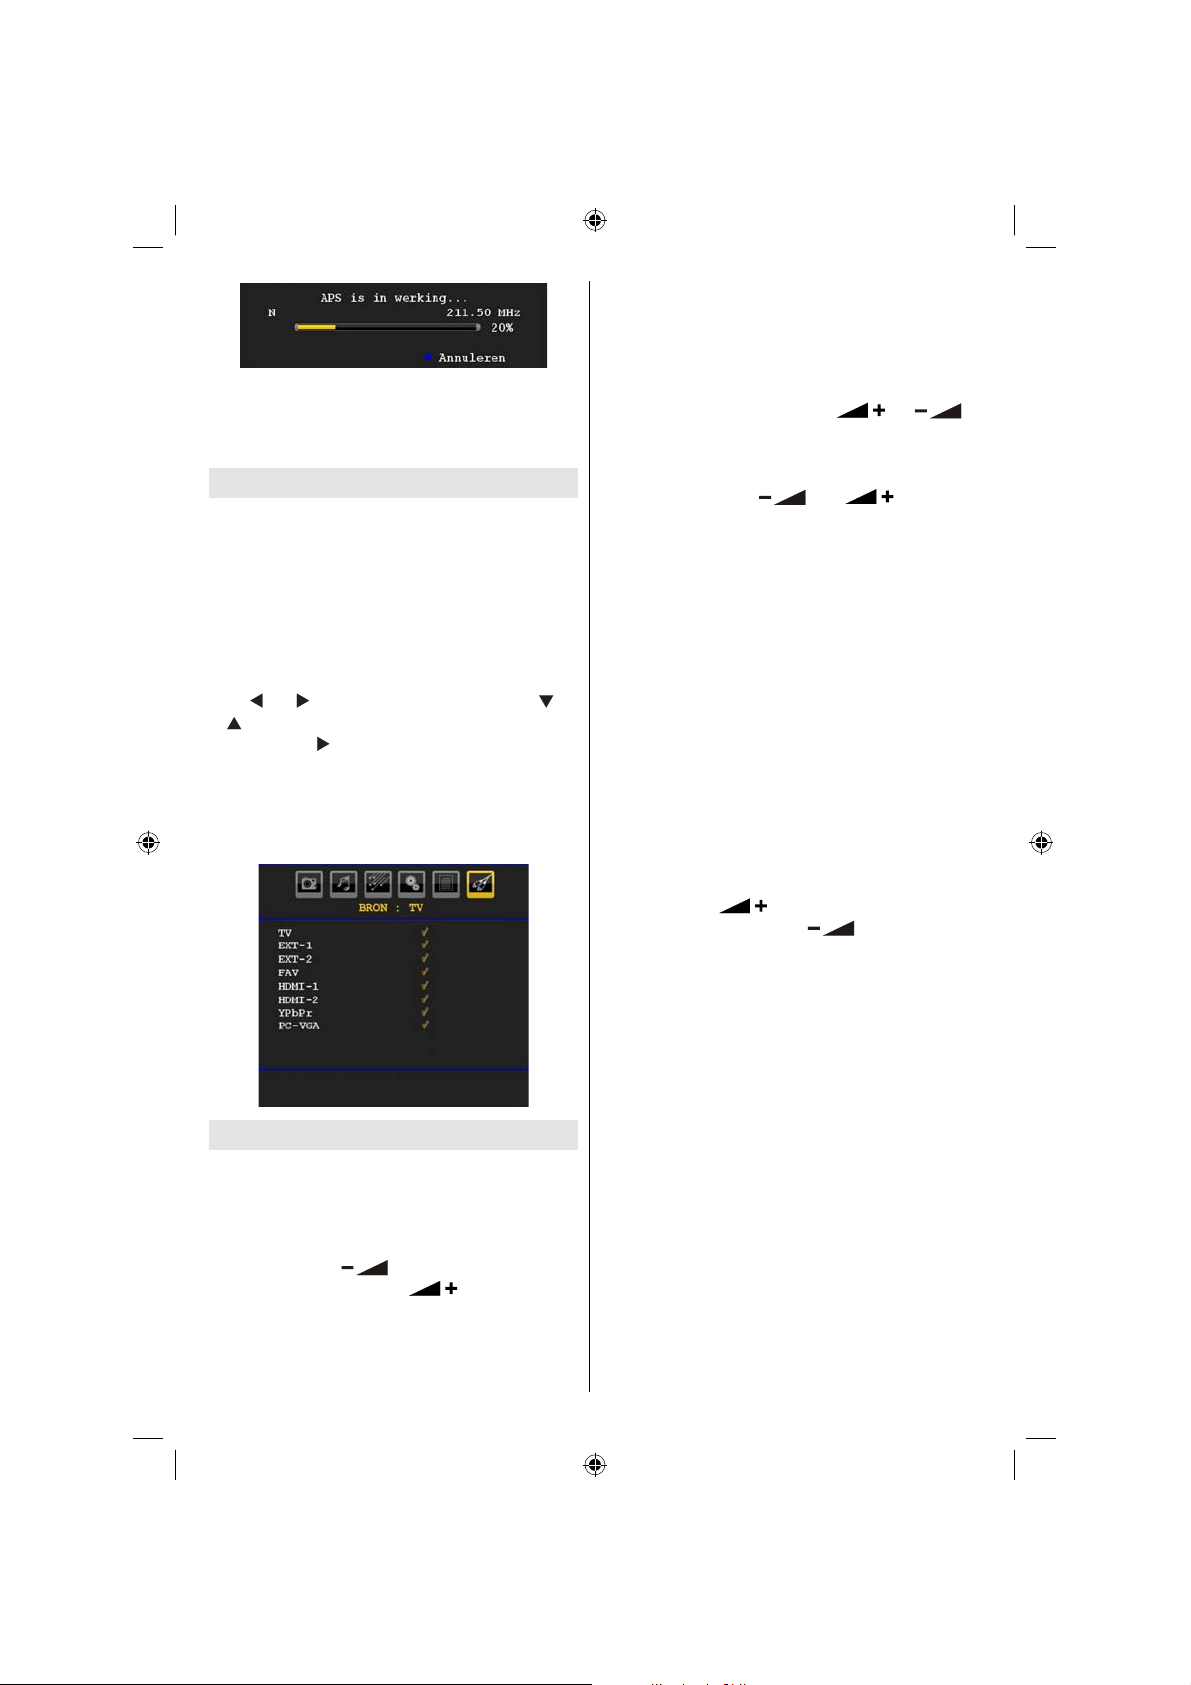
APS (Automatisch Programmeersysteem)
Als u op de BLAUWE toets drukt om het
automatisch afstemmen te starten. verschijnt
het Automatisch programmeringsysteem
menu op het scherm:
Nederlands - 24 -
01_[NL]_SSM_MB35_37883W_1800UK_ANALOG_BRONZE2_10064230_50151923.indd 2401_[NL]_SSM_MB35_37883W_1800UK_ANALOG_BRONZE2_10064230_50151923.indd 24 29.07.2009 13:20:5329.07.2009 13:20:53
Page 26

Land
Druk op de “
” of “ ” toets om uw land te
selecteren. Indien u de APS functie wilt verlaten,
drukt u op de BLAUWE toets.
Druk op de OK of RODE toets om automatisch
afstemmen te starten, worden alle zenders
verwijderd en de TV zoekt de beschikbare
zenders. Tijdens de zoekopdracht wordt de
volgende OSD weergegeven:
Als u op de BLAUWE toets drukt, stopt de
APS-functie en de Zendertabel verschijnt op
het scherm.
Als u wacht tot het einde van de APS wordt de
Zendertabel weergegeven op het scherm met
een lijst van de gevonden zenders.
Bronmenu
Druk op de “ ” of “ ” toetsen om het zesde
pictogram te selecteren. Druk daarna op de “
” of OK toets. Het bronmenu verschijnt op het
scherm:
PC-modus menusysteem
Raadpleeg het gedeelte “De LCD-TV aansluiten
op een PC” om een PC aan te sluiten op het
TV-toestel.
Om over te schakelen naar PC-bron drukt u op
de “SOURCE” toets van uw afstandsbediening
en selecteert u PC-ingang. U kunt ook het
“Bron”menu gebruiken om over te schakelen
naar PC-modus.
Merk op dat PC-modus menuinstellingen enkel
beschikbaar zijn als de TV in PC-bron is.
PC Positiemenu
Selecteer het eerste pictogram door op “ ” of
“ ” te drukken. Het PC-positiemenu verschijnt
op het scherm:
Autopositie
Als u het beeld horizontaal of verticaal naar
een ongewenste positie verschuift, kunt u deze
functie gebruiken om het beeld opnieuw correct
te positioneren. Deze instelling optimaliseert het
scherm automatisch.
Selecteer het Autopositie item met de “
” of “ ”
toetsen. Druk op de OK of “ ”, “ ” toets.
In het bronmenu markeert u een bron door op de
” of “ ” toets te drukken en over te schakelen
“
naar die modus door op de “ ” toets te drukken.
Signaalbronopties zijn; TV , EXT-1 , EXT-2 , FAV ,
HDMI-1 , HDMI-2 , YPbPr of PC-VGA .
Opmerking : Van zodra u optionele toestellen met
uw TV aangesloten heeft, moet u de vereiste invoer
selecteren om de beelden van die bron te kunnen
bekijken.
Waarschuwing : Zorg ervoor dat de automatische
aanpassing wordt uitgevoerd met een volledig
scherm beeld om zo het beste resultaat te
verzekeren.
H (Horizontale) positie
Dit item verschuift het beeld horizontaal naar de
rechter of linkerzijde van het scherm.
Selecteer het H-positie item met de “
” of “
” toetsen. Druk de “ ” of “ ” toets in om de
waarde aan te passen.
Nederlands - 25 -
01_[NL]_SSM_MB35_37883W_1800UK_ANALOG_BRONZE2_10064230_50151923.indd 2501_[NL]_SSM_MB35_37883W_1800UK_ANALOG_BRONZE2_10064230_50151923.indd 25 29.07.2009 13:20:5329.07.2009 13:20:53
Page 27

V (Verticale) positie
Dit item verschuift het beeld verticaal naar de
boven of onderzijde van het scherm.
Selecteer het V-positie item met de “
toetsen. Druk de“ ” of “ ” toets in om de waarde
aan te passen.
Fase
Afhankelijk van de resolutie en de scanfrequentie
die u instelt op het TV toestel kan een onzuiver
beeld op het scherm verschijnen. In een dergelijk
geval kunt u dit item gebruiken om een zuiver
beeld te ontvangen via de proefondervindelijke
methode.
Selecteer het Fase item met de “
“ ” toetsen. Druk de “ ” of “ ” toets in om de
waarde aan te passen.
Pixelfrequentie
Pixelfrequentie aanpassingen corrigeren de
storingen die zich voordoen als verticale banden
in presentaties met een hoog aantal pixels zoals
rekenbladen, paragrafen of tekst in kleinere
lettertypen.
Selecteer het Pixelfrequentie item met de “
” of “ ” toetsen. Druk de “ ” of “ ” toets in om
de waarde aan te passen.
PC-beeldmenu
Ga als volgt te werk om PC-beelditems af te
stellen:
Druk de “
pictogram te selecteren. Het PC-beeldmenu
verschijnt op het scherm.
Contrast- , Helderheid - en
Kleurtemperatuurinstellingen in dit menu zijn
identiek aan de instellingen bepaald in het TVbeeldmenu in “Analoge TV-menusysteem”..
Opmerking : Als u Kleurtemperatuur instelt als
Gebruiker kunt u de R, G, B instellingen handmatig
instellen.
Geluidsmenu
De items in dit menu worden beschreven in
het gedeelte “Geluidmenu” uitgelegd in het
gedeelte “Menusysteem”.
Functiemenu
Functiemenu instellingen zijn identiek aan
de instellingen die uitgelegd zijn in de
“Functiemenu” sectie in de “Systeemmenu”
sectie.
” of “ ” toetsen om het tweede
” of “ ”
” of
Bronmenu
Bronmenu instellingen zijn identiek aan de
instellingen die uitgelegd zijn in de “Bronmenu”
sectie in de “Systeemmenu” sectie.
Mediabrowser menu
Mediabrowsermenu instellingen zijn identiek
aan de instellingen die uitgelegd zijn in
de “Mediabrowsermenu” sectie in de
“Systeemmenu” sectie .
TV-informatie weergeven
Programmanummer , Programmanaam ,
Geluidindicator en Zoommodus informatie
verschijnt in de rechter bovenhoek van het
scherm wanneer een nieuw programma
ingevoerd worden of de INFO toets ingedrukt
wordt.
Geluid dempen functie
Druk op de “ ” toets om het geluid uit te
schakelen. De geluid dempen indicator verschijnt
aan de bovenzijde van het scherm.
Om de geluid dempen functie te annuleren,
bestaan er twee alternatieven: u kunt op “
drukken of u kunt het volumeniveau verhogen.
”
Beeld-in-beeld (PIP) en Beelden-beeld (PAP) Modi
Druk de “ ” toets in om over te schakelen
naar de PIP modus.
In de PIP-modus verschijnt een klein
beeldscherm (PIP-beeld) op het hoofdscherm.
Het PIP venster heeft 1 maat en 4 verschillende
posities (linker bovenhoek, rechter bovenhoek,
onderin links en onderin rechts) beschikbaar.
Eenmaal in de PIP modus is het standaard
actieve venster het PIP-venster en het actieve
venster wordt aangegeven met een rood kader.
Het actieve venster kan gewijzigd worden
door op de “
statusinformatie OSD behoort tot het actieve
venster. De plaats van de status OSD’s zijn
identiek voor beide vensters.
Druk de “
te verlaten.
In de PAP modus worden twee afbeeldingen
van identieke grootte weergegeven op het
scherm. De beeldverhouding van de vensters
is vastgelegd.
” of “ ” toets te drukken. Het
” toets in om de PAP-modus
Nederlands - 26 -
01_[NL]_SSM_MB35_37883W_1800UK_ANALOG_BRONZE2_10064230_50151923.indd 2601_[NL]_SSM_MB35_37883W_1800UK_ANALOG_BRONZE2_10064230_50151923.indd 26 29.07.2009 13:20:5429.07.2009 13:20:54
Page 28
Wanneer u overschakelt op de P AP-modus wordt
het hoofdvenster in PIP-modus weergegeven
aan de rechterzijde van het scherm. Het actieve
venster kan gewijzigd worden door op de “
“
” toets te drukken.
Druk nogmaals de “ ” toets in om de PAPmodus te verlaten.
” of
Beeldmodus selectie
Door op de PRESETS toets te drukken,
kunt u de Beeldmodus instellingen wijzigen
in overeenstemming met uw kijkvereisten.
Beschikbare opties zijn: Dynamisch, Natuurlijk,
Bioscoop en Pixellence.
Opmerking: Deze functie is niet beschikbaar in
de PC-modus .
Beeld bevriezen
U kunt het beeld bevriezen op het scherm door
op “OK” te drukken op de afstandsbediening.
Druk op “OK” om het beeld te bevriezen. Druk
opnieuw om de bevriezen modus te verlaten.
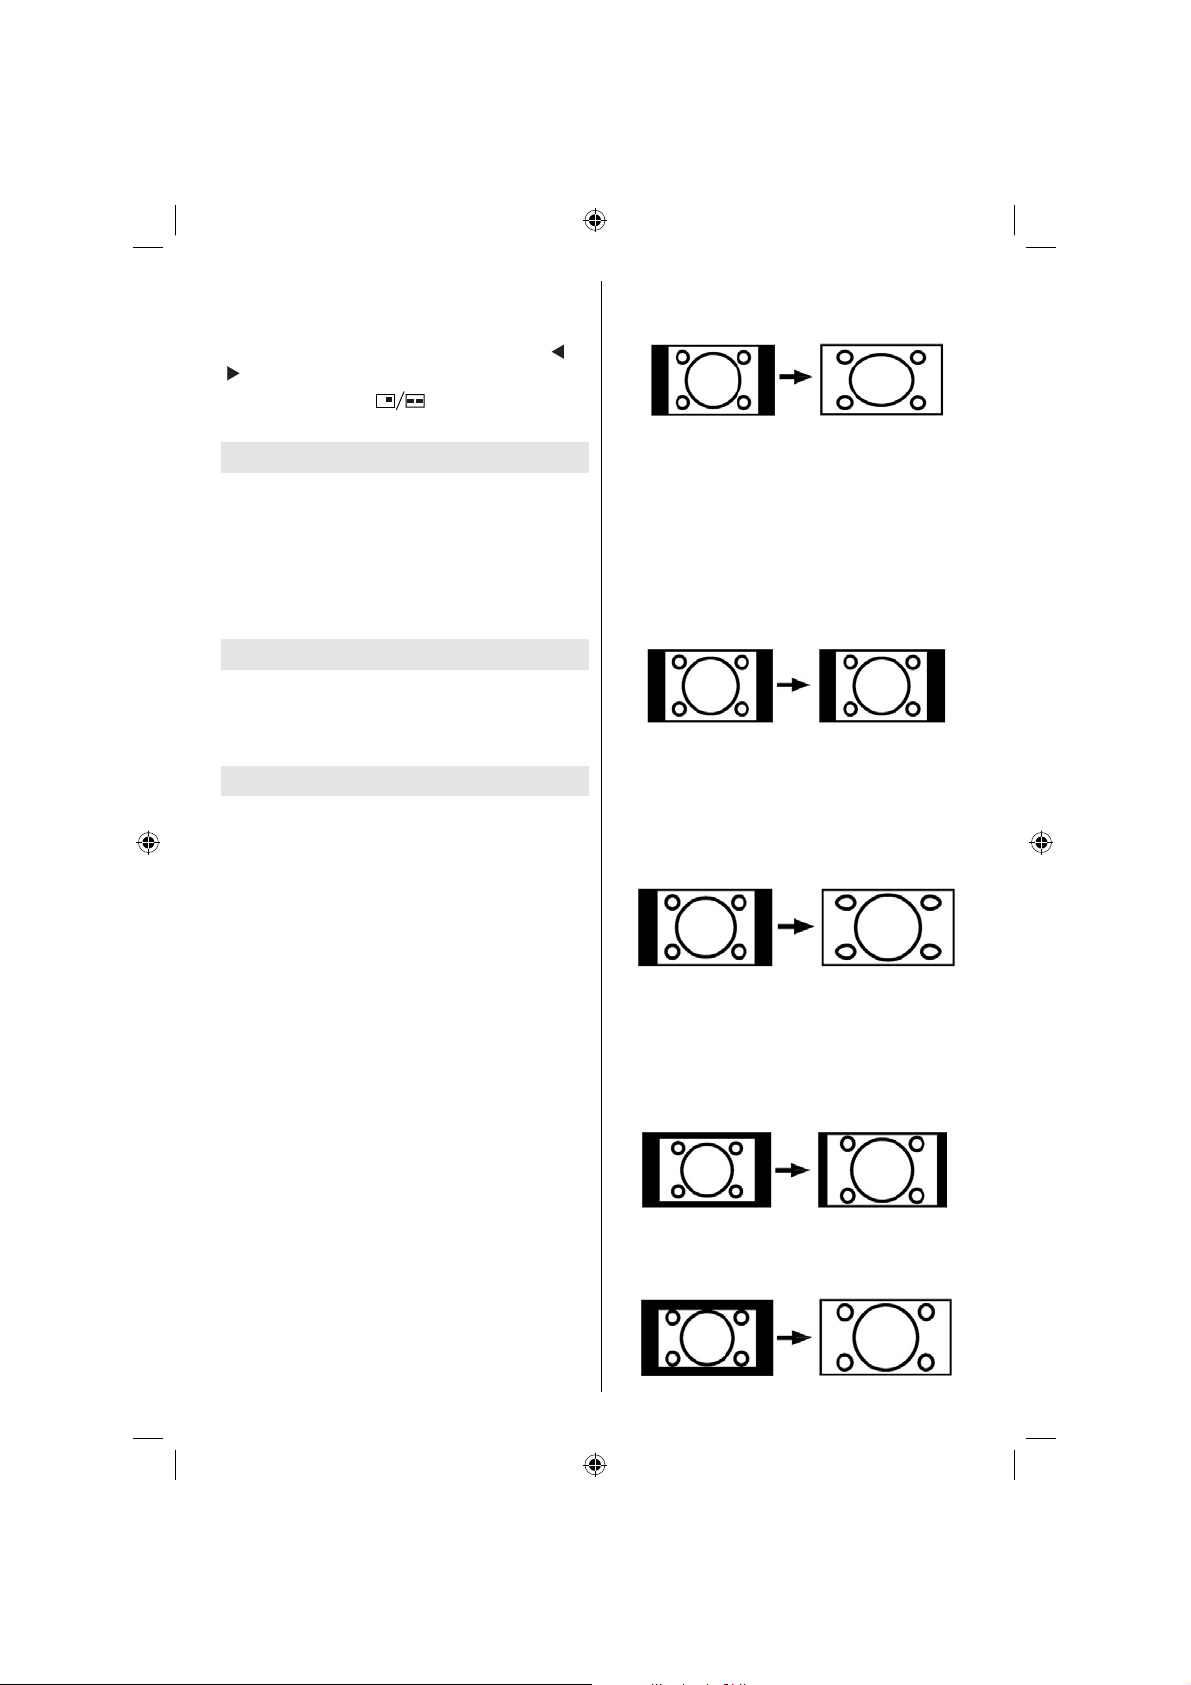
Zoommodi
U kunt de beeldverhouding (beeldgrootte) van
de TV wijzigen om het beeld in verschillende
zoommodi te bekijken.
Druk op de “SCREEN” toets om de zoommodus
rechtstreeks te wijzigen.
De beschikbare zoommodi worden onderaan
weergegeven.
Opmerking:
In de YPbPr en HDMI modi, terwijl in 720p-1080i
resoluties, is enkel de 16:9 modus beschikbaar.
In de PC-modus is uitsluitend de 16:9 modus
beschikbaar.
Auto
Als een WSS (Breedbeeld signaal) signaal, dat
de beeldverhouding van het beeld weergeeft,
omvat is in het uitzendsignaal of het signaal van
een extern apparaat, wijzigt de TV de ZOOM
modus automatisch volgens het WSS signaal.
• Als de AUTO modus niet correct werkt omwille
van een zwakke WSS signaalkwaliteit of als
u de ZOOM modus wilt wijzigen, wijzigt u
handmatig naar een andere ZOOM modus.
16:9
Hierdoor worden de rechter- en linkerzijden
van een normale afbeelding (4:3 breedte-
Nederlands - 27 -
lengteverhouding) gelijkmatig uitgestrekt om het
volledige brede televisiescherm te vullen.
• Voor 16:9 breedte-lengteverhouding
afbeeldingen die in een normale afbeelding
(4:3 beeldverhouding) zijn samengedrukt,
gebruikt u de 16:9 modus om de afbeelding te
herstellen naar de oorspronkelijke vorm.
4:3
Gebruik deze optie om een normale afbeelding
(4:3 beeldverhouding) weer te geven. Dit is de
oorspronkelijke grootte.
Panoramisch
Hierdoor worden de rechter- en linkerzijden van
een normale afbeelding (4:3 beeldverhouding)
gelijkmatig uitgerekt om het TV scherm te
vullen, zonder dat de afbeelding onnatuurlijk
overkomt.
De boven- en onderzijde van de afbeelding
worden lichtjes bijgesneden.
14:9
Hiermee zoomt u in op de brede afbeelding
(14:9 beeldverhouding) naar de bovenste en
onderste limieten van het scherm.
Bioscoop
Hiermee zoomt u in op de brede afbeelding (16:9
beeldverhouding) naar het volledige scherm.
01_[NL]_SSM_MB35_37883W_1800UK_ANALOG_BRONZE2_10064230_50151923.indd 2701_[NL]_SSM_MB35_37883W_1800UK_ANALOG_BRONZE2_10064230_50151923.indd 27 29.07.2009 13:20:5429.07.2009 13:20:54
Page 29
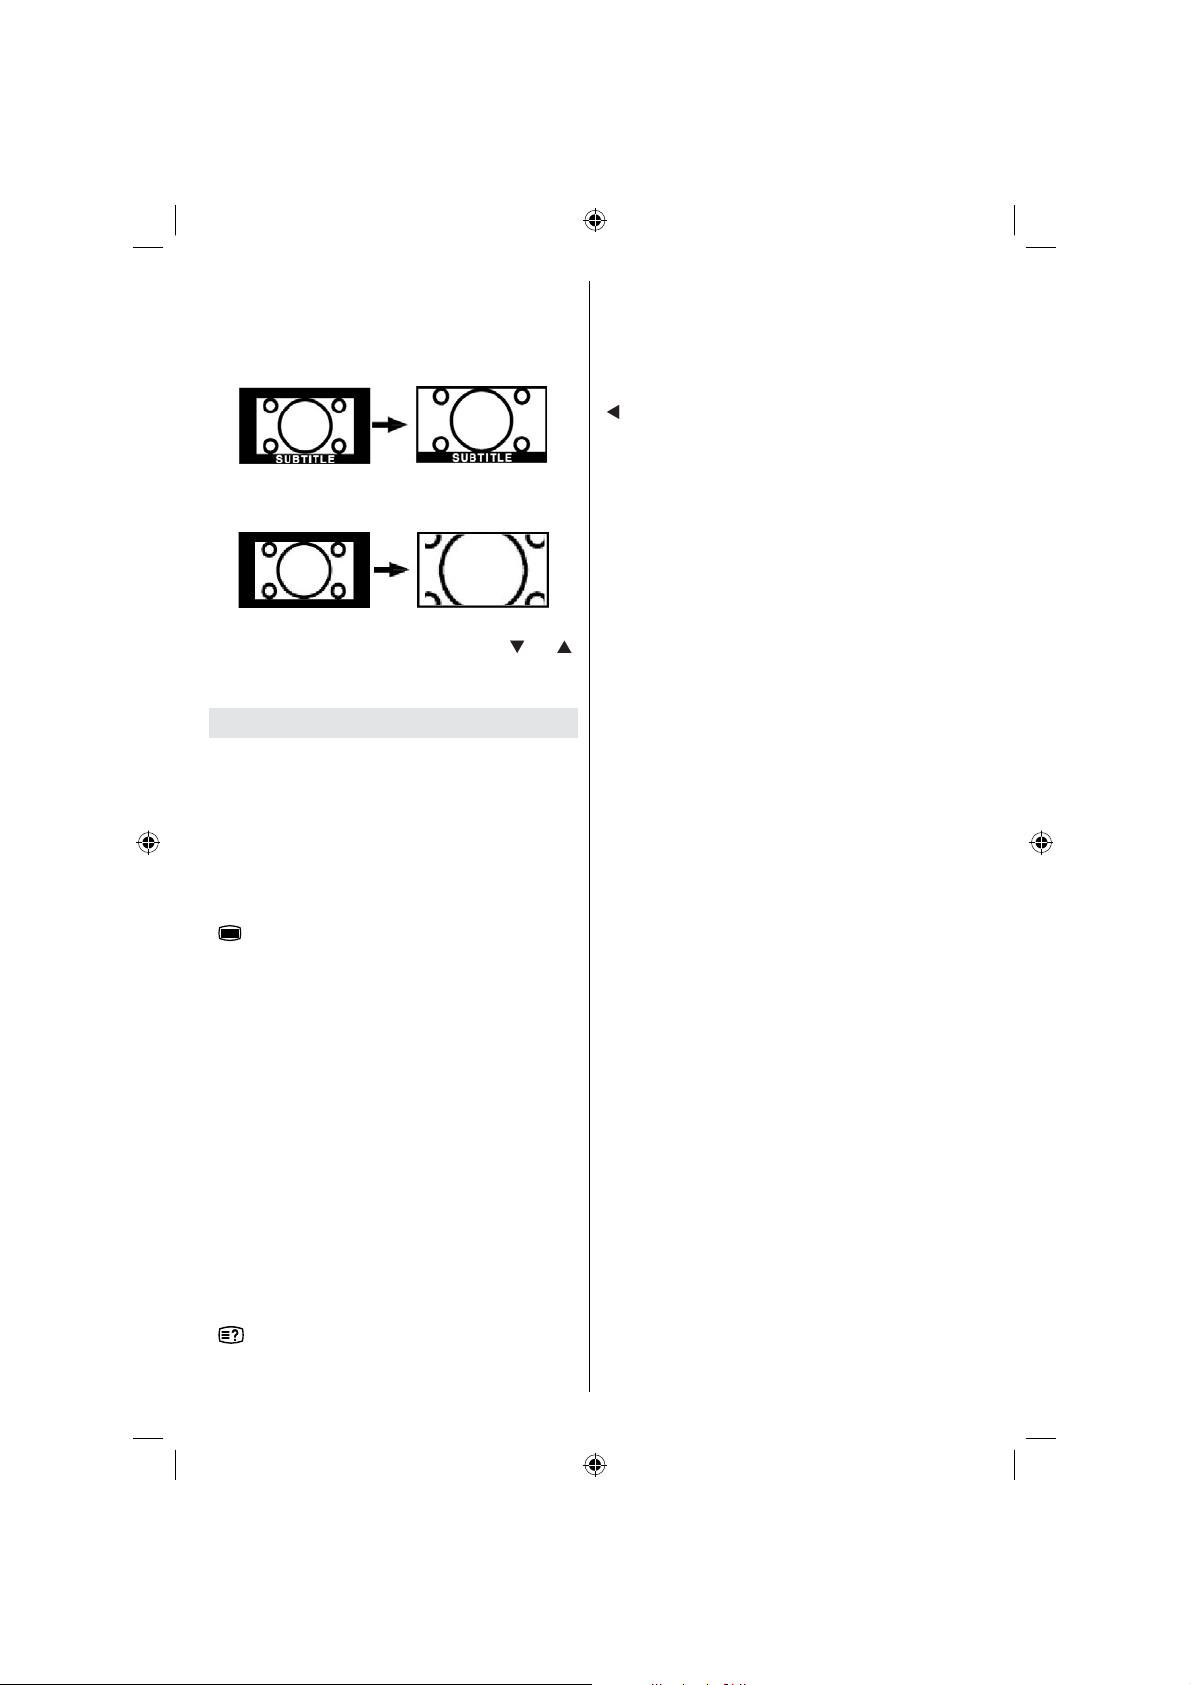
Ondertitel
Hiermee zoomt u in op de brede afbeelding
(16:9 beeldverhouding) met ondertiteling naar
het volledige scherm.
Zoom
Deze optie zoomt in op het beeld.
Opmerking: U kunt overschakelen tussen
scherm omhoog of omlaag met de “ ” / “ ”
toetsen terwijl de beeldzoom geselecteerd is als
panoramisch, 14:9, Cinema of Ondertiteling.
Teletekst
Het teletekstsysteem zendt informatie
zoals nieuws, sport en weer naar uw TV.
Merk op dat indien het signaal vermindert,
bijvoorbeeld bij slechte weeromstandigheden,
sommige tekstfouten kunnen voorkomen of de
teletekstmodus onderbroken wordt.
Teletekst functietoetsen worden hieronder
weergegeven:
” Teletekst / Mengen / PAT
“
Activeer de teletekstmodus indien een maal
ingedrukt. Druk opnieuw om het teletekstscherm
over het programma te plaatsen (mengen).
Door op deze toets te drukken zal het scherm
in twee vensters gedeeld worden, één venster
geeft teletekst weer, het andere het huidige
kanaal. Door opnieuw te drukken verlaat u de
teletekstmodus.
“RETURN” Inhoudsopgave
Selecteert de teletekst inhoudsopgave.
“SCREEN” Vergroten
Druk een maal in om de bovenste helft van het
scherm te vergroten. Druk opnieuw in om de
onderste helft van de pagina te vergroten. Druk
opnieuw om terug te keren naar de normale
weergave.
” Openbaren
“
Geeft verborgen informatie weer (Bijv.
oplossingen van spelletjes).
“OK” Houden
Houdt een teletekst pagina wanneer gepast.
Druk opnieuw om te hervatten.
” Subcode pagina’s
“
Selecteert subcode pagina’s, indien beschikbaar ,
wanneer teletekst geactiveerd wordt.
P+ / P- en cijfers (0-9)
Druk om een pagina te selecteren.
Opmerking : De meeste TV-stations gebruiken code
100 voor hun indexpagina.
Gekleurde toetsen
(ROOD/ GROEN/ GEEL/ BLAUW)
Uw TV ondersteunt zowel FASTEXT en
TOP text systemen. Als deze systemen
beschikbaar zijn, worden de pagina’s in groepen
of onderwerpen verdeeld.
Als het FASTEXT-systeem beschikbaar
is, worden delen in een teletekstpagina
kleurgecodeerd en kunnen, door op de gekleurde
toetsen te drukken, geselecteerd worden. Druk
op de gewenste gekleurde toets.
Het gekleurde schrift verschijnt en toont u welke
gekleurde toetsen te gebruiken wanneer TOP
text uitzending beschikbaar is. Door op P- of
P+ te drukken gaat u respectievelijk naar de
volgende of vorige pagina .
Nederlands - 28 -
01_[NL]_SSM_MB35_37883W_1800UK_ANALOG_BRONZE2_10064230_50151923.indd 2801_[NL]_SSM_MB35_37883W_1800UK_ANALOG_BRONZE2_10064230_50151923.indd 28 29.07.2009 13:20:5529.07.2009 13:20:55
Page 30

Tips
Zorg voor het scherm
Reinig het scherm met een licht vochtige, zachte
doek. Gebruik geen schuurmiddelen want deze
kunnen de beschermlaag van het TV-scherm
beschadigen.
Uit veiligheidsoverwegingen raden we aan
de stekker uit het stopcontact te verwijderen
wanneer u het toestel schoonmaakt. Houd de
TV stevig vast aan de onderkant wanneer u het
toestel verplaatst.
Beeldnawerking
Spookbeelden kunnen voorkomen tijden de
weergave van een doorlopend beeld. Bij LCDtelevisies kan de beeldnawerking na een korte
tijd verdwijnen. Probeer de TV een poosje uit
te schakelen.
Om dit te vermijden, laat geen stilstaand beeld
langdurig op het scherm staan.
Geen stroom
Als uw TV -systeem geen stroom heeft, controleer
dan de voedingskabel en verbindingen naar het
stopcontact.
Zwakke beeldkwaliteit
Hebt u het verkeerde TV -systeem geselecteerd?
Is uw TV-toestel of antenne te dicht bij nietgeaarde geluidsapparatuur of neon lichten,
etc. geplaatst?
Hoge gebouwen en bergen kunnen dubbele
beelden of spookbeelden veroorzaken. Soms
kunt u de beeldkwaliteit verbeteren door de
oriëntering van de antenne te wijzigen.
Is het beeld of teletekst onherkenbaar?
Controleer of u de correcte frequentie hebt
ingevoerd. Stel de kanalen opnieuw af.
De beeldkwaliteit kan verminderen wanneer
twee randapparaten gelijktijdig aangesloten
zijn op de tv . In dat geval kunt u één van beide
loskoppelen.
Geen beeld
Is de antenne correct aangesloten? Zijn de
stekkers stevig aangesloten op de antenne
aansluiting? Is de antennekabel beschadigd?
Werden de correcte stekkers gebruikt voor de
aansluiting van de antenne? Indien u twijfelt,
neemt u contact op met de verdeler.
Geen beeld betekent dat uw TV geen uitzending
ontvangt. Hebt u de juiste knoppen van de
afstandsbediening geselecteerd? Probeer het
opnieuw.
Zorg er ook voor dat de correcte invoerbron
geslecteerd werd.
Geluid
U hoort geen geluid. Is het mogelijk dat u het
geluid hebt onderbroken door op de toets
te drukken?
Het geluid komt slechts uit één van de
luidsprekers. Is de balans ingesteld op één
uiteinde? Raadpleeg het Geluidsmenu
Afstandsbediening
Uw TV reageert niet meer op de
afstandsbediening. Misschien zijn de batterijen
leeg. In dat geval kunt u de lokale toetsen nog
gebruiken aan de onderzijde van de TV.
Invoerbronnen
Indien u geen invoerbronnen kunt selecteren,
is het mogelijk dat het toestel niet is
aangesloten.
Controleer de AV-kabels en verbindingen als u
geprobeerd hebt een toestel aan te sluiten.
Nederlands - 29 -
01_[NL]_SSM_MB35_37883W_1800UK_ANALOG_BRONZE2_10064230_50151923.indd 2901_[NL]_SSM_MB35_37883W_1800UK_ANALOG_BRONZE2_10064230_50151923.indd 29 29.07.2009 13:20:5529.07.2009 13:20:55
Page 31

Bijlage A: PC-invoer normale weergavemodi
Het scherm heeft een maximum resolutie van 1920 x 1200. De onderstaande tabel is een toelichting
van een aantal typische video schermmodi.
Het is mogelijk dat uw TV verschillende resoluties niet ondersteunt. Ondersteunde resolutiemodi
worden hieronder weergegeven.
Indien u uw PC overschakelt op een niet-ondersteunde modus verschijnt een waarschuwing
OSD op het scherm.
Opmerking: Resolutiemodi die met (*) worden aangeduid, zijn niet beschikbaar voor de PIP/PAP modi.
Index
Resolutie Frequentie
Hor. Ver. Ver.(Hz)
1 640 350 85 37.9 VESA
2 640 400 85 37.9 VESA
3 640 400 70 31.5 IBM VGA
4 640 480 60 31.5 VESA
5 640 480 66 35.0 MAC
6 640 480 72 37.9 VESA
7 640 480 75 37.5 VESA
8 640 480 85 43.3 VESA
9 800 600 56 35.2 VESA
10 800 600 60 37.9 VESA
11 800 600 70 43.8
12 800 600 72 48.1 VESA
13 800 600 75 46.9 VESA
14 800 600 85 53.7 VESA
15 832 624 75 49.7 MAC
16 1024 768 43 35.5
17 1024 768 60 48.4 VESA
18* 1024 768 70 56.5 VESA
19* 1024 768 72 57.7
20* 1024 768 75 60.0
21* 1024 768 85 68.3
22 1152 864 60 53.8
23* 1152 864 70 64.2 VESA
24* 1152 864 75 67.5 VESA
25* 1152 864 85 77.1 VESA
26* 1152 870 75 68.9 MAC
27 1280 768 60 47.7 VESA
28 1360 768 60 47.7
29* 1280 768 75 60.2 VESA
30 1280 960 60 60.0 VESA
31* 1280 960 75 75.0 VESA
32* 1280 960 85 85.9 VESA
33 1280 1024 60 64.0 VESA
34* 1280 1024 75 80.0 VESA
35* 1280 1024 85 91.1 VESA
36 1400 1050 60 65.3
37* 1400 1050 75 82.3
38 1440 900 60 55.9
39* 1440 900 75 70.6
40* 1600 1200 60 75.0 VESA
41 1680 1050 60 65.3
42* 1920 1200 60 74.5
Hor
(kHz)
Standaard
VESA
(interlace)
Nederlands - 30 -
01_[NL]_SSM_MB35_37883W_1800UK_ANALOG_BRONZE2_10064230_50151923.indd 3001_[NL]_SSM_MB35_37883W_1800UK_ANALOG_BRONZE2_10064230_50151923.indd 30 29.07.2009 13:20:5529.07.2009 13:20:55
Page 32

Bijlage B: Ondersteunde DVI-resoluties
Als u apparaten wilt aansluiten op de connectoren van uw televisie met DVI-convertorkabels (niet
geleverd) kunt u de onderstaande resolutie-informatie raadplegen.
24Hz 25Hz 30Hz 50Hz 60Hz
480i
480p
576i
576p
720p
1080i
1080p
;;;; ;
;
;
;;
;;
;
;
Nederlands - 31 -
01_[NL]_SSM_MB35_37883W_1800UK_ANALOG_BRONZE2_10064230_50151923.indd 3101_[NL]_SSM_MB35_37883W_1800UK_ANALOG_BRONZE2_10064230_50151923.indd 31 29.07.2009 13:20:5529.07.2009 13:20:55
Page 33

Bijlage C: AV en HDMI-signaalcompatibiliteit (Ingang
signaaltypes)
Bron Ondersteunde signalen Beschikbaar
PAL 50/60 O
EXT-1
(SCART 1)
EXT-2
(SCART-2)
FAV
YPbPr
HDMI1
HDMI2
(X: Niet beschikbaar, O: Beschikbaar)
Opmerking : In bepaalde gevallen kan een signaal op de LCD-TV incorrect worden weergegeven.
Het probleem kan een onverenigbaarheid zijn met de standaarden van het brontoestel (DVD, settop-box, etc...) Indien een dergelijk probleem zich voordoet, neemt u contact op met uw verdeler
en de fabrikant van het bronmateriaal.
NTSC 60 O
RGB 50 O
RGB 60 O
PAL 50/60 O
NTSC 60 O
RGB 50 X
RGB 60 X
S-VHS 50 O
S-VHS 60 O
PAL 50/60 O
NTSC 60 O
480I 60Hz O
480P 60Hz O
576I 50Hz O
576P 50Hz O
720P 50Hz O
720P 60Hz O
1080I 50Hz O
1080I 60Hz O
1080P 50Hz O
1080P 60Hz O
480I 60Hz O
480P 60Hz O
576I 50Hz O
576P 50Hz O
720P 50Hz O
720P 60Hz O
1080I 50Hz O
1080I 60Hz O
1080P 50Hz O
1080P 60Hz O
1080P 24 HZ O
Nederlands - 32 -
01_[NL]_SSM_MB35_37883W_1800UK_ANALOG_BRONZE2_10064230_50151923.indd 3201_[NL]_SSM_MB35_37883W_1800UK_ANALOG_BRONZE2_10064230_50151923.indd 32 29.07.2009 13:20:5529.07.2009 13:20:55
Page 34

Bijlage D: Pin-specifi caties
SCART aansluitpin specifi caties
Pin Invoersignaal Pin Invoersignaal
1 AUDIO UIT (RECHTS) 12
2 GELUID IN (RECHTS) 13
3 GELUID UIT (LINKS/MONO) 14
4 GELUID GND 15
5 RGB-B GND 16
6 GELUID IN (LINKS/MONO) 17
7 RGB-B IN 18
AUDIO / RGB SCHAKELAAR
8
/ 16:9
19
9 RGB-G GND 20
10 Ongebruikt 21
11
RGB-G IN
HDMI aansluitpin specifi caties
Pin Invoersignaal Pin
1 TMDS Data2+ 11 TMDS Klok schild
2
TMDS Data2 Shield 12 TMDS Klok-
3
TMDS Data 2- 13 CEC
4
TMDS Data 1+ 14
5
TMDS Data1 Shield 15 SCL
6
TMDS Data1- 16 SDA
7
TMDS Data0+ 17 DDC/CED aarding
8
TMDS Data0 Shield 18 +5V stroom
9
TMDS Data0- 19 Hot-plug detectie
10
TMDS Klok+
Voorbehouden (numerieke controle
Invoersignaal
Signaalinvoer
PC RGB-terminal (D-sub 15-pin aansluiting)
Pin Invoersignaal
1
2
3
4
5
6
7
8
9
10
11
12
13
H.sync of H/V samengestelde sync
14
15
R
G of sync op groen
B
Geen verbinding
Geen verbinding
R.GND
G.GND
B.GND
Geen verbinding
GND
Geen verbinding
[SDA]
V.sync. [V.CLK]
[SCL]
Ongebruikt
RGB-R GND
GND
RGB-R / S.VHS CHROMINANTIE IN
BLANCO SIGNAAL
SAMENGESTELDE VIDEO GND
BLANCO SIGNAAL GND
SAMENGESTELDE VIDEO UIT
SAMENGESTELDE VIDEO / S.VHS
HELDERHEID IN
GND / SCHILD (CHASSIS)
op toestel)
Nederlands - 33 -
01_[NL]_SSM_MB35_37883W_1800UK_ANALOG_BRONZE2_10064230_50151923.indd 3301_[NL]_SSM_MB35_37883W_1800UK_ANALOG_BRONZE2_10064230_50151923.indd 33 29.07.2009 13:20:5529.07.2009 13:20:55
Page 35
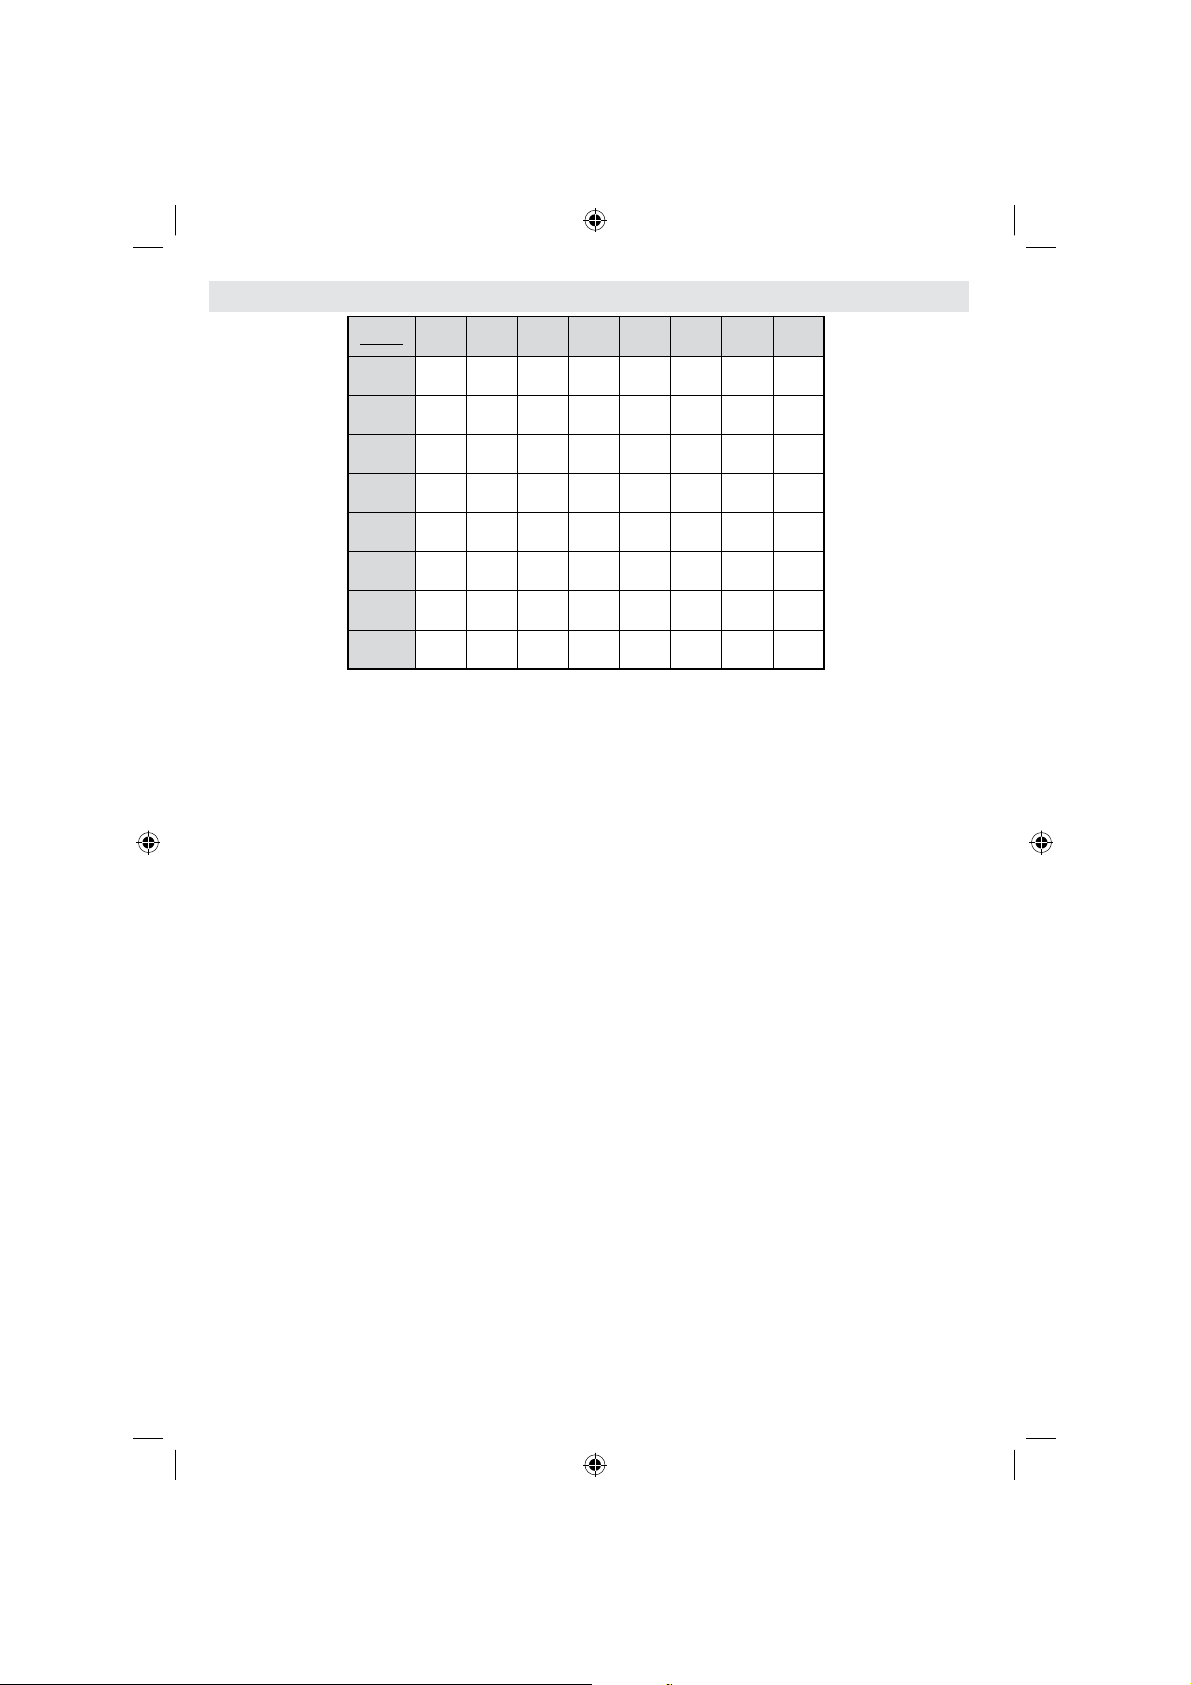
Bijlage E: PIP/PAP-modus combinaties
HOOFD
TV
Scart1
Scart2
FAV
HDMI1
TV Scart1 Scart2 FAV HDMI1 HDMI2 YPbPr
9
8
9
(RGB)
8
8
(RGB)
(RGB)
(RGB)
8 89999
9
8
(RGB) 9 (RGB)
9
8 89999
9
8 89999
9999
99998 899
PC-
VGA
HDMI2
YPbPr
PC-VGA
99998 899
99999989
99999998
( RGB ): Dit geeft aan dat selectie enkel mogelijk is als Scart-1 een RGB-signaal heeft.
Beperkingen : Scart-1 bron moet een RGB-signaal heben om PIP\PAP uit te voeren met bronnen
TV, Scart-2, FAV.
Als deze bronnen ingesteld zijn op hoofdvenster en Scart-1 heeft geen RGB-signaal kan de Pip/
Pap-bron niet overgeschakeld worden naar de Scart-1 bron.
Als scart-1 ingesteld is op hoofdvenster en scart-1 heeft geen RGB-signaal kan de Pip/Pap-bron
niet overgeschakeld worden naar de TV, Scart-2 en FAV bronnen.
Nederlands - 34 -
01_[NL]_SSM_MB35_37883W_1800UK_ANALOG_BRONZE2_10064230_50151923.indd 3401_[NL]_SSM_MB35_37883W_1800UK_ANALOG_BRONZE2_10064230_50151923.indd 34 29.07.2009 13:20:5529.07.2009 13:20:55
Page 36

Technische kenmerken
TV-UITZENDING
PAL/SECAM B/G D/K K’ I/I’ L/L’
KANELEN ONTVANGEN
VHF (BAND I/III)
UHF (BAND U)
HYPERBAND
AANTAL VOORINGESTELDE KANALEN
200
KANAALINDICATOR
Menu Weergave op het scherm
RF ANTENNE INGANG
75 Ohm (niet gebalanceerd)
OPERATIONEEL VOLTAGE
220-240V Wisselstroom, 50 Hz.
AUDIO
Duits + Nicam Stereo
GELUIDsUITGANG STROOM (W
2 x 8
STROOMVERBRUIK (W)
190 W (max)
< 1 W (Stand-by)
PANEEL
16:9 beeld, 37” schermgrootte
AFMETINGEN (mm)
BxLxH (met voet): 246 x 905 x 627
Gewicht (Kg): 14,4
BxLxH (zonder voet): 100 x 905 x590
Gewicht (Kg): 13,6
) (10% THD)
RMS.
Nederlands - 35 -
01_[NL]_SSM_MB35_37883W_1800UK_ANALOG_BRONZE2_10064230_50151923.indd 3501_[NL]_SSM_MB35_37883W_1800UK_ANALOG_BRONZE2_10064230_50151923.indd 35 29.07.2009 13:20:5529.07.2009 13:20:55
Page 37

Table des matières
Caractéristiques.................................................... 38
Accessoires .......................................................... 38
Introduction ........................................................... 39
Préparation ........................................................... 39
Précautions de sécurité ........................................ 39
Source d’alimentation ....................................... 39
Cordon d’alimentation ....................................... 39
Moisissure et eau..............................................39
Nettoyage ......................................................... 39
Ventilation .........................................................39
Chaleur et fl ammes........................................... 39
Éclair ................................................................. 40
Pièces de rechange .......................................... 40
Travaux d’entretien ........................................... 40
Mise au rebut .................................................... 40
Informations applicables aux utilisateurs des
pays de l’Union Européenne ............................40
Débranchement de l’appareil ............................ 40
Volume du casque ............................................ 40
Installation.........................................................40
Écran LCD ........................................................ 40
Attention............................................................40
Aperçu de la télécommande ................................. 41
Téléviseur LCD et boutons de commande ........... 42
Affi chage des branchements – connecteurs
arrières ................................................................. 43
Affi chage des branchements - Connecteurs
latéraux ................................................................. 45
Alimentation électrique ......................................... 46
Branchement de l’antenne....................................46
Connexion du téléviseur LCD à un PC ................. 47
Branchement à un lecteur de DVD ....................... 48
Utilisation des connecteurs AV latéraux ............... 49
Utilisation d’autres connecteurs............................ 50
Branchement d’un autre appareil via Péritel.........51
Insérer les piles dans la télécommande ............... 52
Rayon d’action de la télécommande ....................52
Mise en marche et arrêt du téléviseur LCD .......... 52
Pour allumer le téléviseur ................................. 52
Pour éteindre le téléviseur ................................ 52
Première installation ............................................ 53
Sélection d’entrée ................................................. 53
Opérations de Base .............................................. 53
Fonctionnement du téléviseur à l’aide de ses
boutons ............................................................. 53
Réglage du volume ....................................... 53
Sélection du programme ............................... 53
Affi chage du menu précédent ....................... 53
Mode AV ........................................................53
Fonctionnement du téléviseur à l’aide de la
télécommande .................................................. 53
Réglage du volume ....................................... 54
Sélection de programme (Programme
précédent ou suivant) ...................................54
Sélection de programme (Accès direct) ........ 54
Navigation dans le système de menu...................54
Système de menu ................................................ 55
Menu Image ...................................................... 55
Mode ............................................................. 55
Luminosité/Contraste/Couleur/Défi nition/
T einte ............................................................55
Température de Couleur ...............................55
Réduction de bruit ......................................... 55
Mode Film ..................................................... 55
Mode Jeux (en option) .................................. 55
Zoom image .................................................. 55
Réinitialisation ............................................... 55
Mémoriser ..................................................... 56
Menu Son .........................................................56
Volume ..........................................................56
Égaliseur ....................................................... 56
Balance ......................................................... 56
Casque ......................................................... 56
Volume....................................................56
Son du casque (Optionnel) .....................56
Mode Son (en option) ...................................56
AVL ............................................................... 57
Sortie SPDIF ................................................. 57
Mémoriser ..................................................... 57
Menu Spécifi cations.......................................... 57
Pip-Pap ......................................................... 57
Pip-Pap ...................................................57
Taille PIP .................................................57
Position PIP ............................................57
Source ....................................................58
Programme .............................................58
Echange .................................................58
Minuterie Sommeil ........................................ 58
Verrouillage enfants ...................................... 58
Langue .......................................................... 58
Zoom par défaut ...........................................58
Fond bleu ...................................................... 58
Fond du menu ............................................... 58
Lumière de fond ............................................ 58
Temps d’effacement OSD ............................. 58
Langue du télétexte ......................................58
Mode Plein PC HDMI (optionnelle) ............... 59
Mode plein écran (optionnelle) .....................59
Menu Installation...............................................59
Programme ................................................... 59
Bande ........................................................... 59
Chaîne .......................................................... 59
Système de Couleur .....................................59
Système sonore ............................................ 59
Réglage fi n .................................................... 59
Recherche .................................................... 59
Mémoriser ..................................................... 59
Menu Installation dans les modes AV ...........59
Système de Couleur ...............................60
Mémoriser ..................................................... 60
Français - 36 -
02_[FR]_SSM_MB35_37883W_1800UK_ANALOG_BRONZE2_10064230_50151923.indd 3602_[FR]_SSM_MB35_37883W_1800UK_ANALOG_BRONZE2_10064230_50151923.indd 36 29.07.2009 13:23:1729.07.2009 13:23:17
Page 38

Tableau des programmes ............................. 60
Nom ........................................................60
Déplacer ................................................60
Supprimer ...............................................60
APS (Système Automatique de
Programmation) .....................................60
Pays......................................................61
Menu Source ....................................................61
Système de menu du mode PC............................ 61
Menu de position PC ........................................61
Position automatique ....................................61
Position H (Horizontale) ................................ 61
Position V (Verticale) ....................................62
Phase ............................................................ 62
Fréquence pilote ........................................... 62
Menu Image PC ............................................ 62
Menu Son .....................................................62
Menu Spécifi cations ...................................... 62
Menu Source ................................................62
Menu Navigateur média ................................ 62
Affi chage des informations TV .............................. 62
Fonction Muet ....................................................... 62
Mode PIP (Picture-in-Picture ) et PAP
(Picture-and-Picture) ...........................................62
Sélection du mode Image ..................................... 63
Gel d’images......................................................... 63
Modes Zoom......................................................... 63
Auto .................................................................. 63
16:9 ................................................................... 63
4:3 ..................................................................... 63
Panoramique .................................................... 63
14:9 ................................................................... 63
Cinéma ............................................................. 63
Sous-titre .......................................................... 64
Zoom.................................................................64
Télétexte ............................................................... 64
Astuces ................................................................. 65
Entretien de l’écran ........................................... 65
Persistance de l’image......................................65
Pas d’alimentation ............................................65
Image faible ...................................................... 65
Aucune image ................................................... 65
Son ................................................................... 65
Télécommande ................................................. 65
Sources d’entrée...............................................65
Annexe A: Modes d’affi chage typique de l’entrée
PC......................................................................... 66
Annexe B: Compatibilité du signal AV et HDMI
(types de signal d’entrée) ..................................... 67
Appendice C : Résolutions prises en charge........68
Appendice D: Spécifi cations des broches ............ 69
Spécifi cations des broches de la prise péritel ..69
Spécifi cations des broches de la prise HDMI ... 69
Entrée du signal ................................................ 69
Terminal PC RGB (Mini-prise D-sub 15 broc-
hes) ............................................................... 69
Annexe E: Combinaisons Mode PIP/PAP ............70
Spécifi cations ....................................................... 71
Français - 37 -
02_[FR]_SSM_MB35_37883W_1800UK_ANALOG_BRONZE2_10064230_50151923.indd 3702_[FR]_SSM_MB35_37883W_1800UK_ANALOG_BRONZE2_10064230_50151923.indd 37 29.07.2009 13:23:1829.07.2009 13:23:18
Page 39

Caractéristiques
• Téléviseur couleur LCD avec télécommande.
• Deux connecteurs HDMI pour la vidéo
et l’audio numérique. Cette connexion a
également été conçue pour accepter des
signaux haute défi nition.
• 200 programmes VHF, UHF.
• Système du menu OSD.
• Deux prises péritels (pour périphériques
externes tels vidéo, jeux vidéo, appareils
audio, etc. ).
• Système sonore stéréo. (German+Nicam)
• Télétexte, Fastext, TOP text.
• Branchement du casque.
• Système de programming automatique.
• Réglage manuel vers l’avant ou vers l’arrière.
• Minuterie Sommeil.
• Verrouillage enfants.
• Le son est automatiquement coupé lorsque il
n’y a aucune transmission.
• Lecture NTSC.
• Fonctions PIP / PAP / PAT.
• AVL (Limitation automatique de volume).
• Lorsqu’aucun signal valide n’est détecté, le
téléviseur passe automatiquement au mode
veille après 5 minutes.
• PLL (Recherche de fréquence).
• Entrée PC.
• Plug&Play pour Windows 98, ME, 2000, XP,
Vista.
• Sorties de lignes audio.
• Mode Jeux (en option).
Accessoires
MENU
M
ABC
1
JKL
4
STU
7
PRESETS
SWAP
SCREEN
Télécommande
2 batteries
OK
SELECT
MNO
VWX
P+
-
P-
DTV
TV
LANG
X AAA
DEF GHI
2
5
8
0
RETURN
+
FAV
SUBTITLE
EPG
INFO /
3
PQR
6
9
SOURCE
SLEEP
YZ
/
Manuel d’utilisation
Français - 38 -
02_[FR]_SSM_MB35_37883W_1800UK_ANALOG_BRONZE2_10064230_50151923.indd 3802_[FR]_SSM_MB35_37883W_1800UK_ANALOG_BRONZE2_10064230_50151923.indd 38 29.07.2009 13:23:1829.07.2009 13:23:18
Page 40
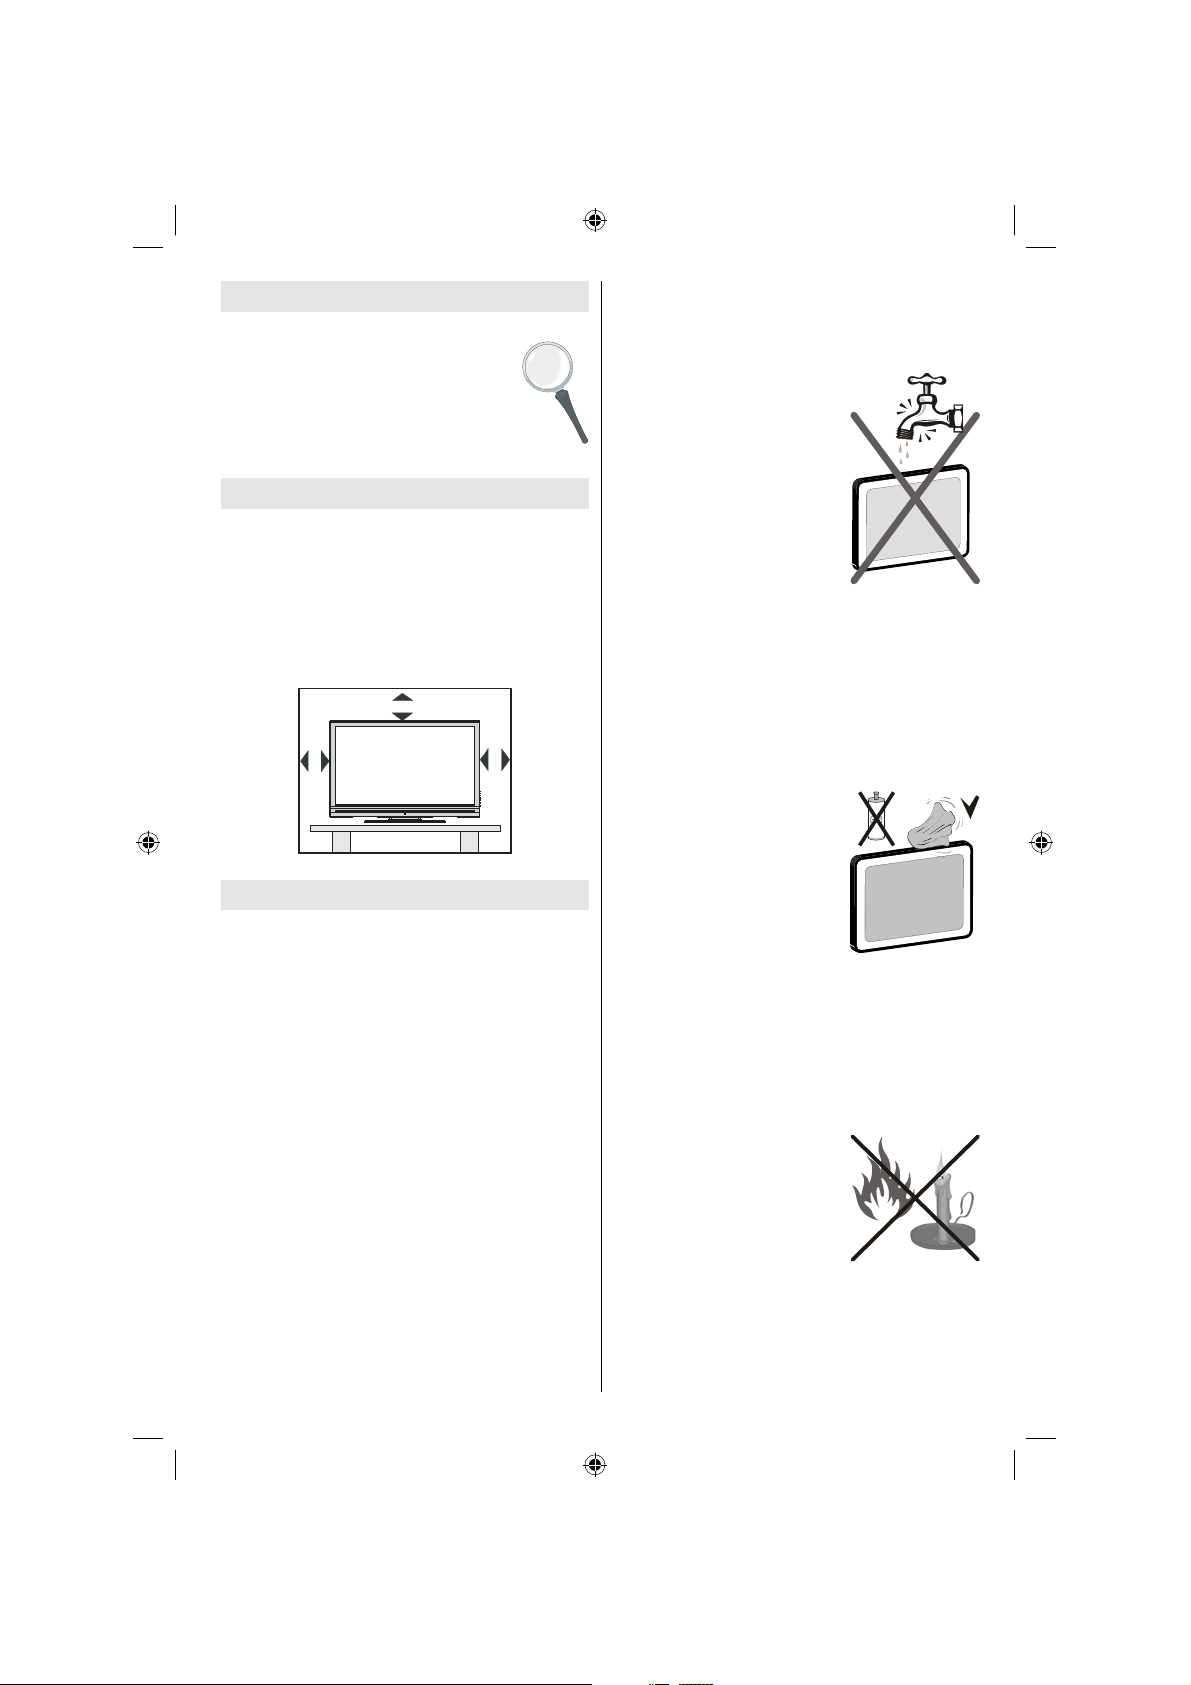
Introduction
Merci d’avoir choisi ce produit. Ce manuel vous
aidera à faire fonctionner correctement
votre téléviseur. Lisez attentivement
ce manuel avant de faire fonctionner
le téléviseur.
Gardez ce manuel dans un endroit
sûr pour des références futures.
Préparation
Pour une bonne ventilation, laissez un espace
d’au moins autour de l’appareil. Pour éviter
tout problème et des situations inconfortables,
veuillez ne poser aucun objet au-dessus de
l’appareil.
Utilisez cet appareil dans des climats
modérés.
10 cm
10 cm
10 cm
Précautions de sécurité
Lisez attentivement les recommandations
de sécurité suivantes pour votre propre
sécurité.
Source d’alimentation
Ce téléviseur ne doit être raccordé qu’à une
prise de 220-240 V AC, 50 Hz . Assurez-vous que
vous avez sélectionné la tension correcte.
Cordon d’alimentation
Ne placez pas l’appareil, ni un meuble, etc. sur
le cordon d’alimentation (câble d’alimentation) et
évitez qu’il se retrouve coincé. Tenez le cordon
d’alimentation par la fi che. Ne débranchez pas
l’appareil en tirant sur le cordon d’alimentation
et ne touchez jamais à ce cordon d’alimentation
avec vos mains si celles-ci sont mouillées, car
cela pourrait causer un court-circuit ou une
électrocution. Ne nouez jamais le cordon et ne
l’attachez pas à d’autres cordons. Les cordons
d’alimentation doivent être placés de façon à
ce qu’on ne risque pas de marcher dessus.
Un cordon de raccordement endommagé peut
Français - 39 -
être la cause d’un incendie ou d’une commotion
électrique. Quand il est endommagé et doit
être remplacé, ceci doit être effectué par un
technicien qualifi é.
Moisissure et eau
N’utilisez pas ce matériel
dans un endroit humide et
mouillé (évitez les salles de
bains, l’évier de la cuisine, et
la proximité d’une machine
à laver). N’exposez pas cet
appareil à la pluie ou à l’eau,
ce qui présenterait un danger,
et ne placez aucun objet
rempli d’eau, comme un vase
par exemple, au-dessus de l’appareil. Évitez
d’exposer votre appareil aux écoulement et
projection d’eau.
Si un objet solide ou liquide tombe sur
l’appareil, débranchez celui-ci et contactez
une personne qualifi ée pour le vérifi er avant
son branchement.
Nettoyage
Avant de nettoyer , débranchez
le téléviseur de la prise murale.
N’utilisez pas de liquides ou
d’aérosols de nettoyage.
Utilisez un chiffon doux et sec.
Ventilation
Les fentes et les ouvertures du téléviseur ont
été conçues pour la ventilation et assurent un
fonctionnement en toute sécurité. Pour éviter la
surchauffe, ces ouvertures ne doivent pas être
bloquées ni couvertes de quelle que manière
que ce soit.
Chaleur et fl ammes
L’appareil ne doit pas être
placé à côté des flammes
nues ou des sources de
chaleur, comme un radiateur .
Assurez-vous qu’il n’y ait pas
de fl ammes nues, comme des
bougies allumées, posées
sur le téléviseur. Les piles ne doivent pas être
exposées à une chaleur excessive telle que
celle du soleil, du feu ou toute autre chaleur de
même nature.
02_[FR]_SSM_MB35_37883W_1800UK_ANALOG_BRONZE2_10064230_50151923.indd 3902_[FR]_SSM_MB35_37883W_1800UK_ANALOG_BRONZE2_10064230_50151923.indd 39 29.07.2009 13:23:1929.07.2009 13:23:19
Page 41

Éclair
En cas d’orage et d’éclair
ou lorsque vous allez en
vacances, débranchez le
cordon d’alimentation de la
prise murale.
Pièces de rechange
Lorsque des pièces doivent être changées,
assurez-vous que le technicien a utilisé les
pièces de rechange spécifi ées par le fabricant
ou des pièces qui ont les mêmes spécifi cations
que les pièces d’origine. Des changements non
autorisés peuvent entraîner un incendie, une
électrocution ou d’autres dangers.
Travaux d’entretien
Veuillez confier tous les
travaux d’entretien à un
personnel qualifi é. Ne retirez
aucun couvercle vous-même
car vous risquez de provoquer
une électrocution.
Mise au rebut
Instructions sur la mise au rebut:
• L’emballage et les éléments qui le composent
sont recyclables et doivent l’être. Les
matériaux de l’emballage, comme le sac en
aluminium doivent être tenus hors de portée
des enfants.
• Les piles, notamment celles ne contenant pas
de métal lourd, ne doivent pas être éliminées
avec les déchets ménagers. Veuillez jetez les
piles usagées de façon écologique. Consultez
les réglementations légales applicables dans
votre région.
• La lampe fl uorescente cathodique froide dans
l’ÉCRAN LCD contient une petite quantité
de mercure. Veuillez respecter les lois ou
réglementations locales pour la mise au
rebut.
Informations applicables aux
utilisateurs des pays de l’Union
Européenne
Le symbole sur le produit ou
sur son emballage signifi e que
votre équipement électrique ou
électronique ne doit pas être jeté
à la fi n de sa durée de vie avec
les résidus domestiques. Il y a des systèmes de
collecte distincts au sein de l’UE pour effectuer
le recyclage.
Pour plus d’informations, veuillez contacter
l’autorité locale ou le détaillant chez qui vous
avez acheté le produit.
Débranchement de l’appareil
La prise secteur d’alimentation est utilisée
comme un dispositif de coupure et doit par
conséquent être en bon état de marche.
Volume du casque
Une pression excessive du
son provenant des écouteurs
et haut-parleurs peut entraîner
une perte de l’ouïe.
Installation
Pour éviter des dommages, le présent appareil
doit être correctement fixé au mur selon
les règles prescrites dans les consignes
d’installation (si l’option est disponible).
Écran LCD
L’écran LCD est un produit de très haute
technologie avec près d’un million de transistors
qui vous permettent d’obtenir une grande qualité
d’image. Il se peut que des pixels non actifs
apparaissent sur l’écran comme des points
fi xes bleus, verts ou rouges. Ceci n’affecte pas
la performance de votre produit.
Attention
Ne laissez pas votre téléviseur en mode de
veille ou en marche lorsque vous quittez votre
domicile.
Français - 40 -
02_[FR]_SSM_MB35_37883W_1800UK_ANALOG_BRONZE2_10064230_50151923.indd 4002_[FR]_SSM_MB35_37883W_1800UK_ANALOG_BRONZE2_10064230_50151923.indd 40 29.07.2009 13:23:1929.07.2009 13:23:19
Page 42
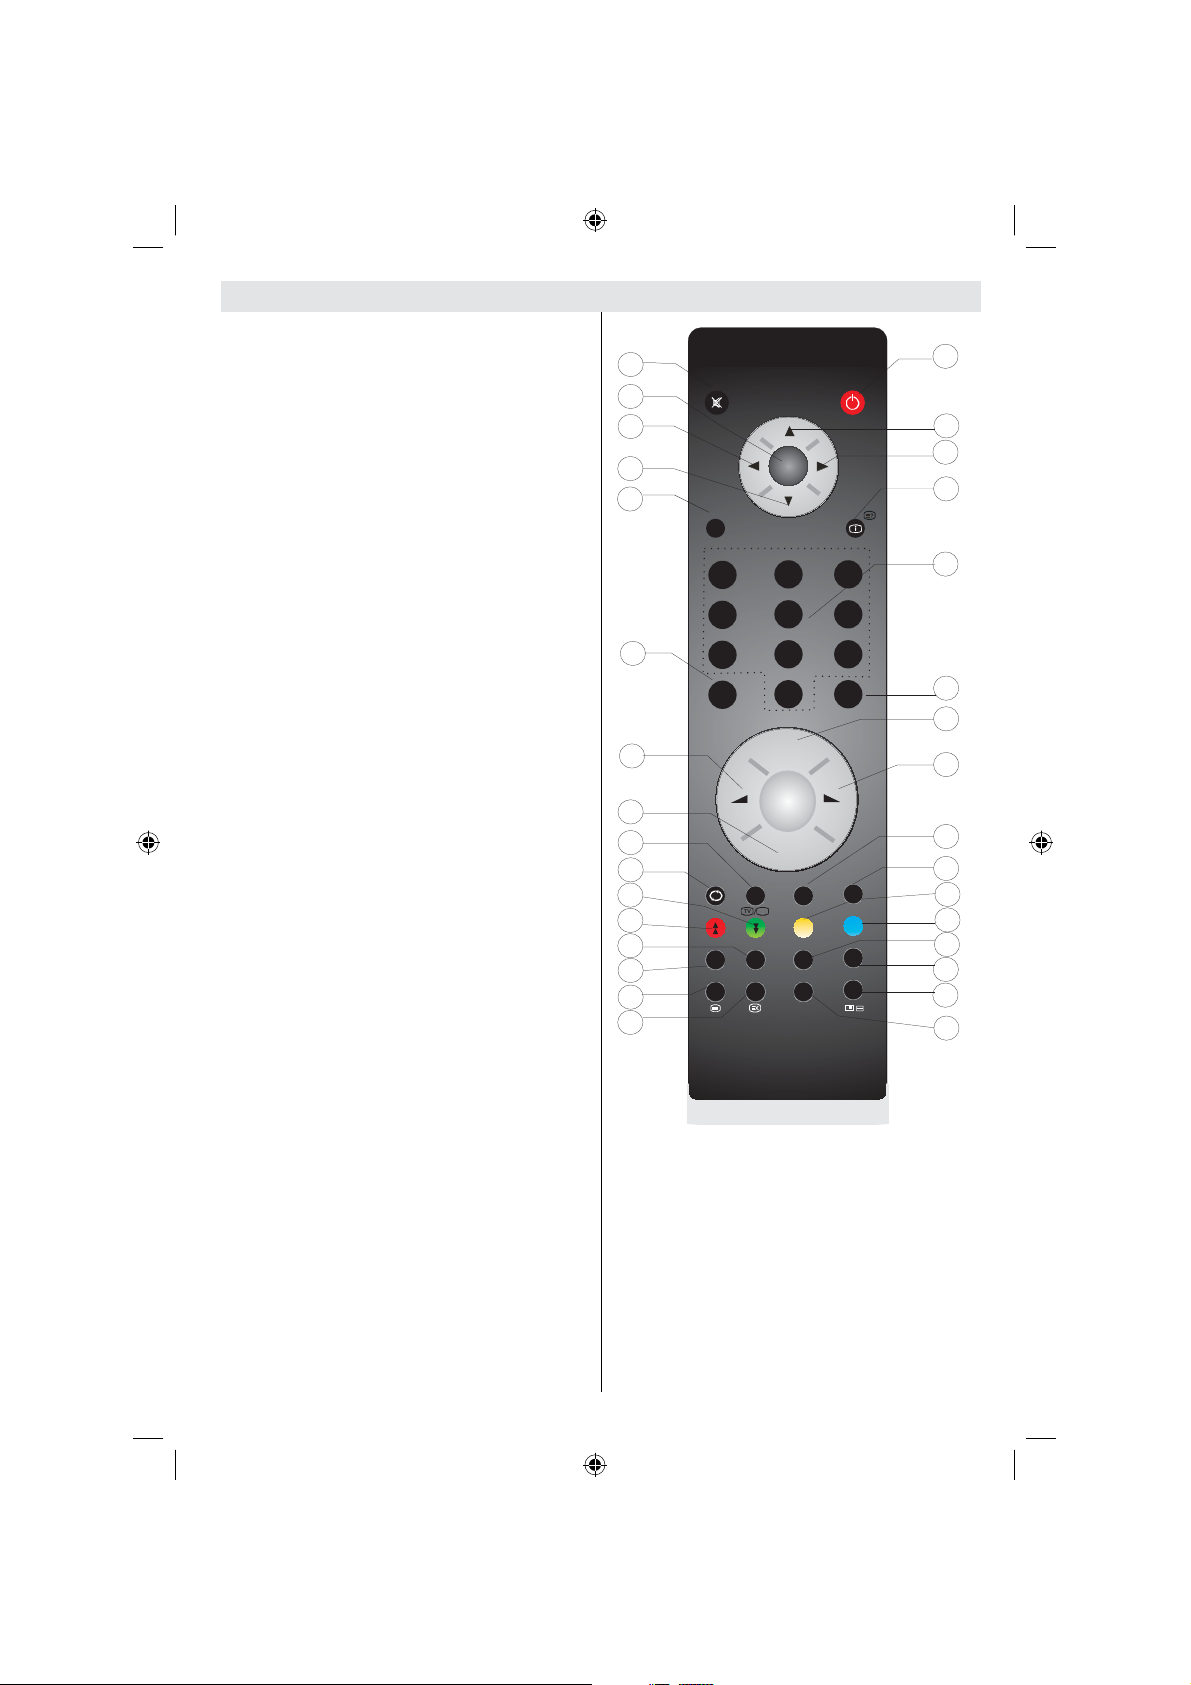
Aperçu de la télécommande
Veille 1.
Touche fl èche vers le haut / Page 2.
précédente (en mode TXT)
Touche curseur vers la droite3. /
Souspage (en mode TXT)
Info / Révéler (en mode TXT)4.
Boutons numériques5.
Retour / Page d’index (en mode TXT)6.
Programme haut 7.
Hausser le volume 8.
Aucune fonction 9.
AV / Sélection de la Source10.
Jaune / Menu Options 11.
Bleu / Menu Installation 12.
Sous-titrage TXT13.
Minuterie d’arrêt programmé 14.
Mode PIP/PAP15.
Aucune fonction 16.
Actualiser (en mode texte -Update)17.
Teletext / Mix / PAT18.
Agrandir (en mode TXT) / Taille de l’image19.
Mono-Stéréo/Dual I-II 20.
Rouge / Menu Son21.
Vert / Menu Image 22.
Programme précédent / Echange23.
Bouton TV24.
Programme suivant 25.
Baisser le volume 26.
Mode de sélection d'image 27.
Menu Marche-Arrêt28.
Touche fl èche vers le haut / Page suivante 29.
(en mode TXT)
Touche directionnelle gauche 30.
OK / Arrêt sur image / Pause (en mode 31.
TXT)
Muet 32.
32
31
30
29
28
27
26
25
24
23
22
21
20
19
18
17
MENU
M
ABC
1
JKL
4
STU
7
PRESETS
SWAP
SCREEN
-
TV
LANG
OK
SELECT
DEF GHI
2
MNO
5
VWX
8
0
P+
P-
DTV
SUBTITLE
1
2
3
4
INFO /
3
PQR
5
6
YZ
9
6
RETURN
7
8
+
9
10
SOURCE
FAV
11
12
13
SLEEP
/
EPG
14
15
16
Français - 41 -
02_[FR]_SSM_MB35_37883W_1800UK_ANALOG_BRONZE2_10064230_50151923.indd 4102_[FR]_SSM_MB35_37883W_1800UK_ANALOG_BRONZE2_10064230_50151923.indd 41 29.07.2009 13:23:1929.07.2009 13:23:19
Page 43

Téléviseur LCD et boutons de commande
AFFICHAGE A V ANT
Bouton de mise en 1.
veille
Bouton TV/A V 2.
Touches Programme 3.
Suivant/Précédent
Touches Volume 4.
Haut/Bas
Remarque: Appuyez
sur les boutons “
”/“ ” au même
moment pour afficher le
menu principal.
AFFICHAGE LATÉRAL
AFFICHAGE ARRIÈRE
Français - 42 -
02_[FR]_SSM_MB35_37883W_1800UK_ANALOG_BRONZE2_10064230_50151923.indd 4202_[FR]_SSM_MB35_37883W_1800UK_ANALOG_BRONZE2_10064230_50151923.indd 42 29.07.2009 13:23:2029.07.2009 13:23:20
Page 44

Affi chage des branchements – connecteurs arrières
12
1.
Sortie numérique S/PDIF (S/PDIF Out) envoi des signaux audio numériques de la source
courant.
Utilisez un câble optique numérique pour transférer des signaux audio en direction d’un
périphérique disposant d’une entrée S/PDIF.
2. La sortie d’un caisson de graves sert à brancher un caisson de graves externe et actif à
l’appareil afi n de produire un effet de basse plus profond.
Utilisez un câble RCA approprié pour brancher l’appareil à un caisson de graves.
La ligne audio 3. produit des signaux audio de sortie en direction d’un appareil externe
comme un système sonore optionnel.
Pour brancher les haut-parleurs externes à votre téléviseur, utilisez l’option SORTIES DE
LIGNE AUDIO du téléviseur avec un câble audio.
Entrées ou sorties 4. PÉRITEL 2 pour périphériques externes.
Entrées ou sorties 5. PÉRITEL 1 pour périphériques externes.
Branchez le câble PERITEL entre la prise PERITEL du téléviseur et la prise PERITEL de
votre périphérique externe (tel que le décodeur, un VCR ou un lecteur de DVD).
Remarque: Si un dispositif externe est branché à l’aide des prises PERITEL , le téléviseur
passera automatiquement au mode AV. Si les deux prises sont utilisées au même
moment, PERITEL 1 prendra le dessus sur PERITEL 2 à moins que la sélection se fasse
manuellement.
Remarque: Vous devez brancher le décodeur à EXT-1, si vous comptez regarder une
chaîne cryptée. Le décodeur peut ne pas fonctionner correctement si vous ne le branchez
Français - 43 -
02_[FR]_SSM_MB35_37883W_1800UK_ANALOG_BRONZE2_10064230_50151923.indd 4302_[FR]_SSM_MB35_37883W_1800UK_ANALOG_BRONZE2_10064230_50151923.indd 43 29.07.2009 13:23:2029.07.2009 13:23:20
Page 45

pas à la prise Péritel 1 (Ext-1).
6. Les entrées Vidéo du composant (YPbPr) sont utilisées pour le branchement vidéo du
composant.
Vous pouvez brancher les prises audio et vidéo du composant avec un périphérique
doté d’une sortie du composant. Branchez les câbles vidéo du composant entre les
ENTREES VIDEO DU COMPOSANT qui se trouvent sur le téléviseur, et les sorties vidéo
du composant de votre appareil. Lors du branchement, assurez-vous que les lettres “ Y ”,
“ Pb ”, “ Pr ” qui se trouvent sur votre téléviseur correspondent aux connecteurs de votre
périphérique.
7. Les sorties audio PC/YbPr servent au branchement de signaux audio d’un PC ou d’un
périphérique qui relie le téléviseur via YPbPr.
Branchez le câble audio de PC entre les ENTREES AUDIO du téléviseur et la sortie audio
de votre PC pour faire fonctionner l’audio de PC.
Branchez le câble audio entre les ENTREES AUDIO du téléviseur et la sortie audio de
votre appareil pour faire fonctionner l’audio du composant.
8. Sortie coaxiale S/PDIF envoi les signaux audio numériques de la source courante.
Utilisez un câble coaxial SPDIF pour transférer des signaux audio en direction d’un
périphérique disposant d’une entrée S/PDIF.
9. L’entrée RF se branche à une antenne ou à un câble.
Remarquez que si vous utilisez un décodeur ou un enregistreur média, vous devez
brancher un câble aérien qui va de l’appareil au téléviseur, avec un câble d’antenne
approprié, tel qu’illustré ci-dessous.
10. L’entrée du PC vise à raccorder un PC au téléviseur.
Branchez le câble de PC entre l’ENTRÉE DU PC sur le téléviseur et la sortie du PC sur
votre ordinateur.
HDMI 2: 11.
Entrée HDMI
Les entrées HDMI (HDMI Inputs) sont réservées à un périphérique doté d’une prise HDMI.
Votre téléviseur LCD peut affi cher des images haute défi nition à partir des appareils tels
que les récepteurs de signaux de satellite haute défi nition ou de lecteur de DVD. Ces
appareils doivent être connectés via la prise HDMI ou composante. Ces prises peuvent
accepter les signaux 720p ou 1080i. Aucun branchement sonore n’est nécessaire pour une
connexion HDMI à HDMI.
HDMI 1: 12. Entrée HDMI
Français - 44 -
02_[FR]_SSM_MB35_37883W_1800UK_ANALOG_BRONZE2_10064230_50151923.indd 4402_[FR]_SSM_MB35_37883W_1800UK_ANALOG_BRONZE2_10064230_50151923.indd 44 29.07.2009 13:23:2029.07.2009 13:23:20
Page 46
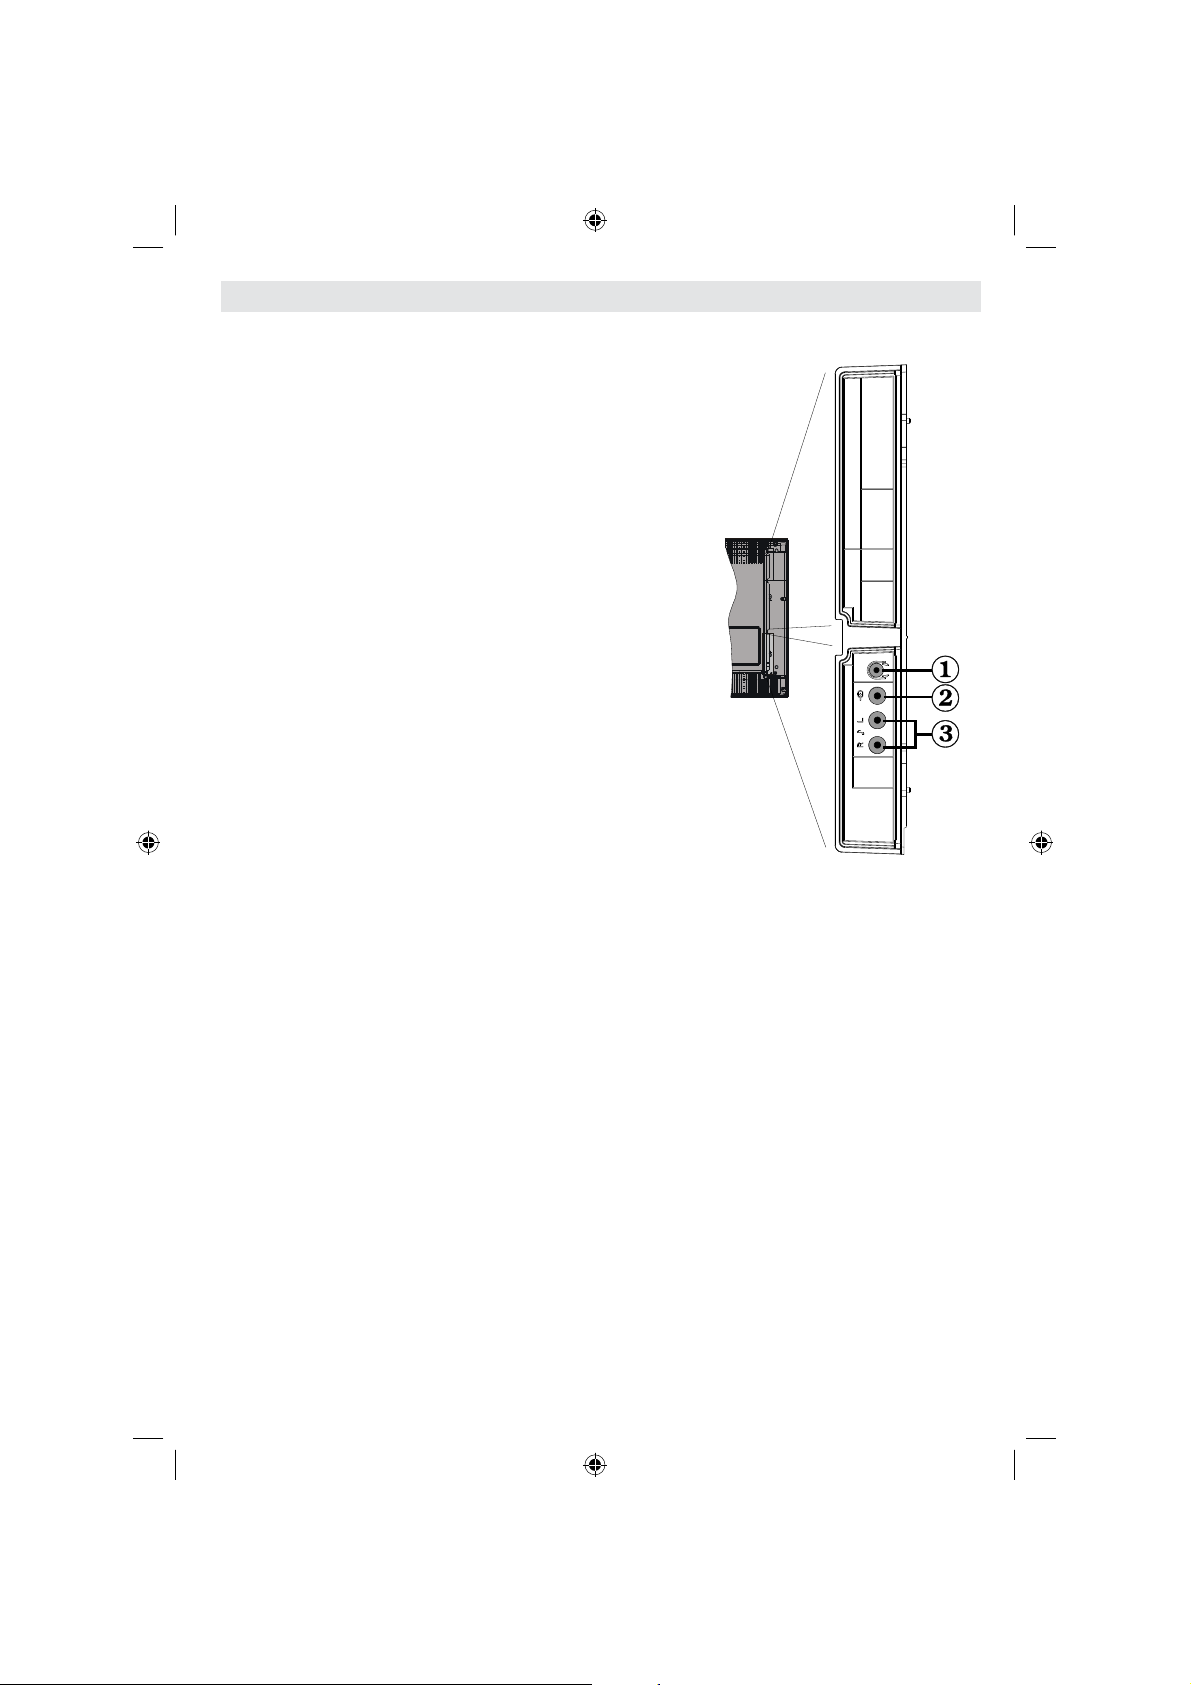
Affi chage des branchements - Connecteurs latéraux
Le port du Casque est utilisé pour brancher un casque 1.
externe au système. Raccordez au port du CASQUE pour
écouter le son du téléviseur en provenance des casques
(optionnel)
L’entrée vidéo est utilisée pour connecter les signaux 2.
vidéo des périphériques externes. Branchez le câble
vidéo entre l’ENTREE VIDÉO du téléviseur et la SORTIE
VIDÉO de votre appareil.
Ensuite, utilisez les entrées audio pour brancher les 3.
signaux audio des périphériques externes. Branchez le
câble audio entre les ENTRÉES AUDIO du téléviseur
et les ports de SORTIE AUDIO de votre appareil.
Remarque: Si vous branchez un périphérique au
téléviseur à travers l’ENTRÉE VIDÉO, vous devez
également brancher votre périphérique à l’aide d’un câble
audio aux ENTRÉES AUDIO du téléviseur pour faire
fonctionner l’audio.
Français - 45 -
02_[FR]_SSM_MB35_37883W_1800UK_ANALOG_BRONZE2_10064230_50151923.indd 4502_[FR]_SSM_MB35_37883W_1800UK_ANALOG_BRONZE2_10064230_50151923.indd 45 29.07.2009 13:23:2129.07.2009 13:23:21
Page 47
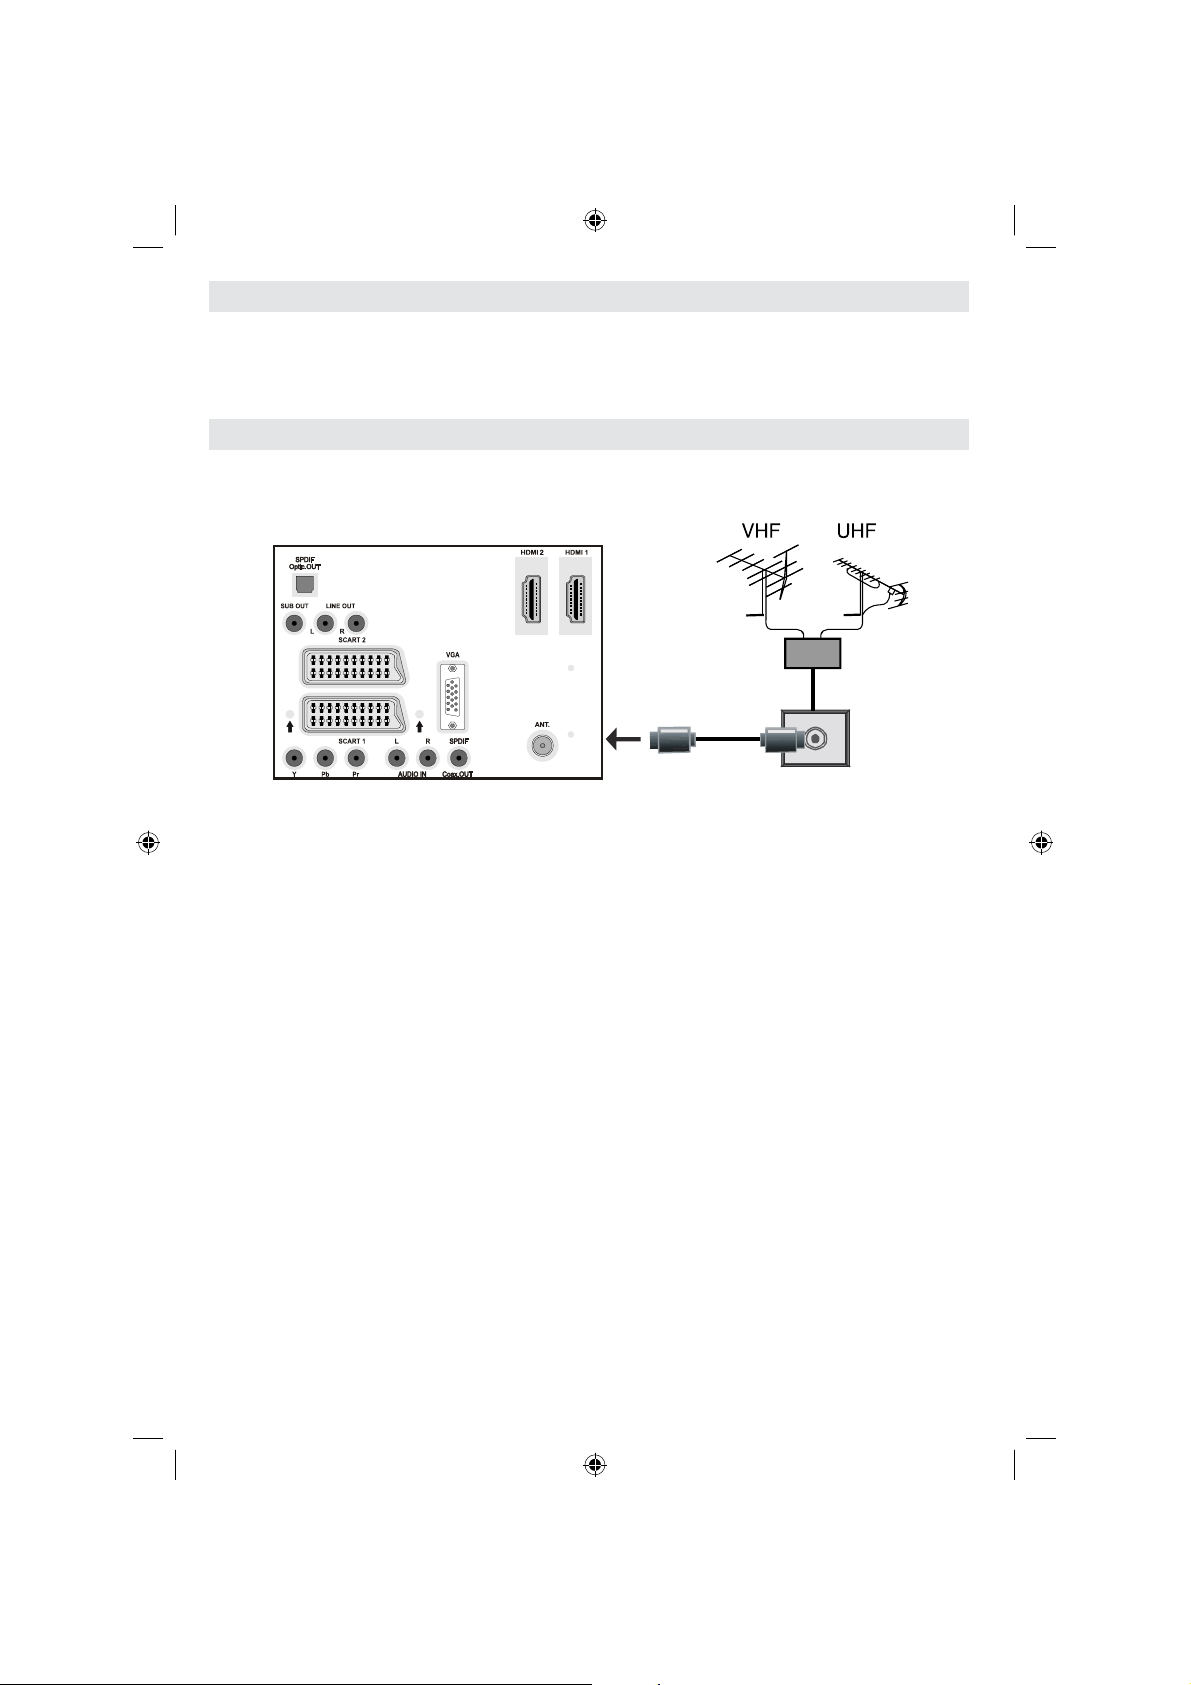
Alimentation électrique
IMPORTANT : Le téléviseur a été conçu pour fonctionner en 220-240V CA, 50 Hz.
• Après l’avoir déballé, attendez un moment pour que le téléviseur atteigne la température ambiante
avant de le brancher à la prise de courant.
• Branchez le câble d’alimentation à la prise secteur.
Branchement de l’antenne
• Branchez l’antenne ou le câble du téléviseur à la prise d’ENTRÉE DE L’ANTENNE située à
l’arrière du téléviseur.
AFFICHAGE ARRIÈRE
Français - 46 -
02_[FR]_SSM_MB35_37883W_1800UK_ANALOG_BRONZE2_10064230_50151923.indd 4602_[FR]_SSM_MB35_37883W_1800UK_ANALOG_BRONZE2_10064230_50151923.indd 46 29.07.2009 13:23:2129.07.2009 13:23:21
Page 48

Connexion du téléviseur LCD à un PC
Câble audio de PC
(non fourni)
sur les ENTREES AUDIO
du téléviseur
Câble RGB du
PC (non fourni)
à l'entrée du PC
Entrées
audio
Entrée PC
Pour affi cher l’image de votre écran d’ordinateur sur votre téléviseur LCD, vous pouvez brancher
votre ordinateur au téléviseur.
• Débranchez l’ordinateur et le téléviseur avant d’effectuer les branchements.
• Utilisez le câble de 15 broches pour brancher le PC au téléviseur LCD.
• Une fois le branchement effectué, passez à la source du PC. Voir la section «Sélection
d’entrée».
• Réglez la résolution d’affi chage qui vous convient. Pour les informations relatives à la résolution,
se reporter à l’annexe.
AFFICHAGE ARRIÈRE
Français - 47 -
02_[FR]_SSM_MB35_37883W_1800UK_ANALOG_BRONZE2_10064230_50151923.indd 4702_[FR]_SSM_MB35_37883W_1800UK_ANALOG_BRONZE2_10064230_50151923.indd 47 29.07.2009 13:23:2229.07.2009 13:23:22
Page 49

Branchement à un lecteur de DVD
Si vous voulez brancher un lecteur de DVD à votre téléviseur LCD, vous pouvez utiliser les
branchements qui se trouvent sur le téléviseur. Les lecteurs de DVD peuvent avoir différents
connecteurs. Veuillez consulter le manuel d’utilisation de votre lecteur de DVD pour plus
d’informations. Débranchez le téléviseur et les appareils avant d’effectuer les branchements.
Remarque: Les câbles présentés dans l’illustration ne sont pas fournis.
• Si votre lecteur de DVD est doté d’une prise HDMI, vous pouvez le brancher via HDMI. Lorsque
vous branchez l’appareil au lecteur de DVD tel qu’illustré ci-dessous, passez à la source HDMI.
Voir la section « Sélection d’entrée ».
• La plupart des lecteurs de DVD sont branchés à travers les PRISES DU COMPOSANT . Utilisez
un câble vidéo du composant pour brancher l’entrée vidéo. Pour activer l’option audio, utilisez un
câble audio du composant tel qu’illustré ci-dessous. Une fois le branchement effectué, passez
en source YPbPr. Voir la section « Sélection d’entrée ».
• Vous pouvez également vous brancher au moyen de la prise PERITEL 1 ou PERITEL 2 Utilisez
un câble de PERITEL tel qu’illustré ci-dessous.
Remarque : Ces trois méthodes de branchement effectuent la même fonction mais à différents niveaux de
qualité. Il n’est pas nécessaire de recourir à toutes ces trois méthodes de branchement.
Entrées
audio du
composant
Lecteur DVD
Entrées HDMI
Prises Péritel
Entrées
vidéo du
composant
AFFICHAGE ARRIÈRE
Français - 48 -
02_[FR]_SSM_MB35_37883W_1800UK_ANALOG_BRONZE2_10064230_50151923.indd 4802_[FR]_SSM_MB35_37883W_1800UK_ANALOG_BRONZE2_10064230_50151923.indd 48 29.07.2009 13:23:2229.07.2009 13:23:22
Page 50

Utilisation des connecteurs AV latéraux
V ous pouvez brancher une gamme d’appareils optionnels à votre téléviseur LCD. Les branchements
possibles sont présentés ci-dessous. Remarquez que les câbles présentés dans l’illustration ne
sont pas fournis.
• Pour raccorder un caméscope, branchez une prise VIDEO IN, ainsi que les PRISES AUDIO.
Pour sélectionner la source correspondante, se reporter à la section « Sélection d’entrée » dans
les paragraphes suivants.
• Pour écouter le son du téléviseur en provenance des casques, branchez le port dudit CASQUE
au téléviseur.
Casque
Caméscope
AFFICHAGE LATÉRAL
Français - 49 -
02_[FR]_SSM_MB35_37883W_1800UK_ANALOG_BRONZE2_10064230_50151923.indd 4902_[FR]_SSM_MB35_37883W_1800UK_ANALOG_BRONZE2_10064230_50151923.indd 49 29.07.2009 13:23:2329.07.2009 13:23:23
Page 51

Utilisation d’autres connecteurs
Vous pouvez brancher une gamme d’appareils optionnels à votre téléviseur LCD. Les branchements
possibles sont présentés ci-dessous. Remarquez que les câbles présentés dans l’illustration ne
sont pas fournis.
• Pour brancher les haut-parleurs externes, utilisez le câble audio. N’inversez pas les prises AUDIO
GAUCHE et AUDIO DROIT. Allumez le téléviseur LCD et le haut-parleur externe une fois tous
les branchements effectués. En cas de problèmes, reportez-vous au manuel d’utilisation.
• Pour un branchement à un périphérique doté d’un support SPDIF, utilisez un câble SPDIF
approprié pour activer la connexion sonore.
Haut-parleurs externes
Un périphérique
qui prend en
charge le signal SPDIF.
AFFICHAGE ARRIÈRE
Français - 50 -
02_[FR]_SSM_MB35_37883W_1800UK_ANALOG_BRONZE2_10064230_50151923.indd 5002_[FR]_SSM_MB35_37883W_1800UK_ANALOG_BRONZE2_10064230_50151923.indd 50 29.07.2009 13:23:2329.07.2009 13:23:23
Page 52
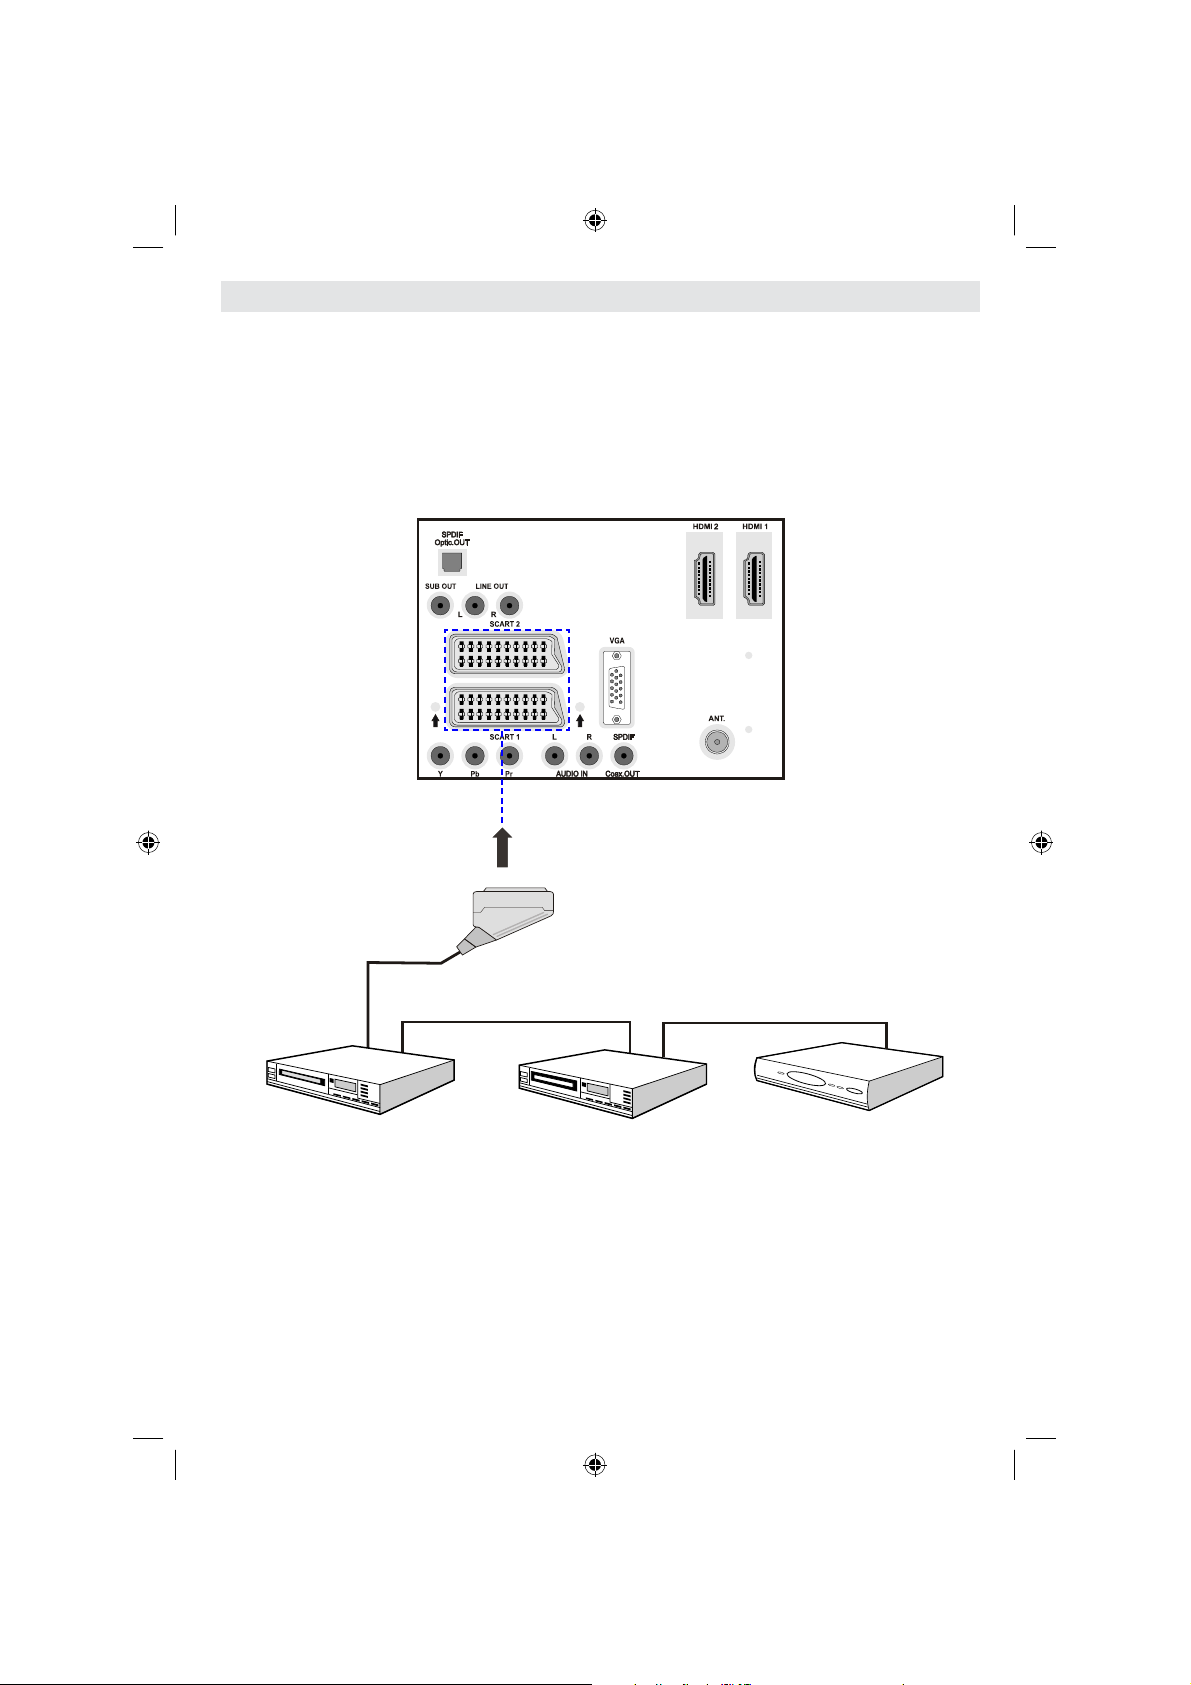
Branchement d’un autre appareil via Péritel
Prise Péritel
Décodeur
Graveur de DVD
Enregistreur vidéo
La plupart des appareils prennent en charge le branchement PERITEL Vous avez la possibilité
de brancher un enregistreur DVD, un magnétoscope, ou un décodeur à votre téléviseur LCD en
utilisant les prises PERITEL. Remarquez que les câbles présentés dans l’illustration ne sont pas
fournis.
Débranchez le téléviseur et les appareils avant d’effectuer les branchements.
Pour de plus amples informations, reportez-vous à votre manuel d’utilisation.
AFFICHAGE ARRIÈRE
02_[FR]_SSM_MB35_37883W_1800UK_ANALOG_BRONZE2_10064230_50151923.indd 5102_[FR]_SSM_MB35_37883W_1800UK_ANALOG_BRONZE2_10064230_50151923.indd 51 29.07.2009 13:23:2329.07.2009 13:23:23
Français - 51 -
Page 53

Insérer les piles dans la
télécommande
• Retirez le couvercle du compartiment des piles
situé dans la partie arrière de la télécommande
en poussant doucement et vers le bas à partir
de la partie indiquée.
• Insérez deux piles AAA/R3 ou des piles
équivalentes. Disposez les piles en respectant
la bonne polarité et placez de nouveau le
couvercle des piles.
Remarque : Si vous n’utilisez pas l’appareil pendant
un certain temps, retirez les piles de la télécommande.
Sinon une fuite possible des piles peut endommager
la télécommande.
Rayon d’action de la
télécommande
• Pointez le haut de la télécommande vers le
voyant du capteur de la télécommande qui se
trouve sur le téléviseur LCD, tout en appuyant
sur un bouton.
Mise en marche et arrêt du
téléviseur LCD
Pour allumer le téléviseur
• Branchez le cordon d’alimentation à une prise
de 220-240V AC, 50 Hz.
• Appuyez sur la touche VEILLE. Le TÉMOIN
de mise en veille s’allume..
• Pour allumer le téléviseur à partir du mode de
veille, vous pouvez soit:
• Appuyez sur la touche “
touche numérique de la télécommande.
• Appuyez sur la touche -P/CH ou P/CH+ du
téléviseur. Le téléviseur s’allumera alors.
Remarque : Si vous mettez votre téléviseur en
marche utilisant les touches PROGRAMME HAUT/
BAS de la télécommande ou du téléviseur, le dernier
programme que vous avez regardé seront sélectionné
de nouveau.
Quelle que soit la méthode utilisée, le téléviseur
s’allume.
Pour éteindre le téléviseur
• Appuyez sur la touche “ ” de la télécommande
ou sur la touche MODE DE VEILLE du
téléviseur ; ainsi, le téléviseur basculera en
mode de veille.
• Pour éteindre complètement le téléviseur,
débranchez le cordon d’alimentation de la
prise murale.
” , P+ / P- ou une
30
30
OK
SELECT
MENU
INFO/
M
ABC
DEF GHI
2
3
1
JKL
MNO
PQR
5
4
6
VWX
STU
YZ
8
7
9
0
RETURN
PRESETS
P+
+
-
P-
SOURCE
DTV
TV
SWAP
FAV
SLEEP
SUBTITLE
LANG
SCREEN
/
EPG
Prévoir un espace d’environ 7m/23ft.
Français - 52 -
02_[FR]_SSM_MB35_37883W_1800UK_ANALOG_BRONZE2_10064230_50151923.indd 5202_[FR]_SSM_MB35_37883W_1800UK_ANALOG_BRONZE2_10064230_50151923.indd 52 29.07.2009 13:23:2429.07.2009 13:23:24
Page 54

Première installation
Lorsque le téléviseur est allumé pour la première
fois, le menu suivant s’affi chera à l’écran.
Sélectionnez votre Pays, Langue et Langue
télétexte à l’aide des touches “
” ou “ ”.
Appuyez sur la touche “OK” ou ROUGE pour
continuer.
Pour annuler, appuyez sur la touche BLEUE.
Pour plus d’informations sur ce procédé,
consultez la section “Menu D’Installation”
(Menu Installation).
Remarque: Ne pas mettre le téléviseur hors tension
pendant l’initialisation de la première installation.
” ou “ ” et “
Sélection d’entrée
Une fois les systèmes externes branchés à votre
téléviseur, vous pouvez basculer à différentes
sources d’entrée.
• Appuyez sur la touche “SOURCE” de la
télécommande pour changer directement les
sources.
ou,
• Sélectionnez l’option « Source » à partir
du menu principal à l’aide de la touche “
” ou “ ” . Puis, utilisez les touches “ ” ou
“ ” pour mettre une entrée en surbrillance
et appuyez sur la touche “ ” pour la
sélectionner.
Remarque : Vous pouvez mettre en surbrillance
les options de sources désirées en appuyant sur la
touche OK . Quand le bouton “SOURCE” est pressé,
seules les options de la source sélectionnées seront
disponibles (en dehors de la source TV).
Français - 53 -
Opérations de Base
V ous pouvez faire fonctionner votre téléviseur
en utilisant non seulement ses boutons,
mais aussi ceux de la télécommande.
Fonctionnement du téléviseur à l’aide
de ses boutons
Réglage du volume
• Appuyez sur le bouton “ ” pour diminuer
le volume ou sur le bouton “ ” pour
l’augmenter. Lorsque vous procédez ainsi,
une échelle indiquant le niveau du volume
(curseur) s’affi che à l’écran.
Sélection du programme
• Appuyez sur le bouton “ P/CH + ” pour
sélectionner le programme suivant ou sur
“ P/CH - ” pour sélectionner le programme
précédent.
Affi chage du menu précédent
• Appuyez sur “
au Main menu. Dans le menu principal,
sélectionnez le sous-menu à l’aide des
touches “ P/CH - ” ou “ P/CH + ”, et ouvrez le
sous-menu en utilisant les boutons “ ” ou
“ ” . Pour en savoir davantage concernant
l’utilisation des menus, reportez-vous aux
sections du système du menu.
Mode A V
• Appuyez sur la touche “ TV/AV ” qui fi gure sur le
panneau de contrôle du téléviseur pour passer
aux modes AV.
Fonctionnement du téléviseur à l’aide
de la télécommande
• La télécommande de votre téléviseur est
conçue pour contrôler toutes les fonctions
du modèle sélectionné. Les fonctions seront
” / “ ” pour accéder
02_[FR]_SSM_MB35_37883W_1800UK_ANALOG_BRONZE2_10064230_50151923.indd 5302_[FR]_SSM_MB35_37883W_1800UK_ANALOG_BRONZE2_10064230_50151923.indd 53 29.07.2009 13:23:2529.07.2009 13:23:25
Page 55

décrites conformément au système du menu
de votre téléviseur.
• Les fonctions du système de menu sont
décrites dans les sections suivantes.
Réglage du volume
• Appuyez sur bouton “
” pour augmenter
le volume. Appuyez sur la touche “ ”pour
baisser le volume. Une échelle indiquant
le niveau du volume (curseur) s’affiche à
l’écran.
Sélection de programme (Programme
précédent ou suivant)
• Appuyez sur la touche “
P- ” pour sélectionner
le programme précédent.
• Appuyez sur la touche“
P+ ” pour sélectionner
le programme précédent.
Sélection de programme (Accès direct)
• Appuyez sur les touches numériques de
la télécommande pour sélectionner les
programmes compris entre 0 et 9. Le téléviseur
basculera vers le programme sélectionné.
Pour sélectionner les programmes compris
entre 10-199 appuyez consécutivement sur les
boutons numériques (Pour le programme 27
par exemple, appuyez d’abord sur la touche 2,
puis sur la touche 7). Lorsque la durée d’appui
est expirée pour le deuxième numéro, seul le
premier programme numérique s’affi chera.
La limite de la durée d’attente est de 3
secondes.
• Appuyez directement sur le numéro de
programme pour sélectionner à nouveau les
programmes à un chiffre.
Navigation dans le système de
menu
Pour naviguer
Pour visualiser
les options de menu
• Appuyez sur “ M ” pour visualiser le menu
principal.
• Appuyez sur le bouton “
sélectionner une icône.
• Utilisez le bouton “
” ou “ ” pour mettre en
surbrillance.
• Appuyez sur le bouton “ ” ou “ ” pour changer
les réglages.
• Appuyez sur “
” pour plus d’options.
• Appuyez sur OK pour mémoriser.
• Pour quitter le menu ou revenir à la fenêtre de
sous-menu, appuyez sur “ M ”.
Remarque : Ces explications sont valides pour la
navigation dans le système de menu. Pour sélectionner
les options expliquées dans les paragraphes suivants,
se reporter à la section « Navigation dans le système
de menu ».
Pour confirmer les choix
” ou “ ” pour
Français - 54 -
02_[FR]_SSM_MB35_37883W_1800UK_ANALOG_BRONZE2_10064230_50151923.indd 5402_[FR]_SSM_MB35_37883W_1800UK_ANALOG_BRONZE2_10064230_50151923.indd 54 29.07.2009 13:23:2529.07.2009 13:23:25
Page 56
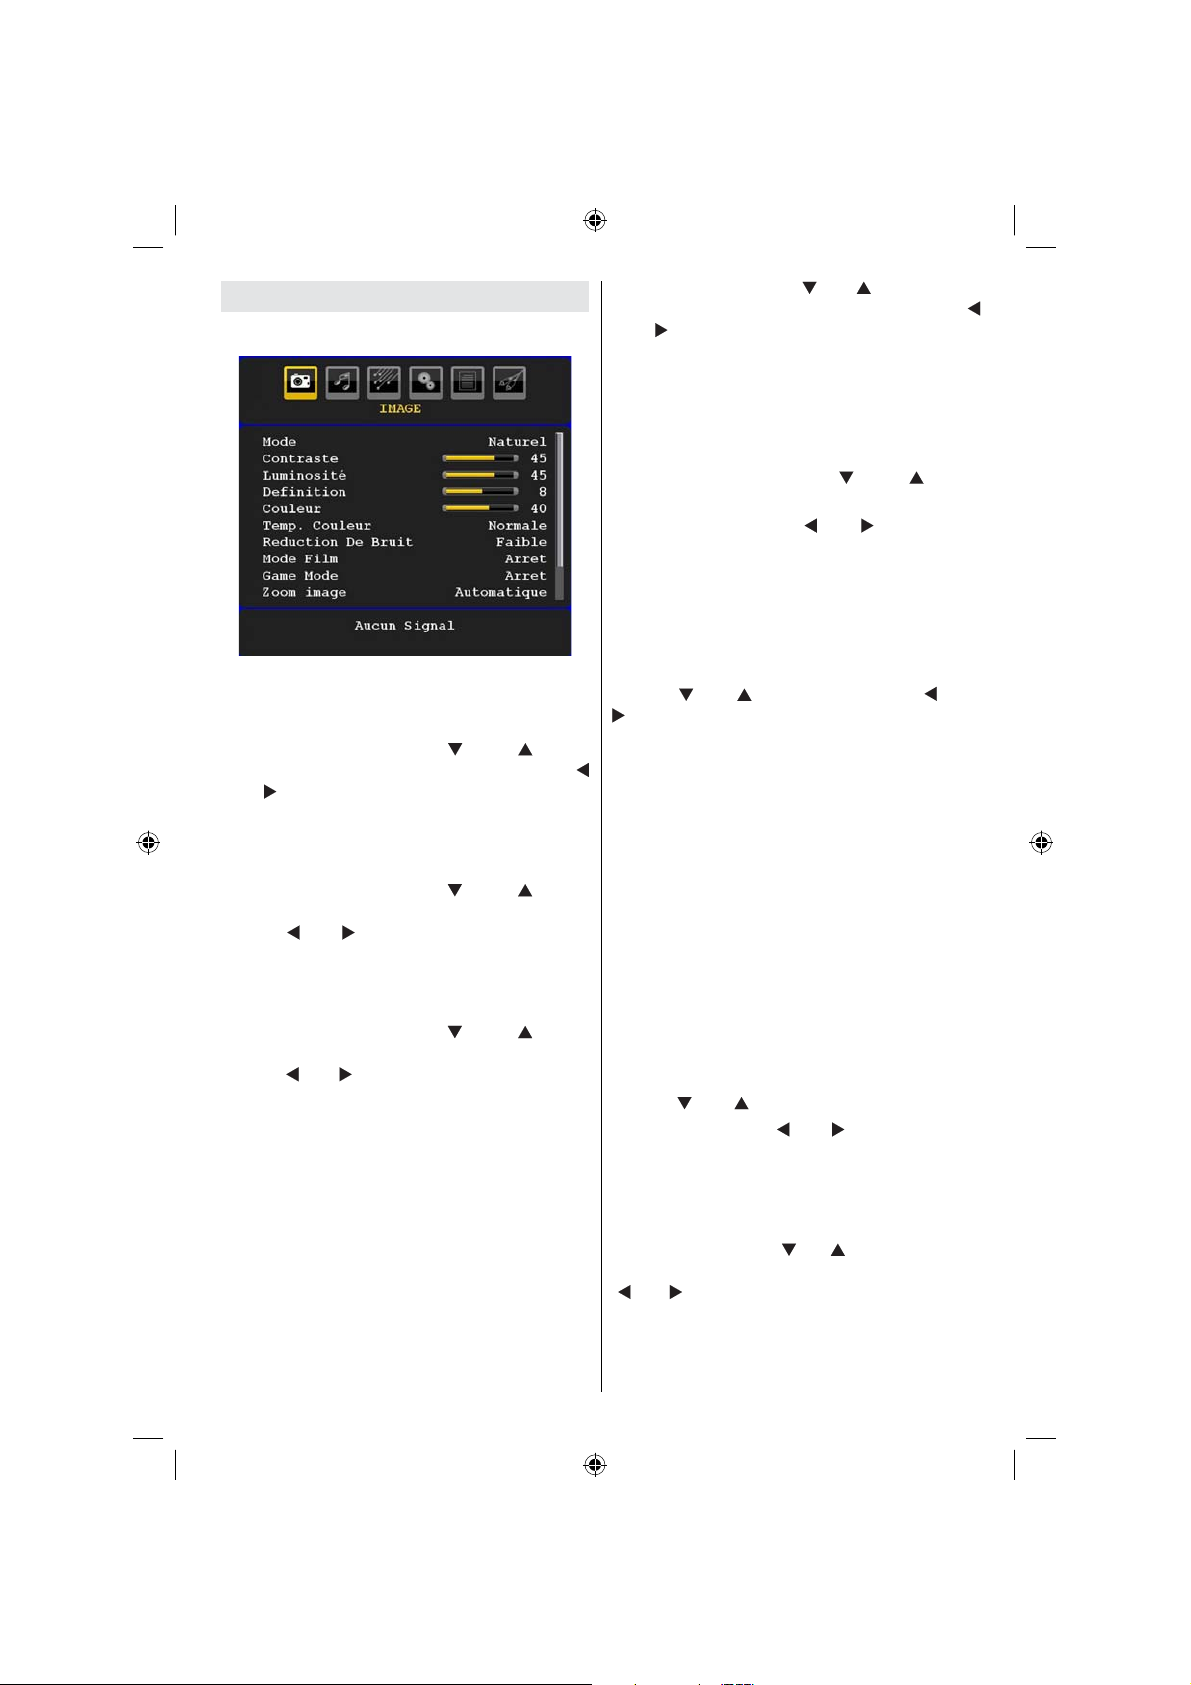
Système de menu
Menu Image
Mode
Pour vos besoins en matière d’affi chage, vous
pouvez régler l’option Mode y relative.
Appuyez sur le bouton “
sélectionner Mode . Appuyez sur le bouton “
” ou “ ” pour sélectionner une de ces options:
Cinéma , Dynamique et Naturel .
Luminosité/Contraste/Couleur/Défi nition/
Teinte
Appuyez sur la touche “
sélectionner l’option désirée. Appuyez sur le
bouton “ ” ou “ ” pour régler le niveau.
Remarque : L’option Teinte ne peut être visible que
lorsque le téléviseur reçoit un signal NTSC.
Température de Couleur
Appuyez sur la touche “
sélectionner Temp couleur . Appuyez sur le
bouton “ ” ou “ ” pour sélectionner une de ces
options: Froide , Normale et Chaude .
Remarque :
• Un réglage de l’option Froid donne aux couleurs
blanches un accent légèrement bleu.
• Un réglage sur l’option Chaud donne aux couleurs
blanches un accent légèrement rouge.
• Pour les couleurs normales, sélectionnez l’option
Normal .
Réduction de bruit
Si le signal de diffusion est faible et l’image
bruyante, utilisez le réglage Réduction de bruit
pour réduire les bruits.
” ou “ ” pour
” ou “ ” pour
” ou “ ” pour
En utilisant les boutons “ ” ou “ ” sélectionnez
Réduction du bruit. Appuyez sur le bouton “
” ou “ ” pour sélectionner une de ces options:
Faible , Moyen , Haut ou Arrêt .
Mode Film
Les films sont enregistrés à un nombre de
cadres différent par seconde comparé aux
programmes de télévision normaux.
Appuyez sur le bouton “
” ou “ ” pour
sélectionner Mode Film .
Appuyez sur la touche “
” ou “ ” pour activer
ou désactiver cette fonction.
Activez cette fonction lorsque vous voyez un fi lm
pour voir clairement les scènes qui se déroulent
rapidement.
Mode Jeux (en option)
Sélectionnez le mode Jeu en appuyant sur le
bouton “
” ou “ ” . Utilisez le bouton “ ” ou “
” pour défi nir le mode Jeu en tant que Activé
ou Désactivé . Lorsque le mode Jeu est défi ni
sur Activé, les réglages du mode jeu, qui sont
optimisés pour une meilleure qualité vidéo,
seront chargés.
De même, les réglages Mode image, Contraste,
Luminosité, Netteté, Couleur et Temp. Couleur
seront invisibles et désactivés pendant que le
mode Jeu est activé.
Remarque :
Le bouton de sélection du mode Image qui se trouve
sur la télécommande n‘aura aucune fonction pendant
que le mode Jeu est activé.
Si la télé est réglée sur le mode PIP/PAP, le mode Jeu
sera désactivé puis supprimé du menu Image.
Zoom image
Sélectionnez Zoom image en appuyant sur la
touche “ ” ou “ ” .
Utilisez les touches “ ” ou “ ” pour changer le
mode de Zoom d’image sur Auto , 16:9 , 4:3 ,
Panoramique , 14:9 , Cinéma , Sous-titrage
ou Zoom .
Réinitialisation
Appuyez sur le bouton “
” ou “ ” pour sélectionner
Réinitialisation . Appuyez sur la touche
“ ” ou “ ” ou encore sur OK pour réinitialiser les
paramètres d’usine des modes d’image.
Français - 55 -
02_[FR]_SSM_MB35_37883W_1800UK_ANALOG_BRONZE2_10064230_50151923.indd 5502_[FR]_SSM_MB35_37883W_1800UK_ANALOG_BRONZE2_10064230_50151923.indd 55 29.07.2009 13:23:2529.07.2009 13:23:25
Page 57

Mémoriser
Appuyez sur le bouton “
” ou “ ” pour
sélectionner Mémoriser. Appuyez sur la touche
“
” ou sur le bouton OK pour mémoriser les
réglages. “ Mémorisé... ” apparaîtra à l’écran.
Menu Son
Volume
Appuyez sur le bouton “
sélectionner Volume . Appuyez sur la touche “ ”
ou “ ” pour changer le niveau du volume.
Égaliseur
Appuyez sur “
” ou sur le bouton “ ”, pour
sélectionner Égaliseur . Appuyez sur la touches
“ ” pour affi cher le menu de l’égaliseur.
Appuyez sur la touche “
le préréglage. Dans le menu égaliseur, le
préréglage peut être réglé sur Musique , Film ,
Parole , Plat , Classique et Utilisateur .
Sélectionnez la fréquence désirée en appuyant
le bouton “ ” ou “ ” et augmentez ou réduisez
” ou “ ” pour
” ou “ ” pour changer
le gain de fréquence en appuyant sur le bouton
” ou “ ”.
“
Appuyez sur la touche “ M ” pour revenir au menu
précédent.
Remarque : Les réglages du menu Egaliseur ne
peuvent être modifi és que lorsque le mode Egaliseur
se trouve à Utilisateur .
Balance
Ce réglage sert à mettre un accent au niveau de
l’équilibre du haut-parleur gauche ou droit.
Appuyez sur le bouton “
” ou “ ” pour
sélectionner Balance. Appuyez sur la touche “
” ou “ ” pour changer le niveau de la balance.
Le niveau de balance peut être réglé entre -32
et + 32.
Casque
Appuyez sur le bouton “
” ou “ ” pour sélection
Casque . Appuyez sur le bouton “ ” pour affi cher
le menu Casque.
Les options du sous-menu Casque sont décrites
ci-dessous:
Volume
Appuyez sur le bouton “
” ou “ ” pour
sélectionner Volume . Appuyez sur la touche “
” pour augmenter le niveau de volume. Appuyez
sur la touche “ ” pour diminuer le niveau de
volume. Le niveau de volume du casque peut
être réglé entre 0 et 63 .
Son du casque (Optionnel)
Appuyez sur le bouton “
” ou “ ” pour
sélectionner Son du casque . Grâce à la touche
“ ” ou “ ” , vous pouvez sélectionner Groupe
principal, PIP/PAP, Actif ou Inactif.
Groupe principal : Son Fenêtre principale.
PIP/PAP : Son Fenêtre PIP/PAP.
Actif : Son de la sélection actuelle.
Inactif : Son de la fenêtre actuellement
inactive.
Mode Son (en option)
Appuyez sur le bouton “
” ou “ ” pour
sélectionner Mode Son . À l’aide du bouton “
” ou “ ” , vous pouvez sélectionner le mode
Mono, Stéréo, Dual I ou Dual II, si la chaîne
sélectionnée accepte ce mode.
Français - 56 -
02_[FR]_SSM_MB35_37883W_1800UK_ANALOG_BRONZE2_10064230_50151923.indd 5602_[FR]_SSM_MB35_37883W_1800UK_ANALOG_BRONZE2_10064230_50151923.indd 56 29.07.2009 13:23:2629.07.2009 13:23:26
Page 58

AVL
La fonction de limitation automatique de
volume (A VL) ajuste le son dans le but d’obtenir
un niveau de sortie sonore fixe entre les
programmes (par exemple, le niveau de volume
des publicités tend à être plus élevé que celui
des programmes).
Appuyez sur le bouton “
sélectionner AVL . Appuyez sur le bouton “
“
” pour activer ou désactiver cette fonction.
” ou “ ” pour
” ou
Sortie SPDIF
Appuyez sur le bouton “
” ou “ ” pour
sélectionner Sortie Spdif . Appuyez sur le
bouton “
” ou “ ” pour régler la Sortie Spdif
en tant que Activé ou Désactivé .
Remarque : Si la sortie Spdif est réglée sur Activé, le
casque sera désactivé.
Effet
Si vous regardez une diffusion mono, activez
l’option Effet pour obtenir un meilleur effet
sonore qui sera plus stéréo. Si le système
sonore actuel est en Stéréo et si l’effet de son
est activé, l’effet rendu sera plus spatial.
En appuyant sur “
” ou sur “ ”, sélectionnez
Effet. Appuyez sur le bouton “ ” ou “ ” pour
activer ou désactiver cette fonction.
Mémoriser
Appuyez sur le bouton “ ” ou “ ” pour
sélectionner Mémoriser. Appuyez sur la touche
“ ” ou sur le bouton OK pour mémoriser les
réglages. “ Mémorisé... ” apparaîtra à l’écran.
Menu Spécifi cations
Pip-Pap
Dans le menu Fonctions , sélectionnez la
rubrique PIP en appuyant sur les touches “
ou “ ” . Appuyez sur le bouton “ ” pour accéder
au sous-menu PIP :
À l’aide du bouton “
” ou “ ” , vous pouvez
passer en mode PIP, PAP, ou désactiver
l’option.
Si le téléviseur bascule en mode PIP ou
PAP, le sous-menu Pip-Pip sera modifié
en conséquence et les réglages suivants
s’affi cheront ensemble.
Remarquez que si vous basculez en mode PAP en
utilisant le réglage Pip-Pap, seules les options Source
et Echange seront actives de tous les réglages du
menu.
Pip-Pap
Cette ligne contrôle les modes Pip/Pap. Utilisez
le bouton “ ” ou “ ”, pour faire basculer le
téléviseur en mode Pip , Pap ou désactiver
l’option.
Taille PIP
Grâce à ce réglage, vous pouvez défi nir la taille
de la fenêtre Pip. Appuyez sur les touches “
” ou “ ” pour sélectionner l’élément Taille Pip.
Utilisez le bouton “ ” ou “ ” pour régler la taille
Pip sur Petite ou Grande.
Remarque : Ce réglage sera inactif sii la télé est réglée
sur le mode PIP/PAP.
Position PIP
Ce réglage sert à déplacer la sous-image.
Sélectionnez l’élément Position PIP en utilisant
les boutons “ ” ou “ ”. Appuyez sur la touche
“ ” ou “ ” pour régler la Position PIP.
”
Français - 57 -
02_[FR]_SSM_MB35_37883W_1800UK_ANALOG_BRONZE2_10064230_50151923.indd 5702_[FR]_SSM_MB35_37883W_1800UK_ANALOG_BRONZE2_10064230_50151923.indd 57 29.07.2009 13:23:2729.07.2009 13:23:27
Page 59

Les positions disponibles sont les suivantes:
En Bas a Droite, Bas gauche, Haut Gauche et
Haut droit.
Source
Le réglage Source PIP vous permet de
sélectionner la source de la sous-image.
Sélectionnez l’élément Source PIP en utilisant
les boutons “
” ou “ ” . Utilisez le bouton “ ”
ou “ ” pour régler la Source PIP .
Programme
Ce réglage sera indisponible pour être utilisé.
Echange
Sélectionnez la rubrique Échange en utilisant
le bouton “
” ou “ ” . Utilisez le bouton “
” ou “ ” pour régler. Cette fonction donne la
possibilité de procéder à un échange entre
l’image principale et l’image PIP.
Remarque : Voir l’annexe E pour tous les modes
PIP/PAP.
Minuterie Sommeil
Appuyez sur le bouton “ ” ou “ ” pour
sélectionner Minuterie Sommeil . Appuyez sur
le bouton “ ” ou “ ” pour régler la Minuterie
Sommeil .
La minuterie peut être programmée entre
Désactivé et 120 minutes par intervalles de
10 minutes.
Si la Minuterie Sommeil est activée, à
la fin du temps sélectionné, la télé passe
automatiquement au mode de veille.
Verrouillage enfants
En utilisant les boutons “
” ou “ ” sélectionnez
Verrouillage enfants .
Utilisez le bouton “ ” ou “ ” pour sélectionner
l’activation ou la désactivation du Verrouillage
Enfant. Lorsque Activé est sélectionné, le
téléviseur peut uniquement être contrôlé à l’aide
de la télécommande. Dans ce cas les boutons
du panneau de contrôle, sauf le bouton VEILLE
ne fonctionneront pas.
Si l’un de ces boutons est enclenché V errouillage
enfant activé s’affi che à l’écran lorsque la
fenêtre de menu n’est pas visible.
Langue
Appuyez sur le bouton “
” ou “ ” pour
sélectionner Langue . En appuyant sur le bouton
“
” ou “ ”, sélectionnez la Langue .
Français - 58 -
Zoom par défaut
Lorsque le mode Zoom est réglé sur AUTO , le
téléviseur réglera le mode Zoom conformément
au signal de la diffusion. En cas d’absence de
WSS ou d’informations relatives au rapport
d’aspect, le téléviseur utilisera alors ce
réglage. Appuyez sur le bouton “ ” ou “ ” pour
sélectionner Zoom par défaut . Vous pouvez
régler le zoom par défaut à Panoramique ,
16:9 , 4:3 ou 14:9 en appuyant sur la touche “
” ou “ ”.
Fond bleu
Si le signal est faible ou absent, la couleur de
l’écran du téléviseur deviendra automatiquement
bleue. Pour l’activer, réglez le Fond bleu sur
Activer .
En appuyant sur “
Bleu . Appuyez sur la touche “
” ou “ ” sélectionnez Fond
” ou “ ” pour
activer ou désactiver cette fonction.
Fond du menu
Appuyez sur le bouton “
” ou “ ” pour
sélectionner Fond du menu . Vous pouvez
régler le niveau du fond du menu en appuyant
sur la touche “ ” ou “ ” .
Lumière de fond
Ce réglage contrôle le niveau de la lumière
de fond. Sélectionnez Lumière de fond en
appuyant sur la touche “
” ou “ ”. Appuyez sur
le bouton “ ” ou “ ” pour régler la Lumière de
fond sur Minimum , Medium ou Maximum .
Temps d’effacement OSD
Pour régler un effacement d’affi chage précis
pour les écrans de menu, réglez une valeur
pour cette option.
Appuyez sur le bouton “
” ou “ ” pour
sélectionner le menu Temps d’effacement
OSD . Utilisez le bouton “ ” ou “ ” pour régler
le menu temps d’effacement OSD sur 15 sec ,
30 sec ou 60 sec .
Langue du télétexte
Appuyez sur le bouton “ ” ou “ ” pour
sélectionner Langue du télétexte . Appuyez sur
la touche “
” ou “ ” pour régler la Langue du
télétexte sur Ouest, Est , Turc/Gre , Cyrillique,
Arabe ou Perse .
02_[FR]_SSM_MB35_37883W_1800UK_ANALOG_BRONZE2_10064230_50151923.indd 5802_[FR]_SSM_MB35_37883W_1800UK_ANALOG_BRONZE2_10064230_50151923.indd 58 29.07.2009 13:23:2729.07.2009 13:23:27
Page 60
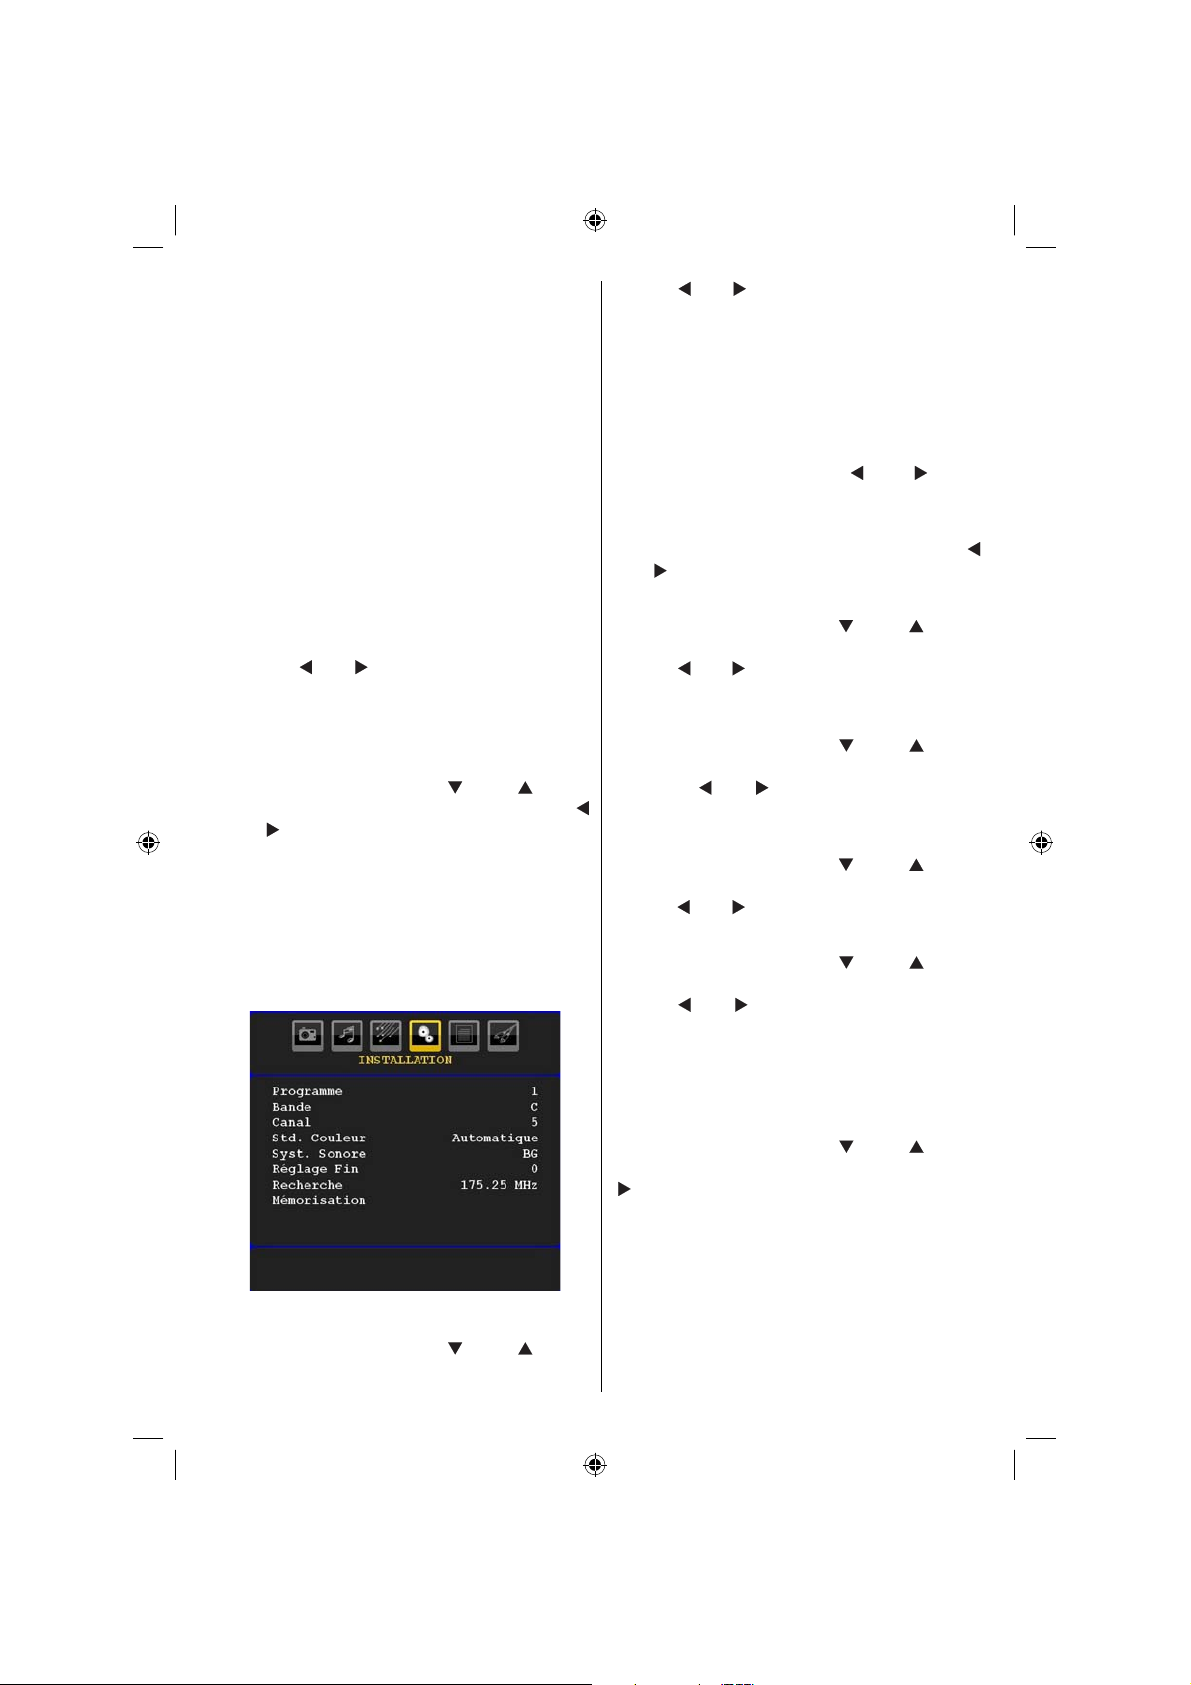
Mode Plein PC HDMI (optionnelle)
Si vous voulez affi cher l’écran du PC en mode
HDMI grâce à une connexion externe, l’option
HDMI PC FULL MODE doit être activée pour
ajuster correctement le rapport d’aspect de
l’écran. Cet élément peut être inactive dans
certaines résolutions.
Remarque: Si vous raccordez un appareil HDMI et
faites basculer le téléviseur en mode HDMI, cette
option sera visible (à l’exception de la résolution
1080i/1080P).
Mode plein écran (optionnelle)
Si vous raccordez un appareil en vous servant
des prises HDMI ou YPbPr, et défi nissez les
résolutions 1080i/1080P, la rubrique Mode
plein écran sera visible. En mode Plein écran,
vous pouvez choisir l’option 1 :1 ou Normal à
l’aide de “
” ou “ ”. Si vous sélectionnez 1 :1,
l’aspect de l’écran sera ajusté correctement. Si
vous choisissez Normal ; le format de l’écran
peut s’agrandir.
Sortie Ext
Appuyez sur le bouton “ ” ou “ ” pour
sélectionner Sortie Ext . Utilisez le bouton “
” ou “ ” pour défi nir la sortie Ext en tant que
Activé ou Désactivé.
Remarque :
Pour copier d’un DVD à un magnétoscope, vous
devez choisir la source souhaitée à partir du menu
Source et faire passer « Activé » à « Sortie EXT » à
partir du menu Fonction.
Menu Installation
Programme
Appuyez sur le bouton “
sélectionner Programme. Appuyez sur le
” ou “ ” pour
bouton “
” ou “ ” pour sélectionner le numéro
du programme. Vous pouvez également entrer
un numéro à l’aide des touches numériques
fi gurant sur la télécommande. Vous pouvez
mémoriser jusqu’à 200 programmes entre 0
et 199.
Bande
Vous pouvez sélectionner la bande C ou
S. Appuyez sur le bouton “
” ou “ ” pour
sélectionner Bande.
Chaîne
La chaîne peut être modifi ée avec la touche “
” ou “ ” ou les touches numériques.
Système de Couleur
Appuyez sur la touche “
” ou “ ” pour
sélectionner Système de couleur. Utilisez le
bouton “ ” ou “ ” pour faire passer le système
de couleur à PAL, PAL 60, SECAM ou AUTO.
Système sonore
Appuyez sur le bouton “ ” ou “ ” pour
sélectionner le Système sonore. Appuyez sur
le bouton “ ” ou “ ” pour changer le système
sonore à BG,DK, I, L ou L’.
Réglage fi n
Appuyez sur la touche “
” ou “ ” pour
sélectionner « Bon réglage ». Appuyez sur la
touche “ ” ou “ ” pour ajuster le réglage.
Recherche
Appuyez sur le bouton “
” ou “ ” pour
sélectionner Recherche. Appuyez sur la
touche “ ” ou “ ” pour démarrer la recherche
du programme. Vous pouvez également
saisir la fréquence désirée avec les touches
numériques lorsque la rubrique Recherche est
en surbrillance.
Mémoriser
Appuyez sur le bouton “ ” ou “ ” pour
sélectionner Mémoriser. Appuyez sur la touche
“ ” ou sur le bouton OK pour mémoriser les
réglages. “ Mémorisé... ” apparaîtra à l’écran.
Menu Installation dans les modes AV
L’écran suivant apparaîtra dans le menu
d’installation lorsque le téléviseur est en mode
A V. Remarquez que les options limitées seront
disponibles. Activez le mode TV pour la version
complète du menu d’Installation .
Français - 59 -
02_[FR]_SSM_MB35_37883W_1800UK_ANALOG_BRONZE2_10064230_50151923.indd 5902_[FR]_SSM_MB35_37883W_1800UK_ANALOG_BRONZE2_10064230_50151923.indd 59 29.07.2009 13:23:2829.07.2009 13:23:28
Page 61
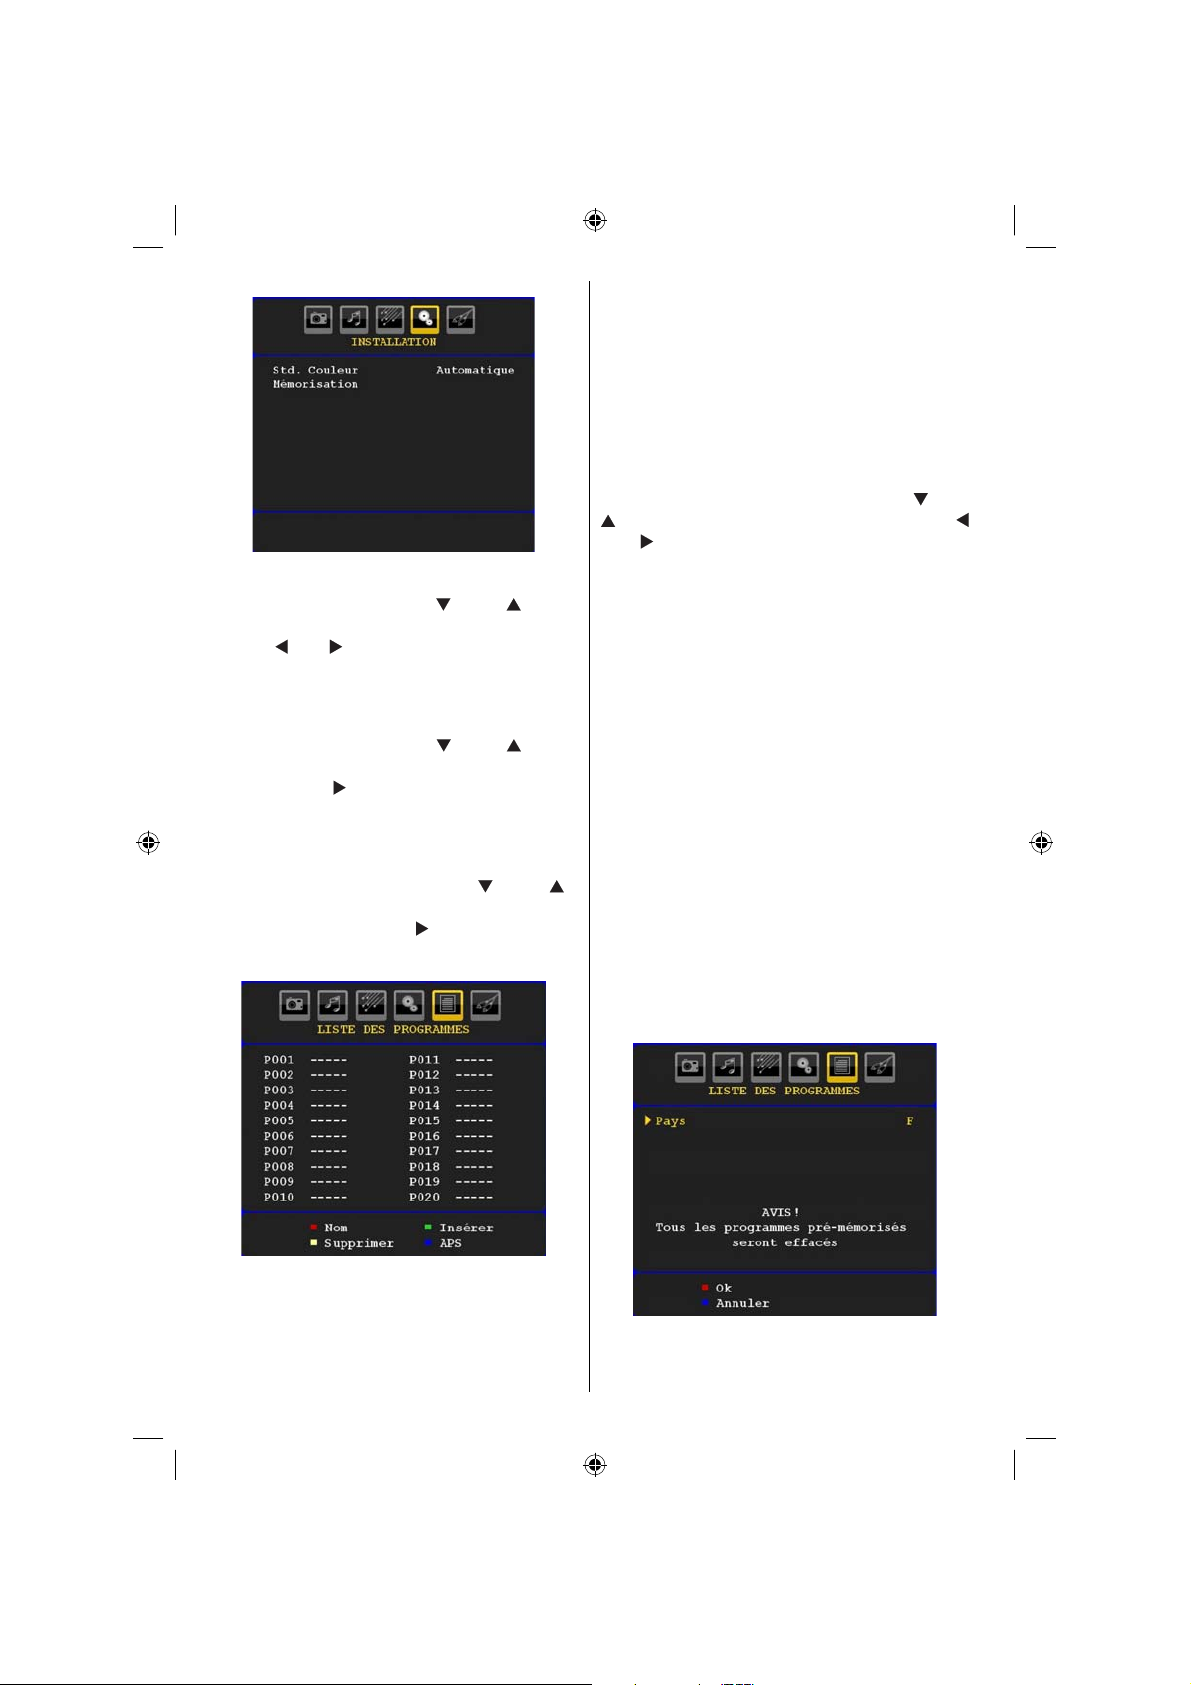
Système de Couleur
Appuyez sur la touche “
sélectionner Système de couleur .
bouton “
” ou “ ” pour faire passer le système
” ou “ ” pour
Utilisez le
de couleur à PAL , SECAM , PAL60, AUTO,
NTSC 4,43 ou NTSC 3,58 .
Mémoriser
Appuyez sur le bouton “
” ou “ ” pour
sélectionner Mémoriser Programme . Appuyez
sur la touche “ ” ou sur le bouton OK pour
mémoriser les réglages. “ Mémorisé... ”
apparaîtra à l’écran.
Tableau des programmes
En appuyant sur la touche “
” ou “ ”,
sélectionnez Tableau des Programmes .
Appuyez sur la touche“ ” pour afficher le
tableau des programmes.
modes AV). Par l’action du curseur, la sélection
du programme est faite automatiquement.
Nom
Pour changer le nom d’un programme,
sélectionnez le programme et appuyez sur le
bouton Pour changer le nom d’un programme,
sélectionnez le programme et appuyez sur le
bouton ROUGE
.
La première lettre du nom sélectionné sera mise
en surbrillance. Appuyez sur le bouton “
” ou “
” pour changer cette lettre et sur le bouton “
” ou “ ” pour sélectionner les autres lettres. En
appuyant sur le bouton ROUGE , vous pouvez
mémoriser le nom.
Déplacer
Sélectionnez le programme que vous voulez
insérer avec les touches directionnelles.
Appuyez sur le bouton VERT . À l’aide des
touches de navigation, déplacez le programme
sélectionné à l’emplacement de votre choix et
appuyez à nouveau sur le bouton VERT .
Supprimer
Pour supprimer un programme, appuyez sur le
bouton JAUNE . En appuyant de nouveau sur le
bouton JAUNE , vous supprimez le programme
sélectionné de la liste de programmes, et les
programmes suivants montent d’une place.
APS (Système Automatique de
Programmation)
Quand vous appuyez sur la touche BLEUE
pour lancer la recherche automatique, le Menu
du Système Automatique de Programmation
apparaîtra sur l’écran:
En déplaçant le curseur dans quatre directions,
vous pouvez atteindre 20 programmes sur la
même page. Vous pouvez défi ler les pages
vers le haut ou vers le bas en appuyant sur
les touches de navigation pour voir tous les
programmes en mode TV (à l’exception des
Français - 60 -
02_[FR]_SSM_MB35_37883W_1800UK_ANALOG_BRONZE2_10064230_50151923.indd 6002_[FR]_SSM_MB35_37883W_1800UK_ANALOG_BRONZE2_10064230_50151923.indd 60 29.07.2009 13:23:2929.07.2009 13:23:29
Page 62

Pays
Appuyez sur le bouton “
” ou “ ” pour
sélectionner votre pays. Si vous voulez quitter la
fonction APS, appuyez sur la touche BLEUE
.
Quand vous appuyez sur la touche OK ou
ROUGE pour lancer la recherche automatique,
tous les programmes mémorisés seront effacés
et le téléviseur recherchera les documents
disponibles. Durant la recherche, l’OSD ci-après
s’affi chera :
À chaque fois que vous appuyez sur la touche
BLEUE , la fonction APS s’arrête et la table des
chaînes apparaît sur l’écran.
Si vous patientez jusqu’à la fi n de l’APS, la liste
des chaînes s’affi chera avec les programmes
trouvés et repérés.
Menu Source
Appuyez sur “ ” ou “ ” pour sélectionner la
sixième icône. Appuyez ensuite sur le bouton
“ ” ou sur OK . Le menu source apparaît sur
l’écran :
Système de menu du mode PC
Se reporter à la section “Connexion du
téléviseur LCD à un PC” pour brancher un
PC au téléviseur.
Pour basculer vers la source PC, appuyez sur
la touche
et sélectionnez l’entrée PC. Vous pouvez
également utiliser le menu Source pour
basculer en mode PC.
Remarquez que les réglages du menu mode PC sont
disponibles uniquement lorsque le téléviseur se trouve
dans la source PC.
Menu de position PC
Sélectionnez la première icône en appuyant
sur la touche “ ” ou “ ”. Le menu Position PC
apparaît à l’écran:
“SOURCE” de votre télécommande
Position automatique
Si vous changez l’image horizontalement ou
verticalement vers une position non voulue,
utilisez cette rubrique pour mettre l’image à
la bonne place automatiquement. Ce réglage
optimise donc de manière automatique
l’affi chage.
Dans le menu source, sélectionnez une source
en appuyant sur la touche “
” ou “ ” et passez
à ce mode en appuyant sur le bouton “ ”. Les
options de source sont: TV , EXT-1 , EXT-2 , FA V ,
HDMI-1 , HDMI-2 , YPbPr ou PC-VGA .
Remarque : Une fois que vous avez branché
des systèmes en option à votre télé, vous devez
sélectionner l’entrée requise pour visualiser les
images à partir de cette source.
Sélectionnez la rubrique Position Automatique
en appuyant sur la touche “
sur la touche OK ou sur le bouton “
” ou “ ”. Appuyez
” , “ ”.
Avertissement : Veuillez vous assurer que
l’ajustement automatique s’effectue à l’aide
d’une image plein écran pour garantir de
meilleurs résultats.
Position H (Horizontale)
Cette rubrique change l’image horizontalement
vers le côté droit ou gauche de l’écran.
Sélectionnez l’élément Position H en utilisant
les boutons “
” ou “ ” . Utilisez le bouton “ ”
ou “ ” pour régler la valeur.
Français - 61 -
02_[FR]_SSM_MB35_37883W_1800UK_ANALOG_BRONZE2_10064230_50151923.indd 6102_[FR]_SSM_MB35_37883W_1800UK_ANALOG_BRONZE2_10064230_50151923.indd 61 29.07.2009 13:23:2929.07.2009 13:23:29
Page 63
Position V (Verticale)
Cet élément change l’image verticalement vers
le haut ou le bas de l’écran.
Sélectionnez l’élément Position V en utilisant
les boutons “
ou “ ” pour régler la valeur.
Phase
Selon la résolution et la fréquence de balayage
qui entre dans le téléviseur, vous pouvez avoir
une image trouble ou avec du bruit sur l’écran.
Dans ce cas, vous pouvez utiliser cette rubrique
pour obtenir une image claire à travers la
méthode d’essai et d’erreur.
Sélectionnez l’élément Phase à l’aide des
touches “
” pour régler la valeur.
Fréquence pilote
Les réglages de la fréquence pilote corrigent
l’interférence qui apparaît verticalement dans
des présentations comme les feuilles ou les
paragraphes ou encore les textes en plus
petites polices.
Sélectionnez Fréquence pilote à l’aide des
touches “
” pour régler la valeur.
Menu Image PC
Pour ajuster les éléments de l’image du PC,
procédez ainsi qu’il suit :
Appuyez sur “
sélectionner la deuxième icône. Le menu image
PC apparaît à l’écran.
Les réglages du contraste, de la luminosité et
de la couleur et de la température de couleur
dans ce menu sont les mêmes que les réglages
dans le menu image TV du Système de Menu
« TV analogique ».
Remarque : Si vous réglez Temp. Couleur en tant que
Utilisateur, vous pouvez défi nir les réglages R, G, B
manuellement.
Menu Son
Les éléments contenus dans ce menu sont
décrits au paragraphe « Menu Son » expliqué
dans « Système de menu ».
Menu Spécifi cations
Les réglages du menu Spécifi cation sont identiques
aux réglages expliqués dans la section “ Menu
Spécifi cation ” du “ Système de menu ”.
” ou “ ” . Utilisez le bouton “ ”
” ou “ ” . Utilisez le bouton “ ” ou “
” ou “ ” . Utilisez le bouton “ ” ou “
” ou sur la touche “ ” pour
Menu Source
Les réglages du menu Source sont identiques
aux réglages expliqués dans la section “ Menu
Source ” du “ Système de menu ”.
Menu Navigateur média
Les réglages du menu Navigateur média
sont identiques aux réglages expliqués dans
la section “ Menu Navigateur média ” du
“ Système de menu ” .
Affi chage des informations TV
Le numéro du programme , le nom du
programme , l’indicateur de son et le mode
zoom sont affichés sur l’écran quand un
nouveau programme est introduit ou le bouton
INFO appuyé.
Fonction Muet
Appuyez sur la touche “ ” pour désactiver le
son. L’indicateur Muet sera affi ché dans la partie
supérieure de l’écran.
Pour annuler la coupure du son, deux alternatives
se présentent à vous. Vous pouvez soit utiliser
la touche “
volume.
”, soit augmenter le niveau du
Mode PIP (Picture-in-Picture )
et PAP (Picture-and-Picture)
Appuyez sur la touche “ / ” pour passer
au mode PIP.
En mode PIP, une petite image apparaît
dans l’image principale. 1 taille et 4 positions
sont disponibles (gauche supérieure, droite
supérieure, gauche inférieure, et droite
inférieure) sont disponibles pour la fenêtre
PIP.
Lorsque le mode PIP est saisi, la fenêtre active
par défaut est la fenêtre PIP et la fenêtre active
est indiquée par un cadre jaune tout autour. La
fenêtre active peut être changée en appuyant
sur la touche “
relatives au statut appartient à la fenêtre active.
L’emplacement des OSD de l’emplacement est
le même pour les deux fenêtres .
Appuyez de nouveau sur la touche “ / ”
pour quitter le mode PAP.
En mode PAP, deux images de même taille
apparaissent à l’écran. Les rapports d’aspect
des fenêtres sont fi xés.
” ou “ ” . L’OSD des informations
Français - 62 -
02_[FR]_SSM_MB35_37883W_1800UK_ANALOG_BRONZE2_10064230_50151923.indd 6202_[FR]_SSM_MB35_37883W_1800UK_ANALOG_BRONZE2_10064230_50151923.indd 62 29.07.2009 13:23:3029.07.2009 13:23:30
Page 64

Lorsque vous basculez en mode P AP , la fenêtre
principale en mode PIP s’affi che à droite de
l’écran. La fenêtre active peut être changée en
appuyant sur la touche “
Appuyez de nouveau sur le bouton “
pour quitter le mode PAP.
” ou “ ” .
/ ”
Sélection du mode Image
En appuyant sur la touche PRESETS , vous
pouvez modifi er les paramètres du Mode Image
selon vos besoins. Les options disponibles sont
Dynamique, Naturel, et Cinéma.
Remarque: Cette fonction ne sera pas disponible
en mode PC.
Gel d’images
Vous pouvez geler une image sur l’écran
en appuyant sur le bouton “OK” de la
télécommande. Appuyez sur la touche « OK
» pour geler l’image. Appuyez à nouveau pour
quitter le mode de gel d’images.
Remarque : Cette option sera indisponible lorsque les
sources PC, YPBPr et HDMI sont en cours d’utilisation.
Modes Zoom
V ous pouvez modifi er le rapport d’aspect (taille
de l’image) du téléviseur pour affi cher l’image
en différents modes zoom.
Appuyez sur la touche “SCREEN” pour modifi er
directement le mode zoom.
Les modes zoom disponibles sont présentés
ci-dessous.
Remarque:
En mode YPbPr et HDMI , résolutions 720p-1080i,
seul le mode 16:9 est disponible.
En mode PC, seul le format 16:9 , est disponible.
Auto
Lorsque un signal WSS (Signal d’écran large)
qui montre le rapport d’aspect de l’image est
inclus dans le signal de transmission ou dans
le signal d’un dispositif externe, le téléviseur
change automatiquement le mode ZOOM vers
4:3 ou 16:9 selon le signal WSS .
• Lorsque le mode AUTO ne fonctionne pas
correctement à cause de la mauvaise qualité
du signal WSS ou lorsque vous voulez changer
le mode ZOOM , passez à autre mode ZOOM
manuellement.
16:9
Ceci étend les côtés gauche et droit d’une image
normale (rapport d’aspect 4 :3) pour remplir le
grand écran du téléviseur.
• Pour les images du rapport d’aspect 16 :9 qui
ont été réduites en une image normale (rapport
d’aspect 4 :3), utilisez le mode 16:9 pour
restaurer l’image dans son format original.
4:3
Utilisez pour afficher une image normale
(rapport d’aspect 4:3) puisqu’il s’agit ici de sa
taille originelle.
Panoramique
Ceci étend les côtés gauche et droit d’une image
normale (rapport d’aspect 4 :3) pour remplir
l’écran, sans faire que l’image apparaisse
dénaturée.
La partie supérieure et le fond de l’image sont
légèrement coupés.
14:9
Ceci augmente le zoom de l’image (rapport
d’aspect 14:9) vers les limites supérieure et
inférieure de l’écran.
Cinéma
Ceci augmente le zoom de l’image (rapport
d’aspect 16:9) vers l’écran entier.
Français - 63 -
02_[FR]_SSM_MB35_37883W_1800UK_ANALOG_BRONZE2_10064230_50151923.indd 6302_[FR]_SSM_MB35_37883W_1800UK_ANALOG_BRONZE2_10064230_50151923.indd 63 29.07.2009 13:23:3029.07.2009 13:23:30
Page 65

Sous-titre
Ceci augmente le zoom de l’image (rapport
d’aspect 16:9 ) avec sous-titrage vers l’écran
entier.
Zoom
Cette option augmente le zoom de l’image.
Remarque: Vous pouvez passer à l’option Ecran
Haut ou Bas en appuyant sur les touches “ ” /
“
” tandis que Zoom d’images est sélectionné
ainsi qu’il suit: Panoramique, 14:9, Cinéma ou
Sous-titres
Télétexte
Le télétexte transmet des informations telles que
actualités, sports et météo sur votre TV. Notez
que si le signal se dégrade, par exemple dans
des conditions météorologiques mauvaises ou
adverses, certaines erreurs textuelles peuvent
se produire ou le mode télétexte peut être
interrompu.
Les boutons de fonction télétexte sont listés
ci-dessous :
” Teletext / Mix / PAT
“
Active le mode télétexte lorsque pressé une fois.
Appuyer à nouveau pour affi cher le télétexte
au-dessus du programme (mix).Lorsque vous
appuyez sur cette touche, l’écran est divisé
en deux fenêtres, l’une affi chant le télétexte et
l’autre la chaîne actuelle. Presser à nouveau
quitte le mode télétexte.
“RETURN” Index
Sélectionne la page d’index télétexte.
“SCREEN” Agrandir
Presser une fois pour élargir la moitié supérieure
de la page, appuyez à nouveau pour élargir la
moitié inférieure de la page. Pressez à nouveau
pour retourner à la taille normale.
” Révéler
“
Révèle les informations cachées (par ex.
solutions de jeux).
“OK” Garder
Garde une page de texte selon convenance.
Pressez à nouveau pour reprendre.
” Pages / Heure de signaux d’affi chage
“
Sélectionne les pages de signaux d’affi chage
quand le télétexte est activé.
P+ / P- et numéros de 0 à 9
Pressez pour sélectionner une page.
Remarque : La plupart des stations TV utilisent le
code 100 pour leurs pages d’index.
Boutons colorés
(ROUGE/VERT/JAUNE/BLEU)
Votre TV supporte à la fois les systèmes
FASTEXT et TOP text. Lorsque ces systèmes
sont disponibles, les pages sont divisées en
groupes ou en sujets.
Lorsque le système FASTEXT est disponible,
certaines sections d’une page de télétexte
prennent un code de couleur et peuvent être
sélectionnées en pressant les boutons colorés.
Pressez un bouton de couleur qui correspond
à vos besoins.
Les textes colorés apparaîtront, indiquant quels
boutons colorés utiliser lorsque la transmission
TOP text est présente. Presser les commandes
P - ou P + sollicite respectivement la page
suivante ou précédente .
Français - 64 -
02_[FR]_SSM_MB35_37883W_1800UK_ANALOG_BRONZE2_10064230_50151923.indd 6402_[FR]_SSM_MB35_37883W_1800UK_ANALOG_BRONZE2_10064230_50151923.indd 64 29.07.2009 13:23:3029.07.2009 13:23:30
Page 66

Astuces
Entretien de l’écran
Nettoyez l’écran avec un tissu légèrement
mouillé et doux. N’utilisez pas de solvants
abrasifs parce qu’ils peuvent endommager
l’écran du téléviseur.
Pour votre sécurité, débranchez le téléviseur
de l’alimentation secteur lors du nettoyage de
l’appareil. Lors du déplacement du téléviseur,
tenez-le correctement en le saisissant sur la
partie inférieure.
Persistance de l’image
Veuillez remarquer que des images fantômes
peuvent apparaître pendant l’affi chage d’une
image persistante. La persistance de l’image
du téléviseur LCD peut disparaître après un
court instant. Essayez d’éteindre le téléviseur
pendant un moment.
Pour éviter cet incident, ne laissez pas d’images
fi gées pendant des périodes prolongées.
Pas d’alimentation
Si votre téléviseur n’est pas alimenté, veuillez
vérifi er le câble d’alimentation principal et le
branchement du câble d’alimentation à la prise
secteur.
Image faible
Avez-vous sélectionné le système de télé
approprié ? Est-ce que votre téléviseur ou votre
antenne est trop proche d’un appareil audio qui
n’est pas branché à la terre ou d’une lumière
au néon ?
Des montagnes ou de hauts bâtiments peuvent
être à l’origine des images doubles et des images
fantômes. Parfois, vous pouvez améliorer la
qualité de l’image en changeant la direction de
l’antenne.
Est-ce que l’image ou le télétexte sont
méconnaissables ? Vérifi ez si vous avez saisi
la bonne fréquence. Veuillez régler à nouveau
les chaînes.
La qualité de l’image peut se dégrader lorsque
deux périphériques sont branchés au téléviseur
au même moment. Dans une telle situation,
débranchez l’un des périphériques.
Aucune image
Est-ce que l’antenne est correctement branchée
? Est-ce que les prises sont correctement
branchées à la prise d’antenne ? Est-ce que le
câble d’antenne est endommagé ? Les fi ches
appropriées sont-elles utilisées pour brancher
l’antenne? En cas d’incertitudes, veuillez
contacter votre fournisseur.
Sans Image signifi e que votre téléviseur ne
reçoit aucune transmission. Avez-vous appuyé
sur le bouton approprié de la télécommande?
Essayez une nouvelle fois.
Assurez-vous également que la bonne source
d’entrée a été sélectionnée.
Son
Impossible d’entendre un son. Avez-vous coupé
le son en appuyant sur le bouton
Le son sort d’un seul haut-parleur. Est-ce que la
balance est à l’une des extrémités ? Consultez
le menu Son .
?
Télécommande
Votre téléviseur ne répond plus à la
télécommande. Peut être que les piles sont
usagées. Si tel est le cas, vous pouvez
utiliser les boutons qui se trouvent au bas du
téléviseur.
Sources d’entrée
S’il vous est impossible de sélectionner une
source d’entrée, il est possible qu’aucun
appareil ne soit branché.
Vérifi ez les câbles AV et les branchements si
vous avez essayé de brancher un appareil.
Français - 65 -
02_[FR]_SSM_MB35_37883W_1800UK_ANALOG_BRONZE2_10064230_50151923.indd 6502_[FR]_SSM_MB35_37883W_1800UK_ANALOG_BRONZE2_10064230_50151923.indd 65 29.07.2009 13:23:3129.07.2009 13:23:31
Page 67

Annexe A: Modes d’affi chage typique de l’entrée PC
L’affi chage comporte une résolution maximale de 1920 x 1200 . Le tableau ci-après illustre quelques
modes d’affi chage vidéo.
Votre téléviseur peut ne pas prendre en charge différentes résolutions. Les modes de résolution
pris en charge sont présentés ci-dessous.
Si vous faites passer votre PC à un mode non pris en charge, un message d’avertissement
apparaîtra à l’écran.
Remarque: Les modes de résolution indiquées à l’aide d’un astérisque (*) ne sont pas disponibles
pour les modes PIP/PAP.
Index
20
21
22
23
25
26
27
28
31
33
34
36
37
39
41
42
44
Résolution Frequence
Hor Ver Ver (Hz)
1 640 350 85 37.9 VESA
3 640 400 85 37.9 VESA
4 640 400 70 31.5 IBM VGA
6 640 480 60 31.5 VESA
7 640 480 66 35.0 MAC
8 640 480 72 37.9 VESA
9 640 480 75 37.5 VESA
10 640 480 85 43.3 VESA
11 800 600 56 35.2 VESA
12 800 600 60 37.9 VESA
13 800 600 70 43.8
14 800 600 72 48.1 VESA
15 800 600 75 46.9 VESA
16 800 600 85 53.7 VESA
17 832 624 75 49.7 MAC
18 1024 768 43 35.5
19 1024 768 60 48.4 VESA
* 1024 768 70 56.5 VESA
* 1024 768 72 57.7
* 1024 768 75 60.0
* 1024 768 85 68.3
24 1152 864 60 53.8
* 1152 864 70 64.2 VESA
* 1152 864 75 67.5 VESA
* 1152 864 85 77.1 VESA
* 1152 870 75 68.9 MAC
29 1280 768 60 47.7 VESA
30 1360 768 60 47.7
* 1280 768 75 60.2 VESA
32 1280 960 60 60.0 VESA
* 1280 960 75 75.0 VESA
* 1280 960 85 85.9 VESA
35 1280 1024 60 64.0 VESA
* 1280 1024 75 80.0 VESA
* 1280 1024 85 91.1 VESA
38 1400 1050 60 65.3
* 1400 1050 75 82.3
40 1440 900 60 55.9
* 1440 900 75 70.6
* 1600 1200 60 75.0 VESA
43 1680 1050 60 65.3
* 1920 1200 60 74.5
Hor
(KHz)
Standard
VESA
(interlace)
Français - 66 -
02_[FR]_SSM_MB35_37883W_1800UK_ANALOG_BRONZE2_10064230_50151923.indd 6602_[FR]_SSM_MB35_37883W_1800UK_ANALOG_BRONZE2_10064230_50151923.indd 66 29.07.2009 13:23:3129.07.2009 13:23:31
Page 68
Annexe B: Compatibilité du signal AV et HDMI (types de signal
d’entrée)
Source Signaux pris en charge Disponible
PAL 50/60 O
EXT-1
(SCART 1)
EXT-2
(SCART-2)
FAV
YPbPr
HDMI1
HDMI2
NTSC 60 O
RGB 50 O
RGB 60 O
PAL 50/60 O
NTSC 60 O
RGB 50 X
RGB 60 X
PAL 50/60 O
NTSC 60 O
480I 60Hz O
480P 60Hz O
576I 50Hz O
576P 50Hz O
720P 50Hz O
720P 60Hz O
1080I 50Hz O
1080I 60Hz O
1080P 24Hz O
1080P 50Hz O
1080P 60Hz O
480I 60Hz O
480P 60Hz O
576I 50Hz O
576P 50Hz O
720P 50Hz O
720P 60Hz O
1080I 50Hz O
1080I 60Hz O
1080P 50Hz O
1080P 60Hz O
1080P 24 HZ O
(X: Non disponible, O: Disponible)
Remarque : Dans certains cas, un signal à l’écran du téléviseur LCD peut ne pas s’affi cher correctement. Le problème peut
être celui d’une inconsistance rencontrée avec les standards de l’appareil source (DVD, décodeur, etc.) Si vous rencontrez un
tel problème, veuillez contacter votre fournisseur et le fabricant de l’appareil source.
Français - 67 -
02_[FR]_SSM_MB35_37883W_1800UK_ANALOG_BRONZE2_10064230_50151923.indd 6702_[FR]_SSM_MB35_37883W_1800UK_ANALOG_BRONZE2_10064230_50151923.indd 67 29.07.2009 13:23:3129.07.2009 13:23:31
Page 69
Appendice C : Résolutions prises en charge
Reportez-vous aux résolutions suivantes au moment de raccorder les connecteurs à votre
téléviseur à l’aide des câbles DVI (non fournis).
24Hz 25Hz 30Hz 50Hz 60Hz
480i
480p
576i
576p
720p
1080i
1080p
;
;
;;
;;
;;;; ;
;
;
Français - 68 -
02_[FR]_SSM_MB35_37883W_1800UK_ANALOG_BRONZE2_10064230_50151923.indd 6802_[FR]_SSM_MB35_37883W_1800UK_ANALOG_BRONZE2_10064230_50151923.indd 68 29.07.2009 13:23:3129.07.2009 13:23:31
Page 70

Appendice D : Spécifi cations des broches
Spécifi cations des broches de la prise péritel
Broche Signal d’entrée Broche Signal d’entrée
1 SORTIE AUDIO (DROIT) 12
2 ENTRÉE AUDIO (DROIT) 13
3 SORTIE AUDIO (GAUCHE/MONO) 14
4 AUDIO GND 15
5 RGB-B GND 16
6 ENTRÉE AUDIO (GAUCHE/MONO) 17
7 ENTRÉE RGB-B 18
8 AUDIO / RGB SWITCH / 16:9 19
9 RGB-G GND 20
VIDEO COMPOSITE / ENTRÉE S.VHS LUMINANCE
10 Non utilisé 21
11 ENTRÉE RGB-G
Spécifi cations des broches de la prise HDMI
Broche
Signal d’entrée
1 TMDS Data2+ 11 TMDS Clock Shield
2
TMDS Data2 Shield 12 TMDS Clock-
3
TMDS Data 2- 13 CEC
4
TMDS Data 1+ 14 Réservé (N.C. sur périphérique)
5
TMDS Data1 Shield 15 SCL
6
TMDS Data1- 16 SDA
7
TMDS Data0+ 17 DDC/CED Ground
8
TMDS Data0 Shield 18 +5V Power
9
TMDS Data0- 19 Hot Plug Detect
10
TMDS Clock+
Broche
Signal d’entrée
Entrée du signal
Terminal PC RGB (Mini-prise D-sub 15 broches)
Broche Signal d’entrée
1
2
G ou sync sur vert (Green)
3
4
5
6
7
8
9
10
11
12
13
H.sync ou H/V composite sync
14
15
R
B
Pas de branchement
Pas de branchement
R.TERRE
G.TERRE
B.TERRE
Pas de branchement
GND
Pas de branchement
[SDA]
V.sync. [V.CLK]
[SCL]
Non utilisé
RGB-R GND
GND
RGB-R / S.VHS CHROMINANCE IN
SIGNAL DE SUPPRESSION
VIDÉO COMPOSITE GND
SIGNAL DE SUPPRESSION GND
SORTIE VIDEO DU COMPOSITE
GND / SHIELD (CHASSIS)
Français - 69 -
02_[FR]_SSM_MB35_37883W_1800UK_ANALOG_BRONZE2_10064230_50151923.indd 6902_[FR]_SSM_MB35_37883W_1800UK_ANALOG_BRONZE2_10064230_50151923.indd 69 29.07.2009 13:23:3129.07.2009 13:23:31
Page 71

Annexe E: Combinaisons Mode PIP/PAP
GROUPE
PRINCIPAL
TV
Scart1
Scart2
FAV
HDMI1
HDMI2
YPbPr
PC-VGA
TV Scart1 Scart2 FAV HDMI1 HDMI2 YPbPr
9
8
9
(RGB)
8
8
(RGB)
(RGB)
(RGB)
8 89999
9
8
(RGB) 9 (RGB)
9
8 89999
9
8 89999
9999
99998 899
99998 899
99999989
99999998
PC-
VGA
( RGB ): Ceci indique que la sélection n’est possible que si Péritel-1 est doté d’un signal RGB.
Restrictions : La source Péritel-1 doit disposer d’un signal RGB pour effectuer les combinaisons
du mode PIP/PAP avec les sources TV, Péritel-2, FAV.
Si ces sources sont défi nies sur la fenêtre principale, et Péritel-1 ne dispose pas d’un signal RGB,
la source PIP/PAP ne peut pas basculer vers la source Péritel-1.
Si la source Péritel-1 est défi nie sur la fenêtre principale, et Péritel-1 ne dispose pas d’un signal
RGB, la source PIP/PAP ne peut pas basculer vers le téléviseur, FAV et les sources.
Français - 70 -
02_[FR]_SSM_MB35_37883W_1800UK_ANALOG_BRONZE2_10064230_50151923.indd 7002_[FR]_SSM_MB35_37883W_1800UK_ANALOG_BRONZE2_10064230_50151923.indd 70 29.07.2009 13:23:3129.07.2009 13:23:31
Page 72

Spécifi cations
TRANSMISSION TV
PAL/SECAM B/G D/K K’ I/I’ L/L’
RÉCEPTION DE CHAINES
VHF (BAND I/III)
UHF (BAND U)
HYPERBAND
NOMBRE DE CHAÎNES PRÉRÉGLÉES
200
INDICATEUR DE CHAÎNE
Affi chage à l’écran
ENTRÉE D’ANTENNE RF
75 Ohm (Non équilibré)
VOLTAGE DE FONCTIONNEMENT
220-240V CA, 50 Hz.
AUDIO
German + Nicam Stereo
PUISSANCE DE SORTIE AUDIO (W
2 x 8
CONSOMMATION ÉLECTRIQUE (W)
190 W (max)
< 1 W (Veille)
PANNEAU
Écran 16 :9, Taille de l’écran 37”
DIMENSIONS (mm)
DxLxH (Avec pied): 246 x 905 x 627
Poids (en Kg): 14,4
DxLxH (Sans pied):100 x 905 x 590
Poids (en Kg): 13,6
RMS.
) (10% THD)
Français - 71 -
02_[FR]_SSM_MB35_37883W_1800UK_ANALOG_BRONZE2_10064230_50151923.indd 7102_[FR]_SSM_MB35_37883W_1800UK_ANALOG_BRONZE2_10064230_50151923.indd 71 29.07.2009 13:23:3129.07.2009 13:23:31
Page 73

Contents
Features ............................................................... 74
Accessories .......................................................... 74
Introduction ........................................................... 75
Preparation ........................................................... 75
Safety Precautions ...............................................75
Power Source ................................................... 75
Power Cord ....................................................... 75
Moisture and Water ..........................................75
Cleaning............................................................75
Heat and Flames ..............................................75
Lightning ........................................................... 75
Replacement Parts ........................................... 75
Servicing ........................................................... 76
Waste Disposal ................................................. 76
Information for Users in European Union
Countries .......................................................... 76
Disconnecting the Device ................................. 76
Headphone Volume .......................................... 76
Installation.........................................................76
LCD Screen ...................................................... 76
Warning ............................................................76
Overview of the Remote Control ..........................77
LCD TV and Operating Buttons ............................ 78
Viewing the Connections- Back Connectors ........79
Viewing the Connections - Side Connectors ........ 81
Power Connection ................................................ 82
Aerial Connection ................................................. 82
Connecting the LCD TV to a PC ........................... 83
Connecting to a DVD Player................................. 84
Using Side AV Connectors ................................... 85
Using Other Connectors ....................................... 86
Connecting Other Equipment via Scart ................ 87
Inserting Batteries in the Remote Control
Handset ............................................................... 88
Operating Range for the Remote Control ............. 88
Switching the TV On/Off ....................................... 88
To Switch the TV On .........................................88
To Switch the TV Off .........................................88
First Time Installation............................................88
Input Selection ...................................................... 89
Basic Operations .................................................. 89
Operation with the Buttons on the TV ............... 89
Volume Setting ..............................................89
Programme Selection ...................................89
Viewing Main Menu .......................................89
AV Mode ....................................................... 89
Operation with the Remote Control ..................89
Volume Setting ..............................................89
Programme Selection (Previous or Next
Programme) .................................................. 89
Programme Selection (Direct Access) .......... 89
Navigating the TV Menu System .......................... 90
Menu System........................................................ 90
Picture Menu.....................................................90
Mode ............................................................. 90
Brightness/Contrast/Colour/Sharpness/Hue . 90
Colour Temp .................................................. 90
Noise Reduction ...........................................90
Film Mode ..................................................... 90
Game Mode (optional) .................................. 90
Picture Zoom ................................................91
Reset ............................................................ 91
Store ............................................................. 91
Sound Menu .....................................................91
Volume ..........................................................91
Equalizer ....................................................... 91
Balance ......................................................... 91
Headphone ................................................... 91
Volume....................................................91
Headphone Sound (optional) .................91
Sound Mode (optional) .................................91
AVL ............................................................... 92
Spdif Out ....................................................... 92
Store ............................................................. 92
Feature Menu ...................................................92
Pip-Pap ......................................................... 92
Pip-Pap ...................................................92
Pip Size ..................................................92
PIP Position ............................................92
Source ....................................................92
Program ..................................................93
Swap.......................................................93
Sleep Timer ................................................... 93
Child Lock ..................................................... 93
Language ...................................................... 93
Default Zoom ................................................93
Blue Background ..........................................93
Menu Background ......................................... 93
Backlight ....................................................... 93
Menu Timeout ............................................... 93
HDMI PC Full Mode (optional) ...................... 93
Full Mode (optional) ...................................... 93
Teletext Language ........................................ 93
Install Menu ......................................................94
Program ........................................................ 94
Band ............................................................. 94
Channel ........................................................ 94
Colour System ..............................................94
Sound System ..............................................94
Fine Tune ...................................................... 94
Search .......................................................... 94
Store ............................................................. 94
Install Menu in AV Modes .............................. 94
Colour System ........................................94
Store ............................................................. 94
Program Table ............................................... 94
Name ......................................................95
Move .......................................................95
Delete .....................................................95
APS (Auto Programming System) ..........95
English - 72 -
03_[GB]_SSM_MB35_37883W_1800UK_ANALOG_BRONZE2_10064230_50151923.indd 7203_[GB]_SSM_MB35_37883W_1800UK_ANALOG_BRONZE2_10064230_50151923.indd 72 29.07.2009 13:25:4429.07.2009 13:25:44
Page 74

Country ................................................95
Source Menu ....................................................95
PC Mode Menu System........................................ 96
PC Position Menu ............................................. 96
Autoposition .................................................. 96
H (Horizontal) Position .................................. 96
V (Vertical) Position ......................................96
Phase ............................................................ 96
Dot Clock ......................................................96
PC Picture Menu ........................................... 96
Sound Menu .................................................96
Feature Menu ...............................................96
Source Menu ................................................96
Displaying TV Information .................................... 97
Mute Function ....................................................... 97
PIP (Picture-in-Picture) and PAP (Picture-and-
Picture) Modes .....................................................97
Picture Mode Selection......................................... 97
Freezing Picture ...................................................97
Zoom Modes......................................................... 97
Auto .................................................................. 97
16:9 ................................................................... 97
4:3 ..................................................................... 97
Panoramic.........................................................98
14:9 ................................................................... 98
Cinema ............................................................. 98
Subtitle .............................................................. 98
Zoom.................................................................98
T eletext ................................................................. 98
Tips .......................................................................99
Screen Care......................................................99
Image Persistence ............................................ 99
No Power .......................................................... 99
Poor Picture ...................................................... 99
No Picture ......................................................... 99
Sound ............................................................... 99
Remote Control.................................................99
Input Sources....................................................99
Appendix A: PC Input Typical Display Modes ..... 100
Appendix B: AV and HDMI Signal Compatibility
(Input Signal Types) ............................................ 101
Appendix C: Supported DVI Resolutions............102
Appendix D: Pin Specifi cations........................... 103
SCART connector pin specifi cations .............. 103
HDMI connector pin specifi cations .................103
Signal Input ..................................................... 103
PC RGB Terminal (D-sub 15-pin
connector) ................................................... 103
Appendix E: PIP/PAP Mode Combinations ........104
Specifi cations ..................................................... 105
English - 73 -
03_[GB]_SSM_MB35_37883W_1800UK_ANALOG_BRONZE2_10064230_50151923.indd 7303_[GB]_SSM_MB35_37883W_1800UK_ANALOG_BRONZE2_10064230_50151923.indd 73 29.07.2009 13:25:4529.07.2009 13:25:45
Page 75

Features
• Remote controlled colour LCD TV.
• HDMI connectors for digital video and audio.
This connection is also designed to accept
high defi nition signals.
• 200 programmes from VHF, UHF.
• OSD menu system.
• Two scart sockets for external devices (such
as video, video games, audio set, etc.).
• Stereo sound system. (German+Nicam)
• Teletext, fastext, TOP text.
• Headphone connection.
• Automatic programming system.
• Forward or backward manual tuning.
• Sleep timer.
• Child lock.
• Automatic sound mute when no
transmission.
• NTSC playback.
• PIP / PAP / PAT functions.
• AVL (Automatic Volume Limiting).
• When no valid signal is detected, after 5
minutes the TV switches itself automatically
to standby mode.
• PLL (Frequency Search).
• PC input.
• Plug&Play for Windows 98, ME, 2000, XP,
Vista.
• Audio line out.
• Game Mode (optional)
Accessories
MENU
M
ABC
1
JKL
4
STU
7
PRESETS
SWAP
SCREEN
Remote Controller
OK
SELECT
DEF GHI
2
MNO
5
VWX
8
0
P+
-
P-
DTV
TV
FAV
SUBTITLE
LANG
EPG
Batteries
2 X AAA
+
INFO /
3
PQR
6
YZ
9
RETURN
SOURCE
SLEEP
/
Instruction Book
English - 74 -
03_[GB]_SSM_MB35_37883W_1800UK_ANALOG_BRONZE2_10064230_50151923.indd 7403_[GB]_SSM_MB35_37883W_1800UK_ANALOG_BRONZE2_10064230_50151923.indd 74 29.07.2009 13:25:4529.07.2009 13:25:45
Page 76
Introduction
Thank you for choosing this product. This
manual will guide you for the proper
operation of your TV . Before operating
the TV, please read this manual
thoroughly.
Please do keep this manual in a safe
place for future references.
Preparation
For ventilation, leave a free space of at least
10 cm all around the set. To prevent any fault
and unsafe situations, please do not place any
objects on top of the set.
Use this device in moderate climates.
10 cm
10 cm
10 cm
Safety Precautions
Please read the following recommended
safety precautions carefully for your
safety.
Power Source
The TV set should be operated only from a
22 0-240 V AC, 50 Hz outlet. Ensure that you
select the correct voltage setting for your
convenience.
Power Cord
Do not place the set, a piece of furniture, etc.
on the power cord (mains lead) or pinch the
cord. Handle the power cord by the plug. Do
not unplug the appliance by pulling from the
power cord and never touch the power cord with
wet hands as this could cause a short circuit or
electric shock. Never make a knot in the cord or
tie it with other cords. The power cords should
be placed in such a way that they are not likely
to be stepped on. A damaged power cord can
cause fi re or give you an electric shock. When it
is damaged and needs to be replaced, it should
be done by qualifi ed personnel.
Moisture and Water
Do not use this device in a
humid and damp place (avoid
the bathroom, the sink in the
kitchen, and near the washing
machine). Do not expose this
device to rain or water, as this
may be dangerous and do
not place objects fi lled with
liquids, such as fl ower vases,
on top. Avoid from dripping
or splashing.
If any solid object or liquid falls into the cabinet,
unplug the TV and have it checked by qualifi ed
personnel before operating it any further.
Cleaning
Before cleaning, unplug the TV
set from the wall outlet. Do not
use liquid or aerosol cleaners.
Use soft and dry cloth.
Ventilation
The slots and openings on
the TV set are intended for
ventilation and to ensure reliable operation. To
prevent overheating, these openings must not
be blocked or covered in anyway.
Heat and Flames
The set should not be placed
near to open flames and
sources of intense heat such
as an electric heater. Ensure
that no open fl ame sources,
such as lighted candles,
are placed on top of the TV.
Batteries should not be exposed to excessive
heat such as sunshine, fi re or the like.
Lightning
In case of storm and lightning
or when going on holiday,
disconnect the power cord
from the wall outlet.
Replacement Parts
When replacement parts are required, make
sure that the service technician has used
replacement parts, which are specifi ed by the
manufacturer or have the same specifi cations as
English - 75 -
03_[GB]_SSM_MB35_37883W_1800UK_ANALOG_BRONZE2_10064230_50151923.indd 7503_[GB]_SSM_MB35_37883W_1800UK_ANALOG_BRONZE2_10064230_50151923.indd 75 29.07.2009 13:25:4529.07.2009 13:25:45
Page 77
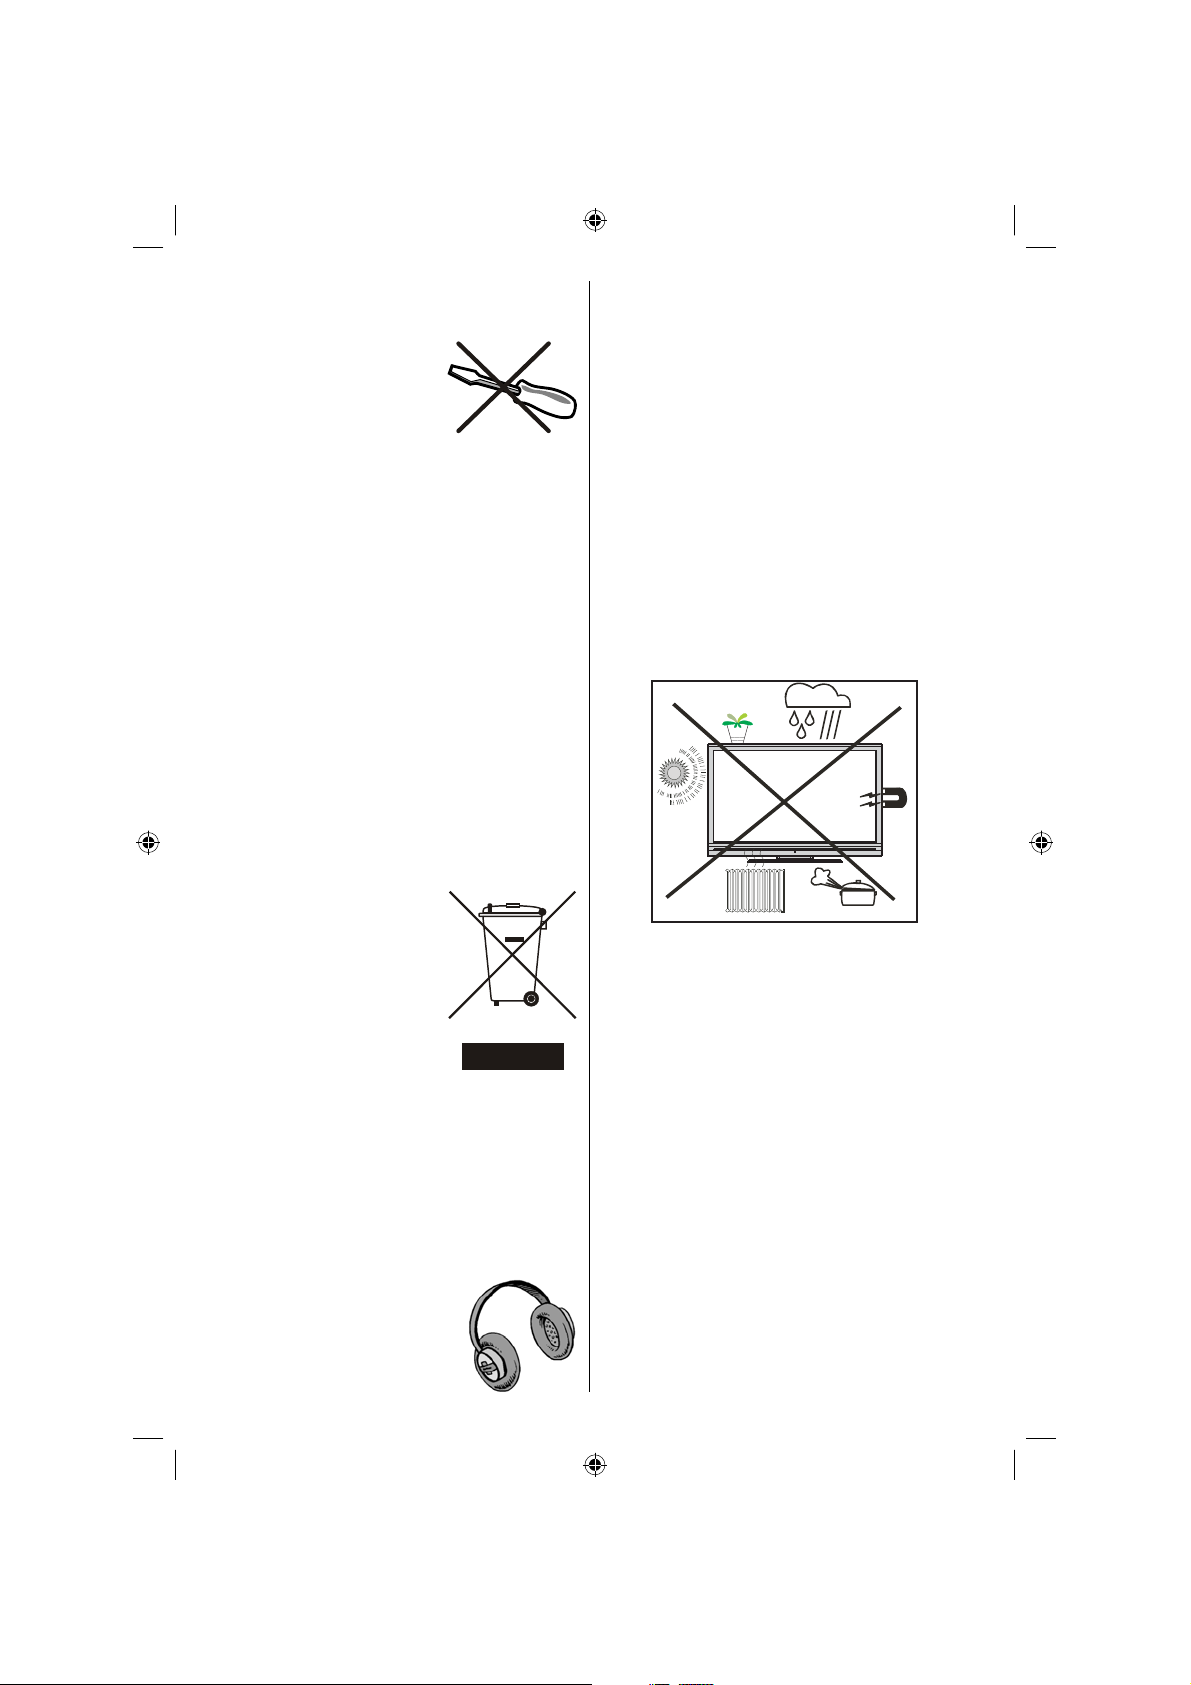
the original one. Unauthorized substitutions may
result in fi re, electrical shock or other hazards.
Servicing
Please refer all servicing to
qualifi ed personnel. Do not
remove the cover yourself as
this may result in an electric
shock.
Waste Disposal
Instructions for waste disposal:
• Packaging and packaging aids are recyclable
and should principally be recycled. Packaging
materials, such as foil bag, must be kept away
from children.
• Batteries, including those which are heavy
metal-free, should not be disposed of with
household waste. Please dispose of used
battery in an environment friendly manner.
Find out about the legal regulations which
apply in your area.
• Cold cathode fluorescent lamp in LCD
PANEL contains a small amount of mercury;
please follow the local laws or regulations for
disposal.
Information for Users in European
Union Countries
This symbol on the product or
on its packaging means that
your electrical and electronic
device should be disposed
at the end of its service
life separately from your
household wastes. There are
separate collection systems
for recycling in EU.
For more information, please
contact the local authority or the dealer where
you purchased the product.
Disconnecting the Device
The mains plug is used to disconnect TV set
from the mains and therefore it must remain
readily operable.
Installation
To prevent injury, this device must be securely
attached to the wall in accordance with the
installation instructions when mounted to the
wall (if the option is available).
LCD Screen
The LCD panel is a very high technology product
with about a million thin fi lm transistors, giving
you fi ne picture details. Occasionally, a few
non-active pixels may appear on the screen
as a fi xed blue, green or red point. Please note
that this does not affect the performance of
your product.
Warning
Do not leave your TV in standby or operating
mode when you leave your house.
Headphone Volume
Excessive sound pressure from
earphones and headphones
can cause hearing loss.
English - 76 -
03_[GB]_SSM_MB35_37883W_1800UK_ANALOG_BRONZE2_10064230_50151923.indd 7603_[GB]_SSM_MB35_37883W_1800UK_ANALOG_BRONZE2_10064230_50151923.indd 76 29.07.2009 13:25:4529.07.2009 13:25:45
Page 78

Overview of the Remote Control
Standby1.
Cursor up / Page up (in TXT mode)2.
Cursor right / Subpage (in TXT mode)3.
Info / Reveal (in TXT mode)4.
Numeric buttons5.
Return / Index page (in TXT mode)6.
Programme up 7.
Volume up8.
No function 9.
AV / Source selection10.
Yellow / Feature menu 11.
Blue / Install menu 12.
TXT subtitle13.
Sleep timer14.
PIP/PAP mode 15.
No function 16.
Update (in TXT mode)17.
Teletext / Mix / PAT 18.
Image size / Expand (in TXT mode)19.
Mono-Stereo / Dual I-II 20.
Red / Sound menu 21.
Green / Picture menu 22.
Previous Programme / Swap23.
TV button 24.
Programme down 25.
Volume down26.
Picture mode selection27.
Menu on-off28.
Cursor down / Page down (in TXT mode)29.
Cursor left 30.
OK / Freeze picture / Hold (in TXT mode)31.
Mute32.
32
31
30
29
28
27
26
25
24
23
22
21
20
19
18
17
MENU
M
ABC
JKL
STU
PRESETS
SWAP
SCREEN
1
2
OK
SELECT
3
4
INFO /
DEF GHI
1
4
7
2
MNO
5
VWX
8
0
P+
-
3
PQR
6
YZ
9
RETURN
+
P-
5
6
7
8
9
10
DTV
TV
SOURCE
FAV
11
12
13
LANG
SUBTITLE
EPG
SLEEP
/
14
15
16
English - 77 -
03_[GB]_SSM_MB35_37883W_1800UK_ANALOG_BRONZE2_10064230_50151923.indd 7703_[GB]_SSM_MB35_37883W_1800UK_ANALOG_BRONZE2_10064230_50151923.indd 77 29.07.2009 13:25:4629.07.2009 13:25:46
Page 79
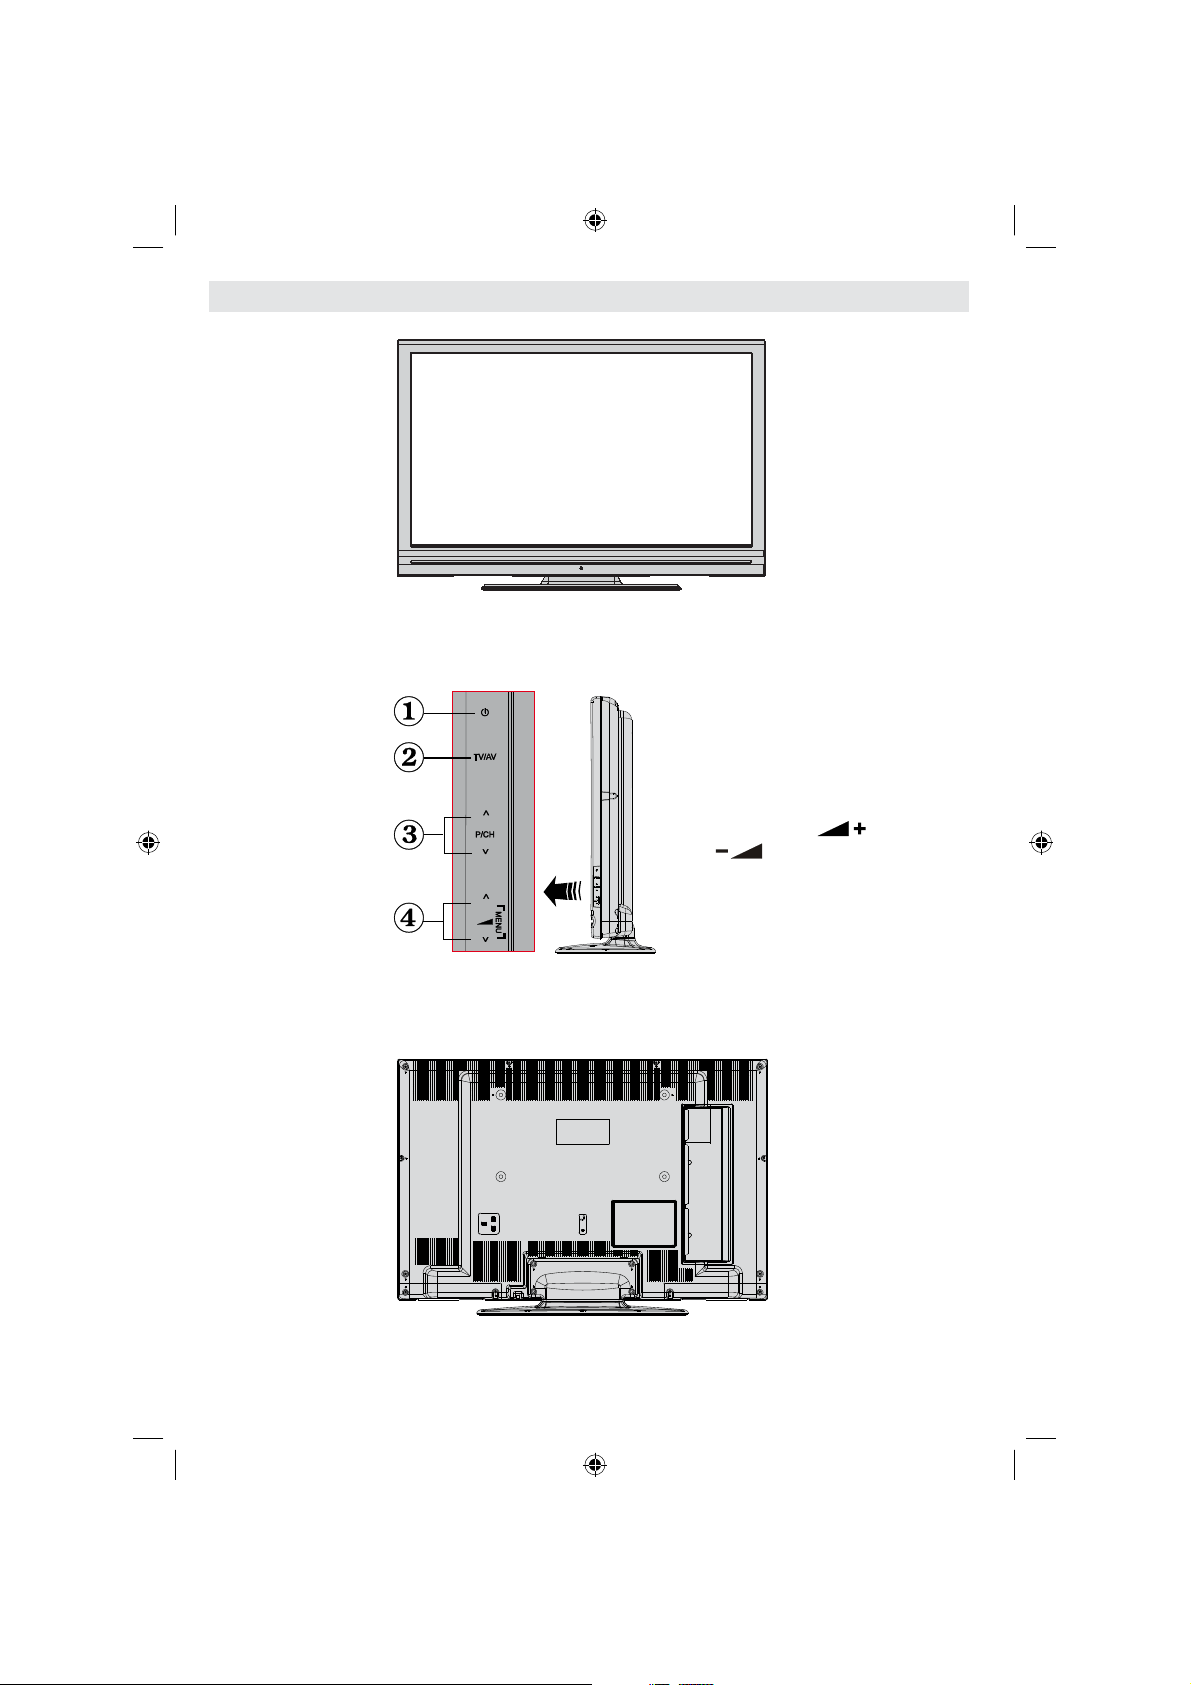
LCD TV and Operating Buttons
FRONT VIEW
Standby button1.
TV/AV button2.
Programme Up/3.
Down buttons
Volume Up/Down 4.
buttons
Note: Press “ ”/“
”buttons at the
same time to view main
menu.
SIDE VIEW
REAR VIEW
English - 78 -
03_[GB]_SSM_MB35_37883W_1800UK_ANALOG_BRONZE2_10064230_50151923.indd 7803_[GB]_SSM_MB35_37883W_1800UK_ANALOG_BRONZE2_10064230_50151923.indd 78 29.07.2009 13:25:4629.07.2009 13:25:46
Page 80

Viewing the Connections- Back Connectors
12
1. S/PDIF Digital Out outputs digital audio signals of the currently watched source.
Use a digital optic cable to transfer audio signals to a device that has S/PDIF input.
2. Subwoofer Out is for connecting an external, active subwoofer to the set to give a much
deeper bass effect.
Use an appropriate RCA cable to connect the set to a subwoofer unit.
Audio Line Outs 3. output audio signals to an external device such as an optional sound system.
To connect the external speakers to your TV, use AUDIO LINE OUTS of the TV with an
audio cable.
SCART 2 inputs or outputs for external devices.
4.
5. SCART 1 inputs or outputs for external devices.
Connect the SCART cable between SCART sockets on TV and SCART socket on your
external device (such as a decoder, a VCR or a DVD player).
Note: If an external device is connected via the SCART sockets, the TV will automatically switch to
AV mode. If both sockets are employed at the same time, SCART 1 will override SCART 2 unless
manually selected.
Note: You should connect the decoder to EXT-1, if you are planning to watch a scrambled channel.
The decoder might not function properly if you do not connect the decoder to the Scart 1 (Ext-1) socket
Note: Picture state can be affected by scart cable quality.
6. Component Video Inputs (YPbPr) are used for connecting component video.
You can connect the component video and audio sockets with a device that has component
output. Connect the component video cables between the COMPONENT VIDEO INPUTS
on on the TV and the component video outputs of your device. While connecting, be sure
that the letters on your TV, “ Y ”, “ Pb ”, “ Pr ” correspond with your device’s connectors.
English - 79 -
03_[GB]_SSM_MB35_37883W_1800UK_ANALOG_BRONZE2_10064230_50151923.indd 7903_[GB]_SSM_MB35_37883W_1800UK_ANALOG_BRONZE2_10064230_50151923.indd 79 29.07.2009 13:25:4629.07.2009 13:25:46
Page 81

7. PC/YPbPr Audio Inputs are used for connecting audio signals of a PC or a device that
connects to the TV via YPbPr.
Connect the PC audio cable between the AUDIO INPUTS on the TV and audio output of
your PC to enable PC audio.
Connect the audio cable between AUDIO INPUTS on the TV and audio outputs of your
device to enable component audio.
8. S/PDIF Coaxial Out outputs digital audio signals of the currently watched source.
Use an SPDIF coaxial cable to trasfer audio signals to a device that has S/PDIF input.
9. RF Input connects to an antenna or a cable.
Note that if you use a decoder or a media recorder, you should connect the aerial cable
through the device to the television with an appropriate antenna cable, as shown in the
illustrationin the following pages.
10. PC Input is for connecting a personal computer to the TV set.
Connect the PC cable between the PC INPUT on the TV and the PC output on your PC.
11. HDMI 2: HDMI Input
HDMI Inputs are for connecting a device that has an HDMI socket. Your LCD Television
is capable of displaying High Defi nition pictures from devices such as a High Defi nition
Satellite Receiver or DVD Player. These devices must be connected via the HDMI sockets
or Component Socket. These sockets can accept either 720p or 1080i signals. No sound
connection is needed for an HDMI to HDMI connection.
HDMI 1: 12. HDMI Input
English - 80 -
03_[GB]_SSM_MB35_37883W_1800UK_ANALOG_BRONZE2_10064230_50151923.indd 8003_[GB]_SSM_MB35_37883W_1800UK_ANALOG_BRONZE2_10064230_50151923.indd 80 29.07.2009 13:25:4729.07.2009 13:25:47
Page 82

Viewing the Connections - Side Connectors
Headphone jack is used for connecting an external 1.
headphone to the system. Connect to the HEADPHONE
jack to listen to the TV from headphones (optional).
Video Input is used for connecting video signals of 2.
external devices.Connect the video cable between the
VIDEO IN socket on the TV and the VIDEO OUT jack on
your device.
Audio Inputs are used for connecting audio signals of 3.
external devices. Connect the audio cable between the
AUDIO INPUTS on the TV and the AUDIO OUTPUT jacks
on your device. Note: If you connect a device to the TV via
the VIDEO INPUT, you should also connect your device
with an audio cable to the AUDIO INPUTS of the TV to
enable audio.
English - 81 -
03_[GB]_SSM_MB35_37883W_1800UK_ANALOG_BRONZE2_10064230_50151923.indd 8103_[GB]_SSM_MB35_37883W_1800UK_ANALOG_BRONZE2_10064230_50151923.indd 81 29.07.2009 13:25:4729.07.2009 13:25:47
Page 83
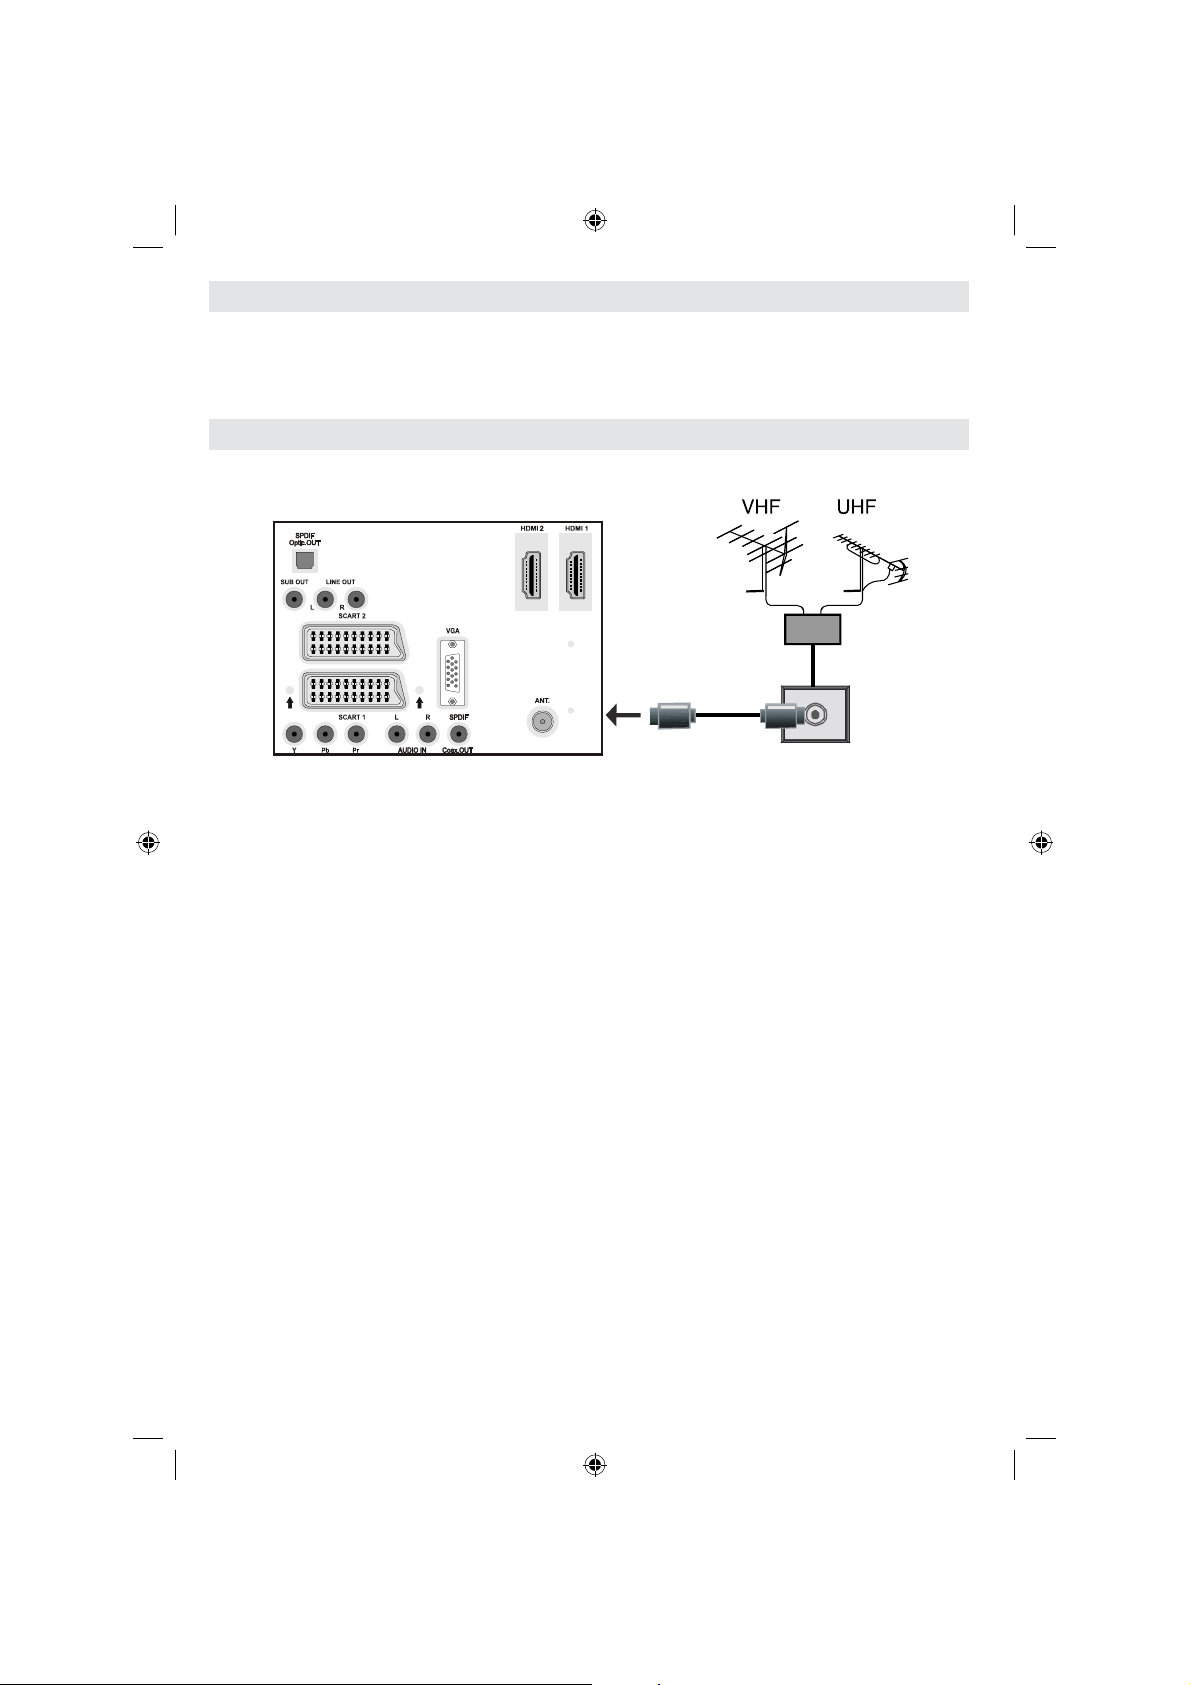
Power Connection
IMPORTANT : The TV set is designed to operate on 220-240V AC, 50 Hz.
• After unpacking, allow the TV set to reach the ambient room temperature before you connect
the set to the mains.
• Plug the power cable to the mains socket outlet.
Aerial Connection
• Connect the aerial or cable TV plug to the AERIAL INPUT socket located at the rear of the TV.
REAR VIEW
English - 82 -
03_[GB]_SSM_MB35_37883W_1800UK_ANALOG_BRONZE2_10064230_50151923.indd 8203_[GB]_SSM_MB35_37883W_1800UK_ANALOG_BRONZE2_10064230_50151923.indd 82 29.07.2009 13:25:4829.07.2009 13:25:48
Page 84

Connecting the LCD TV to a PC
For displaying your computer’s screen image on your LCD TV, you can connect your computer
to the TV set.
• Power off both computer and display before making any connections.
• Use 15-pin D-sub display cable to connect a PC to the LCD TV.
• When the connection is made, switch to PC source. See “Input selection” section.
• Set the resolution that suits your viewing requirements. Resolution information can be found in
the appendix parts.
REAR VIEW
PC audio cable
(not supplied)
to AUDIO INPUTS
on the TV
Audio
Inputs
PC Input
PC RGB cable
(not supplied)
to PC input
English - 83 -
03_[GB]_SSM_MB35_37883W_1800UK_ANALOG_BRONZE2_10064230_50151923.indd 8303_[GB]_SSM_MB35_37883W_1800UK_ANALOG_BRONZE2_10064230_50151923.indd 83 29.07.2009 13:25:4829.07.2009 13:25:48
Page 85

Connecting to a DVD Player
If you want to connect a DVD player to your LCD TV, you can use connectors of the TV set. DVD
players may have different connectors. Please refer to your DVD player’s instruction book for
additional information. Power off both the TV and the device before making any connections.
Note: Cables shown in the illustration are not supplied.
• If your DVD player has an HDMI socket, you can connect via HDMI. When you connect to DVD
player as illustrated below, switch to HDMI source. See, “Input Selection” section.
• Most DVD players are connected through COMPONENT SOCKETS. Use a component video
cable to connect video input. For enabling audio, use a component audio cable as illustrated
below. When the connection is made, switch to YPbPr source. See, “Input selection” section.
• You may also connect through the SCART 1 or SCART 2. Use a SCART cable as shown
below.
Note : These three methods of connection perform the same function but in different levels of quality. It is not
necessary to connect by all three methods.
Component
audio
inputs
DVD Player
HDMI
inputs
Scart sockets
Component
video
inputs
REAR VIEW
English - 84 -
03_[GB]_SSM_MB35_37883W_1800UK_ANALOG_BRONZE2_10064230_50151923.indd 8403_[GB]_SSM_MB35_37883W_1800UK_ANALOG_BRONZE2_10064230_50151923.indd 84 29.07.2009 13:25:4929.07.2009 13:25:49
Page 86

Using Side AV Connectors
You can connect a range of optional equipment to your LCD TV. Possible connections are shown
below. Note that cables shown in the illustration are not supplied.
• For connecting a camcorder, connect to the VIDEO IN socket and the AUDIO SOCKETS. Do not
connect the camcoder to VIDEO IN socket at the same time since it can cause noise in the picture.
For selecting the related source, see the section “Input selection” in the following parts.
• To listen the TV sound from headphones, connect to the HEADPHONE jack of theTV.
Headphone
Camcorder
SIDE VIEW
English - 85 -
03_[GB]_SSM_MB35_37883W_1800UK_ANALOG_BRONZE2_10064230_50151923.indd 8503_[GB]_SSM_MB35_37883W_1800UK_ANALOG_BRONZE2_10064230_50151923.indd 85 29.07.2009 13:25:4929.07.2009 13:25:49
Page 87

Using Other Connectors
You can connect a range of optional equipment to your LCD TV. Possible connections are shown
below. Note that cables shown in the illustration are not supplied.
• To connect external speakers, use an audio cable. Do not reverse the AUDIO LEFT and AUDIO
RIGHT jacks. Turn on the LCD TV and external speaker set after all connections are made.
Refer to your speaker set’s manual for further queries.
• For connecting a to a device that has SPDIF support, use an appropriate SPDIF cable to enable
sound connection.
External Speakers
A device that
supports
SPDIF signal.
REAR VIEW
English - 86 -
03_[GB]_SSM_MB35_37883W_1800UK_ANALOG_BRONZE2_10064230_50151923.indd 8603_[GB]_SSM_MB35_37883W_1800UK_ANALOG_BRONZE2_10064230_50151923.indd 86 29.07.2009 13:25:5029.07.2009 13:25:50
Page 88

Connecting Other Equipment via Scart
Scart sockets
Decoder
DVD Recorder
Video Recorder
Most devices support SCART connection. Y ou can connect a; DVD recorder , a VCR or a decoder
to your LCD TV by using the SCART sockets. Note that cables shown in the illustration are not
supplied.
Power off both the TV and the devices before making any connections.
For more information, refer to your device’s own instruction book.
REAR VIEW
03_[GB]_SSM_MB35_37883W_1800UK_ANALOG_BRONZE2_10064230_50151923.indd 8703_[GB]_SSM_MB35_37883W_1800UK_ANALOG_BRONZE2_10064230_50151923.indd 87 29.07.2009 13:25:5029.07.2009 13:25:50
English - 87 -
Page 89

Inserting Batteries in the
Remote Control Handset
• Remove the battery cover located on the back
of the handset by gently pulling backwards
from the indicated part.
• Insert two AAA/R3 or equivalent type batteries
inside. Place the batteries in the right directions
and replace the battery cover.
Note : Remove the battery from remote control
handset when it is not to be used for a long period.
Otherwise it can be damaged due to any leakage of
batteries.
Operating Range for the
Remote Control
• Point the top of the remote control toward the
LCD TV’s remote sensor LED while pressing
a button.
Switching the TV On/Off
To Switch the TV On
• Connect the power cord to the 220-240V AC,
50 Hz.
• Press STANDBY switch. Then the standby
LED lights up.
• To switch on the TV from standby mode
either:
• Press the “
” button, P+ / P- or a numeric
button on the remote control.
• Press the -P/CH or P/CH+ button on the TV.
The TV will then switch on.
Note : If you switch on your TV via PROGRAMME
UP/DOWN buttons on the remote control or on the
TV set, the programme that you were watching last
will be reselected.
By either method the TV will switch on.
To Switch the TV Off
• Press the “ ” button on the remote control
or press the STANDBY switch, so the TV will
switch to standby mode.
• To power down the TV completely, unplug
the power cord from the mains socket.
First Time Installation
When the TV is switched on for the fi rst time, the
following menu screen will be displayed.
30
30
OK
SELECT
MENU
INFO/
M
ABC
DEF GHI
2
3
1
JKL
MNO
PQR
5
4
6
VWX
STU
YZ
8
7
9
0
RETURN
PRESETS
P+
+
-
P-
SOURCE
DTV
TV
SWAP
FAV
SLEEP
SUBTITLE
LANG
SCREEN
/
EPG
Select your Country, Language and TXT
language by using “ ” or “ ” and “ ” or “ ”
buttons.
Press OK or RED button to continue.
To cancel, press the BLUE button.
For more information on this process, see
“Install Menu” section.
Remote range is approximately 7m/23ft.
Note: Do not turn off the TV while initializing fi rst time
installation.
English - 88 -
03_[GB]_SSM_MB35_37883W_1800UK_ANALOG_BRONZE2_10064230_50151923.indd 8803_[GB]_SSM_MB35_37883W_1800UK_ANALOG_BRONZE2_10064230_50151923.indd 88 29.07.2009 13:25:5029.07.2009 13:25:50
Page 90

Input Selection
Once you have connected external systems
to your TV, you can switch to different input
sources.
• Press “SOURCE” button on your remote
control for directly changing sources.
or,
• Select “Source” option from the main menu
by using “
“ ” button to highlight an input and press “
” button to select.
Note : You can mark desired source options by pressing
the OK button. Therefore, when “SOURCE”button
is pressed, only the marked source options will be
available (except for the TV source).
” or “ ” button. Use then “ ” or
Basic Operations
You can operate your TV using both the
remote control and onset buttons.
Operation with the Buttons on the TV
Volume Setting
• Press “ ” button to decrease volume
or “ ” button to increase volume, so a
volume level scale (slider) will be displayed
on the screen.
Programme Selection
• Press “ P/CH + ” button to select the next
programme or “ P/CH - ” button to select the
previous programme.
Viewing Main Menu
• Press “
time to view main menu. In the Main menu
select sub-menu using “ P/CH - ” or “ P/CH + ”
buttons and enter the sub-menu using “
” or “ ” buttons. To learn the usage of the
menus, refer to the menu system sections.
”/“ ”buttons at the same
English - 89 -
AV Mode
• Press the “ TV/AV ” button in the control panel
on the TV to switch between AV modes.
Operation with the Remote Control
• The remote control of your TV is designed
to control all the functions of the model you
selected. The functions will be described in
accordance with the menu system of your
TV.
• Functions of the menu system are described
in the following sections.
Volume Setting
• Press “
Press “ ” button to decrease the volume.
A volume level scale (slider) will be displayed
on the screen.
Programme Selection (Previous or Next
Programme)
• Press “ P - ” button to select the previous
programme.
• Press “ P + ” button to select the next
programme.
Programme Selection (Direct Access)
• Press numeric buttons on the remote control
to select programmes between 0 and 9. The
TV will switch to the selected programme. To
select programmes between 10-199, press
the numeric buttons consecutively (e.g. for
programme 27, first press 2 and then 7).
When the pressing time is due for the second
numeric button, only the fi rst digit programme
will be displayed. The limit of the delay time
is 3 seconds.
• Press directly the programme number to
reselect single digit programmes.
” button to increase the volume.
03_[GB]_SSM_MB35_37883W_1800UK_ANALOG_BRONZE2_10064230_50151923.indd 8903_[GB]_SSM_MB35_37883W_1800UK_ANALOG_BRONZE2_10064230_50151923.indd 89 29.07.2009 13:25:5129.07.2009 13:25:51
Page 91

Navigating the TV Menu
System
For navigation
To confirm choices
For displaying
menu options
• Press “ M ” to display the main menu.
• Press “
” or “ ” button to select an icon.
• Use “ ” or “ ” button to highlight.
• Press “ ” or “ ” buttons to change the
settings.
• Press “
” for more options.
• Press OK to store.
• To exit the menu or return from sub-menu
screen, press “ M ”.
Note : These explanations are valid for the navigation
of the menu system. To select options that are
explained in the following parts, refer to “Navigating
the Menu System”.
Menu System
Picture Menu
Mode
For your viewing requirements, you can set the
related mode option.
Press “
“ ” or “ ” button to choose from one of these
options: Cinema , Dynamic and Natural .
Brightness/Contrast/Colour/Sharpness/
Hue
Press “
option. Press “ ” or “ ” button to set the level.
” or “ ” button to select Mode . Press
” or “ ” button to select the desired
Note : Hue option can only be visible when the TV
receives an NTSC signal.
Colour Temp
Press “
” or “ ” button to select Colour Temp .
Press “ ” or “ ” to choose from one of these
options: Cool , Normal and Warm .
Note :
• Setting Cool option gives white colours a slight
blue stress.
• Setting Warm option gives white colours a slight
red stress.
• For normal colours, select Normal option.
Noise Reduction
If the broadcast signal is weak and the picture
is noisy , use Noise Reduction setting to reduce
the noise amount.
Press “
” or “ ” button to select Noise
Reduction. Press “ ” or “ ” to choose from one
of these options: Low , Medium , High or Off .
Film Mode
Films are recorded at a different number
of frames per second to normal television
programmes.
Press “
” or “ ” button to select Film Mode .
Press “ ” or “ ” button to set this feature On
or Off.
Turn this feature on when you are watching.
fi lms to see the fast motion scenes clearly.
Game Mode (optional)
Select Game Mode by pressing “
” or “
” button. Use “ ” or “ ” button to set Game
Mode as On or Off . When Game Mode is set
to On, specific game mode settings, which
are optimized for better video quality, will be
loaded.
Also; Picture Mode, Contrast, Brightness,
Sharpness, Colour and Colour Temp settings
will be invisible and disabled while Game Mode
is on.
Note :
Picture mode selection button on the remote control
will have no function while Game Mode is on.
If the TV is switched to PIP/PAP mode, Game Mode
setting will be disabled and be removed from the
Picture menu.
English - 90 -
03_[GB]_SSM_MB35_37883W_1800UK_ANALOG_BRONZE2_10064230_50151923.indd 9003_[GB]_SSM_MB35_37883W_1800UK_ANALOG_BRONZE2_10064230_50151923.indd 90 29.07.2009 13:25:5129.07.2009 13:25:51
Page 92
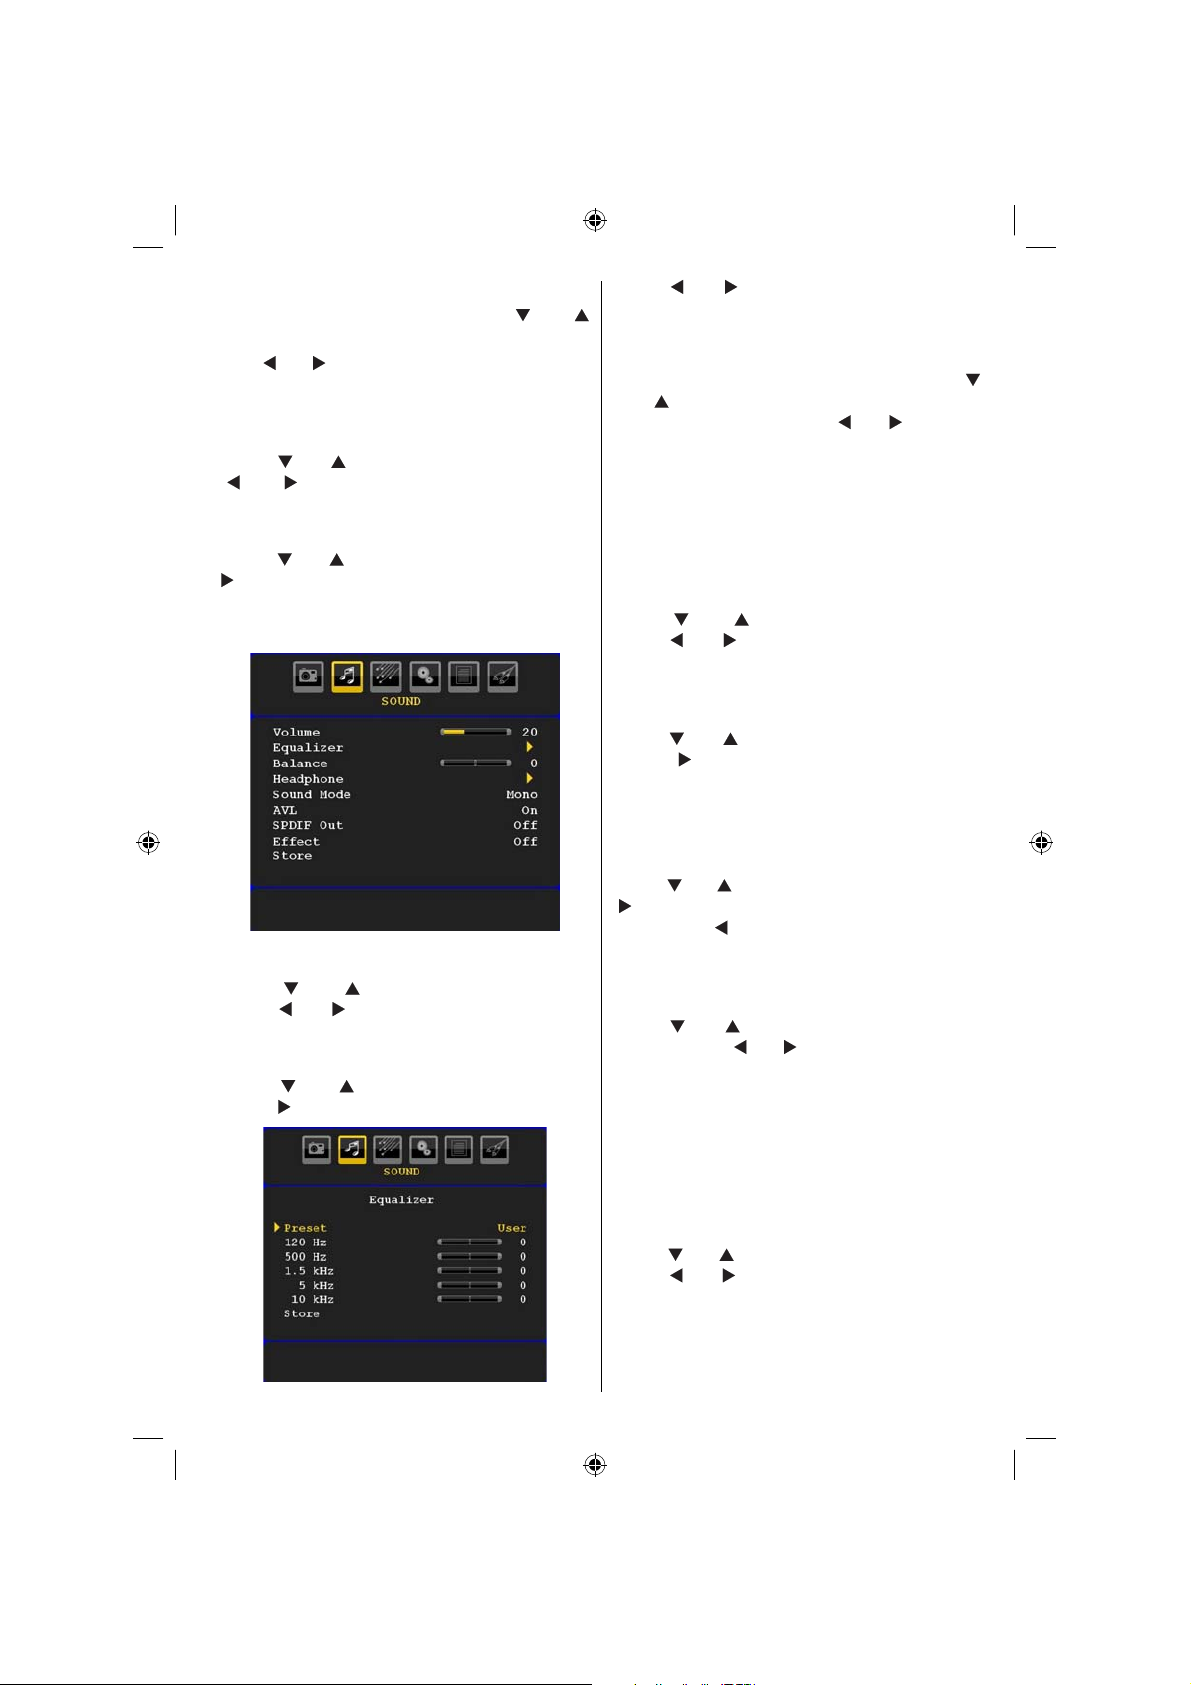
Picture Zoom
Select Picture Zoom by pressing “
” or “
” button.
” or “ ” buttons, to change picture zoom
Use “
to Auto , 16:9 , 4:3 , Panoramic , 14:9 , Cinema ,
Subtitle or Zoom .
Reset
Press “ ” or “ ” button to select Reset . Press
“ ” or “ ” or OK button to reset the picture
modes to factory default settings.
Store
Press “
” or “ ” button to select Store. Press “
” or OK button to store the settings. “ Stored... ”
will be displayed on the screen.
Sound Menu
Volume
Press “
Press “ ” or “ ” button to change the level of
the Volume.
Equalizer
Press “ ” or “ ” button to select Equalizer .
Press “
” or “ ” button to select Volume .
” button to view equalizer menu.
Press “
” or “ ” button to change the preset.
In equalizer menu, the preset can be changed
to Music , Movie , Speech , Flat , Classic and
User .
Select the desired frequency by pressing “
” or “ ” button and increase or decrease the
frequency gain by pressing “ ” or “ ” button.
Press the “ M ” button to return to the previous
menu.
Note : Equalizer menu settings can be changed only
when the Equalizer Mode is in User .
Balance
This setting is used for emphasizing left or right
speaker balance.
Press “
Press “
” or “ ” button to select Balance.
” or “ ” button to change the level of
the balance. Balance level can be adjusted
between -32 and + 32.
Headphone
Press “
” or “ ” button to select Headphone .
Press “ ” button to view the headphone
menu.
Headphone sub-menu options are described
below:
Volume
Press “
” or “ ” button to select Volume . Press
“ ” button to increase headphone volume
level. Press “ ” button to decrease headphone
volume level. Headphone volume level can be
adjusted between 0 and 63 .
Headphone Sound (optional)
Press “
” or “ ” button to select Headphone
Sound . Using “ ” or “ ” button, you can select
Main, PIP/PAP, Active or Inactive.
Main : Main window sound.
PIP/PAP : PIP/PAP window sound.
Active : Sound of the current selection.
Inactive : Sound of the currently inactive
window.
Sound Mode (optional)
Press “
” or “ ” button to select Sound Mode .
Using “ ” or “ ” button, you can select Mono,
Stereo, Dual I or Dual II mode, only if the
selected channel supports that mode.
English - 91 -
03_[GB]_SSM_MB35_37883W_1800UK_ANALOG_BRONZE2_10064230_50151923.indd 9103_[GB]_SSM_MB35_37883W_1800UK_ANALOG_BRONZE2_10064230_50151923.indd 91 29.07.2009 13:25:5229.07.2009 13:25:52
Page 93
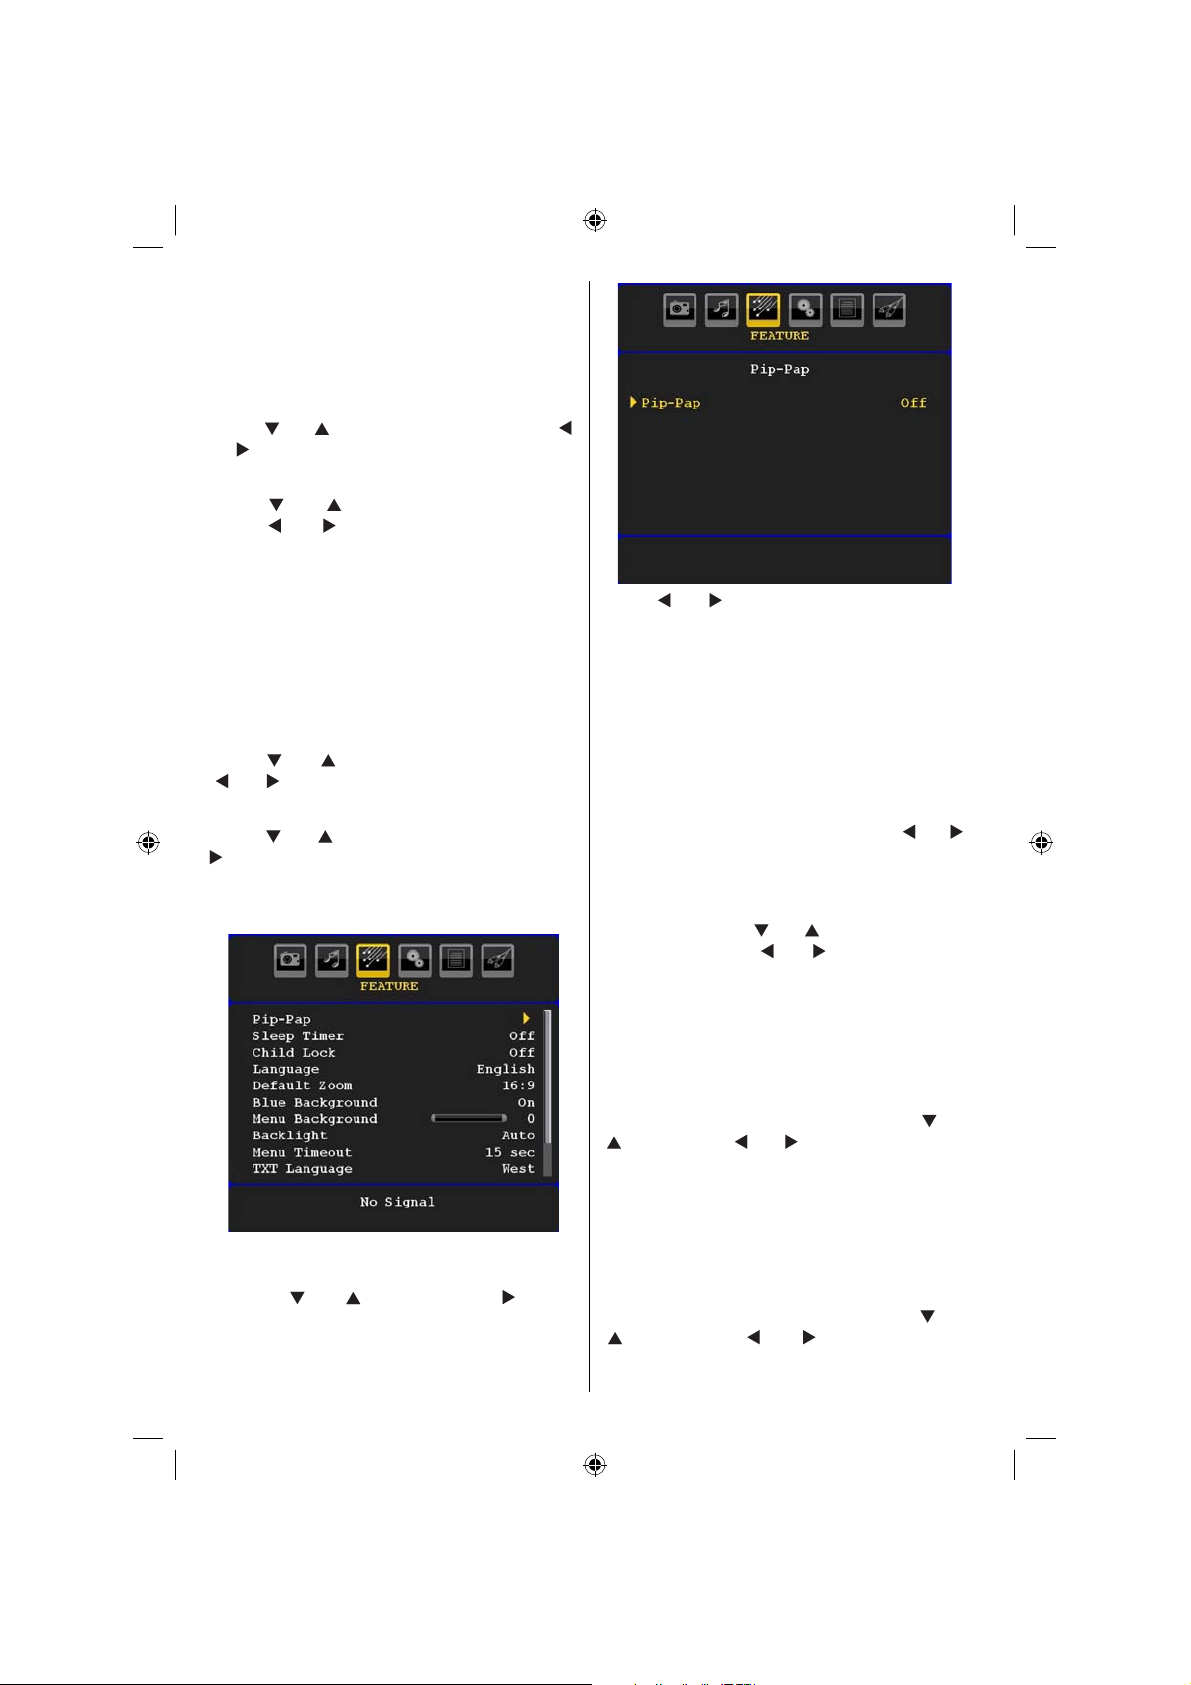
AVL
Automatic Volume Limiting (AVL) function
adjusts the sound to obtain fi xed output level
between programmes (For instance, volume
level of advertisements tend to be louder than
programmes).
Press “
or “
” or “ ” button to select AVL . Press “ ”
” button to set the AVL as On or Off .
Spdif Out
Press “ ” or “ ” button to select Spdif Out .
Press “ ” or “ ” button to set the Spdif Out .
as On or Off .
Note : If Spdif Out is set to On, headphone will be
disabled.
Effect
If you are watching a mono broadcast, set Effect
on to obtain a better sound effect which will be
more stereo-like. If the current sound system is
stereo, switching this effect on will give a more
spatial effect.
Press “
” or “ ” button to select Effect. Press
“ ” or “ ” button to set as On or Off .
Store
Press “ ” or “ ” button to select Store. Press “
” or OK button to store the settings. “ Stored... ”
will be displayed on the screen.
Feature Menu
Pip-Pap
In the Feature menu, highlight PIP item by
pressing “
to enter PIP submenu:
” or “ ” buttons. Press “ ” button
Using “
” or “ ” button, you can switch to PIP,
PAP mode or turn off the feature.
If the TV is switched to PIP or PAP mode,
Pip-Pap submenu will change accordingly and
the following settings will appear on the same
menu screen.
Note that if you switch to PAP mode by using Pip-Pap
setting, only Source and Swap options will be active
among the menu settings.
Pip-Pap
This line controls Pip/Pap modes. Use “ ” or “ ”
buttons to switch the TV to Pip , Pap or Off .
Pip Size
Using this setting, you can set the size of the
Pip window. Press “
” or “ ” button to highlight
Pip Size item. Use “ ” or “ ” button to set Pip
Size to Small or Large.
Note : This setting will be inactive if the TV is set to
Pap mode.
PIP Position
This setting is used for moving the sub
picture.
Select PIP Position item by using “ ” or
“ ” button. Use “ ” or “ ” button to adjust PIP
position.
Positions available are: Bottom Right,Bottom
Left, Top Left and Top Right.
Source
PIP Source setting enables you to select the
source of the sub picture.
Select PIP Source item by using “
“
” button. Use “ ” or “ ” button to set PIP
” or
source.
English - 92 -
03_[GB]_SSM_MB35_37883W_1800UK_ANALOG_BRONZE2_10064230_50151923.indd 9203_[GB]_SSM_MB35_37883W_1800UK_ANALOG_BRONZE2_10064230_50151923.indd 92 29.07.2009 13:25:5329.07.2009 13:25:53
Page 94

Program
This setting will be unavailable to be used.
Swap
Select Swap item by using “
” or “ ” button.
Use “ ” or “ ” button to set. This function
enables to swap between the main and the
PIP picture.
Note : See Appendix E for all PIP/PAP modes.
Sleep Timer
Press “ ” or “ ” button to select Sleep Timer .
Use “ ” or “ ” button to set the Sleep Timer.
The timer can be programmed between Off and
120 minutes in steps of 10 minutes.
If Sleep Timer is activated, at the end of the
selected time, the TV goes automatically to
standby mode.
Child Lock
Press “
Use “
” or “ ” button to select Child Lock .
” or “ ” button to set the Child Lock On
or Off . When On is selected, the TV can only
be controlled by the remote control handset. In
this case the control panel buttons (except for
the STANDBY button) will not work.
Hence, if one of those buttons is pressed, Child
Lock On will be displayed on the screen when
the menu screen is not visible.
Language
Press “
” or “ ” button to select Language .
Use “ ” or “ ” button to select the Language .
Default Zoom
While zoom mode is set as AUTO , the TV will
set the zoom mode in accordance with the
signal of the broadcast. If there is no WSS or
aspect ratio information, the TV will then use
this setting to adopt. Press “
” or “ ” button
to select Default Zoom . You can set Default
Zoom to Panoramic , 16:9 , 4:3 or 14:9 by
pressing “ ” or “ ” button.
Blue Background
If the signal is weak or absent, the TV will
automatically change to a blue screen. To
enable this, set Blue Background to On .
By pressing “
” or “ ” button, select Blue
Background . Press “ ” or “ ” button to set
Blue Background as On or Off .
Menu Background
Press “
” or “ ” button to select Menu
Background . You can set menu background
level by pressing “
” or “ ” button.
Backlight
This setting controls the backlight level. Select
Backlight by pressing “
” or “ ” button.
Press“ ” or “ ” button to set Backlight to Auto,
Medium , Maximum or Minimum .
Menu Timeout
To set a specific display timeout for menu
screens, set a value for this option.
Press “
” or “ ” button to select Menu Timeout .
Use “ ” or “ ” button to change menu timeout
to 15 sec , 30 sec or 60 sec .
HDMI PC Full Mode (optional)
If you want to view PC screen in HDMI mode
by using external connection, HDMI PC FULL
MODE option should be On to adjust the screen
ratio correctly. This item might be inactive in
some resolutions.
Note: If you connect an HDMI device and switch the
TV to HDMI mode, this feature will be visible (except
for 1080i/1080P resolution).
Full Mode (optional)
If you connect a device via HDMI or YPbPr
connectors and set 1080i/1080P resolutions,
Full Mode item will be visible.You can set Full
Mode as 1:1 or Normal by using “ ” or “ ”.If you
select 1:1, screen ratio will be adjusted correctly .
If you set Normal, screen ratio may expand.
Teletext Language
Press “ ” or “ ” button to select Teletext
Language . Use “ ” or “ ” button to change
Teletext Language to West, East , Turk/Gre ,
Cyrillic, Arabic or Persian .
Ext Out
Press “ ” or “ ” button to select Ext Out.
Use “ ” or “ ” button to set the Ext Out as On
or Off.
Note :
For copying from a DVD or VCR device, you should
choose desired source from source menu and turn
“On” to EXT Out from feature menu.
English - 93 -
03_[GB]_SSM_MB35_37883W_1800UK_ANALOG_BRONZE2_10064230_50151923.indd 9303_[GB]_SSM_MB35_37883W_1800UK_ANALOG_BRONZE2_10064230_50151923.indd 93 29.07.2009 13:25:5429.07.2009 13:25:54
Page 95

Install Menu
Program
Press “
“
Y ou can also enter a number using the numeric
buttons on the remote control. There are 200
programme storage between 0 and 199.
Band
Band can be selected either C or S. Press “ ”
or “ ” button to set Band.
Channel
Channel can be changed by “
or numeric buttons.
Colour System
Press “ ” or “ ” button to select Colour System.
Use “ ” or “ ” button to change the colour
system to PAL, PAL 60, SECAM or AUTO.
Sound System
Press “
Press “ ” or “ ” button to change the sound
system to BG,DK, I, L or L’.
Fine Tune
Press “
Press “ ” or “ ” button to adjust the tuning.
Search
Press “ ” or “ ” button to select Search.
Use “ ” or “ ” button to start programme
searching. You can also enter the desired
frequency using the numeric buttons while
Search item is highlighted.
Store
Press “
Press “ ” or OK button to store the settings.
“ Stored... ” will be displayed on the screen.
” or “ ” button to select Program. Use
” or “ ” button to select the program number.
” or “ ” button
” or “ ” button to select Sound System.
” or “ ” button to select Fine Tune.
” or “ ” button to select Store.
English - 94 -
Install Menu in AV Modes
The following screen appears in the install menu
when the TV is in AV modes. Note that limited
options will be available. Switch to TV mode for
viewing complete version of the Install menu.
Colour System
Press “
” or “ ” button to select Colour
System . Use “ ” or “ ” button to change the
colour system to PAL, SECAM, P AL60, AUTO,
NTSC 4,43 or NTSC 3,58.
Store
Press “
” or “ ” button to select Store
Program . Press “ ” or OK button to store the
settings. “ Stored... ” will be displayed on the
screen.
Program Table
Select Program Table by pressing “
” or “
” button.
By moving the cursor in four directions you can
reach 20 programmes in the same page. You
can scroll the pages up or down by pressing the
navigation buttons to see all the programmes
in TV mode (except for the AV modes). By
cursor action, programme selection is done
automatically.
03_[GB]_SSM_MB35_37883W_1800UK_ANALOG_BRONZE2_10064230_50151923.indd 9403_[GB]_SSM_MB35_37883W_1800UK_ANALOG_BRONZE2_10064230_50151923.indd 94 29.07.2009 13:25:5429.07.2009 13:25:54
Page 96

Name
T o change the name of a programme, select the
programme and press the RED button.
The fi rst letter of the selected name will be
highlighted. Press “
” or “ ” button to change
that letter and “ ” or “ ” button to select the
other letters. By pressing the RED button, you
can store the name.
Move
Select the programme which you want to insert
by navigation buttons. Press the GREEN
button. By navigation buttons move the selected
programme to the decided programme space
and press the GREEN button again.
Delete
To delete a programme, press the YELLOW
button. Pressing the YELLOW button again
erases the selected programme from the
programme list, and the following programmes
shift one line up.
APS (Auto Programming System)
When you press the BLUE button for starting
automatic tuning, Auto Programming System
menu will appear on the screen:
Whenever you press the BLUE button, APS
function stops and Program Table appears on
the screen.
If you wait until the end of APS, Program Table
will be displayed with the programmes found
and located.
Source Menu
Press “ ” or “ ” button and select the sixth icon.
Then press “ ” or OK button. Source menu
appears on the screen:
In source menu, highlight a source by pressing
“
” or “ ” button and switch to that mode by
pressing “ ” button. Source options are; TV ,
EXT-1 , EXT-2 , HDMI-1 , HDMI-2 , YPbPr or
PC-VGA .
Note : Once you have connected optional equipment
systems to your TV, you should select the required
input to view pictures from that source.
Country
Press “
” or “ ” button to select your country.
If you want to exit from A.P.S. function, press
the BLUE button.
When you press OK or RED button for starting
automatic tuning, all stored programmes will
be erased and the TV will search for available
channels. During the search, the following OSD
will be displayed:
English - 95 -
03_[GB]_SSM_MB35_37883W_1800UK_ANALOG_BRONZE2_10064230_50151923.indd 9503_[GB]_SSM_MB35_37883W_1800UK_ANALOG_BRONZE2_10064230_50151923.indd 95 29.07.2009 13:25:5529.07.2009 13:25:55
Page 97

PC Mode Menu System
See “Connecting the LCD TV to a PC” section
for connecting a PC to the TV set.
For switching to PC source, press “SOURCE”
button on your remote control and select PC
input. Y ou can also use “Source” menu to switch
to PC mode.
Note that PC mode menu settings are available only
while the TV is in PC source.
PC Position Menu
Select the first icon by pressing “ ” or
“ ” button. PC Position menu appears on the
screen:
Autoposition
If you shift the picture horizontally or vertically
to an unwanted position, use this item to put
the picture into correct place automatically.
This setting therefore automatically optimizes
the display.
Select Autoposition item by using “
buttons. Press OK or “ ”, “ ” button.
Warning : Please ensure auto adjustment is
performed with a full screen image to ensure
best results.
H (Horizontal) Position
This item shifts the image horizontally to right
hand side or left hand side of the screen.
Select H Position item by using “
” button. Use “ ” or “ ” button to adjust the
value.
V (Vertical) Position
This item shifts the image vertically towards the
top or bottom of the screen.
” or “ ”
” or “
Select V Position item by using “
” or “
” button. Use “ ” or “ ” button to adjust the
value.
Phase
Depending on the resolution and scan frequency
that you input to the TV set, you may see a hazy
or noisy picture on the screen. In such a case
you can use this item to get a clear picture by
trial and error method.
Select Phase item by using “
Use “
” or “ ” button to adjust the value.
” or “ ” buttons.
Dot Clock
Dot Clock adjustments correct the interference
that appear as vertical banding in dot intensive
presentations like spreadsheets or paragraphs
or text in smaller fonts.
Select Dot Clock item by using “
” or “
” buttons. Use “ ” or “ ” button to adjust the
value.
PC Picture Menu
For adjusting PC picture items, do the
following:
Press “
” or “ ” button to select the second icon.
PC Picture menu appears on the screen.
Brightness, Contrast, Colour and Colour
T emperature settings in this menu are identical
to settings defi ned in TV picture menu under “TV
Menu System”.
Note : If you set Colour Temp as User, you can defi ne
R, G, B settings manually.
Sound Menu
The items in this menu are described at “Sound
Menu” section explained in “Menu System”.
Feature Menu
Feature menu settings are identical to the
settings explained in “ Feature Menu ” section
in “ Menu System ”.
Source Menu
Source menu settings are identical to the
settings explained in “ Source Menu ” section
in “ Menu System ”.
English - 96 -
03_[GB]_SSM_MB35_37883W_1800UK_ANALOG_BRONZE2_10064230_50151923.indd 9603_[GB]_SSM_MB35_37883W_1800UK_ANALOG_BRONZE2_10064230_50151923.indd 96 29.07.2009 13:25:5629.07.2009 13:25:56
Page 98
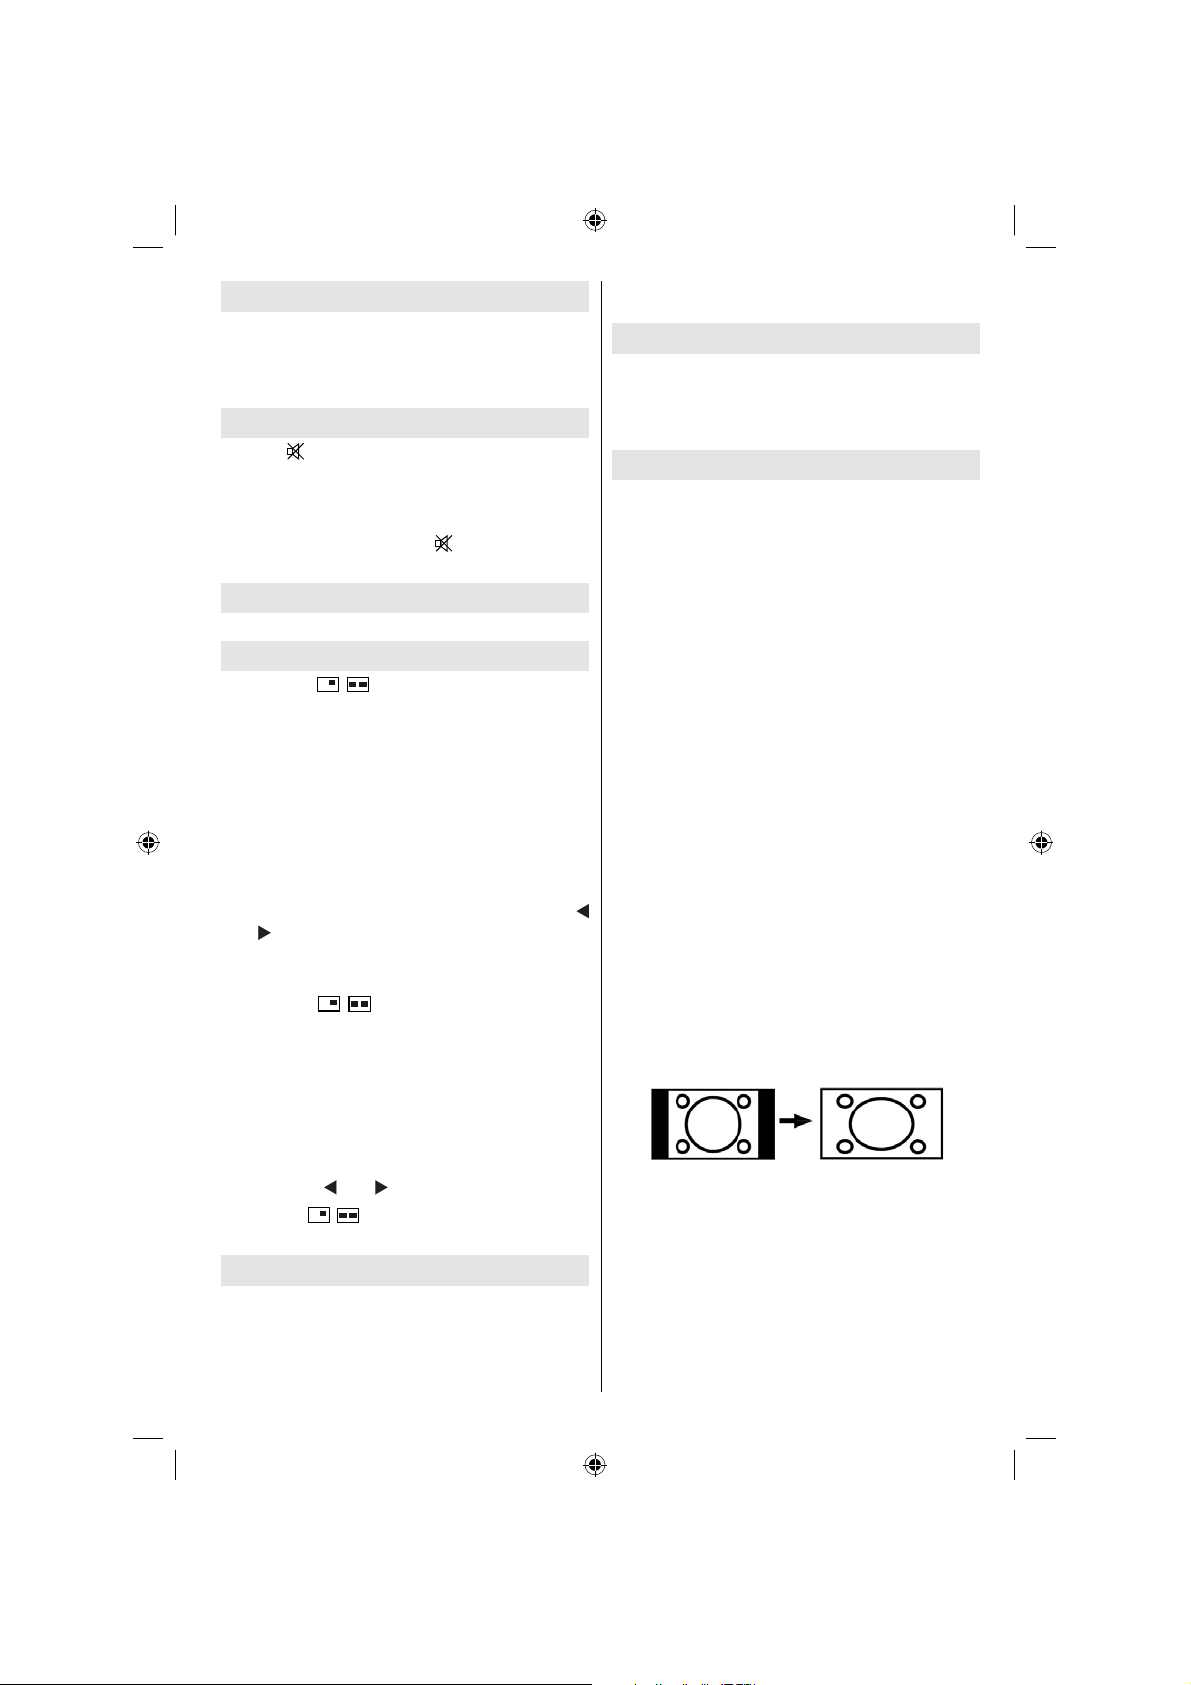
Displaying TV Information
Programme Number , Programme Name ,
Sound Indicator and Zoom Mode information is
displayed on the screen when a new programme
is entered or INFO button is pressed.
Mute Function
Press “ ” button to disable sound. Mute
indicator will be displayed in the upper side of
the screen.
To cancel mute, there are two alternatives; the
fi rst one is pressing the “ ” button and the
second one is increasing the volume level.
PIP (Picture-in-Picture) and
PAP (Picture-and-Picture)
Modes
Press the “ / ” button once to switch to
PIP mode.
At PIP Mode, a small picture (PIP picture) is
displayed on the main picture. There are 1
size and 4 positions (upper left, upper right,
bottom left and bottom right) available for the
PIP window.
When PIP Mode is entered, the default active
window is the PIP window and the active window
is indicated by a yellow frame around it. The
active window can be changed by pressing “
” or “ ” button. The status info OSD belongs to
active window. The place of the status OSDs
are same for both windows.
Press the “ / ” button again to activate
PAP mode.
At P AP Mode, two pictures with equal sizes are
displayed on the screen. Aspect Ratios of the
windows are fi xed.
When you switch to P AP Mode, main window in
PIP Mode will be displayed on the right side of
the screen. The active window can be changed
by pressing “
Press the “ / ” button again to exit the PAP
mode.
” or “ ” button.
Picture Mode Selection
By pressing PRESETS button, you can change
Picture Mode settings in accordance with your
viewing requirements. Available options are
Dynamic, Natural and Cinema.
Note : This function will not be available while in PC
mode.
Freezing Picture
You can freeze the picture on the screen by
pressing the “ OK ” button on the remote control.
Press the “ OK ” button to freeze picture. Press
again to quit freeze mode.
Zoom Modes
You can change the aspect ratio (image size)
of the TV for viewing the picture in different
zoom modes.
Press “SCREEN” button to directly change the
zoom mode.
Available zoom modes are listed below.
Note:
In YPbPr and HDMI modes, while in 720p-1080i
resolutions, only 16:9 mode is available.
In PC mode, only 16:9 mode is available.
Auto
When a WSS (Wide Screen Signalling) signal,
which shows the aspect ratio of the picture, is
included in the broadcast signal or the signal
from an external device, the TV automatically
changes the ZOOM mode according to the
WSS signal.
• When the AUTO mode does not function
correctly due to poor WSS signal quality or
when you want to change the ZOOM mode,
change to another ZOOM mode manually.
16:9
This uniformly stretches the left and right sides
of a normal picture (4:3 aspect ratio) to fi ll the
wide TV screen.
• For 16:9 aspect ratio pictures that have been
squeezed into a normal picture (4:3 aspect
ratio), use the 16:9 mode to restore the picture
to its original shape.
4:3
Use to view a normal picture (4:3 aspect ratio)
as this is its original size.
English - 97 -
03_[GB]_SSM_MB35_37883W_1800UK_ANALOG_BRONZE2_10064230_50151923.indd 9703_[GB]_SSM_MB35_37883W_1800UK_ANALOG_BRONZE2_10064230_50151923.indd 97 29.07.2009 13:25:5629.07.2009 13:25:56
Page 99

Panoramic
This stretches the left and right sides of a normal
picture (4:3 aspect ratio) to fill the screen,
without making the picture appear unnatural.
The top and bottom of the picture are slightly
cut off.
14:9
This zooms up the wide picture (14:9 aspect
ratio) to the upper and lower limits of the
screen.
Cinema
This zooms up the wide picture (16:9 aspect
ratio) to the full screen.
Subtitle
This zooms up the wide picture (16:9 aspect
ratio) with subtitles to the full screen.
Zoom
This option zooms to the picture.
Note: You can shift to screen up or down by pressing
“ ” / “ ” buttons while picture zoom is selected as
panaromic, 14:9, Cinema or Subtitle.
Teletext
Teletext system transmits information such as
news, sports and weather on your TV. Note
that is the signal degrades, for example in
poor/adverse weather conditions, some text
errors may occur or the teletext mode may be
aborted.
Teletext function buttons are listed below:
” Teletext / Mix / PAT Mode
“
Activates teletext mode when pressed once.
Press again to place the teletext screen over
the programme (mix). Pressing this button
again will split the screen into two windows, one
displaying the teletext and the other displaying
the current channel. Pressing again will quit the
teletext mode.
“RETURN” Index
Selects the teletext index page.
“SCREEN” Expand
Press once to enlarge top half of the page, press
again to enlarge the bottom half of the page.
Press again to revert back to normal size.
” Reveal
“
Shows hidden information (e.g. solutions of
games).
“OK” Hold
Holds a text page when convenient. Press again
to resume.
” Subcode Pages
“
Selects subcode pages if available when the
teletext is activated.
P+ / P- and numbers (0-9)
Press to select a page.
Note : Most TV stations use code 100 for their index
pages.
Coloured Buttons
(RED/GREEN/YELLOW/BLUE)
Y our TV supports both FASTEXT and TOP text
systems. When these systems are available, the
pages are divided into groups or topics.
When FASTEXT system is available, sections in
a teletext page will become colour-coded and can
be selected by pressing the coloured buttons.
Press a coloured button that corresponds to
with your needs.
English - 98 -
03_[GB]_SSM_MB35_37883W_1800UK_ANALOG_BRONZE2_10064230_50151923.indd 9803_[GB]_SSM_MB35_37883W_1800UK_ANALOG_BRONZE2_10064230_50151923.indd 98 29.07.2009 13:25:5629.07.2009 13:25:56
Page 100

The coloured writings will appear, showing you
which coloured buttons to use when TOP text
transmission is present. Pressing P - or P +
commands will request the next or previous
page respec tively.
Tips
Screen Care
Clean the screen with a slightly damp, soft
cloth. Do not use abrasive solvents as they may
damage the coating layer of the TV screen.
For your safety, unplug the mains plug when
cleaning the set. When moving the TV, hold it
properly from the bottom part.
Image Persistence
Please note that ghosting may occur while
displaying a persistent image. LCD TVs’ image
persistence may disappear after a short time.
Try turning off the TV for a while.
To avoid this, do not leave the screen in still
picture for extended periods.
No Power
If your TV system has no power, please check
the main power cable and connection to the
mains socket outlet.
Poor Picture
Have you selected the correct TV system? Is
your TV set or house aerial located too close
to a non-earthed audio equipment or neon
lights, etc.?
Mountains or high buildings can cause double
pictures or ghost images. Sometimes you can
improve the picture quality by changing the
direction of the aerial.
Is the picture or teletext unrecognisable? Check
if you have entered the correct frequency.
Please retune the channels.
The picture quality may degrade when two
peripherals are connected to the TV at the
same time. In such a case, disconnect one of
the peripherals.
No Picture
Is the aerial connected properly? Are the plugs
connected tightly to the aerial socket? Is the
aerial cable damaged? Are suitable plugs used
to connect the aerial? If you are in doubt, consult
your dealer.
No Picture means that your TV is not receiving
a transmission. Have you selected the correct
button on the remote control? Try once more.
Also make sure the correct input source has
been selected.
Sound
You can not hear any sound. Did you perhaps
interrupt the sound, pressing the
Sound is coming from only one of the speakers.
Is the balance set to one extreme? See Sound
Menu .
button?
Remote Control
Your TV no longer responds to the remote
control. Perhaps the batteries are exhausted.
If so you can still use the local buttons at the
bottom of the TV.
Input Sources
If you cannot select an input source, it is possible
that no device is connected.
Check the AV cables and connections if you
have tried to connect a device.
English - 99 -
03_[GB]_SSM_MB35_37883W_1800UK_ANALOG_BRONZE2_10064230_50151923.indd 9903_[GB]_SSM_MB35_37883W_1800UK_ANALOG_BRONZE2_10064230_50151923.indd 99 29.07.2009 13:25:5629.07.2009 13:25:56
 Loading...