

Page 1
GEBRUIKSAANWIJZING
EF-Y-3B140B
Lees alle instructies alvorens deze TV te gebruiken en hou de
gebruiksaanwijzing bij voor later gebruik.
Page 2

Page 3

Inhoud
Inleiding
Inhoud
1-Veiligheidsinformatie
2-Veiligheidsinstructies
3-Onderdelen en accessoires
4-Bedieningstoetsen
5-Aansluitingen achteraan
6-Afstandsbediening
7-Gebruik van de afstandsbediening
Afstandsbediening
TV bediening
Andere
7-BRON en BASISBEDIENING
8-Eerste installatie
9-14TV menu
15-PC menu
16-HDMI/SCART/AV/Side menu
17-Teletekst
18-Hotel modus
19-USB FUNCTIES
20-DVD FUNCTIES
23-In geval van problemen
Page 4
Veiligheidsinformatie
OPGELET
RISICO OP ELEKTRISCHE SCHOKKEN
NIET OPENEN
OPGELET: OM HET RISICO OP EEN ELEKTRISCHE SCHOK TE VERMIJDEN
DE ACHTERKANT VAN HET TOESTEL NIET OPENEN.
ER BEVINDEN ZICH BINNENIN GEEN GEBRUIKSFUNCTIES.
CONTACTEER EEN PROFESSIONEEL VOOR SERVICE
Het bliksemsymbool binnen een gelijkbenige driehoek dient ervoor de gebruiker te verwittigen
dat er zich binnen het product ongeïsoleerde GEVAARLIJKE SPANNINGEN bevinden met
voldoende sterkte om een risico op elektrische schokken te vormen.
Het uitroepteken binnen een gelijkbenige driehoek dient ervoor de gebruiker te verwittigen dat
er bij het toestel belangrijke bedienings- en onderhoudsinstructies meegeleverd worden.
Juist verwijderen van het toestel
(Afval van Elektrische en Elektronische Apparaten)
De doorkruiste VUILBAK dient om te verwittigen dat het toestel bij het einde van zijn leven niet
met ander huishoudelijk afval verwijderd mag worden. Om mogelijke schade aan het milieu en
de gezondheid van de mens te vermijden dient het toestel gescheiden gehouden te worden van
ander huishoudelijk afval en dient het gerecycleerd te worden en kunnen materialen hergebruikt
worden.
Huishoudelijke gebruikers kunnen hun dealer waar ze het product gekocht hebben of de lokale
autoriteiten consulteren om te zien waar ze het toestel voor recyclage kunnen binnenbrengen.
Professionele gebruikers moeten hun leverancier consulteren en de voorwaarden van het
aankoopcontract bekijken. Dit toestel mag niet met ander professioneel afval verwijderd worden.
Dit toestel is een CLASS 1 laser product. Het product maakt gebruik van een zichtbare laserstraal
die een blootstelling aan gevaarlijke straling kan veroorzaken. Zorg ervoor dat het toestel gebruikt
wordt zoals aangegeven. Verwijder het omhulsel niet en kijk niet in de DVD lade als het toestel
ingeschakeld is. Wijzig de bediening NIET om te vermijden dat er laser straling zou ontstaan.
Consulteer een specialist als het toestel defect is.
Dit toestel voldoet aan de Europese richtlijnen inzake veiligheid van elektrische apparaten.
Page 5
Veiligheidsinstructies
OPGELET. LEES EN VOLG ALLE VERWITTIGINGEN EN INSTRUCTIES IN DEZE GEBRUIKSAANWIJZING OF
ZOALS AANGEDUID OP HET TOESTEL. HOU DE GEBRUIKSAANWIJZING BIJ VOOR LATER GEBRUIK.
Dit toestel is ontwikkeld en gemaakt met het oog op uw persoonlijke veiligheid. Onjuist gebruik kan elektrische
schokken of brand veroorzaken. De ingebouwde veiligheidsmaatregelen beschermen u als u de juiste procedure
voor installatie, onderhoud en gebruik opvolgt. Binnenin bevinden zich GEEN bedieningsfuncties. OPEN HET
TOESTEL NIET WANT U KAN BLOOTGESTELD WORDEN AAN GEVAARLIJKE SPANNINGEN EN
LASERSTRALING EN UW GARANTIE KOMT DAN TE VERVALLEN. CONSULTEER EEN SPECIALIST VOOR
SERVICE.
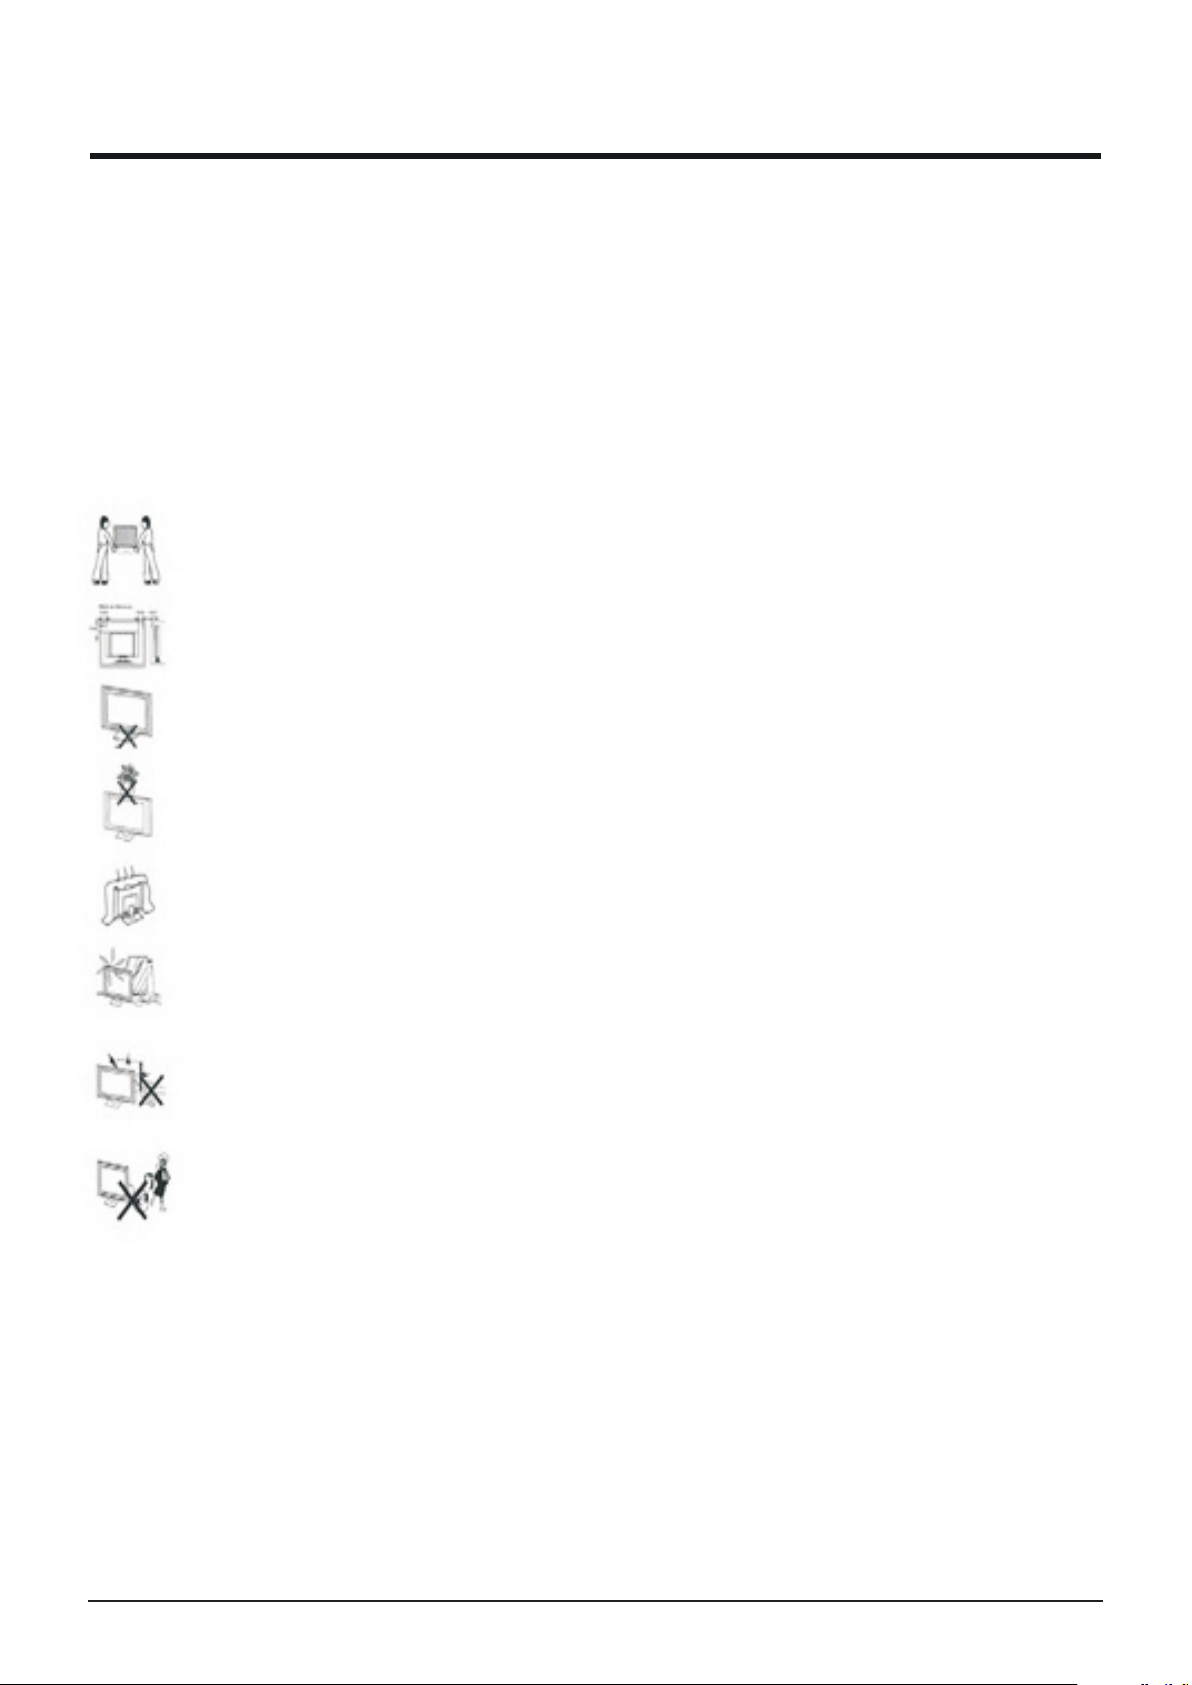
Uitpakken. Open voorzichtig de kartonnen doos en verwijder de bovenste foam. Haal het toestel uit de
doos en plaats het op een stevige ondergrond. Verwijder de plastic hoes en hou de verpakking bij voor
later gebruik. Zorg ervoor dat kinderen en dieren niet bij de verpakking kunnen.
Plaatsing van de TV. De TV dient op een stevige tafel of plank geplaatst te worden. Plaats het niet in een
kast tenzij er voldoende vrije plaats omheen is voor luchtstroom en voor het openen van de DVD lade.
Aansluitingen. Zorg ervoor, wanneer er andere apparaten aangesloten worden of wanneer de
stroomkabel aangesloten wordt, dat er niet op de snoeren getrapt kan worden. Plaats geen zware
voorwerpen op de stroomkabel en de stroomadapter en plooi de kabel niet.
Bovenkant van de TV. Plaats geen zaken zoals een vaas of een kandelaar of andere objecten die kunnen
lekken boven de TV.
Ventilatie en warmtebronnen. Plaats geen materiaal op de ventilatieopeningen vermits de Tv daardoor
oververhit en defect kan worden. Plaats de TV niet in direct zonlicht of naast warmtebronnen zoals een
radiator of een open haard.
Vochtigheid. Plaats de TV niet in vochtige plaatsen zoals een keuken, een kelder of andere plaatsen waar
zich damp bevindt. Zorg ervoor dat er gaan water of een andere vloeistof in het toestel kan geraken. Raak
de stekker en de stroomadapter niet aan met vochtige handen. Als er vloeistof in het toestel geraakt is,
onmiddellijk de stroom afsluiten en uw dealer contacteren.
Reinigen. Haal de stekker uit het stopcontact. Gebruik een zacht en droog doekje. Voor heviger vuil,
gebruik een licht met detergent bevochtigd doekje. Gebruik GEEN producten op basis van petroleum.
De TV achterlaten. Laat de TV niet in werking als u weggaat. Het is aanbevolen het toestel uit te schakelen.
Om energie te besparen is het aangeraden de TV niet te lang in stand-by te laten. Als de TV gedurende
lange tijd niet gebruikt wordt (VAKANTIE) of er een onweer is, trek dan de stroomstekker en de antenne uit.
1)Batterijen mogen niet blootgesteld worden aan overdreven warmte zoals zonlicht, vuur of dergelijke.
2)Te hoog geluidsvolume bij gebruik van een hoofdtelefoon kan schade aan het gehoor veroorzaken.
3)Zorg ervoor dat de stroomadapter steeds bereikbaar is.
4)Zorg ervoor dat het toestel niet blootgesteld wordt een druppels en spatten en plaats geen met vloeistof gevuld
voorwerp, zoals een vaas, boven het toestel.
5)Dit toestel met Class I constructie moet aangesloten worden op een stopcontact met aarding.
2
Page 6
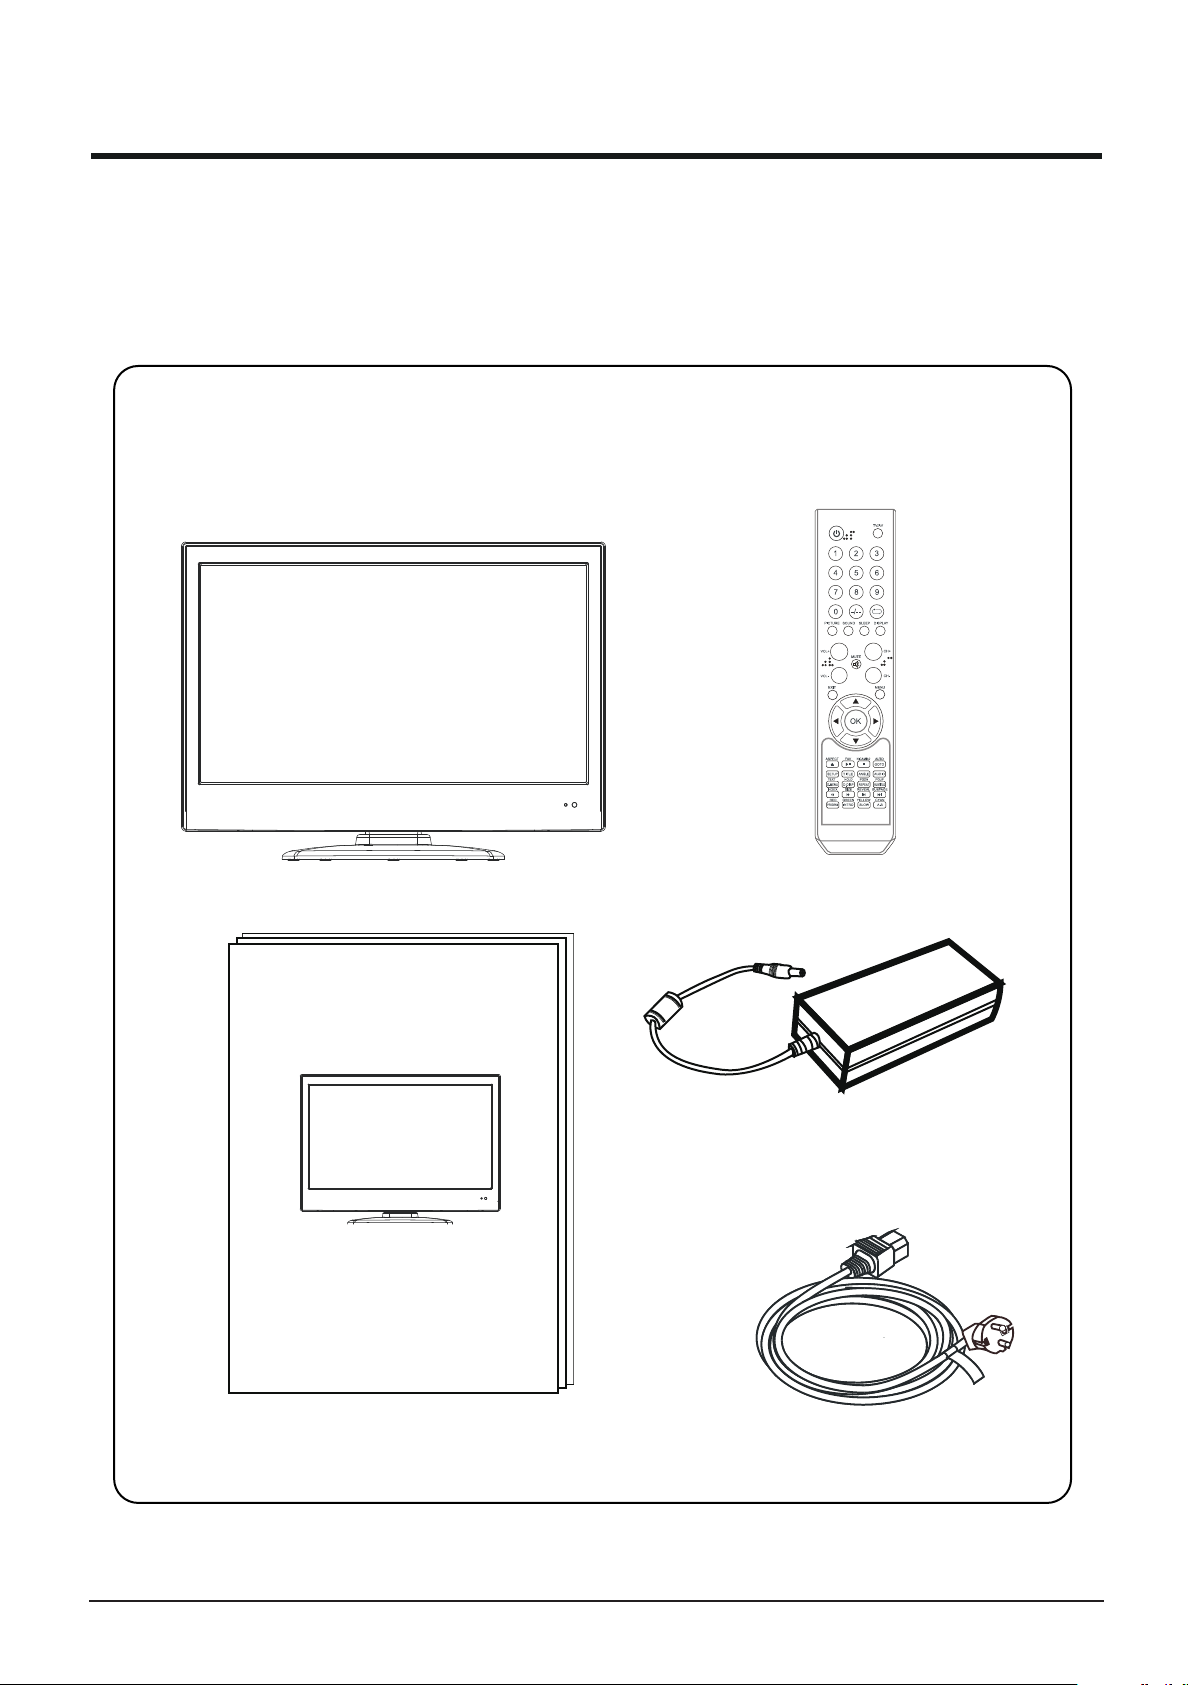
Onderdelen en accessoires
Uitpakken.
Haal de Tv voorzichtig uit het karton.
Controleer de accessoires. Als er iets mist, contacteer dan uw dealer.
Verwijder de verpakking niet alvorens u vastgesteld heeft dat het toestel normaal werkt.
In de doos
TV
Afstandsbediening
Adapter
Gebruiksaanwijzing Stroomkabel
3
Page 7
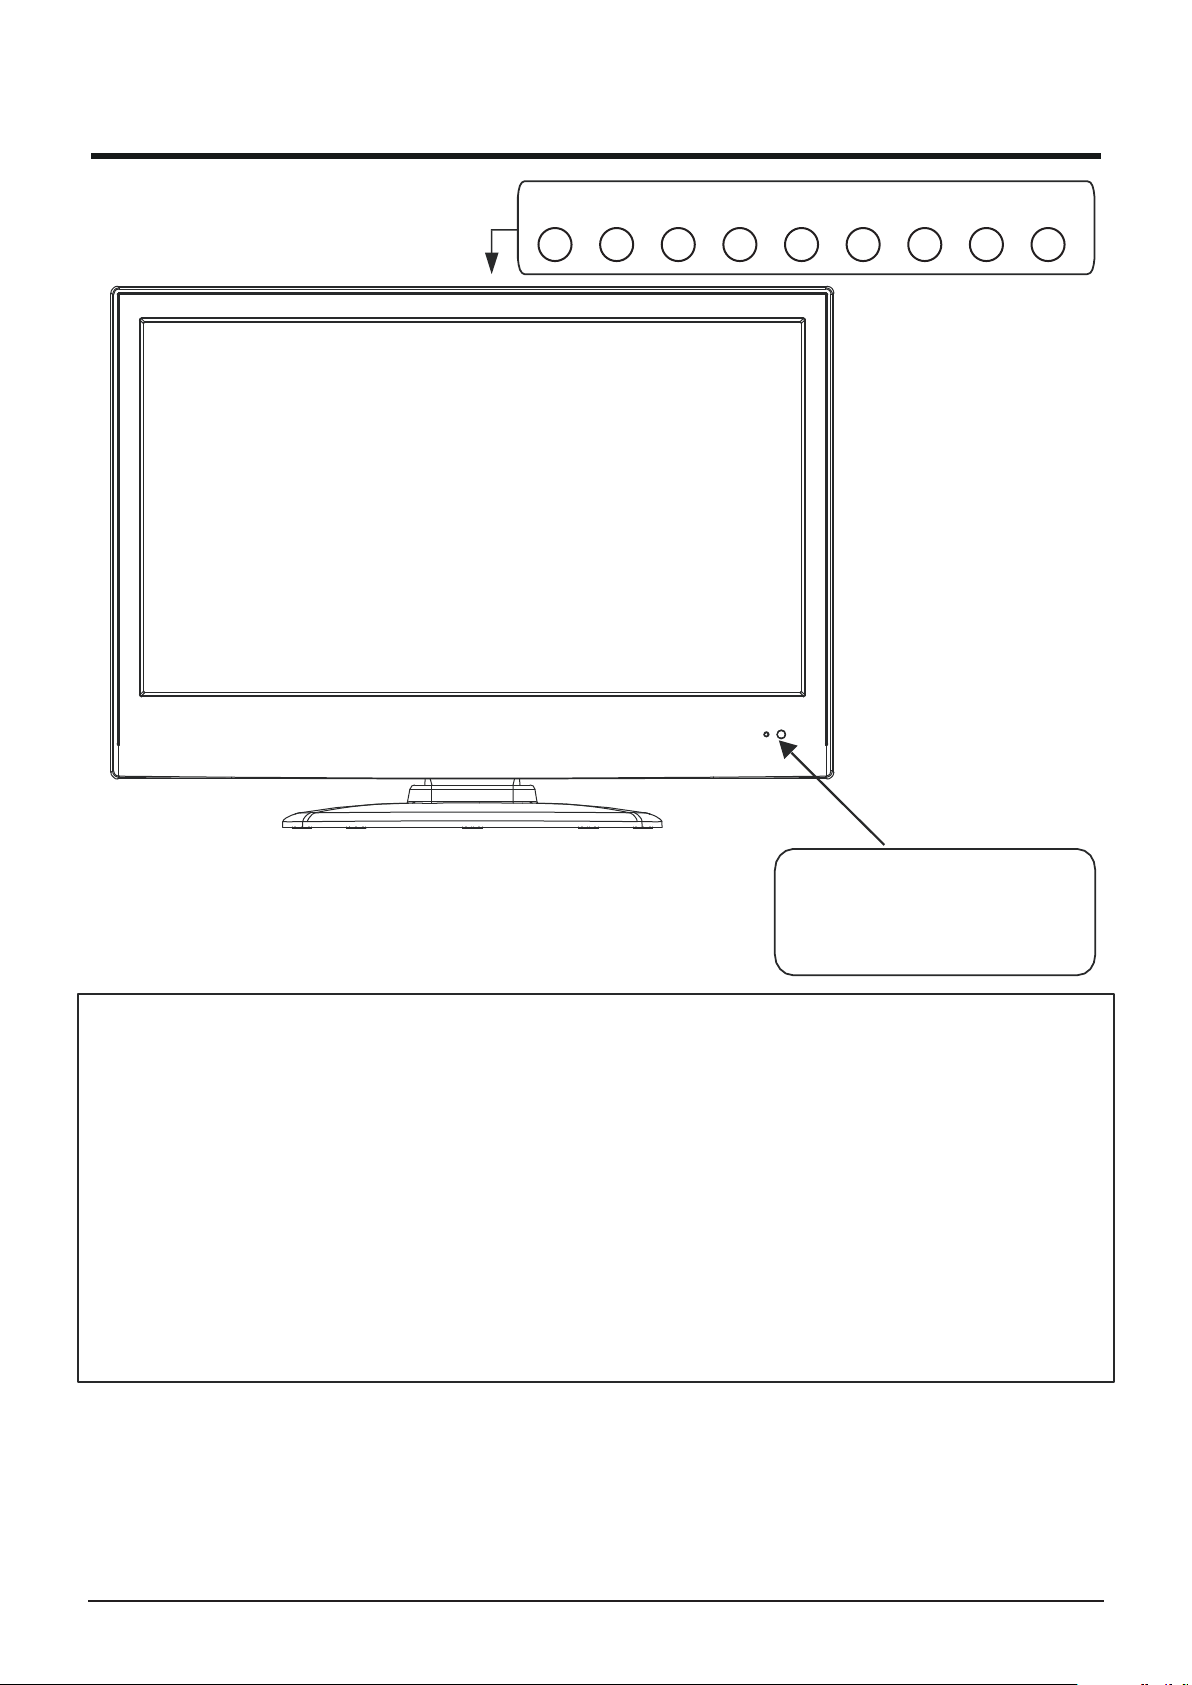
Bedieningstoetsen
EJECT
TV/AV
MENUPLAY
CH+ CH-
VOL+
VOL-
POWER
EJECT.
PLAY.
TV/AV .
MENU.
CH+ / CH-.
VOL+ / VO L -
POWER.
Infrarood ontvanger
Stand-by LED
Beschrijving bedieningen
De DVD disk uitwerpen
Weergave van de DVD
Keuze van de ingang
Naar de menu modus gaan
Zenderkeuze
Volumeregeling
Inschakelen vanuit stand-by; terug naar stand-by brengen.
4
Page 8
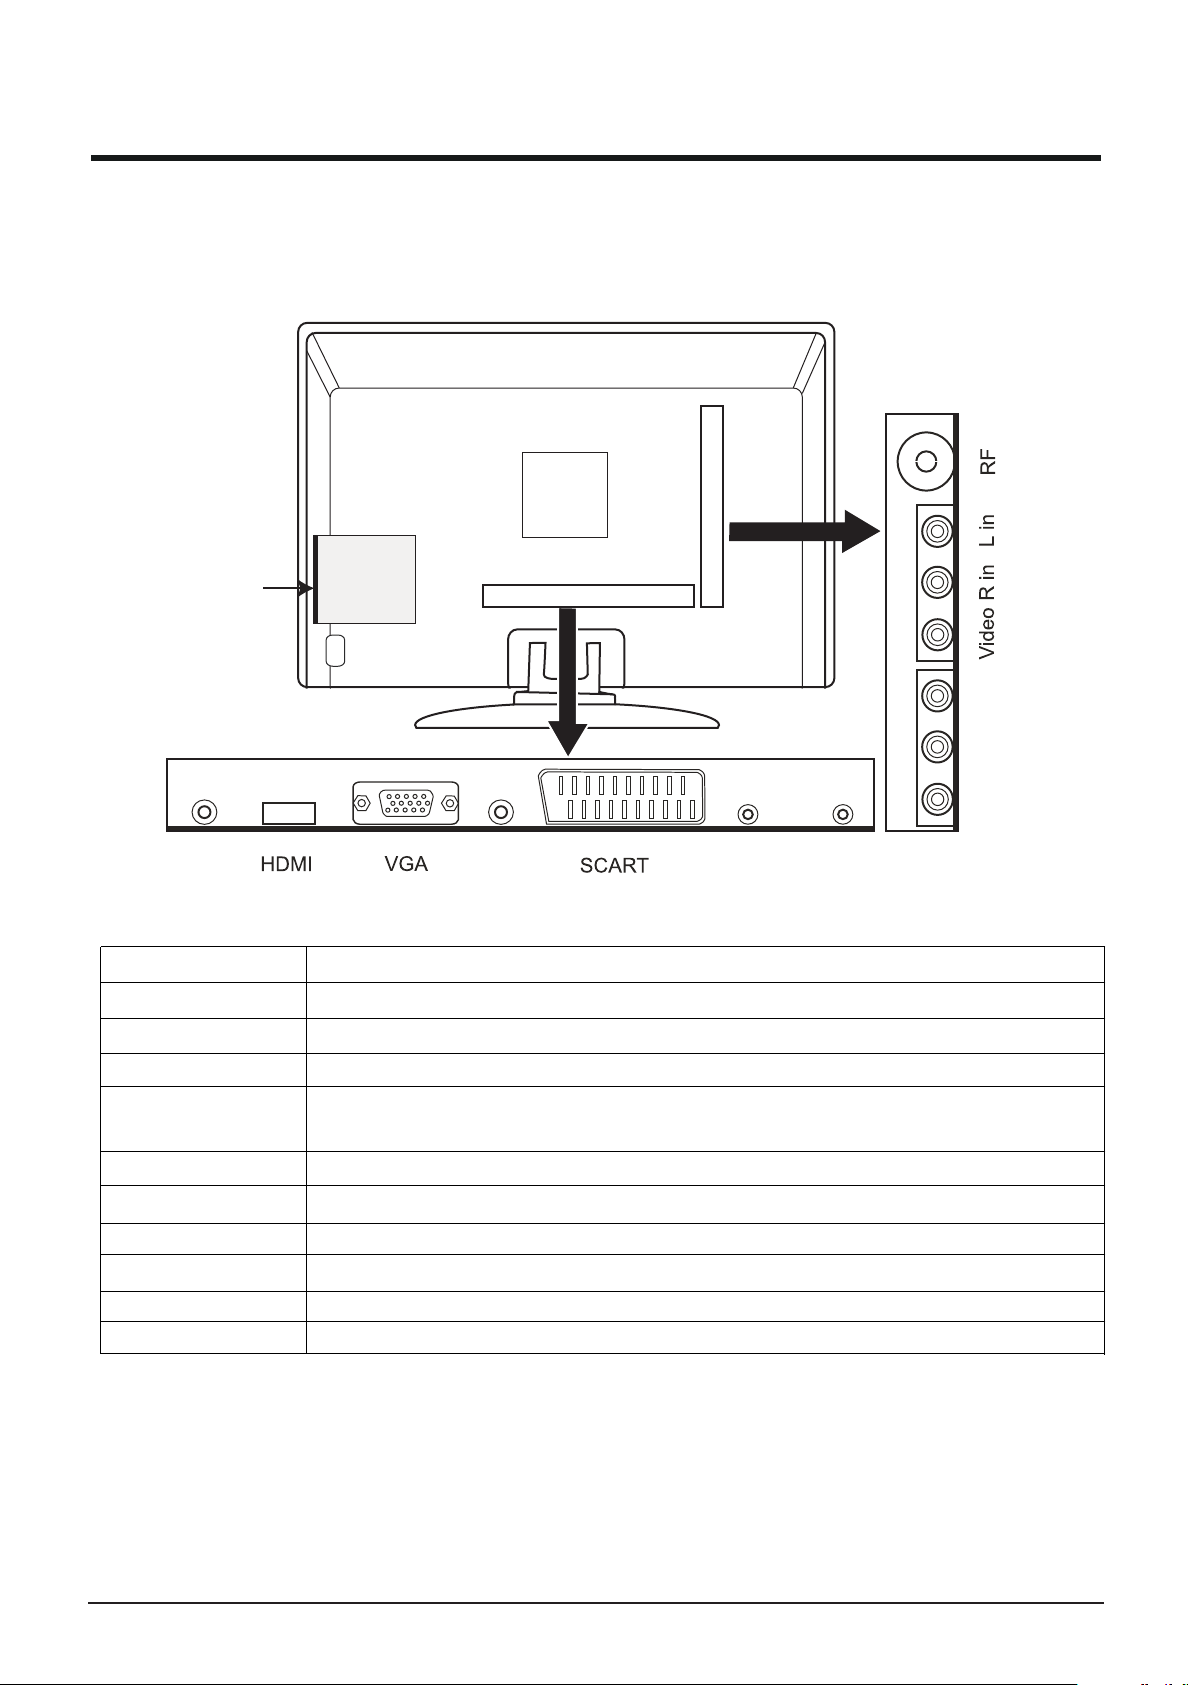
Aansluitingen achteraan
U kan een uitgebreid gamma van externe toestellen aan het toestel aansluiten. Consulteer de gebruiksaanwijzingen
van deze apparaten. Zie tabel hieronder voor de mogelijke aansluitingen.
USB
POWER
Power
DVD
PC
Audio
Stroomaansluiting
Earphone
Y P B PR
Coaxial
HDMI Hoge kwaliteitsaansluiting voor satellietontvanger, DVD, videogames
VGA Aansluiting voor computer
PC Audio Aansluiting voor geluid computer
SCART
Composietsignalen van DVD, videorecorder of satellietontvanger
Earphone Aansluiting voor hoofdtelefoon
Coaxial
YPBPR
Digitale audio uitgang
Aansluiting voor uitgang van DVD speler (kies YPBPR als bron)
Video Beeldsignalen van een camcorder, spelconsole, enz
R in L
Antenne-ingang
RF
in
Geluid van camcorder, spelconsole, DVD speler, videorecorder, enz
5
Page 9
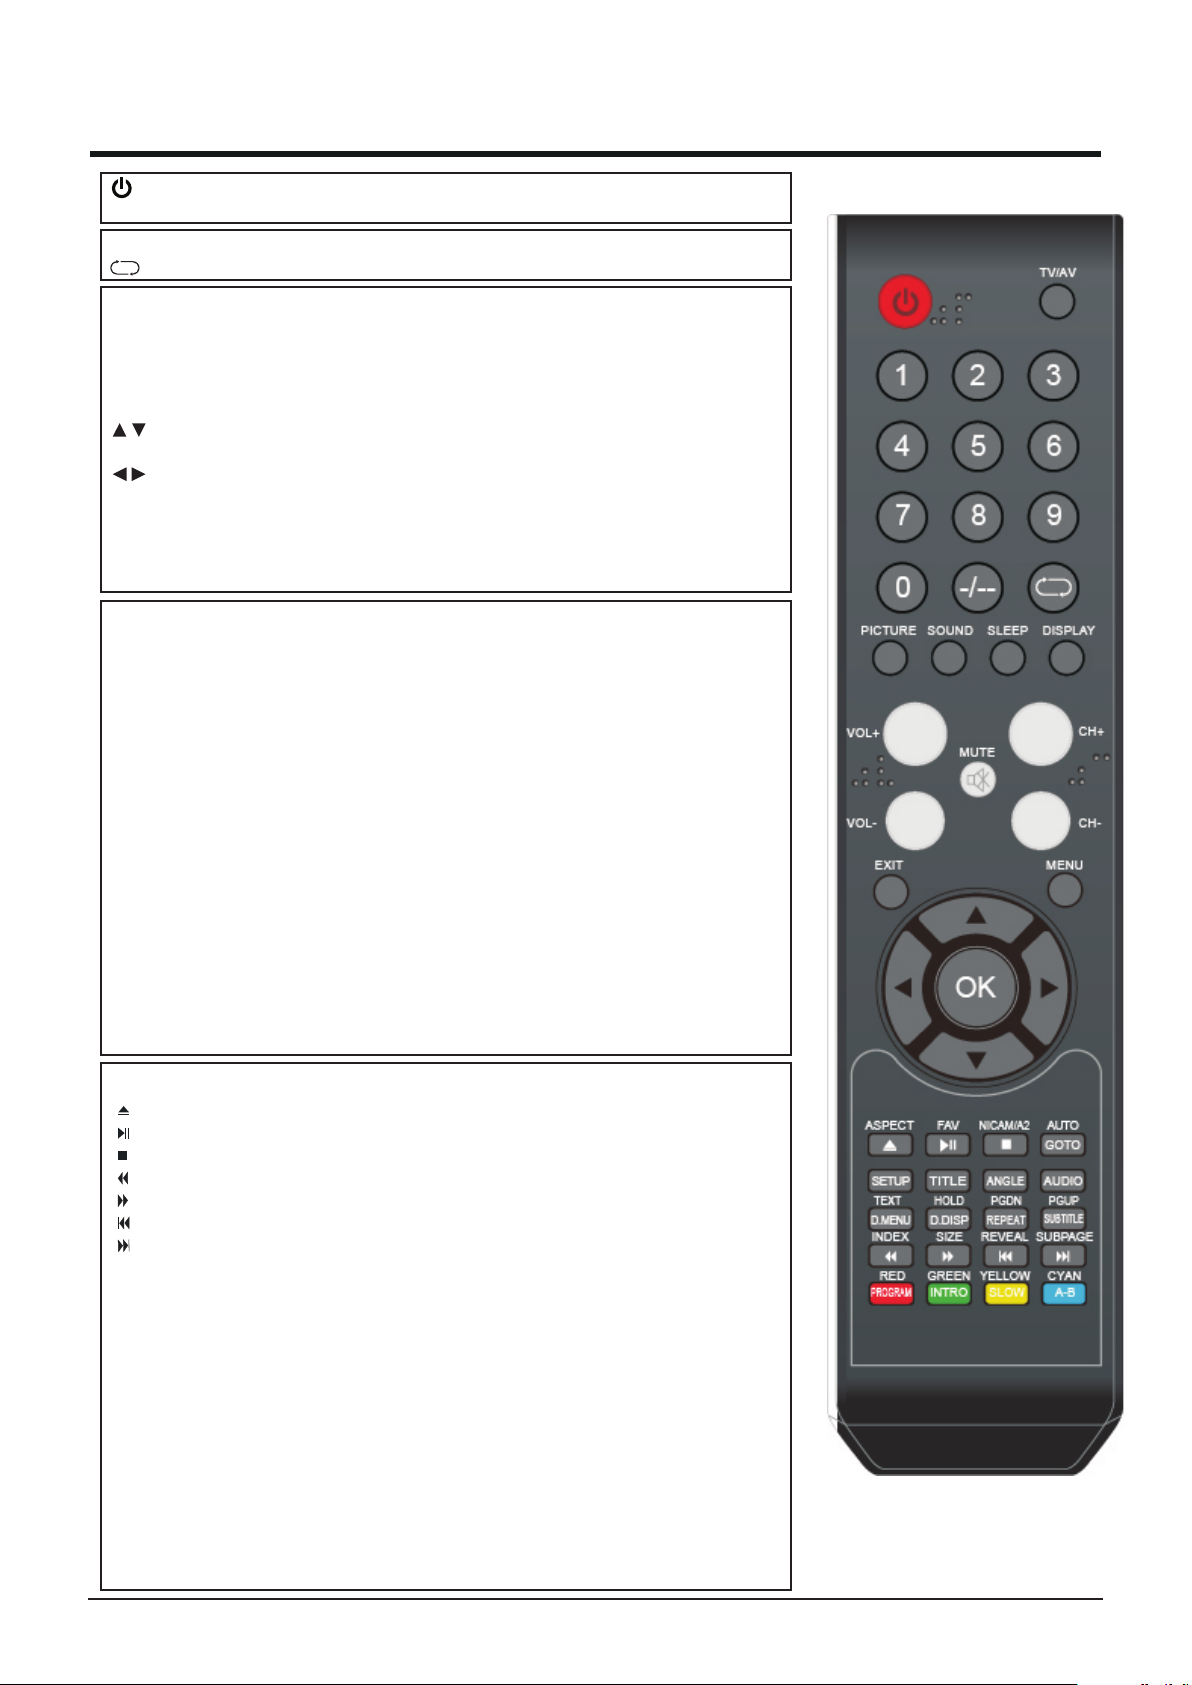
Afstandsbediening
: om de TV in te schaken en in stand-by te zetten
INPUT: keuze van de bron
0-9, -/-- : zender selecteren
: teruggaan naar laatst bekeken zender
PICTURE: keuze van de beeldmodus
SOUND: keuze van de geluidsmodus
SLEEP:tijd voor automatisch uitschakelen
DISPLAY : informatie over de weergave
CH+/-: doorlopen van de zenders
cursors naar boven en beneden voor gebruik in OSD menu
VOL+/-:regeling van het volume
cursors naar links en rechts voor gebruik in OSD menu
OK: om te bevestigen
MENU: TV systeem menu
EXIT:om het huidig menu te verlaten
MUTE: geluid uitschakelen
ASPECT:instelling beeldformaat
FAV : om in de lijst van de voorkeurzenders te gaan
NICAM/A2 : keuze tussen NICAM en A2
AUTO : automatische instelling (alleen PC)
TEXT : drukken om teletekst op te roepen, nogmaals drukken om tekst met
beeld te mengen,nogmaals drukken om teletekst te verlaten
HOLD : om een teletekstpagina vast te houden
PGDN : pagina naar beneden
PGUP : pagina naar boven
INDEX : naar de index gaan
SIZE : keuze van de lettergrootte bij teletekst
REVEAL : om verborgen tekst op te roepen
SUBPAGE : om een subpagina op te roepen
ROOD: toets voor Fast text
GROEN: toets voor Fast text
GEEL: toets voor Fast text
CYAAN: toets voor Fast text
Toetsen voor USB bediening
: weergave programma
: weergave of pauze programma
: stop programma
: snel achterwaarts
: snel voorwaarts
: naar vorig hoofdstuk
: naar volgend hoofdstuk
GOTO : gaan naar gekozen titel/hoofdstuk/nummer
SETUP : DVD instelmenu, zoals de keuze van de OSD taal
TITLE: titels op de DVD
ANGLE : bekijken van onder een ander hoek; sommige disks bieden deze
mogelijkheid, andere niet
AUDIO : keuze van de geluidsweergave
D.MENU : DVD menu
D.DISP : weergave van de DVD statut
REPEAT : herhaling van de titel of het hoofdstuk
SUBTITLE : om de ondertitels in/uit te schakelen
PROGRAM : programmeren van de weergavevolgorde
INTRO : alleen voor VCD en CD disks die deze eigenschap bieden
SLOW : vertraagde weergave
A-B : herhaling van een bepaalde passage
6
Page 10
Gebruik van de afstandsbediening
Plaats de batterijen in de afstandsbediening. Controleer of de POWER toets van het toestel ingeschakeld is.
Richt de afstandsbediening naar de infrarood ontvanger van het toestel en druk op POWER. De Tv schakelt in
vanuit stand-by en het scherm licht op.
Het maximaal bereik van de afstandsbediening is ongeveer 5 meter met een maximale
hoek van 30°.
Plaatsen van de batterijen (niet meegeleverd)
Open het batterijencompartiment op de achterkant van de afstandsbediening.
Breng 2 x AAA 1.5 V alkaline batterijen in zoals afgebeeld in het batterijencompartiment.
Hou rekening met de polariteit (+/-) en breng het klepje terug aan.
Opmerking
-Breng oude batterijen naar een inzamelpunt voor recyclage.
-Werp de batterijen NIET in een vuur vermits deze kunnen ontploffen en kwetsuren kunnen veroorzaken.
-Gebruik alleen AAA 1.5 V batterijen.
-Gebruik batterijen van hetzelfde type. Meng geen verschillende batterijentypes.
-Meng geen oude en nieuwe batterijen. Vervang beide tegelijkertijd.
-Probeer de batterijen niet te ontmantelen want dit kan kwetsuren geven.
-Haal de batterijen uit de afstandsbediening als deze gedurende lange tijd niet gebruikt wordt.
Compartment
Cover
Battery
SOURCE
2xAAA Battery
TV/AV BRON
-Druk op de TV/AV toets om de ingangslijst op te roepen.
-Gebruik / om de gewenste ingang te kiezen.
-Druk op ENTER om de ingang te bevestigen.
BASISBEDIENING
ATV
HDMI
SCART
YPBPR
AV
VGA
-Druk op MENU om het OSD HOOFDMENU op te roepen.
-Gebruik / om het gewenste menu aan te duiden.
-Gebruik om in het submenu te gaan.
U kan MENU of EXIT gebruiken om te bevestigen en terug te gaan naar het vorig menu.
-Gebruik / om de optie te kiezen en gebruik / om de instellingen te doen.
7
Page 11
Eerste installatie
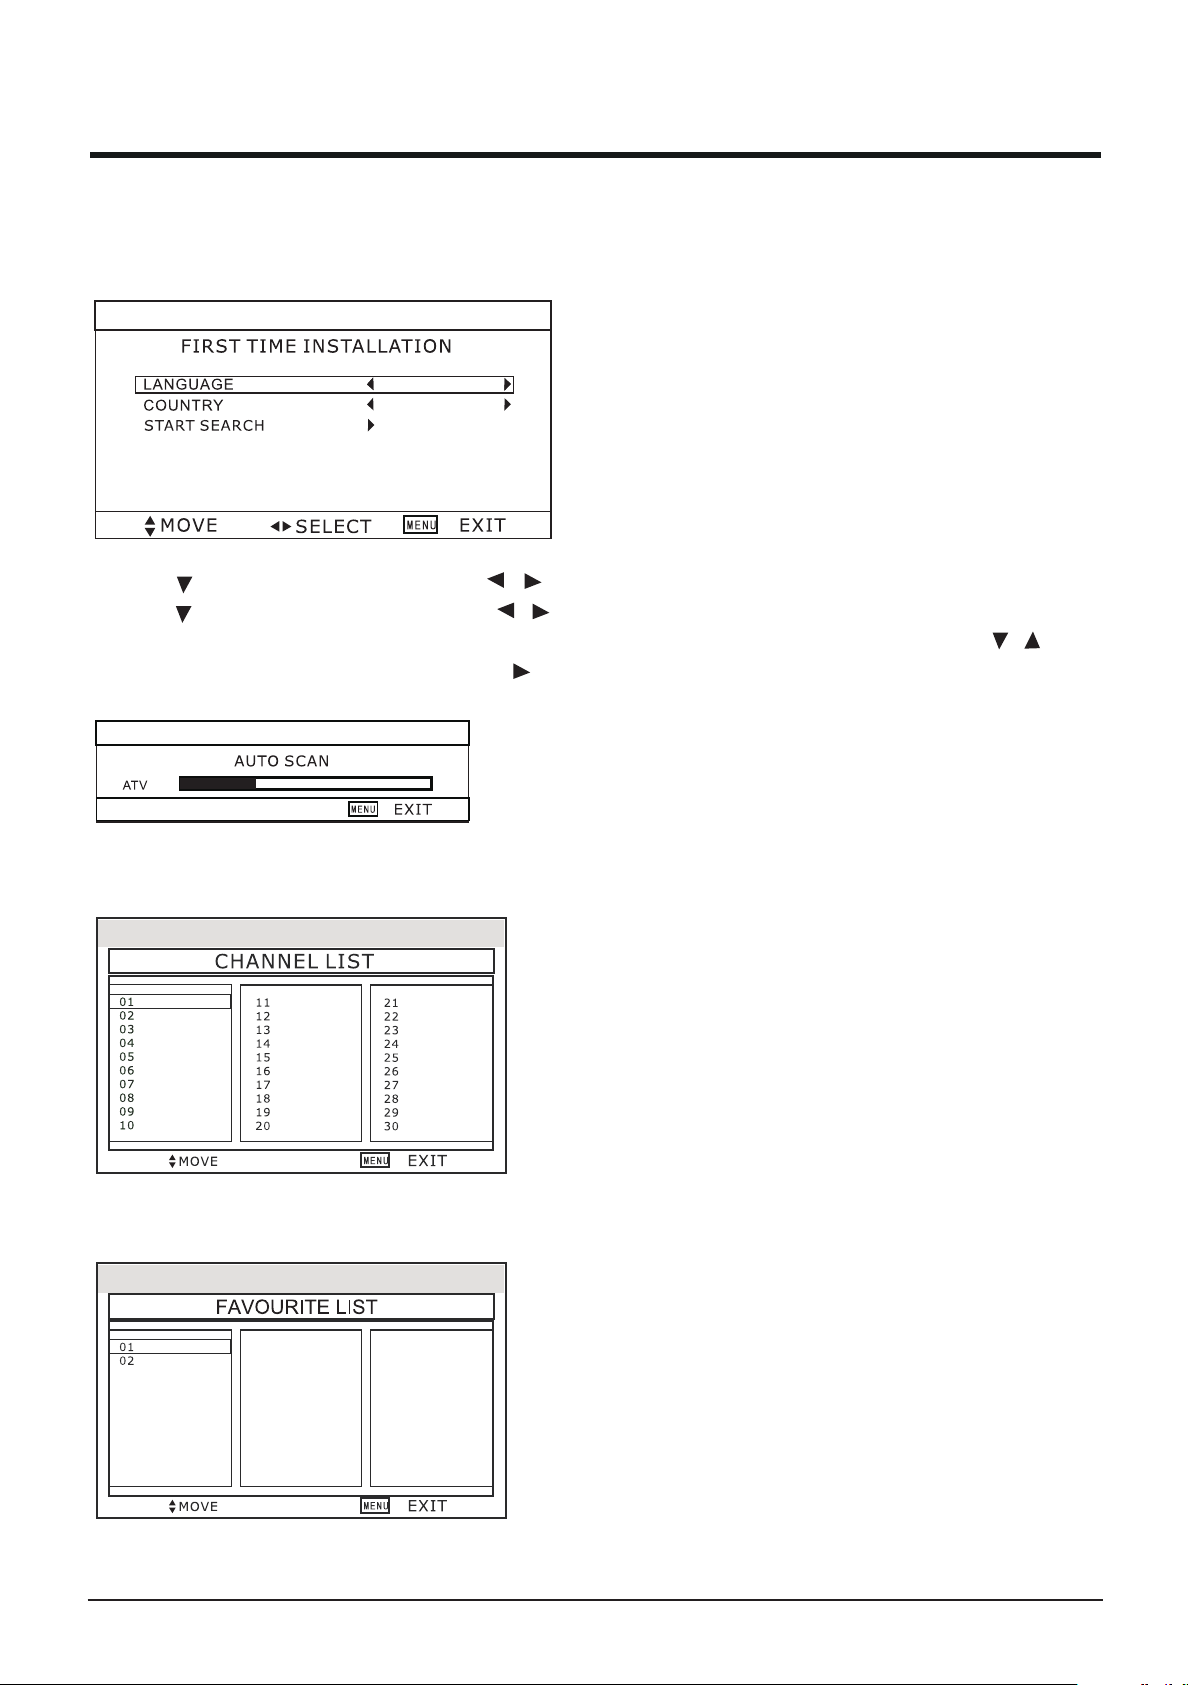
Als u de TV voor de eerste keer inschakelt en er zijn geen zenders in het geheugen opgeslagen, dan verschijnt het
Eerste Installatie menu, zoals hieronder getoond, op het scherm. Een scherm zal u vragen om automatisch de
zenders te zoeken. De zenders worden opgeslagen in de tuner van de TV.
ENGLISH
OTHER
-Gebruik om TAAL aan te duiden. Gebruik / om de OSD taal te kiezen.
-Gebruik om LAND aan te duiden. Gebruik / om het land te kiezen.
Na het instellen van deze gegevens kan u op MENU drukken om de installatie te stoppen. Of gebruik / om
START ZOEKEN aan te duiden en druk dan op om het zoeken te starten. Het volgende beeld verschijnt.
Zenderlijst
Druk op ENTER om de ZENDERLIJST op te roepen.
LIJST VOORKEURZENDERS
Druk op FAV om de LIJST VOORKEURZENDERS op te roepen.
8
Page 12
TV informatie
Programma informatie
Druk op DISPLAY om de programma informatie weer te geven.
1.Huidig zendernummer.
2.Het kleurensysteem van de huidige zender. Kan gewijzigd worden in het menu handmatig afstemmen (een optie
van het INSTEL menu).
3.Huidige zendernaam.
4.Het geluidsysteem van de huidige zender. Kan gewijzigd worden in het menu handmatig afstemmen (een optie
van het INSTEL menu).
5.De NICAM modus van de huidige zender.
Als het symbool van NICAM rood is, betekent dit dat de huidige zender Multi I/II signalen uitstuurt. Dit kan
gewijzigd worden door op de NICAM toets te drukken.
Er zijn vier NICAM modes met de volgende symbolen:
Mono Stereo Dual Dual
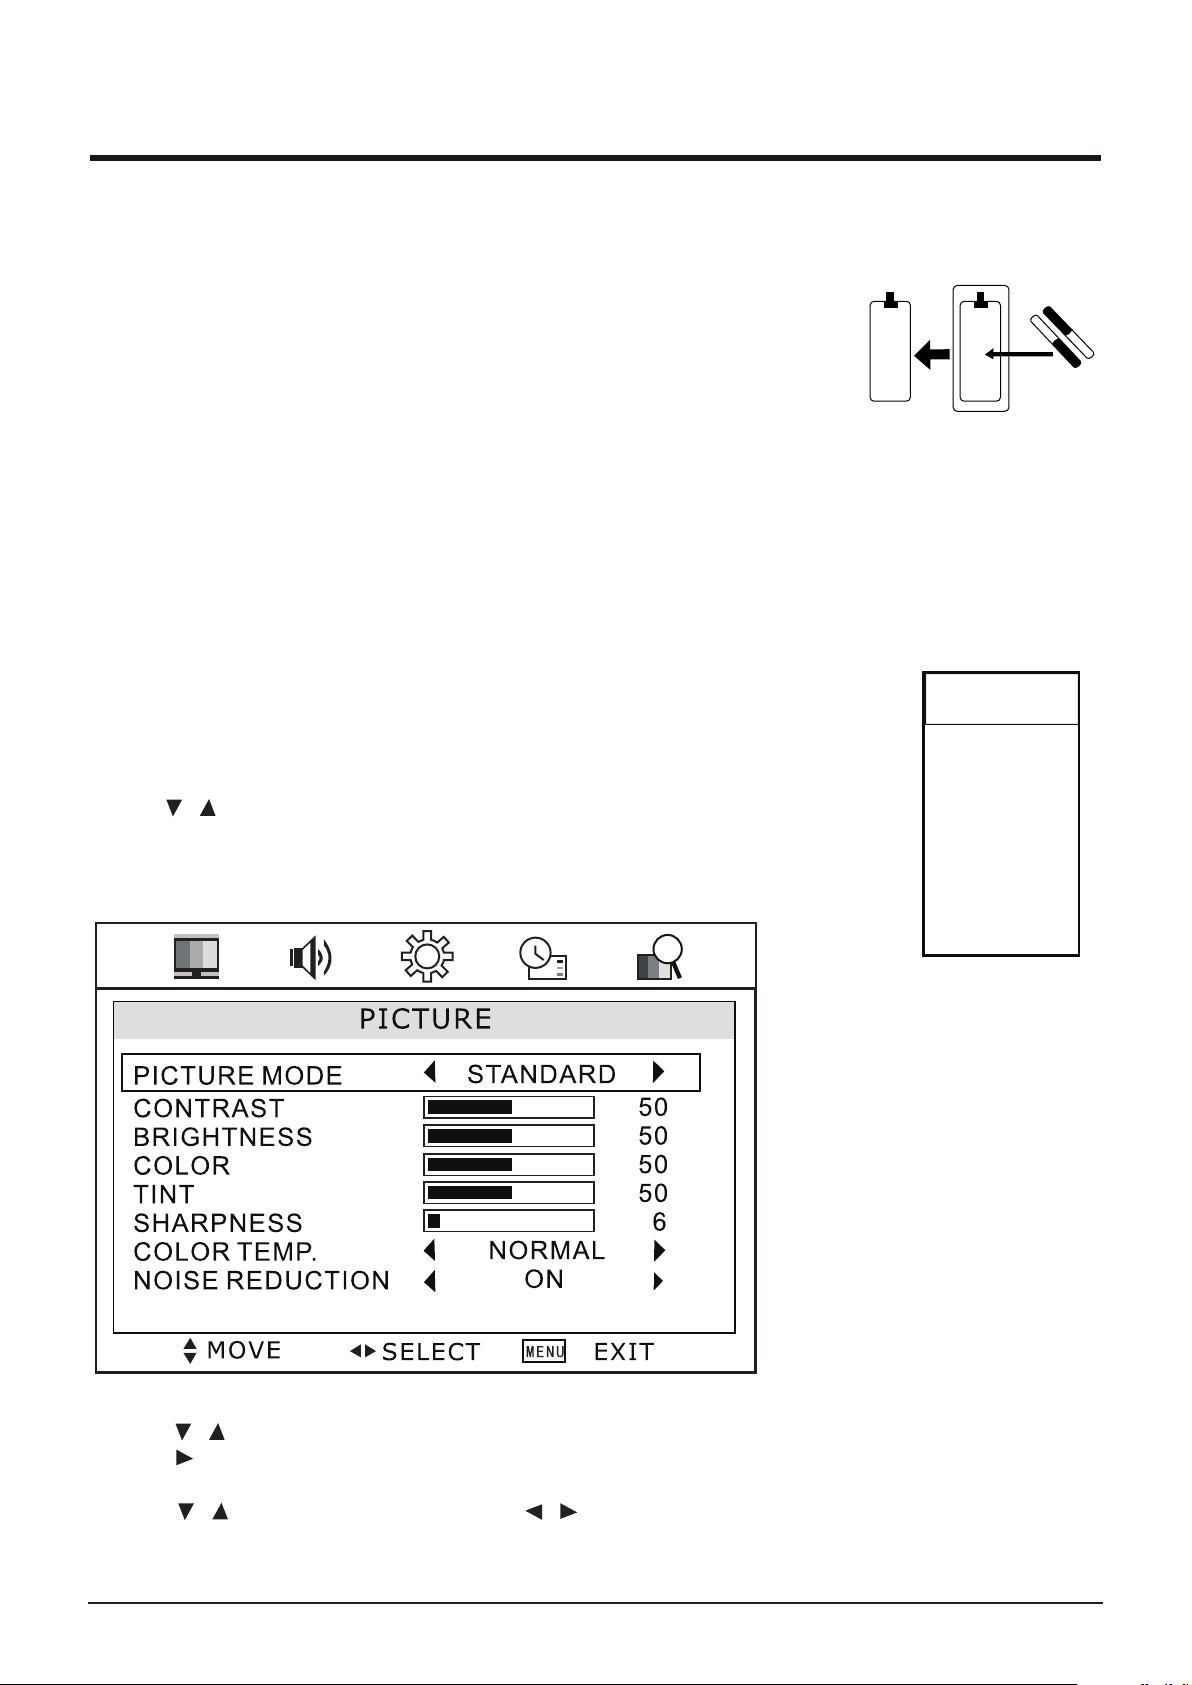
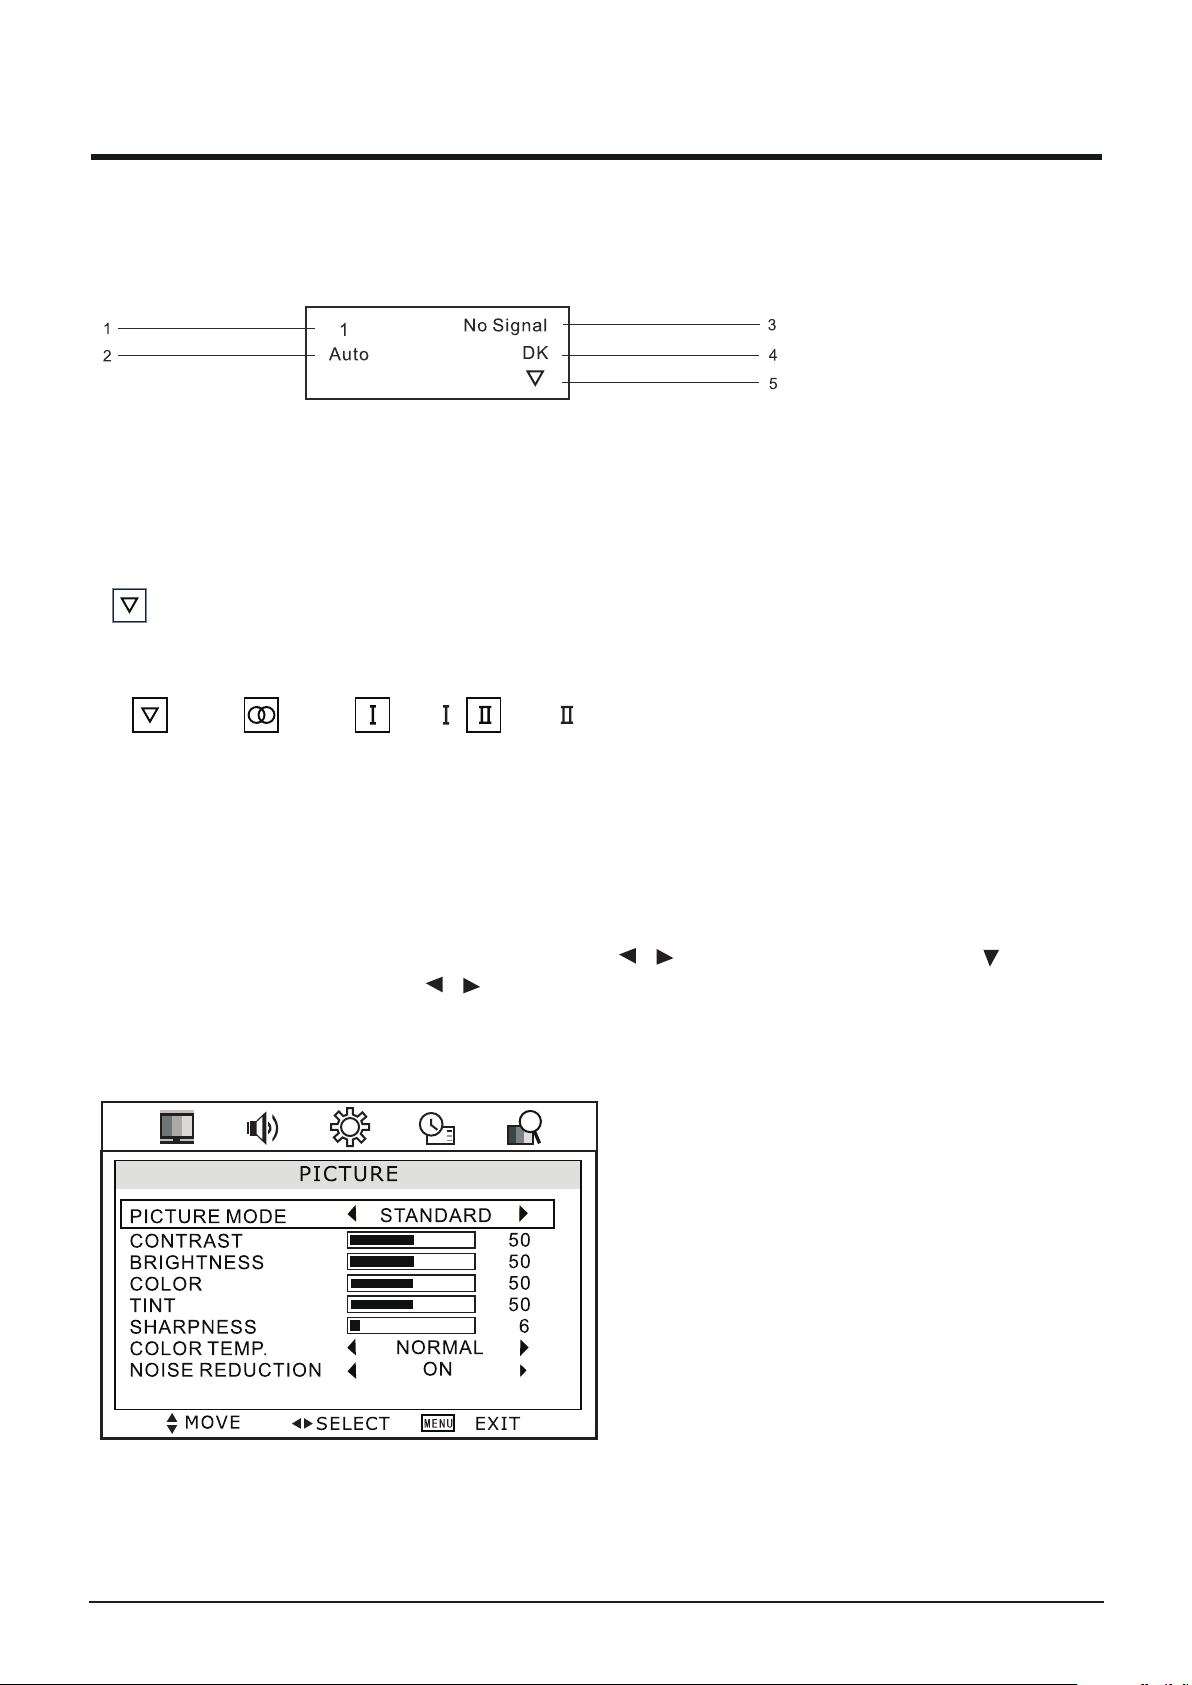
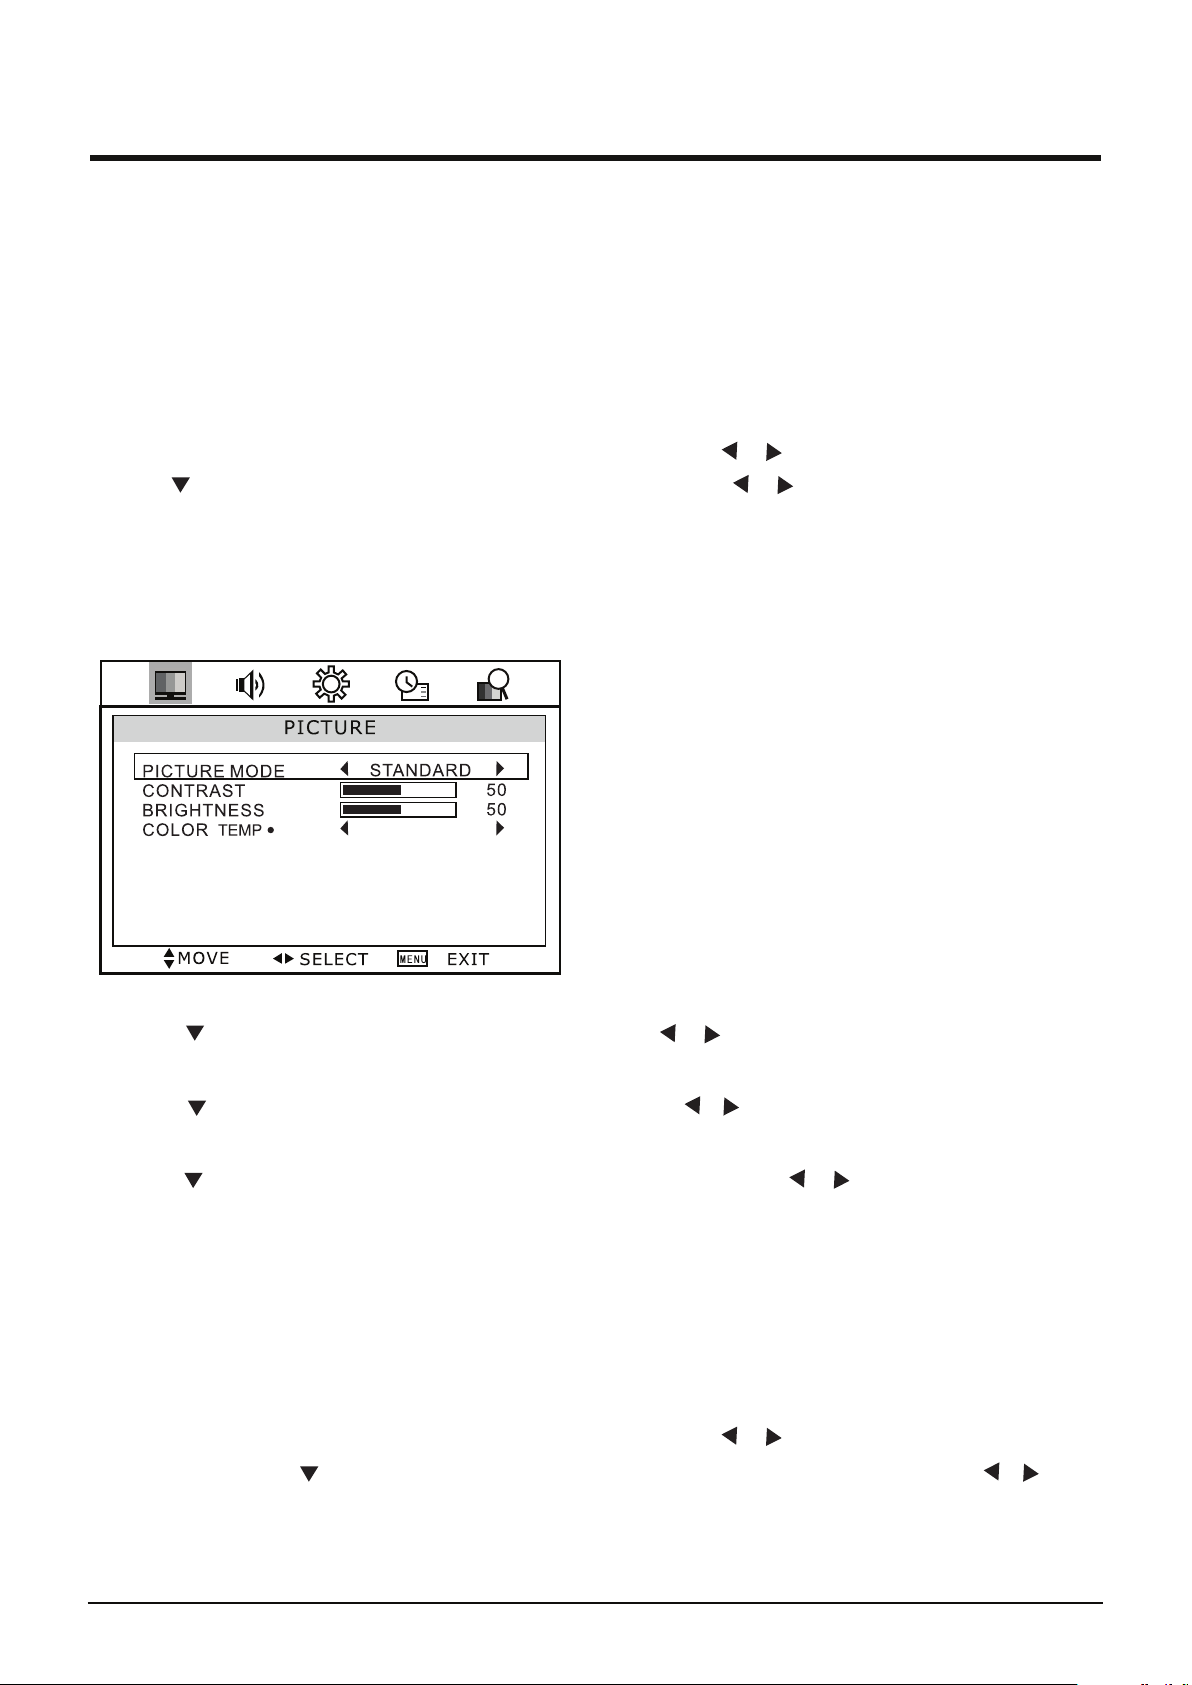
BEELD
Het BEELD menu geeft een aantal opties waarmee u het beeld van uw TV kan aanpassen aan de
lichtomstandigheden van de kamer en uw persoonlijke voorkeur. De mogelijke opties zijn BEELD MODUS,
CONTRAST, HELDERHEID, KLEUR, TINT, SCHERPTE, KLEURTEMPERATUUR en RUISONDERDRUKKING.
Om te navigeren:
Druk op de MENU toets van de afstandsbediening. Gebruik / om BEELD te selecteren. Gebruik om BEELD
MODUS te selecteren en gebruik dan / om te kiezen uit vier voorgeprogrammeerde opties : STANDARD >
FILM > LEVENDIG > PERSOONLIJK.
De STANDAARD optie is aanbevolen voor de meeste omstandigheden. Afhankelijk van de lichtomstandigheden in
de kamer, kan u echter voor één van de andere opties kiezen.
Als u PERSOONLIJK gekozen heeft kunt u nog meerdere instellingen uitvoeren.
9
Page 13
-Gebruik om CONTRAST aan te duiden en gebruik / om het contrast te verhogen of te verlagen.
-Gebruik om HELDERHEID aan te duiden en gebruik / om de helderheid te verhogen of te verlagen.
-Gebruik om KLEUR aan te duiden en gebruik / om de kleurintensiteit te verhogen of te verlagen.
-Gebruik om TINT aan te duiden en gebruik / om aan de kleur meer groen of rood te geven.
-Gebruik om SCHERPTE aan te duiden en gebruik / om de randen in het beeld zachter of scherper te maken.
-Gebruik om KLEURTEMPERATUUR aan te duiden en gebruik / om te kiezen tussen KOUD (meer blauwe toon),
NORMAAL of WARM. De standaardinstelling is NORMAAL.
-Gebruik om RUISONDERDRUKKING aan te duiden en gebruik / om de ruisonderdrukking AAN of UIT te zetten.
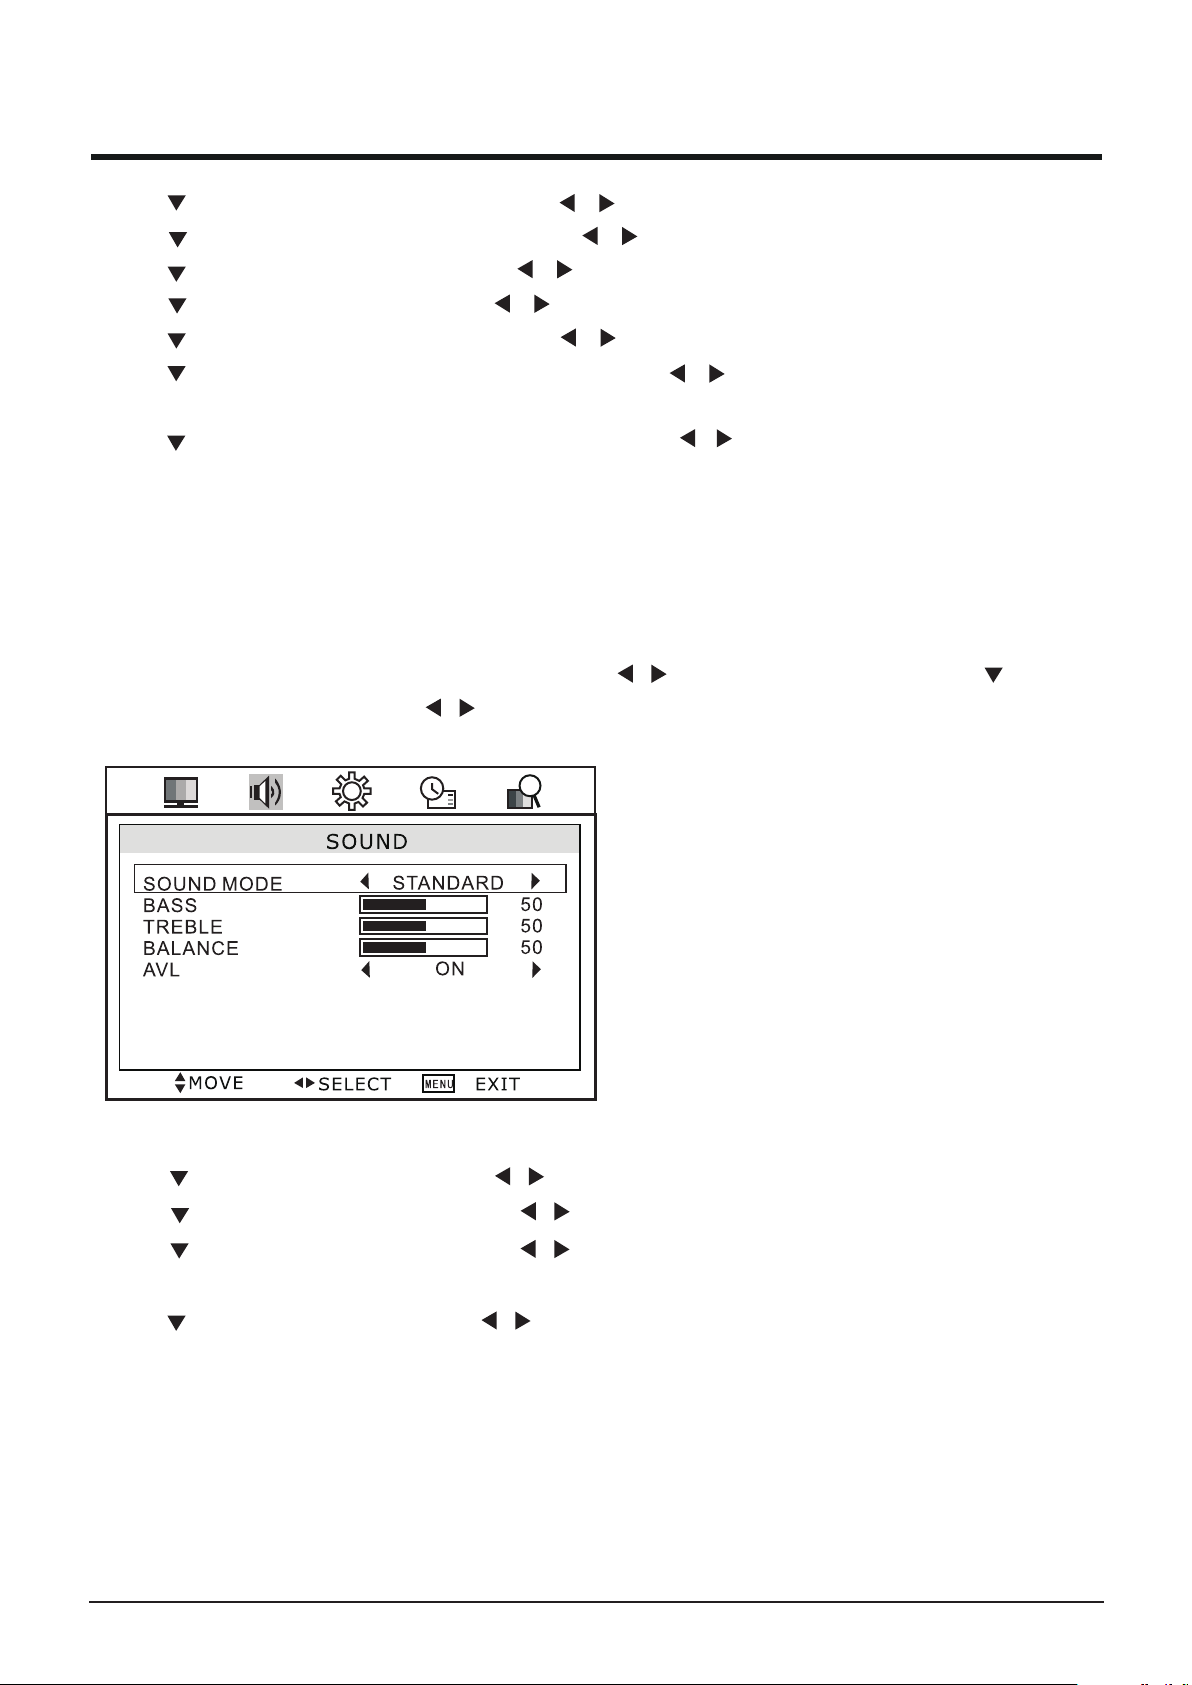
GELUID
Het GELUID menu laat toe het geluid voor de luidsprekers aan te passen.
Om te navigeren:
Druk op de MENU toets van de afstandsbediening. Gebruik / om GELUID te selecteren. Gebruik om GELUID
MODUS te selecteren en gebruik dan / om te kiezen uit vier voorgeprogrammeerde opties : STANDARD > FILM >
MUZIEK > PERSOONLIJK.
-Gebruik om BASS aan te duiden en gebruik / om de intensiteit van de lage tonen te verhogen of te verlagen.
-Gebruik om TREBLE aan te duiden en gebruik / om de intensiteit van de hoge tonen te verhogen of te verlagen.
-Gebruik om BALANS aan te duiden en gebruik / om de balans tussen de linker en rechter luidspreker in te
stellen.
-Gebruik om AVL aan te duiden en gebruik / om het AAN of UIT te zetten.
10
Page 14
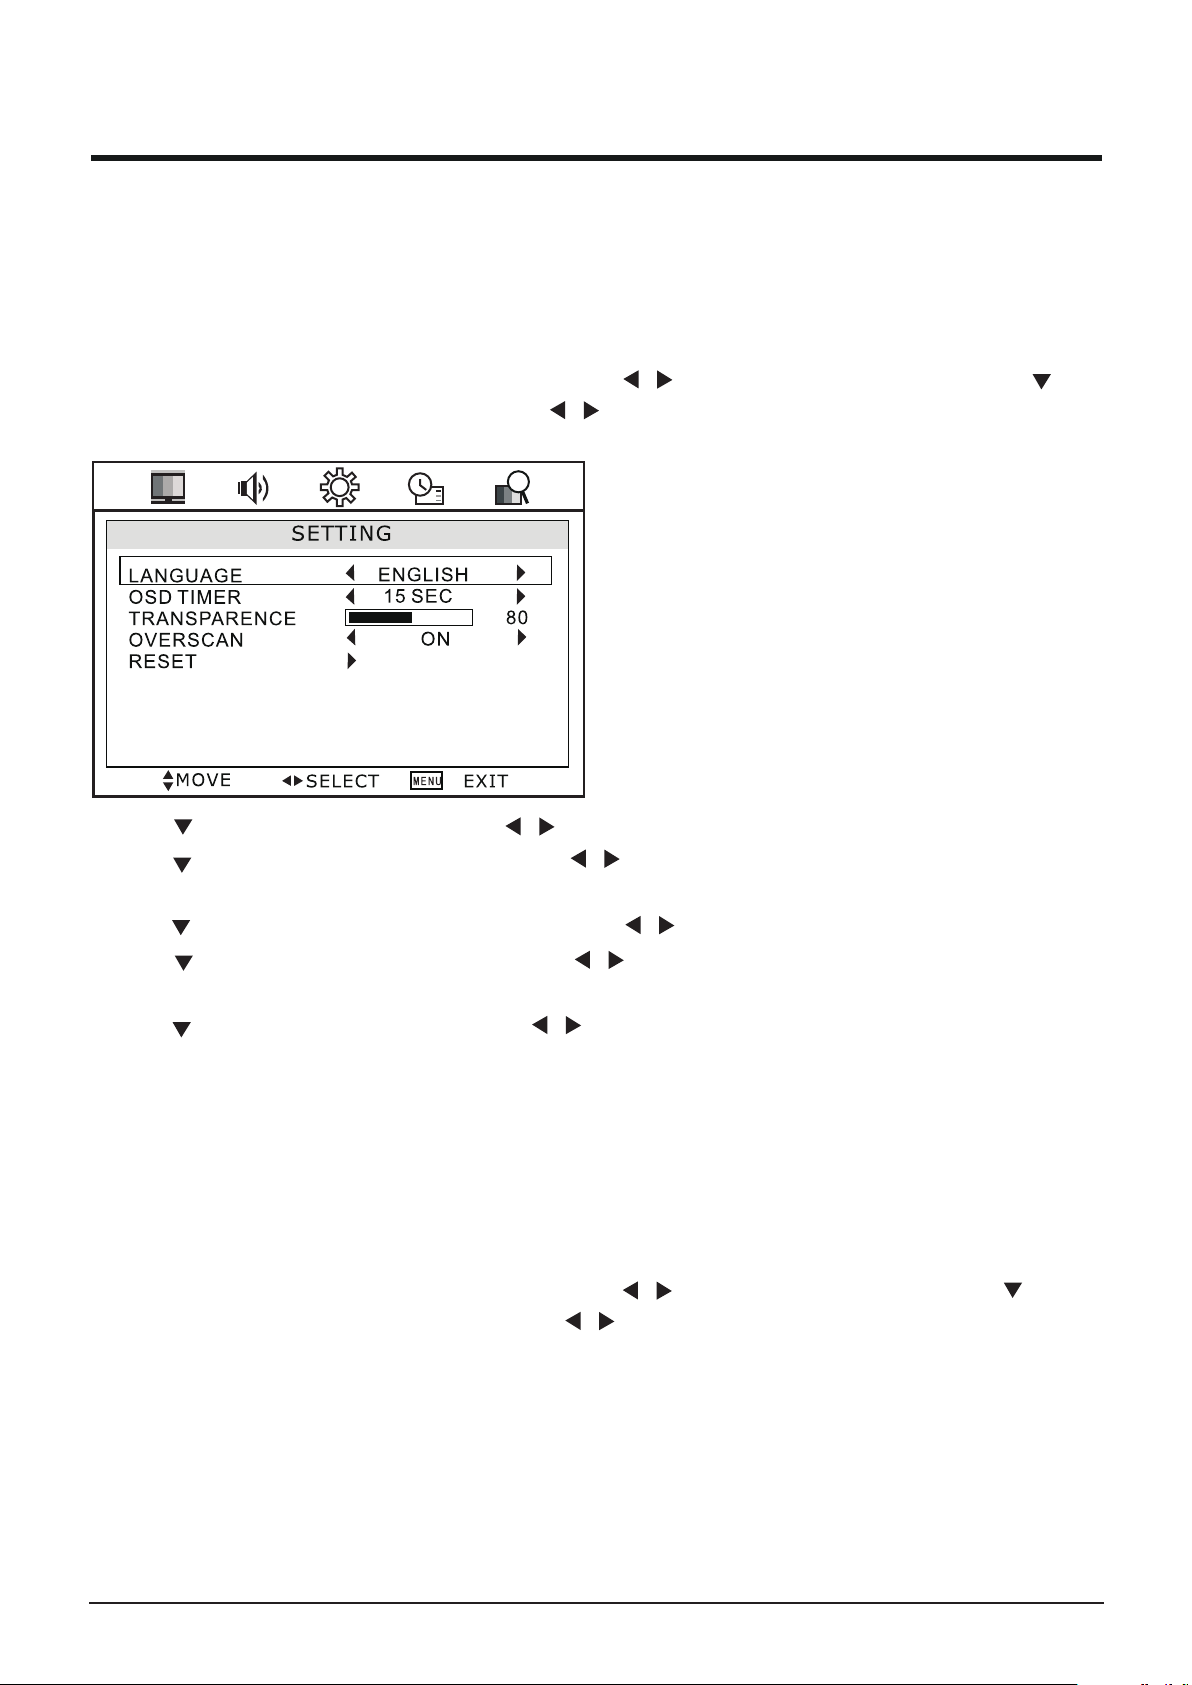
INSTELLINGEN
In het INSTEL menu kan u bepaalde voorkeuren instellen zoals TAAL, OSD TIMER, TRANSPARANTIE, OVERSCAN
en RESET om de TV terug op de fabrieksinstellingen te brengen.
Om te navigeren :
Druk op de MENU toets van de afstandsbediening. Gebruik / om INSTELLING te selecteren. Gebruik om
TAAL of andere opties te selecteren en gebruik dan / om te selecteren.
-Gebruik om TAAL aan te duiden en gebruik / om de OSD taal te kiezen.
-Gebruik om OSD TIMER aan te duiden en gebruik / om de tijd in te stellen: 5 SEC > 10 SEC > 15 SEC >
20 SEC > 25 SEC > 30 SEC.
-Gebruik om TRANSPARANTIE aan te duiden en gebruik / om de transparantie van het OSD in te stellen.
-Gebruik om OVERSCAN aan te duiden en gebruik / om het AAN of UIT te zetten. Deze optie is alleen
beschikbaar bij een HDMI bron.
-Gebruik om RESET aan te duiden en gebruik / om te kiezen uit de opties.
FUNCTIE
In het FUNCTIE menu kan u bepaalde voorkeuren instellen wat betreft SLEEP TIMER, ASPECT, TAAL TELETEKST,
BLAUW SCHERM, BLOKKERING SYSTEEM en FTI.
Om te navigeren :
Druk op de MENU toets van de afstandsbediening. Gebruik / om FUNCTIE te selecteren. Gebruik om SLEEP
TIMER of andere opties te selecteren en gebruik dan / om te selecteren.
11
Page 15
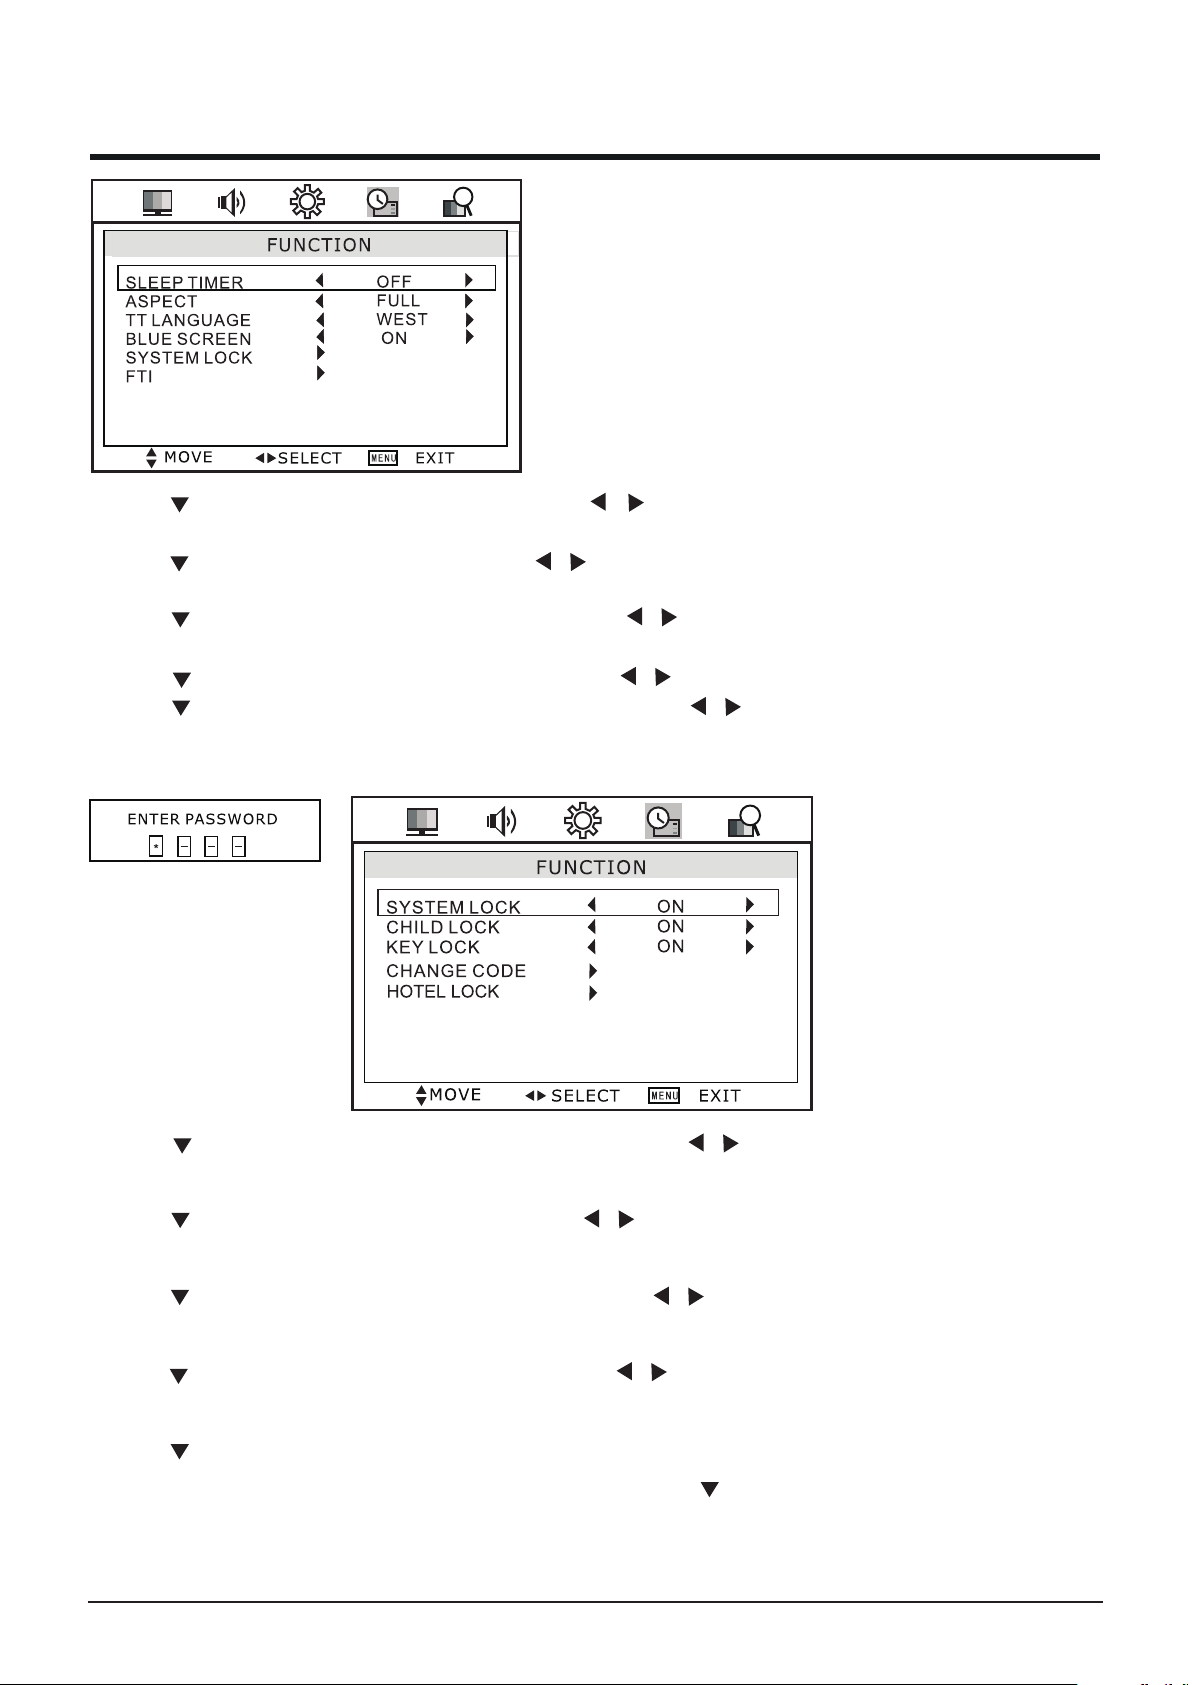
-Gebruik om SLEEP TIMER aan te duiden en gebruik / om de tijd in te stellen waarna de TV automatisch
zal uitschakelen. U kan kiezen uit 15 Min > 30 Min > 45 Min > 60 Min > 90 Min > 105 Min > 120 Min > UIT.
-Gebruik om ASPECT aan te duiden en gebruik / om te kiezen tussen VOLLEDIG > ZOOM > 4:3 > AUTO.
De standaardinstelling is VOLLEDIG.
-Gebruik om TELETEKST TAAL aan te duiden en gebruik / om te kiezen tussen WEST > OOST >
RUSSISCH > ARABISCH > FARSI
-Gebruik om BLAUW SCHERM aan te duiden en gebruik / om het AAN of UIT te zetten.
-Gebruik om BLOKKERING SYSTEEM aan te duiden en gebruik / om deze optie te kiezen. Breng uw 4
cijfer code in (standaard is 0000) tenzij die vroeger gewijzigd werd.
-Gebruik om BLOKKERING SYSTEEM aan te duiden en gebruik / om het AAN of UIT te zetten. Wanneer
gekozen wordt voor UIT, zijn onderstaande blokkeringen niet mogelijk.
-Gebruik om KINDERSLOT aan te duiden en gebruik / om het AAN of UIT te zetten. Wanneer het AAN staat
kan de zender niet weergegeven worden.
-Gebruik om TOETSBLOKKERING aan te duiden en gebruik / om het AAN of UIT te zetten.
Wanneer het AAN staat kan de toets niet gebruikt worden.
-Gebruik om CODE WIJZIGEN aan te duiden en gebruik / om het paswoord voor de blokkering te wijzigen.
Er verschijnt een dialoog om het paswoord te wijzigen.
-Gebruik om HOTEL MODUS aan te duiden. Dit wordt verder behandeld op pagina 18.
-Gebruik de MENU toets om naar het hoofdmenu te gaan en gebruik om FTI aan te duiden, zi pagina 11.
12
Page 16
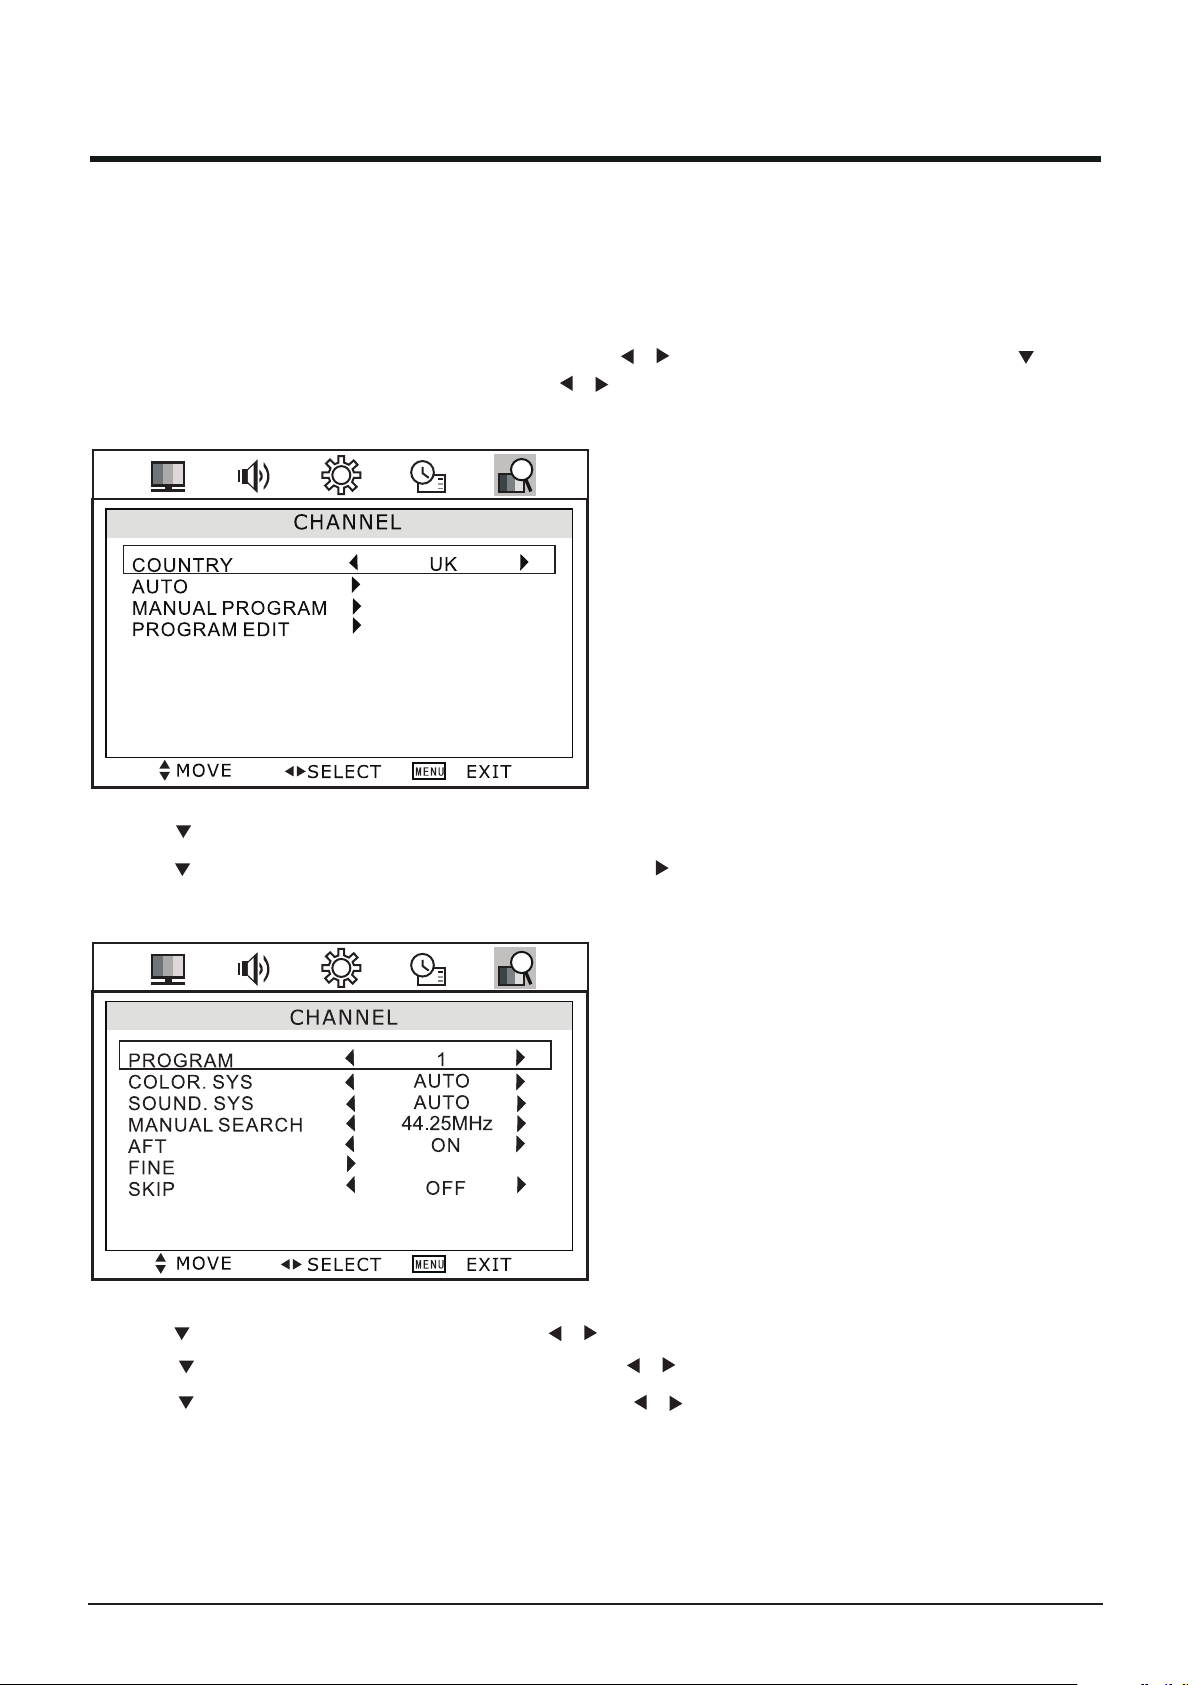
ZENDERS
In het ZENDER menu kan u instellingen wijzigen zoals LAND, AUTOMATISCH ZOEKEN, HANDMATIG ZOEKEN
en PROGRAMMA BEWERKEN.
Om te navigeren :
Druk op de MENU toets van de afstandsbediening. Gebruik / om ZENDERS te selecteren. Gebruik om
LAND of andere opties te selecteren en gebruik dan / om te selecteren.
SEARCH
-Gebruik om LAND en AUTOMATISCH ZOEKEN aan te duiden. Zie verder op pagina 11.
-Gebruik om HANDMATIG ZOEKEN aan te duiden. Gebruik om in het submenu te gaan.
-Gebruik om ZENDER aan te duiden en gebruik / om de zender aan te duiden die u wil bekijken.
-Gebruik om KLEURSYSTEEM aan te duiden en gebruik / om te kiezen tussen AUTO > PAL > SECAM.
-Gebruik om GELUIDSYSTEEM aan te duiden en gebruik / om te kiezen tussen AUTO > B/G > D/K > I >
L > L'.
13
Page 17
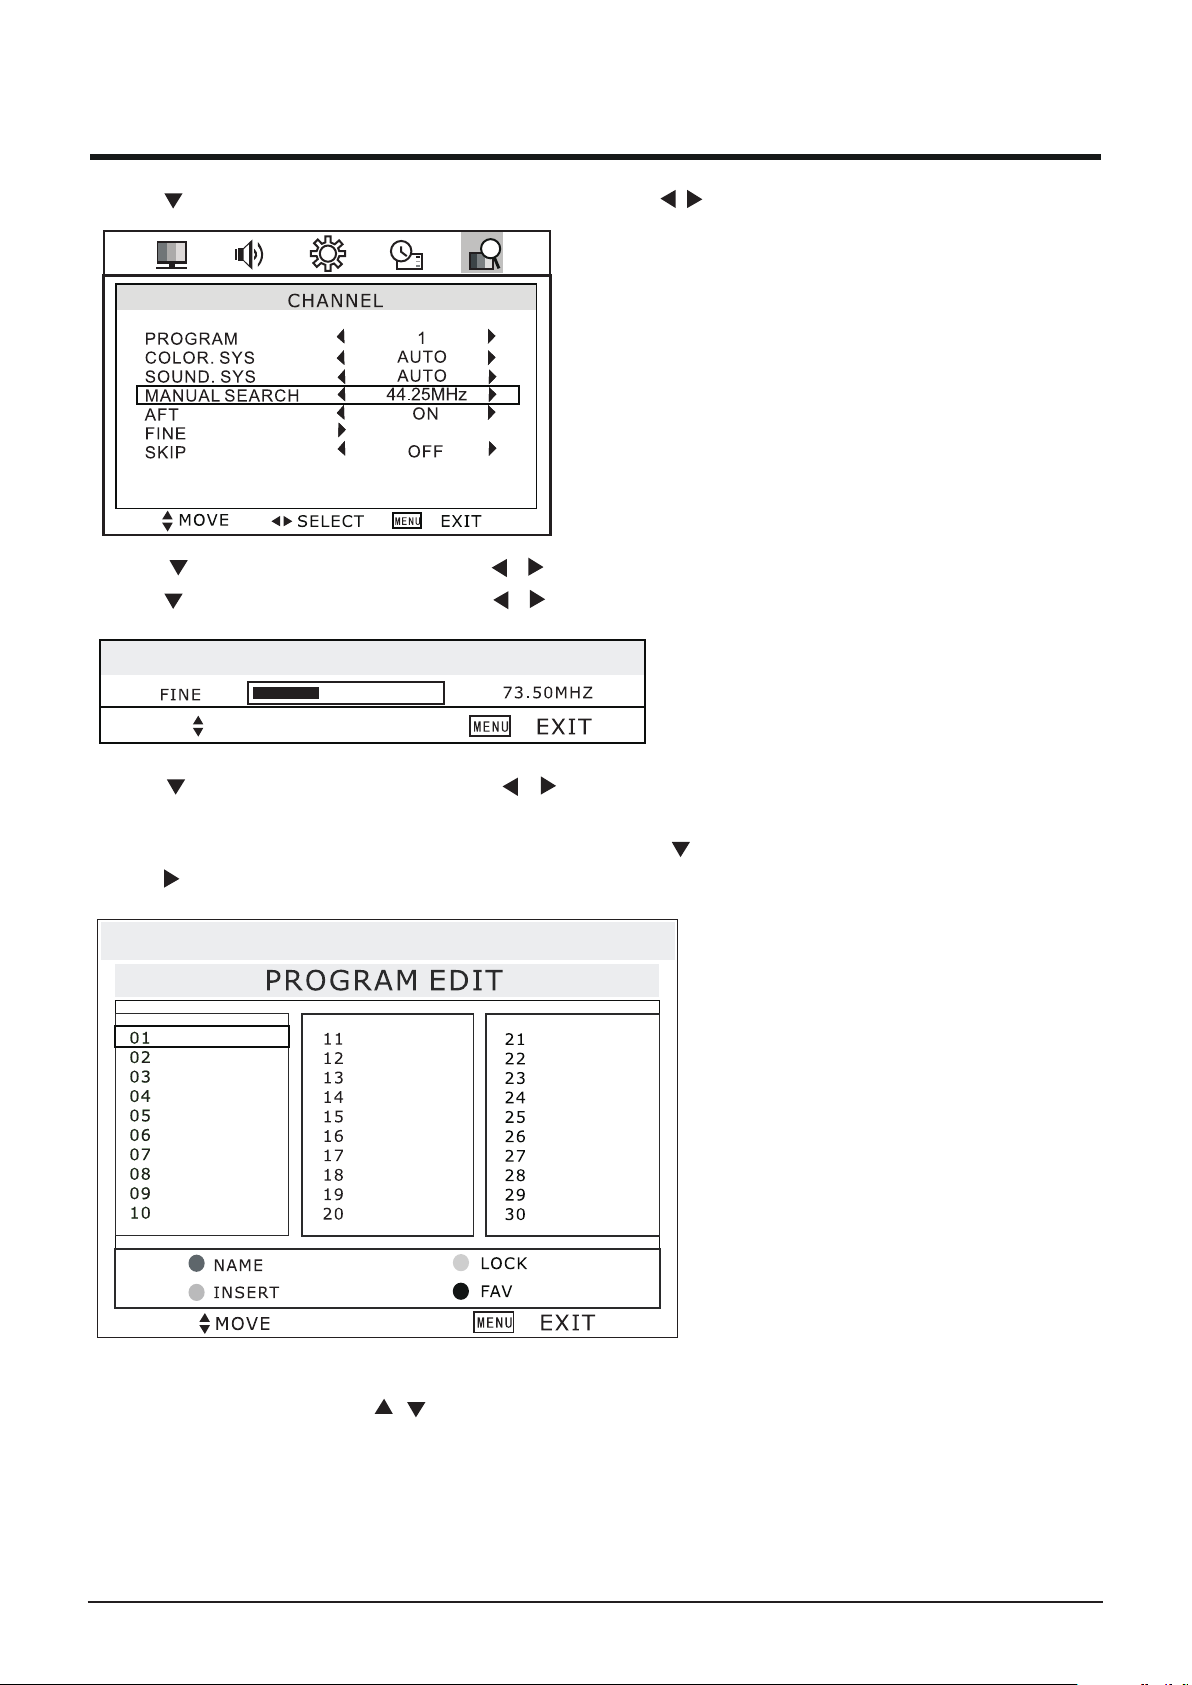
Gebruik om HANDMATIG ZOEKEN aan te duiden en gebruik / om te selecteren.
-Gebruik om AFT aan te duiden en gebruik / om het AAN of UIT te zetten.
Gebruik om FINE aan te duiden en gebruik / om te selecteren.
.
MOVE
-Gebruik om SKIP aan te duiden en gebruik / om het AAN of UIT te zetten.
-Druk op MENU om terug te gaan naar het hoofdmenu en gebruik om ZENDERS BEWERKEN aan te duiden.
Gebruik om in het submenu te gaan.
Deze optie heeft vier functies:
-Gebruik de groene toets en de / toetsen om een naam aan de zender te geven.
-Gebruik de gele toets om een zender in te voegen.
-Gebruik de rode toets om een zender te blokkeren. Als de zender reeds geblokkeerd is, gebruik de blauwe toets
om de deblokkeren.
-Gebruik de blauwe toets om een zender als een voorkeurzender te markeren. Als de zender reeds als
voorkeurzender gemarkeerd is, druk op de blauwe toets om er een normale zender van te maken.
14
Page 18
PC
BEELD
Het BEELD menu geeft een aantal opties waarmee u het beeld van uw TV kan aanpassen aan
de lichtomstandigheden van de kamer en uw persoonlijke voorkeur. De mogelijke opties zijn
BEELD MODUS, CONTRAST, HELDERHEID, KLEUR.
Om te navigeren:
Druk op de MENU toets van de afstandsbediening. Gebruik / om BEELD te selecteren.
Gebruik om BEELD MODUS te selecteren en gebruik dan / om te kiezen uit vier
voorgeprogrammeerde opties : STANDARD > FILM > LEVENDIG > PERSOONLIJK.
De STANDAARD optie is aanbevolen voor de meeste omstandigheden. Afhankelijk van de
lichtomstandigheden in de kamer, kan u echter voor één van de andere opties kiezen.
NORMAL
Als u PERSOONLIJK gekozen heeft kunt u nog meerdere instellingen uitvoeren.
-Gebruik om CONTRAST aan te duiden en gebruik / om het contrast te verhogen of te
verlagen.
-Gebruik om HELDERHEID aan te duiden en gebruik / om de helderheid te verhogen of
te verlagen.
-Gebruik om KLEURTEMPERATUUR aan te duiden en gebruik / om de kleurintensiteit
te verhogen of te verlagen : KOUD, NORMAAL, WARM
PC INSTELLINGEN
In het menu PC INSTELLINGEN kunt u voorkeuren instellen in PC MODUS, waaronder
H-POSITIE, V-POSITIE, KLOK, FASE en AUTOMATISCHE INSTELLING.
Om te navigeren :
Druk op de MENU toets van de afstandsbediening. Gebruik / om PC INSTELLING te
selecteren. Gebruik om H-POSITIE of andere opties te selecteren en gebruik dan / om
te selecteren.
15
Page 19

-Gebruik om H-POSITIE aan te duiden en gebruik / om de H-POSITIE in te stellen.
-Gebruik om V-POSITIE aan te duiden en gebruik / om de V-POSITIE in te stellen.
-Gebruik om KLOK aan te duiden en gebruik / om de KLOK in te stellen.
-Gebruik om AUTOMATISCHE INSTELLING aan te duiden en gebruik / om de instellingen hierboven
automatisch te laten uitvoeren.
Het GELUIDMENU, het INSTELMENU en het FUNCTIEMENU zijn identiek aan die van de TV modus.
HDMI/SCART/AV
BEELDMENU, GELUIDMENU, INSTELMENU, FUNCTIEMENU en ZENDERMENU zijn
identiek aan die van TV modus.
16
Page 20

Teletekst
Druk op TEXT op de afstandsbediening om naar teletekst over te gaan. Druk op OK om te bevestigen.
Teletext
Teletext
TTxPid
EXIT
EXIT
Hieronder volgt een overzicht van de functies van de teleteksttoetsen op de afstandsbediening.
1)Teletekst AAN/UIT
Om teletekst te zien, druk op TEXT. Druk opnieuw om terug naar normale weergave te gaan. De zender kan
tijdens teletekst niet gewijzigd worden.
2)Teletekst INDEX pagina.
Druk op INDEX om naar de index/beginpagina te gaan.
3)Verborgen tekst weergeven.
Druk op REVEAL om oplossingen op vragen van een quiz te tonen.
4)Een pagina vasthouden.
Het is praktisch om een pagina te kunnen vasthouden. Druk op HOLD om de pagina vast te houden totdat u
terug op de toets drukt.
5)Om het lettertype te vergroten.
Druk op SIZE om de bovenste helft van de pagina te vergroten; druk opnieuw om de onderste helft van de
pagina te vergroten; druk nogmaals om terug op normaal formaat te komen.
6)Rode/groene/gele en cyaan toetsen.
In FASTTEXT of TOP modus corresponderen deze toetsen met verschillende onderwerpen. In lijstmodus
komen ze overeen met de verschillende gekleurde paginanummers.
7)Pagina naar boven of naar beneden.
Gebruik / om naar een hoger of lager paginanummer te gaan.
8)Paginanummers
Gebruik de 0-9 toetsen om een paginanummer direct in te brengen.
9)EXIT toets.
Een TV programma bekijken en op de hoogte gehouden worden wanneer een teletekstpagina aangepast wordt.
Druk op de EXIT toets. Het Tv programma verschijnt op het scherm en het teletekstsymbool verschijnt
bovenaan in het scherm. Wanneer de teletekst aangepast wordt, verschijnt het nummer van de gewijzigde
pagina op het scherm. Het TV programma kan niet veranderd worden als de EXIT toets geactiveerd is.
Druk op EXIT en de aangepaste teletekstpagina verschijnt op het scherm.
10)SUBPAGINA
Om direct naar een subpagina te gaan, druk op SUBPAGE. Breng het nummer van de subpagina direct in
met de 0-9 toetsen. Voorbeeld: om de tweede pagina op te roepen: 0002.
7321
MOVE
17
Page 21
HOTEL MODUS
Instellen van de Hotel modus.
Gebruik / om HOTEL LOCK in het FUNCTIEMENU te kiezen en druk op om
te bevestigen.
HOTEL MODE
HOTEL LOCK
VOLUME ON
MAX VOLUME
DEFAULF SOURCE
SOURCE LOCK
CLEAR LOCK
ATV
Hotel LOCK
Gebruik / om HOTEL LOCK te selecteren en gebruik / om AAN of UIT te kiezen.
100
30
VOLUME AAN
Gebruik / om VOLUME AAN te selecteren en gebruik / om het geluidvolume in te stellen.
MAXIMUM VOLUME
Gebruik / om MAX VOLUME te selecteren en gebruik / om het maximum geluidvolume
in te stellen.
STANDAARD BRON
Gebruik / om STANDAARD BRON te selecteren en gebruik om te bevestigen.
Gebruik / om de bron te selecteren en gebruik / om AAN of UIT te kiezen.
Met deze instelling worden de volgende poorten afgesloten: ATV, HDMI, YPBPR, AV, Side, VGA.
BRONBLOKKERING
Gebruik / om BRONBLOKKERING te selecteren en druk op om in het submenu te
gaan om de inhoudselectie te beperken en STANDAARDBRON menu uit te schakelen.
BLOKKERING VERWIJDEREN
Druk op om de Hotel modus leeg te maken.
18
Page 22
USB FUNCTIES
--General Setup Page –
TV Display Wide
OSD Lang Eng
Source
Last Memory Off
Closed Caption
Enter
Off
De USB functies bevatten weergave van film, muziek en foto.
Gebruik om USB te selecteren. Druk op ENTER om in
het submenu te gaan.
▼ / ▲
DVD
USB
00:00
005/039
MP3
MP3
GIF
WMA
JPG
00:00
druk op knop om te selecteren ▼ / ▲
Temp
Beperkingen van het toestel en het systeem
1) Het systeem ondersteunt USB (max 4)
2) USB : ondersteunt USB 2.0, compatibel met USB1.1, maar niet USB Hub.
3) Het externe filesysteem moet FAT32/FAT zijn, ander werkt het niet.
4) Het systeem ondersteunt de verbinding van 4 partities disk.
5) De lijst kan tot 9999 files bevatten, er kunnen zich dus tot maximaal 9999 documenten in
eenzelfde partitie bevinden.
6) Het fileformaat van de FAT/FAT32 is beperkt tot 4GB.
Ondersteunde media:
VIDOE
MPEG1(.*DAT, VDC1.0,VCD1.1,
VCD2.0, SVCD
Max: 720*480*30 decodering NTSC
MPEG2(*.VOB,*.MPG)
Max:720*480*30 decodering NTSC
MPEG4 (AV1 Xvid met B-Frame,
Xvid met Q-pel)
Geen ondersteuning van Divx
Max: 720*480*30 decodering NTSC
19
AUDIO
MP3(*.mp3)
WMA(*.wma)
FOTO
JPEG(*.jpg)
GIF(*.gif)
Versie:98
Page 23
DVD FUNCTIONS
Druk op SETUP op de afstandsbediening om in het
instelmenu te gaan.
Gebruik om de Algemene Instelpagina te
selecteren.
Gebruik om het gewenste item aan te duiden.
Gebruik om in het submenu te gaan.
Gebruik om naar het vorig menu te gaan.
◄ / ►
▼▼ /
►
◄ / ►
Algemene instellingen
TV scherm
Kies het formaat (aspect verhouding) die overeenkomt
met uw TV.
Normaal PS: het centrale deel van het beeld is
zichtbaar op een 4:3 TV, maar de linkse en rechtse
kanten zijn samengedrukt.
Normaal LB : het hele breedbeeld is zichtbaar op een
4:3 TV, maar er verschijnen boven en onderaan
zwarte stroken.
BREEDBEELD: kies deze optie als de speler wordt
aangesloten op een breedbeeld TV. DVD’s die zijn
opgenomen in het 4:3 formaat kunnen echter niet als
16:9 weergegeven worden.
--General Setup Page –
TV Display Wide
OSD Lang Eng
Last Memory Off
Source
Go To General Setup Page
--General Setup Page –
TV Display Wide
OSD Lang Eng
Last Memory Off
Source
Go To General Setup Page
--General Setup Page –
normal ps
norma lb
wide
OSD taal
Kies de gewenste taal.
Druk op OK om te bevestigen.
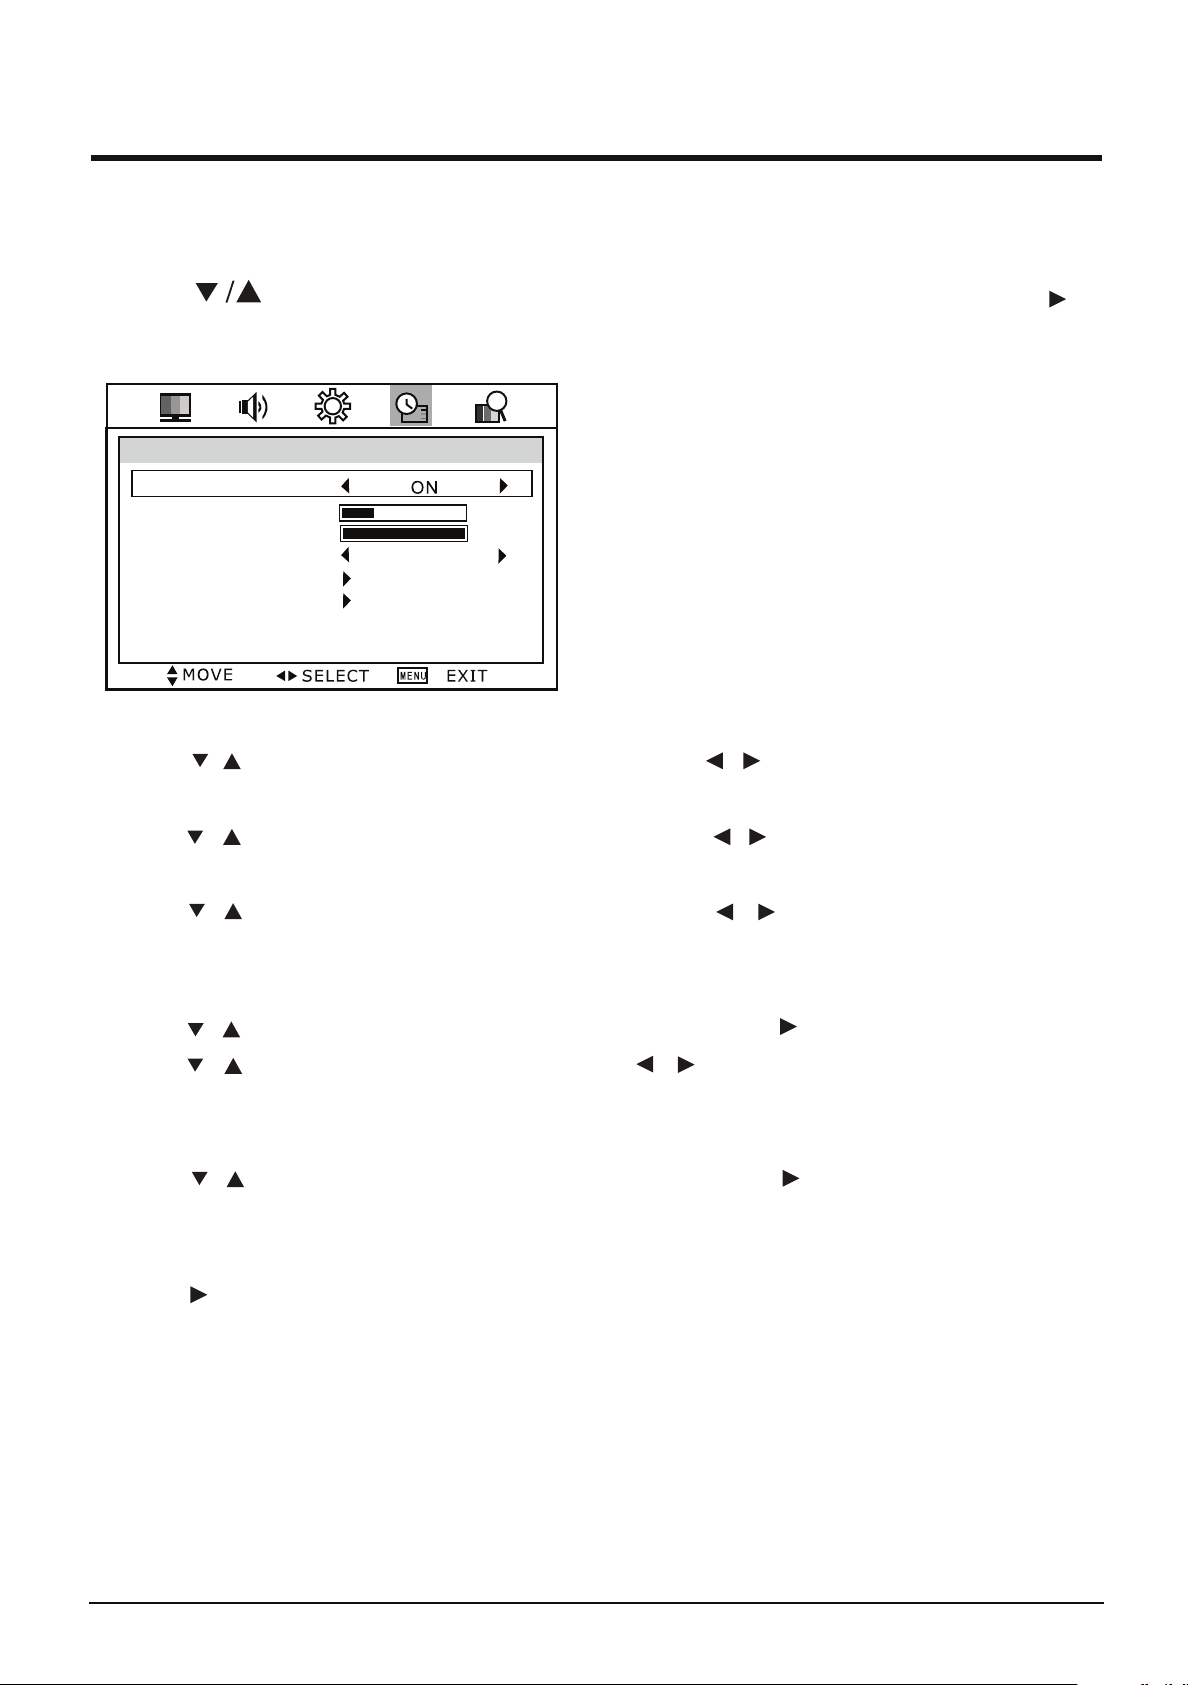
Laatste geheugen
Kies de gewenste modus.
ON: druk op de OPEN toets tijdens de weergave van
een DVD. Als u de lade terug sluit begint de weergave
waar u gestopt bent.
OFF: geen geheugenfunctie.
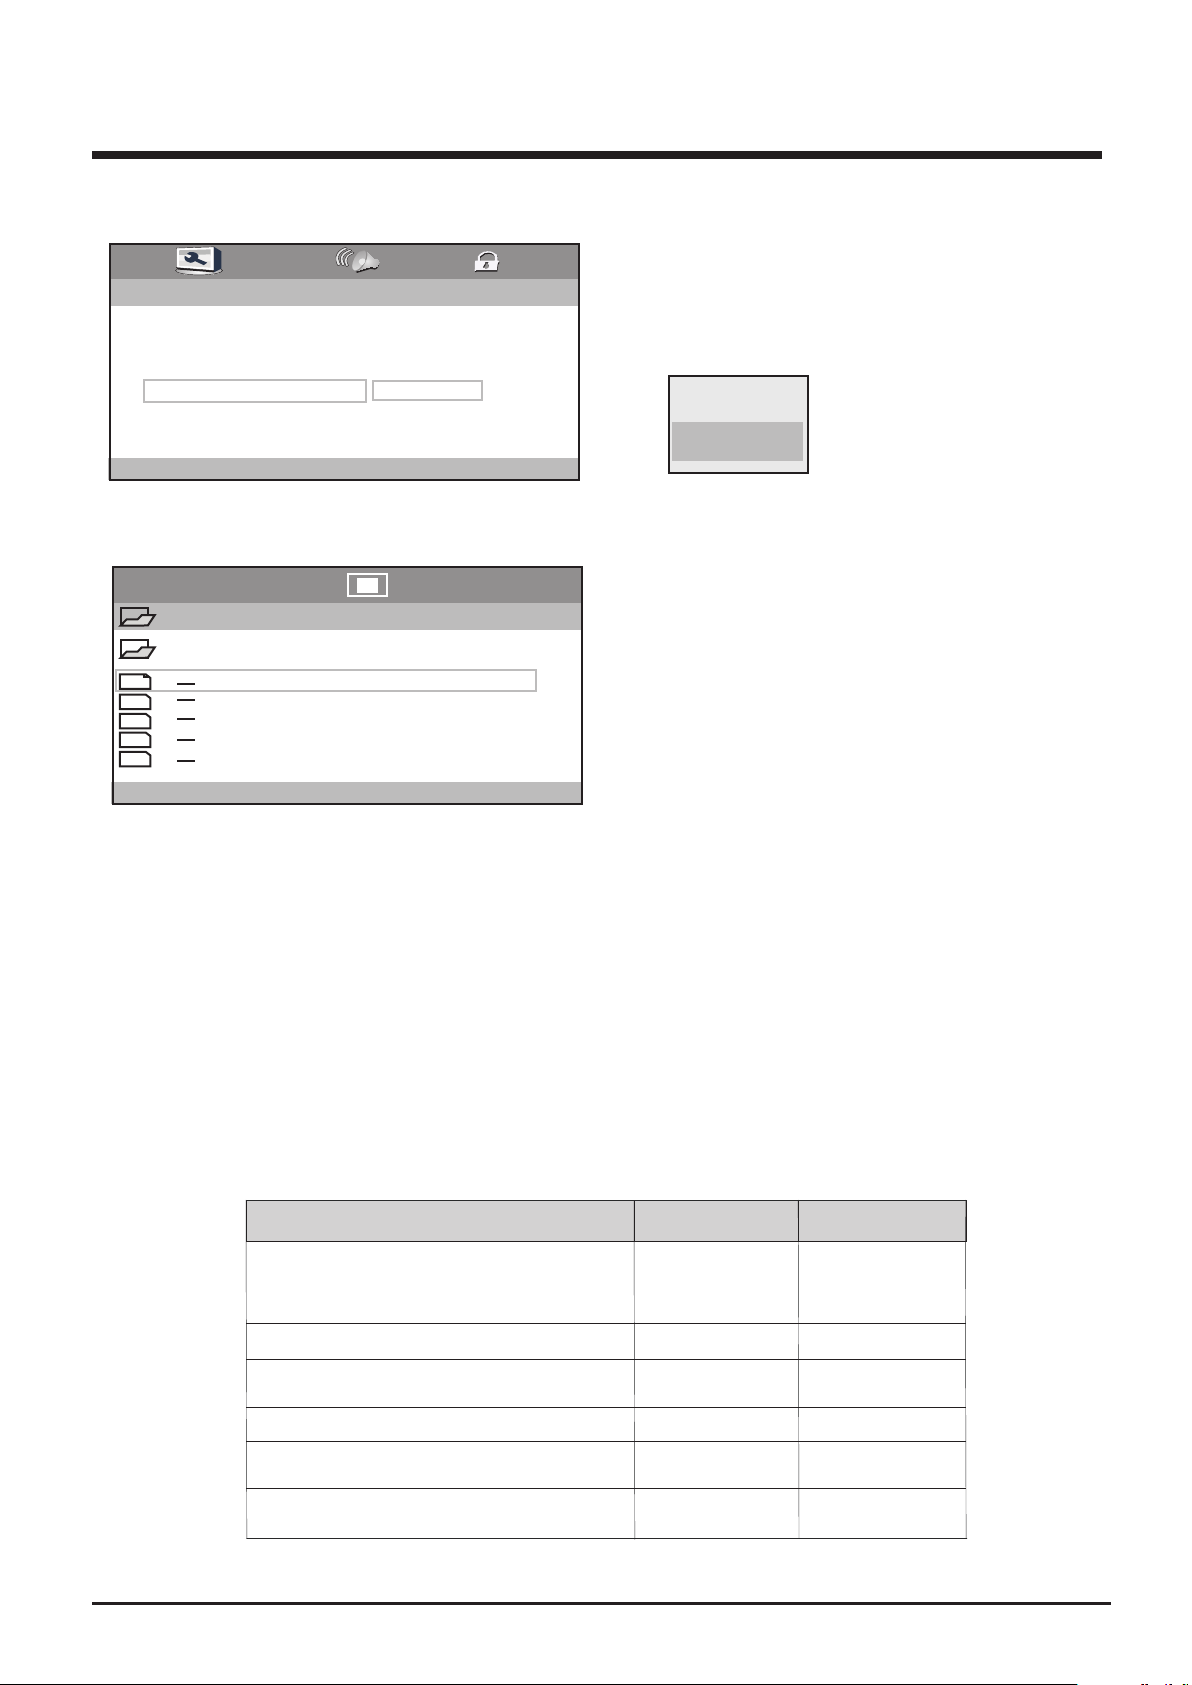
Bron
Selecteer uw bronmodus
Gelieve OK-toets Enter en selecteer USB-of DVD-
TV Display Wide
OSD Lang Eng
Last Memory Off
Source
Set OSD Language
--General Setup Page –
TV Display W ide
OSD Lang Eng
Last Memory Off
Source
Set Last Memory State
--General Setup Page –
TV Display Wide
OSD Lang Eng
Last Memory Off
Source
English
French
German
Spanish
Italian
Portuguese
On
Off
Off
Enter
20
Closed Caption
Page 24
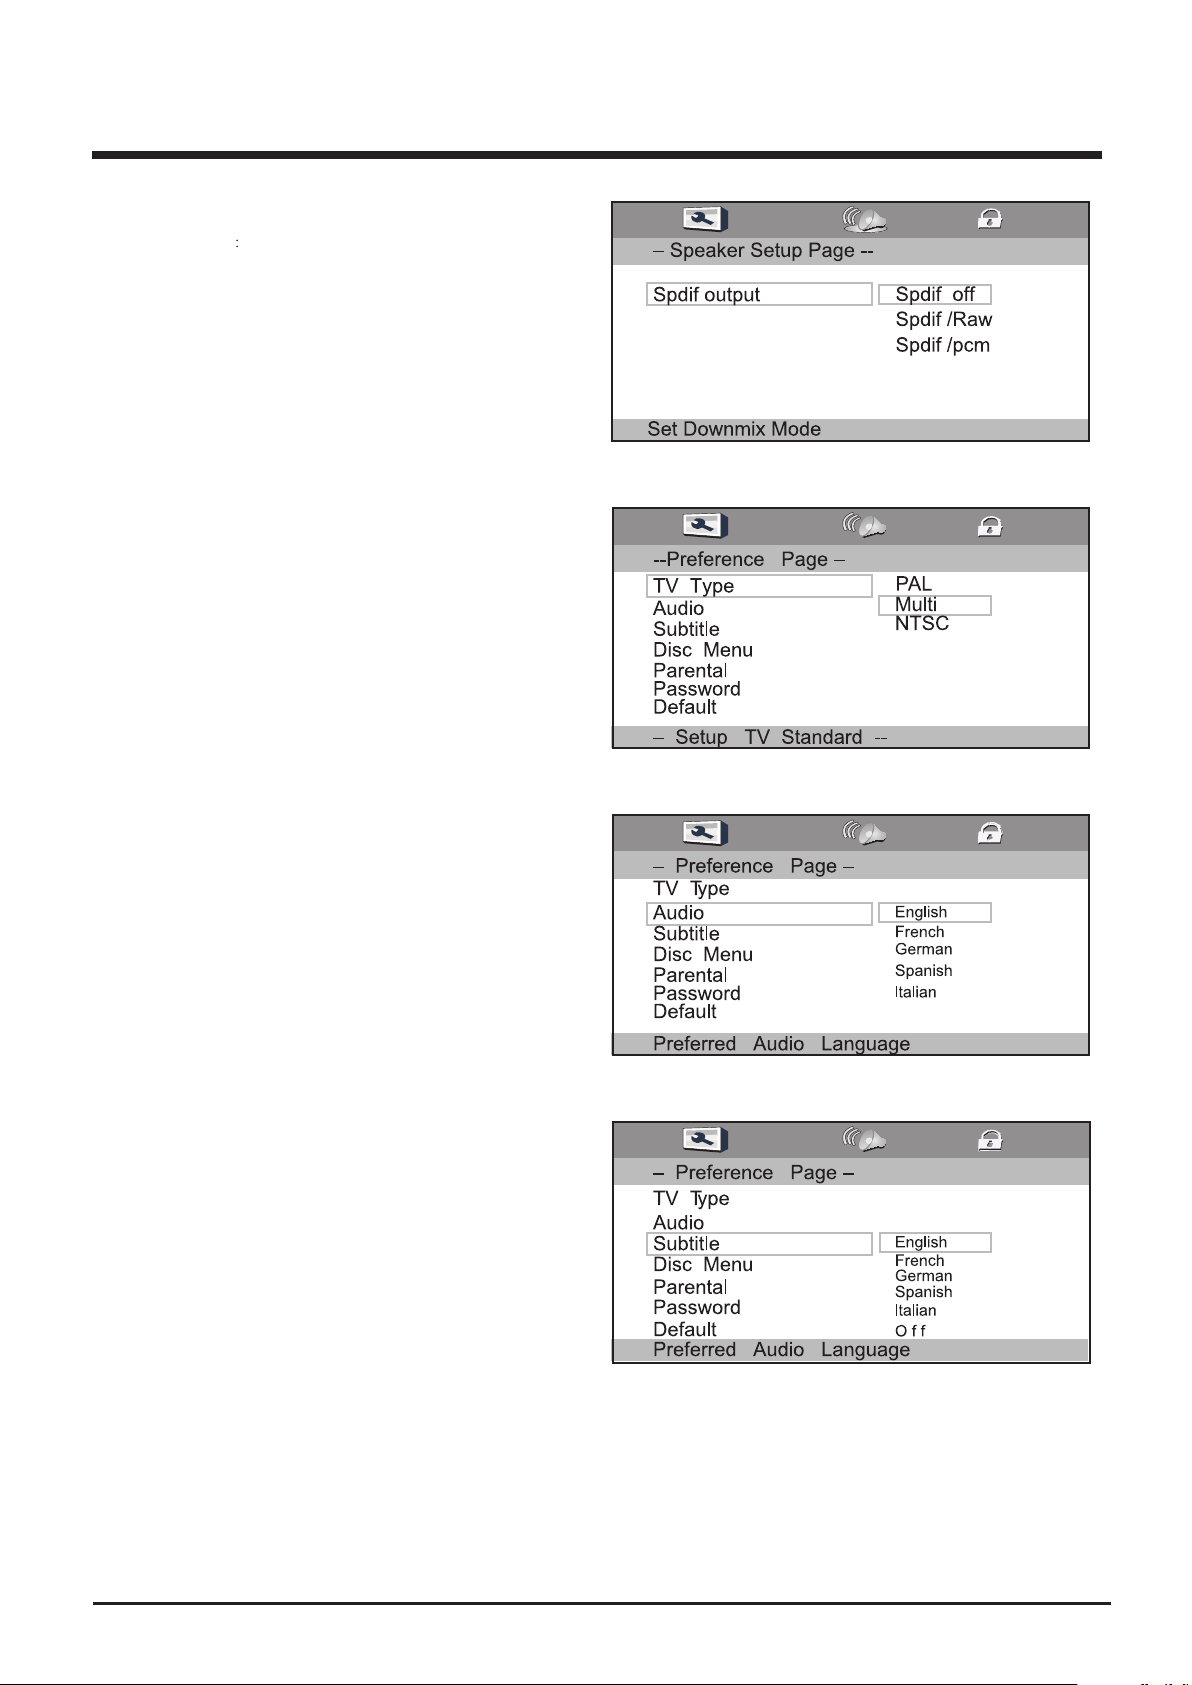
Speaker Setup
SPDIF-uitgang
Druk op knop om de SPDIF-uitgang verwekt ▼ / ▲
U kunt kiezen uit: SPDIF Off
SPDIF / RAW
SPDIF / PCM
Voorkeurinstellingen
Type TV.
Kies het gewenste TV systeem.
Druk op OK om te bevestigen.
Audio
Kies bij DVD de gewenste gesproken taal.
1) De geselecteerde taal krijgt voorrang en wordt
automatisch bij de weergave gekozen.
2) De mogelijke talen hangen af van de DVD. U
kan de taal ook kiezen door op AUDIO van de
afstandsbediening te drukken.
Ondertitels
Kies bij DVD de gewenste taal voor de ondertitels.
1) De geselecteerde taal krijgt voorrang en wordt
automatisch bij de weergave gekozen.
2) De mogelijke talen hangen af van de DVD. U
kan de taal ook kiezen door op SUBTITLE van de
afstandsbediening te drukken.
21
Page 25

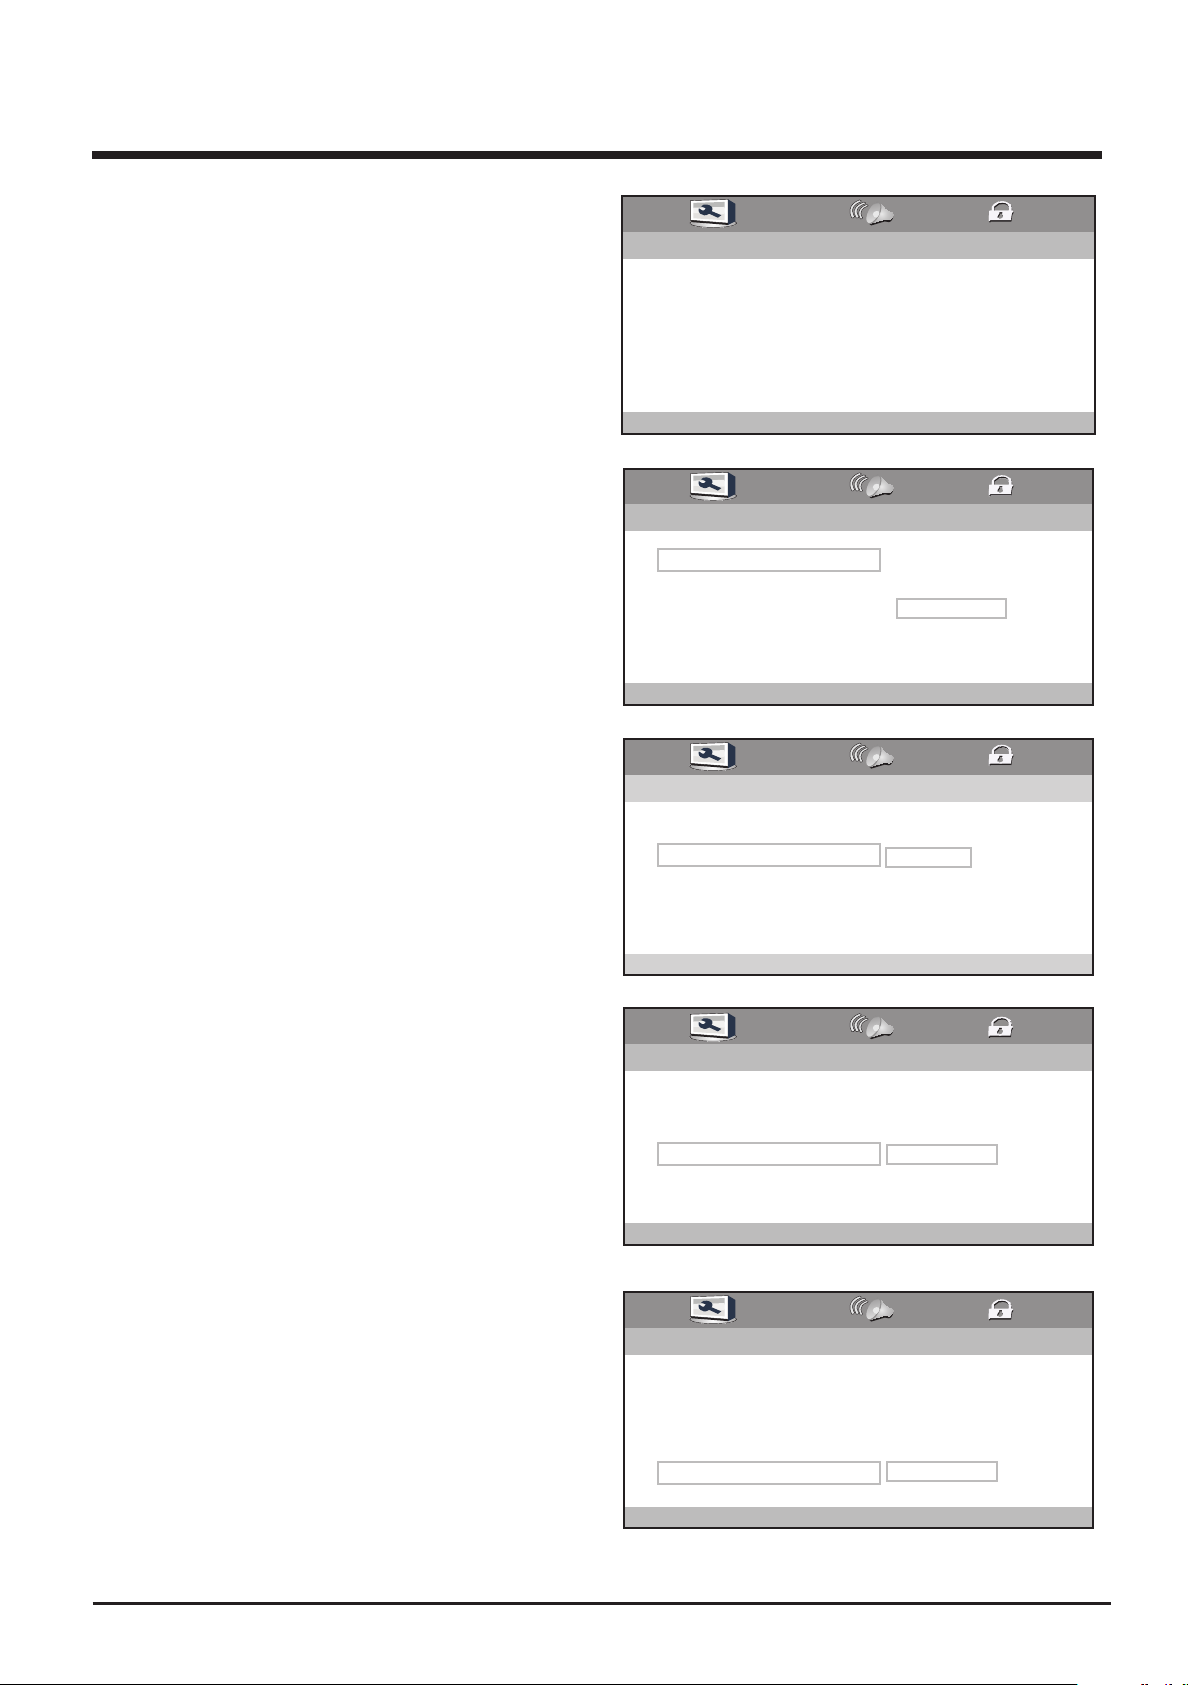
Disk menu
Kies de gewenste taal voor het diskmenu van de
DVD. De talen variëren volgens de disk.
Ouderlijke controle
Het is mogelijk de weergavemogelijkheid van
bepaalde disks te beperken volgens een bepaald
niveau, bijvoorbeeld in functie van de leeftijd.
Sommige scènes kunnen geblokkeerd worden of
vervangen worden door andere. Via de ouderlijke
controle kan u het niveau instellen. Deze functie
wordt met een paswoord beschermd.
Opmerking: met diks die de ouderlijke
controlefunctie niet ondersteunen kan dit niet
gebruikt worden.
– Preference Page –
TV Type
Audio
Subtitle
Disc Menu
Parental
Password
Default
Preferred Menu Language
– Preference Page –
TV Type
Audio
Subtitle
Disc Menu
Parental
Password
Default
Load Factory Setting
English
French
German
Spanish
ltalian
1 Kid Saf
2 G
3 Pg
4 Pg13
5 Pgr
6 R
7 Nc17
8 Adult
Password
Wijzig het paswoord.
Het standaard paswoord is 0000
Standaard
Om de instellingen van de speler terug op de
.
fabriekswaarden te brengen.
– Preference Page –
TV Type
Audio
Subtitle
Disc Menu
Parental
Password
Default
Load Factory Setting
– Preference Page –
TV Type
Audio
Subtitle
Disc Menu
Parental
Password
Default
Load Factory Setting
Change
Reset
22
Page 26

In geval van problemen
Als de TV niet goed functioneert, consulteer onderstaande tabel alvorens externe hulp te halen.
Probleem Mogelijke oorzaak Oplossing
Doet niets, geen LED Niet aangesloten op het
stroomnet
LED licht op, maar
toetsen van het toestel
doen niets
TV staat op verkeerde
Geen beeld, blauwe LED
ingangsbron Fout backlight
Geen beeld, blauw
scherm
Slechte beeldkwaliteit in
(analoge) TV of bevroren
beeld
of gebroken beeld in
(digitale) TV modus
Bevroren of gebroken
teletekst
Blokkering van de toetsen Zie pagina 13.
Zet de TV aan met de
afstandsbediening
Geen ingangsignaal
TV niet afgestemd
TV in verkeerde modus
Zwak TV signaal
Zwak TV signaal
Controleer of de TV aan het
stroomnet is aangesloten.
Zet de TV op TV modus
Contacteer service
Is de antenne aangesloten ?
Zie pagina's 12-13
Is AV of PC geselecteerd ?
Controleer de antenne-aansluiting
Mogelijk nodig om te upgraden
of te wisselen
Als hierboven
Heldere of donkere
vlekken op het scherm
Geen geluid
Verloren of vergeten
paswoord
PC BEDIENING
Scherm toont geen
signaal
Beeld niet centraal
Geen PC geluid Audio instellingen
Controleer de audio instellingen
van de PC
Schade aan het scherm Niet gedekt door de waarborg
Mute toets is ingedrukt
Slechte externe aansluiting
Breng 0000 in
Slechte aansluiting
Beeldpositie niet afgesteld Selecteer het PC menu en
Controleer of de VGA kabel
goed is aangesloten
Controleer de mute toets.
Controleer de verbinding met
een externe versterker
regel de N en V positie
23
Page 27

MANUEL D'UTILISATION
EF-Y-3B140A
Lisez toutes les instructions avant d'utiliser le TV et gardez le
manuel d'utilisation pour consultation ultérieure.
Page 28

Page 29

Content
Content
1-Information de sécurité
2-Instructions de sécurité
3-Pièces et accessoires
Introduction
Télécommande
Opération TV
4-Commandes
5-Connexions à l'arrière
6-Télécommande
7-Utilisation de la télécommande
7-SOURCE et OPERATION DE BASE
8-Première installation
9-14 Menu TV
15-Menu PC
16-Menu HDMI/SCART/AC
17-Télétexte
Autres
18-Mode hôtel
19-FONCTIONS USB
20-FONCTIONS DVD
23-En cas de problèmes
Page 30

Information de sécurité
ATTENTION
RISQUE DES CHOCS ELECTRIQUES
NE PAS OUVRIR
ATTENTION : POUR EVITER LE RISQUE DES CHOCS ELECTRIQUES
NE PAS OUVRIR L'APPAREIL
IL N'Y A PAS DES FONCTION D'UTILISATION A L'INTERIEUR
CONSULTEZ UN SPECIALISTE POUR SERVICE
Le symbole d'éclair dans un triangle isocèle sert à avertir l'utilisateur qu'à l'intérieur de l'appareil
se trouvent des VOLTAGES DANGEREUX non isolés avec une magnitude suffisante pour
constituer un risque des chocs électriques.
Le point d'exclamation dans un dans un triangle isocèle sert à avertir l'utilisateur que des
instructions importantes d'utilisation et d'entretien accompagnent cet appareil.
Enlèvement correct de l'appareil
(Déchets d'Equipement Electrique et Electronique)
L symbole d'une poubelle croisée signifie que cet appareil ne peut pas – quand il arrive à le fin
de sa vie – être déposé avec les autres déchets domestiques. Afin d'éviter des dommages à
l'environnement et la santé humaine par des déchets incontrôlés, gardez l'appareil séparé
d'autres déchets domestiques et recyclez le pour promouvoir la réutilisation des matériaux.
Pour les produits électriques domestiques, consultez votre revendeur ou les autorités locaux
pour savoir où vous pouvez déposer votre appareil.
Les utilisateurs professionnels doivent contacter leur fournisseur et contrôler les conditions du
contrat. Ce produit ne peut pas être mélangé avec d'autres déchets industriels.
Cet appareil est un produit laser CLASS 1. Ce produit utilise un rayon laser visible qui peut
causer l'exposition aux radiations dangereuses. Assurez vous que l'appareil est utilisé selon les
instructions. N'enlevez pas le boîtier et ne regardez pas dans le tiroir DVD quand l'appareil est
en marche. NE pas modifier ou régler les contrôles qui peuvent avoir un effet sur l'émission laser.
Consultez un spécialiste quand l'appareil ne fonctionne pas bien.
Cet appareil es conforme aux directives européennes de sécurité des appareils électriques.
Page 31

Instructions de sécurité
ATTENTION. LISEZ ET SUIVEZ TOUS LES AVERTISSEMENTS ET TOUTES LES INSTRUCTIONS DU MANUEL
D'UTILISATION ET LES INDICATIONS SUR L'APPAREIL. GARDEZ LE MANUEL POUR CONSULTATION
ULTERIEURE.
Cet appareil a été développé et fabriqué pour assurer votre sécurité. Une mauvaise utilisation peut causer des chocs
électriques et du feu. Les précautions incorporées dans l'appareil vous donnent une garantie de sécurité quand vous
suivez les procédures d'installation, de service et d'opération. Il n' y a PAS des fonctions d'utilisation à l'intérieur de
l'appareil. NE PAS OUVRIR L'APPAREIL CAR VOUS POUVEZ ETRE EXPOSE AUX HAUTES VOLTAGES ET LA
RADIATION LASER ET VOUS RISQUEZ QUE LA GARANTIE EST ANNULEE.CONSULTEZ UN SPECIALISTE
POUR LE SERVICE.
Emballage. Ouvrez prudemment le carton et enlevez le polystyrène. Sortez le TV et mettez-le sur une
surface stable. Enlevez le sac en plastique et gardez l'emballage pour utilisation ultérieure. Ne pas mettre
l'emballage à la disposition d'enfant ou d'animaux.
Emplacement du TV. Le Tv doit être placé sur une table ou une planche stable. Ne pas mettre dans un
armoire sauf s'il y a assez d'espace libre autour de l'appareil pour ventilation et accès au tiroir DVD.
Connexions. Quand vous connectez d'autres appareils ou le câble courant secteur, faites attention
qu'on ne peut pas marcher au-dessus les câbles. Ne placez pas des objets lourds sur le câble ou
l'adaptateur.
Face supérieure du TV. Ne placez pas des objets tels que vases, chandelier ou d'autres objets au-dessus
du TV.
Ventilation et sources de chaleur. Ne couvrez pas les ouvertures de ventilation car ceci peut provoquer
de la sur-chaleur. Ne placez pas le TV dans la lumière du soleil ou à côté des sources de chaleurs comme
des radiateurs ou des feux ouverts.
Humidité. Ne pas placer le TV dans des conditions humides comme une cuisine, un cave ou d'autres
places humides. Faites attention que l'eau ou d'autres liquides n'entrent pas dans l'appareil. Ne touchez
pas la prise courant secteur et l'adaptateur aves les mains humides. Quand une liquide est entrée dans le
TV, déconnectez-le et consultez le département service.
Nettoyage. Déconnectez l'appareil du courant secteur. Utilisez un chiffon doux et sec. Pour des saletés
plus dures utilisez un chiffon avec un peu de détergent. NE pas utiliser des produits sur base de pétrole.
Abandonner le TV. Ne laissez pas le TV en fonction quand quelqu'un n'est pas présent. Il est recommandé
de mettre l'appareil hors fonction. Pour conserver l'énergie, ne laissez pas le TV trop longtemps en mode
standby. Déconnectez l'antenne et le courant secteur quand vous n'utilisez pas l'appareil pendant un certain
temps (VACANCES) ou en cas de tempête.
1)Ne pas exposer les piles à la chaleur comme la lumière du soleil, un feu.
2)Ecouter par casque d'écoute à des niveaux forts peut endommager votre oreille.
3)Faites attention que l'adaptateur courant secteur est toujours accessible.
4)Ne pas exposer l'appareil à des goutes et faites attention de ne pas placer des objets remplis d'un liquide, comme
une vase, au-dessus de l'appareil.
5)Cet appareil avec construction Class 1 doit être connecté au prise courant secteur avec terre.
2
Page 32

Pièces et accessoires
Sortir de l'emballage.
Retirez prudemment le TV du carton.
Contrôlez les accessoires. Si quelque chose manque, consultez votre revendeur.
Ne jetez pas l'emballage avant que vous êtes sûr que l'appareil fonctionne bien.
Dans l'emballage
TV
Télécommande
Adaptateur
Manuel d'utilisation Câble courant secteur
3
Page 33

Commandes
EJECT
TV/AV
MENUPLAY
CH+ CH-
VOL+
VOL-
POWER
EJECT.
PLAY.
TV/AV .
MENU.
CH+ / CH-.
VOL+ / VO L -
POWER.
Récepteur infrarouges
LED standby
Description des commandes
Ejecter let DVD
Lecture du DVD.
Sélection de la source d'entrée
Entrer dans le mode menu.
Sélections des émetteurs
Réglage du volume.
Pour mettre l'appareil en fonction ou en standby
4
Page 34

Connexions sur le panneau arrière
Vous pouvez connecter une grande gamme d'appareils externes. Consultez les manuels d'utilisation des autres
appareils.
Voyez ci-dessous les connexions possibles.
USB
POWER
Power
DVD
Alimentation
PC
Audio
Earphone
Coaxial
HDMI Haute Qualité, connexion récepteur satellite, DVD, jeux vidéo
VGA Connexion vidéo PC
PC Audio Connexion audio PC
SCART
Signaux composites DVD, magnétoscope, récepteur satellite
Earphone Prise casque d'écoute
Y P B PR
Coaxial
YPBPR
Sortie audio digitale
Sortie vidéo DVD (utilisation source YPBPR)
Video Signaux vidéo d'un caméscope, console jeux, etc
R in L
Entrée antenne
RF
in
Son d'un caméscope, console jeux, lecteur DVD, VCR, etc
5
Page 35

Télécommande
: Mettre le TV en fonction ou en standby
INPUT: sélection de la source d'entrée
0-9, -/-- : Sélection d'émetteurs
: Retourner vers l'émetteur précédent
PICTURE: Sélection mode image
SOUND: Sélection mode son
SLEEP:Temps de mise hors fonction automatique
DISPLAY : Affichage données de lecture
CH+/-: Sélection d'émetteurs
curseurs vers le bas et vers le haut en menu OSD
VOL+/-:Réglage du volume
curseurs vers la gauche et vers la droite en menu OSD
OK: bouton de confirmation
MENU: menu système TV
EXIT:sortir du menu actuel
MUTE: couper le son
ASPECT:format de l'image
FAV : liste des émetteurs préférés
NICAM/A2 : Sélection Nicam/A2
AUTO : réglage automatique (uniquement PC)
TEXT : pour appeler le télétexte, repoussez pour mixer télétexte avec
image, repoussez pour quitter le télétexte
HOLD : pour garder une page télétexte
PGDN : page vers le bas
PGUP : page vers le haut
INDEX : aller vers la page index
SIZE : format des caractères en mode télétexte
REVEAL : afficher du texte caché
SUBPAGE : sous-page télétexte
ROUGE : bouton télétexte rapide
VERT : bouton télétexte rapide
JAUNE : bouton télétexte rapide
BLEU : bouton télétexte rapide
Boutons pour opération USB
: lecture programme
: lecture ou pause programme
: arrêt programme
: avancement rapide en arrière
: avancement rapide en avant
: chapitre précédent
: chapitre suivant
GOTO : aller vers titre/chapitre/numéro
SETUP : réglage DVD, comme p.e. langue OSD
TITLE : titres sur le disque DVD
ANGLE : voir sous un autre angle, pas sur tous les disques DVD
AUDIO : mode sortie audio DVD
D.MENU : menu DVD
D.DISP : affichage information de lecture DVD
REPEAT : répétition d'un titre ou chapitre
SUBTITLE : afficher ou cacher les sous-titres
PROGRAM : programmer l'ordre de lecture des numéros
INTRO : pour disques VCD et CD qui offrent cette possibilité
SLOW : ralenti
A-B : répétition d'une section
6
Page 36

Utilisation de la télécommande
Mettez les piles dans la télécommande. Assurez vous que le bouton POWER est en position en fonction. Dirigez la
télécommande vers le récepteur à infrarouges du TV et poussez POWER. Le TV se met en fonction et l'écran
s'allume.
La rangée de la télécommande est 5 mètres avec un angle maximal de 30°.
Installation des piles (non livrés)
Ouvrez le compartiment à piles sur le dos de la télécommande. Insérez deux
piles AAA 1.5 V alcaline comme marqué dans le compartiment. Faites attention
à la polarité (+/-) et remettez le couvercle.
Remarque :
-Déposez les piles usées chez un point de collecte pour recyclage
-NE pas jeter les piles dans du feu car elles peuvent exploser et causer des dommages.
-Utilisez uniquement des piles AAA 1.5 V.
-Utilisez les piles du même type. Ne pas mélanger différents types.
-Ne pas mélanger des nouvelles et des anciennes piles. Remplacez les deux en même temps.
-Ne pas essayer à démonter les piles, ceci peut causer des dommages.
Enlevez les piles quand vous n'utilisez pas la télécommande pendant un certain temps.
Compartment
Cover
Battery
SOURCE
2xAAA Battery
SOURCE TV/AV
-Poussez le bouton TV/AV pour afficher la liste des sources.
-Utilisez les boutons / pour sélectionner la source voulue
-Poussez ENTER pour confirmer la source.
OPERATION DE BASE
ATV
HDMI
SCART
YPBPR
AV
VGA
-Poussez MENU pour afficher le menu principal
-Utilisez les boutons / pour sélectionner le menu voulu
-Utilisez pour entrer dans le sous-menu
-Vous pouvez utiliser MENU ou EXIT pour quitter le menu et revenir au menu précédent.
-Utilisez les boutons / pour sélectionner l'option et utilisez / pour faire le réglage.
7
Page 37

Première installation
Si vous mettez le TV pour la première fois en fonction et il n'y a pas d'émetteurs dans la mémoire, le menu Première
Installation apparaît sur l'écran, comme montré ci-dessous. Un écran vous demande de rechercher automatiquement
les émetteurs. Les émetteurs sont mémorisés dans le tuner du TV
ENGLISH
OTHER
-Utilisez pour sélectionner LANGUE. Utilisez / pour sélectionner la langue OSD.
-Utilisez pour sélectionner PAYS. Utilisez / pour sélectionner le pays.
Après ces réglages vous pouvez pousser MENU pour quitter l'installation. Ou utilisez les boutons / pour
marquer
DEMARRER RECHERCHE, poussez et la recherche automatique commence comme illustré ci-dessous.
Liste émetteurs
-Poussez ENTER pour afficher la liste des émetteurs.
Liste favoris
-Poussez FAV pour afficher la liste des émetteurs préférés.
8
Page 38

Information TV
Information programme
Poussez DISPLAY pour afficher l'information programme
1.Numéro de l'émetteur actuel.
2.Le système couleurs de l'émetteur actuel ; peut être changé dans le menu de recherche manuelle (option dans
le menu SETUP)
3.Nom de l'émetteur actuel.
4.Le système son de l'émetteur actuel ; peut être changé dans le menu de recherche manuelle (option dans le
menu SETUP)
5.Le mode NICAM de l'émetteur actuel..
Quand le symbole NICAM est rouge, l'émetteur actuel transmet des signaux multiples I/II. Vous pouvez le
changer en utilisant le bouton NICAM.
Il existe 4 modes NICAM :
Mono Stéréo Dual Dual
IMAGE
Le menu IMAGE offre la possibilité de régler l'image en fonction de l'ambiance lumière dans la chambre et vos
propres préférences. Les réglages comportent MODE IMAGE, CONTRASTE, LUMINOSITE, COULEURS, TEINTE,
NETETTE, TEMPERATURE COULEURS et REDUCTION SOUFFLE.
Pour naviguer :
Poussez le bouton MENU de la télécommande. Utilisez / pour sélectionner IMAGE. Poussez pour marquer
MODE IMAGE et utilisez les boutons / pour sélectionner entre STANDARD > FILM > VIVANT > PERSONNEL
La sélection STANDARD suffit pour la plupart des environnements. Dépendant des circonstances de lumière, vous
pouvez choisir parmi les autres possibilités.
Vous pouvez effectuer des réglages plus précis quand vous avez choisi PERSONNEL
9
Page 39

-Utilisez pour marquer CONTRASTE et utilisez les boutons / pour diminuer ou augmenter le contraste.
-Utilisez pour marquer LUMINOSITE et utilisez les boutons / pour diminuer ou augmenter la luminosité.
-Utilisez pour marquer COULEURS et utilisez les boutons / pour diminuer ou augmenter l'intensité des
couleurs.
-Utilisez pour marquer TEINTE et utilisez les boutons / pour ajuster la couleur vers une teinte verte ou rouge.
-Utilisez pour marquer NETETTE et utilisez les boutons / pour ajuster les bords dans l'image.
-Utilisez pour marquer TEMPERATURE COULEURS et utilisez les boutons / pour choisir entre FROID
(teinte bleue), NORMAL ou CHAUD. Le réglage standard est NORMAL.
-Utilisez pour marquer REDUCTION SOUFFLE et utilisez les boutons / pour mettre le système en ou hors
fonction.
SON
Le menu son offre de régler le son par les haut-parleurs incorporés.
Pour naviguer :
Poussez le bouton MENU de la télécommande. Utilisez / pour sélectionner SON. Poussez pour marquer
MODE SON et utilisez les boutons / pour sélectionner entre STANDARD > FILM > MUSIQUE > PERSONNEL
-Utilisez pour marquer BASS et utilisez les boutons / pour diminuer ou augmenter les graves
-Utilisez pour marquer TREBLE et utilisez les boutons / pour diminuer ou augmenter les aigües.
-Utilisez pour marquer BLANCE et utilisez les boutons / pour régler la balance entre le haut-parleur
gauche et droite.
Utilisez pour marquer AVL et utilisez les boutons / pour mettre le système en ou hors fonction.
10
Page 40

REGLAGES
Dans le menu REGLAGES vous pouvez régler des fonctions telles que LANGUE, TIMER OSD, TRANPARANCE,
OVERSCAN et RESET pour remettre e TV au niveau d'usine.
Pour naviguer :
Poussez le bouton MENU de la télécommande. Utilisez / pour sélectionner REGLAGES. Poussez pour
marquer LANGUE ou d'autres options et utilisez les boutons / pour faire la sélection.
-Utilisez pour marquer LANGUE et utilisez les boutons / pour sélectionner la langue OSD.
-Utilisez pour marquer TIMER OSD et utilisez les boutons / pour régler le temps OSD entre 5 SEC >
10 SEC > 15 SEC > 20 SEC > 25 SEC > 30 SEC.
-Utilisez pour marquer TRANSPARANCE et utilisez les boutons / pour régler la transparance du OSD.
-Utilisez pour marquer OVERSCAN et utilisez les boutons / pour le mettre en ou hors fonction. Cette
fonction est uniquement disponible avec une source HDMI.
-Utilisez pour marquer RESET et utilisez les boutons / pour régler les options dans le menu REGLAGES.
FONCTION
Dans le menu FONCTION vous pouvez régler des fonctions telles que SLEEP TIMER, ASPECT, LANGUE
TELETEXTE, ECRAN BLEU, BLOCKAGE SYSTÈME et FTI.
Pour naviguer :
Poussez le bouton MENU de la télécommande. Utilisez / pour sélectionner FONCTION. Poussez pour
marquer SLEEP TIMER ou d'autres options et utilisez les boutons / pour faire la sélection.
11
Page 41

-Utilisez pour marquer SLEEP TIMER et utilisez les boutons / pour régler te temps après lequel le TV doit
se mettre automatiquement hors fonction : 15 Min > 30 Min > 45 Min > 60 Min > 75 Min > 90 Min > 105 Min >
120 Min > Hors fonction.
-Utilisez pour marquer ASPECT et utilisez les boutons / pour choisir entre COMPLET > ZOOM > 4 :3 >
AUTO. Le réglage standard est COMPLET.
-Utilisez pour marquer LANGUE TELETEXTE et utilisez les boutons / pour choisir entre OUEST > EST >
RUSSE > ARABE > FARSI.
-Utilisez pour marquer ECRAN BLEU et utilisez les boutons / pour le mettre en ou hors fonction.
-Utilisez pour marquer BLOCKAGE SYSTEME et utilisez les boutons / pour sélectionner cette option.
Entrez le mot de passe (mot de passe standard est 0000) ou le mot de passe que vous avez changé.
-Utilisez pour marquer BLOCKAGE SYSTEME et utilisez les boutons / pour le mettre en ou hors fonction.
Si vous choisissez OFF, les fonctions suivantes ne sont pas disponibles.
-Utilisez pour marquer PROTECTION ENFANTS et utilisez les boutons / pour le mettre en ou hors fonction.
Si vous avez choisi ON, l'émetteur ne peut pas être regardé.
-Utilisez pour marquer BLOCKAGE BOUTON et utilisez les boutons / pour le mettre en ou hors fonction.
Si vous avez choisi ON, le bouton ne peut pas être utilisé.
-Utilisez pour marquer CHANGER MOT DE PASSE et utilisez les boutons / pour changer le mot de passe.
Un écran dialogue apparaît pour changer le mot de passe.
-Utilisez pour marquer MODE HOTEL. Ceci est expliqué à la page 18.
Utilisez MENU pour retourner au menu principal et utilisez pour marquer FTI. Voyez page
12
Page 42

EMETTEURS
Dans le menu EMETTEURS vous pouvez régler des préférences telles que PAYS, RECHERCHE AUTOMATIQUE,
RECHERCHE MANUELLE et ADAPTATION PROGRAMME.
Pour naviguer :
Poussez le bouton MENU de la télécommande. Utilisez / pour sélectionner EMETTEURS. Poussez pour
marquer PAYS ou d'autres options et utilisez les boutons / pour faire la sélection.
SEARCH
-Utilisez pour marquer PAYS et RECHERCHE AUTOMATIQUE. Voyez page 11.
-Utilisez pour marquer RECHERCHE MANUELLE et poussez pour entrer dans le sous-menu.
-Utilisez pour marquer PROGRAMME et utilisez les boutons / pour indiquer l'émetteur que vous voulez
regarder.
-Utilisez pour marquer SYSTÈME COULEURS et utilisez les boutons / pour sélectionner le système couleurs :
AUTO > PAL > SECAM.
-Utilisez pour marquer SYSTÈME SON et utilisez les boutons / pour sélectionner le système son : AUTO >
B/G > D/K > I > L > L'
13
Page 43

-Utilisez pour marquer RECHERCHE MANUELLE et poussez pour sélectionner.
-Utilisez pour marquer AFT et poussez / pour le mettre en ou hors fonction.
-Utilisez pour marquer FINE et poussez pour sélectionner.
MOVE
-Utilisez pour marquer SKIP et poussez / pour le mettre en ou hors fonction.
-Utilisez MENU pour revenir au menu principal et poussez pour marquer ADAPTATION PROGRAMME.
Poussez pour entrer dans le sous-menu..
Cette option offre quatre fonctions :
-Utilisez le bouton vert et les boutons / pour changer le nom de l'émetteur actuel.
-Utilisez le bouton jaune pour insérer l'émetteur actuel.
-Utilisez le bouton rouge pour bloquer l'émetteur actuel. Si l'émetteur est déjà bloqué, repoussez le bouton pour
débloquer.
-Utilisez le bouton bleu pour marque l'émetteur actuel comme émetteur préféré. Si l'émetteur est déjà marqué
comme préféré, repoussez le bouton pour le marquer comme émetteur normal.
14
Page 44

PC
IMAGE
Le menu IMAGE offre la possibilité de régler l'image en fonction de l'ambiance lumière dans la
chambre et vos propres préférences. Les réglages comportent MODE IMAGE, CONTRASTE,
LUMINOSITE, COULEURS.
Pour naviguer :
Poussez le bouton MENU de la télécommande. Utilisez / pour sélectionner IMAGE. Poussez
pour marquer MODE IMAGE et utilisez les boutons / pour sélectionner entre STANDARD >
FILM > VIVANT > PERSONNEL
La sélection STANDARD suffit pour la plupart des environnements. Dépendant des circonstances
de lumière, vous pouvez choisir parmi les autres possibilités.
NORMAL
Vous pouvez effectuer des réglages plus précis quand vous avez choisi PERSONNEL
-Utilisez pour marquer CONTRASTE et utilisez les boutons / pour diminuer ou augmenter
le contraste.
-Utilisez pour marquer LUMINOSITE et utilisez les boutons / pour diminuer ou augmenter
la luminosité.
-Utilisez pour marquer TEMPERATURE COULEURS et utilisez les boutons / pour choisir
entre FROID > NORMAL > CHAUD.
REGLAGE PC
Dans le menu REGLAGE PC vous pouvez régler vos préférences en MODE PC concernant
POSITION H, POSITION V, MONTRE, PHASE et REGLAGE AUTOMATIQUE.
Pour naviguer :
Poussez le bouton MENU de la télécommande. Utilisez / pour sélectionner REGLAGE PC.
Poussez pour marquer POSITION H ou d'autres options et utilisez les boutons / pour faire
la sélection.
15
Page 45

-Utilisez pour marquer POSITION H et utilisez / pour régler la position horizontale.
-Utilisez pour marquer POSITION V et utilisez / pour régler la position verticale.
-Utilisez pour marquer MONTRE et utilisez / pour régler la montre.
-Utilisez pour marquer REGLAGE AUTOMATIQUE et utilisez pour régler automatiquement les points
précédents.
HDMI/SCART/AV
Le MENU IMAGE, MENU SON, MENU REGLAGES, MENU FONCTION et le MENU
EMETTEURS sont identiques au mode TV.
16
Page 46

Télétexte
Poussez le bouton TEXT de la télécommande et poussez OK pour confirmer..
Teletext
Teletext
TTxPid
EXIT
EXIT
Ci-dessous vous trouver une explication pour les boutons télétexte de la télécommande
1)Télétexte ON/OFF
Pour voir le télétexte poussez TEXT. Repoussez le bouton pour revenir à l'image normale. L'émetteur ne peut
pas être changé en mode télétexte.
2)INDEX
Poussez INDEX pour aller vers la page index/initiale.
3)REVEAL
Poussez le bouton REVEAL pour afficher les réponses au quiz.
4)HOLD
Poussez le bouton HOLD pour garder une page. Pour débloquer la page, repoussez ce bouton.
5)SIZE
Poussez le bouton SIZE une fois pour agrandir la moitié supérieure de l'écran, repoussez pour agrandir la
moitié inférieure de l'écran, repoussez pour revenir au format normal.
6)Boutons rouge, vert, jaune et bleu.
En FASTTEXT et TOP ces boutons correspondent avec un certain sujet. En mode liste les boutons
correspondent avec les numéros de pages colorés.
7)Pages vers le haut ou le bas.
Utilisez / pour voir une page supérieure ou inférieure.
8)Boutons de page numériques
Utilisez les boutons 0-9 pour insérez directement le numéro de la page voulue.
9)EXIT
Pour regarder une émission TV et être prévenu quand une page télétexte a été adaptée.
Poussez le bouton EXIT. L'émission apparaît sur l'écran ainsi que le symbole télétexte (en haut de l'écran).
Dès que le télétexte a été adapté le numéro de la page adaptée est affichée sur l'écran et peut être activé
en poussant le bouton EXIT. Il n'est pas possible de changer l'émetteur quand EXIT est activé.
10)SUBPAGE
Pour entrer directement dans les sous-pages. Poussez le bouton SUBPAGE. Entrez le numéro de la souspage avec les boutons 0-9. Exemple : pour la 2ième page, entrez 0002.
7321
MOVE
17
Page 47

MODE HOTEL
Réglage du mode hôtel.
Utilisez / pour sélectionner HOTEL LOCK dans le MENU FONCTION et
poussez pour confirmer.
HOTEL MODE
HOTEL LOCK
VOLUME ON
MAX VOLUME
DEFAULF SOURCE
SOURCE LOCK
CLEAR LOCK
ATV
Hotel LOCK
Utilisez / pour sélectionner Hotel LOCK et utilisez / pour le mettre en ou hors fonction.
100
30
VOLUME EN FONCTION
Utilisez / pour sélectionner VOLUME ON et utilisez / pour régler le volume.
VOLUME MAXIMAL
Utilisez / pour sélectionner VOLUME MAX et utilisez / pour régler le volume maximal.
SOURCE STANDARD
Utilisez / pour sélectionner SOURCE STANDARD et utilisez pour confirmer.
Utilisez / pour sélectionner source standard et utilisez / pour le mettre en ou hors
fonction.Avec ce réglages les entrées ATV, HDMI, YPBPR, AV, S-VIDEO et VGA sont bloquées.
BLOQUAGE SOURCE
Utilisez / pour sélectionner BLOQUAGE SOURCE et utilisez pour limiter la sélection du
contenu et mettre hors fonction le menu SOURCE STANDARD.
ANNULER BLOQUAGE
Poussez pour vider le mode hôtel.
18
Page 48

FONCTIONS USB
--General Setup Page –
TV Display Wide
OSD Lang Eng
Source
Last Memory Off
Closed Caption
Enter
Off
Utilisez ▼/▲ pour sélectionner USB
Poussez OK pour entrer dans le sous-menu.
DVD
USB
00:00
005/039
00:00
Utilisez ▼/▲ pour sélectionner la lecture
Temp
MP3
MP3
GIF
WMA
JPG
Restrictions de l’appareil et du système
1)Le système supporte USB (Max 4).
2)USB : USB2.0, compatible avec USB1.1, mais ne supporte pas USD Hub.
3)Le système du document externe doit être FAT32/FAT, sinon la lecture n’est pas possible.
4)Le système supporte la connexion d’un disque à quatre partitions.
5)La liste peut afficher 9999 numéros ; une partition du disque peut donc contenir jusqu’à 9999 documents.
6)Le format d’un documente FAT/FAT32 est limité à 4GB.
Liste des media supportés:
VIDOE
MPEG1(.*DAT, VDC1.0,VCD1.1,
VCD2.0, SVCD
Max: 720*480*30 décodage NTSC
MPEG2 (*.VOB,*.MPG)
Max: 720*480*30 décodage NTSC
MPEG4 (AV1 Xvid avec B-Frame,
Xvid avec Q-pel)
Pas de support pour Divx
Max: 720*480*30 décodage NTSC
19
AUDIO
MP3(*.mp3)
WMA(*.wma)
PHOTO
JPEG(*.jpg)
GIF(*.gif)
version:98
Page 49

FONCTIONS DVD
Poussez SETUP sur la télécommande pour entrer dans le
menu des réglages.
Poussez ◄ / ► pour aller vers la page de réglage générale.
Poussez ▼/▲ pour choisir l’item désiré.
Poussez ▼ pour entrer dans le sous-menu.
Poussez ◄ / ► pour aller vers le menu précédent.
Réglage général
Ecran TV.
Sélectionnez le format (rapport écran) qui correspond avec
le TV utilisé.
Normal PS : la partie centrale de l’image est visible sur un
TV 4 :3, mais les parties gauches et droites sont comprimées.
Normal LB : l’image large est entièrement visible sur un
TV 4 :3, mais des bandes noires apparaissent en haut et en
bas de l’écran.
Ecran large : sélectionnez cette option quand vous utilisez un
TV à écran large. Les images d’un DVD enregistré en format
4 :3 ne peuvent pas être reproduites en 16 :9.
Langue OSD
Sélectionnez la langue désirée.
Poussez ENTER pour confirmer.
Dernière mémoire
Sélectionnez le mode voulu.
ON : poussez le bouton OPEN quand vous regardez un DVD.
Fermez le tiroir disque et la lecture commence à l’endroit où
vous vous êtes arrêté.
OFF : pas de fonction de mémoire.
Source
S'il vous plaît sélectionnez votre mode Source
S'il vous plaît sur le bouton OK Entrez et
sélectionnez USB ou un DVD
20
Page 50

Réglages haut-parleurs
sortie SPDIF :
Utilisez ▼ / ▲ pour sélectionner l'entrée
SPDIF outputsired
Vous pouvez choisir: SPDIF OFF
SPDIF / RAW
SPDIF / PCM
Réglage préférences
Type TV
Sélectionnez le système TV.
Poussez ENTER pour confirmer.
Audio
Sélectionnez la langue parlée préférée (DVD).
1)La langue sélectionnée est donné priorité et
est choisie automatiquement quand vous démarrez
le lecture d’un disque.
2)Les langues disponibles varient selon le disque DVD.
Vous pouvez également choisir la langue en poussant
le bouton AUDIO de la télécommande.
Sous-titres
Sélectionnez la langue préférée pour les sous-titres(DVD).
1)La langue sélectionnée est donné priorité et est choisie
automatiquement quand vous démarrez le lecture
d’un disque.
2)Les langues disponibles varient selon le disque DVD.
Vous pouvez également choisir la langue en poussant le
bouton SUBTITLE de la télécommande.
21
Page 51

Menu disque
Choisissez la langue pour le menu disque.
Le choix dépend du contenu du DVD.
Contrôle parental
Il est possible de limiter la lecture de certains
disques jusqu’un certain niveau, per exemple
en fonction de l’âge. Certaines scènes peuvent
être bloquées ou remplacées par d’autres. La
fonction contrôle parental permet ce réglage.
Cette fonction est protégée par un mot de passe.
Remarque : avec les disques qui ne supportent
pas la fonction contrôle parental, ce réglage
n’est pas possible.
Mot de passe
Changez, si vous voulez, le mot de passe.
Le mot de passe standard est 0000.
Standard
Pour revenir aux réglages d’usine.
22
Page 52

En cas de problèmes
Si le TV ne fonctionne pas bien, consultez la liste ci-dessous avant d'appeler de l'aide externe.
Problème Cause Solution
Mort, pas de LED L'appareil n'est pas alimenté Contrôlez la connexion
courant secteur.
LED s'allume, mais
boutons d'appareil ne
fonctionnent pas
TV en mauvais mode d'entrée
Pas d'image, LED bleu
Panne Backlight
Pas d'image, écran bleu
Mauvaise qualité
d'image (analogue) ou
en mode digital
Télétexte bloqué ou
cassé
Taches noires ou claires
dans l'écran
Bloquage des boutons Voyez page 13. Mettez le TV
en fonction avec la
télécommande.
Pas de signal d'entrée
TV non syntonisé
TV en mauvais mode
Signal faible
Signal faible
Dommage à l'écran Pas couvert par la garantie
Mettez le TV en mode TV
Appelez le service
Antenne connectée ?
Voyez pages 12-13
AV ou PC sélectionné ?
Vérifiez la connexion antenne
intérieure
Remplacer l'antenne par une
antenne extérieure
Comme ci-dessus
Pas de son
Mot de passe oublié ou
perdu
OPERATION PC
Pas de signal Contrôlez le câble VGA
Image non centrée
Pas de son PC Réglage audio
Vérifiez les réglages audio
du PC
Bouton mute en fonction
Mauvaise connexion
Entrez 0000
Mauvaise connexion
Réglage de position Dans le menu PC, réglez la
Contrôlez le bouton mute.
Vérifiez la connexion à
l'amplificateur
position H et V
23
Page 53

EF-Y-1B140B
Page 54

Page 55

Content
Content
1-Safety information
2-Safety instructions
3-Part and Accessoris
4-User Controls
5-Rear View Connections
6-Remote Control
7-Remote Control Use
7-SOURCE and BASIC OPERATION
8-First Time Installation
9-14 TV Menu
15- PC Menu
16-HDMI/SCART/AV
17-Teletext
18-Hotel Mode
19-USB Functions
20-DVD Functions
23-Trouble Shooting Guide
Page 56

Safety Information
CAUTION
RISK OF ELECTRIC SHOCK
DO NOT OPEN
CAUTION:TO AVOID THE RISK OF ELECTRIC SHOCK.
DO NOT MOVE COVER(OR BACK)
NO USER-SERVICEABLE PARTS INSIDE.
REFER SERVICING TO QUALIFIED SERVICE PERSONNEL.
LTAGE
The lightning flash with arrowhead symbol, within an equilateral triangle, is intended to
alert the user to the presence of un-insulated
products
shock to
enclosure that may be of sufficient magnitude to constitute a risk of electric
the persons.
ANGEROUS VOLTAGE
The exclamation point within an equilateral triangle is intend to alert the user to the
presence of important operati
literature accompanying the appliance
ng and maintenance (servicing) instructions in
.
within the
the
Correct disposal of this Product
(Waste Electrical & Electronic Equipment (WEEE)
The crossed out
W HEELIE BIN
is intended to show that this appliance must not be
placed with ordinary household waste at the end of its useful life. Toprevent possible
harm to the environment or human health from uncontrolled waste disposal, pleas
e
keep separate from other household waste and recycle it responsibly to promote the
sustainable reuse of material
resources.
Household users should contact either the retailer where you purchased the product, or
their local government office for details of where and how you can take this item for
environmentally safe re-cycling.
Business users should contact their supplier and check the terms and conditions of
the
purchase contract. This product must not be mixed with other commercial wastes for
disposal
This unit is a
laser product. This product uses a visible laser beam which
could cause hazardous radiation exposure. Ensure the recorder is operated as
instructed. Do not remove any covers or look into the DVD drawer opening whilst power
is applied. Do NOT modify or adjust any controls that may affect laser emissions.
Should the appliance become faulty consult a qualified technician.
This appliance complies with European
Safety and Electrical directives
Page 57

Safety Instructions
CAUTION. PLEASE READ AND OBSERVE ALL WARNINGS AND INSTRUCTIONS GIVEN IN THIS
USER MANUAL AND MARKED ON THE APPLIANCE . RETAIN THIS BOOKLET FOR FUTURE USE.
This set has been designed and manufactured to assure your personal safety. Improper use can
result in Electric shock or Fire hazard. The safeguards in this appliance will protect you if you
observe the correct procedures for installation, servicing and operation. There are NO user parts
inside. DO NOT REMOVE THE CASE OR OTHER COVERS OR YOU MAY BE EXPOSED TO
DANGEROUS VOLTAGES OR LASER RADIATION AND WILL INVALIDATE YOUR WARRANTY.
REFER ALL SERVICING TO QUALIFIED SERVICE PERSONNEL.
Unpacking and Handling. Open the carton carefully and remove the top polyfoam packing.
Carefully lift the TV and place onto a firm stable surface. Lift off the Poly bag and retain all
packaging for future use. Keep all packaging away from small children and animals.
Placing TV. The TV should be placed on a firm table or shelf. Do not place in a cabinet unless there
is sufficient spacing for air flow and access for the DVD player opening.
Connections. When connecting the TV to external sources and the mains supply, do not place wires
that can be tripped over. Do not place heavy objects, bend or trap the mains lead or mains adaptor.
Top of TV. Do not place objects such as vases, candles or other objects which may spill into the TV.
Ventilation and Heat Sources. Do not place material over the ventilation slots, this will cause the
TV to overheat and fail. Do not place the TV in direct sunlight or near heat sources such as radiators
or fires.
Moisture. Do not place the TV in wet or damp conditions, such as steamy kitchens, basements or
other damp places. Do not allow water or other fluids to enter the TV. Donot touch the Mains plug
or Mains adaptor with wet hands. Should moisture enter the TV , disconnect from the supply and call
the customer help line.
Cleaning. Disconnect the TV from the mains supply. Use a soft dry cloth, for stubborn stains use a
soft moist cloth with a dilute mild detergent.. Do NOT use petrol based fluids
Leaving your TV. Do not leave your TV operating whilst un attended. It is wise to switch off at the
Power switch. To conserve power do not leave the TV in standby for long periods VERNIGHT. When
leaving the TV for long periods HOLIDAYS and when local thunderstorms occur, disconnect the aerial
if external and mains supply.
1).The batteries shall not be exposed to excessive heat such as sunshine, fire or the like.
2).Excessive sound pressure from earphones and headphones can cause hearing loss.
3).When the appliance coupler is used as the disconnect device, the appliance coupler
shall remain readily operable
4).Do not expose the product to any dripping or splashing and make sure no object filled
with liquids, such as vases, etc., are placed on them
5).This product with Class I construction shall be connected to a Mains socket outlet with
a protective earthing connection.
2
Page 58

Part and Accessories
Unpacking.
Remove the TV carefully from the carton.
Please check accessories.Should any item be missing.Please contact your point of purchase.
Do not dispose of your packaging until you are confident the Tv is working normally.
In the box
Remote Control
TV
Adapter
User Manual Mains Le
ad
3
Page 59

User Controls
EJECT
TV/AV
MENUPLAY
CH+ CH-
VOL+
VOL-
POWER
EJECT.
PLAY.
TV/AV .
MENU.
CH+ / CH-.
VOL+ / VO L -
POWER.
Remote Control Sensor
Standby LED
User Control Description
Eject DVD disc.
Play DVD disc.
elects the required input.
S
Enters the Menu mode..
Channel select buttons.
Adjusts the volume level.
Switches the TV on from standby. Also switches TV back to standby.
4
Page 60

Rear View Connections
You can connect a wide range of extemal equipment to product. Please refer to your equipment
Manufacturers guide for further information.
See tale below for descriptions of the available connections.
USB
(TOP:)
POWER
DVD
PC
Audio
Y PB PR
Earphone Coaxial
POWER Power input
HDMI High Quality HD Connect to Satellite, DVD, Games console
VGA Computer Video Graphics Array output
PC Audio Computer Audio output
SCART Composite signals from DVD or VCR player/recorder or
Satellite receiver
Earphone Headphones output
Coaxial
BPR
YP
Digital audio output
Video Picture information of Camcorder ,Games console etc
R in L in
Sound of Camcorder ,Games console, DVD player, VCR etc
RF TV Tuner input
5
Page 61

Remote Control
: Turn on/standby the TV
INPUT : Source select
0-9, -/-- : Choose channel
: Go to program you latest program
PICTURE: Select the picture mode
SOUND : Select the sound mode
SLEEP: Time shutting down
DISPLAY: Display playing status
CH+/-: Scan the channel
Cursor up/down keys in OSD menu
VOL+/-:Volume up/down
Cursor left/right keys in OSD menu
OK: Comfirm button
MENU : TV system menu
EXIT:
Exit from the current menu
MUTE: Silence status
ASPECT: Adjust picture size
FAV: Press to enter the favourite channel list
NICAM/A2
AUTO: Auto adjust (only PC mode)
TEXT: Press to select Teletext ,press again to select
Mixed mode,press again to exit
HOLD: Teletext hold button
PGDN:
PGUP: page up
INDEX: Go to index
SIZE : In text mode, selects the text font size
REVEAL : Press to reveal hidden answers in text mode
SUBPAGE : Teletext subpage button
RED : Fast text selection button
GREEN : Fast text selection button
YELLOW: Fast text selection button
CYAN : Fast text selection button
:TV N icam/A2 select.
page down
TV/AV
1 2 3
4 5 6
7 8 9
0 -/--
PICTURE SOUND SLEEP DISPLAY
VOL+
VOL-
EXIT
MUTE
MENU
OK
CH+
CH-
Buttons for USB Operating
: Play program
: Play or pause program
: Stop program
: fast reverse
: fast forward
: previous chapter
: next chapter
GOTO: Play your favorite title/chapter/track
SETUP:DVD feature set menu, such as changing the default language OSD
TITLE:DVD discs in the titles
ANGLE:multi-angle feature that some DVD discs with this feature, and some
DVD discs without this feature
AUDIO:DVD channel output mode switch
D.MENU:DVD menu
D.DISP:DVD display playing status
REPEAT
: Repeatedly play th e title or c h a pter continuous.
SUBTITLE: Turn on/off the USB subtitle display
PROGRAM:Program play, that is defined according to customer order to play
INTRO:browsing, VCD and CD disc that is only with this function
SLOW: play USB programs at slow speed
A-B: Select and play the preferable paragraph of the program
by pressing the button twice at the beginning and end of it
6
ASPECT FAV
SETUP
TEXT HOLD PGDN PGUP
D.MENU
RED GREEN YELLOW CYAN
PROGRAM
TITLE
D.DISP
SIZEINDEX
SLOW A-B
INTRO
NICAM/A2
AUTO
GOTO
AUDIO
ANGLE
SUBTITLE
REPEAT
REVEAL SUBPAGE
WB-044
Page 62

Remote Control Use
Touse the remote control, insert the batteries into the battery compartment. Ensure the POWER
button of the TV is switched on. Point the remote control towards the remote control sensor on
the TV and press the POWER button. The TV will now come out of standby and the screen will
light.
The range of the remote control is approx 5 metres at an angle of no more than 30
To install the batteries: (not supplied)
Open the battery compartment cover on the rear of the remote control.
Insert 2 x
battery compartment. Take care to observe the polarity (+/-) and refit the
cover.
Note :
. Dispose of exhausted batteries responsibly at a local householdwaste recycling facility.
...DO NOT dispose of batteries in a fire as they may explode and cause
injury.
. Only use
. Use batteries of the same type. Do not mix battery types.
. Do not mix old and new cells. Replace both at same time.
. Do not try to dismantle cells, they may cause injury.
. Always remove cells if not using the remote control for some time.
AAA 1.5V alkaline cells in accordance with the diagram in the
AAA 1.5V cells in this appliance.
Battery
Compartment
Cover
2xAAA Battery
TV/AV SOURCE
-Use TV/AV button to display the input source list;
-Use / button to select the input source you went to watch;
-Use ENTER button to enter the input source;
BASIC OPERATION
SOURCE
ATV
HDMI
SCART
YPBPR
AV
VG A
-Use MENU hutton to display the MAIN OSD MENU;
-Use / button to select the MEN U you went;
-Use button to enter the sub-menu:
You can use MENU or EXIT button to save end return beck to the previous menu.
-Use / button to select the option end then press / to edjust the value in the sub menu.
7
Page 63

First Time Installation
If this is the first time you turn on the TV and there is no TV programs memory ,there will display First Time
Installation menu on screen just as the following picture. A screen will display asking you to run a Channel Auto
Scan to search andreceive available local channels. And the channels will be stored in the TV tuner.
ENGLISH
OTHER
-Use down arrow button to highlight LANGUAGE. Navigate using / arrow button to select the OSD
language. There are 2 language for selection: ENGLISH, GERMAN.
PORTUGUESE.
-Use down arrow button to highlight COUNTRY. Navigate using / arrow button to select the country.
There are 6 country for selection: UK, ITALY, SPAN, FRANCE, GERMANY, OTHER,.
After setting these items, you can press MENU to give up your installation and exit. Or press / button to
highlight START SEARCH and then press button, the Auto Search will begin as the following picture:
Channel List
-Use down ENTER button to call out the CHANNEL LIST.
Favourite List
-Use down FAV button to call out the FAVOURITE LIST.
8
Page 64

TV Information
Program Information
Press DISPLAY button to display program information.
1. Current Channel Number.
2. The colour system of current program, could be changed on Manual Tuning menu(an option of SETUP menu).
3. Current program name.
4. The sound system of current program, could be changed in Manual Tuning menu(an option of SETUP menu).
5. The NICAM mode of current program.
If the icon of NICAM mode is red, it means the current program supplies multiple I/II signals,
and you can change it by pressing NICAM button.
Four kinds of NICAM modes and relative icons:
Mono Stereo Dual Dual
PICTURE
The PICTURE menu offers options to enhance and refine the picture displayed on your TV based on ambient
room light and personal prefer-ences. Adjustment options include PICTURE MODE, CONTRAST, BRIGHTNESS,
COLOR, TINT,SHARPNESS, COLOR TEMP. and NOISE REDUCTION.
How to Navigate:
Press the MENU button on the remote control. Navigate using / arrow buttons to select PICTURE. Press
the down arrow button to highlight PICTURE MODE, then press the / arrow button to select your viewing
preference from 4 factory options: STANDARD > MOVIE > VIVID > PERSONAL.
The STANDARD setting is recommended for most viewing environments. Depending on the ambient light level in
the room, you may ind one of the other options more pleasing.
To make more critical adjustments based on your own preferences in PERSONAL:
9
Page 65

-Use down arrow button to highlight CONTRAST. Navigate using the / arrow buttons to increase or
decrease contrast intensity.
-Use down arrow button to highlight BRIGHTNESS. Navigate using the / arrow buttons to increase or
decrease overall brightness.
-Use down arrow button to highlight COLOR. Navigate using the / arrow buttons to increase or
decrease color intensity.
-Use down arrow button to highlight TINT. Navigate using the / arrow buttons to adjust colors toward
green or reddish tint.
-Use down arrow button to highlight SHARPNESS. Navigate using the / arrow buttons to soften or view
crisper edges in the picture.
- Use down arrow button to highlight COLOR TEMP.. Navigate using the / arrow buttons to select COOL
(more bluish tone), NORMAL or WARM. The default setting is NORMAL.
-Use down arrow button to highlight NOISE REDUCTION. Navigate using the / arrow buttons to select
it ON or OFF.
SOUND
The SOUND menu offers options to make sound enhancements while listening through the built-in speakers
How to Navigate:
Press the MENU button on the remote control. Navigate using / arrow buttons to select SOUND. Press the
arrow button to highlight SOUND MODE, then press the / arrow button to select your sound preference
from 4 factory options: STANDARD> MOVIE >MUSIC > PERSONAL.
-Use down arrow button to highlight Bass. Navigate using the / arrow buttons to increase or decrease
low frequency intensity.
-Use down arrow button to highlight TREBLE. Navigate using the / arrow buttons to increase or decrease
high frequency intensity.
-Use down arrow button to highlight BALANCE. Navigate using the / arrow buttons to adjust sound
towards the left or right speaker.
-Use down arrow button to highlight AVL. Navigate using the / arrow buttons to select it ON or OFF.
10
Page 66

SETTING
In the SETTING menu you may change the initial set up of preferences that include LANGUAGE, OSD TIMER,
TRANSPARENCE, OVERSCAN, and RESET your TV back to its factory default status.
How to Navigate:
Press the MENU button on the remote control. Navigate using arrow / buttons to select SETTING. Gain
access to display options by pressing the down arrow button to highlight LANGUAGE or other options, then
press / arrow buttons on your remote to select.
-Use down arrow button to highlight LANGUAGE. Navigate using / arrow button to select the OSD
language. There are 6 language for selection: ENGLISH > GERMAN> GREEK> SLOVAK>CROATIAN>
SLOVENIAN .
-Use down arrow button to highlight OSD TIMER. Navigate using / arrow button to select the OSD
timer. There are 6 modes for selection: 5 SEC>10 SEC> 15SEC> 20SEC> 25 SEC> 30 SEC.
-Use down arrow button to highlight TRANSPARENCE. Navigate using / arrow button to select the
transparence of the OSD.
-Use down arrow button to highlight OVERSCAN. Navigate using / arrow button to select it ON or
OFF. But this option is only available in the HDMI source.
-Use down arrow button to highlight RESET. Navigate using arrow button to reset the options in the
SETTING menu.
FUNCTION
In the FUNCTION menu you may change the function set up of preferences that include SLEEP TIMER,
ASPECT, TT LANGUAGE , BLUE SCREEN, SYSTEM LOCK and FTI.
How to Navigate:
Press the MENU button on the remote control. Navigate using arrow / buttons to select FUNCTION.
Gain access to display options by pressing the down arrow button to highlight SLEEP TIMER or other
options, then press / arrow buttons on your remote to select.
11
Page 67

-Use down arrow button to highlight SLEEP TIMER. Navigate using / arrow button to select the sleep
timer, and the TV will turn off automatically in the setting time . There are 9 modse for selection:
15 Min>30 Min> 45 Min> 60 Min> 75 Min> 90 Min> 105 Min> 120 Min> OFF.
-Use down arrow button to highlight ASPECT. Navigate using / arrow button to select: FULL>ZOOM >
4:3> AUTO. The default setting is FULL.
-Use down arrow button to highlight TT LANGUAGE. Navigate using / arrow button to select: WEST>
EAST>RUSSIAN>ARABIC>FARSI.
-Use down arrow button to highlight BLUE SCREEN. Navigate using / arrow button to select this option
ON or OFF.
-Use down arrow button to highlight SYSTEM LOCK. Navigate using arrow button to select this option.
Enter your 4 digit code (factory default code is
0000 ) unless previously changed to enter the submenu.
-Use down arrow button to highlight SYSTEM LOCK. Navigate using / arrow button to select this option
ON or OFF. When set the system lock OFF, the locks below will be unavailable.
-Use down arrow button to highlight CHILD LOCK. Navigate using / arrow button to select this option
ON or OFF. When set the child lock ON, the program locked in the PROGRAM EDIT can not be displayed.
-Use down arrow button to highlight KEY LOCK. Navigate using / arrow button to select this option
ON or OFF. When set the key lock ON, the key can not work.
-Use down arrow button to highlight CHANGE CODE. Navigate using arrow button to change the password
of the system lock. A dialog as above will appear, the enter the new password can change the password
successfully.
-Use down arrow button to highlight HOTEL LOCK. The operation please to look at the page 18.
-Use down MENU button to return to the main menu, then use down arrow button to highlight FTI. The operation
can be referred to page 11.
12
Page 68

CHANNEL
In the CHANNEL menu you may change the channel set up of preferences that include COUNTRY,
AUTO SCAN, MANUAL PROGRAM and PROGRAM EDIT.
How to Navigate:
Press the MENU button on the remote control. Navigate using arrow / buttons to select CHANNEL. Gain
access to display options by pressing the down arrow button to highlight COUNTRY or other options, then
press / arrow buttons on your remote to select.
SEARCH
-Use down arrow button to highlight COUNTRY and AUTO SEARCH. The operation of these two optins
can be referred to page 11.
-Use down arrow button to highlight MANUAL PROGRAM. Navigate using arrow button to enter
the submenu.
-Use down arrow button to highlight PROGRAM. Navigate using / arrow button to select the program
that you want to watch.
-Use down arrow button to highlight COLOR. SYS. Navigate using / arrow button to select the color
system: AUTO>PAL> SECAM.
-Use down arrow button to highlight SOUND. SYS. Navigate using / arrow button to select the sound
system:AUTO > B/G> D/K> I> L> L’.
13
Page 69
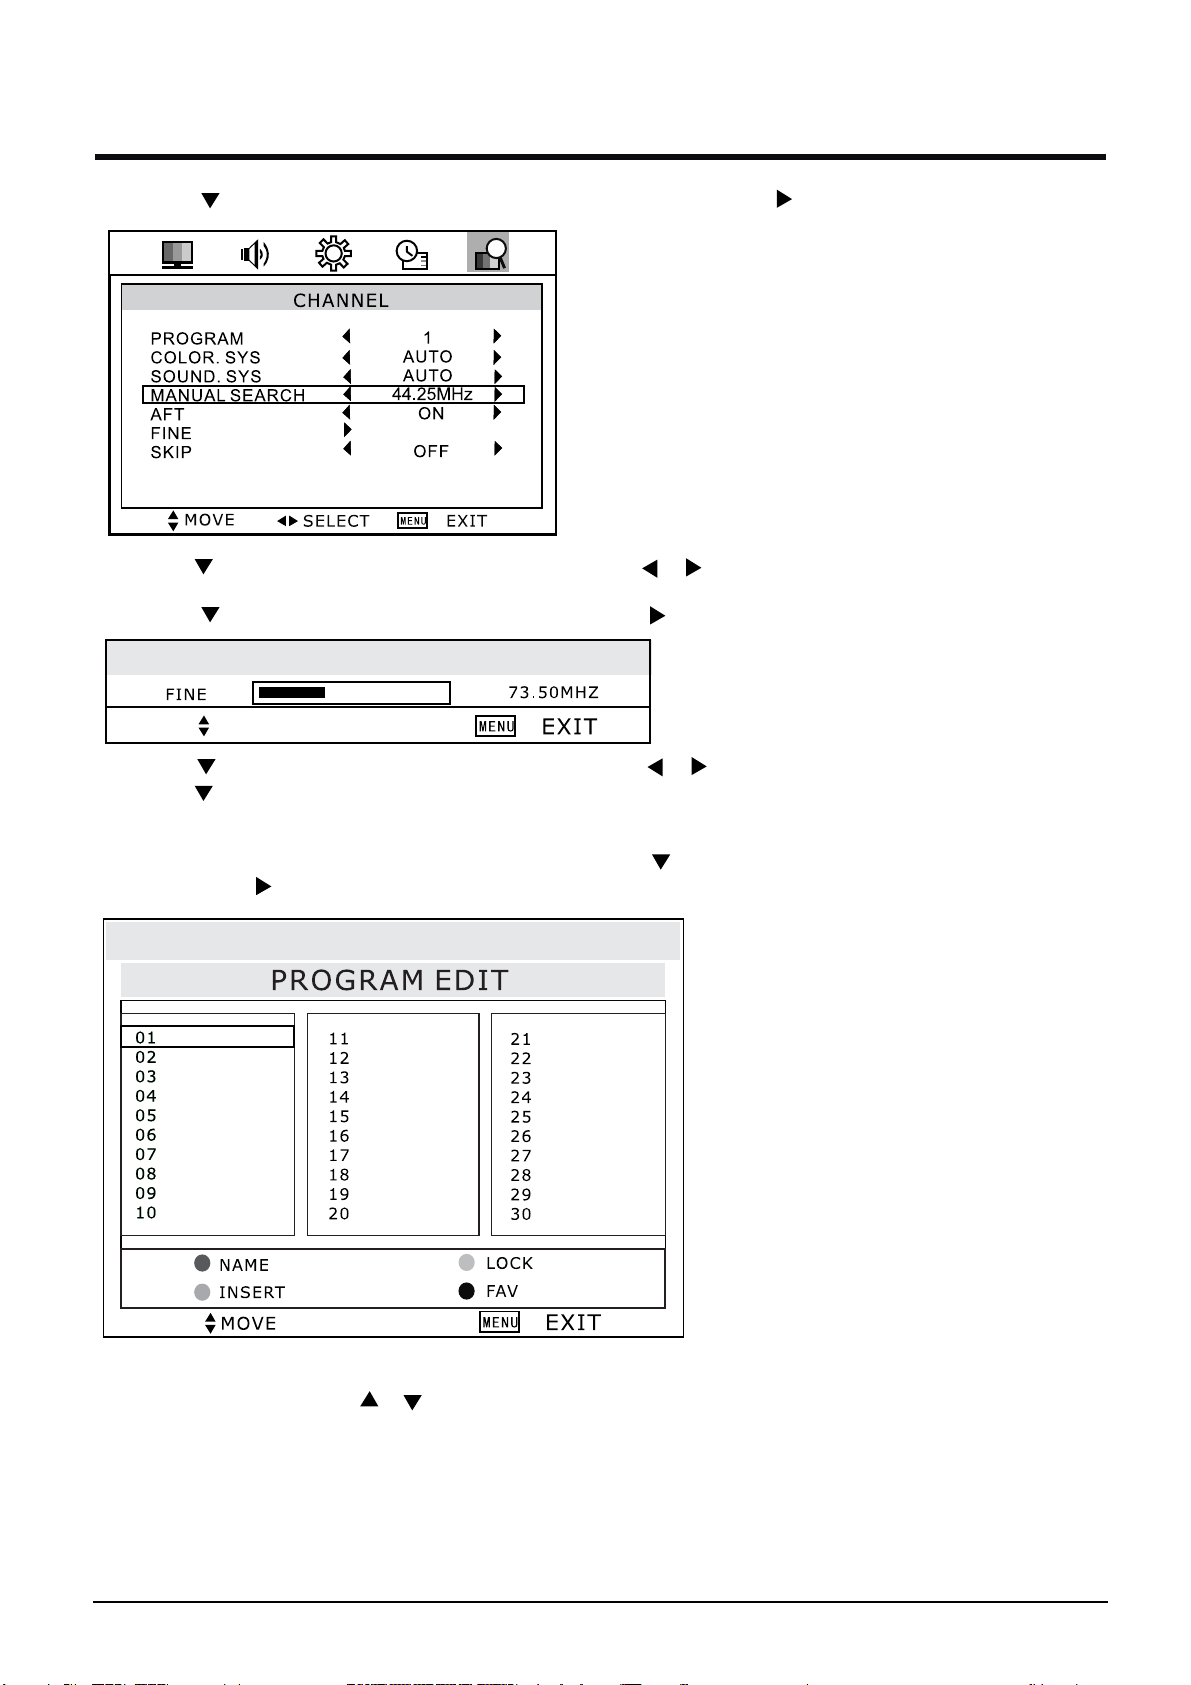
-Use down arrow button to highlight MANUAL SEARCH. Navigate using arrow button to select it.
-Use down arrow button to highlight AFT. Navigate using / arrow button to select this option ON or OFF.
-Use down arrow button to highlight FINE. Navigate using arrow button to select this option.
MOVE
-Use down arrow button to highlight SKIP. Navigate using / arrow button to select this option ON or OFF.
ate using arrow button to select this option.
-Use MENU button to return to the main menu, then use down arrow button to highlight PROGRAM EDIT.
Navigate using arrow button to enter the submenu.
This option has four functions.
-Use Green button and the / arrow button to name the current channel.
-Use Yellow button to insert the current channel.
-Use Red button to set the current channel to lock. if the current channel already lock, press blue button again
will unlock.
-Use Blue button set the current channel to your favorite channel. if the current channel already be one of your
favorite channel, press Blue button again will set it to a normal channel.
14
Page 70

PC
PICTURE
The PICTURE menu offers options to enhance and refine the picture displayed on your TV
based on ambient room light and personal preferences. Adjustment options include PICTURE
MODE, CONTRAST, BRIGHTNESS and COLOR.
How to Navigate:
Press the MENU button on the remote control. Navigate using / arrow buttons to select
PICTURE. Press the down arrow button to highlight PICTURE MODE, then press the
/ arrow button to select your viewing preference from 4 factory options: STANDARD
> MOVIE > VIVID > PERSONAL.
The STANDARD setting is recommended for most viewing environments. Depending on the
ambient light level in the room, you may ind one of the other options more pleasing.
NORMAL
To make more critical adjustments based on your own preferences in PERSONAL:
-Use down arrow button to highlight CONTRAST. Navigate using the / arrow buttons
to increase or decrease contrast intensity.
-Use down arrow button to highlight BRIGHTNESS. Navigate using the / arrow buttons
to increase or decrease overall brightness.
-Use down arrow button to highlight COLOR TEMP. Navigate using the / arrow buttons
to increase or decrease color intensity. COLD -NORMAL -WARM.
PC SETUP
In the PC SETUP menu you may change the channel set up of preferences in PC MODE that
include H-POSITION, H-POSITION, CLOCK, PHASE and AUTO ADJUST.
How to Navigate:
Press the MENU button on the remote control. Navigate using arrow / buttons to select
PC SETUO. Gain access to display options by pressing the down arrow button to highlight
H-POSITION or other options, then press / arrow buttons on your remote to select.
15
Page 71

-Use down arrow button to highlight H-POSITION. Navigate using / arrow button to select the
H-POSITION.
-Use down arrow button to highlight V-POSITION. Navigate using / arrow button to select the
V-POSITION.
-Use down arrow button to highlight CLOCK. Navigate using / arrow button to select the CLOCK.
-Use down arrow button to highlight AUTO ADJUST. Using arrow button to auto adjust the options above.
HDMI/SCART/AV
PICTURE MENU、SOUND MENU、SETTING MENU、FUNCTION MENU and CHANNEL
MENU are the same as those of TV mode.
16
Page 72

Teletext
Press TEXT button on your remote control to enter the Teletext.Press OK button to confirm it.
Teletext
Teletext
TTxPid
EXIT
Blow is a guide to the functions of the remote control teletext buttons
(1). Teletext ON/OFF control
To view teletext press “TEXT” button .Press again to return to normal broadcast viewing .Program can
not be changed until teletext is cancelled.
(2). Teletext INDEX page display control
Press “ INDEX ” to return to the index/initial page.
(3). Reveal concealed text in the Teletext page
Press “ Reveal ” to To discover the solutions on quiz and joke pages.
(4). Hold a wanted page
At times it is convenient to hold a page of text. Press “ HOLD ” and the page will be held on
screen until the button is pressed again.
(5). To enlarge the teletext display size
Press “SIZE” once to enlarge the top half of the page, press again to enlarge the bottom half of
the page. Press again to revert to normal size.
(6). Red / Green / Yellow / Cyan buttons
In FASTEXT or TOP mode these correspond to the differently coloured subjects. In List mod
correspond to the differently coloured page numbers.
(7). Page Numbers Up and Down
The “ ” button are used to move to higher or lower page numbers.
(8). Page Number buttons
EXIT
7321
MOVE
e they
The “ 0 – 9 ” digit buttons allow you to directly enter the page number that you want to view.
(9). EXIT button
Watch one TV programme and keep informed at the same time if some teletext pages are updated.
To do this, press EXIT button . Then, TV programme appears on screen and the teletext
symbol appears at the top of the screen. When teletext programme will be updated, concerned page
number appears on screen. Note that TV programme cannot be changed with EXIT button activated.
Pressing the EXITbutton again, the teletext page appears with the updated information.
(10).SUBPAGE button
Allows to enter subpage directly : Press SUBPAGE button. Enter directly the subpage number you want
with the remote control NUMBER 0...9 buttons : for example to enter the 2nd page, sequence
0002 .
17
Page 73

HOTEL MODE
HOTEL LOCK item in the FUNCTION MENU
HOTEL MODE
HOTEL LOCK
VOLUME ON
MAX VOLUME
DEFAULF SOURCE
SOURCE LOCK
CLEAR LOCK
Hotel LOCK
Hotel LOCK
VOLUME ON
VOLUME ON
MAX VOLUME
MAX VOLUME
30
100
ATV
DEFAULF SOURCE
DEFAULF SOURCE
ATV,HDMI,YPBPR , AV,S-VIDEO,VGA.
SOURCE LOCK
SOURCE LOCK
content selection and switching of DEFAULF SOURCE Menu.
CLEAR LOCK
empty Hotel Mode.
into the lower sub-menu to Limit the
18
Page 74

USB FUNCTIONS
--General Setup Page –
TV Display Wide
OSD Lang Eng
Source
Last Memory Off
Closed Caption
Enter
Off
Press button to select the USB device,▼ / ▲
Press OK button to enter the sub menu .
DVD
USB
00:00
005/039
00:00
Press button to select play▼ / ▲
Temp
MP3
MP3
GIF
WMA
JPG
Device & System Restriction:
1) The system support USB Mass Storage(MAX 4) .
2) USB host: Support USB 2.0, USB1.1 compatible, but can not support USB Hub.
3) The external device file system FAT32/FAT is supported. If not, can not support.
4) The system can support the connection of four partition disk.
5) file list can display the file up to 9999, it is means user can include 9999 files in the same disk
partition at most.
6) Single file size of the FAT/FAT32 system is restricted to 4GB.
Media Support List:
VIDOE
MPEG1(.*DAT, VDC1.0,VCD1.1,
VCD2.0,SVCD
Max:720*480*30 decoding NTSC
MPEG2(*.VOB,*.MPG)
Max:720*480*30 decoding NTSC
MPEG4(AV1 Xvid with B-Frame,
Xvid with Q-pel)
No supporing Divx
Max:720*480*30 decoding NTSC
19
AUDIO
MP3(*.mp3)
WMA(*.wma)
PHOTO
JPEG(*.jpg)
GIF(*.gif)
version:98
Page 75

DVD FUNCTIONS
Press SETUP button on the remoter the
display then setup menu.
Pre ss button to select General Setup Page◄ / ►
Press button to select ▼ / ▲ the desired item
Press button to ► enter sub menu
Press button to ◄ / ► enter upper menu
General Setup
TV Display
Please select screen format (aspect ratio)
according to the type of TV that you use.
Normal Ps : The central section of anamorphic
widescreen images is visible on a 4:3 TV, but the
left and right edges are truncated.
Normal LB : Anamorphic widescreen images are
visible in their entirety on a 4:3 TV, but thereare
black bands at the top and bottom of thescreen.
WIDE : Select this option if you are connecting the
player to a wide screen TV. However, you will not be
able to view DVDs recorded in 4:3 as complete
16:9 images even if you select this option.
OSD Lang
Please select the language,
Press OK button to save operation
--General Setup Page –
TV Display Wide
OSD Lang Eng
Last Memory Off
Source
Go To General Setup Page
--General Setup Page –
TV Display Wide
OSD Lang Eng
Last Memory Off
Source
Go To General Setup Page
--General Setup Page –
TV Display Wide
OSD Lang Eng
Last Memory Off
Source
Set OSD Language
normal ps
norma lb
wide
English
French
German
Spanish
Italian
Portuguese
Last Memory
Please select your desired mode
ON: Press open button when you watch a
DVD, it can play go on to the broken
segment if you close the player.
OFF: No memory function;
Source
Please select your Source mode
Please OK button Enter and select USB or DVD
--General Setup Page –
TV Display Wide
OSD Lang Eng
Last Memory Off
Source
Closed Caption
--General Setup Page –
TV Display W ide
OSD Lang Eng
Last Memory Off
Source
Set Last Memory State
On
Off
Enter
Off
20
Page 76

Speaker Setup
Spdif output
Press button to select
▼ / ▲
You can select:
Spdif off
Spdif /Raw
Spdif /pcm
the Spdif outputsired
Preference Set
TV Type
Please select the TV system ,
Press OK button to save operation
– Speaker Setup Page --
Spdif output
Set Downmix Mode
--Preference Page –
TV Type
Audio
Subtitle
Disc Menu
Parental
Password
Default
– Setup TV Standard --
Spdif off
Spdif /Raw
Spdif /pcm
PAL
Multi
NTSC
Audio
Please select the preferred language for
1) The selected language is assigned high
priority and can therefore be adopted
automatically when the player begins
playing a disc.
2) Languages vary between discs,
depending on the DVD.You can also select
alternative languages by pressing the
AUDIO button on the remoter
Subtitle
Selects the preferred language for subtitles
recorded on Discs.
1) The selected subtitle language is assigned
high priority and can therefore be adopted
automatically when the player begins playing
a disc.
2) Subtitles vary between discs, depending
on the Discs. You can also select alternative
subtitle language by pressing the SUBTITLE
button on the remoter.
DVD audio.
– Preference Page –
TV Type
Audio
Subtitle
Disc Menu
Parental
Password
Default
Preferred Audio Language
– Preference Page –
TV Type
Audio
Subtitle
Disc Menu
Parental
Password
Default
Preferred Audio Language
English
French
German
Spanish
ltalian
English
French
German
Spanish
ltalian
O f f
21
Page 77

Disc Menu
Select the preferred language for the disc
menu recorded on the Discs. This choice
varies between Discs.
Parental
It is possible to restrict playback of certain
Discs to a certain level of user, based on
their age, for example. Certain scenes can
be blocked or replaced with different
scenes. The "Parental Control" function lets
you set the access control level. This
function is password-protected.
Note: If you play discs that do not support
the Parental Control function, the DVD
player cannot restrict access to the disc.
– Preference Page –
TV Type
Audio
Subtitle
Disc Menu
Parental
Password
Default
Preferred Menu Language
– Preference Page –
TV Type
Audio
Subtitle
Disc Menu
Parental
Password
Default
Load Factory Setting
English
French
German
Spanish
ltalian
1 Kid Saf
2 G
3 Pg
4 Pg13
5 Pgr
6 R
7 Nc17
8 Adult
Password
Change the password to your desired .
The default password is 0000
Default
Restore the DVD player's system to
.factory default settings
– Preference Page –
TV Type
Audio
Subtitle
Disc Menu
Parental
Password
Default
Load Factory Setting
– Preference Page –
TV Type
Audio
Subtitle
Disc Menu
Parental
Password
Default
Load Factory Setting
Change
Reset
22
Page 78

Trouble Shooting Guide
Should the TV stop work ing or work abno rmally.Please consult the guide below,
before calling the customer help line.
Symptom Possible cause Remedy
Dead No led lit Power not connected to Check AC connection to
TV TV Check connection to
mains socket and that
the supply is turned on.
Standby led lit but Keylock feature set Refer to page 13.
buttons will not Turn TV on with remote
work on TV control.
No picture Led blue TV in wrong input mode Set TV to TV modes.
Backlight faulty. Call customer help line
No picture Blue screen No signal input Is aerial connected
TV not tuned in See pages 12-13
TV in wrong mode Is AV or PC selected.
Poor picture in Poor signal to TV Check aerial connections.
(analog)TV or using an indoor aerial
picture freezing or
breaking up in (digital) it may be necessary to
TV mode upgrade or exchange
aerial to an outdoor
aerial
Teletext freezing or Poor signal to TV As above
breaking up.
Bright or dark spots Damage to LCD screen Not covered in warranty
on screen.
No Sound Mute button pressed Check mute button has
Poor external connection not been pressed If using
an external amplifier
check connection and
it is turned on.
Lost or forgotten Pin Enter 0000
number (TV)
PC OPERATION
Display shows No Poor connection Ensure VGA lead is
Signal connected properly
Picture not central Adjust picture position Select PC Menu using
MENU button and select
H or V position
No PC sound Audio settings Check audio settings on
PC
23
Page 79

 Loading...