

Page 1

LCD -TFT
USER MANUAL (GB)
READ CAREFULLY
LCD1521TNDVX
LCD1921TNDVX
LCD1922TNDVX
LCD2221TNDVX
BEFORE OPERATION
Page 2

IMPORTANT SAFETY INSTRUCTIONS
This symbol indicates dangerous voltage inside
the product that presents a risk of electric shock
or personal injury.
This symbol indicates important instructions
accompanying the product.
Please read this manual carefully before using this product.
Before connecting the AC power cord to the DC adapter outlet ,make sure the
voltage designation of the LCD TV corresponds to the local electrical supply .
If you are unsure of your power supply , ask your local power company .
Never insert anything metallic into the cabinet openings of the liquid crystal
display LCD TV/monitor;otherwise it may create the danger of electric shock.
To avoid electric shock, Never touch the inside of the LCD TV/monitor and adapter.
Only a qualified technician should open the case of the LCD TV/monitor/adapter.
Never use your LCD TV/monitor/adapter if the power cord has been damaged .
Do not allow anything to rest on the power cord, and keep the cord away from
place where people can trip over it .
Be sure to hold the plug, not the cord, when disconnecting the adapter from an
electric socket.
Openings in the LCD TV/monitor/adapter cabinet are provided for ventilation.
To prevent overheating, these openings should not be blocked or covered. Also,
avoid using the LCD TV/monitor on a bed ,sofa ,rug, or other soft surface. Doing
so may block the ventilation openings in the bottom of the cabinet. If you put the
LCD TV/monitor in a bookcase or some other enclosed space, be sure to provide
adequate ventilation.
Do not expose the LCD TV/monitor to extreme temperature conditions or to
extreme humidity conditions.
The apparatus shall not be exposed to dripping or splashing and that no objects
filled with liquids, such as vases, shall be placed on the apparatus.
Page 3

IMPORTANT SAFETY INSTRUCTIONS
Do not place the LCD TV/monitor on an unstable cart, stand, tripod, bracket, table, or
floor where it can fall. It is damaged if dropped, hit or scratched. Do not clean the front
with keton-type materials (e.g.Acetone ),ethyl alcohol, toluene, ethy lacid, methyl, or
chloride-these may damage the panel.
Locate your DC adapter near an easily accessible AC outlet.
If your LCD TV/monitor does not operate normally in particular, if there are any
unusual sounds or smells coming from it unplug it immediately and contact an
authorized dealer or service enter.
High temperature can cause problems. Don`t use your LCD TV/monitor in direct
sunlight, and keep it away from heaters, stoves, fireplaces, and other sources of heat.
Unplug the DC adapter when it is going to be left unused for an extended period of
time .
,
To reduce the risk of fire or electric shock, and annoying interference, use the
recommended accessories only.
If the LCD TV/monitor is broken, do not try to repair it yourself. Contact qualified
service personnel.
Unplug your DC adapter from the AC outlet before any service.
Be sure the service technician uses authorized replacement parts or their equivalents.
Unauthorized parts may cause fire, electrical shook, or other hazards.
Following any service or repair, be sure the service technician performs safety checks
to certify that your TFT-LCD TV/monitor is in safe operating order.
The apparatus with CLASS I construction shall be connected to a MAINS socket outlet
with a protective earthing connection.
Page 4

CONTENT
PANEL BUTTON FUNCTIONS
Front panel
1
Local keyboard panel
1
EXTERNAL EQUIPMENT
Connecting diagram
2
REMOTE CONTROL
Remote control 3
Remote buttons (TV mode option) 4
Remote buttons(DVD mode option) 7
Battery installation 8
LET S START'
Switching on 9
Selecting source operation 9
TV OSD MANUAL
First Time installation 11 TV Information 12
Video menu options 13 Audio menu options 14
Setup menu options 14 VGA / HDMI input 17
Timer menu options 18 Function menu options 18
TELETEXT FUNCTION
Teletext function 22
DVD OPERATION
Basic operation 24 Supporting DVD format 25
DVD functions operating instructions 26 MP3 / JPEG playback 28
Function settings 29
TROUBLESHOOTING
Display troubleshooting 35 Sound and TV troubleshooting 35
SPECIFICATIONS
Specifications 36
ACCESSORIES
Accessories 37
Page 5
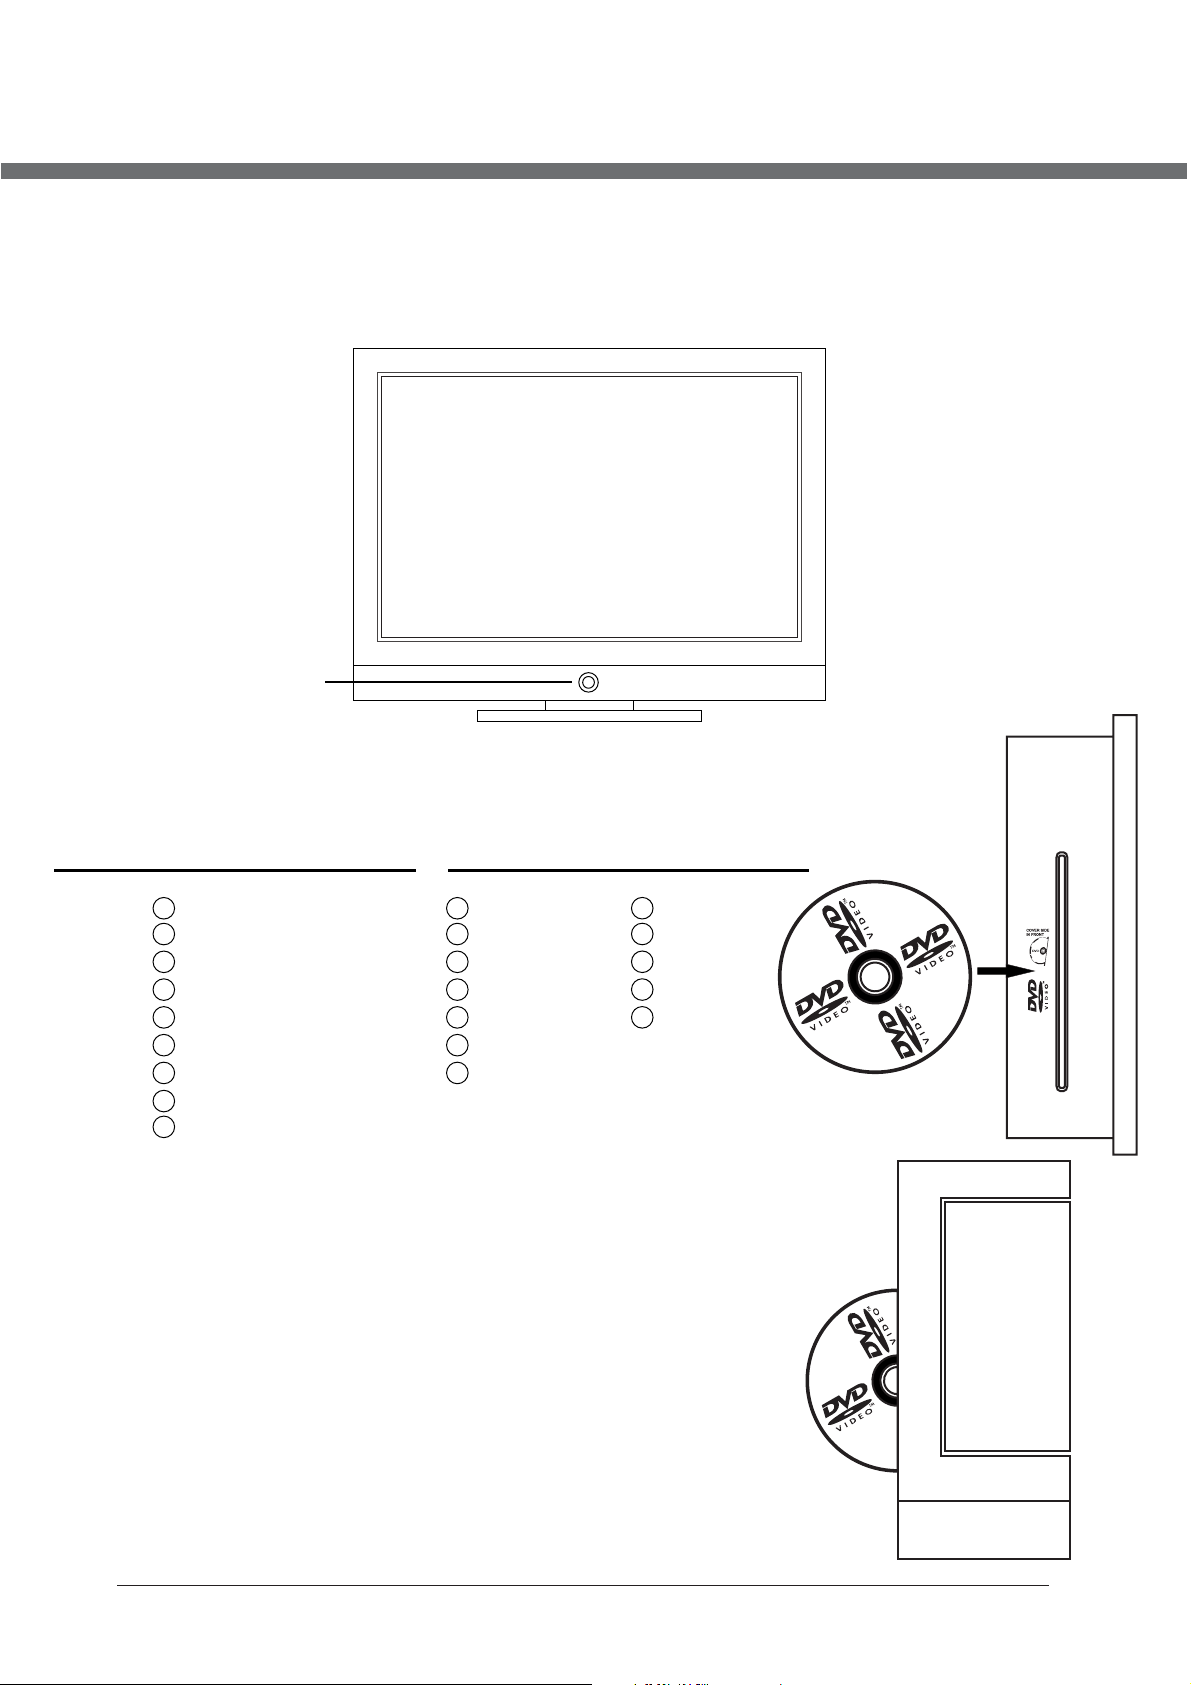
PANEL BUTTON FUNCTIONS
FRONT PANEL
Indicator (the indicator is red when in standby mode, and green when in working normally).
IR sensor window
LOCAL KEYBOARD PANEL (VERSIONS)
TV+DVD (15,6“, 19“) TV+DVD (22“)
PLAY\ II
EJECT
TV/AV
CH+
CH-
VOL+
VOLMENU
POWER
TV/AV – select input source
CH+ - increase channel number
CH- - decrease channel number
VOL+ - increase sound volume
VOL- - decrease sound volume
MENU – enter or exit menu
POWER – switch between standby and power-on mode
TV/AV NEXT
CH+ PREV
CH- STOP
VOL+ PLAY\ II
VOL- EJECT
MENU
POWER
NEXT – play the next Title / Chapter / track
PREV – play the previous Title / Chapter / track
STOP – stop of play
PLAY\ II – start of play or pause of play
EJECT – take the disk out
1
Page 6
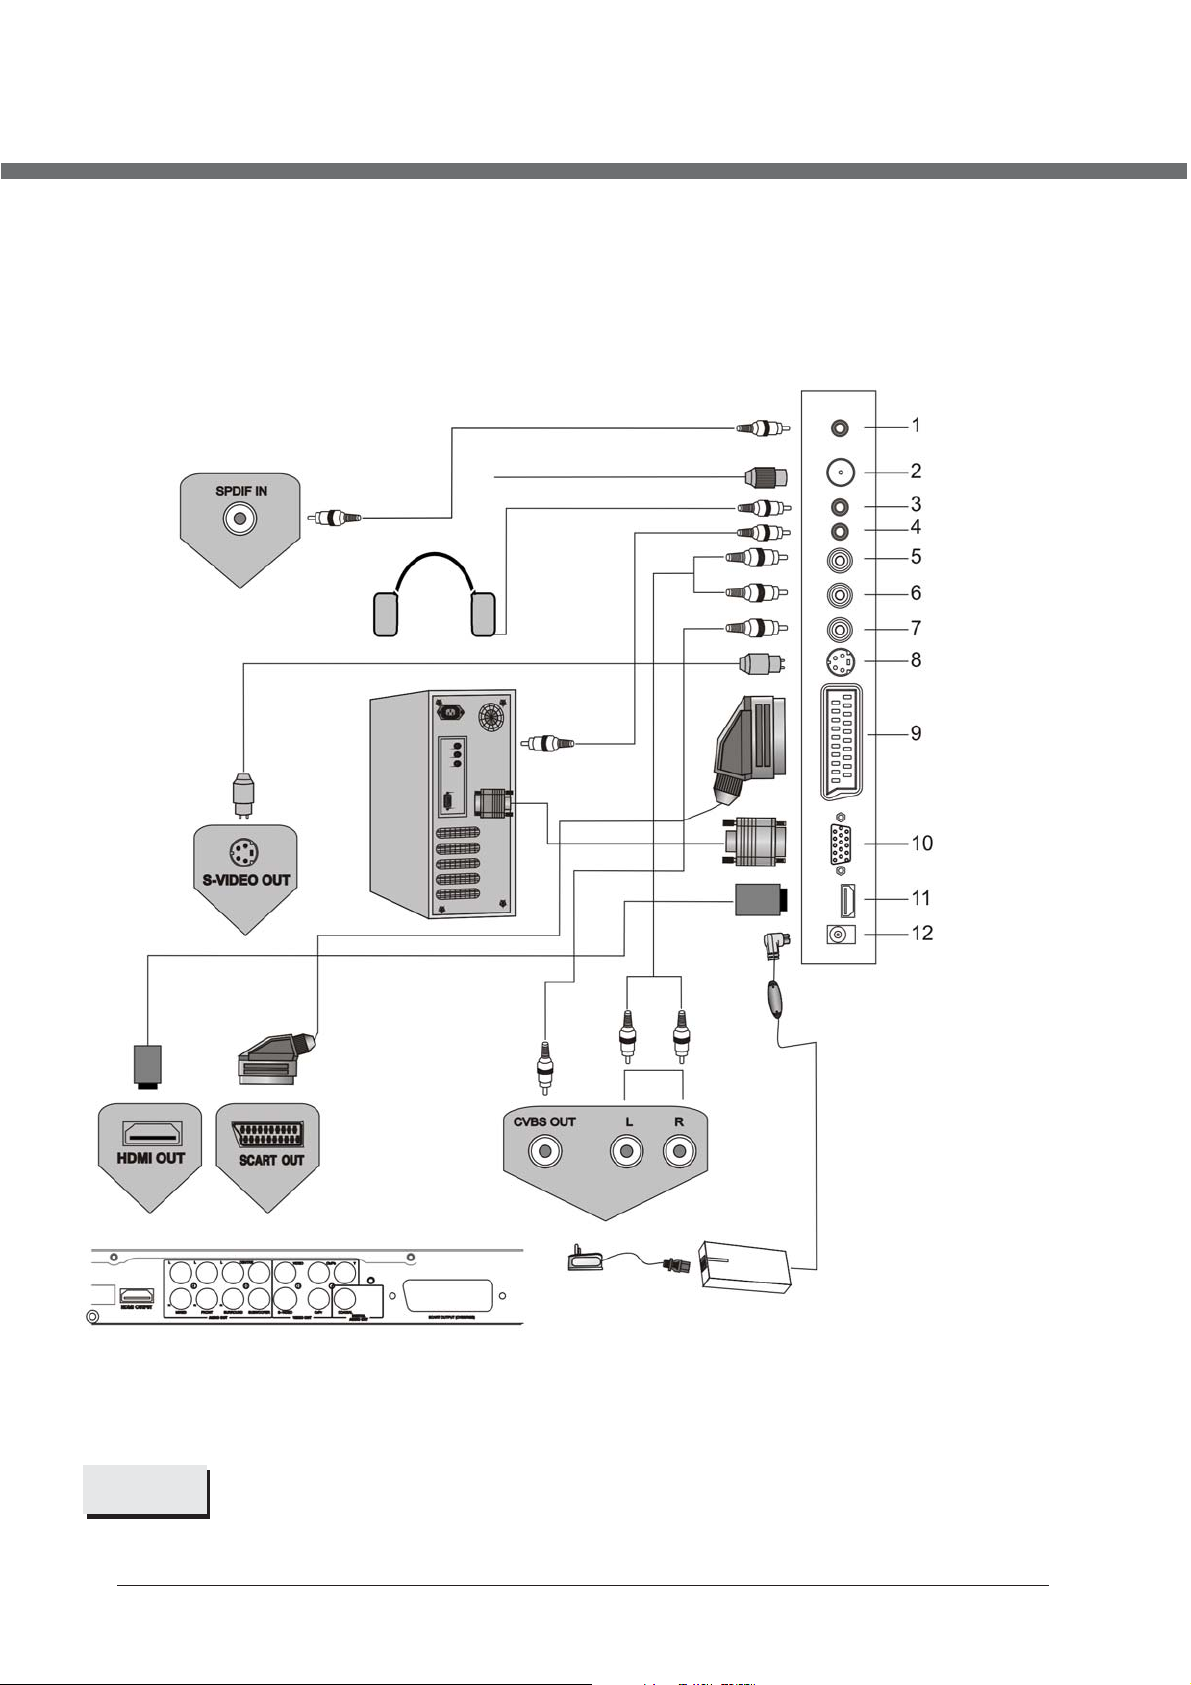
EXTERNAL EQUIPMENT
CONNECTING DIAGRAM
1. DVD SPDIF output
2. TV signal input
3. Audio Earphone output
4. PC audio input
5. CVBS / S-Video Right
audio input
6. CVBS / S-Video Left
audio input
7. CVBS input
8. S-Video input
9. SCART connecting
DVD or VCR player
teminal
10. PC VGA input
11. HDMI input
12. 12V DC power input
NOTE
You should insert all necessary cables BEFORE plugging in power cord.
2
Page 7

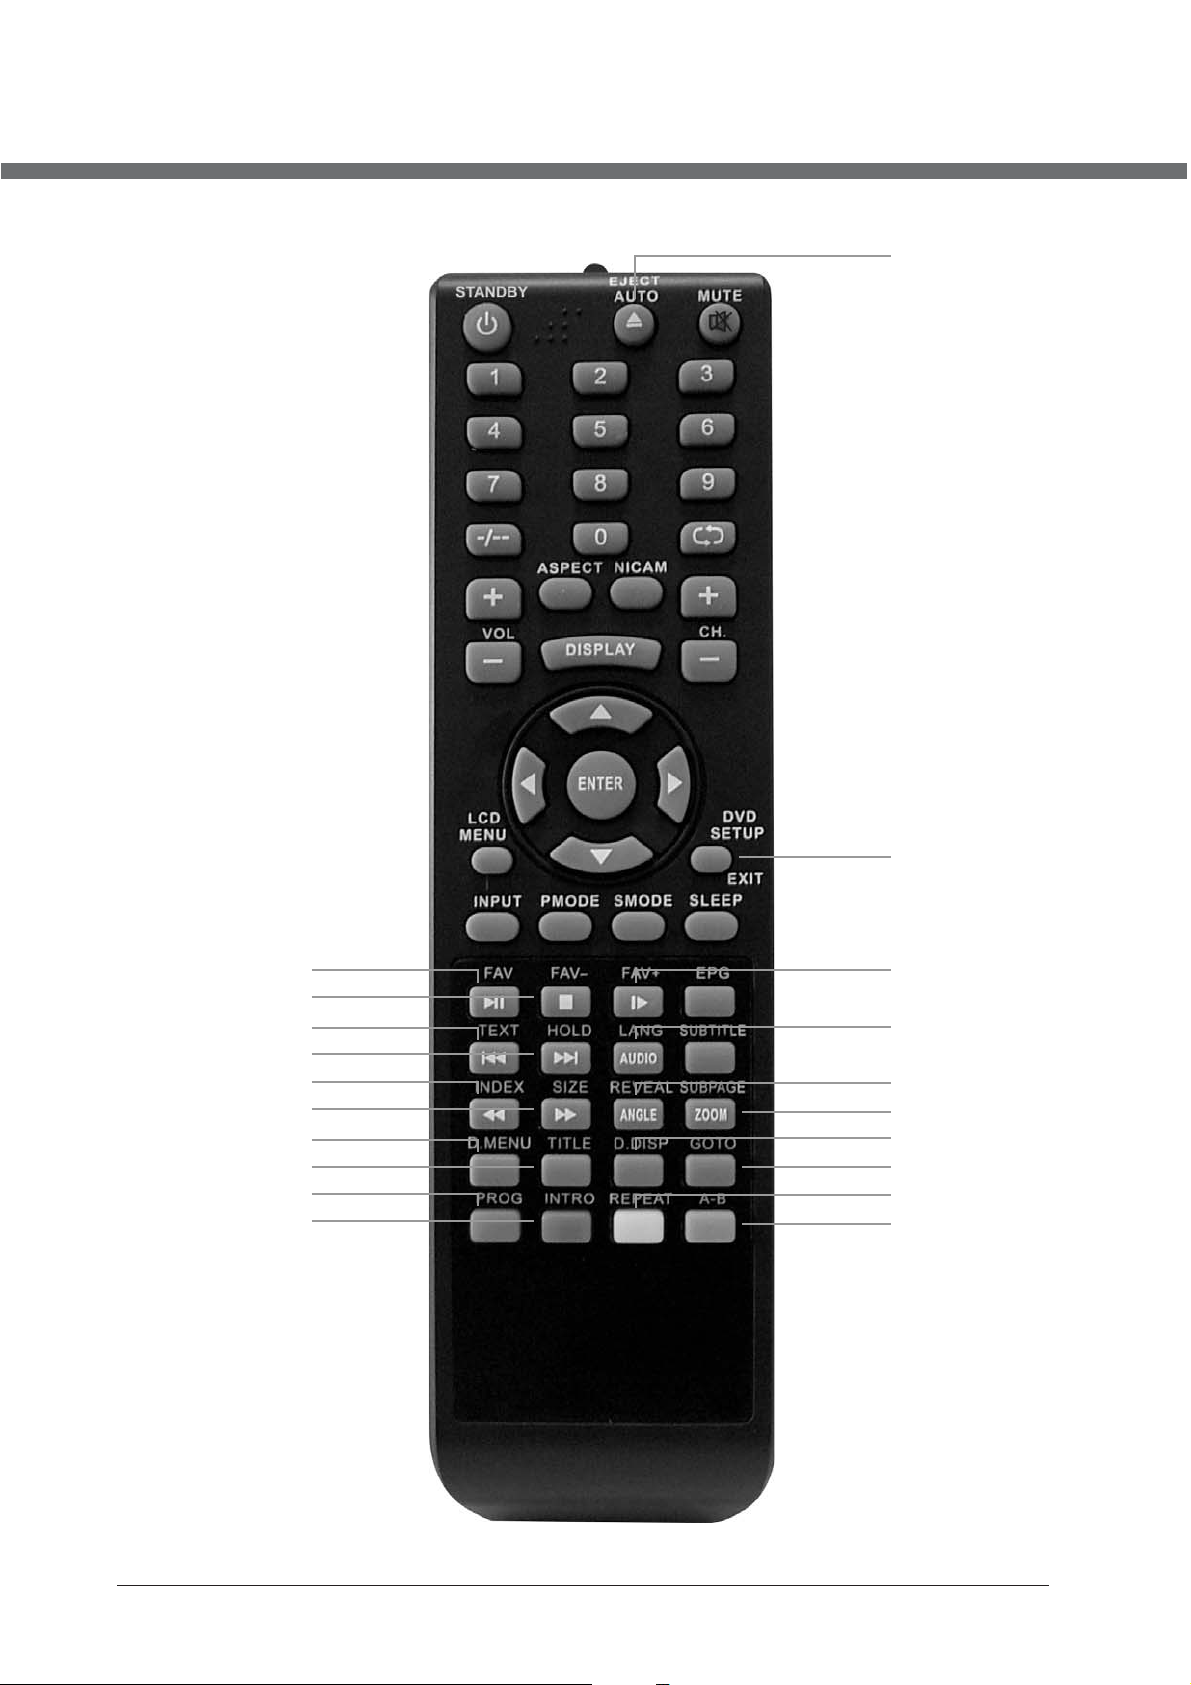
REMOTE CONTROL
1
23
25
27
28
29
30
31
2
3
424
5
626
7
8
9
10
11
12
13
32
33
34
35
36
37
38
39
40
14
15
16
17
18
19
20
21
22
3
Page 8
REMOTE CONTROL
REMOTE BUTTONS
TV mode option
1. AUTO
Reserved.
2. MUTE
Sound mute switch.
3. NUMBER BUTTONS
Select program number.
(
4.
Swap between a previous program and the current program.
5. NICAM
Display program sound information, select NICAM sound channel.
6. CH+
To increase program number.
7. DISPLAY
Display current program information.
8. CH-
To decrease program number.
9.
To select upward in the menu or increase channel number.
10. ENTER
Confirm the selection.
11.
Move cursor rightward or adjust the selected item in the menu, or increase sound volume.
12. EXIT
Exit or get back to the previous menu.
13.SMODE
To select sound equalizer modes: Personal, Voice, Music, Theatre.
14. SLEEP
15. FAV+
16. EPG
17. LANG
18. SUBTITLE
19. REVEAL
Display hidden teletext information.
20. SUBPAGE
21. YELLOW
Select a teletext link.
22. BLUE
RECALL)
(UP)
(RIGHT)
Setup the sleep timer.
Not used
Not used
Not used
Not used.
Open sub-page of teletext.
Select a teletext link.
.
.
.
4
Page 9

REMOTE CONTROL
REMOTE BUTTONS
23. STANDBY
Switch between standby mode and power-on mode.
24. -/- -
To toggle one-two digits channel number entering mode.
25. ASPECT
Change picture dimensions ratio in sequence: FullScreen, Zoom1, Zoom2, Auto, 4:3, 14:9,
16:9, Subtitle.
26. VOL+
Increase sound volume.
27. VOL-
Decrease sound volume.
28. (LEFT)
Move cursor leftward or adjust the selected item in the menu, or decrease sound volume.
29. (DOWN)
Move cursor upward in the menu, or change the channel.
30. LCD MENU
Open/close user menu.
31.PMODE
Change picture modes in sequence: Standard, Personal, Movie, Sport, Mild, Game.
32. INPUT
Open/close input source selection menu. Use TV option to activate TV mode and
DVD
option – to activate
33. FAV-
Not used
34.FAV
Not used
35. HOLD
Stop teletext on current page.
36. TEXT
Toggle teletext mode between Enabled/Mixed/Disabled.
37. SIZE
Magnify teletext page.
38. INDEX
Display main content page.
39. GREEN
Select a teletext link.
40. RED
Select a teletext link.
.
.
mode.
DVD
5
Page 10
REMOTE CONTROL
41
43
44
46
47
49
50
53
54
57
60
42
45
48
51
52
55
56
58
59
6
Page 11

REMOTE CONTROL
REMOTE BUTTONS
DVD mode option
41. (EJECT)
Disk in/out.
42.DVD SETUP
Display DVD setup menu.
43. (PLAY/PAUSE)
Play or pause of playing.
44. (STOP)
Stop of playing.
45. (SLOW MOTION)
Different speeds of playing in sequent.
46. (PREVIOUS)
Play to the last Title / Chapter / Track.
47. (NEXT)
Play to the next Title / Chapter / Track.
48.AUDIO
Toggle between different audio modes in sequent.
49. (BACKWARD)
Toggle between different speeds in sequent.
50. (FORWARD)
Toggle between different speeds in sequent.
51.ANGLE
Change camera angle in DVD mode.
52.ZOOM
Toggle between different zoom modes in sequent.
53.D.MENU
Return to the root menu.
54.TITLE
Return to the title menu.
55.D.DISP
To activate roll-down menu for the current title on screen.
56.GOTO
Play favourite Title / Chapter / Track number.
57.PROG
Program playback.
58.REPEAT
Repeat playback.
59.A-B
To segment repeat.
60.INTRO
Not used.
7
Page 12
REMOTE CONTROL
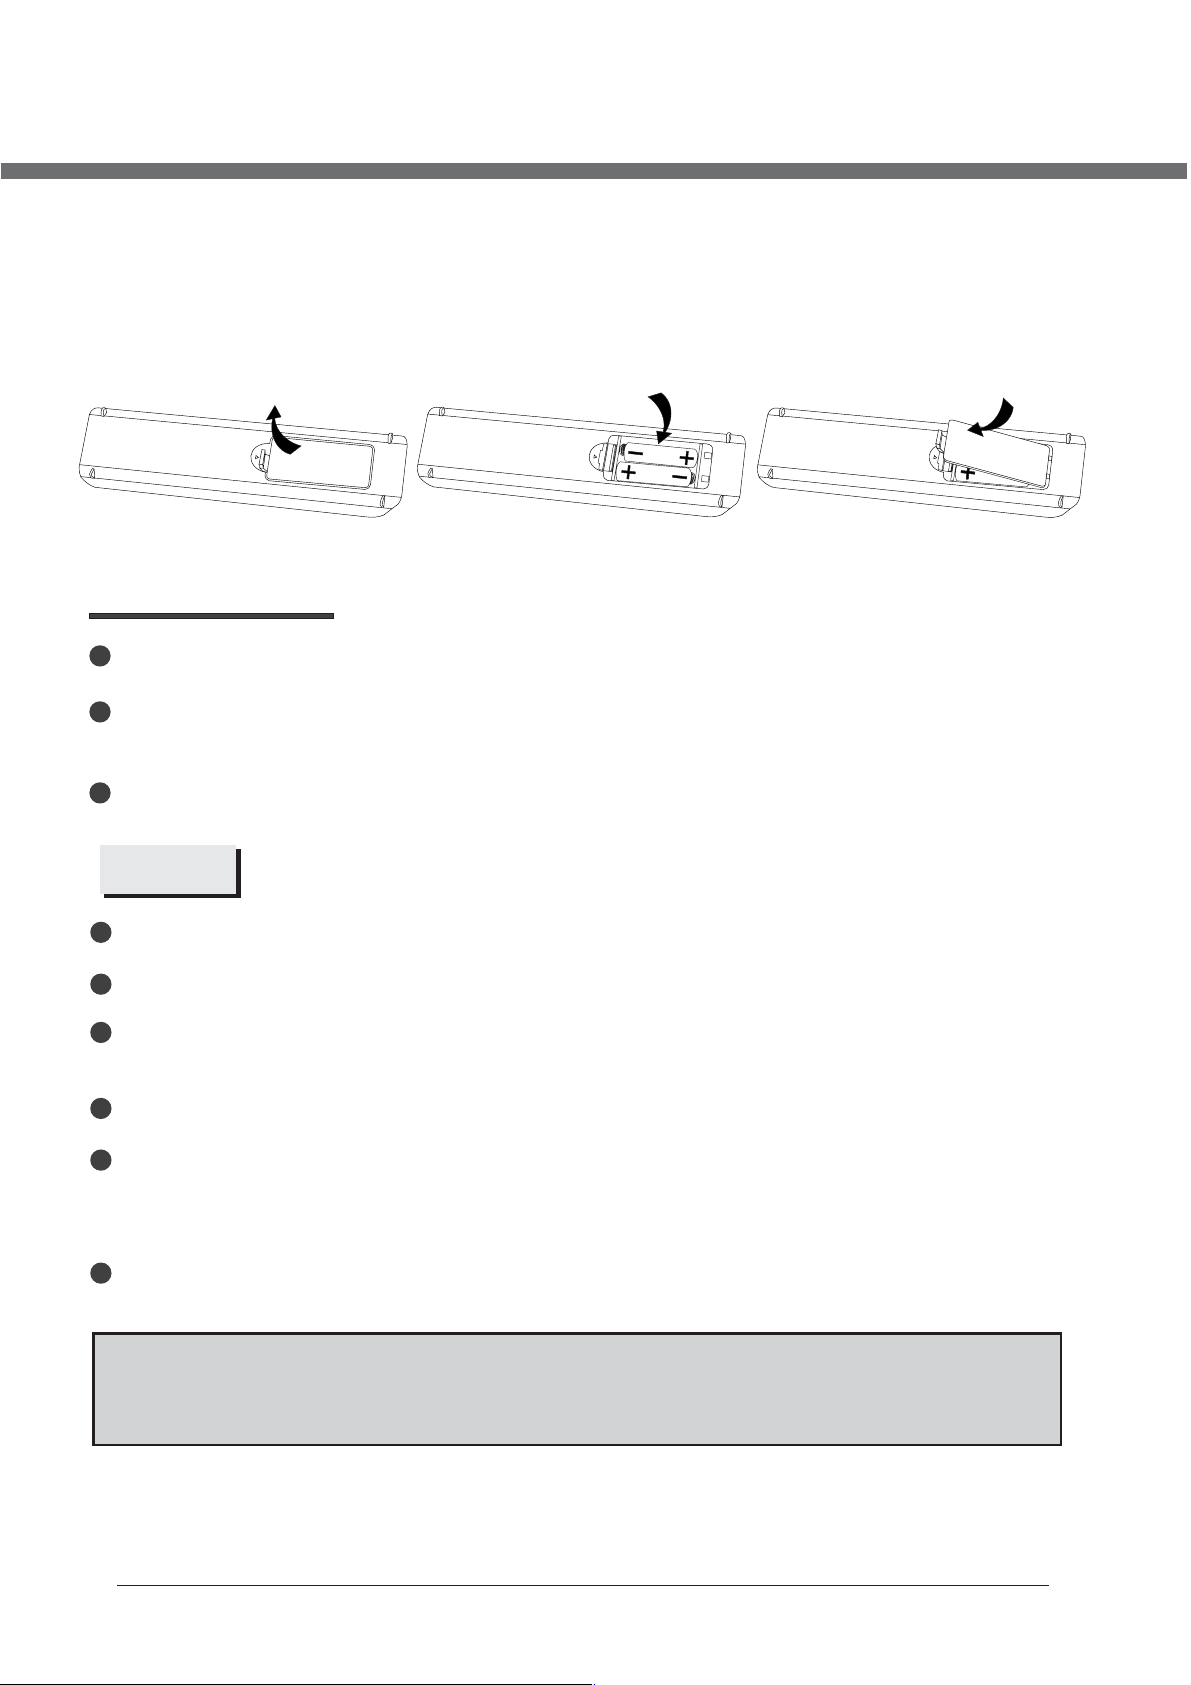
BATTERY INSTALLATION
Remove the battery cover. Insert two SUM-4(AAA) batteries matching the -/+ polarities of
the battery to the -/+ marks inside the battery compartment, as follows:
BATTERY LIFE
Normally, battery can be used one year.
If the remote control is still invalid when very near to the TV's remote sensor window,
please use new battery.
Please use SUM-4(AAA) battery.
NOTES
Never use rechargeable battery.
Never charge, short-circuit, disassemble and heat the battery, or throw it into fire.
Pay attention not to fall or knock the remote controller, which will cause damage or
function failure to it.
Do not use new and old battery together.
When not using the remote controller for a long time, please take out battery to avoid
liquid leakage. Before replacing new battery, please clean the electrolyte in the remote
controller.
If electrolyte splashes into body, please clean it with water.
CAUTION:
Please put battery in the place children cannot touch. If swallow by accident, please
contact with the local doctor immediately.
8
Page 13
LET S START'
After the unit has been suitably placed / fixed, on the desk or on the wall, and all necessary
cables include power have connected, the next you should do is:
• Press the [STANDBY] button on the remote control to make the unit switch to power-on
mode - you will see the LED indicator turn green. Now you can enjoy the many features
of your new TV.
SELECTING SOURCE OPERATION
You can select input source by using source menu.
• Press INPUT button or TV/AV key on the right side of LCD TV to show the menu as
follows:
TV
SCART
CVBS
S-VIDEO
VGA
HDMI
DVD
The current source item is highlighted.
• Through press button on the remote control or CH+/CH- key on the right side
of LCD TV to select your desire, press
confirm your choice.
button, VOL+ key or ENTER button, to
9
Page 14

TV
Page 15
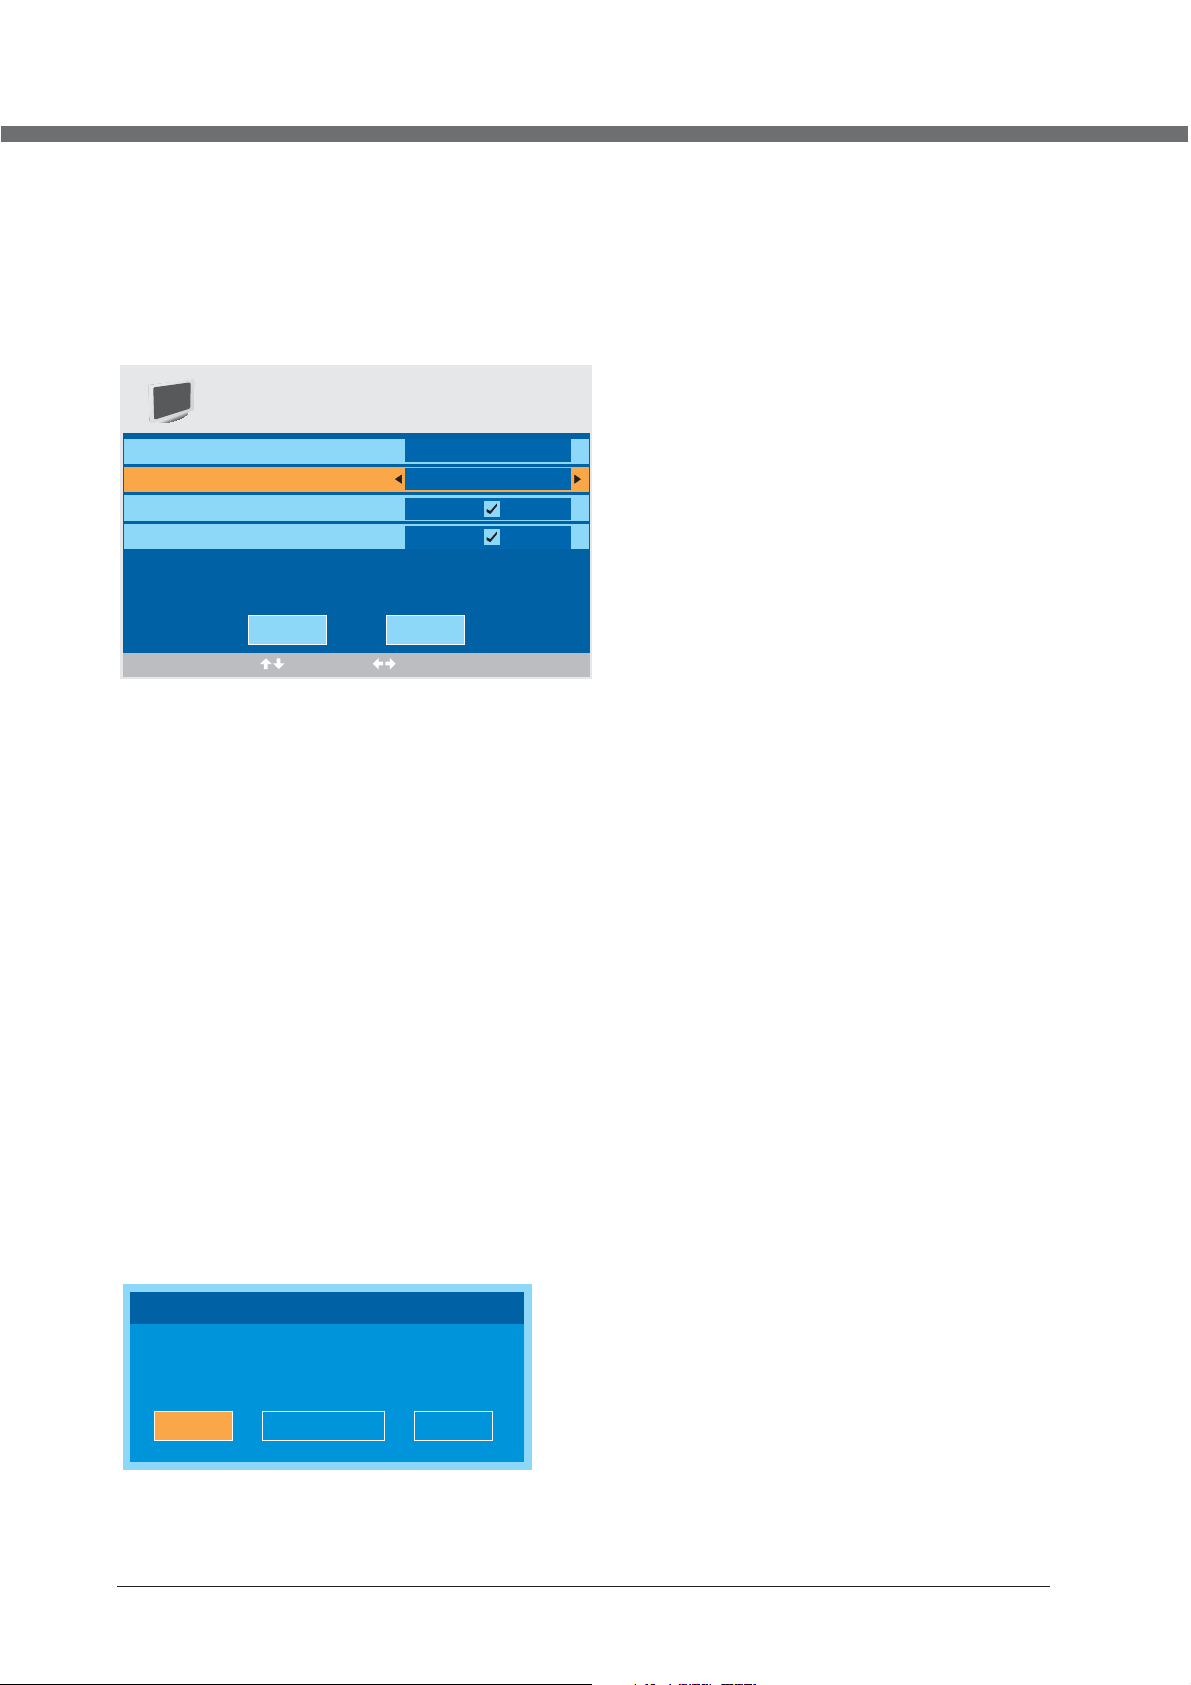
OSD MANUAL
First Time Installation
First Time Installation
Country
Language
Delete Analog Program
Analog Program Search
OK
Select Adjust
Country
Press ▼ / ▲ button and then use ◄ / ► to select the country.
Language
Press ▼ / ▲ button and then use ◄ / ► to select the OSD language.
Delete Analog Program
Press ▼ / ▲ button and then use ◄ / ► to select whether to delete all the analog programs.
Analog Program Search
Press ▼ / ▲ b utton and t hen use ◄ / ► to se lect whet her to star t sear ching ana log progr ams.
Canc el
Fran ce
Engl ish
If this is the first time you open the TV and there is no
prog ram s in th e TV m emo ry, the Fi rst Time Insta lla tion
menu w ill a ppe ar in the pict ure .
Afte r set tin g the ite ms, s ele ct OK to fi nis h the f irst ti me in sta llati on, o r sel ect Cancel t o exi t this menu.
If you cancelled the first time installation, it will remind you wheth er to set t he fi rst t ime ins tal lat ion next tim e.
First Time Installation
First time installation is not finished!
Are yo u sur e to ex it?
YES
Do It ne xt ti me
NO
11
Page 16
OSD MANUAL
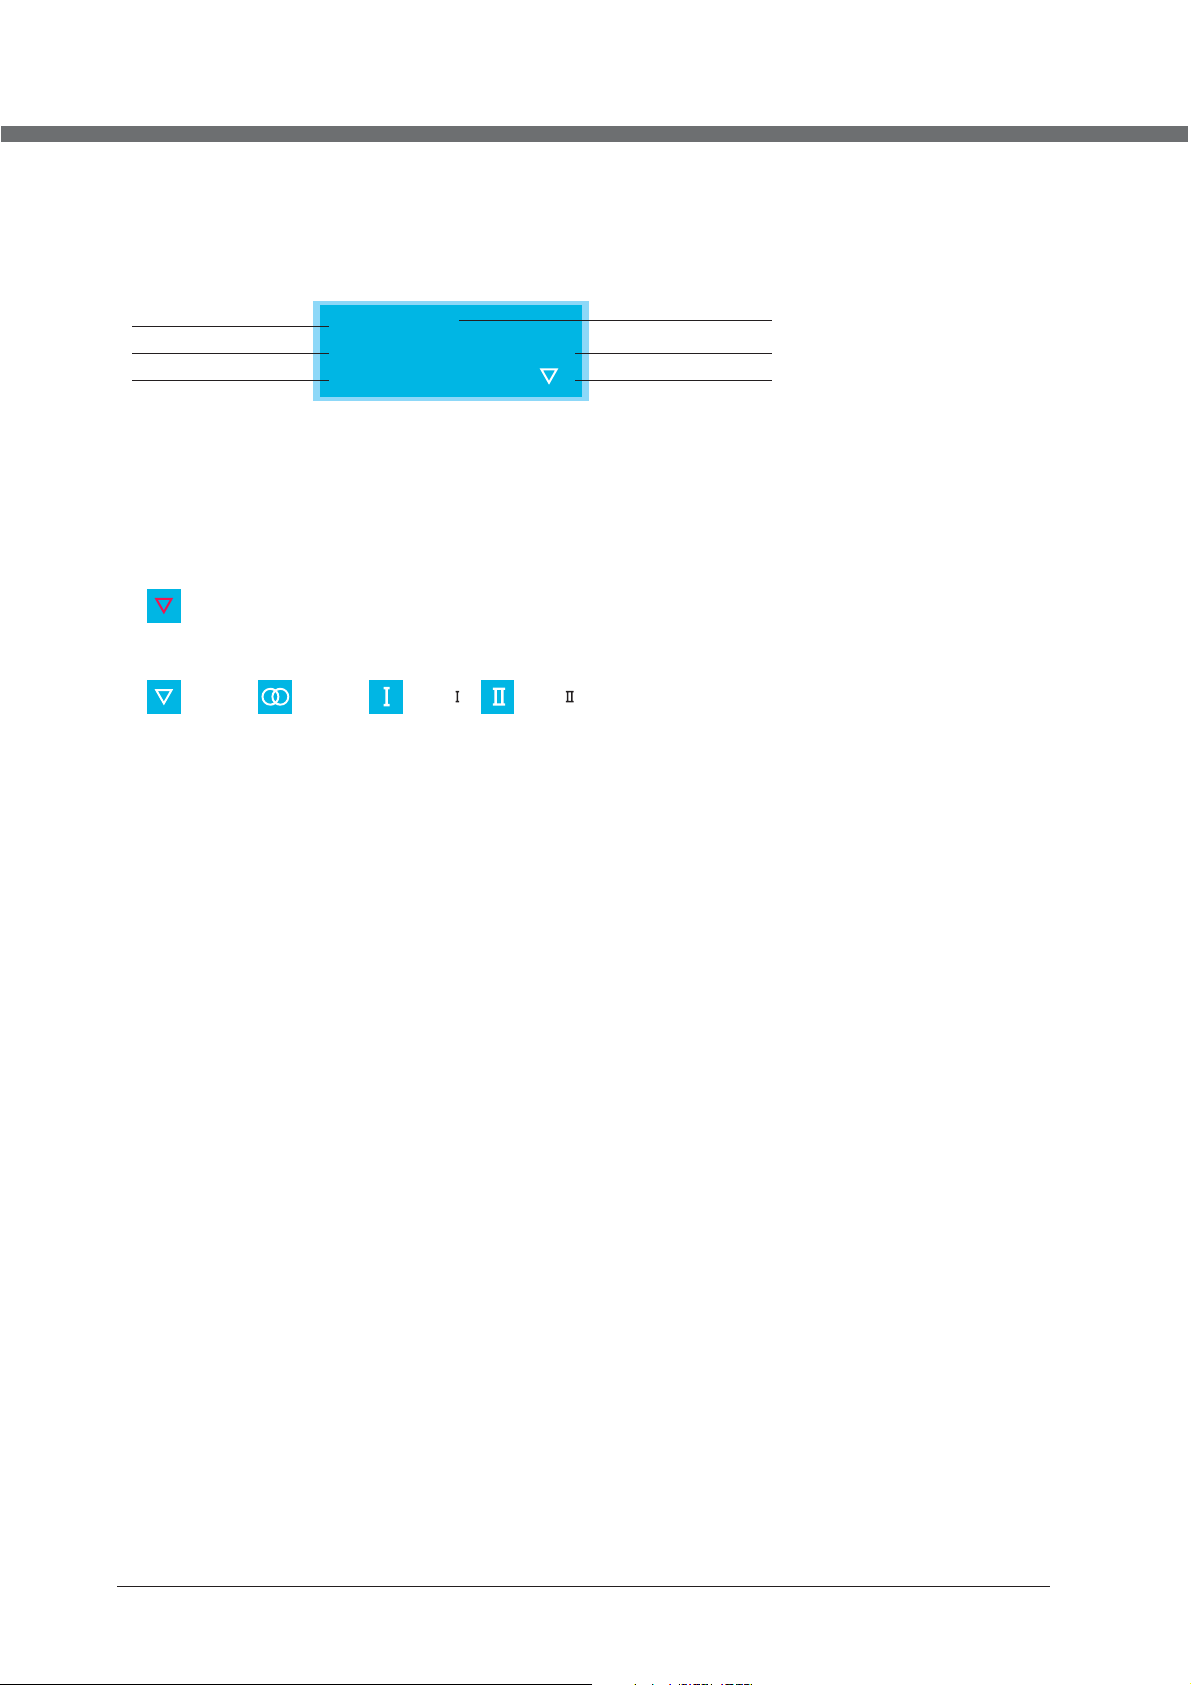
TV Information
Prog ram Informati on
Press DISPLAY or NIC AM button to display the program information.
1
2
3
1. The number o f cur ren t program.
2. The colour s yst em of curren t pro gra m, coul d be se lec ted in Manual Tuning men u(an optio n of SETUP men u).
3. The name of cu rre nt program .
4. The l abe l of cu rrent program, you can label it in Manual Tuning me nu( an op tion of SETUP me nu) .
5. The sound sy ste m of current p rog ram , could b e sel ect ed in Manual Tuning menu( an op tio n of SETUP menu) .
6. The NICAM mo de of c urrent pro gra m.
If the i con o f NIC AM mode i s red , it me ans the c urr ent p rogra m sup pli es multi NIC AM si gnals, and y ou ca n
sele ct it b y pre ssing NICAM button.
The NICAM modes and relative icons:
Mono Stereo Dual Dual
TV Labe l
25
Auto
No Signal
Auto
4
5
6
12
Page 17
OSD MANUAL
VIDEO menu options
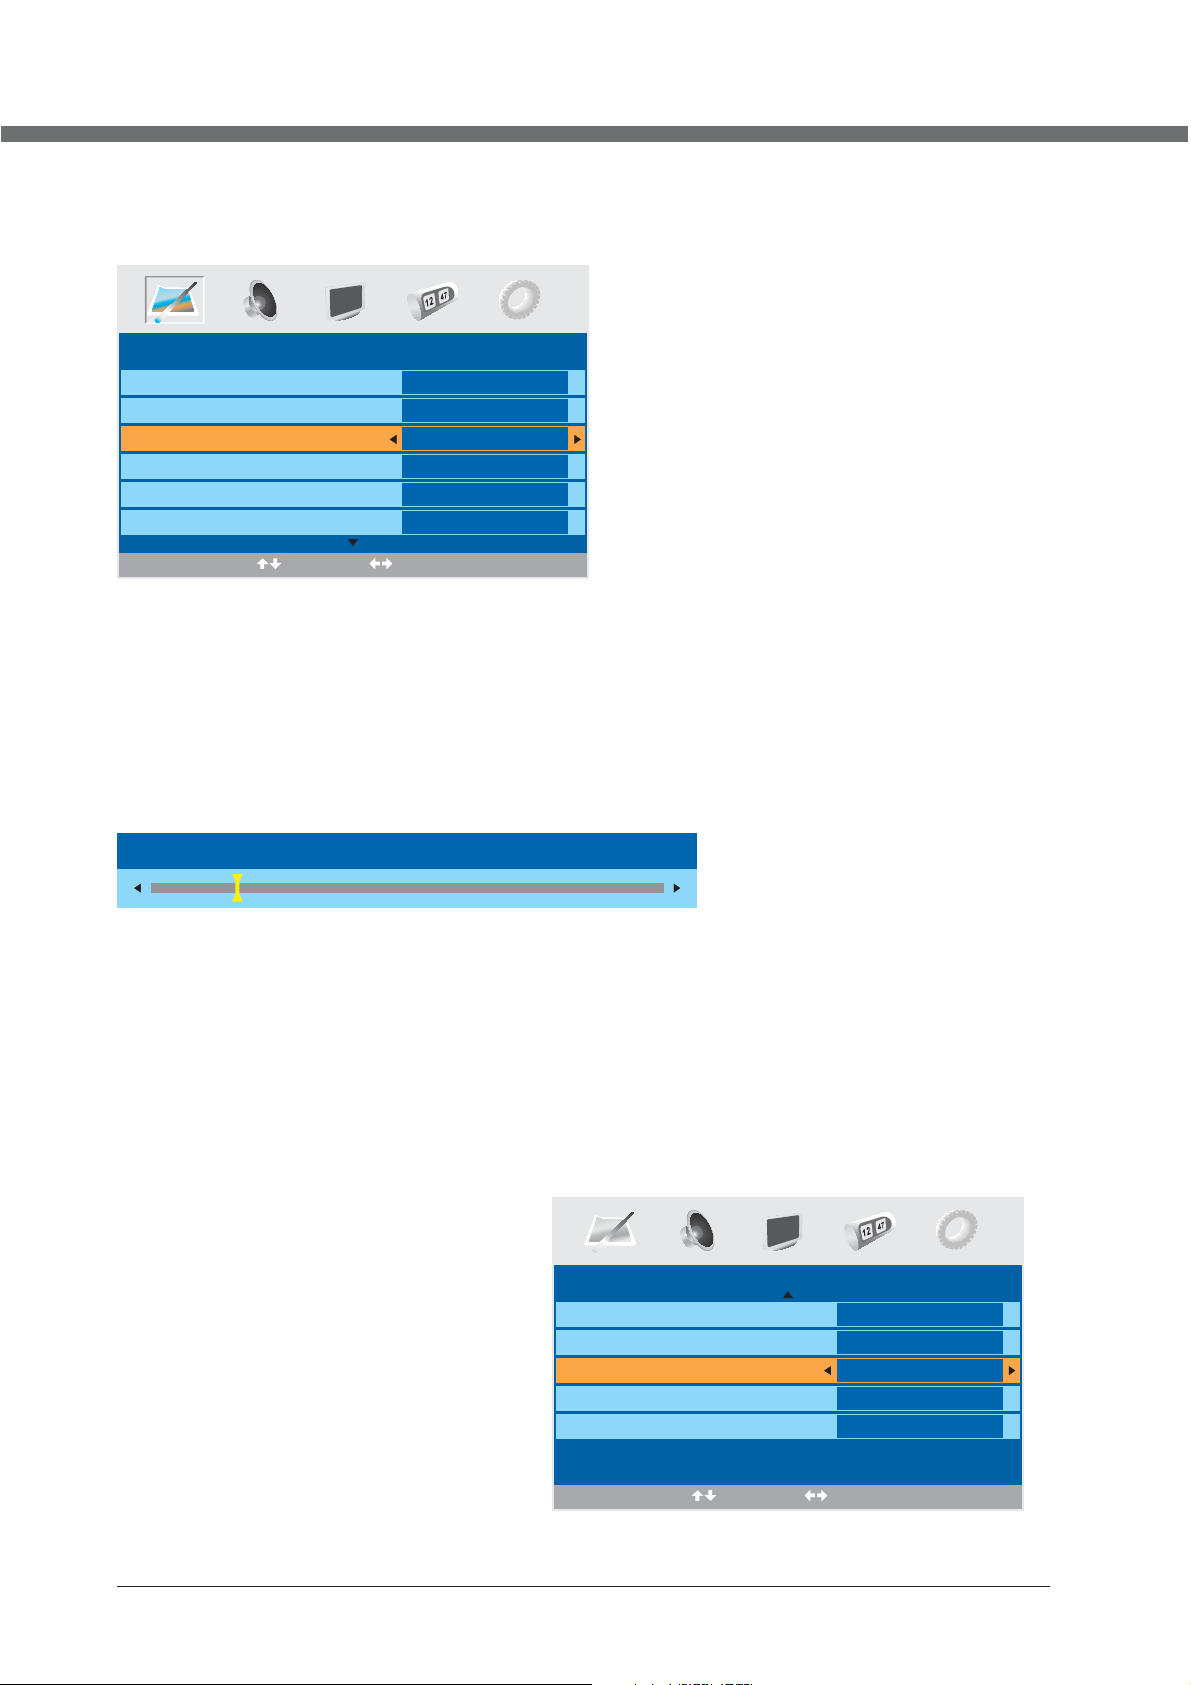
Pres s MEN U but ton on the fro nt pa nel o r LCD-M ENU o n the r emote cont rol t o dis play th e mai n men u.
Picture Mode
Contrast
Brightness
Colour
Tint
Sharpness
PICTURE
Sele ct
Standard
50
50
50
0
Normal
Adjust
1. Pre ss ◄ / ► bu tto n to sele ct PI CTU RE in the m ain
menu .
2. Pre ss ▼ / ▲ bu tto n to sele ct th e opt ion tha t you
want t o adj ust i n the PIC TUR E men u.
3. Pre ss ◄ / ► bu tto n to adju st.
4. Whe n you a re sa tisfi ed wi th yo ur adju stm ent , pre ss the L CD- MEN U butto n to re tur n to the pr evi ous m enu
or pre ss th e EXI T butto n to ex it th e main me nu.
Picture Mode
Sele ct Pi ctu re Mode i n PIC TUR E menu. ( Avail abl e pic ture mo de: S tan dard, Pers ona l, Movie, Sp ort , Mild, Game .)
If you c han ge th e value o f Con tra st, Bri ght nes s, Colo ur, Tin t , Sha rpness or Co lou r tem perat ure o n the p ictur e men u, th e
pict ure m ode w ill be ch ang ed to " Perso nal " aut omatical ly. You may se lec t the pictur e mod e dir ectly b y pre ssi ng PMOD E
butt on.
TIPS: You can press PMODE but ton on th e rem ote c ontro l to se lec t the Pictur e Mod e dir ectly.
Contrast
Press ▼ / ▲ b utton and t hen use ◄ / ► to ad just the co ntrast of t he pictur e.
Contrast 28
After a djust the v alue you wa nt, pr ess LCD-MENU button to ret urn to t he previe w MENU.
Brightness
Press ▼ / ▲ b utton and t hen use ◄ / ► to ad just the br ightnes s of the pict ure.
Colour
Press ▼ / ▲ b utton and t hen use ◄ / ► to ad just the co lour satu ration.
NOTE : Thi s opt ion is in val id in PC mode, a nd it w ill be shown i n gra y.
Tint
Press ▼ / ▲ b utton and t hen use ◄ / ► to ad jus t the tone of co lou r whe n your sy ste m is in N TSC.
Sharpness
Press ◄ / ► t
TV. (Avai lable Sha rpness Mo de: No rmal,Sh arp,
Sharp est, Soft est, Soft .)
Colour temperature
Sele ct an o pti mum col our t emp eratu re mo de to s uit your
eyes f or vi ewi ng amon g Nor mal , Warm a nd Co ld.
DNR (Digital Noise Reduction)
If the b roa dca st sign al re cei ved is we ak, y ou ca n select
the DN R opt ion t o reduc e the v ide o noise l eve l bet ween
Off, Low,Mid a nd Hi gh.
o selec t the sharp ness mode o f your
PICTURE
Colour
Tint
Sharpness
Colour temperature
DNR
Select Adjust
50
0
Normal
Normal
Off
13
Page 18
OSD MANUAL
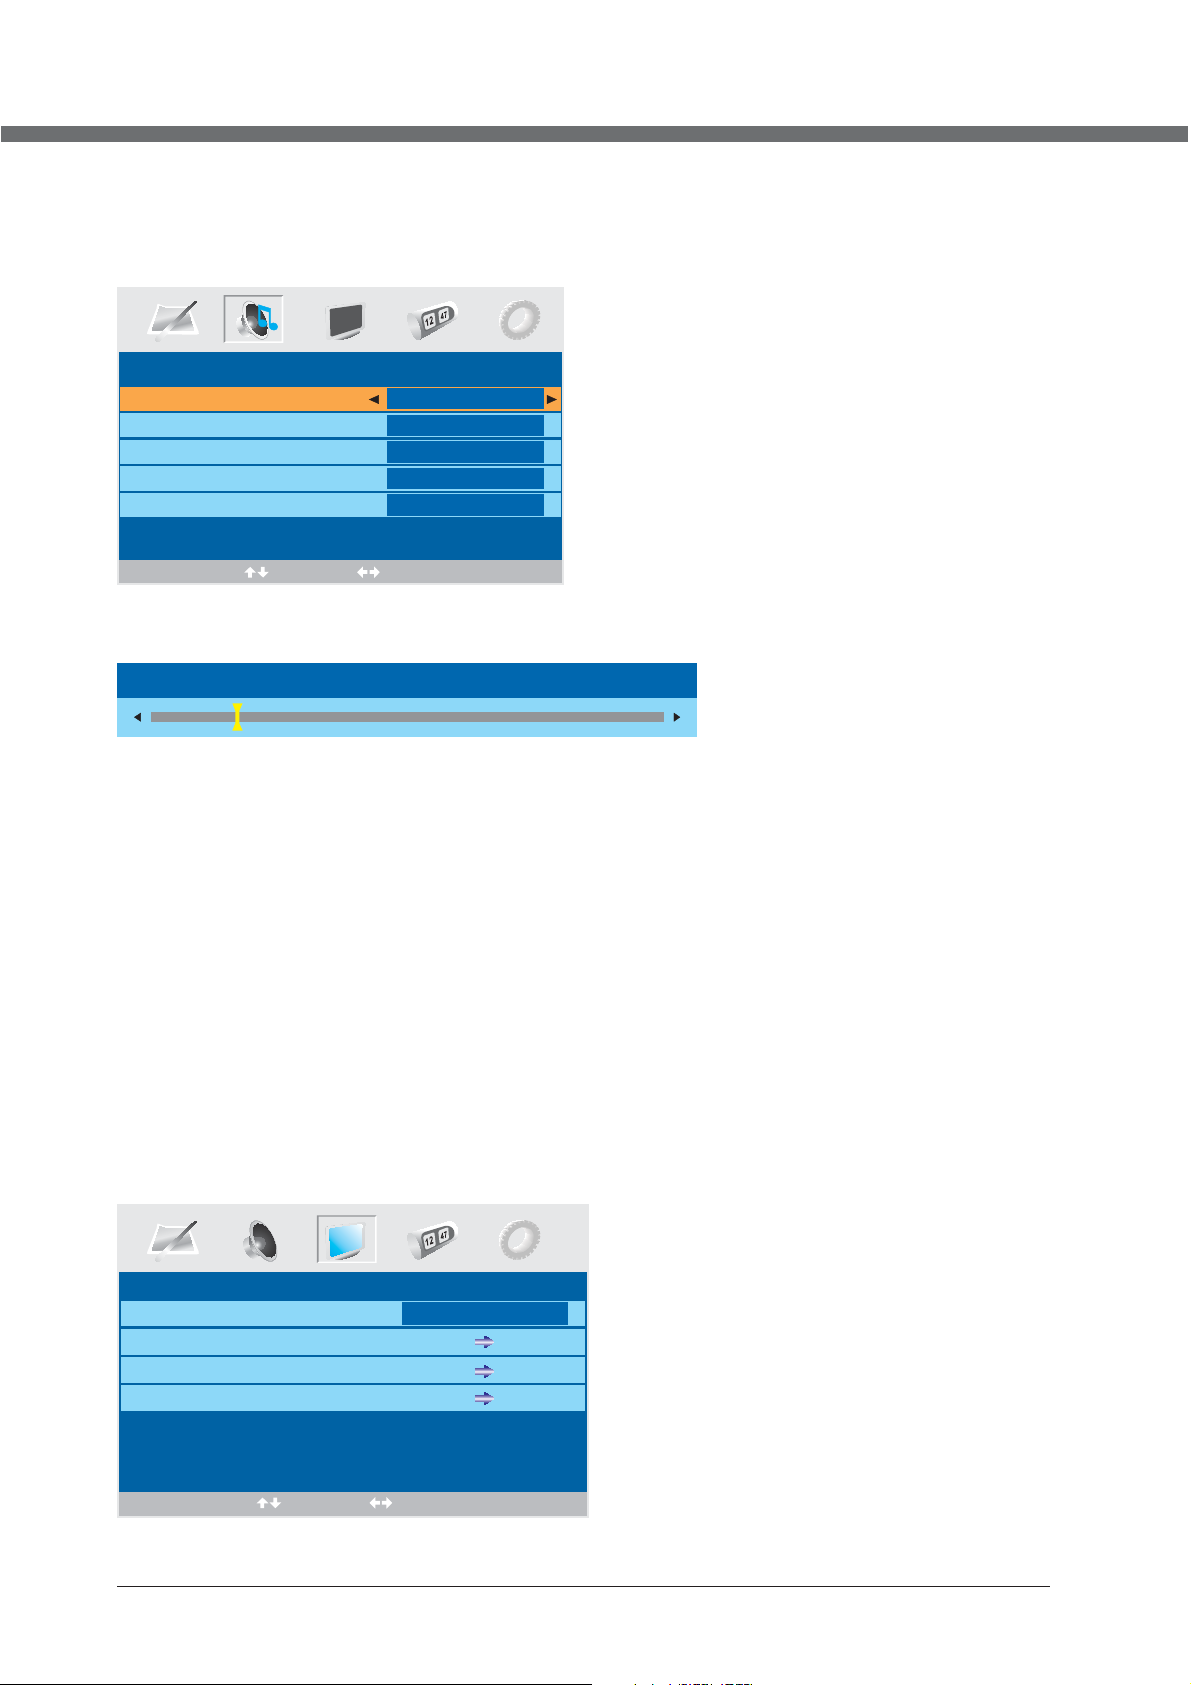
AUDIO menu options
Press MENU but ton o n the fro nt pa nel o r LCD-MENU on the rem ote c ont rol to displ ay th e mai n menu.
1. Pre ss th e ◄ / ► but ton to se lec t SOU ND in the
main m enu .
2. Pre ss th e ▼ / ▲ but ton to se lec t the o ption that y ou
want t o adj ust i n the SOU ND me nu.
3. Pre ss th e ◄ / ► but ton to ad jus t.
4. Whe n you a re sa tisfied wi th yo ur ad justm ent , pre ss
the LC D-M ENU b utton t o ret urn t o the previo us me nu
or pre ss th e EXI T butto n to ex it th e main menu.
Volume
Sound Mode
Bass
Treble
Balance
SOUND
28
Personal
0
0
0
Sele ct
Adjust
Volume
Press ▼ / ▲ b utton and t hen use ◄ / ► to ad just the so und level .
Volume 28
After a djust the v alue you wa nt, pr ess LCD-MENU button to ret urn to t he previe w MENU.
Sound Mode
Sele ct So und M ode in SOUND m enu . (Avai lab le sound mod e: Pe rao nal, Voi ce, M usi c, Thea tre.)
If you c han ge th e value of Bas s and Tr ebl e on the So und m enu , the s ound mo de wi ll be c hanged to "P ers ona l" automat ica lly.
You ma y sel ect the soun d mod e dir ectly by pre ssi ng SM ODE button .
TIPS: You can press SMODE but ton on th e rem ote c ontro l to se lec t the Sound Mo de di rec tly.
Bass
Pres s ▼ / ▲ but ton a nd then u se ◄ / ► to i ncr ease or d ecr eas e the lev el of t he lo wer-p itc hed s ounds.
Treble
Pres s ▼ / ▲ but ton a nd then u se ◄ / ► to i ncr ease or d ecr eas e the lev el of t he hi gher- pit che d sounds.
Balance
Press ▼ / ▲ b utton and t hen use ◄ / ► to ad just the au dio outpu t betw een l eft an d right spe akers.
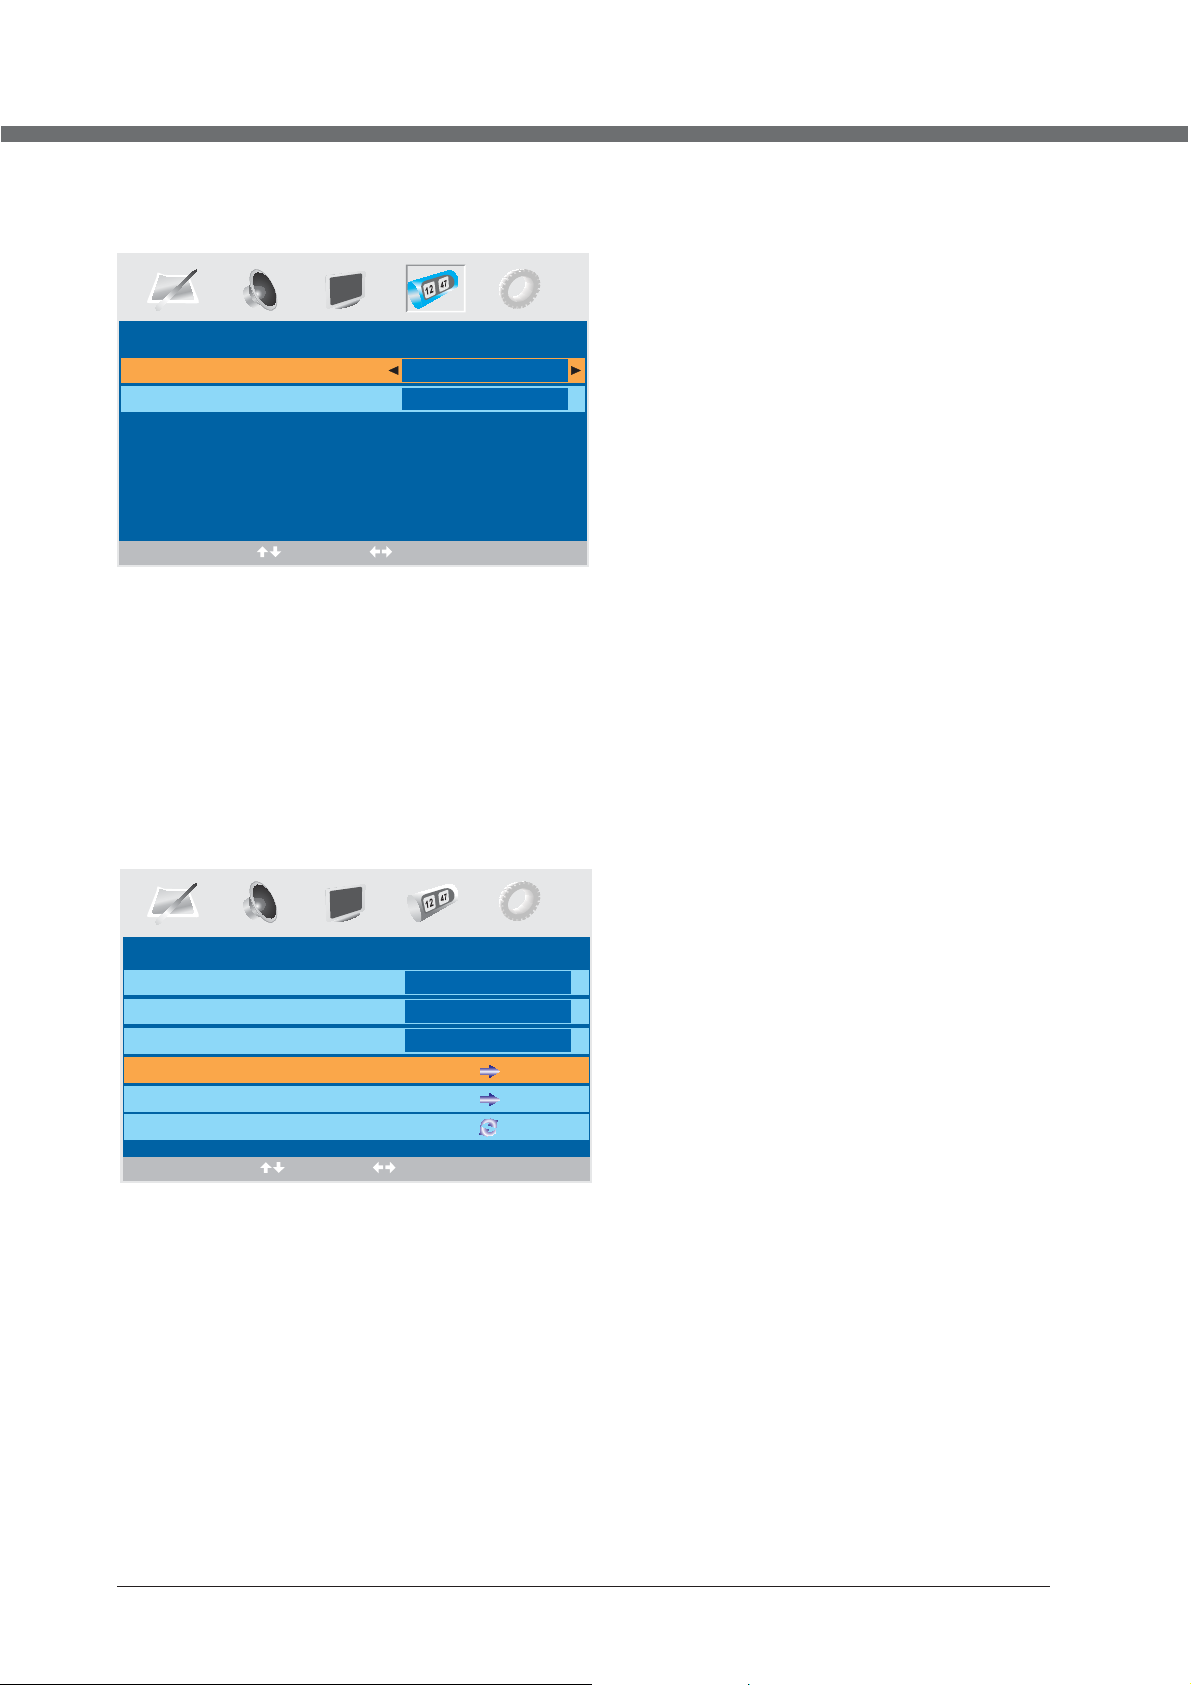
Setup menu options
Press MENU but ton o n the fro nt pa nel o r LCD-MENU on the rem ote c ont rol to displ ay th e mai n menu.
SETUP
Country
Auto tuning
Manual tuning
Program Edit
Select Adjust
UK
14
Page 19
OSD MANUAL
1. Pre ss th e ◄ / ► but ton to se lec t SET UP in the main men u.
2. Press the ▼ / ▲ button to select your option what you want to adjust in the SETUP menu.
3. Pre ss th e ◄ / ► but ton to ad jus t.
4. When you are satisfied with your adjustment, press the LCD-MENU button to return to the previous menu or press the
EXIT button t o exi t the main men u.
Country
This option allows you to select the country.
Auto t uning
This o pti on al lows yo u to tu ne th e channels t hat c an be r eceiv ed automatically.
Note: Befor e you p erf orm Auto Tu nin g, yo u must ch oos e the c ountr y whe re yo u are by selec tin g COUNTRY option.
Auto Tuning
Press E NTER key to s tart.
ENTER
Enter Return
Pres s ENT ER ke y to star t.
MENU
Auto Tun ing
Searc hing
ATV
MEN U
You ca n pre ss LCD-MEN U but ton to stop au to tu nin g and clo se th e OSD m enu.
Exit
6
215.0 0MHz
Manual Tuning
This o pti on al lows yo u to pe rfo rm Manu al Tun ing .
Note: Before you perform Manual Tuning, you must choose the country where you are by selecting Country option
in the F UNC TIO N menu.
1. Pre ss ◄ / ► to s ele ct Manu al tu nin g in SETU P men u.
2. Pre ss ▼ / ▲ to p erf orm you r sel ect ion, th e men u of Ma nual tu nin g wil l display on t he sc ree n.
Manual tuning
Program
Sound System
Colour System
Program Label
AFT
Manual Search
1
Auto
Auto
Off
471.25 MHz
Select Adjust
Program
The cu rre nt pr ogram n umb er. Pr ess ◄ / ► to se lec t the u pper or l owe r pro gram.
Sound System
Press ◄ / ► to select a corresponding sound system, such as DK, L/L’, BG, I.
15
Page 20
OSD MANUAL
Colour System
Pres s ◄ / ► to se lec t a corre spo ndi ng colo ur sy ste m, such a s Auto , PAL , SEC AM.
Program Label
This o pti on al lows yo u to la bel a c hannel, yo u can a lso relabe l the p rog rams ha ve be en la beled .
1. Sel ect a c han nel you w ant t o lab eled.
2. Pre ss▼ / ▲ s ele ct Prog ram L abe l in SETU P menu.
3. Pre ss▼ / ▲ t o per form yo ur se lec tion. T he menu o f pro gra m label w ill d isp lay as be low :
Program Label
4. Pre ss th e num eric bu tto ns to i nput th e num ber s directly o r pre ss to sel ect t he le tters .
5. Pre ss ◄ / ► to m ove t he curs or.
6. Pre ss EN TER , LCD-M ENU o r EXI T butto n to co nfi rm and re tur n to pr eviou s men u.
▼ / ▲
AFT (Auto Fine Tune)
Due to w eak s ign als or a wr ong a nte nna con fig ura tion, some o f the c hannels ma y not b e tun ed to the b est r ece ption
cond iti on. AF T fu nct ion all ows y ou to f ine tun e cha nne l selec ted (th e frequenc y of ch annel is aro und t he va lue in
Manu al Se arc h optio n.
Manual Search
Manua l Search
This o pti on ha s two fun cti ons :
1. Set t he fr equ ency of c han nel f or AFT opt ion.
2. Pre ss ► bu tto n for 3+ se con ds an d it will s tar t aut o tunin g fro m thi s frequenc y.
Prog ram E dit
This f unc tio n allow s you t o sor t the TV pr ogram s acc ord ing to yo ur pr efe rence s, as f oll owing:
- - - . - -
MH
z
Channel List
Flags ATV
1.
x
x
2.
3.
x
x
x
x
x
Favourite
1. Pre ss ▼ / ▲ to s ele ct Prog ram E dit i n SETUP menu.
2. Pre ss ◄ / ► to e nte r into th e sub m enu , a chann el li st wi ll disp lay.
3. Pre ss ▼ / ▲ to s ele ct the ch ann el in t he list w hic h you w ould li ke to s ort .
4. Pre ss ► to p erf orm you r sel ect ion.
5. Pre ss ▼ / ▲ to s ele ct the lo cat ion y ou woul d lik e to pl ace the c han nel .
6. Pre ss ◄ to p erf orm you s ele cti on.
7 . Pres s LCD -ME NU to ret urn t o the p revio us me nu or p ress EX IT to exi t.
Skip
4.
5.
6.
7.
8.
Lock
Move
16
Page 21

OSD MANUAL
VGA input
SETUP menu of VGA input (for setting the PC picture position):
PC Position
Auto Sync
Phase
Clock
H Position
V Position
Position Reset
Select Adjust
HDMI input
SETUP menu of HDMI input (for setting the HDMI picture position):
Begin
51
50
50
50
H Position
V Position
Position Reset
HDMI Position
50
50
Select Adjust
17
Page 22
OSD MANUAL
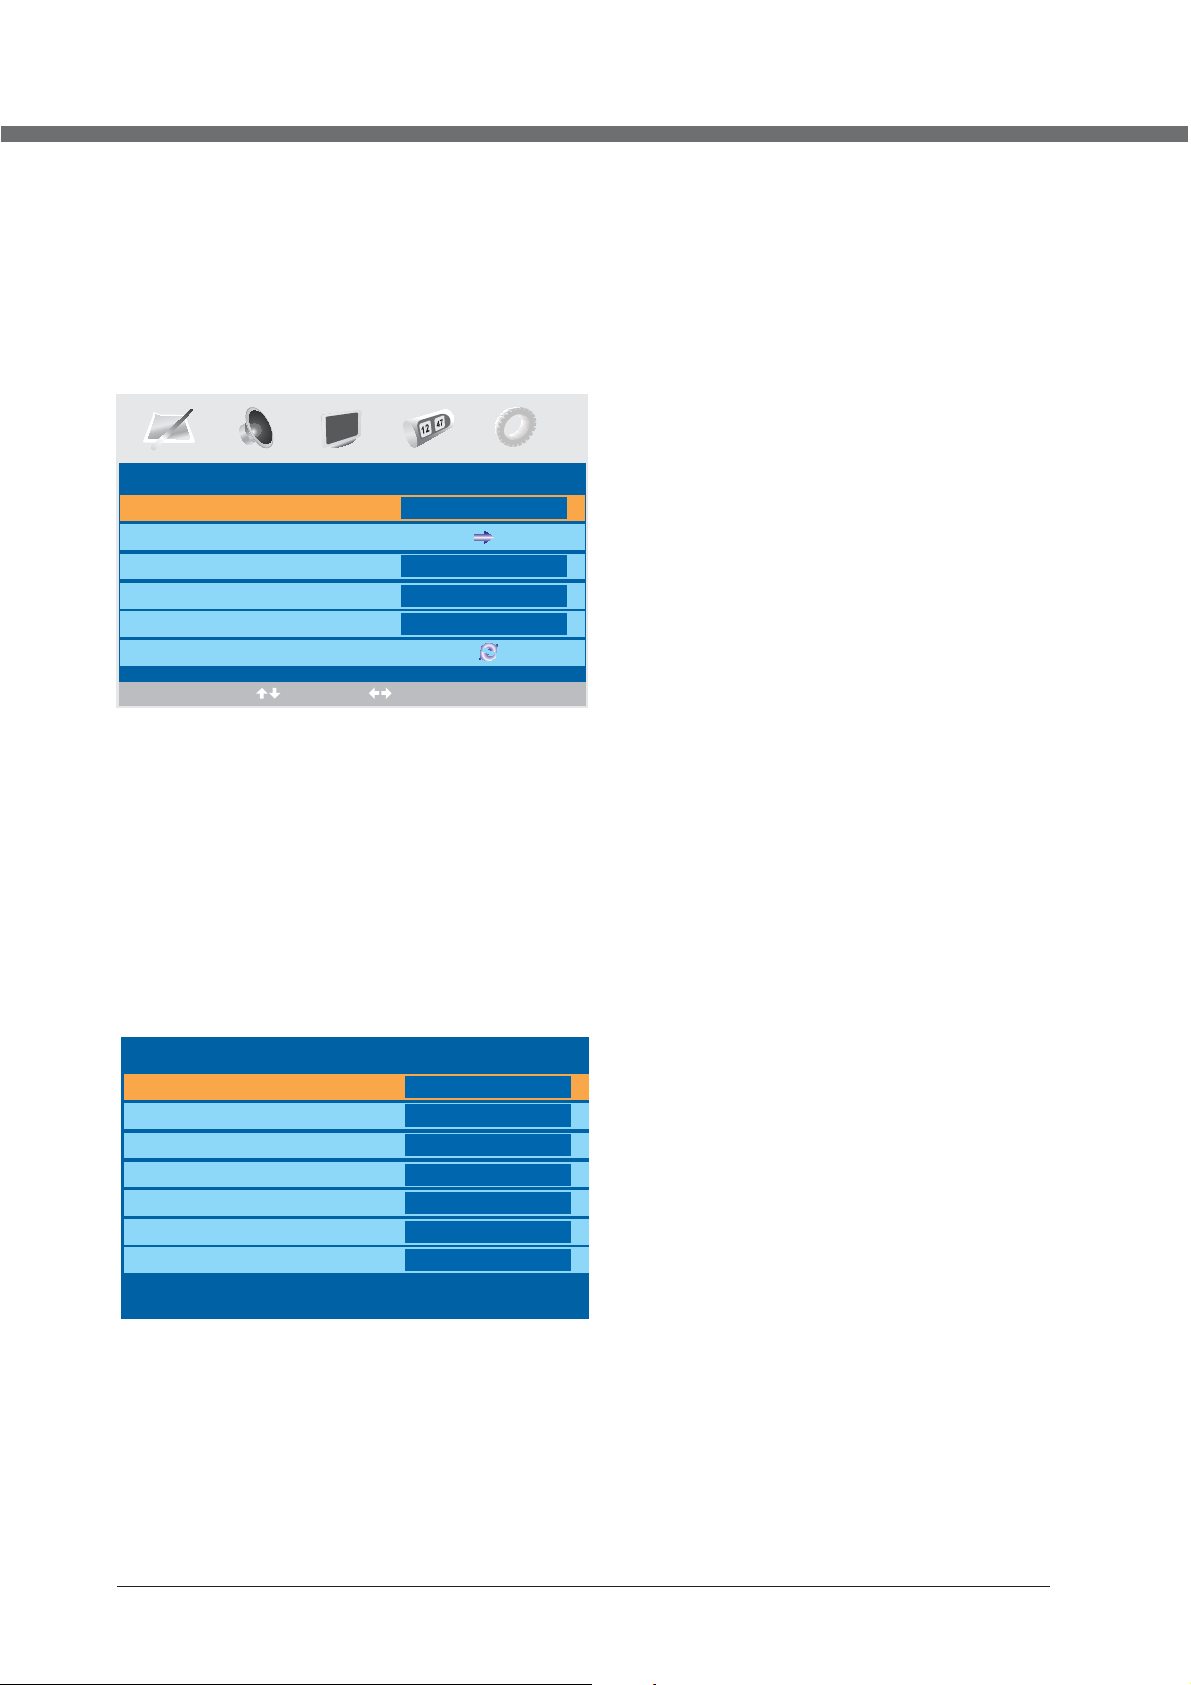
Timer menu options
Pres s MEN U but ton on th e fro nt pa nel or LC D-M ENU o n the remote c ont rol to displ ay th e mai n menu.
Sleep Timer
OSD Timer
TIMER
0 Min.
30Sec
Select Adjust
1. Pre ss th e ◄ / ► but ton to se lec t TI MER i n the
main m enu .
2. Pre ss th e ▼ / ▲ but ton to se lec t you r option
what y ou wa nt to a djust in the TIM ER me nu.
3. Pre ss th e ◄ / ► but ton to ad jus t.
4. Whe n you a re sa tisfied wi th yo ur ad justm ent , pre ss the LCD-MENU button to return to the previous menu
or press the EXIT button to exit the main menu.
Sleep Timer
Sele ct th e sle ep time t o put a uto matic all y the TV in s tan dby mod e. Tim er ca n be sele cte d as 0m in, 15min, 3 0mi n,4 5min,
60mi n,7 5mi n,90m in, 105 min,1 20m in. Al so you can sel ect t he sl eep tim e by pr ess ing SLE EP bu tto n repea ted ly.
OSD Timer
You ca n sel ect the time w hen t he OSD displ ay on t he sc reen su ch as : 5Se c,10S ec, 15S ec,20 Sec ,25 Sec,3 0Se c.
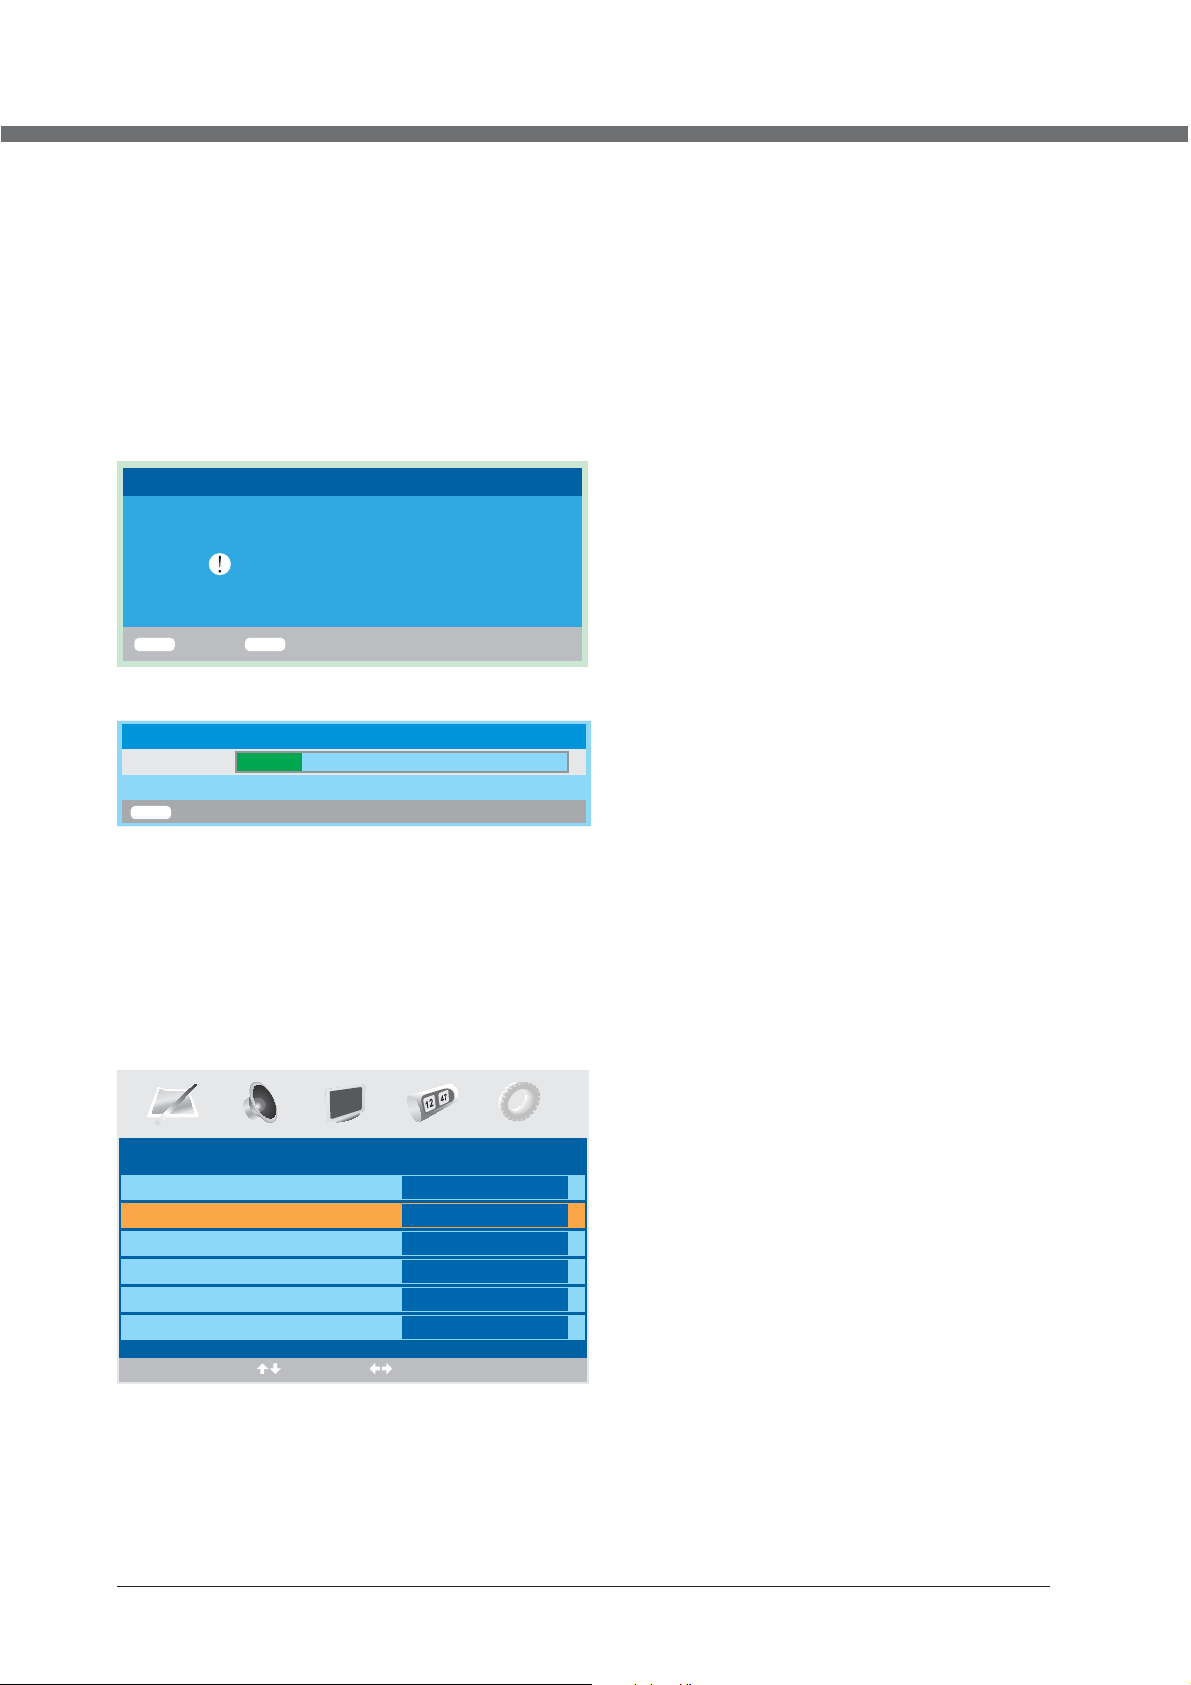
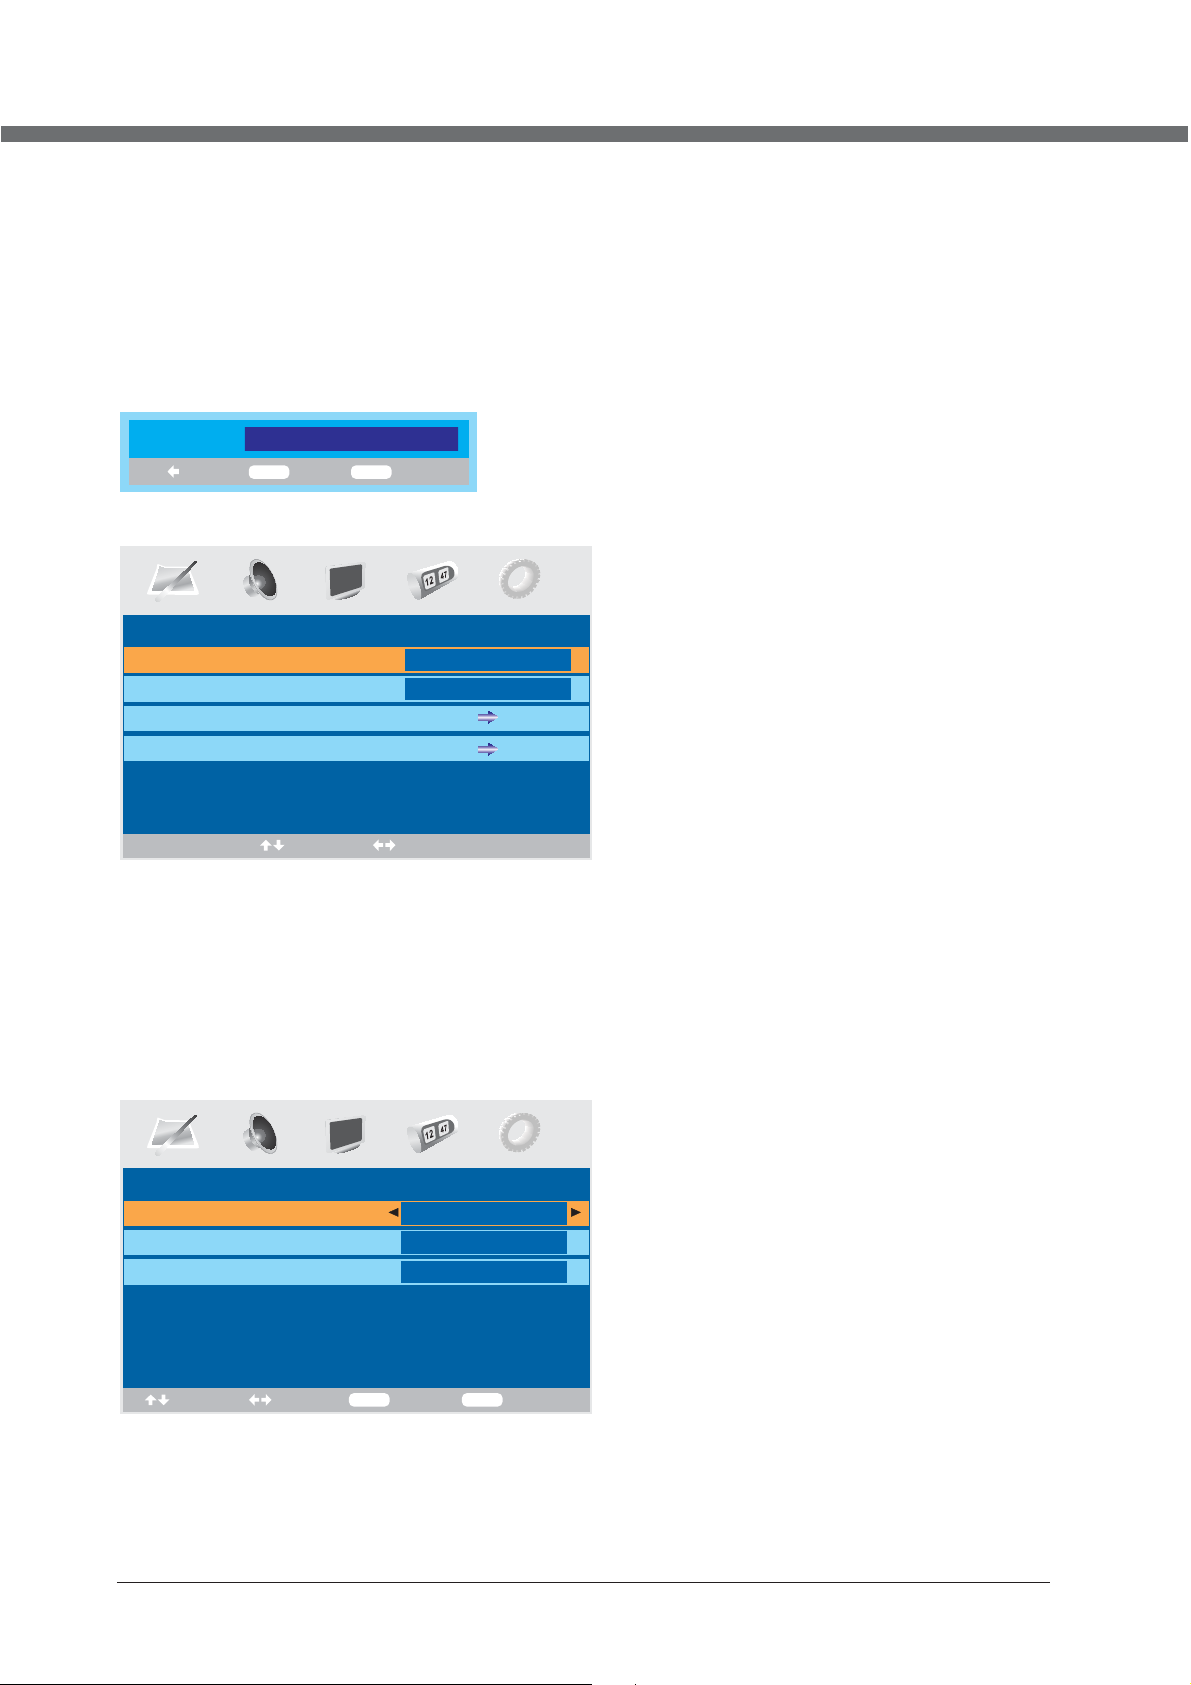
Function menu options
Pres s MEN U but ton on th e fro nt pa nel or LC D-M ENU o n the remote c ont rol to displ ay th e mai n menu.
FUNCTION
Language
Vide o Size
Blue screen
Child Lock
Firs t Time I nst allat ion
Reset
Select Adjust
1. Pre ss th e ◄ / ► but ton to se lec t FUN CTION i n the m ain m enu .
2. Pre ss th e ▼ / ▲ but ton to se lec t you r option wha t you w ant t o adjus t in th e FUN CTION m enu .
3. Pre ss th e ◄ / ► but ton to ad jus t.
4. Whe n you a re sa tisfied wi th yo ur ad justm ent , pre ss the LCD-M ENU b utt on to ret urn t o the p revio us me nu or p res s the
EXIT b utt on to e xit the m ain m enu .
English
FullScreen
On
Language
Pres s ◄ / ► to se lec t the OSD l ang uag e.
Video Size
This o pti on al lows yo u to se lec t the scr een d isp lay mode whi ch be st co rresp ond s to yo ur view ing r equ ireme nts .
Note : The a vai lable a spe ct mo de may be d iff ere nt in dif fer ent i nput si gna l.
18
Page 23
OSD MANUAL
Blue screen
This o pti on al lows yo u to se lec t the blu e bac kgr ound on or off. If o n, th e scr een backgr oun d will turn bl ue at v ery
weak o r no si gna l condi tio n.
Child Lock
Press ENTER or ► button to set the child lock.
You need to en ter the PIN c ode if the Ch ild lo ck is set “on ”, an d the defau lt PIN c ode is empt y, you can pr ess
ENTER button directly to enter.
PIN Code:
Delete
0~9
TIPS: The superuser's (administrator's) password is 4711.
Child Lock On
Key Lo ck On
Change PIN Code
Hotel Lock
ENTER
Input
CHILD LOCK
Enter
Select Adjust
Child Lock
Press E NTER or ► but ton to set th e child loc k.
Key Lock
Press E NTER or ► but ton to set th e key lock.
Change PIN Code
Press ► b utton to en ter Chang e PIN Code me nu.
Chan ge PI N Cod e
Old PI N Cod e
New PI N Cod e
Enter Again
Select
Adjust
0~9
Input
ENTER
Confirm
Old PI N Code
Press 0 ~9 button s to enter th e corr ect old PIN c ode, you ca n not chang e the PIN cod e if you ente red a wr ong
PIN code.
19
Page 24
OSD MANUAL
New PI N Code
Press 0 ~9 button s to enter th e new PIN cod e you wa nt.
Chan ge PIN Code
Press 0 ~9 button s to enter th e PIN code yo u ente red in the Ne w PIN Code me nu again to c onfirm th e new
PIN code.
Hotel Lock
Press
► butto n to enter Hotel Lock menu.
LOCK SETTING
Hotel Lock On
Source Lock
Default Source
Default Prog
Max Volume
Clear Lock
OFF
1
100
Select Adjust
1. Press the
2. Press the
ź / Ÿ
button to select your option what you want to adjust in the LOCK SETTING menu.
Ż / Ź
button to adjust.
3. When you are satisfied with your adjustment, press the LCD-MENU button to return to the previous menu or press
the EXIT button to exit the main menu.
Hotel Lock
Press
Ż / Ź
to select On or Off of Hotel Lock
.
Source Lock
Press
Ź
button to enter Source Lock menu.
Source Lock
TV
SCART
CVBS
S-VIDEO
VGA
HDMI
DVD
Off
Off
Off
Off
Off
Off
Off
Press the
Press
ź / Ÿ
button to select your option what you want to adjust in the Source Lock menu.
Ż / Ź
to select On or Off of the Source.
When you are satisfied with your adjustment, press the LCD-MENU button to return to the previous menu or press the
EXIT button to exit the main menu.
20
Page 25

OSD MANUAL
Default Source
Press
Ż / Ź
to select the default source from TV, SCART, CVBS, S-VIDEO, VGA, HDMI or DVD.
Default Prog
Press
Ż / Ź
to select the default program in Hotel mode.
Max Volume
Ż / Ź
Press
Clear Lock
Press
First Time Installation
Press
to adjust the max volume in Hotel mode.
Ż / Ź
to clear the lock settings in Hotel mode.
► butto n to open the first time installation menu, and the operation of this menu is in page 11.
Reset
Press E NTER or
► button to reset the TV to the factory default.
21
Page 26

TELETEXT FUNCTION
TELETEXT FUNCTION
Most TV stations provide cost-free teletext information, including the latest news, weather
information, TV program list and stock information etc. You just input the needed teletext
page according to the teletext content.
TELETEXT MODES DISPLAY
• Select the channel with teletext signal;
• Press TEXT button to activate teletext mode;
• Select desired teletext page using colour link buttons;
• Press TEXT again to activate mixed mode, while channel picture and teletext information are presented on
the screen at the same time;
• Press TEXT button once again to disable teletext mode.
PAGE SELECTION
• You can input 3 digital numbers to enter the page you want to watch through number buttons. If the
inputted number is invalid, you need to input correct 3 digital numbers again after you finished inputting
these 3 digital numbers.
• You can select to turn pages forward or backward through button.
LOCK
• You can press HOLD button to lock teletext page. Press this button again to cancel locking.
INDEX
• Pressing INDEX button to display content page.
• Enter a certain teletext page through inputting number buttons.
ZOOM IN TELETEXT
• When teletext page shows, you may double zoom in to display this teletext page;
• Press SIZE button to zoom in the upper half part of teletext page;
• Press SIZE button again to enter the under half part of teletext page;
• Press this button once more to return to original display mode.
DISPLAY MODE
• Press REVEAL button to display the hidden teletext information.
• Press this button again to cancel.
COLORIZED BUTTONS (RED, GREEN, YELLOW, BLUE)
• Select the corresponding teletext page through colorized buttons.
22
Page 27

DVD
Page 28

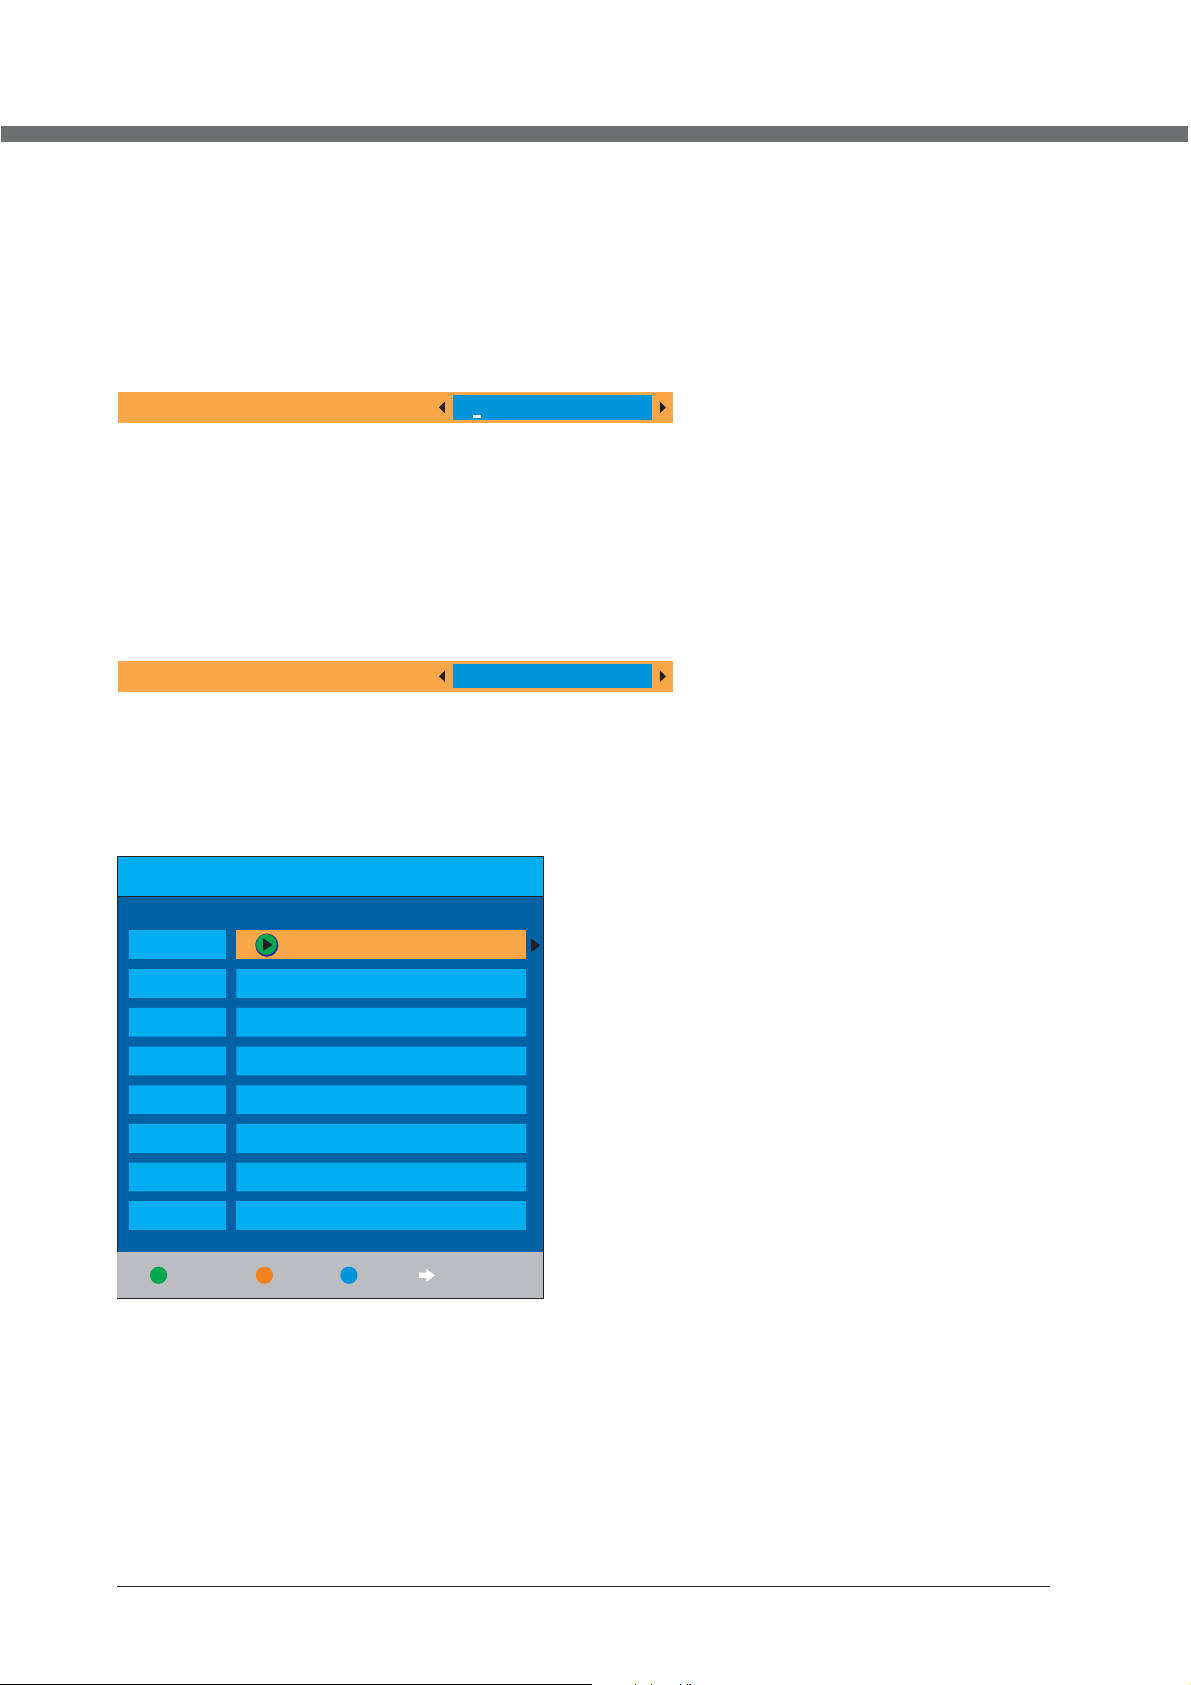
DVD OPERATION
Basic operation
1. Turn O N and OFF the D VD functi on
- Turn on th e LCD TV and t hen pr ess INPUT button on RC. Use the buttons
confirm this with ENTER button.
2. Inse rt Disc to DV D
- Inser t the Disc to t he Disc slo t (printe d side of the d isc has to face towards front of the unit), the player
will lo ad the disc a utomati cally.T here w ill have an o n screen in dication “CLOSE” then “READ”. After
loadi ng the disc c ontent, i t will swit ch to play mo de automa tically. If the disc is already placed inside,
the disc will be read automatically.
NOTE: - For some d iscs, aft er loadin g the conte nt of the dis c, need to pr ess or sele ct from the d isc menu
- Pleas e make sure w hen inser ting the Di sc, the pri nted side o f the disc sh ould b e fac ing yo u Whe n
inser ting the Di sc incorr ectly, yo u may damag e the DVD mec hani sm.
3. Play t he DVD
4. Menu playback (for DVD/ super VCD and VCD 2.0 discs)
to start.
- According to the disc content, the disc menu will display for your select ion. When p laying th e disc , you
may use b utton to to ggle betw een Play an d Pause mod e. Th is produc t also supp orts Menu , Title,
Sequential and Program playback.
- Press
For DVD d iscs, the s creen wil l display t he DVD Disc M enu (Root M enu)
For Sup er VCD & VCD2 .0 discs, t he screen w ill display the Super VCD, VCD2.0 Disc Menu (PBC: [OFF])
(Pres s the MENU bu tton to dis play the PB C status) .
Playb ack the Sup er VCD & VCD2 .0 discs, t he defaul t PBC statu s is ON.
- For DVD discs, use the navigation buttons to select and Play the highlighted contents; For Super VCD &
VCD2. 0 discs, us e the numer ic button s to play you r favorit e content directly.
NOTE: PBC sho uld be OFF.
- Press E NTER or but ton to star t from the hi ghlight ed conten t.
- Return to the Root Menu when playing the disc
For DVD d iscs, pre ss MENU to di splay the D isc Menu.
For Sup er VCD & VCD2 .0 discs, w hen PBC is ON , press MEN U to display the Disc Menu.
- STOP
Press b utton onc e to stop. Pr ess butto n to resume f rom where y ou stoppe d.
Press b utton Twi ce to stop. P ress butt on to start f rom beginning.
In order to protect the disc, press but ton then press EJECT button to take the disc out. When the
disc is e jected, h old the dis c edge slig htly and ta ke it from th e eject dir ecti on to p reve nt scratc hes.
When no t using the D VD functi on (in stan d-by mode o r using oth ers modes f or a lon g time), please take
out the disc to protect the DVD loader and the disc.
D.MENU button
▲ / ▼
select DVD mode and
5. Tit le playba ck (for DVD d isc only)
- Press TITLE bu tton, the re will hav e an on scree n indicat ion “TITLE”.
- Press t he direct ion or nume ric butto ns to selec t your favo rite title.
- Then w ill play fr om the firs t chap ter of the se lected ti tle.
6. Sequ ential pl ayback (f or DVD/ Sup er VCD/ VCD / CD/ CD-G/ HD-CD and M p3/ JPEG di scs)
- For Su per V CD & VC D discs , if PB C is “O N” stat us, p res s butto n wil l ent er the di sc me nu. P ress MENU butt on to
turn P BC OF F. Pres s butto n to st art in seque nt. F or others, w hil e it stopped , pre ss button to s tar t in sequent .
7. Prog ram playb ack (for DV D/ Super VC D/ VCD/ CD/ C D-G/HD- CD and Mp3/ J PEG discs )
- Press PROG button.
- Usin g Pro gra m playb ack , you c an sele ct ma x. 16 t racks f rom t he di sc to pla yba ck in p rogra mme d ord er.
- OSD fo r pro gra m playb ack a s bel ow.
24
Page 29
DVD OPERATION
DVD/ M P3/ JPE G discs S uper VCD/ VCD/ CD /CD-G/ D-CD discs
PROG
T C T C T C T C
1--:-- 5--:-- 9--:-- 13--:--
2--:-- 6--:-- 10--:-- 14--:--
3--:-- 7--:-- 11--:-- 15--:--
4--:-- 8--:-- 12--:-- 16--:--
PLAY CLEA R
- If it is in PBC ON status, using program playback will turn to PBC OFF automatically.
- According to the highlight area input the title and chapter number by numeric buttons, press but ton t o start ; or mo ve
to the < PLAY> by navigation buttons, press ENTER butt on to s tart.
- While playing the program, you may press PROGRAM button to display the program menu for edit. To clear the program
by moving to <CLEAR> and press ENTER butto n. Or press b utton t o end t he program. When press but ton again,
the disc will play by sequent.
- While playing the program, there will have an on screen indication “PRG PLAY” and the current title and chapter number.
PROG
----- 5----- 9----- 13-----
1
2----- 6----- 10----- 14-----
3----- 7----- 11----- 15-----
4----- 8----- 12----- 16-----
PLAY CLEA R
Supporting DVD format
This products can play the following format of DVD disc.
Disc Type
DVD 12cm
Disc Size (Diameter) Recorded Time
Single side:120mins. Approx
Double side:240mins. Approx
Recorded Content Remarks
DVD format:
Compressed digital
audio and video
Super VCD
VCD
CD
HD-CD
MP3/JPEG
Also support DVD-R, CD-R, CD-RW playback.
NOTE:
12cm
12cm
12cm
12cm
12cm
MPEG2
45mins. Approx
74mins. Approx
74mins. Approx CD-DA: Digital audio
74mins. Approx
600mins. Approx
Compressed digital
audio and video
MPEG1
Compressed digital
audio and video
HD-DA: Digital audio
Digital audio
Include SVCD
Include:
VCD2.0/ VCD1.1
VCD1.0/ DVCD
25
Page 30

DVD OPERATION
DVD Functions operating instructions
1. Play ( for DVD/ Su per VCD/ VC D/ CD/ CD-G /HD-CD an d Mp3/ JPEG discs)
- For DV D dis c, press but ton f rom root or ti tle m enu; while playing the DVD, you may play your favorite title directly with
titl e sel ection by pr ess ing the TITLE button.
- For Su per V CD & VCD discs , whi le pl aying the disc, you may play your favorite tracks by numeric buttons.
(NOT E: Wh en us ing the P rog ram playba ck or w hen it is P CB ON s tat us, you c an on ly us e or butt ons t o
chan ge th e tra ck)
- For CD , CD- G & HD-CD disc s, wh ile p layin g the d isc , you may p lay your favorite tracks by numeric buttons.
- For MP 3 / JPE G disc, you ma y pla y your favorite tracks by numeric buttons from the content menu.
- If input track number is not valid, it will not function.
NOTE: From track 1-10, use numeric buttons directly; For tracks over 10, press - / -- button first. (E.g. Track 15,
press -/--, then 5 )
2. Previous/Next (for DVD/ Super VCD/ VCD/ CD/ CD-G/HD-CD and Mp3/ JPEG disc s)
- Whil e pla yin g the dis c;
Pres s but ton to play to t he la st Title / Chap ter / t rack.
Pres s but ton to play to t he ne xt Title / Chapter / tra ck
- For su per V CD & VCD discs , in PB C OFF status ;
If the current track is the first one, press bu tto n will stop th e pla yback.
If the c urr ent track is t he la st one, pres s but ton will sto p the p layback.
- For DV D dis cs, the abov e fun ctions may v ary d ue to different DVD d isc 's structu re.
3. Forw ard/ Back ward (for D VD/ Super V CD/ VCD/ CD / CD-G/HD -CD and Mp3/ JPEG discs)
- While playing the disc, you may use forward or backward function.
- There are 4 speeds for forward. Press butto n to to ggl e betwe en di ff ere nt speeds in s equent. (FORWARDx2 /
FORWA RDx 4 / FORWARDx8 / F ORWA RDx20 / Play ).
While in backward, you may press to re sum e normal spe ed.
For CD , HD- CD, MP3, bac kwa rd also has au dio o utp ut.
For DV D dis cs, if backw ard t o first titl e / chapter, it w ill start fr om th e beginning.
For Su per V CD & VCD discs , in PB C ON status, i f bac kward to the f irs t track, it wi ll start from the beginning.
NOTE: Durin g For war d or Back war d, th e sound w ill b e off.
4. Slow m otion(f or DVD/ Sup er VCD/ VCD discs)
- Whil e pla yin g the dis c, yo u may u se slow m oti on fu nctio n.
Ther e are 6 s pee ds for sl ow mo tio n. Pres s but ton to toggle between different speeds in sequent. (SF1/2, SF1/3,
SF1/ 4, SF 1/5, SF1/6 , SF1 /7, Play).
Whil e in sl ow mo tion, y ou ma y pre ss to res ume n ormal spee d.
NOTE: Duri ng Sl ow mo tion, t he so und w ill be off.
5. Paus e (for DVD/ S uper VCD/ V CD/ CD/ CD- G/HD-CD a nd Mp3/ JPE G discs)
- FOR CD , CD- G, HD-CD & MP3 /JP EG discs, pr ess b utton to pau se; p ress butto n to re sume.
- FOR DV D, Su per VCD, VCD d isc s, press but ton t o pause; pre ss bu tton to play bac k frame by fra me; p ress bu tto n
to res ume .
6. Repe at (for DVD / Super VCD / VCD/ CD/ CD -G/HD-C D and Mp3/ JP EG discs)
- Press REPEAT button onc e to di splay the cu rre nt repeat mo de.
For Super VCD, VCD, CD, CD-G, HD-CD, discs, while playing in sequent, you m ay us e the repeat p lay back.
Ther e are 2 r epe at mode s, pr ess REPEAT to tog gle bet wee n diffe rent modes in sequent. (REPEAT (OFF)/ REPEAT (1)
/REPEAT (ALL)).
For DV D dis cs, you may se tup t he repeat pl ayb ack mode. There are 2 r epe at modes, pr ess R EPEAT to toggle between
different m ode s in sequent . (RE P: (OFF) / REP : (CH APTER ) / REP : (TITLE) / REP: ( ALL)) .
For MP 3 / JPE G discs, whi le pl aying the di sc, y ou may use the r epeat playback. There are 3 rep eat mod es, p res s
REPEAT to tog gle b etw een differen t mod es in sequen t. (R EPEAT (OFF ) / REPEAT (1) / REPEAT (DIR) / REPEAT (AL L)) .
7. Disp lay (for DV D/ Super VC D/ VCD/ CD/ C D-G/HD- CD and Mp3/ J PEG discs )
- Press
D.DISP button to activate the on screen roll-down menu for the current Titl e, Ch apt er, time a nd ot her i nform ati on
26
Page 31

DVD OPERATION
For DVD discs, (2 pages), Press D.DISP butt on on ce to d isplay fir st pa ge as shown be low :
Disc Type Chapter - /-(Current/Full) E lapsed disc time
0 / 3 C H 1 / 2 00:05:45
DVD
Press button again to display second pages shown below:D.DISP
Audio Language Audio Type Angle ON/OFF
TT
Til tl e -/- (Current/ Full)
1 / 2 E N G 1 CH 1 /1 E N G O F F
-/- (Current/ Full) or OFF Subtit le - /-(Current/Full)or OFF
For Super VCD discs, (2 pages),Press button once to display first p age: Di sc ty pe, Tr ack -/- ( Cur ren t / Full),
Mute status, PBC status, Repeat mode status, Current track time. Pre ss D.DISP button again to display second page:
Audio-/--(Current/Full) or OFF, Audio type, Language, Subtitle-/-(Current/Full) or OFF. Press D.DISP bu tton ag ain t o
turn off the on screen display.
For CD , CD- G, HD-CD, MP 3 / JPE G discs, Press button once to display first page: Disc type, Track -/- (Current
/ Full), Mute status, Repeat mode status, Current track time.
- Press button again to turn off the on screen display.D.DISP
D.DISP
D.DISP
8. Goto (for DVD/ Super VCD/ VCD/ CD/ CD-G/HD-CD and Mp3/ JPEG discs)
- This function allows you to play your favorite Title / Chapter / track. P ress GOTO button to activate the on screen scroll down m enu f or edit. According to the highlighted area, input your favorite Title / chapter / Track number by numeric buttons
or input the playback time. After editing, press ENTER to s tar t. If the input is invalid, it will not function.
NOTE: While editing, the GOTO button is not function.
- If it is in PBC ON status, this function will switch it to OFF.
9. AUDIO (for DVD/ Super VCD/ VCD/ CD/ CD-G/HD-CD and Mp3/ JPEG discs)
- Press AUDIO button once to display current audio mode.
- Press again to toggle between different audio modes in sequent.
For Su per V CD & VC D discs: (Stereo - L - R - Aut o L - Auto R)
For CD, CD-G, HD-CD, MP3 discs: (Stereo - L - R)
Note: Switching to Auto L / R audio channel may be varied due to different discs contents. Bilingual VCD discs can use
AUDIO button to switch between different languages.
10. Language and (for DVD Super VCD discs)
- Press AUDIO button once to display current language.
- Press again to toggle between different languages mode in sequent.
NOTE: For Multi-languages DVD & Super VCD discs, press AUDIO button to select your favorite language.
27
Page 32

DVD OPERATION
11. Sub title and (for DVD Super VCD discs)
- Press SUBTITLE button once t o dis play curre nt su b-title.
- Pres s aga in to t oggle b etw een d ifferent sub tit le modes in se quent.
NOTE: For Mul ti- language s sub tit le DVD & Su per V CD di scs, pr ess SUBTITLE button to select your favorite subtitle
lang uag e.
12. Angle (for DV D disc)
- Pres s ANGLE butt on on ce to dis pla y cur rent pl ayb ack a ngle.
- Press again to toggle between different playback angle codes in se quent. (E. g. Ang le -/- (Curr ent /Full) or OF F)
NOTE: Only fo r DVD w ith multi- ang le, p ress ANG LE bu tto n to sele ct yo ur favorite playback angle. Selectable playback
angl e dep ends on the av ail ability of t he DV D contents.
13. Mut e (for DVD/ S uper VCD/ V CD/ CD/ CD- G/HD-CD a nd Mp3/ JPE G discs)
- Pres s MUTE butt on to mute the a udi o output. There wil l hav e an on screen symbol indicate “MUTE”.
- Press again to cancel, or Press VOL + to ca ncel an d adj ust t he volu me.
- In cas e the re is no audio o utp ut, t ry to pre ss MU TE button to c anc el mu te.
14. ZOO M / a nd (for DV D/ Super VC D/ VCD Mp3 JPEG discs)
- Pres s ZOO M button to zo om in t he picture .
- There are 6 zoo m mod es, press ZO OM bu tton to togg le be tween differ ent z oom m odes in sequ ent . (Zoom2 - Zoo m3 Zoom 4 - Zoo m1/2 - Zoom1 /3 - Zo om1/4 - Zoom O FF)
- In Zoo m2- 4, you may use t he na vig ation b utt ons t o pan the p icture for your favorite portion.
15. Rep eat A- B (for DVD / Super VCD / VCD/ CD/ CD -G/HD-C D and Mp3/ JP EG discsB )
- In normal Playback, fast forward or fast reverse, press A-B but ton a t whe re you wa nt to s tar t the rep eat p ort ion. There wil l
have a n on sc ree n indic ati on “R EPEAT A “.
- In normal Playback, fast forward or fast reverse, press A-B but ton a gai n at wher e you w ant t o stop th e rep eat p ortio n.
There will have an on screen indication “REPEAT A B“.
- The repeat function started to playback the portion from A to B au tomatically.
- Pres s A-B bu tto n again t o can cel . Th ere will hav e an on s creen indi cat ion “ A B CANCEL”.
For Su per V CD, VCD & CD dis cs, r epeat A-B is on ly fu nction wit hin t he sa me trac k. Wh en pl aying t he ot her s, repe at
A-B will cancel automatically.
For Su per D VD di scs, re pea t A-B is o nly fun cti on wi thin th e sam e Titl e /Chap ter. W hen p layin g the o the rs, rep eat
A-B will cancel automatically.
16. Vol ume (for DV D/ Super VC D/ VCD/ CD/ C D-G/HD- CD and M p3/ J PEG di scs)
- Pres s - VOL / VOL + bu tto ns to adj ust t he ou tput vo lum e.
NOTE: Playback DVD discs in original code, is not adjustable
MP3/JPEG Playback
Afte r loa din g the MP3 / J PEG d isc, it wil st art t o scan for the s tor ed MP3 /JPEG f old ers. Th en will firs tly d isplay the M P3
cont ent s aut omati cal ly an d start t o pla y the f irst fi le (h igh light ed fi le) . Scree n as fo llo w:
Display current
MP3 playback
function
MP3 MP3
01 M P 3
PICTURE
01
02
03
04
05
06
07
08
09
10
Highlight file for
current playback.
Display current
MP3 playback
function
Buttons for switching
between MP3 and JPEG
playback function.
01 PICTURE
JPG
01
02
03
04
05
06
07
08
09
10
Scr ol l ba r to v ie w
next page.
28
Page 33

DVD OPERATION
P
G
D
E
M
T
- Using the navigation buttons to check you favorite folder and playback the first file or move to the your
favorite file.
NOTE:
- Press ◄ ► buttons to move the highlight to folders, documents or mode selection.
- Press numeric buttons to select the contents directly. For number over 10, press 0 button first. (e.g. File
number 15, press 0 then 5.)
- When playback MP3 files, there is no picture display, only audio output.
- Playing the JPEG discs, press PROGRAM button to select slide effects. There are 17 slide modes, press
PROGRAM button to toggle between different modes in sequent. (Start from top Star t from b ottom Sta rt
from left Start from right Start from upper left corner Start from upper right corner Merge fr om left / right
Horizontal blades Vertical blades Merge form 4 corners Random Playback Slide effect OFF).
- When play or pause with picture playback, you may use navigation butoons to flip / ro tate the picture.
▲ button to flip horizontally.
▼ button to flip vertically.
◄ button t o rotate le ft 90˚.
► button to rotate right 90˚.
- When play or pause with picture playback, you may use D.MENU button to enter preview mode to dislay
12 pictures. Press / butto n to select next / previous page or press numeric buttons to view the
corresponding pictures.
- The maximum JPEG image size that can be displayed is 1280 x 1024.
Function Settings
DVD Function General setup
SYSTEM SET UP
TTVV SSYYSSTTEEM
TTVV TTYYPPE
PPAASSSS WWOORRD
RRAATTIINNG
DDEEFFAAUULLT
EEXXIITT SSEETTUUP
NOTE: In Setup mode, the following functions will be cancel or pause :
TITLE, SUB-TITLE, DISPLAY, PLAY, SETUP, STOP, SLOW / STEP, NICAM / AUD IO, FF, FR, PRE V,
NEXT, GOTO, ZOOM, ANGLE, PROGRAM, PREVIEW, REPEAT, REPEAT A-B.
- Press DVD SETUP button to activate the DVD player
OSD menu;
- Press ◄ / ► button to move and highlight between
different sub-menu. Press ▲ / ▼ EN TER butto n to
enter the highlighted sub-menu.
- Press SETUP button to exit the OSD menu, or
DVD
move the highlight to EXIT SETUP then press ENTER
button to exit.
29
Page 34

DVD OPERATION
System Setup
SYSTEM S ET UP
TV SYSTEM
TV TY PE
PASS W OR D
RATI NG
DEFAULT
EXIT SE TU P
NTSC
PAL
AUTO
NOTE: PAL format is generally used for TVs.
Check your TV user guide for
supported formats.If NTSC is selected
with a non-compatible television you
may experience interference or picture
scrolling.
TV Type
DVDs are produced in a variety of screen aspect ratios. This menu enables you to select one of the three aspect ratios:
SYSTEM S ET UP
TV SYSTEM
TV TY PE
PASS W OR D
RATI NG
DEFAULT
EXIT SE TU P
4:3PS
4:3LB
16:9
4:3 PS (Normal)
4:3 LB (Normal)
16:9 (Wide)
- Select the most appropriate aspect
ratio for the DVD being viewed.
4:3PS (Normal)
Normal Pan and Scan is used for most normal television broadcasts and
it is the default setting. It has an aspect ration of 4:3. If you select this setting
when viewing a DV D the picture will fill the screen but, you will not see the
left and right edges of the picture.
4:3LB (Normal)
Normal Letter Box will show the DVD in its original aspect ratio so depending
on the size of your television screen, you may see black borders above and
below the picture.
16:9 ( Wid e)
Choose this setting if you have a widescreen television.
NOTE:
- Playback screen size may vary according to the discs contents.
- For discs with 4:3 contents, using any mode would only display a 4:3 screen
- Screen ratio selection should be according to the connected TV / Display
aspect ratio.
30
Page 35

DVD OPERATION
PassWord
- The default setting is locked. No Rating selection or change password could be done. To edit the Rating setting, please
ente r def aul t password “0000” by numeric buttons, then press ENTER button to confirm.
- To change password, input any 4 digit number when the lock is unlocked. Once the 4 digit number is entered, that will be
your n ew password.
SYSTEM S ET UP
TV SYSTE M
TV TY PE
PASS W OR D
RATI NG
DEFAULT
EXIT SE TU P
Rating
- Playback for some discs with rating, you can select the rating
setting according to your preference. Rating restriction divid ed in eight different category from KID SAFE to ADULT.
SYSTEM S ET UP
TV SYSTE M
TV TY PE
PASS W OR D
RATI NG
DEFAULT
EXIT SE TU P
SYSTEM S ET UP
TV SYSTE M
TV TY PE
PASS W OR D
RATI NG
DEFAULT
EXIT SE TU P
1 K ID SA FE
2 G
3 P G
4 P G1 3
5 P G R
-
6 R
7 N C 17
-
8 A DU LT
RESTO RE
NOTE: Only editable when password is unlocked.And only
can function when password is locked. It does not,
however, reset either the Password or the Rating
setting.
Default Setting
- Press ENTER button to restore factory default.
31
Page 36

DVD OPERATION
Language Setup
Press SETUP button to enter the DVD OSD menu.
DVD
LANGUA GE S ET UP
- OSD Language
OSD LANG UA GE
AUDIO LA NG
SUBTIT LE L AN G
MENU LAN G
EXIT SE TU P
ENGLIS H
Use navigation buttons to select the OSD LANGUAGE setup
icon, press ENTER button to confirm. There are 7 languages
for your selection, press ▲ & ▼ buttons to toggle between
different languages . Press ENTER button to confirm.
NOTE: If the selected language is not included in you DVD disc
content, it will select the default language of the disc
automatically. The default language setting is ENGLISH.
- Audio Language
Use navigation buttons to select the AUDIO LANG setup icon, press ENTER button to confirm. There are 7 languages for
you selection, press ▲ & ▼ buttons to toggle between different languages. Press ENTER button to confirm.
LANGUA GE S ET UP
OSD LANG UA GE
AUDIO LA NG
SUBTIT LE L AN G
MENU LAN G
EXIT SE TU P
ENGLIS H
NOTE: If the selected language is not included in you DVD
disc content, it will select the default language of the
disc automatically. The default language setting
is ENGLISH.
- Subtitle Language
Use navigation buttons to select the SUBTITLE LANG setup icon, press ENTER button to confirm. There are 7 languages
for you selection, press ▲ & ▼ buttons to toggle between different languages. Press ENTER button to confirm.
LANGUA GE S ET UP
OSD LANG UA GE
AUDIO LA NG
SUBTIT LE L AN G
MENU LAN G
EXIT SE TU P
ENGLIS H
NOTE: If the selected language is not included in you DVD disc content, it will select the default language of the disc
automatically. The default language setting is ENGLISH.
32
Page 37

DVD OPERATION
MENU Language
LANGUA GE S ET UP
OSD LANG UA GE
AUDIO LA NG
SUBTIT LE L AN G
MENU LAN G
EXIT SE TU P
Audio Output
AUDIO OU T
TON E
EXIT SE TU P
AUDIO SE TU P
ENGLIS H
/
OFF
SPDIF
SPDIF/RAW
SPDIF
/
PCM
- Use navigation buttons to select the MENU LANG setup icon,
press ENTER button to confirm. There are 7 languages for you
selection, press ▲ & ▼ buttons to toggle between different
languages. Press button to confirm.ENTER
Audio Setup
- Use navigation buttons to select the AUDIO OUT setup icon,
press ENTER button to confirm.
- Ther e are 3 modes for your selection; use navigation buttons
to select different modes, press ENTER button to confirm.
(SPDIF / OF F SPD IF / original code SPDIF / P CM).
- SPDI F / OFF: Coaxial output off.
- SPDI F / Original code: When connected the coaxial output to your audio amplifier, playing back the discs with Dolby, MPEG
contents, the coaxial output the original signal to your amplif ier. Your Amplifier must have the corresponding decoding
function.
- SPDI F / PCM : Whe n connected with 2 channels digital stereo amplifier, playing back the discs with Dolby, MPEG contents
the coaxial output with 2 channel to your amplifier.
Tone
- Use ▲ & ▼ buttons to adjust the Tone setting.
AUDIO SE TU P
AUDIO OU T
TON E
EXIT SE TU P
#
+ 4
+ 2
+ 0
- 2
- 4
b
33
Page 38

DVD OPERATION
Dolby Digital Setup
Dynamic Range
DIGITAL SETU P
Dual Mono
DYNAMI C RA NG E
DUAL MO NO
EXIT SE TU P
DIGITAL SETU P
DYNAMI C RA NG E
DUAL MO NO
EXIT SE TU P
STEREO
MONO L
MONO R
MIX MONO
FULL
6 8
/
4 8 /
2 8 /
OFF
- When switch the compress mode to “Audio output”, adjust the
compress ratio for different effect. When selected FULL, the
peak signal value is smallest. Whe n selected OFF, the peak
signal value is biggest.
- You can select four different audio output, STEREO, MONO L,
MONO R, MIX MONO. The audio out description of these
Selections is shown in the table below.
MODE L EFT S PEAKER RIGHT S PEAKER
STER EO ST EREO-L STEREO-R
L-MONO L-MO NO L-MONO
R-MONO R-MO NO R-MONO
MIX-MONO L-MO NO+R-MONO L -MONO +R-MONO
34
Page 39

TROUBLESHOOTING
Please check for causes of problems in accordance with the following chart before contacting
any maintenance personnel.
DISPLAY TROUBLESHOOTING
Symptom
Black screen, power
indicator light off
Image display flicker,
unstable
Check whether power cord is well connected, and whether
this unit is power on
Check whether the signal cord of input device is well
connected
Check whether input device is power on
Check whether the input device signal is in this unit's
specification
Check computer output mode: control panel-display-setup
If the setup does not accord with this unit's specification,
please change the display setup
Hor scanning frequency: 30kHz 75kHz
Causes and Correction
SOUND AND TV TROUBLESHOOTING
~
50 Hz 75HzVer scanning frequency:
~
Symptom
Cannot power on
No sound
Volume too low
Snowy picture
Remote control failure
Causes and Correction
Please make sure the well connecting of power cord
Please make sure the well connecting of audio cord
Check volume
Make sure there is nothing plugged in the headphone jack
Check volume
If volume is still too low when adjusting volume to maximum,
please check whether the input device is well set
Input antenna damaged or not well connected
Check whether remote control battery used up
Whether battery installation is correct
Whether obstacles exists between remote control and the
unit's receiving window
Check whether receiving window has strong light
35
Page 40

SPECIFICATIONS
LCD Screen
Video Input
Size
Type
TV
PC-RGB
CVBS
S-VIDEO
SCART
15" : 38 cm / 19" : 48 cm / 22" : 56 cm
TFT colour
Video System
Audio System
Receive Channel
Format
H-Frequency
V-Frequency
1.0 Vp -p +/ - 5%
S-Y 0.714Vp-p +/-5%; S-C 0.286Vp-p +/-5%: :
Full SCART
PAL, SECAM
BG, DK , I, L/ L’
200CH
Up to 1680x1050 @60Hz
30~80KHz
56~75Hz
480i, 480p, 576i, 576p, 720p, 1080i, 1080p
Earphone input terminal
2 RCA terminal(white, red)
DC 12V(+/-0.6V)
Audio Input
Expansion
Function
HDMI
PC-RGB
CVBS/S-VIDEO
Built in DVD Video and Audio input Connector
Input
Power
Low power consumption mode; standby< 1W
Amplifier
Management
2X2.6W (4Ω )
Panel Resolutions 15": 1280 x 800 / 19": 1440 x 900 / 22": 1680 x 1050
STEREO
DVD
Disc type
NICAM / A2
DVD VIDEO / MPEG4 / SVCD / VCD1.0, 1.1, 2.0 version / CD-DA
36
Page 41

SPECIFICATIONS
Terminals
Input
Output
TV/DTV Input
PC-RGB Input
CVBS Input
S-Video Input
SCART
HDMI Input
S-Video/CVBS Audio Input
PC Audio Input
DVD SPDIF Output
Earphone Terminal Output
1 IEC 75
1 D-SUB 15Pin terminal
1 RCA terminal
1 S-Video terminal
1 SCART terminal
1 HDMI terminal
2 RCA terminal
1 earphone terminal
1 terminal
1 earphone terminal
ACCESSORIES
TV set (LCD) - 1 pcs.
User’s manual – 1 copy.
Remote control (RC) – 1 psc.
Packaging box - 1 pcs.
AC Adapter - 1 pcs.
37
Page 42

Page 43

Page 44

8T10000834/ 22
Page 45

LCD-TFT
LCD1521TNDVX
LCD1921TNDVX
LCD1922TNDVX
LCD2221TNDVX
GEBRUIKERSHANDLEIDING (
ZORGVULDIG DOORLEZEN VOOR GEBRUIK
NL
)
Page 46

BELANGRIJKE VEILIGSHEIDSINSTRUCTIES
Dit symbool geeft aan dat dit produkt gevaarlijke voltage heeft wat
een risiko is voor elektrische shock of persoonlijke blessures.
Dit symbool geeft aan dat belangrijke instructies aan het produkt zijn
bijgevoegd.
Gelieve deze handleiding voor het gebruik zorgvuldig door te lezen.
•
Voordat u de AC netsnoer aansluit op de DC adapter uitgang, gelieve ervan zeker te
zijn dat de voltage bestemming van de LCD TV overeenkomt met de lokale elektrische
toevoer. Als u zich niet zeker bent wat betreft de stroom toevoer, vraag dan uw
stroomleverancier.
• Plaats nooit metalen in de openingen van de vloeibare kristalle display LCD
TV/monitor; dit kan het risiko voor elektrische shock veroorzaken.
•
Om elektrische shock te vermijden, raak nooit de binnenkant van de LCD TV/monitor
en adapter aan. Enkel een gekwalificeerde technicus mag de LCD TV/monitor/adapter
openen.
•
Gebruik uw LCD TV/monitor/adapter nooit als het netsnoer beschadigd is. Plaats
geen objekten op het netsnoer, en houd het snoer zo dat niemand erover kan
struikelen.
• Houd de stekker, niet het snoer, vast als u de adapter uit het stopcontact haalt.
•
Openingen in de LCD TV/monitor/adapter zijn geplaatst voor de ventilatie. Om
oververhitting te voorkomen, mag u deze openingen niet blokkeren of bedekken.
Tevens moet u het gebruik van de LCD TV/monitor op een bed, sofa, tapijt of ander
zacht oppervlak vermijden. Dit kan namelijk de ventilatie openingen aan de onderkant
blokkeren. Als u de LCD TV/monitor in een boekenkast of een andere gesloten plek
plaatst, moet u wel voor goede ventilatie zorgen.
•
Stel de LCD TV/monitor niet bloot aan extreme temperatuur condities of aan extreem
vochtige condities.
• Het apparaat mag niet blootgesteld worden aan druppels of spatters en er mogen
geen objekten gevuld met vloeistoffen, zoals vazen, op het apparaat geplaatst
worden.
Page 47

BELANGRIJKE VEILIGSHEIDSINSTRUCTIES
•
Plaats de LCD TV/monitor niet op een instabiele wagen, stand, driepoot, plankdrager,
tafel of bodem waar het kan vallen. Indien het valt, een slag krijgt of gekrast wordt, is
het beschadigd. Maak de voorkant niet schoon met keton-type materialen (zoals
aceton), ethyl alcohol, toluene, ethyl lacid, methyl of chloride-these, deze kunnen het
paneel beschadigen.
• Plaats uw DC adapter in de buurt van de AC uitgang.
• Als uw LCD TV/monitor niet normaal functioneert, als er ongewoonlijke geluiden of
geuren ontstaan, haal dan direkt de stekker uit het stopcontact en neem contact op
met een geautoriseerde verkoper of uw service center.
•
Hoge temperaturen kunnen problemen veroorzaken. Gebruik uw LCD TV/monitor niet
in direkt zonlicht, houd het weg van verwarmingen, ovens, open haarden en andere
warmtebronnen.
• Haal de DC adapter eruit als het apparaat voor een langere periode niet gebruikt gaat
worden.
•
Om het risiko op brand of elektrische shock te vermijden, en stroomstoringen te
vermijden, raden wij u aan enkel de aanbevolen accessoires te gebruiken.
•
Probeer niet zelf de LCD TV/monitor te repareren als deze kapot is. Neem contact op
met gekwalificeerd personeel.
• Haal uw DC adapter uit de AC uitgang voordat u het laat repareren.
•
Wees er zeker van de service expert geautoriseerde vervangende onderdelen, of
evenredig, gebruikt. Niet geautoriseerde onderdelen kunnen brand, elektrische shock
en andere gevaren veroorzaken.
• Na elke vorm van service of reparatie, moet u controleren dat de service expert
veiligheidscontroles uitvoert om te bevestigen dat uw TFT-LCD TV/monitor weer veilig
gebruikt kan worden.
• Het apparaat met CLASS 1 constructie wordt aangesloten op een MAINS stopcontact
met een beschermende aardverbinding.
Page 48

PANEEL KNOPPEN FUNCTIES
INHOUD
Voorkant paneel
1
Lokaal toetsenbord paneel
1
EXTERN MATERIAAL
Diagram aansluiten
2
AFSTANDSBEDIENING
3
Afstandsbediening
Afstandsknoppen (DVD modus optie) 7
Afstandsknoppen (TV modus optie) 4
Plaatsen van de batterijen
HET BEGIN
Aanzetten
9
Bron gebruik uitkiezen 9
TV OSD HANDLEIDING
Eersteinstallatie 11 TVinformatie 12
Video menu opties
Setup menu opties
Timer menu opties
13
Audio menu opties
14
VGA / HDMI ingang
18
Functie menu opties
14
17
18
TELETEXT FUNCTIE
Teletext functie
22
8
DVD GEBRUIK
Basis gebruik
DVD functies gebruiksinstructies
Functie instellingen 29
26
24
PROBLEMEN OPLOSSEN
Display probleem oplossing
SPECIFICATIES
Specificaties
ACCESSOIRES
Accessoires
Ondersteund DVD f
MP3 / JPEG afspelen
35
Geluid en TV probleemoplossing
36
37
ormaat 25
28
35
Page 49

PANEEL KNOPPEN FUNCTIES
VOORKANT PANEEL
Indicator (de indicator wordt rood in standby modus en groen als de TV aan is).
IR sensor opening
LOKAAL TOETSENBORD PANEEL (VERSIES)
TV+DVD (15,6“, 19“) TV+DVD (22“)
PLAY\ II
EJECT
TV/AV
CH+
CH-
VOL+
VOLMENU
POWER
TV/AV – kies bron van invoer
CH+ - gaat één kanaal omhoog
CH- - gaat één kanaal omlaag
VOL+ - verhoogt het geluidsvolume
VOL- - verlaagt het geluidsvolume
MENU – in of uit het menu gaan
POWER – schakelt tussen standby en aan modus
TV/AV
CH+
CH- STOP
VOL+ PLAY\ II
VOL- EJECT
MENU
POWER
VOLGENDE
VORIGE
VOLGENDE – speelt het volgende titel / Hoofdstuk / nummer
VORIGE – speelt het vorige titel / hoofdstuk / nummer
STOP – afspelen stoppen
PLAY\ II – afspelen starten of afspelen pauzeren
EJECT – geeft de disc uit
1
Page 50

EXTERN MATERIAAL
DIAGRAM AANSLUITEN
1. DVD SPDIF uitgang
2. TV signaal ingang
DVD of VCR speler
NOTITIE
U moet eerst alle noodzakelijke kabels aansluiten VOORDAT u het netsnoer in het
stopcontact steekt.
2
3. Audio Koptelefoon uitgang
4. PC audio ingang
5. CVBS / S-Video Rechts audio ingang
6. CVBS / S-Video Links audio ingang
7. CVBS ingang
8. S-Video ingang
9. SCART aansluitende terminal
10. PC VGA ingang
11. HDMI ingang
12. 12V DC stroom ingang
Page 51

AFSTANDSBEDIENING
1
23
25
27
28
29
30
31
2
3
424
5
626
7
8
9
10
11
12
13
32
33
34
35
36
37
38
39
40
14
15
16
17
18
19
20
21
22
3
Page 52

AFSTANDSBEDIENING
AFSTANDSKNOPPEN
TV
modus optie
1. AUTO
Gereserveerd.
2. MUTE
Zet het geluid uit.
3. NUMMER KNOPPEN
Kiest het programma nummer.
4.
5. NICAM
6. CH+
7. DISPLAY
8. CH-
9. (OMHOOG)
10. ENTER
11. (RECHTS)
12. EXIT
13. S-MODUS
14. SLEEP
15. FAV+
Wordt niet gebruikt.
16. EPG
Wordt niet gebruikt.
17. LANG
Wordt niet gebruikt.
18. SUBTITLE
Wordt niet gebruikt.
19. REVEAL
20. SUBPAGE
21. GEEL
22. BLAUW
Kies een teletext link.
(
RECALL)
Wisselt tussen het vorige en het huidige programma.
Geeft de geluidsinformatie van het programma weer, kies hiervoor het NICAM
geluidskanaal.
Gaat één programma hoger.
Geeft de huidige programma informatie weer.
Gaat één programma lager.
Om in het menu omhoog te gaan of één kanaal omhoog te gaan.
Bevestigt de keuze.
Beweeg de cursor naar rechts of pas het gekozen item in het menu aan, of verhoogt
het geluidsvolume.
Verlaat het menu of gaat terug naar het vorige menu.
Om de
Stelt de sleep timer in.
Toont verborgen teletext informatie.
Opent de sub-pagina van teletext.
Kies een teletext link.
equalizer
modus te kiezen: Persoonlijk, Stem, Muziek, Theater.
4
Page 53

AFSTANDSBEDIENING
23. STANDBY
Schakelt tussen standby en aan modus.
24. -/- -
Wisselt naar de modus om een kanaalnummer met twee getallen in te geven.
25. ASPECT
Wijzigt de beeld dimensie-ratio als volgt: Full screen, Zoom 1, Zoom 2, Auto, 4:3, 14:9,
16:9, Ondertiteling.
26. VOL+
Verhoogt het geluidsvolume.
27. VOL-
Verlaagt het geluidsvolume.
28. (LINKS)
Beweeg de cursor naar links of pas het gekozen item in het menu aan, of verlaagt het
geluidsvolume.
29. (OMLAAG)
Beweeg de cursor omhoog in het menu, of wijzig het kanaal.
30. LCD MENU
Opent/sluit het gebruikersmenu.
31. PMODUS
Wijzigt de beeldmodus als volgt: Standaard, Persoonlijk, Film, Sport, Mild, Spel.
32. INPUT
Opent/sluit het ingangsbron-selectie menu. Gebruik TV optie om de TV modus te
activeren en DVD optie om DVD modus te activeren.
33. FAV-
Wordt niet gebruikt.
34. FAV
Wordt niet gebruikt.
35. HOLD
Stopt de teletext op de huidige pagina.
36. TEXT
Wisselt bij de teletext modus tussen Ingeschakeld/Gemengd/Uitgeschakeld.
37. SIZE
Vergroot de teletext pagina.
38. INDEX
Toont de hoofdpagina.
39. GROEN
Kies een teletext link.
40. ROOD
Kies een teletext link.
5
Page 54

AFSTANDSBEDIENING
41
43
44
46
47
49
50
53
54
57
60
42
45
48
51
52
55
56
58
59
6
Page 55

AFSTANDSBEDIENING
AFSTANDSKNOPPEN
DVD modus optie
41. (EJECT)
Disc in/uit.
42. DVD SETUP
Toont het DVD instellingen menu.
43. (PLAY/PAUZE)
Afspelen of het afspelen pauzeren.
44. (STOP)
Stopt het afspelen.
45. (SLOWMOTION)
Verschillende snelheden bij het afspelen.
46. (VORIGE)
Spoel naar het laatste titel / hoofdstuk / nummer.
47. (VOLGENDE)
Spoel naar het volgende titel / hoofdstuk / nummer.
48. AUDIO
Wisselt tussen opeenvolgende verschillende audio modussen.
49. (TERUG)
Wisselt tussen opeenvolgende verschillende snelheden.
50. (VOORUIT)
Wisselt tussen opeenvolgende verschillende snelheden.
51. ANGLE
Wijzig de camerahoek in DVD modus.
52. ZOOM
Wisselt tussen opeenvolgende verschillende zoom modussen.
53. D.MENU
Keert terug naar het hoofdmenu.
54. TITLE
Keert terug naar het titelmenu.
55. D.DISP
Activeert het roll-down menu voor de huidige titel op het scherm.
56. GOTO
Speel favoriete titel / hoofdstuk / nummer.
57. PROG
Programma afspelen.
58. REPEAT
Herhaalt het afspelen.
59. A-B
Het segment herhalen.
60. INTRO
Wordt niet gebruikt.
7
Page 56

AFSTANDSBEDIENING
PLAATSEN VAN DE BATTERIJEN
Open het batterij deksel. Plaats twee SUM-4 (AAA) batterijen zoals de polariteit het aangeeft,
waarbij de + van de batterij bij de – van het batterij-kompartiment hoort, zoals hier:
LEVENSDUUR BATTERIJ
• Normaal gesproken kan de batterij het een heel jaar doen.
• Als de afstandsbedieining het nog steeds niet doet ook al bent u heel dicht bij de
afstandssensor van de TV, gelieve dan nieuwe batterijen te gebruiken.
•
Gelieve SUM-4 (AAA) batterijen te gebruiken.
NOTITIES
• Gebruik nooit oplaadbare batterijen.
• Laad de batterij nooit op, vermijd kortsluitingen, demontage en het verwarmen van de
batterij en gooi het niet in het vuur.
• Let op dat u de afstandsbediening niet laat vallen of stoten, dit zal schade of
foutmeldingen veroorzaken.
• Gebruik geen oude en nieuwe batterijen tegelijkertijd.
•
Als u de afstandsbediening een langere periode niet gebruikt, neem dan de batterij
eruit om vloeibare lekkage te vermijden. Voordat u een nieuwe batterij plaatst, gelieve
de elektrolyten in de afstandsbediening schoon te maken.
• Als elektrolyten erin spatten, gelieve dit schoon te maken met water.
LET OP:
Gelieve de batterijen van kinderen weg te houden. Indien per ongeluk doorgeslikt moet u
direkt met uw arts kontakt opnemen.
8
Page 57

HET BEGIN
Nadat het apparaat korrekt geplaatst is, op het onderstel of aan de wand, en alle
noodzakelijke kabels inclusief het netsnoer aangesloten zijn, moet u het volgende doen:
• Druk op de [STANDBY] knop op de afstandsbediening om het apparaat aan te zetten –
u zult zien dat de LED indicator groen wordt. Nu kunt u de vele eigenschappen van uw
nieuwe TV genieten.
BRON GEBRUIK UITKIEZEN
U kunt de bron voor het gebruik uitkiezen met het bron menu.
• Druk op de INPUT knop of de TV/AV toets aan de rechterkant van de LCD TV om het
menu als volgt weer te geven:
TV
SCART
CVBS
S-VIDEO
VGA
HDMI
DVD
De huidige bron is gemarkeerd.
• Door op de knoppen op de afstandsbediening te drukken of op de CH+/CH- toets
aan de rechterkant van de LCD TV om uw keuze te selecteren, druk op de knop,
VOL+ toets of de ENTER knop om uw keuze te bevestigen.
9
Page 58

TV
Page 59

OSD HANDLEIDING
Eerste installatie
Eerste keer installeren
Land
Taal
Verwijderen Programma
Programma zoeken
Oke
Selecteer Pas
Annuleren
Overig
Hollands
Als dit de eerste keer is dat u uw TV gebruikt en er geen
programma’s in het geheugen van de TV zijn, verschijnt
het Eerste keer installeren menu in uw beeld.
Land
Druk op de ź / Ÿ knop en gebruik Ż / Ź om het land te kiezen.
Taal
Druk op de ź / Ÿ knop en gebruik Ż / Ź om de OSD taal te kiezen.
Verwijderen Programma
Druk op de ź / Ÿ knop en gebruik Ż / Ź om te kiezen of u alle analoge programma’s wilt wissen.
Programma zoeken
Druk op de ź / Ÿ knop en gebruik Ż / Ź om te kiezen of u wilt zoeken naar analoge programma’s.
Nadat u deze items heeft ingesteld, druk op OK om de eerste installatie af te ronden, of kies Cancel om dit
menu te verlaten.
Als u de eerste installatie annulleert, dan zal de TV u er later aan herinneren om de eerste installatie uit te
voeren.
Eerste keer installeren
Eerste keer installatie is niet afgesloten
Wilt u afsleuten?
Ja
Doe het de volge
Nee
11
Page 60

OSD HANDLEIDING
TV informatie
Programma informatie
Druk op de DISPLAY of NICAM knoppen om de programma informatie weer te geven.
1
2
3
1. Het nummer van het huidige programma.
2. Het kleursysteem van het huidige programma, kan geselecteerd worden in het Hand afstemmen menu
(een optie in het SET-UP menu).
3. De naam van het huidige programma.
4. Het label van het huidige programma, kan gemaakt worden in het Hand afstemmen menu (een optie in
het SET-UP menu).
5. Het geluidssysteem van het huidige programma, kan geselecteerd worden in het Hand afstemmen
menu (een optie in het SET-UP menu).
6. De NICAM modus van het huidige programma.
Als het icoon van de NICAM modus rood is, dan betekent dit dat het huidige programma meerdere
NICAM signalen biedt, en u hieruit kunt kiezen door op de NICAM knop te drukken.
De NICAM modus en bijbehorende iconen:
TV Label
25
Auto
Geen signaal
Auto
4
5
6
Mono Stereo Duaal I Duaal II
12
Page 61

OSD HANDLEIDING
VIDEO menu opties
Druk op de MENU knop aan de voorkant van het paneel of op LCD-MENU op de afstandsbediening om het
hoofdmenu weer te geven.
1. Druk op de Ż / Ź knop om BEELD in het
BEELD
Beeld modus
Contrast
Helderheid
Kleur
Tint
Scherpte
Selecteer Pas
Standaard
50
50
50
0
Normal
Beeld modus
Kies Beeldmodus in het BEELD menu. (Beschikbare beeldmodus: Standaard, Persoonlijk, Film, Sport,
Mild, Game.)
Als u de contrast, helderheid, kleur, tint, scherpte of kleurtint in het BEELD menu aanpast, zal de
beeldmodus automatisch wijzigen naar “Persoonlijk”. U kunt de beeldmodus direkt kiezen door op de
P-MODUS knop te drukken.
TIPS: U kunt op de P-MODUS knop op de afstandsbediening drukken op direkt de Beeldmodus te kiezen.
Contrast
Druk op de ź / Ÿ knop en gebruik Ż / Ź om het contrast van het beeld aan te passen.
hoofdmenu te kiezen.
2. Druk op de ź / Ÿ knop om de optie die u wilt
aanpassen in het BEELD menu te kiezen.
3. Druk op de Ż / Ź knop om aan te passen.
4. Als u tevreden bent met uw aanpassing, druk
op de LCD-MENU knop om terug te keren naar
het vorige menu of druk op de EXIT knop om het
hoofdmenu te verlaten.
Contrast 28
Nadat u het heeft aangepast naar de gewenste waarde, druk op de LCD-MENU knop om terug te keren
naar het vorige MENU.
Helderheid
Druk op de ź / Ÿ knop en gebruik Ż / Ź om de helderheid van het beeld aan te passen.
Kleur
Druk op de ź / Ÿ knop en gebruik Ż / Ź om de kleur saturatie aan te passen.
NOTITIE: Deze optie is niet geldig in PC modus, en wordt daardoor in grijs weergegeven.
Tint
Druk op de ź / Ÿ knop en gebruik dan Ż / Ź om de kleurtoon aan te passen als uw systeem op NTSC
loopt.
Scherpte
Druk op Ż / Ź om de scherpte modus van uw TV aan te
passen. (
Zeer scherp, Zeer z
Kleurtint
Kies voor een optimale kleurtemperatuur modus wat
u prettig kijkt
DNR (Digitale Geluids Reductie)
Beschikbare scherpte-modus: Normaal, Scherp,
acht, Zacht)
voor
uit Normaal, Warm en Koud.
Kleur
Tint
Scherpte
Kleurtint
DNR
BEELD
50
0
Normaal
Normaal
Uit
Als het zendsignaal wat u ontvangt zwak is, kunt u de DNR
optie k
door tussen Uit, L
iezen om het video geluidsniveau te verminderen
aag, Medden en Hoog te kiezen.
Selecteer Pas
13
Page 62

OSD HANDLEIDING
AUDIO menu opties
Druk op de MENU knop aan de voorkant van het paneel of op LCD-MENU op de afstandsbediening om het
hoofdmenu weer te geven.
1. Druk op de Ż / Ź knop om GELUID in het
hoofdmenu te kiezen.
GELUID
Volume
Geluid modus
Lage tonen
Hoge tonen
Balans
Selecteer Pas
28
Personal
0
0
0
Volume
Druk op de ź / Ÿ knop en gebruik Ż / Ź om het geluidsniveau aan te passen.
Volume 28
2. Druk op de ź / Ÿ knop om de optie die u wilt
aanpassen in het GELUID menu te kiezen.
3. Druk op de Ż / Ź knop om aan te passen.
4. Als u tevreden bent met uw aanpassing, druk op de
LCD-MENU knop om terug te keren naar het vorige
menu of druk op de EXIT knop om het hoofdmenu te
verlaten.
Nadat u het heeft aangepast naar de gewenste waarde, druk op de LCD-MENU knop om terug te keren
naar het vorige MENU.
Geluid modus
Kies Geluidsmodus in het GELUID menu. (Beschikbare geluidsmodus: Persoonlijk, Stem, Muziek
, Theater.)
Als u de waarde van Lage tonen en Hoge tonen in het geluidsmenu wijzigt, zal de geluidsmodus
automatisch wijzigen naar “Persoonlijk”.
U kunt de geluidsmodus direkt kiezen door op de S-MODUS knop te drukken.
TIPS: U kunt op de S-MODUS knop op de afstandsbediening drukken op direkt de Geluidsmodus te kiezen.
Lage tonen
Druk op de ź / Ÿ knop en gebruik dan Ż / Ź om het niveau van de lagere tonen te verhogen of t
e verlagen.
Hoge tonen
Druk op de ź / Ÿ knop en gebruik dan Ż / Ź om het niveau van de hogere tonen te verhogen of t
e verlagen.
Balans
Druk op de ź / Ÿ knop en gebruik dan Ż / Ź om de audio uitgang aan te passen door tussen de linker of
de rechter luidsprekers te kiezen.
Set-up menu opties
Druk op de MENU knop aan de voorkant van het paneel of op LCD-MENU op de afstandsbediening om het
hoofdmenu weer te geven
.
Land
Auto afstemmen
Hand afstemmen
Programma edit
SET-UP
Overig
Selecteer Pas
14
Page 63

OSD HANDLEIDING
1. Druk op de Ż / Ź knop om
SET-UP
in het hoofdmenu te kiezen.
2. Druk op de ź / Ÿ knop om de optie die u wilt aanpassen in het SET-UP menu te kiezen.
3. Druk op de Ż / Ź knop om aan te passen.
4. Als u tevreden bent met uw aanpassing, druk op de LCD-MENU knop om terug te keren naar het vorige
menu of druk op de EXIT knop om het hoofdmenu te verlaten.
Land
Deze optie laat u het land bepalen.
Auto afstemmen
Deze optie laat u de te ontvangen kanalen automatisch instellen.
Notitie: Voordat u de Automatische Instelling uitvoert, moet u eerst het land waar u bent kiezen door de
LAND optie te kiezen.
Auto afstemmen
Druk op Enter voor srart.
ENTER
Enter Return
MENU
Druk op ENTER om te beginnen.
Auto afstemmen
Zoeken
ATV
MENU
Afsluiten
6
215.00MHz
U kunt op de LCD-MENU knop drukken om de automatische instelling te stoppen en het OSD menu te
sluiten.
Hand afstemmen
Deze optie laat u de Manuele Instelling uitvoeren.
Notitie: Voordat u de Manuele Instelling uitvoert, moet u eerst het land waar u bent kiezen door de LAND
optie in het FUNCTIE menu te kiezen.
1. Druk op de Ż / Ź knop om Manuele Instelling in het SETUP menu te kiezen.
2. Druk op ź / Ÿ om uw keuze uit te voeren, het menu Manuele Instelling zal op het scherm getoond
worden.
Hand afstemmen
Programma
Geluid systeem
Kleur systeem
Programma Label
AFT
Handmatig zoeken
Selecteer Pas
1
Auto
Auto
Uit
471.25 MHz
Programma
Het huidige programma nummer. Druk op Ż / Ź om het bovenste of onderste programma te kiezen.
Geluid systeem
Druk op Ż / Ź om een bijbehorend geluidssysteem te kiezen, zoals DK, L/L’, BG, I.
15
Page 64

OSD HANDLEIDING
Kleur systeem
Druk op Ż / Ź om een bijbehoren kleursysteem te kiezen, zoals Auto, PAL, SECAM.
Programma Label
Deze optie laat u een kanaal een naam geven, maar u kunt ook de reeds benoemde programma’s een
andere naam geven.
1. Kies het kanaal wat u wilt benoemen.
2. Druk opź / Ÿ en kies Programma Label in het SETUP menu.
3. Druk opź / Ÿ om uw keuze uit te voeren. Het menu van programma label zal als volgt verschijnen:
Programma Label
4. Druk op de numerieke knoppen om de nummers direkt in te voeren of druk op ź / Ÿ om de letters t
e kiezen.
5. Druk op Ż / Ź om de cursor te bewegen.
6. Druk op ENTER, LCD-MENU of de EXIT knop om te bevestigen en terug te keren naar het vorige menu.
AFT (Automatisch bijstellen)
Door zwakke signalen of een foutieve antenne configuratie kan het zijn dat sommige kanalen niet de
allerbeste ontvangst hebben. AFT functie laat u het gekozen kanaal bijstellen (de frequentie van het kanaal
is rond de waarde in de Manuele Zoek optie.)
Handmatig zoeken
Handmatig zoeken
---.--
MH
z
Deze optie heeft twee functies:
1. Stelt de frequentie van het kanaal voor AFT optie in.
2. Druk op de Ź knop voor 3 sekonden of langer en het zal automatisch beginnen vanaf deze frequentie bi
Programma edit
Deze functie laat u als volgt de TV programma’s sorteren zoals u het wenst:
Kanalen lijst
Flags
x
ATV
1.
2.
j te stellen.
x
x
x
x
x
x
Fav Beweg
Overslaan
3.
4.
5.
6.
7.
8.
Vergren
Wissen
1. Druk opź / Ÿ en kies Programma Aanpassen in het SET-UP menu.
2. Druk op Ż / Ź om in het submenu te komen, een lijst met kanalen wordt weergegeven.
3. Druk op ź / Ÿ om het kanaal uit de lijst te kiezen wat u wilt sorteren.
4. Druk opŹ om uw keuze uit te voeren.
5. Druk op ź / Ÿ om de locatie te kiezen waarheen u het kanaal wilt verplaatsen.
6. Druk opŻ om uw keuze uit te voeren.
7. Druk op LCD-MENU om terug te keren naar het vorige menu of druk op EXIT om te verlaten.
16
Page 65
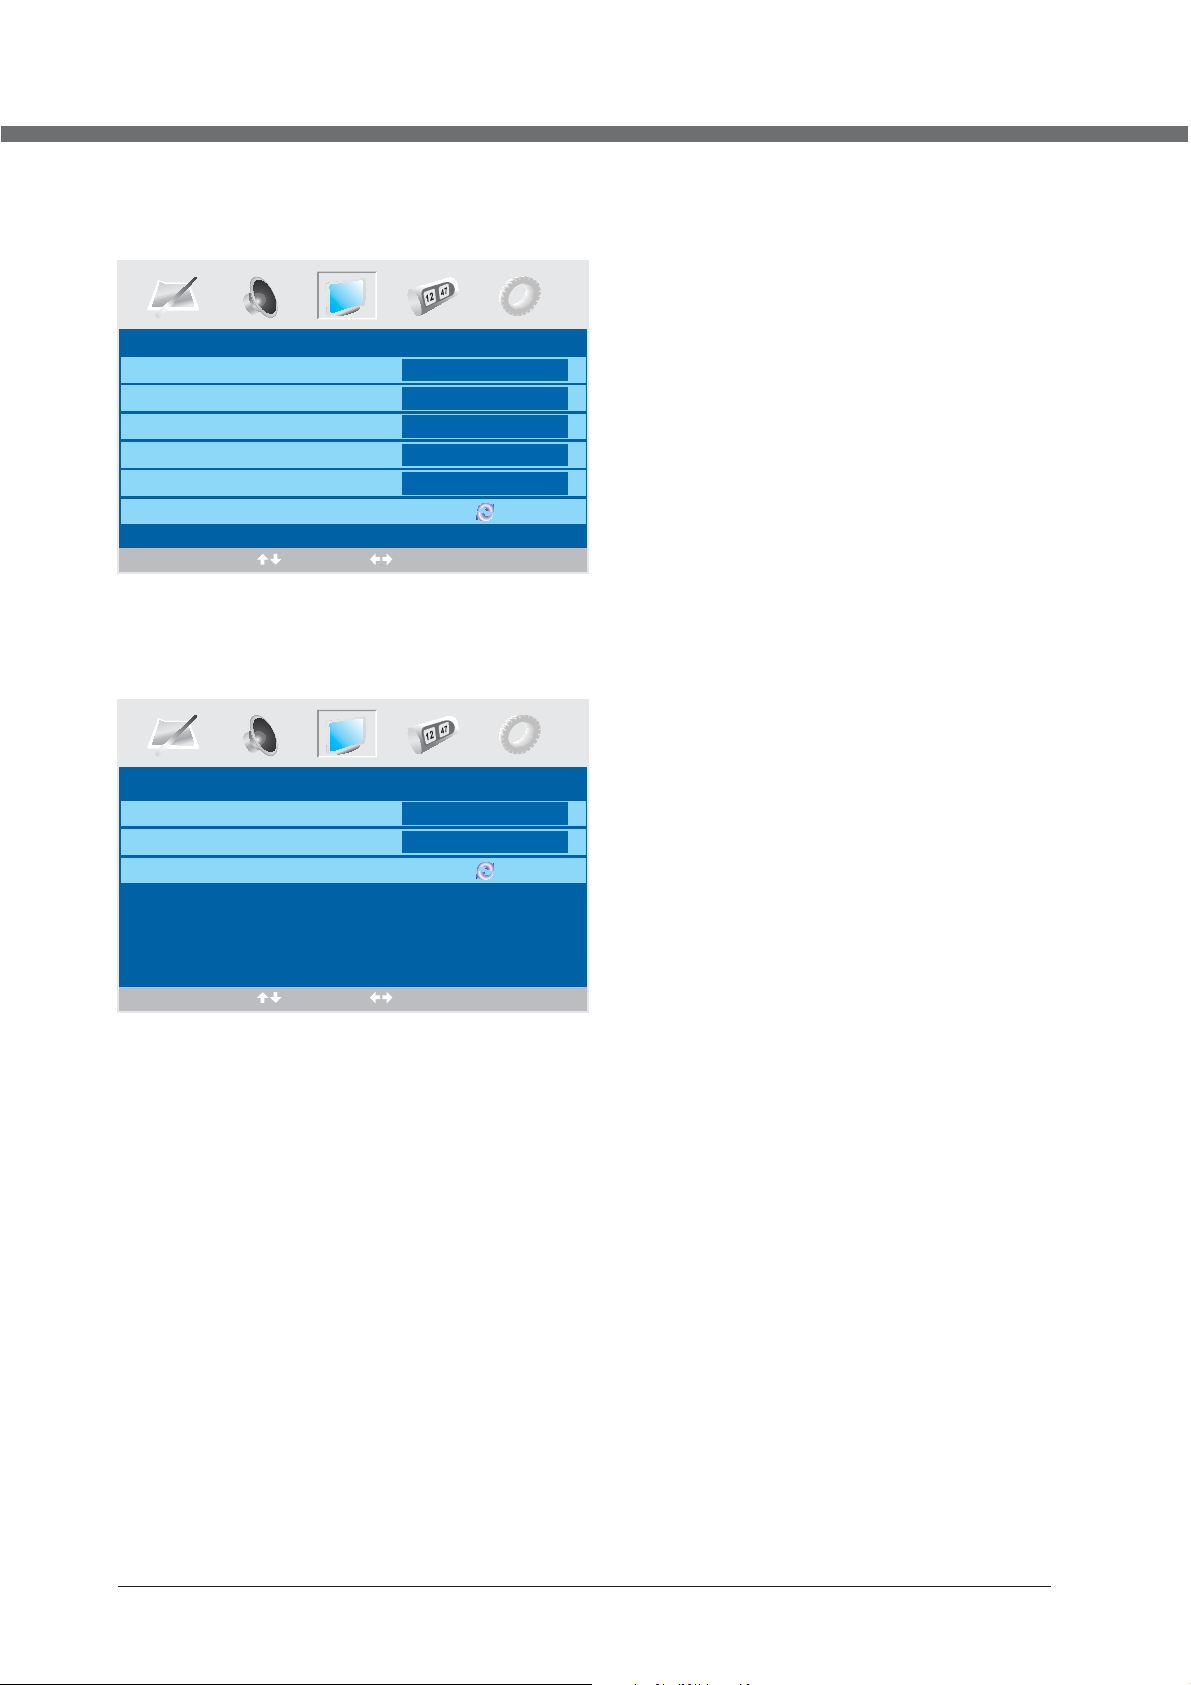
OSD HANDLEIDING
VGA ingang
SETUP menu van VGA ingang (voor het instellen van de PC beeld positie):
PC MODUS
Auto Synchr
Fase
Klok
H Positie
V Positie
Reset positie
Selecteer Enter
HDMI ingang
SETUP menu van HDMI ingang (voor het instellen van de HDMI beeld positie):
Beginnen
51
50
50
50
H Positie
V Positie
Reset positie
HDMI MODUS
50
50
Selecteer Enter
17
Page 66

OSD HANDLEIDING
Timer menu opties
Druk op de MENU knop aan de voorkant van het paneel of op LCD-MENU op de afstandsbediening om het
hoofdmenu weer te geven.
1. Druk op de Ż / Ź knop om TIMER in het hoofdmenu te
TIMER
Slaap timer
OSD Timer
Selecteer Pas
0 Min.
30Sec
Slaap timer
Kies de sleep timer om de TV automatisch in standby modus te zetten. De timer kan voor 0min, 15min,
30min, 45min, 60min, 75min, 90min, 105min en 120min geselecteerd worden. U kunt de sleep timer ook
kiezen door herhaaldelijk op de SLEEP knop te drukken.
OSD Timer
U kunt de tijd kiezen wanneer het OSD display op het scherm verschijnt zoals bijvoorbeeld: 5Sec, 10Sec,
15Sec, 20Sec, 25Sec, 30Sec.
kiezen.
2. Druk op de ź / Ÿ knop om de optie die u wilt
aanpassen in het TIMER menu te kiezen.
3. Druk op de Ż / Ź knop om aan te passen.
4. Als u tevreden bent met uw aanpassing, druk op de
LCD-MENU knop om terug te keren naar het vorige menu
of druk op de EXIT knop om het hoofdmenu te verlaten.
Functie menu opties
Druk op de MENU knop aan de voorkant van het paneel of op LCD-MENU op de afstandsbediening om het
hoofdmenu weer te geven.
FUNCTION
Taal Hollands
Beeld weergave Full screen
Blauw scherm
Kinderslot
Eerste keer installeren
Resetten
Selecteer Pas
1. Druk op de Ż / Ź knop om FUNCTIES in het hoofdmenu te kiezen.
2. Druk op de ź / Ÿ knop om de optie die u wilt aanpassen in het FUNCTIES menu te kiezen.
3. Druk op de Ż / Ź knop om aan te passen.
4. Als u tevreden bent met uw aanpassing, druk op de LCD-MENU knop om terug te keren naar het vorige
menu of druk op de EXIT knop om het hoofdmenu te verlaten.
Taal
Druk op Ż / Ź om de OSD taal te kiezen.
Beeld weergave
Deze optie laat u de scherm-display modus kiezen die het beste past bij uw kijkwensen.
Notitie: De beschikbare aspect modus kan anders zijn bij een ander input signaal.
On
18
Page 67

OSD HANDLEIDING
Blauw scherm
Deze optie laat u kiezen of de blauwe achtergrond aan of uit moet. Indien aan, zal de achtergrond van het
scherm blauw worden bij een zwak signaal of geen signaalontvangst.
Kinderslot
Druk op ENTER of Ź knop om de kinderblokkade in te stellen.
U moet de PIN code invoeren als de kinderblokkade “aan” is, en de standaard PIN code is leeg, dan druk op
de ENTER knop om toegang te krijgen.
PIN Code:
Wissen
0~9
TIPS: Het paswoord voor de superuser (administrator) is 4711.
Kinderslot
Vergrendeling Aan
Wijzig PIN code
Hotel Sluiting
ENTER
Input
Kinderslot
Enter
Aan
Selecteer Pas
Kinderslot
Druk op ENTER of Ź knop om de kinderblokkade in te stellen.
Vergrendeling
Druk op ENTER of Ź knop om de toetsenblokkade in te stellen.
Wijzig PIN code
Druk op de Ź knop om in het menu PIN Code wijzigen te komen.
Wijzig PIN code
Oude PIN code
Nieuwe PIN code
Enter opnieuw
Selecteer
Wissen
0~9
Input
ENTER
Bevestig
Oude PIN code
Druk op de 0-9 toetsen om de juiste oude PIN code in te voeren, u kunt de PIN code niet wijzigen als u een
foute PIN code heeft ingevoerd.
19
Page 68

OSD HANDLEIDING
Nieuwe PIN code
Druk op de 0-9 toetsen om de nieuwe PIN code in te voeren.
Wijzig PIN code
Druk op de 0-9 toetsen om de PIN code die u heeft ingevoerd in het Nieuwe PIN Code menu nogmaals in
om de nieuwe PIN code te bevestigen.
Hotel Sluiting
Druk op de Ź knop om in het menu Hotel Blokkade te komen.
SLUITING ZETTING
Hotel Sluiting
Bron Sluiting
Standaard Bron
Standaard Progr
Maximum- Volume
Sluiting opheffen
Selecteer Pas
Aan
Uit
1
100
1. Druk op de ź / Ÿ knop om de optie die u wilt aanpassen in het SLUITING ZETTING menu te kiezen.
2. Druk op de Ż / Ź knop om aan te passen.
3. Als u tevreden bent met uw aanpassing, druk op de LCD-MENU knop om terug te keren naar het vorige
menu of druk op de EXIT knop om het hoofdmenu te verlaten.
Hotel Sluiting
Druk op Ż / Ź om de Hotel Blokkade Aan of Uit te zetten.
Bron
Sluiting
Bron
Druk op de Ź knop om in het menu
Bron Sluiting
TV
SCART
CVBS
S-VIDEO
VGA
HDMI
Sluiting te komen.
Uit
Uit
Uit
Uit
Uit
Uit
Druk op de ź / Ÿ knop om de optie die u wilt aanpassen in het
Bron
Sluiting menu te kiezen.
Druk op Ż / Ź om de Bron Aan of Uit te zetten.
Als u tevreden bent met uw aanpassing, druk op de LCD-MENU knop om terug te keren naar het vorige
menu of druk op de EXIT knop om het hoofdmenu te verlaten.
20
Page 69

OSD HANDLEIDING
Standaard Bron
Druk op Ż / Ź om bij de standaard bron te kiezen uit TV, SCART, CVBS, S-VIDEO, VGA, HDMI of DVD.
Standaard Progr
Druk op Ż / Ź om het standaard programma in Hotel modus te kiezen.
Maximum- Volume
Druk op Ż / Ź om het maximale volume in Hotel modus aan te passen.
Sluiting opheffen
Druk op Ż / Ź om de blokkade instellingen in Hotel modus vrij te geven.
Eerste keer installeren
Druk op de Ź knop om het menu eerste keer installeren te openen, het gebruik van dit menu is op pagina
11.
Resetten
Druk op ENTER of de Ź knop om de TV te resetten naar de fabrieksinstellingen.
21
Page 70

TELETEXT FUNCTIE
TELETEXT FUNCTIE
De meeste TV zenders bieden gratis teletext informatie, inclusief het laatste nieuws,
weerberichten, TV programma’s en beurzeninformatie, etc. U hoeft enkel de gewenste
teletext pagina in te voeren om de bijbehorende inhoud te lezen.
TELETEXT MODUS DISPLAY
• Kies het kanaal met teletext signaal;
• Druk op de TEXT knop om de teletext modus te activeren;
• Kies de gewenste teletext pagina met de digitale of gekleurde link knoppen;
• Druk nogmaals op TEXT om de gemengde modus te activeren, nu wordt het beeld
van het kanaal en de teletext informatie tegelijkertijd op het scherm getoond;
• Druk nogmaals op de TEXT knop om de teletext modus uit te zetten.
PAGINA KEUZE
• U kunt 3 digitale nummers invoeren om naar de gewenste pagina te komen met de
nummer knoppen. Als het ingevoerde nummer fout is, moet u nogmaals 3 korrekte
digitale nummers invoeren nadat u deze eerste 3 digitale nummers heeft
ingevoerd.
• U kunt pagina's vooruit of terug gaan met de
knop.
BLOKKADE
z
U kunt de HO
nogmaals op deze knop om de blokkade op te heffen.
LD
knop drukken om de teletext pagina te blokkeren. Druk
INDEX
z
Druk op de [INDEX] knop om de inhoud van de pagina weer te geven.
z
Voer een bepaalde teletext pagina in door het drukken op de nummer knoppen.
ZOOM IN TELETEXT
• Als de teletext pagina wordt weergegeven, kunt u tweevoudig inzoomen om deze
teletext pagina weer te geven;
• Druk op de
zoomen;
• Druk nogmaals op de
in te zoomen;
• Druk nogmaals op deze knop om terug te keren naar de oorspronkelijke
weergave.
SIZE
knop om de bovenste helft van de teletext pagina in te
SIZE
knop om de onderste helft van de teletext pagina
DISPLAY MODUS
• Druk op de
• Druk nogmaals op deze knop om te annulleren.
REVEAL
knop om de verborgen teletext informatie weer te geven.
GEKLEURDE KNOPPEN (ROOD, GROEN, GEEL, BLAUW)
• Kies de bijbehorende teletext pagina met de gekleurde knoppen.
22
Page 71

DVD
Page 72

DVD GEBRUIK
Basis gebruik
1. De DVD functie AAN en UIT zetten
ź / Ÿ
- Zet de LCD TV aan en druk dan op de
ENTER knop.
2. Disc in DVD plaatsen
- Plaats de disc in de disc-gleuf (de geprinte kant van de disc moet naar boven wijzen), de speler zal de disc automatisch laden. Er verschijnt op het
scherm de melding “SLUITEN” en dan “LEZEN”. Na het laden van de inhoud van de disc, zal het automatisch wisselen naar de afspeel modus. Als
de disc reeds geplaatst is, dan zal de disc automatisch gelezen worden.
NOTITIE: - Bij sommige discs, na het laden van de disc-inhoud, moet u op drukken of uit het disc-menu kiezen om te starten.
- Zorg ervoor dat de bedrukte kant van de disc naar boven gericht is als u de disc plaatst. Als u de disc foutief plaatst, kunt u het DVD
mechanisme beschadigen.
3. De DVD afspelen
- Afhankelijk van de disc inhouf, zal het disc menu getoond worden zodat u uw keuzes kunt maken. Als de disc afgespeeld wordt, kunt u de
knop gebruiken om te wisselen tussen Afspelen en Pauzeren. Dit produkt ondersteunt ook Menu, Titel, Opvolgend en Programma afspelen.
4. Menu afspelen (voor DVD/super VCD en VCD 2.0 discs)
- Druk op de D.MENU knop
• Voor DVD discs, zal het scherm het DVD disch menu (Hoofdmenu) weergeven
• Voor Super VCD & VCD 2.0 discs, zal het scherm het Super VCD, VCD 2.0 disc menu weergeven (PBC: [UIT]) (Druk op de MENU knop om de
PBC status weer te geven).
• De Super VCD & VCD 2.0 discs afspelen, dan is de standaard PBC AAN.
- Voor DVD discs gebruikt u de navigatie knoppen om de gemarkeerde inhoud te selecteren en af te spelen; voor Super VCD & VCD 2.0 discs
gebruikt u de numerieke knoppen om uw favoriete inhoud direkt af te spelen.
NOTITIE: PBC moet UIT zijn.
- Druk op ENTER of de
- Keer terug naar het Hoofdmenu als u de disc afspeelt
• Voor DVD discs drukt u op MENU op het disc menu weer te geven.
• Voor Super VCD & VCD 2.0 discs drukt u op MENU, indien PBC AAN is, om het disc menu weer te geven.
- STOP
• Druk eenmalig op de knop om te stoppen. Druk op de knop om verder te gaan waar u was gebleven.
• Druk twee keer op de knop om te stoppen. Druk op de knop om bij het begin te starten.
Om de disc te beschermen, druk op de knop en dan op de UITGAVE knop om de disc eruit te nemen. Als de disc uitgegeven wordt, houd de
disc dan voorzichtig aan de zijkanten vast en neem het uit de gleuf om krassen te voorkomen.
• Als u de DVD functie niet gebruikt (in standby modus of als u een langere periode een andere modus gebruikt), gelieve dan de disc eruit te
nemen om de DVD lader en de disc te beschermen.
5. Titel afspelen (enkel voor DVD disc)
- Druk op de
- Druk op de richtings- of numerieke knoppen om uw favoriete titel te kiezen.
- Dan zal het afspelen vanaf het eerste hoofdstuk van de gekozen titel.
6. Opeenvolgend afspelen (voor DVD/Super VCD/VCD/CD/CD-G/HD-CD en Mp3/JPEG discs)
- Voor Super VCD & VCD discs, als PBC AAN is, komt u in het disc menu door op de knop te drukken. Druk op de MENU knop om de PBC UIT
te schakelen. Druk op de knop om opeenvolgende te starten. Voor andere, terwijl gestopt, druk op de knop op opeenvolgende te starten.
7. Programma afspelen (voor DVD/Super VCD/VCD/CD/CD-G/HD-CD en Mp3/JPEG discs)
- Druk op de PROG knop.
- Door Programma afspelen te gebruiken, kunt u max. 16 nummers van de disc in geprogrammeerde volgorde afspelen.
- OSD voor het programma afspelen zoals hieronder aangegeven.
TITLE
knop om de gemarkeerde inhoud te starten.
knop dan geeft het scherm “
INPUT
knop op RC. Gebruik de knoppen om de DVD modus te kiezen en bevestig dit met de
TITLE
” weer.
▲ / ▼
24
Page 73

DVD GEBRUIK
DVD/ MP3/JPEG discs Super VCD/ VCD/ CD /CD-G/ D-CD discs
PROG
T C T C T C T C
1--:-- 5--:-- 9--:-- 13--:--
2--:-- 6--:-- 10--:-- 14--:--
3--:-- 7--:-- 11--:-- 15--:--
4--:-- 8--:-- 12--:-- 16--:--
PLAY CLEA R
- Als de PBC AAN is, het gebruik van programma’s afspelen zal automatisch de PBC UIT schakelen.
- In overeenstemming met de gemarkeerde delen voert u de titel en hoofdstuk nummer in met de numerieke knoppen, druk op de
starten; of beweeg naar <AFSPELEN> met de navigatie knoppen, druk op ENTER om te starten.
- Terwijl u het programma afspeelt, kunt u op de PROGRAM knop drukken de het programma menu voor aanpassingen weer te geven. Om het
programma te legen, gaat u naar <LEGEN> en drukt u op de ENTER knop Of druk op de knop om het programma te beëndigen. Als u nogmaals
op de knop drukt, zal de disc opeenvolgend afgespeeld worden.
- Terwijl u het programma afspeelt, verschijnt op het scherm de indicatie "PRG AFSPELEN" en de huidige titel en hoofdstuk nummer.
PROG
1----- 5----- 9----- 13-----
2----- 6----- 10----- 14-----
3----- 7----- 11----- 15-----
4----- 8----- 12----- 16-----
PLAY CLEA R
knop om te
Ondersteund DVD formaat
Dit produkt kan de folgende formaten DVD disc afspelen.
Disc Type Disc Formaat
(Diameter)
DVD 12cm
Super VCD 12cm 45minuten Ongeveer
VCD 12cm 74minuten Ongeveer
CD 12cm 74minuten Ongeveer CD-DA: Digitaal audio
HD-CD 12cm 74minuten Ongeveer HD-DA: Digitaal audio
MP3/JPEG 12cm 600minuten Ongeveer Digitaal audio
NOTITIE: Ondersteunt ook DVD-R, CD-R, CD-RW formaten.
Opgenomen tijd Opgenomen Inhoud Opmerkingen
Eenzijdig: 120minuten
Ongeveer
Dubbelzijdig: 240minuten
Ongeveer
DVD formaat:
Gecompresseerd digitaal
audio en
MPEG2
Gecompresseerd digitaal
audio e
MPEG1
Gecompresseerd digitaal
audio en
video
n video
video
Inclusief SVCD
Inclusief:
VCD2.0/ VCD1.1
VCD1.0/ DVCD
25
Page 74

DVD GEBRUIK
DVD functies gebruiksinstructies
1. Afspelen (voor DVD/Super VCD/VCD/CD/CD-G/HD-CD en Mp3/JPEG discs)
- Voor DVD disc, druk op de
titelkeuze door tedrukken op deTIT
- Voor Super VCD & VCD discs, terwijl u de disc afspeelt, kunt u uw favoriete nummers afspelen m.b.v. de numerieke knoppen.
(NOTITIE: Als u het Programma afspelen gebruikt of als de PCB AAN is, kunt u enkel de of knoppen gebruiken om het nummer
te wijzigen)
- Voor CD, CD-G & HD-CD discs, terwijl u de disc afspeelt, kunt u uw favoriete nummers afspelen m.b.v. de numerieke knoppen.
- Voor MP3 / JPEG discs, kunt u uw favoriete nummers afspelen m.b.v. de numerieke knoppen uit het hoofdmenu.
- Als het ingevoerde nummer niet juist is, zal het niet werken.
NOTITIE: Bij nummer 1-10, gebruikt u direkt de numerieke knoppen; bij nummers hoger dan 10, drukt u eerst op de - / -- knop. (Bijv.
nummer 15, druk -/--, dan 15)
2. Vorige/Volgend (voor DVD/Super VCD/VCD/CD/CD-G/HD-CD en Mp3/JPEG discs)
- Terwijl u de disc afspeelt;
• Druk op de
• Druk op de knop om het volgende titel / hoofdstuk / nummer af te spelen.
- Voor Super VCD & VCD discs, in PBC status UIT;
• Als het huidige nummer het eerste is, zal het drukken op de knop het afspelen stoppen.
• Als het huidige nummer het laatste is, zal het drukken op de knop het afspelen stoppen.
- Voor DVD discs kunnen de bovenstaande functies afwijken als gevolg van een andere DVD disc structuur.
3. Vooruit/Terug (voor DVD/Super VCD/VCD/CD/CD-G/HD-CD en Mp3/JPEG discs)
- Terwijl u de disc afspeelt, kunt u de vooruit of terug functie gebruiken.
- Er zijn 4 snelheden voor vooruit. Druk op de knop om te wisselen van snelheid. (VOORUITx2 / VOORUITx4 / VOORUITx8 / VOORUIT x20 /
AFSPELEN).
• Als u terugspoelt, kunt u op drukken om de normale snelheid te hervatten.
• Voor CD, HD-CD en MP3 heeft terugspoelen ook een audio output.
• Voor DVD discs, als u terugspoelt naar de eerste titel / het eerste hoofdstuk, zal het bij het begin starten.
• Voor Super VCD & VCD discs, in PBC status AAN, als u terugspoelt naar het eerste nummer, zal het bij het begin starten.
NOTITIE: Tijdens het vooruit- of terugspoelen is het geluid uit.
4. Slowmotion (voor DVD/Super VCD/VCD discs)
- Terwijl u de disc afspeelt, kunt u de slowmotion functie gebruiken.
• Er zijn 6 snelheden voor slowmotion. Druk op de
• Als u in slowmotion bent, kunt u op drukken om de normale snelheid te hervatten.
NOTITIE: Tijdens slowmotion is het geluid uit.
5. Pauze (voor DVD/Super VCD/VCD/CD/CD-G/HD-CD en Mp3/JPEG discs)
- Voor CD, CD-G, HD-CD & MP3/JPEG discs, druk op de knop om te pauzeren; druk op de knop om te hervatten.
- Voor DVD, Super VCD, VCD discs, druk op de knop om te pauzeren; druk op de knop om beeld voor beeld af te spelen; druk op de knop
om te hervatten.
6. Herhalen (voor DVD/Super VCD/VCD/CD/CD-G/HD-CD en Mp3/JPEG discs)
- Druk eenmalig op
• Voor Super VCD, VCD, CD, CD-G, HD-CD discs, tijdens opeenvolgend afspelen, kunt u het herhaald afspelen gebruiken.
• Er zijn 2 herhaal modussen, druk op HERHALEN om te wisselen tussen de verschillende opeenvolgende modussen. (UIT/
HERH
AA
• Voor DVD discs, kunt u de herhaal-afspeel modus instellen. Er zijn 2 herhaal modussen, druk op HERHALEN om te wisselen tussen de
verschillende opeenvolgende modussen. (UIT / HOOFDSTUK / TITEL / HERH
• Voor MP3/JPEG discs, tijdens het afspelen, kunt u het herhaald afspelen gebruiken. Er zijn 3 herhaal modussen, druk op
wisselen tussen de verschillende opeenvolgende modussen. (UIT/ HERH
7. Display (voor DVD/Super VCD/VCD/CD/CD-G/HD-CD en Mp3/JPEG discs)
- Druk op de D.DISP knop om het menu voor de huidige Titel, Hoofdstuk, Tijd en andere informatie te activeren.
knop om het vorige titel / hoofdstuk / nummer af te spelen.
REPEAT
L 1 /HERHAAL ALLES).
knop vanuit het hoofd- of titelmenu; terwijl u de DVD afspeelt kunt u uw favoriete titel direkt afspelen met de
LE
knop.
knop om te wisselen van snelheid. (SF1/2, SF1/3, SF1/4, SF1/5, SF1/6, SF1/7, Afspelen).
om de huidige herhaalmodus weer te geven.
AA
L ALLES).
REPEAT
AA
L1/HERHAAL DI
RECT
/HERHAAL ALLES).
om te
26
Page 75

DVD GEBRUIK
• Voor DVD discs (2 pagina’s), druk eenmalig op de D.DISP knop om de eerste pagina te tonen, zoals hieronder:
Disc Type Hoofdstuk -/-(Huidig/Vol) Verstreken disc tijd
0 / 3 C H 1 / 2 00:05:45
DVD
Druk nogmaals op de D. DISP knop om de tweede pagina, zoals hieronder, weer te geven:
Audio Taal Audio Type Hoek AAN/UIT
• Voor Super VCD discs (2 pagina’s), druk eenmalig op de D.DISP knop om de eerste pagina te tonen: Disc type, Nummer -/- (Huidig / Vol), Mute
status, PBC status, Herhaal modus status, Huidige nummer tijd. Druk nogmaals op de D.DISP knop om te tweede pagina weer te geven:
Audio-/--(Huidig/Vol) of UIT, Audio type, Taal, Ondertiteling-/-(Huidig/Vol) of UIT. Druk nogmaals op de D.DISP knop om de scherm weergave uit
te schakelen.
• Voor CD, CD-G, HD-CD, MP3 / JPEG discs, druk eenmalig op de D.DISP knop om de eerste pagina weer te geven: Disc type, Nummer -/-
(Huidig / Vol), Mute status, Herhaal modus status, Huidige nummer tijd.
- Druk nogmaals op de D.DISP knop om de scherm weergave uit te schakelen.
8. Ga naar (voor DVD/Super VCD/VCD/CD/CD-G/HD-CD en Mp3/JPEG discs)
- Deze functie laat u uw favoriete Titel / Hoofdstuk / Nummer afspelen. Druk op de GA NAAR knop om het menu voor wijzigingen op het scherm te
activeren. In het gemarkeerde gedeelte, voert u uw favoriete Titel / Hoofdstuk / Nummer in met de numerieke knoppen of geeft u de afspeeltijd aan.
Na het aanpassen, drukt u op ENTER om te starten. Als de invoer ongeldig is, zal het niet werken.
NOTITIE: Tijdens het aanpassen kunt u de
- Als het in PBC status AAN is, zal deze functie het UIT zetten.
9. AUDIO (voor DVD/Super VCD/VCD/CD/CD-G/HD-CD en Mp3/JPEG discs)
- Druk eenmalig op AUDIO om de huidige audio modus weer te geven.
- Druk er nogmaals op om tussen opeenvolgende verschillende audio modussen te wisselen.
• Voor Super VCD & VCD discs: (Stereo - L - R - Auto L - Auto R)
• Voor CD, CD-G, HD-CD, MP3 discs: (Stereo - L - R)
Notitie: Het wisselen naar Auto L / R audio kanaal kan anders zijn door verschillende disc inhouden. Tweetalige VCD discs kunnen een AUDIO
knop gebruiken om te wisselen tussen de twee talen.
10. Taal (voor DVD en Super VCD discs)
- Druk eenmalig op AUDIO om de huidige taal weer te geven.
- Druk er nogmaals op om tussen opeenvolgende verschillende talen te wisselen.
NOTITIE: Voor multi-talen DVD & Super VCD discs, druk op de AUDIO knop om uw favoriete taal te kiezen.
TT
itel -/-(Huidig/Vol)
T
1 / 2 E N G 1 CH 1 /1 E N G O F F
-/- (Huidig/Vol) of UIT Ondertiteling -/- (Huidig/Vol) of UIT
GOTO
knop niet gebruiken.
27
Page 76

DVD GEBRUIK
11. Ondertiteling (voor DVD en Super VCD discs)
- Druk eenmalig op
- Druk er nogmaals op om tussen opeenvolgende verschillende ondertiteling modussen te wisselen.
NOTITIE: Voor multi-talen ondertiteling DVD & Super VCD discs, druk op de
12. Hoek (voor DVD disc)
- Druk eenmalig op
- Druk er nogmaals op om tussen opeenvolgende verschillende afspeelhoekcodes te wisselen. (Bijv. Hoek -/- (Huidig/Vol) of UIT)
NOTITIE: Enkel voor DVD met meerdere hoeken, druk op de HOEK knop om uw favoriete afspeelhoek te kiezen. Kiesbare afspeelhoeken hangen
af van de beschikbaarheid van de DVD inhoud.
13. Mute (voor DVD/Super VCD/VCD/CD/CD-G/HD-CD en Mp3/JPEG discs)
- Druk op de MUTE knop om het geluid uit te zetten. Er verschijnt dan het symbool voor "MUTE" op het scherm.
- Druk er nogmaals op om te annulleren, of druk op VOL+ om te annulleren en het volume aan te passen.
- Als er geen geluid is, probeer dan nogmaals op de MUTE knop te drukken om het geluid weer aan te zetten.
14. ZOOM (voor DVD / Super VCD / VCD / MP3 en JPEG discs)
- Druk op de ZOOM knop om het beeld in te zoomen.
- Er zijn 6 zoom modussen, druk op ZOOM om te wisselen tussen de verschillende opeenvolgende zoom modussen. (Zoom2 - Zoom3 - Zoom4 -
Zoom1/2 - Zoom1/3 - Zoom1/4 - Zoom UIT)
- In Zoom2-4, kunt u de navigatie knoppen gebruiken om het beeld te verdelen zodat u uw favoriete stuk ziet.
15. Herhalen A-B (voor DVD/Super VCD/VCD/CD/CD-G/HD-CD en Mp3/JPEG discs)
- Bij normaal Afspelen, vooruitspoelen of terugspoelen, druk op de A-B knop waar u het herhaalde stuk wilt beginnen. Er verschijnt op het scherm
de melding “HERHAAL A”.
- Bij normaal Afspelen, vooruitspoelen of terugspoelen, druk nogmaals op de A-B knop waar u het herhaalde stuk wilt stoppen. Er verschijnt op het
scherm de melding “HERHAAL A B”.
- De herhaal functie begint automatisch het stuk van A tot B af te spelen.
- Druk nogmaals op de A-B knop om te annulleren. Er verschijnt op het scherm de melding “A B ANNULLEREN”.
• Voor Super VCD, VCD & CD discs, herhaal A-B is enkel een functie binnen hetzelfde nummer. Als u de anderen afspeelt, wordt herhaal A-B
automatisch geannulleerd.
• Voor Super DVD discs, herhaal A-B is enkel een functie binnen hetzelfde Titel/Hoofdstuk. Als u de anderen afspeelt, wordt herhaal A-B
automatisch geannulleerd.
16. Volume (voor DVD/Super VCD/VCD/CD/CD-G/HD-CD en Mp3/JPEG discs)
- Druk op de - VOL / VOL + knoppen om het uitgaande volume aan te passen.
NOTITIE:
Afspelen van DVD discs in originele code kan niet aangepast worden.
SUBTITLE
ANGLE
om de huidige afspeelhoek weer te geven.
om de huidige ondertiteling weer te geven.
SUBTITLE
knop om uw favoriete ondertitelingstaal te kiezen.
MP3 / JPEG afspelen
Na het laden van de MP3 / JPEG disc, zal het direkt scannen naar de opgeslagen MP3 / JPEG mappen. Dan worden eerst de MP3 bestanden
automatisch weergegeven en de eerste titel wordt afgespeeld (gemarkeerd bestand). Het scherm ziet er dan zo uit:
Display huidig
MP3
afspeelfunctie
MP3 MP3
01 MP3
PICTURE
01
02
03
04
05
06
07
08
09
10
Gemarkeerd bestand
voor huidig afspelen.
Display huidig
MP3
afspeelfunctie
Knoppen voor het wisselen
tussen MP3
afspeelfunctie.
en JPEG
01 PICTURE
28
JPG
01
02
03
04
05
06
07
08
09
10
Scroll optie om de
volgende pagina
te bekijken.
Page 77

DVD GEBRUIK
.
D
D
- M.b.v. de navigatie knoppen kunt u uw favoriete map bekijken en het eerste bestand afspelen of verder gaan naar uw favoriete bestand.
NOTITIE:
- Druk op de ŻŹ knoppen om de markering van de mappen, dokumenten of modus selectie te bewegen.
- Druk op de numerieke knoppen om de inhoud direkt te selecteren. Bij getallen boven de 10, drukt u eerst op de 0. (Bijv. bestandsnummer 15, druk
op 0 en dan op 5).
- Als u MP3 bestanden afspeelt, worden er geen beelden getoond, enkel geluid.
- Bij het afspelen van JPEG discs, druk op de PROGRAM knop om de dia-effekten te kiezen. Er zijn 17 dia modussen, druk op PROGRAM
om te wisselen tussen de verschillende opeenvolgende modussen. (Start bovenaan, Start onderaan, Start vanaf links, Start vanaf rechts, Start
vanuit hoek linksboven, Start vanuit hoek rechtsboven, van links / recht overgaan, horizontale strepen, verticale strepen, vanuit 4 hoeken overgaan,
willekeurig afspelen met dia effekt UIT).
- Als u afspeelt of pauzeert met beeldweergave, kunt u de navigatie knoppen gebruiken om het beeld te draaien.
• Ÿ knop om horizontaal om te draaien.
• ź knop om verticaal om te draaien.
• Ż knop om 90˚ naar links te draaien.
• Ź knop om 90˚ naar rechts te draaien.
- Als u afspeelt of pauzeert met beeldweergave, kunt u de D.MENU knop gebruiken om in de preview modus 12 beelden te bekijken. Druk op de
knop om de volgende / vorige pagina te kiezen of druk op de numerieke knoppen om de bijbehorende beelden te bekijken.
- Het maximale JPEG beeldformaat wat weergegeven kan worden is 1280 x 1024.
Functie instellingen
DVD Functie Algemene instellingen
SYSTEE M SE T- UP
TV S YS TE
TV TY PE
WWAACCHHTTWWOOOORRD
LLEEEEFFTTIIJJD
DE FAU LT
SSEETT--UUPP VVEERRLLAA.
NOTITIE: In de SETUP modus, worden volgende functies geannulleerd of gepauzeerd:
TITLE, SUB-TITLE, DISPLAY, AFSPELEN, SETUP, STOP, SLOW / STEP, NICAM / AUDIO, FF, FR, VORIG, VOLGEND,
GOTO, ZOOM, ANGLE, PROGRAM, PREVIEW, REPEAT, REPEAT A-B.
EM
- Druk op de DVD SETUP knop om het OSD menu in de
DVD speler te activeren;
- Druk op de Ż / Ź om naar een ander sub-menu te
gaan en te markeren. Druk op de Ÿ / ź ENTER knop
om in het gemarkeerde submenu te komen.
- Druk op de DVD SETUP knop om het OSD menu te
verlaten, of beweeg de markering naar EXIT SETUP
en druk dan op de ENTER knop om te verlaten.
29
Page 78

DVD GEBRUIK
SYSTEE M SE T- UP
Systeem Setup
TV S YS TE EM
TV TY PE
WACHTWOORD
LEEFTI JD
DE FAU LT
NT SC
PAL
AU TO
NOTITIE: PAL formaat wordt meestal gebruikt voor TV's.
Controleer uw TV gebruikshandleiding
voor de ondersteunde formaten. Als
NTSC geselecteerd is met een
niet-compatibele TV kan het zijn dat u
SET-UP V ER LA .
storing of beeldverschuivingen krijgt.
TV Type
DVD’s worden geproduceerd in verschillende scherm aspect ratio’s. Dit menu laat u één van de drie aspect ratio’s kiezen.
SYSTEE M SE T- UP
TV S YS TE EM
TV TY PE
WACHTWOORD
LEEFTI JD
DE FAU LT
SET-UP V ER LA .
4:3PS
4:3LB
16:9
• 4:3 PS (Normaal)
• 4:3 LB (Normaal)
• 16:9 (Breedbeeld)
- Kies het best passende aspect ratio voor
de DVD die u w
ilt zien.
4:3PS (Normaal)
Normaal Pan en Scan wordt bij de meeste
TV’uitzendingen gebruikt en is de standaard instelling.
Het heeft een aspect ratio van 4:3. Als u deze instelling
kiest bij het bekijken van een DVD dan wordt het
beeldscherm wel gevuld, maar u zult de linker en
rechter randen van het beeld niet kunnen zien.
4:3LB (Normaal)
Normaal Letter Box zal de DVD tonen in zijn
oorspronkelijke aspect ratio dus afhankelijk van het
formaat van uw TV-scherm, kan het zijn dat u zwarte
strepen boven en onder het beeld heeft.
16:9 (Breedbeeld)
Kies deze instelling als u een breedbeeld TV heeft.
NOTITIE:
- Afspeel schermformaat kan afwijken afhankelijk van de inhoud op de disc.
- Bij discs met 4:3 inhoud, wordt er altijd een 4:3 scherm weergegeven, ongeacht welke modus u selecteert.
- Scherm ratio keuze moet passen bij de aangesloten TV / Display aspect ratio.
30
Page 79

DVD GEBRUIK
Wachtwoord
- De standaard instelling is geblokkeerd. Geen bepalingskeuze of wijziging van het paswoord mogelijk. Om de
bepalingsinstellingen te wijzigen, moet u het standaard paswoord “0000” met de numerieke toetsen invoeren en dan op ENTER
drukken om te bevestigen.
- Om het paswoord te wijzigen, voert u 4 willekeurige getallen is als de blokkade opgeheven is. Zodra de 4 getallen ingevoerd zijn,
wordt dat uw nieuwe paswoord.
SYSTEE M SE T- UP
TV S YS TE EM
TV TY PE
WACHTWOORD
LEEFTI JD
DE FAU LT
SET-UP V ER LA .
Leeftijd
- Bij het afspelen van sommige discs met een
beperking kunt u de beperkingsinstellingen naar uw
voorkeuren selecteren. Beperkingen zijn verdeeld in
acht categorieën van KIND tot
VOLWASSEN.
SYSTEE M SE T- UP
TV S YS TE EM
TV TY PE
WACHTWOORD
LEEFTI JD
DE FAU LT
SET-UP V ER LA .
SYSTEE M SE T- UP
TV S YS TE EM
TV TY PE
WACHTWOORD
LEEFTI JD
DE FAU LT
SET-UP V ER LA .
1 K IN D
2 G
3 P G
4 P G1 3
5 P G R
-
6 R
7 N C 17
-
8 V OL WA SS EN
TERUG
NOTITIE: Kan enkel aangepast worden als het
paswoord ingevoerd is. Kan enkel werken als het
paswoord geactiveerd is. Het kan echter niet het
paswoord of de beperkingsinstellingen resetten.
Default
instelling
- Druk op de ENTER knop om de fabrieksinstellingen
te herstellen.
31
Page 80

DVD GEBRUIK
Taal Instellingen
Druk op de DVD SETUP knop om het OSD menu in de DVD speler te activeren.
INST. TA AL
OS D TAAL
AU DI O TA A
ONDERT IT EL IN G
TAAL M EN U
SET-UP V ER LA .
NEDERL AN DS
- OSD Taal
Gebruik de navigatie knoppen om het OSD TAAL
instellingen icoon te selecteren, druk op ENTER om te
bevestigen. Er zijn 7 talen waar u uit kunt kiezen, druk op
de Ÿ & ź knoppen om te wisselen tussen de
verschillende talen. Druk op ENTER om te bevestigen.
NOTITIE: Als de gekozen taal niet op uw DVD inhoud
beschikbaar is, zal het automatisch de standaard
taal van de disc kiezen. De standaard taak is
ENGELS.
- Audio Taal
Gebruik de navigatie knoppen om het AUDIO TAAL instellingen icoon te selecteren, druk op ENTER om te bevestigen. Er zijn 7 talen
waar u uit kunt
kiezen, druk op de Ÿ & ź knoppen om te wisselen tussen de verschillende talen. Druk op ENTER om te bevestigen.
INST. TA AL
OS D TAAL
AU DI O TA A
ONDERT IT EL IN G
TAAL M EN U
NEDERL AN DS
NOTITIE: Als de gekozen taal niet op uw DVD inhoud
beschikbaar is, zal het automatisch de
standaard taal van de disc kiezen. De
standaard taak is ENGELS.
SET-UP V ER LA .
- Ondertitelingstaal
Gebruik de navigatie knoppen om het ONDERTITELING TAAL instellingen icoon te selecteren, druk op ENTER om te bevestigen. Er
zijn 7 talen waar u uit kunt kiezen, druk op de Ÿ & ź knoppen om te wisselen tussen de verschillende talen. Druk op ENTER om te
bevestigen.
INST. TA AL
OS D TAAL
AU DI O TA A
ONDERT IT EL IN G
TAAL M EN U
SET-UP V ER LA .
NEDERL AN DS
NOTITIE: Als de gekozen taal niet op uw DVD inhoud beschikbaar is, zal het automatisch de standaard taal van de disc
kiezen. De standaard taak is ENGELS.
32
Page 81

DVD GEBRUIK
MENU Taal
INST. TA AL
Audio Uitgang
OS D TAAL
AU DI O TAA
ONDERT IT EL IN G
TAAL M EN U
SET-UP V ER LA .
AU DI O OU T
TOON
SET-UP V ER LA .
AU DI O S
NEDERL AN DS
ET-UP
SP DI F
/
UIT
SP DI F/RAW
/
PC M
SP DI F
- Gebruik de navigatie knoppen om het MENU TAAL
instellingen icoon te selecteren, druk op ENTER om te
bevestigen. Er zijn 7 talen waar u uit kunt kiezen, druk op
de Ÿ & ź knoppen om te wisselen tussen de
verschillende talen. Druk op ENTER om te bevestigen.
Audio Instellingen
- Gebruik de navigatie knoppen om het AUDIO UIT
instellingen icoon te selecteren, druk op ENTER om te
bevestigen.
- Er zijn 3 modussen voor uw keuze; gebruik de navigatie
knoppen om de verschillende modussen te kiezen, druk
op ENTER om te bevestigen. (SPDIF / UIT SPDIF /
originele code SPDIF / PCM).
- SPDIF / UIT: Coaxiaal output uit.
- SPDIF / Originele code: Indien de coaxiaal output aangesloten is op uw audio versterker, verstuurt de coaxiale output het originele
signaal naar uw versterker bij het afspelen van discs met Dolby, MPEG inhouden. Uw versterker moet hiervoor de bijbehorende
decoderingsfunctie hebben.
- SPDIF / PCM: Indien aangesloten bij 2 kanalen digitale stereo versterker, verstuurt de coaxiale output met 2 kanalen naar uw
versterker bij het afspelen van discs met Dolby, MPEG inhouden
Toon
- Gebruik de Ÿ & ź knoppene om de Toon instellingen te wijzigen
AU DI O SE TU P
AU DI O OU T
TOON
SET-UP V ER LA .
#
+ 4
+ 2
+ 0
- 2
- 4
.
b
33
Page 82

DVD GEBRUIK
Dynamisch Bereik
DIGITA LE S ET -U P
Dolby Digital Instellingen
Duaal Mono
DYN. B ER EI K
DU AL MO NO
SET-UP V ER LA .
DIGITA LE S ET -U P
DYN. B ER EI K
DU AL MO NO
SET-UP V ER LA .
ST ER EO
MO NO L
MO NO R
MI X MO NO
VOL
6 8
/
4 8 /
2 8 /
UIT
- Als u de compressie modus wijzigt naar “Audio
output”, pas dan de compressie ratio aan voor een
ander effekt. Als VOL geselecteerd is, is de waarde
van het piek-signaal het kleinst. Als UIT geselecteerd
is, is de waarde van het piek-signaal het grootst.
- U kunt uit 4 verschillende audio output kiezen:
STEREO, MONO L, MONO R, MIX MONO. De audio
uit beschrijving van deze selecties wordt in de
onderstaande tabel weergegeven.
MODUS LINKER
ST ER E O ST EREO-L STEREO-R
L-MONO L- MO N O L- MON O
R-MONO R- MO N O R- MON O
MIX-MONO L- MO N O+R-MONO L -MO NO +R-MONO
LUIDSPREKER
RECHTER
LUIDSPREKER
34
Page 83

PROBLEMEN OPLOSSEN
Gelieve bij problemen eerst in deze lijst te kijken naar oorzaken van problemen en de
bijbehorende oplossingen voordat u contact opneemt met het service personeel.
DISPLAY PROBLEEM OPLOSSEN
Symptoom Oorzaak en Oplossing
•
Zwart scherm, stroom
indicator lampje uit
Beeld weergave
flikkert, onstabiel
Controleer of het netsnoer korrekt aangesloten is en of het
apparaat aan is
• Controleer of het signaalkabel van het input apparaat korrekt is
aangesloten
•
Controleer of het input apparaat aan is
•
Controleer of het input apparaat signaal past bij de specificaties
van dit apparaat
•
Controleer de output modus van de computer: controle
paneel-display-instellingen
•
Als de instellingen niet overeenkomen met de specificaties van
dit apparaat, wijzig dan de display instellingen.
•
Hor scan frequentie: 30kHz 75kHz
•
Ver scan frequentie: 50 Hz~75Hz
GELUID EN TV PROBLEEM OPLOSSEN
Symptoom Oorzaak en Oplossing
Gaat niet aan
Geen geluid
Sneeuw in het beeld
Afstandsbediening doet
het niet
•
Zorg ervoor dat het netsnoer goed aangesloten is
•
Zorg ervoor dat het audiokabel goed aangesloten is
•
Controleer het volume
•
Zorg ervoor dat niks de geluidsstekker verstopt.
•
Controleer het volumeVolume te laag
•
Indien het volume nog steeds te laag is nadat u het maximaal
verhoogd heeft, controleer dan of het input apparaat korrekt
ingesteld is.
•
Input antenne beschadigs of niet korrekt aangesloten
• Controleer of de batterijen van de afstandsbediening leeg zijn
• Controleer of de batterijen korrekt geplaatst zijn
• Controleer of er obstakels zijn tussen de afstandsbediening en
het ontvangstsignaal
•
Controleer of het ontvangstsignaal van de TV een sterk licht
heeft
35
Page 84

SPECIFICATIES
LCD Scherm
Video Input
Formaat 15,6" : 40 cm / 19" : 48 cm /
Type TFT kleur
TV
PC-RGB
CVBS 1.0 Vp-p +/- 5%
S-VIDEO S-Y 0.714Vp-p +/-: 5%; S-C: 0.286Vp-p +/-5%
SCART Vol SCART
Video Systeem PAL, SECAM
Audio Systeem BG, DK, I, L/L’
Ontvangstkanaal 200CH
Formaat Tot 1680x1050
H-Frequentie 30~80KHz
V-Frequentie 56~75Hz
22
" : 56 cm
@60Hz
HDMI 480i, 480p, 576i, 576p, 720p, 1080i, 1080p
Audio Input
Uitbreidingsfunctie Ingebouwde DVD Video en Audio input connectie
Stroom
Versterker 2X2.6W (4 )
Paneel Resoluties 15,6": 1366 x 768 / 19": 1440 x 900 /22":
STEREO NICAM / A2
DVD
Disc type
PC-RGB Koptelefoon input terminal
CVBS/S-VIDEO 2 RCA terminal (wit, rood)
Input DC 12V(+/-0.6V)
Management Laag stroomverbruik modus; standby < 1W
Ω
1680 x 1050
DVD VIDEO / MPEG4 / SVCD / VCD1.0, 1.1, 2.0 versie / CD-DA
36
Page 85

SPECIFICATIES
TV/DTV Input 1 IEC 75
PC-RGB Input 1 D-SUB 15Pin terminal
Input
Terminals
Output
CVBS Input 1 RCA terminal
S-Video Input 1 S-Video terminal
SCART 1 SCART terminal
HDMI Input 1 HDMI terminal
S-Video/CVBS Audio Input 2 RCA terminal
PC Audio Input 1 koptelefoon terminal
DVD SPDIF Output 1 terminal
Koptelefoon Terminal Output 1 koptelefoon terminal
ACCESSOIRES
TV set (LCD) - 1 stuk
Gebruikershandleiding - 1 stuk
Afstandsbediening (RC) - 1 stuk
Verpakkingsdoos - 1 stuk
AC Adapter - 1 stuk
37
Page 86

Page 87

Page 88

8 T 1 0 0 0 0 8 4 4 / 7 2
Page 89

LCD-TFT
LCD1521TNDVX
LCD1921TNDVX
LCD1922TNDVX
LCD2221TNDVX
MANUEL DE L’UTILISATEUR (FR)
A lire attentivement avant l’utilisation
Page 90

CONSIGNES IMPORTANTES DE SÉCURITÉ
Ce symbole indique la présence dans le boîtier de l’appareil de tensions
dangereuses qui présentent des risques d’électrocution et de blessures
corporelles.
Ce symbole indique que d’importants conseils de fonctionnement sont
fournis dans la documentation de ce produit.
Veuillez lire attentivement ce manuel avant l’utilisation de ce produit.
• Avant de brancher le cordon de l'adaptateur CC, assurez-vous que la tension électrique
du secteur local correspond à celle indiquée sur la télé LCD. Si vous n'êtes pas certain,
demandez conseil auprès du distributeur d'électricité local.
• N'introduisez jamais d'objets métalliques dans les fentes de votre télé LCD (écran à
cristaux liquides) /Moniteur ; cela peut provoquer des risques de chocs électriques.
• Pour éviter les chocs électriques, ne toucher jamais l'intérieur de la télé LCD/Moniteur ou
l’adaptateur. Seul un technicien qualifié est habilité à ouvrir le boîtier de la télé
LCD/moniteur/adaptateur.
• N'utilisez jamais votre télé LCD /moniteur si le cordon d’alimentation a été endommagé.
Ne rien déposer sur le câble d'alimentation et mettez le loin des passages des gens afin
que personne ne marche dessus.
• Débranchez le câble et le tenant par la prise et non en tirant sur le câble.
• Les fentes du boîtier de la télé LCD/moniteur/adaptateur servent à la ventilation. Pour
éviter toute surchauffe, ces fentes ne doivent pas être obstruées ou couvertes. Evitez
d'utiliser la télé LCD/moniteur sur un lit, un sofa, une couverture et toute autre surface
moelleuse. Cela pourrait bloquer les fentes de ventilation du bas du boîtier. Si vous
placez la télé LCD/moniteur dans une bibliothèque ou tout autre espace fermé,
assurez-vous de fournir une ventilation adéquate.
• N’exposez pas la télé LCD/moniteur à des températures ou des conditions d’humidité
extrêmes.
• Cet appareil ne doit pas être exposé au ruissellement ni à la projection d'eau ; évitez de
poser des objets remplis de liquides, tels que des vases, au dessus de l'appareil.
Page 91

CONSIGNES IMPORTANTES DE SÉCURITÉ
• Ne pas placer la télé LCD/moniteur sur un chariot, un support, un trépied, une table ou un
sol instables d’où elle risque de tomber. Si elle tombe elle sera endommagée, touchée ou
rayée. Ne nettoyez pas le panneau frontal avec un produit de type acétone, de l'alcool
éthylique, du toluène, de l'acide méthylique ou chlorhydrique car ils peuvent
l'endommager.
• Placez votre adaptateur CC près d'une prise électrique facilement accessible.
• Si votre la télé LCD/moniteur ne fonctionne pas normalement en particulier, en cas de
sons anormaux ou odeurs émanant de l'intérieur, débranchez-la immédiatement et
contacter un revendeur ou un centre de réparation autorisé.
• Les températures élevées peuvent engendrer des problèmes. N'exposez pas votre télé
LCD/moniteur directement aux rayons du soleil, évitez les chauffages, les fours, les
cheminées et toute autre source de chaleur.
• Débranchez l’adaptateur CC s'il ne va pas être utilisé pendant une longue période.
• Afin de limiter le risque d'incendie ou d'électrocution, et les interférences irritantes,
n'utilisez que les accessoires recommandés.
• N'essayez pas de réparer la télé LCD/moniteur par vous-même. Contactez un centre de
service qualifié.
• Débranchez l'adaptateur CC du secteur avant toute réparation.
• Assurez-vous que le centre de réparation n’utilise que des pièces de rechange agréées
ou équivalentes. L’utilisation de pièces non agréées pourrait causer un incendie, un choc
électrique ou d'autres risques.
• A la suite de tout entretien ou réparation, assurez-vous que le centre de réparation a
effectué les contrôles de sécurité nécessaires et certifie que la télé LCD TFT/moniteur est
utilisable en toute sécurité.
• L’appareil étant de CLASSE I, il doit être branché sur une prise SECTEUR disposant
d’une mise à la terre.
Page 92

SOMMAIRE
PANNEAUX DES TOUCHES DE FONCTIONS
Panneau frontal 1 Clavier local 1
EQUIPEMENT EXTERNE
Schéma de branchement 2
TÉLÉCOMMANDE
Télécommande 3 Touches de la
Touches de la télécommande (Mode DVD) 7
DEMARRAGE
Mise en marche
MANUAL DE L’OSD TELE
Installation pour la première fois
Options du menu Vidéo
Options du menu Configuration
Options du menu Minuterie
FONCTION TELETEXTE
Fonction Télétexte
UTILISATION DU DVD
Utilisation de base 24 Formats DVD pris en charge 25
Guide d’utilisation des fonctions DVD 26 Lecture MP3/JPEG 28
Configuration des fonctions 29
9
Sélection de la source 9
11
13
14
18
22
Installation des piles
Informations té
Options du menu Audio
Entrées VGA / HDMI
Options du menu Fonctions
télécommande (Mode TV) 4
8
lé 12
14
17
18
DÉPANNAGE
Problèmes d’affichage
SPÉCIFICATIONS
Spécifications
ACCESSOIRES
Accessoires
35
Problèmes audio et télé
36
37
35
Page 93

PANNEAUX DES TOUCHES DE FONCTIONS
PANNEAU FRONTAL
Voyant (il est rouge en mode veille, vert en fonctionnement normal).
Capteur infrarouge de la télécommande
CLAVIER LOCAL (VERSIONS)
TV+DVD (15,6“, 19“) TV+DVD (22“)
PLAY\ II
EJECT
TV/AV
CH+
CH-
VOL+
VOLMENU
POWER
TV/AV – pour sélectionner la source d’entrée
CH+ - pour augmenter le numéro de canal
CH- - pour diminuer le numéro de canal
VOL+ - pour augmenter le volume
VOL
-
- pour diminuer le volume
MENU – pour entrer ou quitter le menu
POWER – pour basculer entre le mode veille et le mode allumé
TV/AV NEXT
CH+ PREV
CH- STOP
VOL+ PLAY\ II
VOL- EJECT
MENU
POWER
NEXT – pour lire le Titre / Chapitre / piste suivante
PREV – pour lire le Titre / Chapitre / piste précédent
STOP – pour arrêter la lecture
PLAY\ II – pour lancer ou suspendre la lecture
EJECT – pour sortir le disque
1
Page 94

EQUIPEMENT EXTERNE
SCHEMA DE BRANCHEMENT
Lecteur DVD ou
REMARQUE
magnétoscope
(VCR
)
4. Entrée audio PC
5. Entrée droite audio CVBS / S-Vidéo
6. Entrée gauche audio CVBS / S-Vidéo
7. Entrée CVBS
8. Entrée S-vidéo
9. Fiche péritel
10. Entrée VGA PC
11. Entrée HDMI
12. Entrée alimentation 12 V CC
Vous devez brancher tous les câbles avant de mettre sous tension.
2
1. Sortie DVD SPDIF
2. Signal d’entrée TV
3. Sortie écouteurs
Page 95

TÉLÉCOMMANDE
1
23
25
27
28
29
30
31
2
3
424
5
626
7
8
9
10
11
12
13
32
33
34
35
36
37
38
39
40
14
15
16
17
18
19
20
21
22
3
Page 96

TÉLÉCOMMANDE
TOUCHES DE LA TÉLÉCOMMANDE
Mode
1. AUTO
2. MUTE
3. TOUCHES NUMERIQUES
4. (RAPPEL)
5. NICAM
6. CH+
7. DISPLAY
8. CH-
9. (haut)
10. ENTER
11. (Droite)
12. EXIT
13. SMODE
14. SLEEP
15. FAV+
Non utilisé.
16. EPG
Non utilisé.
17. LANG
Non utilisé.
18. SUBTITLE
Non utilisé.
19. REVEAL
20. SUBPAGE
21. JAUNE
22. BLEU
Sélectionne un lien télétexte.
TV
Réservé
Pour couper le son.
Pour sélectionner un numéro de chaîne
Bascule entre la chaîne précédente et actuelle.
Affiche des informations concernant le son de la chaîne, sélectionne le son NICAM du canal.
Pour augmenter le numéro de canal.
Affiche des informations concernant la chaîne courante.
Pour diminuer le numéro de canal.
Pour sélectionner une rubrique plus haut dans le menu ou pour augmenter le numéro de
canal.
Pour confirmer la sélection.
Pour déplacer le curseur vers la droite ou ajuster l’élément sélectionné dans le menu, ou
augmenter le volume.
Pour quitter ou retourner au menu précédent.
Pour sélectionner un mode audio de l'égaliseur : personn
musique/ théâtre.
pour définir le temps de sommeil.
Affiche les informations télétexte masquées.
Ouvre une sous-page de télétexte.
Sélectionne un lien télétexte.
el
/ voix/
4
Page 97

TÉLÉCOMMANDE
TOUCHES DE LA TÉLÉCOMMANDE
23. STANDBY
Bascule entre le mode veille et le mode allumé.
24. -/- -
Bascule entre le mode un et deux chiffres d’entrée de numéro de canal.
25. ASPECT
Change le rapport d’image selon la séquence : plein écran, Zoom1, Zoom2,
Auto, 4:3, 14:9, 16:9,
26. VOL+
Pour
augmenter le volume.
27. VOL-
Pour
diminuer le volume.
28. (Gauche)
Pour déplacer le curseur vers la gauche ou ajuster l’élément sélectionné dans le menu, ou
diminuer le volume.
29. (BAS)
Pour déplacer le curseur vers le bas dans le menu ou
30. MENU LCD
Pour ouvrir/fermer le
31. PMODE
Pour changer le mode image selon la séquence : Standard, Personn
Sport,Doux,Jeu.
32. INPUT
Pour ouvrir/fermer le
l’option DVD pour activer le DVD.
33. FAV-
Non utilisé.
34. FAV
Non utilisé.
35. HOLD
Pour figer la page télétexte actuelle.
36. TEXT
Pour basculer entre les modes télétexte Enabled (activé)/Mixed (mélangé)/Disabled
(désactivé).
37. SIZE
Agrandir la taille de texte de la page télétexte.
38. INDEX
Affiche la page sommaire.
39. VERT
Sélectionne un lien télétexte.
40. ROUGE
Sélectionne un lien télétexte.
sous-titre
menu utilisateur.
menu sélection de la source. Utilisez l’option TV pour activer la télé et
.
pour changer le numéro de canal.
el,Film,
5
Page 98

TÉLÉCOMMANDE
41
43
44
46
47
49
50
53
54
57
60
42
45
48
51
52
55
56
58
59
6
Page 99

TÉLÉCOMMANDE
TOUCHES DE LA TÉLÉCOMMANDE
Mode DVD
41. (EJECT)
Pour entrer/sortir un disque.
42. DVD SETUP
Pour afficher le menu
43. (LECTURE / PAUSE)
Pour lancer ou suspendre la lecture.
44. (STOP)
Pour arrêter la lecture.
45. (RALENTI)
Différentes vitesses de lecture en séquence.
46. (PRÉCÉDENT)
Lecture jusqu’au
47. (SUIVANT)
Lecture jusqu’au Titre / Chapitre / Piste suivant.
48. AUDIO
Bascule entre différents modes audio en séquence.
49. (ARRIERE)
Bascule entre différentes vitesses en séquence.
50. (AVANT)
Bascule entre différentes vitesses en séquence.
51. ANGLE
Change l’angle de caméra angle en mode DVD.
52. ZOOM
Bascule entre différents modes zoom en séquence.
53. D.MENU
Retourne au menu principal.
54. TITLE
Retour au menu titre DVD.
55. D.DISP
Pour activer le menu déroulant du titre courant à l’écran.
56. GOTO (ALLER À)
Pour lire le
57. PROG
Lecture programmée.
58. REPEAT (RÉPÉTER)
Répétition de lecture.
59. A-B
Pour répéter une portion.
60. INTRO
Non utilisé.
Titre / Chapitre / Piste précédent.
Titre / Chapitre / Piste favorite.
de configuration
DVD.
7
Page 100

TÉLÉCOMMANDE
INSTALLATION DES PILES
Retirez le couvercle des piles. Insérez deux piles SUM-4 (AAA) en faisant correspondre les polarités
+/- des piles avec celles inscrites au fond du compartiment pour piles comme illustré :
AUTONOMIE DES PILES
• Normalement les piles peuvent durer un an.
• Changer les piles si la télécommande n’a plus d’effet lorsqu’elle est très proche du capteur de
la télé.
•
Utiliser des piles SUM-4 (AAA).
REMARQUES
• N’utilisez jamais des piles rechargeables.
• Ne tentez jamais de recharger, court-circuiter, démonter, chauffer ou jeter les piles dans du
feu.
• Faites attention de ne pas faire tomber la télécommande ou lui donner des coups, ceci peut
l’endommager.
• N’utilisez pas des piles anciennes avec des nouvelles.
• Si vous n’allez pas utiliser la télécommande pendant une longue période, retirez les piles
pour éviter toute fuite de liquide. Nettoyez éventuellement l’électrolyte avant de remplacer les
piles de la télécommande.
• Nettoyez immédiatement à l’eau de l’électrolyte qui rentre en contact avec la peau.
AVERTISSEMENT
Gardez les piles hors de la portée des enfants.
l’électrolyte e
st avalé par accident
:
.
Contactez immédiatement un médecin si de
8
 Loading...