

Page 1

43UHL2600 49UHL2600 55UHL2600
3
Full compatible wi th
Ultra HD format
Receive digital
satellite TV
standard DVB-S2
Receive digital
satellite TV
standard DVB-T2
IMPORTANT
Please read this manual carefully before installing and operating the TV.
Keep this manual handy for further reference
USER MANUAL
Page 2

Page 3
Important Safety Instructions . . . . . . . . . . . . . . . . . . . . . . . . . . . . . . . . . . . . . . . . . . . -02 03
What is included in the box . . . . . . . . . . . . . . . . . . . . . . . . . . . . . . . . . . . . . . . . . . . .04
Attaching Detaching the stand and wall mounting/ . . . . . . . . . . . . . . . . . . . . . . . . .05
Getting Started First Time Installation- . . . . . . . . . . . . . . . . . . . . . . . . . . . . . . . . . .06
TV Buttons and Input Source Menu . . . . . . . . . . . . . . . . . . . . . . . . . . . . . . . . . . . . . 07
Remote Control . . . . . . . . . . . . . . . . . . . . . . . . . . . . . . . . . . . . . . . . . . . . . . . . . . . . . 08
Remote Control Preparation . . . . . . . . . . . . . . . . . . . . . . . . . . . . . . . . . . . . . . . . . . 09
Connections . . . . . . . . . . . . . . . . . . . . . . . . . . . . . . . . . . . . . . . . . . . . . . . . . . . . . . . . .10-11
TV Menu Operation . . . . . . . . . . . . . . . . . . . . . . . . . . . . . . . . . . . . . . . . . . . . . . . . . . 12-22
Setting Menu
Picture Menu
. . . . . . . . . . . . . . . . . . . . . . . . . . . . . . . . . . . . . . . . . . . . . .
12
. . . . . . . . . . . . . . . . . . . . . . . . . . . . . . . . . . . . . . . . . . . . .12-13
Sound Menu . . . . . . . . . . . . . . . . . . . . . . . . . . . . . . . . . . . . . . . . . . . . .14-15
Time Menu 18-19. . . . . . . . . . . . . . . . . . . . . . . . . . . . . . . . . . . . . . . . . . . . . . . .
Channnel Menu 15-18. . . . . . . . . . . . . . . . . . . . . . . . . . . . . . . . . . . . . . . . . . . .
System Menu 20-21. . . . . . . . . . . . . . . . . . . . . . . . . . . . . . . . . . . . . . . . . . . . . . .
About TV Menu 21-22. . . . . . . . . . . . . . . . . . . . . . . . . . . . . . . . . . . . . . . . . . . . .
Programme Guide . . . . . . . . . . . . . . . . . . . . . . . . . . . . . . . . . . . . . . . . . . . . . . . . . . . .23
USB Mode Media Player/ . . . . . . . . . . . . . . . . . . . . . . . . . . . . . . . . . . . . . . . . . . . . . 24-25
General Information . . . . . . . . . . . . . . . . . . . . . . . . . . . . . . . . . . . . . . . . . . . . . . . . . . 26
Frequently Asked Questions 26. . . . . . . . . . . . . . . . . . . . . . . . . . . . . . . . .
End of Life Disposal . . . . . . . . . . . . . . . . . . . . . . . . . . . . . . . . . . . . . . . . 28
27
CONTENTS
01
Page 4
IMPORTANT SAFETY INSTRUCTIONS
Please read these instructions All the safety and operating instructions should be read before the.
appliance is operated.
W
arnings
•
y
•
the television.
Dispose of this television and any components including batteries in an environmentally friendly manner. If in doubt,
please contact your local authority for details of recycling.
Safety
•
ensure that any replacement is of the same amperage and approved with the BSI mark.
• The television should be connected to a mains socket outlet with a protective earthing connection.
•
event that a replacement mains cable is required, contact the manufacturer for a suitable replacement.
• Never use the television if it is damaged in any way.
•
• Ensure the television is not placed on top of the power cable as the weight of the television may damage the cable and
cause a safety hazard.
• Never place mobile phones, speakers or any other device which may cause magnetic or radio interference in close
proximity to the television. If interference is apparent, move the device causing the interference away from the television.
• To disconnect the apparatus from the mains, disconnect the plug from the wall socket. Always ensure the switch on the
wall socket is readily accesible.
•
• Install the product at least 5cm from the wall for ventilation.
•
To clean this unit, wipe with a soft, dry cloth. If the surfaces are extremely dirty, use a moist soft cloth dipped in a soap
and water solution or a weak detergent solution.
• Use eyeglass cleaner to carefully remove stubborn dirt from the LCD/LED Screen.
• Never use alcohol, paint thinners or benzene to clean this unit.
• Before using a chemically treated cloth, read the instructions that came with the cloth carefully.
surface a malfunction may occur, .
•
The safest way to transport your item is in the original box/packaging - Please save your packaging for this purpose.
• You will need original box/packaging in the event of warranty/service repair or support. We are unable to carry out
warranty/service if you are unable to package it correctly.
away from this product at all times.
CAUTION If water or other liquid enters the television through the display panel:
Packaging
Maintenance
02
Page 5
Please read these instructions All the safety and operating instructions should be read before the.
appliance is operated.
Fixed Image Displays
panel.
type of irreversible LCD LED panel deterioration can be limited by observing the following steps/ :
1 Reduce the brightness contrast setting to a minimum acceptable viewing level. / .
3 Turn the power off when not in actual use. .
Examples of images that you need to watch out for are as follows this is not an exhaustive list( ):
• TV Channel Logos: e.g. Shopping channel logos and pricing displays-especially if they are bright and stationary. Moving or
low-contrast graphics are less likely to cause ageing of the screen.
• Time Displays.
• Teletext: Do not view a stationary page for a long period of time.
• TV/DVD Menus: e.g. Listings of DVD disk content.
• Pause Mode: Do not leave the TV in pause mode for long periods of time, e.g. When watching DVDs or videos.
Batteries
• Observe the correct polarity when inserting batteries.
• erent types of batteries together or mix old and new batteries.
• Dispose of batteries in an environmentally friendly way.
• Certain regions may regulate the disposal of batteries.
• If you are not using your TV for an extended period of time then remove the batteries to prevent
possible damage due to leakage.
• Please consult your local authority regarding disposal
This equipment is a Class II or doubel insulated electrical appliance It has been designed in.
such a way that it does not require a safety connection to electrical earth.
IMPORTANT SAFETY INSTRUCTIONS
Important Information Regarding Use of Video Games Computers Captions or Other, ,
Important: Once a ‘shadow image/screen burn’ occurs, it will never disappear and is not repairable under
warranty.
Cd
How do I dispose of this product?
ROI: Waste electrical products should not be disposed of with household waste. Separate
disposal facilities exist. Check with your Local Authority or retailer for recycling advice.
03
Page 6
Please save your packaging as you will need this in the event of warranty service repair or support/ .
We are unable to carry out warranty service if you are unable to package it correctly The safest way to/ .
package your item in the event of warranty service repair is in it s original box packaging/ ' / .
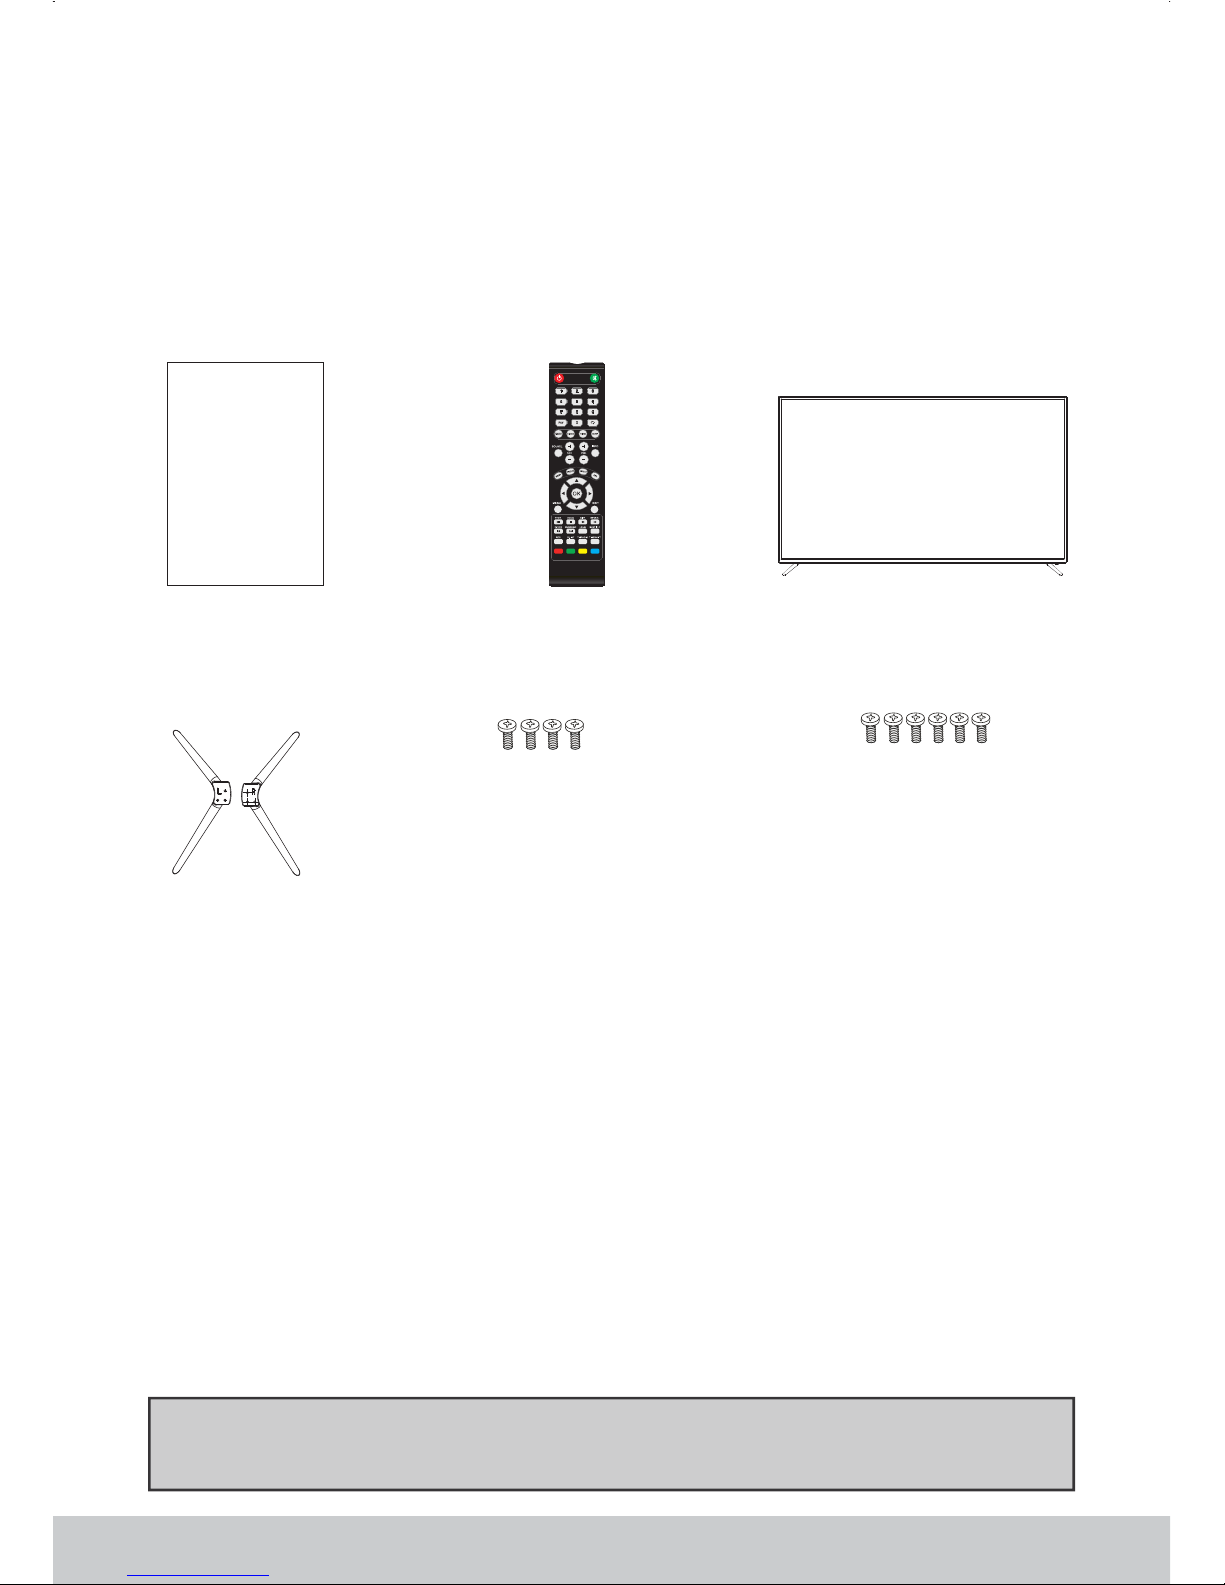
WHAT IS INCLUDED IN THE BOX
Accessories
Included with this TV are the following accessories:
1 x Instruction Manual
1 x TV
1 x Remote Control
2 x Stands
43 ST4x14MM Fixing Screws'' 49 55 M4x20MM Fixing Screws'', ''
04
Page 7
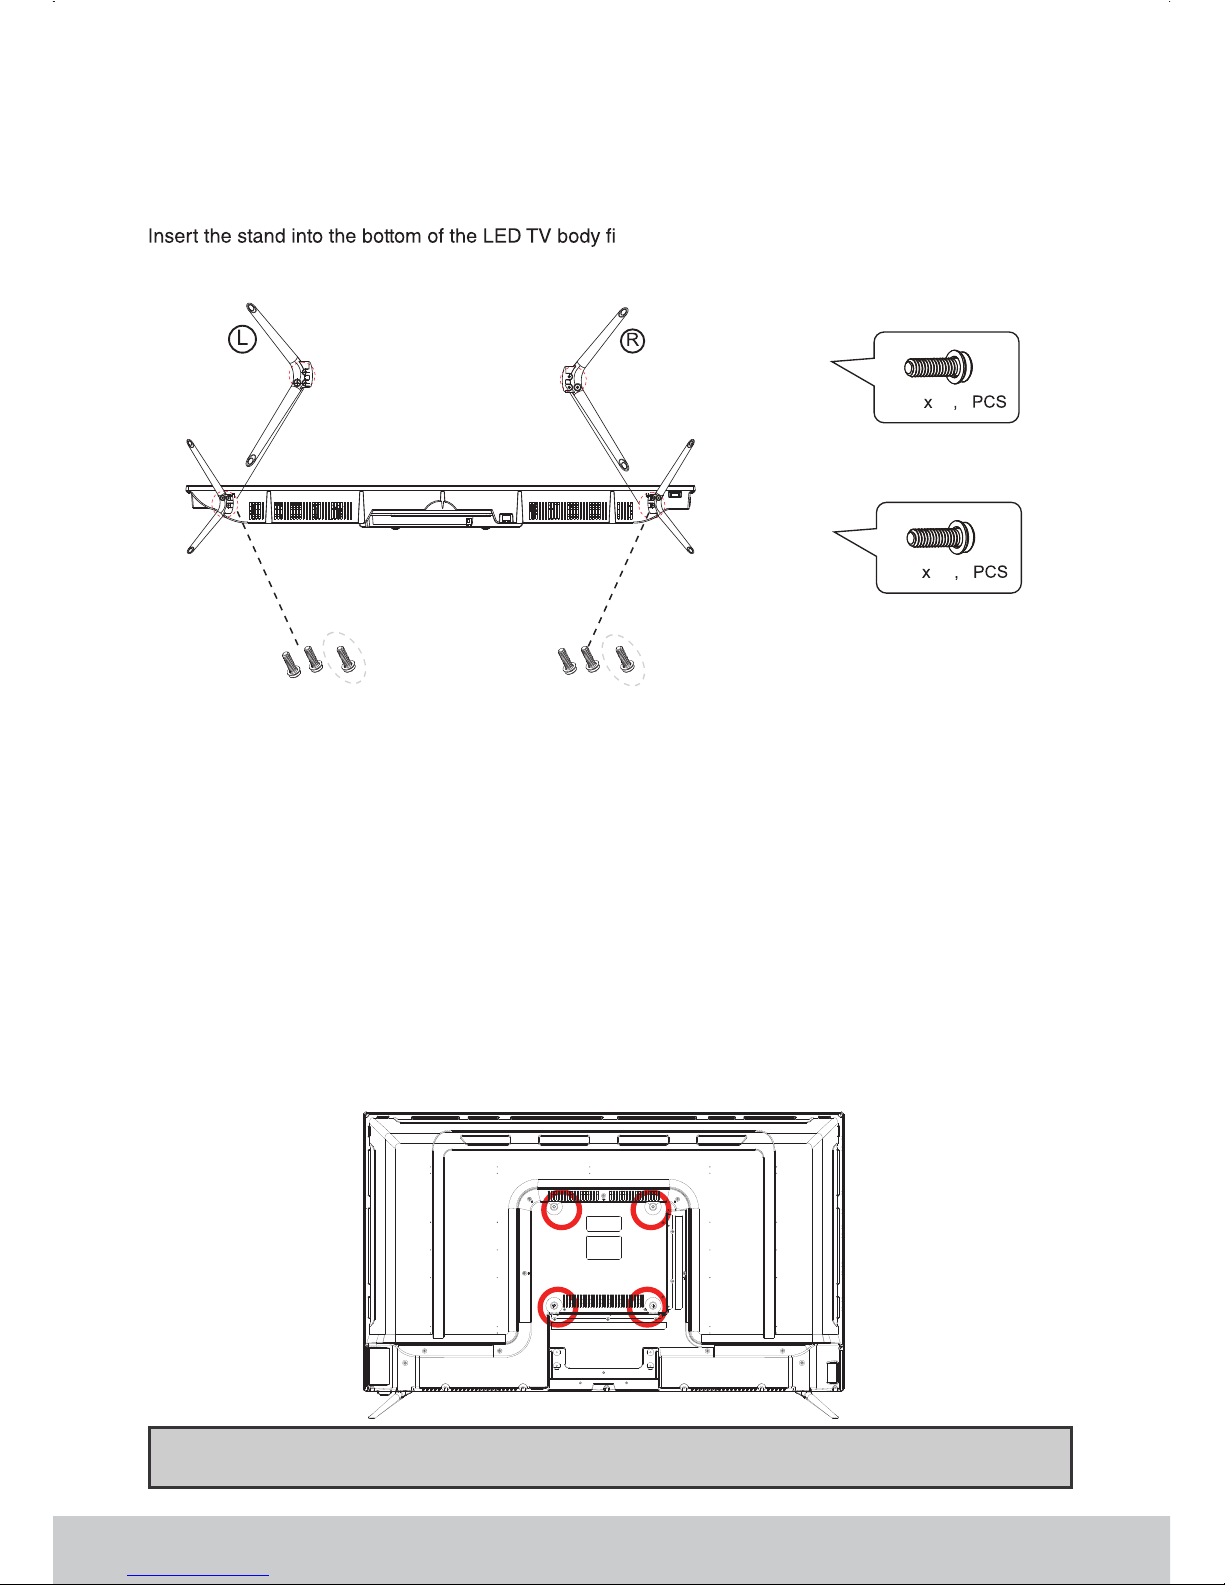
Detaching the Stand
To remove the screws in the circled area then the stand will come off.
Wall mounting the TV
WARNING: Only attempt to wall mount your TV if you are
competent to do so If you are in any doubt seek professional assistance. .
1 Fix the wall mounting bracket to the wall) 2 Tighten the screws M6 onto the TV) ( ) .
3 Put the TV on the bracket) .
IMPORTANT -
B
efore drilling any holes in the wall ensure you are not drilling where
there could be any electric wires water or gas pipes, .
Important If wall mounting this TV only use the spacers already provided in the wall mounting holes— , .
Using other screws which are longer could cause irreparable damage to internal parts.
ATTACHING DETACHING THE STAND/
Attaching the Stand
t and tighten the screws.
This television requires a VESA 200x200.
ST4
M4
14204
6
43''
49''
55''
05
Page 8
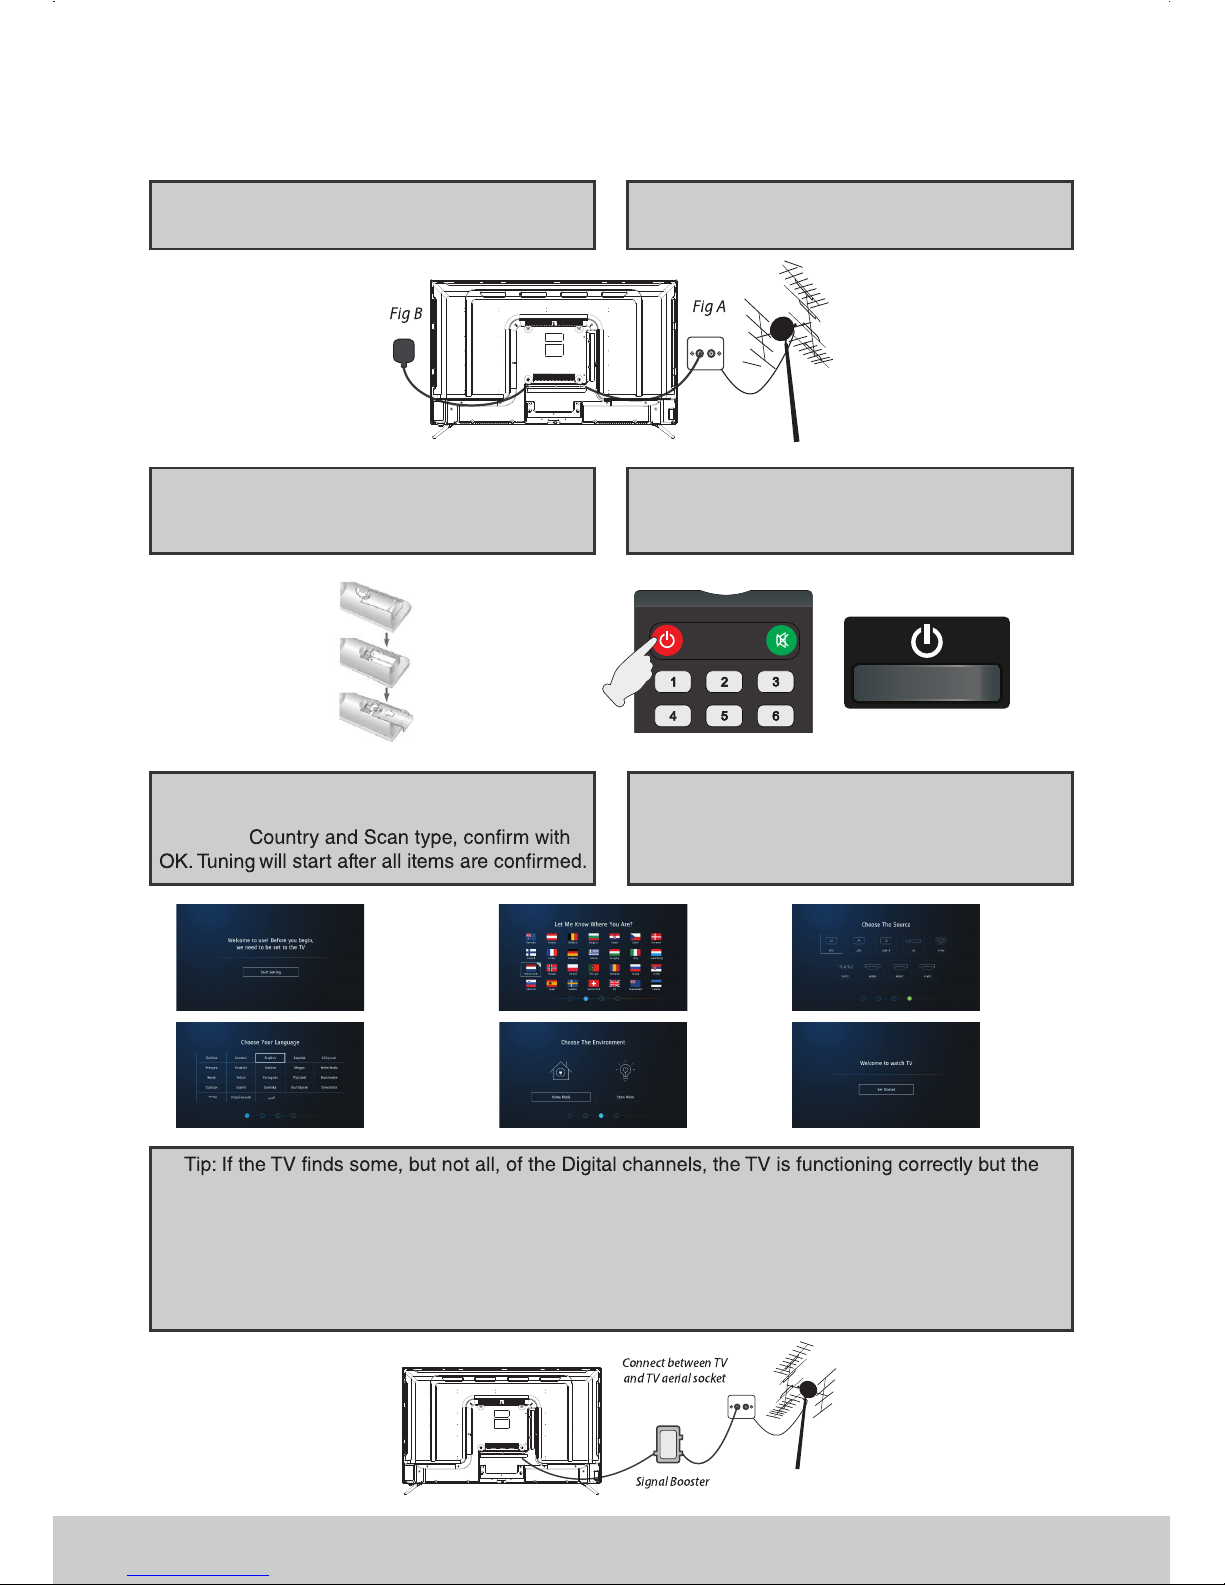
1 Connect the TV to the TV Aerial wall socket) .
( )Fig A
2 Connect the power cable to the wall socket)
( )Fig B
3 Insert 2 x AAA batteries not supplied into) ( )
the Remote control Take care to observe.
correct polarity.
4 Switch on the television using the red power) ( )
button on the remote control or on the side of,
your TV.
5 You will now be welcomed with the First Time.
Installation screen. “Use <> to choose OSD
language,
6 If you would like to to skip current tunning and)
start another if you choose ATV DTV tuning( &
in the previous screen press MENU To cancel), .
completely press EXIT, .
signal being received is not strong enough The signal strength needs to be above 85 you can. ( % -
see the signal strength the TV is receiving when you change channels programmes You will need to/ )
increase the signal reception in order to receive all of the channels available The most economical.
way to do this is by purchasing and connecting a signal booster’‘ in between the TV and the TV aerial
socket If this does not solve the problem you will need to upgrade the TV aerial to a digital hi gain. , -
compatible aerial.
GETTING STARTED First Time Installation-
06
Page 9
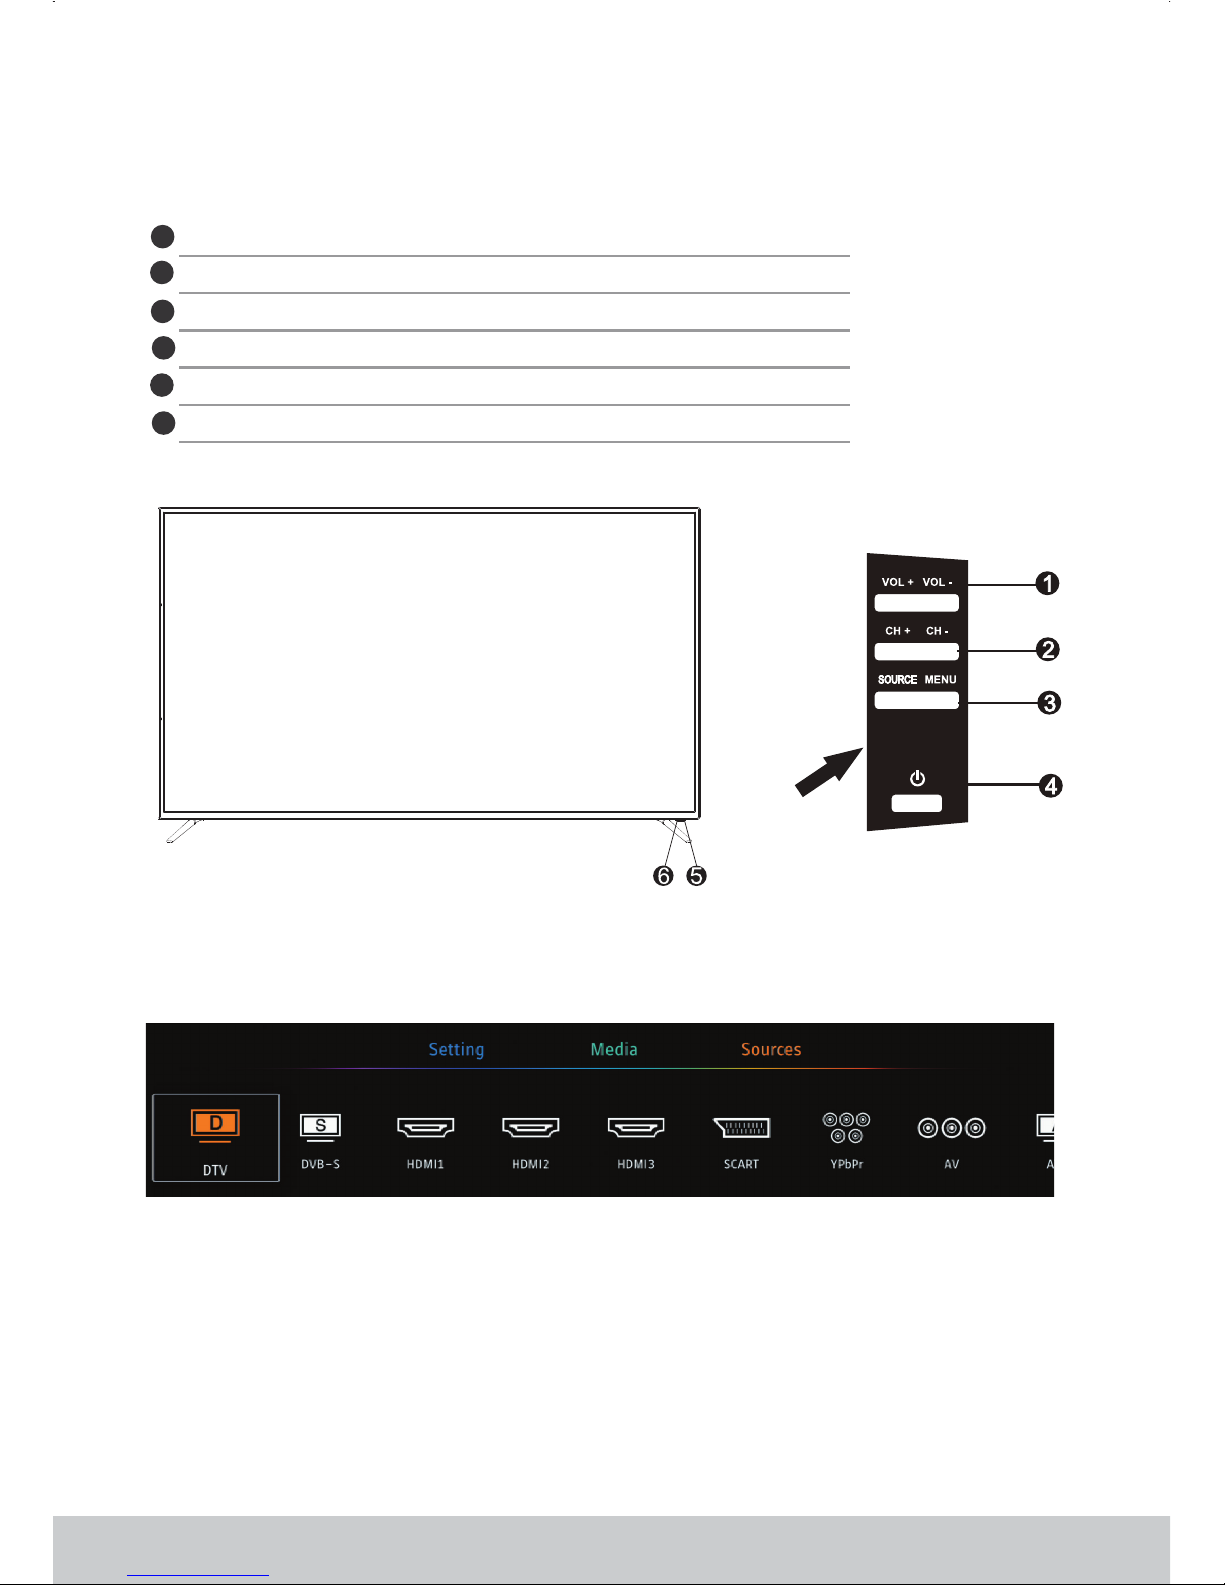
Choosing Mode Input Source/
To switch between the different input connections/ .
A Using the buttons on the remote control) :
1 Press SOURCE The source menu will) [ ] - appear.
2 Press or to select the input you require) [\/] [/\] .
3 Press OK) [ ].
B Using the buttons on the Television) :
1 Press SOURCE) [ ].
2 Scroll up down using CH CH buttons to the) / +/ - input source you require/ .
3 Press Vol to change input source to the one) + / selected.
Volume up down and menu left right/ / .
Channel up down and menu up down/ / .
Displays the input source menu. | /Displays Menu OSD
Standby Power On Off/ .
Red illuminates in standby mode green when your TV is switched on, .
Infrared sensor for the remote control.
1
2
3
4
6
5
TV BUTTONS & SOURCE MENU
07
Page 10
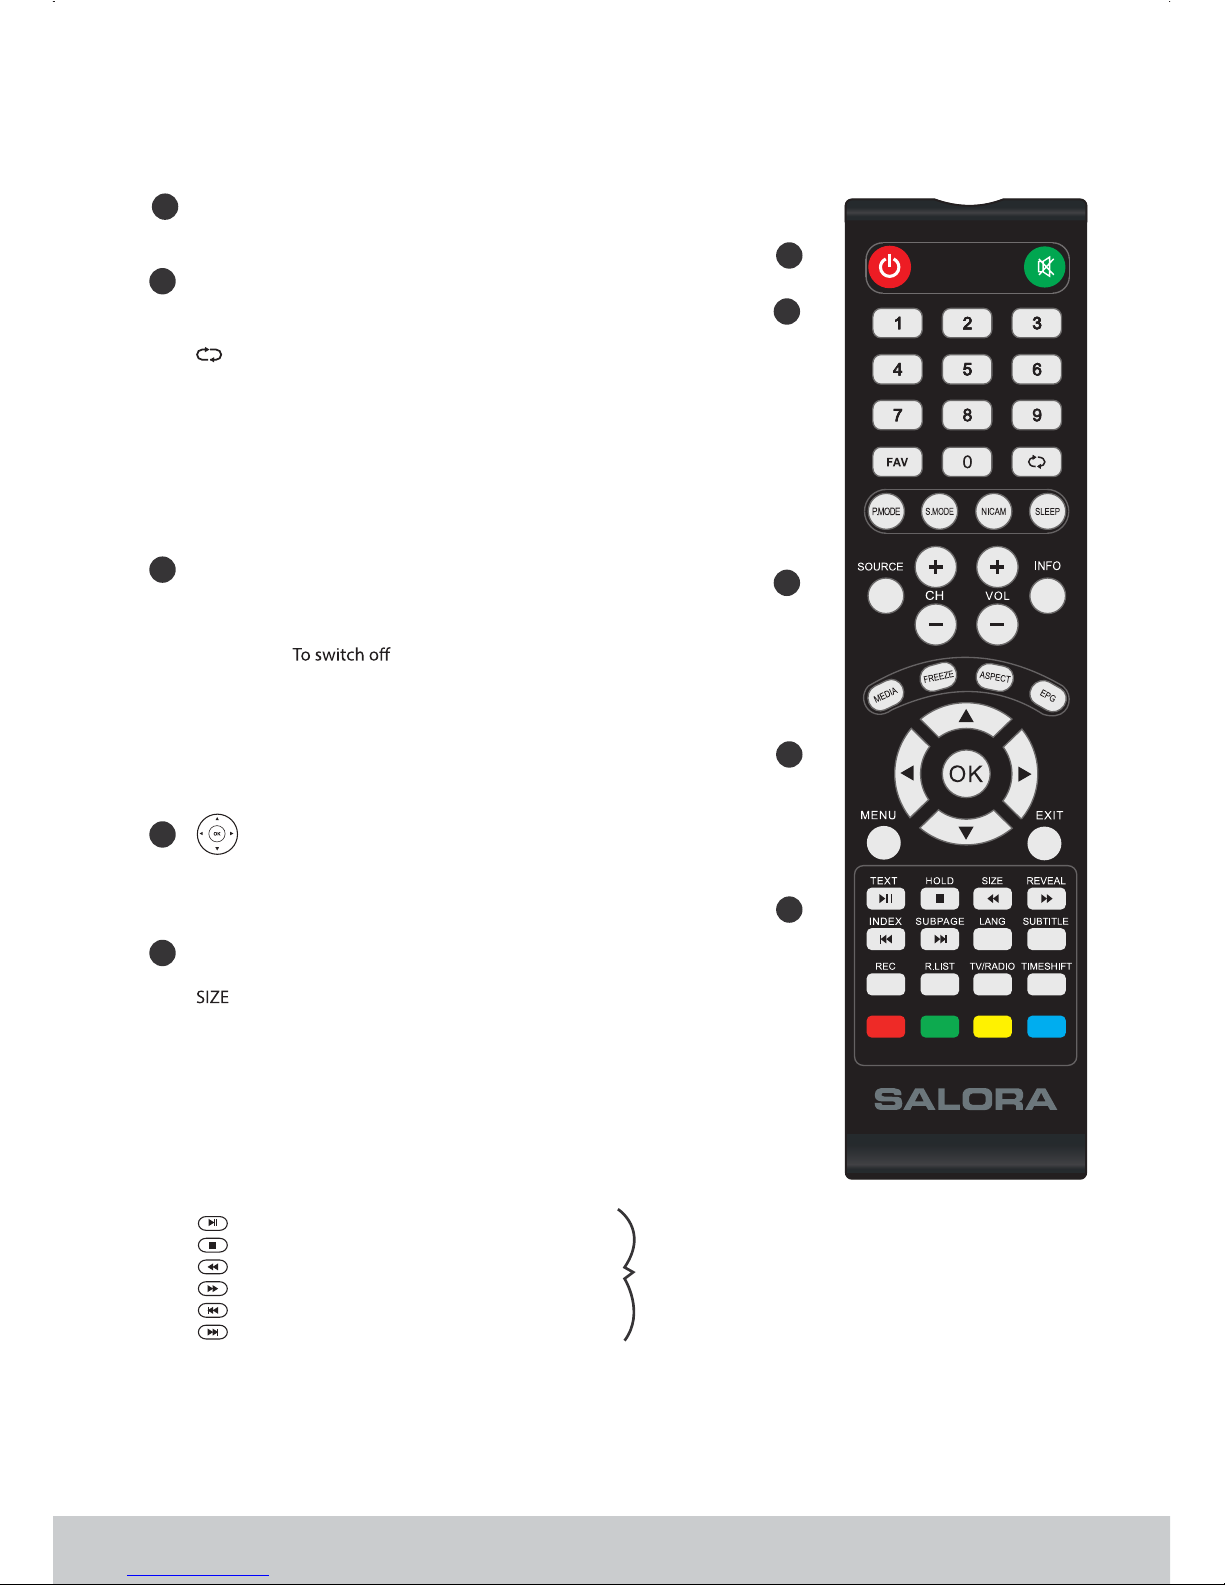
Switch on TV when in standby or vice versa.
MUTE
POWER
Mute the sound or vice versa.
SOURCE To display the input source menu/
P MODE. Scrolls through picture mode options
S MODE. Scrolls through sound mode options
ASPECT Scrolls through aspect mode options
EPG Opens the 7 Day TV Guide Digital TV mode( )
NICAM
SLEEP
Press repeatedly to cycle through the sleep options
FAV Display Favourites List.
REC LIST To display the Recorded List and Schedule List.
REC
NUMBER BUTTONS
0 9 to select a TV channel directly- .
To return to the previous channel viewed.
COLOURED BUTTONS
For navigating as prompted on screen
the screen when listening to radio / displays
media information during USB playback
TV RADIO/ Switches between DVB T TV and Radio channels-
MENU To display OSD menu
EXIT To exit all menus
CH + - To increase or decrease the number of the channel
being watched
VOL + - To increase decrease the sound level/
To Record the current television programme
TEXT To enter Teletext mode
HOLD Teletext mode Hold current page which is displayed-
REVEAL Teletext mode To reveal or hide the hidden words-
MEDIA Switches to USB media screen
FREEZE To freeze the picture.
INDEX To display the index page
S PAGE. Sub coded page access.
SUBTITLE To switch the dialogue at the bottom of the screen on o( / )
LANG Language options.
T SHIFT. In DTV mode press to execute the time shift function, .
1
2
3
4
5
1
4
5
2
3
To play pause/
To stop the playback
To play in fast rewind mode
To play in fast forward mode
To restart the current chapter
To advance forward to the next chapter
Only operates
when a
compatible
USB device
is connected
Allows you to navigate the on screen menusand adjust the system settings to your preference
TV nicam select.
INFO
Change the size of display in Teletext mode.
REMOTE CONTROL
08
Page 11

R
EMOTE CONTROL PREPARATION
BATTERY INSTALLATION
Iinstall the batteries as the following pictures. Be sure + and – terminals are positioned as indicated
in the battery compartment.
SERVICE LIFE OF BATTERIES
- .The batteries normally last for one year although this depends on how often the remote control is used
- , .If the remote control fails to work even when it is operated near the player replace the batteries
- .Use two size AAA dry batteries
NOTE
Do not drop, step on or otherwise impact the remote control.This may damage the parts or lead to
:
°
malfunction
If the remote control is not going to be used for a long time, remove the batteries.
.
°
REMOTE CONTROL OPERATION
Point the remote control from no more than about 6m from the remote control sensor and within about
60° from the front of the player.
NOTES:
- .The operating distance may vary according to the brightness of the room
- .Do not point bright light at remote control sensor
- .Do not place objects between the remote control and the remote control sensor
- Do not use this remote control while simultaneously operating the remote control of any other
equipments.
Precaution on battery use
Improper use of batteries can result in leakage of chemicals and or explosion Be sure to follow the/ .
instructions below:
Place batteries with their terminals corresponding to the and indications(+) (-) .
Different types of batteries have different characteristics Do not mix batteries of different types. .
Do not mix old and new batteries Mixing old and new batteries can shorten the life of new batteries.
and or cause old batteries to leak chemicals/ .
Remove batteries as soon as they are non operable Chemicals that leak from batteries can cause a- .
rash If chemical leakage is found wipe with a cloth. , .
The batteries battery pack of batteries installed shall not be exposed to excessive heat such as( )
sunshine fire or the like, .
IMPORTANT NOTES ON BATTERIES :
Please help to protect the environment It is recommended to dispose of old batteries in collection centers.
specially designed for that.
09
Page 12

CONNECTIONS
Side Connections
A COAX Out
B SCART
C Earphone Out
SCART Input
RF Input tv antenna( )
D HDMI
G SAT
H YPbPr(MINI)
I AV(MINI)
EFANT
USB
Connector for satellite dish
HDMI Input
Connect to the device's composite terminal
External AV signal input
Coax Audio Output
USB Input
Earphone Out
J CI(CI SLOT)
CI Card is not included The card reader input CI
(commoninterface)this requires CAM
(condltional access module)used for payTV.
Bottom Connections
nition (HD) Device
Option 1
- Via HDMI to HDMI cable.
A HDMI cable can output both video and audio and enables you to enjoy digital quality video and audio withminimal loss of quality.
Tv’s Input Source should be set to HDMI The HDMI ports support HDMI 2 2 input/ . .
NOTE For optimum performance always use this option if the device you are connecting is equipped with an:
HDMI output.
HDMI OUT
HDMI
Pay per view services a smartcard to
be inse rted into the TV
If you subscrible to a pay per view
service the provider will i ssue with
a CAM c ard “Smartcard”.The CA M
can the n be in serte d into the
COMMO N INT ERFACE por t.
。
Note:
J
H
I
G
10
Page 13

Option 2
3 5mm jack is not included in the box enables you to enjoy better audio with minimal loss of quality, .
Earphone connection :
Use theHEADPHONES output of your TV set to listen the audio of the unit through your own stereo headphones
( ). , .not included When you connect headphones to the unit the main speakers will be muted
Notes Hearing experts advise against exposure to continuous extended play at loud volume levels while using:
headphone or earphones pos( ), sible hearing loss may result.
er
Connecting a DVD Player Recorder Video Recorder or Cable,or PC/ ,
Connecting a USB Ports
Tv’s Input Source should be set to SCART/ .
COAX OUT
DVD or VCR
ANT In
SCART
SCART
OUT
ANTSAT
SAT
3.5mm jack earphone output
Earphone
ININ
IN
COAX
OUT
COAX
COAX
USB
Notes you can use recharge function of USB ports for your phone when your TV is turned on But it will take a long time: ,
because the USB voltage is only 5V 500mA However due to the different phone models TV models are different USB interface--- . , , ,
output voltage current and mobile phones may need to enter the voltage current does not match there will be some security risks, , , .
-
11
Page 14

Setting Menu
Picture Menu
Press ◄ ► button to select the
Quick Settings
Quick Settings【 】 【 】/ .
Audio Track
Subtitle Track
Teletext
Record List
Schedule List
Select the program audio language.
On/Off the telete xt.
View the program list you set to watch.
Select the program subtitle language.
View the program list you set to record.
Press ◄ ► button to select Setting
Press to enter setting.ENTER
【 】 【 】/ .
1. Press button to select the option that you want to adjust in the menu.
2. Press button to adjust.
3. After finishing your adjustment, Press button to save and return to the previous menu.
▼ ▲ Picture
Enter
Enter
【 】/【 】
Picture Mode
【 】/【 】【 】/【 】
ptional Standard/User/
Press to .
Press button to select , then press ◄ ► button to select.
(O : ECO/ Dynamic/Mild/Vivid
select Picture Mode quickly
▼ ▲ Picture Mode
PMODE
).
Note:
12
Page 15

ECO
User
Image colors more gentle to protect eyes.
Reduce screen brightness, improved contrast for energy saving.
The default mode, to make users experience high-qualit y images under normal light.
User-defined picture settings
This mode is more suitable for watching dynamic program
This mode enhance contrast and sharpness to make picture more vivid.
Standard
Mild
Vivid
.Dynamic
Aspect Ratio
Aspect RatioPress to select , press ◄ ► to select. Auto 16 9 4 3 Zoom1 Zoom2▼ ▲ ( )., : , : , ,
【 】/【 】 【 】/【 】
Colour Temp
Contrast
Colour Temp
Adjust image contrast.
Adjust image noice.
.
.
Adjust the overall color of the image.
ptional
t to adjust
ptional
t to adjust
ptional
【 】/【 】
【 】/【 】
【 】/【 】
. 【 】/【 】
【 】/【 】
【 】/【 】
ress oselect
ress oselect
Press to select press ◄ ►
to select. O :Cool/Standard/Wa rm
P a ◄ ►
O :On/Off
P a ◄ ►
O :Off/Low/Medium/High
▼ ▲
▼ ▲
▼ ▲
( ).
nd press
( ).
nd press
( ).
,
,
Cool
Standard
Warm
Dynamic
Noice Reduction
Produces a gentle blue-hued image.
Produces a vivid image.
Produces a red-hued image.
Advanced Settings
Advanced SettingsPress button to select , then press ◄ ► button to select.▼ ▲ ▼ ▲
【 】/【 】 【 】/【 】/【 】/【 】
NOTE: The following functions are available , When select the User in picture mode.
Brightness/Contrast/Colour/Tint/Sharpness/Backlight
Brightness
Contrast
Colour
Tint
Sharpness
Backlight
Adjust the light output of entire picture, it will effect the dark region of the picture.
Adjust the highlight intensity of picture, but the shadow of the picture is invariable.
Adjust the saturation of the color based on your own like.
Adjust image brightness.
P a ◄ ►
Adjust image color density.
Adjust the image edge sharpness.
▼ ▲ , nd press
ress o select【 】/【 】t to adjust.【 】/【 】
13
Page 16

Sound Menu
Sound
1. Press / bu tton to select the option that you want to adjust in the menu.
2. Press button to adjust.
3. After finishing your adjustment, Press button to save and return to the previous menu.
▼ ▲ Sound
Enter
Enter
Sound Mode
Press button to select , then press ◄ ► button to select.
(O : Music/Theater/User
N select So und Mode quickly
▼ ▲ Sound Mode
SMODE
).
:
【 】/【 】 【 】/【 】
ptional Standard/
Press toote .
Produce a balanced sound in all environments.
Preserve the original sound.Good for musical program s.
Enhance treble and bass for a rich sound experience.
Select to customize sound settings.
Standard
Music
Theater
User
Surround Sound
Press button to select , then press ◄ ► button to
choose ON/OFF.
Press button to select , then press ◄ ► button
to adjust.
This item is used for reducing the difference between program’s volume automatically.
Press button to select , then press ◄ ► button to choose ON/OFF.
Press button to , then press ◄ ► button
to adjust.
▼ ▲
▼ ▲ ▼ ▲
▼ ▲
▼ ▲ ▼ ▲
Speaker
Speaker
AVL
AVL
Advanced Setting
Advanced Settings
【 】/【 】
【 】/【 】 【 】/【 】/
【 】/【 】
【 】/【 】 【 】/【 】/
【 】/【 】
【 】/【 】
【 】/【 】
【 】/【 】
s
Surround Sound
14
Page 17

Balance
Balance
Adjust the left and right channel output balance.
Press button to select , then press ◄ ► button to ad just.▼ ▲
【 】/【 】 【 】/【 】
Audio Description
Select ONOFF.
Set the volume of audio description.
AD Volume
Channel-S2
Select the DVB-S in Source .
Channel Menu
1. Press / bu tton to select the option that you want to adjust in the menu.
2. Press button to adjust.
3. After finishing your adjustment, Press button to save and return to the previous menu.
▼ ▲ Channel
Enter
Enter
Antenna Setup
Press button to select , then press ◄ ► button to select.▼ ▲
【 】/【 】 【 】/【 】Antenna Setup
Antenna Setup
Antenna SetupPress button to select , then press ◄ ► button to select.▼ ▲
【 】/【 】 【 】/【 】
15
Page 18

Channel Type
Channel Type
Service Type
Service Type
Scan Mode
Scan Mode
Press button to select , then press ◄ ► button to select.
(O : Free/Free+Scamble/Scamble
Press button to select , then press ◄ ► button to select.
(O : DTV/All/Radio
Press button to select , then pr ess ◄ ► button to select.
(O : Blind Scan/Default/Network Scan
▼ ▲
▼ ▲
▼ ▲
).
).
).
【 】/【 】
【 】/【 】
【 】/【 】
【 】/【 】
【 】/【 】
【 】/【 】
ptional
ptional
ptional
Press ▼ / ▲ button to select , then press ► button to enter.
Auto Tuning
Auto Tuning Enter/
Channel-T2
Select the DTV in Source .And Select Air/Cable.
Auto Scan
Auto Scan Enter/
ENTER
MENU
Press / button to select , then press ► button to enter.
Select the DTV/DTV+ATV/ATV, and press to search the programs.
First searching the DTV ,press to stop and searching the ATV.
▼ ▲
16
Page 19

Manual
Manual Enter/
Signal Information
Signal Information, Enter
Press / button to select , then press ► button to enter.
Press / button to select press the button to view the detail
information about the signal. Only available when ther e is signal in DTV.
▼ ▲
▼ ▲
Set CAM PIN Code
Input the password so that you can watch the program encrypted.
17
Page 20

Press button to select , then press
button to enter sub-menu.
Press to edit the program.
(Available function:Lock/Fav/Move/Delete)
Channel List
ENTER Channel List ENTER
MENU
Time
1. Press / bu tton to select the option that you want to adjust in the menu.
2. Press button to adjust.
3. After finishing your adjustment, Press button to save and return to the previous menu.
▼ ▲ Time
Enter
MENU
T Menuime
On Time
On TimePress button to select the default source, the default channel ,the
default volume which would show on the TV when turni ng on the TV.
▼ ▲【 】/【 】 , andset
18
Page 21

Press
Sleep Timer
Sleep Timer
【 】/【 】/【 】【 】 .
【 】/【 】
【 】/【 】/【 】【 】 .
【 】/【 】
to set the time
to set the time
ptional off, , , , ,
▼ ▲
▼ ▲
▼ ▲
▼ ▲
◄ / ►
Press button to select to turn off the TV at the time you set.
And press ◄ / ►
Press button to select .
(O : 10min 20min 30min,60min 90min,120min 240min
Off Time
Off Time
).
).
).
Press button to select Press ◄ ► to select.
(O : 20s 30s 60
Press button to select Press ◄ ► to select.
(O :
▼ ▲
▼ ▲
OSD Timer
OSD Timer
Auto Standby
Auto Standby,,
【 】/【 】
【 】/【 】
【 】/【 】
【 】/【 】
, , , ,ptional N 10S
ptional
ever s
Off 3H 4H, 5H, ,
19
Page 22

Country
CountryPress button to select Press ◄ ► to select.▼ ▲
【 】/【 】【 】/【 】 ,
System
1. Press / bu tton to select the option that you want to adjust in the menu.
2. Press button to adjust.
3. After finishing your adjustment, Press button to save and return to the previous menu.
▼ ▲ System
Enter
Enter
System Menu
Language
Language
MENU Language
Audio Language
Primary Audio Language/Secondary Audio Language
Subtitle Language
Primary Subtitle Langua ge/Secondary Subtitle Language
Lock
Lock
Press / button to select . Pre ss ◄ / ► to select the display language.
Press / button to select OSD language.
Press / button to select .
Press ◄ / ► to select the Audio language.
Press / button to select .
Press ◄ / ► to select the Subtitl e language.
Press / button to select . Press ◄ / ► to select .
▼ ▲
▼ ▲
▼ ▲
▼ ▲
▼ ▲
20
Page 23

Parental Guidance
by setting
Some program may not be suitable for children. Parents can
Parental Guidance ,
Press button to select Parental Guidance.
Press button to select Off, 4 5 6 7 18.(Age of children)
shield unsuitable show automatically,
.
▼ / ▲
▼ / ▲ , , , ...
HDMI CEC
Advanced Settings
PVR&Time-Shift Setting
Hearing Impaired
Setup Wizard
Store Mode
Blue Screen
Press to set the HDMI CEC function.
Set the PVR&Time shift function.
Show the description of the program.
Enter the first time installation to set the settings.
Enter the Store mode.
ON/OFF the blue screen.
1. Press / bu tton to select the option that you want to adjust in the menu.
2. Press button to adjust.
3. After finishing your adjustment, Press button to save and return to the previous menu.
▼ ▲ About TV
Enter
Enter
System Information
System Information
Restore to Default
Restore to Default
Press button to select , then press button to enter.
Press button to select to the default settings.
▼ ▲
▼ ▲
【 】/【 】
【 】/【 】
ENTER
About TV Menu
21
Page 24

Press button to select ress ◄ ► to set.
(The default password:1417).
Press button to select
Press button to select to lock/unlock the
channel.
▼ ▲
▼ ▲
▼ ▲
【 】/【 】
【 】/【 】
【 】/【 】
【 】/【 】
green button
Lock
Set Password
Set Password
Channel Lock
Channel Lock
, and p
, and press
.
Key Lock
Select to lock/unlock t .he key board
22
Page 25

PROGRAMME GUIDE/USB RECORD
EPG
Press EPG button on the remote control to select.
Info
Record
Press to view the information of the program.
Press to set the time to record the program.
Remind
Press to set the time to remind you the program, and change to the program at the time you set.
PVR
.Press PVR button on the remoter to select
Press Play button to play the record file right now.
Stop and finish recording, and quit PVR .
Pause recording.
Press to play fast backward.
Press to play fast forward.
23
Page 26

USB MODE/MEDIA PLAYER
Note: Before operating menu,Plug in USB device, then press button to set the Input Source toUSB INPUT USB .
Press ◄ / ► button to select USB Enterin the Source menu, then press button to enter.
Press ◄ / ► button to select the option you want to adjust in the
main menu,USB
then press
button to enter.
【 】/【 】▼ ▲ button to select file and ENTER
Photo
Press button to select PHOTO in the main menu, then press button to enter.
Press button to select drive disk you want to watch, then press button to enter.
Press / button to select return option to back to the previous menu.
Enter
Enter
▼ ▲/
◄ / ►
▼ ▲
Press button to select MUSIC in the main menu, then press button to enter.▼ ▲/
◄ / ►
Enter
EnterPress button to select drive disk you want to watch, then press button to enter.
Press / button to select return option to back to the previous menu.▼ ▲
Music
When highlighting the option you select, the file information will appear on the right.
Press CH+/- to switch operation focus between File List and Player.
Press to repeat the music.
Press to play back faster. Press to pause the music.
Press to play forward faster.
Press to select the encoding of lyric.
Press to play the previous photo.
Rotate 90° anticlockwise.
Press to pause playing next photo.
Rotate 90° clockwise.
Press to play the next photo.
Press to repeat the photos in the current folder.
View the list to play.
View the information of the photo.
24
Page 27

Movie
Press button to select MOVIE in the main menu, then press button to enter
Press button to select drive disk you want to watch, then press button to enter.
Press / button to select return option to back to the previous menu.
Enter
Enter
▼ ▲/
◄ / ►
▼ ▲
Text
Press ◄ / ► button to select TEXT in the main menu, then press button to enter.Enter
EnterPress / button to select drive disk you want to watch, then press button to enter.
Press / button to select return option to back to the previous menu.
▼ ▲
▼ ▲
When highlighting the option you select, the file information will appear on the right.
Press to play the previous movie.
Press to play back faster.
Press to pause the movie.
Press to play forward faster.
Press to play the next movie.
Press to set the picture scale.
Press to repeat the movie.
View the list to play.
View the information of the movie.
25
Page 28

26
Page 29

Customer Type
43UHL2600 49UHL2600 55UHL2600
" " "43 49 55
U 3840 2160HD x
230cd/m2200cd/m2 200cd/m2
170/150
3XHDMI,1XSCART,
1 x ,SAT 1xANT
1 x 3.5mm jack for earphone, 1 x Coax Audio output,AV(mini) ,YPbPr(mini)
1 CI port – 1 USB port for Recording and Playback
2×8W
16:9
4800:1
6000:1
1200:1
8ms
8ms 6ms
941.184(H) × 529.416(V) 1087.7(H) × 617.8(V) 1087.7(H) × 617.8(V)
Movie: , , , Music: 3,AVI MPEG MKV RMVB MP WAV
Photo: , Text:JPG JPEG TXT
AC 100V 240 V 50Hz / 60Hz
80W
〜 〜 , A C 100V 24 0V 50Hz / 60Hz
120W
〜 〜 ,
AC 100V 240V 50Hz / 60Hz
135W
〜 〜 ,
(<0,5W StandBy) (<0,5W StandBy)
(<0,5W StandBy)
971 620mm (W) x mm (H) 1105 706mm (W) x mm (H)
1243.7 781.3mm (W) x mm (H)
x mm (D)95.6 x mm (D)102.4 x mm (D)97
7.35kg 11kg10.5kg
27
Page 30

28
Page 31

Page 32

 Loading...