

Page 1

GEBRUIKSAANWIJZING
Lees de gebruiksaanwijzing alvorens de TV te gebruiken en
houd hem bij de hand voor latere referentie.
Page 2

1
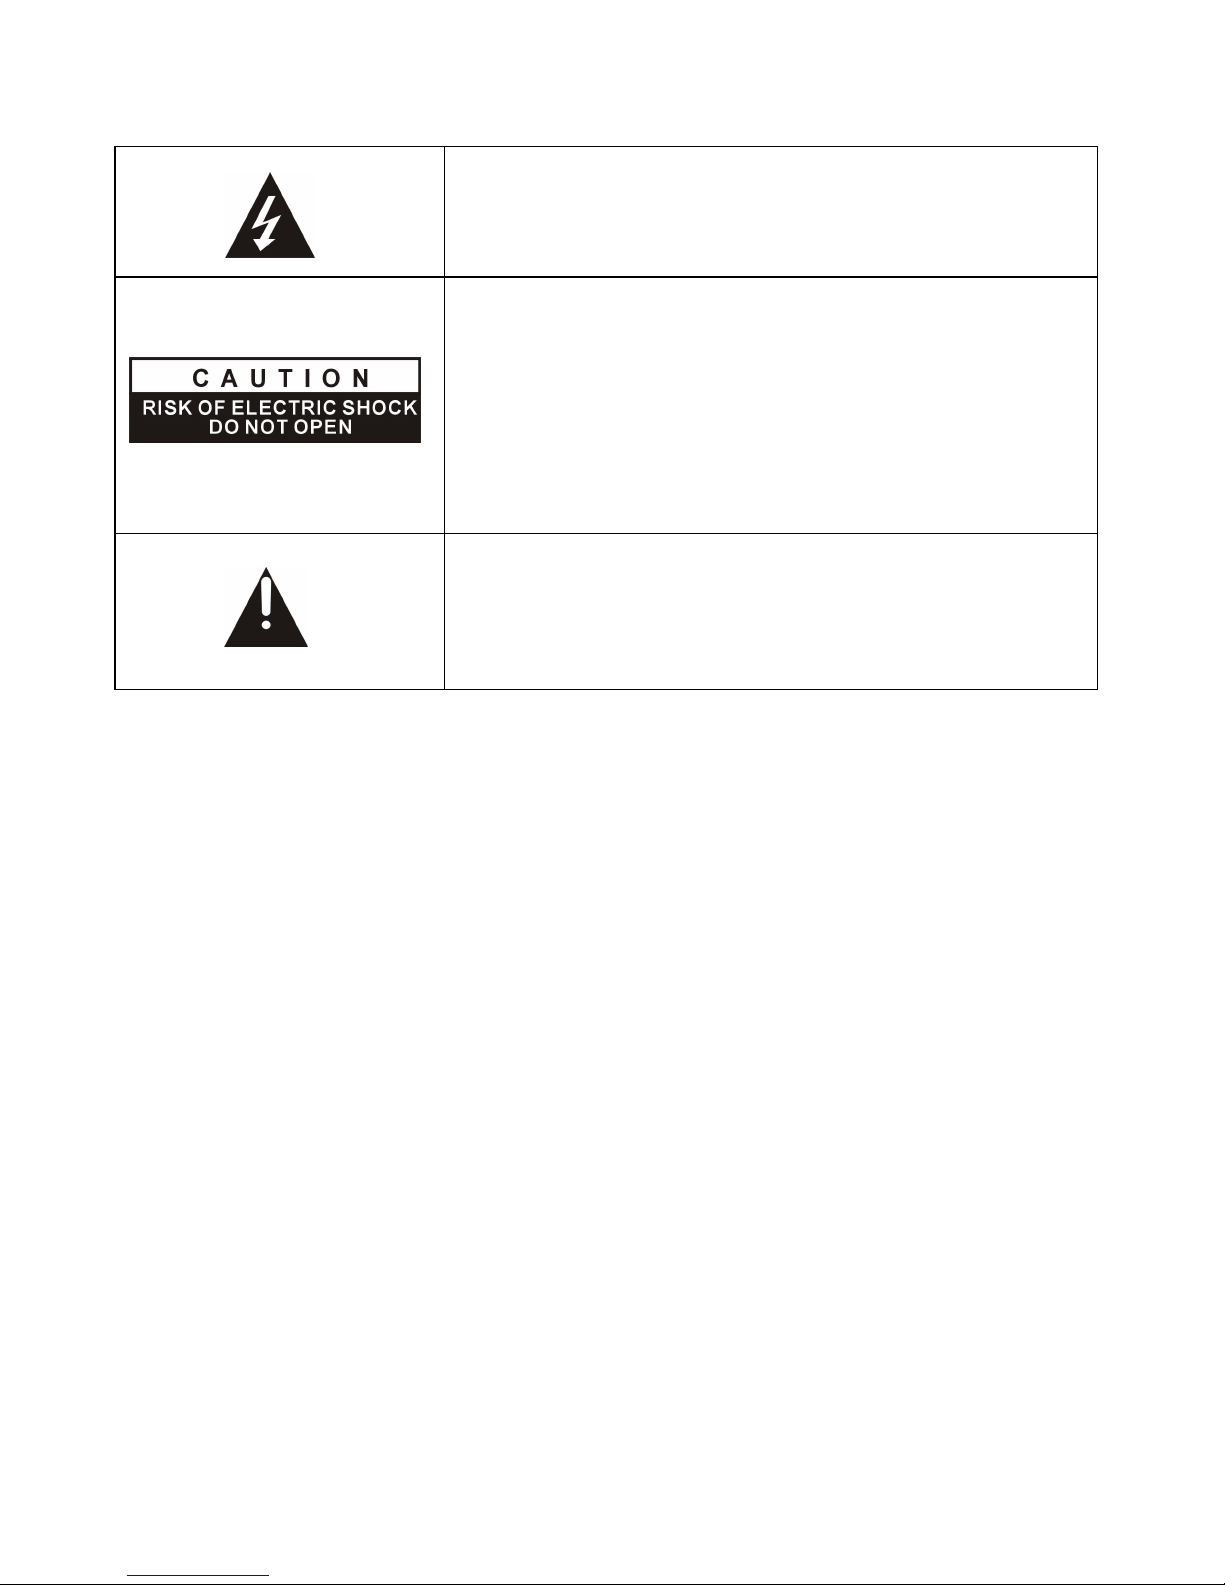
Veiligheidsinformatie
OPGELET
DE DVD/VIDEO CD/CD SPELER IS EEN KLASSE 1 LASERPRODUCT. DE DVD/VIDEO
CD/CD SPELER GEBRUIKT EEN ZICHTBARE LASERSTRAAL DIE GEVAARLIJKE
BLOOTSTELLING AAN STRALING KAN VEROORZAKEN. ZORG ERVOOR DE
DVD/VIDEO CD/CD SPELER TE GEBRUIKEN ZOALS BESCHREVEN IN DE
GEBRUIKSAANWIJZING.
KIJK NIET, ALS DE DVD/VIDEO CD/CD SPELER OP HET STROOMNET IS
AANGESLOTEN, IN DE OPENING VAN DE DISCLADE OF IN ANDERE OPENINGEN
VAN DEZE SPELER.
HET GEBRUIK VAN ANDERE AFSTELLINGEN OF PROCEDURES DAN DIE
BESCHREVEN IN DEZE HANDLEIDING KAN AANLEIDING GEVEN TOT
GEVAARLIJKE BLOOTSTELLING AAN STRALING.
OPEN HET TOESTEL NIET EN PROBEER HET NIET ZELF TE HERSTELLEN.
CONSULTEER EEN SERVICEDIENST.
VERWITTIGING
GEBRUIK, OM BRAND OF EEN ELEKTRISCHE SCHOK TE VERMIJDEN, GEEN
VERLENGSNOER OF STOPCONTACT WAARIN DE STEKKER NIET VOLLEDIG INGEBRACHT
KAN WORDEN.
OM BRAND OF EEN ELEKTRISCHE SCHOK TE VERMIJDEN MAG DIT TOESTEL NIET AAN
REGEN OF VOCHT BLOOTGESTELD WORDEN.
OPGELET – ALS HET TOESTEL OPEN IS, NIET NAAR DE LASERSTRAAL KIJKEN.
VENTILATIE – DE NORMALE VENTILATIE VAN HET TOESTEL MAG NIET
ONDERBROKEN WORDEN.
BELANGRIJKE INSTRUCTIES
Page 3
2
Het bliksemsymbool in een gelijkbenige driehoek
dient om u ervan te verwittigen dat er binnen het
toestel gevaarlijke spanningen aanwezig zijn.
OPGELET
RISICO VAN ELEKTRISCHE SCHOK
NIET OPENEN
OPGELET: OM HET RISICO OP EEN ELEKTRISCHE
SCHOK TE VERMIJDEN MAG HET TOESTEL NIET
GEOPEND WORDEN. BINNENIN BEVINDEN ZICH
GEEN ONDERDELEN VOOR DE GEBRUIKER.
CONSULTEER EEN SERVICEDIENST.
Het uitroepteken in een gelijkbenige driehoek dient
om u te verwittigen dat bij dit toestel belangrijke
instructies meegeleverd worden.
Volg altijd de basis veiligheidsvoorschriften bij gebruik van elektrische producten, zeker
wanneer er kinderen aanwezig zijn.
VERWITTIGING: trek, om elektrische schokken te vermijden, de stekker uit het
stopcontact alvorens het te verplaatsen, te herstellen of te reinigen.
Lees alle instructies alvorens het toestel te gebruiken
Gebruik het toestel niet naast water.
Houd rekening met de instructies bij de installatie van het toestel.
Plaats het toestel niet naast een warmtebron zoals een radiator, een
verwarmingstoestel, een kachel of andere apparaten die warmte produceren (inclusief
versterkers).
Zorg ervoor dat er niet op het netsnoer getrapt kan worden, zeker op die plaatsen waar
het snoer het toestel verlaat.
Als het toestel op het stroomnet is aangesloten is het klaar voor gebruik.
Trek de stekker uit het stopcontact in geval van onweer of wanneer het gedurende
lange tijd niet gebruikt wordt.
Stel het toestel niet bloot aan druppels of spatten en zorg ervoor dat er zich geen
voorwerpen, gevuld met een vloeistof, zoals een vaas, boven het toestel geplaatst worden.
Stel het toestel niet bloot aan direct zonlicht, extreme warmte, vocht of stof.
Gebruik het toestel niet als het netsnoer beschadigd is, wanneer het niet goed werkt,
wanneer het gevallen of beschadigd is of wanneer het werd blootgesteld aan vuil, water of
een andere vloeistof.
Probeer niet zelf het toestel te herstellen. Maak gebruik van de serviceafdeling.
Page 4
3
Hou het toestel op een bepaalde afstand van magnetische voorwerpen zoals
luidsprekers.
LASER VEILIGHEID
Dit toestel beschikt over een optisch lasersysteem in een CD-mechanisme
dat voorzien is van de nodige veiligheidsvoorzieningen. Probeer het niet
uit elkaar te nemen. Blootstelling aan de laserstraal kan oogschade
veroorzaken. Dit is een Klasse-1 laserproduct. Het gebruik van andere
afstellingen of procedures dan die beschreven in deze handleiding kan
aanleiding geven tot gevaarlijke blootstelling aan straling. Dit toestel mag
alleen hersteld worden door gekwalificeerd personeel. Het lasersysteem
komt overeen met de naald van een platenspeler. Ondanks het feit dat dit
toestel een laser pickuplens gebruikt, is het volledig veilig indien gebruikt
volgens de instructies.
OPMERKING: de fabrikant is niet verantwoordelijk voor radio of TV interferentie die
veroorzaakt wordt door niet toegelaten wijzigingen. Zulke wijzigingen kunnen een
gebruiksverbod met zich meebrengen.
1) Gebruik toetsen en schakelaars zoals aangegeven in deze gebruiksaanwijzing.
2) Controleer of de adapter correct is geïnstalleerd voordat u de voeding voor het eerst
inschakelt.
3) Bewaar uw discs op een koele plaats zodat ze niet door warmte beschadigd kunnen
worden.
Behandelen en gebruik van batterijen
Houd batterijen verwijderd van kinderen en dieren. Alleen volwassenen mogen
omgaan met batterijen.
Werp de batterijen nooit in een vuur en stel ze niet bloot aan een vuur of andere
warmtebronnen.
Volg de instructies betreffende de veiligheid en het gebruik van batterijen.
Behandelen en gebruik van discs
Behandeling
Houd de disc aan de rand vast zodat er geen vingerafdrukken op kunnen komen.
Vingerafdrukken, vuil en krassen kunnen voor vervorming zorgen.
Schrijf niet op de labelkant met een ballpoint of ander schrijfgerief.
Gebruik geen reinigingssprays, benzine, thinner of antistatische vloeistoffen.
Zorg ervoor de disc niet te laten vallen of te buigen.
Plaats niet meer dan één disc in de disclade.
Probeer de disclade niet te sluiten als de disc niet goed is ingebracht.
Page 5

4
Bewaar de disc in zijn doosje als hij niet gebruikt wordt.
Als het oppervlak bevuild is
Gebruik een zacht en vochtig (alleen water) doekje.
Wrijf vanuit het midden naar de rand van de disc zodat er geen vervorming kan ontstaan.
(Indien u de disc in een cirkelbeweging reinigt kunnen er cirkelvormige krassen ontstaan
die in vervorming resulteren).
Als de disc uit een koude in een warme ruimte gebracht wordt, kan er zich condens
op de disc vormen.
Verwijder de condens met een zacht droog doekje alvorens hem te gebruiken.
Onjuiste manier om discs te bewaren
De discs kunnen beschadigd worden als u ze op volgende wijze bewaart:
Op plaatsen met direct zonlicht.
In vochtige en stoffige ruimtes.
Op plaatsen in de buurt van een warmtebron.
Gebruiksaanwijzing ................................................................................ …………………..1
Afstandsbediening.................................................................................. …………………..1
Alle afbeeldingen in deze gebruiksaanwijzing dienen als referentie beschouwd te
worden. Op het toestel kunnen deze eventueel iets afwijken.
ACCESSOIRES
Page 6

5
INHOUD
BEGINNEN
BELANGRIJKE INSTRUCTIES.....................................................................................1-4
ACCESSOIRES ............................................................................................................…4
EIGENSCHAPPEN .......................................................................................................…6
ALGEMENE ONDERDELEN....................................................................................... …7-8
AFSTANDSBEDIENING............................................................................................ ...9-10
VOORBEREIDING VAN DE AFSTANDSBEDIENING................................................. .…11
BASIS AANSLUITINGEN .......................................................................................... 12-16
BEDIENING
BASISBEDIENING .................................................................................................... .17-31
DVD ..................................................................................................................... .17-24
TV ........................................................................................................................ .25-31
HOOFDMENU........................................................................................................... .32-37
TV MODUS............................................................................................................ 32- 36
AV EN ANDERE MODI..............................................................................................36
PC MODUS ..................................................................................................................37
VOOR REFERENTIE
ONDERHOUD..................................................................................................................38
MONTAGE AAN DE MUUR........................................................................................... ...38
INSTALLATIE VAN DE VOET........................................................................................ . . 3 9
SPECIFICATIES............................................................................................................. . 4 0
IN GEVAL VAN PROBLEMEN................................................................................... .41-42
INSTELLING REGIONALE CODE ...................................................................................42
Page 7

6
32” TFT SCHERM
Dit toestel beschikt over een 32” TFT scherm om heldere beelden weer te geven.
INGEBOUWDE DVD SPELER
AUTOMATISCH TV ZOEKEN
(EUROPESE) TELETEKST FUNCTIE
USB MULTIMEDIA WEERGAVE
ON SCREEN DISPLAY IN MEERDERE TALEN
MULTIFUNCTIONELE AFSTANDSBEDIENING
INGANGEN: AV, HDMI, SCART, PC AUDIO, VGA, YPBPR
UITGANGEN: HOOFDTELEFOON, CVBS, AUDIO L/R (DVD)
AFNEEMBARE STEUN VOOR VOET
AANSLUITING VOOR EXTERNE ANTENNE
INGEBOUWDE LUIDSPREKERS
RUISONDERDRUKKING
EIGENSCHAPPEN
Page 8
7
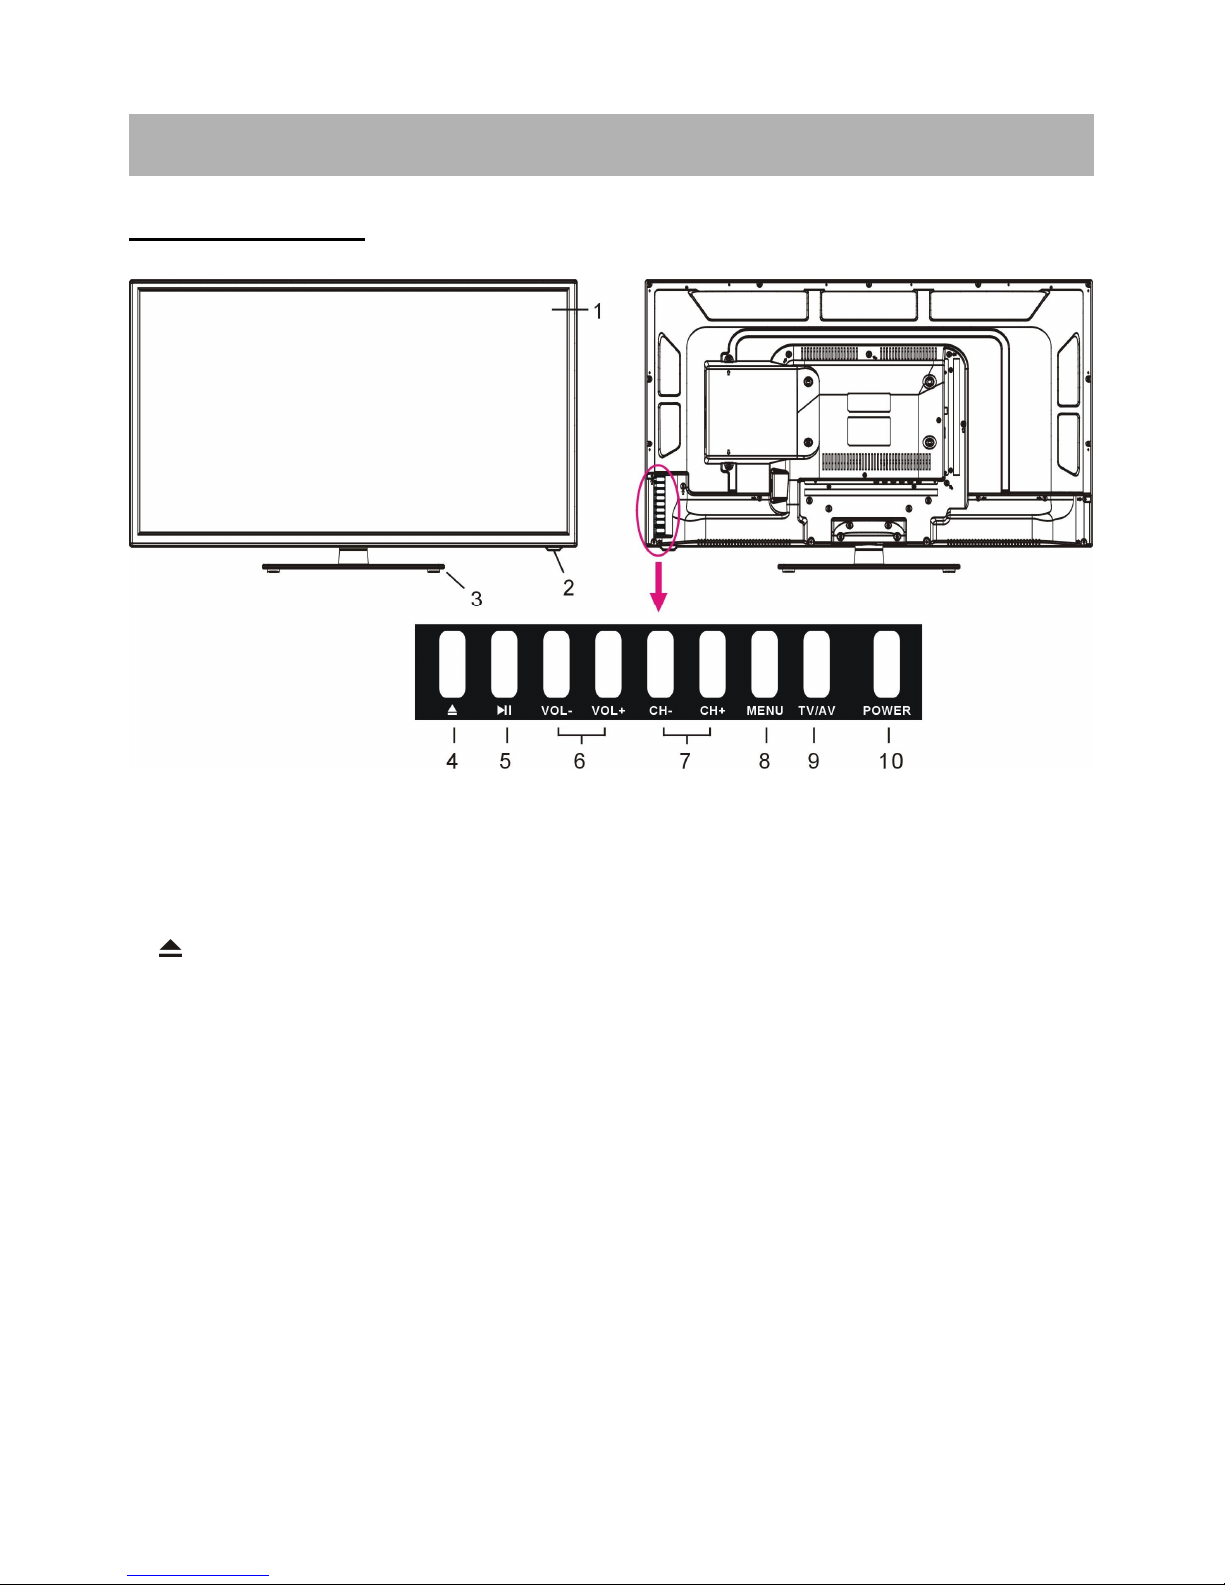
HOOFDEENHEID
1. TFT scherm
2. Infrarood ontvanger / Power indicator: in stand-by licht deze rood op, wanneer het toestel
ingeschakeld wordt deze indicator blauw
3. Voetbevestiging
4.
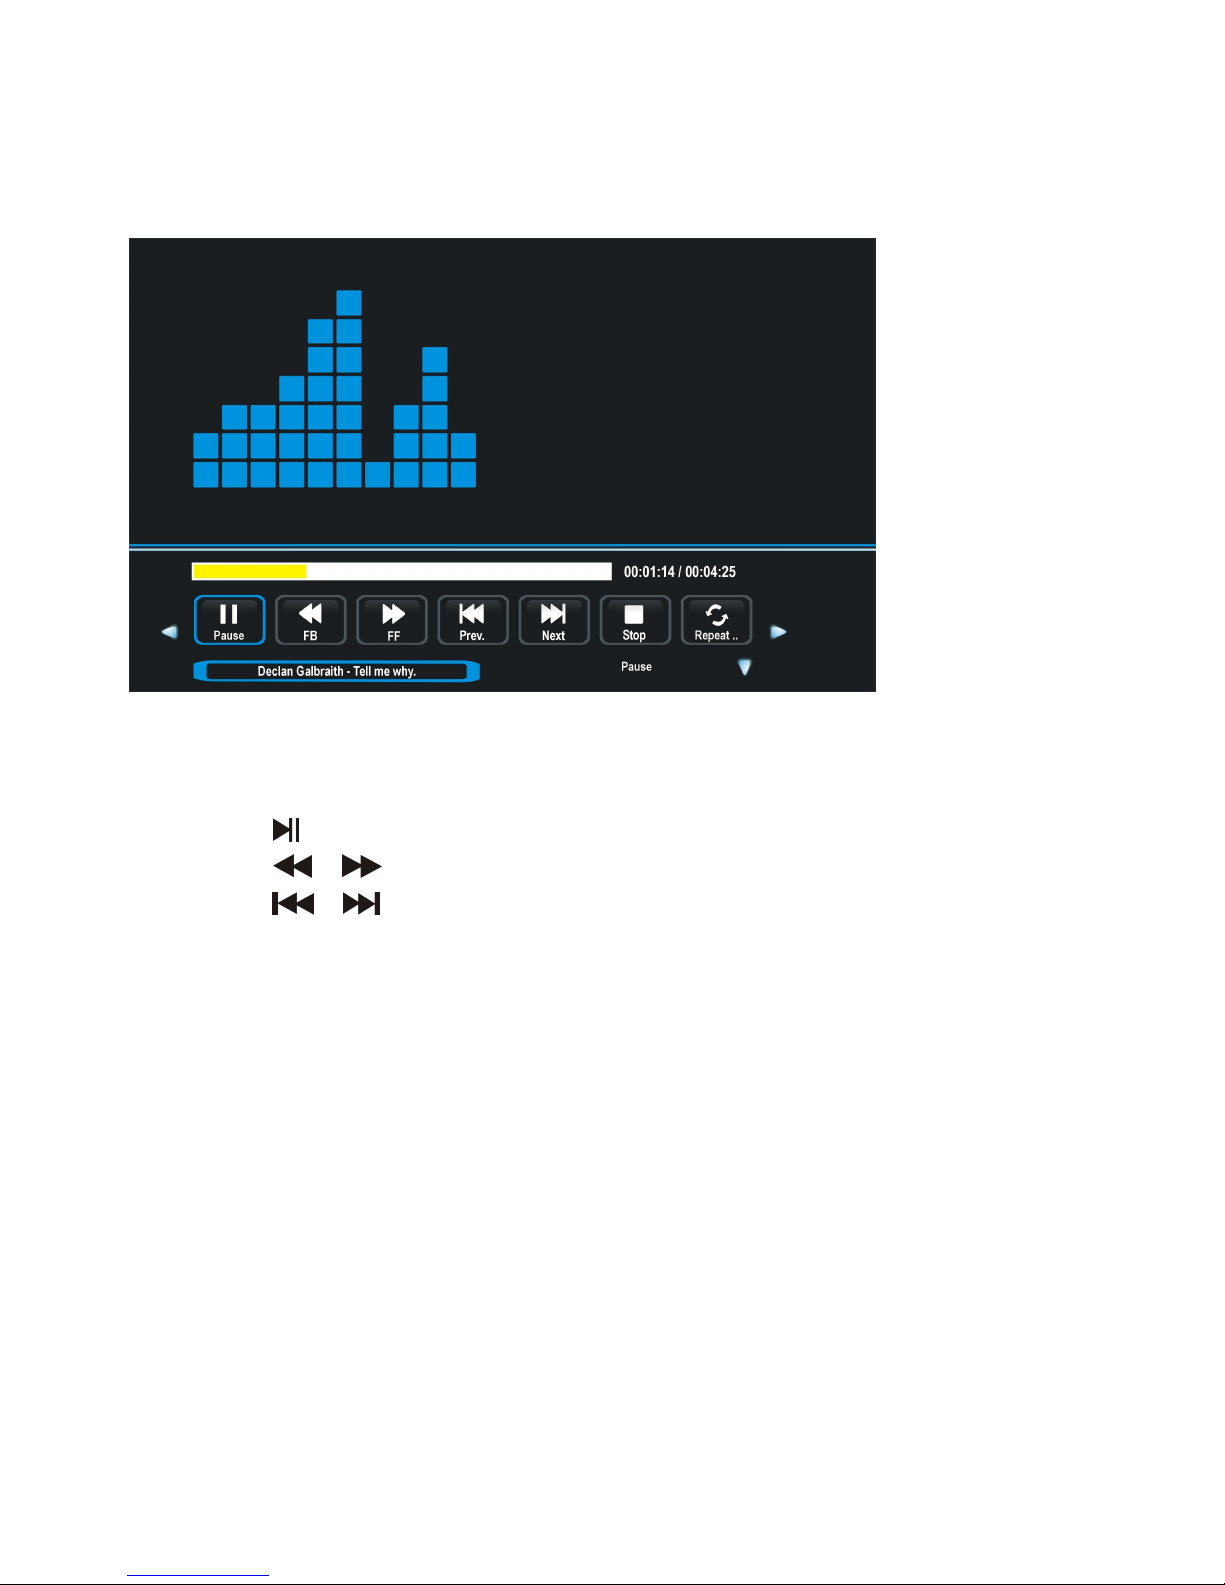
Om disc in te brengen en uit te werpen
5. II Voor weergave en pauze
6. VOL +/- toets: om het volume te verhogen of te verlagen of om naar links/rechts te gaan
7. CH +/- toets: om vorige of volgende zender te kiezen of om naar boven/onder te gaan
8. MENU: om in het menu te gaan
9. TV/AV: om de ingangsbron te kiezen
10. POWER toets: om de Tv in/uit te schakelen
ALGEMENE ONDERDELEN
Page 9

8
HOOFDEENHEID
1. Stroomtoevoer
2. CVBS en AUDIO L/R uitgangen, alleen voor DVD modus
3. Aansluiting hoofdtelefoon
4. HDMI 1/2 ingang
5. VGA ingang
6. RF-ingang: aansluiting antenne
7. PC AUDIO ingang
8. USB1 aansluiting voor multimediaweergave in TV modus
9. SCART ingang
10. YPbPr ingang
11. AV ingang
12. HDMI 3 ingang
13. Disclade: gleuf om een disc in te brengen
14. USB2 aansluiting voor multimediaweergave in DVD modus
ALGEMENE ONDERDELEN
Page 10
9
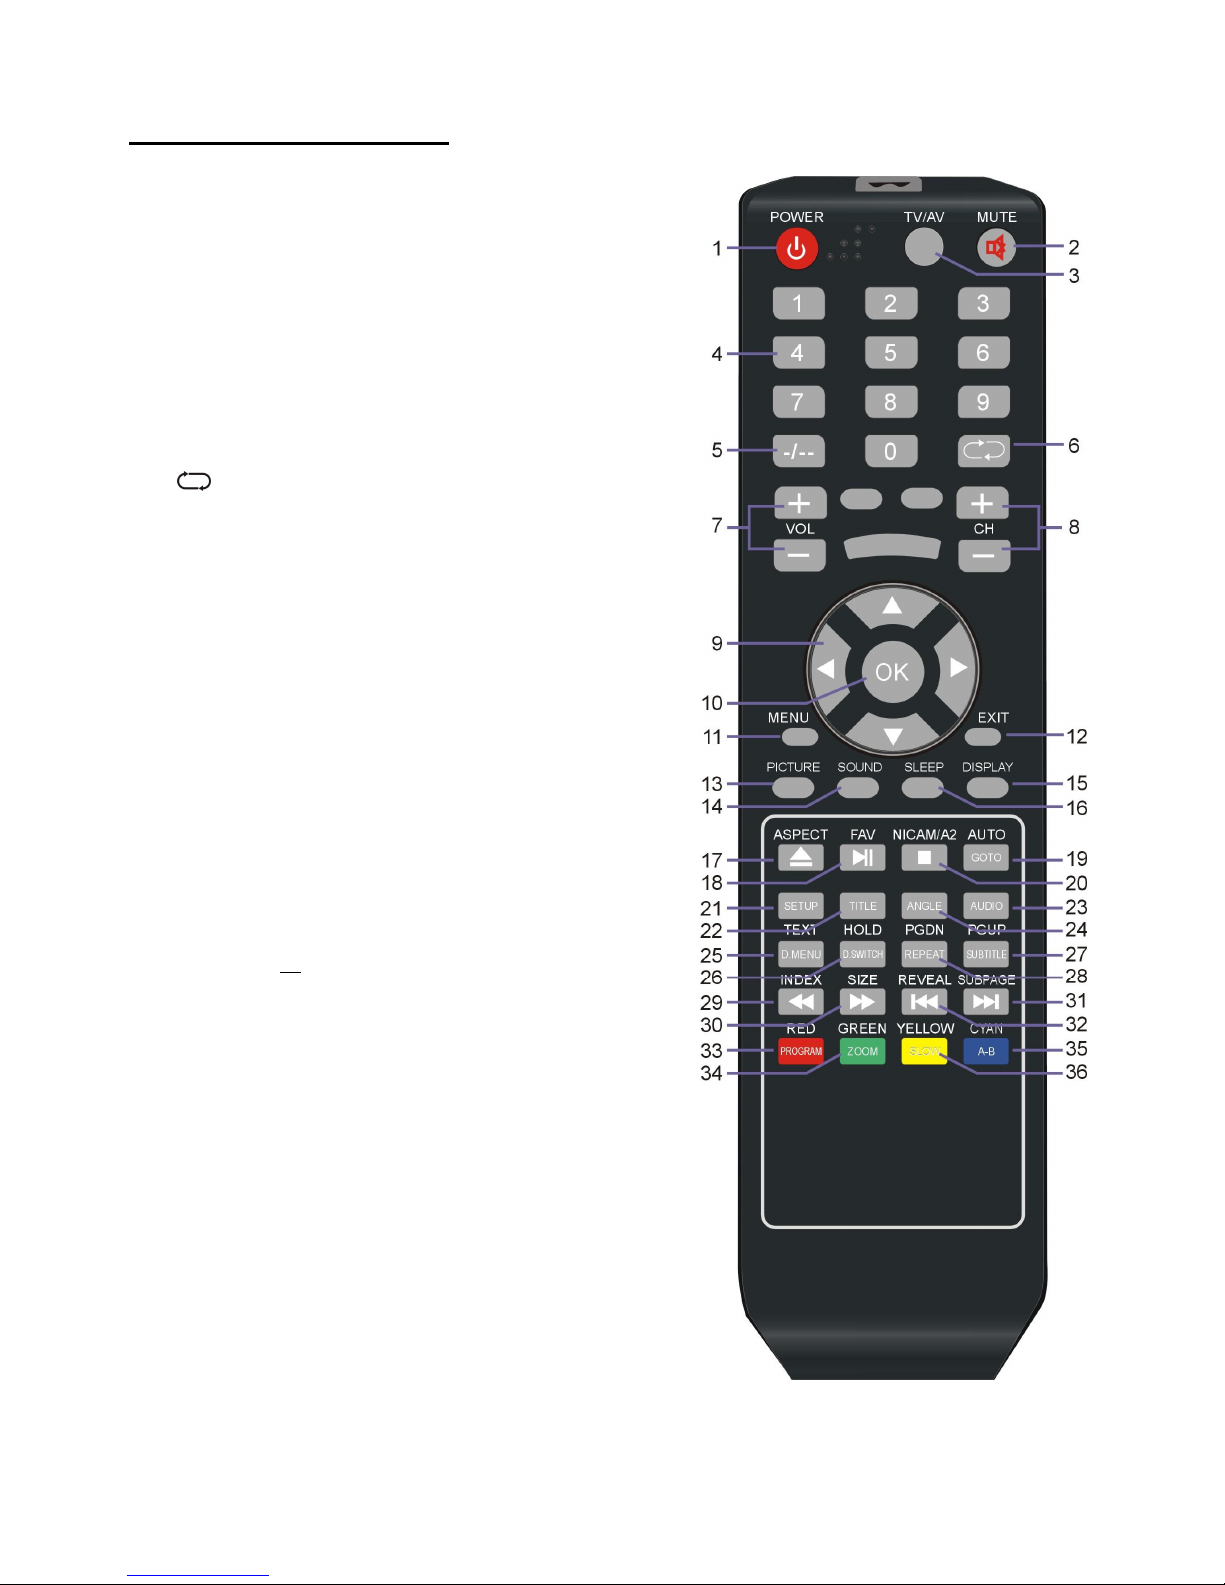
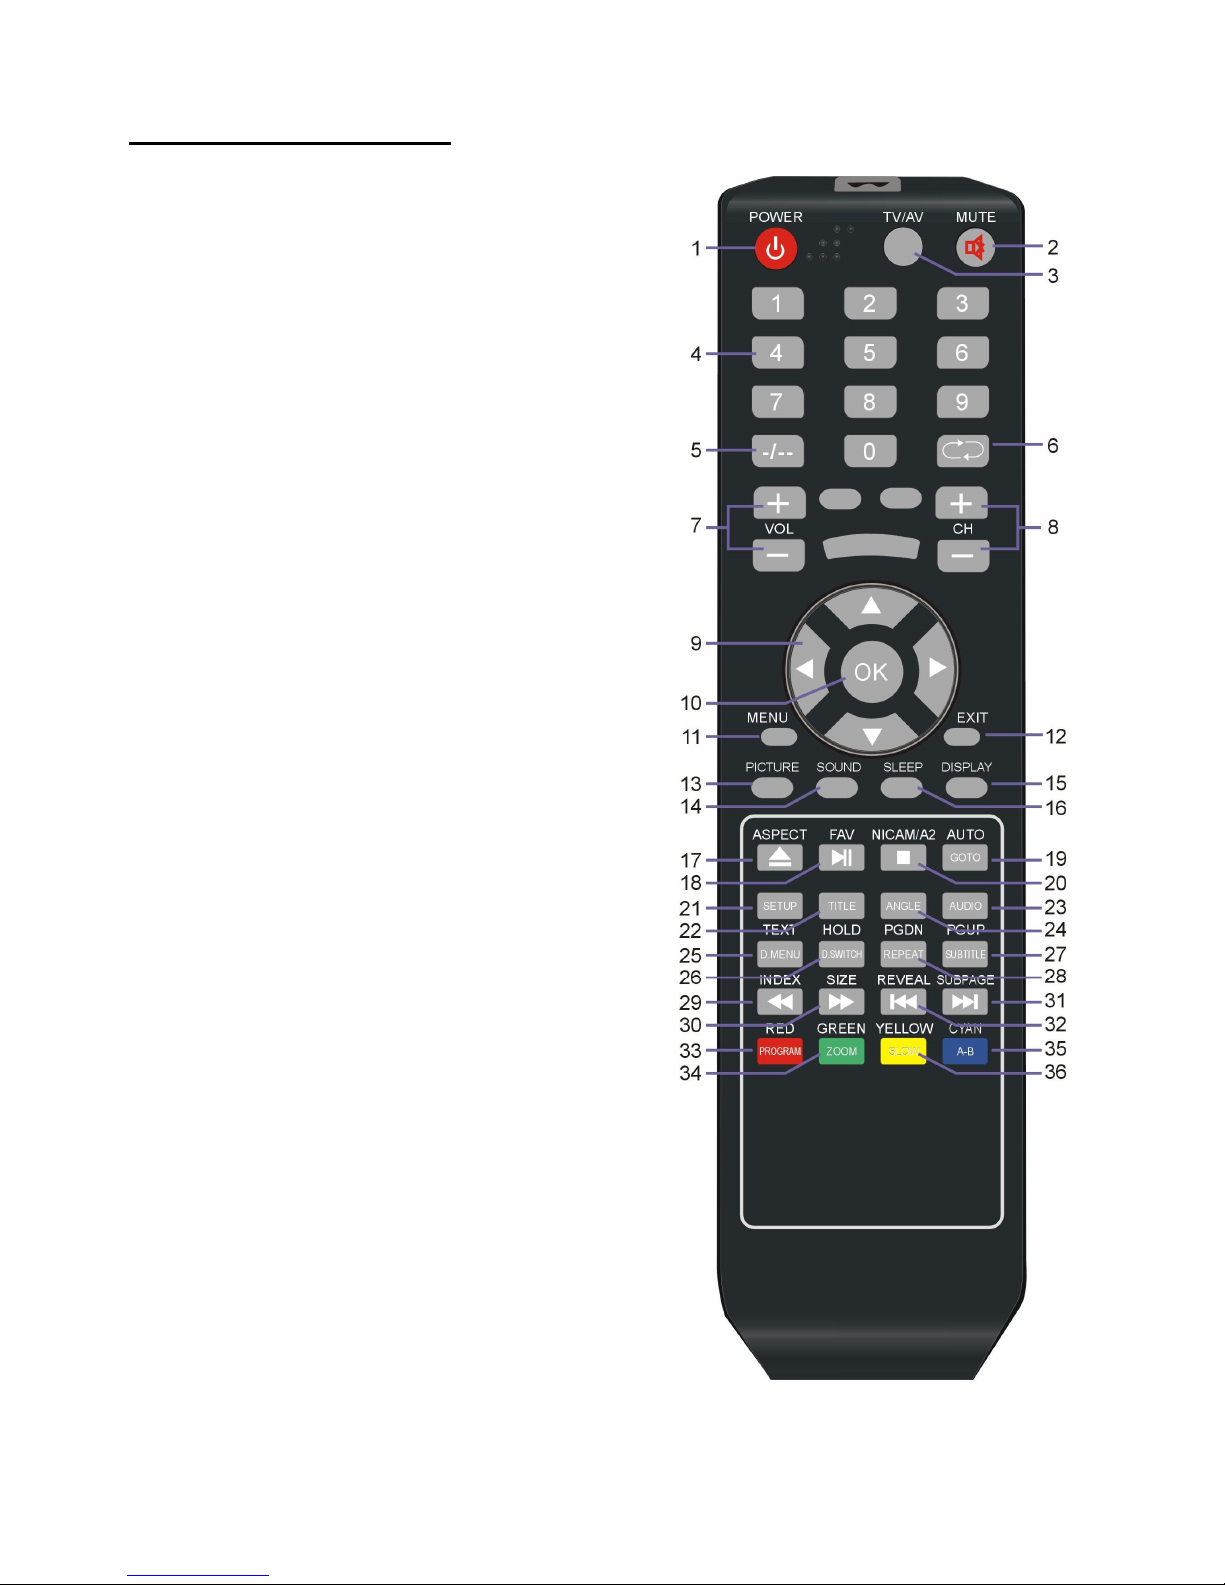
AFSTANDSBEDIENING
1. Om het toestel in stand-by te zetten; opnieuw
drukken om in te schakelen.
2. MUTE: om het geluid uit en terug in te
schakelen.
3. TV/AV: om de ingangslijst te tonen.
4. NUMERIEKE TOETSEN (0-9): om numerieke
gegevens in te brengen, zoals zendernummer.
5. -/--: om nummers bestaande uit meerder cijfers
in te brengen.
6.
: om terug te gaan naar de vorige bekeken
zender.
7. VOL+/-: om het volume te regelen.
8. CH+/-: om naar de vorige of volgende zender
te gaan.
9. ///: navigatietoetsen
10. OK: om selectie te bevestigen.
11. MENU: om het hoofdmenu weer te geven;
drukken om naar vorig menu terug te gaan.
12. EXIT: om uit het menu te gaan.
13. PICTURE: om naar de beeldmodus te gaan.
14. SOUND: om naar de geluidsmodus te gaan.
15. DISPLAY: om informatie over de huidige
zender op te roepen.
16. SLEEP: om de gewenste sleeptijd in te stellen.
17. ASPECT/
: verschillende malen indrukken om
de beeldverhouding bij TV in te stellen; om een
disc in te brengen of uit te werpen in DVD
modus.
18. FAV/II: om lijst voorkeurzenders weer te
geven in TV modus; voor weergave en pauze.
19. AUTO/GOTO: om het scherm in PC/VGA
modus automatisch in te stellen; om naar een
bepaald punt te gaan.
20. NICAM/A2/ █ : om gewenste geluidsinstelling
te kiezen in TV modus; om weergave te
stoppen.
Page 11
10
AFSTANDSBEDIENING
21. SETUP: om het instelmenu op te roepen in
DVD modus.
22. TITLE: om de titel weer te geven bij de
weergave van een disc.
23. AUDIO: om de audio-uitgang bij weergave
disc te selecteren.
24. ANGLE: om de hoek te kiezen bij discs met
meerdere hoeken weergave.
25. TEXT/D.MENU: om teletekst weer te geven
in TV modus; om DVD menu op te roepen bij
weergave van een disc.
26. HOLD/D.SWITCH: om een teletekstpagina
vast te houden in TV modus; om te
schakelen tussen video en audio in DVD
modus.
27. PGUP/SUBTITLE: om naar volgende pagina
teletekst te gaan; om ondertitels te
selecteren.
28. PGDN/REPEAT: om naar vorige pagina in
teletekst te gaan: om de herhaling in te
stellen.
29. INDEX/ : om naar de indexpagina te gaan
in TB modus; om snel achterwaarts te gaan.
30. SIZE/ : om de lettergrootte in teletekst te
wijzigen; om snel voorwaarts te gaan.
31. SUBPAGE/ : om naar een subpagina in
teletekst te gaan: om naar volgend hoofdstuk
te gaan.
32. REVEAL/: om verborgen tekst in teletekst
weer te geven; om naar vorig hoofdstuk te
gaan.
33. RED/PROGRAM: om naar de
programmeerpagina te gaan in DVD modus.
34. GROEN/ZOOM: om in en uit te zoomen.
35. CYAAN/A-B: om tussen twee punten (A en B)
te herhalen.
36. GEEL/SLOW: om vertraagde weergave.
Page 12
11
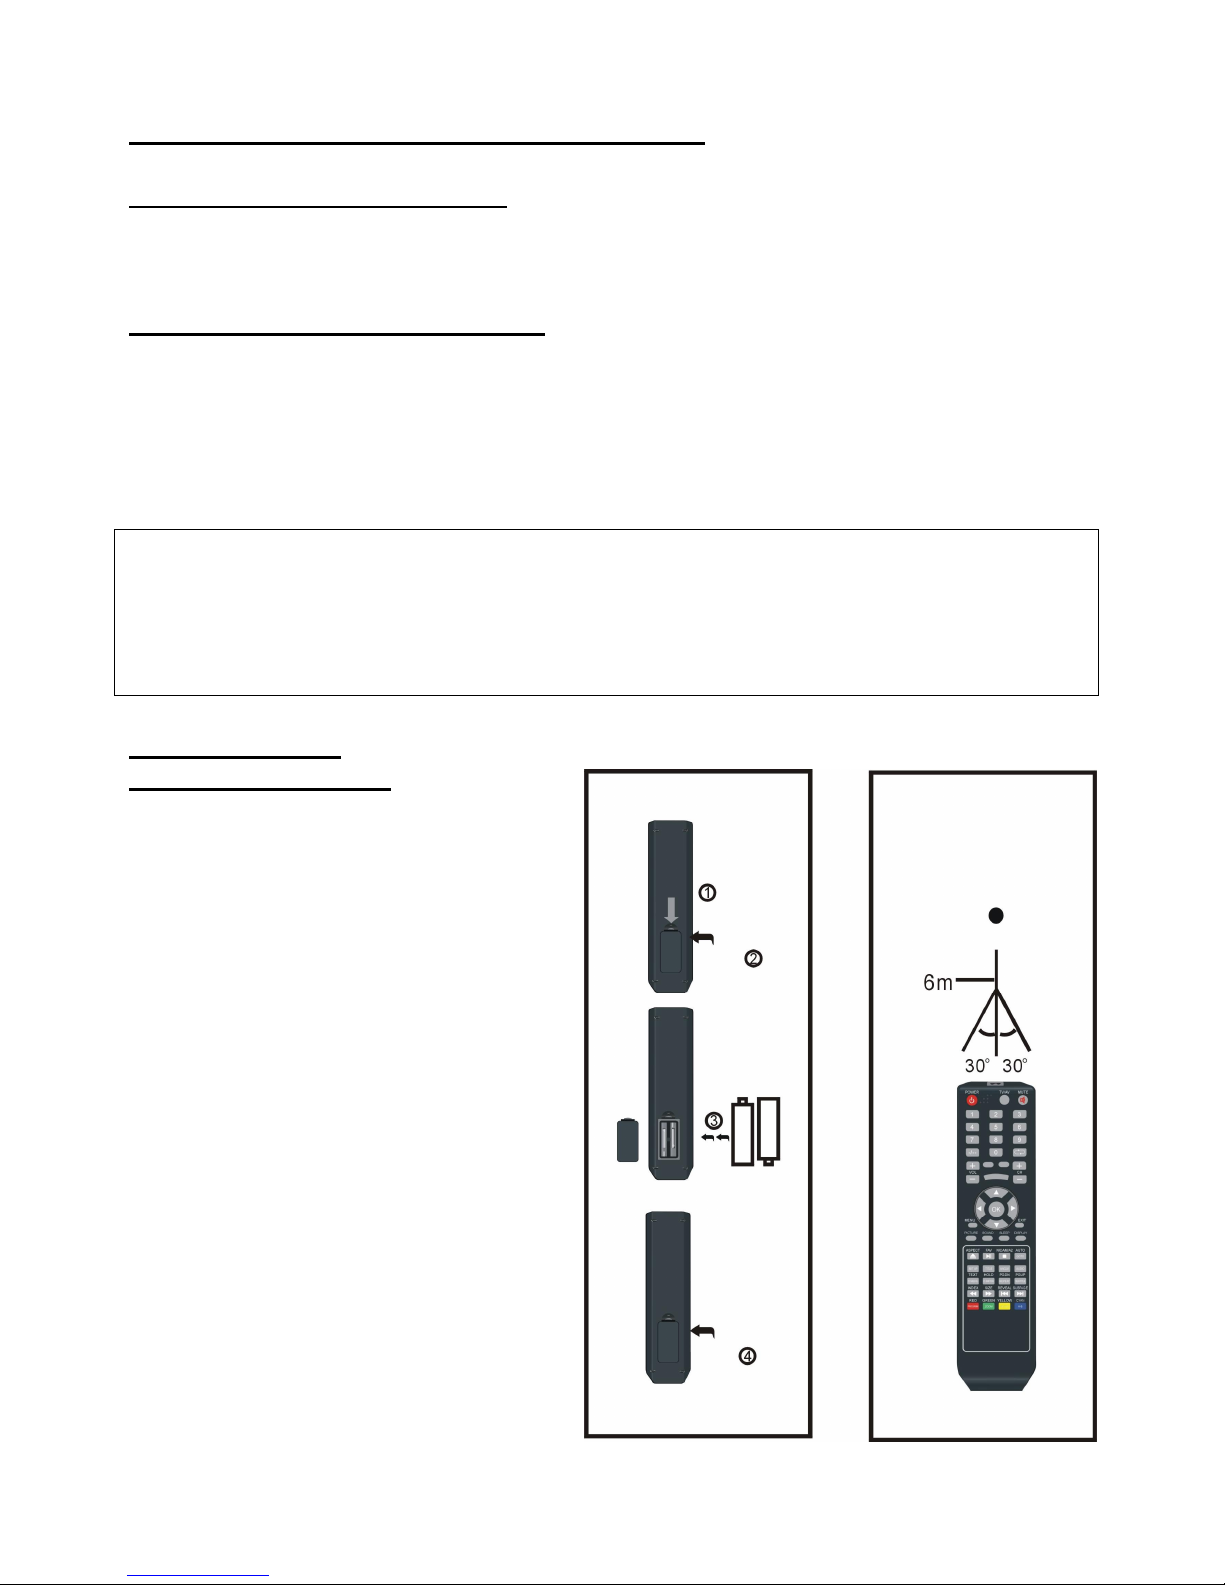
VOORBEREIDING AFSTANDSBEDIENING
PLAATSEN VAN DE BATTERIJEN
Plaats de batterijen zoals getoond in onderstaande illustratie en zorg ervoor dat de + en
– geplaatst worden zoals aangeduid in het batterijencompartiment (fig. 1)
LEVENSDUUR VAN DE BATTERIJEN
- De batterijen gaan gewoonlijk een jaar mee, maar dit hangt af van hoeveel de
afstandsbediening gebruikt wordt.
- Als de afstandsbediening niet goed werkt, zelfs dicht bij het toestel, dan moeten de
batterijen vervangen worden.
- Gebruik twee AAA batterijen.
OPMERKING:
Laat de afstandsbediening niet vallen en trap er niet op. Dit kan schade en slechte
werking veroorzaken.
Verwijder de batterijen als de afstandsbediening gedurende langere tijd niet gebruikt
wordt.
GEBRUIK VAN DE
AFSTANDSBEDIENING
Richt de afstandsbediening binnen een
afstand van 6 meter en een hoek van
60° naar de infrarood ontvanger van het
toestel (Fig2).
OPMERKINGEN:
De bedieningsafstand kan variëren met
de helderheid van de kamer.
Richt geen fel licht op de infrarood
ontvanger.
Plaats geen voorwerpen tussen de
afstandsbediening en het toestel.
Gebruik deze afstandsbediening niet
tegelijkertijd met een afstandsbediening
van een ander toestel.
Fig1 Fig2
Infrarood ontvanger
Drukken
Druk
Open
Page 13
12
Zorg ervoor dat er geen kabels zijn aangesloten alvorens het toestel op netstroom aan
te sluiten.
Lees de instructies alvorens andere toestellen aan te sluiten.
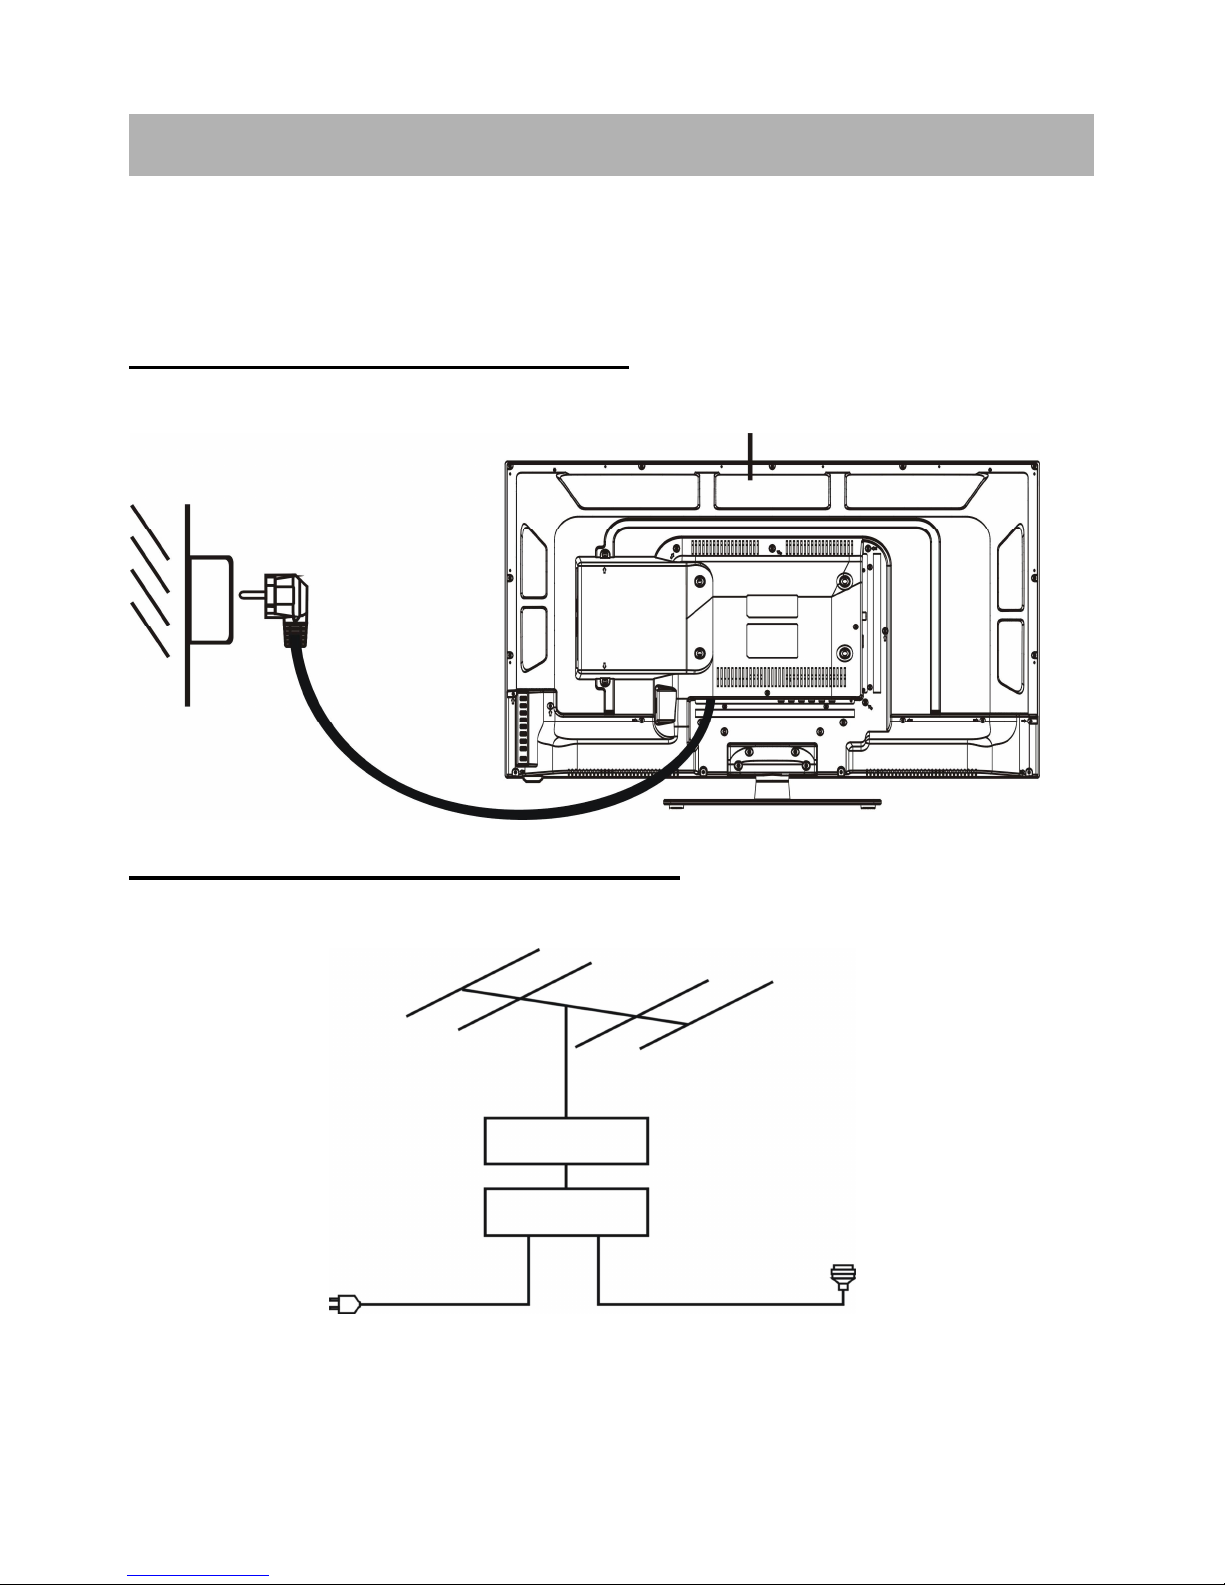
AANSLUITEN VAN DE NETSTROOM
AANSLUITEN VAN EXTERNE ANTENNE
Sluit een externe antenne aan om te genieten van de beste beeldkwaliteit.
BASIS AANSLUITINGEN
Hoofdtoestel
Stopcontact
Antenne
Versterker
buitenanten
ne
Versterker
binnenante
nne
Netsnoer van
antenneverste
rker
75 Ohm
antenne
stekker
Page 14
13
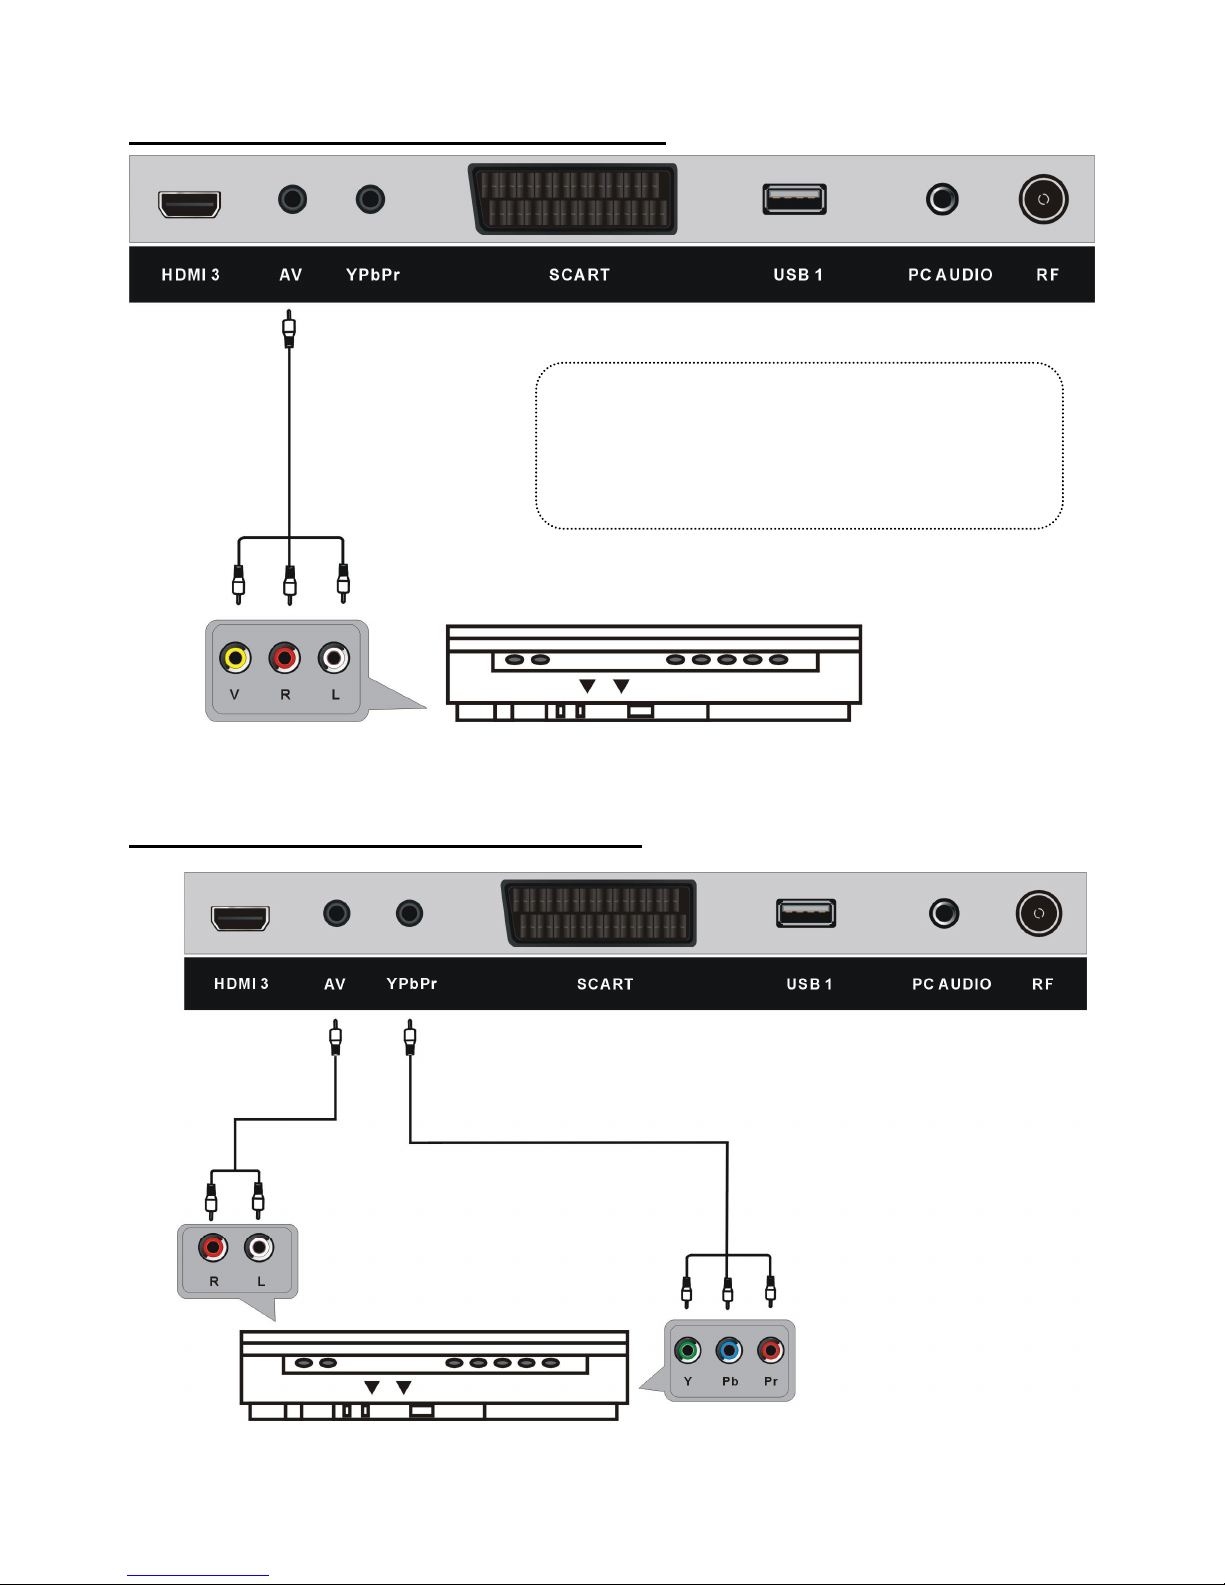
COMPOSIET AV (CVBS) AANLSUITING
COMPONENT (YPbPr) AANSLUITING
Achterkant van DVD/VCR
AV kabel
Voor basisaansluiting, gebruik de composiet
Audio L/R (wit/rood) en CVBS (geel) kabel
voor aansluiting van andere toestellen.
YPbPr kabel
Achterkant van DVD/VCR
Audio kabel
Page 15
14
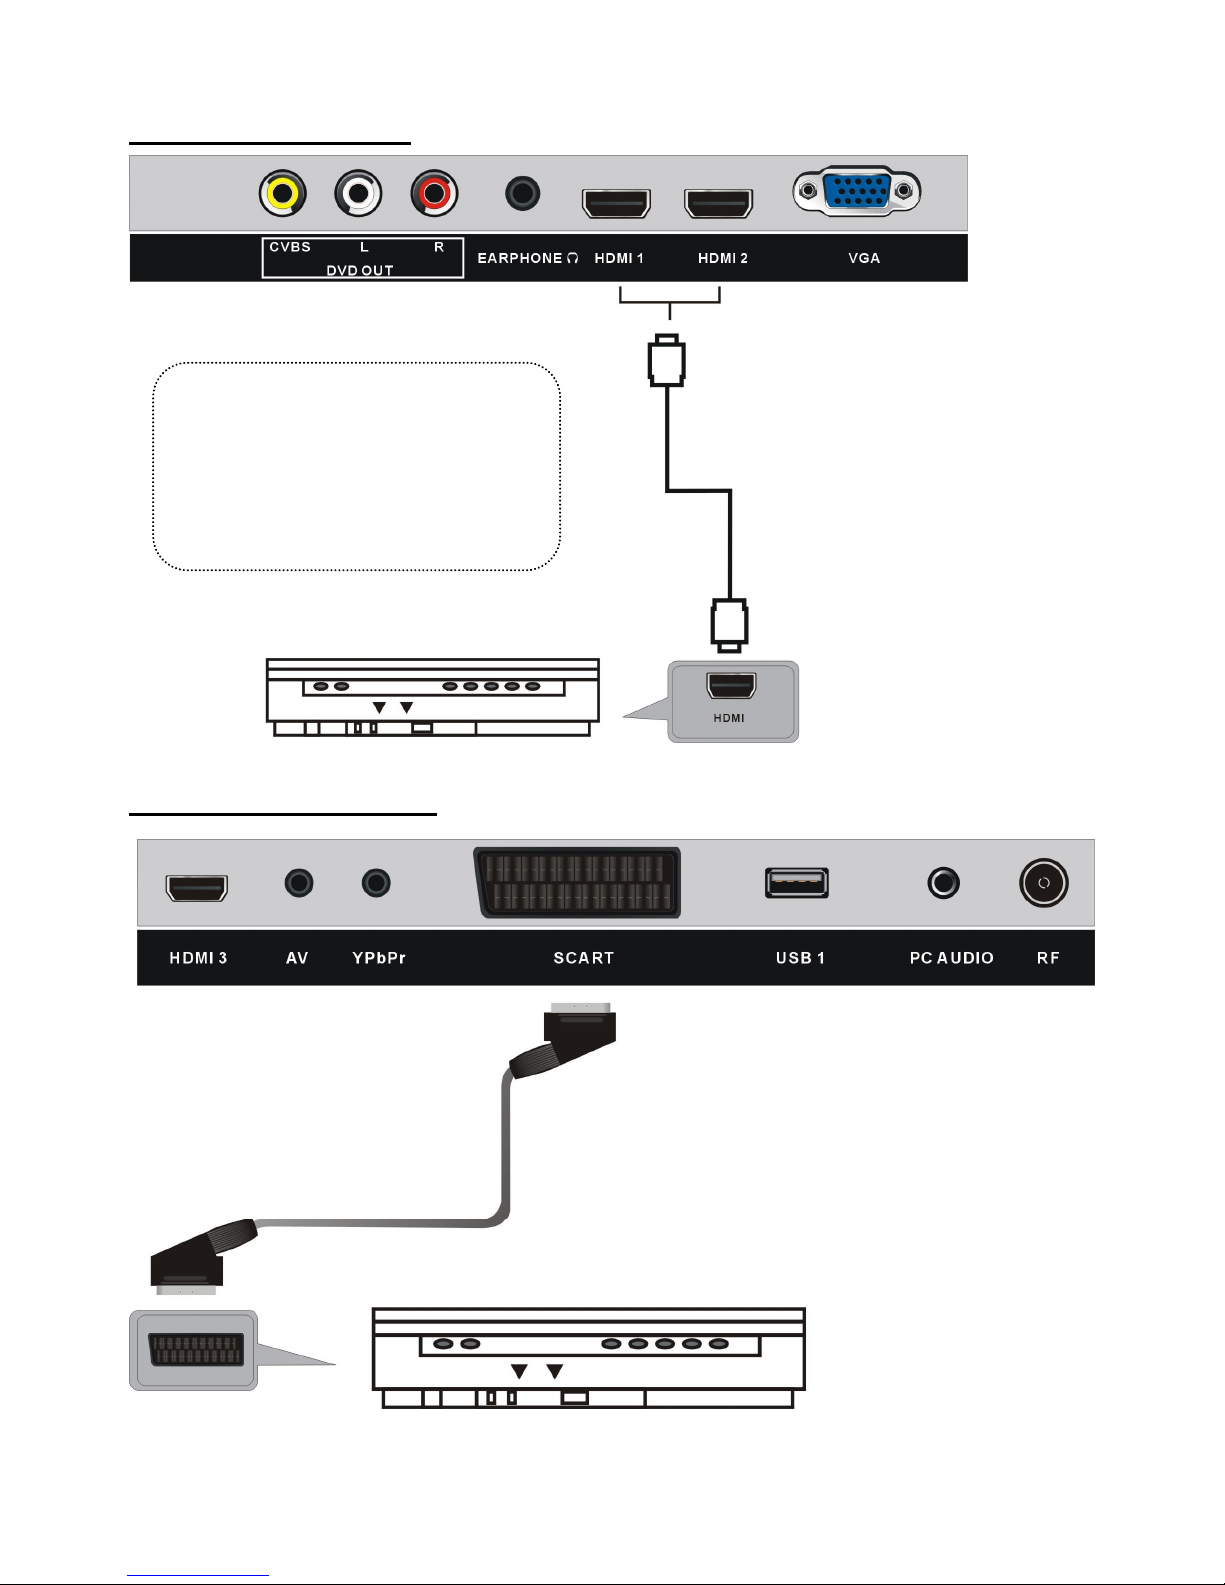
HDMI AANSLUITING
SCART AANSLUITING
Sluit de HDMI kabel aan andere
apparaten aan om een
high-definition multimedia
signaal te ontvangen.
HDMI kabel
SCART kabel
Achterkant van DVD/VCR
Achterkant van DVD/VCR
Page 16

15
PC/VGA AANSLUITING
COMPOSIET AV UITGANG (CVBS UITGANG VOOR DVD MODUS)
Audio kabel
VGA
kabel
Achterkant
van PC
Gebruik een VGA kabel en een
audio kabel om op de TV een PC
aan te sluiten en de TV als
monitor te gebruiken.
AV kabel
Externe display
Page 17
16
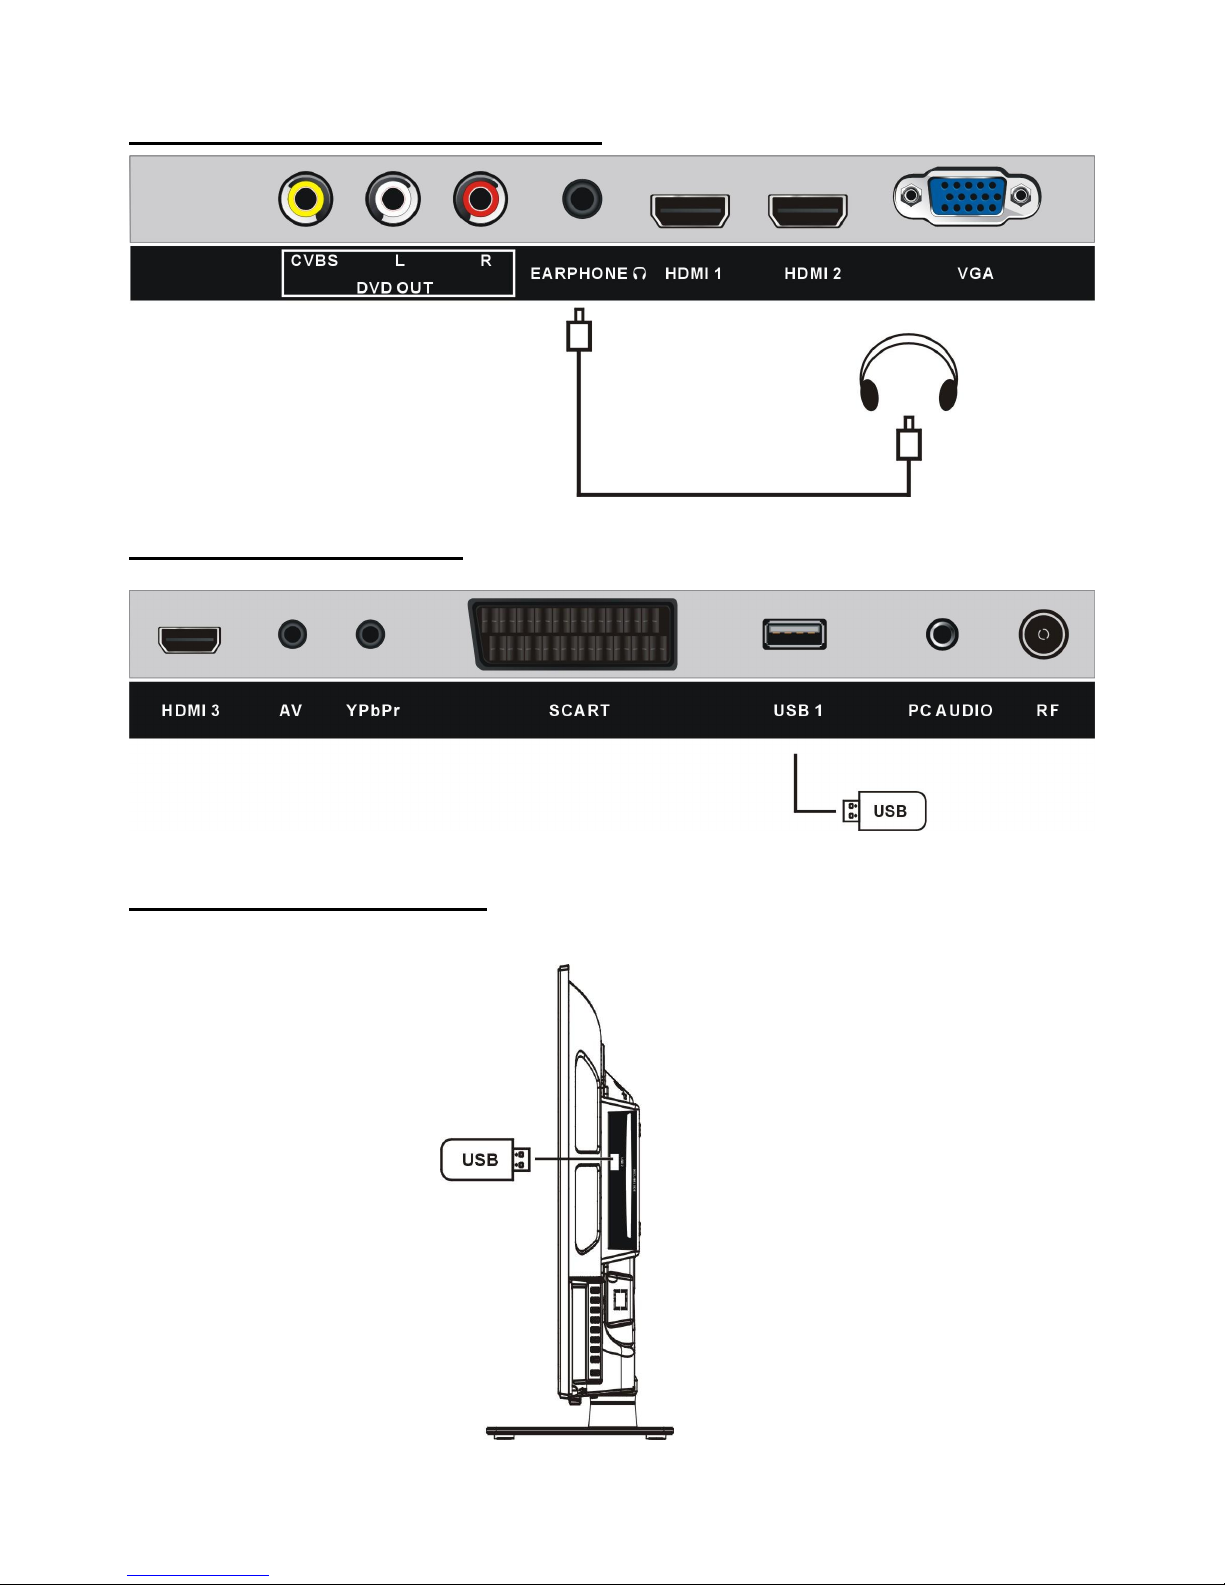
AANSLUITING HOOFDTELEFOON
USB AANSLUITING (TV)
USB AANSLUITING (DVD)
Kabel hoofdtelefoon
Page 18

17
ZORG ER VÓÓR INGEBRUIKNAME VOOR DAT ALLE APPARATUUR
EN DE STROOMADAPTER CORRECT ZIJN AANGESLOTEN EN STEL
HET TOESTEL IN OP DE JUISTE GEBRUIKSMODUS.
- Druk op de POWER toets van de afstandsbediening om het toestel in te schakelen
(de indicator wordt blauw); druk opnieuw om het toestel in stand-by te zetten
(indicator wordt rood).
- Druk op de TV/AV toets van de afstandsbediening om het toestel in DVD modus te
zetten.
1. Basis weergave
a) Controleer of er reeds een disc in het compartiment is. Breng een disc in het compartiment.
Hou de disc vast bij de rand en schuif hem met de leeskant (spiegel) naar u toe in het
compartiment. De disc wordt automatisch in het toestel opgenomen, of druk op van de
afstandsbediening om de disc in het compartiment te laden.
b) Van zodra de disc in het toestel is start de weergave automatisch.
c) Als er een menu op het scherm verschijnt, gebruik dan de navigatietoetsen o de numerieke
toetsen om een bepaald nummer te kiezen en druk op OK om te bevestigen.
d) Om de weergave te stoppen en terug te gaan naar het hoofdmenu, druk op TITLE of
D.MENU.
2. Weergave stoppen
Druk op (STOP) om de weergave te stoppen.
OPMERKING: als de weergave gestopt wordt onthoudt de speler de plaats waar gestopt werd
(RESUME functie). Druk op II (PLAY) en de weergave gaat verder vanaf dit punt. Als de disc
uit het toestel gehaald wordt of (STOP) opnieuw wordt ingedrukt wordt de RESUME functie
gewist.
3. Voorwaarts en achterwaarts springen
Voorwaarts springen
Druk tijdens de weergave op om naar het volgende
hoofdstuk (DVD) of nummer (Video CD/CD) te gaan.
Achterwaarts springen
Druk tijdens de weergave op om naar het vorige hoofdstuk (DVD) of nummer (Video
CD/CD) te gaan.
BASIS BEDIENING
DVD
Page 19
18
4. Snel voorwaarts/achterwaarts
Druk tijdens de weergave op of om snel voorwaarts
of achterwaarts te zoeken.
Druk op
(PLAY) om terug tot een normale weergave
te gaan.
5. Pauze/weergave
Druk tijdens de weergave op om de weergave te
pauzeren en druk opnieuw om verder te gaan met normale
weergave.
6. Weergave muziek
a) Breng een disc in dat muziekdocumenten bevat en
na enkele seconden toont het scherm de folders die
zich op de disc bevinden.
b) Gebruik de navigatietoetsen om een folder te kiezen
en druk op OK om te bevestigen.
c) De nummers in de folder worden getoond. Gebruik
de navigatietoetsen om een nummer te kiezen en druk
op
(PLAY) om de weergave te starten, of druk op
OK.
d) Gebruik de of toetsen om de volgende of
vorige menupagina weer te geven.
e) Druk op REPEAT van de afstandsbediening om de weergavemodus te kiezen:
- SINGLE: weergave van één enkel nummer
- REPEAT ONE: herhaling van het nummer
- REP DIR: alle nummers in de folder worden herhaald.
- FOLDER: alle nummers in de folder worden weergegeven.
OPMERKING: de beschikbare mogelijkheden kunnen variëren van disc tot disc.
7. Weergave film
a) Breng een disc in dat filmdocumenten bevat en na
enkele seconden toont het scherm de folders die zich
op de disc bevinden.
b) Gebruik de navigatietoetsen om een folder te kiezen
en druk op OK om te bevestigen.
Page 20
19
c) De nummers in de folder worden getoond. Gebruik de navigatietoetsen om een nummer te
kiezen en druk op
(PLAY) om de weergave te starten, of druk op OK.
d) Gebruik de of toetsen om de volgende of vorige menupagina weer te geven.
e) Druk op REPEAT van de afstandsbediening om de weergavemodus te kiezen:
- SINGLE: weergave van één enkel nummer
- REPEAT ONE: herhaling van het nummer
- REP DIR: alle nummers in de folder worden herhaald.
- FOLDER: alle nummers in de folder worden weergegeven.
OPMERKING: de beschikbare mogelijkheden kunnen variëren van disc tot disc.
f) Druk op D.MENU om terug naar de lijst te gaan.
8. JEPG weergave
Bij een CD met JPEG foto’s, gebruik de
navigatietoetsen om de folder aan te duiden die u wil
zien en druk op OK om te bevestigen. De documenten
in de folder worden getoond. Gebruik de
navigatietoetsen om te selecteren en druk op OK om
de weergave te starten. Tijdens het scrollen doorheen
de file worden thumbnail afbeeldingen getoond. Druk
op
(PLAY) of op OK om de weergave te starten.
OPEMRKING: de tijd nodig voor het laden en het
weergeven hangt af van de grootte van het document.
Druk tijdens de weergave op D.MENU om terug naar de keuzelijst te gaan.
Druk op REPEAT van de afstandsbediening om de weergavemodus te kiezen:
- SINGLE: weergave van één enkel nummer
- REPEAT ONE: herhaling van het nummer
- REP DIR: alle nummers in de folder worden herhaald.
- FOLDER: alle nummers in de folder worden weergegeven.
OPMERKING: de beschikbare mogelijkheden kunnen variëren van disc tot disc.
Springen naar volgende/vorige foto
Gebruik om naar de volgende foto te gaan of druk op om naar de vorige foto te gaan.
Indien er binnen 3 seconden geen toets ingedrukt wordt, springt het toestel automatisch naar
de volgende foto.
Foto’s draaien
Druk op de rechtse navigatietoets om de foto naar rechts te draaien.
Druk op de linkse navigatietoets om de foto naar links te draaien.
Page 21
20
Foto’s spiegelen
Druk op de navigatietoets naar boven om de foto verticaal te spiegelen.
Druk op de navigatietoets naar onderen om de foto horizontaal te spiegelen.
Beelden in- en uitzoomen
Druk op ZOOM om het beeld te verkleinen of vergroten tot 50%, 75%, 100%, 125%, 150% en
200%.
OPMERKING: als het beeld vergroot is kan u de navigatietoetsen gebruiken om het beeld te
verschuiven.
Dia showeffecten
Druk op de PROGRAM toets om de overgangseffecten te kiezen.
Beschikbare opties: Veeg van boven, veeg van beneden, veeg links, veeg rechts, diagonaal
vegen linksboven, diagonaal vegen rechtsboven, diagonaal vegen linksonder, diagonaal vegen
rechtsonder, horizontaal uitrekken vanuit midden, verticaal uitrekken vanuit midden, horizontaal
samendrukken naar midden, verticaal samendrukken naar midden, horizontaal venster,
verticaal venster, vegen van rand naar midden en invoegen van boven.
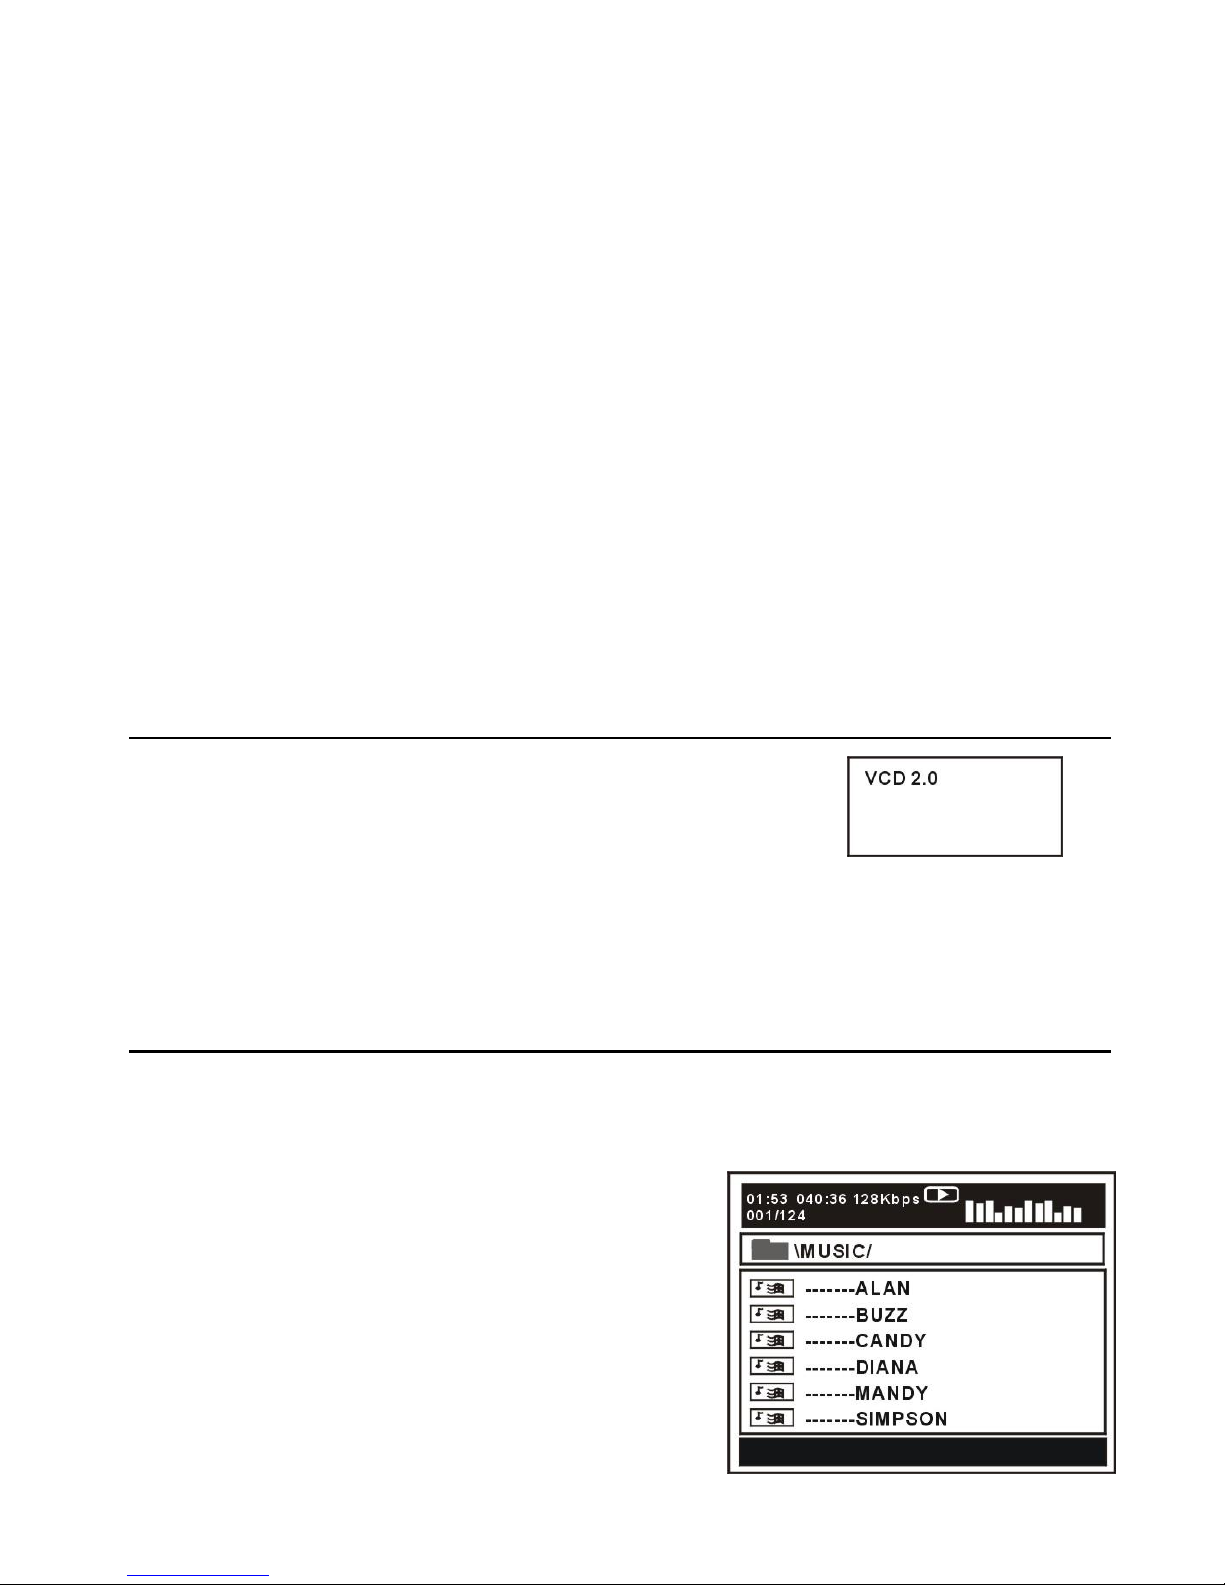
9. Video CD met weergavecontrole
a) Bij weergave van een VCD met PBC, toont het scherm over
welke versie het gaat.
b) Druk op D.MENU om te kiezen tussen PBC AAN of UIT.
c) Gebruik de numerieke toetsen om het gewenste nummer te
selecteren.
Voorbeel: nummer 9, druk 0 en 9, enkele seconden later start de weergave van nummer
9; nummer 15, druk -/-- en 5 en enkele seconden later start de weergave van nummer 15.
d) Gebruik of om naar het volgende of vorige nummer te gaan.
10. USB weergave
Om het toestel in USB modus te zetten, druk op SETUP en selecteer de bron in het
menu. Selecteer dan de USB bron met de navigatietoetsen.
a) Breng een USB, die muziek, foto’s of films bevat, in
het toestel.
b) Na enkele seconden verschijnen alle folders in de
USB op het scherm.
c) Selecteer met de navigatietoetsen de folder die u
wil gebruiken en druk op OK om te bevestigen.
d) De inhoud van de folder wordt getoond. Kies het
gewenste item met de navigatietoetsen en druk op OK
om de weergave te starten.
Page 22
21
e) Gebruik of om naar de volgende of de vorige menupagina te gaan.
f) Druk op REPEAT van de afstandsbediening om de weergavemodus te kiezen:
- SINGLE: weergave van één enkel nummer
- REPEAT ONE: herhaling van het nummer
- REP DIR: alle nummers in de folder worden herhaald.
- FOLDER: alle nummers in de folder worden weergegeven.
OPMERKING: de beschikbare mogelijkheden kunnen variëren van disc tot disc.
11. Bekijken vanuit een andere hoek (alleen DVD)
Sommige DVD’s beschikken over scènes die vanuit verschillende hoeken zijn opgenomen. In
dat geval kan de hoek gekozen worden door op de ANGLE toets te drukken.
12. Herhaling
Druk tijdens de weergave op de REPEAT toets. Het is mogelijk een hoofdstuk of een titel te
herhalen (bij DVD) of een nummer (bij VCD/CD).
A-B herhaling
Herhalen van een sectie tussen twee punten (A en B).
a) Druk op de A-B toets op het punt (A) waar de herhaling moet beginnen.
b) Druk op de A-B toets op het punt (B) waar de herhaling moet eindigen. Het deel tussen A en
B wordt nu herhaald.
c) Druk op de A-B toets om terug naar normale weergave te gaan.
HERHAAL HOOFDSTUK
HERHAAL TITEL
HERHAAL ALLES
HERHAAL NUMMER
REPEAT DISC
DVD DISC
VCD/CD DISC (In PBC OFF modus)
Page 23
22
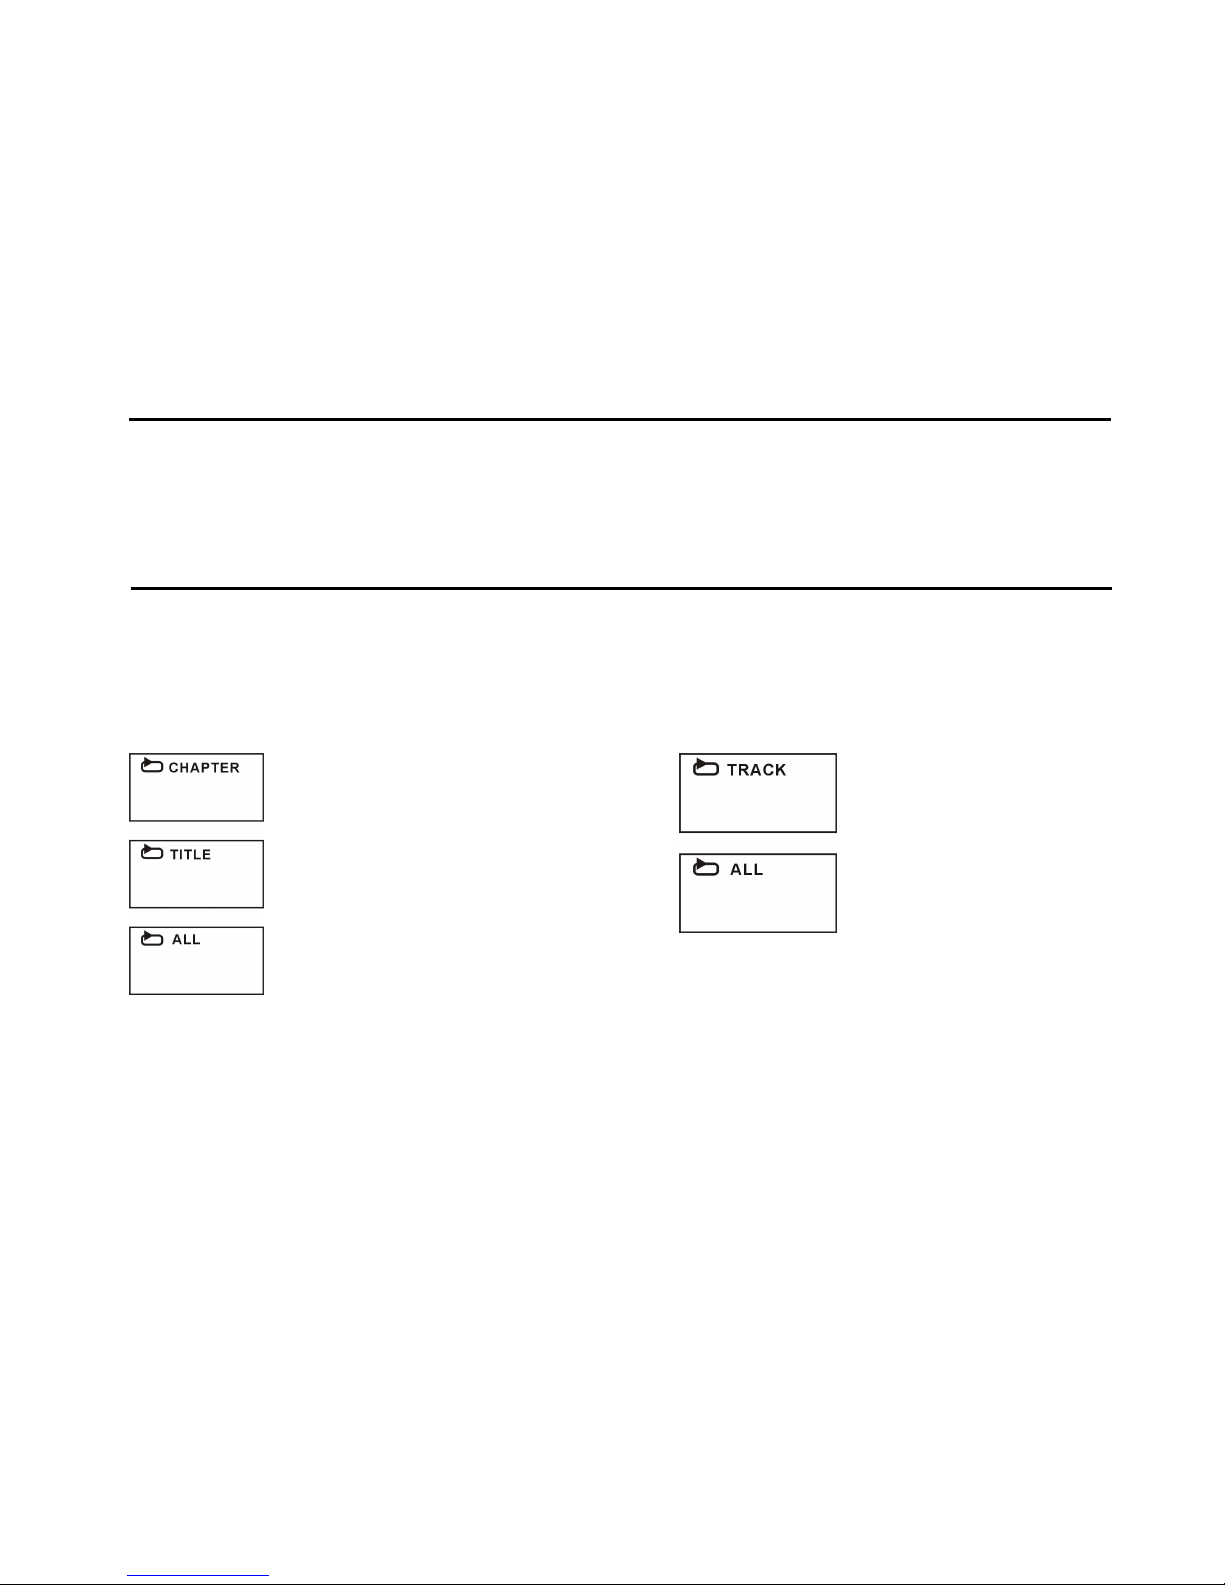
13. Programma weergave
a) Druk op de PROGRAM toets en het scherm toont
het programmeermenu.
b) Gebruik de navigatietoetsen om een
geheugenindex te kiezen en druk op OK om met het
programmeren te beginnen. Breng de gewenste
nummers van de titels/hoofdstukken in via de
navigatietoetsen. Deze worden in het geheugen opgeslagen. Gebruik om naar de volgende
pagina te gaan. Tot 20 nummers kunnen geprogrammeerd worden.
c) Kies START in het menu en druk op OK om de geprogrammeerde weergave te starten of
kies EXIT en druk op OK om de geprogrammeerde weergave te verlaten.
d) Om het programma te stoppen, druk op PROGRAM en selecteer STOP in het menu; druk
op OK om te bevestigen.
14. GOTO
Druk meerdere malen op GOTO om het item te kiezen dat u wil instellen en breng dan de tijd in,
het hoofdstuk, het nummer, enz. De weergave zal vanaf dat punt starten.
15. DISPLAY
Druk op DISPLAY om de weergavestatus van de disc weer te geven.
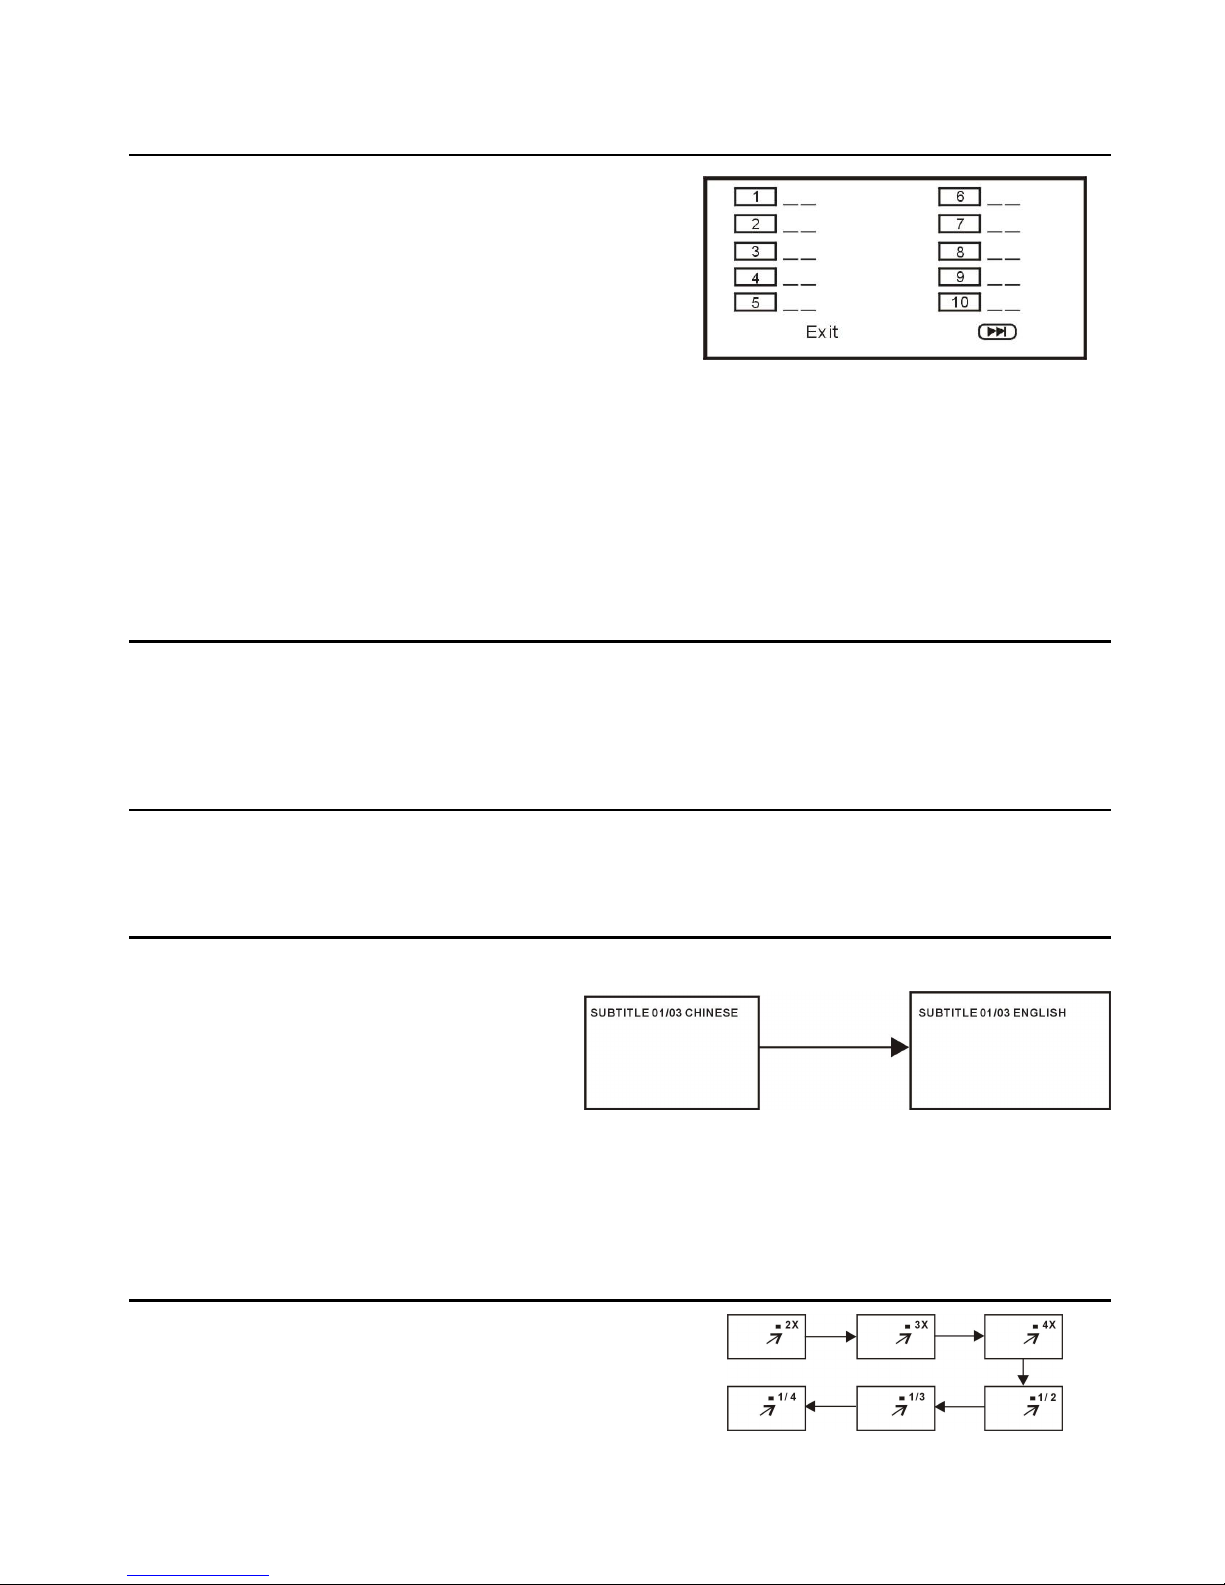
16. Taal van ondertitels wijzigen (alleen DVD)
Het is mogelijk de taal van de ondertitels
te wijzigen ten opzichte van de originele
instelling. (Dit werkt alleen met discs die
meerdere talen voor ondertitels
voorzien).
1. Druk tijdens de weergave op SUBTITLE en het scherm toont de actuele taal.
2. Druk nogmaals op SUBTITLE om de taal te wijzigen.
OPMERING: als er geen ondertitels opgenomen zijn, heeft deze toets geen functie.
17. ZOOM play
Druk tijdens de weergave op ZOOM en het scherm
toont:
Gebruik de navigatietoetsen om doorheen het
vergrootte beeld te scrollen.
Taal van ondertitels wijzigen
Page 24
23
18. Wijzigen van de gesproken taal (DVD/VCD/CD)
Het is mogelijk de gesproken taal te wijzigen ten opzichte van de originele instelling. (Dit
werkt alleen met discs die meerdere gesproek talen voorzien).
- Druk tijdens de weergave op AUDIO om de gewenste en beschikbare taal te kiezen.
OPMERKING: als er geen gesproken taal is opgenomen, heeft deze toets geen functie.
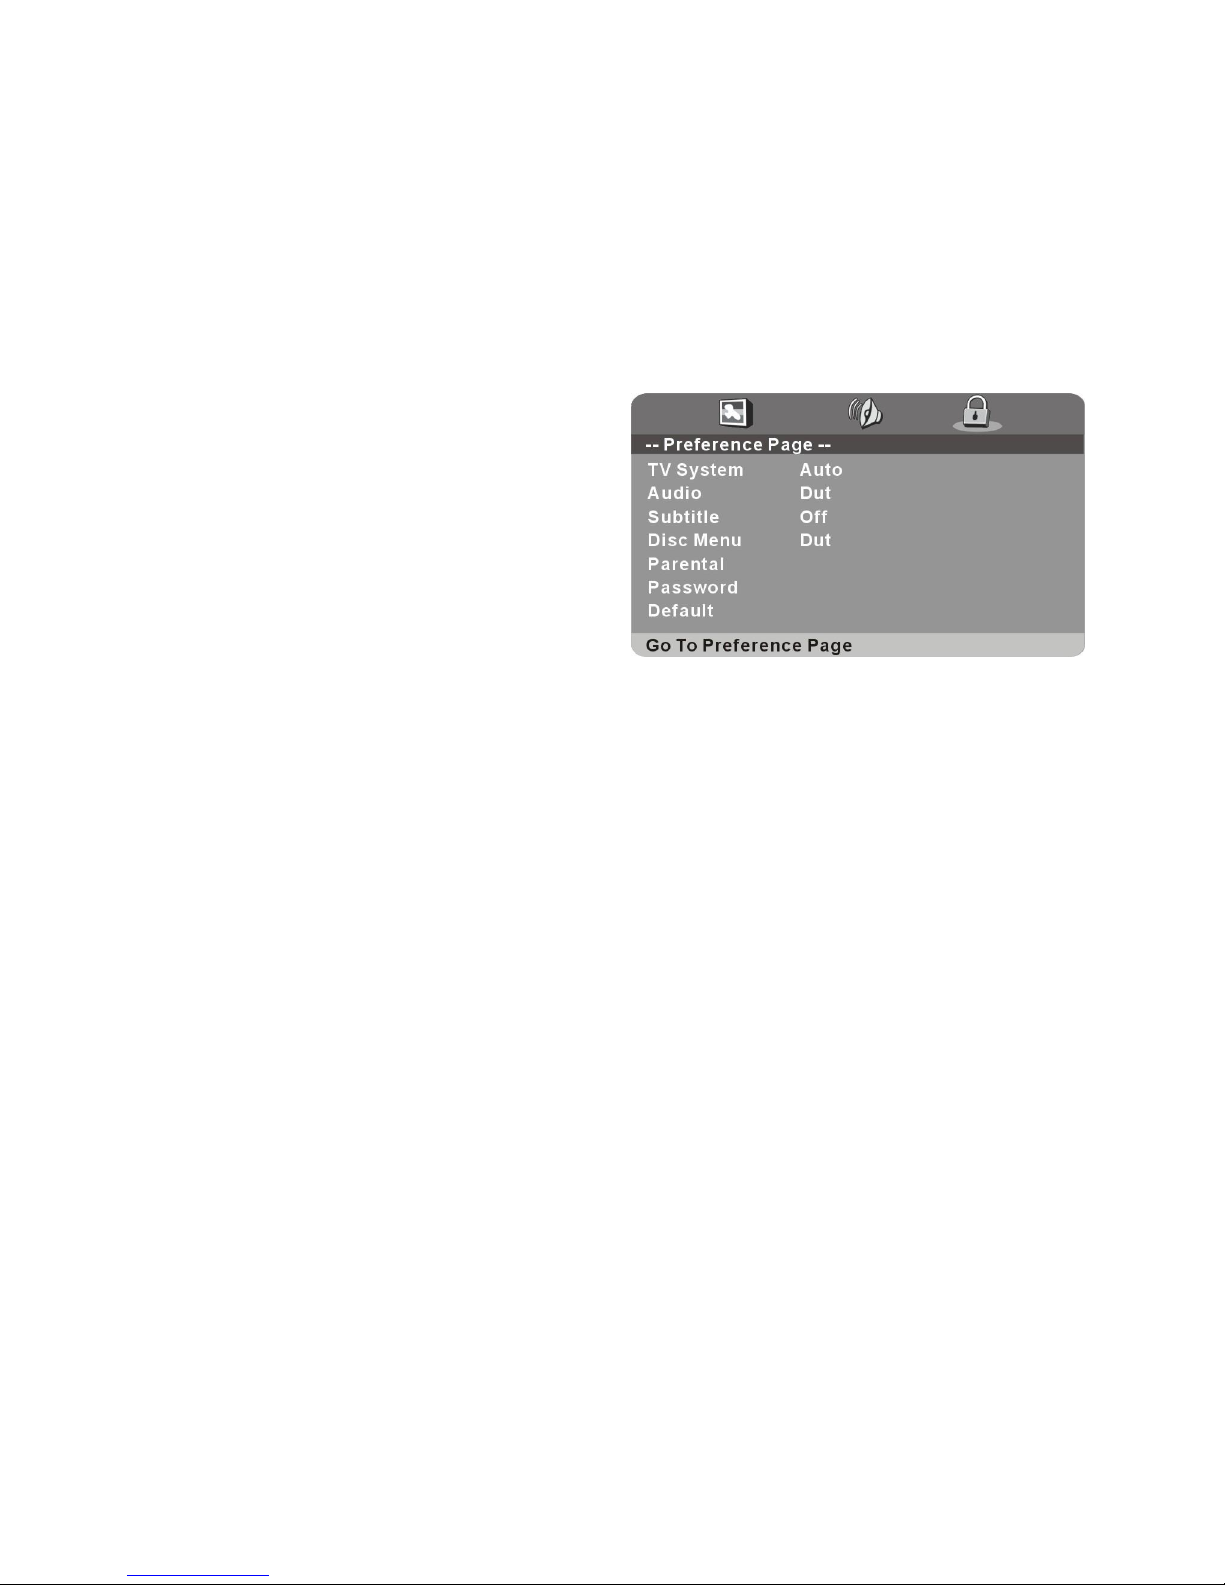
19. Initiële instellingen
Eens de initiële instellingen ingebracht zijn, blijven deze in het geheugen totdat ze
gewijzigd worden. Aldus werkt de speler steeds onder dezelfde condities.
Algemene procedure voor de initiële instellingen
- Druk op SETUP op de afstandsbediening.
- Gebruik de navigatietoetsen om het gewenste item te kiezen en druk dan op de OK toets.
Gebruik de navigatietoetsen om de waarden in te stellen en druk dan op OK om te
bevestigen.
- Druk op SETUP om het menu te verlaten.
- Gebruik de LINKSE en RECHTSE navigatietoetsen om naar een ander item over te gaan.
Druk op de RECHTSE navigatietoets of op OK om in het submenu te gaan: druk op de
LINKSE navigatietoets om naar het vorig menu te gaan.
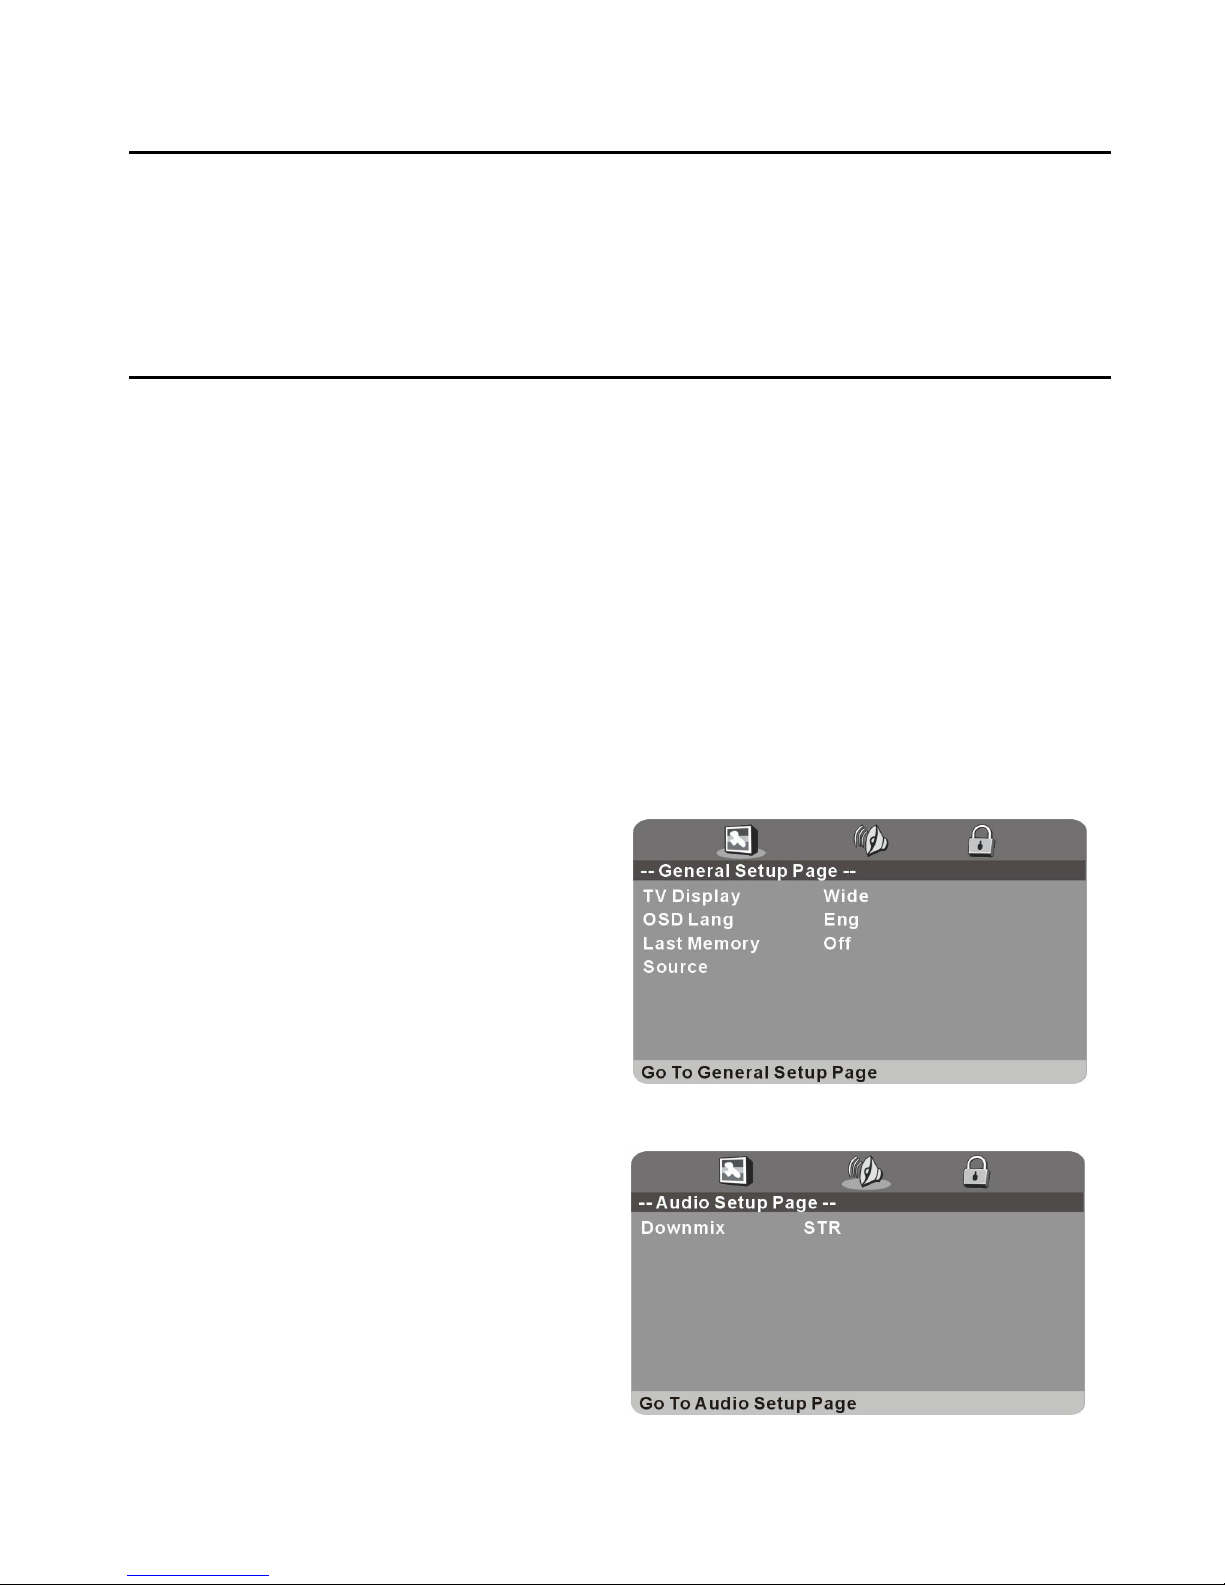
1. ALGEMEEN
1.1 TV DISPLAY
om de TV uitgangsmodus in te stellen.
Opties:
a) Normaal/PS: Pan & scan modus
b) Normaal/LB: Letter box modus
c) Breed: voor 16:9 weergave
1.2 OSD LANG - om de taal van OSD te kiezen
1.3 Laatste geheugen - Kies, tijdens de
weergave van een disc een andere
ingangsbron (behalve USB) en ga dan terug
naar de DVD ingangsbron. Het toestel
herneemt de weergave vanaf het punt waar
gestopt werd als het laatste geheugen op
AAN staat.
1.4 Bron - wordt gebruikt om de ingangsbron in DVD modus te selecteren.
Page 25
24
2. AUDIO
Downmix - gebruikt om de audio uitgangsmodus te kiezen.
Opties:
a) LT/RT - links/rechts gemengd
b) STEREO
3. VOORKEUREN
3.1 TV systeem - selecteer het gewenste
TV-systeem.
3.2 Audio systeem - selecteer de gewenste
gesproken taal bij disc met meerdere talen.
3.3 Ondertitels - selecteer de taal voor
ondertitels bij een disc met meerdere talen.
3.4 Disc menu - selecteer de taal van het discmenu, als deze over meerder talen beschikt.
3.5 Ouderlijke controle - om het niveau van de ouderlijke controle in te stellen.
3.6 Paswoord - wijzig het paswoord met de numerieke toetsen op de afstandsbediening.
OPMERKING: het standaard paswoord is “0000”. Schrijf het gewijzigde paswoord
ergens op en verberg het.
3.7 Default - om terug te gaan naar de fabrieksinstellingen.
Page 26

25
- Druk op de TV/AV toets van de afstandsbediening op het toestel in TV modus
te zetten
DE GEWENSTE ZENDER KIEZEN
1. Druk op CH+ om naar de volgende zender te gaan.
2. Druk op CH- om naar de vorige zender te gaan.
3. Gebruik de numerieke toetsen van de afstandsbediening om het zendernummer direct
in te brengen.
OPMERKING: druk op -/-- om het nummer van een zender in te brengen die uit meerdere
cijfers bestaat.
VOLUMEREGELING
Gebruik VOL+ of VOL- om het volume te regelen.
Beschikbaar bereik: 0-100
MUTE
Druk op MUTE om het geluid uit te schakelen en druk opnieuw om het geluid in te
schakelen.
SELECTIE INGANGSBRON
Druk op de TV/AV toets om de ingangsbronlijst weer te geven.
Gebruik de opwaartse of neerwaartse navigatietoetsen om de gewenste bron te kiezen en
druk op OK om te bevestigen.
Beschikbare mogelijkheden: TV/AV/YPBPR/HDMI 1,2,3/SCART/PC/MEDIA/DVD
BEELDMODUS
Druk op PICTURE om de gewenste beeldmodus direct te kiezen.
Beschikbare mogelijkheden: Gebruiker, Dynamisch, Standaard, Zacht.
GELUIDMODUS
Druk op SOUND om de gewenste geluidmodus direct te kiezen.
Beschikbare mogelijkheden: Standaard, Muziek, Film, Sport, Gebruiker
INSTELLEN SLEEP TIMER
Druk op SLEEP om de gewenste sleeptime direct te kiezen.
Beschikbare mogelijkheden: Uit, 10/20/30/60/90/120/180/240 min
TV
Page 27
26
INSTELLEN VIDEOFORMAAT
Druk op ASPECT om het videoformaat direct in te stellen.
Beschikbare mogelijkheden: Auto, 4:3, 16:9, Zoom1, Zoom2, PAL+
OPMERKING: het beschikbare formaat hangt af van de ingangsbron.
GELUIDSINSTELLING
Druk op NICAM/A2 om de gewenste geluidsinstelling te kiezen
OPMERKING: afhankelijk van de zender kan deze toets verschillende opties bieden.
INFORMATIESCHERM
Druk op DISPLAY om informatie over de zender op te roepen, zoals zendernummer,
kleursysteem, geluidsysteem, enz.
TELETEKST
Wanneer teletekst beschikbaar is:
Druk op TEXT om de teletekst op te roepen.
Druk op HOLD om de teletekst pagina vast te houden
Druk op PGUP om naar de vorige pagina te gaan.
Druk op PGDN om naar de volgende pagina te gaan.
Druk op INDEX om naar de index pagina te gaan.
Druk op SIZE om de lettergrootte te wijzigen.
Druk op REVEAL om verborgen tekst op te roepen.
Druk op SUBPAGE om naar een subpagina te gaan.
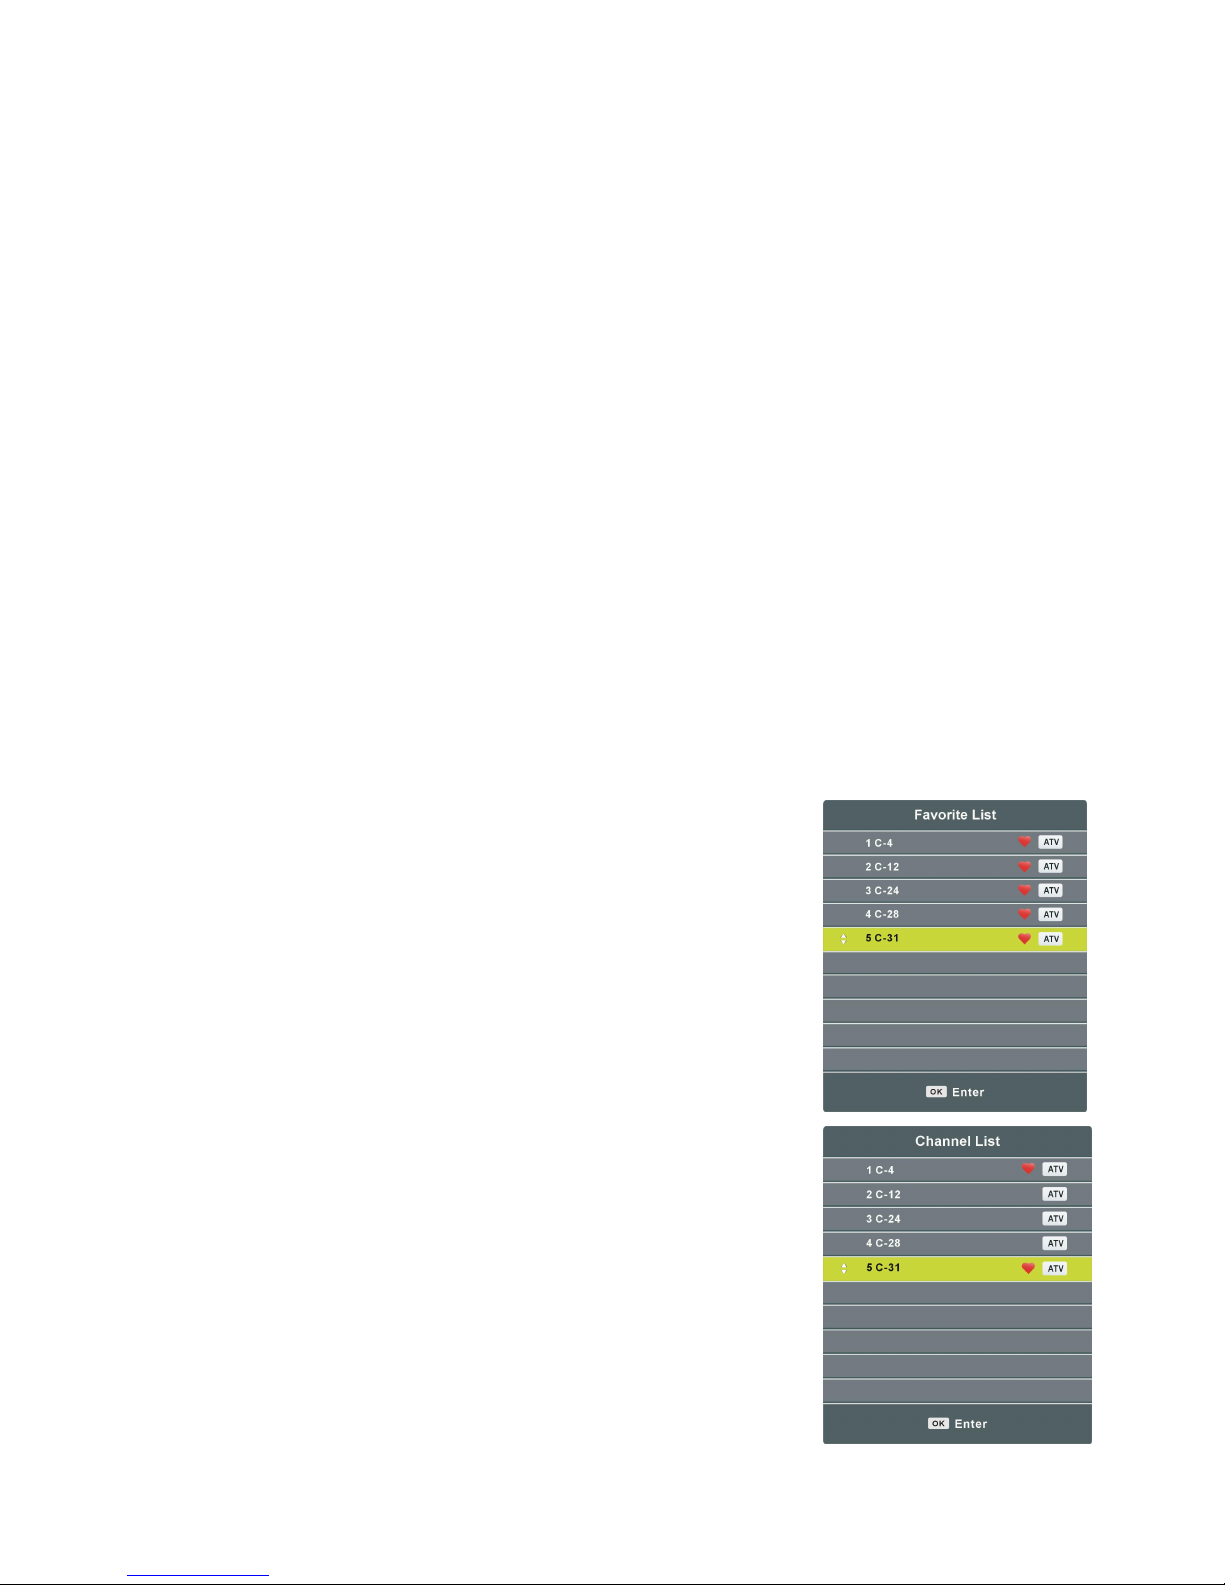
VOORKEURLIJST
Druk op FAV om de voorkeurzenderlijst op te roepen.
Gebruik de navigatietoetsen (UP/DOWN) om de gewenste
zender te kiezen en druk op OK om ernaar te kijken.
SNELLE SELECTIE
Druk op OK om de zenderlijst op te roepen.
Gebruik de navigatietoetsen (UP/DOWN) om de gewenste
zender te kiezen en druk op OK om ernaar te kijken.
Page 28
27
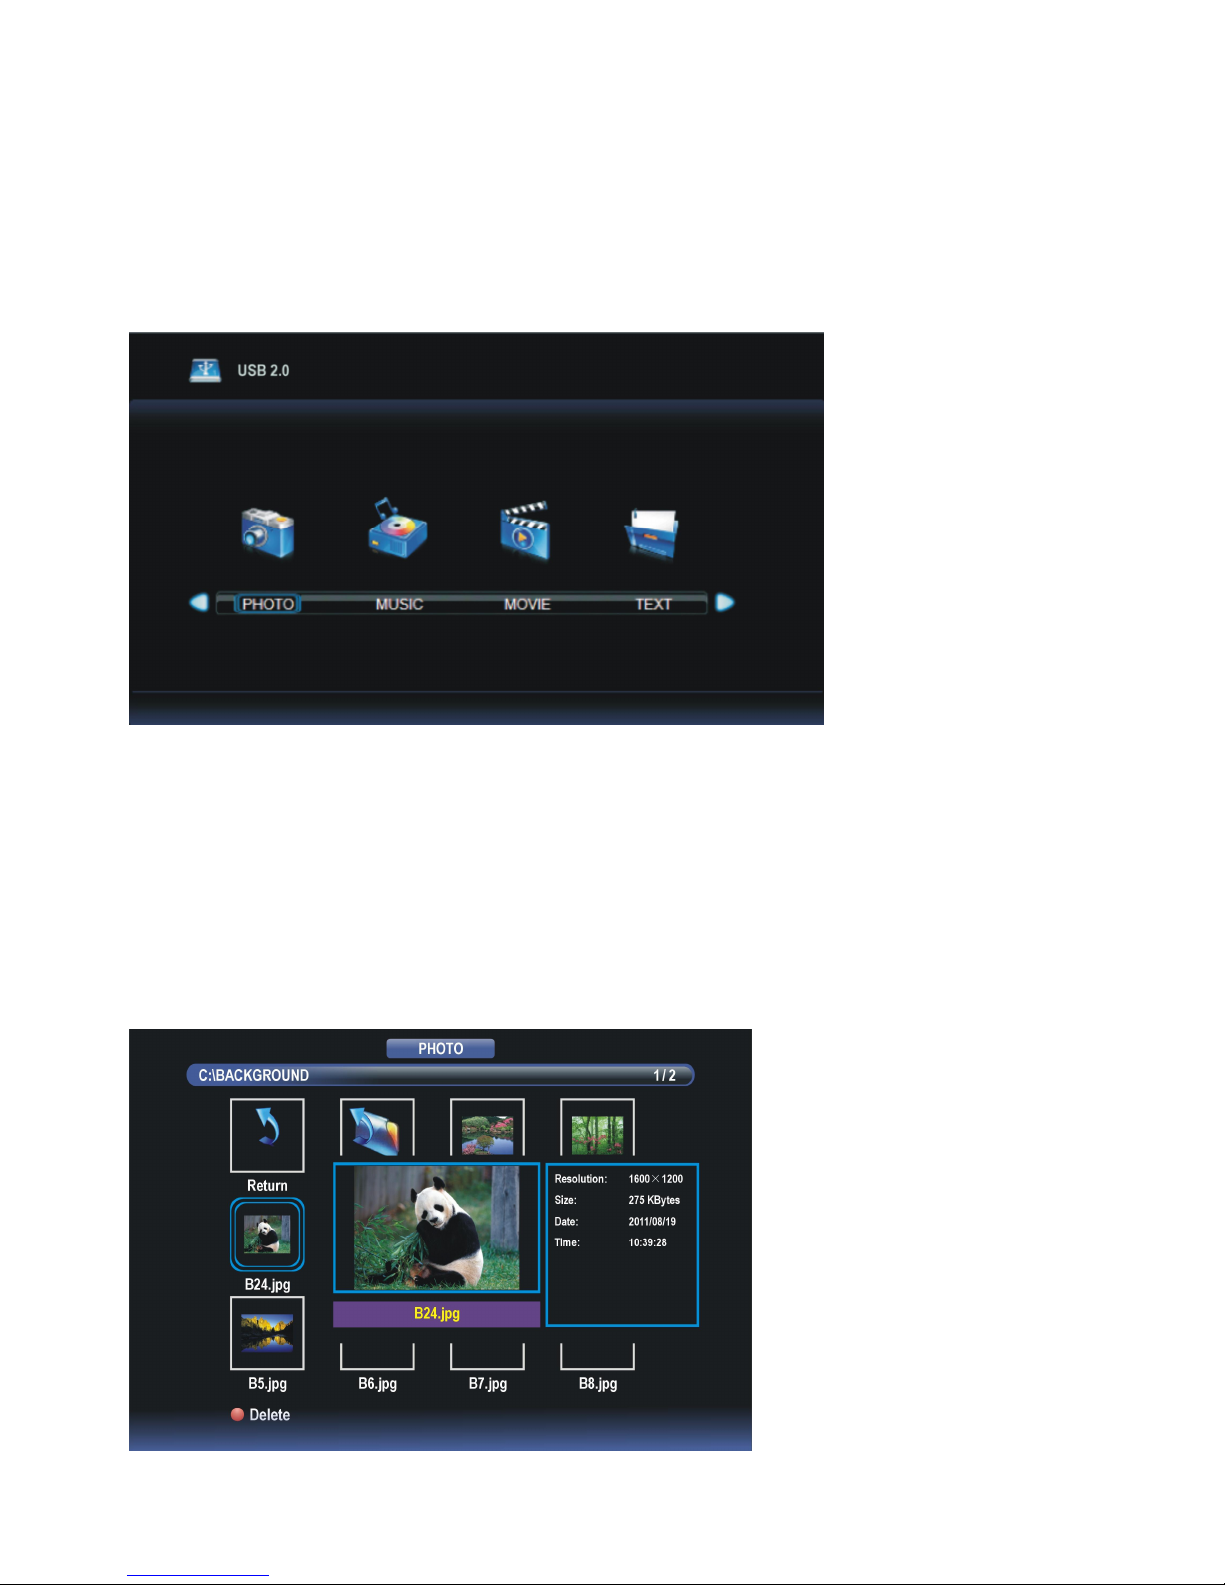
MEDIA AFSPELEN
- Steek de USB geheugenapparaat in de USB1 poort.
- Druk op de TV/AV knop op het apparaat of op de afstandsbediening om dit apparaat op
Mediamodus te schakelen.
- Druk op de VERLATEN knop op de afstandsbediening om terug te keren naar de vorige
menupagina.
1. FOTO’S
- Druk op de LINKSE of RECHTSE navigatieknop om een FOTO item te selecteren.
- Druk op de OK knop om het te openen en druk op de LINKSE of RECHTSE
navigatieknop om de gewenste disk te selecteren.
- Druk op de OK knop om het te openen en gebruik de navigatieknoppen om de gewenste
folder te selecteren.
- Druk op de OK knop om het te openen en gebruik de navigatieknoppen om het gewenste
Fotobestand te selecteren.
Page 29
28
- Druk op de RODE knop om een dialoogvenster te openen en druk op de LINKSE of
RECHTSE navigatieknop om het item al dan niet te wissen.
- Druk op de OK knop om het gemarkeerde bestand af te spelen.
Tijdens normale weergave van FOTO’S:
- Druk op de DISPLAY knop op de afstandsbediening om de taakbalk te
openen/verbergen.
- Druk op de LINKSE/RECHTSE navigatieknop om de gewenste optie te selecteren en
druk ter bevestiging op de ENTER knop.
- Druk op de
knop om het afspelen te pauzeren/starten.
- Druk op de / knop om het vorige/volgende bestand af te spelen.
- Druk op de █ knop om het afspelen te stoppen.
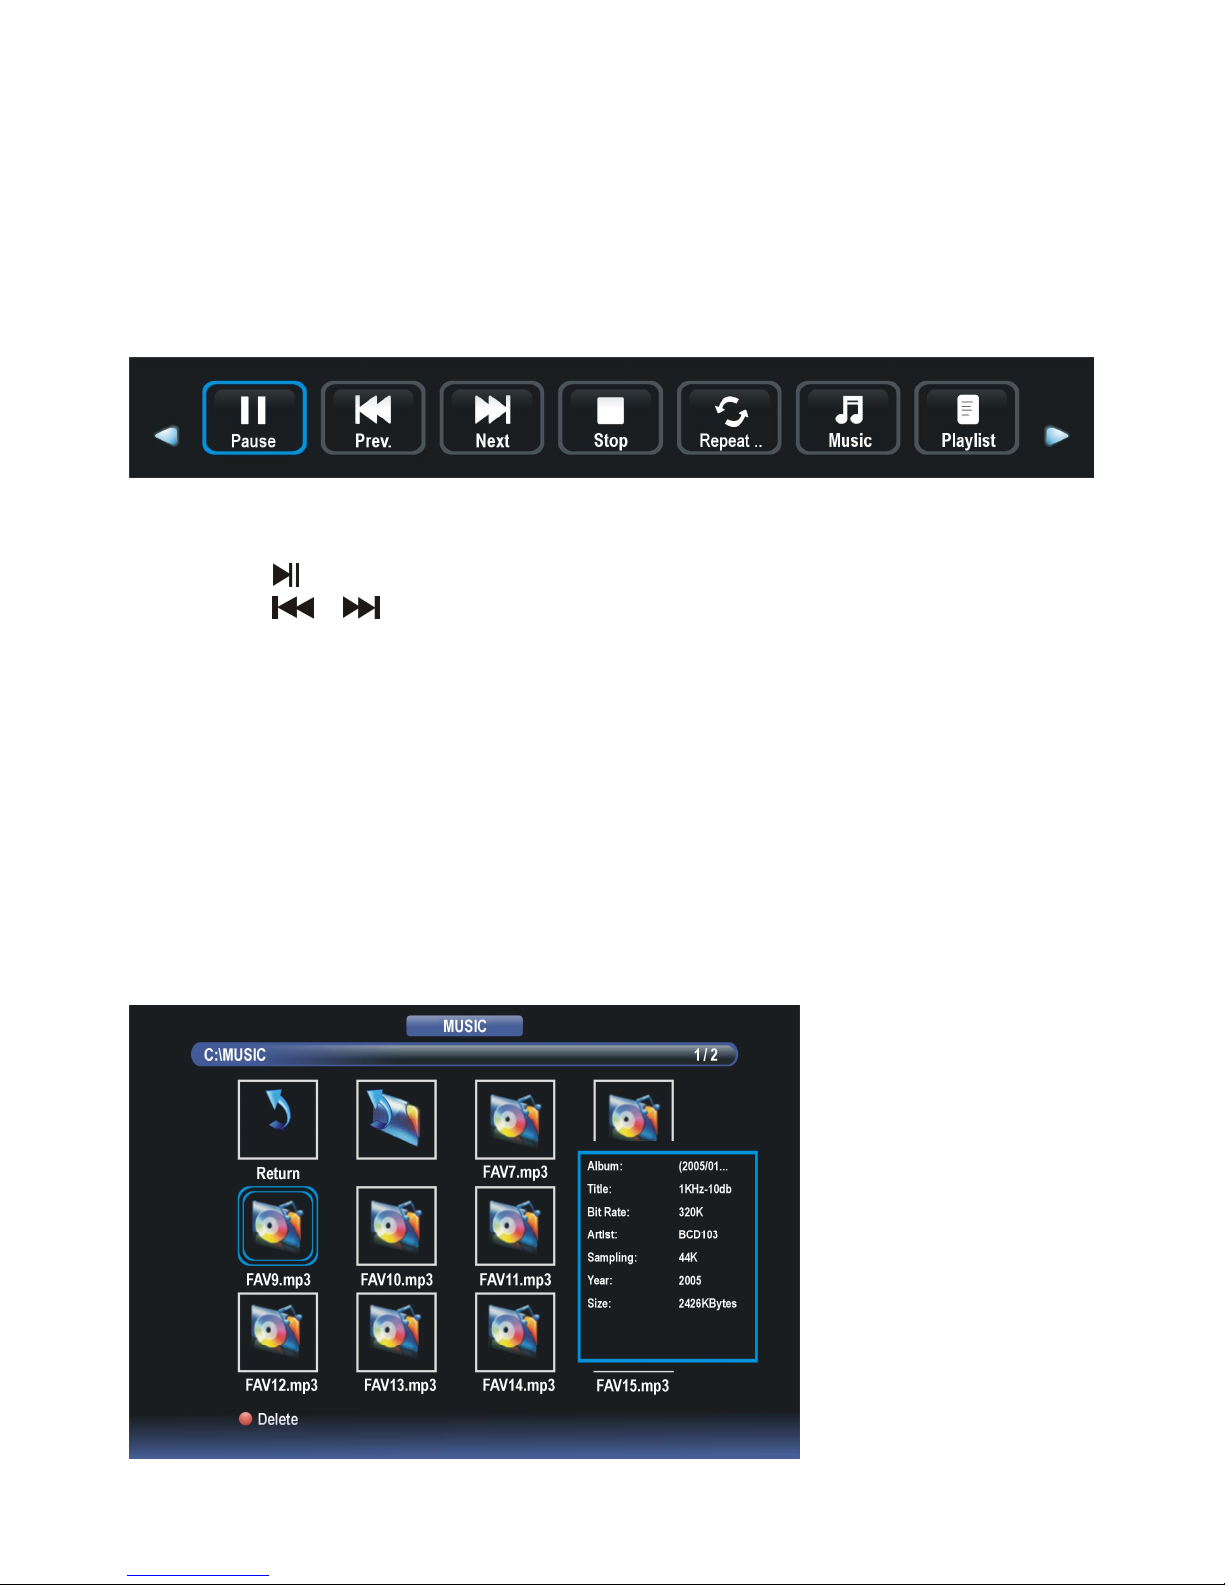
2. MUZIEK
- Druk op de LINKSE of RECHTSE navigatieknop om een MUZIEK item te selecteren.
- Druk op de OK knop om het te openen en druk op de LINKSE of RECHTSE
navigatieknop om de gewenste disk te selecteren.
- Druk op de OK knop om het te openen en gebruik de navigatieknoppen om de gewenste
folder te selecteren.
- Druk op de OK knop om het te openen en gebruik de navigatieknoppen om het gewenste
Muziekbestand te selecteren.
Page 30
29
- Druk op de RODE knop om een dialoogvenster te openen en druk op de LINKSE of
RECHTSE navigatieknop om het item al dan niet te wissen.
- Druk op de OK toets om het gemarkeerde bestand af te spelen.
Tijdens normaal afspelen van MUZIEK:
- Druk op de LINKSE/RECHTSE navigatieknop om de gewenste optie te selecteren in de
taakbalk en druk ter bevestiging op de OK knop.
- Druk op de
knop om het afspelen te pauzeren/starten.
- Druk op de / knop om terug/vooruit te spoelen.
- Druk op de
/ knop om het vorige/volgende bestand af te spelen.
- Druk op de █ knop om het afspelen te stoppen.
3. FILM
- Druk op de LINKSE of RECHTSE navigatieknop om een FILM item te selecteren.
- Druk op de OK knop om het te openen en druk op de LINKSE of RECHTSE
navigatieknop om de gewenste disk te selecteren.
- Druk op de OK knop om het te openen en gebruik de navigatieknoppen om de gewenste
folder te selecteren.
- Druk op de OK knop om het te openen en gebruik de navigatieknoppen om het gewenste
Filmbestand te selecteren.
Page 31

30
- Druk op de RODE knop om een dialoogvenster te openen en druk op de LINKSE of
RECHTSE navigatieknop om het item al dan niet te wissen.
- Druk op de OK toets om het gemarkeerde bestand af te spelen.
Tijdens normale weergave van FILMS:
- Druk op de DISPLAY knop op de afstandsbediening om de taakbalk te
openen/verbergen.
- Druk op de LINKSE/RECHTSE navigatieknop om de gewenste optie te selecteren in de
taakbalk en druk ter bevestiging op de OK knop.
- Druk op de
knop om het afspelen te pauzeren/starten.
- Druk op de / knop om terug/vooruit te spoelen.
- Druk op de / knop om het vorige/volgende bestand af te spelen.
- Druk op de █ knop om het afspelen te stoppen.
Page 32

31
4. TEKST
- Druk op de LINKSE of RECHTSE navigatieknop om het TEKST item te selecteren.
- Druk op de OK knop om het te openen en druk op de LINKSE of RECHTSE
navigatieknop om de gewenste disk te selecteren.
- Druk op de OK knop om het te openen en gebruik de navigatieknoppen om de gewenste
folder te selecteren.
- Druk op de OK knop om het te openen en gebruik de navigatieknoppen om het gewenste
Tekstbestand te selecteren.
- Druk op de RODE knop om een dialoogvenster te openen, en druk op de LINKSE of
RECHTSE knop om het item al dan niet te wissen.
- Druk op de OK knop om het gemarkeerde bestand af te spelen.
Tijdens normale weergave van TEKST:
- Druk op de DISPLAY knop op de afstandsbediening om de taakbalk te
openen/verbergen.
- Druk op de LINKSE/RECHTSE navigatieknop om de gewenste optie te selecteren in de
taakbalk en druk ter bevestiging op de ENTER knop.
- Druk op de
/ knop om de vorige/volgende pagina weer te geven.
- Druk op de / kmop om het vorige/volgende bestand af te spelen.
- Druk op de █ knop om het afspelen te stoppen.
OPMERKING: Zorg ervoor het correcte icoontje in het hoofdmenu van MEDIA AFSPELEN
te selecteren om uw multimediabestanden af te kunnen spelen. D.w.z., u kunt alleen
Fotobestanden weergeven in het FOTO item, muziekbestanden in het MUZIEK item, enz.
Page 33

32
● Dit toestel beschikt over verschillende instelmenus. Eens de instellingen gedaan blijven
deze in het geheugen en zorgen er aldus voor dat het toestel steeds onder dezelfde
condities functioneert.
● De instellingen blijven in het geheugen (zelfs als het toestel in stand-by gezet wordt)
totdat u ze terug wijzigt.
Algemene procedure voor de instellingen
- Druk op MENU om in het hoofdmenu te gaan.
- Gebruik de LINKSE/RECHTSE navigatietoetsen om een submenu te selecteren.
- Gebruik de UP/DOWN navigatietoetsen om een optie in de lijst te selecteren.
- Druk op OK of RECHTSE navigatietoets om in het submenu te gaan.
- Gebruik de navigatietoetsen om de gewenste waarde in te stellen en druk op OK om te
bevestigen.
- Druk op MENU om terug te gaan naar het vorig menu.
- Druk op EXIT om het menu te verlaten.
TV MODUS
Druk op TV/AV om de TV modus te selecteren.
1. ZENDERS
1.1 Automatisch afstemmen
Gebruik de UP/DOWN navigatietoetsen om dit item aan te duiden en druk op OK om het
automatisch afstemmen te starten.
HOOFDMENU
Page 34

33
1.2 Handmatig afstemmen
- Gebruik de UP/DOWN navigatietoetsen om dit
item aan te duiden en druk op OK om in het menu te
gaan.
- Gebruik de UP/DOWN navigatietoetsen om de
tweede optie te kiezen.
- Gebruik de LINKSE/RECHTSE navigatietoetsen
om de regeling te beginnen.
1.3 Zenderlijst bewerken
- Gebruik de UP/DOWN navigatietoetsen om dit item aan te duiden en druk op OK om in
het menu te gaan.
- Druk op ROOD om de zender te verwijderen.
- Druk op GROEN om in het menu voor
naamverandering te komen. Gebruik UP/DOWN om de
waarden in te stellen; gebruik LINKS/RECHTS om de
cursor te verplaatsen.
- Druk op GEEL om in het menu voor zenderverplaatsing
te komen. Gebruik UP/DOWN om de gewenste positie
aan te duiden en druk op GEEL om de zender te
verplaatsen.
- Druk op BLAUW om de zender over te slaan.
- Druk op FAV om de zender als een voorkeurzender
aan te duiden of druk opnieuw op FAV om er terug een
gewone zender van te maken.
2. BEELD
Page 35

34
2.1 Beeldmodus
Beschikbare opties: gebruiker, dynamisch, standaard, zacht.
OPMERKING: de instellingen van contrast, helderheid, kleur, tint en scherpte zijn
beschikbaar als ‘gebruiker’ is gekozen.
2.2 Contrast
De waarde van het contrast kan ingesteld worden tussen 0-100.
2.3 Helderheid
De waarde van de helderheid kan ingesteld worden tussen 0-100.
2.4 Kleur
De waarde van de kleur kan ingesteld worden tussen 0-100.
2.5 Tint
De waarde van de tint kan ingesteld worden tussen 0-100.
OPMERKING: dit is alleen beschikbaar bij NTSC systeem.
2.6 Scherpte
De waarde van de scherpte kan ingesteld worden tussen 0-100.
2.7 Kleurtemperatuur
Gebruik dit om de kleurtemperatuur naar wens in te stellen.
Beschikbare opties: medium, koel, warm.
2.8 Ruisonderdrukking
Beschikbare opties: uit, laag, gemiddeld, hoog.
3. GELUID
Page 36

35
3.1 Geluidmodus
Beschikbare opties: standaard, muziek, film, sport, gebruiker.
OPMERKING: de instellingen van hoge en lagen tonen is mogelijk als ‘gebruiker’ is
gekozen.
3.2 Hoge tonen
De waarde van de hoge tonen kan ingesteld worden tussen 0-100.
3.3 Lage tonen
De waarde van de lage tonen kan ingesteld worden tussen 0-100.
3.4 Balans
Om het uitgangsniveau tussen linker en rechter luidsprekers in te stellen van -50 tot 50.
3.5 Automatisch volume
Om het automatisch volume in of uit te schakelen.
4. TIJD
4.1 Sleep timer
Om de tijd in te stellen waarna het toestel automatisch in stand-by gaat.
Mogelijke opties: uit, 10/20/30/60/90/120/180/240 min
4.2 Automatische stand-by
Om de automatische stand-by duur in te stellen.
Mogelijke opties: uit, 3 uur, 4 uur, 5 uur.
4.3 OSD timer
Om in te stellen hoe lang het OSD op het scherm verschijnt.
Mogelijke opties: 5/10/15/20/25/30 seconden.
Page 37

36
5. OPTIES
5.1 OSD taal
Om de taal van OSD in te stellen.
5.2 Teletekst taal
Om de taal van teletekst in te stellen.
5.3 Beeldverhouding
Beschikbare opties: auto, 4:3, 16:9, Zoom1, Zoom2, PAL+
OPMERKING: dit kan volgens het beschikbaar signaal soms niet instelbaar zijn.
5.4 Blauw scherm
Om de blauwe achtergrond in of uit te schakelen. Het scherm wordt blauw in geval van
geen of een zeer zwak signaal, als deze functie ingeschakeld is.
5.5 Toetsblokkering
Druk op OK om de toetsblokkering in of uit te schakelen.
5.6 Reset
Om de instellingen terug op de fabriekswaarden te brengen.
AV EN OVERIGE MODI
- Druk op de TV/AV toets om de gewenste ingangsbron te selecteren.
- Voor het gebruik van de menu’s BEELD, GELUID, TIJD en OPTIES, refereer naar het
deel betreffende de bediening van de TV.
Page 38

37
PC MODUS
- Schakel de computer en de TV in.
- Sluit de computer aan via een VGA kabel.
- Druk op de TV/AV toets om PC modus te selecteren.
- Druk op MENU om in het hoofdmenu te komen en gebruik de LINKSE/RECHTSE
navigatietoetsen om SCHERM aan te duiden.
- Gebruik UP/DOWN navigatietoetsen om de gewenste optie te kiezen en druk op OK om
in het submenu te gaan.
- Gebruik de LINKSE/RECHTSE navigatietoetsen om de waarde in te stellen.
Automatische instelling
Om het scherm automatisch in te stellen.
Horizontale positie
Om de waarde van de horizontale positie in te stellen tussen 0-100.
Verticale positie
Om de waarde van de verticale positie in te stellen tussen 0-100.
Klok
Om de waarde van de klok in te stellen tussen 0-100.
Fase
Om de waarde van de fase in te stellen tussen 0-100.
OPMERKING: het beeld is onstabiel als deze waarde niet goed is ingesteld.
- Voor het gebruik van de menu’s BEELD, GELUID, TIJD en OPTIES, refereer naar het
deel betreffende de bediening van de TV.
Page 39

38
●
Zorg ervoor op de AAN/UIT toets te drukken om de speler op stand-by te zetten en
haal de stekker uit het stopcontact voordat u de speler reinigt.
● Reinig met een droog en zacht doekje.
● Als de behuizing erg vuil is, gebruik een doekje dat ondergedompeld is in een
water/zeep solutie en voldoende is uitgewrongen. Gebruik daarna opnieuw een droog
doekje.
● Gebruik nooit alcohol, benzine, thinner, een reinigingsmiddel of andere
chemicaliën. Gebruik ook geen spuitbus op stof te verwijderen.
● Contacteer een professionele installateur om de TV aan de muur te bevestigen. Wij zijn
niet verantwoordelijk voor schade aan het toestel of kwetsuren aan uzelf indien u zelf de
TV aan de muur monteert.
● Monteer de TV niet aan de muur terwijl deze aanstaat. Dit kan een elektrische schok
veroorzaken.
● Gebruik standaard M6*10mm schroeven (4 stuks) om de TV te bevestigen.
ONDERHOUD
MONTAGE TEGEN EEN MUUR
Achterzijde van uw TV
Page 40

39
Bij uw toestel wordt een aparte voet meegeleverd. Gelieve de volgende instructies te
volgen voor het monteren van de voet alvorens de TV in gebruik te nemen.
Stap 1
Plaats de TV met het beeld omlaag op een
zachte doek of een kussen om
paneelbeschadiging te voorkomen.
Stap 2
Stem de Steun af op de onderkant van de TV.
Stap 3
Draai de meegeleverde schroeven vast met een
schroevendraaier.
OPMERKING:
- Haal altijd de stekker uit het stopcontact
voordat u de TV steun installeert of verwijdert.
- Vraag anderen om hulp wanneer u de TV
steun installeert of verwijdert.
INSTALLATIE VAN DE VOET
Page 41

40
Scherm 32 inch LED TV
Resoutie 1366×768
Pixelgrootte 0.51075(H)×0.51075(V)mm
Luminantie 200 cd/m2
Contrastverhouding 3000:1
Beeldschermverhouding 16:9
Reactietijd 6.5 ms
Kijkhoek 178(H)/178(V)
Zichtbaar bereik 697.7(H)×392.3(V)mm
Levensduur 30,000 uur
Film: AVI, MP4, TS, MPG, MKV/MOV, DAT, VOB,
RM/RMVB
Muziek: AAC
Foto: JPG/JPEG, BMP, PNG
MULTIMEDIA
WEERGAVE FORMATEN
(TV MODUS) USB1
Tekst: TXT
Film: MPEG-1, MPEG-2, MPEG-4
Muziek: WMA
MULTIMEDIA
WEERGAVE FORMATEN
(DVD MODUS) USB2
Foto: JPEG
Ondersteunde discs
DVD/CD/CDR/CDRW/DVD-R/DVD+R/
DVD-RW/DVD+RW/VCD/SVCD
VOEDING AC 100-240V, 50/60Hz
VERBRUIK <60W
GEBRUIKSTEMPERATUUR -5°C tot 45°C
AFMETINGEN 737(B) x 190(D) x 479(H) mm
GEWICHT Ongeveer 6.2 Kg
Specificaties kunnen zonder voorafgaande verwittiging
gewijzigd worden.
SPECIFICATIES
Page 42

41
Gebruik onderstaande lijst voor het oplossen van mogelijke problemen.
Probleem
(ALGEMEEN)
OPLOSSING
Geen voeding Steek de netstekker stevig in het stopcontact.
Geen beeld Controleer of alles goed is aangesloten.
Geen geluid
Vervormd geluid
Controleer of alles goed is aangesloten
Controleer of de ingangselectie van de TV en het stereo
systeem overeenkomen.
Regel het volume met de VOL+/VOL- toetsen
Er kunnen geen functies
met de
afstandsbediening
uitgevoerd worden
Controleer of de batterijen juist zijn aangebracht (polariteit)
Vervang de batterijen
Richt de afstandsbediening naar de infrarood ontvanger van
het toestel
Gebruik de afstandsbediening op geen grotere afstand dan
zes meter
Verwijder voorwerpen tussen de afstandsbediening en het
toestel.
Geen enkele
toetsbediening (op het
toestel of
afstandbediening) heeft
effect
Koppel de netstekker los en sluit het opnieuw aan (de speler
werkt mogelijk verkeerd wegens onweer, statische
elektriciteit of andere factoren.)
Probleem (TV) Oplossing
Geen of slecht beeld
Regel de antenne of gebruik een buitenantenne.
Plaats het toestel naast een raam (in een gebouw)
Verwijder voorwerpen die interferentie kunnen veroorzaken
Voer terug automatisch afstemmen uit
Probeer een andere zender
Geen of slecht geluid
Controleer de audio instellingen
Druk op MUTE om de geluidsonderdrukking uit te schakelen
Trek de hoofdtelefoon uit het toestel
Ruis of andere storing Naburige elektronische apparatuur veroorzaakt interferentie.
Verplaats het toestel of de andere apparatuur.
IN GEVAL VAN PROBLEMEN
Page 43

42
De regionale code van de DVD speler is
Probleem (DVD) Oplossing
Weergave start niet,
zelfs niet na selectie van
de titel
Controleer of de regionale code overeenkomt
De initieel ingestelde
talen voor audio en
ondertitels zijn niet
bruikbaar
De initieel ingestelde talen zijn niet beschikbaar op de disc,
alleen die op de disc kunnen gebruikt worden.
Geen ondertitels Ondertitels zijn alleen mogelijk bij discs die er over beschikken.
Volg de instructies om de ondertitels op te roepen.
Andere gesproken talen
of talen voor ondertitels
kunnen niet
geselecteerd worden
Er kan geen andere taal gekozen worden als de disc slechts
over één taal beschikt.
Bij sommige discs kan de andere taal niet gekozen worden via
de TAAL of ONDERTITELS toetsen. Probeer een selectie te
maken via het DVD menu
De hoek kan niet
gewijzigd worden
Deze functie is afhankelijk van de software. Zelfs al heeft een
disc deze functie, dan kan die slechts bij bepaalde scènes
gebruikt worden.
Paswoord voor instellen
van de ouderlijke
controle vergeten
Consulteer uw verkoper
Probleem (Video CD) Oplossing
Geen menu weergave Deze functie werkt alleen met Video CD’s voorzien van
playback control
Probleem (USB) Oplossing
Toestel herkent mijn
USB-sleutel of externe
harde schijf niet
wanneer aangesloten
op de USB ingang
Lees de instructie betreffende het gebruik van USB met dit
apparaat.
Dit toestel is getest met de meest voorkomende Flash memory
cards (USB en MP3 spelers) en harde schijven
(muziek/videospelers met HDD). Mogelijk is dit toestel niet
compatibel met externe harde schijven met eigen voeding.
Regionale code
Alle DVD discs beschikken over een regionale code. Deze speler beschikt over regionale
code 2 die niet gewijzigd kan worden. Dit in overeenkomst met de patenteisen van DVD.
IN GEVAL VAN PROBLEMEN
Page 44

INSTRUCTION MANUAL
Read all of the instructions before using this TV and keep the
instruction manual in a safe place for future reference.
Page 45

1
Safety information
CAUTION:
DVD/VIDEO CD/CD PLAYER IS A CLASS 1 LASER PRODUCT. HOWEVER THIS
DVD/VIDEO CD/CD PLAYER USES A VISIBLE LASER BEAM WHICH COULD
CAUSE HAZARDOUS RADIATION EXPOSURE IF DIRECTED. BE SURE TO
OPERATE THE DVD/VIDEO CD/CD PLAYER CORRECTLY AS INSTRUCTED.
WHEN THIS DVD/VIDEO CD/CD PLAYER IS PLUGGED TO THE WALL OUTLET, DO
NOT PLACE YOUR EYES CLOSE TO THE OPENING OF THE DISC TRAY AND
OTHER OPENINGS TO LOOK INTO THE INSIDE OF THIS PLAYER.
USE OF CONTROLS OR ADJUSTMENTS OR PERFORMANCE OF PROCEDURES
OTHER THAN THOSE SPECIFIED HEREIN MAY RESULT IN HAZARDOUS
RADIATION EXPOSURE.
DO NOT OPEN COVERS AND REPAIR YOURSELF. REFER SERVICING TO
QUALIFIED PERSONNEL.
WARNING:
- TO PREVENT FIRE OR SHOCK HAZARD. DO NOT USE THIS POWER CORD WITH
AN EXTENSION CORD, RECEPTACLE OR OTHER OUTLET UNLESS THE BLADES
CAN BE FULLY INSERTED TO PREVENT BLADE EXPOSURE.
- TO PREVENT FIRE OR SHOCK HAZARD. DO NOT EXPOSE THIS APPLIANCE TO
RAIN OR MOISTURE.
CAUTION - LASER RADIATION WHEN OPEN, DO NOT STARE INTO BEAM.
VENTILATION WARNING - THE NORMAL VENTILATION OF THE PRODUCT SHALL
NOT BE IMPEDED FOR INTENDED USE.
The lightning flash and
arrow head within the
triangle is a warning
sign alerting you of
“ dangerous
voltage”inside the
product.
CAUTION: TO REDUCE THE RISK
OF ELECTRIC SHOCK. DO NOT
REMOVE COVER (OR BACK).
NO USER SERVICEABLE PARTS
INSIDE. REFER SERVICING TO
QUALIFIED SERVICE PERSONNEL.
The exclamation
point within the
triangle is a warning
sign alerting you of
important
instructions
accompanying the
product.
Always follow basic safety precautions when using electrical products, especially
when children are present.
WARNING: To avoid the risk of electrical shock, make sure the product is unplugged
from the electrical outlet before relocating, servicing, or cleaning it.
IMPORTANT INSTRUCTIONS
Page 46

2
Read all instructions before using
Do not use this product near water.
Install the product in accordance with the operating instructions.
Do not set the product near heat sources, such as radiators, heat registers, stoves, or
other apparatus (including amplifiers) that produce heat.
Protect the power cord from being walked on or pinched, particularly at plugs,
convenience receptacles, and the point where they exit the product.
Where the MAINS plug or an appliance coupler is used as the disconnect device, the
disconnect device shall remain readily operable.
Unplug the product during lightning storms or when unused for long periods of time.
The product shall not be exposed to dripping or splashing and that no objects filled
with liquids, such as vases, shall be placed on the product.
Do not place in or expose the product to direct sunlight, extreme heat, humid or dusty
locations.
Never operate this product if it has a damaged power cord or plug, do not work
properly, has been dropped, damaged, or exposed to moisture, water, or other liquids.
Do not attempt to examine or repair this product yourself; take the product to a service
center for inspection and repair.
Keep magnetic objects such as speakers, at a distance from the player.
LASER SAFETY
This set employs an optical laser beam system in the CD mechanism
designed with built-in safeguards. Do not attempt to disassemble.
Exposure to this invisible laser light beam may be harmful to the human
eye. This is a Class-1 laser product. Use of controls, adjustments or
procedures other than those specified herein may result in hazardous
laser light beam exposure. This compact disc player should not be
adjusted or repaired by anyone except qualified service personnel. The
laser mechanism in the set corresponds to the stylus (needle) of a record
player. Although this product uses a laser pick-up lens, it is completely
safe when operated according to directions.
NOTE: The manufacturer is not responsible for any radio or TV interference caused by
unauthorized modifications. Such modifications could void the user's authority to operate
the equipment.
1) Operate turning controls and switches as instructed in the manual.
2) Before turning on the power for the first time, make sure that the power cord is
properly installed.
3) Store your discs in a cool area to avoid damage from heat.
Battery Handling and Usage
● Keep batteries away from children and pets. Only adults should handle batteries.
● Never throw batteries into a fire or expose them to fire or other heat sources.
● Follow the battery safety and usage instructions.
Page 47

3
DISC Handling and Maintenance
Handling precautions
Hold the disc by the edges so the surface will not be soiled with fingerprints. Fingerprints,
dirt and scratches can cause skipping and distortion.
Do not write on the label side with a ball-point pen or other writing utensils.
Do not use record cleaning sprays, benzine, thinner, static electricity prevention liquids.
Be careful not to drop or bend the disc.
Do not install more than 1 disc on the disc compartment.
Do not try to close the disc cover when the disc is not installed properly.
Be sure to store the disc in its exclusive case when not in use.
If the surface is soiled
Wipe gently with a soft, damp (water only) cloth.
When wiping discs, always move the cloth from the center hole toward the outside,
which will not cause distortion. (If you wipe the discs using a circular motion, circular
scratches are likely to occur, which will cause distortion.)
If the disc is brought from a cold to a warm environment, moisture may
form on the disc.
Wipe this moisture off with a soft, dry, lint-free cloth before using the disc.
Improper disc storage
You can damage discs if you store them in the following places:
Areas exposed to direct sunlight
Humid or dusty areas
Areas directly exposed to a heat outlet or heating appliance
Instruction Manual……………………………………………………………………………1
Remote Control……………..…………………………………………………………………1
All the pictures in this manual are just for your reference, appearance and display
should subject to the final product.
ACCESSORIES
Page 48

4
TABLE OF CONTENTS
GETTING STARTED
IMPORTANT INSTRUCTIONS...................................................................................1-3
ACCESSORIES.............................................................................................................3
FEATURES....................................................................................................................5
GENERAL PARTS......................................................................................................6-7
REMOTE CONTROL..................................................................................................8-9
REMOTE CONTROL PREPARATION.........................................................................10
BASIC CONNECTION............................................................................................11-15
OPERATIONS
BASIC OPERATIONS.............................................................................................16-30
DVD.....................................................................................................................16-23
TV........................................................................................................................24-30
MAIN MENU...........................................................................................................31-36
TV MODE............................................................................................................31-35
AV AND OTHER MODES.........................................................................................35
PC MODE.................................................................................................................36
FOR REFERENCE
MAINTENANCE...........................................................................................................37
WALL MOUNTING……………………………………………………………………..……37
STAND INSTALLATION………………………………………………………………..……38
SPECIFICATIONS.......................................................................................................39
TROUBLESHOOTING............................................................................................40-41
REGION CODE SETTING………………………………………………………………….41
Page 49

5
32" TFT DISPLAY
This player has a built-in 32” TFT display window to provide clear vision and low
radiation.
WITH BUILT-IN DVD PLAYER
SUPPORT AUTO TV SCANNING
SUPPORT TELETEXT (EUROPE) FUNCTION
SUPPORT USB MULTIMEDIA PLAYBACK
SUPPORT MULTI-LANGUAGES ON SCREEN DISPLAY
SUPPORT FULL FUNCTION REMOTE CONTROL
SUPPORT AV, HDMI, SCART, PC AUDIO, VGA AND YPBPR INPUT
SUPPORT EARPHONE, CVBS AND AUDIO R/L (DVD) OUTPUT
WITH DETACHABLE STAND HOLDER
WITH EXTERNAL ANTENNA JACK
WITH BUILT-IN SPEAKERS
WITH NOISE REDUCTION FUNCTION
FEATURES
Page 50

6
MAIN UNIT
1. TFT display screen
2. Remote control sensor \ Power indicator- In standby mode the indicator light will display red
color; when switching on the unit the indicator light will display blue color.
3. Stand holder
4. - To enter/eject a disc.
5. - To play or pause playing.
6. VOL +/- button- To increase/decrease the volume level or move left/right.
7. CH +/- button- To select next/previous channel or move up/down.
8. MENU button- To enter menu setting page.
9. TV/AV button- To select the input source.
10. POWER button - To switch ON/OFF the TV.
GENERAL PARTS
Page 51

7
MAIN UNIT
1. Power input
2. CVBS and AUDIO L/R output terminals (DVD mode only)
3. EARPHONE output terminal
4. HDMI 1/2 input terminals
5. VGA input terminal
6. RF input jack – To connect the antenna.
7. PC AUDIO input terminal
8. USB1 slot - For multimedia playback in TV mode.
9. SCART input terminal
10. YPbPr input terminal
11. AV input terminal
12. HDMI 3 input terminal
13. Disc slot-To insert a disc according to the silk screen on the side of this slot.
14. USB2 slot-For multimedia playback in DVD mode.
GENERAL PARTS
Page 52

8
REMOTE CONTROL
1. POWER: To set the unit in standby mode;
press it again to switch it on.
2. MUTE: To mute the sound; press it again to exit
MUTE mode.
3. TV/AV: To display the input source list.
4. NUMBER BUTTONS (0-9): To input the
number information, such as channel number and
so on.
5. -/--: To switch the digit when selecting multiple
digit channels.
6.
: To return to the previous channel.
7. VOL+/-: To turn up/down the volume.
8. CH+/-: To play next/previous channel.
9. ▲/▼/◄/►: UP/DOWN/LEFT/RIGHT
navigation buttons.
10. OK: To confirm selection.
11. MENU: To display the main menu; press it
again to return to previous menu page.
12. EXIT: To exit the menu page.
13. PICTURE: To switch the picture mode.
14. SOUND: To switch the sound mode.
15. DISPLAY: To display information of current
program.
16. SLEEP: To set desired sleep time.
17. ASPECT/
: Press this button repeatedly to
select desired aspect ratio of screen in TV mode;
to enter/eject a disc in DVD mode.
18. FAV/
: To display favorite channel list in TV
mode; to play/pause playing.
19. AUTO/GOTO: To adjust the screen
automatically in PC/VGA mode; to play from a
certain point.
20. NICAM/A2/ █: To select desired sound track
in TV mode; to stop playing.
21. SETUP: To enter setup menu page in DVD
mode.
22. TITLE: To display the title when playing a
disc.
Page 53

9
REMOTE CONTROL
23. AUDIO: To switch the audio output mode when
playing a disc.
24. ANGLE: To select the available angle when
playing a multi-angle disc.
25. TEXT/D.MENU: To display the available teletext
information in TV mode; to display the DVD menu
when playing a disc.
26. HOLD/D.SWITCH: To hold teletext in TV mode;
to switch between video and audio in DVD mode.
27. PGUP/SUBTITLE: Page up of available teletext;
to open/close subtitle.
28. PGDN/REPEAT: Page down of available teletext;
to change the repeat mode.
29. INDEX/
: To display the index of teletext in TV
mode; to play fast backward.
30. SIZE/
: To switch teletext size in TV mode; to
play fast forward in DVD mode.
31. SUBPAGE/
: To display the sub-page of
teletext; to play next chapter.
32. REVEAL/ : To hide teletext or display hidden
characters; to play previous chapter.
33. RED/PROGRAM: To enter programming page
in DVD mode.
34. GREEN/ZOOM: To zoom in/out.
35. CYAN/A-B: To repeat playing between two
specific points (A-B).
36. YELLOW/SLOW: Playback at lower speed.
Page 54

10
REMOTE CONTROL PREPARATION
BATTERY INSTALLATION
Install the batteries as the following pictures. Be sure + and – terminals are positioned
as indicated in the battery compartment (Fig1).
SERVICE LIFE OF BATTERIES
- The batteries normally last for one year although this depends on how often the
remote control is used.
- If the remote control fails to work even when it is operated near the player, replace the
batteries.
- Use two size AAA dry batteries.
NOTE:
● Do not drop, step on or otherwise impact the remote control. This may damage the
parts or lead to malfunction.
● If the remote control is not going to be used for a long time, remove the batteries.
REMOTE CONTROL
OPERATION
Point the remote control from no more
than about 6m from the remote control
sensor and within about 60°of the
front of the player (Fig2).
NOTES:
- The operating distance may vary
according to the brightness of the
room.
- Do not point bright light at remote
control sensor.
- Do not place objects between the
remote control and the remote control
sensor.
- Do not use this remote control while
simultaneously operating the remote
control of any other equipments.
Fig1 Fig2
Remote Control
Sensor
Push
Open
Press
Page 55

11
● Ensure all the cables are disconnected from the main unit before connecting to AC
power source.
● Read through the instructions before connecting other equipments.
CONNECTING TO AC POWER SOURCE
CONNECT EXTERNAL ANTENNA TO UNIT
Install external antenna into antenna jack for best picture.
Antenna
Outdoor
antenna
amplifier
Indoor
antenna
amplifier
Power plug
of antenna
amplifier
75 OHM
antenna
plug
BASIC CONNECTION
Main unit
To power outlet
Page 56

12
COMPOSITE AV (CVBS) CONNECTION
COMPONENT (YPbPr) CONNECTION
Back of DVD/VCR
AV cable
For basic connection, use the
composite Audio L/R (white/red) and
CVBS (yellow) cable to connect the
unit with other devices.
Back of DVD/VCR
YPbPr cable
AUDIO cable
Page 57

13
HDMI CONNECTION
SCART CONNECTION
Use HDMI cable to connect
the unit with other devices to
receive high-definition
multimedia signal.
HDMI cable
Back of DVD/VCR
SCART cable
Back of DVD/VCR
Page 58

14
PC/VGA CONNECTION
COMPOSITE AV OUT (CVBS OUTPUT FOR DVD MODE) CONNECTION
Audio cable
VGA cable
Back of PC
Use VGA cable and Audio
cable to connect the unit with
TV or PC, and use this product
AV cable
External Display Device
Page 59

15
CONNECT EARPHONE TO THE UNIT
USB CONNECTION (TV)
USB CONNECTION (DVD)
EARPHONE cable
Page 60

16
MAKE SURE ALL THE EQUIPMENTS AND AC CORD ARE
CONNECTED PROPERLY AND THE UNIT IS SET IN CORRECT MODE
BEFORE KINDS OF OPERATIONS.
- Press POWER button on the unit or remote control to power ON the unit (indicator
will glow blue); press it again to power OFF (standby mode) the unit (indicator will
glow red).
- Press TV/AV button on the unit or remote control to switch this unit to DVD mode.
1. Basic play
a) Make sure the disc compartment has no disc. Place a disc into the disc compartment. Hold
the disc without touching either of its surfaces, position it with the readable (mirror) side facing
towards you, then the disc will automatically enter into the disc compartment; or you can press
button on remote control to enter the disc into the disc compartment.
b) Once the disc is in the disc compartment, the player starts to read the disc immediately.
c) When a menu screen appears on the unit, press the navigation buttons or press the number
buttons to select preferred track number, then press OK button to confirm.
d) To stop playing and return to the menu screen, press TITLE or D.MENU button.
2. Stopping play
Press █ (STOP) button to stop playing.
NOTE: When player is stopped, the player records the point where STOP was pressed
(RESUME function). Press
(PLAY) button again, playback will resume from this point.
When the tray is taken out or █ (STOP) is pressed again, the RESUME function will be
cleared.
3. Skipping ahead or backward
Skipping ahead
During playback, press button to skip the next chapter (DVD) or a track (Video CD/CD).
Skipping backward
During playing, press
button to skip the previous
chapter (DVD) or track (Video CD/CD).
BASIC OPERATIONS
DVD
Page 61

17
4. Fast forward/Fast backward
During playback, press button or button to fast
forward/backward.
Press
(PLAY) button to resume normal play.
5. Pause/play
During playback, press button to pause playing, press it
again to resume normal playback.
6. Music playback
a) Insert the disc which contains music files and after a
few seconds, the screen will show all the folders on the
disc.
b) Select the folder you want to play by the navigation
buttons and press the OK button to confirm.
c) The files in this folder are displayed and select the
desired song by navigation buttons, then press the
(PLAY) or OK button to start playback.
d) In file selecting page, press or button to
turn the current menu page to the next or previous
menu page.
e) Press REPEAT button on remote control to change play mode.
- SINGLE: play one file only.
- REPEAT ONE: repeat one file.
- REP DIR: all the files in the folder will be played repeatedly.
- FOLDER: all the files in the folder will be played.
NOTE: The available repeat modes may vary for different disc.
7. Movie playback
a) Insert the disc which contains movie files and after a
few seconds, the screen will show all the folders on the
disc.
b) Select the folder you want to play by the navigation
buttons and press the OK button to confirm.
c) The files in this folder are displayed and select the
desired file by navigation buttons, then press the
(PLAY) or OK button to start playback.
Page 62

18
d) During normal playing, press or button, the player will play the next or previous file.
e) Press REPEAT button to change play mode.
- SINGLE: play one file only.
- REPEAT ONE: repeat one file.
- REP DIR: all the files in the folder will be played repeatedly.
- FOLDER: all the files in the folder will be played.
NOTE: The available repeat modes may vary for different disc.
f) Press D.MENU button to return to play list page.
8. JPEG playback
For JPEG picture CD, select the folder you want to play
by the navigation buttons and press OK button to
confirm. The files in this folder are displayed and select
your pictures by using the up/down navigation buttons
and press OK button to start playback. Thumbnail of
picture will be displayed while you scrolling across the
file name. Then press the
(PLAY) or OK button to
start playback.
NOTE: The time of loading and displaying a picture
depends on its size.
During playback, press D.MENU button to return to file selecting page.
Press REPEAT button to change play mode.
- SINGLE: play one file only.
- REPEAT ONE: repeat one file.
- REP DIR: all the files in the folder will be played repeatedly.
- FOLDER: all the files in the folder will be played.
NOTE: The available repeat modes may vary for different disc.
Skip to next/previous picture
Press button to skip to the next picture or button to skip to the previous picture. If no key
is pressed for 3 seconds, it will skip to next picture automatically.
Rotating pictures
- Press RIGHT navigation button to rotate the picture clockwise.
- Press LEFT navigation button to rotate the picture counter-clockwise.
Flipping pictures
- Press UP navigation button to flip the picture vertically.
- Press DOWN navigation button to flip the picture horizontally.
Page 63

19
Picture Shrink/Zoom
Press ZOOM button repeatedly to enlarge or shrink picture to 50%, 75%, 100%, 125%, 150%
and 200%.
NOTE: If the picture is enlarged, you may press navigation buttons to pan across other portions
of the picture.
Slideshow effects
Press PROGRAM button on remote control repeatedly to select desired effects.
Available options: Wipe Top, Wipe Bottom, Wipe Left, Wipe Right, Diagonal Wipe Left Top,
Diagonal Wipe Right Top, Diagonal Wipe Left Bottom, Diagonal Wipe Right Bottom, Extend
From Center H, Extend From Center V, Compress To Center H, Compress To Center V, Window
H, Window V, Wipe From Edge To Centre and Move In From Top.
9. Enjoying Video CD with playback control
a) When playing VCD 2.0 with PBC, the player will show the VCD version.
b) Press D.MENU button on remote control repeatedly to set PBC ON or OFF.
c) Press number buttons to select corresponding track.
Example: Track 9, press 0 and 9, several seconds later, it will automatically switch to track 9.
Track 15, press -/-- and 5, several seconds later, it will automatically switch to track 15.
d) Press
or button, the player will play the next or previous track.
10. USB playback
To switch this unit to USB mode, press SETUP button on remote control and select
Source in the menu. Then select USB input source using navigation buttons.
a) Insert a USB memory device which contains music,
picture or movie files.
b) After several seconds, all the folders in the USB will
display on monitor screen.
c) Select a folder you want to play using the navigation
buttons and press the OK button to confirm.
d) The files in this folder are displayed and select the
desired file by navigation buttons, then press the OK
button to start to play.
Page 64

20
e) In file selecting page, press or button to turn the current menu page to the next
or previous menu page.
f) Press REPEAT button to change play mode.
- SINGLE: play one file only.
- REPEAT ONE: repeat one file.
- REP DIR: all the files in the folder will be played repeatedly.
- FOLDER: all the files in the folder will be played.
NOTE: The available repeat modes may vary for different device.
11. Viewing from different angle (DVD only)
Some DVDs may contain scenes which have been shot simultaneously from a number of
different angles. For these discs, the same scene can be viewed from each of these different
angles using the ANGLE button.
12. Repeat play
Press REPEAT button during playback, it will repeat play one chapter or one title (for DVD disc),
or repeat play track (for VCD/CD).
A-B repeat play
Repeating sections between two specific points (A-B repeat)
a) Press A-B button during playing at the point where repeat play is to be started (A).
b) Press A-B button at the point where repeat play is to be ended (B). Repeat play of the
selection between points A and B starts.
c) Press A-B button again to return to normal play.
REPEAT CHAPTER
REPEAT TITLE
REPEAT ALL
REPEAT TRACK
REPEAT DISC
DVD DISC
VCD/CD DISC (In the PBC OFF mode)
Page 65

21
13. Program play
a) Press PROGRAM button and the screen will display the program menu.
b) Press navigation buttons to choose memory index
and then press OK button to start input.
Enter desired titles/chapters numbers by using the
numeric buttons. The selected titles/ chapters are
stored into the memory. Select
on the menu to see
the next page. Up to 20 memories can be stored.
c) Select START on the menu and press OK button to
start program play or select EXIT on the menu and press OK button to exit without program play.
d) To stop the program, press PROGRAM button and select STOP on the menu, then press OK
button to confirm selection.
14. GOTO
Press GOTO button continuously to select the item you want to set and enter a time number,
chapter number, track number, etc. Accordingly, the disc will be played from the selected point.
15. DISPLAY
Press DISPLAY button to display the playing status of your disc.
16. Change subtitle language (DVD only)
It is possible to change the subtitle
language to a different language from the
one selected at the initial settings. (This
operation works only with discs on which
multiple subtitle languages are recorded)
1. Press SUBTITLE button during play, the screen will display the current language.
2. Press SUBTITLE button again to change language or turn off.
NOTE: When no subtitles are recorded, press this button will not work.
17. ZOOM play
This function allows you to enjoy a motion picture.
Press ZOOM button when playing, the screen shows:
Press navigation button to scroll across the enlarged
picture.
CHANGING SUBTITLE LANGUAGE
Page 66

22
18. Changing audio soundtrack language (DVD/VCD/CD disc)
It is possible to change the audio soundtrack language to a different language from the
one selected at the initial settings (This operation works only with discs on which multiple
audio soundtrack languages are recorded).
- When playing a disc, press AUDIO button to select desired and available soundtrack or
soundtrack language.
NOTE: When no soundtrack or soundtrack languages are recorded, pressing this button
will not work.
19. Initial settings
Once the initial programming is entered it will be retained in memory until changed, the
player can always be operated under the same conditions.
Common procedure for initial settings
●
Press SETUP button on remote control.
●
Use the navigation buttons to select preferred item, and press OK button, each screen
for setting the value is displayed. Then move the navigation buttons to set the item and
press OK button to confirm the settings.
●
Press SETUP button to close setup menu.
●
Use LEFT or RIGHT navigation button to switch to another main setup item. Then press
RIGHT or OK button to enter submenu page; press LEFT button to return to previous menu page.
1. GENERAL
1.1 TV DISPLAY - It is for selecting TV
output mode.
Options:
a) Normal /PS: Pan & scan mode.
b) Normal/ LB: Letter box mode.
c) Wide: 16:9 wide screen mode.
1.2 OSD LANG - It is used to choose your
desired OSD language.
1.3 Last Memory - Enter another input source (except USB) during DISC playback, and
then back to DVD input source again, this unit will resume playback from the point where
last playback was stopped, if Last Memory is ON.
1.4 Source - It is used to select your input source in DVD mode.
Page 67

23
2. AUDIO
Downmix - It is used to select desired audio
output mode.
Options:
a) LT/RT-Left/Right mix mode
b) STEREO
3. PREFERENCE
3.1 TV System - Select desired TV system.
3.2 Audio - Select desired audio language, if
your disc contains multiple audio languages.
3.3 Subtitle - Select desired subtitle
language, if your disc contains multiple
subtitle languages.
3.4 Disc Menu - Select desired language of your disc menu, if your disc menu contains
multiple MENU languages.
3.5 Parental - Select desired program rating.
3.6 Password - Change the password. Input the password using number buttons on remote
control.
NOTE: The factory default password is “0000”, you can change it, but you should write it
down and keep it safe.
3.7 Default - It is used to reset to factory settings.
Page 68

24
- Press TV/AV button on the unit or remote control to set the unit in TV mode.
SELECT DESIRED PROGRAM
1. Press CH+ button to play next channel.
2. Press CH- button to play previous channel.
3. Press number buttons on remote control directly to select desired program.
NOTE: Press -/-- button repeatedly to switch the digit when selecting multiple digit
channels.
VOLUME CONTROL
- Press VOL+ or VOL- to adjust the level of current volume.
Available range: 0-100.
MUTE CONTROL
- Press MUTE button to mute the sound, press it again to turn on the sound.
INPUT SOURCE SELECTION
- Press TV/AV button on the unit or remote control to display the sources list.
- Press UP or DOWN navigation button to select desired input source, and then press OK
button to confirm selection.
Available options: TV, AV, YPBPR, HDMI 1/2/3, SCART, PC, Media, DVD.
PICTURE MODE
- Press PICTURE button on remote control repeatedly to select desired PICTURE mode
directly.
Available options: User, Dynamic, Standard, Mild.
SOUND MODE
- Press SOUND button on remote control repeatedly to select SOUND mode directly.
Available options: Standard, Music, Movie, Sports, User.
SLEEP TIME SETTING
- Press SLEEP button on remote control repeatedly to select SLEEP TIME directly.
Available options: Off, 10min, 20min, 30min, 60min, 90min, 120min, 180min, 240min.
VIDEO SIZE SETTING
- Press ASPECT button on remote control repeatedly to select VIDEO SIZE directly.
Available options: Auto, 4:3, 16:9, Zoom1, Zoom2, PAL+.
NOTE: The available video size may be different for different input source.
TV
Page 69

25
SOUND SETTING
- Press NICAM/A2 button on remote control repeatedly to select desired soundtrack.
NOTE: In different channels, pressing NICAM/A2 button may have different options.
INFORMATION DISPLAY
- Press DISPLAY button on remote control to display related information of your channel,
including channel number, color system, sound system and so on.
TELETEXT
When displaying available teletext:
- Press TEXT button on remote control to display the teletext.
- Press HOLD button on remote control to hold the teletext.
- Press PGUP button on remote control to display previous page.
- Press PGDN button on remote control to display next page.
- Press INDEX button on remote control to display the index.
- Press SIZE button on remote control repeatedly to switch teletext size.
- Press REVEAL button on remote control to hide or display hidden characters.
- Press SUBPAGE button on remote control to enter subpage.
FAVORITE LIST
- Press FAV button on remote control to display the Favorite
List.
- Press UP/DOWN navigation button to select a favorite
channel, and press OK button to watch it.
QUICK SELECTION
- Press OK button on remote control to display the Channel
List.
- Press UP/DOWN navigation button to select a channel, and
press OK button to watch it.
Page 70

26
MEDIA PLAYBACK
- Insert a USB memory device into USB1 slot.
- Press TV/AV button on the unit or remote control to switch this unit to Media mode.
- Press EXIT button on remote control to return to previous menu page.
1. PHOTO
- Press LEFT or RIGHT navigation button to select PHOTO item.
- Press OK button to enter it and press LEFT or RIGHT navigation button to select desired
disk.
- Press OK button to enter it and press navigation buttons to select desired folder.
- Press OK button to enter it and press navigation buttons to select desired Photo file.
Page 71

27
- Press RED button to enter a dialog box, and press LEFT or RIGHT navigation button to
decide whether delete it or not.
- Press OK button to play highlighted file.
During PHOTO normal playing:
- Press DISPLAY button on remote control to display/hide the tool bar.
- Press LEFT/RIGHT navigation buttons to select desired option and press OK button to
confirm it.
- Press
button to pause/start playing.
- Press / button to play previous/next file.
- Press █ button to stop playing.
2. MUSIC
- Press LEFT or RIGHT navigation button to select MUSIC item.
- Press OK button to enter it and press LEFT or RIGHT navigation button to select desired
disk.
- Press OK button to enter it and press navigation buttons to select desired folder.
- Press OK button to enter it and press navigation buttons to select desired Music file.
Page 72

28
- Press RED button to enter a dialog box, and press LEFT or RIGHT navigation button to
decide whether delete it or not.
- Press OK button to play highlighted file.
During MUSIC normal playing:
- Press LEFT or RIGHT navigation button to select desired option in the tool bar, and press
OK button to confirm selection.
- Press
button to pause/start playing.
- Press / button to play fast backward / fast forward.
- Press
/ button to play previous/next file.
- Press █ button to stop playing.
3. MOVIE
- Press LEFT or RIGHT navigation button to select MOVIE item.
- Press OK button to enter it and press LEFT or RIGHT navigation button to select desired
disk.
- Press OK button to enter it and press navigation buttons to select desired folder.
- Press OK button to enter it and press navigation buttons to select desired Movie file.
Page 73

29
- Press RED button to enter a dialog box, and press LEFT or RIGHT navigation button to
decide whether delete it or not.
- Press OK button to play highlighted file.
During MOVIE normal playing:
- Press DISPLAY button on remote control to display/hide the tool bar.
- Press LEFT or RIGHT navigation button to select desired option in the tool bar, and press
OK button to confirm selection.
- Press
button to pause/start playing.
- Press / button to play fast backward / fast forward.
- Press / button to play previous/next file.
- Press █ button to stop playing.
Page 74

30
4. TEXT
- Press LEFT or RIGHT navigation button to select TEXT item.
- Press OK button to enter it and press LEFT or RIGHT navigation button to select desired
disk.
- Press OK button to enter it and press navigation buttons to select desired folder.
- Press OK button to enter it and press navigation buttons to select desired Text file.
- Press RED button to enter a dialog box, and press LEFT or RIGHT navigation button to
decide whether delete it or not.
- Press OK button to play highlighted file.
During TEXT normal playing:
- Press DISPLAY button on remote control to display/hide the tool bar.
- Press LEFT or RIGHT navigation button to select desired option in the tool bar, and press
OK button to confirm selection.
- Press
/ button to play previous/next page.
- Press / button to play previous/next file.
- Press █ button to stop playing.
NOTE: To play your multimedia files, make sure you have selected correct icon in the main
menu of MEDIA PLAYBACK. That is to say, you can only play Photo files in PHOTO item,
music files in MUSIC item and so on.
Page 75

31
● The unit contains different setting menus. Once the initial programming is entered, it will
be remained in the memory until change, and the unit can always be operated under the
same conditions.
● The settings will be remained in the memory until the settings are changed ever after
setting the player to standby mode.
Common procedure for initial settings
- Press MENU button on remote control to display the main menu.
- Press LEFT/RIGHT navigation button to select submenus.
- Press UP/DOWN navigation button to select the option that you want to adjust.
- Press OK or RIGHT navigation button to enter submenu page.
- Press navigation buttons to select/adjust option to desired value. Then press OK button to
confirm selection.
- Press MENU button to return to previous menu page.
- Press EXIT button to exit menu page.
TV MODE
- Press TV/AV button on the unit or remote control to switch this unit to TV mode.
1. CHANNEL
1.1 Auto Tuning
- Press UP or DOWN navigation button to select this item, and then press OK button to start
auto channel tuning.
MAIN MENU
Page 76

32
1.2 ATV Manual Tuning
- Press UP or DOWN navigation button to select this
item, and press OK button to enter it.
- Press UP or DOWN navigation button to select the
second option.
- Press LEFT or RIGHT navigation button to adjust
it.
1.3 Programme Edit
- Press UP or DOWN navigation button to select this
item, and press OK button to enter it.
- Press RED button to delete highlighted channel.
- Press GREEN button to enter Rename mode. Then
press UP/DOWN navigation button to adjust the value;
press LEFT/RIGHT navigation button to move the cursor.
- Press YELLOW button to enter Move mode. Then press
UP/DOWN navigation button to select desired position
and press YELLOW button again to move it.
- Press BLUE button to skip current channel.
- Press FAV button to set current channel as a favorite
channel, and press FAV button again to set it as a normal
channel.
2. PICTURE
Page 77

33
2.1 Picture Mode
Available options: User, Dynamic, Standard, Mild.
NOTE: The value of Contrast, Brightness, Colour, Tint and Sharpness is adjustable only
when Picture Mode is User.
2.2 Contrast
The value of contrast can be adjusted from 0-100.
2.3 Brightness
The value of brightness can be adjusted from 0-100.
2.4 Color
The value of color saturation can be adjusted from 0-100.
2.5 Tint
The value of tint can be adjusted from 0-100.
NOTE: This item is available only in NTSC system.
2.6 Sharpness
The value of sharpness can be adjusted from 0-100.
2.7 Color Temperature
This item is used to adjust the optimum color temperature for suitable viewing.
Available options: Medium, Cool, Warm.
2.8 Noise Reduction
Available options: Off, Low, Middle, High.
3. SOUND
Page 78

34
3.1 Sound Mode
Available options: Standard, Music, Movie, Sports, User.
NOTE: The value of Treble and Brass is adjustable only when Sound Mode is User.
3.2 Treble
This item is used to adjust the level of higher-pitched sounds from 0-100.
3.3 Bass
This item is used to adjust the level of lower-pitched sounds from 0-100.
3.4 Balance
This item is used to adjust the audio output between left and right speakers from -50 to 50.
3.5 Auto Volume
This item is used to turn on/off Auto Volume function.
4. TIME
4.1 Sleep Timer
This item is used to set the automatic sleep time in standby mode.
Available options: Off, 10min, 20min, 30min, 60min, 90min, 120min, 180min, 240min.
4.2 Auto Standby
This item is used to set the auto standby duration.
Available options: Off, 3H, 4H, 5H.
4.3 OSD Timer
This item is used to set the OSD (on screen display) time.
Available options: 5S, 10S, 15S, 20S, 25S, 30S.
Page 79

35
5. OPTION
5.1 OSD Language
This item is used to select desired On Screen Display language.
5.2 TT Language
This item is used to select desired TT language.
5.3 Aspect Ratio
Available options: Auto, 4:3, 16:9, Zoom1, Zoom2, PAL+.
NOTE: Aspect Ratio may not be adjustable if no available signals are present.
5.4 Blue Screen
This item is used to set the blue background ON or OFF. The screen background will turn
blue at very weak or no signal condition, if BLUE SCREEN is ON.
5.5 Key Lock
- Press OK button repeatedly to turn on/off Key Lock.
5.6 Reset
This item is used to reset the unit to factory default settings.
AV AND OTHER MODES
- Press TV/AV button on the unit or remote control to select desired input source.
- For the PICTURE, SOUND, TIME and OPTION menus, please refer to the menu
operations of TV mode.
Page 80

36
PC MODE
- Power on your computer and this TV.
- Connect your computer to this TV using a VGA cable.
- Press TV/AV button on the unit or remote control to switch this unit to PC mode.
- Press MENU button to display the main menu and press LEFT or RIGHT navigation button
to select SCREEN.
- Press UP or DOWN navigation button to select desired option and press OK button to
enter submenu.
- Press LEFT or RIGHT navigation button to adjust the value.
Auto Adjust
This item is used to adjust the value of screen automatically.
Horizontal Pos.
This item is used to adjust the value of horizontal position from 0-100.
Vertical Pos.
This item is used to adjust the value of vertical position from 0-100.
Clock
This item is used to adjust the value of clock from 0-100.
Phase
This item is used to adjust the value of phase from 0-100.
NOTE: The picture will shake with unsuitable phase setting.
- For the PICTURE, SOUND, TIME and OPTION menus, please refer to the menu
operations of TV mode.
Page 81

37
● Be sure to press POWER button to set the player to the standby mode and
disconnect the AC cord before maintaining the player.
● Wipe the player with a dry, soft cloth.
● If the surface is extremely dirty, wipe clean with a cloth which has been dipped in a
weak soap-water solution and wrung out thoroughly, and then wipe again with a dry
cloth.
● Never use alcohol, benzene, thinner, cleaning fluid or other chemicals. And do not
use compressed air to remove dust.
● Contact a professional for assistance when wall mounting your TV. We are not
responsible for any damage to the product or injury to yourself, if you mount the TV on your
own.
● Do not wall mount the TV while TV is turned on. It may cause personal injury due to
electric shock.
● Use standard M6*10mm screws (4 pieces) to mount this TV.
MAINTENANCE
WALL MOUNTING
Back of your TV
Page 82

38
Your TV is packaged with the Stand and the Cabinet separated. Before enjoying this TV,
please carry out the Stand Installation according to the instructions below.
Step 1
Place the TV faced down on a soft cloth or
cushion to prevent the panel from being
damaged.
Step 2
Align the Stand with TV bottom.
Step 3
Tighten the included screws with a screw driver.
NOTES:
- Unplug the power plug first when installing or
removing the TV Stand.
- Contact one or more partner for assistance
when installing or removing the TV stand.
STAND INSTALLATION
Press
Page 83

39
Display Device
32 inch LED TV
Resolution
1366×768
Pixel Pitch
0.51075(H)×0.51075(V)mm
Luminance
200 cd/m2
Contrast Ratio
3000:1
Aspect Ratio
16:9
Response Time
6.5 ms
Viewing Angle
178(H)/178(V)
Visible Range
697.7(H)×392.3(V)mm
Life Time
30,000 Hrs
Movie: AVI, MP4, TS, MPG, MKV/MOV, DAT, VOB, RM/RMVB
Music: AAC
Photo: JPG/JPEG, BMP, PNG
USB1 MULTIMEDIA
PLAYBACK FORMAT
(TV MODE)
Text: TXT
Movie: MPEG-1, MPEG-2, MPEG-4
Music: WMA
USB2 MULTIMEDIA
PLAYBACK FORMAT
(DVD MODE)
Photo: JPEG
Supported discs
DVD/CD/CDR/CDRW/DVD-R/DVD+R/
DVD-RW/DVD+RW/VCD/SVCD
POWER SOURCE AC 100-240V, 50/60Hz
POWER
CONSUMPTION
<60W
OPERATION
TEMPERATURE
-5℃ to 45℃
MEASUREMENT 737(W)×190(D)×479(H)mm
WEIGHT Approx. 6.2 Kg
Specifications are subject to change without notice.
SPECIFICATIONS
Page 84

40
Check the following points before assuming malfunctions of this unit:
Symptom[COMMON] Remedy
No power. Insert the power plug securely into the power outlet.
No picture. Ensure that the equipment is connected properly.
● No sound.
● Distorted sound.
● Ensure that the equipment is connected properly.
● Ensure that the input setting for the TV and stereo system are
correct.
● Adjust the master volume to a suitable volume by pressing
VOL+/VOL- button.
No operations can be
performed with the
remote control unit.
● Check the batteries are installed with the correct polarities.
● The batteries are exhausted; replace them with new ones.
● Point remote control at the remote control sensor and operate
it again.
● Operate the remote control unit at a distance of no more than
6m from the remote control sensor.
● Remove the obstacles between the remote control and
remote control sensor.
No key operation (by the
main unit and/or the
remote control unit) is
effective.
Disconnect the power plug and then reconnect it.(The player may
not be operating properly due to lightning, static electricity or
some other factors.)
Symptom[TV] Remedy
No or poor picture.
● Adjust antenna or use an external antenna.
● Relocate the unit near a window (if inside a building).
● Move units away from this product that causes interference.
● Do Auto Tuning again.
● Try another channel.
No sound or poor sound.
● Check the audio settings.
● Press MUTE button on remote control to cancel mute
function.
● Unplug the headphone.
Noise or other interface.
Electronic equipment near the unit is causing interface. Relocate
the unit or move the equipment.
Symptom [DVD] Remedy
Play does not start even
when title is selected.
Confirm the region code setting is right.
Audio soundtrack and/or
subtitle language is not
the initial settings.
If the audio soundtrack and/or subtitle language does not exist on
the disc, the language selected at the initial settings will not be
seen/heard.
No subtitles. Subtitles appear only with discs which contain them.
Subtitles are cleared from the TV monitor, Perform the steps
display the subtitles.
GENERAL TROUBLESHOOTING
To be continued
Page 85

41
The region number for this DVD player is
Alternative audio
soundtrack (or subtitle)
languages fail to be
selected.
● An alternative language is not selected with discs which
do not contain more than one language.
● In the case of some discs, the alternative language can
not be selected by operating the LANGUAGE or SUBTITLE
button. Try selecting it from the DVD menu if one is available.
Angle cannot be
changed.
This function is dependent on software availability. Even if a
disc has a number of angles recorded, these angles may be
recorded for specific scenes only.
The password for
rating level has been
forgotten.
Please contact your local sales dealer.
Symptom [Video CD] Remedy
No menu play. This function works only for Video CDs with playback control.
Symptom [USB] Remedy
My player does not
recognize my USB key
or my external hard
disk when plugged to
the DVD player's USB
slot.
Would you please refer first to the instructions describing how
to use USB devices with this unit.
If the problem still occurs: This machine has though been
tested with the majority of the market's Flash memory-based
devices (USB keys and MP3 players) and hard disks (Music/
Movie players with HDD), however, this unit may not be
compatible with certain devices, in particular external
self-powered hard disks.
Region code setting
Region coding: All DVD discs are coded by the sales territory. Please note the player is set to region 2
coding by the factory which cannot be changed. This is in compliance with the DVD patent
requirements.
GENERAL TROUBLESHOOTING
Page 86

MANUEL D’INSTRUCTION
Lisez le manuel d’utilisation avant d’utiliser le TV et gardez-le
pour consultation ultérieure.
Page 87

1
Information de sécurité
ATTENTION
LE LECTEUR DVD/VIDEO CD/CD EST UN PRODUIT LASER CLASSE 1. LE
LECTEUR DVD/VIDEO CD/CD UTILISE UN RAYON LASER VISIBLE QUI POURRAIT
CAUSER UNE RADIATION DANGEREUSE. UTILISEZ LE LECTEUR DVD/VIDEO
CD/CD COMME INDIQUE DANS LES INSTRUCTIONS
QUAND LE LECTEUR DVD/VIDEO CD/CD EST CONNECTE AU COURANT
SECTEUR NE REGARDEZ PAS DANS L’OUVERTURE DU COMPRATIMENT DISQUE
OU DANS LES AUTRES OUVERTURES DU LECTEUR.
L’UTILISATIONS DES CONTROLES OU REGLAGES AUTRES QUE SPECIFIES
DANS CE MANUEL PEUT RESULTER EN RADIATION DANGEUREUSE.
NE PAS OUVRIR L’APPAREIL OU NE PAS ESSAYER DE REPARER VOUS-MEME.
CONSULTEZ UN SPECIALISTE.
AVERTISSEMENT
AFIN D’EVITER UN FEU OU DES CHOCS ELECTRIQUES NE PAS UTILISER DES
CABLES DE PROLOGNEMENT ET INSEREZ BIEN LA PRISE COURANT SECTEUR.
AFIN D’EVITER UN FEU OU DES CHOCS ELECTRIQUES NE PAS EXPOSER
L’APPAREIL A LA PLUIE OU HUMIDITE.
ATTENTION – RADIATION LASER QUAND OUVERT, NE PAS REGARDER DANS LE
RAYON.
AVERTISSEMENT VENTILATION – NE PAS BLOQUER LA VENTILATION NORMALE
PENDANT L’UTILISATION
Le symbole d’éclair
dans un triangle isocèle
sert à vous prévenir
qu’à l’intérieur se
trouvent des hauts
voltages dangéreux
ATTENTION: POUR REDUIRE LE
RISQUE DE CHOC ELECTRIQUE NE
PAS OUVRIR L’APPAREIL. IL N’Y A
PAS DES FONCTIONS
D’UTILISATION A L’INTERIEUR.
POUR SERVICE, CONSULTEZ UN
SPECIALISTE
Le point
d’exclamation dans
un triangle isocèle
sert à vous prévenir
que l’appareil est
accompagné
d’importantes
instructions
d’utilisation.
Suivez toujours les précautions de base quand vous utilisez des appareils électriques,
surtout dans la présence d’enfants.
AVERTISSEMENT : afin d’éciter le risque d’un choc électrique, assurez-vous que la
prise courant est retiré avant de déplacer, entretenir ou nettoyer l’appareil.
INSTRUCTION IMPORTANTES
Page 88

2
L’isez toutes les instructions avant utilisation
Ne pas utiliser l’appareil à côté d’eau.
Installez l’appareil en suivant les instructions.
Ne placez pas l’appareil à côté des sources de chaleurs telles que radiateurs, poêle,
ou autres appareils (y compris amplificateurs) qui produisent de la chaleur.
Evitez qu’on puisse marcher sur le câble courant secteur.
Quand l’appareil est connecté au courant secteur il est prêt à fonctionner.
Déconnectez le courant secteur pendant des orages ou quand vous ne l’utilisez pas
pendant un certain temps.
Ne pas exposez l’appareil à des goutes et ne pas placer des objets remplis d’une
liquide, comme une vase, au-dessus de l’appareil.
Ne pas exposer l’appareil à la lumière directe du soleil, chaleur extrème, humidité ou
la poussière.
Ne jamais utiliser l’appareil quand le câble courant secteur est abimé, quand
l’appareil ne fonctionne pas bien, quand il a tombé ou a été exposé à l’humidité, l’eau
ou d’autres liquides.
Ne pas essayer à réparer vous-même l’appareil. Apportez l’appareil vers un
spécialiste pour réparation.
Gardez une certaine distance avec des objets magnétiques, tels que haut-parleurs.
SECURITE LASER
L’appareil comporte dans le méchanisme CD un sytème optique rayon
laser, pourvu des éléments de sécurité nécessaires. N’essayez pas de
désassembler. L’exposition à la lumière laser invisible peut endommager
l’oeil humain. Ceci est un produit laser Classe 1.
L’utilisation des contrôles ou réglages autres que spécifiés dans ce
manuel peut reseulter en radiation dangereurse. Ce lecteur ne peut être
réglé ou répéré que par du personnel qualifié. Le méchanisme laser
correspons avec l’aiguille d’un tourne-disque. Bien que cet appareil
comporte un système pick-up laser, il est absolument sûr quand on suit les
instructions.
REMARQUE : le fabricant n’est pas responsable pour des interférences TV ou radio
causées par des modifications non autorisées. Ces modifications peuvent résulter dans le
fait que l’utilisateur ne peut plus utiliser l’appareil.
1) Utilisez les boutons et les commutateurs comme indiqué dans le manuel.
2) Avant d'allumer l'appareil pour la première fois, vérifiez que le branchement
d'alimentation est correctement effectué.
3) Gardez vos discs dans un endroit frais pour éviter endommagement par chaleur.
Traitement et usage piles
Tenez à l’écart les piles pour enfants et animaux. Uniquement les adultes peuvent
utliser les piles.
Ne jamais jeter les piles dans un feu ou les exposer à la chaleur.
Suivez les instructions de sécurité et d’utilisation des piles.
Page 89

3
Traitement et entretien des discs
Traitement
Tenez le disc avec le bord pour ne pas pour ne pas mettre des empreintes sur la
surface. Les empreintes et des griffes peuvent causer une distorsion.
N’écrivez pas avec un stylo ou autre instrument sur la face label.
N’utilisez pas des aérosols de nettoyage, essence, thinner ou produits antistatitques.
Ne pas laisser tomber ou plier le disque.
Ne pas mettre plus qu’un disc dans le compartiment.
N’essayez pas de fermer le compartiment à disque quand celui n’est pas bien inséré.
Gardez le disc dans son boîtier quand vous ne l’utilisez pas.
Nettoyage de la surface
Utilisez un chiffon doux légèrement humide (uniquement eau).
Frottez du centre vers le bord, pour ne pas créer de la distorsion. (Si vous frottez d’une
façon circulaire vous risquez de faire des griffes qui peuvent causer une distorsion).
Quand le disc est apporté d’un endroit froid dans un endroit chaud, la
condensation peut se former sur la surface.
Enlevez la condensation avec un chiffon douw avant d’utiliser le disque.
Conservation incorrecte des discs
Vous pouvez endommager les disques quand vous les gardez dans les endroits suivants.
Endroits avec lumière soleil directe.
Endroits humides ou poussiéreux.
Endroits exposés au chaleur.
Manuel d’instruction……..……………………………………………………………………1
Télécommande………………..………………………………………………………………1
Toutes les illustrations sont pour référence. Les affichages sur l’écran peuvent être
différents.
ACCESSORIES
Page 90

4
SOMMAIRE
COMMENCER
INSTRUCTIONS IMPORTANTES..............................................................................1-3
ACCESSORIES.............................................................................................................3
CARACTERISTIQUES..................................................................................................5
COMMANDES ET CONNEXIONS APPAREIL……....................................................6-7
TELECOMMANDE…..................................................................................................8-9
PREPARATION DE LA TELECOMMANDE.................................................................10
CONNEXTIONS DE BASE.....................................................................................11-15
COMMANDES
OPERATION DE BASE..........................................................................................16-30
DVD.....................................................................................................................16-23
TV........................................................................................................................24-30
MENU PRINCIPAL..................................................................................................31-36
MODE TV............................................................................................................31-35
AV ET AUTRES MODES..........................................................................................35
MODE PC.................................................................................................................36
REFERENCES
ENTRETIEN...........................................................................................................37
MONTAGE AU MUR…………………………………………………………………..……37
INSTALLATION DU PIED……………………………………………………………..……38
SPECIFICATIONS.......................................................................................................39
EN CAS DE PROBLEMES.....................................................................................40-41
CODE REGIONAL………….……………………………………………………………….41
Page 91

5
ECRAN 32’’ TFT
Cet appareil possède un écran 32’’ TFT pour offrir des images claires avec
radiation minimale.
LECTEUR DVD INCORPORE
SYNTONISATION AUTOMATIQUE DES EMETTEURS
FONCTION TELETEXTE
LECTURE USB MULTIMEDIA
AFFICHAGE ECRAN MULTI-LANGUES
TELECOMMANDE MULTI-FONCTIONS
ENTREES AV, HDMI, SCART, PC AUDIO, VGA, YPBPR
SORTIES CASQUE, CVBS, AUDIO L/R (DVD)
PIED AMOVIBLE
ENTREE ANTENNE
HAUT-PARLEURS INCORPORES
FONCTION REDUCTION DU SOUFFLE
CARACTERISTIQUES
Page 92

6
UNITE PRINCIPALE
1. Ecran TFT
2. Récepteur infrarouges / Indicateur puissance – en mode standby l’indicateur s’allume en
rouge; quand l’appareil est en fonction l’indicateur devient bleu
3. Pied
4. - Pour insérer/éjecter disc
5.
- Lecture/pause
6. VOL+/- Pour augmenter ou diminuer le volume ou pour bouger gauche/droite
7. CH+/- Pour sélectionner l’émetteur suivant ou précédent ou pour bouger en haut/en bas
8. MENU – pour entrer dans le menu
9. Bouton TV/AV – sélection d’entrée
10. POWER – pour mettre le TV en/hors fonction
COMPOSANTS
Page 93

7
UNITE PRINCIPALE
1. Connexion alimentation
2. Sorties CVBS et AUDIO L/R uniquement en mode DVD
3. Sortie casque d’écoute
4. Entrée HDMI 1/2
5. Entrée VGA
6. Entrée RF – antenne
7. Entrée Audio PC
8. Connexion USB1 pour lecture multimédia (TV)
9. Entrée SCART
10. Entrée Y Pb Pr
11. Entrée AV
12. Entrée HDMI 3
13. Compartiment disc
14. Connexion USB2 pour lecture multimédia en mode DVD
COMPOSANTS
Page 94

8
TELECOMMANDE
1. POWER: Pour mettre l’appareil en standby et en
fonction.
2. MUTE: Pour couper le son.
3. TV/AV: Pour afficher la liste de source d’entrée.
4. NUMBER BUTTONS (0-9): Pour entrers des
valeurs numériques, tels que numéros des
émetteurs.
5. -/--: Pour entrer des valeurs numériques des
plusieurs chiffres.
6.
: Pour revenir à l’émetteur précédant.
7. VOL+/-: Pour régler le volume.
8. CH+/-: Pour aller vers l’émetteur
suivant/précédant.
9. ▲/▼/◄/►: Boutons de navigation.
10. OK: Pour confirmer.
11. MENU: Pour afficher le menu principal ou pour
retourner vers le menu précédant.
12. EXIT: Pour quiter le menu.
13. PICTURE: Pour régler le mode image.
14. SOUND: Pour régler le mode son.
15. DISPLAY: Affichage d’informations de
l’émetteur.
16. SLEEP: Pour régler le temps sleep.
17. ASPECT/
: Pour changer le format de l’écran
en mode TV ; pour insérer/éjecter le disc.
18. FAV/ : Pour afficher la liste des émetteurs
préférés en mode TV ; pour lecture/pause.
19. AUTO/GOTO: Pour ajuster l’écran
automatiquement en mode PC/VGA ; pour démarrer
la lecture à partir d’un certain point.
20. NICAM/A2/ █: Pour sélectioner le mode son
en mode TV, pour arrêter la lecture.
21. SETUP: Pour entrer dans le menu principal en
mode DVD.
22. TITLE: Pour afficher le titre pendant la lecture
du disc.
Page 95

9
TELECOMMANDE
23. AUDIO: Pour régler la sortie audio pendant la
lecture disc.
24. ANGLE: Pour choisir l’angle avec un disc
multi-angles.
25. TEXT/D.MENU: Pour afficher le télétexte en
mode TV ; pour afficher le menu DVD pendant la
lecture du disc.
26. HOLD/D.SWITCH: Pour bloquer une page
télétexte ; pour changer entre vidéo et audio en
mode DVD.
27. PGUP/SUBTITLE: Page suivante en télétexte;
sélection sous-titres.
28. PGDN/REPEAT: P page précédente en
télétexte; sélection répétition.
29. INDEX/
: Pour aller vers la page index en
télétexte; avancement rapide en arrière.
30. SIZE/
: Pour changer le format des lettres en
télétexte; avancement rapide en avant.
31. SUBPAGE/ : Entrer dans une sous-page en
télétexte; chapitre suivant.
32. REVEAL/
: Afficher texte caché en télétexte;
chapitré précédent.
33. RED/PROGRAM: Pour entrer dans le mode de
programmation en mode DVD.
34. GREEN/ZOOM: Pour utiliser le zoom.
35. CYAN/A-B: Pour répéter entre deux points
(A-B).
36. YELLOW/SLOW: Pour lecture au ralenti.
Page 96

10
PREPARATION DE LA TELECOMMANDE
INSTALLATION DES PILES
Insérez les piles comme montré dans les illustrations suivantes. Faites attention à la
position + et – comme indiqué dans le compartiment à piles (Fig1).
DUREE DE VIE DES PILES
- Normalement les piles ont une durée de vie d’un an, mais ceci dépend du nombre de fois
que la télécommande est utilisée.
- Quand la télécommande ne fonctionne pas bien, même tout près de l’appareil, il faut
remplacer les piles.
- Utilisez deux piles AAA.
REMARQUE:
●
Ne laissez pas tomber la télécommande ou ne marchez pas au-dessus. Ceci peut
endommager la télécommande et causer des malfonctionnements.
● Enlevez les piles si vous n’utilisez pas la télécommande pendant un certain temps.
UTILISATION DE LA
TELECOMMANDE
Dirigez la télécommande vers le
récepteur de l’appareil sur une distance
maximale de 6 mètres et sous un angle
maximal de 60° (Fig2).
REMARQUES:
- La distance opérationnelle peut changer
selon les circonstances de lumière dans
la chambre.
- Ne pas diriger une forte lumière vers le
récepteur à infrarouges.
- Ne pas placer des objets entre
l’appareil et la télécommande.
- Ne ps utiliser la télécommande
simultanément avec une télécommande
d’un autre appareil.
Fig1 Fig2
Recpeteur
infrarouges
Pousser
Pousser
Ouvrir
Page 97

11
● Faites attention que tous les câbles sont déconnectés de l’appareil avant de brancher le
courant secteur.
● Lisez les instructions avant de connecter les autres appareils.
CONNEXION COURANT SECTEUR
CONNEXION ANTENNE EXTERIEURE
Connectez l’antenne extérieur pour obtenir une réception optimale.
Antenne
Amplificate
ur antenne
extérieure
Amplificate
ur antenne
intérieure
Câble courant
secteur de
l’amplificateur
antenne
Prise
antenne 75
ohms
CONNEXIONS DE BASE
Appareil
Prise courant
secteur
Page 98

12
CONNEXION COMPOSITE AV (CVBS)
CONNEXION COMPOSANTS (YPbPr)
Dos du DVD/VCR
Câble AV
Pour connexion de base, utilisez le
câble composite Audio L/R
(blanc/rouge) et CVBS (jaune) pour
connexion avec d’autres appareils
.
Dos du DVD/VCR
Cable YPbPr
Cable audio
Page 99

13
CONNEXION HDMI
CONNEXION SCART
Utilisez un câble HDMI
pour connecter d’autres
appareils et pour recevoir
des signaux multimédia
en haute définition.
Câble HDMI
Dos du DVD/VCR
Câble SCART
Dos du DVD/VCR
Page 100

14
CONNECXION PC/VGA
CONNEXION SORTIE AV (SORTIE CVBS EN MODE DVD)
Câble audio
Câble
VGA
Dos du PC
Utilisez un câble VGA et audio
pour connecter le PC et utiliser
l’appareil comme moniteur.
Câble AV
Ecran externe
 Loading...