

Page 1
GEBRUIKSAANWIJZING
Lees de gebruiksaanwijzing alvorens de TV te gebruiken en
houd hem bij de hand voor latere referentie.
Page 2
BELANGRIJKE INSTRUCTIES
VEILIGHEIDSINSTRUCTIES
The lightning flash and
arrow head within the
triangle is a warning
sign alerting you of
“dangerous voltage”
inside the product.
WAARSCHUWING - OM HET RISICO OP BRAND, EEN ELEKTRISCHE
SCHOK OF ERNSTIG PERSOONLIJK LETSEL TE VERMINDEREN:
Als het netsnoer beschadigd is, laat het dan repareren door de fabrikant, zijn
●
servicedienst of gelijkwaardig gekwalificeerd personeel om gevaren te voorkomen.
Het netsnoer dient altijd makkelijk toegankelijk te zijn.
●
Het apparaat mag niet blootgesteld worden aan druipend of opspattend water of
●
vloeistoffen en er mogen geen objecten gevuld met vloeistof, zoals een bloemenvaas,
bovenop het apparaat geplaatst worden.
●
De normale ventilatie van het product mag niet in het gedrang komen bij het gebruik.
●
Laat altijd een minimale ruimte van 10 cm rond het apparaat om voldoende ventilatie te
garanderen.
Bronnen van open vuur, zoals kaarsen, dienen niet bovenop het apparaat geplaatst te
●
worden.
●
Het apparaat is bedoeld voor gebruik in een gemiddeld klimaat.
Plaats dit product niet in de buurt van warmtebronnen zoals radiators, schoorstenen,
●
fornuizen en overige apparatuur (inclusief versterkers) die warmte produceren.
●
Reinig het product alleen zoals aanbevolen door de fabrikant (zie het deel “Onderhoud”
voor details). Haal de stekker uit het stopcontact voordat u het apparaat reinigt.
●
Haal de stekker uit het stopcontact als u het apparaat langere tijd niet gebruikt.
Zorg dat er geen objecten/vloeistoffen op het apparaat vallen of gemorst worden.
●
Gebruik het apparaat alleen met het meegeleverde netsnoer. Leg het netsnoer zo neer
●
dat er niet overheen gelopen wordt of platgedrukt wordt door zaken die er bovenop of
tegenaan geplaatst worden, let vooral op de stekkers, contactdozen en de plaats waar
deze uit het apparaat komen.
CAUTION: TO REDUCE THE RISK
OF ELECTRIC SHOCK. DO NOT
REMOVE COVER (OR BACK).
NO USER SERVICEABLE PARTS
INSIDE. REFER SERVICING TO
QUALIFIED SERVICE PERSONNEL.
Het uitroepteken in
de driehoek is een
waarschuwingsteken
dat u attent maakt op
belangrijke
instructies die met
het product
meegeleverd
worden.
1
Page 3

●
Wanneer de stekker of een stekkerdoos gebruikt wordt om het apparaat los te koppelen,
dient deze toegankelijk te blijven.
Gebruik het apparaat niet onder de volgende omstandigheden:
●
- Wanneer het netsnoer of de stekker beschadigd is.
- Wanneer er vocht in gemorst is of wanneer er objecten in het apparaat gevallen zijn.
- Wanneer het product is blootgesteld aan regen of water.
- Wanneer het product niet werkt wanneer het volgens de bedieningsinstructies gebruikt
wordt.
- Wanneer het product gevallen is of op een andere manier beschadigd is.
Probeer het product niet zelf te repareren; breng het naar een reparateur naar keuze
●
voor service of reparatie.
●
Overbelast stopcontacten, verlengsnoeren of verdeeldozen niet.
Sluit dit product aan op een geaard stopcontact.
●
VOORZICHTIG - OM HET RISICO OP PERSOONLIJK LETSEL OF
BESCHADIGING VAN HET PRODUCT OF EIGENDOMMEN TE
VERMINDEREN:
Dit product is alleen bedoeld voor niet-commercieel, niet-industrieel, persoonlijk gebruik
●
als televisie. Gebruik dit product niet voor andere doeleinden.
Stel het product niet bloot aan hevige schokken, extreme temperaturen of lange
●
periodes van direct zonlicht.
●
Houd het product uit de buurt van magnetische objecten, motoren en transformatoren.
●
Niet buitenshuis gebruiken tijdens guur weer.
Gebruik de tv niet tijdens het rijden; dit is gevaarlijk en op sommige plaatsen illegaal.
●
HANTEREN EN GEBRUIK VAN DE BATTERIJEN:
VOORZICHTIG: Er bestaat gevaar voor explosie wanneer een batterij onjuist
●
teruggeplaatst is of niet vervangen is door batterijen van hetzelfde of soortgelijk type.
De batterij dient niet blootgesteld te worden aan overmatige hitte zoals zonlicht, vuur of
●
iets soortgelijks.
●
Verschillende soorten batterijen, nieuwe en gebruikte batterijen mogen niet door elkaar
gebruikt worden.
●
Bij het plaatsen van de batterij dient op de polariteit gelet te worden.
●
Wanneer de batterij leeg is dient deze uit het product verwijderd te worden.
De batterij dient op een veilige manier afgevoerd te worden. Gebruik hiervoor altijd de
●
batterijenbak (te vinden bij uw handelaar) om het milieu te beschermen.
●
Houd batterijen uit de buurt van kinderen en huisdieren. Alleen volwassenen mogen de
batterijen hanteren.
Gooi de batterijen nooit in het vuur en stel ze ook niet bloot aan vuur of andere
●
hittebronnen.
●
Volg de veiligheids- en gebruikersinstructies van de batterijen.
2
Page 4

Gebruiksaanwijzing ................................................................................ …………………..1
Afstandsbediening.................................................................................. …………………..1
AC adapter ............................................................................................. …………………..1
ACCESSOIRES
Alle afbeeldingen in deze gebruiksaanwijzing dienen als referentie beschouwd te
worden. Op het toestel kunnen deze eventueel iets afwijken.
INHOUD
BEGINNEN
BELANGRIJKE INSTRUCTIES.....................................................................................1-2
ACCESSOIRES ............................................................................................................ …3
EIGENSCHAPPEN ....................................................................................................... …4
ALGEMENE ONDERDELEN....................................................................................... …5-6
AFSTANDSBEDIENING............................................................................................ .....7-8
VOORBEREIDING VAN DE AFSTANDSBEDIENING……………………………… ...... ..….9
BASIS AANSLUITINGEN .......................................................................................... .10-13
BEDIENING
BASISBEDIENING .................................................................................................... .14-20
HOOFDMENU........................................................................................................... .21-26
TV MODUS............................................................................................................ 21 - 25
AV EN ANDERE MODI..............................................................................................25
PC MODUS ..................................................................................................................26
VOOR REFERENTIE
ONDERHOUD..................................................................................................................27
MONTAGE AAN DE MUUR........................................................................................... ...27
INSTALLATIE VAN DE VOET......................................................................................... .2 8
SPECIFICATIES............................................................................................................ . . 2 9
IN GEVAL VAN PROBLEMEN................................................................................... …...30
3
Page 5

EIGENSCHAPPEN
23.6” TFT SCHERM
Dit toestel beschikt over een 23.6” TFT scherm om heldere beelden weer te geven.
AUTOMATISCH TV ZOEKEN
(EUROPESE) TELETEKST FUNCTIE
USB MULTIMEDIA WEERGAVE
ON SCREEN DISPLAY IN MEERDERE TALEN
MULTIFUNCTIONELE AFSTANDSBEDIENING
INGANGEN: CVBS, AUDIO R/L, HDMI, SCART, PC AUDIO, VGA, YPBPR
UITGANGEN: HOOFDTELEFOON
AFNEEMBARE STEUN VOOR VOET
AANSLUITING VOOR EXTERNE ANTENNE
INGEBOUWDE LUIDSPREKERS
RUISONDERDRUKKING
4
Page 6
HOOFDEENHEID
ALGEMENE ONDERDELEN
1. TFT scherm
2. Infrarood ontvanger / Power indicator: in
stand-by licht deze rood op, wanneer het toestel
ingeschakeld wordt deze indicator blauw
3. Voetbevestiging
4. VOL +/- toets: om het volume te verhogen of te
verlagen of om naar links/rechts te gaan
5. CH +/- toets: om vorige of volgende zender te
kiezen of om naar boven/onder te gaan
6. MENU: om in het menu te gaan
7. TV/AV: om de ingangsbron te kiezen
8. POWER toets: om de Tv in/uit te schakelen
5
Page 7
ALGEMENE ONDERDELEN
HOOFDEENHEID
1. Stroomtoevoer
2. CVBS en AUDIO L/R ingangen
3. HDMI ingang
4. SCART ingang
5. PC AUDIO ingang
6. VGA ingang
7. USB aansluiting voor multimediaweergave
8. Aansluiting hoofdtelefoon
9. RF-ingang: aansluiting antenne
10. Y Pb Pr ingang
6
Page 8
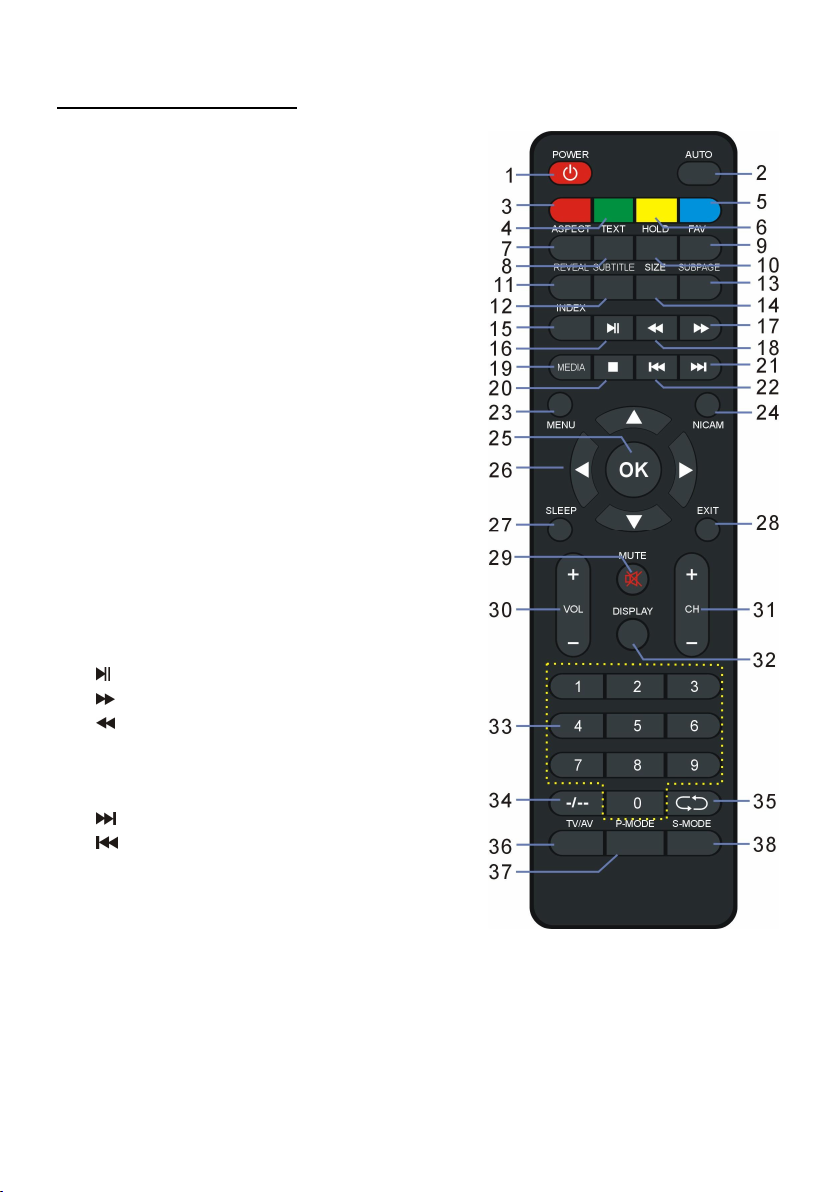
AFSTANDSBEDIENING
1. AAN/UIT: Het apparaat op stand-by modus
schakelen; nogmaals indrukken om in te
schakelen.
2. AUTO: Het scherm automatisch afstellen
(PC/VGA).
3. RODE toets
4. GROENE toets
5. BLAUWE toets
6. GELE toets
7. ASPECT: Druk meerdere keren op deze toets
om de gewenste aspectverhouding voor het
scherm te selecteren.
8. TEKST: De TELETEKST weergeven.
9. FAV: Om de lijst met favorieten te tonen.
10. HOUD: De TELETEKST bevriezen.
11. ONTHUL: Verborgen TELETEKST of
verborgen karakters weergeven.
12. ONDERTITEL: Ondertiteling weergeven.
13. SUBPAGINA: Subpagina openen van
TELETEKST.
14. SIZE: Grootte van TELETEKST wisselen.
15. INDEX: De index weergeven.
16.
: Het afspelen starten of pauzeren.
17.
: Vooruitspoelen.
18. : Terugspoelen.
19. MEDIA: De MEDIA modus direct openen in TV
modus.
20. █ : Het afspelen stoppen.
21.
: Volgende hoofdstuk afspelen.
22.
: Vorige hoofdstuk afspelen.
23. MENU: Het hoofdmenu openen, nogmaals
indrukken om terug te keren naar de vorige
menupagina.
24. NICAM: Van soundtrack wisselen.
25. OK: Selecties bevestigen.
7
Page 9
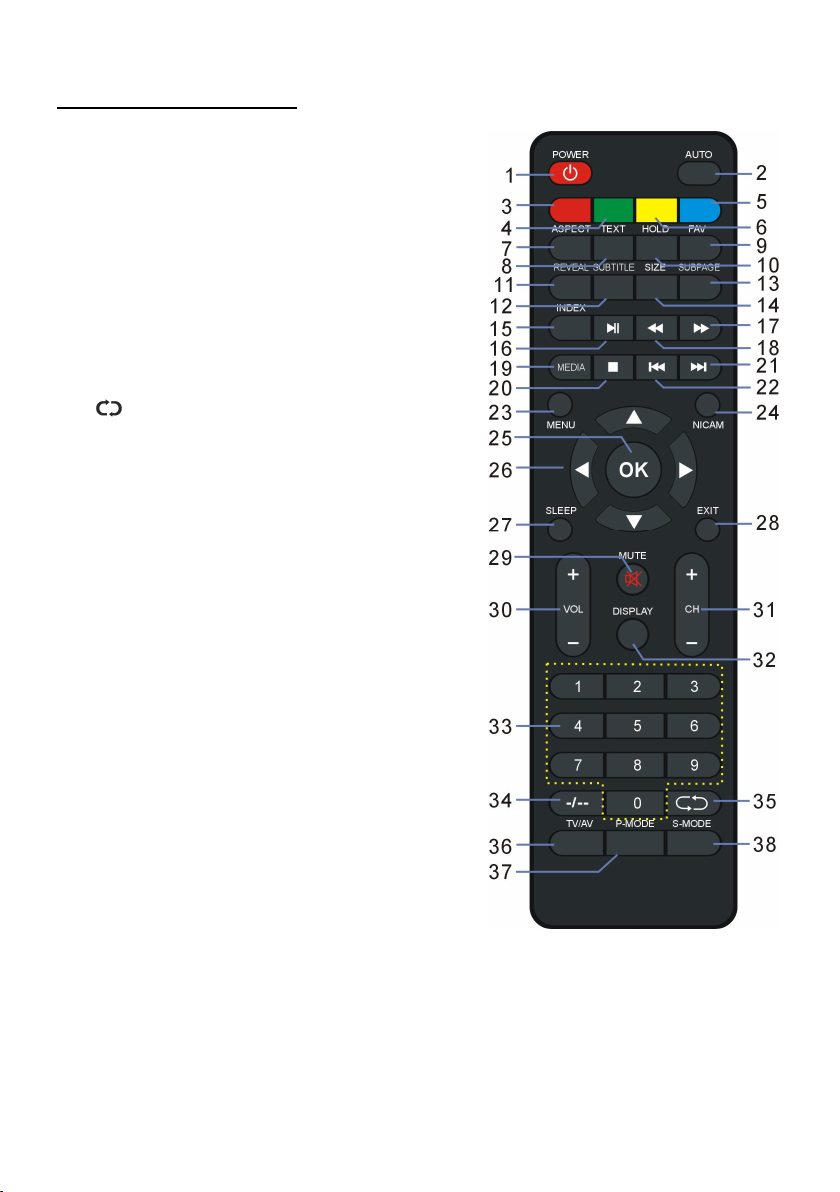
AFSTANDSBEDIENING
26. ▲/▼/◄/►: Navigatietoets
27. SLAAP: De gewenste slaaptijd instellen.
28. VERLATEN: De menupagina verlaten.
29. DEMP: Het geluid dempen.
30. VOL +/-: Het volume verhogen/verlagen.
31. CH+/-: Het volgende/vorige kanaal weergeven.
32. DISPLAY: Informatie over het huidige
programma weergeven.
33. CIJFERTOETSEN (0-9): Invoer van numerieke
informatie zoals kanaalnummers, enz.
34. -/--: Cijfers wisselen tijdens kanaalselectie.
35.
36. TV/AV: De lijst met ingangsbronnen
37. P-MODUS: Van beeldmodus wisselen.
38. S-MODUS: Van geluidmodus wisselen.
: Terugkeren naar het vorige kanaal of de
vorige ingangsbron.
weergeven.
8
Page 10
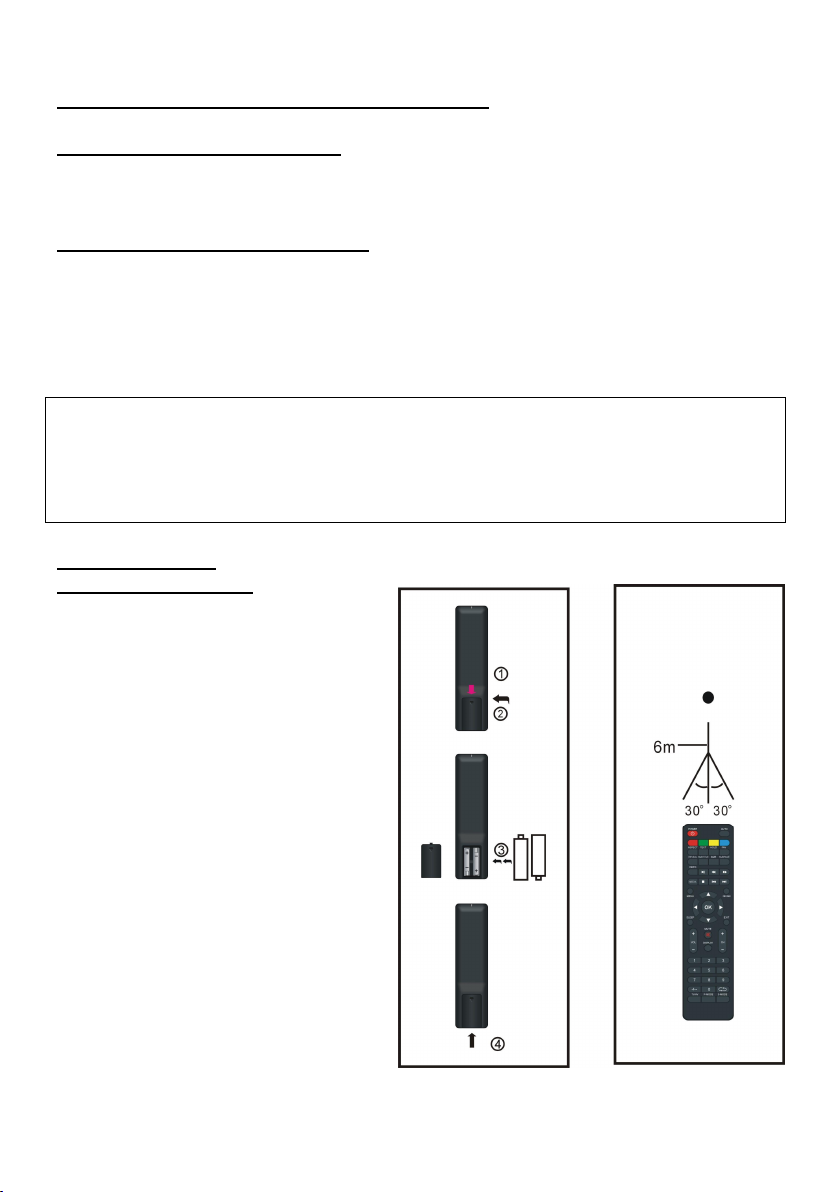
VOORBEREIDING AFSTANDSBEDIENING
Fi
g1 Fig2
PLAATSEN VAN DE BATTERIJEN
Plaats de batterijen zoals getoond in onderstaande illustratie en zorg ervoor dat de + en
– geplaatst worden zoals aangeduid in het batterijencompartiment (fig. 1)
LEVENSDUUR VAN DE BATTERIJEN
- De batterijen gaan gewoonlijk een jaar mee, maar dit hangt af van hoeveel de
afstandsbediening gebruikt wordt.
- Als de afstandsbediening niet goed werkt, zelfs dicht bij het toestel, dan moeten de
batterijen vervangen worden.
- Gebruik twee AAA batterijen.
OPMERKING:
Laat de afstandsbediening niet vallen en trap er niet op. Dit kan schade en slechte
werking veroorzaken.
Verwijder de batterijen als de afstandsbediening gedurende langere tijd niet gebruikt
wordt.
GEBRUIK VAN DE
AFSTANDSBEDIENING
Richt de afstandsbediening binnen een
afstand van 6 meter en een hoek van
60° naar de infrarood ontvanger van het
toestel (Fig2).
OPMERKINGEN:
De bedieningsafstand kan variëren met
de helderheid van de kamer.
Richt geen fel licht op de infrarood
ontvanger.
Plaats geen voorwerpen tussen de
afstandsbediening en het toestel.
Gebruik deze afstandsbediening niet
tegelijkertijd met een afstandsbediening
van een ander toestel.
Druk
Open
Drukken
Infrarood ontvanger
9
Page 11
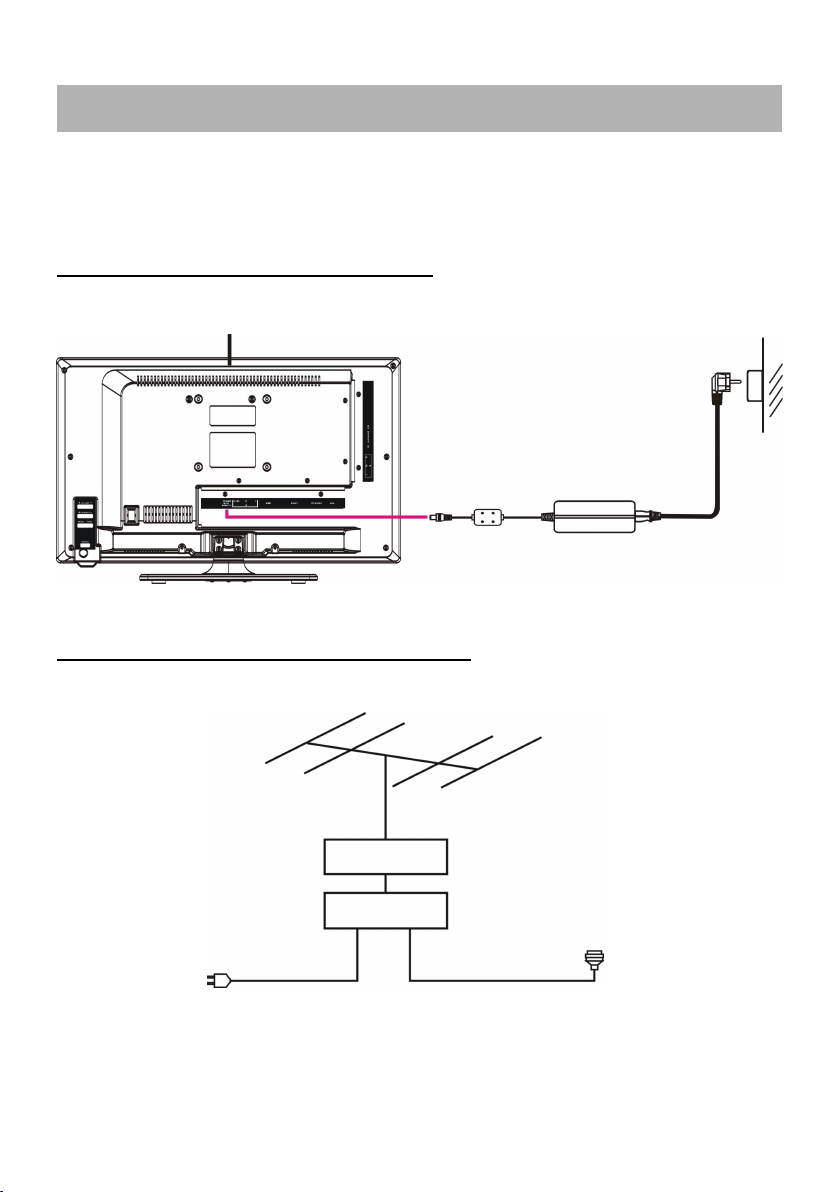
Zorg ervoor dat er geen kabels zijn aangesloten alvorens het toestel op netstroom aan
te sluiten.
Lees de instructies alvorens andere toestellen aan te sluiten.
BASIS AANSLUITINGEN
AANSLUITEN VAN DE NETSTROOM
Hoofdtoestel
Stopcontact
AC Adapter
AANSLUITEN VAN EXTERNE ANTENNE
Sluit een externe antenne aan om te genieten van de beste beeldkwaliteit.
Netsnoer van
antenneverste
rker
Versterker
binnenante
nne
Antenne
Versterker
buitenanten
ne
75 Ohm
antenne
stekker
10
Page 12
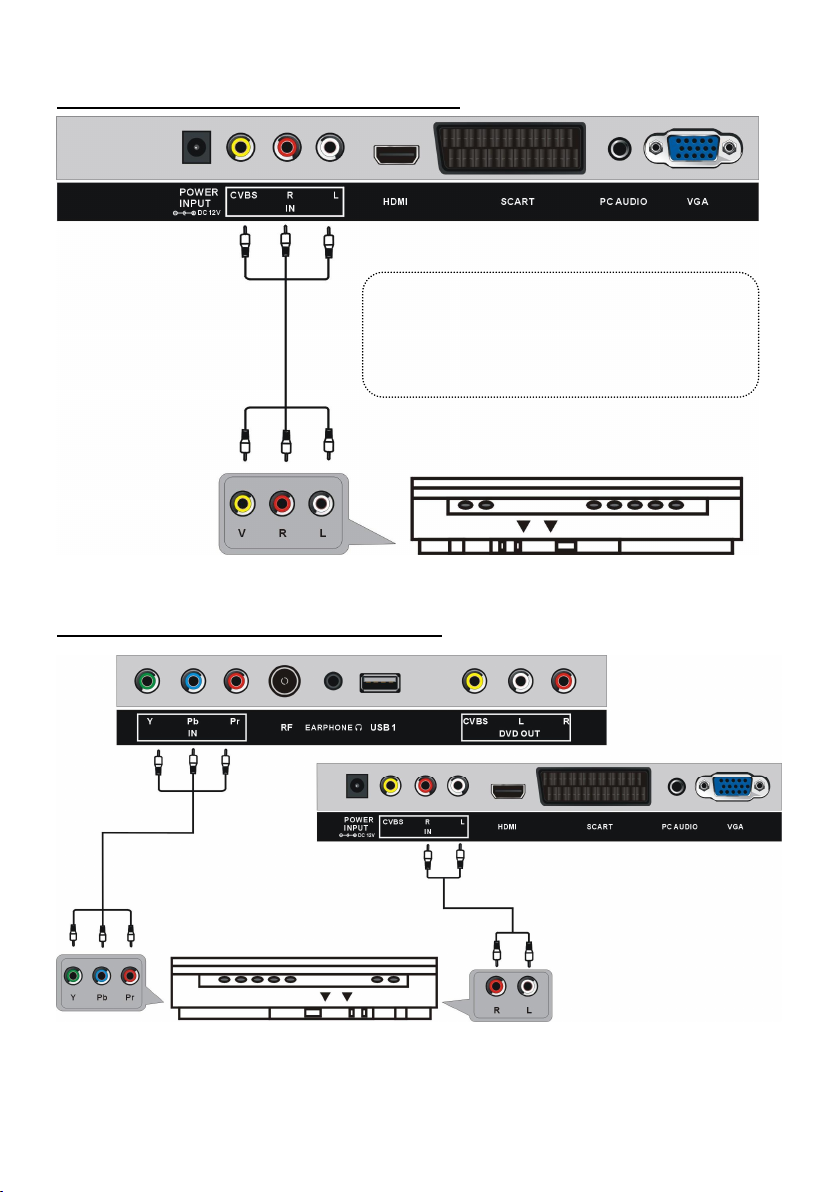
COMPOSIET AV (CVBS) AANLSUITING
AV kabel
Voor basisaansluiting, gebruik de composiet
Audio L/R (wit/rood) en CVBS (geel) kabel
voor aansluiting van andere toestellen.
COMPONENT (YPbPr) AANSLUITING
YPbPr kabel
Achterkant van DVD/VCR
Achterkant van DVD/VCR
Audio kabel
11
Page 13
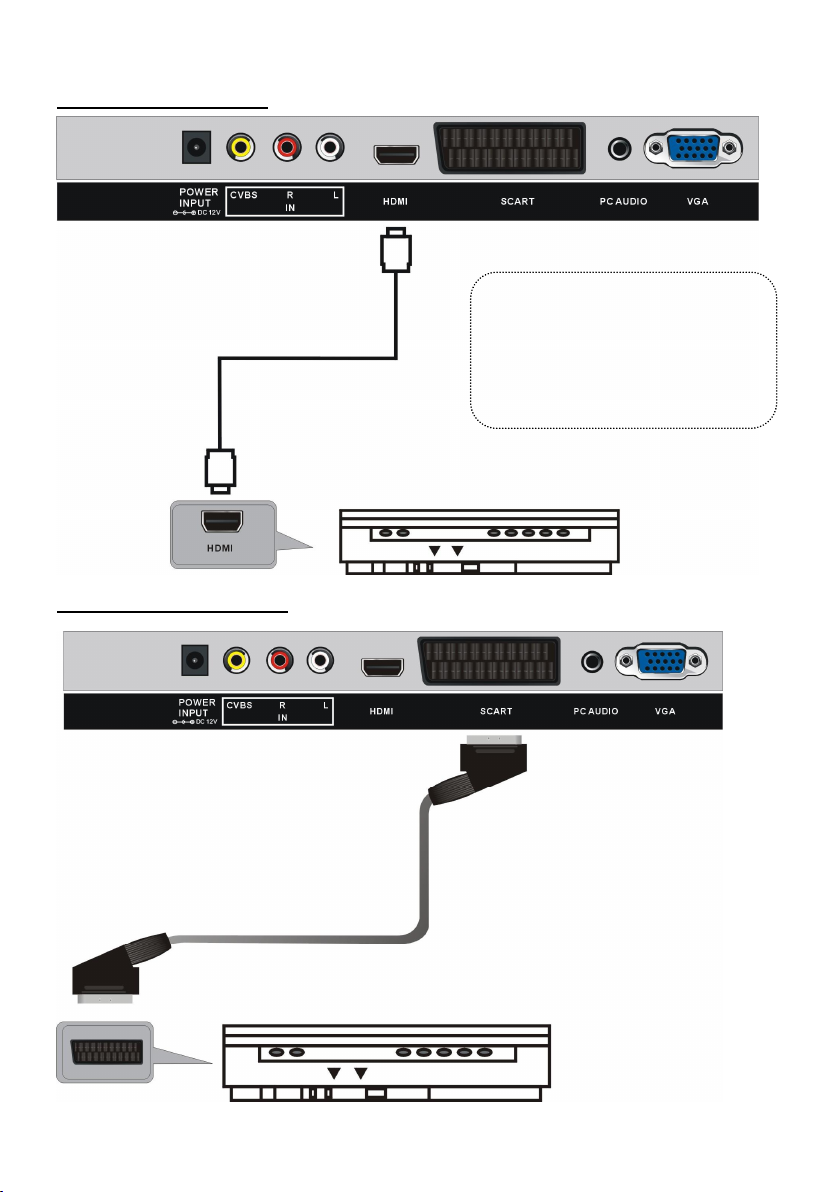
HDMI AANSLUITING
HDMI kabel
SCART AANSLUITING
Sluit de HDMI kabel aan andere
apparaten aan om een
high-definition multimedia
signaal te ontvangen.
Achterkant van DVD/VCR
SCART kabel
Achterkant van DVD/VCR
12
Page 14
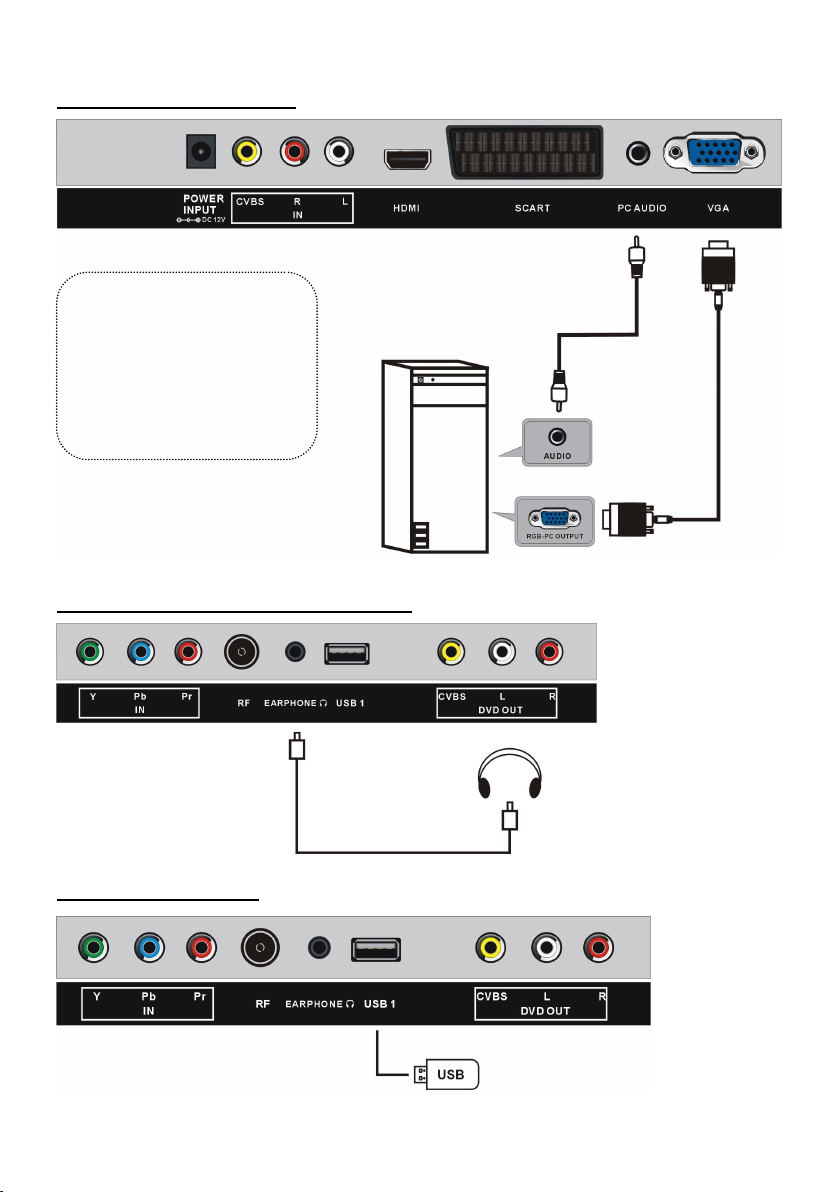
PC/VGA AANSLUITING
Gebruik een VGA kabel en
een audio kabel om op de
TV een PC aan te sluiten en
de TV als monitor te
gebruiken.
Achterkant
van PC
AANSLUITING HOOFDTELEFOON
Kabel hoofdtelefoon
USB AANSLUITING
Audio kabel
VGA
kabel
13
Page 15

ZORG ERVOOR DAT ALLE TOESTELLEN EN DE AC ADAPTER
GOED ZIJN AANGESLOTEN EN HET TOESTEL IN DE CORRECTE
- Druk op de
wordt blauw); druk opnieuw om het toestel in stand-by te zetten (indicator wordt rood).
toets van de afstandsbediening om het toestel in te schakelen (de indicator
- Druk op de TV/AV toets van de afstandsbediening op het toestel in TV modus
te zetten
DE GEWENSTE ZENDER KIEZEN
1. Druk op CH+ om naar de volgende zender te gaan.
2. Druk op CH- om naar de vorige zender te gaan.
3. Gebruik de numerieke toetsen van de afstandsbediening om het zendernummer direct
in te brengen.
OPMERKING: druk op -/-- om het nummer van een zender in te brengen die uit meerdere
cijfers bestaat.
VOLUMEREGELING
Gebruik VOL+ of VOL- om het volume te regelen.
Beschikbaar bereik: 0-100
MUTE
Druk op MUTE om het geluid uit te schakelen en druk opnieuw om het geluid in te
schakelen.
SELECTIE INGANGSBRON
Druk op de TV/AV toets om de ingangsbronlijst weer te geven.
Gebruik de opwaartse of neerwaartse navigatietoetsen om de gewenste bron te kiezen en
druk op OK om te bevestigen.
Beschikbare mogelijkheden: TV/AV/YPBPR/HDMI/PC/MEDIA.
BEELDMODUS
Druk op P-MODE om de gewenste beeldmodus direct te kiezen.
Beschikbare mogelijkheden: Gebruiker, Dynamisch, Standaard, Zacht.
GELUIDMODUS
Druk op S-MODE om de gewenste geluidmodus direct te kiezen.
Beschikbare mogelijkheden: Standaard, Muziek, Film, Sport, Gebruiker
MODUS STAAT
BASIS BEDIENING
14
Page 16
INSTELLEN SLEEP TIMER
Druk op SLEEP om de gewenste sleeptime direct te kiezen.
Beschikbare mogelijkheden: Uit, 10/20/30/60/90/120/180/240 min
INSTELLEN VIDEOFORMAAT
Druk op ASPECT om het videoformaat direct in te stellen.
Beschikbare mogelijkheden: Auto, 4:3, 16:9, Zoom1, Zoom2, PAL+
OPMERKING: het beschikbare formaat hangt af van de ingangsbron.
GELUIDSINSTELLING
Druk op NICAM om de gewenste geluidsinstelling te kiezen
OPMERKING: afhankelijk van de zender kan deze toets verschillende opties bieden.
INFORMATIESCHERM
Druk op DISPLAY om informatie over de zender op te roepen, zoals zendernummer,
kleursysteem, geluidsysteem, enz.
TELETEKST
Wanneer teletekst beschikbaar is:
Druk op TEXT om de teletekst op te roepen.
Druk op HOLD om de teletekst pagina vast te houden
Druk op INDEX om naar de index pagina te gaan.
Druk op SIZE om de lettergrootte te wijzigen.
Druk op REVEAL om verborgen tekst op te roepen.
Druk op SUBPAGE om naar een subpagina te gaan.
VOORKEURLIJST
Druk op FAV om de voorkeurzenderlijst op te roepen.
Gebruik de navigatietoetsen (UP/DOWN) om de gewenste zender te kiezen en druk op OK
om ernaar te kijken.
SNELLE SELECTIE
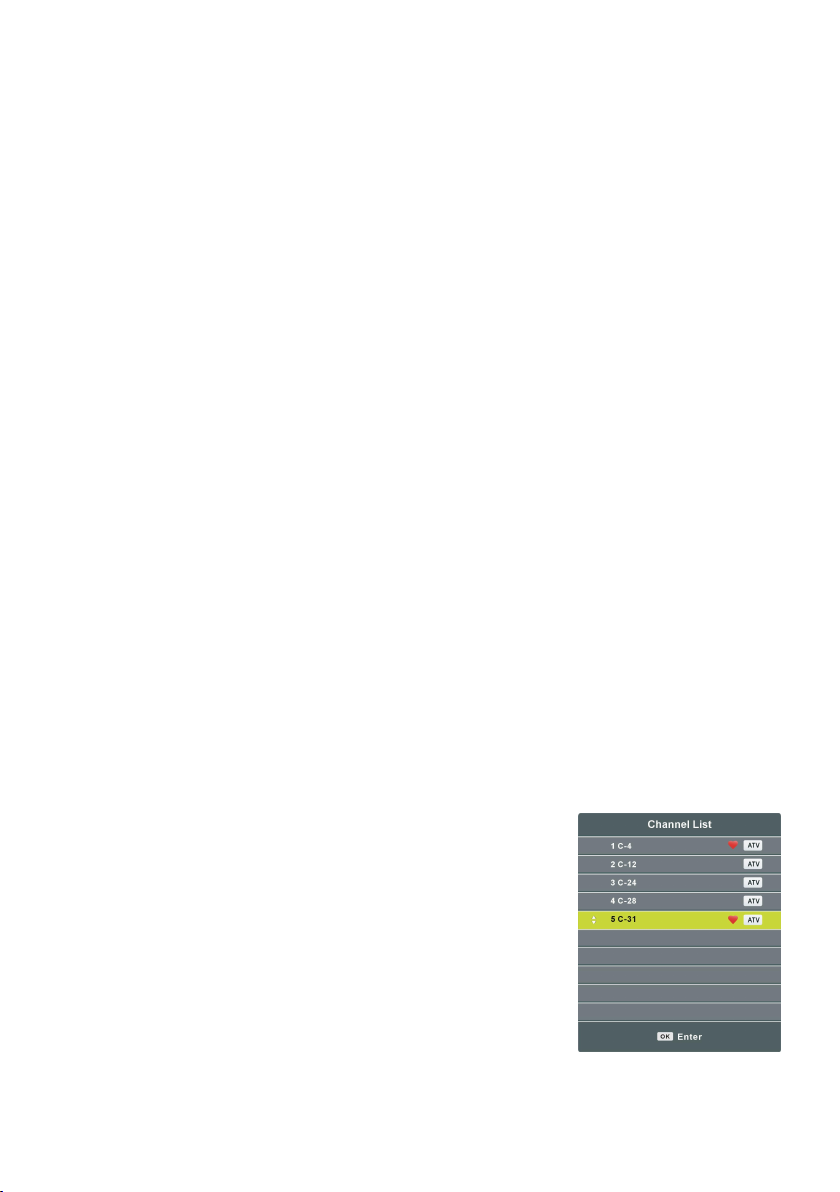
Druk op OK om de zenderlijst op te roepen.
Gebruik de navigatietoetsen (UP/DOWN) om de gewenste
zender te kiezen en druk op OK om ernaar te kijken.
15
Page 17
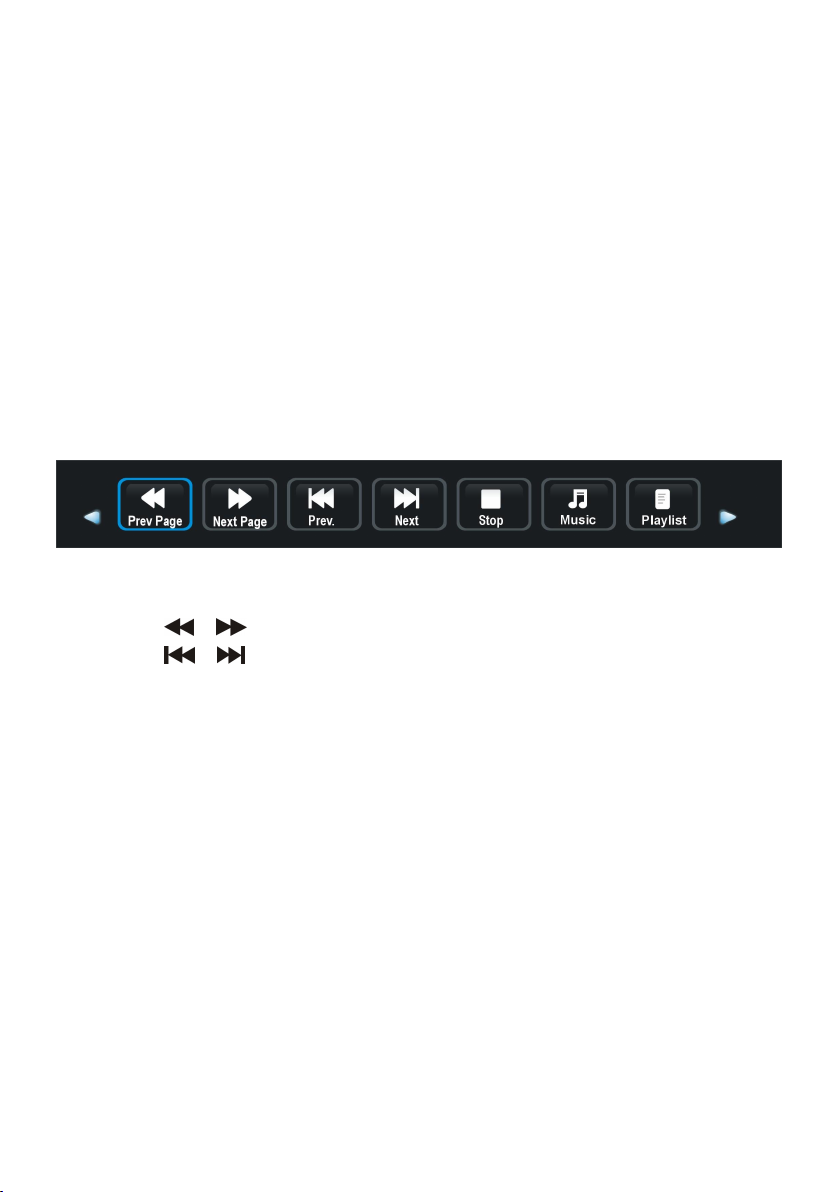
MEDIA AFSPELEN
- Steek de USB geheugenapparaat in de USB poort.
- Druk op de TV/AV knop op het apparaat of op de afstandsbediening om dit apparaat op
Mediamodus te schakelen.
- Druk op de VERLATEN knop op de afstandsbediening om terug te keren naar de vorige
menupagina.
1. FOTO’S
- Druk op de LINKSE of RECHTSE navigatieknop om een FOTO item te selecteren.
- Druk op de OK knop om het te openen en druk op de LINKSE of RECHTSE
navigatieknop om de gewenste disk te selecteren.
- Druk op de OK knop om het te openen en gebruik de navigatieknoppen om de gewenste
folder te selecteren.
- Druk op de OK knop om het te openen en gebruik de navigatieknoppen om het gewenste
Fotobestand te selecteren.
16
Page 18
- Druk op de RODE knop om een dialoogvenster te openen en druk op de LINKSE of
RECHTSE navigatieknop om het item al dan niet te wissen.
- Druk op de OK knop om het gemarkeerde bestand af te spelen.
Tijdens normale weergave van FOTO’S:
- Druk op de DISPLAY knop op de afstandsbediening om de taakbalk te
openen/verbergen.
- Druk op de LINKSE/RECHTSE navigatieknop om de gewenste optie te selecteren en
druk ter bevestiging op de ENTER knop.
- Druk op de
- Druk op de / knop om het vorige/volgende bestand af te spelen.
- Druk op de █ knop om het afspelen te stoppen.
2. MUZIEK
- Druk op de LINKSE of RECHTSE navigatieknop om een MUZIEK item te selecteren.
- Druk op de OK knop om het te openen en druk op de LINKSE of RECHTSE
navigatieknop om de gewenste disk te selecteren.
- Druk op de OK knop om het te openen en gebruik de navigatieknoppen om de gewenste
folder te selecteren.
- Druk op de OK knop om het te openen en gebruik de navigatieknoppen om het gewenste
Muziekbestand te selecteren.
knop om het afspelen te pauzeren/starten.
17
Page 19
- Druk op de RODE knop om een dialoogvenster te openen en druk op de LINKSE of
RECHTSE navigatieknop om het item al dan niet te wissen.
- Druk op de OK toets om het gemarkeerde bestand af te spelen.
Tijdens normaal afspelen van MUZIEK:
- Druk op de LINKSE/RECHTSE navigatieknop om de gewenste optie te selecteren in de
taakbalk en druk ter bevestiging op de OK knop.
- Druk op de
- Druk op de / knop om terug/vooruit te spoelen.
- Druk op de
- Druk op de █ knop om het afspelen te stoppen.
3. FILM
- Druk op de LINKSE of RECHTSE navigatieknop om een FILM item te selecteren.
- Druk op de OK knop om het te openen en druk op de LINKSE of RECHTSE
navigatieknop om de gewenste disk te selecteren.
- Druk op de OK knop om het te openen en gebruik de navigatieknoppen om de gewenste
folder te selecteren.
- Druk op de OK knop om het te openen en gebruik de navigatieknoppen om het gewenste
Filmbestand te selecteren.
knop om het afspelen te pauzeren/starten.
/ knop om het vorige/volgende bestand af te spelen.
18
Page 20
- Druk op de RODE knop om een dialoogvenster te openen en druk op de LINKSE of
RECHTSE navigatieknop om het item al dan niet te wissen.
- Druk op de OK toets om het gemarkeerde bestand af te spelen.
Tijdens normale weergave van FILMS:
- Druk op de DISPLAY knop op de afstandsbediening om de taakbalk te
openen/verbergen.
- Druk op de LINKSE/RECHTSE navigatieknop om de gewenste optie te selecteren in de
taakbalk en druk ter bevestiging op de OK knop.
- Druk op de
- Druk op de / knop om terug/vooruit te spoelen.
- Druk op de / knop om het vorige/volgende bestand af te spelen.
- Druk op de █ knop om het afspelen te stoppen.
knop om het afspelen te pauzeren/starten.
19
Page 21
4. TEKST
- Druk op de LINKSE of RECHTSE navigatieknop om het TEKST item te selecteren.
- Druk op de OK knop om het te openen en druk op de LINKSE of RECHTSE
navigatieknop om de gewenste disk te selecteren.
- Druk op de OK knop om het te openen en gebruik de navigatieknoppen om de gewenste
folder te selecteren.
- Druk op de OK knop om het te openen en gebruik de navigatieknoppen om het gewenste
Tekstbestand te selecteren.
- Druk op de RODE knop om een dialoogvenster te openen, en druk op de LINKSE of
RECHTSE knop om het item al dan niet te wissen.
- Druk op de OK knop om het gemarkeerde bestand af te spelen.
Tijdens normale weergave van TEKST:
- Druk op de DISPLAY knop op de afstandsbediening om de taakbalk te
openen/verbergen.
- Druk op de LINKSE/RECHTSE navigatieknop om de gewenste optie te selecteren in de
taakbalk en druk ter bevestiging op de ENTER knop.
- Druk op de
- Druk op de / kmop om het vorige/volgende bestand af te spelen.
- Druk op de █ knop om het afspelen te stoppen.
OPMERKING: Zorg ervoor het correcte icoontje in het hoofdmenu van MEDIA AFSPELEN
te selecteren om uw multimediabestanden af te kunnen spelen. D.w.z., u kunt alleen
Fotobestanden weergeven in het FOTO item, muziekbestanden in het MUZIEK item, enz.
/ knop om de vorige/volgende pagina weer te geven.
20
Page 22
● Dit toestel beschikt over verschillende instelmenus. Eens de instellingen gedaan blijven
deze in het geheugen en zorgen er aldus voor dat het toestel steeds onder dezelfde
condities functioneert.
● De instellingen blijven in het geheugen (zelfs als het toestel in stand-by gezet wordt)
totdat u ze terug wijzigt.
Algemene procedure voor de instellingen
- Druk op MENU om in het hoofdmenu te gaan.
- Gebruik de LINKSE/RECHTSE navigatietoetsen om een submenu te selecteren.
- Gebruik de UP/DOWN navigatietoetsen om een optie in de lijst te selecteren.
- Druk op OK of RECHTSE navigatietoets om in het submenu te gaan.
- Gebruik de navigatietoetsen om de gewenste waarde in te stellen en druk op OK om te
bevestigen.
- Druk op MENU om terug te gaan naar het vorig menu.
- Druk op EXIT om het menu te verlaten.
HOOFDMENU
TV MODUS
Druk op TV/AV om de TV modus te selecteren.
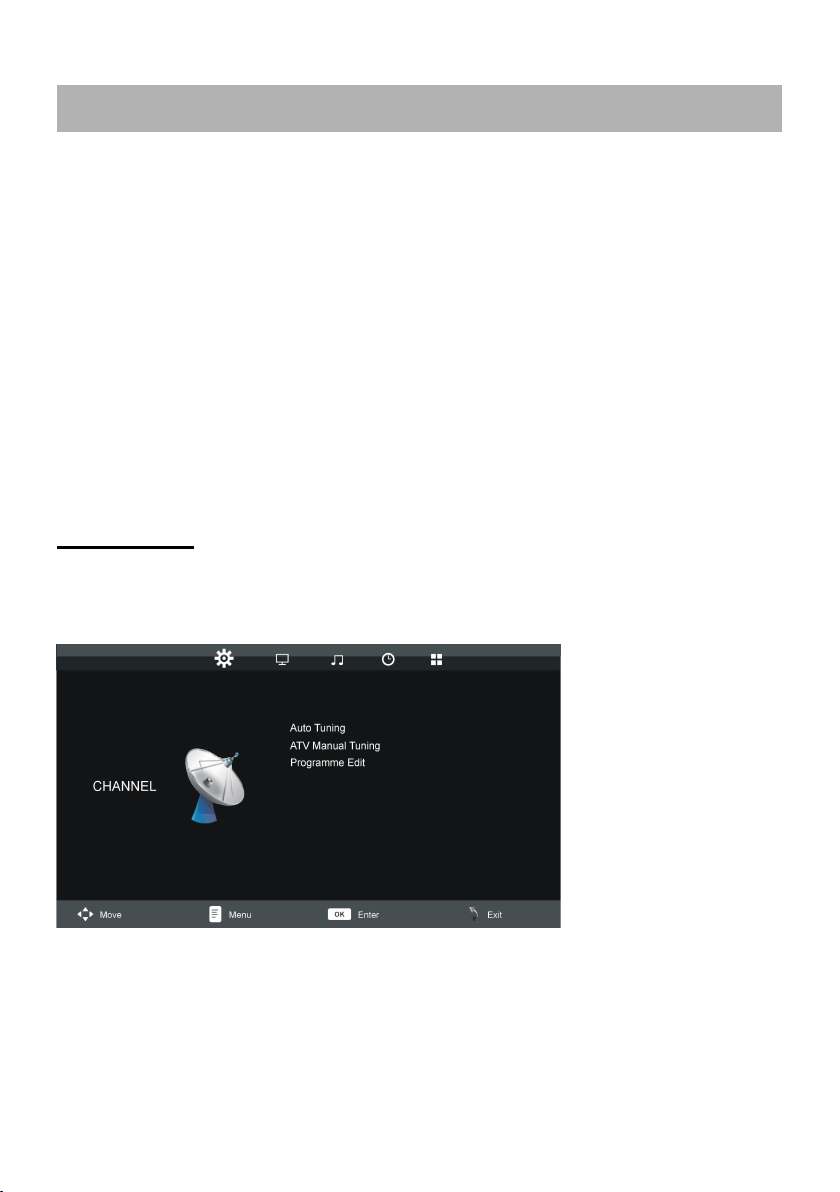
1. ZENDERS
1.1 Automatisch afstemmen
Gebruik de UP/DOWN navigatietoetsen om dit item aan te duiden en druk op OK om het
automatisch afstemmen te starten.
21
Page 23
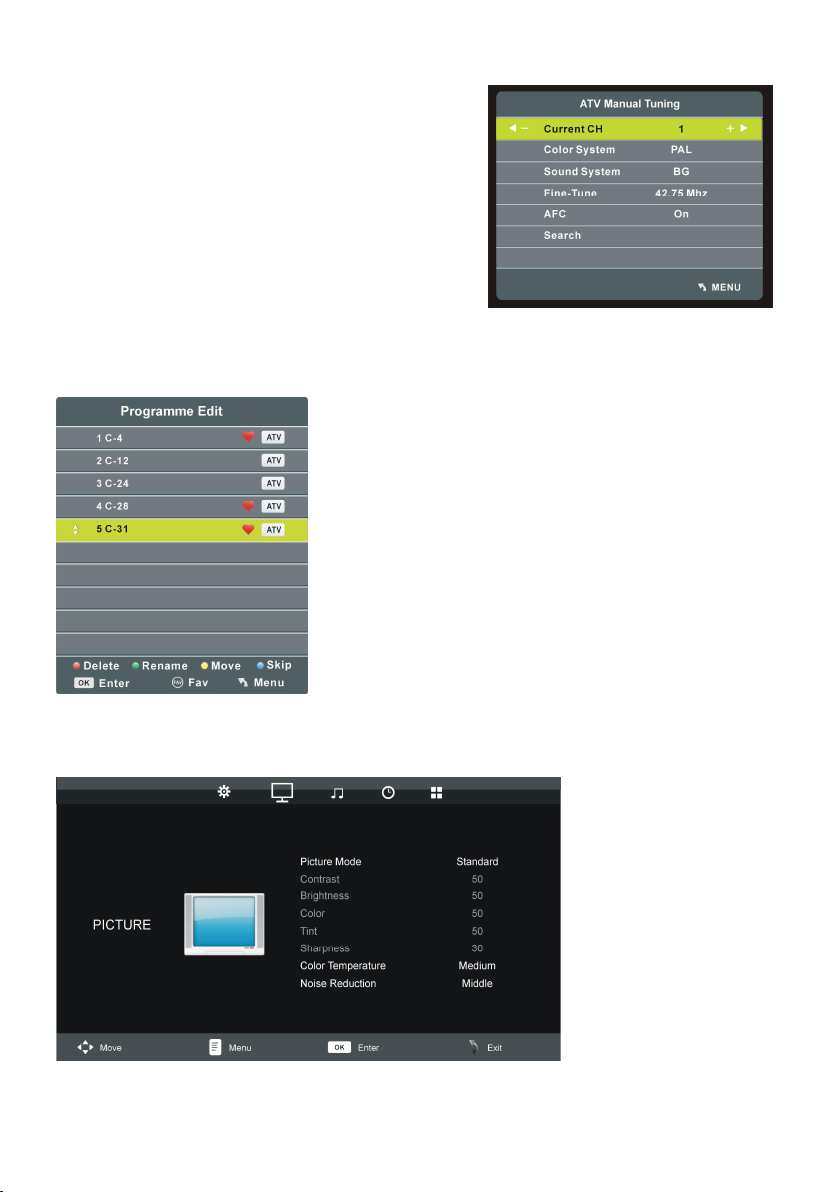
1.2 Handmatig afstemmen
- Gebruik de UP/DOWN navigatietoetsen om dit
item aan te duiden en druk op OK om in het menu te
gaan.
- Gebruik de UP/DOWN navigatietoetsen om de
tweede optie te kiezen.
- Gebruik de LINKSE/RECHTSE navigatietoetsen
om de regeling te beginnen.
1.3 Zenderlijst bewerken
- Gebruik de UP/DOWN navigatietoetsen om dit item aan te duiden en druk op OK om in
het menu te gaan.
- Druk op ROOD om de zender te verwijderen.
- Druk op GROEN om in het menu voor
naamverandering te komen. Gebruik UP/DOWN om de
waarden in te stellen; gebruik LINKS/RECHTS om de
cursor te verplaatsen.
- Druk op GEEL om in het menu voor zenderverplaatsing
te komen. Gebruik UP/DOWN om de gewenste positie
aan te duiden en druk op GEEL om de zender te
verplaatsen.
- Druk op BLAUW om de zender over te slaan.
- Druk op FAV om de zender als een voorkeurzender
aan te duiden of druk opnieuw op FAV om er terug een
gewone zender van te maken.
2. BEELD
22
Page 24
2.1 Beeldmodus
Beschikbare opties: gebruiker, dynamisch, standaard, zacht.
OPMERKING: de instellingen van contrast, helderheid, kleur, tint en scherpte zijn
beschikbaar als ‘gebruiker’ is gekozen.
2.2 Contrast
De waarde van het contrast kan ingesteld worden tussen 0-100.
2.3 Helderheid
De waarde van de helderheid kan ingesteld worden tussen 0-100.
2.4 Kleur
De waarde van de kleur kan ingesteld worden tussen 0-100.
2.5 Tint
De waarde van de tint kan ingesteld worden tussen 0-100.
OPMERKING: dit is alleen beschikbaar bij NTSC systeem.
2.6 Scherpte
De waarde van de scherpte kan ingesteld worden tussen 0-100.
2.7 Kleurtemperatuur
Gebruik dit om de kleurtemperatuur naar wens in te stellen.
Beschikbare opties: medium, koel, warm.
2.8 Ruisonderdrukking
Beschikbare opties: uit, laag, gemiddeld, hoog.
3. GELUID
23
Page 25
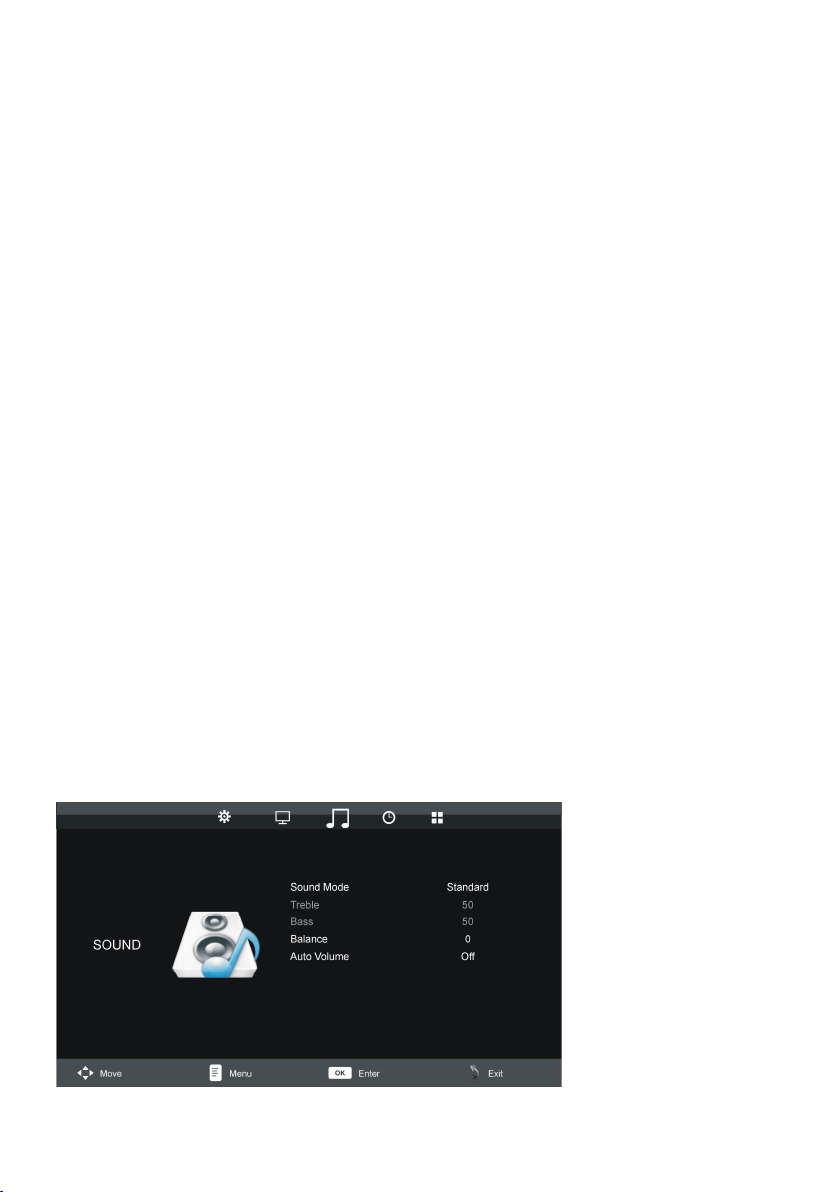
3.1 Geluidmodus
Beschikbare opties: standaard, muziek, film, sport, gebruiker.
OPMERKING: de instellingen van hoge en lagen tonen is mogelijk als ‘gebruiker’ is
gekozen.
3.2 Hoge tonen
De waarde van de hoge tonen kan ingesteld worden tussen 0-100.
3.3 Lage tonen
De waarde van de lage tonen kan ingesteld worden tussen 0-100.
3.4 Balans
Om het uitgangsniveau tussen linker en rechter luidsprekers in te stellen van -50 tot 50.
3.5 Automatisch volume
Om het automatisch volume in of uit te schakelen.
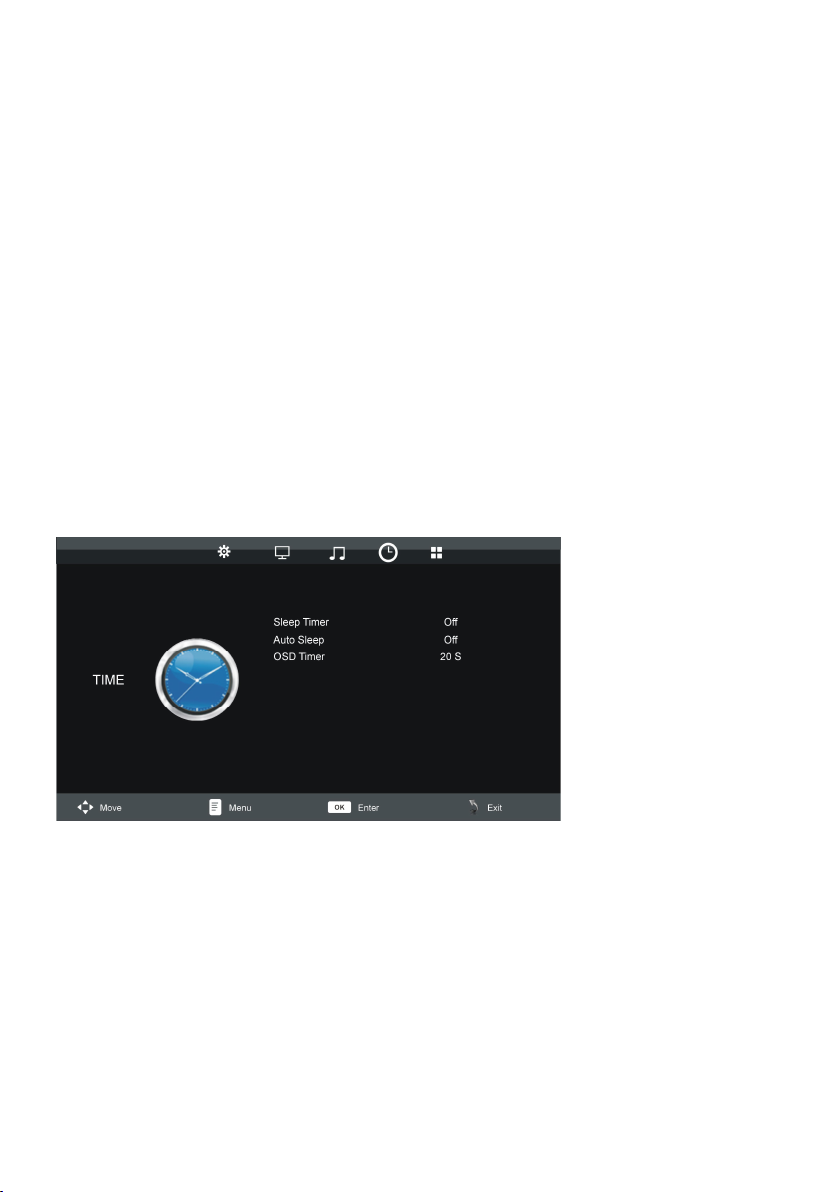
4. TIJD
4.1 Sleep timer
Om de tijd in te stellen waarna het toestel automatisch in stand-by gaat.
Mogelijke opties: uit, 10/20/30/60/90/120/180/240 min
4.2 Automatische stand-by
Om de automatische stand-by duur in te stellen.
Mogelijke opties: uit, 3 uur, 4 uur, 5 uur.
4.3 OSD timer
Om in te stellen hoe lang het OSD op het scherm verschijnt.
Mogelijke opties: 5/10/15/20/25/30 seconden.
24
Page 26
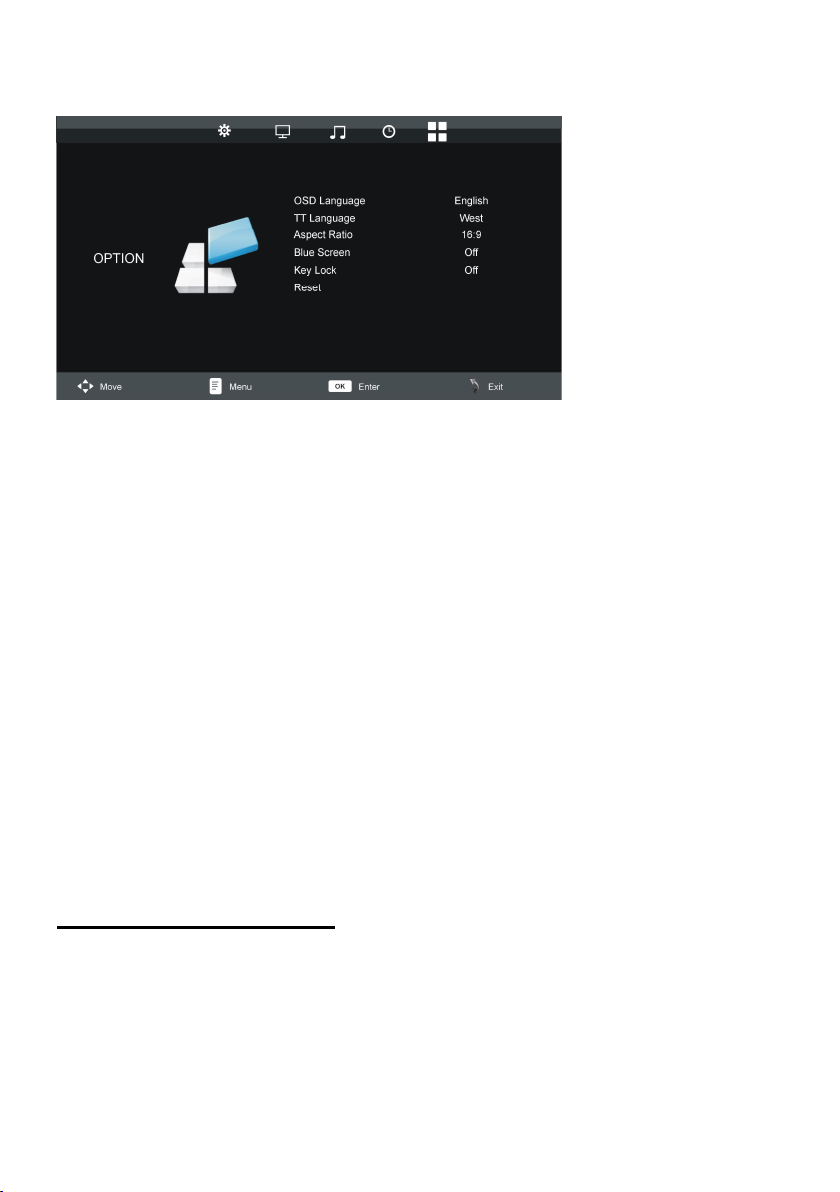
5. OPTIES
5.1 OSD taal
Om de taal van OSD in te stellen.
5.2 Teletekst taal
Om de taal van teletekst in te stellen.
5.3 Beeldverhouding
Beschikbare opties: auto, 4:3, 16:9, Zoom1, Zoom2, PAL+
OPMERKING: dit kan volgens het beschikbaar signaal soms niet instelbaar zijn.
5.4 Blauw scherm
Om de blauwe achtergrond in of uit te schakelen. Het scherm wordt blauw in geval van
geen of een zeer zwak signaal, als deze functie ingeschakeld is.
5.5 Toetsblokkering
Druk op OK om de toetsblokkering in of uit te schakelen.
5.6 Reset
Om de instellingen terug op de fabriekswaarden te brengen.
AV EN OVERIGE MODI
- Druk op de TV/AV toets om de gewenste ingangsbron te selecteren.
- Voor het gebruik van de menu’s BEELD, GELUID, TIJD en OPTIES, refereer naar het
deel betreffende de bediening van de TV.
25
Page 27
PC MODUS
- Schakel de computer en de TV in.
- Sluit de computer aan via een VGA kabel.
- Druk op de TV/AV toets om PC modus te selecteren.
- Druk op MENU om in het hoofdmenu te komen en gebruik de LINKSE/RECHTSE
navigatietoetsen om SCHERM aan te duiden.
- Gebruik UP/DOWN navigatietoetsen om de gewenste optie te kiezen en druk op OK om
in het submenu te gaan.
- Gebruik de LINKSE/RECHTSE navigatietoetsen om de waarde in te stellen.
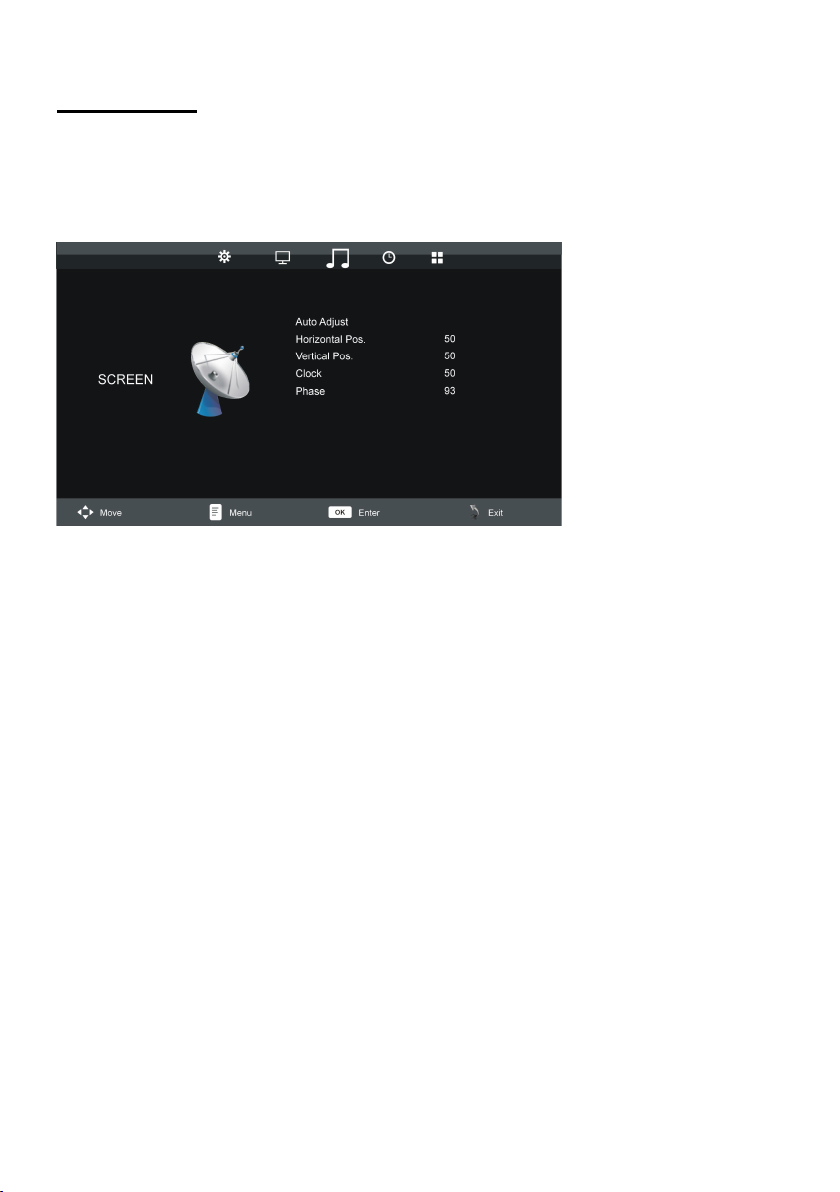
Automatische instelling
Om het scherm automatisch in te stellen.
Horizontale positie
Om de waarde van de horizontale positie in te stellen tussen 0-100.
Verticale positie
Om de waarde van de verticale positie in te stellen tussen 0-100.
Klok
Om de waarde van de klok in te stellen tussen 0-100.
Fase
Om de waarde van de fase in te stellen tussen 0-100.
OPMERKING: het beeld is onstabiel als deze waarde niet goed is ingesteld.
- Voor het gebruik van de menu’s BEELD, GELUID, TIJD en OPTIES, refereer naar het
deel betreffende de bediening van de TV.
26
Page 28
ONDERHOUD
● Schakel het toestel in stand-by en trek de stekker uit het stopcontact alvorens het
toestel te onderhouden.
● Reinig met een droog en zacht doekje.
● Als de behuizing erg vuil is, gebruik een doekje dat ondergedompeld is in een
water/zeep solutie en voldoende is uitgewrongen. Gebruik daarna opnieuw een droog
doekje.
● Gebruik nooit alcohol, benzine, thinner, een reinigingsmiddel of andere
chemicaliën. Gebruik ook geen spuitbus op stof te verwijderen.
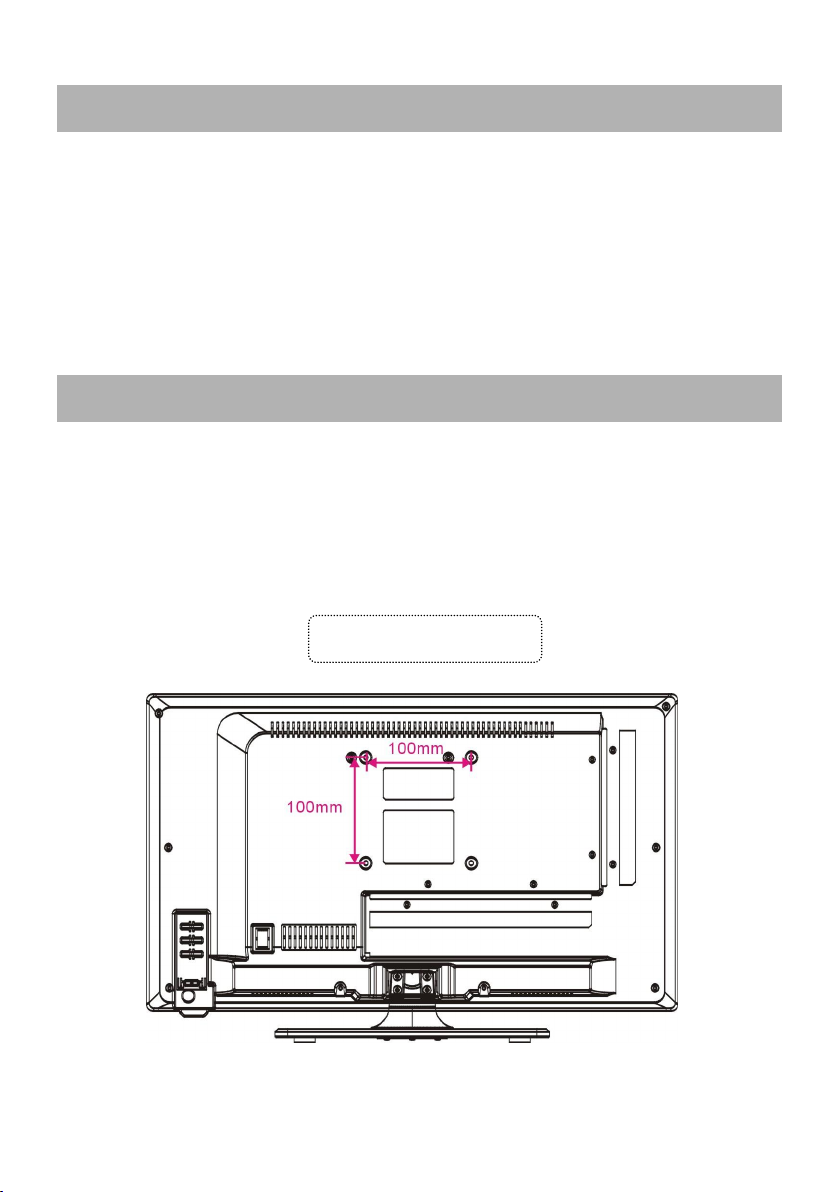
● Contacteer een professionele installateur om de TV aan de muur te bevestigen. Wij zijn
niet verantwoordelijk voor schade aan het toestel of kwetsuren aan uzelf indien u zelf de
TV aan de muur monteert.
● Monteer de TV niet aan de muur terwijl deze aanstaat. Dit kan een elektrische schok
veroorzaken.
● Gebruik standaard M4*10mm schroeven (4 stuks) om de TV te bevestigen.
MONTAGE TEGEN EEN MUUR
Achterzijde van uw TV
27
Page 29

Bij uw toestel wordt een aparte voet meegeleverd. Gelieve de volgende instructies te
volgen voor het monteren van de voet alvorens de TV in gebruik te nemen.
Stap 1
Plaats de TV met het beeld omlaag op een zachte
doek of een kussen om paneelbeschadiging te
voorkomen.
Stap 2
Stem de Steun af op de onderkant van de TV.
Stap 3
Draai de meegeleverde schroeven vast met een
schroevendraaier.
OPMERKING:
- Haal altijd de stekker uit het stopcontact voordat
u de TV steun installeert of verwijdert.
- Vraag anderen om hulp wanneer u de TV steun
installeert of verwijdert.
INSTALLATIE VAN DE VOET
28
Page 30

Scherm 23.6 inch LED TV
Resoutie 1920×1080
Pixelgrootte 0.2715(H)×0.2715(V)mm
Luminantie 250 cd/m2
Contrastverhouding 3000:1
Beeldschermverhouding 16:9
Reactietijd 9 ms
Kijkhoek 176(H)/176(V)
Zichtbaar bereik 521.28(H)×293.22(V)mm
Levensduur 30,000 uur
MULTIMEDIA
WEERGAVE FORMATEN
VOEDING AC adapter (normaal DC 12 V 4A)
VERBRUIK <48W
GEBRUIKSTEMPERATUUR -5°C tot 45°C
AFMETINGEN 551(B) x 175(D) x 356(H) mm
GEWICHT Ongeveer 3.7 Kg
SPECIFICATIES
Film: AVI, MP4, TS, MPG, MKV/MOV, DAT, VOB,
RM/RMVB
Muziek: MP3, AAC
Foto: JPG/JPEG, BMP, PNG
Tekst: TXT
Specificaties kunnen zonder voorafgaande verwittiging
gewijzigd worden.
29
Page 31

Gebruik onderstaande lijst voor het oplossen van mogelijke problemen.
Probleem
(ALGEMEEN)
Geen voeding Stop de stekker stevig in het stopcontact.
Geen beeld Controleer of alles goed is aangesloten.
Geen geluid
Vervormd geluid
Er kunnen geen functies
met de
afstandsbediening
uitgevoerd worden
Geen enkele
toetsbediening (op het
toestel of
afstandbediening) heeft
effect
Probleem (TV) Oplossing
Geen of slecht beeld
Geen of slecht geluid
Ruis of andere storing Naburige elektronische apparatuur veroorzaakt interferentie.
IN GEVAL VAN PROBLEMEN
OPLOSSING
Controleer of alles goed is aangesloten
Controleer of de ingangselectie van de TV en het stereo
systeem overeenkomen.
Regel het volume met de VOL+/VOL- toetsen
Controleer of de batterijen juist zijn aangebracht (polariteit)
Vervang de batterijen
Richt de afstandsbediening naar de infrarood ontvanger van
het toestel
Gebruik de afstandsbediening op geen grotere afstand dan
zes meter
Verwijder voorwerpen tussen de afstandsbediening en het
toestel.
Ontkoppel de stroomadapter en sluit hem terug aan (het
toestel kan mogelijk niet goed werken door bliksem,
statische elektriciteit of andere factoren).
Regel de antenne of gebruik een buitenantenne.
Plaats het toestel naast een raam (in een gebouw)
Verwijder voorwerpen die interferentie kunnen veroorzaken
Voer terug automatisch afstemmen uit
Probeer een andere zender
Controleer de audio instellingen
Druk op MUTE om de geluidsonderdrukking uit te schakelen
Trek de hoofdtelefoon uit het toestel
Verplaats het toestel of de andere apparatuur.
30
Page 32

MANUEL D’INSTRUCTION
Lisez le manuel d’utilisation avant d’utiliser le TV et gardez-le
pour consultation ultérieure.
Page 33

INSTRUCTION IMPORTANTES
INSTRUCTIONS DE SÉCURITÉ
Le signe
d'avertissement
représentant une tête
de flèche dans un
triangle indique que ce
produit contient des
"tensions électriques
dangereuses".
ATTENTION – POUR REDUIRE LES RISQUES D'INCENDIE, DE CHOC
ÉLECTRIQUE OU DE BLESSURE SÉRIEUSE :
●
Si le cordon d’alimentation de l’appareil est endommagé, le faire réparer par le fabricant,
son service après-vente ou une personne de qualification similaire afin d’éviter un
danger.
●
Le cordon d’alimentation doit toujours demeurer aisément accessible.
●
L'appareil ne doit pas être exposé à des égouttements d'eau ou des éclaboussures.
Aucun objet rempli de liquide tel que des vases ne doit être placé sur l'appareil.
●
Laissez toujours une distance minimale de 10 cm autour de l'appareil pour une aération
●
suffisante.
Il convient de ne pas placer sur l'appareil de sources de flammes nues, telles que des
●
bougies allumées.
●
L'appareil est destiné à être utilisé sous un climat tempéré uniquement.
ATTENTION: Danger d'explosion si les piles ne sont pas remplacées correctement.
●
●
Ne remplacer que par des piles du même type ou un type équivalent.
Les piles ne doivent pas être exposées à une chaleur excessive telle que celle du soleil,
●
d'un feu ou d'origine similaire.
●
Différents types de piles ou des piles neuves et usagées ne doivent pas être mélangés.
Les piles doivent être mises en place en respectant la polarité.
●
Si les piles sont usées, elles doivent être enlevées du produit.
●
●
Les piles doivent être mises au rebut de façon sûre. Les déposer dans des bacs de
collecte prévus (renseignez-vous auprès de votre revendeur) afin de protéger
l'environnement.
ATTENTION: POUR EVITER LES
RISQUES D'ELECTROCUTION. NE
PAS RETIRER LE CAPOT (NI
L'ARRIÈRE DE L'APPAREIL).
AUCUNE PIÈCE REMPLAÇABLE
PAR L'UTILISATEUR. VEUILLEZ
CONTACTER LE PERSONNEL
QUALIFIÉ EN CAS DE
DÉFAILLANCE.
Le signe
d'avertissement
représentant une
tête de flèche dans
un triangle indique
que ce point du
manuel nécessite
une attention
particulière.
1
Page 34

ATTENTION - POUR EVITER LES RISQUES DE BLESSURE OU DE
DOMMAGES AU PRODUIT OU AUTRE MATÉRIEL.
Ce produit est destiné à utilisation non commerciale, non industrielle et personnelle
●
uniquement. N'utilisez pas ce produit dans d'autres buts.
●
Ne pas soumettre le produit à des chocs violents, températures extrêmes ou périodes
prolongées à la lumière directe du soleil.
Gardez le produit éloigné des objets magnétiques, moteurs et transformateurs.
●
●
Ne pas utilisez en extérieur sous de mauvaises conditions météorologiques.
Ne pas utiliser la TV en conduisant. Ceci est dangereux et illégal dans certaines régions.
●
UTILISATION ET MANIPULATION DES PILES:
ATTENTION: risque d'explosion si les piles ne sont pas correctement insérées ou
●
remplacées par un modèle non similaire ou compatible.
N'exposez pas les piles à des chaleurs extrêmes en les plaçant au soleil, près d'un feu
●
ou similaire.
●
Différents types de piles, neuves et usagées ne doivent pas être mélangés.
Les piles doivent être insérées dans le respect des polarités.
●
Une pile usagée doit être retirée du produit.
●
●
La batterie doit être mise au rebut de manière sûre. Toujours mettre l'appareil au rebut
dans les points de collecte assignés pour préserver l'environnement (contactez votre
fournisseur).
●
Conservez les piles hors de portée des enfants et animaux. Seuls les adultes sont aptes
à manipuler les piles.
Ne jamais jeter les piles dans le feu ou les exposer à des sources de chaleur.
●
Respectez les instructions de mise au rebut et d'utilisation des piles.
●
Manuel d’instruction……..……………………………………………………………………1
Télécommande………………..………………………………………………………………1
Adaptateur AC…………………………………………………………………………………1
Toutes les illustrations sont pour référence. Les affichages sur l’écran peuvent être
différents.
ACCESSORIES
2
Page 35

SOMMAIRE
COMMENCER
INSTRUCTIONS IMPORTANTES..............................................................................1-2
ACCESSORIES.............................................................................................................2
CARACTERISTIQUES..................................................................................................4
COMMANDES ET CONNEXIONS APPAREIL……....................................................5-6
TELECOMMANDE…..................................................................................................7-8
PREPARATION DE LA TELECOMMANDE...................................................................9
CONNEXTIONS DE BASE.....................................................................................10-13
COMMANDES
OPERATION DE BASE..........................................................................................14-20
MENU PRINCIPAL..................................................................................................21-26
MODE TV............................................................................................................21-25
AV ET AUTRES MODES..........................................................................................25
MODE PC.................................................................................................................26
REFERENCES
ENTRETIEN...........................................................................................................27
MONTAGE AU MUR…………………………………………………………………..……27
INSTALLATION DU PIED……………………………………………………………..……28
SPECIFICATIONS.......................................................................................................29
EN CAS DE PROBLEMES..........................................................................................30
3
Page 36

CARACTERISTIQUES
ECRAN 23.6’’ TFT
Cet appareil possède un écran 23.6’’ TFT pour offrir des images claires avec
radiation minimale.
SYNTONISATION AUTOMATIQUE DES EMETTEURS
FONCTION TELETEXTE
LECTURE USB MULTIMEDIA
AFFICHAGE ECRAN MULTI-LANGUES
TELECOMMANDE MULTI-FONCTIONS
ENTREES CVBS, AUDIO L/R, HDMI, SCART, PC AUDIO, VGA, YPBPR
SORTIES CASQUE
PIED AMOVIBLE
ENTREE ANTENNE
HAUT-PARLEURS INCORPORES
FONCTION REDUCTION DU SOUFFLE
4
Page 37

UNITE PRINCIPALE
COMPOSANTS
1. Ecran TFT
2. Récepteur infrarouges / Indicateur puissance –
en mode standby l’indicateur s’allume en rouge;
quand l’appareil est en fonction l’indicateur
devient bleu
3. Pied
4. VOL+/- Pour augmenter ou diminuer le
volume ou pour bouger gauche/droite
5. CH+/- Pour sélectionner l’émetteur suivant ou
précédent ou pour bouger en haut/en bas
6. MENU – pour entrer dans le menu
7. Bouton TV/AV – sélection d’entrée
8. POWER – pour mettre le TV en/hors fonction
5
Page 38

COMPOSANTS
UNITE PRINCIPALE
1. Connexion alimentation
2. Entrées CVBS et AUDIO L/R
3. Entrée HDMI
4. Entrée SCART
5. Entrée Audio PC
6. Entrée VGA
7. Connexion USB pour lecture multimédia
8. Sortie casque d’écoute
9. Entrée RF – antenne
10. Entrée Y Pb Pr
6
Page 39

TÉLÉCOMMANDE
1. MARCHE/ARRET: Pour mettre l'unité en veille
ou en marche.
2. AUTO: Pour ajuster l'écran automatiquement
(en mode PC/VGA).
3. Bouton ROUGE
4. Bouton VERT
5. Bouton BLEU
6. Bouton JAUNE
7. ASPECT : Appuyez sur ce bouton de manière
répétée jusqu'à obtention du ratio d'image
désiré.
8. TEXTE: Pour afficher le télétexte.
9. FAV : Pour afficher la liste des chaînes
favorites.
10. PAUSE: Pour mettre en pause le télétexte.
11. RÉVÉLER : Pour afficher ou masque le
télétexte.
12. Sous-titres : Pour ouvrir les sous-titres.
13. SOUS-PAGE : Pour entrer dans la sous-page
télétexte.
ZOOM : Pour agrandir ou réduire l'image.
14. TAILLE : Pour modifier la taille du télétexte.
15. SOMMAIRE : Pour afficher le sommaire.
MENU D.: Pour afficher le menu du disque en
cours de lecture.
16.
: Pour mettre en pause ou lire.
17. : Pour avance rapide.
18.
: Pour retour rapide.
19. MÉDIA : Pour entrer directement dans le mode
MÉDIA en mode TV.
20. █ : Pour arrêter la lecture.
21.
: Pour aller au chapitre suivant.
22. : Pour aller au chapitre précédent.
23. Menu : Pour afficher l'écran principal. Appuyez
dessus de nouveau pour revenir à la page
précédente.
24. NICAM : Pour changer de piste son.
25. OK: Pour confirmer la sélection.
7
Page 40

TÉLÉCOMMANDE
26. ▲/▼/◄/►: Bouton de navigation
27. VEILLE : Pour définir la durée de veille.
28. QUITTER : Pour quitter la page.
29. MUET : Pour couper le son.
30. VOL +/- : Pour augmenter ou baisser le
volume.
31. CH+/- : Pour afficher la chaîne
suivante/précédente.
32. AFFICHAGE : Pour afficher les informations
sur le programme actuel.
33. BOUTONS NUMÉRIQUES (0-9) : Pour saisir
des informations numériques, telles que des
numéros de chaîne et autres.
34. -/--: Pour permettre la saisie directe d'un
numéro de chaîne.
35. : Pour revenir à la chaîne ou source
précédente.
36. TV/AV: Pour afficher le menu de source.
37. MODE-P: Pour basculer entre les modes
image.
38. MODE-S : Pour basculer entre les modes
audio.
8
Page 41

PREPARATION DE LA TELECOMMANDE
Fig1 Fig2
INSTALLATION DES PILES
Insérez les piles comme montré dans les illustrations suivantes. Faites attention à la
position + et – comme indiqué dans le compartiment à piles (Fig1).
DUREE DE VIE DES PILES
- Normalement les piles ont une durée de vie d’un an, mais ceci dépend du nombre de fois
que la télécommande est utilisée.
- Quand la télécommande ne fonctionne pas bien, même tout près de l’appareil, il faut
remplacer les piles.
- Utilisez deux piles AAA.
REMARQUE:
●
Ne laissez pas tomber la télécommande ou ne marchez pas au-dessus. Ceci peut
endommager la télécommande et causer des malfonctionnements.
● Enlevez les piles si vous n’utilisez pas la télécommande pendant un certain temps.
UTILISATION DE LA
TELECOMMANDE
Dirigez la télécommande vers le
récepteur de l’appareil sur une distance
maximale de 6 mètres et sous un angle
maximal de 60° (Fig2).
REMARQUES:
- La distance opérationnelle peut
changer selon les circonstances de
lumière dans la chambre.
- Ne pas diriger une forte lumière vers le
récepteur à infrarouges.
- Ne pas placer des objets entre
l’appareil et la télécommande.
- Ne ps utiliser la télécommande
simultanément avec une télécommande
d’un autre appareil.
Pousser
Ouvrir
Pousser
Recpeteur
infrarouges
9
Page 42

Câble courant
● Faites attention que tous les câbles sont déconnectés de l’appareil avant de brancher le
courant secteur.
● Lisez les instructions avant de connecter les autres appareils.
CONNEXIONS DE BASE
CONNEXION COURANT SECTEUR
Appareil
Prise courant
secteur
Adaptateur AC
CONNEXION ANTENNE EXTERIEURE
Connectez l’antenne extérieur pour obtenir une réception optimale.
secteur de
l’amplificateur
antenne
Amplificate
ur antenne
intérieure
Antenne
Amplificate
ur antenne
extérieure
Prise
antenne 75
ohms
10
Page 43

CONNEXION COMPOSITE AV (CVBS)
Câble AV
Pour connexion de base, utilisez le
câble composite Audio L/R
(blanc/rouge) et CVBS (jaune) pour
connexion avec d’autres appareils
CONNEXION COMPOSANTS (YPbPr)
Cable YPbPr
Dos du DVD/VCR
.
Dos du DVD/VCR
Cable audio
11
Page 44

CONNEXION HDMI
Câble HDMI
CONNEXION SCART
Câble SCART
Dos du DVD/VCR
Utilisez un câble HDMI
pour connecter d’autres
appareils et pour recevoir
des signaux multimédia
en haute définition.
Dos du DVD/VCR
12
Page 45

CONNECXION PC/VGA
Utilisez un câble VGA et audio
pour connecter le PC et utiliser
l’appareil comme moniteur.
Dos du PC
CONNEXION CASQUE D’ECOUTE
Câble du casque
d’écoute
CONNEXION USB
Câble audio
Câble
VGA
13
Page 46

ASSUREZ-VOUS QUE TOUS LES APPAREILS ET L’ADAPTATEUR
COURANT SECTEUR SONT BIEN CONNECTES ET QUE L’APPAREIL
EST MIS EN MODE CORRECT AVANT DE COMMENCER LES
OPERATIONS
- Pousez le bouton
(l’indicateur devient bleu); repoussez ce bouton pour mettre l’appareil en mode
standby (l’indicateur devient rouge).
- Poussez le bouton TV/AV sur la télécommande pour choisir le mode TV.
SELECTION DE L’EMETTEUR
1. Poussez CH+ pour aller vers l’émetteur suivant
2. Poussez CH- pour aller vers l’émetteur précédant
3. Utilisez les boutons nuémriques pour choisir directement le numéro de l’émetteur.
REMARQUE : utilisez -/-- quand le numéro comprend plusieurs chiffres
CONTRÔLE VOLUME
Poussez VOL+ ou VOL- pour régler le volume. (Réglage entre 0-100)
MUTE
Poussez MUTE pour couper le son ; repoussez pour reproduire le son.
SELECTION SOURCE D’ENTREE
- Poussez TV/AV pour afficher la liste des sources d’entrées.
- Utilisez les boutons de navigation UP/DOWN pour sélectionner l’entrée et poussez OK
pour confirmer.
Options: TV, AV, YPBPR, HDMI, SCART, PC, Media.
MODE IMAGE
- Poussez P-MODE pour électionner le mode image.
Options : utilisateur, dynamique, standard, doux
MODE SON
- Poussez S-MODE pour sélectionner le mode son.
Options : standard, musique, film, sports, utilisateur
REGLAGE SLEEP TIME
- Poussez SLEEP pour régler le temps sleep.
Options : hors fonction, 10/20/30/60/90/120/180/240 min
OPERATIONS DE BASE
sur la télécommande pour mettre l’appareil en fonction
14
Page 47

FORMAT VIDEO
- Poussez ASPECT pour sélectionner le format vidéo.
Options : auto, 4 :3, 16 :9, Zoom1, Zoom2, PAL+
REMARQUE: le format disponible dépend de la source
REGLAGES SON
- Poussez NICAM pour sélectionner le réglage son.
REMARQUE : selon la source, le bouton NICAM peut avoir différentes options
AFFICHAGE INFORMATION
- Poussez DISPLAY pour afficher des informations de l’émetteur comme numéro,
système couleurs, sytème son, etc
TELETEXTE
Quand télétexte est disponible :
- Poussez TEXT pour afficher le télétexte
- Poussez HOLD pour bloquer une page télétexte
- Poussez INDEX pour aller vers la page index
- Poussez REVEAL pour afficher le texte caché
- Poussez SUBPAGE pour afficher la sous-page
LISTE EMETTEURS PREFERES
- Poussez FAV pour afficher la liste des émetteurs préférés
- Utilisez les boutons UP/DOWN pour sélectionner un
émetteur et poussez OK pour le regarder
SELECTION RAPIDE
- Poussez OK pour afficher la liste des émetteurs.
- Utilisez les boutons UP/DOWN pour sélectionner un
émetteur et poussez OK pour le regarder.
15
Page 48

LECTURE MÉDIA
- Insérez un périphérique de stockage USB dans la prise USB au préalable.
- Appuyez sur TV/AV sur le dessus de l'unité ou sur la télécommande pour basculer en
mode MÉDIA.
- Appuyez sur QUITTER sur la télécommande pour retourner à la page de menu
précédente.
1. PHOTOS
- Appuyez sur Gauche ou Droite pour sélectionner PHOTO.
- Appuyez sur OK pour confirmer puis appuyez sur GAUCHE ou DROITE pour sélectionner
le disque.
- Appuyez sur OK pour confirmer puis appuyez sur les touches de navigation pour
sélectionner le dossier.
- Appuyez sur OK pour confirmer puis appuyez sur les touches de navigation pour
sélectionner le fichier photo.
16
Page 49

- Appuyez sur ROUGE pour afficher une boîte de dialogue, puis utilisez les touches Gauche
ou Droite pour confirmer ou non la suppression.
- Appuyez sur OK pour visualiser la sélection.
En cours de visualisation normale de PHOTO :
- Appuyez sur le bouton DISPLAY sur la télécommande pour afficher ou masquer la barre
d'outils.
- Appuyez sur GAUCHE ou DROITE pour sélectionner option puis sur OK pour confirmer.
- Appuyez sur
- Appuyez sur / pour lire le fichier précédent ou suivant.
- Appuyez sur █ pour arrêter la lecture.
2. MUSIQUE
- Appuyez sur GAUCHE ou DROITE pour sélectionner PHOTO.
- Appuyez sur OK pour confirmer puis appuyez sur GAUCHE ou DROITE pour sélectionner
le disque.
- Appuyez sur OK pour confirmer puis appuyez sur les touches de navigation pour
sélectionner le dossier.
- Appuyez sur OK pour confirmer puis appuyez sur les touches de navigation pour
sélectionner le fichier de musique.
mettre en pause/lancer la lecture.
17
Page 50

- Appuyez sur ROUGE pour afficher une boîte de dialogue, puis utilisez les touches
GAUCHE ou DROITE pour confirmer ou non la suppression.
- Appuyez sur OK pour visualiser la sélection.
En cours d'écoute normale de MUSIQUE :
- Appuyez sur GAUCHE ou DROITE pour sélectionner l'option de la barre d'outils puis sur
OK pour confirmer.
- Appuyez sur
- Appuyez sur / pour avance ou retour rapide.
- Appuyez sur
- Appuyez sur
3. FILM
- Appuyez sur GAUCHE ou DROITE pour sélectionner FILM.
- Appuyez sur ENTRÉE pour confirmer puis appuyez sur GAUCHE ou DROITE pour
sélectionner le disque.
- Appuyez sur OK pour confirmer puis appuyez sur les touches de navigation pour
sélectionner le dossier.
- Appuyez sur OK pour confirmer puis appuyez sur les touches de navigation pour
sélectionner le fichier vidéo.
mettre en pause/lancer la lecture.
/ pour lire le fichier précédent ou suivant.
█
pour arrêter la lecture.
18
Page 51

- Appuyez sur ROUGE pour afficher une boîte de dialogue, puis utilisez les touches
GAUCHE ou DROITE pour confirmer ou non la suppression.
- Appuyez sur OK pour visualiser la sélection.
En cours de visualisation normale de FILM :
- Appuyez sur le bouton DISPLAY sur la télécommande pour afficher ou masquer la barre
d'outils.
- Appuyez sur GAUCHE ou DROITE pour sélectionner l'option de la barre d'outils puis sur
OK pour confirmer.
- Appuyez sur
- Appuyez sur / pour avance ou retour rapide.
- Appuyez sur
- Appuyez sur
mettre en pause/lancer la lecture.
/ pour lire le fichier précédent ou suivant.
█
pour arrêter la lecture.
19
Page 52

4. TEXTE
- Appuyez sur GAUCHE ou DROITE pour sélectionner TEXTE.
- Appuyez sur OK pour confirmer puis appuyez sur GAUCHE ou DROITE pour sélectionner
le disque.
- Appuyez sur OK pour confirmer puis appuyez sur les touches de navigation pour
sélectionner le dossier.
- Appuyez sur OK pour confirmer puis appuyez sur les touches de navigation pour
sélectionner le fichier texte.
- Appuyez sur ROUGE pour afficher une boîte de dialogue, puis utilisez les touches
GAUCHE ou DROITE pour confirmer ou non la suppression.
- Appuyez sur OK pour visualiser la sélection.
En cours de visualisation normale de TEXTE :
- Appuyez sur le bouton DISPLAY sur la télécommande pour afficher ou masquer la barre
d'outils.
- Appuyez sur GAUCHE ou DROITE pour sélectionner l'option de la barre d'outils puis sur
OK pour confirmer.
- Appuyez sur
- Appuyez sur / pour lire le fichier précédent ou suivant.
- Appuyez sur █ pour arrêter la lecture.
REMARQUE : pour pouvoir lire vos fichiers multimédia, assurez-vous d'avoir sélectionné
l'icône correcte dans le menu principal de LECTURE MULTIMÉDIA. Par exemple, vous ne
pourrez visualiser les photos que dans le menu PHOTO, les fichiers musicaux dans le
menu MUSIQUE, etc.
/ pour afficher la page précédente ou suivante.
20
Page 53

● L’appareil contient différents menus de réglages. Une fois que la programmation initiale
est faite, les valeurs sont mémorisées jusqu’au moment où vous les changez. Ainsi
l’appareil fonctionne toujours sous les même conditions.
● Le réglages restent en mémoire même si l’appareil est mis en standby.
MENU PRINCIPAL
Procédure commune pour les réglages initials
- Poussez MENU pour afficher le menu principal
- Utilisez les boutons de navigation GAUCHE/DROITE pour sélectionner les sous-menus
- Utilisez les boutons de navigation UP/DOWN pour sélectionner l’option que vous voulez
régler.
- Poussez OK ou DROITE pour entrer dans le sous-menu.
- Utilisez les boutons de navigation pour faire les réglages et poussez ok pour confirmer.
- Poussez MENU pour aller vers le menu précédant
- Poussez EXIT pour quitter le menu.
MODE TV
- Poussez le bouton TV/AV pour mettre l’appareil en mode TV.
1. EMETTEURS
1.1 Syntonisation autoimatique
- Poussez UP ou DOWN pour sélectionner cet item et poussez OK pour démarrer la
syntonisation automatique.
21
Page 54

1.2 Syntonisation manuelle
- Poussez UP/DOWN pour sélectionner cet item et
poussez OK pour y entrer.
- Utilisez les boutons GAUCHE/DROITE pour faire
le réglage.
1.3 Liste des émetteurs (Program edit)
- Poussez UP/DOWN pour sélectionner cet item et
poussez OK pour y entrer.
- Poussez le bouton ROUGE pour affacer l’émetteur.
- Poussez le bouton VERT pour alle dans le mode pour
renommer l’émetteur. Ensuite utilisez les boutons
UP/DOWN pour changer la valeur. Utilisez les boutons
GAUCHE/DROITE pour déplacer le curseur.
- Poussez le bouton JAUNE pour déplacer les émetteurs.
Utilisez les boutons UP/DOWN pour marquer la place
voulue et pousez le bouton JAUNE pour déplacer
l’émetteur.
- Poussez le bouton BLEU pour sauter l’émetteur.
- Poussez FAV pour marquer l’émetteur comme émetteur
préféré ou poussez FAV pour en refaire un émetteur
normal.
2. IMAGE
22
Page 55

2.1 Mode image
Options : utilisateur, dynamique, standard, doux.
REMARQUE : le contraste, la luminosité, la couleur, la teinte et la netteté peuvent
uniquement être réglés quand vous avez choisi « utilisateur ».
2.2 Contraste
La valeur peut être réglée entre 0-100.
2.3 Luminosité
La valeur peut être réglée entre 0-100.
2.4 Couleurs
La valeur peut être réglée entre 0-100.
2.5 Teinte
La valeur peut être réglée entre 0-100
REMARQUE : ceci est uniquement disponible en système NTSC.
2.6 Netteté
La valeur peut être réglée entre 0-100.
2.7 Température couleurs
Pour régler la température couleurs selon votre choix.
Options : médium, froid, chaud.
2.8 Réduction du souffle
Options : hors fonction, bas, moyen, haut.
3. SON
23
Page 56

3.1 Mode son
Options : standard, musique, film, sports, utilisateur
REMARQUE : les graves et aigües peuvent être réglés quand vous avez chois
« utilisateur ».
3.2 Aigües
La valeur peut être réglée entre 0-100.
3.3 Graves
La valeur peut être réglée entre 0-100.
3.4 Balance
Pour régler la balance entre les haut-parleurs gauche et droite entre -50 à 50.
3.5 Volume automatique
Pour mettre le volume automatique en/hors fonction.
4. TEMPS
4.1 Sleep timer
Pour régler le temps après lequel l’appareil doit se mettre automatiquement en standby
Options : hors fonction, 10/20/30/60/120/180/240 min.
4.2 Auto Standby
Pour régler la durée de standby automatique
Options : hors fonction, 3/4/5 heures.
4.3 Temps OSD
Pour régler la durée d’affichage OSD sur l’écran
Options : 5/10/15/20/25/30 sec.
24
Page 57

5. OPTIONS
5.1 Langue OSD
Pour choisir la langue du OSD.
5.2 Langue télétexte
Pour choisir la langue du télétexte.
5.3 Format écran
Options : auto, 4 :3, 16 :9, Zoom1, Zzom2, PAL+
REMARQUE : pas disponible quand il n’y a pas de signal.
5.4 Ecran bleu
Pour mettre la fonction écran bleu en ou hors fonction. L’écran bleu apparaît en cas d’un
signal faible ou pas de signal, quand cette option est en fonction.
5.5 Bloquage boutons
Poussez OK pour mettre en/hors fonction.
5.6 Reset
Pour remettre les réglages sur la valeur d’usine.
AV ET AUTRES MODES
- Poussez le bouton TV/AV pour sélectionner la source désirée.
- Pour les réglages IMAGE, SON, TEMPS et OPTIONS, référez-vous à la section TV de ce
manuel.
25
Page 58

MODE PC
- Mettez en fonction le TV et le PC.
- Connectez le PC au TV par un câble VGA.
- Poussez le bouton TV/AV pour sélectionner mode PC.
- Poussez le bouton MENU pour entrer dans le menu principal et utilisez les boutons de
navigation GAUCHE/DROITE pour sélectionner ECRAN.
- Utilisez les boutons UP/DOWN pour sélectionner l’option voulue et poussez OK pour enter
dans les sous-menu.
- Utilisez les boutons GAUCE/DROITE pour effectuer le réglage.
Réglage automatique
Pour effectuer un réglage automatique de l’écran.
Position horizontale
La valeur de la position horizontale peut être réglé entre 0-100.
Position verticale
La valeur de la position verticale peut être réglé entre 0-100.
Montre
La valeur de la montre peut être réglé entre 0-100.
Phase
La valeur de la phase peut être réglé entre 0-100.
REMARQUE : image non stable si la phase n’a pas bien été réglée
- Pour les réglages IMAGE, SON, TEMPS et OPTIONS, référez-vous à la section TV de ce
manuel.
26
Page 59

●
Vérifiez que l’appareil a été mis en standby et que la prise courant secteur à été retirée
avant de nettoyer l’appareil.
Utilisez un chiffon doux et sec.
●
●
Si la surface est très sale, utilisez un chiffon trempé dans une mélange eau-savon et
repassez par après avec un chiffon doux.
Ne jamais utiliser l’alcohol, essence, thinner, liquides de nettoyage ou autres produits
●
chimiques. Ne pas utiliser des aérosols pour enlever la poussière.
ENTRETIEN
● Contactez un professionnel quand vous voules monter l’appareil au mur. Nous ne
sommes pas responsables pour les endommagements à l’appareil ou pour des blessures si
vous montez vous-même l’appareil au mur.
● Ne pas monter le TV au mur pendant qu’il est en fonction. Ceci peut causer des chocs
électriques.
● Utlisez les vis standard M4*10mm (4 pièces) pour monter le TV.
MONTAGE AU MUR
Vue arrière de votre TV
27
Page 60

Votre TV est livré avec un pied séparé. Avant d’utiliser le TV montez le pied en suivant les
instructions ci-dessous..
Étape 1
Posez la TV à plat, écran tourné vers le bas, sur
un tissu doux ou coussin, pour éviter de
l'endommager.
Étape 2
Alignez le bas de la TV avec l'extrémité du
support, jusqu'à ce que la TV soit totalement
installée.
Étape 3
Serrez les vis fournies à l'aide d'un tournevis.
REMARQUE :
- Débranchez la TV de la prise secteur lors de
l'installation ou du retrait du socle de la TV.
- Contactez l'un de nos partenaires pour en savoir
plus sur comment installer et retirer le socle de la
TV.
INSTALLATION DU PIED
28
Page 61

SPECIFICATIONS
Ecran 23.6 pouces LED
Résolution
Dimensions pixels
Luminance
Contraste
Format écran
Temps de réponse
Angle de vue
Ecran visible
Durée de vie 30.000 heures
FORMAT DE LECTURE
MULTIMEDIA USB
ALIMENTATION Adaptateur AC (normal DC 12 V 4A)
CONSOMMATION < 48 W
TEMPERATUR
D’OPERATION
DIMENSIONS 551(L) x 175(P) x 356(H) mm
POIDS Environ 3.7 Kg
1920×1080
0.2715(H)×0.2715(V)mm
250 cd/m2
3000:1
16:9
9 ms
176(H)/176(V)
521.28(H)×293.22(V)mm
Film: AVI, MP4, TS, MPG, MKV/MOV, DAT, VOB,
RM/RMVB
Musique: AAC
Photos: JPG/JPEG, BMP, PNG
Texte: TXT
-5°C – 45° C
Les spécifications peuvent être changées sans préavis.
29
Page 62

Consultez la liste ci-dessous en cas de problèmes :
Problème (GENERAL)
Pas de puissance Vérifiez que l’adaptateur est bien connecté
Pas d’image Vérifiez que tous les appareils sont bien connectés
● Pas de son
● Distorsion dans le
son
Aucune opération peut
être commandée par la
trélécommande
Aucun bouton (ni de
l’appareil ni de la
télécommande) est
effectif
Problèmes (TV) Solution
Pas d’image ou
mauvaise image
Pas de son ou son faible
Souffle ou autres
interférences
EN CAS DE PROBLEMES
Solution
● Vérifiez que tous les appareils sont bien connectés
● Vérifier que le réglage d’entrée du TV correspond avec le
système stéreo
● Réglez le volume avec les boutons VOL+/VOL-
● Contrôlez la polarité des piles dans la télécommande
● Replacez les piles
● Dirigez la télécommande vers le récepteur infrarouges de
l’appareil
● Ne pas utiliser la télécommande sur une plus grande
distance de 6 mètres
● Enlevez les objets qui se trouvent entre l’appareil et la
télécommande
Déconnectez l’adaptateur et reconnectez le. (L’appareil ne
peut pas fonctionner à cause d’éclairs, élecricité statique ou
autres facteurs)
● Réglez l’antenne ou utilisez une antenne extérieure
● Placez l’appareil à côté d’une fenêtre
● Déplacez les objets qui peuvent causer des interférences
● Refaite la syntonisation automatique
● Essayez un autre émetteur
● Contrôlez les réglages audio
● Poussez MUTE pour annuler la fonction mute
● Déconnectez le casque d’écoute
Des appareils électroniques à côté de l’appareil causent des
interférences. Déplacez les appareils ou le TV.
30
Page 63

INSTRUCTION MANUAL
Read all of the instructions before using this TV and keep the
instruction manual in a safe place for future reference.
Page 64

SAFETY INSTRUCTIONS
De bliksemschicht met
pijl in de driehoek is een
waarschuwingsteken
dat u attent maakt op
“gevaarlijke spanning”
binnenin het product.
IMPORTANT INSTRUCTIONS
VOORZICHTIG: OM HET RISICO OP
EEN ELEKTRISCHE SCHOK TE
VERMINDEREN DIENT U HET
DEKSEL (OF DE ACHTERKANT)
NIET TE VERWIJDEREN. ER
BEVINDEN ZICH BINNENIN GEEN
DOOR DE GEBUIKER TE
REPAREREN ONDERDELEN. LAAT
DE SERVICE OVER AAN BEVOEGD
PERSONEEL.
triangle is a warning
sign alerting you of
The exclamation
point within the
important
instructions
accompanying the
product.
WARNING – TO REDUCE THE RISK OF FIRE, ELECTRIC SHOCK, OR
SERIOUS PERSONAL INJURY:
●
If the cord is damaged, have it repaired by the manufacturer, its service or a similarly
qualified person in order to avoid any hazard.
●
The cord should always be readily accessible.
●
The apparatus shall not be exposed to dripping or splashing of water or liquids and that
no objects filled with liquids such as flowers vases shall be placed on the product.
The normal ventilation of the product shall not be impended for intended use.
●
●
Always leave a minimum distance of 10 cm around the unit to ensure sufficient
ventilation.
Naked flame sources, such as candles, should not be placed on top of the device.
●
The device is intended for use only in a temperate climate.
●
●
Situate this product away from heat sources such as radiators, heat registers, stoves, or
other appliances (including amplifiers) that produce heat.
●
Clean the product only as recommended by the manufacturer (see “Maintenance”
section for details). Unplug the power plug from the wall outlet before cleaning,
Unplug the power plug from the wall outlet when left unused for an extended period.
●
●
Prevent objects/liquids from falling or spilled on the product.
Operate the product only with the supplied power cord. Route power cords so they are
●
not likely to be walked on or pinched by items placed upon or against them, paying
particular attention to plugs, convenience receptacles, and the point where they exit from
the product.
Where the MAINS plug or an appliance coupler is used as the disconnect device, the
●
disconnect device shall remain readily operable.
1
Page 65

●
Do not operate this product under the following conditions.
- When the power-supply cord or plug is damaged.
- If liquid has been spilled into or objects have fallen into the product.
- If the product has been exposed to rain or water.
- If the product does not operate when used according to the operating instructions.
- If the product has been dropped or damaged in any way.
Do not attempt to service the product; take it to the electronics repair shop of your choice
●
for any servicing or repair.
●
Do not overload wall outlets, extension cords, or integral convenience receptacles.
Connect this product to the power outlet which has protective earth connection.
●
CAUTION- TO REDUCE THE RISK OR PERSONAL INJURY OR
PRODUCT/PROPERTY DAMAGE:
This product is intended solely for non-commercial, non-industrial, personal use as a
●
television. Do not use this product for any other purpose.
Do not subject the product to violent shocks, extreme temperatures, or lengthy periods of
●
direct sunlight.
Keep the product away from magnetic objects, motors, and transformers.
●
●
Do not use outdoors in inclement weather.
Do not use the TV while driving; this is dangerous and is illegal in some areas.
●
BATTERY HANDLING AND USAGE:
CAUTION: Danger of explosion if battery is incorrectly replaced or not replaced by the
●
same type or equivalent.
●
The battery should not be exposed to excessive heat such as sunshine, fire or similar.
Different types of batteries, new and used batteries should not be mixed.
●
●
The battery must be installed according to the polarity.
●
If the battery is worn, it must be removed from the product.
The battery must be disposed of safely. Always use the collection bins provided (check
●
with your dealer) to protect the environment.
●
Keep batteries away from children and pets. Only adults should handle batteries.
●
Never throw batteries into a fire or expose them to fire or other heat sources.
Follow the battery safety and usage instructions.
●
2
Page 66

Instruction Manual……………………………………………………………………………1
Remote Control……………..…………………………………………………………………1
AC Adaptor…………………………………………………………………………………….1
All the pictures in this manual are just for your reference, appearance and display
should subject to the final product.
ACCESSORIES
TABLE OF CONTENTS
GETTING STARTED
IMPORTANT INSTRUCTIONS...................................................................................1-2
ACCESSORIES.............................................................................................................3
FEATURES....................................................................................................................4
GENERAL PARTS......................................................................................................5-6
REMOTE CONTROL..................................................................................................7-8
REMOTE CONTROL PREPARATION.........................................................................9
BASIC CONNECTION............................................................................................10-13
OPERATIONS
BASIC OPERATIONS.............................................................................................14-20
MAIN MENU...........................................................................................................21-26
TV MODE............................................................................................................21-25
AV AND OTHER MODES.........................................................................................25
PC MODE.................................................................................................................26
FOR REFERENCE
MAINTENANCE...........................................................................................................27
WALL MOUNTING……………………………………………………………………..……27
STAND INSTALLATION………………………………………………………………..……28
SPECIFICATIONS.......................................................................................................29
TROUBLESHOOTING............................................................................................30
3
Page 67

FEATURES
23.6" TFT DISPLAY
This player has a built-in 23.6” TFT display window to provide clear vision and low
radiation.
SUPPORT AUTO TV SCANNING
SUPPORT TELETEXT (EUROPE) FUNCTION
SUPPORT USB MULTIMEDIA PLAYBACK
SUPPORT MULTI-LANGUAGES ON SCREEN DISPLAY
SUPPORT FULL FUNCTION REMOTE CONTROL
SUPPORT CVBS, AUDIO R/L, HDMI, SCART, PC AUDIO, VGA AND YPBPR INPUT
SUPPORT EARPHONE OUTPUT
WITH DETACHABLE STAND HOLDER
WITH EXTERNAL ANTENNA JACK
WITH BUILT-IN SPEAKERS
WITH NOISE REDUCTION FUNCTION
4
Page 68

MAIN UNIT
GENERAL PARTS
1. TFT display screen
2. Remote control sensor \ Power indicator- In
standby mode the indicator light will display red color;
when switching on the unit the indicator light will
display blue color.
3. Stand holder
4. VOL +/- button- To increase/decrease the volume
level or move left/right.
5. CH +/- button- To select next/previous channel or
move up/down.
6. MENU button- To enter menu setting page.
7. TV/AV button- To select the input source.
8. POWER button - To switch ON/OFF the TV.
5
Page 69

GENERAL PARTS
MAIN UNIT
1. Power input
2. CVBS and AUDIO L/R input terminals
3. HDMI input terminal
4. SCART input terminal
5. PC AUDIO input terminal
6. VGA input terminal
7. USB slot - For multimedia playback.
8. EARPHONE output terminal
9. RF input jack – To connect the antenna.
10. Y / Pb / Pr input terminals
6
Page 70

REMOTE CONTROL
1. POWER: To set the unit in standby mode; press
it again to switch it on.
2. AUTO: To adjust the screen automatically
(PC/VGA).
3. RED button
4. GREEN button
5. BLUE button
6. YELLOW button
7. ASPECT: Press this button repeatedly to select
desired aspect ratio of screen.
8. TEXT: To display the TELETEXT.
9. FAV: To display the favorite channel list.
10. HOLD: To hold the TELETEXT.
11. REVEAL: To hide TELETEXT, or display
hidden characters.
12. SUBTITLE: To display the available subtitle.
13. SUBPAGE: To enter the sub-page of
TELETEXT.
14. SIZE: To switch TELETEXT size.
15. INDEX: To display the index.
: To play or pause playing.
16.
: To move fast forward.
17.
18. : To move fast backward.
19. MEDIA: To enter Media mode directly.
20. █ : To stop playing.
: To play next chapter.
21.
22. : To play previous chapter.
23. MENU: To display the main menu. Press it
again to return to previous menu page.
24. NICAM: To switch the soundtrack.
25. OK: To confirm selection.
7
Page 71

REMOTE CONTROL
26. ▲/▼/◄/►: Navigation buttons
27. SLEEP: To set the sleep time as desired.
28. EXIT: To exit menu page.
29. MUTE: To mute the sound.
30. VOL +/-: To turn up/down the volume.
31. CH+/-: To play the next/previous channel.
32. DISPLAY: To display information of current
program.
33. NUMBERIC BUTTONS (0-9): To input the
number information, such as channel number
and so on.
34. -/--: To switch the digit when selecting desired
channel.
35.
36. TV/AV: To display the input source list.
37. P-MODE: To switch the picture mode.
38. S-MODE: To switch the sound mode.
: To return to previous channel or input
source.
8
Page 72

REMOTE CONTROL PREPARATION
Fig1
Fig2
BATTERY INSTALLATION
Install the batteries as the following pictures. Be sure + and – terminals are positioned
as indicated in the battery compartment (Fig1).
SERVICE LIFE OF BATTERIES
- The batteries normally last for one year although this depends on how often the
remote control is used.
- If the remote control fails to work even when it is operated near the player, replace the
batteries.
- Use two size AAA dry batteries.
NOTE:
● Do not drop, step on or otherwise impact the remote control. This may damage the
parts or lead to malfunction.
● If the remote control is not going to be used for a long time, remove the batteries.
REMOTE CONTROL
OPERATION
Point the remote control from no more
than about 6m from the remote control
sensor and within about 60°of the
front of the player (Fig2).
NOTES:
- The operating distance may vary
according to the brightness of the
room.
- Do not point bright light at remote
control sensor.
- Do not place objects between the
remote control and the remote control
sensor.
- Do not use this remote control while
simultaneously operating the remote
control of any other equipments.
Push
Open
Press
Remote Control
Sensor
9
Page 73

● Ensure all the cables are disconnected from the main unit before connecting to AC
power source.
● Read through the instructions before connecting other equipments.
BASIC CONNECTION
CONNECTING TO AC POWER SOURCE
Main unit
To power
outlet
AC Adaptor
CONNECT EXTERNAL ANTENNA TO UNIT
Install external antenna into antenna jack for best picture.
Antenna
Power plug
of antenna
amplifier
Indoor
antenna
amplifier
Outdoor
antenna
amplifier
75 OHM
antenna
plug
10
Page 74

COMPOSITE AV (CVBS) CONNECTION
unit with other devices.
AV cable
For basic connection, use the
composite Audio L/R (white/red) and
CVBS (yellow) cable to connect the
COMPONENT (YPbPr) CONNECTION
YPbPr cable
Back of DVD/VCR
Back of DVD/VCR
AUDIO cable
11
Page 75

HDMI CONNECTION
HDMI cable
SCART CONNECTION
Use HDMI cable to connect
the unit with other devices to
receive high-definition
multimedia signal.
Back of DVD/VCR
SCART cable
Back of DVD/VCR
12
Page 76

PC/VGA CONNECTION
Use VGA cable and Audio
cable to connect the unit with
TV or PC, and use this product
as a monitor.
Back of PC
CONNECT EARPHONE TO THE UNIT
USB CONNECTION
Audio cable
VGA cable
EARPHONE cable
13
Page 77

MAKE SURE ALL THE EQUIPMENTS AND AC ADAPTOR ARE
CONNECTED PROPERLY AND THE UNIT IS SET IN CORRECT MODE
- Press
glow blue); press it again to power OFF (standby mode) the unit (indicator will glow
red).
- Press TV/AV button on the unit or remote control to set the unit in TV mode.
button on the unit or remote control to power ON the unit (indicator will
SELECT DESIRED PROGRAM
1. Press CH+ button to play next channel.
2. Press CH- button to play previous channel.
3. Press number buttons on remote control directly to select desired program.
NOTE: Press -/-- button repeatedly to switch the digit when selecting multiple digit
channels.
VOLUME CONTROL
- Press VOL+ or VOL- to adjust the level of current volume.
Available range: 0-100.
MUTE CONTROL
- Press MUTE button to mute the sound, press it again to turn on the sound.
INPUT SOURCE SELECTION
- Press TV/AV button on the unit or remote control to display the sources list.
- Press UP or DOWN navigation button to select desired input source, and then press OK
button to confirm selection.
Available options: TV, AV, YPBPR, HDMI, SCART, PC, Media.
PICTURE MODE
- Press P-MODE button on remote control repeatedly to select desired PICTURE mode
directly.
Available options: User, Dynamic, Standard, Mild.
SOUND MODE
- Press S-MODE button on remote control repeatedly to select SOUND mode directly.
Available options: Standard, Music, Movie, Sports, User.
SLEEP TIME SETTING
- Press SLEEP button on remote control repeatedly to select SLEEP TIME directly.
Available options: Off, 10min, 20min, 30min, 60min, 90min, 120min, 180min, 240min.
BEFORE KINDS OF OPERATIONS.
BASIC OPERATIONS
14
Page 78

VIDEO SIZE SETTING
- Press ASPECT button on remote control repeatedly to select VIDEO SIZE directly.
Available options: Auto, 4:3, 16:9, Zoom1, Zoom2, PAL+.
NOTE: The available video size may be different for different input source.
SOUND SETTING
- Press NICAM button on remote control repeatedly to select desired soundtrack.
NOTE: In different channels, pressing NICAM button may have different options.
INFORMATION DISPLAY
- Press DISPLAY button on remote control to display related information of your channel,
including channel number, color system, sound system and so on.
TELETEXT
When displaying available teletext:
- Press TEXT button on remote control to display the teletext.
- Press HOLD button on remote control to hold the teletext.
- Press INDEX button on remote control to display the index.
- Press SIZE button on remote control repeatedly to switch teletext size.
- Press REVEAL button on remote control to hide or display hidden characters.
- Press SUBPAGE button on remote control to enter subpage.
FAVORITE LIST
- Press FAV button on remote control to display the Favorite
List.
- Press UP/DOWN navigation button to select a favorite
channel, and press OK button to watch it.
QUICK SELECTION
- Press OK button on remote control to display the Channel
List.
- Press UP/DOWN navigation button to select a channel, and
press OK button to watch it.
15
Page 79

MEDIA PLAYBACK
- Insert a USB memory device into USB slot.
- Press TV/AV button on the unit or remote control to switch this unit to Media mode.
- Press EXIT button on remote control to return to previous menu page.
1. PHOTO
- Press LEFT or RIGHT navigation button to select PHOTO item.
- Press OK button to enter it and press LEFT or RIGHT navigation button to select desired
disk.
- Press OK button to enter it and press navigation buttons to select desired folder.
- Press OK button to enter it and press navigation buttons to select desired Photo file.
16
Page 80

- Press RED button to enter a dialog box, and press LEFT or RIGHT navigation button to
decide whether delete it or not.
- Press OK button to play highlighted file.
During PHOTO normal playing:
- Press DISPLAY button on remote control to display/hide the tool bar.
- Press LEFT/RIGHT navigation buttons to select desired option and press OK button to
confirm it.
- Press
- Press / button to play previous/next file.
- Press █ button to stop playing.
2. MUSIC
- Press LEFT or RIGHT navigation button to select MUSIC item.
- Press OK button to enter it and press LEFT or RIGHT navigation button to select desired
disk.
- Press OK button to enter it and press navigation buttons to select desired folder.
- Press OK button to enter it and press navigation buttons to select desired Music file.
button to pause/start playing.
17
Page 81

- Press RED button to enter a dialog box, and press LEFT or RIGHT navigation button to
decide whether delete it or not.
- Press OK button to play highlighted file.
During MUSIC normal playing:
- Press LEFT or RIGHT navigation button to select desired option in the tool bar, and press
OK button to confirm selection.
- Press
- Press / button to play fast backward / fast forward.
- Press
- Press █ button to stop playing.
3. MOVIE
- Press LEFT or RIGHT navigation button to select MOVIE item.
- Press OK button to enter it and press LEFT or RIGHT navigation button to select desired
disk.
- Press OK button to enter it and press navigation buttons to select desired folder.
- Press OK button to enter it and press navigation buttons to select desired Movie file.
button to pause/start playing.
/ button to play previous/next file.
18
Page 82

- Press RED button to enter a dialog box, and press LEFT or RIGHT navigation button to
decide whether delete it or not.
- Press OK button to play highlighted file.
During MOVIE normal playing:
- Press DISPLAY button on remote control to display/hide the tool bar.
- Press LEFT or RIGHT navigation button to select desired option in the tool bar, and press
OK button to confirm selection.
- Press
- Press / button to play fast backward / fast forward.
- Press / button to play previous/next file.
- Press █ button to stop playing.
button to pause/start playing.
19
Page 83

4. TEXT
- Press LEFT or RIGHT navigation button to select TEXT item.
- Press OK button to enter it and press LEFT or RIGHT navigation button to select desired
disk.
- Press OK button to enter it and press navigation buttons to select desired folder.
- Press OK button to enter it and press navigation buttons to select desired Text file.
- Press RED button to enter a dialog box, and press LEFT or RIGHT navigation button to
decide whether delete it or not.
- Press OK button to play highlighted file.
During TEXT normal playing:
- Press DISPLAY button on remote control to display/hide the tool bar.
- Press LEFT or RIGHT navigation button to select desired option in the tool bar, and press
OK button to confirm selection.
- Press
- Press / button to play previous/next file.
- Press █ button to stop playing.
NOTE: To play your multimedia files, make sure you have selected correct icon in the main
menu of MEDIA PLAYBACK. That is to say, you can only play Photo files in PHOTO item,
music files in MUSIC item and so on.
/ button to play previous/next page.
20
Page 84

● The unit contains different setting menus. Once the initial programming is entered, it will
be remained in the memory until change, and the unit can always be operated under the
same conditions.
● The settings will be remained in the memory until the settings are changed ever after
setting the player to standby mode.
Common procedure for initial settings
- Press MENU button on remote control to display the main menu.
- Press LEFT/RIGHT navigation button to select submenus.
- Press UP/DOWN navigation button to select the option that you want to adjust.
- Press OK or RIGHT navigation button to enter submenu page.
- Press navigation buttons to select/adjust option to desired value. Then press OK button to
confirm selection.
- Press MENU button to return to previous menu page.
- Press EXIT button to exit menu page.
MAIN MENU
TV MODE
- Press TV/AV button on the unit or remote control to switch this unit to TV mode.
1. CHANNEL
1.1 Auto Tuning
- Press UP or DOWN navigation button to select this item, and then press OK button to start
auto channel tuning.
21
Page 85

1.2 ATV Manual Tuning
- Press UP or DOWN navigation button to select this
item, and press OK button to enter it.
- Press UP or DOWN navigation button to select the
second option.
- Press LEFT or RIGHT navigation button to adjust
it.
1.3 Programme Edit
- Press UP or DOWN navigation button to select this
item, and press OK button to enter it.
- Press RED button to delete highlighted channel.
- Press GREEN button to enter Rename mode. Then
press UP/DOWN navigation button to adjust the value;
press LEFT/RIGHT navigation button to move the cursor.
- Press YELLOW button to enter Move mode. Then press
UP/DOWN navigation button to select desired position
and press YELLOW button again to move it.
- Press BLUE button to skip current channel.
- Press FAV button to set current channel as a favorite
channel, and press FAV button again to set it as a normal
channel.
2. PICTURE
22
Page 86

2.1 Picture Mode
Available options: User, Dynamic, Standard, Mild.
NOTE: The value of Contrast, Brightness, Colour, Tint and Sharpness is adjustable only
when Picture Mode is User.
2.2 Contrast
The value of contrast can be adjusted from 0-100.
2.3 Brightness
The value of brightness can be adjusted from 0-100.
2.4 Color
The value of color saturation can be adjusted from 0-100.
2.5 Tint
The value of tint can be adjusted from 0-100.
NOTE: This item is available only in NTSC system.
2.6 Sharpness
The value of sharpness can be adjusted from 0-100.
2.7 Color Temperature
This item is used to adjust the optimum color temperature for suitable viewing.
Available options: Medium, Cool, Warm.
2.8 Noise Reduction
Available options: Off, Low, Middle, High.
3. SOUND
23
Page 87

3.1 Sound Mode
Available options: Standard, Music, Movie, Sports, User.
NOTE: The value of Treble and Brass is adjustable only when Sound Mode is User.
3.2 Treble
This item is used to adjust the level of higher-pitched sounds from 0-100.
3.3 Bass
This item is used to adjust the level of lower-pitched sounds from 0-100.
3.4 Balance
This item is used to adjust the audio output between left and right speakers from -50 to 50.
3.5 Auto Volume
This item is used to turn on/off Auto Volume function.
4. TIME
4.1 Sleep Timer
This item is used to set the automatic sleep time in standby mode.
Available options: Off, 10min, 20min, 30min, 60min, 90min, 120min, 180min, 240min.
4.2 Auto Standby
This item is used to set the auto standby duration.
Available options: Off, 3H, 4H, 5H.
4.3 OSD Timer
This item is used to set the OSD (on screen display) time.
Available options: 5S, 10S, 15S, 20S, 25S, 30S.
24
Page 88

5. OPTION
5.1 OSD Language
This item is used to select desired On Screen Display language.
5.2 TT Language
This item is used to select desired TT language.
5.3 Aspect Ratio
Available options: Auto, 4:3, 16:9, Zoom1, Zoom2, PAL+.
NOTE: Aspect Ratio may not be adjustable if no available signals are present.
5.4 Blue Screen
This item is used to set the blue background ON or OFF. The screen background will turn
blue at very weak or no signal condition, if BLUE SCREEN is ON.
5.5 Key Lock
- Press OK button repeatedly to turn on/off Key Lock.
5.6 Reset
This item is used to reset the unit to factory default settings.
AV AND OTHER MODES
- Press TV/AV button on the unit or remote control to select desired input source.
- For the PICTURE, SOUND, TIME and OPTION menus, please refer to the menu
operations of TV mode.
25
Page 89

PC MODE
- Power on your computer and this TV.
- Connect your computer to this TV using a VGA cable.
- Press TV/AV button on the unit or remote control to switch this unit to PC mode.
- Press MENU button to display the main menu and press LEFT or RIGHT navigation button
to select SCREEN.
- Press UP or DOWN navigation button to select desired option and press OK button to
enter submenu.
- Press LEFT or RIGHT navigation button to adjust the value.
Auto Adjust
This item is used to adjust the value of screen automatically.
Horizontal Pos.
This item is used to adjust the value of horizontal position from 0-100.
Vertical Pos.
This item is used to adjust the value of vertical position from 0-100.
Clock
This item is used to adjust the value of clock from 0-100.
Phase
This item is used to adjust the value of phase from 0-100.
NOTE: The picture will shake with unsuitable phase setting.
- For the PICTURE, SOUND, TIME and OPTION menus, please refer to the menu
operations of TV mode.
26
Page 90

MAINTENANCE
● Be sure to press POWER button to set the player to the standby mode and
disconnect the AC adaptor before maintaining the player.
● Wipe the player with a dry, soft cloth.
● If the surface is extremely dirty, wipe clean with a cloth which has been dipped in a
weak soap-water solution and wrung out thoroughly, and then wipe again with a dry
cloth.
● Never use alcohol, benzene, thinner, cleaning fluid or other chemicals. And do not
use compressed air to remove dust.
● Contact a professional for assistance when wall mounting your TV. We are not
responsible for any damage to the product or injury to yourself, if you mount the TV on your
own.
● Do not wall mount the TV while TV is turned on. It may cause personal injury due to
electric shock.
● Use standard M4*10mm screws (4 pieces) to mount this TV.
WALL MOUNTING
Back of your TV
27
Page 91

Your TV is packaged with the Stand and the Cabinet separated. Before enjoying this TV,
please carry out the Stand Installation according to the instructions below.
Step 1
Place the TV faced down on a soft cloth or
cushion to prevent the panel from being
damaged.
Step 2
Align the Stand with TV bottom.
Step 3
Tighten the included screws with a screw driver.
NOTES:
- Unplug the power plug first when installing or
removing the TV Stand.
- Contact one or more partner for assistance
when installing or removing the TV stand.
STAND INSTALLATION
Press
28
Page 92

SPECIFICATIONS
Display Device
Resolution
Pixel Pitch
Luminance
Contrast Ratio
Aspect Ratio
Response Time
Viewing Angle
Visible Range
Life Time
USB MULTIMEDIA
PLAYBACK FORMAT
POWER SOURCE AC adaptor(normal DC 12 V 4A)
POWER
CONSUMPTION
OPERATION
TEMPERATURE
MEASUREMENT 551(W)×175 (D)×356(H)mm
WEIGHT Approx. 3.7 Kg
23.6 inch LED TV
1920×1080
0.2715(H)×0.2715(V)mm
250 cd/m2
3000:1
16:9
9 ms
176(H)/176(V)
521.28(H)×293.22(V)mm
30,000 Hrs
Movie: AVI, MP4, TS, MPG, MKV/MOV, DAT,
VOB, RM/RMVB
Music: AAC
Photo: JPG/JPEG, BMP, PNG
Text: TXT
<48W
-5℃ to 45℃
Specifications are subject to change without notice.
29
Page 93

Check the following points before assuming malfunctions of this unit:
Symptom[COMMON] Remedy
No power. Insert the adaptor securely into the power outlet.
No picture. Ensure that the equipment is connected properly.
● No sound.
● Distorted sound.
No operations can be
performed with the
remote control unit.
No key operation (by the
main unit and/or the
remote control unit) is
effective.
Symptom[TV] Remedy
No or poor picture.
No sound or poor sound.
Noise or other interface.
GENERAL TROUBLESHOOTING
● Ensure that the equipment is connected properly.
● Ensure that the input setting for the TV and stereo system are
correct.
● Adjust the master volume to a suitable volume by pressing
VOL+/VOL- button.
● Check the batteries are installed with the correct polarities.
● The batteries are exhausted; replace them with new ones.
● Point remote control at the remote control sensor and operate
it again.
● Operate the remote control unit at a distance of no more than
6m from the remote control sensor.
● Remove the obstacles between the remote control and
remote control sensor.
Disconnect the power adaptor and then reconnect it.(The player
may not be operating properly due to lightning, static electricity or
some other factors.)
● Adjust antenna or use an external antenna.
● Relocate the unit near a window (if inside a building).
● Move units away from this product that causes interference.
● Do Auto Tuning again.
● Try another channel.
● Check the audio settings.
● Press MUTE button on remote control to cancel mute
function.
● Unplug the headphone.
Electronic equipment near the unit is causing interface. Relocate
the unit or move the equipment.
30
 Loading...