

Salamander Designs Chameleon Assembly Instructions Manual
TIP:
For Innitely Adjustable Shelves please skip ahead to “Fine Tuning & Tips.”
TIP:
If you have a TV Mount, install it before securing the Top.
L
R
At this point you may install accessories (IR Repeater Kit, Power
Conditioner, Etc.) and place components.
TIP:
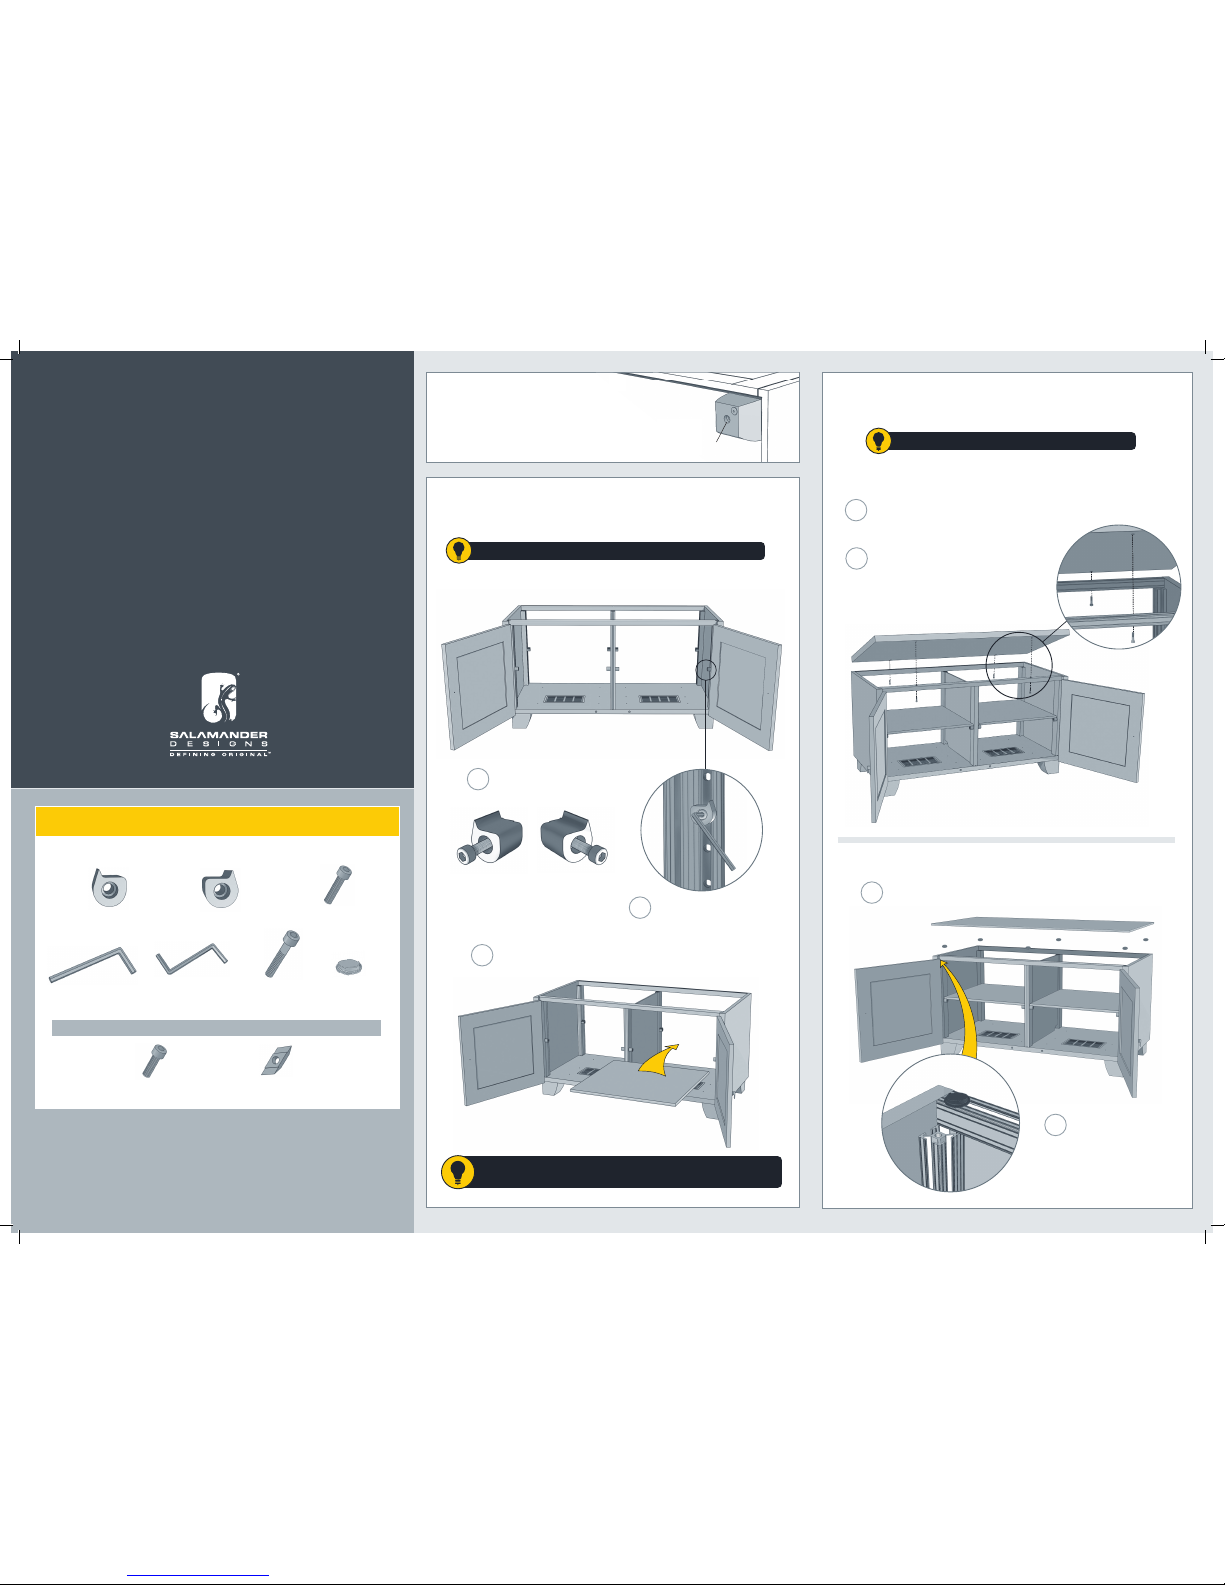
Leveler
1 Level Cabinet
2 Install Shelves
3 Place & Secure Top
Socket Screw 1.25”
303-520
(Wood Tops Only)
Socket Screw 1”
(Use with Shelf Peg)
300-455
Optional: Innitely Adjustable Shelf Kit (See Fine Tuning)
(PHK-2070)
Drop-In Nut
(Use with Shelf Pegs)
300-565
Socket Screw 3/4”
(Use with Shelf Peg)
300-465
Shelf Pegs “L”
300-840
Shelf Pegs “R”
300-830
L
L
R
R
You will need a Phillips head screwdriver to assemble your Chameleon Cabinet.
Rubber Pads
303-380
(Glass Tops Only)
chameleon
ASSEMBLY INSTRUCTIONS
TM
Hex Key 3/16’’
400-060
Hex Key 4mm
400-170
Congratulations on your purchase!
For any questions please call us at:
800.535.5659 / 860.313.0525 (9am-5pm EST)
Visit our website at: www.salamanderdesigns.com
© 2011 Salamander Designs Ltd. Doc No. 501-500 / v 8.11
Chameleon Hardware
Assemble shelf pegs with
socket screws (300-455).
Afx shelf peg assembly
to post at desired position
and secure using hex key.
Remove plastic coating from shelves and place onto shelf pegs.
Place Rubber Pads (303-380) on the frame covering bolts as shown.
Glass Top
Place the glass top
squarely on the cabinet
with the
Salamander Logo
positioned to the back/left
corner.
Wood Top
Align wood top squarely to the cabinet
frame with the holes closest to edge of
top, positioned to the rear of cabinet.
Fasten top to the frame using screws (303-520).
C
B
A
A
B
A
B
LIMITED WARRANTY
For ve full years Salamander Designs Ltd will repair or replace, at our option, any product defective in materials
or craftsmanship. Salamander Designs Ltd. will not be responsible for any damage to or destruction of other
equipment consequential to our equipment failure. Defective product must be given Return Authorization and
is to be returned to the factory prepaid, in the original carton and packing material. Any damage incurred in a
shipment not in original packaging shall be the responsibility of the owner. Warranty repairs will be returned
prepaid within the continental U.S.A. only.
Prior to installing components, it is important to level
the cabinet with the oor. Verify that all of the feet are
properly adjusted to support the cabinet evenly.
Afx socket screw (300-465)
into second hole from top
on inside of posts. Place
rubber covers (303-375)
on screw heads.
TIP:
You may need to wiggle the rear panel to set it into place.
4 Install Door Pulls
5 Rear Panels
Fine Tuning/ Tips
Secure pulls with screws
using a Phillips screwdriver.
Locate the rear post channels.
Lead one end of the rear panel into a
post channel.
Compress the rear panel rmly into
the opposing post channel.
Aligning Doors
Innitely Adjustable Shelves
Assemble loosely as shown.
Insert into post channel and slide to desired height.
Level shelf by adjusting shelf peg positions and
tighten screw using hex key.
Note: Drop-in nut must make a 1/4 turn in post.
Main Adjustment (Side to Side and Up/Down)
Adjustment is made by turning screw (A) in and out.
Dismount Hinge from Hinge Plate
With one hand holding the door open, pull
back on the hinge quick-release lever (B).
Follow these instructions if you wish to adjust your doors.
Speaker Grill Assembly
(Applicable Models Only)
Socket Screw 3/4’’
(300-465)
Shelf Peg
Drop-In Nut
(300-565)
Attach the two brackets (303-370) using the waferhead screws (300-115) to backside of speaker grill.
Note the “UP” arrow.
Speaker Grille Hardware Bag - PHK-2085
Media Drawer Assembly
Set drawer liner (303-555)
on bottom of tray.
Place media organizer
(303-310).
Note: Horizontal grooves.
Socket Screw
300-465
Bracket
303-370
Waferhead Screw
300-115
Rubber Cover
303-375
Place grill pads (303-545) ush to corner edges.
Grill Pad
303-545
Hang speaker grill on brackets.
NOTE: Remove by lifting up and out.
Media Organizer
Drawer Liner
Door Front
Adjust the tops of the doors to be
parallel to the top of the cabinet.
A
A
B
C
A
B
C
D
A
B
A
A
B
1
2
B
 Loading...