

Salamander Designs 703C-B User Manual
.salamanderdesigns.com
Felt
Pad
www
Salamander Designs Ltd. 800-535-5659
c. d.
c.
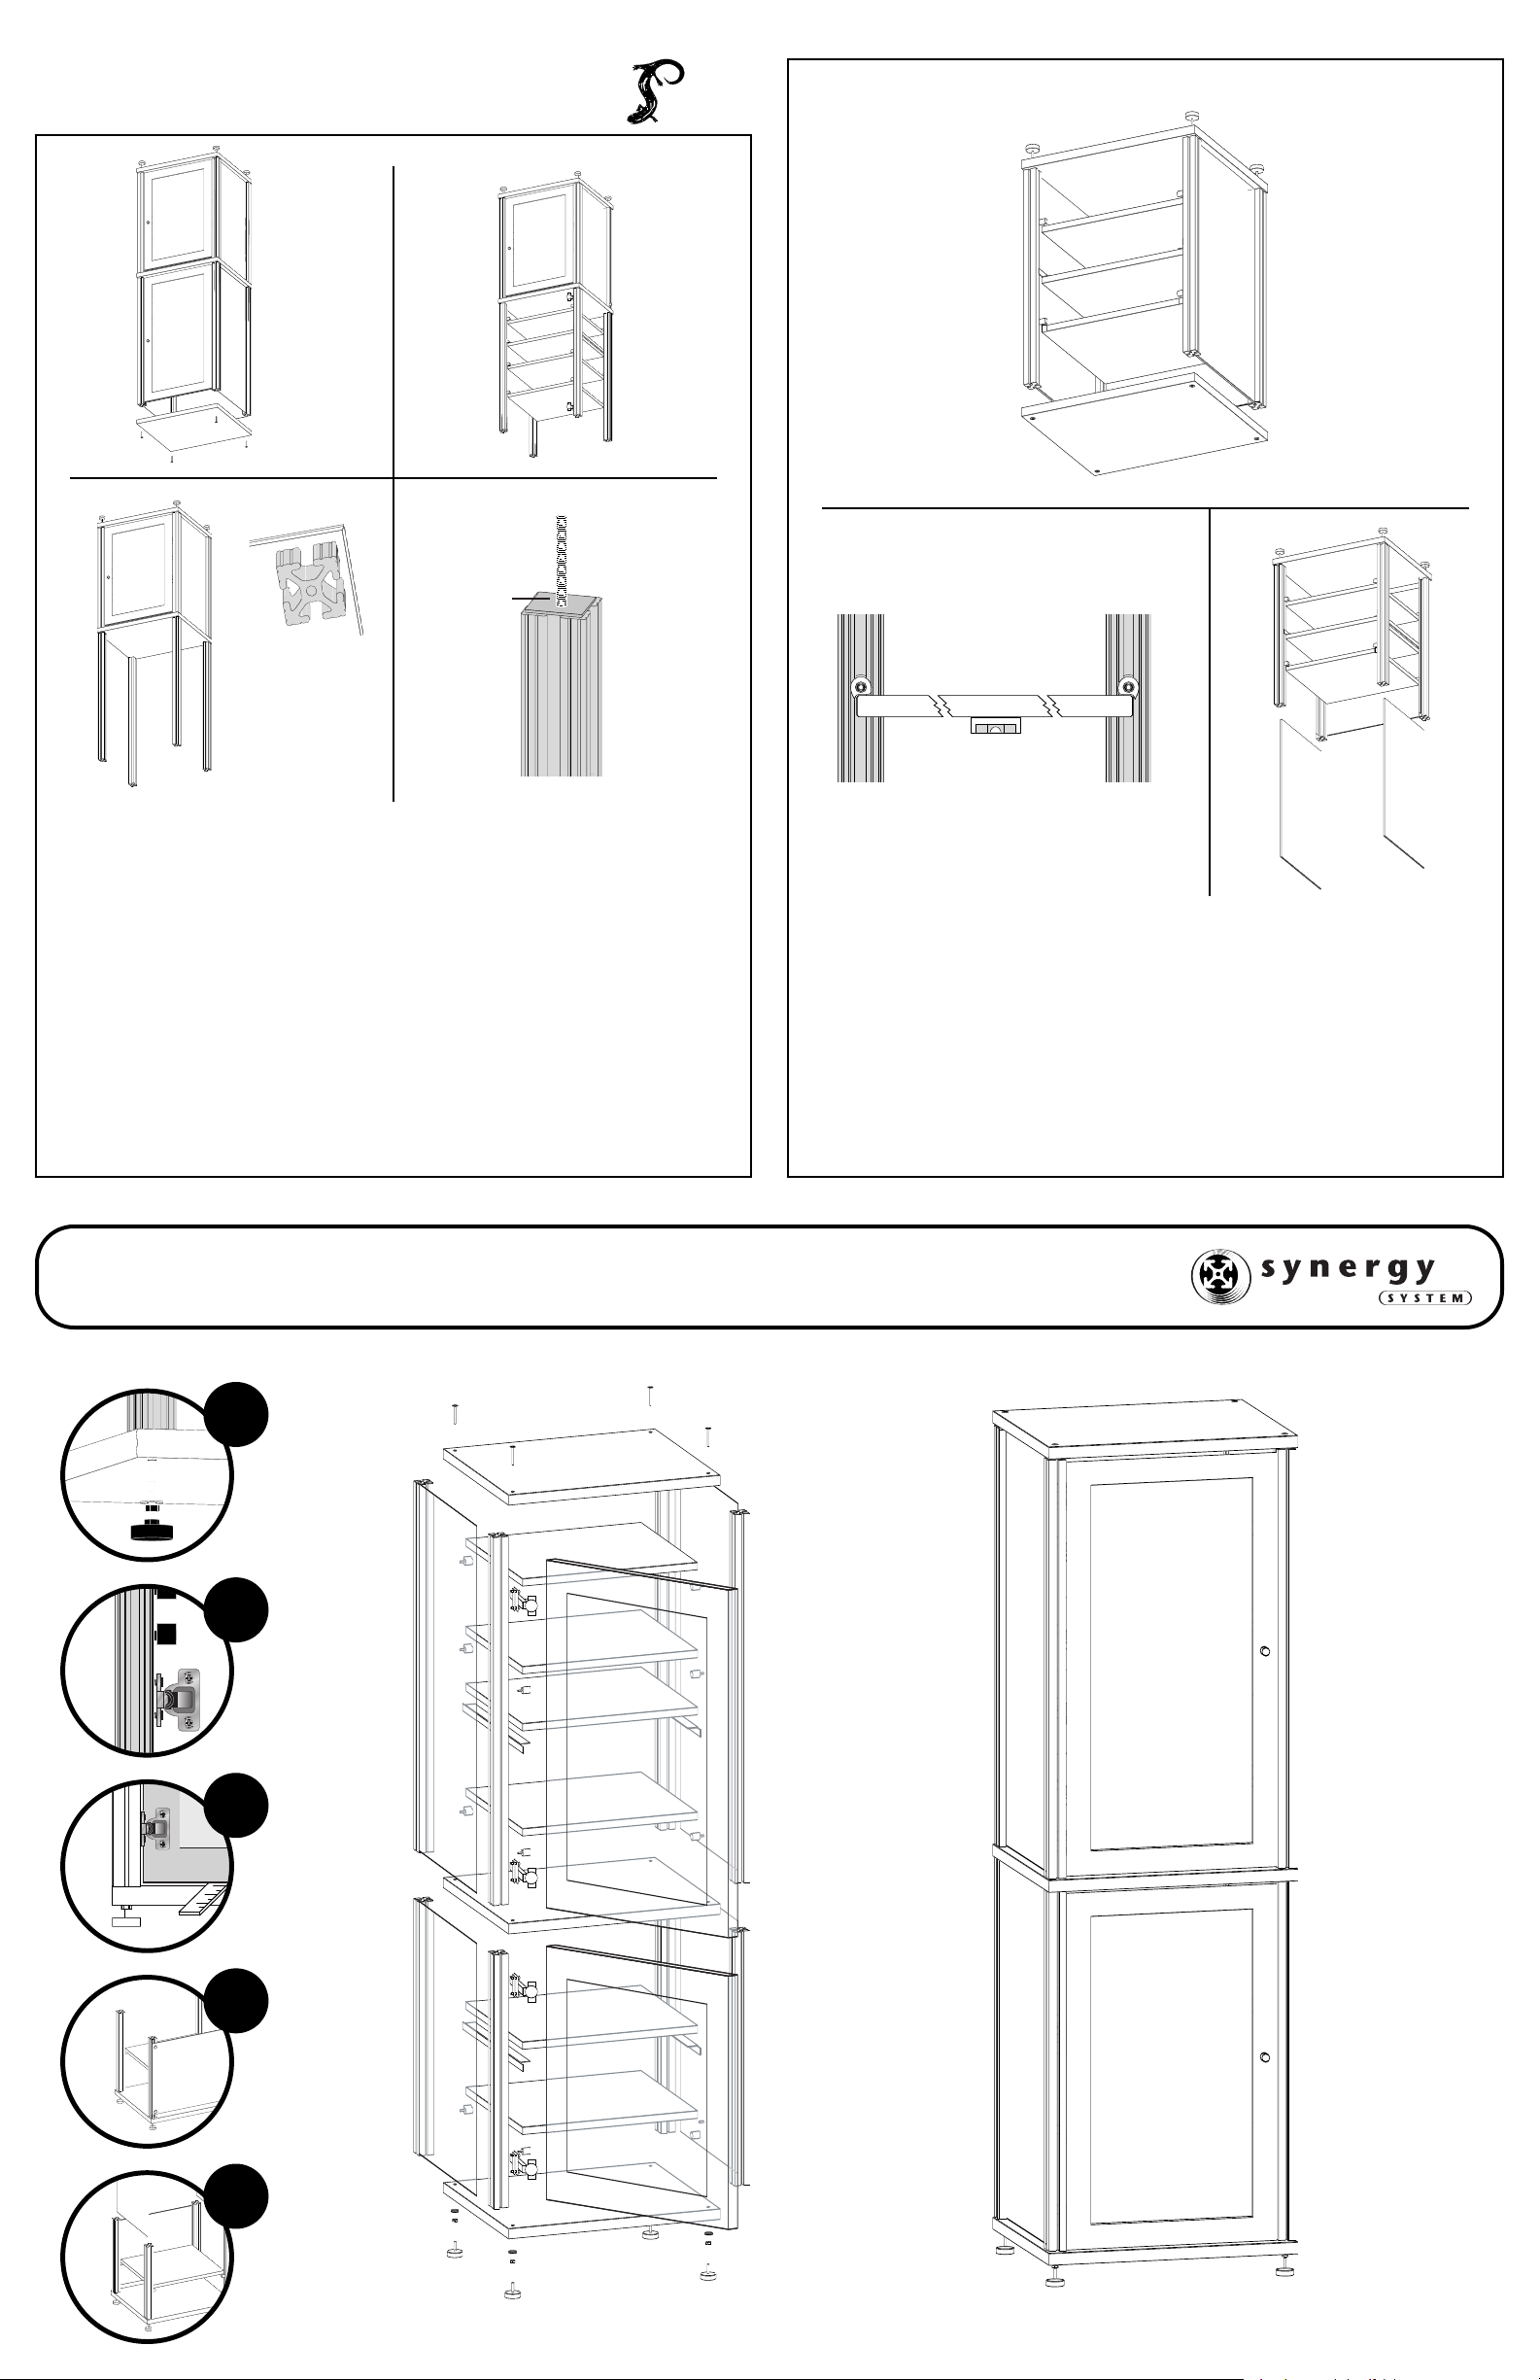
Synergy Solutions 703 Instructions
a. b.
the tops of the posts. Insert the four socket head bolts and tighten.
After all shelf pegs,hinges, side and rear panels are installed, align the top shelf holes over
Add Top Shelf (d)
Continue assembly of extension by repeating steps 2-5 with the elements of the extension.
Repeat steps 2-5 (c)
extension posts to the base unit. Be sure to square the posts with the shelf. Do not over tighten.
Screw the extension posts into existing base securing the shelf to the rack. Finish attaching the
Attach posts (b)
attaching to underside of post. This will prevent marring the surface of the existing top shelf.
wrench. Add felt pads to the underside of the posts; peel off backing and slide over stud
Screw the double ended threaded studs into the ends of the extruded posts, tighten with
Add threaded studs (a)
6. Add extension and finish assembly
a. b.
After all shelf pegs are installed, align the top shelf holes over the tops of the posts.
Add Top Shelf (c)
front to back. Use the hex key to tighten each shelf peg.
Use the bubble level to precisely adjust the shelves. Be sure to level both side to side as well as
Adjust Shelf Pegs and Add Shelf (b)
square to the bottom shelf to prevent any damage to the side panels when inserted.
Carefully slide side panels down center channel of outside posts. Make sure the posts are
Insert side panel (a)
5. Finish Assembly of base unit.
1
2
3
4
5
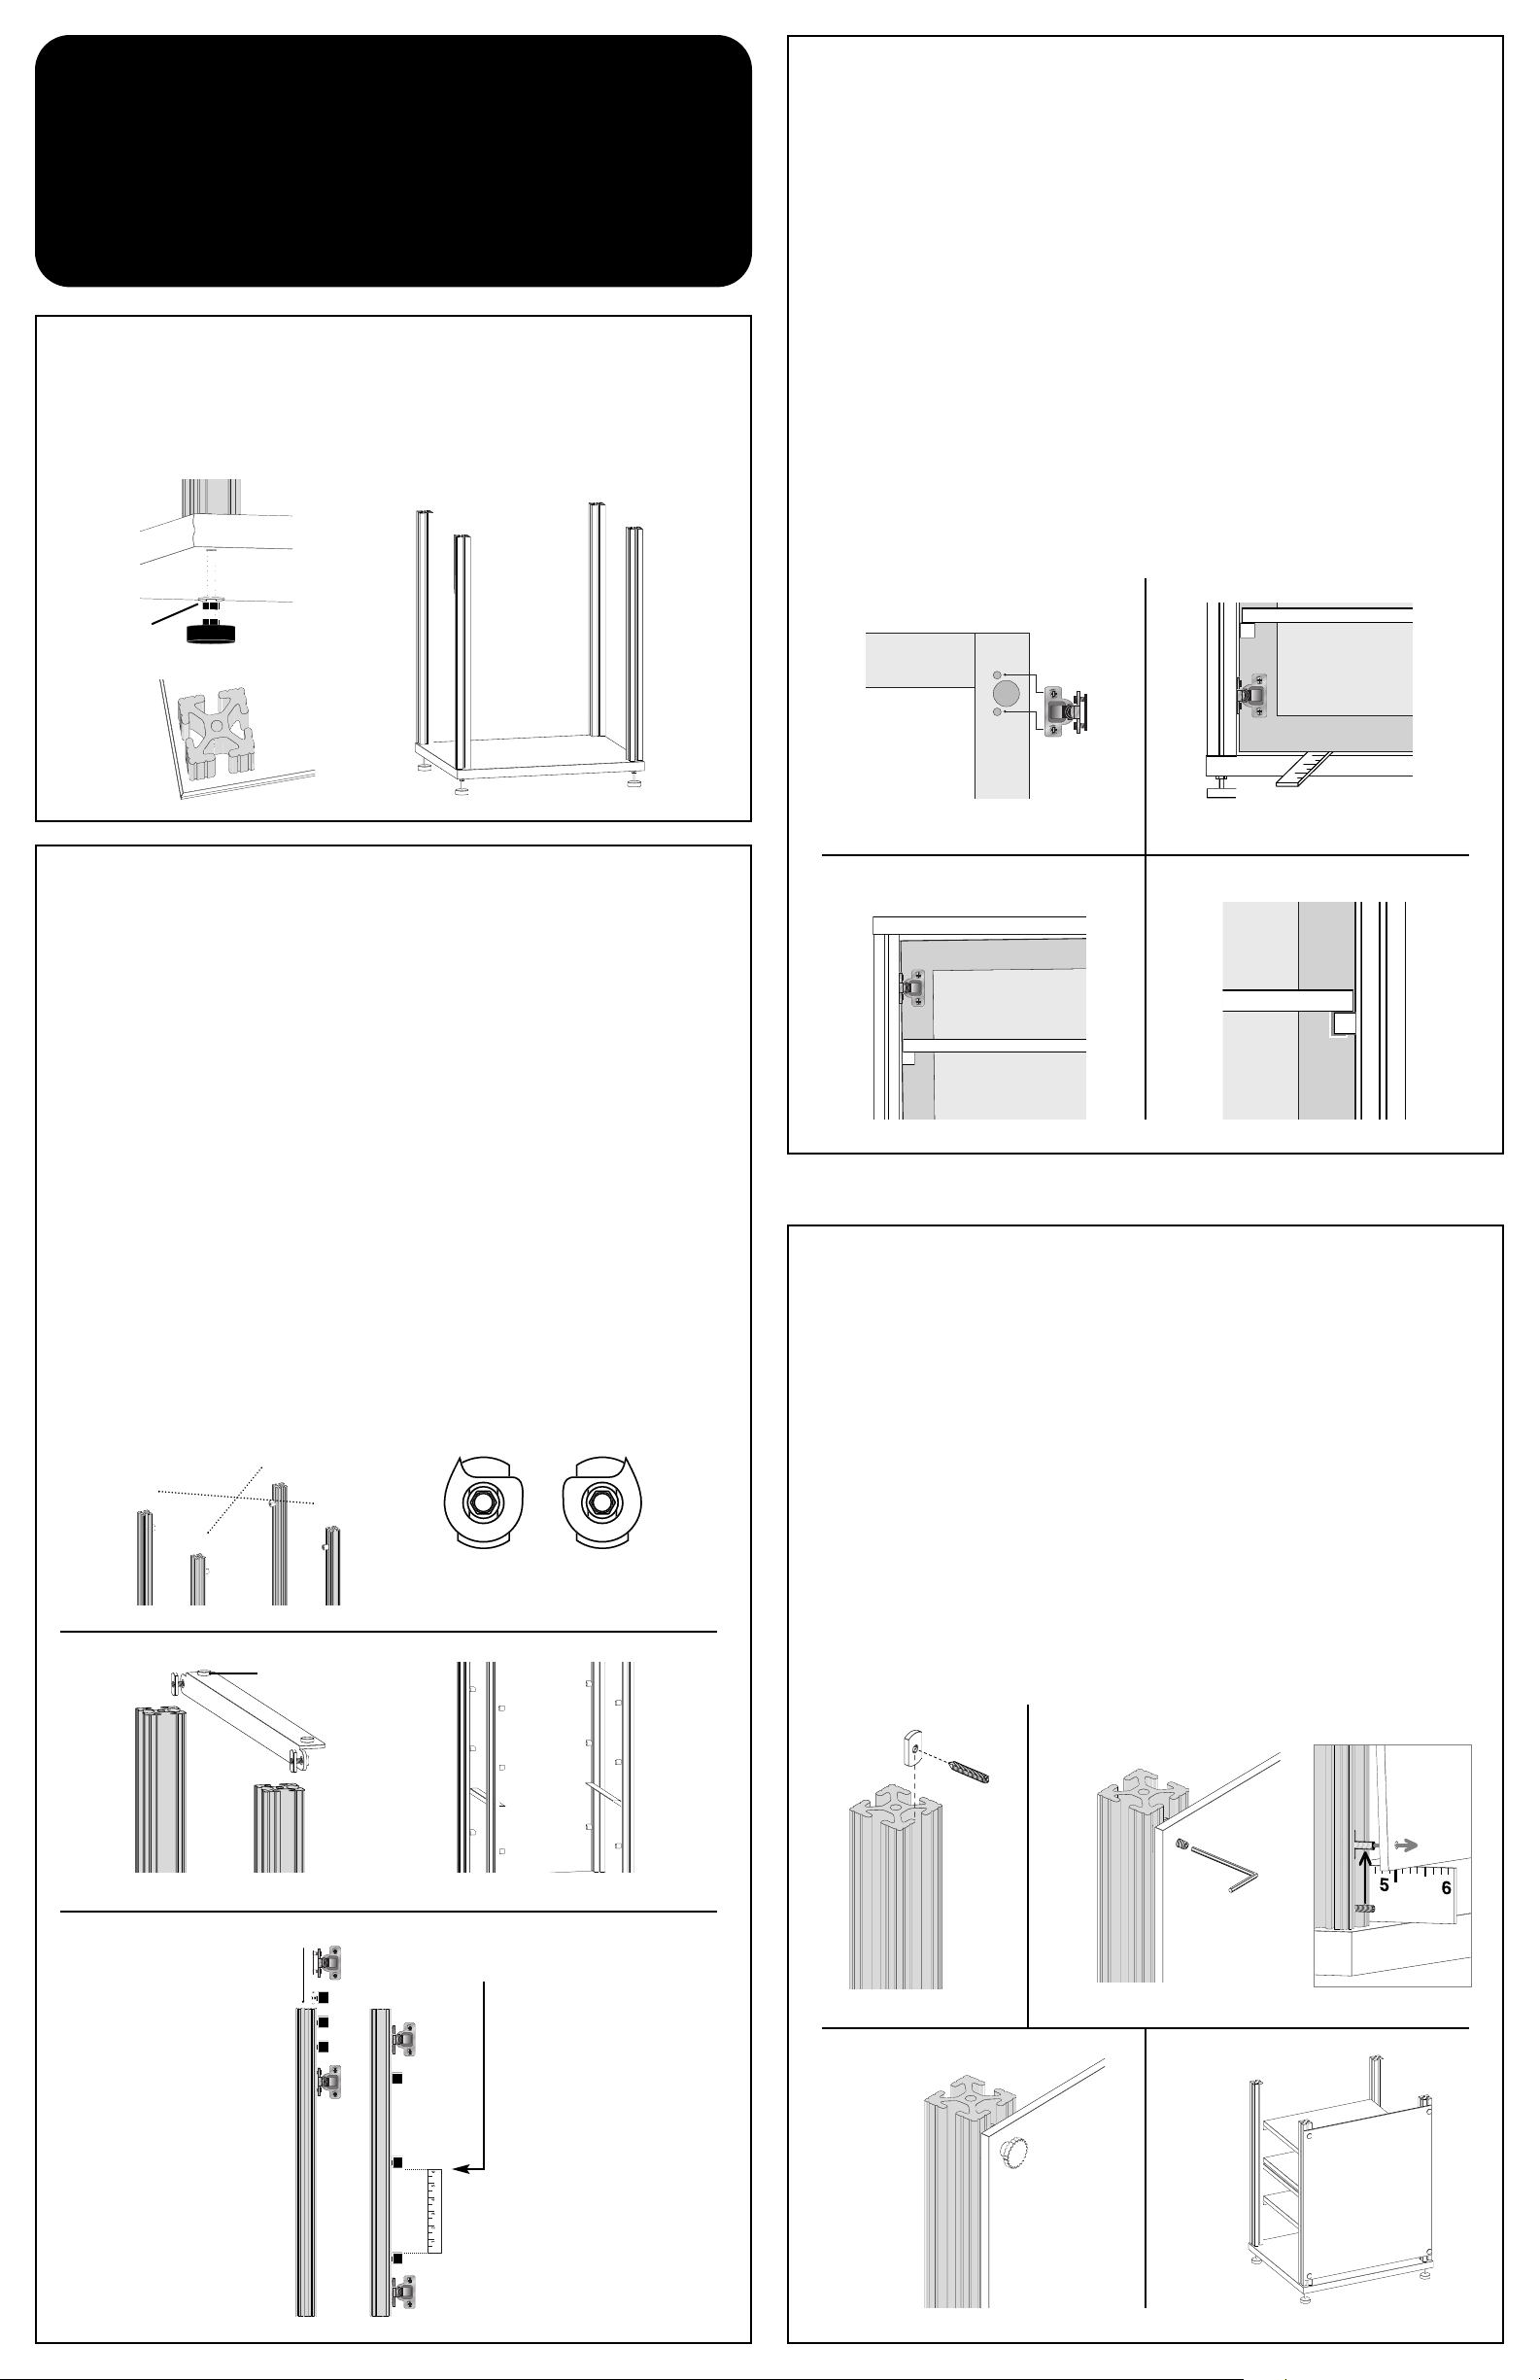
Before you start:
• Unpack all parts and familiarize yourself with them. Look at the blow-apart drawing.
• Take the time to decide the approximate placement of shelves and from which side you
want the door to open. Shelf pegs, heavy shelf bracket and door hinges must be
loaded into the posts in the correct order. They cannot be removed individually without
disassembling the whole unit.
• Keep in mind that you will basically be assembling two racks in the same fashion. After
completing the base you will r
refer back to some of the initial steps.
epeat many of the same steps on the extension and will
1. Connect Posts to Bottom Shelf
ew leveler foot with metal washer through bottom shelf onto the end of a short extruded
Scr
post. Hand tighten fully then use wr
Make sure to square the post to the bottom shelf.
NOTE: Tighten by spinning the leveler foot NOT the post.
Metal Washer
ench on hex nut to back tighten nut onto underside of shelf.
3. Attach door to hinges (a)
Insert the hinges into the corresponding holes on the door. Turn the Phillips screws 1/4 turn
to the right to lock hinges in place.
Adjust clearance (b)
Make sure bottom of door is 1/8” above the bottom shelf before fully tightening hinges
to posts. Use the ruler’s thickness as a guide for the bottom gap.
Align door (c)
If the door needs to be aligned parallel to the posts, twist the smaller flat headed phillips
screws on each of the hinges to adjust for a constant gap between the posts and the door.
Apply rubber stops (d)
Attach the rubber stops to the inside of door frame at the height of the front of a shelf peg
on the side of the door that opens. This will protect the finish of the door and remove any
unwanted noise when opening and closing.
Note:
1. For easier installation, you may separate the door hinge by pulling-up on the black tab.
2. When attaching a short door (ie. S20 Door on S40 unit), place the heavy-duty shelf bracket at the very top of the door so that the adjustable shelf can be pulled out to the edge of
the doorframe and rest in the appropriate position.
a. b.
2. Plan for the location of shelves
NOTE: Insert any shelf pegs that will be supporting shelves between the hinges. After the
doors are inserted, the pegs cannot be added later.
Group shelf pegs (a)
There are two varieties of shelf pegs (A and B). They are designed to cradle the shelf in place.
Follow illustrations for guidance.
Heavy Shelf Bracket (b)
Your unit includes a heavy shelf bracket. Decide whether you want the bracket to be on the
base unit or the extension. Be sure there are equal numbers of shelf pegs on each post either
above or below the heavy shelf bracket.
Insert hinges and add Shelf Pegs (c)
Slide the first hinge down the channel of the post and finger tighten the socket-head screws.
Add the Shelf pegs into the channel and then add other hinge. Add the appropriate shelf
pegs to the other posts without the hinges.
Adjust Pegs (d)
The ruler will prove to be a quick and easy way to set the position of the shelf pegs.
Measure height between pegs and apply to other posts. When everything is adjusted be sure
to tighten, however final adjustment will come later. NOTE: Where attaching a door it may be
easier to adjust the shelf pegs at ths point (refer to step #5b
Note: For easier installation of the top fixed panel, keep one end of the heavy duty shelf
bracket loose until the top is attached then tighten appropriately.
a.
A
B
B
A
A
B
c. d.
4. Attach rear panel
Insert hardware (a)
Combine the 1 inch threaded studs with the flat nuts and slide into rear channel.
Secure studs at top of posts (b)
Place rear panel over the two top studs to set location on posts. Allow bottom studs to
remain loose at bottom of posts. Slide the rear panel along posts using the width of the ruler
to provide a 1” space at the bottom of rack for cable passage. Use the hex wrench to secure
the 2 top studs to the posts first, then position and secure remaining studs to the posts.
Attaching panel (c)
Secure the rear panel over the studs with the silver thumb nuts.
Secure thumb nuts (d)
Put the remaining thumb nuts on to finish rear panel installation.
Note: After the unit is assembled, but prior to attaching the doors and inserting the
adjustable shelves and drawers, place the unit face down and attach the rear panel. This will
prevent the hardware from sliding down the extrusions and will help align the holes.
b.
c.
Rubber Tab
d.
Use ruler
for initial
spacing
when
installing
pegs
a. b.
c. d.
 Loading...