

Page 1

2.1Mega Pixel Crayola™ Camera
Owner’s Manual
© 2008 Sakar International, Inc. All rights reserved.
© 2008 Crayola™
Windows
All other trademarks are the property of their respective companies.
®
and the Windows® logo are registered trademarks of Microsoft Corporation.
Page 2

Table of Contents
Introduction ............................................................................................................ 2
What your camera includes: ................................................................................... 2
Computer System Requirements for Windows® 2000/XP ...................................... 2
Computer System Requirements for Windows® Vista ............................................ 3
Computer System Requirements for Macintosh ..................................................... 3
A Quick Look at Your Camera................................................................................ 4
Preparing Your Camera for Use ............................................................................. 5
Starting Your Camera ............................................................................................ 7
The Camera Modes ............................................................................................... 9
Installing Color Genie Software on Windows® Computers ................................... 11
To Uninstall Color Genie Software ....................................................................... 13
Downloading Photos ............................................................................................ 14
How to Use Color Genie Software to Edit Your Photos ........................................ 15
Camera Maintenance ........................................................................................... 21
Technical Support ................................................................................................ 21
Sakar Warranty Card ........................................................................................... 21
Appendix A: Technical Specifications .................................................................. 22
Appendix B: Troubleshooting .............................................................................. 23
1
Page 3

Introduction
Thank you for purchasing your Crayola™ Camera. Please read this manual FIRST in order to get the most
out of your Crayola™ Camera. Parental supervision is recommended for children under 10.
What your camera includes:
Crayola™ Camera
Color Genie Software CD
USB cable
User’s Manual
Necklace Strap
Computer System Requirements for Windows® 2000/XP
To be able to download photos to your PC you will need the following minimum configuration:
Windows
Pentium-based PC (or equivalent)
150 MB hard disk free space and 128 MB or more RAM
Available USB Interface
CD-ROM Drive
Color display (16 bit or higher recommended)
Screen resolution 1024 X 768
®
2000/XP
2
Page 4

Computer System Requirements for Windows® Vista
To be able to download photos to your PC you will need the following minimum configuration:
Windows
800MHz processor and 512 MB of system memory
20GB hard driver with at least 15GB of available space
Support for Super VGA graphics
Available USB Interface
y CD-ROM driver
®
Vista
Computer System Requirements for Macintosh
y Power Macintosh G3 500 MHz or higher
y Mac OS X version 10.2.6 or later
y 128 MB or more available system RAM (256 MB recommended), 150 MB free disk space
y 800 x 600 or higher-resolution monitor displaying millions of colors
y Available USB interface
y CD-ROM driver
3
Page 5
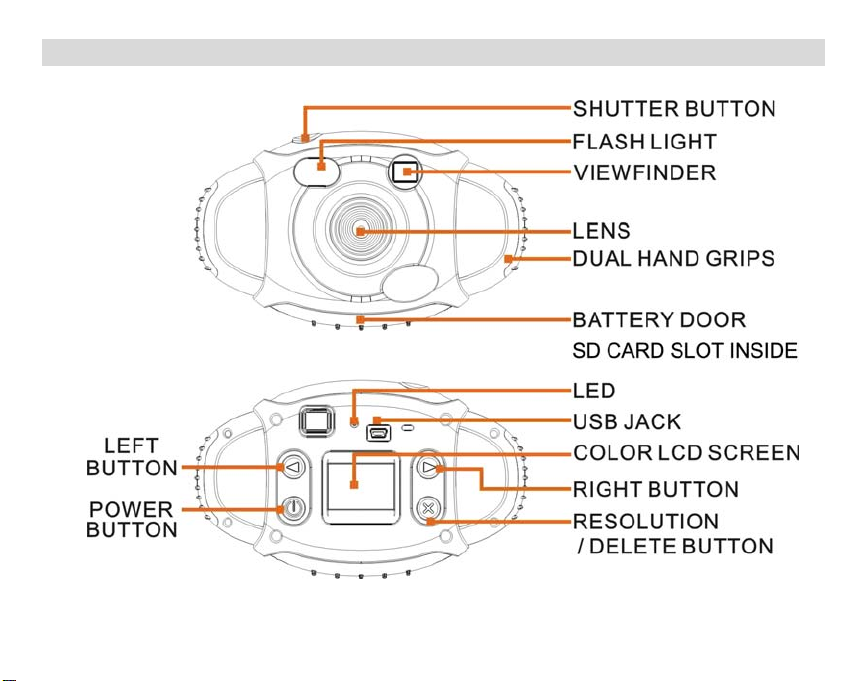
A Quick Look at Your Camera
4
Page 6
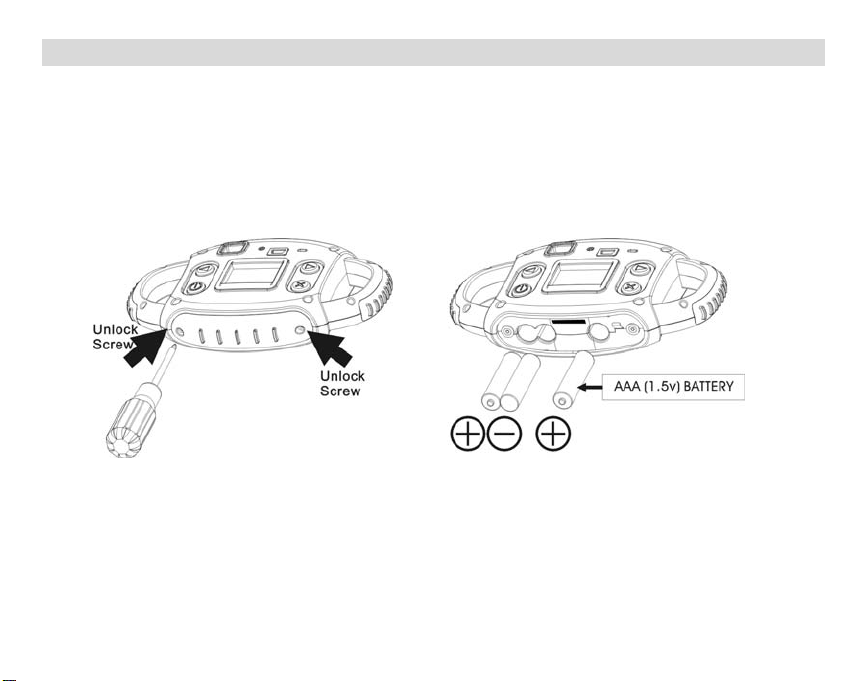
Preparing Your Camera for Use
Battery Installation
Your camera requires three AAA alkaline batteries, which must be inserted as follows:
z Using a screwdriver, open the battery compartment at the bottom of the camera.
z Insert the batteries in accordance with the polarity (+/-) shown in the battery
compartment.
z Close the battery compartment and replace screws tightly.
The LCD screen will flash if your batteries are running low. You will need to replace the came ra’s
batteries before taking photos. Download your photos as often as possible. Photos will be lost
when the batteries run low.
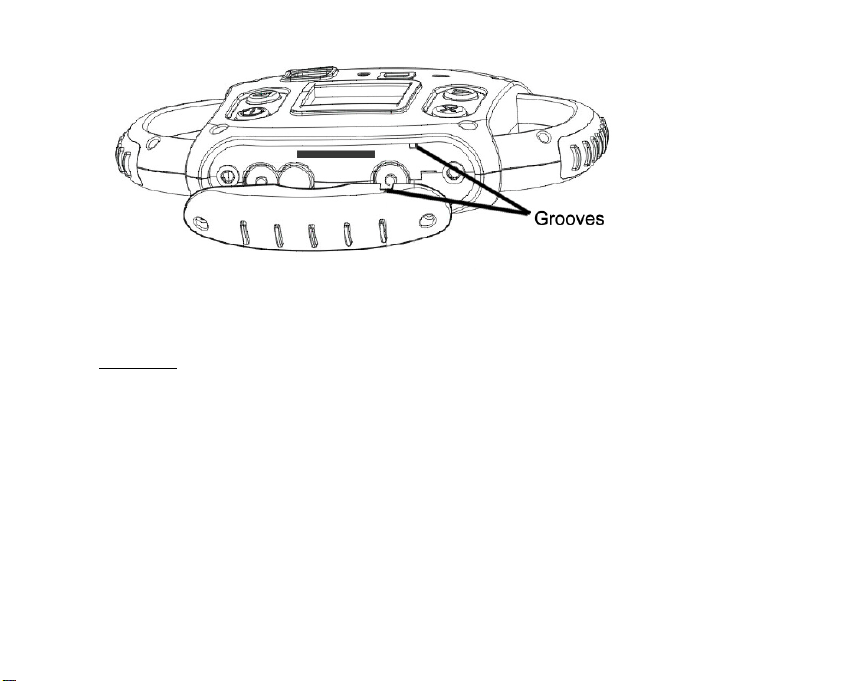
Tips: Find the grooves from the battery compartment and assemble to the convex as shown in the
figure.
5
Page 7
Note: If you do not intend to use your camera for an extended period, remove the batteries to avoid
leakage and corrosion.
WARNING
Please download the test photos you have on the camera before opening the battery
compartment. Opening the battery compartment and/or removing the battery will erase the
photos stored in the camera built-in memory.
Install memory card
Limited internal memory is only for test photos, please insert an SD memory card. to expand your
camera capacity, follow the steps:
1. Open the battery compartment with screwdriver same as battery installation.
2. Insert SD memory card correctly until you hear “Click” sound, and the surface of the SD
memory card will be flushed with your camera.
:
6
Page 8

3. Close the battery compartment with screwdriver again.
Important Note:
z Image files cannot be recorded or erased if a write-protect icon
unlock your SD card and insert again.
z This product included Supports SD card up to 2GB.
z SD card format compatibility: FAT(FAT16)
1. Inserted SD card in the camera.
2. If "
3. Press UP/DOWN button to select “
" is displayed on the screen after you power on your camera, this card is not in FAT
format.
SHUTTER button to format your memory.
” (The selected icon will flash on the screen), then press
7
shown on the screen. Please
Page 9

Caution:
z Please insert your SD card before power on your camera, and remove it after the camera
power off.
z Formatting will delete all the data on the SD Memory Card. To keep your data safe, please
backup the data before the memory card plug in your camera.
z Do not remove the SD Memory Card during formatting as this may damage the card and
render it unusable.
z SD Memory Cards formatted on a PC or device other than the camera cannot be used. Be
sure to format the card with the camera.
z All the data in the built-in memory will be deleted if no SD Memory Card has been inserted in
the camera when you change your battery.
Starting Your Camera
Press the POWER button to start the camera. The camera will sound a musical tone to
confirm that it is ready for use.
Taking Photos
1. Compose your shot using the viewfinder or LCD screen.
2. Hold the Camera steady and press the SHUTTER button to take a photo.
3. Once the photo is taken, the number of photos remaining in the Camera memory will be displayed on
the screen. Each consecutive photo taken will add this number by one.
If icon
photos can be taken until the existing photos have been downloaded and cleared from the camera
memory.
appears on the screen, this is an indication that the internal memory is full. No further
8
Page 10

Alternatively insert an SD memory card.
The Camera Modes
Preview Mode
This is the default mode for this camera, from which you can compose and take your photos with auto flash
light. This mode also enables you to change the camera’s resolution selection.
Taking Photos
You can frame your shot precisely by using the color LCD monitor or the viewfinder
Hold the dual hand grips steady and press the shutter button to take photos.
Resolution Selection
Press the RESOLUTION button once and the camera will give you an option to change resolution.
Press the RESOLUTION button again within 3 seconds to confirm your resolution selection. If you do
9
Page 11

not want to change the resolution wait 3 seconds without hitting any buttons.
is 1.3 Megapixel resolution
is 2.1 Megapixel resolution
Flash
This camera comes equipped
ready, the
Note:
1. Limited internal memory is only for test photos, please insert an SD memory card to expand your
camera memory for taking more photos.
2. Please download your photos to computer as often as possible.
Playback Mode
This mode enables you to look through the photos stored on your camera using the screen.
Press the LEFT or RIGHT button to enter the Playback mode.
The mode has two options:
1. Browse forward
Repeatedly press the RIGHT button to scroll through your photos one by one in the order they were
taken.
2. Browse backward
Repeatedly press the LEFT button to scroll through your photos one by one in reverse order to that in
which they were taken.
Delete Photo
You can also delete photos in this mode one by one by pressing the DELETE button. Find the photo
icon will flash repeatedly- wait until the flash is ready before taking a photo.
with a built-in flash, it will activate the automatic flash. If the flash is not
through your photos:
through your photos:
10
Page 12

you wish to delete appears on the screen, press the DELETE button once and and you will see
shown on the screen. Press the DELETE button a second time to confirm, and the camera will delete
this photo in the memory.
Delete All Photos in the memory
In Playback mode, press and hold DELETE button for 3 seconds until you see
screen. Press DELETE button again to delete all photos in your camera memory.
Power Off
Press the POWER
Energy Saving Mode:
To conserve battery power, if the camera is not used for 60 seconds, it will automatically switch
off.
button to switch off the camera.
shown on the
Installing Color Genie Software on Windows® Computers
Insert the CD-ROM into your CD-ROM drive.
If Auto-play is turned on, the installation screen will open automatically after inserting the CD-ROM into your
CD-ROM drive.
11
Page 13

Click "Install Color Genie Software".
Installation will begin and will not complete until you read the message "Installation complete". To open the
newly installed Color Genie program, you must first exit the installation screen by clicking the Exit button. On
your desktop a shortcut called, "Shortcut to Color Genie.exe", will appear. Double-click the icon to open and
run the program. Have fun!
12
Page 14

If the installation screen does not pop up, AutoPlay may be turned off. If Auto-play is turned off, go to the
Start menu and select Run..., use the Browse... button to select your CD-ROM drive, click on "Install.exe".
This will launch the installation screen.
Installing Color Genie Software on Macintosh Computers
Insert CD
Double click on the Crayola™ icon on the desktop
Open Crayola™ install.osx and choose to install the program
To Uninstall Color Genie Software
Insert the CD-ROM into your CD-ROM drive. If Auto-play is turned off, go to the Start menu and
select Run..., use the Browse... button to select your CD-ROM drive, click on "Install.exe". This will launch
the installation screen.
If Auto-play is turned on, the installation screen will open automatically after inserting the CD-ROM into your
CD-ROM drive.
Click "Uninstall Color Genie Software" - the uninstall process will begin. The process will complete when
the message "Uninstall complete" appears.
13
Page 15

Uninstalling Color Genie Software on Macintosh Computers
Insert CD
Double click on the Crayola™ icon on the desktop
Open Crayola™ install.osx and choose to uninstall the program
Downloading Photos
You can start downloading your photos from the camera onto your computer for further use in the Color
Genie program. Here's how you download your photos from your Crayola™ camera:
Downloading Photos on Your PC
14
Page 16

1. Plug USB cord of camera into your PC computer.
2. The LCD on your camera will show a disk icon
3. Click on “My Computer”
4. The camera will show up as a removable disk
5. Double click on the removable disk icon
6. Click on the DCIM folder
7. Click on the 100IMAGE folder to see your photos
Downloading Photos on Your Mac
1. Plug USB cord of camera into the Mac computer
2. The camera will show up as a removable disk on your desktop
3. Click on the removable disk
4. Click on the DCIM folder
5. Click on the 100IMAGE folder to see your photos
How to Use Color Genie Software to Edit Your Photos
Getting started
The first thing you'll need to do is add photos to the program. Click the ADD PHOTOS button on the top menu
to select photos to import (if you need additional help adding photos, see the “Adding Photos” help topic).
Now you can view and print your photos in the photo center, edit them in the edit center, play a game using
the photos, or create a great storybook!
Adding photos
To add photos to the program, first click the ADD PHOTOS button. Next, to import a single photo from your
hard drive, click the IMPORT SINGLE PHOTO button. Use the dialog box to locate your photo, then click OK.
If you want to import an entire folder of photos, click the IMPORT FOLDER OF PHOTOS button, then select
the folder containing the photos from your hard drive and click OK. After photos are imported, they are stored
according to the name of the folder they came from. To view your imported photos, select the folder name
15
Page 17

using the drop down box in the lower left-hand corner. Because the program does not make copies of your
photos, if you rename, move or delete the original photos from your hard drive, they will no longer appear in
the program.
Viewing and Selecting photos
To select a photo, simply click on the thumbnail. Once selected, you can edit, print, export or remove the
photo from the program. To deselect a photo, re-click the photo or select a different photo. To select a
different folder of photos, select the folder name using the drop down box in the lower left-hand corner. You
can view your photos in three sizes. With smaller thumbnails, you can view more photos at one time. With
bigger thumbnails, you'll be able to see the fine detail of your photos. Click the large green buttons in the
lower right hand corner of the photo center to display your photos in large, medium or small format. The
yellow button shows the current view. If your active folder contains more photos than you can view on the
screen at one time, use the up and down arrows to page through all the photos.
16
Page 18

Slide show
To view a slideshow, select a folder of photos using the folder dropdown box. Next, click the SLIDE SHOW
button. All the photos in the folder will automatically display in full screen mode. To end the slide show, click
the screen.
17
Page 19

Editing a photo
To edit one of your photos, first select a photo thumbnail by clicking it. Click the edit button when it becomes
active. This will take your photo to the edit center and make it ready for painting, cropping and adding special
effects.
Printing
To print a photo:
1. Select a photo thumbnail from the photo center.
2. Click PRINT. A print pop-up box will appear.
3. Select Portrait or Landscape mode.
4. Select FULL, 4x6, or 3x5 formatting for your print. If you choose FULL, use the slider bar to custom size
your print.
5. Click PRINT.
18
Page 20

Exporting
To export a photo to a file you can save or e-mail:
1. Select a photo
2. Click the EXPORT button. An Export pop-up box will appear.
3. Enter a name for the export file.
4. Select a file type (.jpg or .pdf).
5. Choose a location on you computer where the file will be saved.
6. Use the slider to adjust the size of the exported file.
(If you intend to e-mail the photo, a 1 MB maximum is recommended.)
7. Click EXPORT.
19
Page 21

Removing photos
To delete a photo from the program, select a photo.
Then click the REMOVE button. If you just want to remove just the selected photo, click the REMOVE
SELECTED button. If you want to remove ALL the photos in the currently selected folder, click the REMOVE
ENTIRE FOLDER button. To cancel the deletion, click CANCEL
NOTE: When you remove a photo, it will only remove the photo from the program. This program does not
delete original photos!
20
Page 22

For additional information on Color Genie software please see the “Help” section within Color Genie
CD-Rom
Camera Maintenance
Your Crayola™ camera has been rubberized for durability, but it is not a toy - please handle it with care.
Technical Support
For technical support issues please visit our website at www.sakarhelp.com. There you will find
manuals, software and answers to Frequently Asked Questions. Can’t find what you are looking
for? Fill out an online ticket and our technical support team will answer your questions.
Sakar Warranty Card
This warranty covers products that fail to function properly UNDER NORMAL USAGE, due to defects in
material or workmanship. Warranty protects the original consumer purchaser only and is not transferable.
Your product will be repaired at no charge for parts and/or labor for a period of one year from date of
purchase.
What Is Not Covered By Warranty?
1. Damages or malfunctions not resulting from defects in material or workmanship. 2. Damages or
malfunctions from other than normal use, including but not limited to, repair by unauthorized parties,
tampering, modification or accident.
What to Do When Service Is Required:
When returning your defective product (postage pre-paid) for service, your package should include:
1. Copy of original bill of sale
2. A detailed written description of the problem.
21
 Loading...