

Page 1
Android XO Tablet
User Manual
Page 2
2
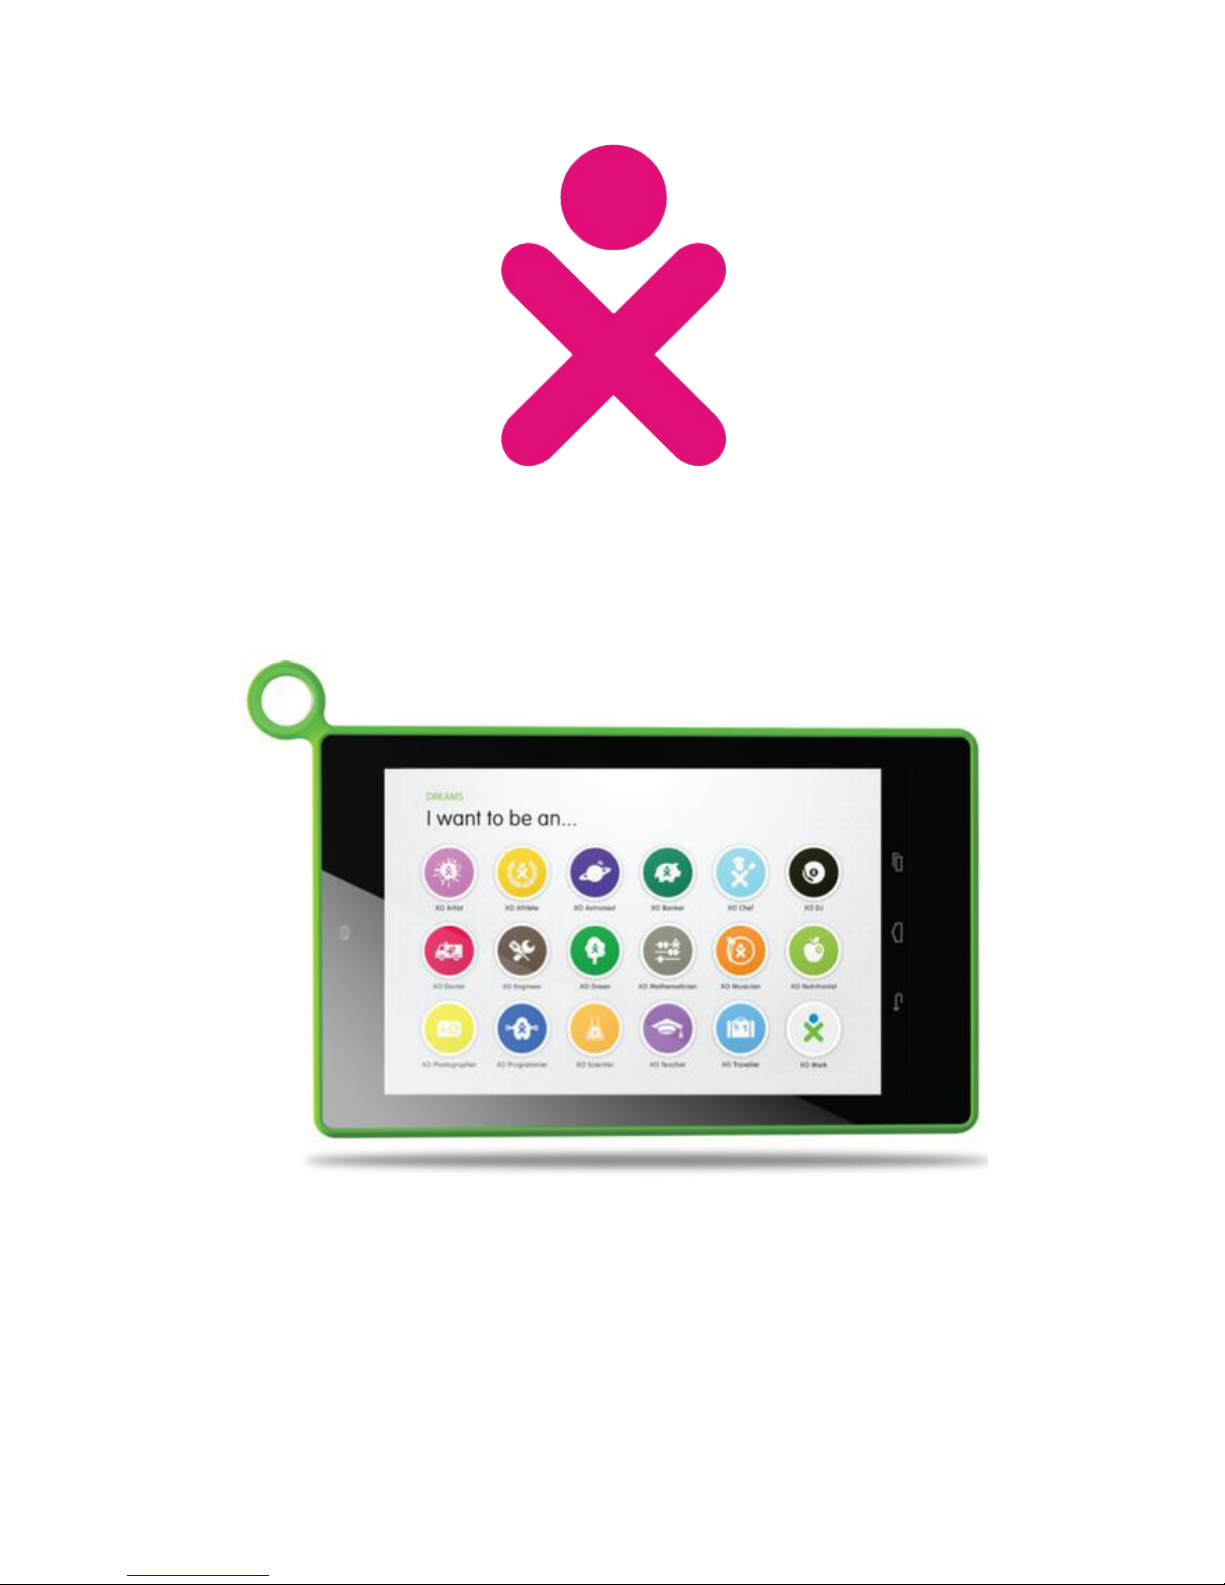
Features
Parental Controls
Front & Rear Cameras
1.6 GHz Dual-Core Processor
1GB of RAM
Wi-Fi
HDMI
Supports Multiple Users
8GB of Flash Storage (expandable by Micro SD)
High Resolution (1024x600) 7 Inch Display
Extra Long Life Battery
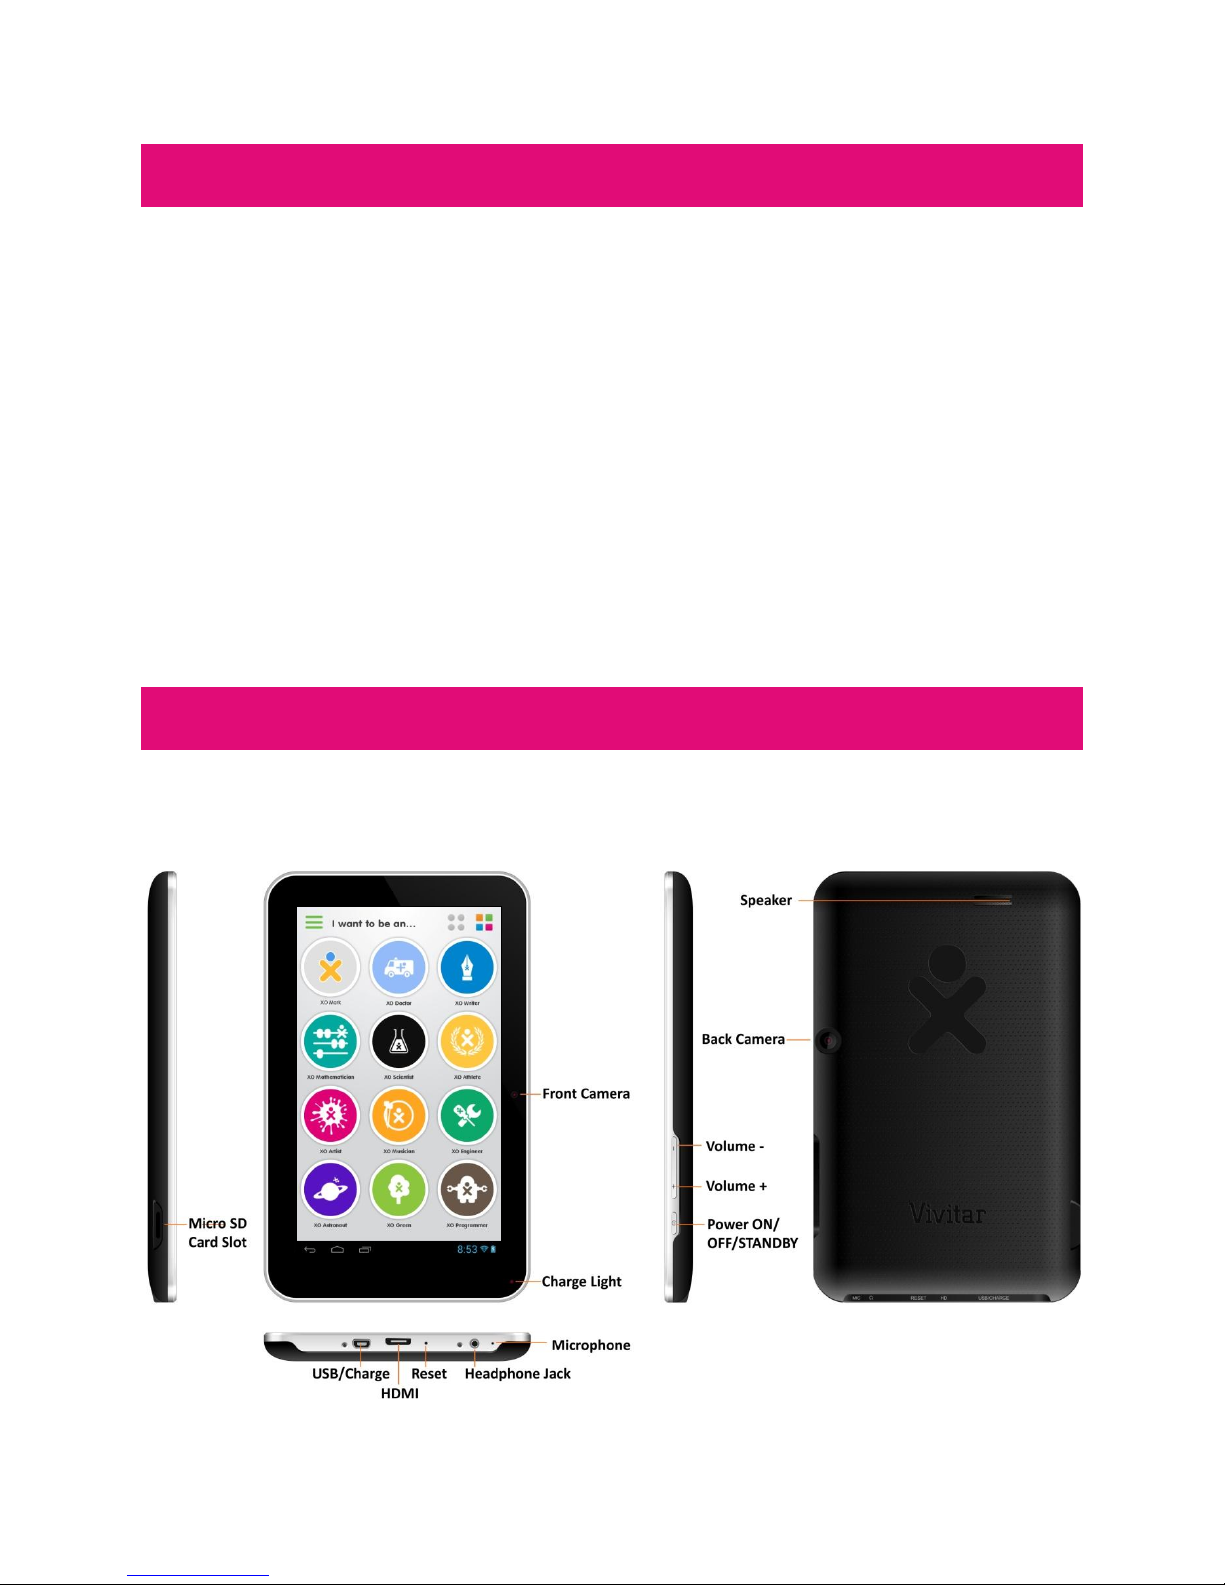
Getting to Know Your XO Tablet
XO TABLET
FRONT BACK
Page 3
3
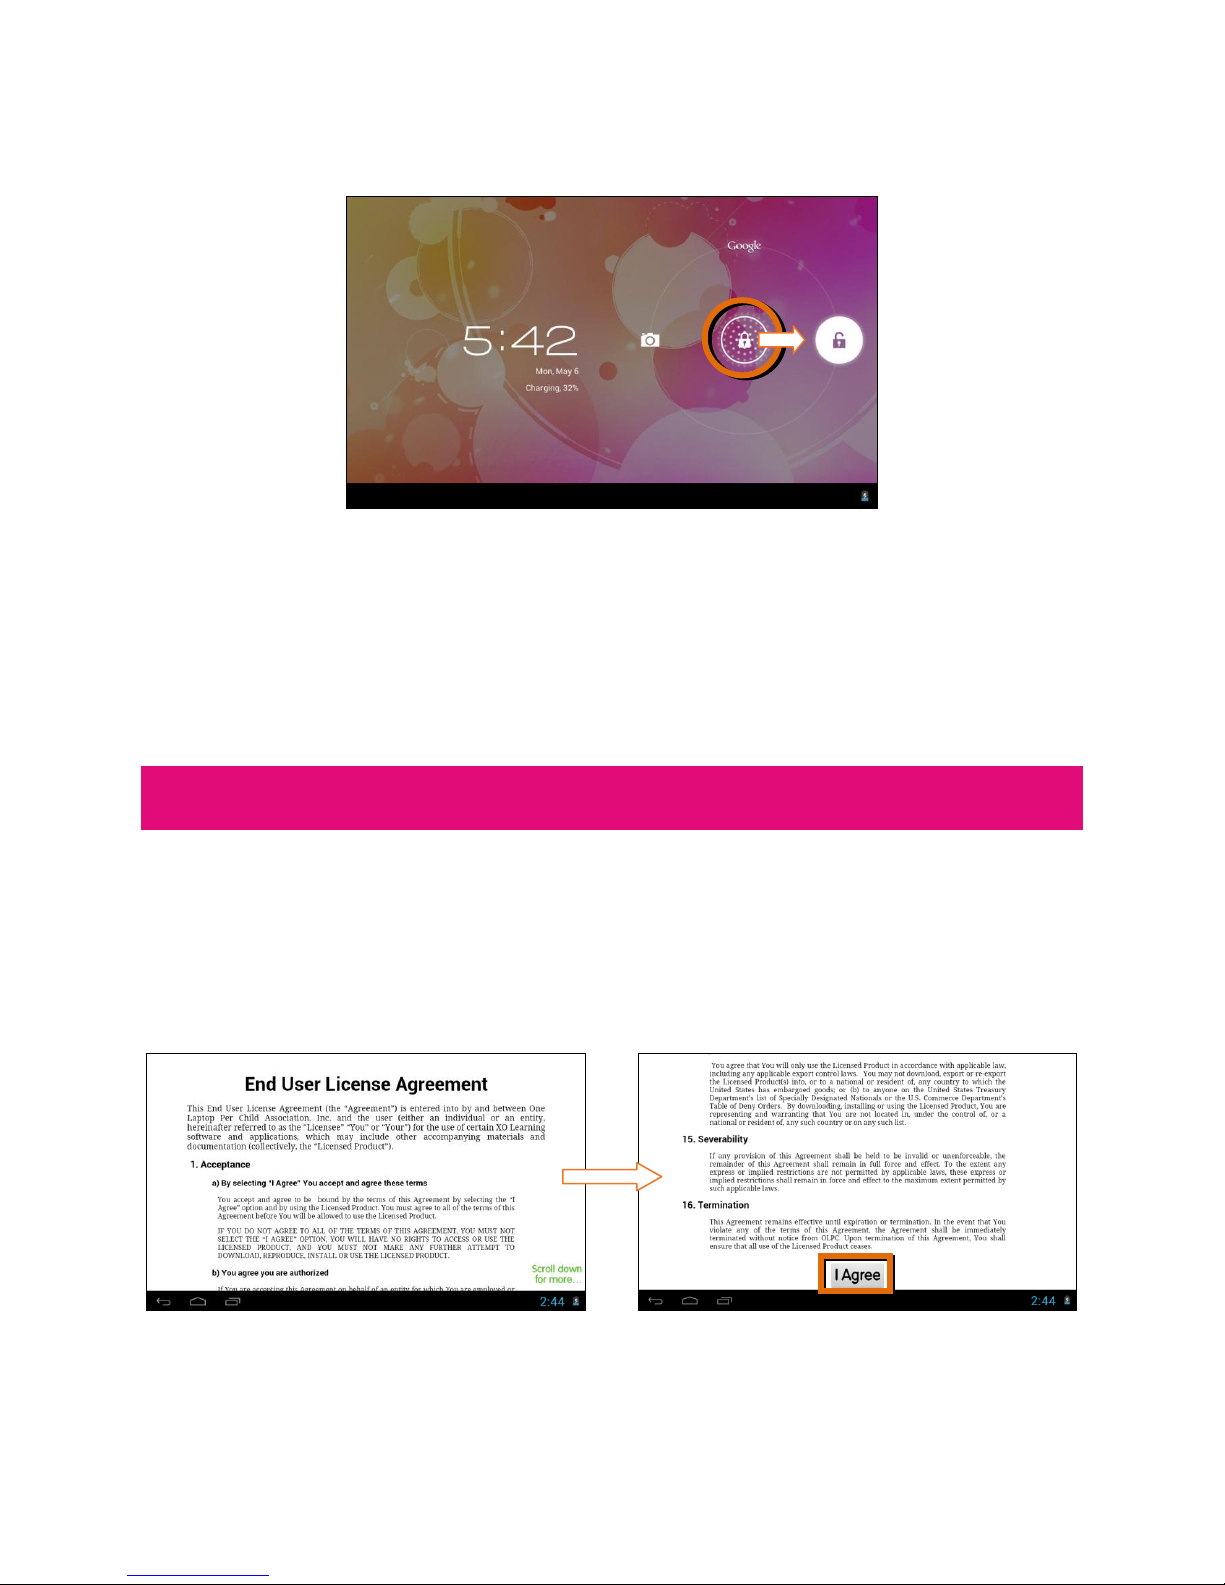
UNLOCK
To unlock your XO Tablet in Android mode, touch and hold the Lock icon. When it
turns into a circle drag it towards the right, to the Unlock icon.
Note: To unlock and activate the tablet’s camera, touch and hold the Lock icon
and when it turns into a circle drag it towards the left, to the Camera icon.
Initial Setup
The first time you power on your tablet you will be taken through the initial setup.
Note: It is recommended to fully charge your tablet before first use. For best
results, give your tablet an extended overnight charge before using it for the first
time.
LICENSE AGREEMENT
You may choose to read the End User License Agreement.
To continue, scroll down to the end of the License Agreement and touch I Agree.
Page 4
4
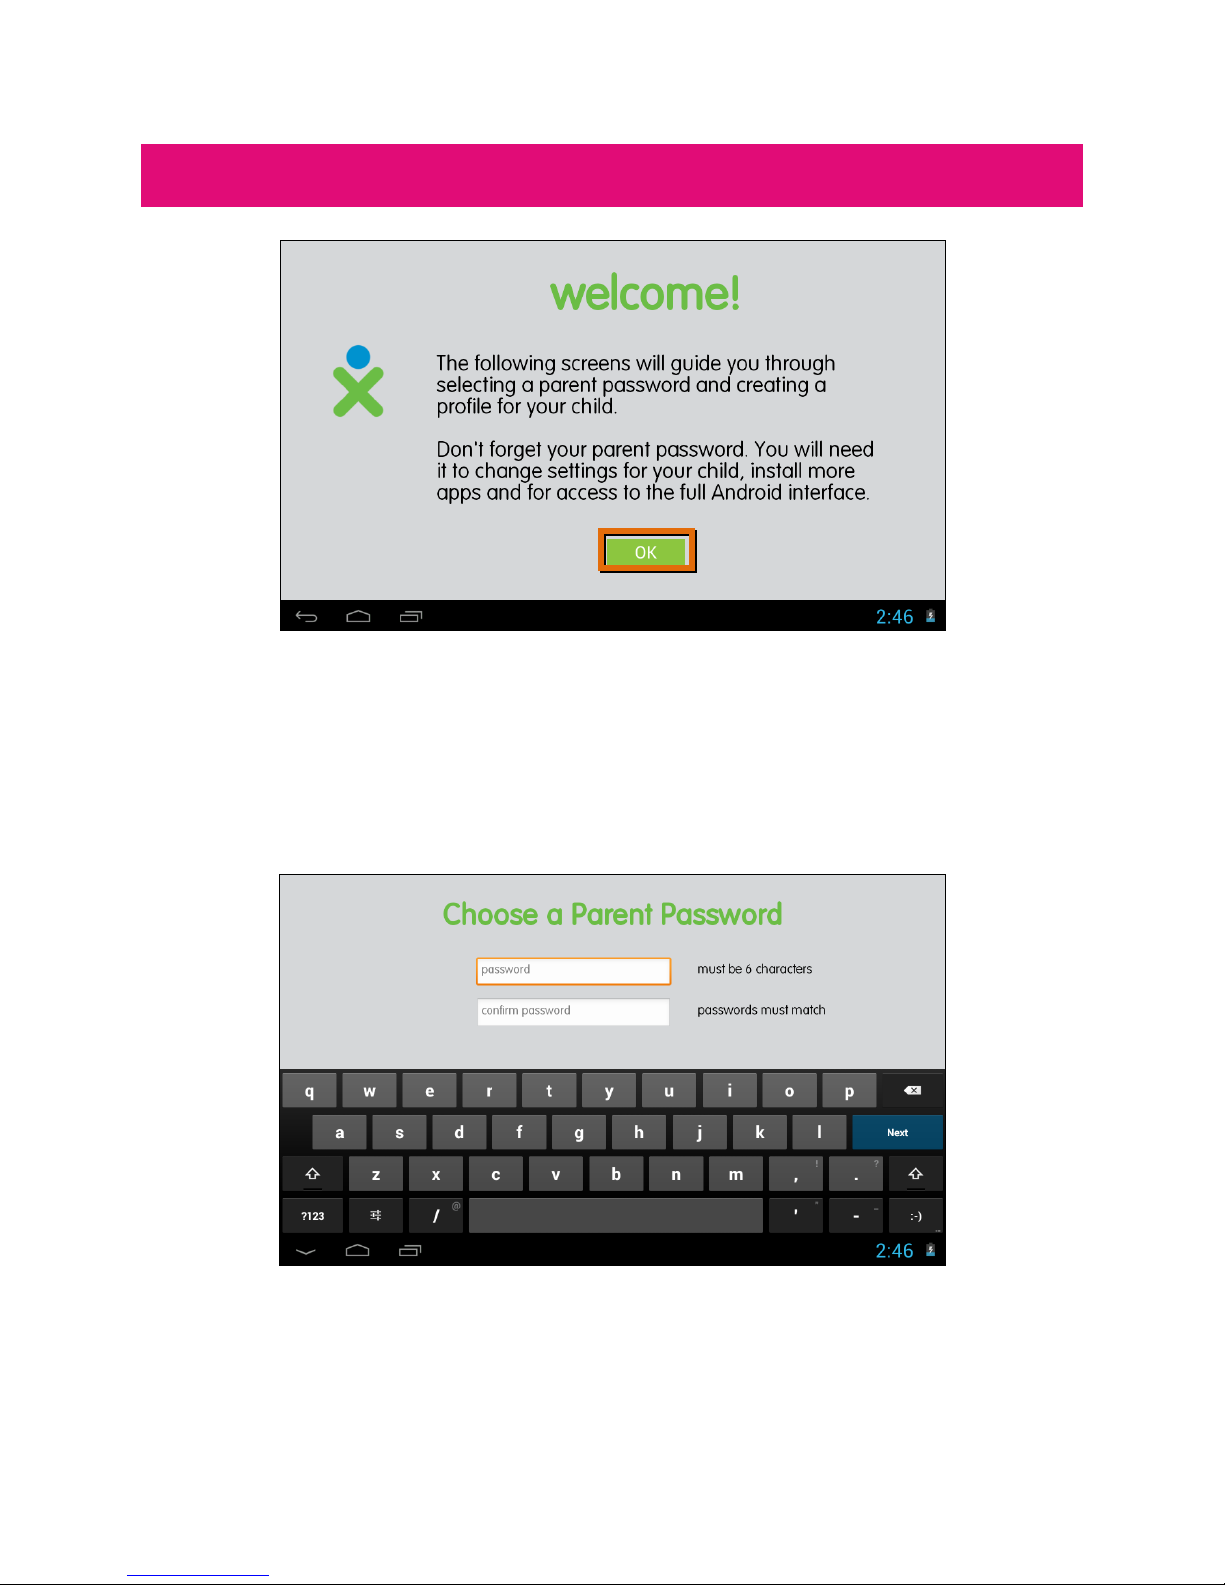
Welcome to Your XO Tablet
Welcome to your XO Tablet! You will now be prompted to continue the XO Setup.
This includes selecting your password and setting up your child’s profile. Touch
OK to continue this process.
CHOOSE A PARENT PASSWORD
Enter your password (must be 6 characters) and touch Next from the onscreen
keyboard. Then re-enter to confirm the password and touch Done from the
onscreen keyboard.
Page 5
5
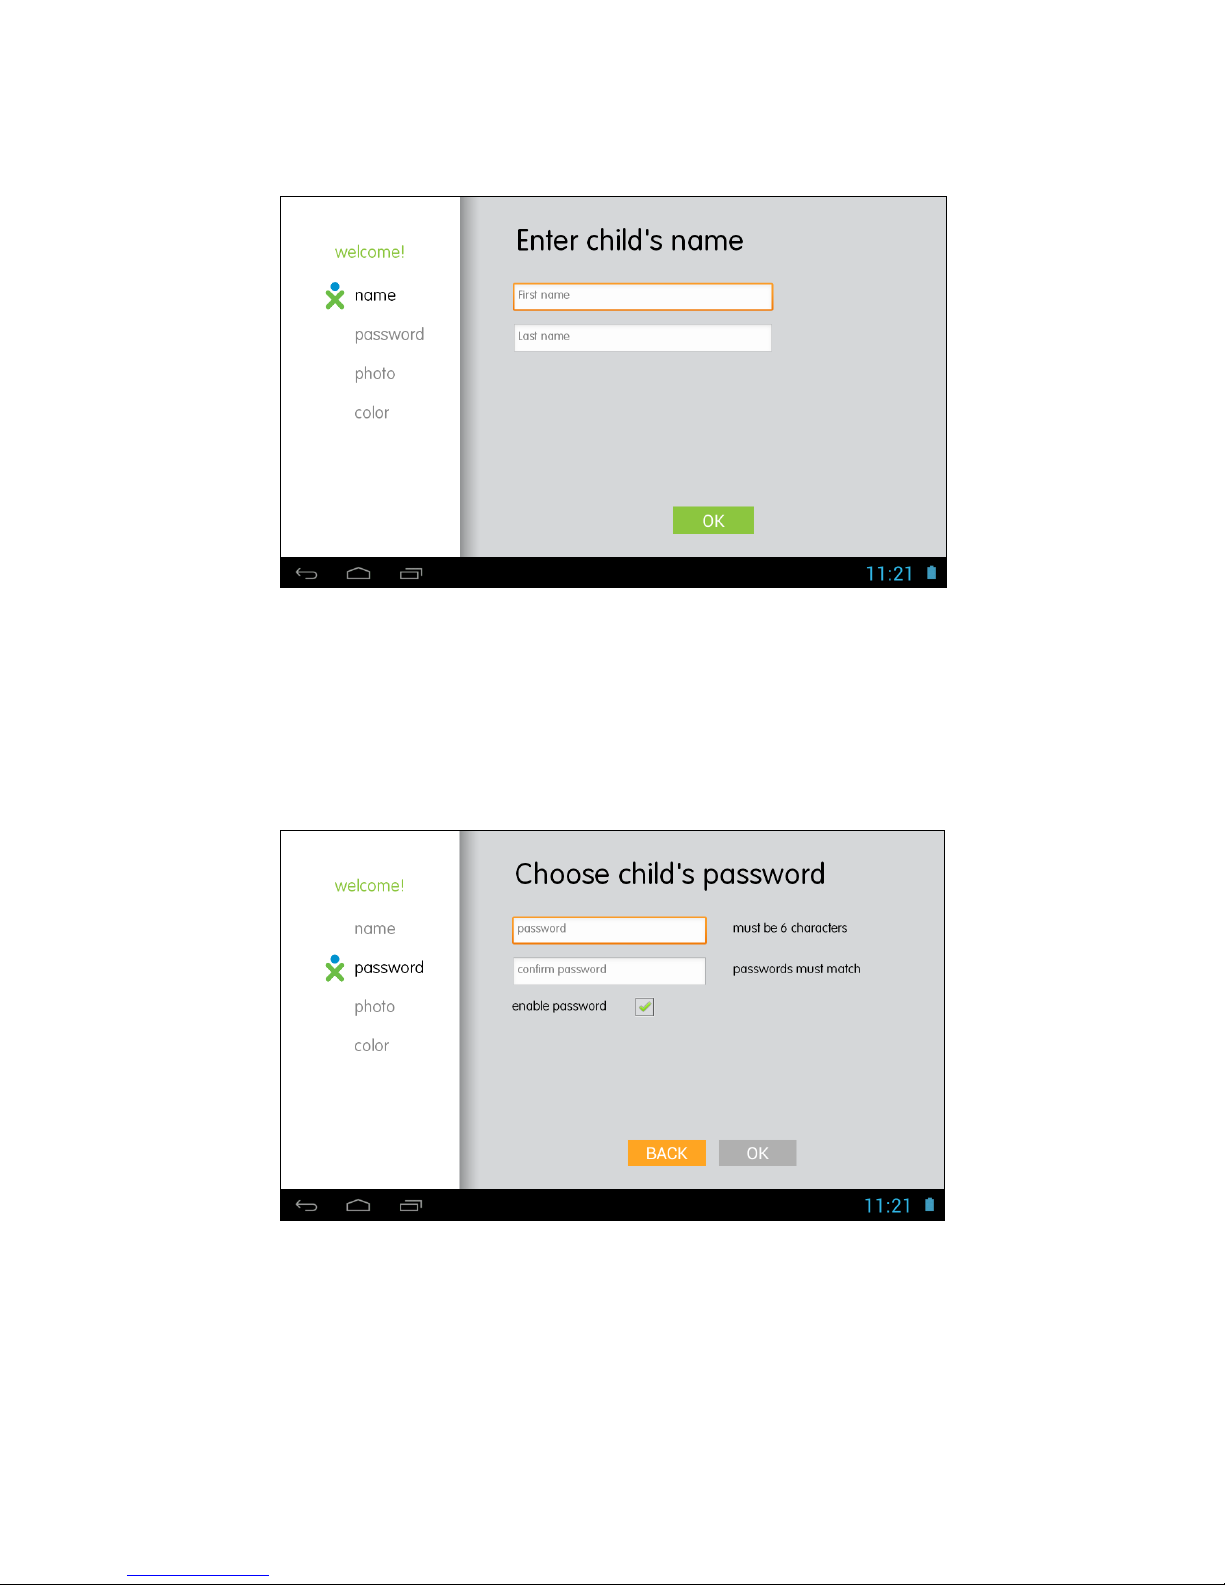
ENTER YOUR CHILD’S NAME
Enter your child’s First name and then touch Next from the onscreen keyboard.
Enter your child’s Last name and then touch Done from the onscreen keyboard.
Touch OK to continue.
CHOOSE YOUR CHILD'S PASSWORD
Enter a password for your child to use (must be 6 characters) and touch Next
from the onscreen keyboard. Then re-enter to confirm the password and touch
Done from the onscreen keyboard. The child’s password is enabled by default. If
you would like to disable the child’s need to enter a password, touch the box to
uncheck the enable password feature. After you have entered the child’s
password details, touch OK to continue.
Page 6

6
TAKE YOUR CHILD'S PHOTO
To personalize your child’s XO experience, take a photo by touching the Take
Photo camera icon.
Touch the Take Photo camera icon to first preview the photo, and then touch
the icon again to capture the photo.
Touch the Switch Camera icon to switch between the Front and the Rear
Camera.
Once you have taken the photo touch OK.
CHOOSE COLOR COMBINATION
Touch a color combination to select the XO user icon for your child and then
touch DONE to complete the XO setup and enter the Home screen.
Take Photo
Switch Camera
Page 7
7
Welcome to your XO Tablet!
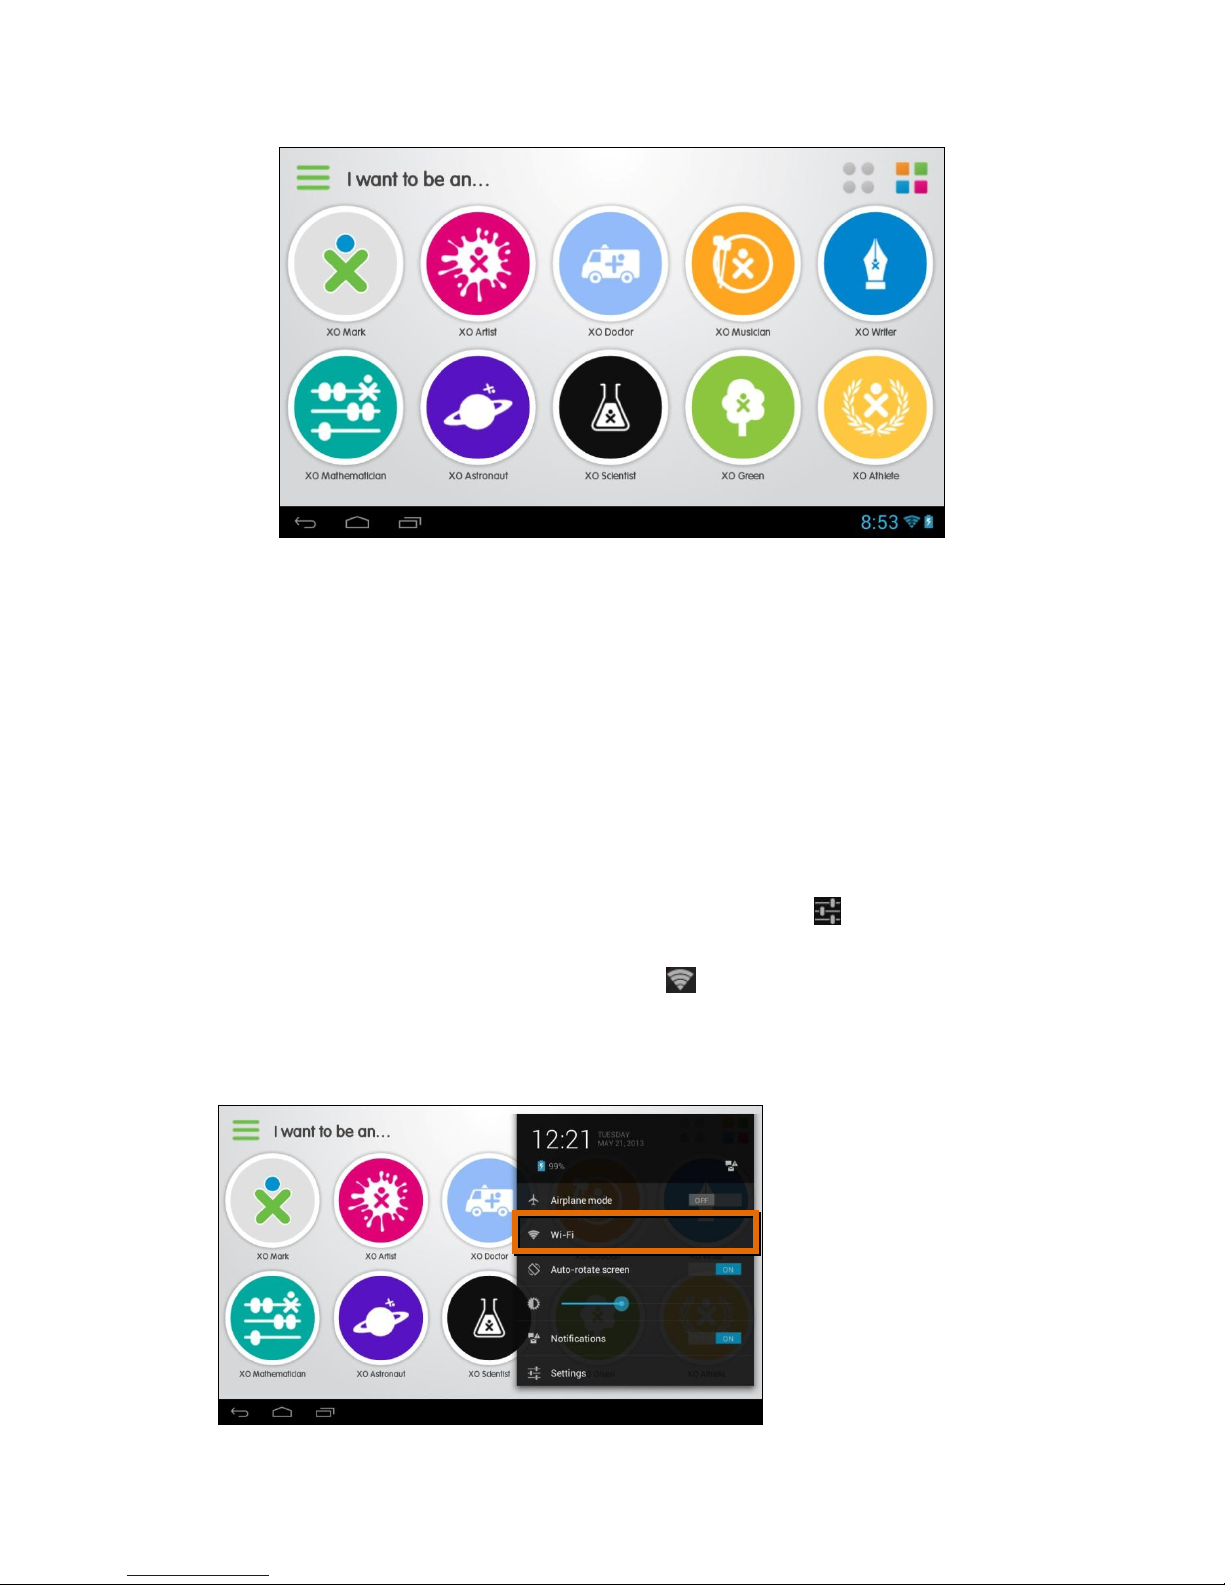
WIFI CONNECTION
You can connect your tablet to WiFi during or after the initial setup.
By default WiFi is turned OFF. To see available networks follow these steps to turn
WiFi ON:
1. Touch the status bar on the bottom right (where the battery icon is
displayed).
2. The window shade appears. Touch the Settings icon .
3. The window shade expands. Touch the Wi-Fi option.
Note: If you do not see the Wi-Fi option, then touch the Settings option.
You you will first be prompted to enter your (parent) password before the
Settings list appears if you have already finished the initial setup.
Page 8
8
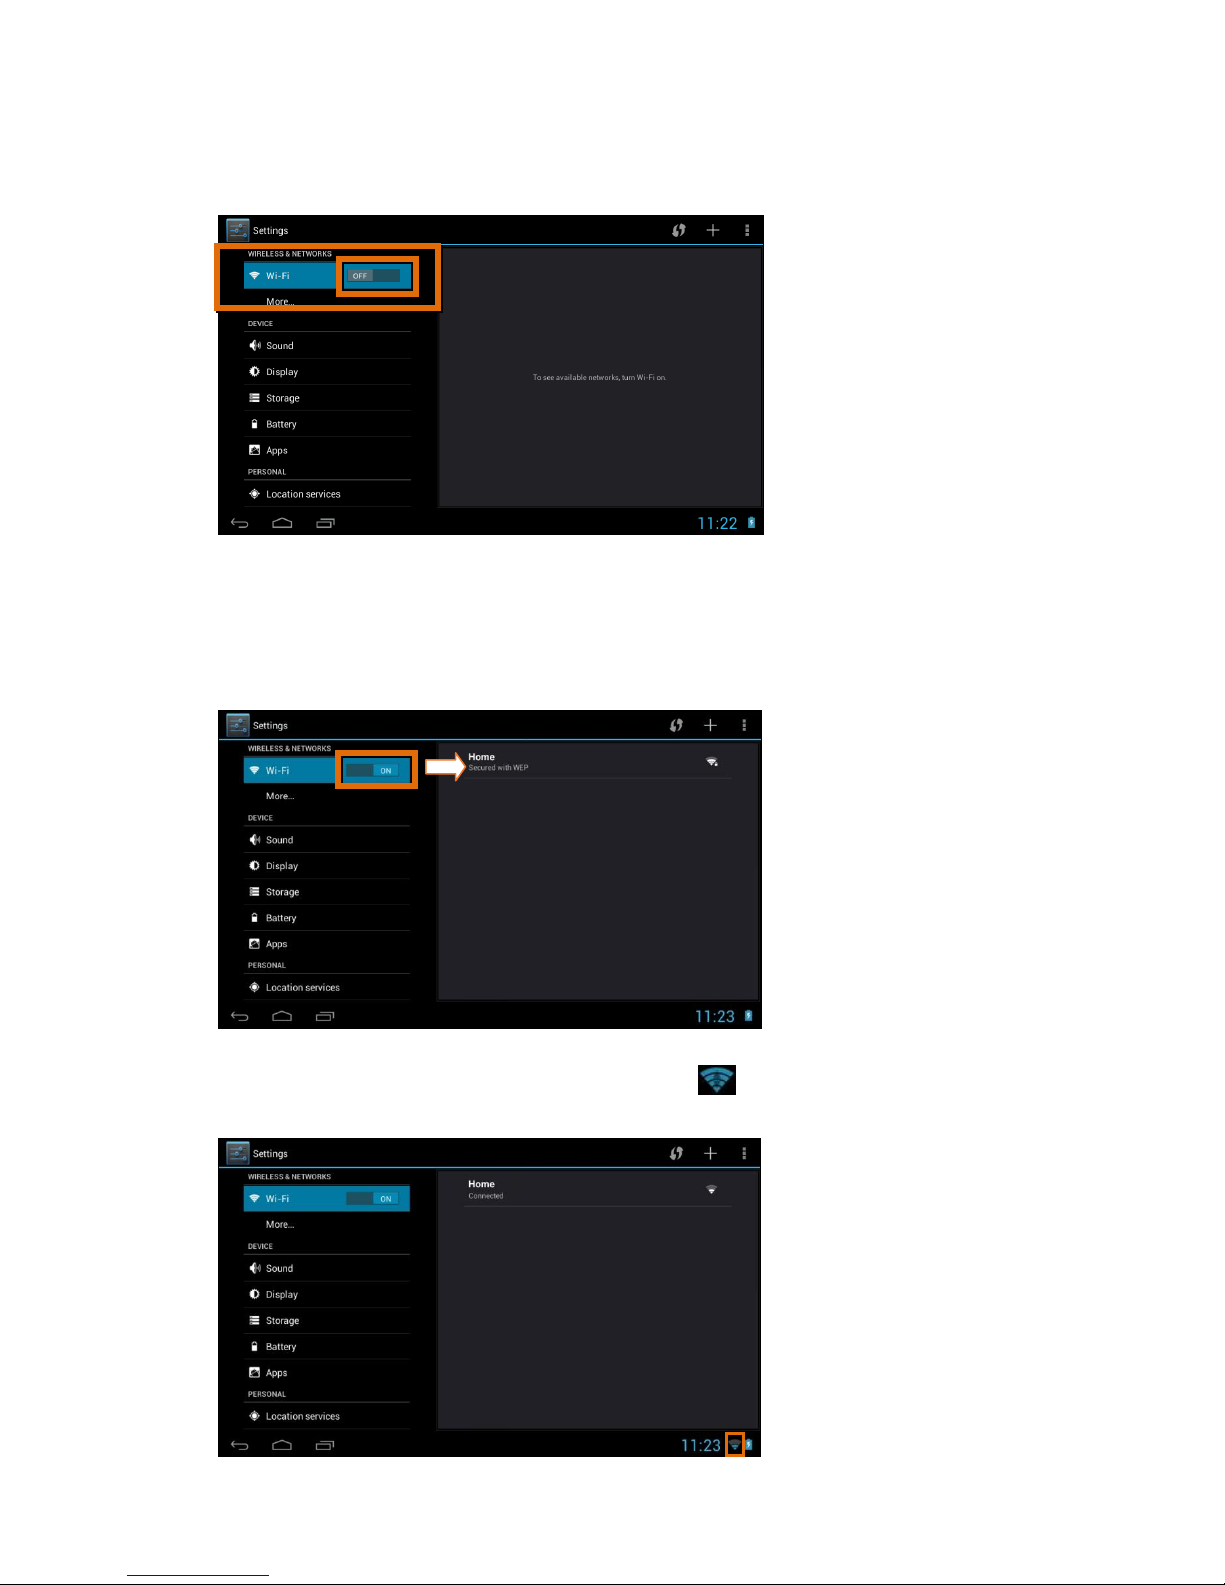
4. The Settings list appears. On the top is the ‘Wireless & Networks’ option
with the WiFi is displayed as OFF. Touch the OFF button to switch WiFi ON.
5. Once Wifi is selected as ON, the available networks are listed on the right.
Touch one of the networks listed to connect.
Note: If the network is protected, you will be prompted to enter a
password to the network. If so, enter the password and touch Connect.
6. Once connected, the WiFi connected icon appears on the bottom right
of the status bar and indicates the strength of the WiFi.
Page 9

9
Home Screen
Once you have completed the Initial Setup the Home Screen appears.
The orientation of the display screen rotates with the tablet as you turn it.
INTERFACE
Menu
‘Dreams’ Home Screen
‘My
Applications’
Screen
Dreams
Categories
Back Home Recent Time Battery Level
Wi-Fi Connected
User
Profile
Page 10

10
Dreams
Children dream about their future and what they would like to be when they
grow up. The Dreams Categories are based on these dreams.
The categories include:
XO DOCTOR, XO WRITER, XO MATHEMATICIAN, XO SCIENTIST, XO ATHLETE, XO
ARTIST, XO MUSICIAN, XO ENGINEER, XO ASTRONAUT, XO GREEN, XO
PROGRAMMER, XO PHOTOGRAPHER, XO CHEF, XO TRAVELER, AND XO TEACHER
Note: To view the Dreams on the next Dreams Home screen, touch the screen
and slide your finger to the right/left.
SELECT A DREAM
Touch a Dream Category to view the Dream elements.
For example, from the Home Screen touch the XO Artist dream icon to open
the Artist Dream.
Each Dream Category includes the following information: APPS, HERO, BOOKS
APPS:
A selection of apps appears divided by levels to give the child maximum freedom
to discover and explore in a safe environment with no limitation.
Touch an app to select and launch it.
Page 11

11
HERO:
Under each dream you will find a Hero - the person that best represents that
category. Touch the Hero’s photo to read his/her bio.
A hero can be changed by opening a Dream, and touching the Dream's current
Hero name. A series of fields for the Hero's first name, last name, and a web page
URL describing the hero are then shown in place of the default information.
Touch the generic picture icon to take a picture of your Hero using the rear-facing
tablet camera, and touch it again to save the photo.
Touch the reset button if you’d like to restore the original, default Hero or touch
the checkmark icon to save your new Hero information.
BOOKS:
Touch the Book icon to view a selection of books that are relevant to the
chosen Dream. Touch a book to open and begin reading.
To exit the selected Dream Category at any time and return to the Dream Home
Screen, press the X button on the top right.
Page 12

12
Menu Options
Touch the Menu Bar on the top left of the Dreams Home screen to view the
following menu options:
CURRENT USER PROFILE; ACCESS TO YOUR BOOKS, MUSIC, VIDEOS AND
INTERNET; LANGUAGE SELECTION; PARENTAL CONTROLS
Note: To exit the Menu Bar, touch Close.
LANGUAGE SELECTION – ENGLISH/SPANISH:
Your XO tablet comes with full content in both English and Spanish. All of the
Dreams offer their apps, books, games, videos and other content in both
languages with just a touch of an icon.
Touch the Menu Bar, and then touch the Español icon.
All XO tablet screens automatically switch to Spanish.
Note: When you are viewing the XO Tablet in Spanish, to switch back to English,
touch the English icon from the Menu Bar.
Page 13

13
PARENTAL CONTROLS:
The XO Tablet allows you to set up password protected user privileges for
multiple users and to limit access to the Internet, app store purchases and talk
and chat features. As your child matures, these privileges can be changed.
Tablets are always a family device shared by children, parents and even
grandparents. The XO Tablet is the perfect solution—a full-fledged Android tablet
with Google Play™ for older users and the educational tablet with its own app
store for children. Press one icon and the tablet changes to match the user. You
can set controls to limit child access to the Android version.
To access the Parental Controls touch the Menu Bar icon and then the
Parents icon. You will be promoted to enter your password.
The following options appear:
ADD CHILD, CURRENT CHILD PROFILE, SETTINGS, CHANGE PASSWORD, RETURN
TO ANDROID
ADD CHILD:
Set up password protected user privileges for each child. Follow the steps as
shown in the Initial Setup for the XO Tablet to create a new profile.
Note: The names of each child appear in the Menu > Parents list.
Page 14

14
CHILD PROFILE (S) – PROTECTION CONTROL:
From the Parents menu, touch one of the child profiles that you have created in
order to control the child’s access to Tablet apps, Internet, Google Play™ and
Google Talk. The child’s profile can also be edited or removed.
SETTINGS:
From the Parents menu, touch the Settings icon to view the General XO Home
settings, Software Updater and About.
CHANGE PASSWORD:
Select the Change Password option to change your password (up to 6 characters).
RETURN TO ANDROID:
Touch Return to Android to automatically exit the XO Tablet Mode and enter
the Android Mode.
Android Tablet Mode
XO Tablet Mode
Page 15

15
Upon entering the Android Tablet Mode for the first time the following screens
appear to guide you through viewing your available apps and creating shortcuts
for the apps you want to quickly access from your Home screen.
Viewing your Apps:
Touch the Android Apps icon, located on the top right corner of the screen,
to view all the tablet’s available apps.
Touch OK to continue to the next introduction screen.
Creating App Shortcuts on the Home Screen:
To add an app from your Apps screen to your Home screen as an app shortcut,
touch and hold the selected app from the apps screen until it appears on the
Home screen. This allows you to easily and quickly access your favorite apps.
To move the app shortcut to a different Home screen, touch and hold the
shortcut while you drag it to another screen.
To delete an app shortcut from a Home screen touch and hold the app shortcut
until ‘X Remove’ text appears on the top of the screen. Then drag the shortcut to
the X and the shortcut will be removed from the Home screen.
Note: To return from Android Mode to your XO Tablet Mode:
Touch the Home icon on the bottom left section of the status bar.
Alternatively, open the apps screen and locate and then touch the XO Home
app icon.
Page 16

16
CURRENT USER PROFILE:
At the top of the Menu Bar the current User’s Name and XO Icon are displayed.
CURRENT USER’S NAME:
Touch the User’s Name to edit the child’s name, password, photo, or XO icon
color combination.
CURRENT USER’S XO ICON:
Touch the User’s XO Icon to change the user interface colors.
ACCESS TO YOUR BOOKS, MUSIC, VIDEOS AND INTERNET:
Touch the Books, Music, and Videos icons from the Menu Bar to access
the respective media libraries on your tablet.
Touch the Internet icon from the Menu Bar to access the Internet.
Please note: WiFi connection is required to access the Internet.
Page 17

17
Customized Dream: User’s Profile
The current User appears as the first Dream icon within the Dreams Home screen.
Touch this customized icon to view the following options:
JOURNAL , MY FILES, BOOKS, DIGITAL PASSPORT CE
Note: Touch the X icon, located on the top right, to exit the Customized Dream
User Profile.
Page 18

18
JOURNAL:
To improve child learning is to help you to more actively participate and guide
your child’s tablet usage. The XO Tablet comes with three dashboards to help you
better understand you children’s intellectual development. One dashboard
captures usage in terms of the famous Gardner Learning Styles, another shows
which dreams are the most popular and the third shows usage by type of
content—apps, games, and books. How your child learns comes alive in the
dashboards.
Touch Journal to open the display for all Dreams and the number of times per
day applications in each category are launched.
Touch a specific Dream to show a chart for the current week of how many times
applications in that Dream have been launched per day. You can select prior
weeks as well.
MULTIPLE INTELLIGENCES ASSESSMENT:
Touch the User's picture in the XO {Child’s Name} Dream offers a multiple
intelligences assessment or your child.
Page 19

19
MY FILES:
Touch My Files to display a directory of all files stored on your Tablet.
This includes music, videos, photos as well as various types of document files.
BOOKS:
Touch Books to view your entire library. Touch a book cover or book title to
select and open the book.
Page 20

20
DIGITAL PASSPORT CE:
Digital Passport is an application which teaches proper online Internet safety
and similar topics. Touch the Digital Passport icon to launch the app.
Multiple User and Android Unlock
MULTIPLE USER UNLOCK
The XO Tablet offers multiple profiles so that each of your children can enjoy their
own customized settings and apps.
Page 21

21
To unlock the XO Tablet when there are multiple users, the Unlock Screen
appears with the icon and name of each User.
Touch and drag the Locked XO Icon in the middle of the screen towards the
User’s XO Icon you wish to use. Enter the User’s password (if needed) to unlock
and enter the Dreams Home screen. All settings remain as per what was defined
for that specific User.
To see the additional children when the tablet has four or more child users, scroll
up or down within the arc of the visible three users until the user’s icon you need
is shown, then touch and drag the locked XO Icon toward to it.
ANDROID MODE UNLOCK
If an adult wants to use the tablet, touch and drag the Locked XO Icon in the
middle of the screen towards the Android logo to enter the Android Mode. Insert
the parent password to unlock the standard Android Mode of the tablet.
Remember:
You can also access the Android Mode while you are within a child’s user profile.
Touch the Menu Bar > then touch the Parents icon (enter your password
when prompted) > and then touch the Return to Android icon.
This automatically exits the XO Tablet Mode and enters the Android Mode.
Page 22

22
If you would like more detailed instructions beyond the Quick Start Guide, please
refer to the online User’s Manual.
If you require further assistance, please visit www.xotablet.com. For phone
support in the US please call toll free 877-238-1563.
© 2013 Sakar International, Inc. All rights reserved.
195 Carter Drive
Edison, NJ 08817
Vivitar One Year Warranty
This warranty covers the original consumer purchaser only and is not transferable.
This warranty covers products that fail to function properly UNDER NORMAL
USAGE, due to defects in material or workmanship. Your product will be repaired
or replaced at no charge for parts or labor for a period of one year.
WHAT IS NOT COVERED BY WARRANTY
Damages or malfunctions not resulting from defects in material or workmanship
and damages or malfunctions from other than normal use, including but limited
to, repair by unauthorized parties, tampering, modification or accident.
TO OBTAIN WARRANTY SERVICE AND TROUBLESHOOTING
INFORMATION:
Call 877-238-1563 in the U.S. or 0-800-917-4831 in the UK or Visit our website at
www.xotablet.com .
Page 23

23
To receive Warranty service along with the name and address of an authorized
product service center, the original consumer purchaser must contact us for
problem determination and service procedures. Proof of purchase in the form of a
bill of sale or receipted invoice, evidencing that the Product is within the
applicable Warranty period(s), MUST be presented in order to obtain the
requested service. It is your responsibility to properly package and send any
defective products along with a dated copy of proof of purchase, a written
explanation of the problem, and a valid return address to the authorized service
center at your expense. Do not include any other items or accessories with the
defective product. Any products received by the authorized service center that
are not covered by warranty will be returned unrepaired.
NO WARRANTIES, WHETHER EXPRESS OR IMPLIED, INCLUDING, BUT NOT
LIMITED TO, ANY IMPLIED WARRANTIES OF MERCHANTABILITY OR FITNESS FOR
A PARTICULAR PURPOSE, OTHER THAN THOSE EXPRESSLY DESCRIBED ABOVE
SHALL APPLY. DISTRIBUTOR FURTHER DISCLAIMS ALL WARRANTIES AFTER THE
EXPRESS WARRANTY PERIOD STATED ABOVE. NO OTHER EXPRESS WARRANTY
OR GUARANTY GIVEN BY ANY PERSON, FIRM OR ENTITY WITH RESPECT TO THE
PRODUCT SHALL BE BINDING ON DISTRIBUTOR. REPAIR, REPLACEMENT, OR
REFUND OF THE ORIGINAL PURCHASE PRICE - AT DISTRIBUTOR’S SOLE
DISCRETION -ARE THE EXCLUSIVE REMEDIES OF THE CONSUMER. IN NO EVENT
WILL DISTRIBUTOR, ITS MANUFACTURERS, OR SAKAR INT. BE LIABLE FOR ANY
INCIDENTAL, DIRECT, INDIRECT, SPECIAL, PUNITIVE OR CONSEQUENTIAL
DAMAGES (SUCH AS, BUT NOT LIMITED TO, DAMAGES FOR LOSS OF PROFITS,
BUSINESS, SAVINGS, DATA OR RECORDS) CAUSED BY THE USE, MISUSE OR
INABILITY TO USE THE PRODUCT. EXCEPT AS STATED HEREIN, NO OTHER
WARRANTIES SHALL APPLY. NOTWITHSTANDING THE FOREGOING,
CONSUMER’S RECOVERY AGAINST DISTRIBUTOR SHALL NOT EXCEED THE
PURCHASE PRICE OF THE PRODUCT SOLD BY DISTRIBUTOR. THIS WARRANTY
SHALL NOT EXTEND TO ANYONE OTHER THAN THE ORIGINAL CONSUMER WHO
PURCHASED THE PRODUCT AND IS NOT TRANSFERABLE.
Some countries, states or provinces do not allow the exclusion or limitation of
incidental or consequential damages or allow limitations on warranties, so
limitation or exclusions may not apply to you. This warranty gives you specific
legal rights, and you may have other rights that vary from state to state or
province to province. Contact your authorized retailer to determine if another
warranty applies. This product is manufactured, distributed and sold by SAKAR
International, Inc. All other trademarks are the property of the respective
owner, who has not sponsored, endorsed or approved this product.
Page 24

24
This device complies with the part 15 of the FCC rules. Operation is subject to the following two
conditions:(1) this device may not cause harmful interference , and (2) this device must accept
any interference received, including interference that may cause undesired operation.
Caution: changes or modifications not expressly approved by the party responsible for
compliance could void the user's authority to operate the equipment.
NOTE: This equipment has been tested and found to comply with the limits for a Class B digital
device, pursuant to Part 15 of the FCC Rules, These limits are designed to provide reasonable
protection against harmful interference in a residential installation. This equipment generates.
Uses and can radiate radio frequency energy and, if not installed and used in accordance with
instructions. May cause harmful interference to radio or -television reception, which can be
determined by turning the equipment off and on, the user is encouraged to try to correct the
interference by one or more of the following measures:
__ Reorient or relocate the receiving antenna.
__ Increase the separation between the equipment and receiver.
__ Connect the equipment into an outlet on a circuit different from that to which the receiver is
connected.
__ Consult the dealer or experienced radio/ TV technician for help.
CANADIAN COMPLIANCE STATEMENT
This Class B digital apparatus complies with Canadian ICES-003. Cet appareil
numérique de la classe B est conforme à la norme NMB-003 du Canada.
EU COMPLIANCE STATEMENT
Sakar International Inc. hereby declares that this wireless device is in compliance
with the essential requirements and other relevant provisions of the R&TTE and
EMF Directive.
Page 25

25
FAQ
Q: Why isn’t my tablet turning on?
A: Before using your tablet, it is necessary to charge its internal baery using the
included charger. For best results, give your tablet an extended overnight charge
before using it for the first me.
Q: I am having diculties connecting to the internet. What should I do?
A: In order to access the Internet using your tablet, you will need to connect to
the nearest Wi-Fi network. Note that some networks require you to enter a
password. Talk to the network administrator of that Wi-Fi network for password
informaon. Consult the full User’s Manual of your
device for precise informaon
on connecng to Wi-Fi. Unfortunately, if your device is out of the range of any
nearby networks you will not be able to access any online features.
Q: I am having issues with an app which I have downloaded. What should I do?
A: For support on any third party apps, soware or accessories, you will need to
contact the company, the soware developer or manufacturer for support.
Q: Where can I nd more information about my device ?
A: For more informaon about your XO Tablet please go to the following website:
hp://xotablet.com/
©2013 Sakar Internaonal, Inc. All rights reserved.
 Loading...