

Sakar 72480 Owner's Manual
7.1Mega Pixel Optical Zoom Digital Camera
Owner’s Manual
© 2007 Sakar International, Inc. All rights reserved.
Windows and the Windows logo are registered trademarks of Microsoft Corporation.
All other trademarks are the property of their respective companies.

Table of Contents
Introduction ....................................................................................................................................... 3
Key Features ..................................................................................................................................... 3
What your camera includes ............................................................................................................... 4
Computer System Requirements for Windows ................................................................................. 4
Computer System Requirements for Macintosh ................................................................................ 4
A Quick Look at Your Camera .......................................................................................................... 5
The mode dial ................................................................................................................................... 6
Icons on the LCD Screen .................................................................................................................. 7
Main Buttons ..................................................................................................................................... 9
Preparing Your Camera for Use ...................................................................................................... 10
Installing SD Memory Card ............................................................................................................. 11
TV out function ................................................................................................................................ 12
Starting Your Camera ..................................................................................................................... 13
Camera Mode ................................................................................................................................. 13
Video Mode ..................................................................................................................................... 18
Playback Mode ............................................................................................................................... 18
Setup Mode ..................................................................................................................................... 28
Transferring Images and video clips to your Macintosh .................................................................. 38
Install PhoTags Express Software on MS Windows ....................................................................... 38
Everything you need to get the most from your photos ................................................................... 41
Download photos to your PC .......................................................................................................... 43
Viewing Videos ............................................................................................................................... 50
Maintenance of Your Digital Camera .............................................................................................. 50
Sakar Warranty Card ...................................................................................................................... 50
2

Appendix A: Technical Specifications ............................................................................................. 52
Appendix B: Troubleshooting ......................................................................................................... 53
Introduction
Thank you for purchasing the 7.1 Mega Pixel Optical Zoom Digital Camera. Everything you need to take
quality digital photos is included with your camera. Please read this manual carefully FIRST in order to get the
most out of your digital camera.
Key Features
• Digital Video 320 x 240 Pixels, 640 x 480 Pixels.
• 7.1 mega pixel camera with choice of 7 digital camera resolutions – 3072x2304 pixels (7MP), 2560x1920
Pixels (5MP), 2304x1728 pixels (4MP) 2048x1536 pixels (3MP), 1600x1200 Pixels (2MP),1280x960 Pixels
(1MP), 640x480 Pixels (VGA).
• 2.4 Inch TFT Color LCD monitor
• 3x Optical zoom
• 4x Digital zoom
• Built-in SDRAM Memory (32MB)
• SD Memory Card Slot accepts SD compatible memory cards up to 1GB.
• Built in Flash
• PhoTags Express software for managing and enhancing your photos, printing, sending photos by e-mails and
much more.
3

What your camera includes
• Camera
• PhoTags Express installation CD
• USB cable
• User’s Manual
• Strip
• AV cable
Computer System Requirements for Windows
To be able to download photos to your PC you will need the following minimum configuration:
• Pentium processor or above with Windows 2000, XP and VISTA (32-bit edition).
• 128 MB RAM, 100 MB free disk space
• Available USB Interface
• CD-ROM Drive
• Recommended screen resolution 1024 X 768 pixels or higher.
• 16-bit color or higher display adaptor.
Computer System Requirements for Macintosh
• Power Macintosh G3 500 MHz or higher
• Mac OS X version 10.2.6 or later
• 128 MB or more available system RAM (256 MB recommended), 150 MB free disk space
• 800 x 600 or higher-resolution monitor displaying millions of colors
4
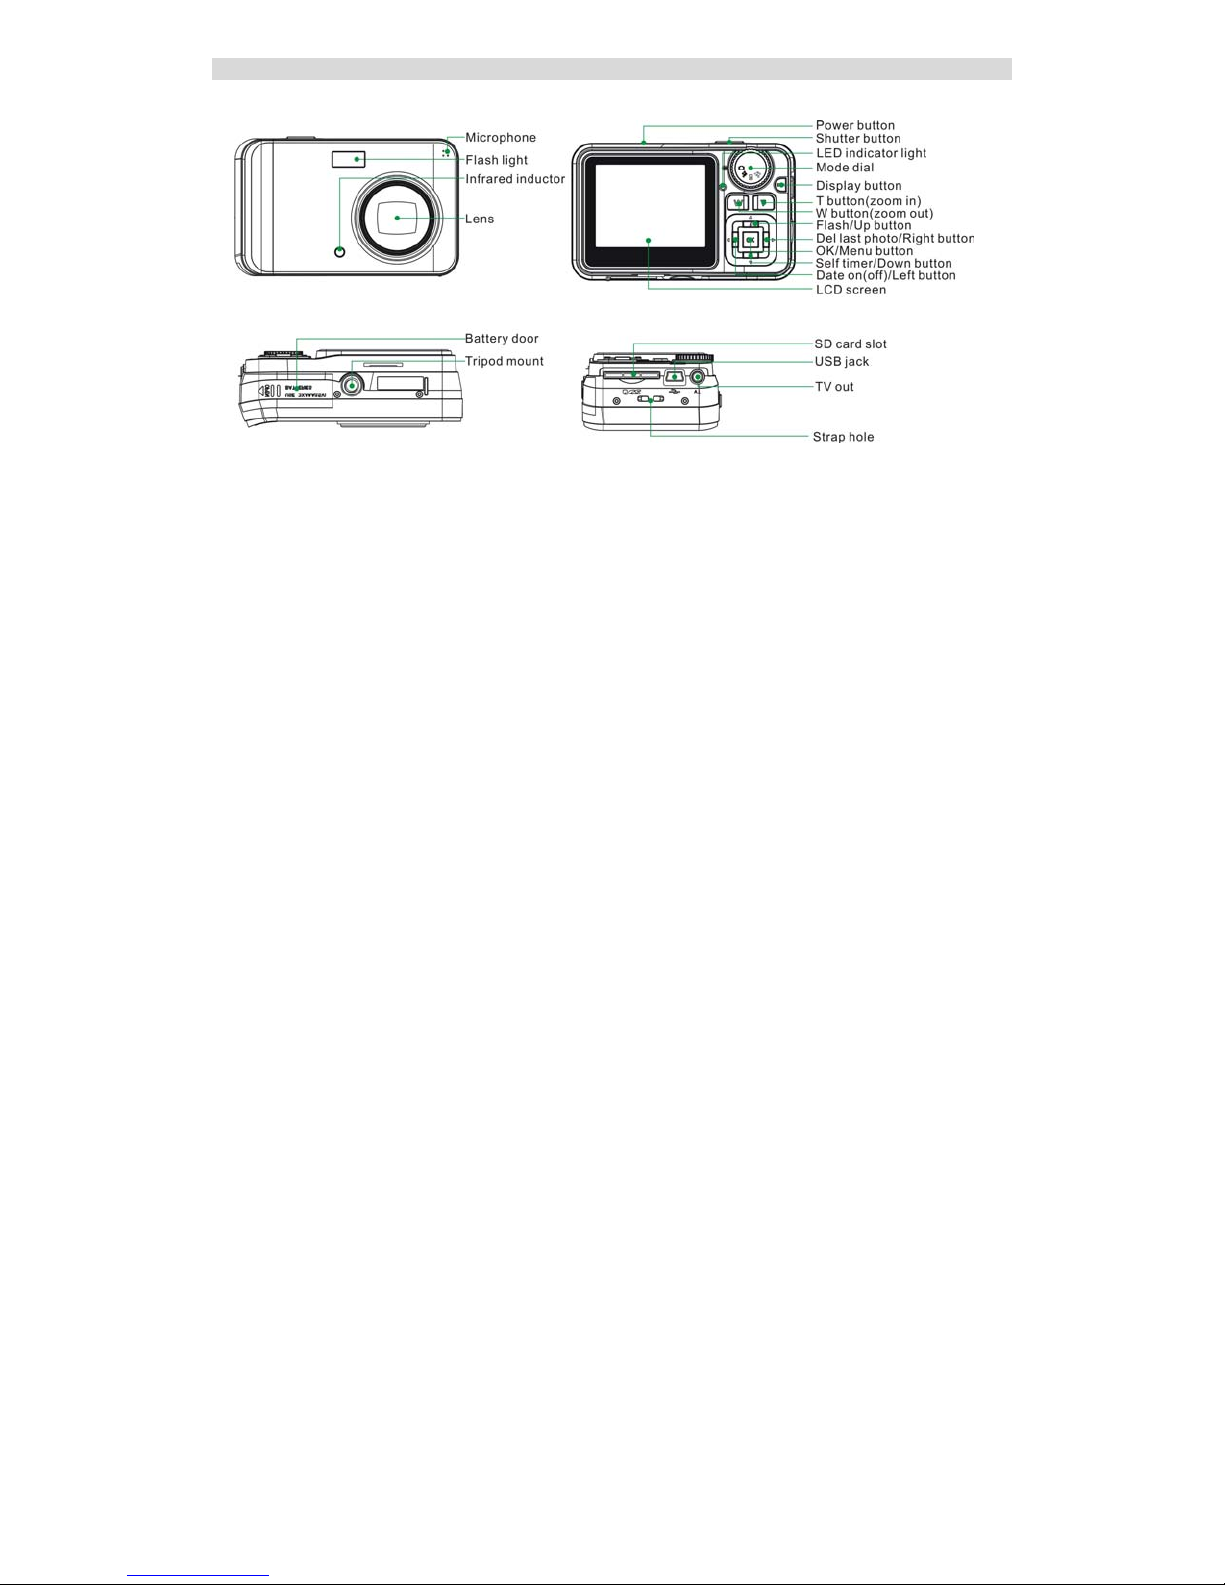
A Quick Look at Your Camera
5

The mode dial
• Camera Mode:
Take still photos
• Video Mode:
Capture video
• Playback Mode:
View, print and edit photos and play videos
• Setup mode
To set “Image setting”, “Exposure”, “White balance”, “Sharpness”, “Quality”, “Frequency”, “Date”, “Auto off”,
“Format memory card”, “Digital zoom”, “Key tone”, “Tv out”, “Color”, “Fw version”,
6
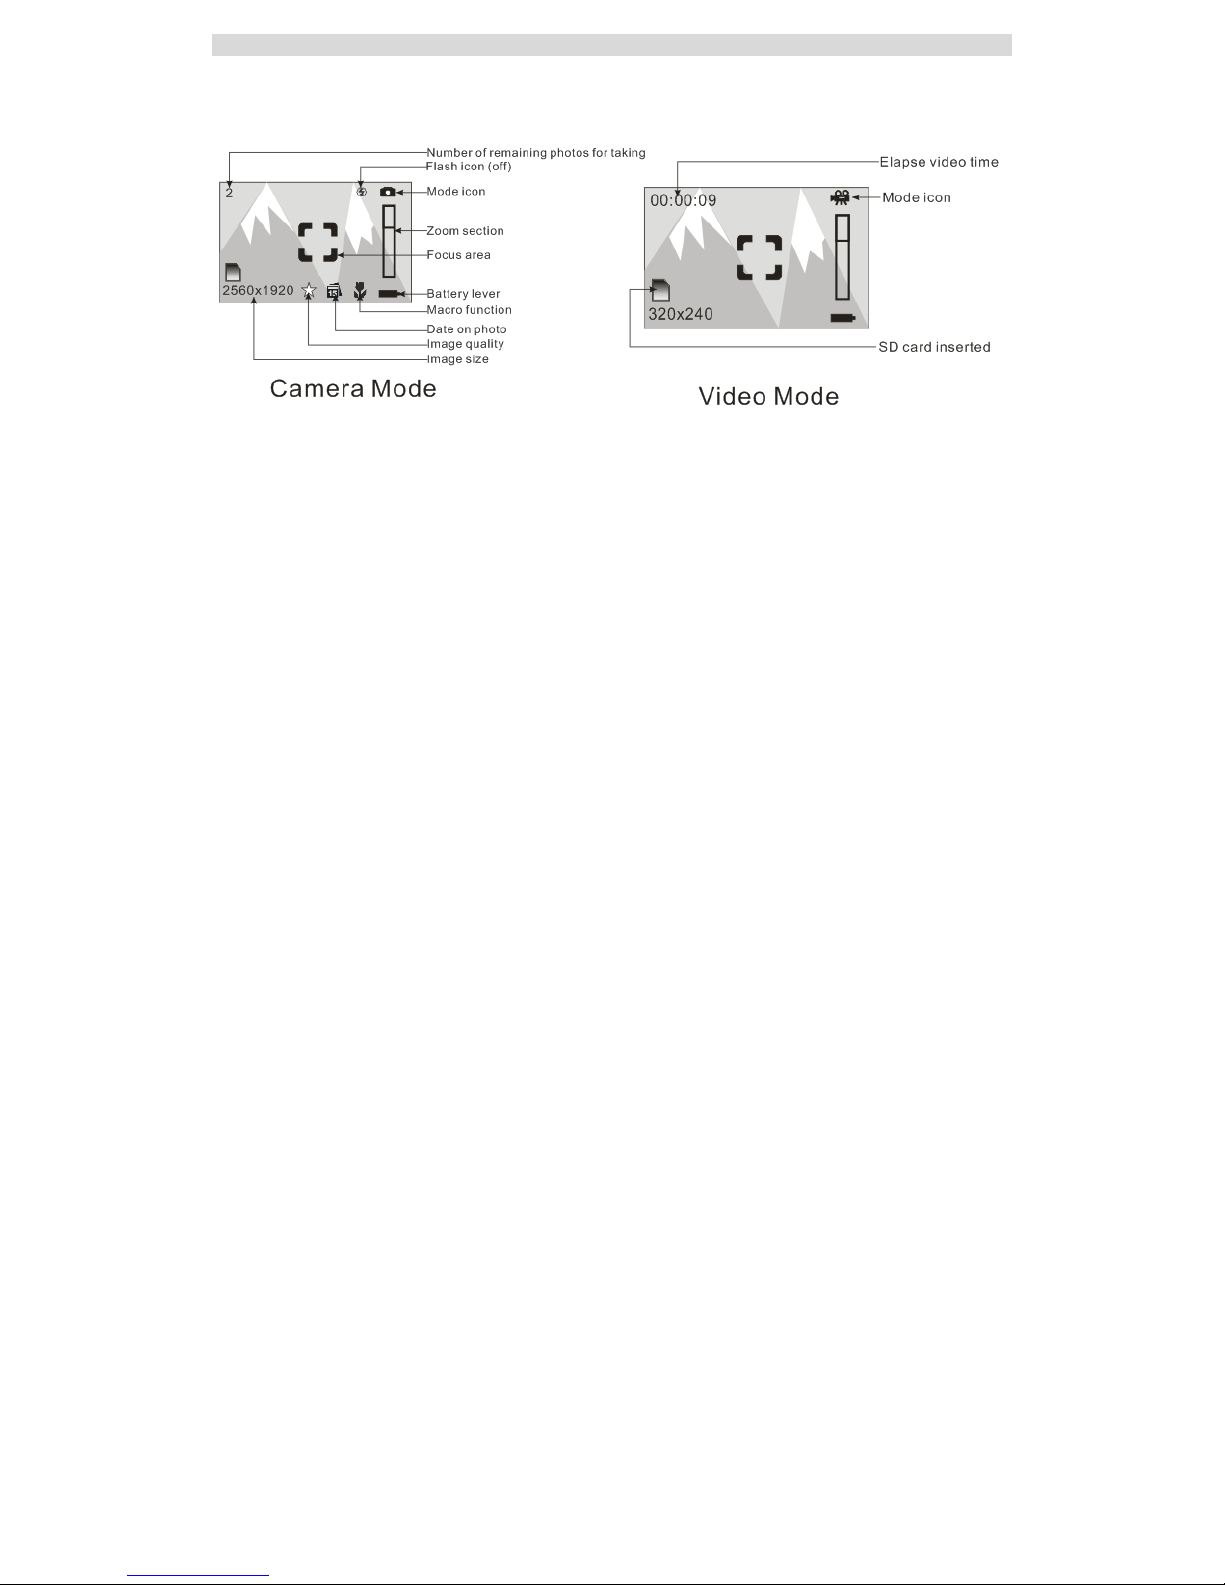
Icons on the LCD Screen
7
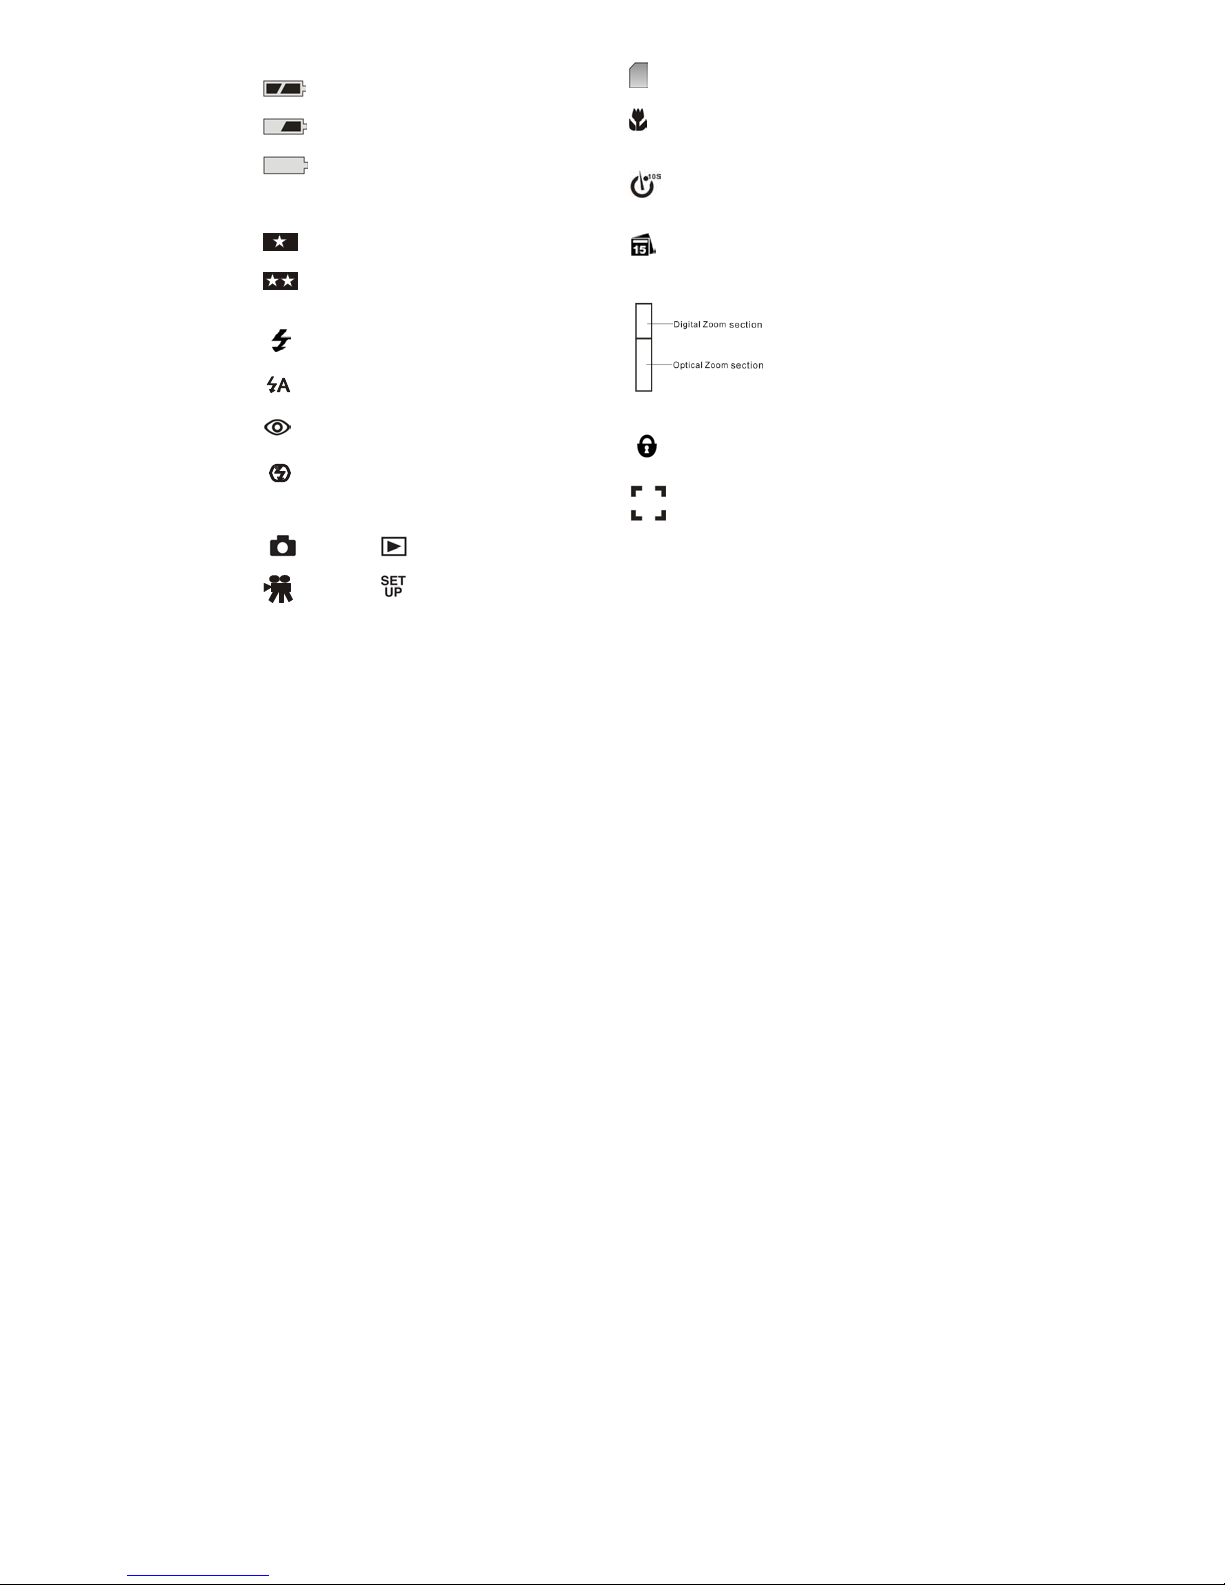
Battery power level
Full battery power
Medium battery power
Low battery power
Photo quality
Standard quality
High quality
Flash
Force Flash
Auto
Reduce red eyes
No Flash
Mode
Camera Playback
Video Set up
SD Card inserted
Macro Capture
Self-timer
Self-timer On
Date
Zoom section:
Protect
Protect On
Focus area
8

Main Buttons
Power on/off:
Press power button to turn your camera on.
Pressing it again will turn your camera off.
Navigation Buttons
The Navigation buttons are used to navigate and
select functions.
Up/Flash
Shutter button
(Take photos)
Down/ Self –Timer
Left/Date
Right/Delete
OK/ (Menu)
Display
Zoom out
Zoom in
9

Preparing Your Camera for Use
Battery Installation
Your camera requires three AAA batteries. Insert the batteries into the camera:
1. Slide and open the cover of the battery compartment.
2. Please make sure that the correct battery is inserted with the correct polarity facing up.
3. Please refer to the diagram below for the correct insertion method.
4. Close battery door.
When the Low Battery icon is flashing, you need to replace your camera’s batteries. If you do not have an
SD memory card in the camera, please download these photos you have on the camera before switching off the
camera.
WARNING: Unless you are using an SD memory card, power off your camera or opening the battery
compartment and removing the battery will erase the photos currently stored in the camera.
Download your photos as often as possible. Photos will be lost when the camera Auto switch-off or
the battery runs low. Do not open the battery door before switch off the camera.
NOTE: If you do not intend to use your camera for an extended period, remove the batteries to avoid battery
leakage and corrosion.
10

Installing SD Memory Card
Your camera has a memory card slot that enables you to insert any “SD” compatible memory card. Adding a
memory card will allow you to increase the capacity of your camera before you have to transfer photos/videos to
a PC. Photos and videos stored in this manner will not be lost regardless of any change in battery power.
Note: Limited internal memory is provided for test images. Those images will be deleted when camera power is
turned off. Please download the test images before turning the power off. SD memory card is required for
normal use.
Installing the SD Memory Card:
1. Locate the Memory card slot as illustrated above.
2. Insert the memory card into the slot.
3. Push the card in until you feel it "click" into position. The top of the card should be flushed with the
surface of the camera. A
card is installed.
4. Once an external memory card is inserted in the camera all the images taken will be stored on the
external memory card.
Caution:
• Be sure to format your SD memory card with the camera in the first time using (See “Format” in Set Up mode).
• Formatting will delete all the data on the SD Memory Card.
• Do not remove the SD Memory Card during formatting as this may damage the card and render it unusable.
• Formatting will delete protected data too.
icon will be visible on the LCD screen indicating that an external memory
11
• SD Memory Cards formatted on a PC or device other than the camera cannot be used. Be sure to format the
card with the camera.
• When you power off the camera or change batteries, all the data in the built-in memory will be deleted, please
download the test images to your PC.
• DO NOT rotate the Mode dial if your camera is connected to the printer when using PictBridge.
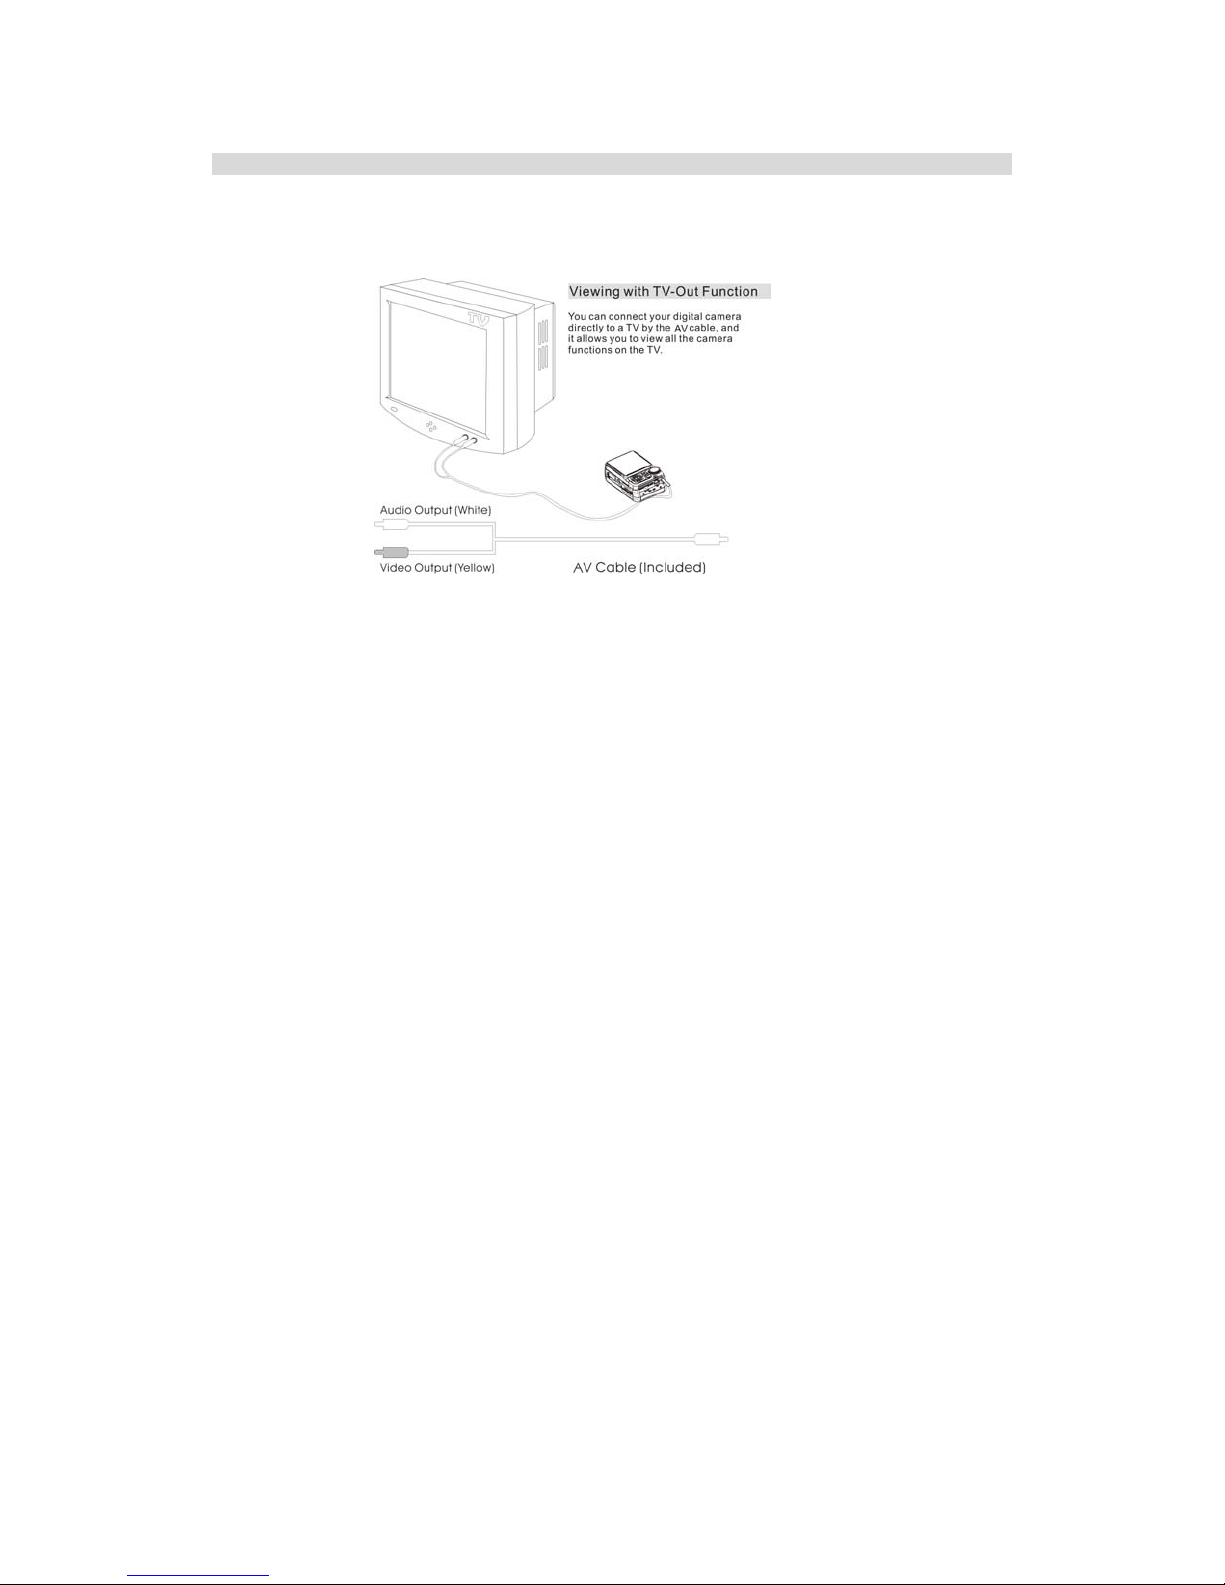
TV out function
You can use TV to compose your object for shooting and view photos you have taken.
Turn on your camera and TV.
Connect your camera to TV with AV cable correctly.
Now you can use TV as your LCD screen.
12

Starting Your Camera
Press the power On/Off button to start the camera. The lens will automatically extend. In camera mode,
the LCD screen will light up. This will confirm that your camera is on and ready for use. Press the power button
again, the camera will be turned off and the lens will go back in.
Camera Mode
Set the mode dial to Camera Mode – the icon will appear on your LCD screen.
TAKING PHOTOS
You can compose your shot using your LCD screen. Hold the camera steady then press and hold the shutter
button half way down to focus. The auto focus area
color changes from white to green, and then press down the shutter button fully to take a good quality photo.
There will be a short delay while the camera saves the photo to memory.
Note:
1. When you press and hold the shutter button half way down for a moment, if the focus area color turns
red, this indicates that the subject is not in focus or the focus range is too light or too dark.
2. When you press and hold the shutter button half way down for a moment, if the focus area color turns
green, this indicates that the subject is fine and you can press down the shutter button fully to take a
good quality photo.
After each photo is shot (when the camera returns to icon mode) the numbers of photos left to shoot at this
resolution is displayed at the top left of the LCD screen.
When the camera's memory (photo capacity) is full. If you attempt to take a photo, the LCD screen will display
“MEMORY FULL. Download photos to your PC and insert a memory card to take more than two test photos.”
MACRO FUNCTION
You can use the MACRO function to take photos when the object being photographed is very near.
1. Press OK/Menu button
.
appear on the LCD screen, wait until the focus area
13

2. Press navigation button to select MACRO menu.
3. Press navigation button or to select “ON”:
MACRO: the auto focus range is from 5 cm to 30 cm.
4. Press OK/Menu button
MACRO.
Now you can take photos with MACRO function.
Note: FLASH-light is unable to use in macro function.
OPTICAL ZOOM
You can magnify your object up to 3 times using the optical zoom. Use the
zoom. Press
Note: Do not touch or forbid your lens moving when in use. It will cause more damage to the camera.
DIGITAL ZOOM
You can magnify your object up to 4 times using the digital zoom in digital still image capture. Use the
buttons to adjust the zoom. Push the button to zoom in on your object. Push the button to zoom
back out.
button to zoom in on your object. Press button to zoom back out.
to confirm and the corresponding icon will be shown on the LCD when you select
and buttons to adjust the
and
14

DISPLAY
The default display setting shows icons on the LCD screen. Press the
icons. Press the
press the
FLASH
In low light conditions it is best to use the built-in flash. You can also use the flash to compensate for backlight
conditions.
To set the flash:
1. Press the
function has been "ON" (manual flash). If the flash charging is not ready, the
2. Press the
automatic flash.
3. Press the
red-eyes reduction.
4. Press the
Note: All the flash functions will be disabled to use when battery power runs low.
SELF-TIMER
You can include yourself in a photo by using this feature to delay the time between your pressing the shutter
and when the photo is actually taken. It is recommended that you use a tripod when you use the self-timer.
button again to switch off the LCD (to conserve battery power). To back to the preview,
button or shutter button.
button. The icon will appear on the LCD screen. This means the Force flash
button repeatedly. Select the icon shown on the LCD screen. This will activate the
button repeatedly. Select the icon shown on the LCD screen. This will activate the
button repeatedly until the icon appears. This will turn off the flash function.
15
display button once to switch off the
icon will flash.

1. Press the
2. Press the shutter button to start a 10 second count down (the count down will appear on the LCD). After
10 seconds a photo is taken.
DATE
If date is selected the date and time the photo was taken will be recorded on the photo.
To set the date and time please refer to the Date and Time section in Setup Mode.
button to select the icon shown on the LCD screen.
Pressing the
on.
DELETE (Last Photo)
You can delete the last photo taken from Camera mode.
1. Press the
2. Press the
3. Press the OK/Menu button
If select “NO”, then press OK/Menu button
IMAGE SIZE AND QUALITY
The image size and quality settings determine the number of photos that can be saved and the amount of
memory required for each photo. The higher quality photo will use more memory. The image size and quality
will also affect the maximum size you can print your photo effectively.
button toggles date ON and OFF – the date icon will appear on the LCD screen if date is
button to select the Delete Image menu.
button to select “YES”.
.
then will return to the preview.
16

Limited internal memory is provided for test images. Those images will be deleted when camera power is turned
off. The following table tells you how many photos can be taken based on the Image Size and Quality settings:
Note: To increase the number of photos your camera can take and store, use an external SD compatible
memory Card (not included). SD memory cards come in a variety of capacities. Please refer to the “Installing an
Optional Memory Card” section of this manual for more information.
To learn how to set photo quality please refer to the “Setup Mode” section of the manual.
Setting the Image Size
In Camera Mode:
Press the OK/Menu
Image Size
3072x2304(7MP) 2 photos
2560x1920(5MP) 2 photos
2304x1728(4MP) 2 photos
2048x1536(3MP) 2 photos
1600x1200(2MP) 2 photos
1280x960(1MP) 2 photos
640x480(VGA) 2 photos
button to display the IMAGE SIZE menu.
Standard
Quality
17
 Loading...