

Page 1
24280/24282
Digital
Camera
O w ner’s M anual
© 2006 SakarInternational,Inc.A llrightsreserved.
Window s and the W indow s logo areregistered tradem arks ofM icrosoftC orporation.
Allothertradem arks a rethe propertyoftheirrespective .
Page 2
Section One -Profile
Overview
Thank you forpurchasing thisdigitalcam era.N otonlycan ittake photos butitalso
has built-inPC cam erafunctions.This cam erais equipped with8MB SDRAM .In
orderto dow nload photos from yourcam erato yourcom puter,you need only
the U S B cablefrom yourcom puter to yourcam era.You can also use the
connect
built-inPC cam eratoholdavideo conference viathe internet,enabling face
face online conversations.
Package Contents
*DigitalCam era * User’s M anual * N eck Strap
* C am eraStand * Software CD * USB
System Requirements
¾ Window s98 S E /2000/M E /X P
¾ 125M B orm orefree harddisk space,32M B orm oreRAM.
¾ Available USB Interface and CD-ROM drive.
¾ ColorM onitor(R ecom m ended atleast800*600,24 bitorhigher)
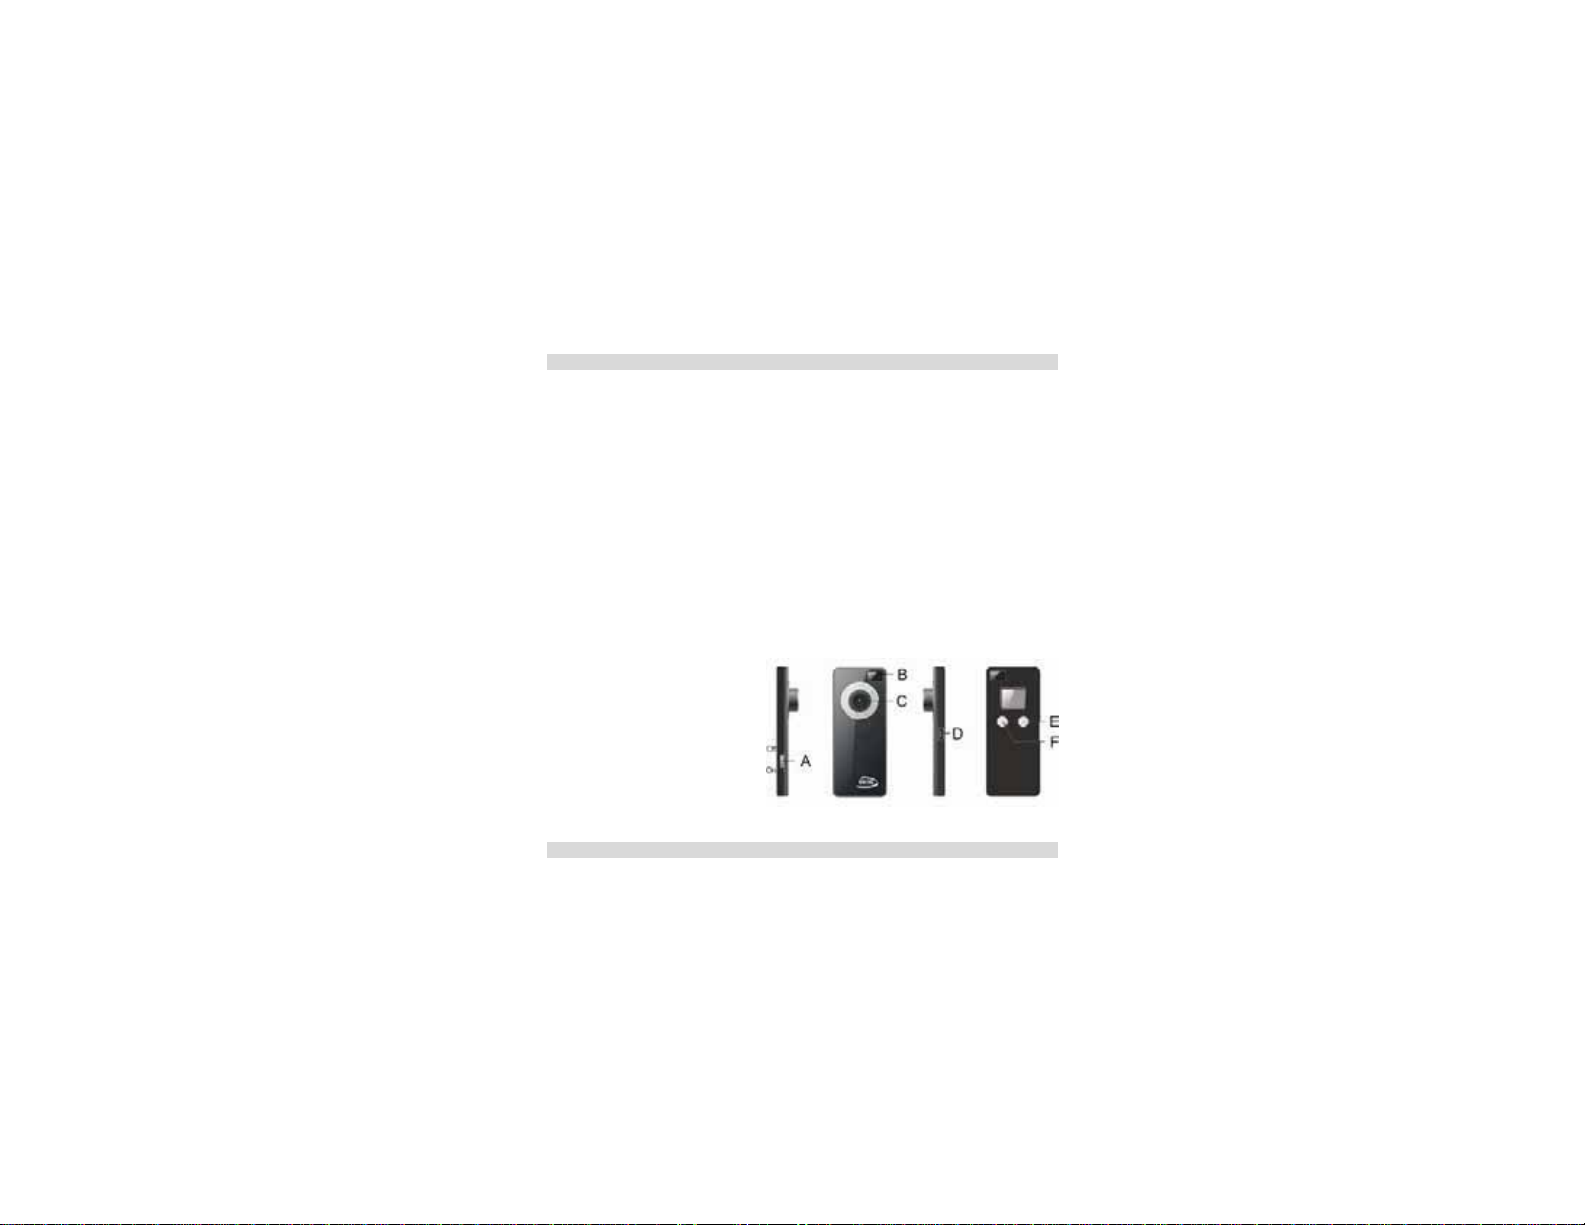
Getting to Know your Digital Camera:
A. Cam era/C hargerselector
B. View finder
C. Lens
D. U SB
E. M ode Butt
F. S hutter/C onfirmButton
Section Two - Lithium Battery
Beforeusing yourcam eraforthe firsttime,charge you rcam era’s battery. O n ce the
batteryischarged,m ove the C am era/Chargerselectorto“Cam era”m ode.D o not
move the selector back to“Charge” m ode untilyou have dow nloaded all
yourphotos to yourcom puterand are ready torecharge the cam era.
S ocket
on
- 1 -
cable
to
Page 3

Switching to Charge mode will erase all the photos on your camera.
To recharge yourcam era’s battery,con ne ctthe cam eratoyourcomputerw iththe U S B
cableand move the C am e ra/C hargerselectorto“Charge”m ode.W hen the batteries
arerecharging,the LE D willb e red.O nce the batteries arefullycharged,
turngreen (afterless than 3hours).The cam erawillfunction normallywhilecharging.
We recom m end chargi
up the fullm em orycapacityofthe cam era.
The camera batteries must be recharged for at least four hours on the
NOTE:
first use.
Inorder to conserve battery pow er,ifthe cam erais notused for30 se con ds,the
cam erawillautom atically enterenergy save m ode.
Section Three – S oftware and C am eraDriver Installatio n
IMPORTANT:Beforeattem pting toinstallthe so f
the cam eraattached to yourcom puter.Thiswillaffectthe installation process and
couldcause yourinstallat
the entireinstallation process has been com pleted.W e recom m end
the step by step instructions thatw illappearon yourscreen during the installation
process.
ng you rcam era’sbatteryevery 7 days orw hen yo u have used
tware,ensurethatyou do nothave
ion tofail.D o notconnectthe cabletothe com puteruntil
the LE D will
following
1. Insertthe C D intoyourCD-Rom drive.M ake surethatyourcam era
is not
connected tothe com puter.
2. ForW IN 2000 orW INXP operating system s -O n the “Install your
camera software”screen,selectyourcam era m odelfrom the drop
dow n listand click the “Install”button toinstallPhoTags Expre ss
follow ed by the installation ofP hoTags W ebC am Express and your
cam e radriver.
ForW IN 98SE operating system - On the “Install your camera
- 2 -
Page 4

software”screen follow these instructions:
1. Click the “DirectX ” button and follow the installation instructions,
restartyourcom puterafterthe installation.
2. Insertthe C D intoyourCD-Rom drive.M ake suret
is notconnected tothe com puter.
3. On the “Installyour cam erasoftware ” screen,selectyourcam era
m odelfrom the drop dow n li
PhoTags Express follow ed by the installation ofP hoTags W ebC am
Express and your ca m e radriver.
4. On the “PhoTags Express" screen,click the “Next” button.
st,click the “Install”button toinstall
hatyourcam era
- 3 -
Page 5
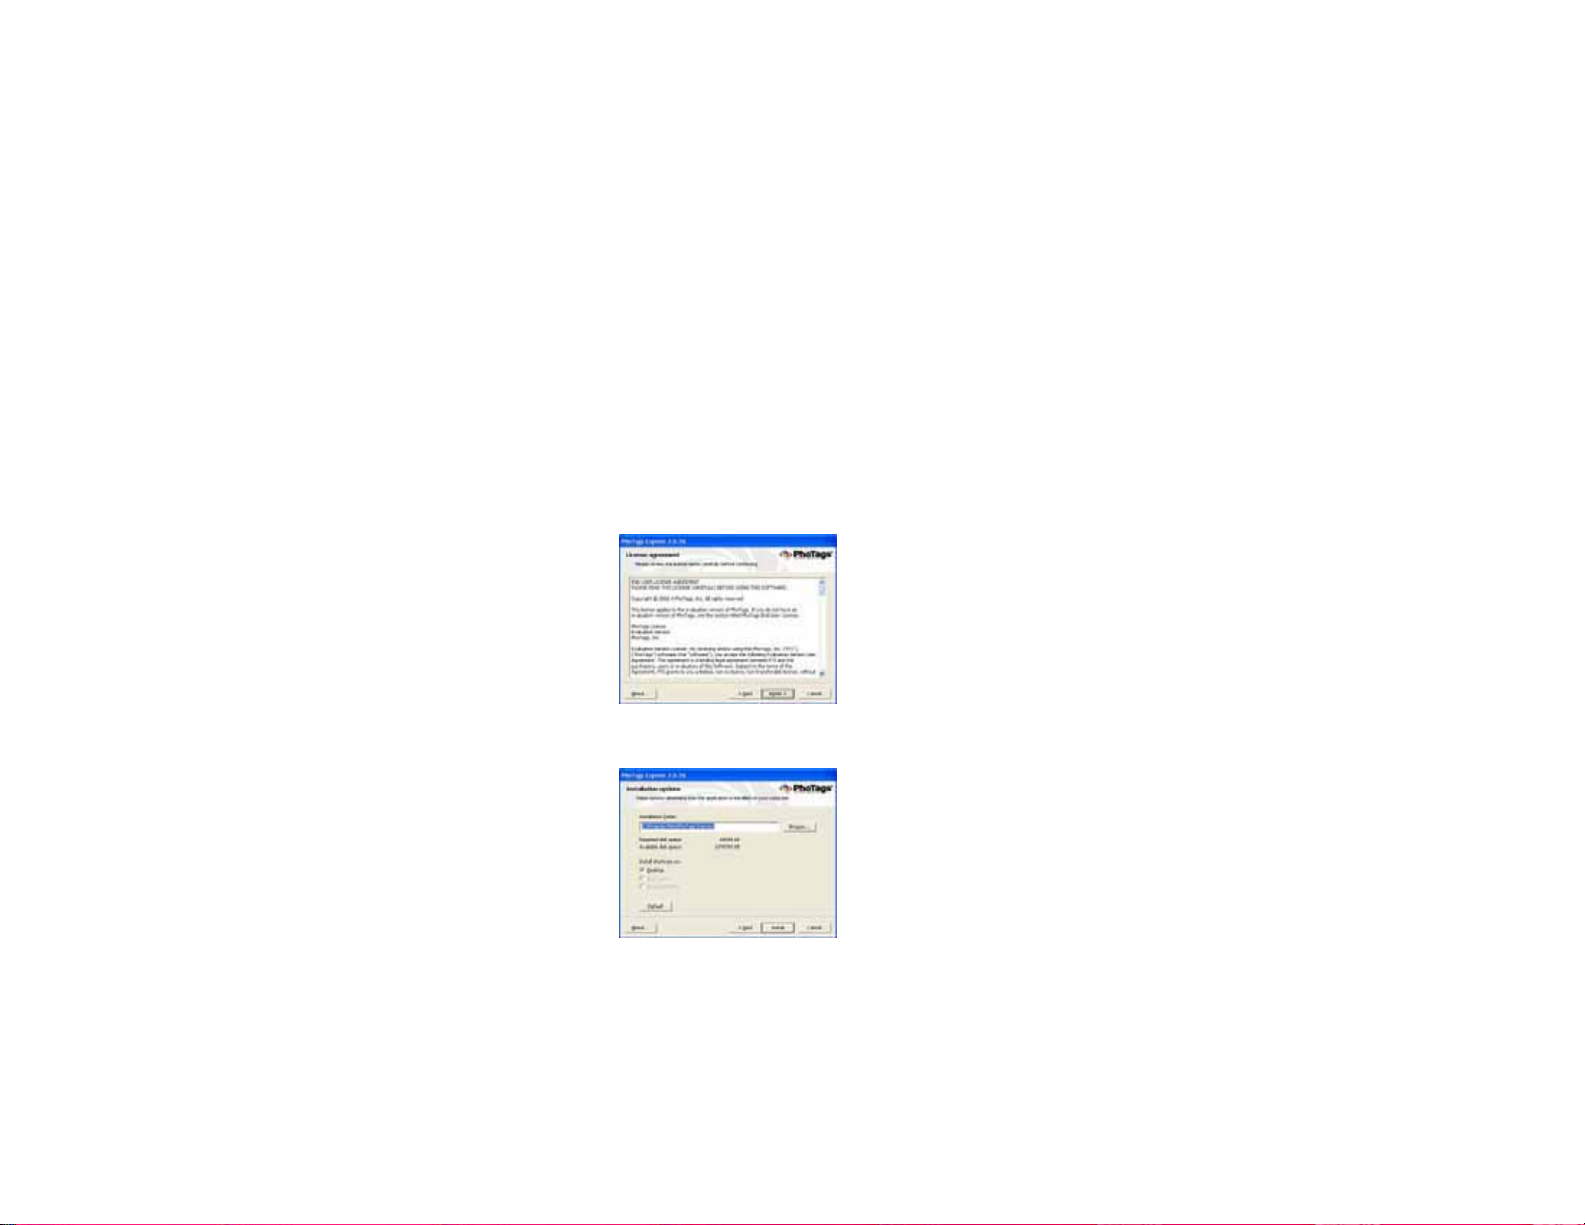
5. Please review the license terms and click the “Agree” button to
continue.
6. Letthe “P hoTags Expre ss” installercreatethe folderw herethe
program willb e installed to,and then click “Install”
- 4 -
Page 6

7. Click “Finish”toletthe “P hoTags Expre ss” installerfinish the
installation program .
8. Thiswillautom aticallylaunch the Installshieldforthe cam eradriver.
Click “Next”to continue.
9. Once the program has finished installing you will
- 5 -
Page 7

have torestartyourcom puter.
10. C ongratulations!!You have successfullyinstalled the “P hoTags
Express” software,the “P hoTags W ebC am Express”and the
Cameradriver.
Section Four - Taking Photos
NOTE:TO ACHIEVE TH E MOST CLARITY,TH E OPTIMAL DISTAN CE
BETW EEN TH E CAM ERA AND THE SU BJECT IS“5”FEET.
Please ensurethatthe batteryisproperly charged beforetaking photos.
1.Press the function button toturnon the cam era-the LCD atthe ba ck ofthe
cam erawilllightup.
2.U se the view findertofram e yourshot.
3.H oldthe cam erasteady,and press the shutterbutton.
4.You willheara beep w hen
shootagain.
5.Ifyou press the shutter button w hen the cam eraisfull,the cam erawillem it
continuous beeps towarn you.
Tips:
1.W hen taking photos,hold yourcam erasteady.
2.Low lighting willreduce the quality ofyourpicture.
Section Five - Camera Functions
you have taken a photo,and the cam eraisready to
- 6 -
Page 8

Ifthe cam eraisin energy save m ode,pre ss the function button once toswitch to
working m ode.
Turn Camera Off
1.Press the Function button toselect“
2.Press the shu tterbutton within 5 seconds toturn cam eraoff.
Auto-Shoot Mode
1.Press the Function button toselect“
2.Press the shu tterbutton within 5 seconds toactiva tethe 10 second timer.
3.The cam erawillbeep once persecond.A fter10 seconds the photowillbe taken.
Continuous Shoot Mode
1.Press the Function button toselect“
2.Press the shutterbutton within 5 seconds toactivatecontinuous shootm ode.D o
notrelease the shutterbutton.
3.The cam erawillbeep once foreach phototaken untilthe shutter button is
released orthememoryisfull.
Note
:
1.W hilethe ca m erais shooting inthis m ode,the incorrectexposuremay be
displayed.
2.The Continuous S hootis onlyinQVGA m ode.
3.Photos taken in C ontinuous S hootm ode can be dow nloaded individually.
Continuous Shoot Mode – 3 shots
1.Press the Function button toselect“
2.H old dow n shutterw ithin 5 seconds and itw illtake 3photos co ntinuously(saved
inVGA format).
Delete All Photos
1.Press the Function button toselect“
2.Press the shutterbutton within 5 seconds,the photocounterw illflash.Press the
shutterbutton againwithin 5 se con ds and allphotos willbe deleted from the
cam era m em ory.
:
Note
Ifyou do notpress the shutter button within 5 seconds, no photos willbe deleted
and the cam erawillreturntothe normalworking state.
Delete Last Photo
1.Press the Function button toselectthe “
2.Press the shu tterbutton once within 5 seconds to deletethe lastphoto.
”show n on LC D display.
”show n on LC D display.
”show n on the LC D disp lay.
”show n on the LC D disp lay.
”show n on the LC D disp lay.
”icon show n on the LCD display.
- 7 -
Page 9

Photo Resolution
C hoose eitherVG A or Q VG A mode.
1.Press the Function button toselect“Lo” shown on the LCD disp lay.
2.Press the shu tterbutton within 5 seconds,the m ode changes toQVGA m ode.
(InQVGA mode you ca n take up to102 photos).
3.Press the Function button to
4.Press the shu tterbutton within 5 seconds,the m ode changes toVGA mode.(In
VGA m ode,you can take up to25photos).
Photo Compression Ratio
You can choose the co m pression ratioforyourphotos -“Hd”high com pression or
“Ld”low com pre ssion.The higher the co m pre ssion,the more photos you ca n take
without having to dow nload them to your PC . You can take up to 409 photos in
“Hd” m ode w ith the low resolution (Lo) se tting preset on your ca m era (see the
photoresolutio n section above).
Photo Storage
The num berofphotos t
com pression ratioofthe photos.The LCD disp lay willshow the currentresolution
and the how m any more photos you can take atthisresolution.The maximum
num bers ofphotos yourcam eracan storeis:
25 photos ---“Hi”resolution + “Ld”com pression
102 photos ---“Lo”resolution +“Ld”com pression
102 photos 409 photos ---“Lo”resolution +“Hd”com pre ssion
Display
Press the shutter button to take a photo. T he num ber of photos shot will be
displayed as adigit
this num berby one as illustrated:
--“Hi”resolution +“Hd”com pre ssion
on the LCD display.E ach consecutive phototaken willincrease
select“HI”show n on the LCD display.
hatcan be taken willvary according tothe r
esolution and
Fluorescent Lamp Frequency
1. Press the F unction button to select “50”or“60”show n on the LCD displ
- 8 -
ay.
Page 10

2.Press the sh utter button within 5 seconds.The frequency willbe togglebetw een
50H Z and 60H Z.
3. Ple ase set the frequency of your cam era according to the standards of the
country you live in.Inthe United States and Asiause 60H z,in Japan and Europe
use 50H z.Ifyou use the wrong f
Section Six – Downloading Photos
Use the “P hoTags Express” program toim portthe photos from yourcam era
1. Plug one end ofthe U SB cableintothe USB sloton yourcam era.
2. Plug the otherend ofthe USB cableintoaUSB porton your
com puter.
3. Make surethatyourcam erais connected and turned on.
4. D ouble-click the “P hoTags Express” icon thatison your
launch the “P hoTags Express” program .
requency yourphotos orvideos may be distorted.
.
desktop to
5. Click o n the “G etPhotos”button on the MainMenu.
6.
The “Getphotos”w izard w illappearw iththe
- 9 -
Page 11

correctnam e ofyourcam era device selected inthe “Active devices”
listinthe “Express”m ode.C lick the “Next” button toproceed
7. On the next screen,choose w here you w anttoplace yourphotos
and click the “Finish ” bu tton to copy the photos to yourcom puter.
8. Allo fthe pictures you im ported willthen appearinthe “Select
photos”m ode’smainwindow .
.
- 10 -
Page 12

Everything you need to get the most out of your photos and MORE
Download photos instantlyfrom yourdigitalcam era,m ediacards,CDs
and storage device s to yourcom puter.
Manage your photos by creating countless unique photocollections
withoutduplicating any photos.Burn CDs ofany foldersforbackup and
storage.
Enhance your photos;A uto E nhance,C rop and Corr
Add Active Capt io ns-add TextCaptions,Fram es,Shapes,
Keywords… and m orethatcan be view ed orhidden any time.
Locate and Organize your photos and collections-S earch by
C aptions,C ategory, K e y w ordorDate-directlyfrom
system ofyourcom puter.
Share your photos viaE-mail,LocalP rint
pages foruploading online.
Create Calendars, two-sided Greeting Cards and Postcards on
standard photo paper... You can purchase Album s and V ideo C D ,two
additionalworkshop projects on line atanytime and these will
- 11 -
ing and C reateHTML web
ectRed Eye.
the operating
Page 13

be autom atica llyactivated in PhoTags Expre ss.Create Photo Albums
and Slide Shows on CDs thatcan be view ed on yourPC and V C D ’sfor
view ing on yourT V using yourD V D player.
WebCam Express- Use the W ebC am Expre ss softwareto snap photos,
record and createvideos.
How to purchase additional “Workshop” projects
In addition tothe free C alendars,t
Postcards Workshop projects,you have the abilityto purchase two
additionalW orkshop projects:"A lbum s"
anytime.
1. To purchase the “Workshop Project”simplyclick the one
you w antand you willbe referred
where you can purchase them .
2. Once you purchase the “Workshop projects” they willbe
autom aticallyactiva ted inthe software.
Section Eight – Capturing AVI
wo-sided G reeting Cards and
and "V ideo CD" online,at
to an online w ebsite
- 12 -
Page 14

Now thatyou have yourcam erainstalled you can use itto capture short
movies called AVIfiles.The lengthoftime you can recordanAVIwhile
the cam erais connected to yourcom puter w illva ry,depending on how
much harddrive space you willuse t
these AVIfiles take up a lotofharddrive space.T hisis done through the
PhoTags W ebC am Express program .This nextsecti
though capturing an AV Ifile.
1. D ouble-click the “WebCam Express”icon thatis on your
desktop tolaunch the “PhoTags WebCam Express”program .
AdjustyourW ebC am tothe desired position.T he screen w ill
display w hatthe W ebC am “sees”.
2. To add audioto yourvideo,plug a m icrophone into your
com puter.
o save the file.P lease take notethat
on w illw alkyou
- 13 -
Page 15

3. Click the “Capture”button tostartrecording the video.The
recording elapse time willappearunderthe video.
4. Click the “Pause”button to holdthe recording.To continue
recording click the “Capture” button again.
5. To f
inish recording click the “Stop”button.
6. T he videos willbe autom atically saved into a defaultdirectory.
You
can view them inthe “Pla yba ck” w indow .
Note:
1. To learnhow to capture JPEG snapsho tsfrom yourW ebC am or
from yourexisting AV I
movies,go tothe “Take S napshots” section
inthe Q uick S tarthelp.
2. To learnhow to change the usersettings,go tothe “SetUser
Preferences” section inthe Q uick S tarthelp.
Video Conferencing
To use the cam eraas aPC cam erato conductim age transm ission orholdonline
video conferences:
1.C onnectthe cam erato yourcom puterU SB portusing the U SB cable.
2.R un the video conferencing software“MicrosoftN etM eeting”on
- 14 -
Page 16

yourcom puter.
3.Inputthe IP addre ss thatyou wish to connecttointhe addre ss bar and dial.
4.Select[Tool]\[Video]\[A ccept]and [Transfer]optio ns. O nce yourcallhas been
accepted,you can holdavideo conference.
Appendix 1:Specifications
ProductType:DigitalC am era
Electronic C oupling Elem ent:C M O S Sensor300K Pixe ls
Im age Resolution:640x480 Pixels(VG A )320x240 Pixe ls(QVGA)
Devices:B uilt-in8MB (SDRAM)
MemoryCapacity:25(VG A)(Hi) 102(QVGA)(Lo)
View finder:Built-i
Auto shoot:10s
Shutter Speed:1/6-1/15000 s
ShootM odes:Single/Continuous Shoot/C ontinuous S hootM ode –3shots/
Autom atic shoot/PC
Autom atic E nergy Saving: autom atica llyentersenergy save
102(VG A)(Hi) 409(QVGA)(Lo)
n
Cam era
- 15 -
Page 17

m ode after30s idle
Im age Process:A utom atic Exposure/Autom aticW hiteBalance
Transm ission Interface:U S B Interface
Working Tem perature:0-40ഒ
O peration System :W indow s98 S E /2000/M E/X P
Appendix 2 : Troubleshooting
Q :Ihave taken photos,butm y com puter says "N o photos in cam era." W h a t d o I
do?
A:First,ensurethatyou have taken photos with yourcam era.P ress the shutter
button a few times totake som e sam ple photos and try again.Ifyou stillge t
photos error,thisindicates thatthe driverisnotinstalled (or notinstalled correctly)
oryou may notm eetthe minimum system
the drive r.
System R equirem ents:
st,ensurethatyou have atleasta P entium II300 MHz,AMD Athlon 300 MHz,or
Fir
aCeleron 400 MHz orhigher as wella s atleast64 MB ofR A M .P lease notethat
the olderA M D K6 processorswillnotw ork. M oreinformation aboutdetermini
yourcom puter'sspecifications ca n be found inthe G eneralC om puterInfor
section.Ifyou have determined thatyou have pictures in yourcam era and you
m eetthe system requirem ents, follow the steps below toreinstallthe so ftware.
twareRe-installation
Sof
1.Firstinstallthe software and drivers.C lick on Start,S ettings,ControlPaneland
Add/Rem ove program s.Therearetwo program s you willneed tor
PhoTags Express and yourcam eradriver.A fterrem oving
yourcom puter.Ifyourcam erais connected,disconnectit.
2.N ow reinstallthe so ftware.Insertthe CD thatcam e with yourcam era-itshould
autom atica llyrun the installation.
3.R estart
4.O nce yourcom puteris b ack up, plug the cam erainto yourcom puter's
the co m puter.
requirem ents.You willneed toreinstall
these program s,restart
- 16 -
ano
ng
mation
em ove –
Page 18

USB port.
5.R ight-click o n the "M y C om puter"icon.SelectP roperties.
Ifyou arerunning Windows 98,98S E ,orM E :C lick o n D evice M anager.
Ifyou arerunning Windows 2000 orXP:Click on hardw are and then Device
M anager.
Ifthe cam eraisi
Devices" and clicking on the "+ " nexttoitshouldrevealyourcam era.Ifnot
probablysee "D igitalStillCam era" under"O therD evice s" withabright
marking nexttoitindicating thatitisnotfunctioning correctly.
Ifyou arerunning Window s 98,98S E ,orM E :R ightclick o n the non functioning
device and selectrem ove.
Ifyou arerunning Windows 2000 orXP:Ri
and selectuninstall.Ifa w ar
6.R estartyourcom puteragain.Yourcam erais now su ccessfullyinstalled.
Q:How do Im ake sure Idon'tlose im portantpictures?
A:Yourcam era u ses sdram memorywhich requires aconstantelectriccurrentto
store yourphotos.S hould yourcam eralose pow er(forinstance ifthe batterydies
orisrem oved)allstored pictures willbe lost.W e recom m end always dow nloading
yourphotos to yourcom puteras soon
loss.
Q :Ihave aMAC.W illthis cam erawork?
A:U nfortunately, the system requirem entsforourcam eras requireaW indow s
operating system .
Thereisno Mac drive r available and
nstalled correctly, therewillbe a categorylisted for"Imaging
,you will
lycolored
ghtclick on the non functioning device
ning pops up,press OK.
as possibletopreventunintentionaldata
currentlyno plans to develop one.
- 17 -
 Loading...