

Page 1
- 1 -
Owner’s Manual
11199 KeyChain Digital Camera
© 2006 Sakar International, Inc. All rights reserved.
Windows and the Windows logo are registered trademarks of Microsoft Corporation.
All other trademarks are the property of their respective.
Page 2

- 2 -
System Requirements 2
Contents
Product Package Contents 2
Profile 2
Overview 2
To know Digital Camera 2
Install Battery 3
Software Installation 4
Take Photos 8
Camera Functions Control 9
Video Conference 18
Download Photos 11
Capturing AVI 16
Appendix1: Specifications 18
Appendix2: Answers of frequent asked questions 19
Page 3

- 3 -
Available USB Interface and CD-ROM
Color Monitor (Suggest at least 800*600 24 bit or above)
Profile
Thank you for purchasing the11199 Keychain digital camera. It not only can
take photos but also has the built-in PC camera functions. This camera is
equipped with a 16MB SDRAM: if you want the photos in the camera to be
download to your computer, you are only required to connect the USB cable to
your computer and your camera; It is also possible to use the built-in PC camera
to hold a video conference via the internet, enabling you to have a face to face
online conversation with others.
Product Package Contents
●Digital Camera ●User’s Manual
System Requirements
Win98SE/2000/XP
Overview
125MB free hard disk space or above, 32MB or more RAM
●Software CD ●USB cable
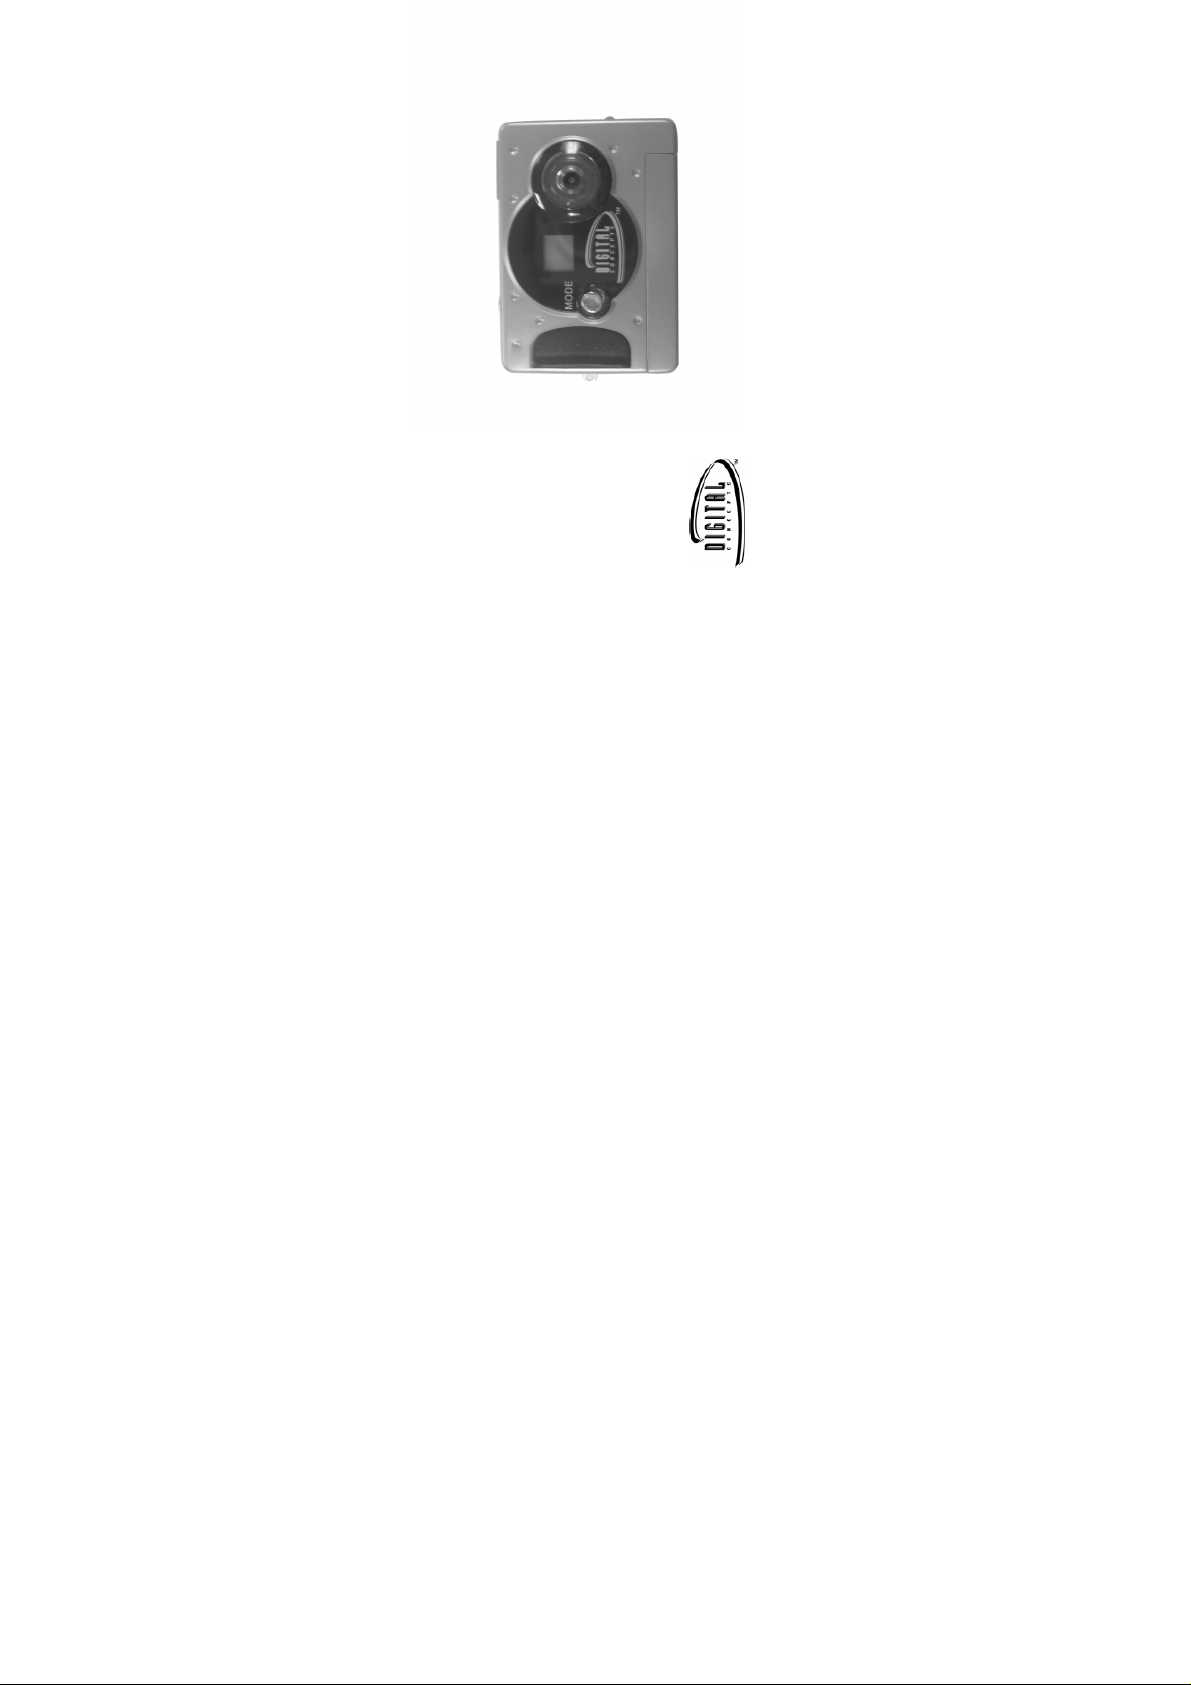
B. LCD
To Know Digital Camera
A. Shutter button
F. Hanging Strap Hole
E. USB Socket
C. Lens
D. Viewfinder Button
Page 4

- 4 -
1. Open the battery box.
2. Load the batteries correctly: when you load the batteries, please place one
3. Close the battery box cover.
1. When you use the USB cable to connect the camera with a computer, is
Note:
H. Battery Box
G. Start/Function Key
battery according to the pole directions for batteries on the battery box;
Install Battery
2. Before you use the PC camera functions, please download all photos in
unnecessary to use the batteries because the camera use the power provided by
the computer through the USB interface.
the camera to your computer, which will avoid pictures missing
1. Don’t open the battery box at will, and the power cut will cause the photos
3. Please pay attention to that the reasonable distance between you eyes and
viewfinder is about 30cm
2. If you don’t use the camera for a long time, please take out of the batteries
3. Please don’t put the battery into fire for fear of explosion to cause
in the camera missing.
Warning
4. When the power of battery lower 1.2V,the symbols in LCD will flash
for fear of the discharging or corrosion of the batteries;
indicating the power shortage
Page 5

- 5 -
restart your computer after the installation
connected to the computer.
camera software” screen, select your camera model from the drop down
1. Insert the CD into your CD-Rom drive. Make sure that your camera is not
Automatically enter the energy saving status
Software Installation
IMPORTANT: Before attempting to install the software, make sure that
you do not have the camera or the USB cable attached to your computer.
This will affect the install process and will cause your installation to fail.
In order to save the energies of batteries, if the camera is not used in 30s,the
camera will auto enter the energy saving status.
Do not connect the cable to the computer until the entire installation
SECTION ONE- Software & Camera Driver Installation
process has been completed. We suggest you follow the step by step
instructions that will appear on your screen during the installation process.
2. For WIN 2000 or WIN XP operating systems - On the “Install your
For WIN 98SE operating system- On the “Install your camera software”
screen and follow these instructions:
1. Click the “DirectX” button and follow the installation instructions,
list and click the “Install” button to install PhoTags Express followed by
the installation of PhoTags WebCam Express and your camera driver.
2. Insert the CD into your CD-Rom drive. Make sure that your camera
Page 6

- 6 -
is not connected to the computer.
model from the drop down list and click the “Install” button to install
PhoTags Express followed by the installation of PhoTags WebCam
Express and
3. On the “Install your camera software” screen, select your camera
3. On the “PhoTags Express" screen, click the “Next” button.
4. Please review the license terms and click the “Agree” button to continue.
Page 7

- 7 -
5. Let the “PhoTags Express” installer create the folder where the program
will be installed to, and then click “Install”
program.
6. Click “Finish” to let the “PhoTags Express” installer finish the installation
Page 8

- 8 -
7. This will automatically launch the Install shield for the camera driver.
Click “Next” to continue.
computer.
8. Once the program has finished installing you will have to restart your
Page 9

9. Congratulations!! You have successfully installed the “PhoTags Express”
- 9 -
software, the “PhoTags WebCam Express” and the Camera driver.
1. Press function button to open the camera and the LCD will be lightened.
2. Use the viewfinder to find the things for which you desire to take photos;
3. Hold the camera steadily, and press the shutter button to take photos
4. When you hear the buzzer beeps once, which indicates you have already
5. When the camera is fully loaded with photos, the buzzer will give out
1. When taking photos, please hold camera steadily
SECTION TWO: Take photos
Please be sure that the power of the batteries is enough before you use this
camera to take photos. If you want to take photos, please:
taken a photo, and you can go on taking photos;
2. The shortage of rays will reduce the quality of picture
continuous beeps sound for alarm.
Prompt:
Page 10

- 10 -
released or the memory is full.
2. Press the shutter button within 5 seconds to activate the 10 seconds timer.
3. After 10 seconds, the camera will beep twice indicate that the photos has
1. Press the Function button to select shown on LCD display;
The digital camera will beep once every second.
been taken.
The function operation of the camera shall be conducted under the working state.
If the camera is in energy saving mode, please press Function button once to
start the camera and let it into the working state, and then conduct the following
operation.
Camera Functions Operation
Auto-shoot mode
1. Press the Function button to select shown on the LCD display;
Continuous Shoot Mode
AVI Capture
3. The camera will beep once for each photo taken till shutter button
2. Press shutter button within 5 seconds activate the continuous AVI capture
mode and do not release the shutter button until you want to stop shooting.
1. Press the Function button to select “C5” shown on the LCD display;
Continuous 3 Capture
Page 11

- 11 -
3. The camera will beep once for each photo taken.
2. Press shutter button within 5 seconds activate the continuous 3-capture
1. During the continuous shooting period, the incorrect exposure will
2. During the continuous shooting period, the operation can be executed
3. The photos under continuous shooting modes will be saved as AVI format
mode and take 3 continuous photos store in your memory.
possibly appear due to the shortage of rays.
under CIF and QCIF two modes.
Prompt:
in your camera. You can play them directry from your download software. Delete ALL photos.
2. Press the shutter button in 5s the photo counter will flash. Press shutter
1. Press the Function button to select shown on the LCD display
in camera will not be executed and the camera will return to the normal working
button again within 5 seconds will delete all photos stored in the memory
Note: If you don’t press shutter button in 5s,the operation of deleting the photos
state. Delete One photos.
1. Press the Function button to select “CL” shown on the LCD display
2. Press the shutter button in 5s the last photo will be deleted.
Page 12

- 12 -
on your computer.
your desktop to launch the “PhoTags Express”
mode, you can take more photos
2. Under mode, you can take the higher quality photos, Under
1. means low compression, means high compression
Image Compression Ratio shift
1. Press the Function button to select “oF” shown on the LCD display, and
press the shutter button in 5s to switch off the camera. SECTION THREE: DownLoad Photos
Switch OFF the camera:
2. Plug the other end of the USB cable into a USB port
1. Plug one end of the USB cable into the USB slot on your camera.
Use the “PhoTags Express” program to import the photos from your camera.
program.
3. Make sure that your camera is connected and turned on.
4. Double-click the “PhoTags Express” icon that is on
5. Click on the “Get Photos” button on the Main Menu.
Page 13

- 13 -
camera device selected in the “Active devices” list in the “Express”
mode. Click the “Next” button to proceed.
click the “Finish” button to copy the photos to your computer.
6. The “Get photos” wizard will appear with the correct name of your
7. On the next screen, choose where you want to place your photos and
Page 14

- 14 -
photos” mode’s main window.
8. All of the pictures you imported will then appear in the “Select
Everything You Need To Get The Most Of Your Photos And MORE
Page 15

- 15 -
on your PC and VCD’s for viewing on your TV using your DVD player.
WebCam Express- Use the WebCam Express software to snap photos, record
projects online at anytime and these will be automatically activated in PhoTags
uploading online.
Create Calendars, two-sided Greeting Cards and Postcards on standard photo
duplicating any photos. Burn CDs of any folders for backup and storage.
Enhance your photos; Auto Enhance, Crop and Correct Red Eye.
Add Active Captions- add Text Captions, Frames, Shapes, Keywords… and
more that can be viewed or hidden any time.
Locate and Organize your photos and collections- Search by Captions,
Category, Keyword or Date - directly from the operating system of your
Download photos instantly from your digital camera, media cards, CDs and
storage devices to your computer.
Manage your photos by creating countless unique photo collections without
computer.
paper... You can purchase Albums and Video CD, two additional workshop
Share your photos via E-mail, Local Printing and Create HTML web pages for
and create videos.
Express. Create Photo Albums and Slide Shows on CDs that can be viewed
Page 16

- 16 -
want and you will be referred to an online website where you can
purchase them.
automatically activated in the software.
1. To purchase the “Workshop Project” simply click the one you
2. Once you purchase the “Workshop projects” they will be
Now that you have your camera installed you can use it to capture short movies
called AVI files. The length of time you can record an AVI while the camera is
connected to your computer will vary, depending on how much hard drive space
you will use to save the file. Please take note that these AVI files take up a lot of
hard drive space. This is done through the PhoTags WebCam Express program.
How to purchase additional “Workshop” projects
In addition to the free Calendars, two-sided Greeting Cards and Postcards
Workshop projects, you have the ability to purchase two additional
Workshop projects: "Albums" and "Video CD" online, at anytime.
SECTION FOUR-Capturing AVI
This next section will walk you though capturing an AVI file.
Page 17

- 17 -
launch the “PhoTags WebCam Express” program. Adjust your
WebCam to the desired position. The screen will display what the
WebCam “sees”.
1. Double-click the “WebCam Express” icon that is on your desktop to
2. To add audio to your video, plug a microphone into your computer.
3. Click the “Capture” button to start recording the video. The
recording elapse time will appear under the video.
recording click the “Capture” button again.
can view them in the “Playback” window.
4. Click the “Pause” button to hold the recording. To continue
6. The videos will be automatically saved into a default directory. You
5. To finish recording click the “Stop” button.
Page 18

- 18 -
WebCam or from your existing AVI movies, go to the “Take Snapshots”
section in the Quick Start help.
section in the Quick Start help.
Note:
1. To take snapshots: to learn how to capture JPEG snapshots from your
Video Conference
The camera can be used as a PC camera to conduct image transmission or hold
online video conferences, you are only required to:
2. To learn how to change the user settings, go to the “Set User Preferences”
1Use the USB cable to connect the camera and the USB interface of PC
3Input others’ IP address in the address bar and dial
2Run the video conferences software Microsoft Netmeeting on your computer.
4Select [Tool]\[Video]\[Accept] and [Transfer]options .After others accepted
your calling, you can hold Video conference
Page 19

- 19 -
Appendix 1:Specifications
Product Type: Digital camera
Electronic Coupling Element: CMOS Sensor 100K Pixels
Image Resolution: 352*288Pixels(CIF) 176*144Pixels(QCIF)
Memory Devices: Built-in 1*16MB(SDRAM)
Memory Capacity: 20(CIF)(Hi) 80(QCIF)(Lo)
Viewfinder: Built-in
Auto shoot: 10s
Continuous Shoot: 10 pieces per second
Shutter Speed: 1/6-1/15000 seconds
Shoot Mode: Single/Continuous Photograph/Automatic shoot/PC camera
Automatic Energy Saving: automatically enter the energy saving mode in 30s
Image Process: Automatic Exposure/Automatic White Balance
Working voltage: AAA 1.5V*1/USB 5V
Page 20

- 20 -
[Properties]
Operation System: Win98SE/2000/XP
Transmission Interface: USB Interface
Working Temperature:0-40℃
Appendix 2:Answers of frequent asked questions
1Q: I finished installing the programme according to the standard ways but
no photos in cameras after download.
A: Please make sure that you’re taken photos by checking the number on the
camera LCD. Please also check if the USB cable is loose. If it still can’t work
please follow below steps.
If your OS is WIN XP or WIN 2000
(1) Find [My Computer] on the Desktop, Press right key of mouse and select
(2) Select [Hardware], click [Device Manager]
(3) Find [Imaging devices], Select your imaging device
[Properties]
device
(4) Press right key of mouse and select [Scan for hardware changes]
If your OS is WIN 98SE
(1) Find [My Computer] on the Desktop, Press right key of mouse and select
(2) Select [Device Manager], Find [Imaging devices], Select your imaging
(3) Press right key of mouse and select [Refresh]
2Q: The camera can’t work after connection, there’s a yellow “!” Before
Device Manager/Imaging devices/Dual-Mode DSC (2770).
A: It’s because of the collision of the computer peripheral please follow
Page 21

- 21 -
WIN ME, Press right key of mouse and select [Remove])
below steps:
(1) Select Dual-Mode DSC (2770) in [Device Manager]
(2) Press right key of mouse and select [Uninstall] (If OS is WIN98SE or
(3) Remove USB
(4) Restart Computer
(5) Reinsert USB
3Q: After finish install software and connect the camera to the computer,
There’s “unknown USB device” in device manager.
A: Connect the camera to your computer and run dear registry, then remove
cameras and reinstall driver.
4Q: May I connect the camera to the compute when I install the driver?
A: No, don’t connect the camera with your computer when you install driver.
5Q: My camera has no response when I press Mode key or shutter.
A: Please get out the battery and reload it.
6Q: Photos downloaded are with color spots stripes layers and segments.
A: Please open dr., and redownload, dr., will save this problem. Please send
A: Camera death caused by improper or bad batteries, then please cut off all the
this file back to your suppliers or customer service team. It is not noticed prior to design change
power, including USB and batteries, start again with new batteries after 10s.
7Q: Can’t download photos or has problem with photo download.
 Loading...