

Page 1
Boiler & Burner instructions
We would like to express our thanks for purchasing our
product “BT-1L” boiler & burner.
This boiler is mainly designed to be installed on a steam
model boat compactly. You will find its high performance,
easy handling, reliability, and adequate safety.
It fits to the steam engine “T1DR-L” which has been
released in parallel.
Read the instructions here carefully before you use this
equipment. If you use it in an improper way, you may
get burn-injure or involved in an accident.
Content
SAITO BT-1L
・ Boiler 1 ・ Spare O-ring for overflow plug 2
・ Burner 1 ・ Neoprene tube 1 roll
・ Smokestack (w/whistle) 1 ・ Aluminum washer 3
・ Pre heating tray 1 ・ Screw for boiler mount 3
・ Needle adjusting bar 1 ・ Screw for burner hold plate 4
・ Burner hold plate 2 ・ Measure cup 1
・ Nozzle cleaning needle 1 ・ Infundibulum 1
・ Spare O-ring for the relief valve 2 ・ Dropper for pre heating tray 1
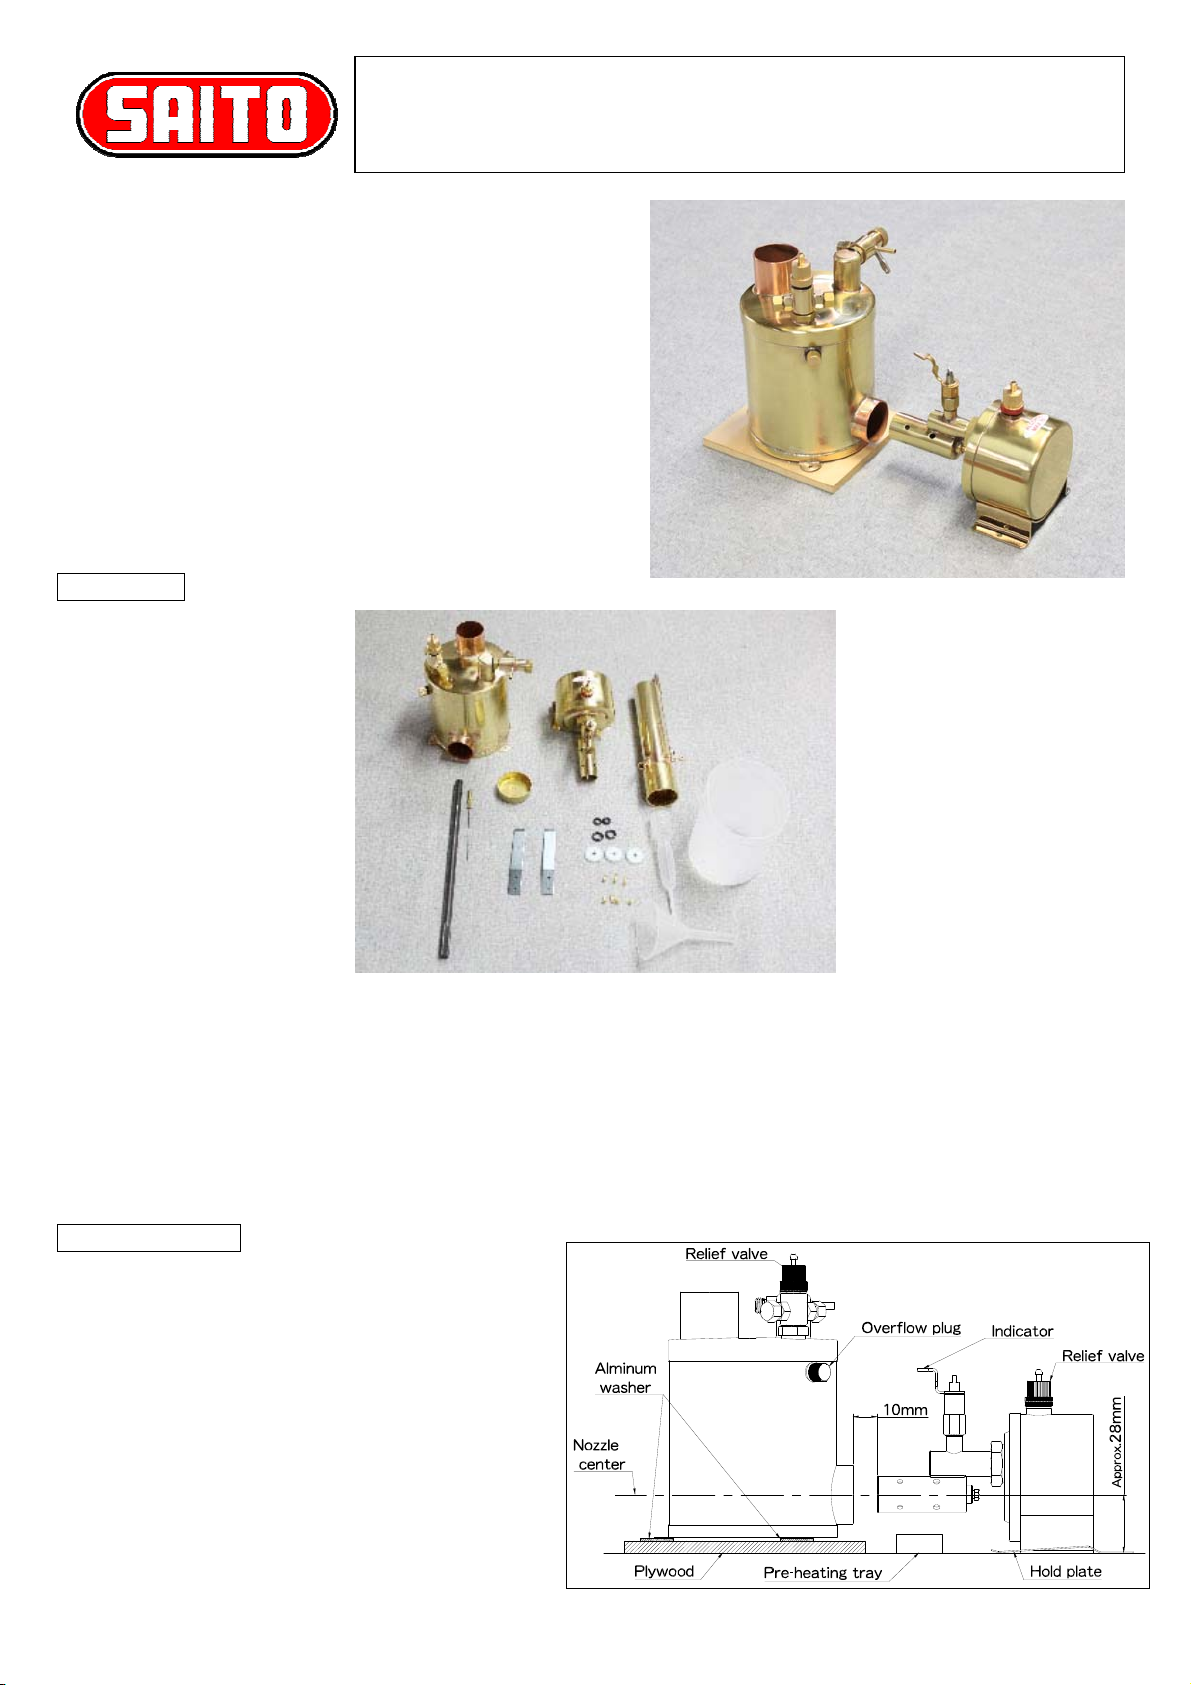
Installation
When you mount the devices, observe the Fig.1 on
the right to secure a space for the pre heating tray,
and arrange correctly the boiler with the aluminum
washer and the burner with a wood block so that
the burner center has the specified height.
Set the burner hold plate on the engine bed and
slide burner to fit its legs under the plate.
Use neoprene tube to connect the connection pipes
on smokestack with the boiler relief valve to
exhaust steam, and burner relief valve to exhaust
alcohol gas.
Fig.1 Layout of boiler & burner
-1-
Page 2

r
Prepare for operation
Below is the principal procedure of filling liquid that you should follow to avoid burnout (overheat with low-water).
Water supply
Oil
(
for lubrication of each part
Fuel supply
↓
↓
(
(
for boile
for burner
)
)
)
※engine is sold separately
1. Water supply ※be sure to fill the water fully!
First, remove the overflow plug and the relief valve from the boiler. Next place the boiler flatly and pour water
from the relief valve inlet. To avoid burnout, be sure to pour the water until it flows from the overflow outlet.
When you finish filling, fix the overflow plug and the relief valve tight with your fingers. (DO NOT USE any tools
such as pliers.)
Also from the 2
When you pour water after the operation, wait until the boiler cools as you can touch by hand.
nd
operation, be sure to confirm overflow.
2. Oil filling to each part of the boiler & burner
For each operation, fill the machine oil to the rotor inside the regulator of the boiler using oil filler or so. Besides,
fill the oil to the pillow block next to the flywheel and link parts of the steam engine (engine is sold separately).
In addition, fill the attached steam oil fully to the oiler which has “OIL” mark on its cap.
3. Fuel supply ※be sure not to fill fuel over 70cc.
・For the 1st operation (when there’s no fuel remains in the burner):
Remove the relief valve of the burner and pour the fuel (methanol or fuel grade alcohol) filled in the measure cup
(approx. 70cc) from the inlet into the burner. When you finish filling, fix the relief valve tight with your fingers.
(DO NOT USE any tools such as pliers.)
・After the 2
Pull out the burner from the boat body and remove the relief valve. Turn the burner upside down to allow the fuel
inside to flow out. Make sure no fuel remains inside the burner. After that, pour the fuel by same procedure as 1
operation.
nd
fuel supply (when there might be fuel remains in the burner):
st
Precaution for the water and fuel supply
In the following cases, it’s possible to burnout (overheat with low-water) because burning time would be longer
in comparison to the water level in the boiler. If it gets burnout, brazing parts melt and result in water leakage
and breakdown of the boiler.
・ Didn’t fill water fully to the boiler.
・ Pour the fuel more than 70cc.
・ Pour the fuel although there was fuel remains in the burner.
※The burner is exclusive to using alcohol therefore DO NOT USE the other fuel such as gasoline or kerosene
and so on.
-2-
Page 3

4. Check before firing
Please do check the following factors before firing.
① Pour water into the boiler until it overflows.
② DO NOT pour the fuel into the burner over 70cc.
③ Close the needle valve of the burner.
④ DO NOT allow the gland nut beneath the needle of the burner to loosen.
⑤ Fix the relief valves of the boiler & burner precisely.
⑥ Fix the overflow plug of the boiler precisely.
⑦ Close the regulator valve of the boiler.
Firing & operation
5. Pre-heating of the burner
Prior to the ignition of the burner, you have to pre-heat the tip nozzle and the front of
the tank. Fix the pre-heating tray as shown in the Fig.2.
Use the attached dropper to fill two-thirds of the tray with alcohol. Fire the pre-heating
tray using lighter and heat around the nozzle.
burning, just cover the area with wet wiper. Burning alcohol can be put out easily with water.
DO NOT heat the nozzle using a propane burner or any other devices. It may be cause
an accident or breakdown.
※If you spill alcohol around the tray and it starts
2/3
Fig.2 Pre-heating tray
6. Ignition of the burner
Just before the fire in the pre-heating tray burns out, open slowly the needle valve a little. Then, the burner will start
burning. If the fire in the tray burns out before the ignition of the burner, fire the burner with a lighter directly. If you
see blue flame and hear the continuous burning noises (roaring), the ignition is completed successfully.
(※If the fire in the tray remains, the burning will be intermittent for a little while.)
7. Adjustment of needle valve of the burner
After ignition, open the needle valve gradually so as to keep the burning condition steady. The firepower of this burner
is strong enough to allow the flame to touch the smokestack when you turn the valve to the maximum. Do not open
the valve more than required. The indicator has the scale on it from the full close to the maximum firepower. Adjust
the firepower looking at the indicator. If you open the needle valve abruptly, burning may be shaky or put out.
Fig.3 Indicator guidance
-3-
Page 4

8. Steam up(ready to release the steam)
After the water starts boiling, it takes 3 to 4 minutes for the pressure of the boiler to reach 0.9~1.1kg/cm
It takes more or less time depending on the climatic conditions and the way of adjusting. (The pressure gauge is
option.)
2
.
9. Operation of the regulator valve
When you pull the lever the valve will be full-open, and when you
push it forward the valve will be full close. (Fig.4)
You can feed the steam to the nozzle for the whistle when the lever
is in the range between just before the full-open to full-open.
Adjustment and Maintenance
Fig.4 Regulator valve
1. Care of relief valve
Every time you pour water to the boiler, move the stem of the relief valve a few times to make sure it can operate
smoothly. If not, use a brush (tooth brush) to remove the boiler scale or rust. Replace the O-ring if it is deformed
remarkably (a new one has an almost round section), it has lost elasticity or it has scratches or cracks.
※Caution: The working pressure for the relief valves are approx. 2.0kg/cm
NOT modify the relief valve especially do not increase the working pressure.
2
for the boiler, and 1.5kg/cm2 for the burner. DO
2. Care of Burner
・ The performances of the boiler depend on how the burner is adjusted or maintained. If you discover anything
wrong with the performances, use the attached cleaning needle and clean the nozzle to remove foreign matter
such as oxide there. DO NOT turn the needle in the nozzle hole. Just thrust it through the nozzle. If you rotate it,
the nozzle hole will become larger and the injection power will be decrease.
・ Tighten the gland nut beneath the needle valve once in a while. If you operate when the nut is loosen, the fuel
leaks and flame occurs from the joint.
3. In case of defect or breakdown
Do not disassemble by yourself just ask the shop you bought it for support.
Disclaimer
All the steam engine, boiler and burner made in our factory are operated by means of steam generated by flame.
When you use them, take a special care of fire or burn injury. We assume no responsibility whatsoever for any
accidents or damages.
Wrong usages which will be not included in the warranty are as follows.
・ Defect caused by using the undesignated liquid. (other than Water for the boiler, Alcohol for the burner)
・ Defect caused by un-required modification.
・ Defect caused by usage beside the procedure described in this instructions.
All specifications and models are subject to change without notice.
SAITO SEISAKUSHO CO., LTD.
22-7, 3-chome, Tokagi, Ichikawa-shi, Chiba 272-0024, Japan
TEL : 047-378-4156 FAX : 047-378-4155
-4-
 Loading...