


LOA: 41.5" (105.41cm)
LWL: 37.75" (95.88cm)
DSPL : 9 lbs (3.4kg)
BEAM: 13.125" (33.33cm)
MAIN HOIST: 52" (132.08cm)
DRAFT: 16" (40.64cm)
SAIL AREA: 710 sq "
(4580.63sqcm)
R
R A D I O C ONTROL L E D
a u s e r ' s m a n u a l
R A D I O C O N T R O L L E D
R
©2003 Out There Technologies
Lase r is a register ed t ra demar k of
Vanguard, Inc., Performance Sailcraft,
and Performance Sailcraft, Pty
DESIGNED BY BRUCE KIRBY
DEVELOPEDBY JON ELMALEH

warranty
There is a six-month limited warranty on parts damaged during normal use
(While sailing and does not included hitting other boats or obstructions). You
must register by mailing the warranty card within 10 days of purchase to be
eligible for the warranty.

preface
Message from Bruce Kirby, Designer of the Laser
It has been a great pleasure to work with world model yacht champion Jon
Elmaleh in the de velopment of this radio-controlled miniature Laser. The
basic hull shape is a one-quarter scale Laser, but of course to make the boat
work at the much smaller size and with no crew aboard to act as ballast, we
had to develop a model yacht-type keel and rudder and slightly reduce the
sail plan.
I have been overjoyed at the result. The boat sails and handles exceptionally
well over a broad range of wind and sea conditions and is faster than I ever
expected it could be. We have kept the rig and control systems simple so
that, as with any good one-design, success on the race course depends on
the sailor, n ot the boat. And as a purely recreational sailing model it is quick
to launch and easy to opera te.
So climb aboard with your imagination. You will find that t he thrill is there, but
your muscles won’t get sore and if you don’t sail in the rain you will stay dry.
Rowayton, Connecticut - January, 1995
--------
Message from the Manufacturer:
Congratulations on your purchase. We hope the RC Laser will fulfill all your
expectations . W e have worked hard to make this product the best RC
sailboat on the market toda y, and we believe the RC Laser is the one-design
sailboat that sailors are looking for.
OUT THERE TECHNOLOGIES, LLC
www.outthere.com
Please note: Out There Technologies, LLC no longer deals directly
with the public. Sales and service is handled by area distributors. Please
contact your local RC Laser retailer with questions and re quests.
--------
May the wind be with you!

contents
TABLE OF CONTENTS
The RC Laser and Components .............................................. 1
Parts Layout .................................. .......................................... 2
Assembly:
Overview ............................................................................ 3
Details:
Sail and Mast ....................... ..................................................... 4
Keel ................................... ......................................... 5
Rudder .................................. ...................................... 5
Batteries ...................................................................... 6
Antenna ........................... ........................................... 6
Rig .............................................................................. 7
Sheet Line .................................................................... 7
Transmitter ... ............................................................... 8
Rudder Control ........................... ................................. 8
Sail Control ............................... ................................... 9
Radio Frequencies ............................ ........................................ 10
Boat Care / Radio Care / Batt eries ........................................... 11
Sail and Boat Numbers ............................................................. 12
Decoration ................................ ............................................ 13
How to Sail ............................................................................ 14
Racing your RC Laser .............................................................. 15
Five Basic Rules ................................ ....................................... 15
Port Tack - Starboard Tack Rule .......................... 15
Buoy Room Rule ....................... .............................. 16
Contact with Buoy Rule ............................ .. 17
Luffing Rights Rule ................................. .................... 18
Collision Rule ................................. ............................ 19
The Race Course ................. ...................................................... 20
Model Sailing Organizations ...................................................... 21
Information about Full Size Lasers ........................................... .. 22
Warranty Information ............... ................................................... 23

1
The RC Laser
was designed to be a strict “one-design” sailboat. The fundamental principle
behind a one-design sailboat is that sailors may not alter their boats. This
ensures that racing is a competition among sailors, not boats. If you intend to
race your RC Laser, you may not change your boat in any other way other
than to decorate it as explaine d in this manual. All replacement parts must be
ge n u i ne RC Laser parts. The onl y e xceptions a re the t ransmitter and
receiver, which may be replaced with any compatible equipment.
Your RC Laser has the following components:
Sail and tell tale Mast
Rudder Rudder bracket
Gooseneck Rudder linkages (2)
Rudder servo Boom
Boom sliders (3) Antenna mount
Antenna tube Sheet line
Screw eye Sail control servo
Hull Transmitter
Receiver Hatch cover
Battery holder Switch
Manual
If you need to purchase replacement parts, you can contact the retailer
where you purchased your RC Laser, or your local distributor. A list of RC
Laser distributors can be found in the back of this manual.

2
Parts Layout
SAIL
MAST
GOOSENECK
KEEL LOCK
SCREW EYE
ANTENNA TUBE
ANTENNA MOUNT
KEEL
SHEET LINE
BOOM
BOOM SLIDERS
TELL TALE
HATCH COVER
POWER SWITCH
RUDDER
RUDDER BRACKET

22
3
ASSEMBLY OVERVIEW
(See following pages for detailed instructions)
You are now ready to sail!
RC LASER RESOURCES
Distributors
Model Sailing Center
290 Circle Drive
Evergreen CO 80439
USA
Orders only: 800 497 8976
Information line:303 670 4670
Steve@ModelSailingCenter.com
www.modelsailingcenter.com
www.sailrclaser.com
Peterkin (UK) Ltd
85 Commercial Square
Freemens Common, Leicester
LE2 7SR England
Tel: 0116 254 3645
Fax: 0116 247 0618
nigel@peterkin.co.uk
www.rclaser.org.uk
www.peterkin.co.uk
Radio Control Sailing Australia
PO Box 1392
North Sydney NSW
2059 Australia
Tel: 61 2 9954 0755
info@radiosail.com.au
www.radiosail.com.au
1) Assemble rig by connecting mast
tubes and sliding assembled mast into
sail pocket. Slide boom into gooseneck.
2) Insert keel into slot at
bottom of hull and slide into
place.
3) Place rudder into hole in
bottom of hull and snap
rudder into bracket.
4) Place 4 AA batteries into
battery holder. Place bat tery
holder into hull and close ha tch
cover. Also, remove b ack of
transmitter and install 9 AA
batteries.
5) Insert antenna tube int o
antenna mount.
6) Slide mast into hole on deck.
7) Connect sheet line to slider
by pulling loop at end of sh eet
line over slider tang until loop
hangs from slider ring.
8) Turn transmitter on, then turn
boat on by sliding switch forward.

4
21
Lap 1
1 SAIL AND MAST
Here’s a course that offers a
lot of opportunities to make
choices an d th i n k a b o u t
strategy, because there are a
nu mbe r o f dif fer ent pat hs
you can take on each lap.
Sai l th r o u g h th e st a r tin g
g a t e , th e n r o u n d t h e
wind wa rd buoy a n d o ff s e t
windward buoy. Travel down
to the leeward gate and pass
arou nd it in any d ir ec tion.
S a i l b a c k t o w a r d s t h e
windward buoy and d o one
m o r e la p , r o u n d i n g t h e
windward and then the offset
b u o y on c e a g a i n . A f t e r
rou nd in g the l eewar d gate
one mor e ti m e , fi n i s h by
co m i ng b a ck t h rou g h th e
starting gate.
Lap 2 and finish
START
Windward buoy
Starting gate
Leeward gate
Offset buoy
START
Windward buoy
Starting gate
Leeward gate
Offset buoy
wind direction
A) Connect mast tubes.
C) Slide boom into gooseneck.
D) Thread outhaul string, attached to the sail,
through the end slider and snap into the next
slider forward (see page 7 for diagram)
B) Insert assembled mast into sail pocket.

20
5
2 KEEL
RACING YOUR RC LASER
There is an infinite number of possible race courses you can
sail - the only limit is your imagination. Here are two of the more
commonly used courses to get you started.
Modified Olympic Course
wind direction
Jockey for the best position
d u r i n g a o n e m i n u t e
countdo wn. S ai l two laps
arou n d t h e c o u r s e , n o t
rounding the wing buoy on
the second lap.
Wing buoy
Start/finish line
Pivot hole
Rotate locking lever 90 degrees
until lever locks in place.
Insert rudder stud into pivot
hole on bottom of hull while
inserting top of rudder into
rudder deck bracket. Snap
rudder into bracket.
3 RUDDER
NOTE:
If the surface of the keel bulb beco me s damaged, exposing
the lead core, cover it with tape or paint. Keep away from
exposed lead.

6
19
A leeward boat that is luffing up cannot sail past head to wind (Figure I).
Head to wind Past head to wind
Your boat is sailing “head to wind” when the bow of the boat is pointed
directly into the wind. If you steer your boat into the wind, past the point
when it is head to wind, you have sailed “past head to wind.” If you
are luffing up, you are not p ermitted to sail past head to wind. If you do,
you lose the right of way, regardless of which tack you are sailing on. If
there is a collision after the le eward boat is past head to wind, the leeward
boat must do a p enalty turn (see Rule 5).
5. Collision rule
Whenever you collide with another boat, or fail to avoid a collision, you
must sail clear of all other boats and complete penalty turns before
continuing the race. Before the start of every race, the race committee or
racers determine whether a penalty will consist of one or two 360 degree
penalty turns. Generally, only one turn is required in light wind conditions.
wind direction
Figure I
4 BATTERIES
5 ANTENNA
Feed excess antenna wire into boat. Insert antenna
tube into antenna mount.
Remove hatch cover. Take out battery holder. Check switch on boat to
make sure it is in the off position. Install four "AA" batteries. Replace
battery holder and hatch cover. Do not put your RC Laser into the
water without its hatch cover. Damage may result.

18
7
4. Luffing Rights Rule
This rule applies when you a re passing another boat at close proximity.
Figure F ind icates the windwa rd and leeward sides of a boat. O n the
starboard tack, the starboard side of the boat is the windward side. On port
tack, the port side of the boat is the windward side.
RULE: When two boats are sailing on the same tack (starboard tack in these
examples) at close proximity (Figure G), the leeward boat has the right of
way over the windward boat 2. If you are a windward boat on the offensive,
you must pass with enough room to avoid the leeward boat. If you cannot
avoid the leeward boat, you must ste er away to avoid a collision.
If the windward boat 2 tries to pass the leeward boat 1, the leeward boat 1
can “luff up” the windward boat 2 by steering into the wind, causing 2's sail to
luff (Figure H). When a boat’s sail luffs, it loses power and speed. Luffing up
is mostly as a defensive maneuver.
Windward side
Leeward side
Figure F
wind direction
Figure G
wind direction
Boat passing
2
1
1
2
Figure H
wind direction
6 RIG
7 SHEET LINE
Slide rig (mast and sail) into mast hole on deck.
Connect sheet line to slider by pulling
loop at end of sheet line over slider
tang until loop hangs from slider ring.
slider tang
slider ring

8
17
ASSEMBLY OVERVIEW
A boat that makes contact with a buoy must sail away from the fleet, out of
the way of other boats, and do a 360-degree penalty turn(figure E). After
the penalty turn, the boat may resume racing. If the boat hits the buoy on
the wrong side of the buoy, it must re-round the buoy on the correct side
before doing the 360-degree penalty turn (figure E1).
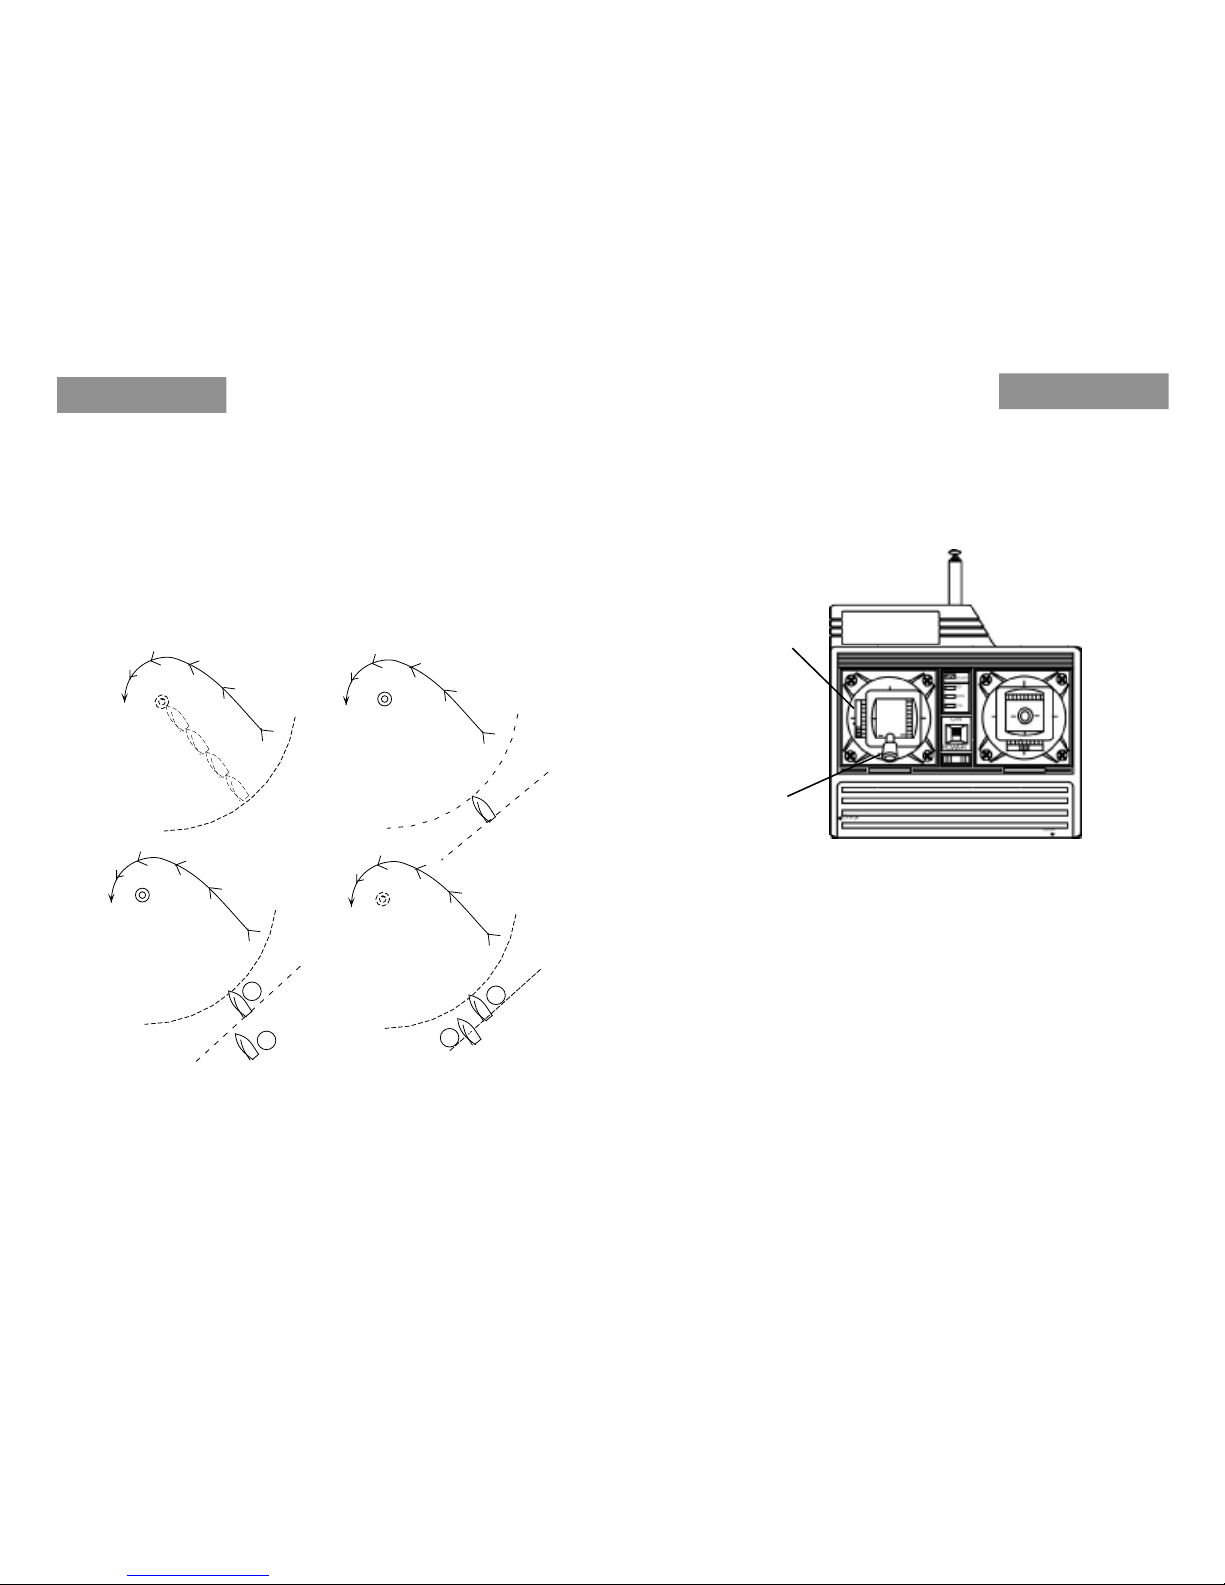
8 TRANSMITTER
The transmitter is the device that enables you to control your RC Laser from
the shore. On the transmitter there are three controls: the stick on the right
is the rudder stick; the switch in the center is the power switch; and the stick
on the left is the sail stick.
To operate the transmitter, remove back panel and install eight “AA” size
batteries, extend the antenna and put power switch to the “on” position.
After turning the transmitter on, slide the power switch on the boat to the
“on” position. The power switch on the boat slides front to back for on and
off. Do not push down, damage may result. ALWAYS turn the transmitter
on before turning the boat on.
RUDDER CONTROL
After turning on the transmitter and the boat, move the rudder stick from
side to side. The rudder will move from side to side. The rudder should be
in the center position when the rudder stick is in the center position. If it is
not, use the rudder trim lever to center the rudder. To steer the boat toward
the right, move the rudder stick to the right; to steer
the boat toward the left, move the rudder stick to the left. boat to the “on”
position. The power switch on the boat slides front to back for on and off.
Do not push down, damage may result. ALWAYS turn the transmitter on
before turning the boat on.
The course sailed after hitting the wrong
side
Rudder stick
Trim lever
crystal
Charge
POWER
ON
HIGH
ONAIR
NORM
LOW
Figure E
Figure E1
The correct side
The wrong side
22
9
Sail Control
Your RC Laser is powered by th e wind, not by your radio. However, the sail
stick on your transmitter enables you to let the sail in and out to maximize
your boat’s use of wind power (see “How to Sail”). As you move the sail stick
up, the wind will push the sail out. When the sail stick is all the way up, the
sail will be able to move out to a position perpendicular to the center line of
the boat, which is as far out as it can go. As you move the sail stick down, the
sail will move toward the center line. When the sail stick is down as far as it
can go, the sail will be close to the center line of the boat. Use the trim le ver
to fine tune the sail.
You are ready to sail. Put your boat in the water and have fun!
2. Buoy room rule
The buoy room rule applies when boats are rounding or passing a buoy or
an obstruction on a race course. You mu st imagine a circle around the buoy
or obstruction. The radius of the circle is four boat lengths (figure A). When
your boat’s bow touches the imagined circle (figure B). imagine a line parallel
to the back of your boat. If the nearest boat to your boat has not yet crossed
(overlapped) the parallel line (figure C) , you may round the buoy witho ut
yielding to that boat. If there is a boat that has crossed the line - an overlap
(figure D) - your boat must yield to that boat.
No overlap. 1 may round the
buoy without yielding to 2.
Inside overlap.1 must give 2
room to round buoy.
Figure A
Figure B
Figure C
Figure D
1
2
1
2
Trim lever
Sail stick

10
15
RACING YOUR RC LASER
Sailboat racing is a lot of fun. If you are already familiar with yacht racing
rules, those rules can be used when racing the RC Laser. Even if you know
nothing about saliboat racing, the following five basic rules and race course
will allow you to compete on the water with experienced sailors. RC Lasers
sail by the same ISAF (International Sailing Federation) rules that govern full
sized sailboat racing, with the exception of Appendix E. Learn more at
www.sailing.org.
Five Basic Rules of Racing
1. Port tack/starboard tack rule
Port refers to the left side when facing the bow of the boat. Starboard refers
to the right side of the boat when facing the bow. A boat in motion is either
on port tack or starboard tack. When the boom is left of the center of the
boat, the boat is sailing on starboard tack. When the boom is right of the
center of the boat, the boat is sailing on port tack.
RULE: When sailing on a collision cou rse , boats sailing on starboard tack
have “right of way” over boats sailing on port tack. Boats on port tack must
yield to boats on starboard tack.
Radio Frequencies
The frequency of your RC Laser is indicated on the end flap of the box. Each
RC Laser comes with a set of removable crystals. The crystal generates the
frequency. The set is made up of one “TX” crystal for the transmitter and one
“RX” crystal for the receiver. The num ber on the “TX” crystal, which is in the
bottom right corner of your transm itter, indicates the frequency of the radio.
Each radio controlled boat uses a frequency on either the 27 or 75 MHz
band. If two boats attempt to sail on the same frequency at the same time
within a two block range, neither boat will work properly. W hen you go
sailing, you must find out what frequencies are available at that site. With a
little cooperation, you will be able to avoid frequency conflicts. There are at
least 6 crystal sets available for each frequency band. We recommend that
you own a t least 4 different crystal sets if you intend to sail at a number of
different sites.
It is quite simple to replace your crystals with another crystal set. First, turn
the transmitte r off and remove the “TX” crystal from the lower right corner of
the transmitter. Replace it with the new “TX” crystal. Then , remove the hatch
cover from the hull, pull the receiver from its mount, and pull the “RX” crystal
out. Replace the crystal with the new “RX” crystal. Finally, replace the
receiver and the hatch cover. You are ready to sail on your new frequency.
Stick Reversing
Many transmitters have reversing switches. If for som e reason you wish to
reverse the rudder stick direction, you can do so by changing the position on
the channel 1 switch only.
Do not reverse the channel 2 switch. Damage may result.
crystal
Charge
POWER
ON
HIGH
ONAIR
NORM
LOW
2
7
.
9
9
5
R
X
27.995RX
27.995TX
"TX""RX"
PORTTACK
STARBOARDTACK
STARBOARD SIDE
PORTSIDE
STERN
BOW

14
11
How to Sail
Sailboats cannot sail directly into the wind. If a boat is pointed into the wind,
the sail will luff, or flap like a fla g in the breeze. Sailboats can only sail when
they are at an angle to the wind. Depending on the direction you want to sail
relative to wind directio n, there is an angle at which the sail should be set. To
sail a close-hauled course (almost directly into the wind) the sail is “in
tight” i.e. at only a slight angle to the center line of the hull. On a run (sailing
away from the wind), the sail should be all the way out, perpendicular to the
center line of the hull. Reaching, or sailing roughly perpendicular to wind
direction, has a sail position about halfway between close-hauled and a run.
To pull the sail in and sail a close-hauled course, move the sail stick down. To
ease the sail out to reach or run, move the sail stick up. When you move the
rudder stick to the right, the boat will turn to the right. When you move the
rudder stick to the left, the boat will turn to the left. As a guide to trim the sail
properly, no matter what course you are sailing, ease the sail out until it
begins to luff. Next, pull it in until the luffing stops.
Now you should be ready to put your RC Laser in the water. good luck and
good sailing!
SAIL HEADING TERMS
Boat Care
The RC Laser requires little maintenance. As long as you sail your boat in
fresh water, you can store it immediately after removing it from the water.
When storing your boat, remove all pressure from the back edge of the sail
by sliding the boom sliders until they are loose. Keep your boat and radio
away from excessive heat. If you sail in salt water, rinse the hull, the fittings,
the mast, the boom, the keel, the rudder and the sail in fresh water after
sailing and before storing your RC laser.
Radio Care
Moisture is your radio’s enemy. When storing your RC Laser, leave the hatch
cover open to avoid condensation, an d store the transmitter in a cool dry
place. Do what you can to keep your radio equipment dry! If you drop your
radio in salt water, it might be salvaged if you take the batteries out and
wash the radio in fresh water immediately. Use a blow dryer to dry wet
equipment.
Batteries
Your RC Laser requires 12 AA size batteries. Four go into the battery holder
in the b oat and eight go into the back of the tran s mitter. You can use
disposable alkaline batteries, which are good for approximately 10 hours of
sailing. These can be bought at almost any store, bu t must be thrown out
after use. A recommended choice is rechargeable Nickel-Metal H ydride
(NiMH) batteries. These batteries, and chargers, are available from your RC
Laser distributor and most hobby shops.
Batteries, whether Alkaline or re chargeable, are good for several hours
depending on wind strength. If the sail control stops working, or the low light
on the transmi t ter comes on, you m ust sail to the shore as quickly as
possible or risk losing control of your bo at.
Close hauled on
port tack
Close hauled on
starboard tack
Reaching on
starboard tack
Reaching on
port tack
Running on
port tack
Running on
starboard tack
wind direction

12
13
Decoration
There are two ways to add color to your boat without violating the one-design
rule that boats cannot be a ltered: magic markers or PVC tape only. Vinyl tape
sticks well to this boat material, and you are allowed to use it on both the hu ll
and deck. Sails are easily marked using permanent markers. Sail marking
make it easy to find your boat i n a crowd. The only restriction is that you
cannot interfere with the Laser logo, sail numbers or the manufacturer’s
markings.
Sail and Boat Numbers
Sail numbers may or may not be included with your boat. The y are primarily
used for racing. Only official font and size nu mbers can be used. You can
obtain more information abo ut sail numbers from your local distribu tor.
Numbers are installed on the sail just as shown in the diagram, and all 4
digits of the number are used, just as you receive them from the Association.
If hull numbers are used, they are to be installed inside the hatch, not on the
hull or deck.
 Loading...