

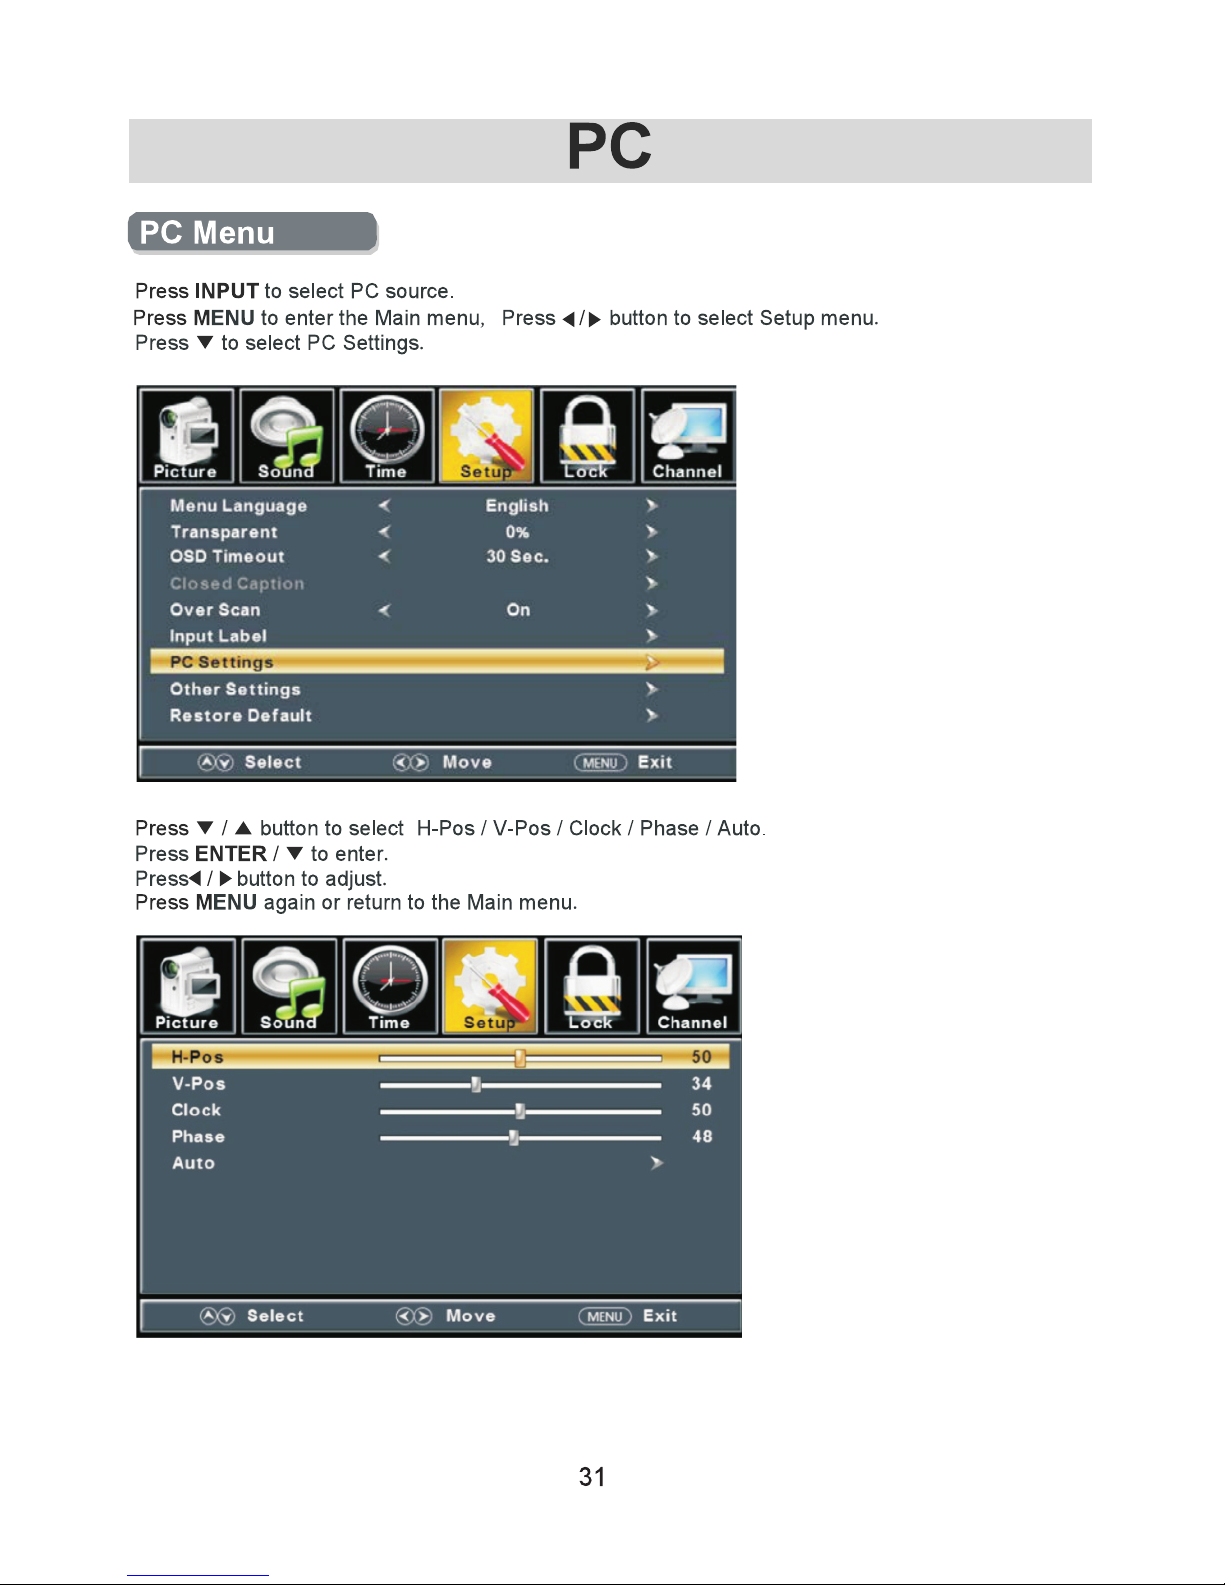
SKTVDOMV01
English
Français
The terms HDMI and HDMI High-Definition Multimedia
Interface, and the HDMI Logo are trademarks or registered
trademarks of HDMI Licensing LLC in the United States and
other countries.
Enabling certain features and functionality in this product (e.g.
Picture Mode, Volume) may increase its energy consumption,
possibly beyond the limits required for ENERGY STAR
qualification.
This product has earned the ENERGY STAR qualification
meeting US Federal Energy efficiency guidelines as
established by the Department of Energy and Environmental
Protection Agency. The ENERGY STAR program exists to
provide energy saving guidelines and help promote energy
efficient products and practices.
Power Savin g Mode is the mode in which the product qualifies
for ENERGY STAR .
L'activation de certaines fonctions et fonctionnalités sur ce
produit (p. ex. Mode image, Volume) peut augmenter sa
consommation d'énergie, probablement au-delà des limites
requises pour la qualification ENERGY STAR .
L'homologation ENERGY STAR a été conférée à ce produit
en conformité aux normes d'efficacité de la Commission
fédérale de régulation de l'énergie (É.-U) établies par le
Ministère de l'énergie et l'Agence pour la protection de
l'environnement. Le programme ENERGY STAR existe pour
fournir des directives relatives aux économies d'énergie et
pour contribuer à la promotion de produits et de pratiques
efficaces du point de vue énergétique.
LED TV / DVD
/ DVD
SAIK YO

TABLE OF CONTENTS
Instructions
DVD
DVD
33-34
35
36
37
FCC Declaration or Co nf ormity Compliance s ta tement
(Part 15):
This device complies with Part 15 of the FCC rules.
Operation is subject to the following two conditions: (1)
this device may not cause harmful
interference, and (2) this device must accept any
interference received, including interference that may
cause undesired operation. The party responsible for
compliance to these rules is:
ORION SALES,INC.
3471 N.UNION DR. OLNEY,ILLINOIS
62450,U.S.A
Ph:1-800-289-0980

Ins truction s

Ins truction s
27) Explanation of symbol, marking, signal lamp or similar means indicate that apparatus
is completely disconnected from the mains. This equipment is a Class II or double
insulated electrical appliance. It has been designed in such a way that it does not require a
safety connection to electrical earth.
28) Correct Disposal of this product. This marking indicates that this product should
not be disposed with other household wastes throughout the EU. To prevent possible harm
to the environment or human health from uncontrolled waste disposal, recycle it responsibly
to promote the sustainable reuse of material resources. To return your used device, please
use the return and collection systems or contact the retailer where the product was purchased.
EXA MPLE OF AN TENNA GR OUNDI NG AS PER TH E NATIONAL ELECTRICAL CODE
ANT ENNAL EADIN W IRE
ANT ENNA
DIS CHAGR E UNIT
(NE C SECTIO N 810-2 0)
GRO UNDIN G CONDU CTORS
(NE C SECTIO N 810-2 1)
GRO UND CLA MPS
POW ER SERV ICE G ROUNDIN G
ELE CTROD E SYSTE M
(NE C ART 25 0,R ARTH)
GRO UND
CLA MP
ELE C TRI C SERVI CE
EQU IPMEN T
NEC-NATIONAL ELECT RIC AL CODE
S2898A
26) Where the mains plug is used as the disconnect device, the disconnect device shall
remain readily operable.
Warning: batteries(pack or batteries installed) should not be exposed to excessive heat
such as sunshine, fire or other heat sources.
Ins truction s

Ins truction s

10cm
10cm
below
Ins truction s
Note: Drawing is a representative example only
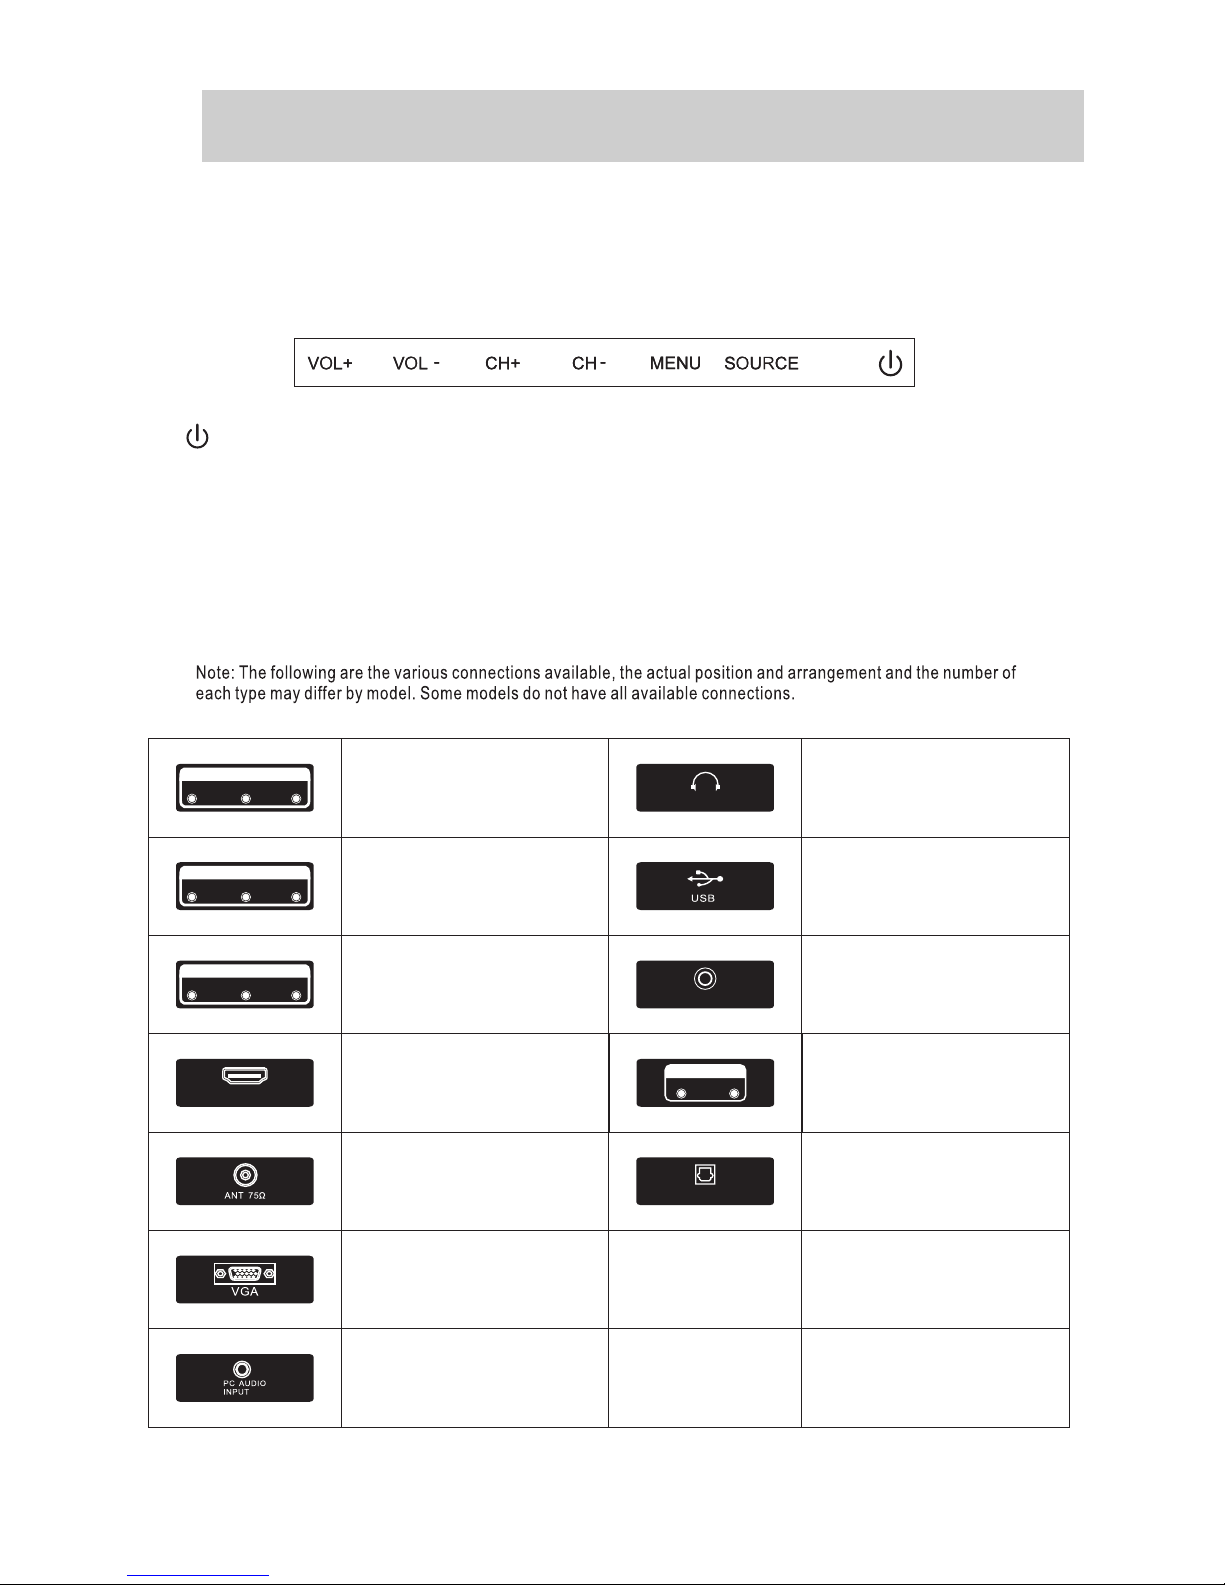
TV Buttons and Connections
TV Buttons
Note: The following is only a representation of the buttons on your unit. The actual
position and arrangement of the buttons may differ by model.
:Turn ON/OFF Power.
SOURCE:External Signal Input Selection.
MENU:Display Main MENU And Confirm MENU Item Selection.
CH+/-:Select Channel.
VOL+/-:Adjust Volume.
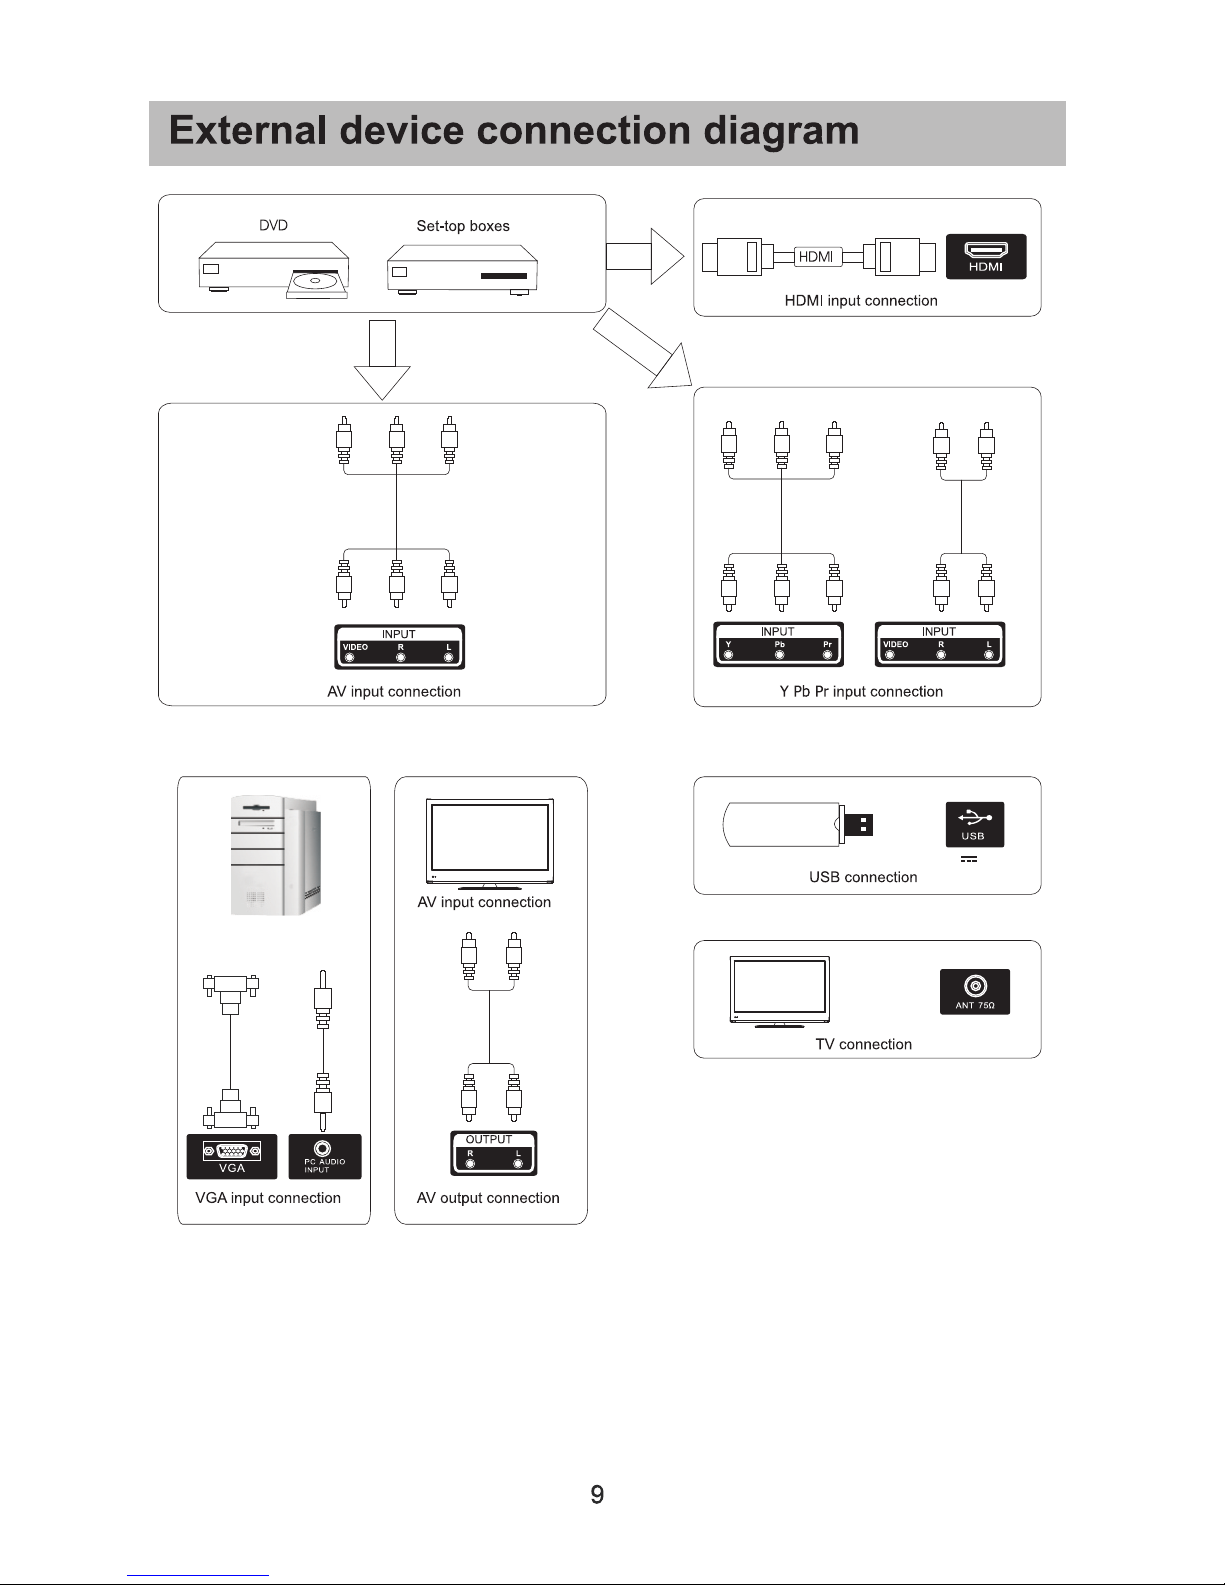
Connections
AV input
Exter nal AV Signal Input and
Right /Left Au dio Inputs.
AV Outpu t
Right /Left Au dio Outputs.
Exter nal AV Signal Output and
Compo nent In put
Conne ct to a com ponent output
conne ction o n your external device.
HDMI In put
Conne ct to a HDM I output
conne ction o n your external device.
ANT 75/ RF Conn ec tio n
Conne ct to the a ntenna/cable TV
outpu t of your d evice or wall plate.
VGA Input
Conne ct to you r PC using a VGA
cable (not pr ovided).
PC Au dio Inp ut
Conne ct to you r PC Audio Out
using 1 /8 line c ord.
HEADP HONE JA CK
Plug ea rphon es into jack for private
liste ning. O verrides speakers.
USB Inp ut
This in put is fo r service personnel
only.
COAXI AL Outp ut
Conne ct to you r SPDIF device
Outpu t
Audio O ut Righ t/Left
Conne ct to you r external device.
OPTIC AL
Digit al Audio O utput.
Y Pb Pr
INP UT
VID EO R L
OUT PUT
VID EO R L
INP UT
OPT ICAL
OUT PUT
R
L
COA XIAL
HDM I
8
HEA DPHON E
5V 0.5A

1
3
2
4
Install and Connect TV
TV ANT
FM ANT
TV signal output
Set your TV
1.Put your TV in a place that can bear the
weight of the TV.
To avoid danger, please do not assemble
the TV near water or extreme heat(such
as a furnace, light source,or candle.)
Do not block the ventilation on the back
of the TV.
Connect antenna and power
2.Connect the antenna cable to the RF
connection on the back of the TV.
Plug the TV into the wall power outlet(
AC120~ 60Hz).
1
3
Turn on the TV
3.While in standby mode the power indication
light will be red.Press the power button on
the TV or remote control.The light will change
to green.
Note:
Picture for reference purposes only.
2
TV Stand Installation Instructions
TV Stand Installation Instructions
1. Open the carton and remove the TV,
accessories, and base.
2. To avoid injury to the TV, place the TV
face down on a firm surface, covered
with a soft cloth. Attach the neck to the
TV with the supplied screws.
3. Attach the base to the neck with the
supplied screws.
4. Note: Insufficient tightening or incorrect
installation of the stand will not support
your unit correctly, and could result in
damage or injury from a tip-over.
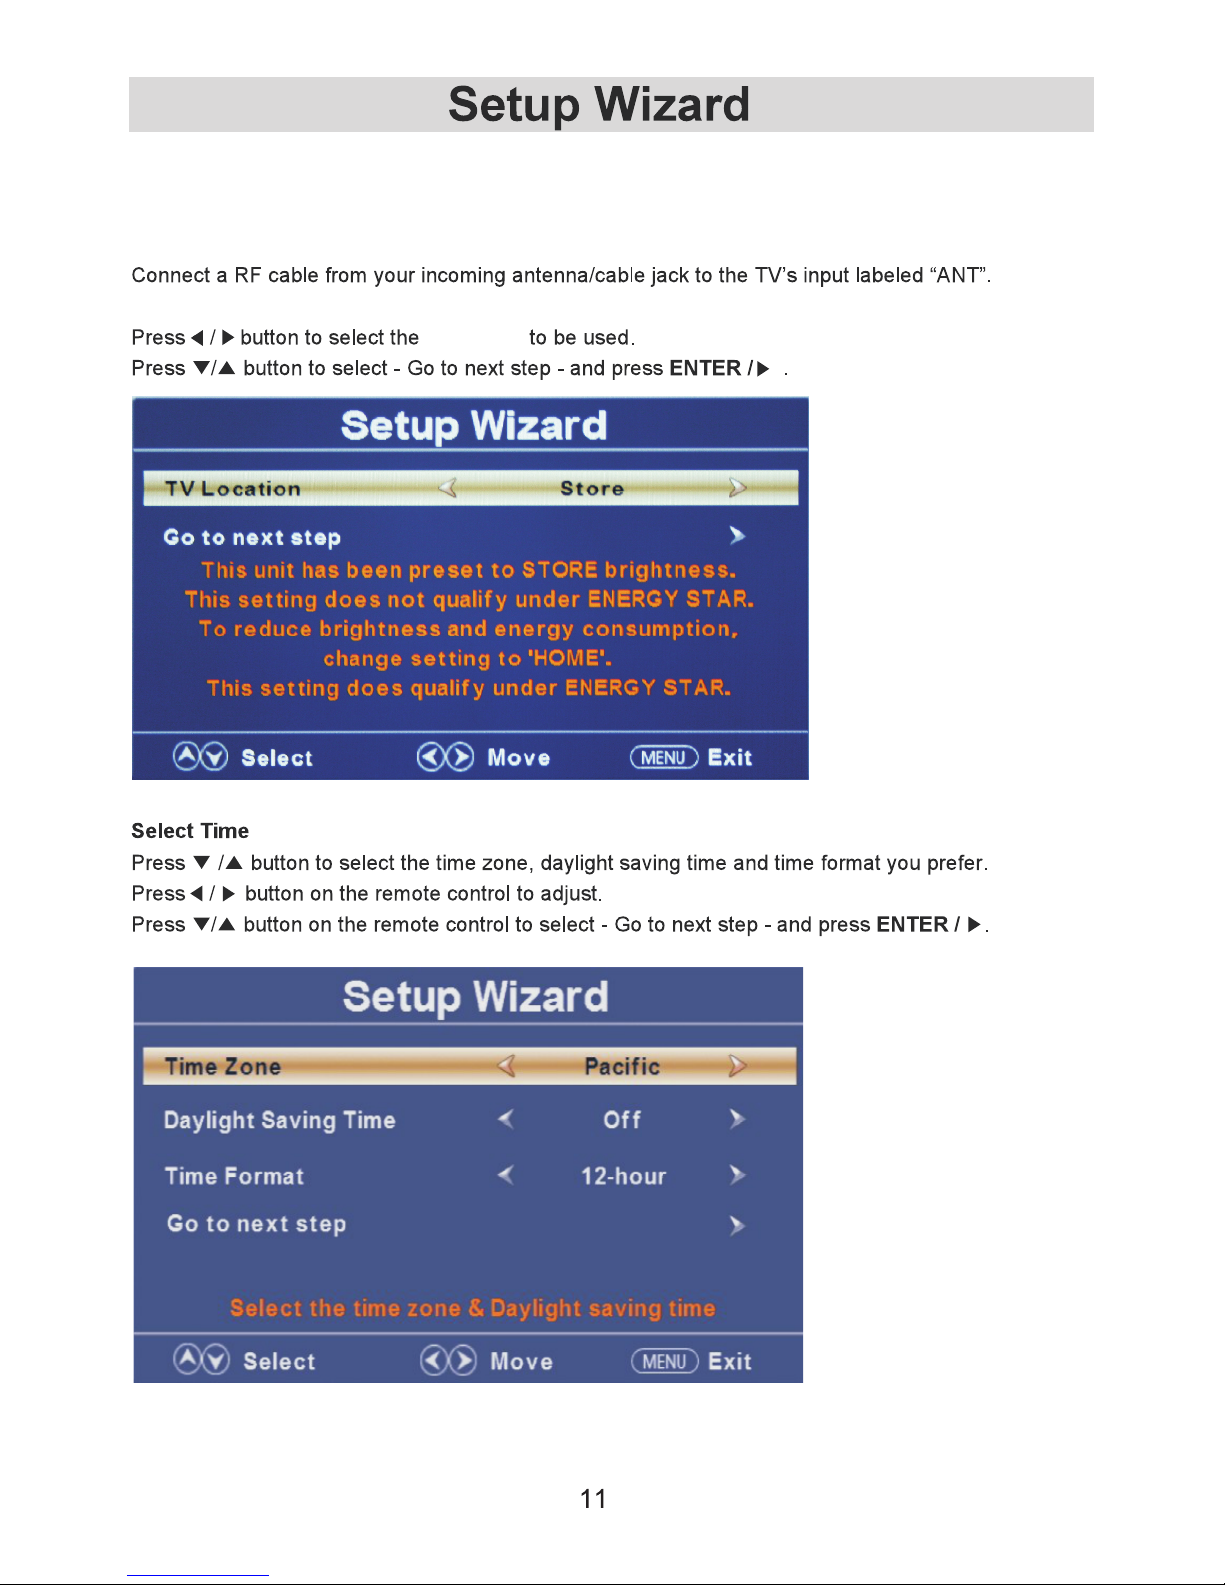
Select TV Location
TV Location
If your preferred language is French or Spanish, exit this Setup Wizard by pressing the Menu
button, and follow the instruction on page 19 to make your language selection and re-enter the
Setup Wizard from that Menu screen.
Setup Wizard


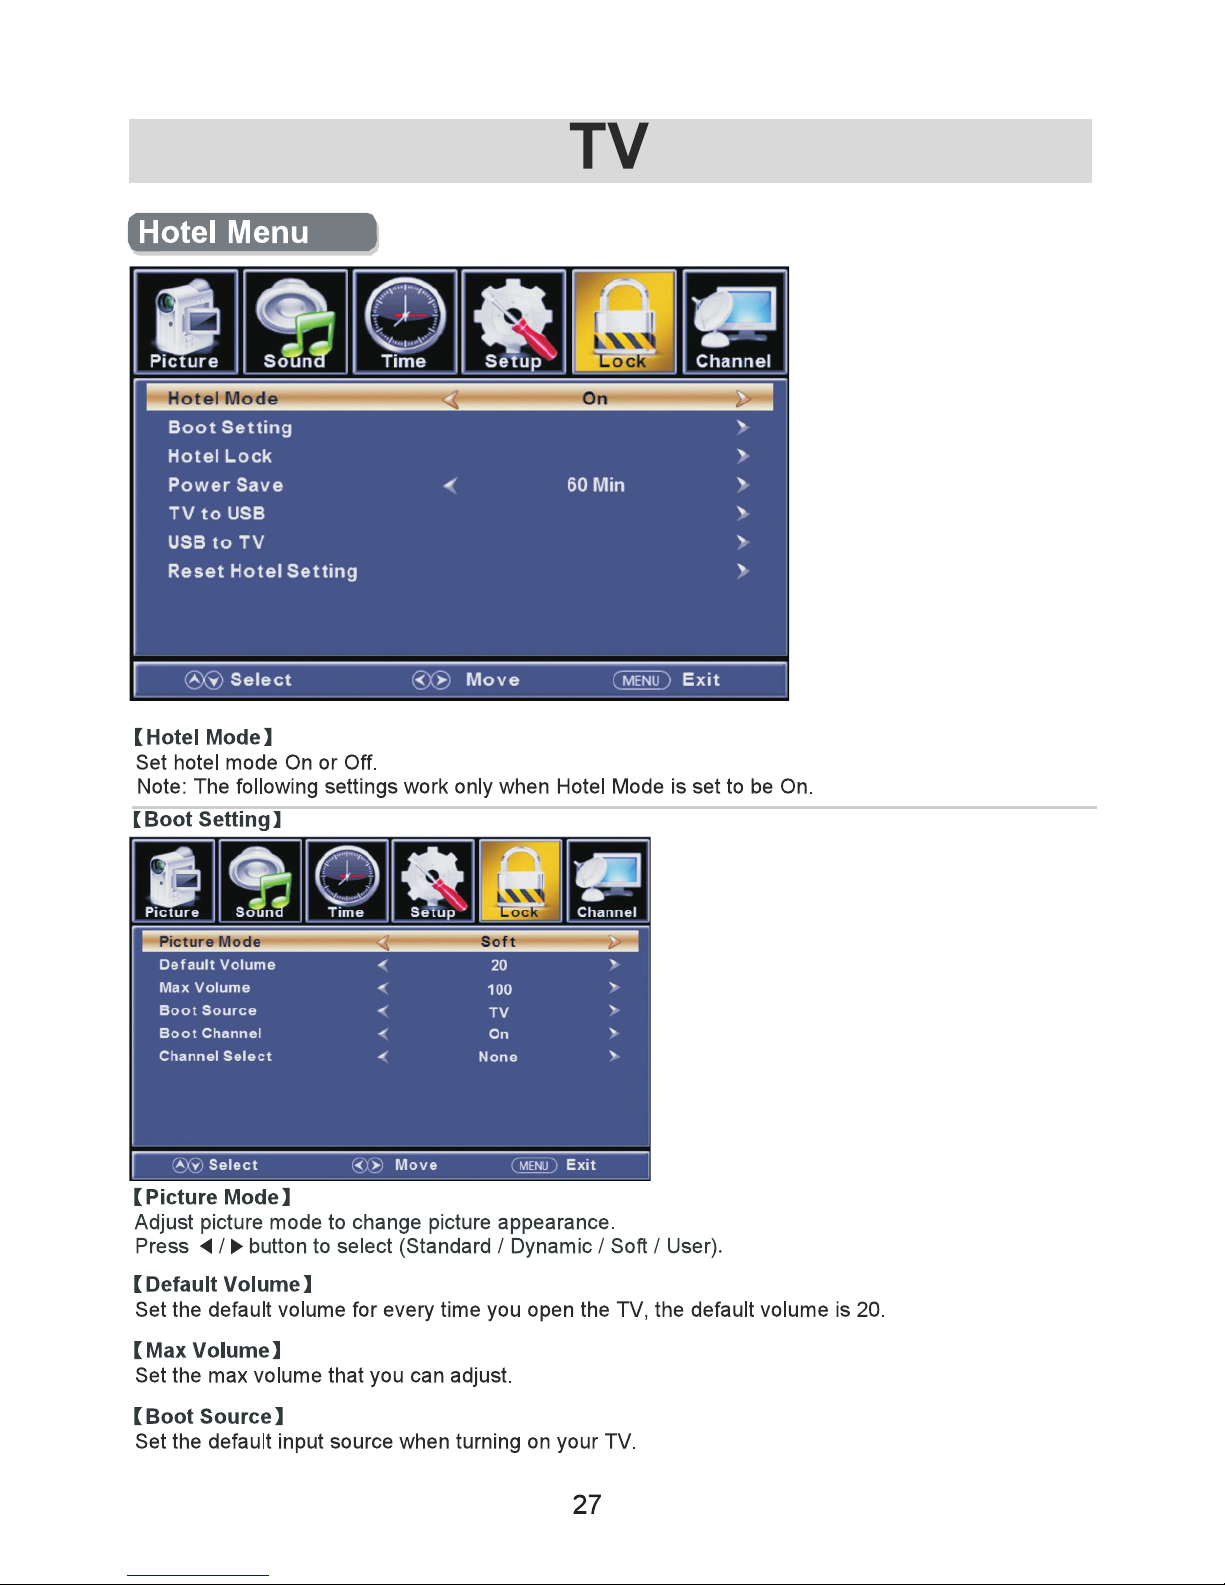
/ Power saving
Power saving Produces a lower power consumption mode.


the default


All children
7 years old and above
General audience
Parental guidance
14 years old and above
17 years old and above

Rating
Define
G
PG
PG-13
R
NC-17
X
General audience. All ages admitted.
Parental guidance suggested. Some material may not be suitable for children.
Parents strongly cautioned. Some material may be inappropriate for children
under 13.
Restricted. Children under 17 require accompanying parent or adult guardian.
No one 17 and under admitted.
Adult audience only.
MPAA
This system defines the rating control which come from MPAA rules.
Off
No Rating Set


interfering lines.

33
1.General Setup Page
OSD Language: Set the language of the setup menu and screen display.
Screen saver: Set the screen protection.
Last Memory: Remember and resume from the position of the previous playback.
2.Speaker Setup Page
Press the “D.Setup” button to enter the DVD settings menu, use the “ ” buttons to select
the desired menu page (General / Audio / Video / Preferences), and use “ ” buttons
to select the items in each menu, then use “ ” button to enter the selected item. If you
change any setting, press “ENTER” button to confirm your selection. Press the “ ” button
to return to the sub menu, to go back up to one of the main DVD menu pages, press the
“EXIT” button.
Downmix: This is for DVD L/R and stereo output, factory default is set to Stereo output.

34
3.Video Setup Page
Sharpness: Allows adjustment of the sharpness of the image.
Brightness: brightness of the image.Allows adjustment of the
Contrast: contrast of the image.Allows adjustment of the
4.Preference Page (Note: This menu page will pop up before a disc is inserted
into the DVD mechanism.)
TV Type: Select the local TV system (PAL TV/Multi/NTSC TV). Factory default is set to NTSC
for use in North America.
Audio: Disc audio language selection may be allowed, dependent upon the disc inserted.
Subtitle: Disc subtitle language selection may be allowed, dependent upon the disc inserted.
Disc Menu: Disc Menu language selection may be allowed, dependent upon the disc inserted.
Parental: Set the maximum disc rating ( ) that can beOFF/G/PG/PG13/R/NC17/X-ADULT
viewed without a password.
(default password is 0000)
Password: Allows user to change the password.
Default: Choose this to restore the original default Preference settings
at the back of the unit
from
35

Specifications
Screen Size
24”
32”
39”
39”
42”
50”
TV System
Preset Channels
Speaker Output
power Consumption
(LED)
NTSC
NTSC
NTSC
NTSC
NTSC
5W+5W
10W+10W
10W+10W
10W+10W
10W+10W
48W
56W
75W
85W
135W
Screen Size
24”
32”
42”
50”
Main accessories
User's manual x1
Remote controller x1
Power cord x1
AAA Batteries x2
NTSC:AIR 2-69
CABLE1-125
NTSC:AIR 2-69
CABLE1-125
NTSC:AIR 2-69
CABLE1-125
NTSC:AIR 2-69
CABLE1-125
NTSC:AIR 2-69
CABLE1-125
28”
NTSC
8W+ 8W
NTSC:AIR 2-69
CABLE1-125
36W
28”
36

MENU
SOURC E
ENTE R
EXIT
SLEEP
P.MODE S.MOD E
DISPLAY
ASPECT
ZOOM
D.MENU D.TITLE
ANGLE
MTS
D.DISP
REV FWD PREV
FAV-
GOTO
AUDIO/CCD
SUBTITLE
FAV FAV+
PROG STEP
REPEAT
A-B
NEXT
D.setup
D.Menu D.Title
Goto
D.Disp
PROG
STEP REPEAT A-B
Zoom
Angle
Subtitle
Audio
D.TITLE:
A-B
Dur ing the p layba ck,pr ess thi s butto n to repe at
pla yback o f a speci fic sec tion on a d isc.
SLEEP: Select amount of time before TV turn
off
automatically.
S.MODE: Press to cycle through the different sound settings
P.MODE: Press to cycle through the different picture settings
D.DISP:
D.MENU:
Pre ss "-" to e nter a pr ogram n umber f or mult iple pr ogram
cha nnel, s uch as 2- 1 etc.
GOTO:
STE P:Play fo r singl e frame i mage
ZOOM In DVD source adjust DVD picture size
MTS:
Pre ss to sel ect the a udio mo de, you c an sele ct Ster eo, Mon o,
or SA P(sec ond aud io prog ram).
CH +/ - : Press t o scan th rough o r to sele ct a chan nel.
V +/- : Press t o incre ase / dec rease t he soun d level .
ASPECT: Aspect function.
D.Setup:
AVTV
HDMI
PC
YPbPr
DVD
AUDIO/CCD
Press to dispiay the closed caption .
37
SAIK YO

Should service be necessary under this warranty for any reason due to a manufacturing defect or
malfunction during the first 12 months from date of original purchase, ORION will provide carry-in
service for units with a screen size of 40 inches or below, and in-home service for units 42 inches or
greater in screen size by an ORION authorized Independent Service Center at no charge. Also, if an
original part fails due to manufacturing defect in material and workmanship within one year from date
of original purchase we will replace the defective part, provided the defect or malfunction is verified along
with dated proof of purchase.
There are ORION authorized Independent Service Centers located throughout the country. For the one
nearest you, DIAL TOLL FREE:1-855-692-9192,ORION will not be liable for damages incurred in shipment
of the unit. If there are no ORION authorized Independent Service Centers in your area please call
1-855-692-9192 for assistance.
ORION warranty this product to be free from manufacturing defects in material and workmanship
under normal use and conditions for a period of 1 year from data of original purchase in the United States.
SA IK YO
 Loading...