


MOVING WASH 1200 (PF09014)
Moving head projector
USER’ S MANUAL release 1.0
This manual must be considered an integral part of the projector.

1
BEFORE CONNECTING AND USING THE PROJECTOR, IT IS IMPORTANT TO READ CAREFULLY ALL THE
INSTRUCTIONS IN THIS MANUAL.
QUALIFIED PERSONNEL ONLY, IN COMPLIANCE WITH ALL THE SECURITY LAWS, CAN DO THE
INSTALLATION, THE MAINTENANCE AND THE UTILISATION OF THIS PROJECTOR.
BEFORE CONNECTING THE PROJECTOR, MAKE SURE THAT THE FREQUENCY AND THE VOLTAGE
VALUES ARE SUITABLE AS SPECIFIED ON THE PROJECTOR.
FOR ANY DOUBT, CONTACT YOUR SUPPLIER OR SEND AN E-MAIL TO:
tech@lamposrl.it
INDEX
GENERAL DESCRIPTION ---------------------------------------------------------------------------- page 2
START-UP PROCEDURES -------------------------------------------------------------------------- page 2
SPECIAL FUNCTIONS -------------------------------------------------------------------------------- page 5
DMX CHANNEL ASSIGNMENT -------------------------------------------------------------------- page 5
OPTICAL SYSTEM ------------------------------------------------------------------------------------ page 7
MAINTENANCE ---------------------------------------------------------------------------------------- page 8
2
GENERAL DESCRIPTION
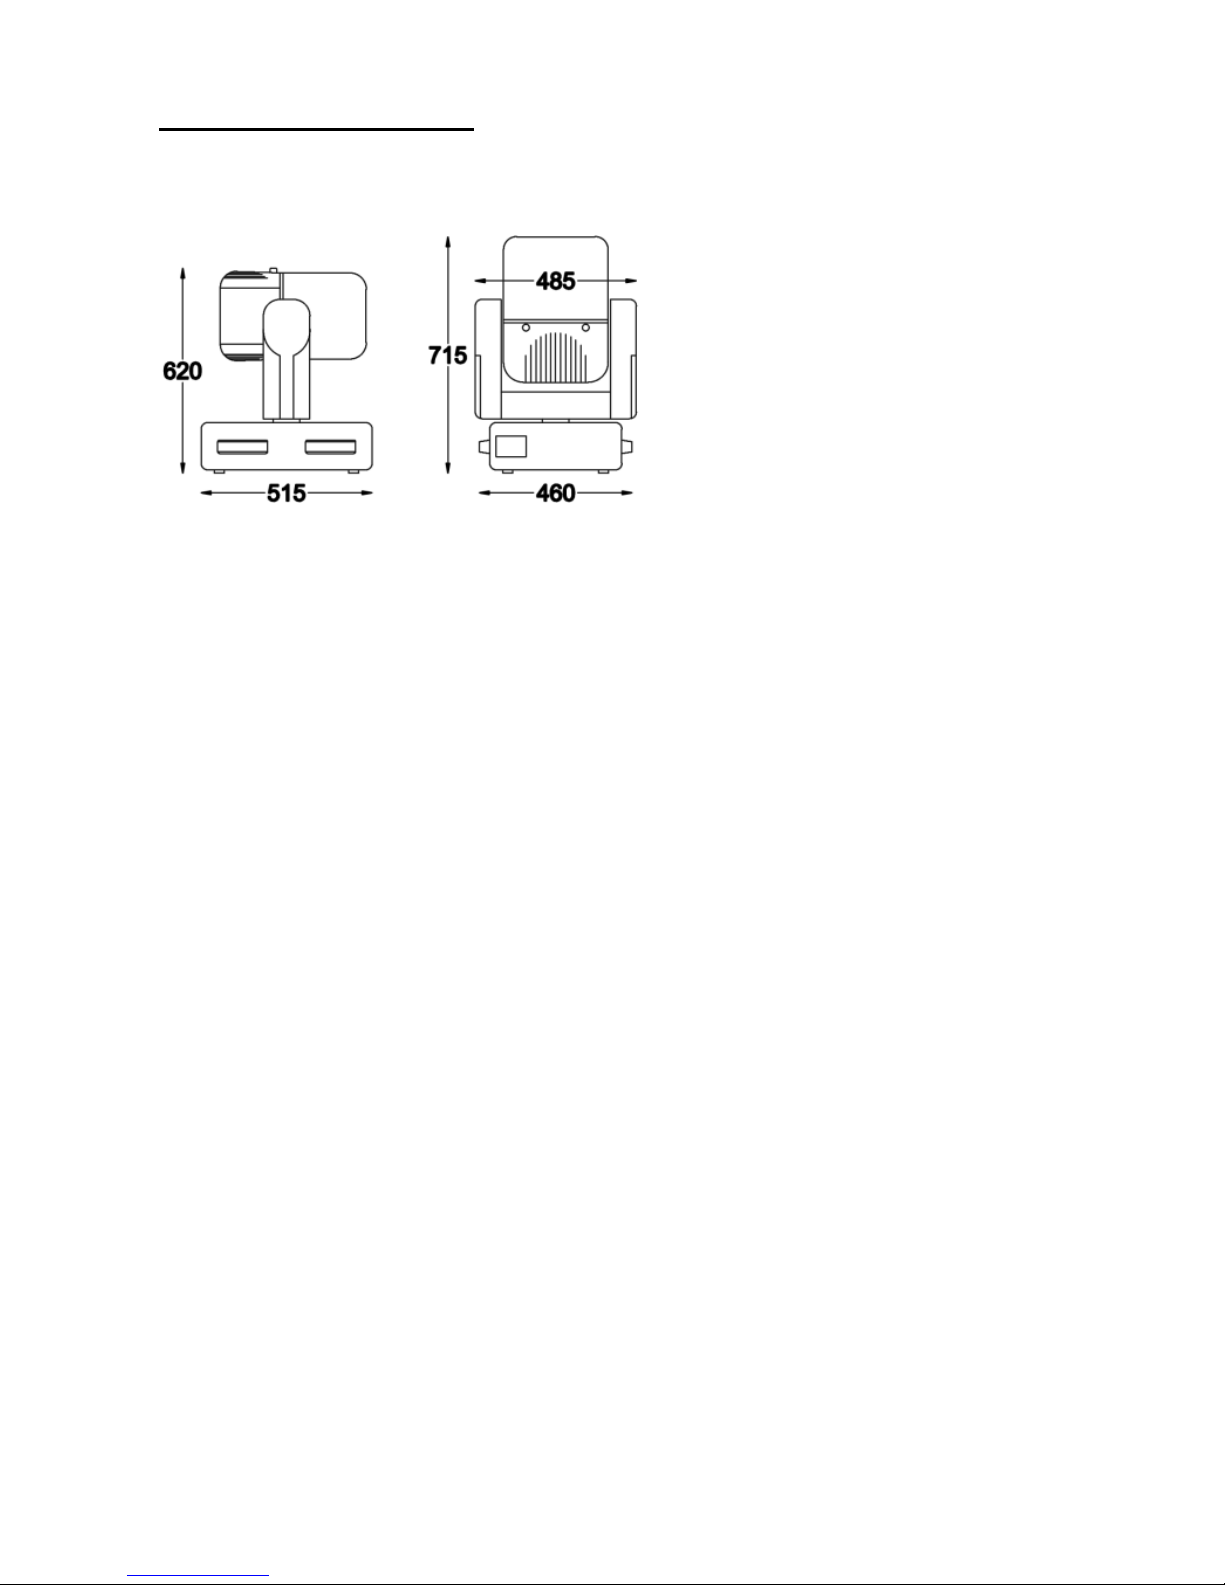
Technical Features and Dimensions
Voltage rating 230 V
Rated current 7,4 A
Frequency 50 Hz
Maximum surface temperature 70º C
Distance from inflammable surfaces 2 mt
Weight 52,5 Kg
Protection rate IP20
HMI 1200/S short discharge lamp, socket SFc 10-4
CAUTION
The projector cannot be mounted on inflammable surfaces.
Norms applied to construction:
EN 60 598-1 EN 60 598-2-17 EN 294 EN 50 082-1
EN 55 015 EN 60 555-2 EN 61 000-3-2
Working Position
Moving Wash 1200 can work in all positions.
Admissible Environmental Conditions
The projector was engineered and produced to function in covered, dry areas with an air temperature ranging
between 5° and 35° C, and with a humidity level between 30 and 90%.Sharp changes in room temperature may
generate condensation inside the projector, which can harm the projector. Therefore, switch on the projector only
after it has undergone a period of gradual adaptation to the room temperature.
Storage
The projector, in its original packing, must be kept in covered, dry areas with a temperature between -10° C and
+50° C.
Mechanical Safety Guards
A bipolar cut-off switch is located between the lamp compartment and the cooling unit. This safety switch cuts off
the power to the projector if the top lid is opened.
Noise Level
After the projector has been powered up and the initial configuration takes place, the noise produced by the
projector is primarily due to its cooling system. The noise level is much lower than the limit of 70 dB permitted by
law.
Handling
The projector, with or without packing, must be handled with care. Lifting and handling must be carried out with
special equipment. Do not expose the projector, with or without its packing, to brusque accelerated or decelerated
movements, knocks, dragging, or other stress caused by unsuitable handling methods.

3
START-UP PROCEDURES
Positioning and Installation
Follow these steps for opening the package and installing the projector on its working position:
· Place the projector near the place it will be installed.
· Open the package and remove anchoring elements and accessories.
· Carefully read the instructions in the manual.
· Prepare suitable hooks for the anchoring brackets and auxiliary support.
· Using suitable lifting equipment, place the projector up against the hooks.
· Attach the auxiliary support element and make sure it is tightly fastened.
· Make sure all adjustable parts are locked firmly in place in the desired position.
IMPORTANT
The projector has PAN and TILT Lock and Release Mechanism. Un-lock the mechanism before switching on the projector.
CAUTION
You must verify the stability of the anchoring elements when the projector is in working condition. In compliance
with the laws in force, the anchoring support must withstand a load of 525 kg. Screws, hooks, and hardware must
be inserted correctly and installed to prevent them from accidentally loosening.
IMPORTANT
Do not install the projector where there are objects located at a distance of less than 20 centimetres from the
cooling system.
Lamp installation
• Loosen the knobs on the top lid and remove it.
• Remove the lamp from the packing and carefully read the
manufacturer’s instructions.
• LAMP HMI/S 1200W short, double ended: Loosen the two
ring nuts at both end of the lamp (socket SFc10-4).
Place the lamp in its socket. Make sure the protuberance of the
central bulb is facing downwards to avoid creating shadows in
the projection. Tighten the two ring nuts on the lamp.
• Replace the lid and firmly tight the knobs.
CAUTION
During lamp installation and substitution, the operator must take care to avoid any contact between the lamp bulb
and the condenser lens. (The condenser lens is a special tempered glass, very resistant to the high temperature
but very fragile in case of contact with quartz glass)
Power Supply
The projector absorbs 1600W at 230V. Makes sure the projector does not pull the cable in all different working
positions.
Connect the fixture to the mains with the enclosed power cord. See the table for the colours of the connectioncable.

4
When in doubt, consult a qualified electrician.
Be careful with your operations. With a high voltage you can suffer a dangerous electric shock when touching the
wires! Inside the projector, the ignitor circuit have very high voltage, over 5Kv.
The User must ensure that the power supply is provided with a highly sensitive differential circuit breaker 30m/A to
protect the projector from indirect contacts, and that the grounding system PE is working properly.
Do not power the projector with a dimmer circuit
Control Unit
The projector can be controlled by all types of controllers on the market that can execute the standard DMX 512
protocol. Controller-projector and projector-projector connections require a two-core screened cable provided with
CANNON XLR 3 pin, plugs and sockets. The ground braid on the screened cable must be connected to just one
end of the cable. The projector and cables must not be installed near overhead ducts for electrical cables or
intense magnetic fields.
Projector Address
The DMX BASE CHANNEL (DMX starting address) is the identity of the projector when in function. The projector
execute the information contained in the DMX starting channel exactly from the BASE CHANNEL (included). In
example if a projector is setted on the DMX starting address 57, it will performs its features following the
information contained in the channel 57, 58, 59 and so on.
HOW TO SET the correct DMX starting address:
Setting the rotative switches, you can read the DMX BASE CHANNEL on the display.

5
SPECIAL FUNCTIONS
Dip-switch Function
1 –
2 –
3 –
4 OFF = PAN/TILT 8/ bit resolution
ON = PAN/TILT 16 bit fine resolution
5 OFF = Standard configuration of PAN direction
ON = Invert PAN direction
6 OFF = Standard configuration of TILT direction
ON = Invert TILT direction
7 –
8 OFF = Standard configuration of 3chromie
ON = Invert the configuration of 3chromie
9 –
10 OFF = Display orientation for ground installation
ON = Display orientation for ceiling installation
DMX CHANNEL ASSIGNMENT
Ch. Function
1 CYAN
2 MAGENTA
3 YELLOW
4 SHUTTER / STROBE
5 PAN
6 TILT
7 COLOURS WHEEL
8 OVALIZER
9 Multi Step Zoom
10 CTO correction filter
11 DIMMER
12 13 PAN fine 16bit
14 TILT fine 16bit

6
CHANNEL 1 = CYAN
WHITE = 0
PROPORTIONAL 1 > 85
CYAN 86 > 100
PROPORTIONAL 101 > 254
WHITE = 255
CHANNEL 2 = MAGENTA
WHITE = 0
PROPORTIONAL 1 > 85
MAGENTA 86 > 100
PROPORTIONAL 101 > 254
WHITE = 255
CHANNEL 3 = YELLOW
WHITE = 0
PROPORTIONAL 1 > 85
YELLOW 86 > 100
PROPORTIONAL 101 > 254
WHITE = 255
Option to channel 1, 2 and 3: dip-switch 8 in ON position, invert the channels functioning
CHANNEL 4 = SHUTTER / STROBE
CLOSED 0 > 25
STROBE EFFECT MIN SPEED = 26
STROBE EFFECT MAX SPEED = 230
OPEN 231 > 255
CHANNEL 5 = PAN
Horizontal movement from 0 to 255, 450°
Dip-switch 5 in ON position, invert the PAN direction
CHANNEL 6 = TILT
Vertical movement from 0 to 255, 252°
Dip-switch 6 in ON position, invert the TILT direction
CHANNEL 7 = COLOURS WHEEL
WHITE 0 > 42
RED 43 > 85
YELLOW 86 > 128
MAGENTA 129 > 171
GREEN 172 > 214
BLUE 215 > 255

7
CHANNEL 8 = OVALIZER
NO OVALIZER = 0
PROPORTIONAL, from 0° to 360° 1 > 254
360° OVALIZER = 255
CHANNEL 9 = ZOOM
NARROW BEAM 0 > 63 19,3°
LIGHT FROST 64 > 127 24,8°
MEDIUM FROST 128 > 191 27°
HEAVY FROST 192 > 255 30°
CHANNEL 10 = CTO correction warm filter
6000K day-light = 0
PROPORTIONAL 0 > 255
3200K warm light = 255
CHANNEL 11 = DIMMER
BLACK-OUT = 0
INCREASING DIMMER LEVEL 0 > 255
OPEN = 255
CHANNEL 12 = AUX. CHANNEL
NOT USED
CHANNEL 13 = PAN fine
(16 bit HIGH DEFINITION DMX with dip-switch n° 04 in position ON)
CHANNEL 14 = TILT fine
(16 bit HIGH DEFINITION DMX with dip-switch n° 04 in position ON)
OPTICAL SYSTEM
MOVING WASH 1200 is provided with a high-efficiency lighting system made of parabolic reflector, Fresnel 200mm
lens, IR mirror and quality CYM disks. This system lets MOVING HEAD to project an extremely powerful and
homogenous light beam. The Multi Step Zoom allows the operator to perform different angles of the projection
beams perfectly focused.
Beam angle from 10% to 10% of light beam:
19,3° 15000Lux at 5m
24,8° 10800Lux at 5m
27° 8400Lux at 5m
30° 6900Lux at 5m

8
MAINTENANCE
CAUTION
Safety guards, lenses, and filters must be replaced if they are visibly damaged to the point that they become
ineffective (for example, if they have deep slashes or cuts).
The lamp must be replaced if damaged, cracked, or deformed by the heat.
PLANNED MAINTENANCE
at user’s charge and responsibility
OPERATION FREQUENCY ACTION
Lamp replacement 750 hours (verify) M1
Surface temperature test Quarterly M3
Cleaning Two months M4
Testing of safety breaker circuit on general
electric system
Monthly Check life-saving safety device pressing “T” button
Check damage to cables due to mobile use
of projector
Once a year
Replace cables if
damaged
NOTE: To ensure the correct functioning of the unit, a general service check of the projector must be made, twice a
year, from an authorized technician
ATTENTION
Always use original spare parts to ensure safe and proper functioning of the projector.
Do not make changes to the projector. A modified projector requires a new CE marking.
M1 - LAMP REPLACEMENT
The lamp must be replaced with the same type of lamp and according to the same frequency. A less efficient lamp jeopardizes
projector performance. Replace the lamp as follows:
- When the projector is cold, turn off the ON/OFF switch to cut the electricity and open the top lid to access the lamp
compartment.
- Remove the lamp from the lamp holder.
- Remove the new lamp from its packing and carefully read the Manufacturer’s instructions.
LAMP HMI 1200W/S Short Double Ended: Loosen the two ring nuts at both ends of the lamp. Place the lamp in its socket inside
the projector. Make sure the protuberance of the central bulb is facing downwards to avoid creating shadows in the projection.
Tighten the two ring nuts on the lamp.
- Replace the top lid and firmly tighten the knobs.
- Switch on the projector to make sure the lamp is working correctly.
ATTENTION
During lamp installation and lamp substitution, the operator must take care to avoid any contact between the lamp bulb and the
reflector.
M3 - SURFACE TEMPERATURE TEST
Before you check the temperature, make sure the projector is in the full operating mode (wait about 20 minutes after switching
on the projector). Use a contact probe to measure the surface temperature on the projector’s metal case and determine the
hottest area (Top lid near to the lamp). The temperature must be less than 70°. Otherwise, check the cooling system.

9
M4 - CLEANING
ATTENTION
Cleaning must be carried out when the projector is cool, disconnected from the power supply, with the general power switch
turned off, and the ON/OFF switch on the rear panel switched OFF.
Frequency
It is recommended to clean the projector every two months to ensure efficiency and performances. If the projector is used in
particularly smoky or dusty areas, clean the projector more frequently.
1. Open the top lid by unscrewing the knob and removing it from its seat.
2. Use a vacuum cleaner to remove dust.
3. Use a soft cloth (non-fabric) and pH neutral (pH7) liquid detergent to clean mirror and lens surfaces. Make sure you remove
all residual traces. Never touch the lamp directly with your hands or materials that can leave greasy traces.
4. Follow the same steps to clean the other internal parts of the projector.
5. Make sure the cleaning procedure did not damage any internal part or modified their correct position.
6. Make sure no cleaning materials or tools remain inside the projector.
7. Replace the top lid and firmly tighten the knob.
Life span and disposal
If the projector is operated in ordinary working conditions and the user follows the planned maintenance operations established
by the Manufacturer, it should last for three years. When the projector is discarded, it must be disposed of according to recycling
laws.
The improper use of this projector, cancel the guarantee and our responsibility. All the information have been
written and driven with extreme care; however, we do not engage us any responsibility for contingent errors or
omissions. We reserve the right to modify and/ or improve our product as we retain necessary, without subsequent
warning or notice. It is forbidden any complete or partial reproduction of this handbook, if not expressly authorized.
 Loading...