

Page 1

Cordless telephone
Model WP 1130
Draadloze telefoon
Model WP 1130
Instructions for use
Gebruiksaanwijzing
Page 2

· The telephone you have purchased complies with the DECT
standard. However, if you register a Type 32 or 33 handset at
the base station, the functions which do not comply with the
DECT standard will not be available.
· Your mobile communication system has a radio module at its
disposal which has a range of up to approximately 300 metres if
used outdoors and up to approximately 50 metres indoors (the
range can be reduced by metal objects (e.g. reinforced concrete)
in the immediate vicinity or by a television or other electrical
appliances (with the exception of the base station).
· Do not install your telephone in a damp place such as a
bathroom or laundry room. Keep the device at a minimum
distance of 1.5 m from the sink if you wish to install it in a
kitchen. The device was designed for use at an ambient
temperature of 5°C - 45°C.
In areas with frequent thunderstorms, the device should be
protected against electrical surges. It is also advisable to check
whether your insurance policy covers such eventualities.
· Electrical connections: 230 V power supply, alternating
current, single-phase with the exception of the facilities on the IT
circuit diagram in accordance with the EN 60-950 standard.
Caution: In accordance with the criteria laid down in the EN 41003 standard the mains voltage is to be classified as high
voltage. In the event of danger the power plugs can be
prophylactically unplugged to isolate the device from the 230 V
power supply. For this reason the sockets must be in the vicinity
of the device and easily accessible. The base station may only
be operated with the supplied power cable.
· Telephone connection: This facility was developed in
accordance with the European guideline 98/482/CE for pan
European operation as a single device within an analogous
telephone network. It complies with the TBR21 and TBR38.
If problems should occur when using this device, please contact
your dealer.
· The sign confirms that the products complied with the technical
regulations laid down in the directive 1999/5/EC, section 3, which
were valid at the time of certification.
· The manufacturer declares that the above-named product was
manufactured in compliance with supplement II of the RTT guideline
1999/5/EC.
· Please note: You are using a device which complies with the DECT
standard for communication in the private sector between cordless
telephones and a cordless private branch exchanges or base stations.
The use of such devices is subject to the guideline from 13th January
1995 (issued on 26th January 1995) which determines the conditions
of a universally applicable licence on the basis of paragraph L.89 of
the Post and Telecommunication Law. Because radio frequencies are
being employed the following directions must be carefully observed:
1. When DECT systems are being employed no guarantee can be given
that approved radio devices will not mutually interfere with one
another.
2. The installation of DECT devices (cordless private branch exchanges
with more than two connections to the telephone network) must be
carried out by a technician who has been approved by the ministry
responsible for telecommunication because installations of this kind
are rated (in accordance with the paragraphs R. 20-22 of the Post
and Telecommunication Law) as being complex.
3. The conditions pertaining to the access to a DECT telephone network
must be stipulated in a written agreement from the authorized and
responsible network operators.
Caution: Only use approved rechargeable batteries which comply with the
specifications laid down by the manufacturer.
Damaged or used up batteries is hazardous waste and must be
disposed of accordingly. They do not under any circumstances belong in
the domestic refuse!
Caution: The telephone cannot be used for emergency calls in the event
of a power failure.
3
Page 3

Table of contents
10 Selecting the base station
Selecting the language
11 Naming the handset
Many thanks for purchasing a WP 1130 telephone!
Emergency number
12 Activating the keyguard
Your WP 1130 telephone 1 The handset Setting the contrast of the display
13 Settings of the base station
2 The base station Selecting the priority handset for
incoming calls
14 Settings for calls
Installing the WP 1130 3 Connecting up to the telephone network Call barring
Dialling a barred number
Inserting the rechargeable batteries into the handset 15 Changing the dialling mode
State of charge of the battery Setting the timed break (R key)
Connecting up to the telephone network 16
Using the WP 1130 4 External calls 17 Changing the pin of the base station
Muting 18 Setting year
Volume level of the handset 19 Registering
5 Receiving calls Registering mode of the base station
Forwarding a call to another handset
Internal calls De-registering a base station
Redialling one of the last three numbers 21 Factory default settings of the base station
6 Forwarding a call to another telephone 22 Factory default settings of the handset
Directory
Saving a telephone number in the directory
Using the directory Deleting a number
Changing/Deleting a number in the directory Saving a number
7 Saving a dialled number in the directory Useful
Searching for a handset Maintenance and care
8 Settings for the handset Troubleshooting 27
Setting the melody of the handset Guarantee 27
Setting the volume level of the melody
9 Activating/Deactivating the key beeps
Changing the pin of a handset Please read these directions for use carefully before using your WP
Functions of
the caller Id
(directory)
information
1130 telephone for the first time.
20 De-registering a handset
23 Displaying the numbers of received
24 Dialling a number
25 Use in combination with devices from
Setting the number for automatic outward calls
(private branch exchanges)
Setting the delay until the outward call
connection is made
calls
other manufacturers
Technical specifications
4
Page 4
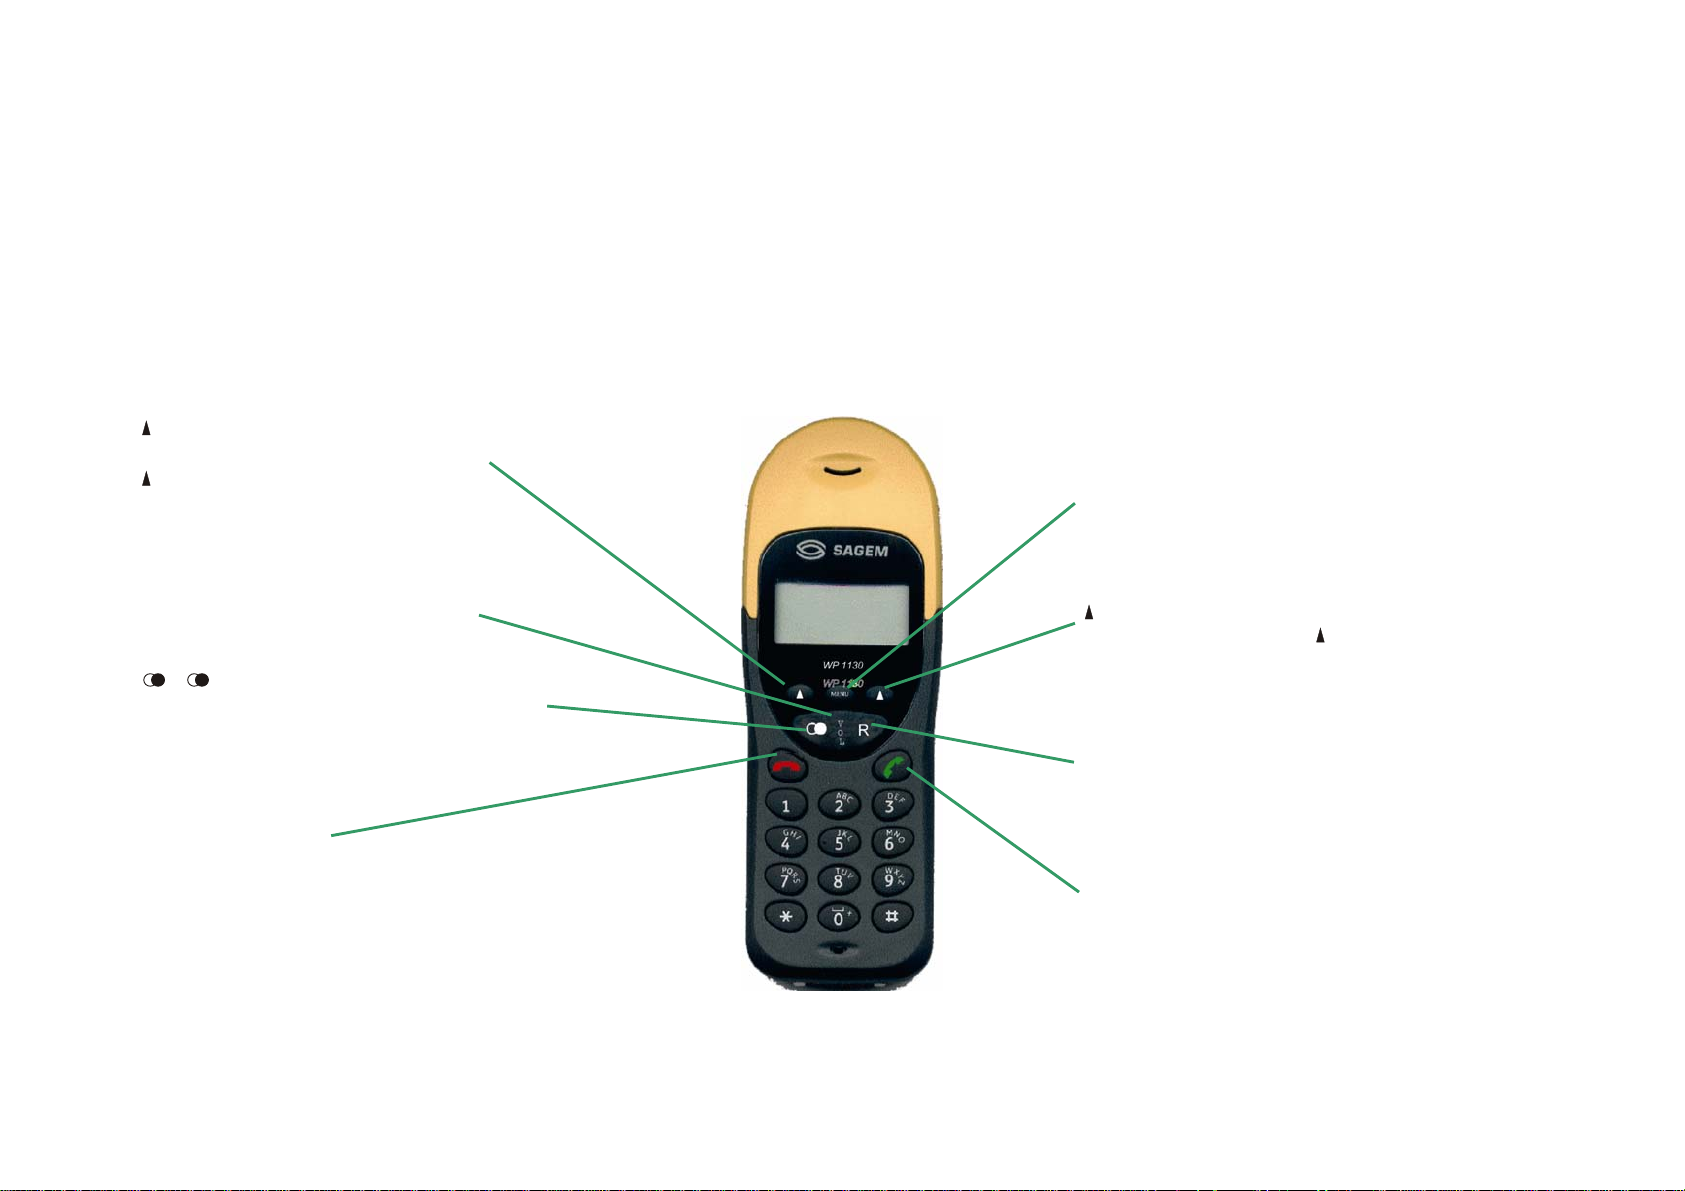
Your WP 1130 telephone
The handset
Components of the telephone:
- A base station
- a stand
- a power supply unit
- a telephone cord
- a handset
- self-adhesive feet
Enables you to select the function which is shown
on the display directly above the key.
Volume
There are three volume levels at your disposal (can
be set during a call).
R edial key
Enables you to select one of the last three numbers
you have dialled.
HANG UP key
Press to end the call
MENU key
Displays the menus.
Enables you to select the function which is shown
on the display directly above the key.
Enables you to scroll through certain lists.
Enables you to select the function which is shown
on the display directly abo
R key
Recall function in connection with a private branch
exchange.
ANSWER key
Press this key to answer a call if the handset is not
currently on the base station.
ve the key.
1
Page 5

The base station
WP 1130
WP 1130
Short press: search for handset.
Long press: register the handset.
Charging display
Lights up when the handset is being charged.
Call display
Lights continually if a call is being made with another handset.
Flashes fast when registering.
Flashes slowly when a handset is being searched for.
2
Page 6
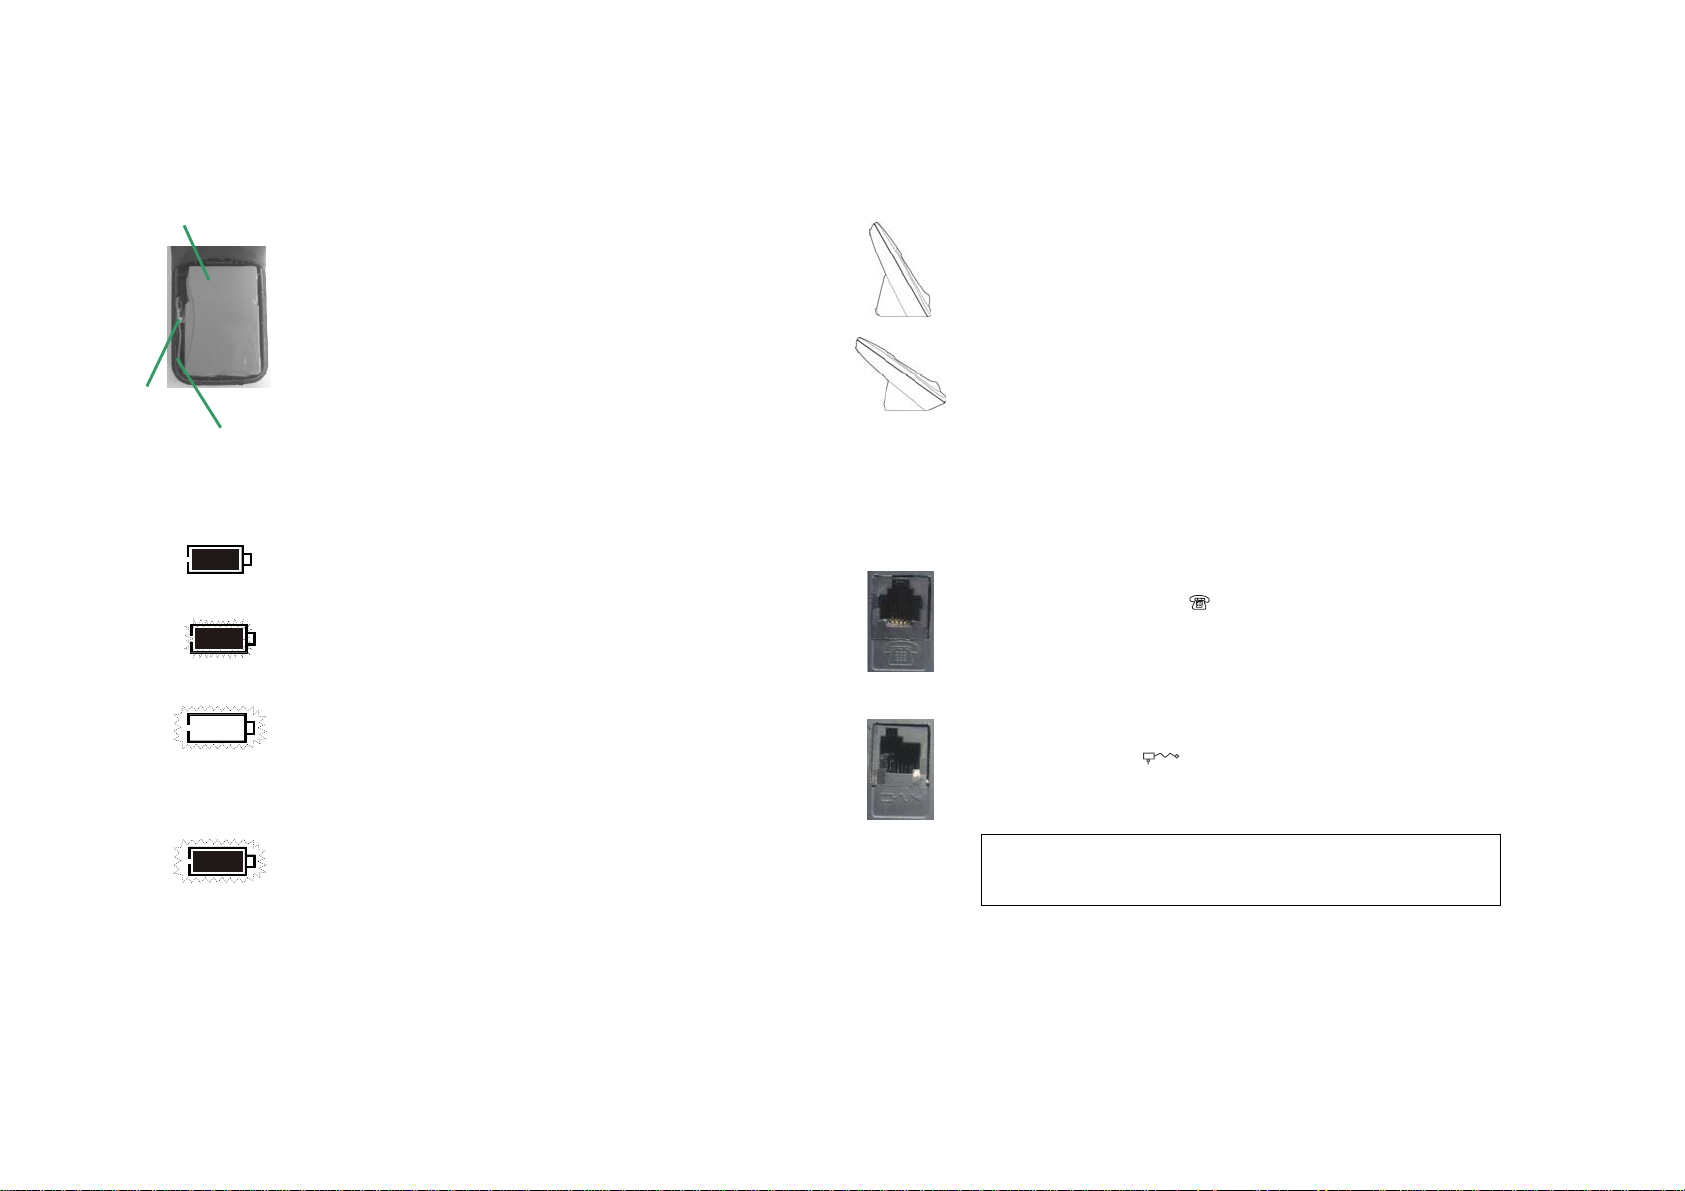
Installing the WP 1130
battery
plug
for the
connection of the
battery
battery full
low charge
battery empty
Inserting the batteries into the handset
The handset is provided with a rechargeable NIMH
battery (3.6 V 400 mA).
Remove the lid of the battery compartment at the back of
the handset and insert the plug of the battery into the
socket on the left-hand side of the compartment.
Lay the battery cord carefully into the compartment and
then close the latter by sliding the lid.
State of charge of the battery
Recommendation: Charge the battery in the handset for
12 hours before using the telephone for the first time.
The battery symbol will light up continually if the battery is
sufficiently charged.
If the battery is only partially charged, the inner part of the
symbol will start to flash. This indicates that the battery is
almost empty and will soon have to be recharged.
Shortly before the battery is empty, the outer part of the
battery symbol will start to flash accompanied by an
acoustic symbol. This indicates that the battery has been
totally discharged und must be recharged immediately.
Positioning the base station
The mounting base can be attached in two ways
depending on the desired inclination:
Position 1: semi-inclined
The base rests on its short side.
Attach two self-adhesive feet to the base station and the
other two the mounting base.
Position 2: inclined
The base rests on its long side.
Attach the four self-adhesive feet to the mounting base.
Slide the two cords through the hole at the rear of the base
station.
Connecting up to the telephone network
Connect the telephone cord to the corresponding socket
with the following sign:
Plug the other end of the cord into the telephone outlet
box.
Connecting up to the mains supply
Plug the power supply unit into the socket bearing the
following symbol:
battery charging
Charging the batteries in the handset
Place the handset into the charging cradle. The battery
symbol will flash as long as the battery in the handset is
being charged. It will stop flashing when the battery has
been sufficiently charged.
Insert the mains plug into the wall socket.
Only use the supplied power supply unit. Using another
power pack could cause damage to the device which is not
covered by the guarantee.
The WP 1130 is now ready for use.
3
Page 7

MENU
Using the WP 1130
Setting the required language for the
handset
Press the MENU key several times until Telephone
appears on the display.
Or...
Dial the number before you press the ANSWER key.
Enter the telephone number of your choice and it will
appear on the display.
If you make a mistake when entering the telephone
number, press the Back key to delete the inco rrect
figure.
MENU
MENU
Press the OK key to confirm. HS Settings will then
appear on the display.
Press the OK key to confirm.
Press the MENU key several times until Set Language is
displayed.
Press the OK key to confirm.
Press the MENU key in order to scroll through the
available languages.
English – Deutsch – French – Nederlands – Spain –
Italiano
Press the OK key to select a language.
Press the <<< Back key several times or wait 20
seconds until the telephone has switched back to the idle
condition.
External calls
Press the ANSWER key and wait for the dialling tone.
Ext Call will then appear on the display.
Enter the required telephone number.
The number will then appear on the display.
Now press the ANSWER key in order to dial the number
you have entered.
Press the HANG UP key to end your call. The length of
your call will then be shown for five seconds on the
display.
Muting
During a call you can press the key under the word
Mute on the display in order to switch off the microphone.
As long as this option is activated, the word Mute will be
visible on the display and the handset will give an acoustic
signal.
Press the key once more in order to switch on the
microphone again.
Level of volume of the handset
Three volume levels are available.
You can adjust the volume during a call by pressing either
the bottom or the top of the VOL key.
If you wish to set the volume during a call, press the
bottom or the top of the VOL key repeatedly in order to
hear the three available volume levels.
Volume x (x = 1, 2 or 3) will be shown on the display.
4
Page 8

Receiving calls (2 possibilities)
The telephone rings. Ext Call appears on the display.
If the handset is on the base station:
Take it off the base station and answer the call.
The Symbol will light up on the base station and you can then
speak to the caller. Replace the handset on the base station to
end your call.
If the handset is not on the base station:
You must press the ANSWER key before you can speak with the
caller.
The Symbol will light up on the base station.
Press the HANG UP key to end the call.
Forwarding a call to another handset
You can forward an external call to another handset (information
concerning the registering of another handset can be found on
page 19).
Press the INT key and then enter the number of the required
handset. The dialled handset will then start to ring and Int Call x
will appear on its display (x corresponds with the number of the
calling handset). The
The person with the second handset accepts the call by pressing
the ANSWER key. The connection will then be made.
If the person with the first handset presses the INT key again,
he will take over the call. Ext Call and the duration of the call will
appear on the display. If you would like to forward the call again,
press the
INT key once more.
symbol will then begin to flash.
In order to end the forwarding process to the second handset you
must press the HANG UP key on the first handset. The second
handset will then take over the call.
Press the HANG UP key on the second handset to end the call.
Internal calls
Internal calls can take place between two handsets. If, for
example, five handsets have been registered, you can phone an
external subscriber when an internal call is taking place between
two handsets.
Making an internal call:
Press the INT key and enter the number of the handset you
require (if only two handsets have been registered with the base
station, the call will go automatically to the second handset). Int
Call x will appear on the display (x is the number of the calling
handset) and the
ANSWER key to accept the call.
The call can be brought to an end by pressing the HANG UP key
on one of the two handsets
symbol will start to flash. Press the
.
Redialling one of the last three numbers
Press this key if you would like to dial the last number you
called.
Press the ANSWER key to dial the displayed number.
Press the key repeatedly in order to scroll through the last
three numbers you have dialled.
Press the ANSWER key when the number you require is
displayed.
5
Page 9
R
R key (Flash)
If you try to save a new number and the directory is already
full, Full will appear on the display and then the directory
If you have a private branch exchange, you can use the R key,
for example, to direct a call to another extension.
Please refer to the manual provided by the manufacturer of your
exchange for the exact directions.
According to the timed break which has been set (see "Setting
the timed break, p. 15), you can also take advantage of particular
functions provided by your network provider.
Please contact your network provider for information about the
timed break and the functions which are available.
MENU
again.
Using the directory
Press the MENU key until Directory is displayed.
Press the OK key several times in order to display the first
number by alphabetical order.
Press the key (right) several times in order to scroll through
the entries in the directory.
Or
Directory
Enter the first letter of the name (press, for example, the 3 key
to show the names which begin with “D”). Press the 3 key
You can save up to 40 telephone numbers in the phone’s
directory. The number may not exceed 20 figures and the name
may not exceed 12 letters.
twice to show the names which begin with “E” etc. Press the
key (right) several times to scroll through the names which
begin with the letter you have selected.
MENU
MENU
Saving a telephone number in the directory
Press the MENU key several times until Directory is displayed.
Press the OK key. Empty will appear on the display.
When the telephone number you have been looking for is
displayed, press the ANSWER key.
Press the HANG Up key to end the call.
Press the NEW key. Enter number will then be displayed.
Enter the required number and then press the OK key.
Enter the name and then press the Save key.
Press the MENU key and then NEW in order to enter another
number etc.
MENU
If you make a mistake when entering a number or name, press
the Back key to delete the incorrect character.
Press the R key to insert a pause.
*
# In order to enter the characters * or #, use the
MENU
Changing/Deleting a number in the directory
Press the MENU key several times until Directory appears on
the display.
Press the OK key in order to display the first number by
alphabetical order.
Press the key (right) several times to select a number in the
directory.
Press the MENU key when the number you are looking for is
shown.
corresponding keys (* or #).
Press the key (left) several times or wait 20 seconds until the
telephone has switched back to the idle condition.
6
Page 10

MENU
This is how you can change the name and the number:
Press the MENU key a second time. Press the key (left) in
order to delete the figures. Then enter the new number and
press the
OK key to save it.
(Empty will appear on the display if there is no entry in the list
of the last dialled numbers.)
Press the key several times until the required number is
displayed.
MENU
MENU
Press the key (left) to delete the letters. Then enter the new
name and press the
Save key to store it.
Or
This is how you can delete the name and the number:
Press the key (left) to display the Del option on the screen
and then press the
key (right) to select OK. An acoustic
Press the OK key to save.
Enter the name of the subscriber.
Press the Save key in order to save it.
Saved will then appear on the display accompanied by an
acoustic symbol.
The first entry in the telephone will then be shown.
signal will be given in order to confirm.
Entry Deleted will then appear on the display.
In order to delete all the numbers, select the option All Entries.
Press the key (left) several times or wait for 20 seconds until
the telephone switches back into the idle condition again.
Enter the pin of the handset (default 0000) and confirm your
decision by pressing the
OK key.
Searching for a handset (paging)
All the telephone numbers in the directory will then be deleted.
Press the key (left) several times or wait 20 seconds until
the telephone switches back into the idle condition again.
Use the Search/Register Handset button on the base station
to search for handsets which have already been registered
with the base station.
Saving a dialled number in the directory
You can save one of the last three numbers which you have
dialled in the directory.
Press the Search/Register Handset button. The symbol will
then flash and all registered handsets will start to ring. Paging
will appear on the display.
Press the MENU key several times until Directory appears on
the display.
Press the OK key to display the numbers.
Press the MENU key first and then the NEW key to enter the
The ringing of the handsets will stop automatically. However,
you can also press the
key on the base station or the
ANSWER key of the respective handset.
new number you would like to save.
Press the key to make your selection.
The last number you have dialled will then appear on the
display.
7
Page 11

Settings for the handset
Setting the volume level of the melody
MENU
MENU
MENU
Setting the melody of the handset
You can use different melodies for internal and external calls.
There are five melodies to choose from.
Press the MENU key several times until Telephone appears
on the display.
Press the OK key to confirm. HS Settings will then appear
on the display.
Press the OK key to confirm. Handset Ring will be shown on
the display.
Press the CHANGE key to select a melody.
Press the MENU key to select the option Ext Call or Int Call.
Press the OK key to select the melody.
The melody which is currently being used will be shown on the
display (e.g. Melody 3).
Press the MENU key to scroll through the available melodies
and to listen to them.
MENU
MENU
MENU
Press the MENU key several times until Telephone is shown
on the display.
Press the OK key to confirm. HS Settings will appear on the
display.
Press the OK key to confirm. Handset Ring will be
displayed.
Press the MENU key until Handset Vol and the currently
selected volume level are displayed after one another (e.g.
Low).
Press the CHANGE key to select an option.
The current setting (e.g. Low) will be shown on the display.
Press the MENU key to scroll through the available volume
levels and to hear them (Low, High, Off).
Press the Save key to select and store the current volume
level.
Press the Back key or wait 20 seconds until the telephone
switches back into the idle condition.
Press the Save key to select and save the present melody.
Press the Back key several times or wait 20 seconds until
the telephone switches back into the idle condition.
8
Page 12
Activating/Deactivating the key beeps
Changing the pin of the handset
MENU
MENU
MENU
You can determine whether the telephone should produce a
sound each time you press a key.
Press the MENU key several times until Telephone appears
on the display.
Press the OK key to confirm. HS Settings will be displayed.
Press the OK key to confirm.
Press the MENU key until Key Beeps and the currently valid
setting (e.g. On) alternately appear.
Press the CHANGE key to change the setting.
The new setting will then be shown on the display (e.g. Off).
You can also use the MENU keys to change between the
settings On and Off.
Press the SAVE key to save your setting. An acoustic signal
will confirm it.
Press the Back key several times or wait 20 seconds until
the telephone switches back into the idle condition.
MENU
MENU
The default pin of the handset is 0000.
You are able to change it.
This is how you can change the pin:
Press the MENU key several times until Telephone appears
on the display.
Press the OK key to confirm. HS Settings will then be
shown.
Press the OK key to confirm.
Press the MENU key several times until Handset Pin
appears on the display.
Press the CHANGE key in order to change the pin.
HS Pin? will then appear on the display.
Enter the pin.
Press the OK key to confirm.
An acoustic signal will confirm it and New Pin? will appear
on the display. You can now enter the new pin.
Press the OK key to confirm.
New Pin? will appear on the display again. Confirm the new
pin by entering it once more.
If you do not enter the same pin twice you will hear an
acoustic signal and Wrong Pin will appear on the display.
Press the SAVE key to change the pin. An acoustic signal
will confirm it and Handset Pin will be shown on the display.
Press the Back key several times or wait 20 seconds until
the telephone switches back into the idle condition.
9
Page 13

Selecting the base station
If you are employing more than one base station, you can
select which one will be used. This selection can, however,
also be carried out automatically by the handset (decisive
here is the quality of the respective receive signal).
Press the OK key to search for the selected base
station.
Searching will then appear on the display.
When the connection to the base station has been
established, you will hear a signal and the HS Settings
menu will be displayed.
MENU
MENU
MENU
Press the MENU key several times until Telephone is
displayed.
Press the OK key to confirm. HS Settings will appear on the
display.
Press the OK key to confirm.
Press the MENU key several times until Select Base appears.
Press the OK key.
The available base stations will then be shown on the display
(e.g. Base 1-3-?).
You will hear a signal if you enter the number of a base which
does not exist.
Enter the number of an available base station (e.g. 3) and
then press the
OK key.
Or
Press the MENU key (Auto) in order that the handset selects
the base station with the strongest signal.
MENU
MENU
MENU
Or
If no base station is found within 10 seconds, the
handset will switch back to the original base station.
Press the Back key several times or wait 20 seconds
until the telephone switches back into the idle condition.
Selecting the language
Press the MENU key several times until Telephone
appears on the display.
Press the OK key to confirm. HS Settings will then
appear.
Press the OK key to confirm.
Press the MENU key several times until Set Language
is displayed.
Press the OK key to confirm.
Press the MENU key in order to scroll through the
available languages.
English – Deutsch – French – Nederlands – Spain –
Italiano
Press the OK key to select a language.
10
Press the Back key several times or wait 20 seconds
until the telephone switches back into the idle condition.
Page 14

Naming the handset
Emergency number
MENU
MENU
The default name of the mobile unit is Handset. If you wish, you
can give it a new name with max. 10 characters.
Press the MENU key several times until Telephone is displayed.
Press the OK key to confirm. HS Settings will appear on the
display.
Press the OK key to confirm.
Press the MENU key several times until HS Name is displayed.
Press the OK key.
Press the CHANGE key in order to change the name (you can
enter a maximum of 10 characters).
Press the Save key to save your setting.
Press the Back key several times or wait 20 seconds until
the telephone switches back into the idle condition.
MENU
MENU
MENU
You can configure the telephone in such a way that a number will
be automatically dialled if you press a particular key or lift the
handset off the base station. This number could be, for example,
an emergency number or any other number of your choice (max.
20 figures).
Press the MENU key several times until Telephone is displayed.
Press the OK key to confirm. HS Settings will then appear.
Press the OK key to confirm.
Press the MENU key several times until Set Emergency is
displayed.
Press the OK key.
Enable? will then appear on the display.
Press the MENU key.
Edit Number? will be shown.
Press the OK key.
Enter the telephone number.
Press the OK key. Set Emergency will then appear on the
display.
Press the OK key. Enable? will be displayed.
Press the OK key. Set Emergencywill be shown on the display.
Press the Back key several times or wait 20 seconds until
the telephone switches back into the idle condition.
Set Emergency will be shown on the display.
11
Press the key (left) and then the * key if you would like to
deactivate the emergency number
Page 15

Activating the keyguard
Setting the contrast of the display
MENU
Press the MENU key and then the * key in order to lock the
keypad. Keyguard On will then be shown on the display.
In order to deactivate the keyguard you must press the key
(links) and then *. Keyguard Off will then be displayed.
MENU
MENU
MENU
Press the MENU key several times until Telephone is
displayed.
Press the OK key to confirm. HS Settings will appear on the
display.
Press the OK key to confirm.
Press the MENU key several times until LCD Contrast can be
seen.
Press the OK key.
Contrast x will then appear (x = 0 - 9).
Press the MENU key to set the contrast (0 lighter, 9 darker).
Press the OK key.
Press the Back key several times or wait 20 seconds until
the telephone switches back into the idle condition.
12
Page 16
MENU
MENU
Settings of the base station
Selecting the priority handset for incoming calls
If you have more than one handset, you can determine which
of the handsets will ring first in the event of an incoming call.
The other handsets will also ring, but with a slight delay. If you
prefer, all handsets can be programmed to ring at the same
time (Setting: Priority All).
Press the MENU key several times until Telephone is
displayed.
Press the OK key to confirm.
Press the MENU key several times until Select Base appears.
MENU
Enter the number of the priority handset (e.g. 1).
If you have entered the incorrect pin, Wrong Pin will
appear on the display first and then the menu with the
priorities you can choose from.
Press the OK key to confirm. n Rings and Delay will
be alternately displayed (n is the number of rings which
is to be used as the delay).
Press the MENU key several times to increase the
number of rings (a maximum delay of 9 rings is
possible).
MENU
Press the OK key to confirm.
Making Link will be displayed for a short period of time.
Wait until this message has disappeared.
If Making Link is displayed again, it means that the handset
cannot find a base station or that the base station has not
been plugged in. Try again.
Press the MENU key until the current setting is displayed:
Priority All or Handset.
Press the CHANGE key. Bs Pin? will appear on the display.
Enter the pin of the base station (default 0000).
Press the OK key to confirm.
If you have entered the correct pin, you will hear a confirming
signal. 1 2 - - - - -? will be shown on the display. The numbers
designate the handsets which are registered at the base
station (between 1 and 5).
Press the SAVE key to save this setting. Handset will
then appear on the display.
Press the Back key several times or wait 20 seconds
until the telephone switches back into the idle condition.
13
Page 17

Settings for calls
The handset will give an acoustic signal as a confirmation.
MENU
MENU
MENU
Call barring
You can set the telephone in such a way that particular
numbers cannot be dialled (for example all international
numbers or all numbers which begin with 06).
You must use four digits in order to block particular number
groups.
This means that if the call barring option is active, three digits
can still be dialled, i.e. the emergency numbers will still be
available.
Press the MENU key several times until Telephone is
displayed.
Press the OK key to confirm.
Press the MENU key several times until BS Settings is
displayed.
Press the OK key to confirm.
Press the MENU key several times until Tele Config is
displayed.
Press the OK key to confirm. Call Barring will then be
displayed.
Press the OK key to confirm. Pin? will then appear on the
display.
Enter the pin of the base station (default 0000).
Press the OK key to confirm.
If you have entered the correct pin CB1 XXXX Off will be
shown on the display.
MENU
MENU
MENU
MENU
If you have entered an incorrect pin, the error will be
acknowledged with an acoustic signal. Wrong Pin will appear
on the display followed by the Call Barring menu again.
Press the ON key (right) to toggle between On and Off.
By pressing the MENU key the first barred number will be
saved. CB2 XXXX Off will then appear on the display.
Press the Back key to save all the barred numbers. The
numbers will be shown one after another on the display again
to give you the opportunity of checking them.
Dialling a barred number
Press the MENU key several times until Telephone is
displayed.
Press the OK key to confirm.
Press the MENU key several times until BS Settings is
displayed.
Press the OK key to confirm.
Press the MENU key several times until Tele Config appears
on the display.
Press the OK button. Call Barring will then be displayed.
14
Page 18
Press the OK key to confirm. BS Pin? will appear on the
display.
Enter the pin of the base station (default 0000).
Press the OK key to confirm.
If you have entered an incorrect pin, the error will be
acknowledged with an acoustic signal. Wrong Pin will appear
on the display followed by the Call Barring menu again.
CB1 XXXX Off will be displayed if the pin is correct. If you
enter a digit to display the barred number, the first number will
be automatically changed.
Press the Back key to correct any mistakes.
Press the SAVE key. CBX XXXX On will now appear on the
display.
If you press the Back key, the numbers will be shown one
after another again on the display giving you the possibility of
checking them.
MENU
MENU
MENU
MENU
Press the MENU key several times until BS Settings is displayed.
Press the OK key to confirm.
Making Link will appear briefly on the display.
Press the MENU key several times until Tele Config appears.
Press the OK key.
Press the MENU key until Dial Mode and the current setting are
alternately displayed (e.g. Tone). Press the CHANGE key. Bs Pin?
will then appear on the display.
Enter the pin of the base station and then press the OK key. The
current setting will be shown (e.g. Tone).
Use the MENU key to toggle between the settings Tone and Pulse.
Press the OK key in order to save your selection. The handset
will confirm by giving an acoustic signal.
Press the Back key several times or wait 20 seconds until the
telephone switches back into the idle condition.
MENU
Changing the dialling mode
You can set your telephone to tone dialling or pulse dialling.
The default setting is tone dialling.
You should only change this setting after consulting your
telephone network operator.
Press the MENU key several times until Telephone is
displayed.
Press the OK key to confirm.
15
MENU
Setting the timed break (R key)
The telephone call duration has been preset before the telephone
leaves the works. Only change this setting after contacting your
telephone network operator. He will tell you the value you should
set.
Press the MENU key several times until Telephone is displayed.
Page 19

MENU
MENU
Press the OK key to confirm.
Press the MENU key several times until Bs Settings is
displayed.
Press the OK key to confirm.
Making Link will appear briefly on the display.
Press the MENU key several times until Tele Config is
displayed.
MENU
MENU
Press the MENU key several times until Bs Settings is
displayed.
Press the OK key to confirm.
Making Link will appear briefly on the display.
Press the MENU key several times until Tele Config is
displayed.
Press the OK key.
MENU
MENU
MENU
Press the OK key.
Press the MENU key several times until Timed Break appears
on the display.
Press the OK key.
Timed Break 100 – 300 or 600 appears on the display.
You can set duration by pressing the MENU key.
Press the OK key.
Press the Back key several times or wait 20 seconds until
the telephone switches back into the idle condition.
Setting the number for automatic outward calls
(private branch exchanges)
If the telephone is being used in combination with a private
branch exchange, you can define the number for automatic
outward calls.
Press the MENU key several times until Telephone is
displayed.
Press the OK key to confirm.
MENU
MENU
Press the MENU key several times until Prefix setting is
shown on the display.
Press the OK key.
Enter the pin of the base station and then press the OK key.
Access= will then appear on the display.
Enter the number for automatic outward calls
(normally 0 or 9).
Press the OK key.
Press the Back key several times or wait 20 seconds until
the telephone switches back into the idle condition.
Setting the delay until the outward call
connection is made
After the number for automatic outward calls you can insert a
delay.
Press the MENU key several times until Telephone is
displayed.
Press the OK key to confirm.
16
Page 20

MENU
MENU
MENU
MENU
Press the MENU key several times until Bs Settings is
displayed.
Press the OK key to confirm.
Making Link will appear briefly on the display.
Press the MENU key several times until Tele Config is
displayed.
Press the OK key.
Press the MENU key several times until Delay is shown on the
display.
Press the OK key.
The currently valid setting will then be displayed (e.g. Pause 2
s).
Set the required delay by pressing the MENU key (between 1
and 5 seconds).
Press the OK key.
Press the Back key several times or wait 20 seconds until
the telephone switches back into the idle condition.
MENU
Press the OK key to confirm.
Making Link will then appear briefly on the display.
Wait until this message disappears.
If Bs Settings is displayed once again, this means that the
handset cannot find a base station or the base station is not
plugged in. Try again.
Press the MENU key several times until Base Pin is displayed.
Press the CHANGE key. BS Pin? will appear.
Enter the pin of the base station.
Press the OK key.
If you have entered the incorrect pin, the error will be
acknowledged with an acoustic signal. Wrong Pin will appear
on the display.
New Pin? will then be displayed.
Enter the new pin.
Press the OK key.
New Pin? will then appear on the display again. Enter the new
pin once more in order to confirm.
MENU
MENU
Changing the pin of the base station
The default pin of the base station is 0000.
Press the MENU key several times until Telephone is
displayed.
Press the OK key to confirm.
Press the MENU key several times until Bs Settings is
displayed.
If you have entered the incorrect pin, the error will be
acknowledged with an acoustic signal. Wrong Pin will appear
on the display.
Press the SAVE key.
This will be acknowledged with an acoustic signal.
Press the Back key several times or wait 20 seconds until
the telephone switches back into the idle condition.
17
Page 21

Setting year
MENU
MENU
MENU
Press the MENU key several times until Telephone is
displayed.
Press the OK key to confirm.
Press the MENU key several times until Bs Settings is
displayed.
Press the OK key to confirm.
Making Link will briefly appear on the display.
Wait until this message has disappeared.
If Bs Settings is displayed once again, this means that
the handset cannot find a base station or the base
station is not plugged in. Try again.
Press the MENU key several times until Select Year is
displayed.
Press the OK key.
Enter the year: 02 = 2002 etc.
Press the OK key.
The year is required for saving telephone numbers
together with the Caller Id function.
Press the Back key several times or wait 20 seconds
until the telephone switches back into the idle condition.
18
Page 22

Registering
The registering (subscribing) mode of the base
station
Switch the base station to the registering mode first.
There is a key on the base station which is used for searching
and registering handsets. Press this key and keep it pressed
(the handset must be on the base station).
After approximately 5 seconds the green lamp will start to
flash. The base station will now be in the registering mode for
the next minute.
The handset is on the base station:
You can register a maximum number of 5 handsets at a base
station.
Press the OK key to confirm. Subscribe Hs will then appear
on the display.
Press the OK key to confirm.
Base - - - -? will then be displayed.
Enter the number of the base station (1 to 4) which you would
like to register the handset at. Enter 1 for a new handset.
Press the OK key to confirm.
Searching will appear on the display.
When the handset has found the base station, Found Base
will be displayed for 3 seconds as well as the registering code
of the system. Confirm this by pressing OK. Bs Pin? will then
appear on the display.
Enter the pin of the base station (default 0000).
MENU
MENU
This step must also be repeated in order to register a handset
at further base stations. Handsets can only be used if they
have been registered at a base station.
If the handset has not yet been registered, Subscribe Hs will
appear on the display.
Option 1
Press the YES button in order to have a number assigned
automatically to the handset.
Option 2
Press the MENU key several times until Telephone is
displayed.
Press the OK key to confirm.
Press the MENU key several times until Subscribe is
displayed.
Press the OK key to confirm.
If the pin is correct, Subscribe Hs will be displayed.
After a few seconds, the handset will confirm by giving an
acoustic signal.
If you have entered the incorrect pin, the error will be
acknowledged with an acoustic signal. Wrong Pin will appear
on the display. After a few seconds Subscribe will be
displayed again.
Or
An acoustic signal will be given if the base station is not found
and Subscribe will appear on the display.
Press the Back key several times or wait 20 seconds until
the telephone switches back into the idle condition.
19
Page 23

MENU
De-registering a handset
The following steps refer to the handset which you use.
Press the MENU key several times until Telephone is
displayed.
Press the OK key to confirm.
If this procedure has been carried out without any errors, you
will hear a signal and HS2 – De-Registered will be displayed.
If the handset is not registered at another base station, the
registration menu will appear on the display again.
Press the Back key several times or wait 20 seconds until
the telephone switches back into the idle condition.
MENU
MENU
Press the MENU key several times until Subscribe is
displayed.
Press the OK key to confirm.
Press the MENU key several times until De-Register is
displayed.
Press the YES key to confirm. BS Pin? will then appear on
the display.
Enter the pin of the handset (default 0000).
Press the OK key to confirm.
If the pin you have entered is correct, it will be confirmed by
an acoustic signal and HS: 2 - - -? will appear on the display.
If you have entered the incorrect pin, you will hear a warning
signal and Wrong Pin will appear on the display. After a few
seconds Subscribe will appear again.
Enter the number of the handset you would like to de-register.
Press the OK key.
MENU
MENU
MENU
De-registering a base station
Press the MENU key several times until Telephone is
displayed.
Press the OK key to confirm.
Press the MENU key several times until Subscribe is
displayed.
Press the OK key to confirm.
Press the MENU key several times until De-Register? is
displayed.
Press the YES key to confirm. Base 1-3-? will then appear
on the display.
Enter the number of the base station you would like to deregister.
Press the OK key to confirm.
Subscribe will then appear on the display of the handset.
Press the Back key several times or wait 20 seconds until
the telephone switches back into the idle condition.
20
Page 24

Factory default settings of the base station
The base station can be reset at any time to the default
settings when it left the factory.
The following list shows the original default settings of the
base station:
Function Setting
If you have entered the incorrect pin, you will hear a warning
signal and Wrong Pin will appear on the display. After a few
seconds Subscribe will appear again.
Press the OK key.
Reset will be shown on the display.
If this procedure has been carried out without any errors, the
base station will confirm with an acoustic signal.
MENU
MENU
MENU
Dialling mode Tone
Priority for incoming calls All
Calls Barred 4x XXXX On
Press the MENU key several times until Telephone is
displayed.
Press the OK key to confirm.
Press the MENU key several times until Subscribe is
displayed.
Press the OK key to confirm.
Press the MENU key several times until Reset Bs is
displayed.
Press the OK key to confirm.
1- - - ? will then appear on the display.
Enter the number of the base station which you would like to
reset and then press the
OK key.
BS Pin? will then be displayed.
Enter the pin of the base station (default 0000).
Press the OK key to confirm.
If the pin is correct, Reset? will be shown on the display.
If the base station cannot be found, No Base will appear on
the display and shortly afterwards the Subscribe menu.
Press the Back key several times or wait 20 seconds until
the telephone switches back into the idle condition.
21
Page 25

Factory default settings of the handset
The handset can be reset at any time to the default settings
when it left the factory.
The following list shows the original default settings of the
handset:
Function Setting
Pin 0000
Ring internal call 1, volume = loud
Ring external call 1, volume = loud
Key beeps on
Reset? will now appear on the display.
Press the OK key to confirm.
If this procedure has been carried out without any errors, the
base station will confirm with an acoustic signal. Subscribe will
appear on the display.
Press the Back key several times or wait 20 seconds until
the telephone switches back into the idle condition.
MENU
MENU
MENU
Press the MENU key several times until Telephone is
displayed.
Press the OK key to confirm.
Press the MENU key several times until Subscribe is
displayed.
Press the OK key to confirm.
Press the MENU key several times until Reset HS is
displayed.
Press the OK key to confirm.
HS Pin? will then be shown on the display.
Enter the pin of the handset (default 0000).
Press the OK key to confirm.
If you have entered the incorrect pin, you will hear a warning
signal and Wrong Pin will appear on the display. After a few
seconds Subscribe will appear again.
22
Page 26

Functions of the caller Id
Displaying the numbers of received calls
The caller Id function enables the numbers of your callers to
be shown on the display (*).
· In the event of an incoming call, the number of the caller
will be shown on the display.
· If this number has been saved in the directory, the name
of the caller will be displayed.
· If the caller withholds the transmission of his telephone
number, Withheld No. will be shown on the display.
· If this service is not available, Ext Call will appear.
· If the number of the caller is not in the main directory, Ext
Call and then Unknown No. will be displayed.
(*) Ask your telephone network operator whether this function
is available to you.
MENU
MENU
The numbers of incoming calls are recorded if they are not
answered.
Press the MENU key several times until Caller Id is displayed.
Press the OK key.
The date and time of the last call will be shown on the display.
The name of the caller will be displayed if it has been saved in
the directory.
Press the MENU key in order to scroll through the stored
numbers.
If the memory is full, the number which was saved first will be
automatically deleted.
23
Page 27

Dialling a number
Saving a number
MENU
MENU
MENU
Press the MENU key several times until Caller Id is displayed.
Press the OK key to confirm.
Press the MENU key to scroll through the stored numbers.
When the required number is shown on the display, press the
ANSWER key to dial it.
Deleting a number
After the display of a stored number the following two options
are open to you for 4 seconds:
Back Funktion
Press the Function key to delete a number.
Press the MENU key until Del is shown on the right of the
display.
Press the Del key.
Delete?
No Yes
Press the YES key in order to delete the number.
MENU
When the number can be seen on the display:
Press the Function key to display the name or the number.
Press the MENU key until Save is shown on the right of the
display.
Press the SET key in order to save the number.
Press the OK key to confirm.
Enter the name.
Press the SET key to save.
Saving Entry will then appear as a flashing text on the display.
When this has been done, you will hear a confirming signal
and the saved number will be displayed.
Press the Back key several times or wait 20 seconds until
the telephone switches back into the idle condition.
24
Page 28

Menu structure
Directory
Caller Id
Telephone
Hs Settings
Bs Settings
Subscribe
Hs Ring
Hs Volume
Set Emergency
Key Beeps
Hs Pin
Select Base
Set Language
Hs Name
LCD Contrast
Priority All
Dial Configs
Call Barring
Dial Mode
Recall Time
Pabx Setting
Pause Time
Base Pin
Set Date/Tim
Subscribe Hs
Unsubscr Hs
Unsubscr Bs
Reset Bs
Reset Hs
25
Page 29

Useful information
Enter the pin of the WP 1130 base station with the handset of
the other manufacturer when you are asked to do so.
Use in combination with devices from other
manufacturers
The WP 1130 complies with the GAP guidelines (Generic
Access Profile). On account of this, you are able to use your
handset in combination with a base station made by another
manufacturer. The opposite also applies: Handsets from other
manufacturers can be registered with the base station of the
WP 1130.
Registering a WP 1130 handset at the base station of
another manufacturer
Register the handset as described on page 14. When you are
asked to enter the pin of the base station, enter the code of
the other base station (you will find the pin in the manual
supplied with the base station of the other manufacturer).
Registering the handset of another manufacturer at the
base station of the WP 1130
Follow the steps described in the manual supplied with the
handset of the other manufacturer. If required, switch the base
station into the registering mode as described in this manual.
Maintenance and care
Care
Wipe the base station and the handset with a dry cloth
occasionally.
Do not use any scouring agents or solvents because these
can damage the device.
Positioning
Place the device in the vicinity of a power point and a
telephone outlet box. Keep it as far away as possible from
television sets.
Never expose the device to direct sunlight, extreme
temperatures or high air humidity.
Rechargeable batteries
Never dispose of batteries in the domestic refuse!
Defect and used batteries must be disposed of at the
designated collecting points.
26
Page 30

Troubleshooting
There is no dialling tone
Has the telephone cord been correctly connected to the base
station and the telephone outlet box?
Guarantee
The guarantee period is 12 months from date of
purchase.
Make sure that the base station is connected up to the power
supply.
Is the handset registered at the base station?
If you try to use the handset and it is not registered at the
base station, Out of Range will appear on the display. For
further information please refer to the chapter about
registering.
You cannot make or receive calls
Is the battery of the handset sufficiently charged?
If the battery symbol indicates that the battery is empty,
charge the batteries for several hours.
The handset does not ring
Have you set the volume of the ringing tone to "Off"?
You can adjust the volume level of the melody. For further
information, please refer to page 4.
During the guarantee period, Sagem will repair all faults
linked to defective materials or manufacturing, or
alternatively provide a product swap.
It is mandatory to provide proof of purchase which must
include the purchase date.
This guarantee does not cover any faults or defects
caused by accidents or misuse (such as a fall, water or
external object damage, etc.), or faults caused by
normal wear and tear, neglect, or attempts at repair by
anyone other than through approved agents.
The guarantee does not cover battery wear, or damage
that does not reduce the value or functionality of the
product.
27
Page 31

· De telefoon die u heeft aangeschaft, voldoet aan de DECT-
standaard. Als u echter een handset van het type 32 of 33 bij het
basisstation aanmeldt, zijn de functies die niet aan de DECTstandaard voldoen, niet beschikbaar.
· Uw mobiele communicatie-inrichting beschikt over een
radiomodule met een actieradius maximaal ca. 300 meter bij
gebruik in de openlucht en van maximaal ca. 50 meter bij
gebruik binnenshuis; de onmiddellijke nabijheid van metalen
voorwerpen (bijv. gewapend beton), een televisietoestel of
andere elektrische toestellen (behalve het basisstation) kan de
actieradius beperken).
· Plaats het toestel niet in vochtige vertrekken zoals badkamers of
waskeukens. In een keuken moet een minimum afstand van
1,50 m tot de afwasbak worden aangehouden. Het toestel is
voor gebruik bij een omgevingstemperatuur van 5°C tot 45°C
geconcipieerd.
In streken waar veelvuldig onweersbuien voorkomen, dient het
toestel tegen elektrische overspanningen te worden beveiligd.
Overtuig u er bovendien van dat uw verzekering dergelijke
schadegevallen dekt
· Elektrische aansluiting: stroomvoorziening 230 V,
wisselstroom, éénfasig, met uitzondering van inrichtingen
volgens schakelschema IT overeenkomstig norm EN 60-950.
N.B.: volgens de criteria van de norm EN 41-003 wordt de
netspanning als hoogspanning beschouwd. Ingeval van gevaar
kunnen de stekkers als voorzorgsmaatregel ter onderbreking
van de 230 V stroomvoorziening uit het stopcontact worden
getrokken. De stopcontacten dienen derhalve in de nabijheid
van het toestel en makkelijk toegankelijk te zijn. Het basisstation
mag alleen met het meegeleverde netaansluitingssnoer worden
gebruikt.
· Telefoonaansluiting: deze inrichting is volgens de Europese
Richtlijn 98/482/CE voor paneuropees gebruik als afzonderlijke
inrichting bij het analoge telefoonnet ontwikkeld. Zij voldoet aan
de normen TBR21 en TBR38.
· Mocht u bij het gebruik van dit toestel problemen ondervinden,
verzoeken wij u contact op te nemen met uw dealer.
· Het -keurmerk garandeert dat de producten aan de op het tijdstip
waarop de vergunning werd verleend geldende technische
voorschriften volgens Richtlijn 1999/5/EC, sectie 3 voldoen.
· De fabrikant verklaart dat het bovengenoemde product in
overeenstemming met appendix II van de RTT-Richtlijn 1999/5/EC
wordt vervaardigd.
· Opmerking: u gebruikt een toestel dat voldoet aan de DECT-
standaard voor de communicatie in een privé-omgeving tussen
draadloze telefoons en een draadloze telefooninstallatie of
basisstations.
· Bij gebruik van DECT-inrichtingen kan geen garantie voor optredende
storingen worden aanvaard, die door wederzijdse beïnvloeding met
andere goedgekeurde radiotechnische inrichtingen ontstaan.
N.B.: Gebruik alleen goedgekeurde oplaadbare batterijen/accu’s die
overeenkomen met de gegevens van de fabrikant.
Beschadigde of verbruikte batterijen dienen als gevaarlijk afval te worden
aangeboden. Geef ze in geen geval met het huisvuil mee!
N.B.: Tijdens een stroomuitval kan de telefoon niet voor noodgevallen
worden gebruikt.
28
Page 32

Inhoud
10 Basisstation selecteren
Taal selecteren
11 Naam van de handset
Hartelijk dank dat u tot aankoop van een WP 1130-telefoon heeft besloten!
Nummer voor noodgevallen
12 Toetsenbord uit
Uw WP 1130-telefoon 1 De handset Displaycontrast instellen
13 Instellingen van het basisstation
2 Het basisstation Voorkeurshandset voor
inkomende gesprekken selecteren
14 Instellingen voor gesprekken
WP 1130 aansluiten 3 Netaansluiting Blokkeren van gesprekken
Een nummer blokkeren
Plaatsen van de accu in de handset 15 Kiesmethode veranderen
Laadtoestand van de accu Pulslengtetijd instellen (R-toets)
Telefoonaansluiting 16 A
Gebruik van de WP 1130 4 Externe gesprekken 17 Pin van het basisstation veranderen
Stil 18 Jaar instellen
Volume van de handset 19 Registreren
5 Gesprekken aannemen Registratiemodus van het basisstation
Een gesprek naar een andere handset doorverbinden
Intern gesprek Een basisstation afmelden
De laatste drie nummers herhalen 21 Fabrieksinstellingen van het basisstation
6 Doorverbinden naar een ander toestel 22 Fabrieksinstellingen van de handset
Adresboek
Een telefoonnummer in het adresboek opslaan
Gebruik van het adresboek Een nummer wissen
20 Een handset afmelden
23 Nummers van de ingekomen gesprekken
24 Een nummer kiezen
Een nummer in het adresboek wijzigen/wissen
7 Een gekozen telefoonnummer in het
adresboek opslaan
Een handset zoeken Klantenservice en onderhoud
8 Instellingen van de handset Problemen
Beltoon van de handset instellen Garantie 27
Belvolume instellen
9 Toetsklikken instellen
Pincode van de handset veranderen Lees deze gebruiksaanwijzing voordat u uw WP 1130-telefoon voor de
Nuttige
informatie
oplossen
eerste keer gebruikt.
26 Gebruik met toestellen van andere
27
utom. buitenlijn instellen (telefooninstallaties)
Pauze vóór de buitenlijn instellen
oproepen
Een nummer uit de nummerweergave
opslaan
fabrikaten
Technische gegevens
29
Page 33

Uw WP 1130 telefoon
De handset
Bestanddelen van de telefoon:
- een basisstation
- een toestelhouder
- netvoeding
- een telefoonaansluitsnoer
- een handset
- zelfklevende voetjes
Hiermee wordt de functie geselecteerd die op het
display direct boven de toets verschijnt.
Volume
Er staan drie volumeniveaus ter beschikking
(instelling tijdens het gesprek).
Toets kiezen herhalen
Hiermee kunt u een van de drie laatst gekozen
nummers selecteren.
Toets OPHANGEN
Ophangen
MENU-toets
Hiermee kunt u de functie selecteren die op het
display direct boven de toets wordt aangeduid.
Hiermee kunt u de functie selecteren die op het
display direct boven de toets wordt
R-toets
Pulslengtefunctie bij een telefooninstallatie.
Toets OPNEMEN
Toets voor het opnemen, voor zover de handset
niet op het basisstation is aangebracht.
aangewezen.
1
Page 34

Het basisstation
WP 1130
WP 1130
Kort indrukken: handset zoeken.
Lang indrukken: handset registreren.
Laad aanduiding
Brandt als de handset wordt geladen.
Gespreksaanduiding
Brandt permanent: er wordt een gesprek met een handset gevoerd.
Knippert snel: registreren.
Knippert langzaam: zoekt handset.
2
Page 35

WP 1130 aansluiten
Batterij / accu
Stekker
voor baterij-
aansluiting
Volle accu
Geringe lading
Accu ontladen
Accu laden
Batterijen van de handset aanbrengen
De handset is voorzien van een accu van het type NIMh
(3,6 V 400 mA).
Haal het batterijklepje aan de achterzijde van de handset
af en steek de stekker van de batterij in de aansluitbus op
de linkerzijde van het vakje.
Leg de batterij aansluitkabel zorgvuldig in het vakje en sluit
het door het deksel dicht te schuiven.
Laadtoestand van de accu
Advies: Laad de handset 12 uur voordat u het voor het
eerst gebruikt.
Als de accu voldoende geladen is, blijft het accusymbool
permanent zichtaar.
Wanneer de batterij bijna leeg is brandt het accusymbool.
Dit symbool geeft aan dat de batterij bijna geheel ontladen
is en geladen moet worden.
Als de accu geheel ontladen is, knippert het buitenste van
het accusymbool en wordt een akoestisch signaal
gegeven. Dit geeft aan dat de accu volkomen ontladen is
en direct weer moet worden geladen.
Handset laden
Zet de handset in de lader. Zolang de handset wordt
geladen, knippert het accusymbool. Het knipperen houdt
op als de accu voldoende geladen is.
Hellingshoek van het basisstation
De toestelhouder kan afhankelijk van de gewenste
hellingshoek in twee posities worden geplaatst.
Positie 1: halfschuin
De toestelhouder rust op de korte kant. Breng twee
zelfklevende voetjes op het basisstation en de andere
twee op de houder aan.
Positie 2: schuin
De toestelhouder rust op de lange kant. Breng de vier
zelfklevende voetjes op de houder aan.
Schuif de twee aansluitsnoeren door de uitsparing aan
de achterzijde.
Telefoonaansluiting
Sluit het telefoonaansluitingssnoer op de betreffende
uitgang aan, die als volgt is gekenmerkt:
Steek het andere uiteinde van de kabel in de telefoondoos.
Netaansluiting
Sluit de netvoeding op de betreffende uitgang aan, die als
volgt is gekenmerkt:
Steek de stekker van de netvoeding in het stopcontact.
Gebruik uitsluitend de meegeleverde netvoeding. Als u
een andere netvoeding gebruikt, kan het toestel schade
oplopen, die dan niet onder de garantie valt.
De WP 1130 is nu klaar voor het gebruik.
3
Page 36

Gebruik van de WP 1130
Gewenste taal op de handset instellen
Of...
Kies het nummer voordat u opneemt.
Voer het gewenste telefoonnummer in.
Het nummer verschijnt op het display.
MENU
MENU
MENU
Druk enkele malen op de MENU-toets tot Telefoon wordt
aangeduid.
Druk op de toets OK om te bevestigen. Handset Inst
wordt aageduid.
Druk op de toets OK om te bevestigen.
Druk enkele malen op de MENU-toets tot Kies Taal
verschijnt.
Druk OK om te bevestigen.
Druk op de MENU-toets om door de beschikbare talen te
bladeren.
EnglisFrançaissch – Francais – Nederlands – Espanol –
Italiano –
Druk voor selectie van een taal op de toets OK.
Druk enkele malen op de toets <<< (Terug), of wacht 20
seconden tot de telefoon weer op standby wordt
geschakeld.
Externe gesprekken (2 mogelijkheden)
Druk op de toets OPNEMEN en wacht op de kiestoon.
Op het display verschijnt Ext Gesprek.
Voer het gewenste telefoonnummer in.
Het nummer wordt op het display aangeduid.
Als u bij het invoeren van het nummer een fout maakt,
druk dan op de toets <<< om het verkeerde cijfer te
wissen.
Druk op de toets OPNEMEN om het ingevoerde nummer
te kiezen.
Om het gesprek te beëindigen drukt u op de toets
OPHANGEN.
Na afloop van het gesprek wordt de gespreksduur
5 seconden op het display getoond.
Stil
Druk tijdens een gesprek op de toets die zich onder het
op het display aangeduide woord Stil bevindt, om de
microfoon uit te schakelen. Terwijl het geluid is
uitgeschakeld staat op het display Stil en geeft de handset
een akoestisch signaal.
Druk opnieuw op de toets om de microfoon weer in te
schakelen.
Volume van de handset
Er staan drie volumeniveaus ter beschikking.
U kunt het volume tijdens een gesprek instellen door op
het onderste of bovenste deel van de VOL-toets te
drukken.
Als u het volume tijdens een gesprek wilt instellen drukt u
enkele malen op het onderste of bovenste deel van de
VOL-toets om de drie beschikbare volumeniveaus te
horen.
Op het display verschijnt Volume x (x = 1, 2 of 3).
4
Page 37

Gesprekken aannemen (2 mogelijkheden)
De telefoon gaat over. Op het display verschijnt Ext Gesprek.
Als de handset zich in het basisstation bevindt:
Neem de handset uit het station en beantwoord het gesprek.
Op het basisstation brandt de aanwijzing . Spreek met uw
gesprekspartner en zet de handset weer in het basisstation terug
om het gesprek te beëindigen.
Als de handset zich niet in het basisstation bevindt:
Druk op de OPNEMEN-toets om het gesprek met uw
gesprekspartner te beginnen.
Op het basisstation brandt de aanwijzing .
Om na het doorverbinden van een gesprek naar de tweede
handset het doorverbinden te beëindigen drukt u bij het eerste
toestel op de OPHANGEN-toets.
Het gesprek wordt nu met de tweede handset gevoerd.
Om het gesprek te beëindigen drukt u op de OPHANGEN-toets
van de tweede handset.
Intern gesprek
U kunt interne gesprekken met twee handsets voeren. Als er
bijvoorbeeld vijf handsets zijn geregistreerd, kunt u op één toestel
een extern gesprek voeren, terwijl een intern gesprek met twee
andere handsets plaatsvindt.
Druk op de OPHANGEN-toets om het gesprek te beëindigen.
Een gesprek naar een andere handset
doorverbinden
U kunt externe gesprekken naar een andere handset
doorverbinden (informatie over het registreren van een andere
handset vindt u op pagina 19).
Druk op de toets INT. en voer het nummer van de gewenste
handset in. De gekozen handset gaat over en op het display
verschijnt Int Gesprek x. (x is het nummer van de bellende
handset). Het symbool
Druk bij de tweede handset op de OPNEMEN-toets om het
gesprek aan te nemen. De verbinding is nu tot stand gekomen.
Als u op de eerste handset opnieuw op de toets INT. drukt,
wordt het gesprek weer teruggehaald. Op het display wordt
Extern gesprek en de gespreksduur
Om het gesprek opnieuw naar een ander toestel om te leiden
drukt u op de toets
knippert.
aangewezen.
INT.
Zo voert u een intern gesprek:
Druk op de toets INT. en voer het nummer van de gewenste
handset in (als bij het basisstation slechts twee toestellen zijn
geregistreerd, wordt automatisch het andere toestel opgebeld).
Op het display van het opgebelde toestel wordt Int Gesprek x
aangewezen (x is daarbij het nummer van de opbellende
handset) en het symbool
toets om het gesprek met uw gesprekspartner te beginnen.
Druk bij één van de twee toestellen op de OPHANGEN-toets om
het gesprek te beëindigen
knippert. Druk op de OPNEMEN-
.
De laatste drie nummers herhalen
Druk op de toets als u het laatst gekozen nummer wilt
opbellen.
Druk op de OPNEMEN-toets om het ingevoerde nummer te
kiezen.
Druk enkele malen op de toets om door de laatste drie
gekozen nummers te bladeren.
Druk op de OPNEMEN-toets als het gewenste nummer
verschijnt.
5
Page 38

MENU
R
MENU
R-toets (Pulslengte)
Als het adresboekgeheugen vol is wanneer u nog een
nummer probeert op te slaan, duidt het display Boek Vol en
U kunt de R-toets gebruiken om bijvoorbeeld een gesprek binnen
een telefooncentrale naar een andere aansluiting te verbinden.
Hoe u daarbij te werk gaat, kunt u lezen in de handleiding van de
fabrikant van de centrale.
Naargelang de Pulslengt„ -tijd (zie "Pulslengte“ijd instellen" pag.
15) kunt u bepaalde telecomoperator-functies gebruiken.
Neem contact op met uw telecomoperator voor informatie over
Pulslengte -tijd en beschikbare functies.
MENU
vervolgens weer het adresboek aan.
Gebruik van het adresboek
Druk enkele malen op de MENU-toets tot Adres Boek
verschijnt.
Druk op de toets OK om het eerste opgeslagen nummer (in
alfabetische volgorde) aan te duiden.
Druk enkele malen op de toets (rechts) om door de
Adresboek
nummers van het adresboek te bladeren.
Of
U kunt maximaal 40 telefoonnummers in het adresboek opslaan.
Elk nummer mag maximaal 20 cijfers en elke naam maximaal 12
karakters lang zijn.
Voer de eerste letter van de naam in (druk bijvoorbeeld op de
toets 3 om de namen aan te wijzen die met „D“ beginnen).
Druk tweemaal op de toets 3 om de namen aan te duiden die
met „E“ beginnen enz. Druk enkele malen op de toets
Een telefoonnummer in het adresboek opslaan
Druk enkele malen op de MENU-toets tot Adres Boek verschijnt.
(rechts) om door de namen te bladeren die met de gewenste
letter beginnen.
Druk op de toets OK. Het display wijst Leeg aan.
Druk op de toets NIEUW. Op het display verschijnt Geef
Nummer.
Voer het gewenste nummer in en druk op de toets OK.
Druk op de OPNEMEN-toets als het gewenste nummer
verschijnt.
Druk op de OPHANGEN-toets om het gesprek te beëindigen.
Voer de naam in en druk op de toets Opsl (invoer opslaan).
Druk op de MENU-toets en dan op NIEUW om nog een
nummer in te voeren enz.
MENU
Als u bij het invoeren van het nummer of de naam een fout
maakt, druk dan op de toets < om het verkeerde teken te
wissen.
Om een pauze in te voegen drukt u op de R-toets.
*
# Om de karakters * of # in te voeren gebruikt u de toetsen
MENU
Een nummer in het adresboek wijzigen/wissen
Druk enkele malen op de MENU-toets tot Adres Boek
verschijnt.
Druk op de toets OK om het eerste opgeslagen nummer (in
alfabetische volgorde) aan te wijzen.
Druk enkele malen op de toets (rechts) om een nummer in
het adresboek uit te kiezen.
Druk op de MENU-toets als het gewenste nummer verschijnt.
* of #.
Druk enkele malen op de toets (links) of wacht 20 seconden tot
de telefoon weer op standby wordt geschakeld.
6
Page 39

MENU
Zo verandert u de naam en het nummer:
Druk nogmaals op de MENU-toets. Druk op de toets (links)
om de cijfers te wissen. Voer vervolgens het nieuwe nummer
in en druk op de toets
OK om het op te slaan.
(als het register van de laatst gekozen nummers geen inhoud
bevat, wordt op het display Leeg aangewezen.)
Druk enkele malen op de toets tot het gewenste nummer
verschijnt.
MENU
MENU
Druk op de toets (links) om de letters te wissen. Voer
vervolgens de nieuwe naam in en druk op de toets
Opsl om
het op te slaan.
Of
Zo wist u de naam en het nummer:
Druk op de toets (links) om het woord Wissen op het
display aan te duiden en druk dan op de toets
(rechts) om
OK te selecteren. Ter bevestiging wordt een akoestisch
signaal gegeven.
Druk op de toets OK om op te slaan.
Voer de naam van de gesprekspartner in.
Druk op de toets Opsl om op te slaan.
Op het display verschijnt Opgeslagen en ter bevestiging wordt
een akoestisch signaal gegeven.
De eerste invoer in de telefoon wordt aangeduid.
Druk enkele malen op de toets (links) of wacht 20 seconden
tot de telefoon weer op standby wordt geschakeld.
Het display wijst Ingave Gewist aan.
Om alle nummers te wissen kiest u Alle Ingaven.
Een handset zoeken (paging)
Voer de Pin van de handset (standaard 0000) in en bevestig
de invoer met de toets
OK.
Hiermee worden alle nummers uit het adresboek gewist.
Druk enkele malen op de toets (links) of wacht 20 seconden
Gebruik de toets voor het zoeken/registreren van een handset
op het basisstation om naar de handsets te zoeken die bij het
basisstation zijn geregistreerd.
tot de telefoon weer op standby wordt geschakeld.
Druk op de toets voor het zoeken/registreren van een
Een gekozen telefoonnummer in het adresboek opslaan
U kunt in het adresboek een van de drie laatst gekozen
nummers opslaan.
Druk enkele malen op de MENU-toets tot Adres Boek
verschijnt.
Druk op de toets OK om de nummers aan te wijzen.
Druk op de MENU-toets en dan op de toets NIEUW om het
handset. De aanwijzing
handsets gaan over. Op het display verschijnt Paging.
Het overgaan van de handsets houdt automatisch weer op. U
kunt hiertoe echter ook op de toets
op de toets OPNEMEN van de betreffende handset drukken.
knippert en alle geregistreerde
van het basisstation of
nieuwe nummer in te voeren dat moet worden opgeslagen.
Druk voor selectie op de toets .
Op het display verschijnt het laatste opgebelde nummer.
7
Page 40

Instellingen van de handset
Belvolume instellen
MENU
MENU
MENU
Beltoon van de handset instellen
U kunt voor interne en externe gesprekken verschillende
beltonen gebruiken. Hiertoe kunt u uit vijf tonen kiezen.
Druk enkele malen op de MENU-toets tot Telefoon op het
display verschijnt.
Druk op de toets OK om te bevestigen. Handset Inst wordt
aangeduid.
Druk op de toets OK om te bevestigen. Belsign Hs wordt
aangeduid.
Druk op de toets AANP om een toon te selecteren.
Druk op de MENU-toets om de ingave Belsign Ext of Belsign
Int te selecteren.
Druk op de toets OK om de melodie te selecteren.
Op het display wordt de actueel ingestelde melodie
aangewezen (bijvoorbeeld Melodie 3).
Druk op de MENU-toets om door de beschikbare beltonen te
bladeren en deze te horen.
MENU
MENU
MENU
Druk enkele malen op de MENU-toets tot telefoon verschijnt.
Druk op de toets OK om te bevestigen. Handset Inst wordt
aangeduid.
Druk op de toets OK om te bevestigen. Belsign Hs wordt
aangeduid.
Druk op de MENU-toets tot op het display afwisselend Volume
Hs en het actueel gekozen volume verschijnt (bijv. Zacht).
Druk op de toets AANP om de instelling te selecteren. Op
het display wordt de actuele instelling, bijv. Zacht, aangeduid.
Druk op de MENU-toets om door de beschikbare
volumeniveaus te bladeren en deze te horen (Volume Zacht,
Volume Luid, Volume Uit).
Druk op de toets Opsl om de actuele volume-instelling te
selecteren en op te slaan.
Druk enkele malen op de toets <<< of wacht 20 seconden
tot de telefoon weer op standby wordt geschakeld.
Druk op de toets Opsl om de actuele beltoon te selecteren
en op te slaan.
Druk enkele malen op de toets <<< of wacht 20 seconden
tot de telefoon weer op standby wordt geschakeld.
8
Page 41

Toetsklikken instellen
Pin van de handset veranderen
MENU
MENU
MENU
U kunt instellen of de telefoon een akoestisch signaal moet
geven als u op een toets drukt.
Druk enkele malen op de MENU-toets tot Telefoon verschijnt.
Druk op de toets OK om te bevestigen. Handset Inst wordt
aangeduid.
Druk op de toets OK om te bevestigen.
Druk op de MENU-toets tot op het display afwisselend
Toetsklik en de actueel gekozen instelling verschijnt
(bijvoorbeeld Aan).
Druk op de toets AANP om de instelling te veranderen.
Op het display wordt de nieuwe instelling aangeduid
(bijvoorbeeld Uit).
U kunt ook met de MENU-toets tussen de instellingen Aan en
Uit heen -en weerschakelen.
Druk op de toets OPSL om uw keuze op te slaan. Ter
bevestiging wordt een akoestisch signaal gegeven.
Druk enkele malen op de toets <<< of wacht 20 seconden
tot de telefoon weer op standby wordt geschakeld.
MENU
MENU
Standaard is de Pin van de handset op 0000 ingesteld.
U kunt deze echter veranderen.
Zo verandert u de Pin:
Druk enkele malen op de MENU-toets tot telefoon verschijnt.
Druk op de toets OK om te bevestigen. Handset Inst wordt
aangeduid.
Druk op de toets OK om te bevestigen.
Druk enkele malen op de MENU-toets tot Pin Hs verschijnt.
Druk op de toets AANP om de Pin te veranderen.
Het display geeft Pin Hs? aan.
Voer de Pin in.
Druk op de toets OK om te bevestigen.
Het toestel geeft ter bevestiging een akoestisch signaal en
op het display verschijnt Nieuwe Pin?. Voer de nieuwe Pin
in.
Druk op de toets OK om te bevestigen.
Op het display verschijnt Nieuwe Pin?. Voer ter bevestiging
de nieuwe Pin in.
Als u niet beide keren dezelfde Pin invoert, wordt een
akoestisch signaal gegeven en verschijnt op het display
Foute Pin.
Druk op de toets OPSL om de nieuwe Pin te veranderen.
Het toestel geeft ter bevestiging een akoestisch signaal en
op het display verschijnt Pin Hs.
Druk enkele malen op de toets <<< of wacht 20 seconden
tot de telefoon weer op standby wordt geschakeld.
9
Page 42

Basisstation selecteren
Als u meerdere basisstations gebruikt, kunt u kiezen welk
basisstation gebruikt moet worden. Deze selectie kan de
handset echter ook automatisch uitvoeren (aan de hand van
het sterkste ontvangen signaal).
Druk op de toets OK om het geselecteerde
basisstation te zoeken.
Op het display wordt Zoekende aangeduid.
Nadat de verbinding met het basisstation tot stand is
gekomen, wordt een akoestisch signaal gegeven en het
menu Handset Inst aangeduid.
MENU
MENU
MENU
Druk enkele malen op de MENU-toets tot Telefoon verschijnt.
Druk op de toets OK om te bevestigen. Handset Inst wordt
aangeduid.
Druk op de toets OK om te bevestigen.
Druk enkele malen op de MENU-toets tot Select Basis
verschijnt.
Druk op de toets OK.
Op het display worden de beschikbare basisstations
aangeduid (bijvoorbeeld Basis 1-3-?).
De handset geeft een akoestisch signaal als u het nummer
van een niet voorhanden basisstation invoert.
Voer het nummer van een beschikbaar basisstation
(bijvoorbeeld 3) in en druk op de toets
OK.
Of
Druk op de MENU-toets (Auto), zodat de handset het
basisstation met het sterkste signaal selecteert.
MENU
MENU
MENU
Of
Als er binnen 10 seconden geen basisstation wordt
gevonden, schakelt de handset weer naar het
oorspronkelijke basisstation terug.
Druk enkele malen op de toets <<< of wacht 20
seconden tot de telefoon weer op standby wordt
geschakeld.
Taal selecteren
Druk enkele malen op de MENU-toets tot Telefoon
verschijnt.
Druk op de toets OK om te bevestigen. Handset Inst
wordt aangeduid.
Druk op de toets OK om te bevestigen.
Druk enkele malen op de MENU-toets tot Kies Taal
verschijnt.
Druk op de toets OK om te bevestigen.
Druk op de MENU-toets om door de beschikbare talen
te bladeren. Engels – Duits – Frans – Nederlands –
Spaans – Italiaans
10
Druk op de toets OK om een taal te selecteren.
Druk enkele malen op de toets <<< of wacht 20
seconden tot de telefoon weer op standby wordt
geschakeld.
Page 43

Naam van de handset
Noodgevalnummer
MENU
MENU
U kunt de standaard vastgestelde naam Handset door een
andere naam met een lengte van maximaal 10 karakters
vervangen.
Druk enkele malen op de MENU-toets tot Telefoon verschijnt.
Druk op de toets OK om te bevestigen. Handset Inst wordt
aangeduid.
Druk op de toets OK om te bevestigen.
Druk enkele malen op de MENU-toets tot Hs Naam verschijnt.
Druk op de toets OK.
Druk op de toets AANP om de naam te veranderen (u kunt
maximaal 10 karakters invoeren).
Druk op de toets Opsl om op te slaan.
Druk enkele malen op de toets <<< of wacht 20 seconden tot
de telefoon weer op standby wordt geschakeld.
MENU
MENU
MENU
U kunt de telefoon zo instellen dat automatisch bij het indrukken
van een toets of opnemen van de handset van het basisstation
een nummer wordt gekozen. Dit nummer kan bijvoorbeeld een
nummer voor noodgevallen zijn of een willekeurig ander nummer
(maximaal 20 cijfers) (in deze modus kan geen ander
telefoonnummer worden gekozen).
Druk enkele malen op de MENU-toets tot Telefoon verschijnt.
Druk op de toets OK om te bevestigen. Handset Inst wordt
aangeduid.
Druk op de toets OK om te bevestigen.
Druk enkele malen op de MENU-toets tot Noodgeval verschijnt.
Druk op de toets OK.
Op het display wordt Activeren? Aangeduid.
Druk op de MENU-toets.
Nr Aanpassen ? wordt op het display aangeduid.
Druk op de toets OK.
Voer het nummer in.
Druk op de toets OK. Noodgeval wordt op het display
aangeduid.
Druk op de toets OK. Op het display wordt Activeren?
Aangeduid.
Druk op de toets OK. Noodgeval wordt op het display
aangeduid.
Druk enkele malen op de toets <<< of wacht 20 seconden tot
de telefoon weer op standby wordt geschakeld.
Op het display wordt Noodgeval aangeduid.
11
Als u het nummer voor noodgevallen wilt deactiveren, drukt u op
de toets
(links) en dan op de toets *.
Page 44

Toetsenbord uit
Displaycontrast instellen
Druk voor het blokkeren van het toetsenbord op de MENUtoets en dan op de toets *. Op het display wordt Toetsenb Uit
aangeduid.
Druk voor het opheffen van de toetsenblokkering op de toetsn
(links) en *. Op het display wordt Toetsenb Aan aangeduid..
MENU
MENU
MENU
Druk enkele malen op de MENU-toets tot Telefoon verschijnt.
Druk op de toets OK om te bevestigen. Handset Inst wordt
aangeduid.
Druk op de toets OK om te bevestigen.
Druk enkele malen op de MENU-toets tot LCD Contrast
verschijnt.
Druk op de toets OK.
Contrast x wordt aangeduid (x = 0 tot 9).
Druk op de MENU-toets om het contrast in te stellen (0 lichter,
9 donkerder).
Druk op de toets OK.
Druk enkele malen op de toets <<< of wacht 20 seconden
tot de telefoon weer op standby wordt geschakeld.
12
Page 45

MENU
MENU
MENU
Instellingen van het basisstation
Voorkeurs-handset voor inkomende gesprekken
selecteren
Als u meerdere handsets gebruikt, kunt u bepalen welk toestel
bij een inkomend gesprek het eerst moet overgaan. De
andere toestellen gaan dan met enige vertraging over. U kunt
echter ook bepalen dat alle handsets tegelijk overgaan.
Druk enkele malen op de MENU-toets tot Telefoon verschijnt.
Druk op de toets OK om te bevestigen.
Druk enkele malen op de MENU-toets tot Select Basis
verschijnt.
Druk op de toets OK om te bevestigen.
Op het display wordt korte tijd Verb Makende aangewezen.
Wacht tot deze mededeling weer verdwijnt.
Als op het display opnieuw Verb Makende wordt aangeduid,
betekent dit dat de handset geen basisstation vindt of dat het
basisstation niet aangesloten is. Probeer het opnieuw.
Druk op de MENU-toets tot op het display de actuele instelling
verschijnt: Priorit Alle of Handset.
Druk op de toets Aanp. Op het display wordt Pin basis?
aangeduid.
Voer de Pin van het basisstation in (standaard 0000).
MENU
Voer het nummer van de voorkeurshandset in
(bijvoorbeeld 1).
Als de ingevoerde Pin verkeerd is, wordt op het display
Foute Pin en vervolgens het menu met de te selecteren
prioriteit aangeduid.
Druk op de toets OK om te bevestigen. Op het display
wordt afwisselend 2 Belsign en Vertrging aangeduid (2
is daarbij het aantal belsignalen dat als vertraging moet
worden gebruikt).
Druk enkele malen op de MENU-toets om deze waarde
te verhogen (maximaal 9 belsignalen zijn als vertraging
mogelijk).
Druk op de toets OPSL om de waarde voor de
vertraging op te slaan. Op het display wordt Handset
aangeduid.
Druk enkele malen op de toets <<< of wacht 20
seconden tot de telefoon weer op standby wordt
geschakeld.
Druk op de toets OK om te bevestigen.
Als de ingevoerde Pin juist is, wordt dit door een akoestisch
signaal bevestigd. Op het display wordt 1 2 - - - - -?
aangeduid. De cijfers staan voor de geregistreerde handsets
(tussen 1 en 5).
13
Page 46

Instellingen voor gesprekken
Ter bevestiging wordt op de handset een akoestisch signaal
gegeven.
MENU
MENU
MENU
Blokkeren van gesprekken
U kunt de telefoon zo instellen dat bepaalde nummers niet
gekozen kunnen worden (bijvoorbeeld alle internationale
nummers of alle nummers die met 06 beginnen).
Voor het blokkeren van bepaalde soorten nummers moet u 4
cijfers gebruiken.
Dat betekent dat bij ingestelde geblokkeerde nummers nog
steeds drie cijfers kunnen worden gekozen, zodat de
nummers voor noodgevallen bereikbaar blijven.
Druk enkele malen op de MENU-toets tot Telefoon verschijnt.
Druk op de toets OK om te bevestigen.
Druk enkele malen op de MENU-toets tot Basis Instel
verschijnt.
Druk op de toets OK om te bevestigen.
Druk enkele malen op de MENU-toets tot Tele Config
verschijnt.
Druk op de toets OK om te bevestigen. Op het display wordt
Verboden aangeduid.
Druk op de toets OK om te bevestigen. Op het display wordt
Pin ? aangeduid.
Voer de Pin van het basisstation in (standaard 0000).
Druk op de toets OK om te bevestigen.
Als de Pin juist is, wordt op het display CB1 XXXX Uit
aangeduid.
MENU
MENU
MENU
MENU
Als de ingevoerde Pin verkeerd is, wordt er een akoestische
foutmelding gegeven. Op het display wordt Foute Pin en
vervolgens opnieuw het menu Verboden aangeduid.
Druk op de toets AAN (rechts) om tussen Aan en Uit om te
schakelen.
Door op de MENU-toets te drukken slaat u het eerste
verboden nummer op. Op het display wordt CB2 XXXX Uit
aangeduid.
Druk op de toets <<< om alle verboden nummers op te
slaan. Op het display worden de nummers nogmaals ter
controle na elkaar aangeduid.
Een te blokkeren nummer invoeren
Druk enkele malen op de MENU-toets tot Telefoon verschijnt.
Druk op de toets OK om te bevestigen.
Druk enkele malen op de MENU-toets tot Basis Instel
verschijnt.
Druk op de toets OK om te bevestigen.
Druk enkele malen op de MENU-toets tot Tele Config
verschijnt.
Druk op de toets OK. Op het display wordt Verboden
aangeduid.
14
Page 47

Druk op de toets OK om te bevestigen. Op het display wordt
Pin Basis? Aangeduid.
Voer de Pin van het basisstation in (standaard 0000).
Druk op de toets OK om te bevestigen.
Als de ingevoerde Pin verkeerd is, wordt er een akoestische
foutmelding gegeven. Op het display wordt Foute Pin en
vervolgens opnieuw het menu Gesprek verboden aangeduid.
Als de Pin juist is, wordt op het display CB1 XXXX Uit
aangeduid. Als u een cijfer voor het aanduiden van het
geblokkeerde nummer invoert, wordt het eerste cijfer
automatisch gewijzigd.
Druk op de toets < om een verkeerde invoer te corrigeren.
Druk op de toets OPSL om te bevestigen. Op het display
wordt jetzt CBX XXXX Aan aangeduid.
Door de toets <<< in te drukken worden op het display de
nummers nogmaals ter controle achter elkaar aangeduid.
Kiesmethode veranderen
U kunt de telefoon op toon- of impulskiezen instellen; de
standaardinstelling is toonkiezen.
MENU
MENU
MENU
MENU
Druk enkele malen op de MENU-toets tot Basis Instel verschijnt.
Druk op de toets OK om te bevestigen.
Op het display wordt korte tijd Verb Makende aangeduid.
Druk enkele malen op de MENU-toets tot Tele Config verschijnt.
Druk op de toets OK.
Druk op de MENU-toets tot op het display afwisselend Kiesmodus
en de actueel gekozen instelling verschijnt (bijvoorbeeld Toon).
Druk op de toets AANP. Op het display wordt Pin basis?
Aangeduid.
Voer de Pin van het basisstation in en druk dan op de toets OK.
Op het display wordt de actueel gekozen instelling
aangeduid.(bijvoorbeeld Toon).
Gebruik de MENU-toets om tussen de instelling Toon en Puls te
wisselen.
Druk op de toets OK om uw keuze op te slaan. Ter bevestiging
wordt op de handset een akoestisch signaal gegeven.
Druk enkele malen op de toets <<< of wacht 20 seconden tot de
telefoon weer op standby wordt geschakeld.
Pulslengtetijd instellen (R-toets)
MENU
Verander deze instelling uitsluitend na overleg met uw
telecomoperator.
Druk enkele malen op de MENU-toets tot Telefoon verschijnt.
Druk op de toets OK om te bevestigen.
15
MENU
De telefoon wordt met een fabrieksinstelling voor de gespreksduur
afgeleverd. Verander deze instelling uitsluitend na overleg met uw
telecomoperator, dat u de in te stellen waarde meedeelt.
Druk enkele malen op de MENU-toets tot Telefoon verschijnt.
Page 48

MENU
MENU
Druk op de toets OK om te bevestigen.
Druk enkele malen op de MENU-toets tot Basis Instel
verschijnt.
Druk op de toets OK om te bevestigen.
Op het display wordt korte tijd Verb Makende aangeduid.
Druk enkele malen op de MENU-toets tot Tele Config
verschijnt.
MENU
MENU
Druk enkele malen op de MENU-toets tot Basis Instel
verschijnt.
Druk op de toets OK om te bevestigen.
Op het display wordt korte tijd Verb Makende aangeduid.
Druk enkele malen op de MENU-toets tot Tele Config
verschijnt.
Druk op de toets OK.
MENU
MENU
Druk op de toets OK.
Druk enkele malen op de MENU-toets tot op het display
PulsLengte verschijnt.
Druk op de toets OK.
Het display duidt PulsLengte 100 300 of 600 aan.
Door de MENU-toets in te drukken kunt u een andere duur
instellen.
Druk op de toets OK.
Druk enkele malen op de toets <<< of wacht 20 seconden
tot de telefoon weer op standby wordt geschakeld.
Autom. buitenlijn instellen (telefooncentrales)
Als u de telefoon bij een telefooncentrale gebruikt, kunt u het
nummer voor de buitenlijn van de telefooncentrale invoeren.
Druk enkele malen op de MENU-toets tot Telefoon verschijnt.
Druk op de toets OK om te bevestigen.
MENU
MENU
Druk enkele malen op de MENU-toets tot op het display
Centr. Instl verschijnt.
Druk op de toets OK.
Voer de Pin van het basisstation in en druk dan op de toets
OK.
Het display duidt Access= aan.
Voer het nummer voor de buitenlijn in
(over het algemeen 0 of 9).
Druk op de toets OK.
Druk enkele malen op de toets <<< of wacht 20 seconden
tot de telefoon weer op standby wordt geschakeld.
Pauze voor de buitenlijn instellen
U kunt na het cijfer voor de buitenlijn een pauze invoegen.
Druk enkele malen op de MENU-toets tot Telefoon verschijnt.
Druk op de toets OK om te bevestigen.
16
Page 49

MENU
MENU
MENU
Druk enkele malen op de MENU-toets tot Basis Instel
verschijnt.
Druk op de toets OK om te bevestigen.
Op het display wordt korte tijd Verb Makende aangeduid.
Druk enkele malen op de MENU-toets tot Tele Config
verschijnt.
Druk op de toets OK.
Druk enkele malen op de MENU-toets tot Pauze tijd
verschijnt.
MENU
Druk op de toets OK om te bevestigen.
Op het display wordt korte tijd Verb Makende aangewezen.
Wacht tot deze melding verdwijnt.
Als op het display opnieuw Basis Instel wordt aangewezen,
betekent dit dat de handset geen basisstation vindt of dat het
basisstation niet aangesloten is. Probeer het opnieuw.
Druk enkele malen op de MENU-toets tot Pin basis verschijnt.
Druk op de toets AANP Op het display wordt Pin basis?
Aangeduid.
Voer de Pin van het basisstation in.
MENU
MENU
MENU
Druk op de toets OK.
Op het display wordt de actueel gekozen instelling aangeduid.
(bijvoorbeeld Pauze 2 S).
Stel door het indrukken van de MENU-toets de gewenste tijd
in (tussen 1 en 5 seconden).
Druk op de toets OK.
Druk enkele malen op de toets <<< of wacht 20 seconden
tot de telefoon weer op standby wordt geschakeld.
Code van het basisstation veranderen
De standaard-Pin van het basisstation is 0000.
Druk enkele malen op de MENU-toets tot Telefoon verschijnt.
Druk op de toets OK om te bevestigen.
Druk enkele malen op de MENU-toets tot Basis Instel
verschijnt.
Druk op de toets OK.
Als de ingevoerde Pin verkeerd is, wordt er een akoestische
foutmelding gegeven. Op het display wordt Foute Pin
aangeduid.
Op het display wordt Nieuwe Pin? aangewezen.
Voer de nieuwe Pin in.
Druk op de toets OK.
Op het display wordt Nieuwe Pin? aangewezen. Voer de
nieuwe Pin nogmaals ter bevestiging in.
Als de ingevoerde Pin verkeerd is, wordt er een akoestische
foutmelding gegeven. Op het display wordt Foute Pin
aangeduid.
Druk op de toets OPSL
Ter bevestiging wordt een akoestisch signaal gegeven.
Druk enkele malen op de toets <<< of wacht 20 seconden
tot de telefoon weer op standby wordt geschakeld.
17
Page 50

Jaar instellen
MENU
MENU
MENU
Druk enkele malen op de MENU-toets tot Telefoon
verschijnt.
Druk op de toets OK om te bevestigen.
Druk enkele malen op de MENU-toets tot Basis Instel
verschijnt.
Druk op de toets OK om te bevestigen.
Op het display wordt korte tijd Verb Makende
aangeduid.
Wacht tot deze melding weer verdwijnt.
Als op het display opnieuw Basis Instel wordt
aangeduid, betekent dit dat de handset geen
basisstation vindt of dat het basisstation niet is
aangesloten. Probeer het opnieuw.
Druk enkele malen op de MENU-toets tot Slct Jr
verschijnt.
Druk op de toets OK.
Voer het jaar in: 02 voor 2002 enz
Druk op de toets OK.
Druk enkele malen op de toets <<< of wacht 20
seconden tot de telefoon weer op standby wordt
geschakeld.
18
Page 51

Aanmelden
Registratiemodus van het basisstation
Schakel eerst het basisstation in de registratiemodus.
Houd de toets voor Zoeken/Registreren van de handsets op
het basisstation ingedrukt (handset moet zich in het
basisstation bevinden).
Na ca. 5 seconden begint het groene lampje te knipperen. 1
minuut lang bevindt het basisstation zich nu in de
registratiemodus.
Handset bevindt zich in basisstation:
U kunt bij een basisstation nog maximaal 4 handsets
aanmelden.
Deze stap moet u ook voor het aanmelden van extra
basisstations uitvoeren. U kunt alleen handsets gebruiken als
deze tevoren bij een basisstation zijn aangemeld.
Als de handset nog niet is aangemeld, duidt het display
reer Hs aan.
Regist
Mogelijkheid 1
Druk op de toets JA om automatisch een registratienummer
voor de handset te laten toewijzen.
Druk op de toets OK om te bevestigen. Op het display wordt
Regist
reer Hs aangeduid.
Druk op de toets OK om te bevestigen.
Op het display wordt Basis - - - -? Aangeduid.
Voer het nummer van het basisstation (1 tot 4) in waarbij u de
handset wilt aanmeldem. Voer bij een nieuwe handset 1 in.
Druk op de toets OK om te bevestigen.
Op het display verschijnt Zoekende.
Als de handset de basis heeft gevonden, wordt 3 seconden
lang Basis gevonden en de registratiecode van het systeem
op het display aangeduid. Bevestig dit met OK. Het display
duidt Pin? aan.
Voer de Pin van het basisstation in (standaard 0000).
Druk op de toets OK om te bevestigen.
Als de Pin juist is, wordt op het display Registreer Hs
aangeduid.
Na enkele seconden geeft de handset een akoestisch signaal
ter bevestiging.
Als de ingevoerde Pin verkeerd is, wordt een akoestische
foutmelding gegeven en op het display Foute Pin aangeduid.
Na enkele seconden duidt het display weer Registreren aan.
MENU
MENU
Mogelijkheid 2
Druk enkele malen op de MENU-toets tot Telefoon verschijnt.
Druk op de toets OK om te bevestigen.
Druk enkele malen op de MENU-toets tot Registreren
verschijnt.
Of
Als het basisstation niet wordt gevonden, wordt een
akoestische foutmelding gegeven en op het display Registreer
aangeduid.
Druk enkele malen op de toets <<< of wacht 20 seconden
tot de telefoon weer op standby wordt geschakeld.
19
Page 52

MENU
MENU
MENU
Een handset afmelden
De volgende stappen hebben betrekking op de handset die u
in gebruik heeft.
Druk enkele malen op de MENU-toets tot Telefoon verschijnt.
Druk op de toets OK om te bevestigen.
Druk enkele malen op de MENU-toets tot Registreer
verschijnt.
Druk op de toets OK om te bevestigen.
Druk enkele malen op de MENU-toets tot HS afmelden
verschijnt.
MENU
Bij correcte uitvoering wordt een akoestisch signaal ter
bevestiging gegeven en op het display
Hs2 – Afmelden
aangeduid.
Als de handset niet bij een ander basisstation is aangemeld
wordt op het display weer het menu voor het registreren
aangeduid.
Druk enkele malen op de toets <<< of wacht 20 seconden
tot de telefoon weer op standby wordt geschakeld.
Een basisstation afmelden
Druk enkele malen op de MENU-toets tot Telefoon verschijnt.
Druk op de toets OK om te bevestigen.
· Druk op de toets JA om te bevestigen. Op het
display wordt Pin basis? Aangeduid..
Voer de Pin van de basis in (standaard 0000).
Druk op de toets OK om te bevestigen.
Als de ingevoerde Pin juist is, wordt dit door een akoestisch
signaal bevestigd en op het display wordt Hs:
2 - - -? Aangeduid.
Als de ingevoerde Pin verkeerd is, wordt een akoestische
foutmelding gegeven en op het display wordt Foute Pin
aangeduid. Na enkele seconden duidt het display weer
Registreer aan.
Voer het nummer van de handset in die u wilt afmelden.
Druk op de toets OK.
20
MENU
MENU
Druk enkele malen op de MENU-toets tot Registreer
verschijnt.
Druk op de toets OK om te bevestigen.
Druk enkele malen op de MENU-toets tot Bs Afmelden?
verschijnt.
Druk op de toets JA om te bevestigen. Op het display wordt
Basis 1-3-? Aangeduid.
Voer het nummer van het basisstation in dat u wilt afmelden.
Druk op de toets OK om te bevestigen.
Het display van de handset duid Registreer aan.
Druk enkele malen op de toets <<< of wacht 20 seconden
tot de telefoon weer op standby wordt geschakeld.*
Page 53

Fabrieksinstellingen van het basisstation
U kunt het basisstation te allen tijde weer naar de
fabrieksinstellingen terugzetten.
In de volgende lijst ziet u de fabrieksinstellingen van het
basisstation:
Functie Instelling
Als de ingevoerde Pin verkeerd is, wordt een akoestische
foutmelding gegeven en op het display verschijnt Foute Pin.
Na enkele seconden duidt het display weer Registreer aan.
Druk op de toets OK.
Het display duidt Reset aan.
Als deze stap correct wordt uitgevoerd geeft het basisstation
ter bevestiging een akoestisch signaal.
MENU
MENU
MENU
Kiesmethode Toon
Voorrang voor inkomende gesprekken Alle
Gesprek blokkeren 4x XXXX Aan
Druk enkele malen op de MENU-toets tot Telefoon verschijnt.
Druk op de toets OK om te bevestigen.
Druk enkele malen op de MENU-toets tot Registreer
verschijnt.
Druk op de toets OK om te bevestigen.
Druk enkele malen op de MENU-toets tot Reset basis
verschijnt.
Druk op de toets OK om te bevestigen.
Op het display wordt 1- - - ? aangeduid.
Voer het nummer van het basisstation in dat u nieuw wilt
instellen en druk dan op op de toets
OK.
Op het display wordt Pin basis? Aangeduid.
Voer de code van het basisstation in
(standaard 0000).
Druk op de toets OK om te bevestigen.
Als de Pin juist is, wordt op het display Reset? aangeduid.
Als het basisstation niet wordt gevonden, verschijnt op het
display Geen Basis en vervolgens het menu Registreer.
Druk enkele malen op de toets <<< of wacht 20 seconden
tot de telefoon weer op standby wordt geschakeld.
21
Page 54

Fabrieksinstellingen van de handset
U kunt de handset te allen tijde weer naar de
fabrieksinstellingen terugzetten.
In de volgende lijst ziet u de fabrieksinstellingen van de
handset :
Functie Instelling
Pin 0000
Overgaan intern gesprek 1, volume = luid
Overgaan extern gesprek 1, volume = luid
Toetsklikken Aan
Het display duidt Reset? aan.
Druk op de toets OK om te bevestigen.
Als deze stap correct wordt uitgevoerd, geeft de handset ter
bevestiging een akoestisch signaal. Het display duidt
Registreer aan.
Druk enkele malen op de toets <<< of wacht 20 seconden
tot de telefoon weer op standby wordt geschakeld.
MENU
MENU
MENU
MENU
MENU
Druk enkele malen op de MENU-toets tot Telefoon verschijnt.
Druk op de toets OK om te bevestigen.
Druk enkele malen op de MENU-toets tot Registreer
verschijnt.
Druk op de toets OK om te bevestigen.
Druk enkele malen op de MENU-toets tot Reset Handset
verschijnt.
Druk op de toets OK om te bevestigen.
Het display duidt Pin Hs?- - - aan.
Voer de Pin van de handset in (de standaardinstelling is
0000).
Druk op de toets OK om te bevestigen.
Als de ingevoerde Pin verkeerd is, wordt een akoestische
foutmelding gegeven en op het display wordt Foute Pin
aangeduid. Na enkele seconden duidt het display weer
Registreer aan.
22
Page 55

Functie voor nummerweergave
Nummers van ingekomen gesprekken afroepen
Met de functie voor de nummerweergave kunt u de nummers
van uw gesprekspartner op het display laten aanduiden (*).
· Bij een inkomend gesprek wordt het nummer van de
gesprekspartner op het display aangeduid.
· Als dit nummer in het adresboek is opgeslagen, wordt de
naam van de gesprekspartner aangeduid.
· Als de opbellende gesprekspartner de
telefoonnummertransmissie heeft uitgeschakeld, wordt op
het display Priv Nr aangeduid.
· Als de dienst van de telefoonnummertransmissie niet
beschikbaar is, wordt op het display Ext Gesprek
aangeduid.
· Als het telefoonnummer van de beller niet in het centrale
telefoonregister is geregistreerd, wordt op het display Ext
Gesprek en dan Niet Gekend aangeduid.
(*) Vraag uw telecomoperator of deze functie voor u
beschikbaar is.
MENU
MENU
De nummers van de inkomende gesprekken worden
geregistreerd als u het gesprek niet aanneemt.
Druk enkele malen op de MENU-toets tot Nummerweerg
verschijnt.
Druk op de toets OK.
Op het display wordt de datum en het tijdstip van het laatste
gesprek aangeduid.
Als het nummer van de gesprekspartner in het adresboek is
opgeslagen, wordt de naam aangeduid.
Druk op de MENU-toets om door de opgeslagen nummers te
bladeren.
Als het geheugen vol is, wordt automatisch het eerste
opgeslagen nummer gewist.
23
Page 56

Een nummer kiezen
Een nummer van de nummerweergave opslaan
MENU
MENU
MENU
Druk enkele malen op de MENU-toets tot Nummerweerg
verschijnt.
Druk op de toets OK om te bevestigen.
Druk op de MENU-toets om door de opgeslagen nummers te
bladeren.
Als het gewenste nummer op het display wordt aangeduid,
drukt u op de toets OPNEMEN om het te kiezen.
Een nummer wissen
4 seconden na aanduiding van een opgeslagen nummer
staan de volgende 2 opties ter beschikking:
Terug functie
Druk voor het wissen van een nummer op de toets Func.
Druk op de MENU-toets tot rechts op het display Wis
verschijnt.
Druk op de toets Wiss.
Wissen?
Nee Ja
MENU
Als het nummer op het display verschijnt:
Druk op de toets functie om de naam of het nummer aan te
wijzen.
Druk op de MENU-toets tot rechts op het display Instell
verschijnt.
Druk op de toets SET om het nummer op te slaan.
Druk op de toets OK om op te slaan.
Voer de naam in.
Druk op de toets SET om op te slaan.
Op het display knippert de tekst Opslaan. Vervolgens wordt
een akoestisch signaal ter bevestiging gegeven en het
opgeslagen nummer op het display aangeduid.
Druk op de toets (links) of wacht 20 seconden tot de
telefoon weer op standby wordt geschakeld.
Druk op de toets JA om het nummer te wissen.
24
Page 57

Menustructuur
Adres Boek
Nummerweerg.
Telefoon
Handset Inst
Basis Inst
Registreer
Belsign Hs
Volume Hs
Zet Noodroep
Toetsklik
Pin Hs
Select Basis
Kies Taal
Hs naam
LCD Contrast
Priorit Alle
Telef Config
Verboden
Kies Mode
Flash Tijd
Inst. Centrl
Pauze Duur
Pin Basis
St Dtum/Tijd
Register Hs
Deregstr Hs
Deregstr Bs?
Reset Basis
Reset Hset
25
Page 58

Nuttige informatie
Voer op verzoek de Pin van het basisstation WP 1130 op de
handset met het andere fabrikaat in.
Gebruik met toestellen van andere fabrikaten
De WP 1130 voldoet aan de GAP-richtlijnen (Generic Access
Profile). Daardoor is het mogelijk dat u de handset bij het
basisstation van een ander fabrikaat kunt gebruiken.
Omgekeerd kunt u ook handsets van andere fabrikaten bij het
basisstation van de WP 1130 aanmelden.
De handset van de WP 1130 bij het basisstation van een
ander fabrikaat aanmelden.
Meld de handset zo aan als op pagina 14 is beschreven. Als u
wordt verzocht de Pin van het basisstation in te voeren, voert
u de Pin van het andere station in (de Pin vindt u in de bij het
basisstation meegeleverde handleiding van de andere
fabrikant).
Handsets van andere fabrikanten bij het basisstation van
de WP 1130 registreren
Volg de stappen voor het registreren in de bij de handset
meegeleverde handleiding van de andere fabrikant op.
Schakel eventueel het basisstation volgens de beschrijving in
de onderhavige handleiding in de registratiesmodus.
Klantenservice en onderhoud
Onderhoud
Neem het basisstation en de handset nu en dan met een
droge doek af.
Gebruik geen schuur- of oplosmiddelen, aangezien het toestel
daardoor kan beschadigen.
Plaats van opstelling
Plaats het toestel in de nabijheid van een stopcontact en
telefoonaansluiting. Zorg ervoor dat de afstand tot
televisietoestellen zo groot mogelijk is.
Stel het toestel niet bloot aan direct zonlicht, extreme
temperaturen of een hoge luchtvochtigheid.
Onderhoud van de accu’s
Doe accu’s nooit bij het huisvuil!
Lever defecte accu’s of verbruikte batterijen bij de daarvoor
bestemde inzamelplaatsen af.
26
Page 59

Problemen oplossen
Garantie
Geen kiestoon
Is het telefoonaansluitingssnoer correct met het basisstation
en de telefoonaansluiting aan de muur verbonden?
Controleer of het basisstation van stroom wordt voorzien.
Is de handset op het basisstation aangemeld?
Als de handset niet is aangemeld wanneer u daarmee
probeert te telefoneren, dan verschijnt op het display Uit
Bereik. Meer informatie vindt u in het hoofdstuk over de
aanmelding.
U kunt niet bellen en geen gesprekken ontvangen
Is de accu van de handset geladen?
Als het accusymbool aanwijst dat de accu leeg is, laad dan de
accu enkele uren op.
De handset gaat niet over
Hebt u de instelling voor het belvolume op „Uit“ gezet?
U kunt het belvolume van de handset instellen. Nadere
informatie hierover vindt u op pag. 4.
De garantieperiode bedraagt 12 maanden vanaf de
aankoop van het product. Sagem zal in deze periode
alle mankementen die aan de productie of het
toegepaste materiaal te wijten zijn, bij dit product
repareren of een vervanging uitvoeren. Het overleggen
van een bewijs van aankoop met datum is verplicht.
Criteria voor uitsluiting van de garantie:
De garantie dekt geen mankementen of schade die het
gevolg zijn van verkeerd gebruik (schade door vallen,
waterschade enz….), normale slijtage, ingrepen door
niet-bevoegde personen of inwerking van buitenaf
(overspanning, blikseminslag enz...).
Voorts dekt de garantie geen aan slijtage onderhevige
onderdelen (bijv. batterij) of mankementen die de
waarde van het toestel respectievelijk het gebruik
slechts in geringe mate verminderen.
27
Page 60

*251194001*
28
 Loading...