

Page 1
SAGEM Wi-Fi 11g USB ADAPTER
Quick Start Guide
About this guide
This Quick Start Guide describes how to install and operate your SAGEM Wi-Fi 11g USB
ADAPTER.
Please read this manual before you install the product.
Introduction
The SAGEM Wi-Fi 11g USB ADAPTER is a network adapter with a rate of 54 to 1 Mbps operating
in the 2.4 GHz band implementing the IEEE 802.11g standard.
Its USB port is USB 2.0 compliant
It fully supports wireless networking under Windows 98SE/ME/2000/XP or under Mac OS X.2 or
higher
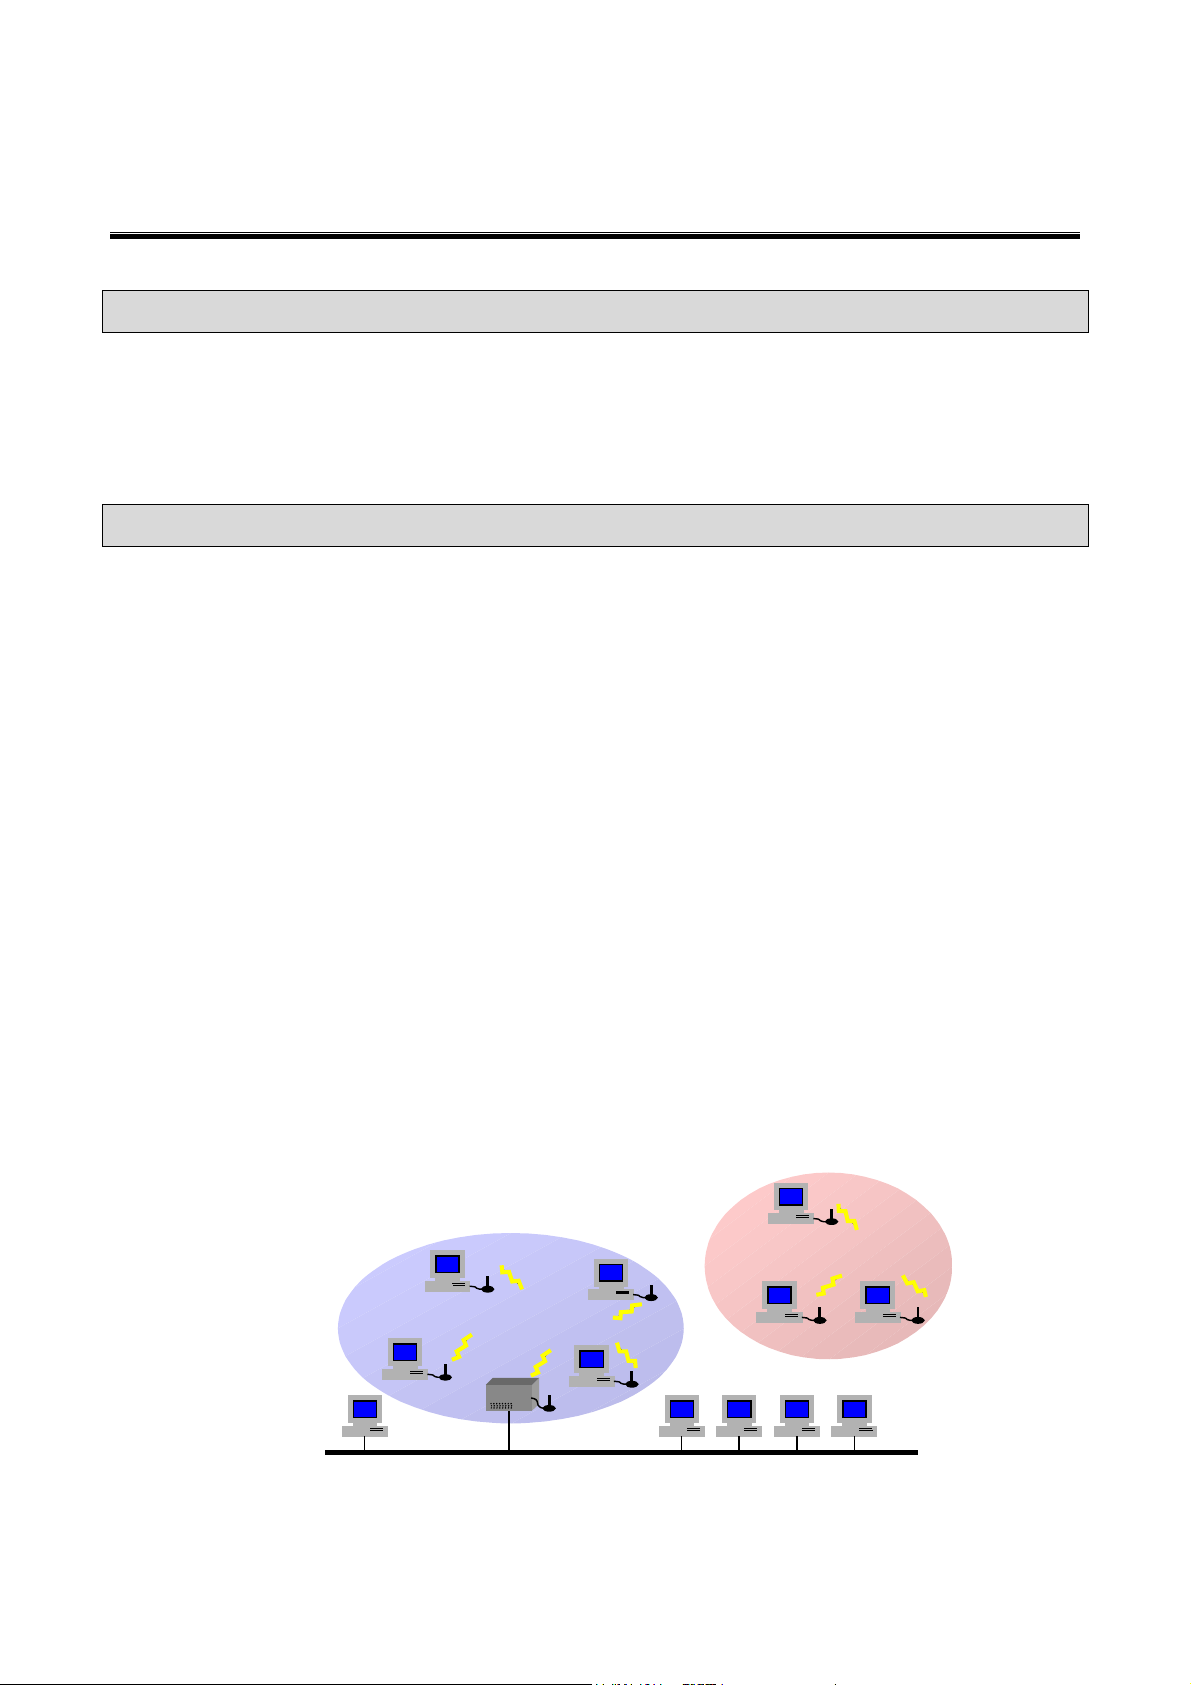
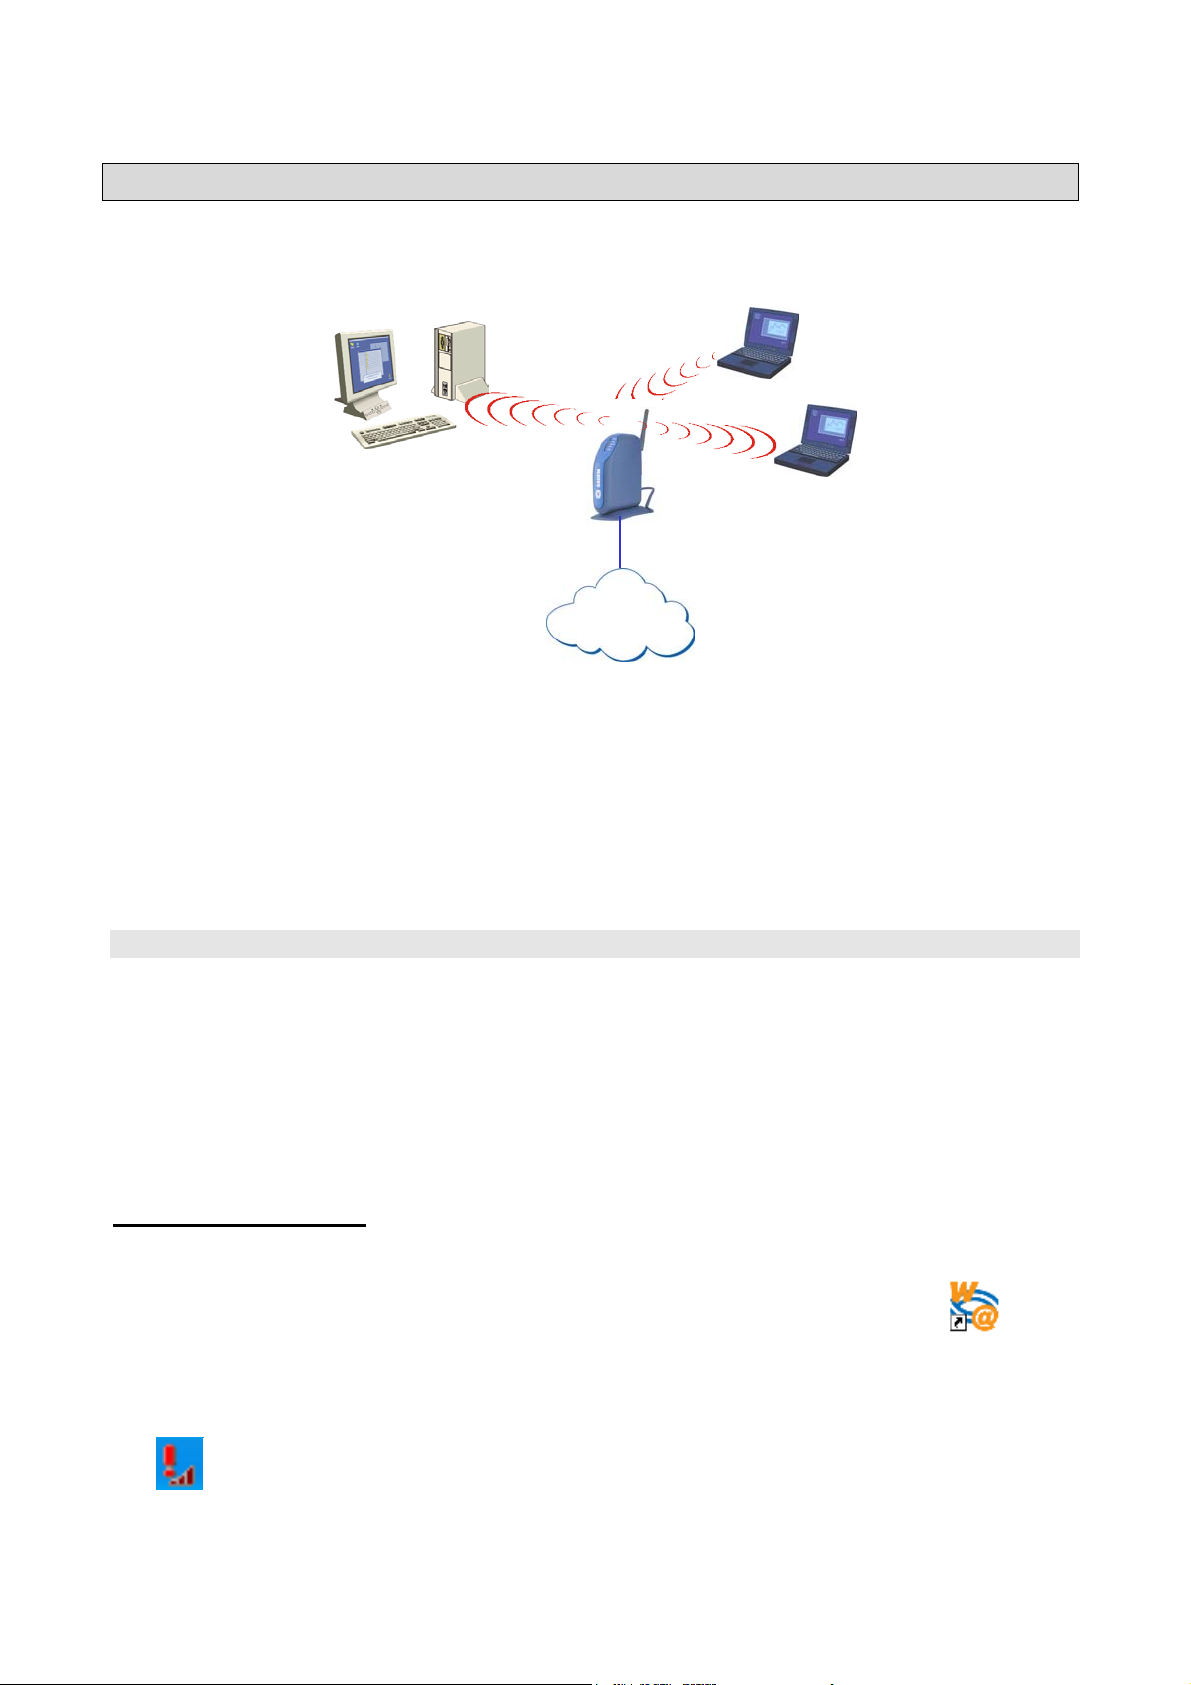
The Wireless LAN (Local Area Network) USB adapter can be operated in one of the two following
networking configurations :
In this mode, the radio links are coordinated by
1. Infrastructure Networking
2. Ad-hoc Networking
an Access Point enabling to access an existing
wired network and/or enabling to access to
network resources such as Internet, email, file
transfer…
Also known as a peer to peer network, this mode
allows wireless to wireless connection, enabling
all workstations to act as servers to all others.
This mode can be used to share a printer or for
file transfer.
Wireless Network
Ad-hoc
Infrastructure
Wired Network
1
Page 2
Package Content
These are the items included in the package:
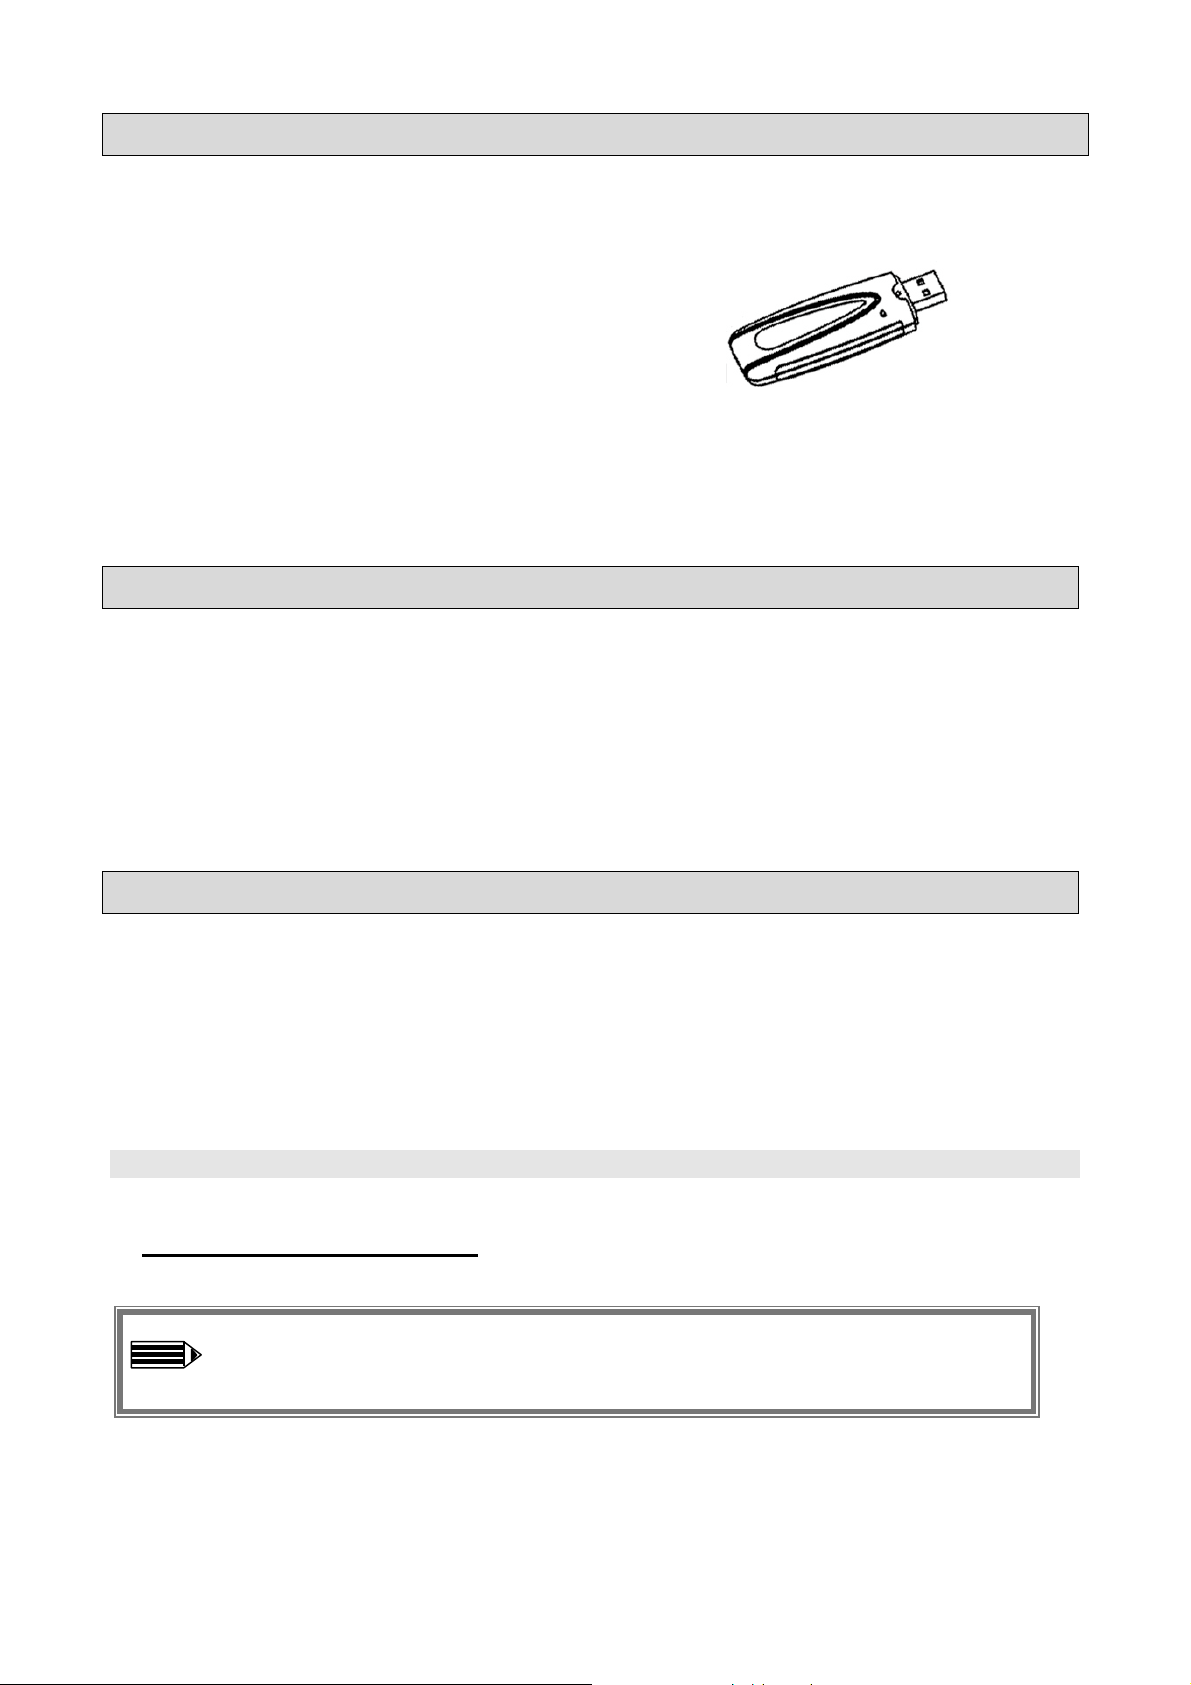
♦ One SAGEM Wi-Fi 11g USB ADAPTER
♦ One USB Cable
♦ One Quick Start Guide
♦ One installation CD-ROM
Minimum System Requirements
♦ PC or MAC Computer with an available USB port (the available USB ports on the MAC
keyboard are not usable because they do not supply enough current).
♦ Compatible with USB 1.1 port
♦ Microsoft Windows 98 Second Edition (98SE), Windows Millennium (ME), Windows 2000
or Windows XP installed on the PC or Mac OS X.2 or higher installed on the MAC.
Installation of the Wireless LAN Software
The installation of your LAN USB adapter requires three steps:
♦ Installation of the software
♦ Installation of the hardware
♦ Configuration of the wireless connection
I. Installation of your LAN USB adapter under Windows :
I.1 Installation of the software
Warning: It is necessary to install the Wireless LAN Software BEFORE to insert
the USB adapter in the appropriate USB port of your computer.
The first step consists in copying on your hard disk all the necessary files for your new
equipment. For that, please follow the next instructions:
2
Page 3
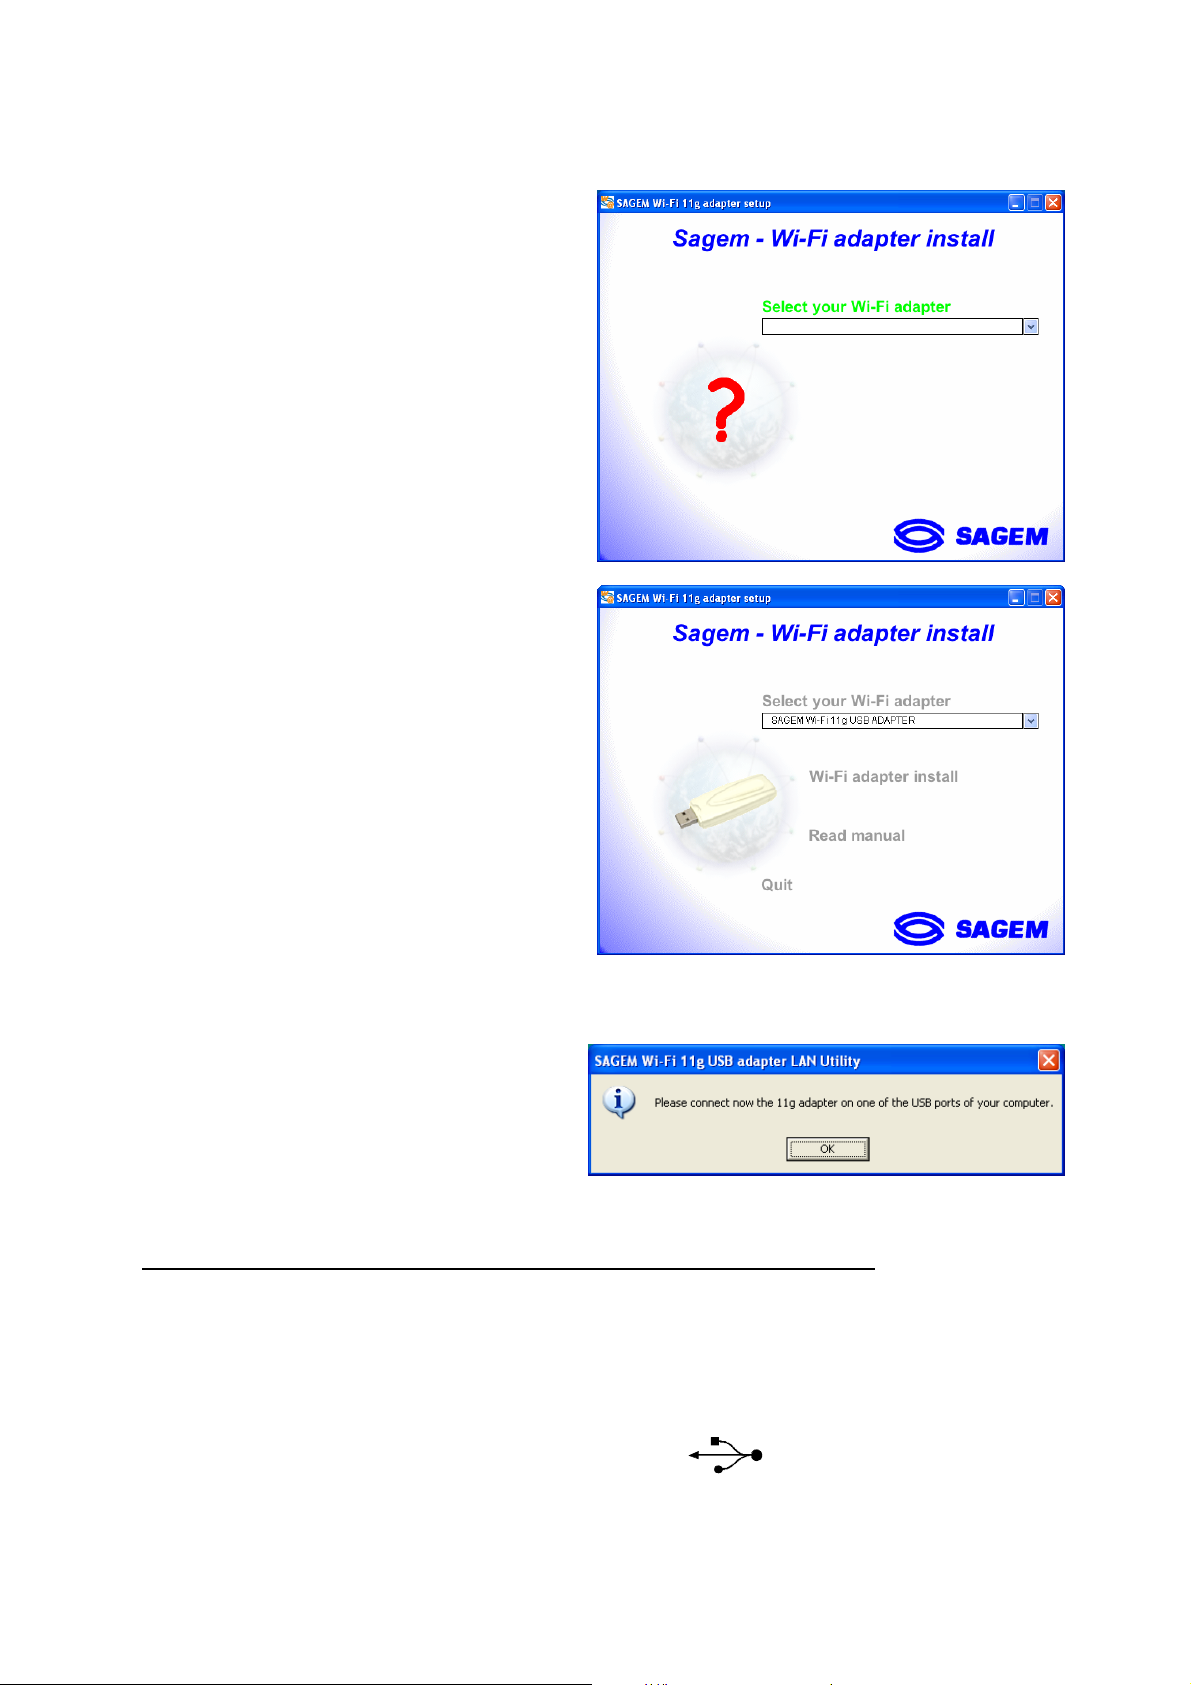
1. Insert the Product CD-ROM into the CD-ROM drive of your computer.
2. An Auto-run is automatically executed and the
following screen comes up. If not, run the
“Autorun.exe” on the CD-ROM
Select in the list your adapter model.
Please, read the model information directly on
your equipment.
The menu offers the following choices :
♦ Install the Wireless LAN Utility and driver
♦ Read the present manual
To launch the installation, click “Wi-Fi adapter
install”
A first screen shows up. Click “Continue” to continue. Follow the on-screen instructions to install
the Wireless LAN Utility.
When this screen shows up, go to the next
chapter to execute the hardware installation of
your SAGEM Wi-Fi 11g USB ADAPTER, then
click on “OK”.
I.2 Hardware installation of the SAGEM Wi-Fi 11g USB ADAPTER
After having copied all necessary files in the previous step, we will now connect the Wireless
LAN.
1. Remove the protective covering for the USB connector from your Wireless LAN adapter
2. Insert the USB connector of the adapter in an USB port on your computer or use the
USB cable included in your package, if it is impossible to connect the USB adapter directly on
your computer.
3
Page 4

Important remark under Windows 98SE
♦ If the “Please insert the disk labeled “Windows 98SE/ME CD-ROM”, and then click “OK”
Window appears, insert your Windows CD-ROM and enter the path corresponding to the CDROM drive then click “OK”. Click “Finish” to complete the installation, which will restart
Windows.
I. Installation of your LAN USB adapter under MAC OS X.2 :
I.1 Installation of the software
Warning: It is necessary to install the Wireless LAN Software and to restart your
computer BEFORE to insert the USB adapter in the appropriate USB port.
1- Insert the Product CD-ROM into the CD-ROM drive of your computer. An icon Sagem Wi-Fi
USB comes up on the desktop. Double-click on this icon to see the CD-ROM composition.
2- Run the installation program
3- The authentication screen shows up as seen
opposite.
4- Enter the Administrator name and password,
then click on
Warning : To install the USB adapter, it is necessary to have the Administrator right.
4
Page 5
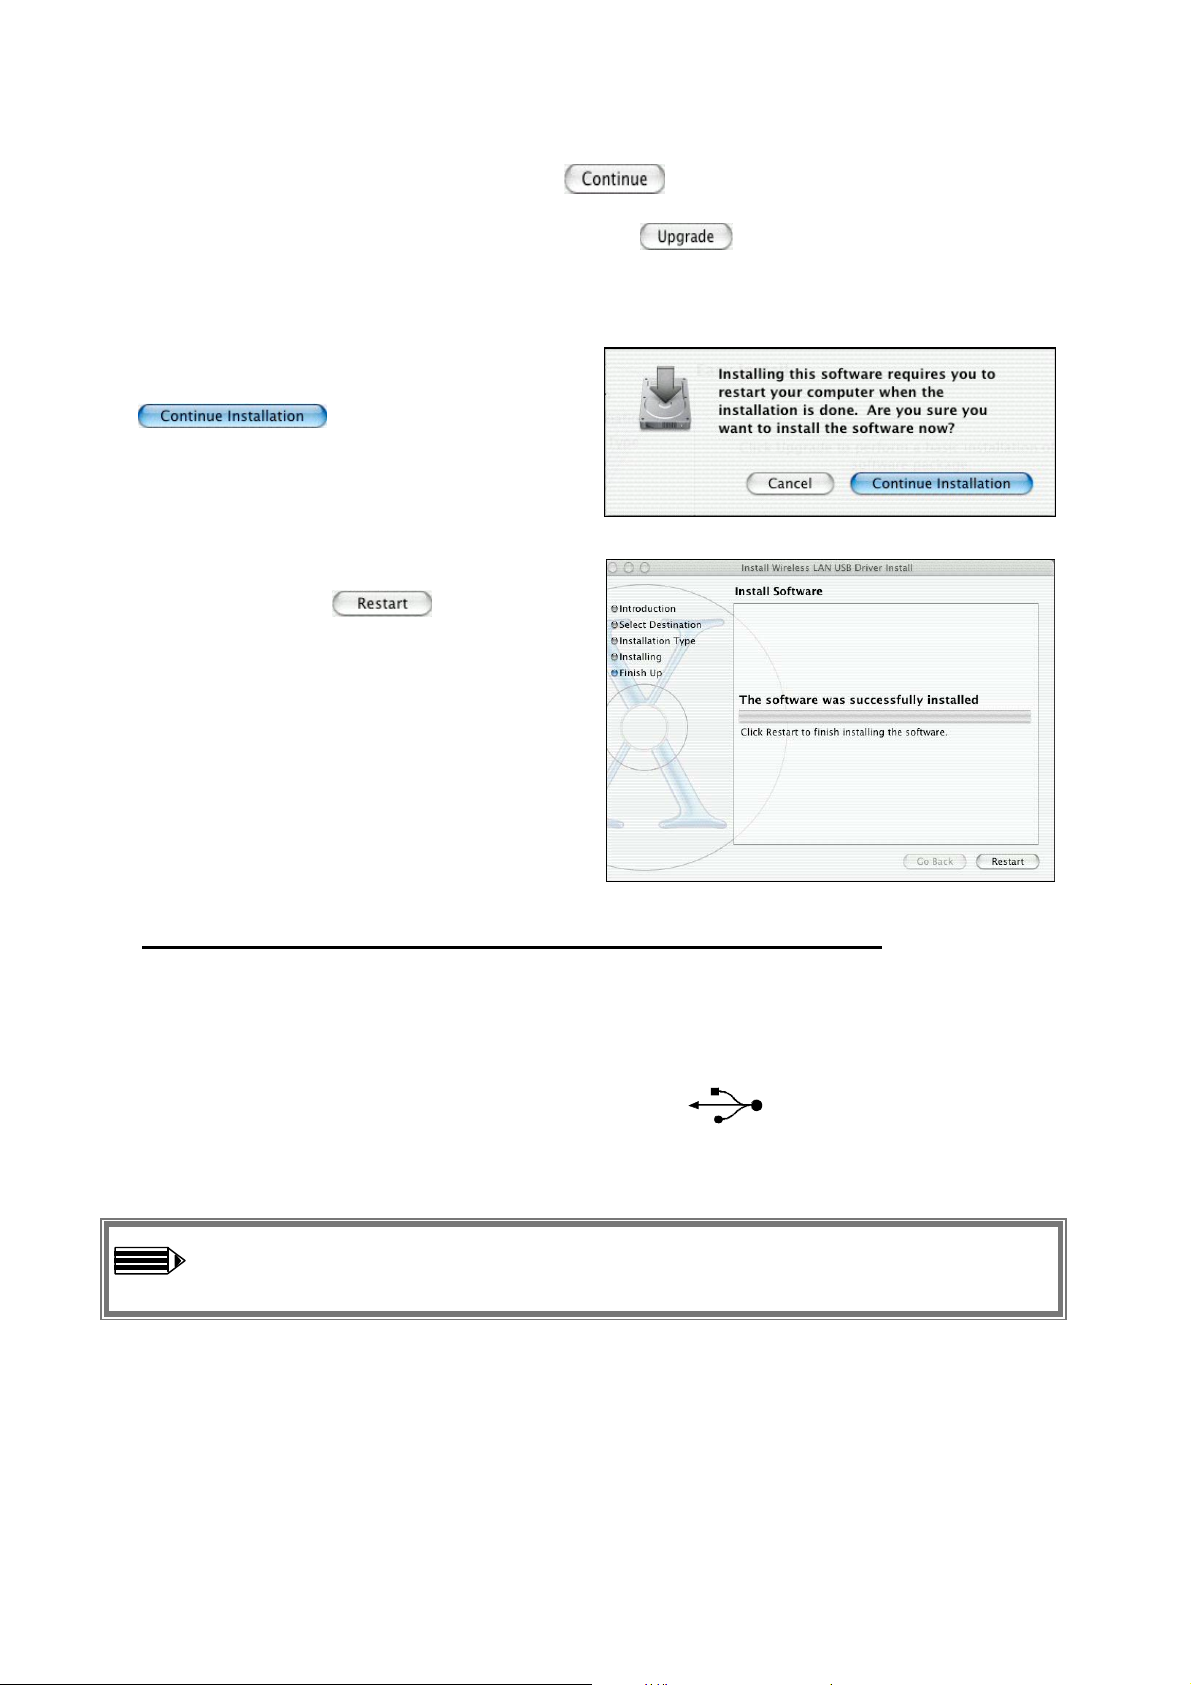
5- The initial install screen shows up, click on select the location by double-clicking the
appropriate Mac OS X system drive and follow the on-screen instructions to install the Wireless
LAN Utility. Then start the installation by clicking on
6- During the installation a message shows up
to prevent to quit all applications. Click on
to continue. Follow the
on-screen instructions.
7- The installation of your WLAN USB adapter
is finished
. Click on to finalize it.
II.2 Hardware installation of the SAGEM Wi-Fi 11g USB ADAPTER
After having copied all necessary files in the previous step and restart the computer, we will now
connect the Wireless LAN adapter to finish the installation.
1. Remove the protective covering for the USB connector from your Wireless LAN adapter
2. Insert the USB connector of the adapter in an USB port on your computer or use the
USB cable included in your package.
Warning : the available USB ports on the MAC keyboard are not usable because they
do not supply enough current.
5
Page 6
Configuration of your Wireless LAN USB to access to Internet
After the two previous steps completion, your Wireless USB LAN adapter is now installed. You now
have to configure your connection to be able to access via an access as seen below.
Client 2
Client 3
Client 1
Point
Access
INTERNET
To do that, you will have to:
♦ Launch the WLAN Utility management software
♦ Configure your adapter in Infrastructure Mode
♦ Set the SSID of the wireless network on which you want to attach
♦ Configure the encryption parameters if you want to protect your wireless network
I. Configuration to access to à Internet under Windows :
At first, you must verify that the computer, where you have installed your USB adapter is
configured in DHCP (dynamic address) :
♦ In the Network Connection tab of the Control Panel menu, click on the TCP/IP protocol
of the Wireless network connection (SAGEM Wi-Fi 11g USB ADAPTER).
♦ Select Obtain an IP address automatically in the IP Address tab.
Open the WLAN utility
To open the WLAN utility, you have two possible choices:
♦ Select the “SAGEM Wi-Fi 11g USB adapter LAN Utility” from the
Start Menu of Windows,
♦ Or double-click the corresponding icon laying on the Windows
desktop :
SAGEM Wi-Fi 11g
USB adapter
LAN Utility
The‘ ’ icon then appears in the System Tray (in the bottom right corner of your task bar.
6
Page 7

Double-click this icon and the main
screen of the Utility shows up as seen
opposite.
Configuration of your Wireless LAN adapter in Infrastructure Mode
To access Internet your Wireless LAN adapter must be set in Infrastructure Mode as seen below.
In the main screen of the Utility, click the down arrow at
the right of the Network Type field and select
“Infrastructure”
Selection of the SSID
The SSID is a string of characters identifying a wireless network (it is the name of this network). To
belong to a same wireless network, the client stations and the access point (connected to the
Internet) have to use the same SSID.
If you keep the SSID field to ANY (default value), your
adapter will attach itself to the nearest access point (or to
the one sending the higher radio signal).
If you know the name of the access point you want to associate with, enter this SSID in the
corresponding field and then click “Apply” button to make the setting take effect.
The SSID can be set up to 32 characters. It is case sensitive (please take great attention to that).
Configuration of the Encryption parameters
To prevent unauthorized wireless station from accessing data transmitted over your network, the
Wireless LAN adapter offers secures data encryption, like “open” and “shared Key” authentication
with WEP (Wired Equivalent Privacy) encryption or WPAShared Key) authentication with TKIP (Temporal Key Integrity Protocol) encryption. The activation
or not of the security has to be set on the same way on the Access Point and on your LAN USB
adapter (client station).
PSK (Wi-Fi Protected Access – Pre
7
Page 8

Your network can only be operated in the 2 following conditions:
♦ No security activated, neither in the Access Point, neither in the client stations
♦ Security activated (recommended for securing your data) in the Access Point and on all client
stations with the same characteristics of encryption.
1) Security disabled on Access Point.
If your Access Point works without security, your wireless LAN adapter also has to be set without
WEP. Check in the main screen of the Utility that the Security Enabled check box is unchecked.
2) Security enabled on Access Point.
Beware that if you enable security on your adapter, you necessarily have to enable the type of
security on the Access Point side, as well, if you want your adapter to be able to associate with it.
Go the Configuration tab in the main screen of the Utility and activate the Security Enabled check
box.
The “Security” window then shows up.
Here we will explain how to configure open security with WEP and WPA-PSK security with TKIP.
2.1) WEP encryption :
In the window “ Security”, you will have to :
♦ select authentication : Open
♦ encryption is fix to WEP
♦ disable IEEE 802.1X authentication mode
♦ select the WEP type : 64 bits or 128 bits
♦ select the index key
♦ select the way to generate the encryption keys (from a passphrase or manually)
Length of the WEP keys
WEP protocol offers two levels of encryption: encryption based on 40 or 64 bits key length and
more secure encryption based on 104 or 128 bits key length.
40 bits keys and the 64 bits keys are the same, if their effective length is 64 bits, only 40 bits
The
are selected by the user, the others bits are automatically calculated. Speak about 40 bits keys or
64 bits keys is the same thing. It is identical for the 104 and 128 bits keys.
The principle of management is identical for both 64 bits and 128 bits.
The key length has to be set at the same value on the Access Point and on the client station
(Wireless LAN adapter in our case).
8
Page 9

Creation of the WEP keys
It is possible to manually enter the WEP key you want to use. However, this entry being rather
tedious, especially for 128 bit keys, it is possible to have them generated automatically. To do that,
you will have to enter a string of characters called "Passphrase".
Create Encryption Keys by Using a “Passphrase”
1- Select first the “64bit” or ”128bit” length of
the key.
Select in “key format” : “Passphrase”.
2-
Select index key
3-
4- Enter the string in “Network key” and
“Confirm network key”. The key is
generated from your string.
Finally click the “Apply button” in the
5-
Configuration tab to save the configuration.
Warning: when Create Key with Passphrase is enabled, the wireless device’s Key number with
PassPhrase must match the Key number with PassPhrase used by the access point with which
wireless devices are going to communicate.
Create Encryption Keys Manually
You can also create up a encryption key.
1. Select first the “64bit” or “128bit” length of the key
to generate
2. Select “ASCII” or “Hexadecimal”
3. Select index key
Enter manually the key you want in the key field
4.
taking in account the remarks here after specifying
the authorized characters
Finally click the “Apply button” in the
5.
Configuration tab to save the configuration and
make setting take effect.
For 64bit encryption you may choose:
♦ Alphanumeric: 5 characters (case sensitive) ranging from “a-z”, “A-Z” and “0-9” (e.g. MyKey)
9
Page 10

♦ Hexadecimal: 10 hexadecimal digits in the range of “A-F”, “a-f” and “0-9” (e.g. 11AA22BB33)
For 128bit encryption you may choose:
♦ Alphanumeric: 13 characters (case sensitive) ranging from “a-z”, “A-Z” and “0-9” (e.g.
MyKey12345678)
♦ Hexadecimal: 26 hexadecimal digits in the range of “A-F”, “a-f” and “0-9” (e.g.
00112233445566778899AABBCC).
2.2) WPA-PSK / TKIP encryption:
For Windows only
1 - Select authentication mode : WPA-PSK
2 – Select encryption mode : TKIP.
3 – Enter a string from 8 to 63 characters or a
64 hexadecimal characters key in Network key
and Confirm network key
.
4 - Select «OK» to close Privacy
configuration.
5 - select «Apply button» in the Configuration
tab to save the configuration and make setting
take effect
The configuration of your Wireless LAN adapter to access to Internet under Windows is finished
.
II. Configuration to access to Internet under MAC OS X.2 :
For a first installation of your USB adapter you must creates a new network port for it :
♦ Go in the Network tab of the System Preferences menu. A message New port detected
shows up ; if not, go in the Show menu, select Network port Configuration and check, if it is
not, the Ethernet Adaptor port. In all the case click on apply.
♦ If the port is not present or if it appears in grey, restart the computer and resume this operation.
10
Page 11

Open the WLAN utility
To open the WLAN utility, you have two possible choices :
♦ Click on the icon ‘ ’ will appear in the top right corner of your menu bar and select the
“Wireless preferences” menu
♦ Or double-click on the icon “Sagem USB adapter” will appear in the
System Preferences menu, as seen opposite :
Then the main window of the WLAN
utility shows up. Click on Start Scan to
see your available Wireless Networks.
Configuration of your SAGEM Wi-Fi 11g USB ADAPTER
If the name of your Wireless Networks shows up in the
Available Wireless Networks window, click on it then
click on Connect. If a WEP key is necessary,
screen below shows up.
To create a new Wireless Network, click on “Show My
Network” in the main window of your Wireless LAN
Utility a screen shows up as seen opposite. then click
on Create, you will get the screen below.
For all previous modification on a Wireless
Network, click on its profile on the opposite
screen, highlight it then click “Properties”.
the
11
Page 12

Selection of the SSID (Network Name) and configuration in Infrastructure Mode
The SSID is a string of characters identifying your wireless network (it is the name of this network).
To belong to a same wireless network, the client stations and the access point connected to the
Internet have to use the same SSID. The SSID can be set up to 32 characters. It is case sensitive
(please take great attention to that).
If it is a new Wireless Network, enter the SSID of
the access point you want to associate with, in
the field “Network Name” of your profile screen.
Or double clicking on this SSID, if it is present, in
the “Available Wireless Networks” field of the
main menu.
To set your Wireless LAN adapter in
infrastructure mode, select “Access Point” in
the field “Network Type” and then click “Apply”
button to make the setting take effect.
Configuration of the Encryption parameters
To prevent unauthorized wireless station from accessing data transmitted over your network, the
Wireless LAN adapter offers a highly secure data encryption, known as WEP (Wired Equivalent
Privacy). The activation or not of this WEP encryption has to be set on the same way on the
Access Point and on your LAN USB adapter (client station).
Your network can only be operated in the 2 following conditions:
♦ No WEP activated, neither in the Access Point, neither in the client stations
♦ WEP activated (recommended for securing your data) in the Access Point and on all client
stations with the same characteristics of encryption.
1) WEP disabled on Access Point.
If your Access Point works without WEP encryption, your wireless LAN adapter also has to be set
without WEP. Check in the Profile screen of your connection that the “Enabled WEP” check box is
unchecked.
2) WEP enabled on Access Point.
Beware that if you enable WEP encryption on your adapter, you necessarily have to enable it on
the Access Point side, as well, if you want your adapter to be able to associate with it. Go the
Profile screen of your connection and check the “Enabled WEP” check box.
In this window, you will have to :
♦ Select one of the generated key (the same that has been selected in the Access Point)
♦ Select the WEP type : 40 bits or 104 bits,
♦ Generate the keys
12
Page 13

Keys Selection
You can create up to 4 encryption keys, but only one of them is active. To enter a key, first you
must
check the “Enabled Key Index” check box, select the WEP key index you want (index 0 for
key 1…) then create the key. To select one of the key as active key, its index must be visible in the
index screen before you click “Apply” button to make the setting take effect.
Length of the WEP keys
WEP protocol offers two levels of encryption: encryption based on 40 or 64 bits key length and
more secure encryption based on 104 or 128 bits key length.
40 bits keys and the 64 bits keys are the same, if their effective length is 64 bits, only 40 bits
The
are selected by the user, the others bits are automatically calculated. Speak about 40 bits keys or
64 bits keys is the same thing. It is identical for the 104 and 128 bits keys.
The principle of management is identical for both 40 bits and 104 bits.
The key length has to be set at the same value on the Access Point and on the client station
(Wireless LAN adapter in our case).
Creation of the WEP keys
There are two methods to set the WEP keys, Manually or by
using a Apple Password :
This second method is there to be consistent with Apple's
Airport. They allow the user to type in a password (with no
length restriction), and this value is converted into a 40-bit WEP
key. It uses apple's hashing algorithm to create the key, so it's
compatible only with Airport base stations. To select this
method, Pull down the Encryption (WEP) menu and select
Apple Password, then enter the password. This mode is not
compatible with the PassPhrase mode.
Create Encryption Keys Manually
To do that, go to the Encryption menu of your
profile screen
:
♦ Check the Enable WEP check box
♦ Check the Enable Key index check box
♦ Pull down the Index menu and select either
key1 (Index 0), key2 (Index 1), key3 (Index
2) or key4 (Index 3)
♦ Select either 40bits or 104bits encryption
level in hexadecimal or in ASCII (
as the Point
Access key level)
♦ Enter manually the key in the key field taking
in account the remarks here after specifying
the authorized characters
Click “Apply” button to make the setting
♦
take effect.
13
Page 14

For 40 bit (64bit) encryption you may choose:
♦ Alphanumeric: 5 characters (case sensitive) ranging from “a-z”, “A-Z” and “0-9” (e.g. MyKey)
♦ Hexadecimal: 10 hexadecimal digits in the range of “A-F”, “a-f” and “0-9” (e.g. 11AA22BB33)
For 104 bit (128bit) encryption you may choose:
♦ Alphanumeric: 13 characters (case sensitive) ranging from “a-z”, “A-Z” and “0-9” (e.g.
MyKey12345678)
♦ Hexadecimal: 26 hexadecimal digits in the range of “A-F”, “a-f” and “0-9” (e.g.
00112233445566778899AABBCC).
The configuration of your Wireless LAN adapter to access to Internet under MAC OS X.2 is finished
Configuration of your Wireless LAN adapter in Ad Hoc mode
Also known as a peer to peer network, this mode allows wireless to wireless connection, enabling
all workstations to act as servers to all others. This mode can be used to share a printer or for file
transfer.
Client 1
Client 3
Client 2
I. Configuration in Ad Hoc mode under Windows :
Configuration of Network Type
To set your Wireless LAN adapter in the Ad Hoc mode, click the down arrow at the right of the
Network Type field and select “Ad Hoc” in the main screen of the WLAN utility.
Configuration of the SSID
The SSID is a string of characters identifying your wireless network (it is the name of this
network).To be part of a same network, wireless clients must have the same SSID. This SSID is
the name of this network.
If you want to associate to an existing Ad Hoc network,
enter the SSID of this network in the corresponding field
(replacing ANY) and click the “Apply” button on the
Configuration tab to make the setting take effect.
If you want to create a new Wireless Ad Hoc network, enter an unused SSID (replacing ANY) to
14
Page 15

identify your own network.
Then click the “Apply” button on the Configuration tab to make the setting take effect.
Configuration of the Channel
To be part of a same network, wireless clients must use the same channel If you want to associate
to an existing Ad Hoc network
Channel in the main screen of the WLAN utility. Then click the “Apply” button on the
Configuration tab to make the setting take effect.
, select the channel of this network in the corresponding field AdHoc
If you want to create a new Wireless Ad Hoc network
“Apply” button on the Configuration tab to make the setting take effect.
, select an unused channel, then click the
Configuration of WEP encryption
The configuration of WEP encryption in Ad Hoc mode is similar to the one in Infrastructure Mode.
Please refer to the above explanations.
The configuration of your Wireless LAN adapter in Ad-Hoc mode is finished.
II. Configuration in Ad Hoc mode under MAC OSX.2 :
Configuration of the SSID
The SSID is a string of characters identifying your wireless network (it is the name of this
network).To be part of a same network, wireless clients must have the same SSID. This SSID is
the name of this network.
If you want to associate to an existing Ad Hoc
network, click on it in the Available Wireless
Networks screen then click on Connect or enter the
SSID of this network in the corresponding field and
click the “Apply” button on the Configuration tab
to make the setting take effect.
If you want to create a new Wireless Ad Hoc network, enter an unused SSID (replacing ANY) to
identify your own network. Then click the “Apply” button on the Configuration tab to make the
setting take effect.
Configuration of Network Type
To set your Wireless LAN adapter in the Ad Hoc mode,
click the down arrow at the right of the Network Type
field and select “Peer-to-Peer” in the profile screen of
your connection and click the “Apply” button on the
Configuration tab to make the setting take effect.
Configuration of the Channel
To be part of a same network, wireless clients must use the same channel If you want to associate
to an existing Ad Hoc network
Channel in the profile screen of your connection. Then click the “Apply” button on the
Configuration tab to make the setting take effect.
If you want to create a new Wireless Ad Hoc network
“Apply” button on the Configuration tab to make the setting take effect.
, select the channel of this network in the corresponding field
, select an unused channel, then click the
Configuration of WEP encryption
15
Page 16

The configuration of WEP encryption in Ad Hoc mode is similar to the one in Infrastructure Mode.
Please refer to the above explanations.
The configuration of your Wireless LAN adapter in Ad-Hoc mode under Mac OS X.2 is finished.
About Status Information on your Wireless LAN USB
adapter LED Indicator
The 11Mbps SAGEM Wi-Fi 11g USB ADAPTER has one LED indicator giving the following
informations on the link status:
♦ Solid Green: Connected to an Access Point or Ad-Hoc wireless workstation and
transmitting data.
♦ Blinking Green: Attempting connection to the Access Point or Ad-Hoc wireless workstation
I. On the WLAN utility under Windows :
Icon of the WLAN utility
The color behind the system tray icon indicates the link status :
Blue indicates a good or excellent link.
Yellow indicates a usable but weak link.
Red indicates no or very poor link quality.
Status field on the Configuration Menu of the WLAN utility
The Status field on the Configuration menu provides more detailed information.
State : When operating in Infrastructure mode, this field shows the MAC address of
the Access Point with which the SAGEM Wi-Fi 11g USB ADAPTER is
communicating. When operating in Ad-Hoc mode, it shows the virtual MAC
address used by computers participating in the Ad-Hoc network.
Current Channel : Shows the radio channel on which the connection is made.
16
Page 17

Current Tx Rate : Shows the highest transmit rate of the current 54 Mbps to 1 Mbps.
Throughput : Shows the short term transmit and receive throughput in packets/second, and
is continuously updated.
Link Quality : Based on the quality of the received signal
There are 4 states of link quality:
Excellent
Good
Poor
no connection.
Signal Strength : Based on the received radio signal strength.
There are 4 states of signal strength:
Excellent
Good
Poor
no signal strength.
II. On the WLAN utility under MAC OS X.2 :
Icon of the WLAN utility
The color behind the system menu bar icon indicates the link status :
Black : The radio link is present
Red : No radio link or bad WEP code.
By clicking on this icon, the will appear give more information on the link :
Rate : shows the highest transmit rate of the
current association (from 54 Mbps to 1 Mbps).
Link : there are four states of link quality :
Excellent: Excellent link
Good: Good link quality
Fair : Fair link quality
Poor: Poor or no connection
17
Page 18

Current Wireless Network field of the WLAN utility
The Current Wireless Network field of the main screen gives the following information on the
current connection :
Network Name : This field shows the Access Point SSID (Infrastructure Mode) or the other
station SSID (Ad-Hoc Mode).
Network Type : Shows the connection mode : Access Point (Infrastructure Mode) or Peer-to-
Peer (Ad-Hoc Mode)
Link State : Shows if the l802.11g station is connected or not to the network and if the USB
adapter is present.
Channel : Shows the channel on which the connection is made.
Signal Strength : Based on the received signal strength measurement of the baseband processor
of the Beacon signal. Its value in percentage is shown in the signal item of the
Available Wireless Networks field of the main screen.
There are 4 levels of signal strength :
100%~65%: Excellent signal strength
65%~45%: Good signal strength
45%~30%: Fair signal strength
Under 30%: Poor or no signal strength
The Available Wireless Networks field of the main screen can display all the Access Points
around the working environment and gives information on all these connections. It permits to
connect at one of these Access Point by double clicking on it.
Description of all the Wireless LAN Utility features
Please refer to the User Manual for a complete description of the functions that are offered by the
Wireless LAN Utilities.
Uninstall the Wireless LAN adapter
I. Uninstallation under Windows :
1. To remove the Wireless LAN Utility from your computer, go to the Start menu and select
“Uninstall SAGEM Wi-Fi 11g USB adapter LAN Utility
2. Follow the instructions on the different screens to uninstall the Wireless Utility then click
“Finish”.
3. Now you can disconnect your SAGEM Wi-Fi 11g USB ADAPTER.
18
”.
Page 19

II. Uninstallation under MAC OS X.2 :
1. Reinsert the product CD-ROM into the CD-ROM drive of your computer and double-click on the
icon comes up on the desktop to see the CD-ROM composition.
2. run the uninstallation program.
3. An uninstallation script starts where you must enter your Administrator password then type on
the Return (↵) touch of your computer.
4. You must disconnect your USB adapter and restart your computer adapter.
5. The Uninstallation is finished
Troubleshooting
If you experience any difficulty resolving the problem while installing or using the SAGEM Wi-Fi
11g USB ADAPTER, please contact the supplier for support.
Problem Solution
At SAGEM Wi-Fi 11g USB
ADAPTER installation, Windows
was unable to locate the driver for
this device.
The Wireless LAN adapter LED
does not come on.
The Wireless LAN adapter LED
flashes and you cannot access to
your Access Point or to the other
client stations of your network.
Under MAC the Wireless LAN
adapter LED
cannot access to Internet or to the
other
mode.
client stations in Ad-Hoc
come on but you
• Restart your PC and follow the screens showed up.
• Check that the Wireless LAN adapter is correctly
connected.
• Plug out the Wireless LAN adapter, then plug in it into the
same USB port on your computer.
• Under Windows check the Wireless LAN adapter driver is
correctly installed (see chapter 3.1.3 of the user’s manual).
If this is not the case uninstall then reinstall the driver.
• Check that the SSID and the WEP encryption keys are the
same on the computers and the access point which are on
the same network.
• Under MAC control that the Enable Key index check box is
checked.
• Check that the wireless network is operational.
•
Check that your computer has create a new network port :
go in the Network tab of the System Preferences menu.
In the Show menu, select Network port Configuration
and control that the Ethernet Adaptor port is present and
check, if it is not, check it and click on apply.
• If the port is not present or if it appears in grey, restart the
computer and resume this operation.
After a restart of your computer
(PC or Mac), the system cannot
detected the Wireless LAN adapter
plug into it.
• Plug out the Wireless LAN adapter, then plug in it into the
same USB port on your computer.
All rights reserved Copyright 2004 SAGEM SA PARIS France
Ref. 251 892 201
19
 Loading...