

Page 1

USER GUIDE
Page 2

1
Dear Customer,
You have just acquired a Sagemcom DECT telephone. Thank you for placing your
confidence in us.
This device has been manufactured with the utmost care. If you should have difficulties
in operating it, we recommend that you consult this manual.
For your comfort and safety, we urge you to carefully read the paragraph
« R
ecommendations and safety instructions » of the warranty card included in the pack.
The CE label confirms that the product complies with the 1999/5/EC regulations
of the European Union Parliament regarding wireless systems and
telecommunications.
The declaration of compliance may be looked up on the
h
ttp://support.sagemcom.com site or can be obtained from the following
address :
X
-GEM SAS
9 rue de la Négresse
64200 Biarritz - France
Page 3

SIXTY 2
2
Overview
Discover............................................................ 5
Your phone .......................................................................... 5
The base ................................................................................................................................................. 5
The handset ........................................................................................................................................... 6
The charger ........................................................................................................................................... 9
Installing the phone ........................................................... 11
Replacing the batteries .................................................................................................................... 12
Browsing principle............................................................................................................................. 13
Switch the handset off and then on again ........................... 14
Settings to make before use ............................................... 14
Menu tree structure ........................................................................................................................... 15
Call... ...............................................................17
Managing your calls ........................................................... 17
Making a call........................................................................................................................................ 17
Ending a call........................................................................................................................................ 19
Receiving a call .................................................................................................................................. 19
Choose your line................................................................................................................................. 20
Managing several calls ....................................................... 21
Receiving a second call ................................................................................................................... 21
Switching from one call to the other............................................................................................. 21
Ending one of the calls in progress.............................................................................................. 22
Talking with two contacts at the same time (3-way conference) ......................................... 22
Making a second call ........................................................................................................................ 23
Transferring calls ............................................................................................................................... 24
Options during a call .......................................................... 26
Activate/Deactivate loudspeaker
(hands-free mode) ............................................................................................................................. 26
Adjusting volume................................................................................................................................ 27
Activating the mute mode................................................................................................................ 28
Using additional handsets .................................................. 29
Calling another handset (intercom) .............................................................................................. 29
Intrusion ................................................................................................................................................ 30
Page 4

SIXTY 2
3
Tracking your calls... ........................................31
Call logs ............................................................................. 31
Displaying the list of all calls........................................................................................................... 31
Viewing the received or dialed call log........................................................................................ 32
Consulting the missed call log ....................................................................................................... 33
The events log.................................................................... 34
Checking new events........................................................................................................................ 34
Managing incoming or outgoing calls.......................................................................................... 35
Manage your contacts... ...................................36
Use the phonebook ............................................................ 36
Create an entry .................................................................................................................................. 36
Call a contact from the phonebook............................................................................................... 37
Changing an entry ............................................................................................................................. 37
Deleting an entry ............................................................................................................................... 37
Search for an entry ............................................................................................................................ 38
Delete all the entries ........................................................................................................................ 38
Speed dialing ...................................................................................................................................... 39
Answering machine... .......................................40
Activating/Deactivating the answering machine....................................................................... 40
Answering machine announcements .................................. 41
Choosing your default announcement......................................................................................... 41
Recording your personal announcement.................................................................................... 41
Listening to your personal announcement ................................................................................. 42
Erasing your personal announcement......................................................................................... 42
Messages........................................................................... 43
Listening to your messages ............................................................................................................ 43
Managing your messages................................................................................................................ 44
Deleting all old messages................................................................................................................ 44
Querying your answering machine remotely ............................................................................. 45
Audio adjustment... ..........................................46
Changing the ringtone...................................................................................................................... 46
Activating/Deactivating the silent mode...................................................................................... 46
Activating/Deactivating audio alerts............................................................................................. 47
Page 5

SIXTY 2
4
Setting up.........................................................48
The phone .......................................................................... 48
Setting the date and the time.......................................................................................................... 48
Picking up and hanging up calls automatically......................................................................... 49
Changing the display language..................................................................................................... 49
Adjust the brightness........................................................................................................................ 50
Change the screen background.................................................................................................... 50
The handset ....................................................................... 51
Associating a new handset ............................................................................................................. 51
Customizing the handset’s registration ....................................................................................... 53
Defining the main base for your handset .................................................................................... 53
Modifying the Voice box number................................................................................................... 54
Deleting the Voice box number...................................................................................................... 54
Handset version.................................................................................................................................. 55
Resetting the handset....................................................................................................................... 55
The base ............................................................................ 56
Changing the base code.................................................................................................................. 56
Resetting the base............................................................................................................................. 56
Base version........................................................................................................................................ 57
Activating emission free mode....................................................................................................... 57
Modifying the country ....................................................................................................................... 58
The charger ....................................................................... 59
Modifying the display colour........................................................................................................... 59
Activating time display ..................................................................................................................... 59
The line .............................................................................. 60
Change the line name....................................................................................................................... 60
Pair the handset with a line ............................................................................................................. 61
Mask the line number........................................................................................................................ 61
Allow three-way communication (Intrusion) ............................................................................... 62
Modifying the dialing mode ............................................................................................................. 62
Changing the flash duration............................................................................................................ 63
Call management ............................................................... 64
Managing your calls .......................................................................................................................... 64
The list of handsets ............................................................ 65
Manage handsets............................................................................................................................... 65
Answering machine setup .................................................. 66
Modify the remote enquiry code .................................................................................................... 66
Answering machine delay time ...................................................................................................... 66
Page 6

5
SIXTY 2
Discover...
Your phone
The base
Discover...
1 Power socket
2
Indicator light :
• Rapid blinking : the base is in pairing mode.
• Medium blinking : searching for handsets associated with the base.
• Slow blinking : communication in progress.
3 Telephone socket
4
Paging button / Pairing :
• Short press : find handset (Paging).
• Long press : handset pairing mode.
(The bottom of the base)
1
2
3
4
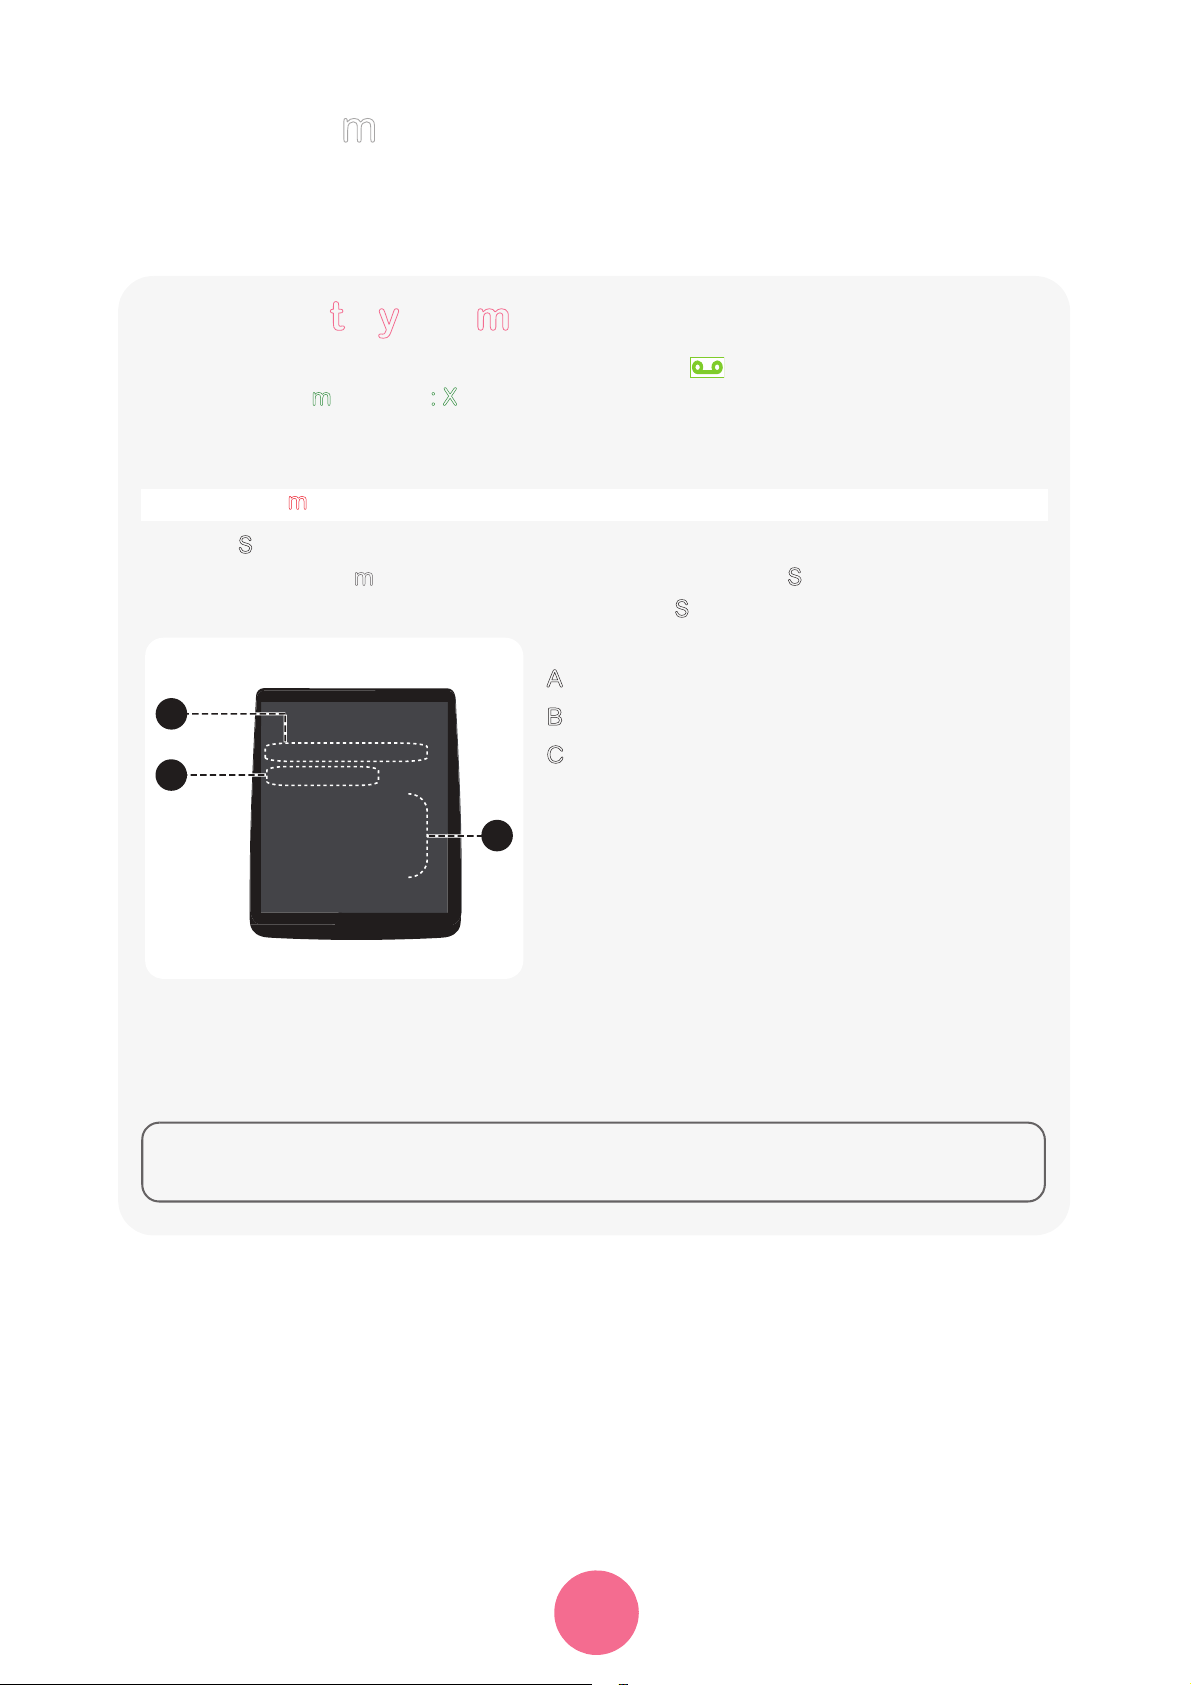
Page 7

SIXTY 2
Discover...
6
The handset
Key Description
1 Earpiece
2 Screen
3 Handset charging contacts
4 OK key : Access to the main
menu / Validation key
5 Pick-up / Access to outgoing call
list (long press in standby mode)
6 Key 1 :
- Access to voice mail (long press
in standby mode)
- Access to answering machine
messages
(if answering machine
mode is activated)
7 key : Lock / unlock keypad
(long press from home screen)
8 Activate / deactivate hands-free
mode
9 Browsing through the menus
10 Cancel the action / Return to
previous menu
11 Hang up (during a call) / Return
to main menu / Turn off/on the
handset (long press)
12 key :
- Activate / deactivate the mute
mode (long press during a call)
- Activate / deactivate the silent
mode (long press from home
screen)
13 Access phonebook
14 Microphone
1
2
9
10
11
12
13
14
3
4
5
6
7
8
15:45
12/11/2015
MENU
INTERN
DECT3
Page 8

7
SIXTY 2
Discover...
The screen
In standby mode or during use, the screen indicates the current state through icons, and
in particular :
Legend Description
1 Status icons : indicates your phone's current state.
2
Information field : the handset's name and number, the current time
and date.
3
Action icons : functions associated to and keys.
* : during a call
1
2
3
INTERN
DECT X
MENU
HH:MM
dd/mm/yyyy
*
Page 9

SIXTY 2
Discover...
8
THE ICONS DISPLAYED
Battery charge condition Silent mode activated
DECT signal :
blinks when the handset is out
of range of the base
or when the base is not supplied.
Keypad locked
Phone in conversation mode
Voice(s) message(s) not
consulted
Microphone mute activated Answering machine activated
Hands-free activated New message(s) on your
answering machine
Missed call(s)
Page 10

9
SIXTY 2
Discover...
The charger
1 Charging contacts
2
Indicator light :
Backlighting is red, green, or orange.
3
Display screen :
• the current time,
• number of messages on answering machine or voice mail.
1 5
23
1
2
3
Page 11

SIXTY 2
Discover...
10
DISPLAY AND INDICATION BACKLIGHTING
Case 1 :
• the display colour selected is "Variable on events",
• time display is activated,
• the handset is placed on its charger.
Colour and display Indication
Red : is permanently displayed and
goes out if the handset is taken off the
charger.
Reception of an unknown call.
Orange : is permanently displayed and
goes out if the handset is taken off the
charger.
Reception of a CLIP call.
Green : is permanently displayed and
goes out if the handset is taken off the
charger.
Receiving a CLIP call whose number has
been entered into the directory.
• Green : blinks permanently and goes
out if the handset is taken off the
charger.
• Display of the current time on the
screen.
There are missed call(s).
• Green : blinks permanently and goes
out if the handset is taken off the
charger.
• Display of messages on answering
machine or voice mail.
There are message(s) on the answering
machine or voice mail.
• Red : blinks permanently and goes
out if the handset is taken off the
charger.
• Display of messages on answering
machine.
Answering machine memory full.
Green : is displayed for 1s then goes
out.
The handset is placed on the charger.
Note To change the display colour of your indicator light, refer to paragraph
“M
odifying the display colour”, page 59.
To change the time display on your screen, refer to paragraph “A
ctivating
t
ime display”, page 59.
Page 12

11
SIXTY 2
Discover...
Case 2 :
• the display colour selected is "Red" or "Green" or Orange",
• time display is activated.
If the handset is on or off its charger, the backlighting is set to the selected colour and
the current time is displayed.
C
ase 3 :
• the display colour selected is "Off",
• time display is activated.
If the handset is on or off its charger, the backlighting is deactivated and the current time
is displayed.
Installing the phone
1 Plug the phone cable into the socket of your base.
2 Connect the other end of the cable with the phone wall socket or with the Gateway.
3 Connect the power adapter cord to the socket on the bottom of the base.
Note Once the permanent colour has been selected, no other effect is
displayed and the charger behaves as a lamp.
Note If time display is deactivated, neither the time nor the indication for
answering machine nor for voice mail are displayed.
The base The charger The handset
Phone
@
2
4
5
1
3
5s
6
7
8
9
Page 13

SIXTY 2
Discover...
12
4 Connect the other end of the cable with the power wall socket.
5 The indicator on the base lights during 5 seconds.
6 Connect the power supply unit to the charger.
7 Plug in the other end of the power supply unit to the mains.
8 Remove the tab.
9 The handset screen comes on. The message "SAGEMCOM" appears on the screen.
Replacing the batteries
1 Remove the battery compartment cover.
2 Insert the new batteries one by one in compliance with the polarity of the batteries.
3 Replace the battery compartment cover.
4 Press the cover gently. The "Click" sound indicates that the cover is in the locked
position.
5 Place the handset on its charger.
Note To ensure optimum charging, leave the handset on the base for at least
10 hours before using the phone for the first time.
Note If your handset battery is empty leave the handset in the charging unit for
at least 4 minutes.
2
3
4
5
+
-
+
-
+
-
+
-
Clack
-
+
+
-
1
Page 14

13
SIXTY 2
Discover...
Browsing principle
To browse through menus, use the browser keys and the keys and :
DETAILED BROWSER EXAMPLE: CHANGING THE RING TONE OF EXTERNAL CALLS
MENU > Audio
1 Press MENU .
2 Press the top () or the bottom () of the navigation key until
the menu
Audio is displayed.
3 Enter the Audio menu by pressing Select .
4 Select External ringtone using the or keys.
5 Press Select .
6 Scroll down the pre-recorded sounds and press Select .
7 Adjust the volume of the ring tone using the or keys and press Select .
The action is confirmed by the "O
K" indication.
Key Corresponds to... (throughout the manual)
: select the previous menu (or setting).
: select the next menu (or setting).
1 Press MENU .
The main menu is displayed on the screen.
2 Press the top () or the bottom () of the navigation key
to select the desired function.
3 Select your choice / Enter the menu by pressing the Select key.
4 Cancel your choice / Exit the displayed menu :
- either by pressing thee Back key : return to previous menu.
- or by pressing the key : the home screen is displayed.
Page 15

SIXTY 2
Discover...
14
Switch the handset off and then on
a
gain
1 To turn off the handset, hold down the red key.
The "P
ower off ?" message is displayed on the screen. Press Yes to confirm.
2 To turn on your handset, press the red key. The "SAGEMCOM" message is
displayed on the screen.
Settings to make before use
• When starting up the first time, the Language menu is displayed.
• Select the language to be used using the or keys and validate using the key.
• The Country menu is displayed.
• Select the country using the or keys and validate using the key.
• The date and time setting menu is displayed.
• Enter the right date and time and validate using the key.
The message "O
K" is displayed on the screen.
Power o ?
Yes
No
Long press
Short press
SAGEMCOM
2
1
Important After setting date and time, place the handset on the charger to
s
ynchronise the display.
Page 16

15
SIXTY 2
Discover...
Menu tree structure
Phonebook
Calls
List
Search
Add
Delete all
Speed dialing
All calls
Incoming calls
Outgoings calls
Missed calls
Events
Tree structure continued on next page
Options
Second call
Intercom
Calls
Phonebook
Select call line
Press R
During a call
Audio
External ringtone
Internal ringtone
Beeps
Silent
Ans. machine
On/Off
Incoming msg.
Outgoing msg.
Settings
Page 17

SIXTY 2
Discover...
16
Settings
Set handset
Registration
Person.registration
Base priority
Voicebox number
Handset version
Reset handset
Change code
Reset base
Base version
Emission free mode
Country
Set base
Set line
Line name
Handsets’ list
Associated handset
Configuration
Select call line
Advanced settings
Settings
Date/Time
Auto hang/pick up
Language
Display
Dial mode
Flash time
Set charger
Display color
Settings
Page 18

SIXTY 2
Call...
17
Managing your calls
Call...
Making a call
METHOD 1 (PRE-DIALING)
1 Pick up the handset.
2
Dial your contact’s number.
3
Press the green key.
Phone number
1234567890
1234567890
00:35
Mute Options
Store
Cancel
1
2 3
Page 19

SIXTY 2
Call...
18
METHOD 2 (POST-DIALING)
1 Pick up the handset.
2
Press the green key.
3
Dial your contact’s number.
Phone number
1234567890
Mute Options
1
3
2
Phone number
Mute Options
Page 20

SIXTY 2
Call...
19
Ending a call
1 At the end of the call, press the red key.
2
Put the handset back on its charger.
End of call
2
1
Receiving a call
IF THE «AUTO PICKUP» IS ACTIVATED
Pick up the handset.
Allo
Page 21

SIXTY 2
Call...
20
IF THE «AUTO PICKUP» IS DEACTIVATED
1 Pick up the handset.
2
Press the green key.
Allo
1234567890
00:35
Mute Options
1 2
Choose your line
This menu allows you to select the line on which you want to make a second
outgoing call (subject to availability of service).
1
During a call, press Options.
2
Select Select call line and press Select.
3
Select your line using the keys or .
4
Press Select. The action is confirmed by the "OK" indication.
Page 22

SIXTY 2
Call...
21
Managing several calls
Your phone allows you to manage several calls (subject to availability of service) when
you are already in a call.
Receiving a second call
During a call, a beep indicates the arrival of a second call.
The contact details of the second caller are displayed on the screen.
C
ase 1 : Answer the new call and put the current call on hold.
• Press the green key.
The first caller is put on hold and you can speak with the new caller.
C
ase 2 : Answer the new call and end the current call.
• Press Replace.
The call with your first caller is ended. You can speak with the new caller.
Note To reject a second call, press Release all.
Switching from one call to the other
During a conversation press Switch. The current call is put on hold in order to take
the call that was previously on hold.
Page 23

SIXTY 2
Call...
22
Ending one of the calls in progress
During a conversation :
• Press Options.
• Choose the option End active call using the or keys.
• Press Select.
The current call is ended and you resume the previous call.
- OR -
• Press the red key to end the current call.
Options > End active call
Note During the call you can hang up both calls by pressing the red
key for a long time.
Talking with two contacts at the same time
(
3-way conference)
During a double call :
• Press Options.
• Choose the option 3-part conference using the or keys.
• Press Select.
• You can then talk with the 2 contacts at the same time and " 3-part conference"
is displayed on the screen.
• To end the conference call, press the key.
Options > 3-part conference
Page 24

SIXTY 2
Call...
23
B
A
C
C
OptionsSwitch
num 2
01:30
name 1
Making a second call
During a conversation :
• Press Options.
• Choose the option Second call using the or keys.
• Dial the number using the keypad and press Call..
- OR -
• Select the number for the person you want to call in the phonebook by
pressing , and then press .
The second called number appears on the screen.
A
: the number and/or name of the current call.
B
: the number and/or the name of the waiting
call.
C
: the call time.
Options > Second call
B
A
C
C
OptionsSwitch
num 2
01:30
name 1
Page 25

SIXTY 2
Call...
24
Transferring calls
During a call, you can transfer it to another handset. This function can be used as
long as two handsets have been registered to the same base.
UNANNOUNCED TRANSFER
This function allows you to transfer the current call directly to another device.
Options > Intercom
Steps Calling handset Called handset
1 Press Options.
2 Choose the option Intercom.
3 Press Select.
4 Select the handset (or all handsets)
to call.
5 Press Call.
6 Rings: internal call.
7 Press Trans..
8
Hangs up automatically.
Rings: external call.
Take the call.
Note At the 5th step you can cancel the transfer of the call.
To do this, select C
ancel and then validate.
Page 26

SIXTY 2
Call...
25
ANNOUNCED TRANSFER
This function allows you to transfer the current call to another device once it has
been picked up.
Steps Calling handset
Called handset
1 Press Options.
2 Choose the option Intercom.
3 Press Select.
4 Select the handset (or all handsets)
to call.
5 Press Call.
6
Rings : internal call.
7
Press the key to accept the
internal call.
8 The external call is put on hold.
9 Press Trans..
10 Hangs up automatically.
The external call is transferred.
Communicating with the
external caller.
Dual incoming call management can also be done via the option Press R :
• Accepting a second incoming call (unknown call) : Press R.
• Making a second call during communication : Press R + recipient number.
• Switching from one call to the other : Press R + .
• Ending a call and switching to the call on hold : Press R + .
• Setting up a 3 way-call : Press R + .
Options > Press R
Page 27

SIXTY 2
Call...
26
Options during a call
You can use the following options during a call :
Activate/Deactivate loudspeaker
(
hands-free mode)
During the call you can activate the hands-free mode by pressing the key.
The icon is displayed on the screen.
To deactivate the hands-free mode, press the key again.
The icon disappears.
1234567890
00:35
Mute options
Note When your battery charging icon displays the minimum, the
hands-free mode is unavailable until the next charging cycle. The
hands-free mode is optimized for speaking at 50 cm from the
handset.
Page 28

SIXTY 2
Call...
27
Adjusting volume
During a call you can increase or decrease the volume of the handset by pressing
the or keys on the browser.
A bar graph makes it possible to adjust the volume according to 5 levels.
Volume
Page 29

SIXTY 2
Call...
28
Activating the mute mode
During a call, you can switch to mute mode and your handset's microphone will be
muted and your contact will no longer hear you.
TO ACTIVATE THE MUTE MODE :
• During a conversation, press Mute.
The icon is displayed at the top of the screen.
TO DEACTIVATE THE MUTE MODE :
• Press Unmute.
Your contact will hear you again.
KEYBOARD SHORTCUT:
During a conversation, press and hold the key to activate/deactivate the mute
mode.
1234567890
00:35
Unmute Options
1234567890
00:35
Mute Options
Page 30

SIXTY 2
Call...
29
Using additional handsets
You can associate additional handsets with your phone. You can then make and receive
outside calls or calls between these handsets.
Note You first have to pair the handsets with the base.
For further details, refer to the section “A
ssociating a new handset”,
page 51.
Calling another handset (intercom)
1 Press INTERN.
2
Select the handset (or all handsets) you want to call using the or keys.
3
Press Call. The selected handset rings.
DECTX
HH: MM
DECTX
Call Back
1 2
jj/mm/aaaa
MENU
INTERN
Handsets’ list
All handsets
DECTX
Call Back
3
Handsets’ list
All handsets
Page 31

SIXTY 2
Call...
30
Intrusion
This function allows another paired handset to join a call in progress on another
handset.
• You have a call in progress.
• Press and hold the green key from another paired handset.
The handset displays "L
ocal conference" and there is an externally initiated 3
way conference set-up.
Note To activate/deactivate the intrusion, refer to section “Allow
t
hree-way communication (Intrusion)”, page 62.
Page 32

SIXTY 2
Tracking your calls...
31
Call logs
Logs are lists of numbers or events received or sent by your phone. Depending on your
phone provider and the options of your contract, the following information may be
accessed in the call logs:
• the date and time of the call.
• the contact's name and/or number.
Tracking your calls...
Note The numbers stored in the call log are prefixed by a symbol :
: List of incoming calls,
: List of outgoing calls,
: List of missed calls.
Displaying the list of all calls
• Press Select.
• Select All calls, then press Select.
• The last call is displayed with its date and time, its status (incoming, outgoing,
missed), name and/or number.
• Scroll through the numbers stored in the list using the or keys.
• Select the call you wish to view and press Details.
• The following information is displayed :
- the call status (incoming/outgoing/missed),
- the contact's name,
- the contact's number,
- the call date,
- the call time.
• Press Back to return to the previous menu.
Menu > Calls
Page 33

SIXTY 2
Tracking your calls...
32
Viewing the received or dialed call log
• Press Select.
• Select Incoming calls, (or Outgoings calls) then press Select.
• The last received call (or dialed number) is then displayed first.
• The other calls are displayed using the keys or .
• Select the call you wish to view and press Details.
• The following information is displayed :
- the call status (incoming/outgoing/missed),
- the contact's name,
- the contact's number,
- the call date,
- the call time.
Menu > Calls
Note Unknown calls are included in the received call log.
Page 34
SIXTY 2
Tracking your calls...
33
Consulting the missed call log
The icon is displayed if there are one or more new missed calls which have not
been reviewed yet.
• Press Select.
• Select Missed calls, then press Select.
• The latest missed call is displayed.
• Scroll through the numbers stored in the list using the or keys.
• Select the call you wish to view and press on Details.
• The following information is displayed :
- the call status (received/sent/missed),
- the contact's name,
- the contact's number,
- the call date,
- the call time.
• Press Back to return to the previous menu.
Menu > Calls
Note Once the missed call log has been viewed, the icon disappears
from all handsets.
Page 35

SIXTY 2
Tracking your calls...
34
The events log
Note The icon is displayed if there is one or more voice mail messages.
Checking new events
A summary screen for the number of events that occurred in your absence is
displayed :
• Press Select.
• Select Events then press Select.
• Select Missed or Voicemail using the keys or and press Details. The event
appears on the screen.
Menu > Calls
Dismiss
DECT X
Voicemail
Missed calls : XX
Select
HH:MM
jj/mm/aaaa
- the operator messages,
- the number of missed calls.
Page 36

SIXTY 2
Tracking your calls...
35
Managing incoming or outgoing calls
• Press Select.
• Select All calls or Outgoings calls or Incoming calls or Missed calls then
press S
elect.
• The list of calls (incoming/outgoing/missed) is displayed.
• Select the desired call and press Details.
• Press Options for the actions you can perform :
- Call : call the displayed number,
- Delete : delete the stored number,
- Store : save the number in your phonebook,
- Delete all : delete all the numbers in the list.
Menu > Calls
Page 37

SIXTY 2
Manage your contacts...
36
Use the phonebook
Manage your contacts...
You can save up to 250 entries (24 digits and 16 characters) in the phonebook.
You can also directly access the list of phonebook entries using the key.
When browsing through the phonebook, the handset displays in the right top
corner the number of the current entry and the total number of available entries.
Create an entry
• Press Select.
• Select Add and press Select.
• Specify the required information by confirming at each step. To move between
the input fields, use and keys.
• Last name : enter your contact's name,
• First name : enter your contact's first name,
• Number : enter the phone number(s) in the corresponding box (Home, Mobile
and Work).
• Select from one of the 6 available ring tones using the or keys to uniquely
identify this contact.
• After making the settings, select Save changes ? using the or keys and
press S
tore.
Menu > Phonebook
Note To enter a letter, press and hold the required key until the letter is
displayed on the screen or press the related key quickly unitl the
character required is shown.
Page 38

SIXTY 2
Manage your contacts...
37
Call a contact from the phonebook
• Press Select.
• Select List or Search and press Select.
• Select an entry and press Options.
• Select Call and press Select.
Menu > Phonebook
Changing an entry
• Press Select.
• Select List or Search and press Select.
• Select an entry and press Options.
• Select Edit and press Select.
• Change the last name, first name and/or phone number by deleting characters
using the key and/or the ring tone.
• After making the settings, select Save changes ? using the or keys and
press S
tore.
Menu > Phonebook
Deleting an entry
• Press Select.
• Select List or Search and press Select.
• Select an entry and press Options.
• Select Delete and press Select.
• For the question Delete ?, press Yes to confirm the deletion of the entry.
Menu > Phonebook
Page 39

SIXTY 2
Manage your contacts...
38
Search for an entry
• Press Select.
• Select Search and press Select.
• To look up a Last name, enter the first letter of the name, the entire name, or part
of the name and press S
elect.
• Once the list is displayed, you can also directly enter the first few letters of the
name sought.
Menu > Phonebook
Delete all the entries
• Press Select.
• Select Delete all and press Select.
• For the question Delete all ?, press Yes to confirm the deletion of all entries.
Menu > Phonebook
Page 40

SIXTY 2
Manage your contacts...
39
Speed dialing
This function allows you to assign a keyboard shortcut to a contact in your
phonebook.
• Press Select.
• Select Speed dialing and press Select.
• Using the keys or , select the number of the key to which you want to link
your contact contact (0 ~ 9).
• Press Edit.
• Select Edit and press Select.
• Press Phonebook, select the contact you want to assign a keypad shortcut.
Press S
elect.
• You can also directly enter the number of your choice.
• Once the number is entered, press Select.
To exit the menu, press B
ack 3 times in succession.
Menu > Phonebook
Note To call your contact, press and hold the key assigned to the
number and the number is automatically dialed.
Page 41

SIXTY 2
Answering machine...
40
Answering machine...
Note When your answering machine’s memory is full, the answering machine
turns off. You have to read your messages and delete some to free up
memory space.
The recording capacity of your handset is 40 minutes. The maximum
duration of each message is 2 minutes.
Activating/Deactivating the answering
m
achine
When the answering machine is activated, the icon is displayed.
• Press Select.
• Select On/Off using the or keys and press Select.
• Select "On" or "Off" using the or keys to activate or deactivate your
answering machine then press S
elect.
The action is confirmed by the "O
K" indication.
Menu > Ans. machine
Page 42
SIXTY 2
Answering machine...
41
Answering machine announcements
Note If you have not saved a personal announcement, the answering
machine will automatically use the pre-recorded announcement in the
specific language of your country.
Choosing your default announcement
• Press Select.
• Select Outgoing msg. using the or keys and press Select.
• Select the language to be used with the keys or keys and press Select.
• Select Select using the or keys and press Select.
The action is confirmed by the "O
K" indication.
Menu > Ans. machine
Recording your personal announcement
• Press Select.
• Select Outgoing msg. using the or keys and press Select.
• Select Personal using the or keys and press Select.
• Select Record using the or keys and press Select.
• Clearly state your announcement.
• Press Stop, to stop the recording of the announcement.
• The message Save changes ? is displayed,press Yes key.
The recorded announcement is played.
If you make a mistake while recording the message, repeat the operations
described above until you are satisfied with your message.
Menu > Ans. machine
Note The recording of a new message will automatically replace the
previous message.
Page 43

SIXTY 2
Answering machine...
42
Listening to your personal announcement
• Press Select.
• Select Outgoing msg. using the or keys and press Select.
• Select Personal using the or keys and press Select.
• Select Play using the or keys and press Select.
The currently used announcement is played.
When the personal announcement has finished, your answering machine returns
to the previous menu
.
Menu > Ans. machine
Note You can also listen to the default announcement in the desired
language from those available.
Erasing your personal announcement
• Press Select.
• Select Outgoing msg. using the or keys and press Select.
• Select Personal using the or keys and press Select.
• Select Delete using the or keys and press Select.
The action is confirmed by the "O
K" indication.
Menu > Ans. machine
Note If you have erased your personal message, the answering
machine will use the pre-recorded message.
Page 44
SIXTY 2
Answering machine...
43
A
New
611050661 - James
01/01 - 02:40
1 : Next
2 : Previous
3 : Delete
4 : Pause/Play
Back
B
C
Messages
Listening to your messages
If you have received new messages, the icon lights up in green and the
message "
New messages : X" scrolls on the screen.
X : the number of messages on the answering machine
• Press Select.
• Select Incoming msg. using the or keys and press Select.
• Select New using the or keys and press Select.
A
: your correspondent ’s name or number.
B
: date time of recording of the message.
C
: control keys while reading messages.
The messages are read in chronological order (from oldest to newest).
At the end of the last message, the answering machine will stop automatically.
Menu > Ans. machine
A
New
611050661 - James
01/01 - 02:40
1 : Next
2 : Previous
3 : Delete
4 : Pause/Play
Back
B
C
Note You can also listen to your old messages by selecting "Old"
instead of "
New".
Page 45

SIXTY 2
Answering machine...
44
Managing your messages
When playing back messages, press the following buttons :
Key Action
Go on to the next message.
Return to the previous message.
Delete the message being read.
- Stop playback of the messages.
- Replay the current message.
Deleting all old messages
• Press Select.
• Select Incoming msg. using the or keys and press Select.
• Select Delete old using the or keys and press Select.
• The message "Delete ?" is displayed, press Yes to confirm the deletion of all
old messages.
Menu > Ans. machine
Page 46

SIXTY 2
Answering machine...
45
Querying your answering machine remotely
This function allows you to check your voice messages and change your answering
machine settings even when you are not at home.
To remotely access your answering machine :
• Dial your phone number.
• Wait for the answering machine to come on.
• While listening to your announcement press the key and enter your remote
access code.
• A beep will indicate access to the answering machine, any unread messages will
be automatically played back.
• At the end of playback, a new beep will sound to let you know that the answer
machine is ready.
You can perform the following operations :
Key Action
5
Play messages / Stop playing messages
3 Delete the message being played
0 Pause/Continue playing back
*
Return to the start of the message (1 press)
Return to the previous message (2 presses)
#
Go on to the next message
9 Activate / Deactivate the answering machine
Note By default, the remote enquiry code is 0000. This code must be
modified so that remote access is activated.
To modify the
remote enquiry code refer to paragraph “M
odify the remote
e
nquiry code”, page 66.
Page 47

SIXTY 2
Audio adjustment...
46
Audio adjustment...
Changing the ringtone
You can change the ring of :
• outside calls,
• calls between handsets (intercom).
• Press Select.
• Select External ringtone to change the ringing tone for external calls.
- OR -
• Select Internal ringtone to change the ringing tone for internal calls.
• Scroll through the pre-recorded ringing tones and press Select.
• Adjust the ringtone volume using the or keys and press Select.
Menu > Audio
Activating/Deactivating the silent mode
In silent mode, the telephone ringer and keypad beeps are muted.
• Press Select.
• Select Silent to change the silent mode, then press Select.
• The message " Disable silent mode ? " or "Activate silent mode ? " is displayed
on the screen.
- Press Yes to confirm the question.
- Press No to reject the question.
Menu > Audio
Note The key can also be used to activate/deactivate the silent mode.
If the silent mode is active the icon is displayed.
Page 48

SIXTY 2
Audio adjustment...
47
Activating/Deactivating audio alerts
Audio alerts refer to :
• pressing the keypad keys,
• putting the handset on the charger,
• low battery alert,
• others (error alerts).
• Press Select.
• Select Beeps to change the audio alerts, then press Select.
• Select Keypad and press the On/Off key to activate or deactivate the keypad
beeps.
- OR -
• Select Charger and press the On/Off key to activate or deactivate the beep when
the handset is placed on the charger.
- OR -
• Select Battery low and press the On/Off key to activate or deactivate the low
battery warning.
- OR -
• Select Others and press the On/Off key to activate or deactivate the error alerts.
• After making the settings, select Save changes ? using the or keys then
press S
tore.
The action is confirmed by the "O
K" indication.
Menu > Audio
Note The activated function is marked by the symbol .
Page 49

SIXTY 2
Setting up...
48
The phone
Setting up...
Setting the date and the time
• Press Select.
• Select Settings using the or keys and press Select.
• Select Date/Time using the or keys and press Select.
• The date and time setting screen is displayed, press Edit.
• Set the clock mode (automatic or manual) with On/Off key.
• Press the key and then enter the date in MM/DD/YY format.
• Press the key and then enter the time in HH:MM format.
• Confirm your entry by pressing Select.
• The message "Save changes ? " is displayed.
• Confirm by pressing key.
The action is confirmed by the "O
K" indication.
Menu > Settings
Note If the Auto is activated (checked), it is not possible to change the
date and time displayed on the handset.
Page 50

SIXTY 2
Setting up...
49
Picking up and hanging up calls automatically
• Press Select.
• Select Settings using the or keys and press Select.
• Select Auto hang/pick up using the or keys and press Select.
• Select Auto hangup or Auto pickup using the or keys.
• Set the status (activated or deactivated) with the On/Off key.
• Select "Save changes ? " using the or keys and press Store.
The action is confirmed by the "O
K" indication.
Menu > Settings
Changing the display language
• Press Select.
• Select Settings using the or keys and press Select.
• Select Language using the or keys and press Select.
• Select the language to be used with the keys or and press Select.
• The action is confirmed by the "OK" indication if the choice of language is
English.
Menu > Settings
Page 51

SIXTY 2
Setting up...
50
Adjust the brightness
• Press Select.
• Select Settings using the or keys and press Select.
• Select Display using the or keys and press Select.
• Select Brightness using the or keys and press Select.
• A bar graph is used to adjust the brightness according to 8 levels.
• Select the level you want using the keys or .
The brightness is directly visible on the screen.
• Press Select. The action is confirmed by the "OK" indication.
Menu > Settings
Change the screen background
This menu allows you to change your handset’s screen background image.
• Press Select .
• Select Settings using the or keys and press Select.
• Select Display using the or keys and press Select.
• Select Wallpaper using the or keys and press Select.
• Select a background screen from the ones offered using the keys or .
The image is displayed on the screen.
• Press Select to display the image as background.
The action is confirmed by the "O
K" indication.
Menu > Settings
Page 52

SIXTY 2
Setting up...
51
The handset
Associating a new handset
You can associate other handsets with your base telephone. You then have to pair
them so they are recognised.
FROM THE BASE :
To put your base in pairing mode :
• Press the button on the rear face of the base, until the light starts blinking.
• The base remains in pairing mode for one minute.
FROM THE HANDSET :
Case 1 : the handset displays "Please register".
• Press key.
• The handset displays : "Put the base in registration & press OK".
• Press OK.
• The message "Search" is displayed.
• Once the base is detected, its name is displayed on the handset screen.
• Press Yes to confirm.
• The message "Registration in progress" is displayed.
• The message "Registered" is displayed.
You then automatically exit the pairing mode.
Page 53

SIXTY 2
Setting up...
52
Case 2 :
• Press Select.
• Select Advanced settings using the or keys and press Select.
• Select Set handset using the or keys and press Select.
• Select Registration then press Select.
• The handset displays : "Put the base in registration & press OK".
• Place your base in pairing mode (see previous paragraph).
• On the handset, press OK.
• The message "Search" is displayed.
• Once the base is detected, its name is displayed on the handset screen.
• Press Yes to confirm.
• The message "Registration in progress" is displayed.
• The message "Registered" is displayed.
You then automatically exit the pairing mode.
Menu > Settings
Note The standard pairing of a new handset is automatic if the default
pin number (0000) has not been changed. Otherwise a message
E
nter code prompts you to enter the new PIN number.
If an error occurs, the message R
egistration failed is displayed
prompting you to repeat the whole procedure.
Page 54

SIXTY 2
Setting up...
53
Customizing the handset’s registration
You can personalise the following information :
• the name of your base,
• the registration number of your handset.
FROM THE HANDSET :
1 Press Select.
2 Select Advanced settings using the or keys and press Select.
3 Select Set handset using the or keys and press Select.
4 Select Person.registration then press Select.
5 Select the base number and confirm.
6 Enter the new base name and confirm.
7 Enter the base code.
FROM THE BASE :
8 Press the pairing button for a few seconds.
On the base: the light blinks and the base is in paired mode.
Once the handset is registered, you automatically quit pairing mode.
Menu > Settings
Defining the main base for your handset
This function allows you to specify the priority base to be used for making calls.
• Press Select.
• Select Advanced settings using the or keys and press Select.
• Select Set handset using the or keys and press Select.
• Select Base priority using the or keys and press Select.
• Select the base that the handset should use first and press Select.
The action is confirmed by the "O
K" indication.
Menu > Settings
Note Only if you have paired the same handset on several bases.
Page 55

SIXTY 2
Setting up...
54
Modifying the Voice box number
If you have subscribed to your operator's voice mail service, calls received while
you are absent will be redirected to the voice mail on your telephone line.
• Press Select.
• Select Advanced settings using the or keys and press Select.
• Select Set handset using the or keys and press Select.
• Select Voicebox number using the or keys and press Select.
• Select Edit using the or keys and press Select.
• Deleting the Voice box number.
The action is confirmed by the "O
K" indication.
Menu > Settings
Note If you do not know the number of your voice mail, ask your operator
for it.
Deleting the Voice box number
• Press Select.
• Select Advanced settings using the or keys and press Select.
• Select Set handset using the or keys and press Select.
• Select Voicebox number using the or keys and press Select.
• Select Delete using the or keys and press Select.
• The message "Delete ?" is displayed.
• Press Yes to confirm.
The action is confirmed by the "O
K" indication.
Menu > Settings
Page 56

SIXTY 2
Setting up...
55
Handset version
• Press Select.
• Select Advanced settings using the or keys and press Select.
• Select Set handset using the or keys and press Select.
• Select Handset version using the or keys and press Select.
The software and EEPROM version of the
SIXTY 2 handset is displayed on the
screen.
Menu > Settings
Resetting the handset
When you reset your handset, all the settings are returned to their initial values
(factory settings), except for the phonebook.
• Press Select.
• Select Advanced settings using the or keys and press Select.
• Select Set handset using the or keys and press Select.
• Select Reset handset using the or keys and press Select.
• On a confirmation request "Reset handset ?", press Yes.
Menu > Settings
Page 57

SIXTY 2
Setting up...
56
The base
Changing the base code
Your base station code (default setting 0000) is required to access certain security
functions.This must contain 4 digits.
• Press Select.
• Select Advanced settings using the or keys and press Select.
• Select Set base using the or keys and press Select.
• Select Change code using the or keys and press Select.
• At the "Old code" prompt, enter the old 4-digit code and then confirm by
pressing S
elect.
• At the "New code" prompt, enter the new 4-digit code and then confirm by
pressing S
elect.
• At the "Confirm code" prompt, enter the new code again and then confirm by
pressing S
elect.
The action is confirmed by the "O
K" indication.
Menu > Settings
Resetting the base
When you reset your base, all the settings are returned to their initial values (factory
settings), except for the phonebook.
• Press Select.
• Select Advanced settings using the or keys and press Select.
• Select Set base using the or keys and press Select.
• Select Reset base using the or keys and press Select.
• On a confirmation request "Reset base?", press Yes.
The action is confirmed by the "O
K" indication.
Menu > Settings
Page 58

SIXTY 2
Setting up...
57
Base version
• Press Select.
• Select Advanced settings using the or keys and press Select.
• Select Set base using the or keys and press Select.
• Select Base version using the or keys and press Select.
• The following information is displayed :
- base software version,
- EEPROM version,
- base hardware version.
Menu > Settings
Activating emission free mode
There is a Emission free mode on your handset. It controls the radio transmission
power needed according to how far away your base is.
If emission free mode is activated it means that neither base nor handset do emit
any signal until it is resumed by any action from the line or handset.
• Press Select.
• Select Advanced settings using the or keys and press Select.
• Select Set base using the or keys and press Select.
• Select Emission free mode using the or keys and press Select.
• Set the status (activated or deactivated) with the On/Off key.
• Select Save changes ? using the or keys and press Store.
The action is confirmed by the "O
K" indication.
Menu > Settings
Page 59

SIXTY 2
Setting up...
58
Modifying the country
Country choice allows specific settings for different countries to be modified but
does not change the language in the
Settings.
• Press Select.
• Select Advanced settings using the or keys and press Select.
• Select Set base using the or keys and press Select.
• Select Country using the or keys and press Select.
• A list of countries is available. Select the country in which you are using your
phone and press S
elect.
The action is confirmed by the "O
K" indication.
Menu > Settings
Page 60

SIXTY 2
Setting up...
59
The charger
Note The updated settings of the charger from the menu Set charger
becomes effective as soon as the handset is put back to the charger.
Modifying the display colour
With this menu you can change the display colour of your charger.
• Press Select.
• Select Advanced settings using the or keys and press Select.
• Select Set charger using the or keys and press Select.
• Select Display color using the or keys and press Select.
• A list of colours is available. Select the desired colour then press Select.
The action is confirmed by the "O
K" indication.
Menu > Settings
Activating time display
With this menu you can activate the time display on your charger display screen.
• Press Select.
• Select Advanced settings using the or keys and press Select.
• Select Set charger using the or keys and press Select.
• Select Settings using the or keys and press Select.
• Set the status (activated or deactivated) with the On/Off key.
• Select Save changes ? using the or keys and press Store.
The action is confirmed by the "O
K" indication.
Menu > Settings
Page 61

SIXTY 2
Setting up...
60
The line
This menu allows you to change the settings of the lines on the base.
Important We do not recommend that you change line settings without first
c
ontacting your operator, as this may result in your phone line being
d
isconnected.
Change the line name
• Press Select.
• Select Advanced settings using the or keys and press Select.
• Select Set line using the or keys and press Select.
• Select Line name using the or keys and press Select.
• Press Editto change the line name using the alphanumeric keys.
• Enter your line name by successively pressing the corresponding keys,
press S
elect.
The action is confirmed by the "O
K" indication.
Menu > Settings
Page 62

SIXTY 2
Setting up...
61
Pair the handset with a line
This menu allows you to display the list of handsets paired with the line used.
• Press Select.
• Select Advanced settings using the or keys and press Select.
• Select Set line using the or keys and press Select.
• Select Associated handset using the or keys and press Select.
• Enter the base code and press Select.
• The list of paired handsets is displayed on the screen.
• Select the desired handset using the or keys.
• Press On/Off key to pair/unpair the handset with/from the line used (the paired
handset is then unpaired and vice versa).
• Select Save changes ? using the or keys and press Store.
The action is confirmed by the "O
K" indication.
Menu > Settings
Note The activated function is marked by the symbol .
Mask the line number
This function when activated, hides your line number.
• Press Select.
• Select Advanced settings using the or keys and press Select.
• Select Set line using the or keys and press Select.
• Select Configuration using the or keys and press Select.
• Select Hide number using the or keys.
• Change the status using the key On/Off and press OK.
• Select Save changes ? using the or keys and press Store.
The action is confirmed by the "O
K" indication.
Menu > Settings
Note The activated function is marked by the symbol .
Page 63

SIXTY 2
Setting up...
62
Allow three-way communication (Intrusion)
This intrusion function allows or prohibits a second handset registered on the same
base to share an ongoing conversation. If the intrusion mode is activated, you will
then be able to share a call in process with another handset.
• Press Select.
• Select Advanced settings using the or keys and press Select.
• Select Set line using the or keys and press Select.
• Select Configuration using the or keys and press Select.
• Select Intrusion using the or keys.
• Change the status using the key On/Off and press Select.
• Select Save changes ? using the or keys and press Store.
The action is confirmed by the "O
K" indication.
Menu > Settings
Modifying the dialing mode
You can use the dialing system based on voice frequency or pulse.
• Press Select.
• Select Advanced settings using the or keys and press Select.
• Select Set line using the or keys and press Select.
• Select Dial mode using the or keys and press Select.
• Select Edit using the or keys and press Select.
• Select the desired type of dialing with the keys or and press Select.
The action is confirmed by the "O
K" indication.
Menu > Settings
Note To verify the type of dialing used, select View.
Page 64

SIXTY 2
Setting up...
63
Changing the flash duration
You can configure the flash duration if you use your phone abroad or on private
PABX network, you may need to modify the flash duration in order to use your
telephone correctly with regard to the following functionalities: outgoing 2nd call,
incoming 2nd call and 3 way conference.
Please contact your service provider to obtain the correct flash duration and then
modify it by doing the following.
• Press Select.
• Select Advanced settings using the or keys and press Select.
• Select Set line using the or keys and press Select.
• Select Flash time using the or keys and press Select.
• Select Edit using the or keys and press Select.
• Select the appropriate flash duration using the or key and press Select.
The action is confirmed by the "O
K" indication.
Menu > Settings
Flash duration
(
MS)
Country
100 Spain, United Kingdom, Italy, Switzerland, Austria,
Netherlands, Poland, Ireland, Hungary, Slovenia,
Romania, Slovakia, Czech Republic and Sweden
120 Belgium
250 Germany, France, Greece, Portugal, Croatia, Serbia,
Montenegro, Bosnia and Macedonia
600 Bulgaria
Note To verify the type of flash duration used, select View.
Page 65

SIXTY 2
Setting up...
64
Call management
This menu allows you to select the line on which you want to make your outgoing call.
Managing your calls
• Press Select.
• Select Advanced settings using the or keys and press Select.
• Select Select call line using the or keys and press Select.
• The list of lines available is displayed on the screen.
• Select your line using the keys or and press
Select.
The action is confirmed by the "O
K" indication.
Menu > Settings
Page 66

SIXTY 2
Setting up...
65
The list of handsets
This menu displays the list of handsets registered on the same base.
Manage handsets
• Press Select.
• Select Advanced settings using the or keys and press Select.
• Select Handsets’ list using the or keys and press Select.
• The list of handsets registered on the base is displayed on the screen.
• Select the desired handset using the keys or and press Options.
• You can perform the following actions :
Changing the handset name : " Edit "
Change the handset name using the alphanumeric keys. Press Clear to delete
unwanted characters. Press S
elect.
Call the handset : " Call "
Call the selected handset.
Remove the handset : " Delete "
Remove the handset's registration.
At the confirmation prompt "D
elete handset ?" press Yes.
The action is confirmed by the "O
K" indication.
Intercept the call : "Interception"
Authorise a DECT earpiece, previously registered with the base, to intercept a call.
The message "
Enter code " is displayed. Enter the base PIN code (0000 by default),
press S
elect.
Then select
On or Off and press Select.
The action is confirmed by the "O
K" indication.
Menu > Settings
Page 67

SIXTY 2
Setting up...
66
Answering machine setup
Modify the remote enquiry code
Your answering machine can be consulted remotely. With this function you can read
your messages and consult your answering machine from any other telephone
outside your home.
• Press Select.
• Select Settings using the or keys and press Select.
• Select Remote access using the or keys and press Select.
• Enter the base code (0000 by default) using the keys on the keypad. Press Select.
• Enter the new remote enquiry code, press Select.
• Enter the new remote enquiry code a second time, press Select to confirm.
The action is confirmed by the "O
K" indication.
Menu > Ans. machine
Note The default code is 0000. This code must be modified for remote
access to be activated.
Answering machine delay time
With this setting you set the time in seconds before your answering machine
operates.
You can increase the time before your answering machine operates to give yourself
more time to come to the phone.
• Press Select.
• Select Settings using the or keys and press Select.
• Select Time to pickup using the or keys and press Select.
• Enter the desired time in seconds. Press Select.
The action is confirmed by the "O
K" indication.
Menu > Ans. machine
Page 68

253616670A 10/2015
 Loading...