

Page 1
SAGEM AXIUM
TM
ECRAN PLAT DLP
TM
Manuel d’utilisation
SAGEM AXIUM
TM
ECRAN PLAT DLP
TM
Manuel d’utilisation
E
c
r
a
n
p
l
a
t
D
L
P
E
c
r
a
n
p
l
a
t
D
L
P
E
c
r
a
n
p
l
a
t
D
L
P
E
c
r
a
n
p
l
a
t
D
L
P
E
c
r
a
n
p
l
a
t
D
L
P
D
L
P
f
l
a
t
s
c
r
e
e
n
E
c
r
a
n
p
l
a
t
D
L
P
D
L
P
F
l
a
c
h
b
i
l
d
s
c
h
i
r
m
D
L
P
f
l
a
t
s
c
r
e
e
n
E
c
r
a
n
p
l
a
t
D
L
P
D
L
P
f
l
a
t
s
c
r
e
e
n
D
L
P
f
l
a
c
h
b
i
l
d
s
c
h
i
r
m
Français
English
Deutsch
Français
English
Deutsch
DLPTMFLAT SCREEN
User manual
DLPTMFLACHBILDSCHIRM
Bedienungsanleitung
DLPTMFLAT SCREEN
User manual
DLPTMFLACHBILDSCHIRM
Bedienungsanleitung
Téléchargé sur www.lampe-videoprojecteur.info
Page 2

Chères clientes et chers clients SAGEM,
Vous venez d'acheter un Ecran Plat DLP™ SAGEM AXIUM™ et nous vous en félicitons.
Ce produit a été fabriqué avec le plus grand soin et nous espérons qu'il vous procurera des années de grand spectacle et de
joie. Ce produit étant extrêmement complet, nous vous recommandons de vous reporter tout d'abord au chapitre 2 "Mise en
service" et au chapitre "première installation rapide" avant de prendre connaissance du mode d'emploi complet.
Nous vous conseillons de conserver soigneusement ce document à des fins de référence ultérieure.
Nous vous rappelons que cet appareil est agréé conformément aux normes européennes.
Si vous rencontrez un éventuel problème pour lequel le chapitre 10 de ce document ne peut vous apporter de solution,
veuillez alors vous adresser à votre revendeur ou votre distributeur.
Dear Sagem customers,
You have just bought a Flat Screen DLP™ SAGEM AXIUM™. Congratulations!
This product was manufactured with the greatest care and we hope that it will provide you joy and spectacular sensations for
many years. This product is extremely complete and we recommend that you first refer to Chapter 2 " SET UP" and Chapter 3
"First Rapid Installation" before reading the whole user manual.
We recommend you to keep this document in a safe place in order to be able to refer to it afterwards.
We remind you that this device complies with the European norms.
If you happen to have any potential problem for which Chapter 10 does not provide solution, please contact your retailer or
distributor.
Sehr geehrte SAGEM-Kundin, sehr geehrter SAGEM-Kunde,
Sie haben einen Flat Screen DLP™ SAGEM AXIUM™ erworben. Dazu möchten wir Ihnen herzlich gratulieren.
Dieses Produkt wurde mit grösster Sorgfalt hergestellt und wir hoffen es wird Ihnen jahrelange Freude bereiten.
Dieses Gerät verfügt über eine aussergewöhnlich Ausstattung. Wir empfehlen Ihnen deshalb sich zuerst den Kapiteln 2
"INBETRIEBNAHME" und 3 "ERSTE SCHNELL-INSTALLATION" zu widmen, bevor Sie das gesamte Bedienungshandbuch
zur Kenntnis nehmen.
Wir empfehlen Ihnen ausserdem dieses Handbuch aus Referenzgründen sorgfältig aufzubewahren.
Wir weisen Sie darufhin das dieses Gerät den Europäischen Normen entspricht.
Sollten Sie auf ein Problem stossen auf das Ihnen das Kapitel 10 dieses Handbuches keine Lösung bietet, wenden Sie sich
bitte an Ihren Fachhändler.
© 2003 SAGEM SA Tous droits réservés.
Ce document est la propriété de SAGEM SA.
Toute reproduction sans la permission écrite de SAGEM SA est strictement interdite.
Les informations contenues dans ce document peuvent être modifiées sans avertissement préalable.
Les marques citées dans ce livret d'utilisation : le logo SAGEM et SAGEM sont des marques déposées de SAGEM SA ; l'appellation DLP™
(Digital Light Processing) et Texas Instruments sont des marques déposées de Texas Instruments Corporation : l'appellation DCDi™ et
Faroudja sont des marques déposées de Faroudja.
D'autres marques et appellations commerciales peuvent être citées dans ce document.
SAGEM SA dément tout intérêt de propriété dans les marques et appellations commerciales autres que les siennes propres.
© The SAGEM brand is a SAGEM SA brand.
DLP™ is a registered trademark of Texas Instrument.
Documentations can be subject to amendment.
© SAGEM ist ein eingetragens Warenzichen der SAGEM SA.
DLP™ ist ein eingetragens Warenzeichen der Texas Instruments
Änderungen des Benutzerhandbuches vorbehalten.
Page 3

SOMMAIRE
1. PRÉCAUTIONS . . . . . . . . . . . . . . . . . . . . . . . . . . . . . . . . . . . . . . . . . . . . . . . . . . . . . . . . . .2
1.1. Sécurité . . . . . . . . . . . . . . . . . . . . . . . . . . . . . . . . . . . . . . . . . . . . . . . . . . . . . . . . . . . . . . . .2
1.2. Entretien . . . . . . . . . . . . . . . . . . . . . . . . . . . . . . . . . . . . . . . . . . . . . . . . . . . . . . . . . . . . . . .3
2. MISE EN SERVICE . . . . . . . . . . . . . . . . . . . . . . . . . . . . . . . . . . . . . . . . . . . . . . . . . . . . . . . .4
2.1. Raccordement antenne . . . . . . . . . . . . . . . . . . . . . . . . . . . . . . . . . . . . . . . . . . . . . . . . . . . .4
2.2. Raccordement secteur . . . . . . . . . . . . . . . . . . . . . . . . . . . . . . . . . . . . . . . . . . . . . . . . . . . . .4
2.3. Mise en marche . . . . . . . . . . . . . . . . . . . . . . . . . . . . . . . . . . . . . . . . . . . . . . . . . . . . . . . . . .4
2.4. Arrêt de l'Ecran Plat DLP™ . . . . . . . . . . . . . . . . . . . . . . . . . . . . . . . . . . . . . . . . . . . . . . . . .5
3. PREMIÈRE INSTALLATION RAPIDE . . . . . . . . . . . . . . . . . . . . . . . . . . . . . . . . . . . . . . . . . . . . .5
4. FONCTIONS DE FAÇADE . . . . . . . . . . . . . . . . . . . . . . . . . . . . . . . . . . . . . . . . . . . . . . . . . . . .6
4.1. Commandes de façade . . . . . . . . . . . . . . . . . . . . . . . . . . . . . . . . . . . . . . . . . . . . . . . . . . . .6
4.2. Indicateurs lumineux en façade et récepteur télécommande . . . . . . . . . . . . . . . . . . . . . . . . .6
5. TÉLÉCOMMANDE . . . . . . . . . . . . . . . . . . . . . . . . . . . . . . . . . . . . . . . . . . . . . . . . . . . . . . . .7
6. RÉGLAGES PERSONNALISÉS . . . . . . . . . . . . . . . . . . . . . . . . . . . . . . . . . . . . . . . . . . . . . . . . .8
6.1. Changement de code de protection . . . . . . . . . . . . . . . . . . . . . . . . . . . . . . . . . . . . . . . . . . .8
6.2. Retour à la configuration initiale . . . . . . . . . . . . . . . . . . . . . . . . . . . . . . . . . . . . . . . . . . . . . .8
6.3. Recherche des programmes hertziens . . . . . . . . . . . . . . . . . . . . . . . . . . . . . . . . . . . . . . . . .8
6.3.1. Choix de la norme de votre pays . . . . . . . . . . . . . . . . . . . . . . . . . . . . . . . . . . . . . . . . . . . . . . . . .9
6.3.2. Installation manuelle . . . . . . . . . . . . . . . . . . . . . . . . . . . . . . . . . . . . . . . . . . . . . . . . . . . . . . . . . . .9
6.3.3. Installation automatique . . . . . . . . . . . . . . . . . . . . . . . . . . . . . . . . . . . . . . . . . . . . . . . . . . . . . . . .10
6.3.4. Modification de la liste des programmes . . . . . . . . . . . . . . . . . . . . . . . . . . . . . . . . . . . . . . . . . . .10
6.4. Choix de la langue MENU . . . . . . . . . . . . . . . . . . . . . . . . . . . . . . . . . . . . . . . . . . . . . . . . .11
6.5. Réglages mode double image . . . . . . . . . . . . . . . . . . . . . . . . . . . . . . . . . . . . . . . . . . . . . .11
6.6 Réglage du mode de sortie de veille . . . . . . . . . . . . . . . . . . . . . . . . . . . . . . . . . . . . . . . . .11
7. RACCORDEMENTS DES ÉQUIPEMENTS ET CONFIGURATIONS . . . . . . . . . . . . . . . . . . . . . . . . . . .12
7.1. Conseils de raccordements . . . . . . . . . . . . . . . . . . . . . . . . . . . . . . . . . . . . . . . . . . . . . . . .12
7.2. Configurations des sources . . . . . . . . . . . . . . . . . . . . . . . . . . . . . . . . . . . . . . . . . . . . . . . .13
7.3. Configurations des sources informatiques . . . . . . . . . . . . . . . . . . . . . . . . . . . . . . . . . . . . .14
8. UTILISATION QUOTIDIENNE . . . . . . . . . . . . . . . . . . . . . . . . . . . . . . . . . . . . . . . . . . . . . . . . .15
8.1. Réglage image . . . . . . . . . . . . . . . . . . . . . . . . . . . . . . . . . . . . . . . . . . . . . . . . . . . . . . . . .15
8.2. Réglage son . . . . . . . . . . . . . . . . . . . . . . . . . . . . . . . . . . . . . . . . . . . . . . . . . . . . . . . . . . .15
8.3. Minuterie de veille . . . . . . . . . . . . . . . . . . . . . . . . . . . . . . . . . . . . . . . . . . . . . . . . . . . . . . .16
8.4. Verrouillage du téléviseur . . . . . . . . . . . . . . . . . . . . . . . . . . . . . . . . . . . . . . . . . . . . . . . . . .16
8.5. Choix des sources . . . . . . . . . . . . . . . . . . . . . . . . . . . . . . . . . . . . . . . . . . . . . . . . . . . . . . .17
8.6. Choix du format . . . . . . . . . . . . . . . . . . . . . . . . . . . . . . . . . . . . . . . . . . . . . . . . . . . . . . . . .17
8.7. Informations programmes . . . . . . . . . . . . . . . . . . . . . . . . . . . . . . . . . . . . . . . . . . . . . . . . . .18
8.8. Sélection mode double image . . . . . . . . . . . . . . . . . . . . . . . . . . . . . . . . . . . . . . . . . . . . . .18
8.9. Choix de réglage audio . . . . . . . . . . . . . . . . . . . . . . . . . . . . . . . . . . . . . . . . . . . . . . . . . . .19
8.10. Choix du programme hertzien . . . . . . . . . . . . . . . . . . . . . . . . . . . . . . . . . . . . . . . . . . . . . .19
8.11. Arrêt sur image . . . . . . . . . . . . . . . . . . . . . . . . . . . . . . . . . . . . . . . . . . . . . . . . . . . . . . . . .19
9. TÉLÉTEXTE . . . . . . . . . . . . . . . . . . . . . . . . . . . . . . . . . . . . . . . . . . . . . . . . . . . . . . . . . . .20
10. DIAGNOSTICS ET PANNES . . . . . . . . . . . . . . . . . . . . . . . . . . . . . . . . . . . . . . . . . . . . . . . . . .22
11. ÉCHANGE DU BLOC LAMPE . . . . . . . . . . . . . . . . . . . . . . . . . . . . . . . . . . . . . . . . . . . . . . . . .23
12. INDEX . . . . . . . . . . . . . . . . . . . . . . . . . . . . . . . . . . . . . . . . . . . . . . . . . . . . . . . . . . . . . .25
13. CARACTÉRISTIQUES TECHNIQUES . . . . . . . . . . . . . . . . . . . . . . . . . . . . . . . . . . . . . . . . . . . . .26
1
FRANÇAIS
Page 4
1. Précautions
1.1. Sécurité
Respectez tous les avertissements, les précautions et les consignes recommandés de
maintenance dans ce livret d’utilisation pour votre sécurité et afin de prolonger la durée de
vie de votre appareil.
• Définitions
Attention - Risque de danger. Avertissement concernant la sécurité de l'utilisateur
et de l'appareil.
Attention - Avertissement sur le risque de chocs électriques.
Attention - Signalement de surface chaude.
Attention - Avertissement sur le risque d'explosion de la lampe.
• Règles de sécurité
Cet ECRAN PLAT DLP™ est un appareil de classe I ; ce qui veut dire qu'il doit être
obligatoirement connecté à une prise électrique murale munie d'une borne de
terre.
Cet ECRAN PLAT DLP™ est conçu pour fonctionner :
- sur un réseau de 220-240 V, 50 Hz, AC (courant alternatif).
- à température ambiante de +5°C à +35°C.
- dans des locaux présentant un taux d'hygrométrie inférieur à 85%.
Pour éviter les risques d'échauffement ou d'électrocution :
- éviter une exposition directe aux rayons du soleil et ne pas placer au dessus de
l'appareil une flamme nue, telle une bougie ou toute autre source de chaleur.
- ne pas exposer l'appareil à l'égouttement ou à l'éclaboussement d'eau.
- ne pas placer sur l'appareil des objets remplis de liquides, tels des vases à fleurs.
- ne pas exposer l'appareil à un environnement fortement poussiéreux.
- éviter les chocs et les vibrations.
Il est recommandé de débrancher l'appareil du réseau électrique et de l'antenne :
- en cas d'orage.
- en cas de non-utilisation prolongée.
- en cas d'anomalie de fonctionnement (voir le paragraphe “Diagnostics et pannes”
En cas d'utilisation avec un ordinateur PC, allumer l'ECRAN PLAT DLP™ avant
l'ordinateur.
Assurez-vous que la ventilation de l'appareil n'est pas gênée par l'obstruction des grilles
d'aération, par des objets tels que par exemple : journaux, nappe de table, rideaux, etc.
Afin d'éviter des décharges électriques, ne pas introduire, par les grilles d'aérations, de
corps étrangers tels que par exemple : aiguilles, pièces de monnaies ou autres.
Laisser un espace libre d'au moins 10 cm autour de l'appareil pour une aération
suffisante.
Avant de débrancher le cordon secteur, il est recommandé de laisser les ventilateurs de
refroidissement fonctionner quelques minutes.
2
Attention
Attention
(Pour plus de détails, voir le paragraphe “spécifications techniques” page 26).
page 22).
Page 5
Cet ECRAN PLAT DLP™ met en œuvre de hautes tensions. Ne jamais tenter d'accéder
à l'intérieur de l'appareil sauf pour le changement du bloc lampe.
Seul le personnel qualifié y est autorisé.
N'ouvrez pas et ne démontez pas le produit car cela vous exposerait à des risques
d'électrocution.
Cet appareil détectera lui-même la fin de vie de la lampe. Remplacez le bloc lampe dès
l'allumage du voyant “ampoule” en face avant.
Lorsque la lampe de l'ECRAN PLAT DLP™ atteint la fin de sa durée de vie, elle s'arrête
en produisant éventuellement un son fort et sec. L'appareil ne peut alors plus
fonctionner jusqu'au remplacement du bloc lampe.
Pour éviter des brûlures ou une explosion du bloc lampe pendant son remplacement, il
est impératif de déconnecter le cordon d'alimentation secteur de la prise murale.
Attendre au moins une heure avant d'entamer le remplacement du bloc lampe.
Veuillez suivre scrupuleusement la procédure de remplacement décrite pages
et au paragraphe "Echange du bloc lampe".
N'utilisez que des piles appropriées et conformes aux caractéristiques du constructeur
(voir “Spécifications techniques”
- les piles fournies ne sont pas rechargeables.
- ayez une attention particulière aux aspects environnementaux.
- rapportez les piles défectueuses ou usagées aux endroits prévus à cet effet
conformément aux réglementations en vigueur ; ne les jetez en aucun cas à la
poubelle !
1.2. Entretien
• Avant toute chose, débranchez le cordon d'alimentation secteur de la prise murale.
• Nettoyez le coffret à l'aide d'un chiffon doux légèrement humide et d'un détergent non abrasif et
non cirant.
• Ne pas utiliser de produits de nettoyage à base de Benzine, d'alcool, ou de pétrole qui
risqueraient d'abîmer la finition.
• Nettoyez l'écran avec précaution en utilisant un chiffon doux humide légèrement imprégné de
produit savonneux.
3
FRANÇAIS
page 26) :
23
24
Attention
Page 6
2. Mise en service
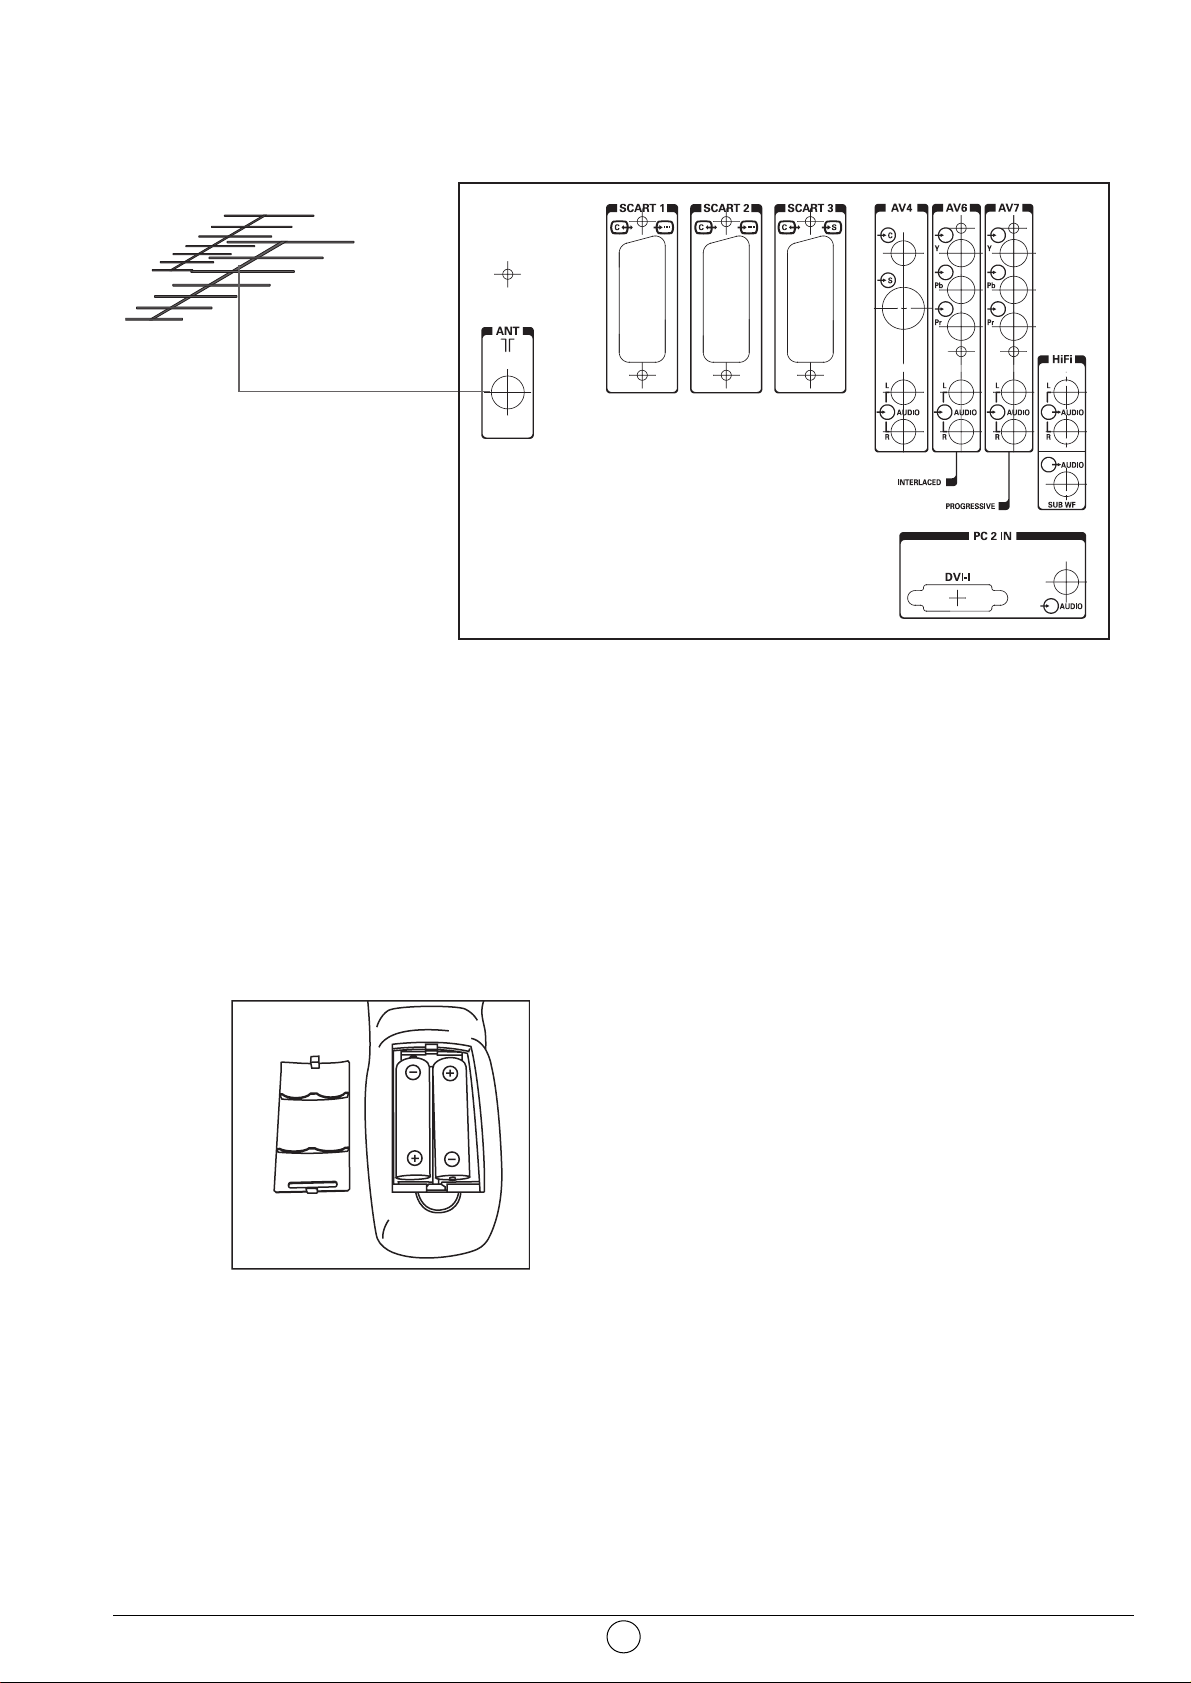
2.1. Raccordement antenne
Introduisez la fiche du cordon coaxial venant de votre antenne dans l'entrée antenne à l'arrière de
l'Ecran Plat DLP™.
Votre Ecran Plat DLP™ est équipé de 2 tuners mais un seul câble suffit pour les alimenter tous les
deux.
2.2. Raccordement secteur
Introduisez la fiche secteur dans une prise de courant présentant une tension secteur de 220 V240 V et étant munie d'une terre (prise à 3 plots).
2.3. Mise en marche
Mettez l'appareil sous tension en actionnant l'interrupteur
situé sur le côté gauche de votre appareil.
Mise en service de votre télécommande :
Ouvrez le couvercle du compartiment à piles et insérez les deux
piles fournies de type R6-1,5 V.
Assurez-vous que les piles soient correctement installées.
N'utilisez pas de piles de types différents ni de piles
rechargeables.
Mise en service de l'Ecran Plat DLP™ :
Appuyez sur la touche veille * de votre télécommande ou appuyez sur la touche veille * située en
face avant de votre appareil.
Nota : l'indicateur lumineux de marche/arrêt situé en face avant de votre Ecran Plat DLP™ passe en
couleur orange clignotant durant le temps de chauffe de la lampe, puis au vert lorsque votre Ecran
Plat DLP ™ est en fonction.
Lorsque vous mettez en service pour la première fois votre Ecran Plat DLP™, une procédure rapide
d'installation vous est proposée après cette phase de mise en chauffe (voir chapitre suivant).
Le raccordement d'autres appareils audio/vidéo ou PC est détaillé au chapitre 7.1. Avant de s’y
reporter, procédez à l'installation rapide.
4
Page 7
2.4. Arrêt de l'Ecran Plat DLP™
Pour arrêter votre Ecran Plat DLP™, appuyez sur le bouton veille de la face avant (au moins 2
secondes) ou sur la touche veille de la télécommande.
Durant la phase de mise en veille, l'indicateur lumineux de face avant passe à l’orange clignotant.
Afin de préserver la durée de vie de la lampe, l'état de veille réelle n'est effectif que lorsque
l'indicateur lumineux de face avant passe au rouge. Attendre 10 s. avant de rallumer.
Durant la phase de mise en veille, votre appareil refusera de sortir de veille si vous le lui demandez
(voir § 4.2).
ATTENTION
Afin de ne pas interrompre le déroulement correct du passage en veille, ne JAMAIS éteindre votre
appareil par l'interrupteur secteur ou débrancher la fiche murale tant que la led de face avant n'est
pas de couleur rouge.
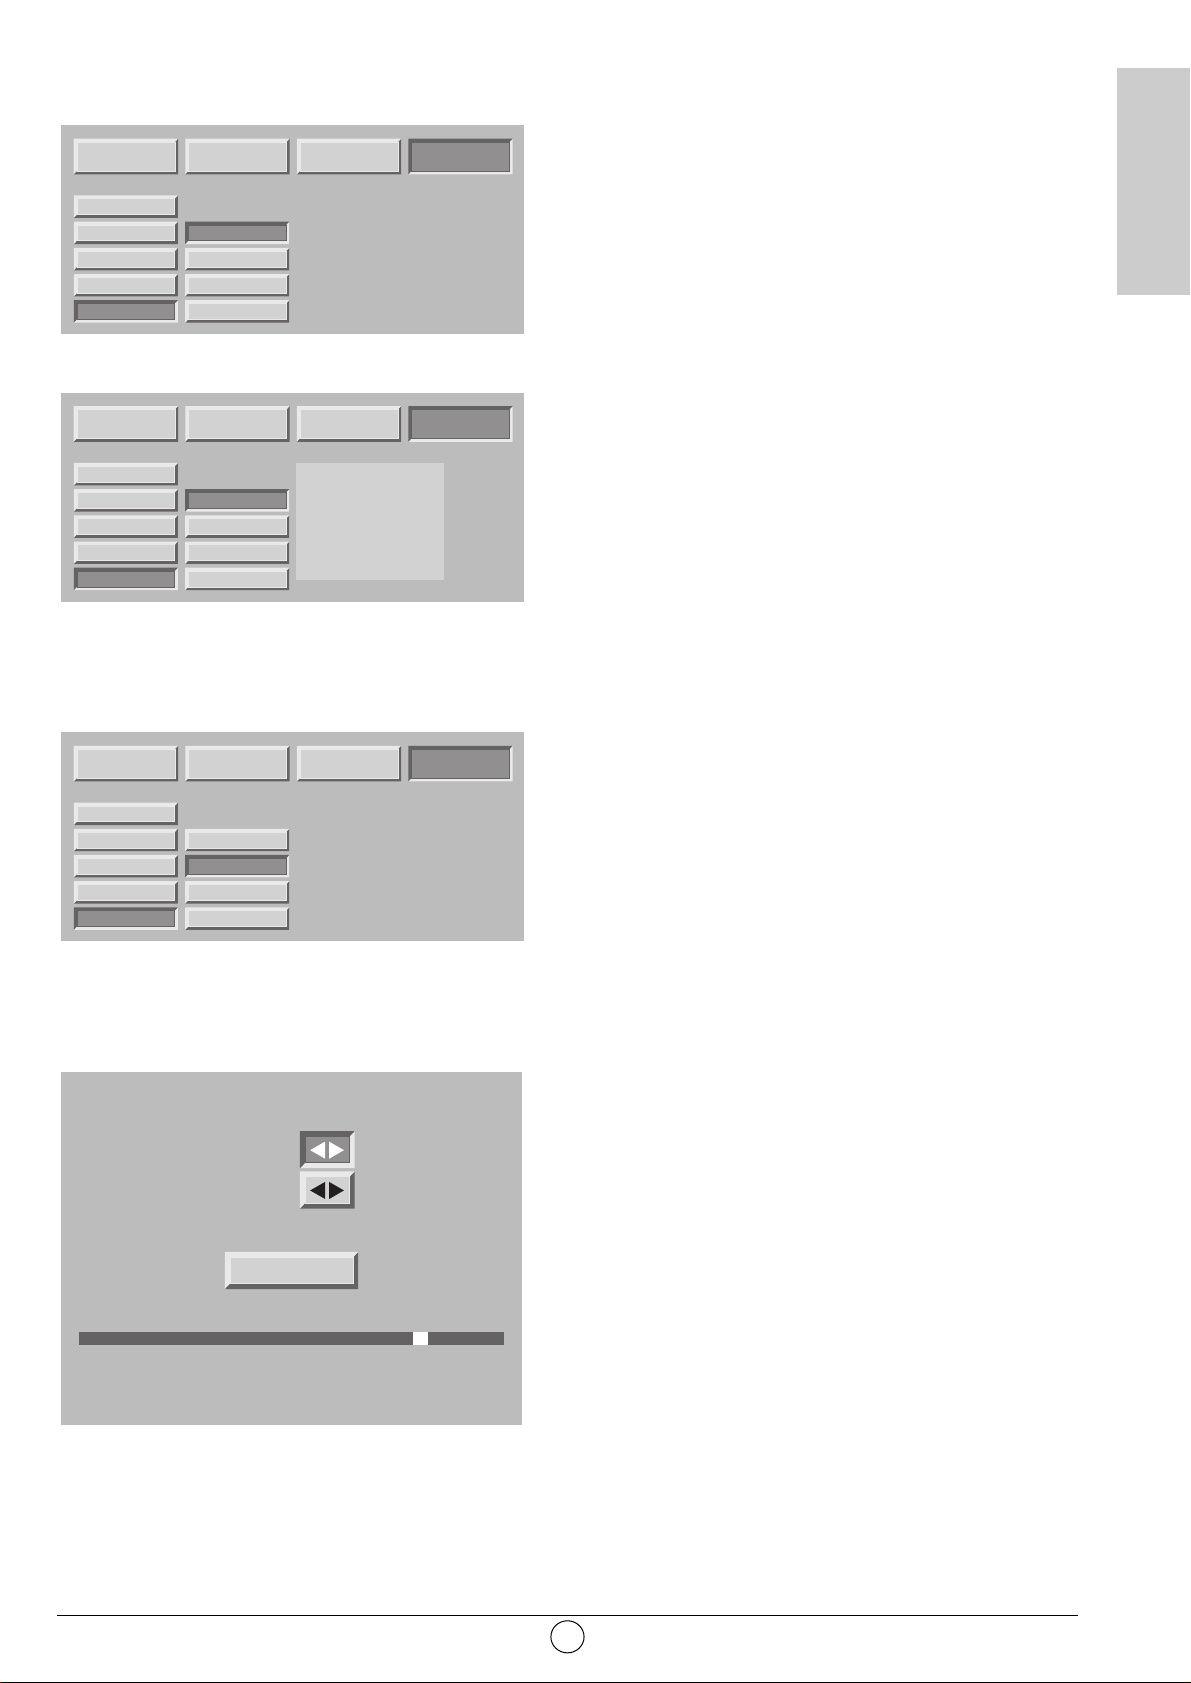
3. Première installation Rapide
Votre Ecran Plat DLP™ n'est pas préréglé pour recevoir les chaînes hertziennes de votre région.
Cette installation rapide vous est proposée automatiquement lors de la première mise en service. Elle
vous permet de configurer les éléments de base de votre produit (langues des menus, pays, réception des
chaînes).
Choisissez la langue des menus avec les touches W et V puis
validez avec la touche OK.
Choisissez le pays où vous vous trouvez ou celui dont vous
souhaitez recevoir les chaînes si vous êtes frontalier avec les
touches W et V puis validez par la touche OK.
Après avoir validé par la touche OK, la recherche automatique
commence et les chaînes sont automatiquement identifiées et
mémorisées.
Vous pouvez également, à tout moment, interrompre la recherche
par la touche MENU. Dans ce cas, le résultat de la recherche ne
sera pas sauvegardé.
5
FRANÇAIS
Pays couleur system stéréo
France SECAM L Nicam L
Allemagne PAL B,G deux porteuses B/G
Autriche PAL B,G Deux porteuses B/G
Italie PAL B,G Deux porteuses B/G
Espagne PAL B,G Nicam B/G
Hollande PAL B,G Deux porteuses B/G
Danemark PAL B,G Nicam B/G
Suède PAL B,G Nicam B/G
Norvège PAL B,G Nicam B/G
Finlande PAL B,G Nicam B/G
Belgique PAL B,H Nicam B/G
Suisse PAL B,G Deux porteuses B/G
UK PAL I Nicam I
Portugal PAL B,G
LANGUES MENU
ENGLISH
FRANCAIS
DEUTSCH
ITALIANO
ESPANOL
PORTUGUES
PAYS
ALLEMAGNE
AUTRICHE
BELGIQUE
DANEMARK
ESPAGNE
FINLANDE
FRANCE
RECHERCHE AUTOMATIQUE
Recherche en cours...
Canal 52
Chaînes trouvées : 2
Menu pour arrêter la recherche
Page 8
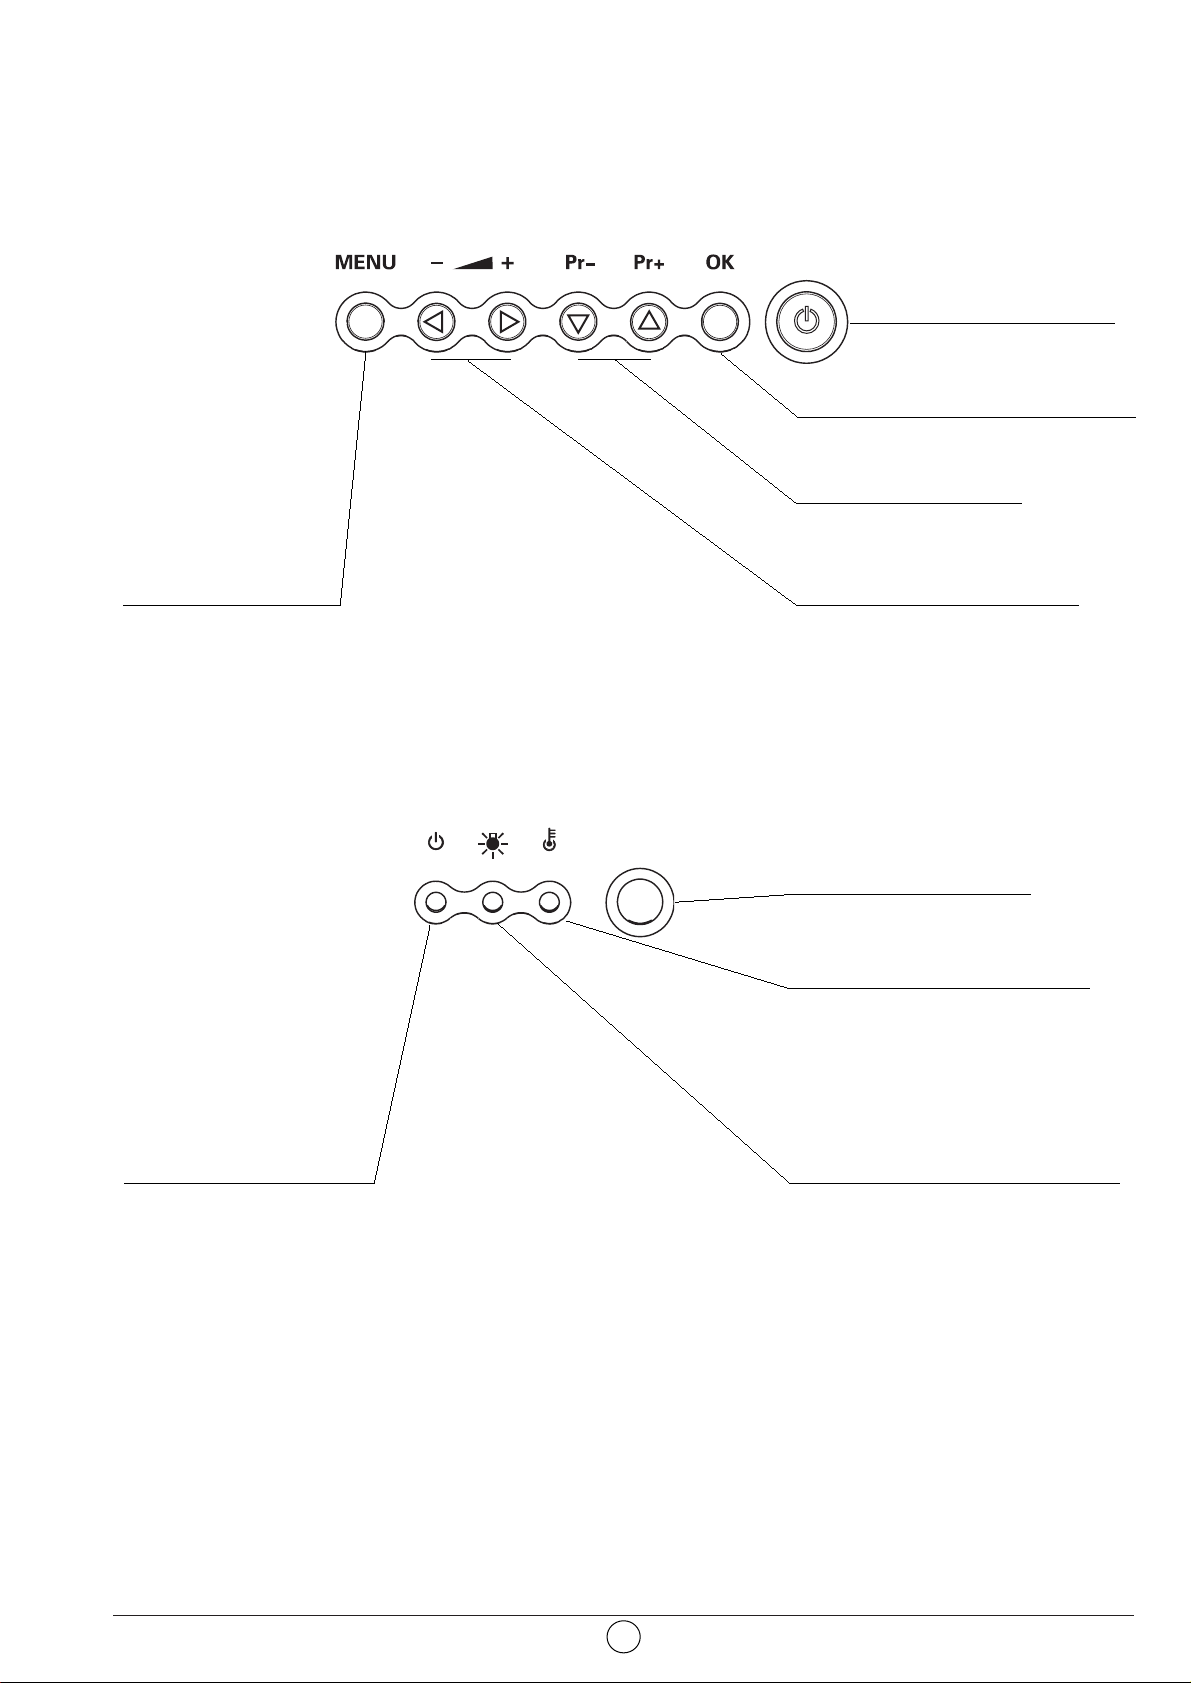
4. Fonctions de façade
4.1. Commandes de façade
4.2. Indicateurs lumineux en façade et récepteur télécommande
6
Récepteur Télécommande.
Voyant de température interne.
Clignotant rouge sur température
excessive.
Voyant de lampe :
Clignotant rouge pendant 10
secondes après le démarrage de
votre Ecran Plat DLP™ : prévoir un
changement de la lampe.
Rouge fixe : un échange de la lampe
est impératif.
Voyant de marche/veille.
Rouge fixe : état de veille.
Orange clignotant : phases
de mise en marche,
et mise en veille.
Vert clignotant : phase de
redémarrage instantané si
nécessaire.
Vert : en fonctionnement.
Touche d'accès aux
menus de configuration.
Lorsque le menu est
appelé, les touches B,
C, V et W servent à
se déplacer dans les
écrans.
Retour à l'écran
précédent en appuyant
sur cette touche.
Touche marche / veille.
Touche de validation dans les menus.
Touches de changement
de programme.
Touches de réglage volume
pour augmenter B ou
diminuer C le volume sonore.
Page 9
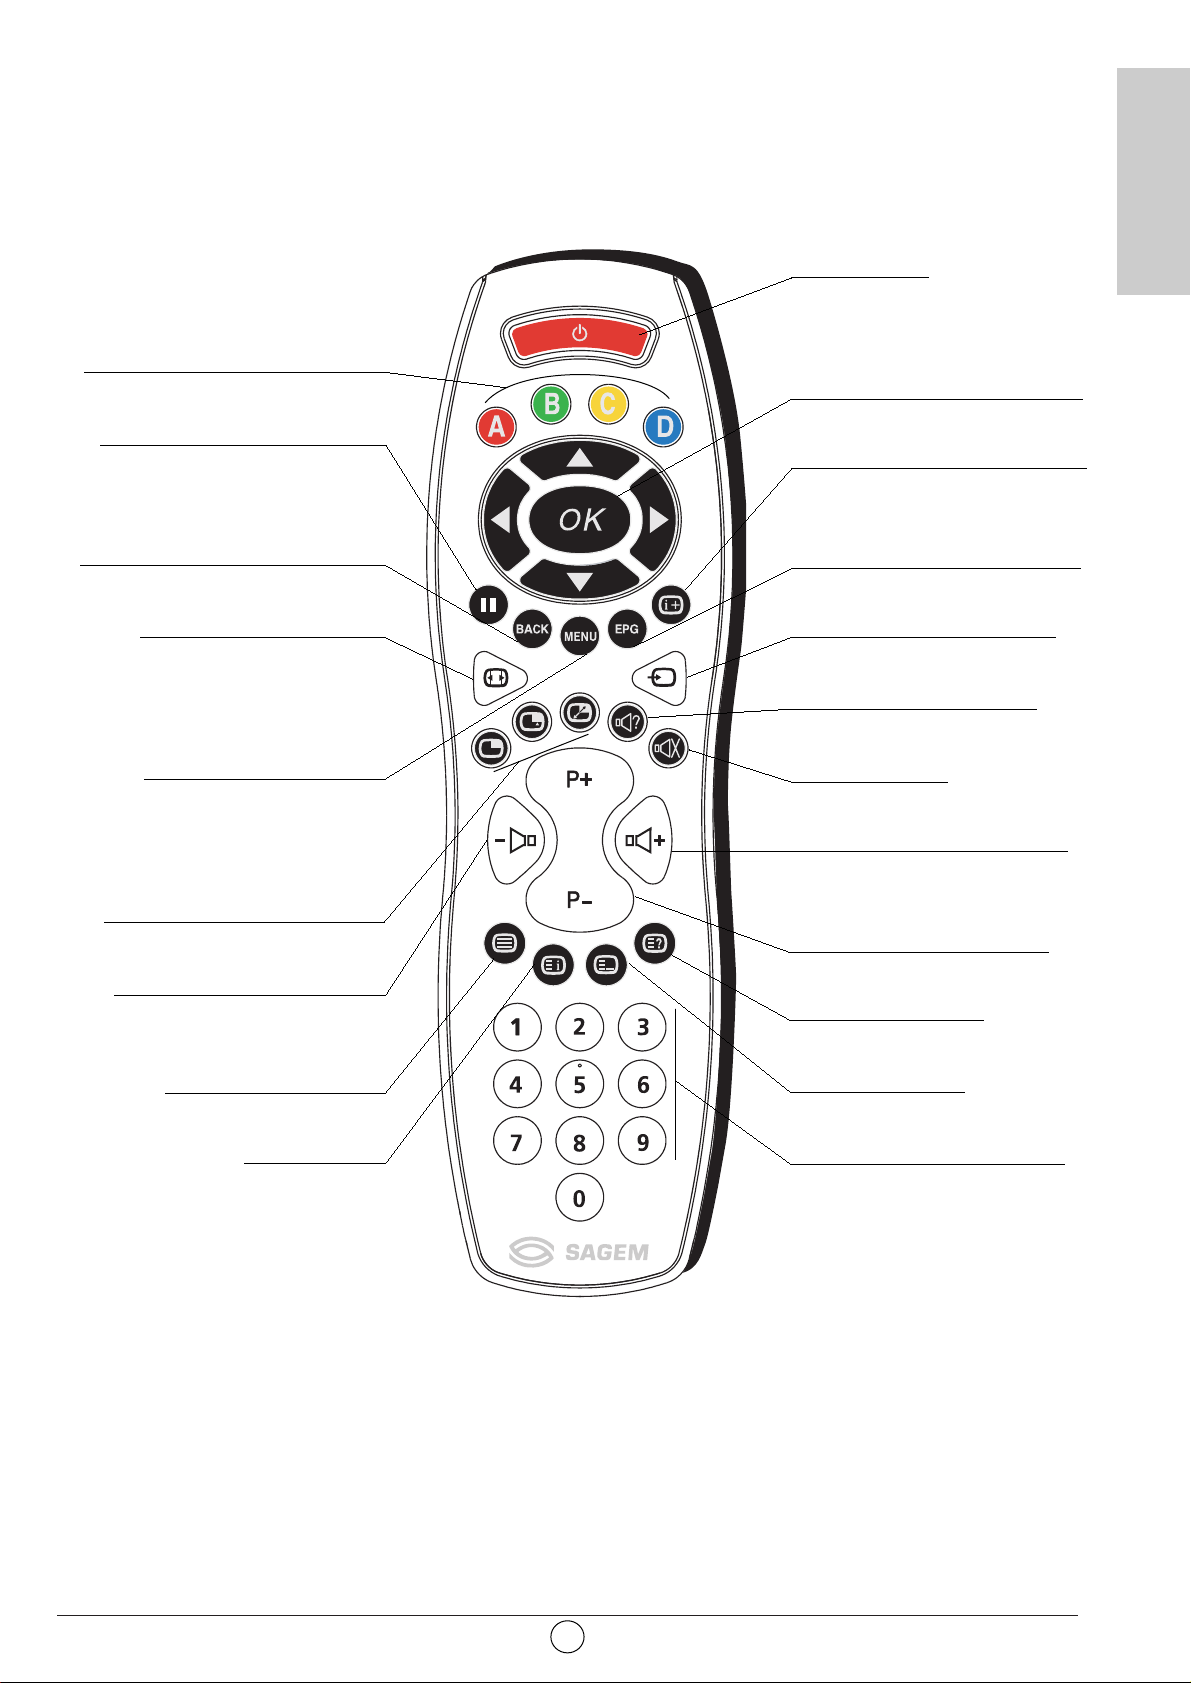
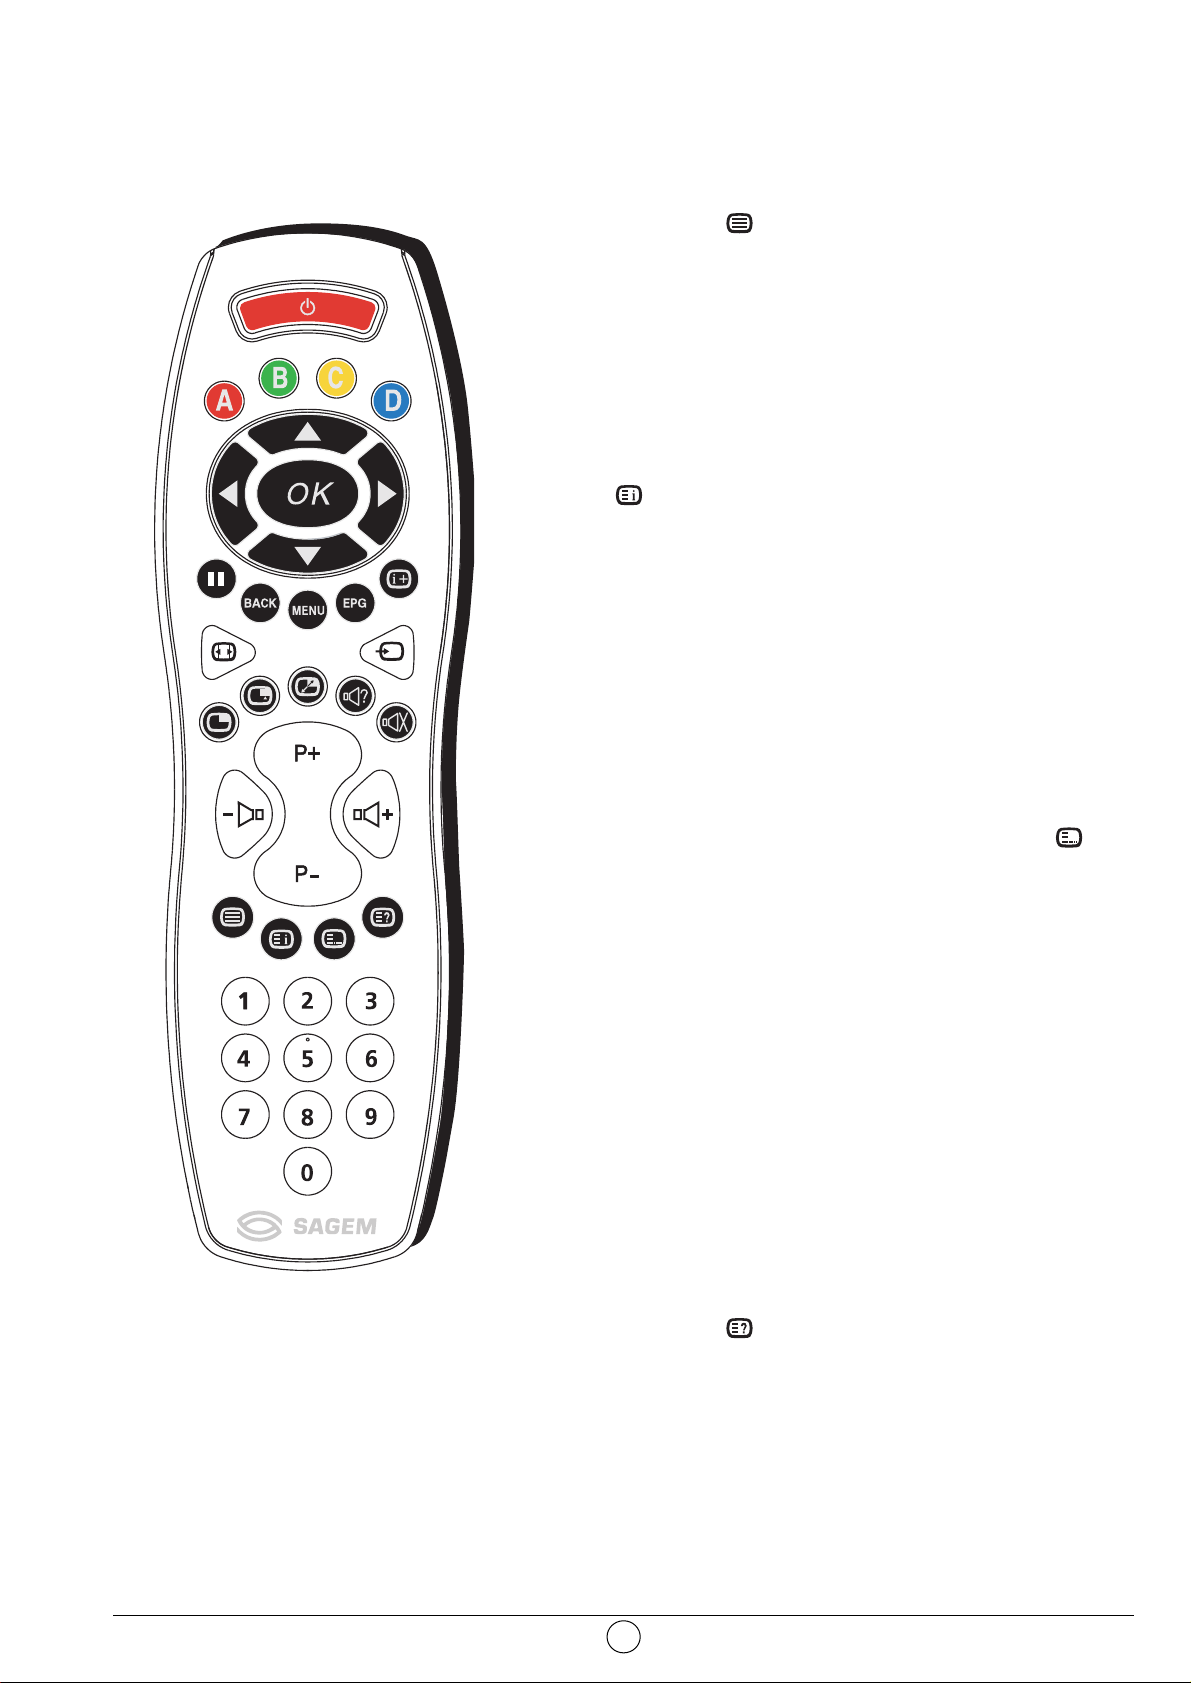
5. Télécommande
7
FRANÇAIS
Touches de couleurs (A, B, C, D)
utilisées dans les menus de
configuration, dans le télétexte et
dans le guide programme
NexTView
Image ou page Télétexte figée
Retour à la chaîne précédente ou
retour à la page précédente dans
un menu ou en mode télétexte
Choix du Format d'image
Accès aux menus de
configurations et fonctions
complémentaires en mode
télétexte
Fonctions PIP/PAP
- Appel et choix de la fonction
- Sélection de l'écran
- Echange des sources
Diminution du volume audio
Télétexte marche/mode
transparent/arrêt
Index télétexte
Marche / Veille
Navigateur dans les menus de
configuration pour sélectionner
votre choix et OK pour le valider
Infos à l'écran et TOP télétexte
Guide de programme NexTView
(fonction non disponible)
Choix de la source d'image
Sélection son ou langage
Coupure du son
Augmentation du volume audio
Sélection des programmes
(Programme +, programme -)
Texte caché télétexte
Télétexte mode fast
Touches numériques de saisie
Page 10
6. Réglages personnalisés
6.1. Changement de code de protection
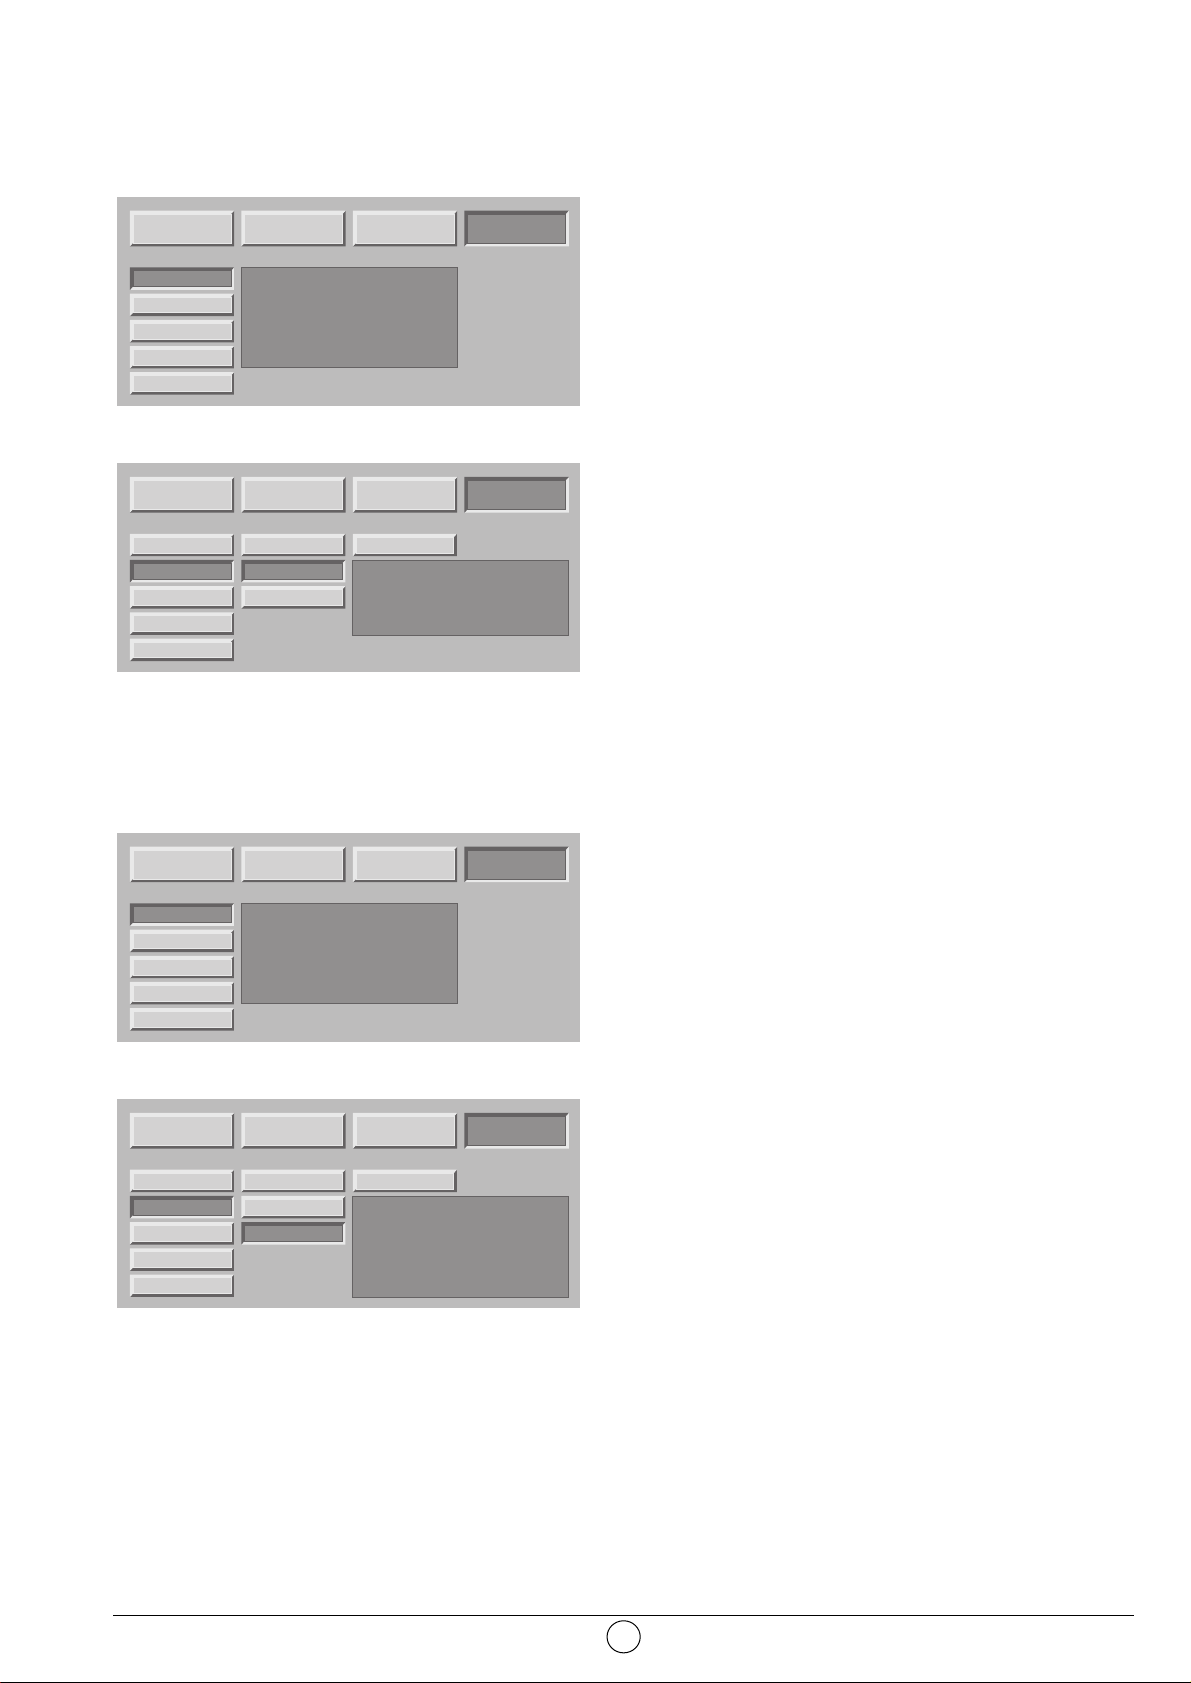
Appuyez sur la touche MENU, puis choisissez “INSTAL.” à
l'aide de la touche B puis validez par la touche OK.
L'ensemble des écrans d’installation est protégeable par un
code personnel.
A la livraison, le code est un code neutre 0000 qui ne
verrouille pas les écrans d’installation.
Choisissez “MODIF.CODE”, validez par la touche OK.
Entrez votre nouveau code dans l'écran de saisie puis
confirmez le même code dans l'écran de confirmation en
validant à chaque fois par la touche OK.
Nota : Pour verrouiller ces écrans, saisissez un code
personnel autre que 0000.
N'oubliez pas votre nouveau code personnel.
6.2. Retour à la configuration initiale
Appuyez sur la touche MENU, puis choisissez “INSTAL”. à
l'aide de la touche B puis validez par la touche OK.
Entrez votre code personnel puis validez par la touche OK.
(aucun code n'est demandé pour le code initial 0000).
Si besoin est, vous pouvez automatiquement reconfigurer
votre Ecran Plat DLP™ comme au premier jour
d'utilisation. Dans ce cas, tous vos paramètres personnels
seront perdus (liste des chaînes, pays, langues,…).
Choisissez “CONFIG USINE” et validez par la touche OK.
Un écran de confirmation vous invitera à continuer par
l'appui sur la touche OK ou à annuler par la touche BACK.
6.3. Recherche des programmes hertziens
Lors de la première mise en service, l’installation des programmes a été effectuée. Néanmoins, les
fonctions suivantes sont utiles en cas de déménagement dans une autre région.
8
IMAGE SON OPTIONS INSTAL.
CODE
PROTECTION
SOURCES
DONNEES PC
RECHERCHE
CODE
SAISIR
VERROU
- - - -
CHAINE
MODIF. CODE
CONFIG. USINE
CODE CODE
PROTECTION VERROU
SOURCES CHAINE
DONNEES PC
RECHERCHE
MODIF. CODE
CONFIG. USINE
IMAGE SON OPTIONS INSTAL.
CODE
PROTECTION
SOURCES
DONNEES PC
RECHERCHE
GENERAL
MODIF. CODE
CONFIG. USINE
MODIF. CODE
CONFIG. USINE
NON
SAISIR
SOURCES
CONFIRMER
DONNEES PC
RECHERCHE
CODE
- - - -
V
- - - -
ERROU
CHAINE
- - - -
MODIF. CODE
CONFIG. USINE
IMAGE SON OPTIONS INSTAL.
CODE
PROTECTION
SOURCES
DONNEES PC
RECHERCHE
CODE
SAISIR
VERROU
CHAINE
MODIF. CODE
CONFIG. USINE
CODE CODE
PROTECTION VERROU
- - - -
SOURCES CHAINE
DONNEES PC
RECHERCHE
MODIF. CODE
CONFIG. USINE
IMAGE SON OPTIONS INSTAL.
CODE
PROTECTION
SOURCES
DONNEES PC
RECHERCHE
GENERAL
MODIF. CODE
CONFIG. USINE
MODIF. CODE
CONFIG. USINE
NON
PROTECTION
DONNEES PC
RECHERCHE
ATTENTION
la configuration sera perdue
SOURCES
CONTINUER
Touche BACK pour annuler
CODE
VERROU
CHAINE
MODIF. CODE
CONFIG. USINE
Page 11
6.3.1. Choix de la norme de votre pays
Vous devez choisir le pays qui correspond en fait à la
norme de diffusion en vigueur.
Appuyez sur la touche MENU.
Sélectionnez le chapitre “INSTAL.” avec la touche OK.
Sélectionnez le chapitre “RECHERCHE” avec la touche OK.
Sélectionnez le chapitre “PAYS” avec la touche OK.
Sélectionnez le pays choisi par les touches V et W.
Votre choix est mémorisé dès que vous sortez de ce menu
par la touche BACK.
6.3.2. Installation manuelle
Sélectionnez “MANUELLE” puis validez par la touche OK.
Seul un écran de recherche est alors affiché pour vous
permettre de contrôler le programme trouvé.
La recherche ainsi que la mise en mémoire des programmes de télévision sont effectuées chaîne par
chaîne.
Sélectionnez “RECHERCHE” et lancez la recherche par B
ou C.
Lorsqu'une image s'affiche sur l'écran,
• vous pouvez décider de la mémoriser :
Descendez sur la ligne “N° PROGRAMME” et entrez la
position de programme désiré à l'aide des touches 0 à 9.
Descendez le curseur sur "MÉMORISER" et validez par
la touche OK.
• Vous pouvez chercher à obtenir une meilleure qualité de
cette image reçue :
Descendez sur la ligne “REGLAGE FIN” et ajustez le
curseur à l'aide des touches C et B.
Descendez le curseur sur "MÉMORISER" et validez par
la touche OK.
• Vous pouvez décider de ne pas sauvegarder cette
image :
Dans ce cas, relancer la recherche.
Recommencez cette procédure manuelle pour tous les
programmes que vous voulez mémoriser.
Appuyez sur la touche MENU pour sortir.
9
FRANÇAIS
IMAGE SON OPTIONS INSTAL.
CODE
PROTECTION
SOURCES
DONNEES PC
RECHERCHE
PAYS
MANUELLE
AUTO
EDITION LISTE
PROTECTION
DONNEES PC
RECHERCHE
ATTENTION
la configuration sera perdue
SOURCES
CONTINUER
Touche BACK pour annuler
IMAGE SON OPTIONS INSTAL.
CODE
PROTECTION
SOURCES
DONNEES PC
RECHERCHE
PAYS
MANUELLE
AUTO
EDITION LISTE
FRANCE (SECAM L)
DEUTCHLAND (PAL B,G)
PROTECTION
OSTERREICH (PAL B,G)
ITALIA (PAL B,G)
NEDERLAND (PAL B,G)
DANMARK (PAL B,G)
DONNEES PC
SVERIGE (PAL B,G)
RECHERCHE
ATTENTION
la configuration sera perdue
SOURCES
CONTINUER
Touche BACK pour annuler
CODEGENERAL NON
VERROU
CHAINE
MODIF. CODE
CONFIG. USINE
CODEGENERAL NON
VERROU
CHAINE
MODIF. CODE
CONFIG. USINE
IMAGE SON OPTIONS INSTAL.
CODE
PROTECTION
SOURCES
DONNEES PC
RECHERCHE
PAYS
MANUELLE
AUTO
EDITION LISTE
RECHERCHE MANUELLE
RECHERCHE
REGLAGE FIN
N˚ PROGRAMME
MEMORISER
FREQUENCE 184,00
Menu pour arrêter la recherche
PROTECTION
DONNEES PC
RECHERCHE
ATTENTION
la configuration sera perdue
SOURCES
CONTINUER
Touche BACK pour annuler
00
CODEGENERAL NON
VERROU
CHAINE
MODIF. CODE
CONFIG. USINE
Page 12
6.3.3. Installation automatique
Sélectionnez “AUTO“ et validez par la touche OK.
Votre ancienne recherche va être effacée au bénéfice de la
nouvelle, confirmez par la touche OK.
Toutes les chaînes sont recherchées et mémorisées
automatiquement.
Si le signal de distribution est reconnu à travers la
transmission d'une page télétexte, les programmes
porteront des noms et seront classés.
A tout moment, vous pouvez décider d'arrêter la recherche
à l'aide de la touche MENU.
Dans ce cas, les résultats de votre recherche ne seront
pas sauvegardés.
6.3.4. Modification de la liste des programmes
A tout moment vous pouvez modifier la liste des
programmes issus d'une recherche.
Appuyez sur la touche MENU.
Sélectionnez le chapitre “INSTAL.” avec la touche OK.
Sélectionnez le chapitre “EDITION LISTE” avec la touche
OK.
Dans l'écran présenté, vous pouvez :
• Supprimer un programme
Placez-vous sur la ligne du programme à supprimer et
appuyez sur la touche rouge pour supprimer. En cas
d'erreur, appuyez de nouveau sur la touche rouge pour
rappeler le programme effacé.
• Déplacer un programme
Placez-vous sur la ligne du programme à déplacer et
appuyez sur la touche verte pour le prendre en compte
(Un “D” apparaît à gauche pour indiquer la prise en
compte), déplacez le par les touches W ou V, puis
validez la position par la touche verte.
• Changer le nom d’un programme
Placez-vous sur la ligne du nom de programme à
modifier et appuyez sur la touche jaune pour le prendre
en compte .
Saisissez le premier caractère en faisant défiler les
lettres par les touches W ou V.
Avancez de un caractère par B puis saisissez le
deuxième. Etc. (6 caractères maximum).
Validez par la touche jaune à la fin.
• Appliquer un filtre de réduction de bruit sur un
programme
Placez-vous sur la ligne du nom de programme à
modifier et appuyez sur la touche bleue pour prendre en
compte un changement de filtre.
Chaque appui sur la touche bleue applique le filtre
suivant. Appliquez un filtre “faible” “moyen” ou “fort” en
fonction de votre condition de réception.
Choisir “aucun” si aucun filtre n'est nécessaire.
Nota : à tout moment vous pouvez visualiser la
chaîne sélectionnée par appui sur la touche OK.
Appuyez sur la touche MENU pour sortir.
10
RECHERCHE AUTOMATIQUE
Recherche en cours...
Canal 52
Chaînes trouvées : 2
Menu pour arrêter la recherche
IMAGE SON OPTIONS INSTAL.
CODE
PROTECTION
SOURCES
DONNEES PC
RECHERCHE
PAYS
MANUELLE
AUTO
EDITION LISTE
PROTECTION
DONNEES PC
RECHERCHE
ATTENTION
la configuration sera perdue
SOURCES
CONTINUER
Touche BACK pour annuler
CODEGENERAL NON
VERROU
CHAINE
MODIF. CODE
CONFIG. USINE
EDITION LISTE
PROG.
1
2
3
4
5
6
SUPPRIM.
FREQ.
479,5
527,25
599,25
671,25
735,25
789,25
DEPLACER
NOM
TF1
F2
F3
C+
F5
M6
NOMMER
N.R.
AUCUN
FAIBLE
MOYEN
FORT
AUCUN
AUCUN
OK
N.R. VOIR
Page 13
6.4. Choix de la langue MENU
Vous pouvez choisir la langue d'affichage des menus et
des informations.
Appuyez sur la touche MENU.
Sélectionnez le chapitre “OPTIONS” avec la touche OK.
Sélectionnez le chapitre “LANGUE MENU” avec la touche
OK.
Sélectionnez la langue choisie par les touches C et B.
Appuyez sur la touche MENU pour sortir ou sur la touche
BACK pour revenir à l'écran précédent.
6.5. Réglages mode double image
Ces réglages vous permettent de choisir vos préférences pour le mode PIP (“picture in picture” ou
“image dans l'image”) et le mode PAP (“picture and picture” ou “image à coté de l'image”).
Reportez-vous au paragraphe 8.9 pour l'utilisation quotidienne.
• Choix de la source audio de la sortie casque
“PRINCIPAL” vous restituera pour le casque le son de
l'image plein écran en mode PIP ou de l'image de droite
en mode PAP.
“PIP/PAP” vous restituera pour le casque le son de
l'image vignette en mode PIP ou de l'image de gauche
en mode PAP.
• Choix de préférence PIP et PAP
PIP oui et PAP oui
L'appui successif sur la touche F vous placera
successivement en PIP, PAP puis de nouveau plein
écran.
PIP oui et PAP non
L'appui successif sur la touche F vous placera
successivement en PIP puis de nouveau plein écran.
PIP non et PAP oui
L'appui successif sur la touche F vous placera
successivement en PAP puis de nouveau plein écran.
PIP non et PAP non
L'appui successif sur la touche F restera inactive (ainsi
que la permutation de source H et la sélection de
source G.
6.6 Réglage du mode de sortie de veille
Cette préférence permet de choisir le mode de réveil ou de
passage en veille.
“Manuel” : sortie de veille et passage en veille sur appui
sur la touche veille * de la télécommande ou de la face
avant.
“Auto” : sortie de veille ou passage en veille automatique
commandé par la sortie de veille ou passage en veille du
ou des équipements raccordés sur les connecteurs “péritel”
en face arrière.
Le comportement par défaut de la touche d'accès
direct Fsera déterminé par votre choix PIP et
PA P.
11
FRANÇAIS
IMAGE SON OPTIONS INSTAL.
VEILLE AUTO
CASQUE
PICTURE IN PICTURE (PIP)
PICTURE AND PICTURE (PAP)
LANGUE MENU
GESTION SOURCE
ENGLISH
FRANCAIS
DEUTSCH
ITALIANO
ESPANOL
PORTUGUES
NON
PRINCIPAL
OUI
OUI
FRANCAIS
AUTO
IMAGE SON OPTIONS INSTAL.
VEILLE AUTO
CASQUE
PICTURE IN PICTURE (PIP)
PICTURE AND PICTURE (PAP)
LANGUE MENU
GESTION SOURCE
ENGLISH
FRANCAIS
DEUTSCH
ITALIANO
ESPANOL
PORTUGUES
IMAGE SON OPTIONS INSTAL.
VEILLE AUTO
CASQUE
PICTURE IN PICTURE (PIP)
PICTURE AND PICTURE (PAP)
LANGUE MENU
GESTION SOURCE
ENGLISH
FRANCAIS
DEUTSCH
ITALIANO
ESPANOL
PORTUGUES
NON
PRINCIPAL
OUI
OUI
FRANCAIS
AUTO
NON
PRINCIPAL
OUI
OUI
FRANCAIS
AUTO
IMAGE SON OPTIONS INSTAL.
VEILLE AUTO
CASQUE
PICTURE IN PICTURE (PIP)
PICTURE AND PICTURE (PAP)
LANGUE MENU
GESTION SOURCE
ENGLISH
FRANCAIS
DEUTSCH
ITALIANO
ESPANOL
PORTUGUES
NON
PRINCIPAL
OUI
OUI
FRANCAIS
AUTO
Page 14
7. Raccordements des équipements et configurations
7.1. Conseils de raccordements
Votre Ecran Plat DLP™ offre un large choix de connecteurs pour raccorder les équipements de votre
choix. Il est recommandé d'effectuer les raccordements en étant hors tension.
FACE ARRIERE
Péritel 1 (SCART 1) préconisé pour un lecteur de DVD, un lecteur enregistreur de DVDR, un
décodeur Numérique (câble, satellite ou terrestre).
Péritel 2 (SCART 2) préconisé pour un décodeur analogique hertzien Canal+, un décodeur
Numérique (câble, satellite ou terrestre.)
Péritel 3 (SCART 3) préconisé pour un magnétoscope VHS ou SVHS.
AV4 préconisé pour une console de jeux.
AV6 préconisé pour un lecteur de DVD muni de sorties Y Pb Pr en mode “entrelacé”.
(Ce type de raccordement améliore significativement la qualité de l'image).
AV7 préconisé pour un lecteur de DVD muni de sorties Y Pb Pr en mode “progressive”.
(Ce type de raccordement améliore significativement la qualité de l'image).
Hifi permet le raccordement d’un amplificateur audio muni de ses enceintes.
Respecter les couleurs pour les voies droite et gauche.
Pour un meilleur confort d’écoute, coupez le son de votre Ecran Plat DLP™ (voir
chapitre 8.2).
Le volume audio sera réglé par votre amplificateur. La technologie DLP apporte un léger
retard dû au traitement de l'image, aussi raccordez votre ampli sur ces sorties et non sur
celles de la source.
PC2 IN préconisé pour le raccordement d’un PC muni de sortie “DVI D”. Utilisez exclusivement
un cordon “DVI D” (carte graphique).
Sub woofer permet le raccordement d’un caisson de basse (option).
12
DVD
DVD
ou
DECODEUR NUMERIQUE
eC
console
de
jeux
DECODEUR NUMERIQUE
DVD
ou
DVD
ou
DECODEUR C+
DVI D
MAGNETOSCOPE
VHS
ou
(
DVD
ou
eC
console
de
jeux
Page 15
FACE AVANT
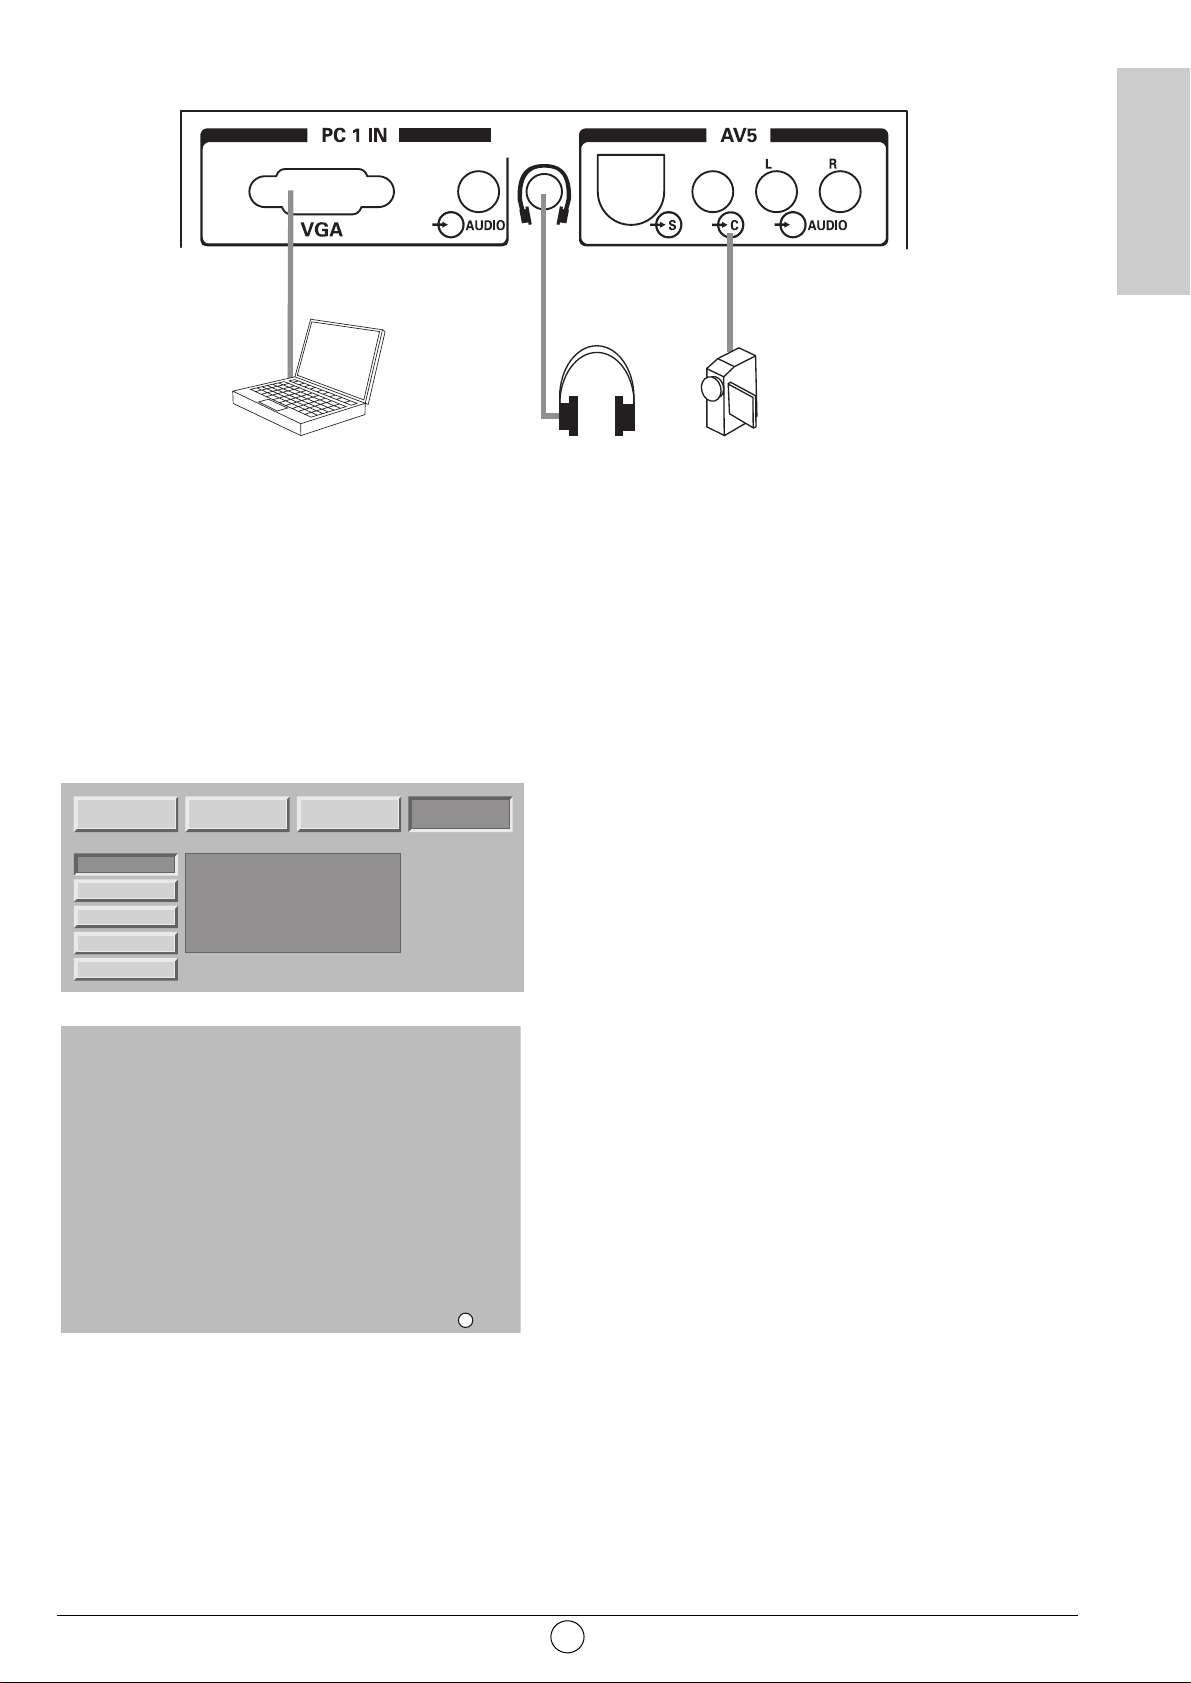
PC1 IN préconisé pour le raccordement d’un PC muni de sortie “VGA”
Une entrée audio jack 3,5 mm permet de raccorder également le son.
CASQUE : raccordement d’un casque.
Le réglage du casque est décrit en chapitre 8.2.
AV5 est préconisé pour le raccordement d’un caméscope de format VHS, S-VHS, 8 mm, Hi-8 ou
numérique DVC.
7.2. Configurations des sources
Appuyez sur la touche MENU, puis choisissez “OPTIONS”
à l'aide de la touche B puis validez par OK.
Si votre code est différent de 0000, cet écran est protégé
et vous devez saisir votre code.
Choisissez “SOURCES”, puis validez par OK.
Grâce à cette option, vous pouvez sélectionner les sources
utilisées pour ne voir apparaître que ces dernières lors de
la sélection des sources en utilisation quotidienne.
Choisissez le connecteur à configurer (W/V).
Pour chacun des connecteurs, vous pouvez :
• Valider un équipement raccordé en appuyant
successivement sur la touche rouge jusqu'à l'affichage
de “OUI” (“NON” pour un connecteur non utilisé). Choisir
“C+” si vous avez raccordé votre décodeur hertzien C+
sur la péritel 2. Dans ce cas, saisissez impérativement le
numéro de programme de C+.
• Choix du nom pré-programmé en appuyant
successivement sur la touche verte (DVD, DVDR, C+,
DEC, MAG, JEUX).
• Choix d'un nom personnalisé en appuyant sur la touche
jaune pour passer en mode édition. Défilement des
caractères par VW Caractère suivant par B.
Appui sur la touche jaune pour valider
• Choix du réducteur de bruit. Vous pouvez appliquer un
réducteur de bruit sur certaines sources comme le
magnétoscope en les faisant défiler par appui successif
sur la touche bleue (aucun, faible, moyen, fort).
Nota : à tout moment, vous pouvez visualiser la
chaîne sélectionnée par appui sur la touche OK.
Appuyez sur la touche MENU pour sortir.
13
FRANÇAIS
VGA
IMAGE SON OPTIONS INSTAL.
CODE
PROTECTION
SOURCES
DONNEES PC
RECHERCHE
ENTREE
PERITEL 1
PERITEL 2
PERITEL 3
AV4
AV5
AV6
AV7
PC1
PC2
SOURCE
CODE
SAISIR
VERROU
- - - -
CHAINE
MODIF. CODE
CONFIG. USINE
SOURCE
OUI
C+
OUI
NON
NON
NON
NON
NON
NON
CHOIX NOM
CODE CODE
PROTECTION VERROU
SOURCES CHAINE
DONNEES PC
RECHERCHE
NOM
N˚
DEC
:04
C+
MAG
JEUX
- - - - - -
- - - - - -
- - - - - -
- - - - - -
- - - - - -
NOMMER
MODIF. CODE
CONFIG. USINE
N.R.
AUCUN
AUCUN
MOYEN
AUCUN
AUCUN
AUCUN
AUCUN
AUCUN
AUCUN
OK
N.R. VOIR
Page 16
7.3. Configurations des sources informatiques
Appuyez sur la touche MENU, puis choisissez “INSTAL.” à
l'aide de la touche B puis validez par OK.
Choisissez “DONNEES PC” puis validez par OK.
Grâce à cette option, vous pouvez ajuster la source issue
de votre PC en mode VGA (Les entrées en mode DVI D ne
nécessitent pas ce réglage).
Position horizontale : appuyez sur C pour déplacer
l'image vers la gauche et sur B pour la déplacer vers la
droite.
Position verticale : appuyez sur B ou C pour déplacer
l'image vers le haut ou pour la déplacer vers le bas.
Fréquence : sert à modifier la fréquence d'affichage des
données afin qu'elle corresponde à la fréquence de la carte
graphique de votre ordinateur. Lorsque vous rencontrez une
barre scintillante verticale, utilisez cette fonction pour
réaliser le réglage.
Phase : ce réglage réalise une synchronisation plus fine
avec la carte graphique de votre ordinateur. Lorsque vous
rencontrez une image instable ou scintillante, utilisez ce
réglage.
Mode automatique : oui / non - effectue les réglages
automatiquement.
Résolutions acceptées (entrées DVI-D, et VGA)
Pour s'assurer que l'affichage de projection fonctionne
correctement avec votre ordinateur, veuillez configurer le
mode d'affichage de votre carte graphique sur une
résolution inférieure ou égale à 1024 x 768.
Nota : la meilleure stabilité est obtenue avec une fréquence
de 60 Hz (consulter la documentation de votre PC pour
configurer ce dernier).
14
Horizontal Vertical Hz
640 x 480 60
640 x 480 66
640 x 480 72
640 x 480 75
640 x 480 85
800 x 600 60
800 x 600 72
800 x 600 75
800 x 600 85
1024 x 768 60
1024 x 768 70
1024 x 768 75
1152 x 864 60
1152 x 864 70
1280 x 720 60
1280 x 1024 60
IMAGE SON OPTIONS INSTAL.
HORIZONTAL 5
CODE
PROTECTION
SOURCES
DONNEES PC
RECHERCHE
CODE
SAISIR
_ _ _ _
VERTICAL 10
VERROU
FREQUENCE -3
CHAINE
PHASE 0
MODIF. CODE
MODE HP INT.
IMAGE AUTO.
CONFIG. USINE
CODE CODE
PROTECTION VERROU
SOURCES CHAINE
DONNEES PC
OUI
RECHERCHE
MODIF. CODE
CONFIG. USINE
Page 17
8. Utilisation quotidienne
8.1. Réglage image
REGLAGES IMAGE PERSONNELS
Vous pouvez définir et mémoriser vos propres paramètres
grâce au mode “PERSO”.
CONTRASTE, LUMIERE, COULEUR, NETTETE,TEINTE
peuvent être réglés selon vos préférences à l'aide des
touches C et B.
Le réglage de la teinte ne s'applique que sur une source
vidéo NTSC.
Le réglage d'équilibrage des couleurs vous permet de
choisir la couleur dominante de l'image.
Effectuez le réglage par C ou B.
AMBIANCES IMAGE PREREGLEES
Vous pouvez choisir votre préférence image parmi les préréglages proposés à l'aide des touches C etB
STANDARD CINEMA STUDIO SPORT.
Sélectionnez celui qui convient le mieux au programme
que vous regardez et validez par la touche OK.
Appuyez sur la touche MENU pour sortir ou sur la touche
BACK pour revenir à l'écran précédent.
8.2. Réglage son
Vous pouvez ajuster et mémoriser vos propres paramètres
parmi :
GRAVES, AIGUS, BALANCE
Le réglage de graves vous permet d'accentuer les
fréquences les plus basses.
Le réglage d'aigus vous permet d'accentuer les fréquences
les plus hautes.
BALANCE
Le réglage de balance affecte les niveaux de son entre les
haut-parleurs de droite et de gauche. Le réglage permet
d'obtenir un niveau de son adapté à la position d'écoute.
VOLUME CAISSON
Ce réglage affecte le volume sonore du caisson de basse
pour vous permettre de l'équilibrer avec les voies droite et
gauche.
VOLUME SORTIE HIFI
Ce réglage vous permet d'avoir un niveau de sortie fixe ou
réglable par la télécommande de votre écran plat DLP™.
15
FRANÇAIS
IMAGE SON OPTIONS INSTAL.
PERSO STANDARD CINEMA STUDIO SPORT
CONTRASTE 55
LUMIERE 45
COULEUR 65
NETTETE 85
TEINTE 35
TON COULEUR
IMAGE SON OPTIONS INSTAL.
PERSO STANDARD CINEMA STUDIO SPORT
CONTRASTE 55
LUMIERE 45
COULEUR 65
NETTETE 85
TEINTE 35
TON COULEUR
CHAUD
CHAUD
IMAGE SON OPTIONS INSTAL.
PERSO STANDARD CINEMA STUDIO SPORT
IMAGE SON OPTIONS INSTAL.
GRAVES 55
AIGUS 45
BALANCE +10
VOL. CAISSON 35
MODE HP INT.
VOL. HIFI
VOL. CASQUE 55
STÉRÉO
FIXE
Page 18
Mode HP INT.
(haut-parleurs internes): les choix dépendent de l'émission que vous regardez (STEREO, MONO)
Vous pouvez couper les haut-parleurs (ARRET) dans le cas où vous ne voulez conserver qu'une
écoute par casque.
Le volume casque peut être ajusté indépendamment du volume sonore haut-parleurs.
Lorsque tous vos réglages ont été faits, appuyez sur la touche MENU pour sortir ou sur la touche
BACK pour revenir à l'écran précédent.
8.3. Minuterie de veille
Appuyez sur la touche MENU, puis choisissez “OPTIONS”
à l'aide de la touche B puis validez par OK.
Choisissez “VEILLE AUTO” puis validez par OK.
Grâce à cette option, vous pouvez programmer une durée
après laquelle le téléviseur passera automatiquement en
veille.
Par pas de 15 mn vous avez la possibilité de différer la
mise en veille jusqu'à 180 mn.
Une minute avant la mise en veille, le décompte de la
dernière minute apparaîtra à l'écran. Cet écran vous
permettra de refuser éventuellement la mise en veille.
Vous pouvez toujours arrêter l’Ecran Plat DLP™ avant
l'heure d'arrêt programmé ou reprogrammer l'heure d'arrêt.
8.4. Verrouillage du téléviseur
Appuyez sur la touche MENU, puis choisissez “INSTAL.” à
l'aide de la touche B puis validez par la touche OK.
Entrez votre code personnel, puis validez par la touche OK
(aucun code n'est demandé pour le code initial 0000).
Choisissez OUI ou NON
Si votre Ecran Plat DLP™ est verrouillé, il ne pourra être
mis en service qu'après saisie de votre code dans un écran
d'invitation à saisir.
16
IMAGE SON OPTIONS INSTAL.
VEILLE AUTO
CASQUE
PICTURE IN PICTURE (PIP)
PICTURE AND PICTURE (PAP)
LANGUE MENU
GESTION SOURCE
ENGLISH
FRANCAIS
DEUTSCH
ITALIANO
ESPANOL
PORTUGUES
NON
PRINCIPAL
OUI
OUI
FRANCAIS
AUTO
IMAGE SON OPTIONS INSTAL.
CODE
PROTECTION
SOURCES
DONNEES PC
RECHERCHE
CODE
SAISIR
VERROU
CHAINE
MODIF. CODE
CONFIG. USINE
IMAGE SON OPTIONS INSTAL.
CODE
PROTECTION
SOURCES
DONNEES PC
RECHERCHE
GENERAL
MODIF. CODE
CONFIG. USINE
MODIF. CODE
CONFIG. USINE
CODE CODE
PROTECTION VERROU
- - - -
SOURCES CHAINE
DONNEES PC
RECHERCHE
NON
PROTECTION
SOURCES
DONNEES PC
RECHERCHE
MODIF. CODE
CONFIG. USINE
CODE
VERROU
CHAINE
MODIF. CODE
CONFIG. USINE
Page 19
8.5. Choix des sources
La sélection des sources peut s 'effectuer de deux
manières différentes :
• Par les Touches P+/P- de la face avant uniquement.
La navigation se fait parmi les chaînes hertziennes
valides puis parmi toutes les sources externes (peritel 1,
peritel 2, peritel 3, av4, av5, av6, av7, etc…).
Nota :Une chaîne est valide si elle a été trouvée lors de la
recherche automatique ou si elle a été mémorisée lors de la
recherche manuelle.
La bannière de zapping est affichée à chaque changement
de chaîne, et la bannière info à chaque changement de
source.
• Par la Touche d'accès direct b de la télécommande.
Sélectionnez la source choisie en appuyant de nouveau
sur b jusqu'à obtention de la bonne source.
Nota : Si vous avez au préalable configuré et nommé vos
entrées équipements au chapitre 7.2, seules les sources
raccordées et configurées au niveau du standard vidéo
vous seront proposées.
8.6. Choix du format
Une touche d'accès direct - vous permet d'accéder à ce
choix simplement.
Cette fonction vous permet de visionner l'image dans son
format maximum, y compris les images écran large.
Appuyez sur la touche - de la télécommande.
Nota : Sur le premier appui, la bannière info affiche l'état
courant, sans faire de changement de format.
FORMAT 4:3
Affiche une image 4:3 sous son format d'origine.
FORMAT ELARGI
Ce format permet de visualiser des images 4:3 à la taille maximum en appliquant une correction au
centre de l'écran pour que la déformation ne soit pratiquement appliquée que sur les bords de droite
et de gauche. La taille de l'image dépendra du signal d'origine.
FORMAT 14:9
Ce format vous permet de visualiser automatiquement des programmes formatés au format 14:9
grâce à la signalisation WSS.
Manuellement, ce format est préconisé pour les films et téléfilms au format cinéma 1.66.
FORMAT 16:9
Ce format vous permet de visualiser automatiquement des programmes formatés au format 16:9
grâce à la signalisation 16/9 arrivant sur la péritel ou grâce à la signalisation WSS.
FORMAT CINEMA
Ce format permet de visualiser des films de format 1.85 (ACADEMY FLAT) diffusés en 4:3 au format
écran maximum sans déformation avec des bandes noires en haut et en bas.
Il permet de visualiser des films aux formats 2.0, 2.20 et 2.35.
17
FRANÇAIS
PERITEL 1
16/9
DVD
4/3
PERITEL 2
CINEMA
Page 20
FORMAT SOUS-TITRE
Ce format permet de visualiser des films de format 1.85 (ACADEMY FLAT) diffusés en 4:3 au format
écran maximum sans perte d'image et sans déformation en décalant l'image vers le haut pour
permettre la lecture de sous-titres éventuels.
FORMAT SCOPE
Ce format permet de visualiser des films de format 2.35 (PANAVISION) diffusés en 4:3 au format
écran maximum sans déformation, en taille haute maximum mais avec une perte d'image aux
extrémités droite et gauche.
8.7. Informations programmes
A tout moment vous pouvez appuyer sur la touche i+ pour
obtenir les informations sur la chaîne hertzienne.
Lorsque vous visualisez une source vidéo externe, le nom
de la source est alors affiché.
8.8. Sélection mode double image
Mise en service du mode double image.
Choisissez le mode vidéo vignette incrustée (PIP) ou deux
vidéo côte à côte (PAP) en appuyant successivement sur la
touche F.
Un des deux modes PIP ou PAP étant en service, vous
pouvez :
Inverser les sources en appuyant sur la Touche H.
Changer les sources à l'écran en appuyant sur la touche
G puis;
• Pr+ ou Pr- pour changer de chaîne hertzienne,
• b pour changer de source puis en sélectionnant la
source désirée dans l'écran proposé,
changer les formats à l'écran en appuyant sur la touche
G puis,
• -pour changer de format puis en sélectionnant la
source désirée dans l'écran proposé.
Nota :
La vidéo vignette du mode PIP est uniquement au format
16/9.
Les touches CBchangent la position de la fenêtre pip si
le mode pip est activé. La navigation se fait sur les 4
positions possibles dans l'ordre haut-gauche, haut-droit,
bas-gauche, bas-droit.
18
SSSSEEEELLLLEEEECCCCTTTTIIIIOOOONN
NN
SELECTION
1 (TF1)
4/3
STEREO
Page 21

8.9. Choix de réglage audio
Volume : Appuyez sur / + ou - pour régler le volume.
Suppression du son : Appuyez sur pour supprimer momentanément ou rétablir le son.
Emission bilingue et sélection du son : Appuyez sur pour choisir entre un son MONO ou
STEREO si la chaîne transmet le son en mode stéréo NICAM. Choisir entre DUAL A et DUAL B en
cas d'émission bilingue.
Ce réglage est mémorisé par chaîne.
8.10. Choix du programme hertzien
Utilisez les touches 0/9 pour choisir votre chaîne. Pour un numéro à deux chiffres, introduisez le
second dans les 2 secondes.
Pour regarder directement une chaîne à un chiffre, appuyez sur la touche chiffrée plus longtemps.
Utilisez la touche BACK pour revenir sur la chaîne précédemment regardée.
8.11. Arrêt sur image
Utilisez la touche K (pause) pour geler l'image ou l'activer.
19
FRANÇAIS
Page 22
9. Télétexte
Les fonctions de télétexte varient selon les sociétés de télévision et ne sont disponibles que si la chaîne
sélectionnée transmet le télétexte.
• Mise en et hors service du télétexte
Appuyez sur la touche pour mettre le télétexte en service sans
vidéo.
Un nouvel appui vous permet d'avoir le télétexte en surimpression
sur la vidéo courante.
Un nouvel appui met hors service le télétexte.
S'il n'y a pas de télétexte sur la chaîne que vous regardez, un
message vous l'indique.
• Sélection de la page d'index
Les services télétexte disposent d'une page d'accueil (généralement
en page 100) donnant l'utilisation du service offert.
La touche permet de sélectionner directement cette page
d'accueil.
• Mode LIST ou FASTEXT
Il existe deux modes de télétexte :
- Mode LIST (liste) : dans ce mode, quatre numéros de page
de couleurs différentes apparaissent en bas d'écran. Chacun
de ces numéros peut être changé et enregistré en mémoire.
- Mode FASTEXT (texte rapide) : dans ce mode, quatre sujets
de couleurs différentes apparaissent en bas de l'écran. Pour
obtenir plus d'information sur l'un de ces sujets, appuyez sur
la touche de couleur correspondante.
Cette fonction permet d'obtenir rapidement des informations sur les
sujets indiqués.
La sélection du mode désiré s'effectue à l'aide de la touche .
• Sélection d'une page
Introduisez le numéro de page désiré à l'aide des touches 0-9 (Des
numéros de pages commençant par 0 ou 9 n'existent pas).
Le compteur de pages en haut d'écran cherche la page ou la page
apparaît immédiatement dans le cas où le numéro de page a déjà
été mémorisé.
En cas de sélection d'une page inexistante, un message apparaît
pour vous indiquer que vous avez saisi un numéro inexistant.
Le défilement rapide des pages de télétexte s'effectue avec les
touches P+ P- ou VW(en sautant les numéros de pages
inexistantes).
Pour mémoriser une autre page dans ce mode, appuyez sur la
touche de couleur voulue suivie de la saisie du numéro de page.
En mode FASTEXT il est possible de choisir un sujet souhaité à
l'aide des touches de couleurs correspondant aux options de bas
d'écran.
• Visualisation informations cachées
Appuyez sur la touche pour appeler et effacer les informations
cachées, comme des solutions de jeux ou des réponses à des
questions.
20
Page 23

• Maintien d'une page
Appuyez sur la touche K pour maintenir la page télétexte lors de la
consultation d'informations sur plusieurs pages. Appuyez de nouveau
pour revenir à la mise à jour automatique.
• Double hauteur
Appuyez sur la touche MENU puis sur la touche verte. De multiples
appuis vous permettent d'afficher la partie supérieure, inférieure et
de retourner au format normal.
• Navigation dans les sous-pages
Lorsque le numéro de page choisi contient plusieurs sous-pages,
une ligne d'aide listant les sous-pages apparaît en bas d'écran.
Choisissez à l'aide des touches CBla sous-page suivante ou
précédente.
• Sélection des sous-titres
Les chaînes TV avec télétexte transmettent souvent certains
programmes avec du sous-titrage.
Appuyez sur la touche et sélectionnez la page sous-titre
désirée.
La page des sous-titres apparaît en continu à l'écran si l'émission en
cours est transmise avec du sous-titrage.
21
FRANÇAIS
Page 24

10. Diagnostics et pannes
22
Symptômes :
Lors de la première mise en service et après
avoir branché votre Ecran Plat DLP™, le voyant
marche arrêt n'est pas allumé sur la position
rouge mais est éteint.
L'appareil ne s'allume pas lors de l'appui sur le
bouton marche/veille de la face avant ou lors de
l'appui de la touche marche/veille de la
télécommande.
Absence d'image.
Image noir & blanc ou déchirée.
Son non présent.
Son faible ou discordant en réception
hertzienne.
Image fixe.
Votre appareil ne démarre pas lorsque vous le
sortez de veille en utilisant la touche de face
avant et la touche veille de votre
télécommande.
Pas d'image en mode PIP.
La télécommande ne fonctionne plus
normalement.
Vérifications recommandées :
Vérifiez que le cordon secteur de votre Ecran Plat DLP™ est
bien branché au niveau de l'appareil et de la prise secteur.
Vérifiez également que l'interrupteur situé sur le coté gauche
de l'appareil est bien sur la position I enfoncée.
Vérifiez que le cordon secteur de votre Ecran Plat DLP™ est
bien branché au niveau de l'appareil et de la prise secteur.
Vérifiez également que l'interrupteur situé sur le côté gauche
de l'appareil est bien sur la position I enfoncée.
Le voyant marche/arrêt est allumé en vert et les menus de
votre Ecran Plat DLP™ sont disponibles : Vérifiez que vos
appareils vidéos sont bien connectés à votre Ecran Plat
DLP™ et actifs. Vérifiez également que vous avez bien
sélectionné la bonne source de votre Ecran Plat DLP™
(Chapitre 8.6 : choix des sources).
Vérifiez que votre cordon antenne est bien connecté sur la
prise murale de votre Ecran Plat DLP™. Vérifiez également
que vous avez bien des chaines mémorisées par votre Ecran
Plat DLP™ dans le menu Options / recherche / édition liste. Si
ce n'est pas le cas, relancez une recherche manuelle ou
automatique.
Vérifiez également que l'interrupteur situé sur le coté gauche
de l'appareil est bien sur la position I enfoncée.
Le voyant d'indication de la température interne clignote au
rouge : respectez les précautions d'utilisation pour éviter une
élévation excessive de la température interne (chapitre 1 :
précautions).
Le voyant d'indication de l'état de la lampe est rouge : la
lampe a dépassé sa durée de vie standard, peut ne plus être
fonctionnelle et doit être changée.
Vérifiez que vous avez bien sélectionné le bon format vidéo :
exemple source vidéo RGB issue d'un lecteur DVD affiché en
S-vidéo au niveau de votre Ecran Plat DLP™ : Vérifiez en
appuyant sur la touche choix de la source image si le type de
source sélectionné est en accord avec la source émise.
Vérifiez que le réglage des couleurs ne soit pas au minimum.
Vérifiez que le volume n'est pas positionné au niveau minimal
ou que la coupure du son ne soit pas activée
Vérifiez que vos appareils sont bien connectés à votre Ecran
Plat DLP™.
Mettez le son en mode Mono.
Vérifiez que vous n'avez pas figé l'image : appuyez sur la
touche "IMAGE ou PAGE TELETEXT FIGEE".
L'indicateur lumineux de MARCHE/VEILLE clignote orange
pendant 20 s et repasse au rouge ou reste à l’orange
clignotant, éteignez l'appareil à l'aide de l'interrupteur situé à
gauche de votre Ecran Plat DLP™ patientez 30 s. et
redémarrez-le selon la procédure normale.
Vérifiez que vous avez sélectionné une source active en mode
PIP (Chapitre 8.9 : Sélection mode double image).
Changez les piles.
Page 25
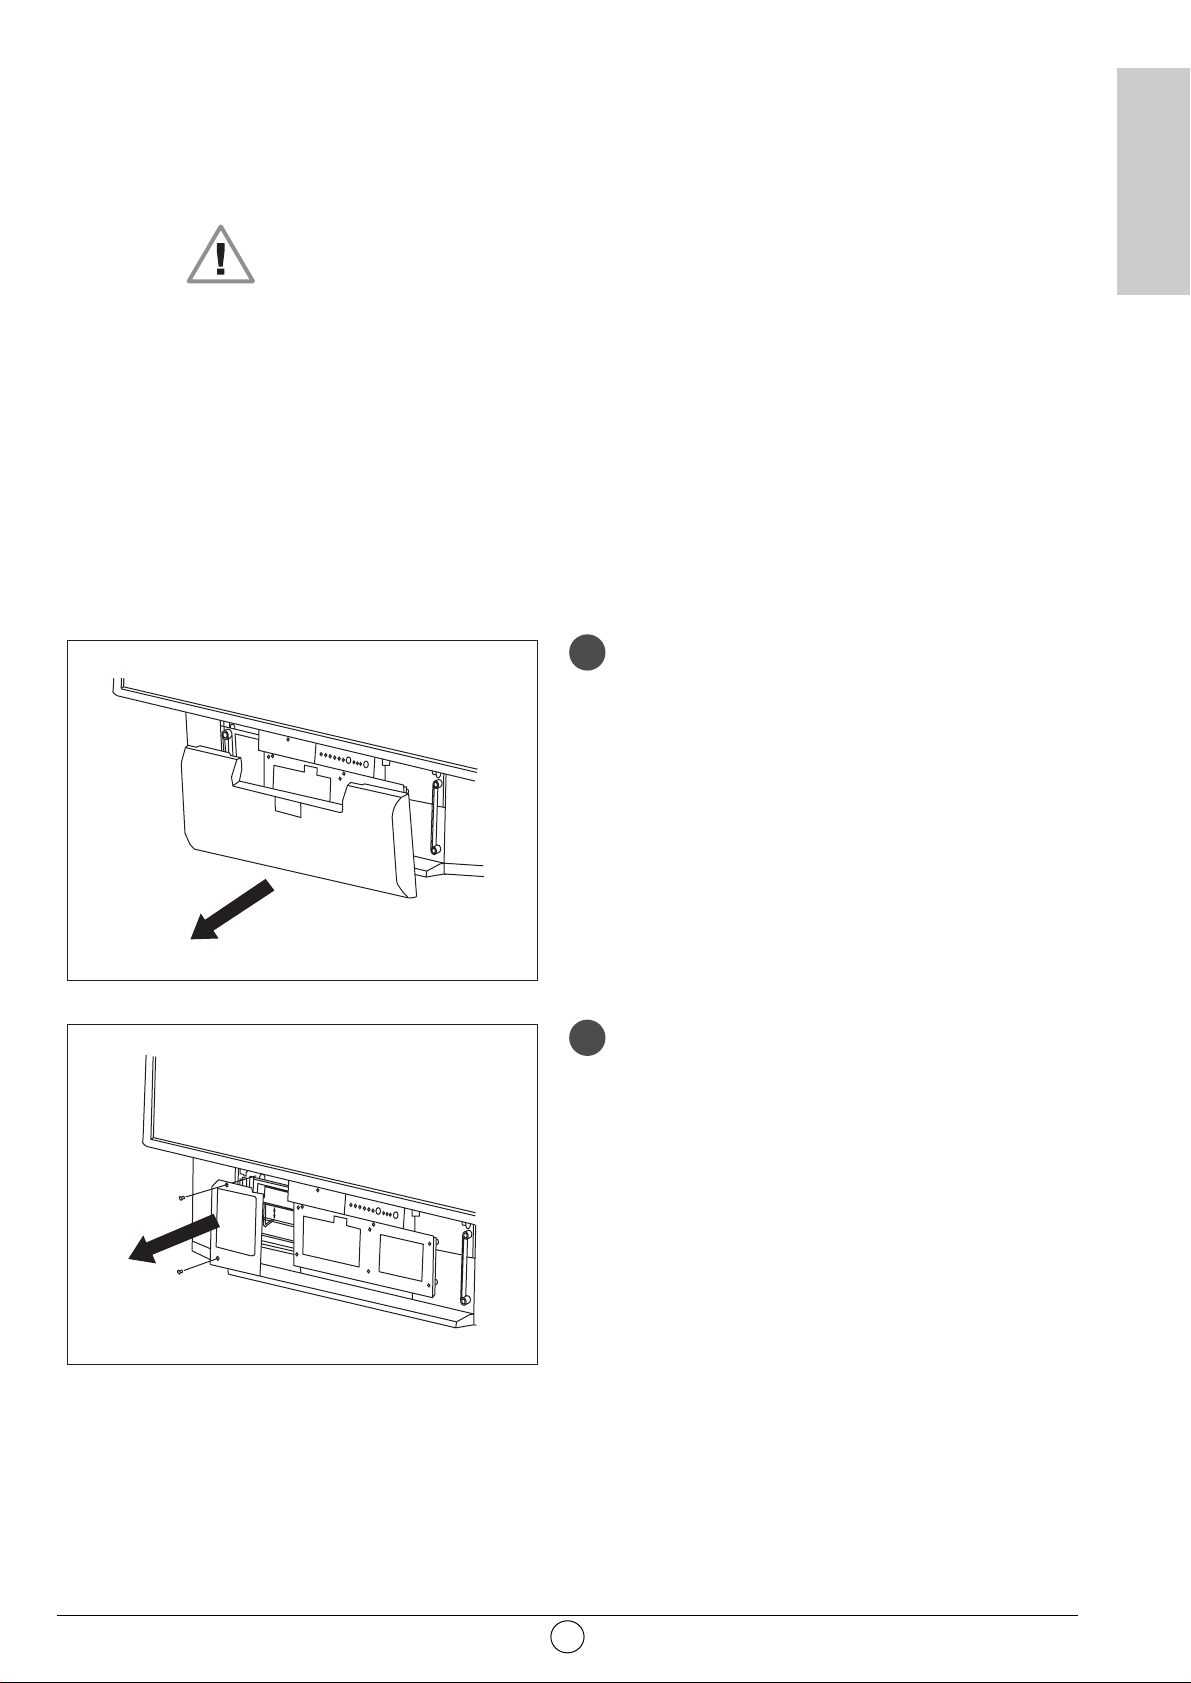
11. Échange du bloc lampe
Ne remplacez le bloc lampe usagé que par le modèle agréé RL1080A de référence Sagem 251282989.
Le bloc lampe usagé doit être recyclé (contactez votre agence de recyclage de déchets pour obtenir
l'adresse du dépôt le plus proche).
ATTENTION
1. Le changement du bloc lampe doit s'effectuer hors tension et le cordon secteur enlevé de la prise
murale.
2. Ne jamais essayer de remplacer le bloc lampe juste après la mise hors tension après
fonctionnement de l’Ecran Plat DLP™.
Afin de permettre à la lampe d'être parfaitement froide, attender au moins 1 heure avant de
procéder à l'échange.
3. Ne manipuler le bloc lampe que par la poignée prévue à cet effet.
Ne jamais toucher les câbles, ni l'ampoule elle-même.
4. Prenez bien garde de revisser toutes les vis et de ne pas laisser des corps étrangers à l'intérieur.
Déposez le panneau avant en le prenant de
chaque coté et en le tirant vers vous.
Dévissez le panneau de protection (vous munir
d’un tournevis cruciforme) et retirez le
panneau en prenant soin de conserver les vis.
23
FRANÇAIS
1
2
Page 26
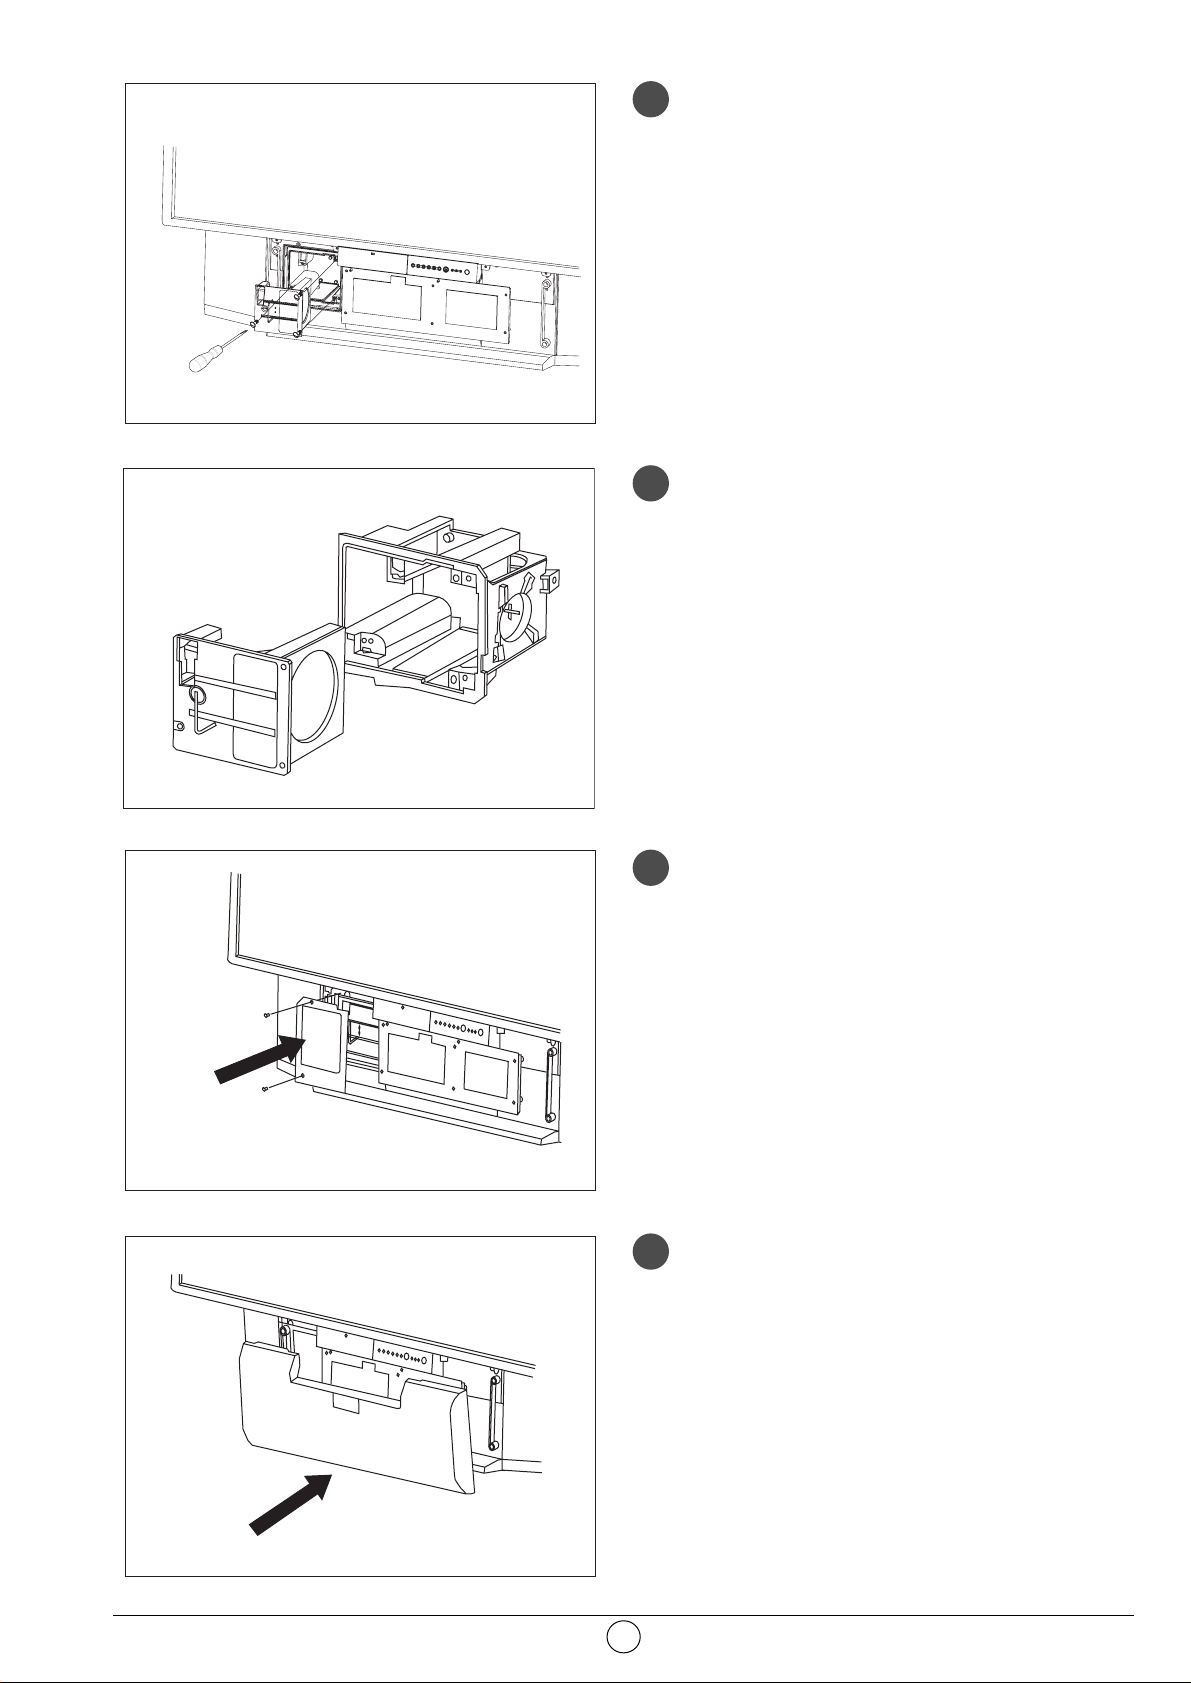
Dévissez les 3 vis de fixation du bloc lampe
et tirez vers vous par sa poignée le bloc lampe
usagé.
(Ces 3 vis sont dites “imperdables” c'est-à-dire
qu'une fois dévissées, elles restent solidaires
du bloc lampe).
Prenez le bloc lampe neuf par sa poignée et
réinsérez-le en lieu et place du précédent
Revissez les 3 vis de fixation attenantes au
bloc.
N'oubliez pas de rabattre la poignée (en
prenant soin de ne pas toucher l'ampoule).
Refixez le panneau de protection à l'aide des 2
vis.
Replacez le panneau avant en le pressant
légèrement pour qu'il reprenne sa place.
24
3
4
5
6
Page 27

12. Index
25
FRANÇAIS
A
aigus, 15
arrêt programmé, 16
arrêt sur image, 19
C
câble péritel, 12
caméscope, 13
casque, 13, 16
code de protection, 8
console de jeux, 12
D
décodeur, 12, 13
déplacement image, 11
deux écrans, 11, 18
diagnostics et pannes, 22
DVD, 12
E
émission bilingue, 19
entretien, 3
F
façade, 6
format d'image, 17
fréquence, 9
G
graves, 15
I
informations à l'écran, 18
installation automatique, 10
installation manuelle, 9
L
lampe, 23
langage, 19
liste des programmes hertziens, 10
M
magnétoscope, 12
mémoriser les chaînes télévision, 8
menu langue OSD, 11
minuterie veille, 16
mise en service de l’Ecran Plat DLP™, 4
modifier numéro de programme, 10
N
nicam, 26
P
pays, 9
précautions, 2
première installation rapide, 5
préréglages d'usine, 8
R
récepteur satellite, 12
rechercher les chaînes hertziennes, 8
réglages de l'image, 15
réglages de son, 15
S
sélection des programmes, 19
son arrêté, 19
sources externes, 13
sources informatiques, 14
sous-pages télétexte, 20
sous-titres, 20
stéréo, 18
S-VHS, 13
T
télécommande, 7
télétexte, 20
V
verrouillage, 16
volume, 18
Page 28

Vidéo
Ecran : 127 cm
Format : 16/9
Résolution : 1280 x 720
Contraste : 2000: 1
Luminosité : 500 cd/m2
Angle de vue : 60/20
Réception Tuner
Fréquences d'entrée: 45,5 - 862,25 MHz
Sensibilité d 'entrée: 20 - 100 dBµV
Nombre de Programmes : 100
PAL B, G, H, I, SECAM B, G, SECAM L/L'
VHF E2 -E12
VHF A - H (Italie)
VHF H1 - H2 (Italie)
UHF E21 - E69
CATV (S01 - S02)
CATV S11 - S20 (U1 - U10)
CATV S1 - S10 (M1 - M10)
CATV S21 - S41 (hyper bande)
PAL D, K, SECAM D, K
VHF R1 - R2
VHF R6 - R12
VHF R3 - R5
UHF E21 - E69
Démodulation audio
AM 6,5 MHz / NICAM 5,85 MHz (L L')
FM 5,5 MHz 5,74 MHz (BG)
FM 5,5 MHz / NICAM 5,85 MHz (B G)
FM 6,0 MHz / NICAM 6,55 MHz (I)
FM 6,5 MHz 6,258 MHz / NICAM 5,85 MHz (D K K')
Audio
Puissance maximum : 2 x 15 W RMS
Nombre de haut-parleurs : 2 x 2 voies
Face avant
AV5
Entrée S-vidéo (Mini Din 4-pin)
Entrée Composite vidéo (1 x RCA)
Entrée Audio (2 x RCA)
PC1
Entrée VGA Computer (subD 15-pin)
Entrée Audio (1 x jack 3,5)
Casque
Sortie (jack 3,5)
7 touches (marche/arrêt, P+, P-, V+, V-, Menu, OK)
3 indicateurs lumineux (on/off, lampe, température)
Connectique arrière
Péritel 1 (RGB/Comp./ S-vidéo; audio)
Péritel 2 (RGB/Comp./ S-vidéo; audio)
Péritel 3 (S-vidéo/Comp.; audio)
AV4
Entrée S-vidéo (Mini Din 4-pin)
Entrée Composite vidéo (1 x RCA)
Entrée Audio In (2 x RCA)
AV6 (entrelacé)
Entrée Y, Cb, Cr In (3 x RCA)
Entrée Audio (2 x RCA)
AV7 (progressive)
Entrée Y, Pb, Pr In (3 x RCA)
Entrée Audio (2 x RCA)
Hi-fi
Sortie Audio out (2 x RCA)
Caisson de basse
Sortie audio (1 x RCA)
PC2
Entrée informatique DVI D
Entrée Audio (1 x jack 3,5)
Signaux d'entrée
Signal vidéo :
Native/Upscale : SDTV/EDTV (480i/480P)(576i/576P)
HDTV (1080i/720P)
Signal PC :
Native/Upscale : VGA 640 x 480, SVGA 800 x 600,
XGA 1024 x 768, SXGA 1280 x 1024
Alimentation
AC 220-240 V ~50 Hz
Puissance consommée max. 250 W
(Stand-by 5 W)
Dimensions et poids
Dimensions (h x l x p) : 1166 x 904 x 375 mm
Poids : 42 kg
Dimensions et poids (emballé)
Dimensions (h x l x p) : 1312 x 905 x 560 mm
Poids : 56 kg
Accessoires
Télécommande TL50
Piles : 2 x 1,5 V (type AA)
Cordon secteur
Manuel d'utilisation
Cordon RF
Normes CE européennes
CEM (Compatibilité ElectroMagnétique)
EN55013 : 10.2001
EN55020 : 2002
EN55022 : 1998+A1 : 2000
EN55024 : 09.1998+A1 : 10.2001
EB61000-3-2 : 12.2000
EN61000-3-3 : 01.95+A1 : 06.2001
Sécurité électrique
EN60065 . 1998
13. Caractéristiques techniques
26
Page 29

NOTES
27
FRANÇAIS
Page 30

NOTES
28
Page 31

TABLE OF CONTENTS
1. PRECAUTIONS . . . . . . . . . . . . . . . . . . . . . . . . . . . . . . . . . . . . . . . . . . . . . . . . . . . . . . . . . .2
1.1. Safety . . . . . . . . . . . . . . . . . . . . . . . . . . . . . . . . . . . . . . . . . . . . . . . . . . . . . . . . . . . . . . . . .2
1.2. Maintenance . . . . . . . . . . . . . . . . . . . . . . . . . . . . . . . . . . . . . . . . . . . . . . . . . . . . . . . . . . . .3
2. SET UP . . . . . . . . . . . . . . . . . . . . . . . . . . . . . . . . . . . . . . . . . . . . . . . . . . . . . . . . . . . . . . .4
2.1. Aerial connection . . . . . . . . . . . . . . . . . . . . . . . . . . . . . . . . . . . . . . . . . . . . . . . . . . . . . . . . .4
2.2. Mains connection . . . . . . . . . . . . . . . . . . . . . . . . . . . . . . . . . . . . . . . . . . . . . . . . . . . . . . . . .4
2.3. Switch on . . . . . . . . . . . . . . . . . . . . . . . . . . . . . . . . . . . . . . . . . . . . . . . . . . . . . . . . . . . . . . .4
2.4. Switching off the Flat Screen DLP™ . . . . . . . . . . . . . . . . . . . . . . . . . . . . . . . . . . . . . . . . . .5
3. FIRST RAPID INSTALLATION . . . . . . . . . . . . . . . . . . . . . . . . . . . . . . . . . . . . . . . . . . . . . . . . .5
4. FRONT PANEL FUNCTIONS . . . . . . . . . . . . . . . . . . . . . . . . . . . . . . . . . . . . . . . . . . . . . . . . . .6
4.1. Front panel controls . . . . . . . . . . . . . . . . . . . . . . . . . . . . . . . . . . . . . . . . . . . . . . . . . . . . . . .6
4.2. Front panel light indicators and remote control receiver . . . . . . . . . . . . . . . . . . . . . . . . . . . .6
5. REMOTE CONTROL . . . . . . . . . . . . . . . . . . . . . . . . . . . . . . . . . . . . . . . . . . . . . . . . . . . . . . .7
6. PERSONALISED SETTINGS . . . . . . . . . . . . . . . . . . . . . . . . . . . . . . . . . . . . . . . . . . . . . . . . . . .8
6.1. Changing the security code . . . . . . . . . . . . . . . . . . . . . . . . . . . . . . . . . . . . . . . . . . . . . . . . .8
6.2. Return to initial configuration . . . . . . . . . . . . . . . . . . . . . . . . . . . . . . . . . . . . . . . . . . . . . . . .8
6.3. Searching TV programmes . . . . . . . . . . . . . . . . . . . . . . . . . . . . . . . . . . . . . . . . . . . . . . . . . .8
6.3.1. Selecting norm for your country . . . . . . . . . . . . . . . . . . . . . . . . . . . . . . . . . . . . . . . . . . . . . . . . . .9
6.3.2. Manual installation . . . . . . . . . . . . . . . . . . . . . . . . . . . . . . . . . . . . . . . . . . . . . . . . . . . . . . . . . . . .9
6.3.3. Automatic installation . . . . . . . . . . . . . . . . . . . . . . . . . . . . . . . . . . . . . . . . . . . . . . . . . . . . . . . . .10
6.3.4. Modifying the programme list . . . . . . . . . . . . . . . . . . . . . . . . . . . . . . . . . . . . . . . . . . . . . . . . . . .10
6.4. Choose the MENU language . . . . . . . . . . . . . . . . . . . . . . . . . . . . . . . . . . . . . . . . . . . . . . .11
6.5. Double picture mode tuning . . . . . . . . . . . . . . . . . . . . . . . . . . . . . . . . . . . . . . . . . . . . . . . .11
6.6 Exit standby mode tuning . . . . . . . . . . . . . . . . . . . . . . . . . . . . . . . . . . . . . . . . . . . . . . . . . .11
7. CONNECTING EQUIPMENT AND CONFIGURATIONS . . . . . . . . . . . . . . . . . . . . . . . . . . . . . . . . . . .12
7.1. Connection advice . . . . . . . . . . . . . . . . . . . . . . . . . . . . . . . . . . . . . . . . . . . . . . . . . . . . . . .12
7.2. Source configuration . . . . . . . . . . . . . . . . . . . . . . . . . . . . . . . . . . . . . . . . . . . . . . . . . . . . .13
7.3. Configuration of computer sources . . . . . . . . . . . . . . . . . . . . . . . . . . . . . . . . . . . . . . . . . . .14
8. DAY-TO-DAY USE . . . . . . . . . . . . . . . . . . . . . . . . . . . . . . . . . . . . . . . . . . . . . . . . . . . . . . .15
8.1. Picture adjustment . . . . . . . . . . . . . . . . . . . . . . . . . . . . . . . . . . . . . . . . . . . . . . . . . . . . . . .15
8.2. Sound adjustment . . . . . . . . . . . . . . . . . . . . . . . . . . . . . . . . . . . . . . . . . . . . . . . . . . . . . . .15
8.3. Sleep timer . . . . . . . . . . . . . . . . . . . . . . . . . . . . . . . . . . . . . . . . . . . . . . . . . . . . . . . . . . . .16
8.4. Locking the television set . . . . . . . . . . . . . . . . . . . . . . . . . . . . . . . . . . . . . . . . . . . . . . . . . .16
8.5. Choice of sources . . . . . . . . . . . . . . . . . . . . . . . . . . . . . . . . . . . . . . . . . . . . . . . . . . . . . . .17
8.6. Choice of format . . . . . . . . . . . . . . . . . . . . . . . . . . . . . . . . . . . . . . . . . . . . . . . . . . . . . . . .17
8.7. Programme information . . . . . . . . . . . . . . . . . . . . . . . . . . . . . . . . . . . . . . . . . . . . . . . . . . .18
8.8. Double picture mode selection . . . . . . . . . . . . . . . . . . . . . . . . . . . . . . . . . . . . . . . . . . . . . .18
8.9. Choice of sound adjustment . . . . . . . . . . . . . . . . . . . . . . . . . . . . . . . . . . . . . . . . . . . . . . . .19
8.10. Choosing a TV programme . . . . . . . . . . . . . . . . . . . . . . . . . . . . . . . . . . . . . . . . . . . . . . . .19
8.11. Picture hold . . . . . . . . . . . . . . . . . . . . . . . . . . . . . . . . . . . . . . . . . . . . . . . . . . . . . . . . . . . .19
9. TELETEXT . . . . . . . . . . . . . . . . . . . . . . . . . . . . . . . . . . . . . . . . . . . . . . . . . . . . . . . . . . . .20
10. DIAGNOSTIC AND FAULTS . . . . . . . . . . . . . . . . . . . . . . . . . . . . . . . . . . . . . . . . . . . . . . . . . .22
11. CHANGING THE LAMP UNIT . . . . . . . . . . . . . . . . . . . . . . . . . . . . . . . . . . . . . . . . . . . . . . . . .23
12. INDEX . . . . . . . . . . . . . . . . . . . . . . . . . . . . . . . . . . . . . . . . . . . . . . . . . . . . . . . . . . . . . .25
13. TECHNICAL CHARACTERISTICS . . . . . . . . . . . . . . . . . . . . . . . . . . . . . . . . . . . . . . . . . . . . . .26
1
ENGLISH
Page 32

1. Precautions
1.1. Safety
Respect all maintenance advice, safety precautions and instructions recommended in this
user booklet for your safety and to prolong the working life of the equipment.
• Definitions
Warning - Danger. Warning concerning user and equipment safety.
Warning - Warning about the risk of electric shocks.
Warning - Indicates a hot surface.
Warning - Warning about the danger of the lamp explosion.
• Safety regulations
This FLAT SCREEN DLP™ is a class 1 appliance; it MUST be connected to an
electrical wall socket equipped with an earth.
This FLAT SCREEN DLP™ is designed to function:
- with a 220-240 V, 50 Hz, AC (alternating current) network;
- at an ambient temperature between +5°C and +35°C;
- in areas with humidity less than 85%.
(For more details, see the "Technical Specifications” paragraph on page 26).
To avoid danger of overheating or electrocution:
- avoid direct exposure to sunlight and do not put naked flames or any other heat
source under the appliance;
- do not expose the appliance to water drips or splashes;
- do not place objects filled with liquid, such as flower vases, on the appliance;
- do not expose the appliance to very dusty environments;
- avoid shocks and vibrations.
You are recommended to disconnect the appliance from the power supply and the
aerial:
- during storms;
- when not used for long periods of time;
- when the appliance is malfunctioning (see paragraph: "Diagnostics and faults",
page 22).
If used with a PC, switch on the FLAT SCREEN DLP™ before the computer.
Make sure that ventilation grills are not obstructed by objects such as newspapers, table
cloths, curtains etc.
To avoid electric shocks, do not insert foreign bodies, such as needles, coins into the
ventilation grills.
Leave a gap of at least 10 cm around the appliance to allow sufficient ventilation.
Before disconnecting the power lead, you are recommended to let the cooling fans work
for a few minutes.
2
Warning
Warning
Page 33

This FLAT SCREEN DLP™ uses high voltages. Never attempt to access the interior of
the apparatus, except when you are changing the lamp unit.
Only suitably qualified persons are authorised to do this.
Do not open or dismantle this product as this will expose you to the risk of electrocution.
This appliance will auto-detect the end of the lamp's working life. Replace the lamp as
soon as the "bulb" indicator lights up on the front panel.
When the FLAT SCREEN DLP™'s lamp reaches the end of its working life, there could
be a loud, sharp sound when it stops working. The appliance will only work when you
replace the bulb.
To avoid burns or the lamp unit exploding whilst it is being replaced, you must
disconnect the mains lead from the wall socket.
Make sure that you follow the whole replacement procedure described in
"Changing the lamp unit" on page 23 and 24.
Only use suitable batteries that comply with the maker's specifications (see "Technical
Specifications" page 26):
- the batteries supplied are not rechargeable;
- pay particular attention to environmental matters;
- take the defective or used batteries to the places provided for this effect in
accordance with current regulations; never throw them in the dustbin.
1.2. Maintenance
• Before doing anything, disconnect the mains lead from the wall socket.
• Clean the cabinet using a soft, slightly damp cloth and a non-abrasive and non-wax detergent.
• Never use Benzene, alcohol or petroleum-based cleaning products as these could damage the
finish.
• Clean the screen carefully using a soft, damp cloth lightly impregnated with a soap solution.
3
ENGLISH
Warning
Page 34

2. SET UP
2.1. Aerial connection
Insert the end of the coaxial cable leading from your aerial into the aerial input socket at the back of
the Flat Screen DLP™.
Your Flat Screen DLP™ is fitted with 2 tuners, but only one cable is needed to supply both.
2.2. Mains connection
Insert the mains plug into a 220-240 V socket that is earthed (3 pin).
2.3. Switch on
Switch the appliance on by pressing the switch on the left
of your appliance.
Setting up your remote control:
Open the battery compartment cover and insert the two R6-1.5V
type batteries.
Make sure that the batteries are installed correctly.
Do not use batteries of different types or rechargeable batteries.
Setting up the Flat Screen DLP™:
Press the stand-by button * on your remote control or press the standby button * on the front
panel of your appliance.
NB: The on/off indicator light located on the front panel of your Flat Screen DLP™ flashes orange
whilst the lamp is warming up then changes to green when your Flat Screen DLP™ is in use.
When you set up your Flat Screen DLP™ for the first time, you can take advantage of a rapid
installation procedure after this warm-up phase (see next chapter). Connecting other audio/video or
PC appliances is covered in chapter 7.1. Before looking at this, proceed to the rapid installation.
4
Page 35

2.4. Switching off the Flat Screen DLP™
To switch off your Flat Screen DLP™, press the standby button on the front panel or the standby
button on the remote control for at least 2 seconds.
During the standby phase, the light indicator on the front panel will flash orange. In order to prolong
the lamp's working life, the actual standby phase only starts when the front panel indicator light is
red. Wait 10s before switching back on.
During the standby procedure, your appliance will refuse to leave standby, if you request it to
(see § 4.2).
WARNING
In order not to interrupt the standby procedure, NEVER switch off your appliance using the mains
switch or disconnect the wall plug unless the front panel led is red.
3. First Rapid Installation
Your Flat Screen DLP™ is not preset to receive the wireless channels for your region. This rapid
installation is automatically offered when you set up the appliance. It allows you to configure the basic
elements of your product (menu languages, country, and channel reception).
Select the menu language using the W and V keys, validate
using the OK key.
Select the country where you are or where you wish to receive
channels, if you live by a frontier, using W and V keys and
validate using OK button.
After validation using the OK button, the automatic search begins
and the channels are identified and saved automatically.
You can interrupt the search at any time by pressing the MENU
key. In this instance, the search result will not be saved.
5
ENGLISH
Country colour system stereo
France SECAM L Nicam L
Germany PAL B,G Two B/G carriers
Austria PAL B,G Two B/G carriers
Italy PAL B,G Two B/G carriers
Spain PAL B,G Nicam B/G
Netherlands PAL B,G Two B/G carriers
Denmark PAL B,G Nicam B/G
Sweden PAL B,G Nicam B/G
Norway PAL B,G Nicam B/G
Finland PAL B,G Nicam B/G
Belgium PAL B,H Nicam B/G
Switzerland PAL B,G Two B/G carriers
UK PAL I Nicam I
Portugal PAL B,G
OSD LANG.
ENGLISH
FRANCAIS
DEUTSCH
ITALIANO
ESPANOL
PORTUGUES
COUNTRY
DEUTSCHLAND
OSTERREICH
BELGIQUE
DANMARK
ESPAÑA
FINLANDE
FRANCE
AUTO TUNING
SEARCHING
CHANNEL 52
CHANNELS FOUND : 2
MENU KEY TO STOP SEARCHING
Page 36

4. Front Panel Functions
4.1. Front panel controls
4.2. Front panel light indicators and remote control receiver
6
Remote control receiver.
Internal temperature light.
Flashes red when temperature is
excessive.
Lamp indicator:
Flashing red during 10 sec. after
switch-on of the Flat Screen DLP™
to indicate a lamp change very
close.
Red to indicate immediate lamp
change.
On/standby light
Red: standby
Flashing red: switch-on and
standby phases
Flashing green: immediate
restart phase if necessary
Green: in operation
Access button to
configuration menus.
When menu is called
up, theB,
C, V and W
buttons are used to
move within the
screens. Return to the
previous screen by
pressing this button.
On/off button.
Validation button (in menus).
Programme change button.
Volume adjustment buttons to
increase B or
decrease C sound volume.
Page 37

5. REMOTE CONTROL
7
ENGLISH
Colour buttons (A, B, C, D) used
in configuration menus, teletext
and NexTView programme guide
Picture or Teletext page held
Return to previous channel or
return to previous page in a menu
or teletext mode
Choice of picture format
Access to
configuration menus and
additional functions in teletext
mode
PIP/PAP functions
- Call up and choice of function
- Screen selection
- Source exchange
Decrease audio volume
Teletext on/mode
Transparent/stop
Teletext index
On/Standby
Navigator in configuration menus
to select your choice and OK to
validate it
On-screen information
and TOP teletext
NexTView programme guide
(function unavailable)
Choice of picture source
Sound or language source
Mute
Increase audio volume
Programme selection
(Programme +, programme -)
Teletext - hidden text
Teletext fast mode
Numeric buttons
Page 38

6. Personalised settings
6.1. Changing the security code
Press the MENU button, then choose INSTALL., using
the B button and validate with OK button.
All installation screens can be protected by a personal
code.
The default code is 0000. This does not lock the installation
screens.
Choose CHANGE CODE and validate using the OK button.
Enter the new code then confirm the same code in the
confirmation screen and validate by using OK button.
NB: To lock these screens, enter a different code than
0000. Always remember your new code.
6.2. Return to initial configuration
Press the MENU button, then choose INSTALL., using
the B button and validate with OK button.
Enter your personal code then validate using the OK button
(no code is requested for the initial 0000 code).
If necessary, you can automatically configure your Flat
Screen DLP™ to the original settings. In this instance, all
your personal settings will be lost (list of channels, country,
languages…).
Choose FACT. RESET and validate using OK button. A
confirmation screen invites you to continue by pressing the
OK button and cancel by pressing the BACK button.
6.3. Searching TV programmes
The programmes are installed at the initial set-up. Nevertheless, the following functions are useful if
you relocate to another region.
8
IMAGE AUDIO OPTIONS INSTAL.
CODE
PROTECTION
SOURCES
PC DATA
SEARCH
CODE
INPUT
VERROU
- - - -
CHAINE
MODIF. CODE
CONFIG. USINE
CODE CODE
PROTECTION VERROU
SOURCES CHAINE
DONNEES PC
RECHERCHE
MODIF. CODE
CONFIG. USINE
IMAGE AUDIO OPTIONS INSTAL.
CODE
PROTECTION
SOURCES
PC DATA
SEARCH
GENERAL
CHANGE CODE
FACT. RESET
MODIF. CODE
CONFIG. USINE
NO
INPUT
SOURCES
CONFIRM
DONNEES PC
RECHERCHE
CODE
- - - -
V
- - - -
ERROU
CHAINE
- - - -
MODIF. CODE
CONFIG. USINE
IMAGE AUDIO OPTIONS INSTAL.
CODE
PROTECTION
SOURCES
PC DATA
SEARCH
CODE
INPUT
VERROU
CHAINE
MODIF. CODE
CONFIG. USINE
CODE CODE
PROTECTION VERROU
- - - -
SOURCES CHAINE
DONNEES PC
RECHERCHE
MODIF. CODE
CONFIG. USINE
IMAGE AUDIO OPTIONS INSTAL.
CODE
PROTECTION
SOURCES
PC DATA
SEARCH
GENERAL
CHANGE CODE
FACT. RESET
MODIF. CODE
CONFIG. USINE
NO
PROTECTION
THE CONFIGURATION WILL BE LOST
DONNEES PC
RECHERCHE
WARNING
SOURCES
CONTINUE
BACK KEY TO CANCEL
CODE
VERROU
CHAINE
MODIF. CODE
CONFIG. USINE
Page 39

6.3.1. Selecting norm for your country
You must select the country that corresponds to the current
broadcasting norm.
Press the MENU key.
Select the "INSTALL." chapter using OK button.
Select the "SEARCH" chapter using OK button.
Select the "COUNTRY" chapter using OK button.
Select the chosen country using V and W buttons.
Your selection will be saved when you exit this menu using
the BACK button.
6.3.2. Manual installation
Select "MANUAL" then validate using OK button.
Only one search screen is then displayed which allows you
to check the programme found.
Television programmes are searched and saved channel by channel.
Select SEARCH and start the search using B or C.
When a picture is displayed on the screen,
• you can decide to save it:
Go to the PROGRAM No line and enter the position of
the desired programme using 0 to 9 buttons.
Move the cursor to "MEMO" and validate using OK
button.
• You can obtain a better picture quality for the picture
received:
Go to the FINE TUNE line and adjust the cursor using
the C and B buttons.
Move the cursor to "MEMO" and validate using OK
button.
• You can decide not to save this picture:
In this instance, restart the search.
Restart this manual procedure for all the programmes you
wish to memorise.
Press on the MENU button to exit.
9
ENGLISH
IMAGE AUDIO OPTIONS INSTAL.
CODE
PROTECTION
SOURCES
PC DATA
SEARCH
COUNTRY
MANUAL
AUTO
LIST EDITION
PROTECTION
DONNEES PC
RECHERCHE
ATTENTION
la configuration sera perdue
SOURCES
CONTINUER
Touche BACK pour annuler
IMAGE AUDIO OPTIONS INSTAL.
CODE
PROTECTION
SOURCES
PC DATA
SEARCH
COUNTRY
MANUAL
AUTO
LIST EDITION
FRANCE (SECAM L)
DEUTCHLAND (PAL B,G)
PROTECTION
OSTERREICH (PAL B,G)
ITALIA (PAL B,G)
NEDERLAND (PAL B,G)
DANMARK (PAL B,G)
DONNEES PC
SVERIGE (PAL B,G)
RECHERCHE
ATTENTION
la configuration sera perdue
SOURCES
CONTINUER
Touche BACK pour annuler
CODEGENERAL NON
VERROU
CHAINE
MODIF. CODE
CONFIG. USINE
CODEGENERAL NON
VERROU
CHAINE
MODIF. CODE
CONFIG. USINE
IMAGE AUDIO OPTIONS INSTAL.
CODE
MEMO
PROTECTION
DONNEES PC
RECHERCHE
ATTENTION
la configuration sera perdue
SOURCES
CONTINUER
Touche BACK pour annuler
00
PROTECTION
SOURCES
PC DATA
SEARCH
COUNTRY
MANUAL
AUTO
LIST EDITION
MANUAL SEARCH
SEARCH
FINE TUNE
PROGRAM No
FREQUENCY 184,00
MENU KEY TO STOP SEARCHING
CODEGENERAL NON
VERROU
CHAINE
MODIF. CODE
CONFIG. USINE
Page 40

6.3.3. Automatic installation
Select "AUTO" and validate using OK button.
Your previous search will be erased and replaced by the
new one, confirm by pressing OK button.
All channels are searched and saved automatically.
If the broadcast signal is recognised by the transmission of
a teletext page, programmes will be named and classified.
You can decide to stop the search at any point in time, by
using the MENU button.
Your search results will not then be saved.
6.3.4. Modifying the programme list
You can modify the programme list that is a result of your
search at any time.
Press the MENU button.
Select the "INSTALL." chapter using the OK button.
Select the "LIST EDITION" chapter using the OK button.
From this screen, you can:
• Delete a programme
Go to the line of the programme to be deleted and press
the red button to delete it. If you make a mistake, press
the red button again and the deleted programme will be
restored.
• Move a programme
Go to the line of the programme to be moved and press
the green button to select it (a "D" will appear to the left
to indicate the selection), move it using the W or V
keys, then validate the location using the green button.
• Change the programme name
Go to the line of the programme name to be modified
and press the yellow button to select it.
Enter the first characters. Move through the characters
using the W and V buttons.
Move forward one character using B then enter the
second etc. (Maximum 6 characters).
Validate using yellow button at end.
• Apply noise reduction filter to a programme
Go to the line of the programme name to be modified
and press the blue button to change the filter.
Each press on the blue button applies the next filter.
Apply a "weak", "medium" or "strong" filter according to
your reception.
Choose "none" if no filter is necessary.
NB: You can display the selected screen at any time
by pressing the OKbutton.
Press the
MENU
button to exit.
10
AUTO TUNING
SEARCHING
CHANNEL 52
CHANNELS FOUND : 2
MENU KEY TO STOP SEARCHING
IMAGE AUDIO OPTIONS INSTAL.
CODE
PROTECTION
SOURCES
PC DATA
SEARCH
COUNTRY
MANUAL
AUTO
LIST EDITION
PROTECTION
DONNEES PC
RECHERCHE
ATTENTION
la configuration sera perdue
SOURCES
CONTINUER
Touche BACK pour annuler
CODEGENERAL NON
VERROU
CHAINE
MODIF. CODE
CONFIG. USINE
LIST EDITION
PROG.
1
2
3
4
5
6
DELETE
FREQ.
479,5
527,25
599,25
671,25
735,25
789,25
MOVE
NAME
TF1
F2
F3
C+
F5
M6
NAME
N.R.
NONE
LOW
MEDIUM
HIGH
NONE
NONE
OK
N.R. VIEW
Page 41

6.4. Choose the MENU language
You can select the menu and information display language.
Press the MENU button.
Select the "OPTIONS" chapter using the OK button.
Select the "OSD LANG." chapter using the OK button.
Select the chosen language using the C and B buttons.
Press the MENU button or the BACK button to return to
the previous screen.
6.5. Double picture mode tuning
This tuning allows you to set your preferences in PIP (“picture in picture”) and PAP (“picture and
picture”) mode. Refer to paragraph 8.9 for normal use.
• Choice of audio source from headphones
"MAIN" will restore the sound of the full screen picture in
PIP mode or the right-hand picture in PAP mode to the
headphones.
"PIP/PAP" will restore the sound of the inset picture in
PIP mode or the left-hand picture in PAP mode to the
headphones.
• Choice of PIP and PAP preference
PIP yes and PAP yes
Pressing the F button more than once will take you to
PIP, PAP and then the full screen in succession.
PIP yes and PAP no
Pressing the F button more than once will take you to
PIP and then the full screen in succession.
PIP no and PAP yes
Pressing the F button more than once will take you to
PAP and then the full screen in succession.
PIP no and PAP no
Pressing the F button more than once will have no
effect. The permutation of source H and selection of
source G will not work either).
6.6 Exit standby mode tuning
This preference allows you to choose alarm mode or to
move to standby.
"Manual": exit from standby and move to standby by
pressing standby button * on the remote control or the
front panel.
"Auto": exit from standby or move to automatic standby
commanded by exit from standby or move to standby of the
equipment connected to the "SCART" connectors at the
rear.
The default setting of the direct access button F
will be determined by your PIP and PAP choice.
11
ENGLISH
IMAGE AUDIO OPTIONS INSTAL.
SLEEP TIMER
HEADPHONES
PICTURE IN PICTURE (PIP)
PICTURE AND PICTURE (PAP)
OSD LANG.
SOURCES MANAGER
ENGLISH
FRANCAIS
DEUTSCH
ITALIANO
ESPANOL
PORTUGUES
NO
MAIN
YES
YES
FRANCAIS
AUTO
IMAGE AUDIO OPTIONS INSTAL.
SLEEP TIMER
HEADPHONES
PICTURE IN PICTURE (PIP)
PICTURE AND PICTURE (PAP)
OSD LANG.
SOURCES MANAGER
ENGLISH
FRANCAIS
DEUTSCH
ITALIANO
ESPANOL
PORTUGUES
IMAGE AUDIO OPTIONS INSTAL.
NO
MAIN
YES
YES
FRANCAIS
AUTO
SLEEP TIMER
HEADPHONES
PICTURE IN PICTURE (PIP)
PICTURE AND PICTURE (PAP)
OSD LANG.
SOURCES MANAGER
ENGLISH
FRANCAIS
DEUTSCH
ITALIANO
ESPANOL
PORTUGUES
NO
MAIN
YES
YES
FRANCAIS
AUTO
IMAGE AUDIO OPTIONS INSTAL.
SLEEP TIMER
HEADPHONES
PICTURE IN PICTURE (PIP)
PICTURE AND PICTURE (PAP)
OSD LANG.
SOURCES MANAGER
ENGLISH
FRANCAIS
DEUTSCH
ITALIANO
ESPANOL
PORTUGUES
NO
MAIN
YES
YES
FRANCAIS
AUTO
Page 42

7. Connecting equipment and configurations
7.1. Connection advice
Your Flat Screen DLP™ offers you a large selection of connectors to attach the equipment of your
choice.You are advised to carry out the connections when the appliances are switched off.
REAR PANEL
SCART 1 recommended for a DVD player, a DVDR player/recorder, a digital decoder (cable,
satellite or wireless).
SCART 2 recommended for a Canal+ analogue decoder, a digital decoder (cable, satellite or
wireless).
SCART 3 recommended for a VHS or SVHS video player.
AV4 recommended for a games console.
AV 6 recommended for a DVD player with Y Pb Pr sockets in "progressive" mode. (This type
of connection significantly improves picture quality).
HiFi allows a sound amplifier to be connected as well as its speakers.
Respect the colours for the left and right channels.
For ease of listening, mute the sound on your Flat Screen DLP™ (see
chapter 8.2).
The audio volume will be regulated by your amplifier. The DLP™ technology causes a
slight delay in picture processing, so connect your amplifier to these sockets and not to
those of the source.
PC2 IN recommended for a PC equipped with "DVI D" socket. Only use a "DVI D" cable
(graphics card).
Sub woofer allows a base woofer to be connected (option).
12
DVD
DVD
or
DIGITAL DECODER
eC
Games
Console
DIGITAL DECODER
DVD
or
DVD
or
C+ DECODER
DVI D
VIDEO RECORDER
VHS
or
(
DVD
or
eC
Games
Console
Page 43

FRONT PANEL
PC1 IN recommended for the connection of a PC fitted with a "VGA" socket.
A 3.5 mm audio jack socket allows you to connect sound.
HEADPHONES recommended for headphones.
Adjusting the headphones is covered in chapter 8.2.
AV 5 recommended when connecting a camcorder in VHS, S-VHS, 8 mm, Hi-8 or digital DVC format.
7.2. Source configuration
Press the MENU key then select "OPTIONS" using the B
button and validate using OK.
If your code is not 0000, this screen is protected and you
must enter your code.
Choose "SOURCES" then validate using OK.
This option allows you to select the sources used but only
displays them when you select sources in daily use.
Choose the connector to be configured (W/V).
For each connector, you can:
• Validate connected equipment by pressing the red key
several times until "YES" (or "NO" for an unused
connector) is displayed. Select "C+" if you have
connected your C+ decoder to SCART 2. In this instance,
enter the C+ programme number at once.
• Choose a pre-programmed name by pressing the green
button several times (DVD, DVDR, C+, DEC, MAG,
GAMES).
• Choose a personalised name by pressing yellow button
to move to edit mode. Scroll the characters using V
or W. Next character using B.
Press yellow button to validate.
• Choose noise reducer.You can apply a noise reducer to
some sources such as a video player by scrolling through
them by pressing the blue button more than once (none,
weak, medium, strong).
NB: You can display the selected channel at any
time by pressing the
OOKK
button.
Press the MENU button to exit.
13
ENGLISH
VGA
IMAGE AUDIO OPTIONS INSTAL.
CODE
PROTECTION
SOURCES
PC DATA
SEARCH
CODE
INPUT
VERROU
- - - -
CHAINE
MODIF. CODE
CONFIG. USINE
CODE CODE
PROTECTION VERROU
SOURCES CHAINE
DONNEES PC
RECHERCHE
MODIF. CODE
CONFIG. USINE
INPUT
SCART 1
SCART 2
SCART 3
AV4
AV5
AV6
AV7
PC1
PC2
SOURCE
SOURCE
YES
C+
YES
NO
NO
NO
NO
NO
NO
CHOOSE NAME
No
:04
NAME
DEC
C+
MAG
JEUX
- - - - - -
- - - - - -
- - - - - -
- - - - - -
- - - - - -
NAME
N.R.
NONE
NONE
MEDIUM
NONE
NONE
NONE
NONE
NONE
NONE
OK
N.R. VIEW
Page 44

7.3. Configuration of computer sources
Press the MENU button, then choose "INSTAL" using
the B button and validate with OK.
Choose "PC DATA" then validate with OK.
This option allows you to adjust the source coming from
your PC in VGA mode. (Entries in DVI D mode do not need
this adjustment).
Horizontal position: press C to move the picture to the
left and B to move it to the right.
Vertical position: Press B or C to move the picture to
the top or bottom.
Frequency: modifies the data display frequency so that it
corresponds to the frequency of your computer's graphics
card. When a flashing vertical bar appears, use this function
to adjust the frequency.
Phase: this enables finer synchronisation with your
computer's graphics card. When an unstable or flashing
page occurs, use this tuning.
Automatic mode: yes/no carries out automatic tuning.
Resolutions accepted (DVI-D and VGA entries)
To ensure that the projection display is operating correctly
with your computer make sure that you configure the
display mode of your graphics card to a resolution lower
than 1024 x 768.
NB: Optimum stability is achieved with a frequency of 60 Hz
(consult the documentation for your PC to configure it).
14
Horizontal Vertical Hz
640 x 480 60
640 x 480 66
640 x 480 72
640 x 480 75
640 x 480 85
800 x 600 60
800 x 600 72
800 x 600 75
800 x 600 85
1024 x 768 60
1024 x 768 70
1024 x 768 75
1152 x 864 60
1152 x 864 70
1280 x 720 60
1280 x 1024 60
IMAGE AUDIO OPTIONS INSTAL.
HORIZONTAL 5
CODE
PROTECTION
SOURCES
PC DATA
SEARCH
CODE
SAISIR
_ _ _ _
VERTICAL 10
VERROU
FREQUENCY -3
CHAINE
PHASE 0
MODIF. CODE
MODE HP INT.
AUTO IMAGE
CONFIG. USINE
CODE CODE
PROTECTION VERROU
SOURCES CHAINE
DONNEES PC
YES
RECHERCHE
MODIF. CODE
CONFIG. USINE
Page 45

8. Day-to-day use
8.1. Picture adjustment
PERSONAL PICTURE TUNING
You can set and save your own parameters using the
"USER" mode.
CONTRAST, BRIGHTNESS, COLOUR, SHARPNESS,
TINT can be adjusted according to your preferences using
the C and B buttons.
The tone adjustment only applies to an NTSC video
source.
The colour balance adjustment allows you to set the main
picture colour.
Adjust using C or B.
PRESET PICTURE SETTINGS
You can choose your picture preference from the settings
offered using the C and B buttons
STANDARD CINEMA STUDIO SPORT
Select the most suitable one for the programme you are
viewing and validate using the OK button.
Press the MENU button to exit and the BACK button to
return to the previous screen.
8.2. Sound adjustment
You can adjust and save your own parameters using:
BASS, TREBLE, BALANCE
Bass allows you to accentuate the lowest frequencies.
Treble allows you to accentuate the highest frequencies.
BALANCE
Adjusting the balance affects the levels of sound between
the right and left speakers. This allows you to obtain a
sound level that is suited to your listening position.
WOOFER VOLUME
This affects the sound volume in your woofer to allow you
to balance the right and left channels.
HIFI OUTPUT VOLUME
This allows you to set an output level (fixed or adjustable
by your flat screen DLP™ remote control.)
15
ENGLISH
IMAGE AUDIO OPTIONS INSTAL.
USER STANDARD CINEMA STUDIO SPORT
CONTRAST 55
BRIGHTNESS 45
COLOR 65
SHARPNESS 85
TEINT 35
COLOR TEMP.
WARM
IMAGE AUDIO OPTIONS INSTAL.
USER STANDARD CINEMA STUDIO SPORT
CONTRAST 55
BRIGHTNESS 45
COLOR 65
SHARPNESS 85
TEINT 35
COLOR TEMP.
IMAGE AUDIO OPTIONS INSTAL.
USER STANDARD CINEMA STUDIO SPORT
WARM
IMAGE AUDIO OPTIONS INSTAL.
BASS 55
TREBLE 45
BALANCE +10
WOOFER VOL. 35
LOUDSP.
HIFI VOL.
HEADPH. VOL. 55
STEREO
FIXED
Page 46

LOUD SP. Mode
(internal speakers): the choice depends on the programme you are watching (stereo, mono).You can
mute the speakers (stop) if you only wish to listen through the headphones.
The headphones volume can be adjusted independently of the speaker volume. When you have
made your adjustments, press the MENU button to exit and the BACK button to return to the
previous screen.
8.3. Sleep timer
Press the MENU button then choose "OPTIONS" using
the B button and validate using OK.
Choose "SLEEP TIMER" then validate using OK.
This option allows you to programme a period of time, after
which the television set will go to standby automatically.
You can set the sleep time at 15 mn intervals up to a
maximum of 180 mn.
One minute before entering standby mode, the last minute
counter will appear on the screen. This screen allows you
to cancel the sleep timer, if you want to.
You can always stop the Flat Screen DLP™ before the
programmed stop time or reprogram the stop time.
8.4. Locking the television set
Press the MENU button then choose "INSTALL." using
the B button and validate using OK.
Enter your personal code, then validate using OK button
(no code is requested for default code 0000).
Choose YES or NO
If your Flat Screen DLP™ is locked, it can only be switched
on when your code has been entered at the invitation
screen.
16
IMAGE AUDIO OPTIONS INSTAL.
SLEEP TIMER
HEADPHONES
PICTURE IN PICTURE (PIP)
PICTURE AND PICTURE (PAP)
OSD LANG.
SOURCES MANAGER
ENGLISH
FRANCAIS
DEUTSCH
ITALIANO
ESPANOL
PORTUGUES
NO
MAIN
YES
YES
FRANCAIS
AUTO
IMAGE AUDIO OPTIONS INSTAL.
CODE
PROTECTION
SOURCES
PC DATA
SEARCH
CODE
INPUT
VERROU
CHAINE
MODIF. CODE
CONFIG. USINE
IMAGE AUDIO OPTIONS INSTAL.
CODE
PROTECTION
SOURCES
PC DATA
SEARCH
GENERAL
CHANGE CODE
FACT. RESET
MODIF. CODE
CONFIG. USINE
CODE CODE
PROTECTION VERROU
- - - -
SOURCES CHAINE
DONNEES PC
RECHERCHE
NO
PROTECTION
SOURCES
DONNEES PC
RECHERCHE
MODIF. CODE
CONFIG. USINE
CODE
VERROU
CHAINE
MODIF. CODE
CONFIG. USINE
Page 47

8.5. Choice of sources
You can select sources in two different ways:
• By using the P+/P- buttons on the front panel only.
Navigate through the valid wireless channels then the
external sources (SCART 1, SCART 2, SCART 3, AV4,
AV5, AV6, A7 etc…).
NB: A channel is valid if it has been found during an
automatic search or if it has been saved during a manual
search.
The zapping banner is displayed each time the channel is
changed and the info banner when the source is changed.
• By using the direct access button b on the remote
control. Select the chosen source by pressing b again
until the correct source is obtained.
Nb: If you have previously configured and named your
equipment entry in chapter 7.2, only the sources connected
and configured at video standard level will be offered.
8.6. Choice of format
A simple access to this choice is by using the direct access
button - This function allows you to display the picture at
the maximum size, including wide screen pictures.
Press the - button of remote control.
Nb: At first press, the info banner displays the current
status without any change of format.
4:3 FORMAT
Displays a 4:3 picture in its original format.
ENLARGED FORMAT
This format allows you to watch 4:3 pictures at the maximum size by applying a correction to the
centre of the screen so that any distortion is only seen at the right and left edges. The size of the
picture will depend on the original signal.
14:9 FORMAT
This format allows you to watch automatic programmes formatted in 14:9 format thanks to WSS
signals.
FORMAT 16:9
This format allows you to watch automatic programmes formatted in 16:9 format thanks to 19/9 signal
arriving at the SCART or to WSS signals.
CINEMA FORMAT
This format allows you to watch films in 1.85 (ACADEMY FLAT) format, broadcast in 4:3 in maximum
screen format without distortion with black bands at the top and bottom.
It allows you to watch films in 2.0, 2.20, and 2.35 format.
17
ENGLISH
SCART 1
16/9
DVD
4/3
SCART 2
CINEMA
Page 48

SUBTITLE FORMAT
This format allows you to watch films in 1:85 (ACADEMY FLAT) format broadcast in 4:3 at maximum
screen format without picture loss and without distortion by moving the picture to the top to enable
any subtitles to be read.
SCOPE FORMAT
This format allows you to watch films in 2.35 (PANAVISION) format, broadcast in 4.3 in maximum
screen format without distortion, at maximum height but with picture loss at the right and left edges.
8.7. Programme information
Press the i+ button at any time to obtain information on the
TV channel.
When you are watching an external video source, the name
of the source will be displayed.
8.8. Double picture mode selection
Switching on double picture mode
Choose the video insert mode (PIP) or two videos side-byside (PAP) by pressing the F button more than once.
When one of the two Modes - (PIP or PAP) is in use, you
can:
Invert the sources by pressing the H button.
Change the sources on the screen by pressing the G
button, then:
• Pr+ ou Pr- to change the wireless channel,
• b to change source then by selecting the relevant
source from the screen displayed.
Change formats on the screen by pressing the G button,
then:
• - to change source then by selecting the relevant
source from the screen displayed.
NB:
The PIP mode video inset is only in 16/9 format.
The CBbuttons change the position of the pip window if
the pip mode is activated. You can navigate through 4
possible positions in the order top-left, top-right, bottom-left,
bottom-right.
18
SSSSEEEELLLLEEEECCCCTTTTIIIIOOOONN
NN
SELECTION
1 (TF1)
4/3
STEREO
Page 49

8.9. Choice of sound adjustment
Volume: On / press + or - to adjust the volume.
Mute: Press to mute or to switch on the sound.
Bilingual broadcast or sound selection: Press to choose between MONO or STEREO sound if
the channel transmits sound in NICAM stereo mode. Choose between DUAL A and DUAL B if there
is a bilingual broadcast.
This adjustment is saved per channel.
8.10. Choosing a TV programme
Use the 0/9 buttons to choose your channel. For a two-digit number, enter the second within
2 seconds.
To watch a one-digit channel directly, press the number button for longer.
Use the BACK button to return to a previously viewed channel.
8.11. Picture hold
Use the K button (pause) to freeze the picture or to activate it.
19
ENGLISH
Page 50

9. Teletext
Teletext functions vary according to television companies and are only available if the selected channel
transmits teletext.
• Switching on teletext
Press the button to switch on teletext without video.
Pressing the button again allows you to view teletext imposed on the
current video.
Pressing it once more switches teletext off.
If there is no teletext on the channel you are watching, a message
will inform you of this.
• Selecting the index page
Teletext pages include an introduction page (usually page 100)
telling you how to use the service.
The button allows you to select this introduction page directly.
• LIST or FASTEXT mode
There are two teletext modes:
- LIST mode: in this mode, four pages numbers appear at the
bottom of the screen, each in a different colour. Each of these
numbers can be changed and saved in the memory.
- FASTEXT mode: in this mode, four subjects appear at the
bottom of the screen, each in a different colour. To obtain
more information on one of these subjects press the
corresponding coloured button.
This function allows you to obtain information on the displayed
subjects quickly.
The required mode is selected by pressing the button.
• Selecting a page
Enter the number of the required page using the 0-9 buttons (There
are no pages starting with a 0 or 9.).
The page counter at the top of the screen searches for the page or
the page appears immediately, if the page number has already been
saved.
If the page does not exist, a message appears to tell you that you
have entered a non-existent number.
You can quickly scroll through teletext pages by using the P+, P- or
VWbuttons (by skipping non-existent pages).
To save another page in this mode, press the relevant coloured
button and enter the page number.
When in FASTEXT mode, you can select a chosen subject using the
colour buttons corresponding to the options at the bottom of the
screen.
• Displaying hidden information
Press the button to call up and delete hidden information, such
as puzzle solutions and replies to questions.
20
Page 51

• Holding a page
Press the K button to hold a text page, whilst looking at information
that is on several pages. Press again to return to automatic update.
• Expand
Press the MENU button then the green button. Pressing it more than
once allows you to display the top half, the bottom half and then
return to normal format.
• Navigation within sub-pages
When the selected pages contain one or more sub-pages, a help
line listing the sub-pages appears at the bottom of the screen.
Use the CBbuttons to choose the next or the previous sub-page.
• Subtitles
TV channels with teletext often transmit certain programmes with
subtitles.
Press the button and select the relevant subtitle page.
The subtitle page continuously appears on the screen if the current
programme is transmitted with subtitles.
21
ENGLISH
Page 52

10. Diagnostic and faults
22
Symptoms:
After initial set-up and after connecting your Flat
Screen DLP™, the on/off indicator light does
not light up.
The appliance does not switch on when the
on/standby button on the front panel or the
on/standby button on the remote control is
pressed.
There is no picture.
Black and white picture or picture interference.
No sound.
Sound weak or discordant during terrestrial
reception.
Frozen picture.
Your appliance does not start up when you exit
standby by pressing the front panel button and
the standby button on your remote control.
No picture on PIP mode.
The remote control is not working normally.
Recommended checks:
Check that the mains cable to Flat Screen DLP™ is
connected to the appliance and the wall socket. Also check
that the switch on the left of the appliance is pressed to
position I.
Check that the mains cable to Flat Screen DLP™ is
connected to the apparatus and the mains socket. Also check
that the switch on the left of the appliance is pressed to
position I.
The on/off switch is green and the Flat Screen DLP™ menus
are available: Check that your video appliances are connected
correctly and that you have selected the correct source for
your Flat Screen DLP™ (Chapter 8.5: Choice of sources).
Check that the aerial lead is correctly connected to the wall
socket of your Flat Screen DLP™. Also check that you have
the channels saved by your Flat Screen DLP™ in the Options
/search/edit list menu. If this is not the case, perform a manual
or automatic search.
Also check that the switch on the left side of the apparatus is
pressed to position I.
The internal temperature indicator light is flashing red: respect
the user precautions to avoid an excessive increase of the
internal temperature (chapter 1: precautions).
The lamp condition indicator light is red: the lamp has gone
past its standard working life and may no longer be
functioning. It must be changed.
Check that you have selected the correct video format: e.g.
RGB video source from a DVD player displayed in S-video on
your Flat Screen DLP™: check by pressing the picture source
selection button if the type of source selected is compatible
with the source emitted.
Check that the colour adjustment is not at minimum.
Check that the volume is not set at minimum and that mute
has not been activated.
Check that your appliances are correctly connected to your
Flat Screen DLP™.
Set sound to Mono.
Check that you have not held the picture: press the “PICTURE
of TELETEXT PAGE HELD” button.
The ON/STANDBY indicator light flashes orange for 20s then
turns to red or still flashes orange, switch off the appliance
using the switch to the left of your Flat Screen DLP™. Wait
30s and restart is using the normal procedure.
Check that you have selected sources that is active in PIP
mode (Chapter 8.8 Double picture mode selection).
Change the batteries.
Page 53

11. CHANGING THE LAMP UNIT
Only replace the old lamp unit with authorised model RL 1080A, reference number Sagem 251282989.
The old lamp unit must be recycled (contact your recycling agency to obtain the address of the nearest
depot).
WARNING
1. You must only change the lamp unit, when the appliance is switched off and mains cable
disconnected from the wall socket.
2. Never try to replace the lamp unit immediately after the Flat Screen DLP™ has been switched off.
So that the lamp is completely cooled down, wait at least 1 hour before changing the lamp unit.
3. Only use the tool provider to change the lamp unit.
Never touch any wires or the bulb itself.
4. Make sure that you tighten all the screws and do not leave any foreign bodies inside the
appliance.
Remove the front panel by gripping it on each
side and pull it towards you.
Unscrew the protection panel (use a Phillips
screwdriver) and remove the panel, taking care
to retain the screws.
23
ENGLISH
1
2
Page 54

Unscrew the 3 fixing screws for the lamp unit
and pull out the old lamp unit by its handle.
(These 3 screws are called "unloseable" - i.e.
once they are unscrewed they remain in the
lamp unit.
Take the new lamp unit by its handle and insert
it in place of the previous lamp unit.
Rescrew the 3 fixing screws.
Do not forget to remove the handle) taking
care not to touch the bulb).
Reattach the protection panel using the
2 screws.
Replace the front panel by pressing it slightly
until it goes back into place.
24
3
4
5
6
Page 55

12. Index
25
ENGLISH
A
Automatic installation, 10
B
Bass, 15
Bilingual programmes, 19
C
Camcorder, 13
Country, 9
D
Data sources, 14
Decoder, 12, 13
Diagnostics and faults, 22
DVD, 12
E
External sources, 13
F
Factory presets, 8
First rapid installation, 5
Frequency, 9
Front panel, 6
G
Games console, 12
H
Headphones, 13, 16
I
Information on screen, 1
L
Lamp, 23
Language, 19
List of wireless programmes, 10
Locking, 16
M
Maintenance, 3
Manual installation, 9
Modify the programme number, 10
Mute, 19
N
NICAM, 26
O
OSD language menu, 11
P
Picture adjustment, 15
Picture format, 17
Picture movement, 11
Precautions, 2
Programmed stop 16
Programme selection, 19
Protection code, 8
R
Remote control 7
S
Satellite receiver, 12
SCART cable, 12
Saving television channels, 8
Search wireless channels, 8
Setting up the Flat Screen
Sleep timer, 16
Sound adjustment, 15
Stereo, 18
Stop on picture, 19
Subtitles, 20
S-VHS, 13
T
Teletext, 20
Teletext sub-pages, 20
Treble, 15
Two screens, 11, 18
V
Video recorder/player, 12
Volume, 18
Page 56

Video
Screen size: 50 inches
Aspect ratio: 16/9
Resolution: 1280 x 720
Contrast ratio: 2000: 1
Brightness: 500 cd/m2
Viewing angle: 60/20
Reception Tuner
Input frequencies: 45.5 - 862.25 MHz
Input sensitivity: 20 - 100 dBµV
Number of programmes: 100
PAL, B, G, H, I, SECAM B, G, SECAM L/L'
VHF E2-E12
VHF A - H (Italy)
VHF H1 - H2 (Italy)
UHF e21 - e69
CATV (S01 - S02)
CATV S11 - S20 (U1 - U10)
CATV S1 - S10 (M1 -M10)
CATV S21 -S41 (hyperband)
PAL D, K, SECAM D, K
VHF R1 - R2
VHF R6 - R12
VHF R3 - R5
UHF E21 - E69
Audio demodulation
AM 6.5 MHz/NICAM 5.85 (L, L')
FM 5.5 MHz 5.74 MHz (BG)
FM 5.5 MHz/NICAM 5.85 MHz (B G)
FM 6.0 MHz/ NICAM 6.55 MHz (I)
FM 6.5 MHz 6.2578 MHz/ NICAM 5.85 MHz (D K K')
Audio outputs
Maximum power: 2 x 15 W RMS
Number of speakers: 2 x 2 channels
Front panel terminals
AV5
S-Video input (Mini Din 4-pin)
Composite video input (1 x RCA)
Audio input (2 x RCA)
PC1
VGA Computer input (SubD 15-pin)
Audio input (jack 3.5)
Headphones
Output (jack 3.5)
7 buttons (on/off, P+, P-, V+, V-, Menu, OK)
3 light indicators (on/off, lamp, temperature)
Rear panel terminals
SCART 1 (RGB/Comp/S-video, audio)
SCART 2 (RGB/Comp/S-video, audio)
SCART 3 (S-video, Comp, audio)
AV4
S-video input (Mini-Din 4-pin)
Composite video input (1 x RCA)
Audio-in input (2 x RCA)
AV6 (intertwined)
Y, Cb, Cr in input (3 x RCA)
Audio input (2 x RCA)
AV7 (progressive)
Y, Pb, Pr in input (3 x RCA)
Audio input (2 x RCA)
Hi-fi
Audio output (2 x RCA)
Base woofer
Audio output (1 x RCA)
PC2
DVI D Computer input
Audio input (1 x jack 3.5)
Input signals
Video signal:
Native/Upscale: SDTV/EDTV (480i/480P) (576i/576P)
HDTV (1080i/720P)
PC signal:
Native/Upscale: VA 640 x 480, SVGA 800 x 600,
XGA 1024 x 768, SXGA 1280 x 1024
Power supply
AC 220-240 V ~ 50Hz
Power consumption: 250W max
(Standby 5W)
Dimensions and weight
Dimensions (w x h x d): 1166 x 904 x 375 mm
Weight: 42 kg
Dimensions and weight (packaged)
Dimensions (w x h x d): 1312 x 1070 x 560 mm
Weight: 56 kg
Accessories
Remote control TL-50
Batteries: 2 x 1.5 V (AA Type)
Power cord
User manual
RF cable
CE European norms
EMC (Electromagnetic Compatibility)
EN55013: 10.2001
EN55020: 2002
EN55022: 1998+A1: 2000
EN55024: 09.1998+A1: 10.2001
EB61000-3-2: 12.2000
EN61000-3-2: 01.95+A1: 06.2001
Electrical safety
EN60065 . 1998
13. Technical characteristics
26
Page 57

NOTES
27
ENGLISH
Page 58

NOTES
28
Page 59

INHALTSVERZEICHNIS
1. VORSICHTSMASSNAHMEN . . . . . . . . . . . . . . . . . . . . . . . . . . . . . . . . . . . . . . . . . . . . . . . . . .2
1.1. Sicherheit . . . . . . . . . . . . . . . . . . . . . . . . . . . . . . . . . . . . . . . . . . . . . . . . . . . . . . . . . . . . . .2
1.2. Wartung . . . . . . . . . . . . . . . . . . . . . . . . . . . . . . . . . . . . . . . . . . . . . . . . . . . . . . . . . . . . . . . .3
2. INBETRIEBNAHME . . . . . . . . . . . . . . . . . . . . . . . . . . . . . . . . . . . . . . . . . . . . . . . . . . . . . . .4
2.1. Antennenanschluss . . . . . . . . . . . . . . . . . . . . . . . . . . . . . . . . . . . . . . . . . . . . . . . . . . . . . . .4
2.2. Netzanschluss . . . . . . . . . . . . . . . . . . . . . . . . . . . . . . . . . . . . . . . . . . . . . . . . . . . . . . . . . . .4
2.3. Anstellen . . . . . . . . . . . . . . . . . . . . . . . . . . . . . . . . . . . . . . . . . . . . . . . . . . . . . . . . . . . . . . .4
2.4. Ausstellen Ihres DLP™-Flachbildschirms . . . . . . . . . . . . . . . . . . . . . . . . . . . . . . . . . . . . . . .5
3. ERSTE SCHNELL-INSTALLATION . . . . . . . . . . . . . . . . . . . . . . . . . . . . . . . . . . . . . . . . . . . . . . .5
4. FUNKTIONEN AUF DER FRONTSEITE . . . . . . . . . . . . . . . . . . . . . . . . . . . . . . . . . . . . . . . . . . . .6
4.1. Einstellungsmöglichkeiten an der Frontseite . . . . . . . . . . . . . . . . . . . . . . . . . . . . . . . . . . . . .6
4.2. Leuchtanzeigen an der Frontseite und Fernbedienungsempfänger . . . . . . . . . . . . . . . . . . . .6
5. FERNBEDIENUNG . . . . . . . . . . . . . . . . . . . . . . . . . . . . . . . . . . . . . . . . . . . . . . . . . . . . . . . .7
6. PERSÖNLICHE EINSTELLUNGEN . . . . . . . . . . . . . . . . . . . . . . . . . . . . . . . . . . . . . . . . . . . . . . .8
6.1. Änderung des Schutzcodes . . . . . . . . . . . . . . . . . . . . . . . . . . . . . . . . . . . . . . . . . . . . . . . . .8
6.2. Rückkehr zur Werkseinstellung . . . . . . . . . . . . . . . . . . . . . . . . . . . . . . . . . . . . . . . . . . . . . .8
6.3. Suche terrestrischer Programme . . . . . . . . . . . . . . . . . . . . . . . . . . . . . . . . . . . . . . . . . . . . .9
6.3.1. Wahl der Norm Ihres Landes . . . . . . . . . . . . . . . . . . . . . . . . . . . . . . . . . . . . . . . . . . . . . . . . . . . .9
6.3.2. Manuelle Installation . . . . . . . . . . . . . . . . . . . . . . . . . . . . . . . . . . . . . . . . . . . . . . . . . . . . . . . . . . .9
6.3.3. Automatische Installation . . . . . . . . . . . . . . . . . . . . . . . . . . . . . . . . . . . . . . . . . . . . . . . . . . . . . . .10
6.3.4. Änderung der Programmliste . . . . . . . . . . . . . . . . . . . . . . . . . . . . . . . . . . . . . . . . . . . . . . . . . . . .10
6.4. Wahl der MENÜ Sprache . . . . . . . . . . . . . . . . . . . . . . . . . . . . . . . . . . . . . . . . . . . . . . . . . .11
6.5. Doppelbild-Modus-Einstellungen . . . . . . . . . . . . . . . . . . . . . . . . . . . . . . . . . . . . . . . . . . . .11
6.6 Einstellungen des Standby-Modus . . . . . . . . . . . . . . . . . . . . . . . . . . . . . . . . . . . . . . . . . . .11
7. GERÄTEANSCHLÜSSE UND KONFIGURATIONEN . . . . . . . . . . . . . . . . . . . . . . . . . . . . . . . . . . . .12
7.1. Anschlussempfehlungen . . . . . . . . . . . . . . . . . . . . . . . . . . . . . . . . . . . . . . . . . . . . . . . . . .12
7.2. Quellenkonfigurationen . . . . . . . . . . . . . . . . . . . . . . . . . . . . . . . . . . . . . . . . . . . . . . . . . . .13
7.3. Konfigurationen der PC-Quellen . . . . . . . . . . . . . . . . . . . . . . . . . . . . . . . . . . . . . . . . . . . . .14
8. TÄGLICHER GEBRAUCH . . . . . . . . . . . . . . . . . . . . . . . . . . . . . . . . . . . . . . . . . . . . . . . . . . .15
8.1. Bildeinstellung . . . . . . . . . . . . . . . . . . . . . . . . . . . . . . . . . . . . . . . . . . . . . . . . . . . . . . . . . .15
8.2. Toneinstellung . . . . . . . . . . . . . . . . . . . . . . . . . . . . . . . . . . . . . . . . . . . . . . . . . . . . . . . . . .15
8.3. Zeitschalter für Standby-Modus . . . . . . . . . . . . . . . . . . . . . . . . . . . . . . . . . . . . . . . . . . . . .16
8.4. Sperrung des Fernsehers . . . . . . . . . . . . . . . . . . . . . . . . . . . . . . . . . . . . . . . . . . . . . . . . . .16
8.5. Quellenwahl . . . . . . . . . . . . . . . . . . . . . . . . . . . . . . . . . . . . . . . . . . . . . . . . . . . . . . . . . . . .17
8.6. Wahl des Formats . . . . . . . . . . . . . . . . . . . . . . . . . . . . . . . . . . . . . . . . . . . . . . . . . . . . . . .17
8.7. Informationsprogramme . . . . . . . . . . . . . . . . . . . . . . . . . . . . . . . . . . . . . . . . . . . . . . . . . . .18
8.8. Wahl des Bild-im-Bild-Modus (PIP/PAP) . . . . . . . . . . . . . . . . . . . . . . . . . . . . . . . . . . . . . . .18
8.9. Wahl der Audio-Einstellung . . . . . . . . . . . . . . . . . . . . . . . . . . . . . . . . . . . . . . . . . . . . . . . .19
8.10. Wahl des terrestrisch Programms . . . . . . . . . . . . . . . . . . . . . . . . . . . . . . . . . . . . . . . . . . . .19
8.11. Standbild . . . . . . . . . . . . . . . . . . . . . . . . . . . . . . . . . . . . . . . . . . . . . . . . . . . . . . . . . . . . . .19
9. VIDEOTEXT . . . . . . . . . . . . . . . . . . . . . . . . . . . . . . . . . . . . . . . . . . . . . . . . . . . . . . . . . . .20
10. STATUSANZEIGE UND STÖRUNGEN . . . . . . . . . . . . . . . . . . . . . . . . . . . . . . . . . . . . . . . . . . . .22
11. AUSTAUSCH DES LAMPENBLOCKS . . . . . . . . . . . . . . . . . . . . . . . . . . . . . . . . . . . . . . . . . . . .23
12. INDEX . . . . . . . . . . . . . . . . . . . . . . . . . . . . . . . . . . . . . . . . . . . . . . . . . . . . . . . . . . . . . .25
13. TECHNISCHE DATEN . . . . . . . . . . . . . . . . . . . . . . . . . . . . . . . . . . . . . . . . . . . . . . . . . . . . .26
1
DEUTSCH
Page 60

1. VORSICHTSMASSNAHMEN
1.1. Sicherheit
Beachten Sie alle Warnungen, Vorsichtsmassnahmen und Wartungsempfehlungen, die in
diesem Bedienungshandbuch gegeben werden und Ihrer Sicherheit sowie der Lebensdauer
Ihres Gerätes dienen.
• Definitionen
Vorsicht! Gefahr. Sicherheitswarnung für Bediener und Gerät.
Vorsicht! Elektrische Schläge.
Vorsicht! Heisse Oberfläche.
Vorsicht! Explosionsgefahr der Lampe.
• Sicherheitsrichtlinien
Dieser DLP™-Flachbildschirm ist ein Gerät der Klasse I; Dieses bedeutet dass er
unbedingt an eine Wandsteckdose mit Erdungsklemme angeschlossen werden
muss.
Dieser DLP™-Flachbildschirm ist für den nachfolgend beschriebenen Betrieb ausgelegt:
- Netz 220-240 V, 50 Hz, Ws.(Wechselstrom).
- Raumtemperatur +5°C bis +35°C.
- In Räumen mit maximaler Luftfeuchtigkeit von 85%.
(Für weitere Details siehe Paragraph “Technische Daten”, Seite 26).
Um Gefahren durch Aufheizen und Elektroschlag zu vermeiden:
- keine direkte Sonneneinstrahlung und keine offene Flamme auf das Gerät stellen
wie z.B. eine Kerze oder eine andere Wärmequelle.
- keine Wassertropfen oder -spritzer an das Gerät kommen lassen.
- Keine mit Flüssigkeiten gefüllten Gegenstände wie Blumenvasen auf das Gerät
stellen.
- Das Gerät nicht in eine stark verstaubte Umgebung stellen.
- Stösse und Schwingungen vermeiden.
Es wird empfohlen, den Netz- sowie Antennenstecker in folgenden Fällen
herauszuziehen:
- Bei Gewitter.
- Bei längerer Nicht-Benutzung.
- Bei Betriebsanomalien (siehe Paragraph “Statusanzeige und Störungen”,
Seite 22).
Verwenden Sie einen PC, stellen Sie zuerst den DLP™-Flachbildschirm an und
anschliessend den Computer.
Achten Sie darauf, dass die Geräteventilation nicht aufgrund der Verstopfung der
Lüftungsschlitze eingeschränkt ist, wie z. B. durch Gegenstände wie Zeitungen,
Tischdecken oder Gardienen, etc. gehindert wird.
Keine Fremdkörper wie Nadeln oder Gegenstände in die Lüftungsschlitze werfen, damit
es nicht zu elektrischen Entladungen kommt.
Lassen Sie zumindest 10 cm Platz um das Gerät herum, damit eine ausreichende
Lüftung garantiert werden kann.
Bevor der Netzstecker herausgezogen wird, wird empfohlen, den Kühlungsventilator
einige Minuten lang laufen zu lassen.
2
Vorsicht
Vorsicht
Page 61

Dieser DLP™-Flachbildschirm steht unter Hochspannung. Es ist untersagt, das Gerät zu
öffnen, ausser für den Wechsel des Lampenblocks.
Nur qualifiziertes Personal ist dazu befugt.
Das Öffnen oder Demontieren des Geräts ist aufgrund der Elektroschlag-Gefahr
untersagt.
Dieses Gerät stellt selbst das Ende der Lampenlebensdauer fest. Ersetzen Sie die
Lampe sobald die Leuchtanzeige “Lampe” auf der Frontseite leuchtet.
Wenn die Lampe des DLP™-Flachbildschirms am Ende ihrer Lebensdauer
angekommen ist, leuchtet sie nicht mehr und löst einen schrillen, lauten Ton aus. Der
DLP™-Flachbildschirm kann erst nach Austausch der Lampe wieder funktionieren.
Mit dem Ziel, Verbrennungen und Explosionen des Lampenblocks bei dem Austausch zu
vermieden, ist es absolut notwendig, den Netzstecker aus der Wandsteckdose
herauszuziehen. Warten Sie zumindest eine Stunde bis zum Austausch des
Lampenblocks.
Bitte befolgen Sie genauestens die Lampen-Austauschanweisungen auf Seite 23
und 24 des Paragraphen “Austausch des Lampenblocks”.
Verwenden Sie nur entsprechende Batterien, die mit den Angaben des Herstellers
übereinstimmen (Siehe Abschnitt “Technische Daten”, Seite 26).
- Die mitgelieferten Batterien sind nicht aufladbar.
- Achten Sie insbesondere auf die Umwelt.
- Bringen sie defekte oder gebrauchte Batterien an die von der sich in Kraft
befindenden Gesetzgebung vorgesehenen Orte; werfen Sie sie auf keinen Fall
inden Müll!
1.2. Wartung
• Bevor Sie irgendetwas unternehmen, ziehen Sie den Netzstecker aus der Wandsteckdose.
• Säubern Sie das Gehäuse mit einem leicht angefeuchteten Tuch und einem nicht scheuernden
und nicht wachsenden Reinigungsmittel.
• Verwenden Sie keine benzin-, alkohol- oder ölhaltigen Reinigungsmittel, die die Oberfläche
beschädigen könnten.
• Säubern Sie vorsichtig den Bildschirm mit einem leicht angefeuchteten Lappen und einem
Seifenreinigungsmittel.
3
DEUTSCH
Vorsicht
Page 62

2. INBETRIEBNAHME
2.1. Antennenanschluss
Schliessen Sie den Antennenstecker an den Antenneneingang auf der Rückseite des DLP™
Flachbildschirms an.
Ihr DLP™-Flachbildschirm ist mit 2 Tunern ausgestattet, aber es reicht ein Kabel aus, um beide zu
versorgen.
2.2. Netzanschluss
Stecken Sie den Stecker in eine Stromsteckdose mit 220 V-240 V Netzspannung und einer
Erdungsklemme (3-polige Steckdose).
2.3. Anstellen
Schalten Sie das Gerät mit dem Schalter ein, der sich auf
der linken Seite ihres Geräts befindet.
Inbetriebnahme Ihrer Fernbedienung:
Öffnen Sie den Deckel des Batterienfachs und legen Sie die
mitgelieferten Batterien des Typs R6-1,5 V hinein.
Überprüfen Sie, dass die Batterien richtig eingelegt wurden.
Verwenden Sie nur einen Batterien-Typ und auch keine
aufladbaren.
Anstellen des DLP™-Flachbildschirm:
Drücken Sie auf die Standby-Taste*Ihrer Fernbedienung oder drücken Sie auf die Standby-Taste an
der Frontseite Ihres Geräts.
Hinweis: Die Leuchtanzeige Ein / Aus an der Frontseite Ihres DLP™-Flachbildschirms blinkt orange
während der Lampen- Aufwärmzeit und leuchtet grün, wenn der DLP™-Flachbildschirm in Betrieb ist.
Nehmen Sie Ihren DLP™-Flachbildschirm zum ersten Mal in Betrieb, wird Ihnen eine SchnellInstallation nach dieser Aufwärmphase angeboten (siehe nachfolgendes Kapitel).
Der Anschluss weiterer Audio- / Video-Geräte oder eines PC ist im Kapitel 7.1 detailliert dargestellt.
Vorher sollten Sie aber die Schnell-Installation vornehmen.
4
Page 63

2.4. Ausstellen Ihres DLP™-Flachbildschirms
Um Ihren DLP™-Flachbildschirm auszustellen, drücken Sie auf die Standby-Taste an der Frontseite
(mindestens 2 Sekunden) oder auf die Standby-Taste Ihrer Fernbedienung.
Während des Standby-Betriebs blinkt eine Leuchtanzeige an der Frontseite orange. Um die
Lampenlebensdauer zu erhalten, ist der Standby-Betrieb erst wirksam, wenn die Leuchtanzeige an
der Frontseite rot leuchtet. Warten Sie 10 Sek Sie ihn wieder anstellen.
Während des Übergangs in den Standby-Betrieb, ist es nicht möglich das Gerät unmittelbar wieder
einzuschalten (siehe § 4.2).
ACHTUNG
Um den Vorgang des Übergangs in den Standby-Betrieb nicht zu unterbrechen, NIEMALS das Gerät
mit dem Netzschalter ausstellen oder den Stecker aus der Wandsteckdose ziehen solange die LED
an der Frontseite nicht rot leuchtet.
3. ERSTE SCHNELL-INSTALLATION
Ihr DLP™-Flachbildschirm ist nicht voreingestellt, um die terrestrischen Sender Ihrer Gegend zu
empfangen. Diese Schnell-Installation wird Ihnen automatisch bei der ersten Inbetriebnahme
vorgeschlagen. Sie können somit die Grundeinstellungen Ihres Geräts (Menüsprache, Land,
Programmempfang) vornehmen.
Wählen Sie die Menüsprache mit den Tasten W und V und
bestätigen Sie mit der Taste OK.
Wählen Sie das Land, in dem Sie sich befinden oder das, dessen
Sender Sie empfangen möchten, wenn Sie im Grenzgebiet
wohnen und zwar mit den Tasten W und V und bestätigen Sie
mit der Taste OK.
Nach der Bestätigung durch die Taste OK setzt die automatische
Suche ein und die Programme werden automatisch identifiziert
und gespeichert.
Sie können die Suche auch mit der MENÜ-Taste jederzeit
unterbrechen. In diesem Fall wird das Suchergebnis nicht
gespeichert.
5
DEUTSCH
Länder Farbe Standard Stereo
Frankreich SECAM L Nicam L
Deutschland PAL B, G Zwei Trägerwellen B/G
Österreich PAL B, G Zwei Trägerwellen B/G
Italien PAL B,G Zwei Trägerwellen B/G
Spanien PAL B,G Nicam B/G
Holland PAL B,G Zwei Trägerwellen B/G
Dänemark PAL B,G Nicam B/G
Schweden PAL B,G Nicam B/G
Norwegen PAL B,G Nicam B/G
Finnland PAL B,G Nicam B/G
Belgien PAL B,H Nicam B/G
Schweiz PAL B,G Zwei Trägerwellen B/G
GB PAL I Nicam I
Portugal PAL B,G
MENÜ SPRACHE
ENGLISH
FRANZÖSISCH
DEUTSCH
ITALIENISCH
SPANISCH
PORTUGIESISCH
LAND
DEUTSCHLAND
OSTERREICH
BELGIEN
DANMARK
ESPAÑA
FINNLAND
FRANKREICH
AUTOMATISCHE SUCHE
SUCHE…
KANAL 52
KANÄLE GEFUNDEN : 2
MENÜ TASTE ZUM BEENDEN DES SUCHLAUFS
Page 64

4. FUNKTIONEN AUF DER FRONTSEITE
4.1. Einstellungsmöglichkeiten an der Frontseite
4.2. Leuchtanzeigen an der Frontseite und Fernbedienungsempfänger
6
Fernbedienungsempfänger.
Innentemperatur-Anzeige.
Rotes Blinklicht bei Überhitzung.
Lampenanzeige
Rotes Blinklicht 10 Sek. nach dem
Start des DLP™-Flachbildschirms:
die Anzeige eines baldigen
Lampenaustauschs.
Rotes Dauerlicht: Die Lampe muss
ungehend ausgewechselt merden.
Ein / Aus -Anzeige
Rotes Dauerlicht: Standby-
Mode
Orangefarbenes Blinklicht:
Phase der Inbetriebnahme
und Standby-Mode
Grünes Blinklicht:
Neustart-Phase, wenn
notwendig
Grün: In Betrieb.
Taste für den
Zugang zu den
Menükonfigurationen.
Die Tasten B, C, V
und W dienen der
Navigation innerhalb des
Menüs. Rückkehr
zum vorherigen
Bildschirm durch das
Drücken dieser Taste.
Ein / Aus -Knopf.
Menü-Bestätigungstaste.
Programmwechsel -Tasten.
Lautstärke-Regeltaste B lauter oder
C leiser .
Page 65

5. FERNBEDIENUNG
7
DEUTSCH
Farbige Tasten (A,B,C,D) werden
für die Menükonfiguration für
Teletext und dem NexTView-
Programmverzeichnis verwendet
Bild oder Videotextseite
festhalten
Zurück zum vorhergehenden
Sender oder zur vorhergehenden
Seite im Menü oder im Videotext-
Modus
Wahl des Bildformats
Zugang zu Konfigurationsmenüs
und zusätzliche Funktionen im
Videotext-Modus
PIP/PAP-Funktionen
- Funktionsaufruf und wahl
- Bildschirmwahl
- Quellenaustausch
Lautstärke -
Videotext Ein/Mode
Transparent/ Stop
Videotext-Index
Ein / Standby
Navigator in den
Konfigurationsmenüs, wählen Sie
aus und bestätigen Sie mit OK
Bildschirminformationen und
TOP-Videotext
NexTView-Programmverzeichnis
(Funktion nicht verfügbar)
Wahl der Bildquelle
Ton- und Sprachauswahl
Stummschaltung
Lautstärke +
Programmwahl (Programm+,
Programme -)
Versteckter Videotext-Text
Fast-Mode-Videotext
Numerische Eingabetasten
Page 66

6. PERSÖNLICHE EINSTELLUNGEN
6.1. Änderung des Schutzcodes
Drücken Sie auf die MENU-Taste, wählen Sie dann mit
Hilfe der Taste B INSTAL., bestätigen Sie mit der Taste
OK.
Alle Bildschirmoptionen können mit einem persönlichen
Code geschützt werden.
Bei Lieferung ist der Code neutral und sperrt keine
Installationsbildschirme.
Wählen Sie CODE ÄNDERN, bestätigen Sie mit der OK-
Taste.
Geben Sie Ihren neuen Code in das Eingabedisplay ein
und bestätigen Sie ihn im Bestätigungsfeld, indem Sie
jedes Mal auf die OK-Taste drücken.
Hinweis: Um die Optionen zu schützen, geben Sie einen
anderen persönlichen Code als 0000 ein.
Vergessen Sie Ihren neuen persönlichen Code nicht.
6.2. Rückkehr zur Werkseinstellung
Drücken Sie auf die MENU-Taste, wählen Sie INSTAL. mit
Hilfe der Taste B und bestätigen Sie mit OK.
Geben Sie Ihren persönlichen Code ein und bestätigen Sie
mit der OK-Taste (für den ursprünglichen Code 0000 ist
kein Code erforderlich).
Sie können, wenn Bedarf besteht, Ihren DLP™Flachbildschirm auf die Parameter des ersten Tags
einstellen. Dabei gehen alle persönlichen Parameter
verloren (Senderliste, Land, Sprachen,…).
Wählen Sie FABRIKKONF. und bestätigen Sie mit der Taste
OK.
Ein Bestätigungsdisplay fordert Sie auf, weiterhin die OK-
Taste zu drücken oder mit der BACK -Taste zu annullieren.
8
BILD AUDIO OPTIONEN INSTAL.
CODE
SCHUTZ
QUELLE
PC DATEN
SUCHE
CODE
EINGEBEN
VERROU
- - - -
CHAINE
MODIF. CODE
CONFIG. USINE
CODE CODE
PROTECTION VERROU
SOURCES CHAINE
DONNEES PC
RECHERCHE
MODIF. CODE
CONFIG. USINE
BILD AUDIO OPTIONEN INSTAL.
CODE
SCHUTZ
QUELLE
PC DATEN
SUCHE
GENERAL
CODE ÄNDERN
FABRIKKONF.
MODIF. CODE
CONFIG. USINE
NEIN
EINGEBEN
SOURCES
BESTÄTIGEN
DONNEES PC
RECHERCHE
CODE
- - - -
V
- - - -
ERROU
CHAINE
- - - -
MODIF. CODE
CONFIG. USINE
BILD AUDIO OPTIONEN INSTAL.
CODE
SCHUTZ
QUELLE
PC DATEN
SUCHE
CODE
EINGEBEN
VERROU
CHAINE
MODIF. CODE
CONFIG. USINE
BILD AUDIO OPTIONEN INSTAL.
CODE
SCHUTZ
QUELLE
PC DATEN
SUCHE
GENERAL
CODE ÄNDERN
FABRIKKONF.
MODIF. CODE
CONFIG. USINE
CODE CODE
PROTECTION VERROU
- - - -
SOURCES CHAINE
ACHTUNG
WEITER
MODIF. CODE
CONFIG. USINE
CODE
VERROU
CHAINE
MODIF. CODE
CONFIG. USINE
DONNEES PC
RECHERCHE
NEIN
PROTECTION
DIE EINSTELLUNG WIRD GELÖSCHT
SOURCES
DONNEES PC
BACK TASTE ZUM ANNULIEREN
RECHERCHE
Page 67

6.3. Suche terrestrischer Programme
Bei der ersten Inbetriebnahme wird die Installation der Programme durchgeführt. Dennoch sind
folgende Funktionen bei Umzug in eine andere Gegend nützlich.
6.3.1. Wahl der Norm Ihres Landes
Sie müssen das Land wählen, in dem das Gerät betrieben
wird bzw. angeschlossen ist.
Drücken Sie auf die MENÜ-Taste.
Wählen Sie das Kapitel “INSTAL” mit der Taste OK.
Wählen Sie das Kapitel “SUCHE” mit der Taste OK.
Wählen Sie das Kapitel “LÄNDER” mit der Taste OK.
Wählen Sie das Land mit Hilfe der Tasten V und W.
Drücken Sie auf BACK-Taste, um die Suche
abzuspeichern.
6.3.2. Manuelle Installation
Wählen Sie “MANUELLE” und bestätigen Sie mit der OK-
Taste.
Es wird nur ein Suchfeld angezeigt, damit Sie das
gefundene Programm überprüfen können.
Die Suche sowie die Speicherung der Fernsehsender werden Sender für Sender vorgenommen.
Wählen Sie SUCHE und starten Sie die Suche mit B
oder C.
Sobald ein Bild auf dem Bildschirm gezeigt wird,
• Haben Sie die Wahl, es zu speichern:
Gehen Sie auf die Linie PROG. NUMMER und geben Sie
die Position des gewünschten Programms mit Hilfe der
Tasten 0 bis 9 ein. Gehen Sie mit dem Kursor auf
“SPEICHERN” und bestätigen Sie mit der Taste OK.
• Sie können versuchen, eine bessere Bildqualität des
empfangenen Bilds zu erhalten:
Gehen Sie auf die Linie FEINEINSTELLUNG und
positionieren Sie den Kursor mit Hilfe der Tasten C
und B .
Gehen Sie mit dem Kursor auf “SPEICHERN” und
bestätigen Sie mit der Taste OK.
• Sie können sich auch entscheiden, dieses Bild nicht zu
speichern:
In diesem Fall, starten Sie erneut eine Suche.
Wiederholen Sie diesen manuellen Vorgang für alle
Programme, die Sie speichern wollen.
Drücken Sie die MENÜ Taste zum Verlassen.
9
DEUTSCH
BILD AUDIO OPTIONEN INSTAL.
CODE
SCHUTZ
QUELLE
PC DATEN
SUCHE
LAND
MANUELLE
AUTOM.
SENDERLISTE
PROTECTION
DONNEES PC
RECHERCHE
ATTENTION
la configuration sera perdue
SOURCES
CONTINUER
Touche BACK pour annuler
BILD AUDIO OPTIONEN INSTAL.
CODE
SCHUTZ
QUELLE
PC DATEN
SUCHE
LAND
MANUELLE
AUTOM.
SENDERLISTE
FRANKREICH
DEUTCHLAND (PAL B,G)
OSTERREICH (PAL B,G)
ITALIEN (PAL B,G)
NEDERLAND (PAL B,G)
DANMARK (PAL B,G)
SVERIGE (PAL B,G)
(SECAM L)
PROTECTION
DONNEES PC
RECHERCHE
ATTENTION
la configuration sera perdue
SOURCES
CONTINUER
Touche BACK pour annuler
CODEGENERAL NON
VERROU
CHAINE
MODIF. CODE
CONFIG. USINE
CODEGENERAL NON
VERROU
CHAINE
MODIF. CODE
CONFIG. USINE
BILD AUDIO OPTIONEN INSTAL.
CODE
SCHUTZ
QUELLE
PC DATEN
SUCHE
LAND
MANUELLE
AUTOM.
SENDERLISTE
MANUELLE SUCHE
SUCHE
FEINEINSTELLUNG
PROG. NUMMER
SPEICHERN
FREQUENZ 184,00
MENÜ TASTE ZUM BEENDEN DES SUCHLAUFS
PROTECTION
DONNEES PC
RECHERCHE
ATTENTION
la configuration sera perdue
SOURCES
CONTINUER
Touche BACK pour annuler
00
CODEGENERAL NON
VERROU
CHAINE
MODIF. CODE
CONFIG. USINE
Page 68

6.3.3. Automatische Installation
Wählen Sie “AUTOM. “ und bestätigen Sie mit der OK-
Taste.
Ihre alte Suche wird gelöscht und durch die neue ersetzt,
bestätigen Sie mit der OK-Taste.
Alle Sender werden automatisch gesucht und gespeichert.
Wenn ein Sendesignal bei der Übertragung einer
Teletextseite erkannt wird, werden die Sender mit dem
Namen benannt und geordnet sein.
Sie können jederzeit die Suche mit Hilfe der MENÜ Taste
stoppen.
In diesem Fall werden Ihre Suchergebnisse nicht
gespeichert.
6.3.4. Änderung der Programmliste
Sie können zu jeder Zeit die Programmliste einer
Suchoperation ändern.
Drücken Sie auf die MENÜ Taste.
Wählen Sie das Kapitel INSTAL. mit der OK-Taste aus.
Wählen Sie das Kapitel “SENDERLISTE” mit der OK-Taste.
Auf dem erscheinenden Bildschirm können Sie:
• Ein Programm löschen
Positionieren Sie sich auf der Linie des Programms, das
zu löschen ist und drücken Sie auf die rote Taste um zu
löschen. Bei Irrtum drücken Sie erneut auf die rote Taste,
um das gelöschte Programm wieder aufzurufen.
• Ein Programm verschieben
Positionieren Sie sich auf der Linie des zu
verschiebenden Programms und drücken Sie die grüne
Taste, um es zu speichern (ein “D” erscheint links, um
das Speichern anzuzeigen), verschieben Sie es mit Hilfe
der Tasten W oder V und bestätigen Sie die Position
mit der grünen Taste.
• Den Programmnamen ändern
Positionieren Sie sich auf der Linie des
Programmnamens, der abgeändert werden soll und
drücken Sie die gelbe Taste für die Registrierung. Geben
Sie den ersten Buchstaben ein, indem Sie die
Buchstaben mit Hilfe der Tasten W oder V durchlaufen.
Mit der Taste B gehen Sie um einen Buchstaben weiter
und geben dann den zweiten ein, etc.... (maximal 6
Buchstaben).
Bestätigen Sie zum Schluss mit der gelben Taste.
• Filter zur Minderung des Bildrauschens
Positionieren Sie sich auf der Linie des Programmnamens, der abzuändern ist und drücken Sie auf die
blaue Taste, um die Änderung des Filters zu registrieren.
Durch Drücken der blauen Taste, können sie die Stärke
des Bildgeräuschfilters auswählen. Verwenden Sie einen
“schwachen”, “mittleren” oder “starken” Filter je nach
Empfangsqualität.
Wählen Sie “Ohne”, wenn kein Filter erforderlich ist.
10
Hinweis: Sie können jederzeit den gewählten Sender
durch das Drücken der OK Taste visualisieren.
Zum Verlassen drücken Sie auf die MENÜ Taste.
AUTOMATISCHE SUCHE
SUCHE…
KANAL 52
KANÄLE GEFUNDEN : 2
MENÜ TASTE ZUM BEENDEN DES SUCHLAUFS
BILD AUDIO OPTIONEN INSTAL.
CODE
SCHUTZ
QUELLE
PC DATEN
SUCHE
LAND
MANUELLE
AUTOM.
SENDERLISTE
PROTECTION
DONNEES PC
RECHERCHE
ATTENTION
la configuration sera perdue
SOURCES
CONTINUER
Touche BACK pour annuler
SENDERLISTE
PROG.
1
2
3
4
5
6
LÖSCHEN
FREQ.
479,5
527,25
599,25
671,25
735,25
789,25
VERSETZEN
NAME
TF1
F2
F3
C+
F5
M6
NAME
CODEGENERAL NON
VERROU
CHAINE
MODIF. CODE
CONFIG. USINE
N.R.
OHNE
GERING
MITTEL
STARK
OHNE
OHNE
OK
N.R. SEHEN
Page 69

6.4. Wahl der MENÜ Sprache
Sie können die Sprache wählen, in der die Menüs und
Informationen angezeigt werden.
Drücken Sie auf die MENÜ-Taste.
Wählen Sie das Kapitel OPTIONEN mit Hilfe der OK-Taste.
Wählen Sie das Kapitel “ MENÜSPRACHE” mit Hilfe der
OK Taste.
Wählen Sie die Sprache mit den Tasten CundB.
Zum Verlassen drücken Sie auf die MENÜ-Taste oder auf
die BACK-Taste , um auf die vorhergehende
Bildschirmseite zu gelangen.
6.5. Doppelbild-Modus-Einstellungen
Mit diesen Einstellungen Können Sie Ihre Präferenzen für den PIP-Modus (“picture in picture”) oder
den PAP-Modus (“picture and picture”) wählen.
Siehe Paragraph 8.9 für den täglichen Gebrauch.
• Wahl der Audioquelle des Kopfhörerausgangs
“HAUPT” gibt Ihnen den Ton für den Kopfhörer der
Gross-Bildschirmseite im PIP-Modus oder des rechten
Bilds im PAP-Modus wieder.
“PIP/PAP” liefert Ihnen für den Kopfhörer den Ton des
eingeblendeten Bilds im PIP-Modus oder des linken Bilds
im PAP-Modus.
• Präferenzwahl PIP und PAP.
PIP ja und PAP ja
Mehrmaliges Drücken der Taste F bringt Sie nach und
nach in PIP, dann in PAP und schliesslich zu einer neuen
Gross-Bildschirmseite.
PIP ja und PAP nein
Mehrmaliges Drücken der Taste F bringt Sie in PIP und
anschliessend zu einer neuen Gross-Bildschirmseite.
PIP nein und PAP ja
Mehrmaliges Drücken der Taste F bringt Sie nach und
nach in den PAP und dann zu einer neuen GrossBildschirmseite.
PIP nein und PAP nein
Mehrmaliges Drücken der Taste F bleibt inaktiv (sowie
der Quellentausch H und die Quellensuche G
6.6 Einstellungen des Standby-Modus
Diese Präferenz ermöglicht Ihnen den Standby-Betrieb zu
onszuwählen.
“MANUELLE”: Ausschalten des Standby-Betriebs und
Übergang in den Standby-Betrieb durch Drücken des
Knopfes * der Fernbedienung oder an der Frontseite.
“Autom.”: Ausschalten des Standby-Betriebs oder
automatischer Übergang in den Standby-Betrieb gesteuert
durch das Ausschalten des Standby-Betriebs oder des
Übergangs in den Standby-Betrieb des oder der an den
SCART-Anschluss angeschlossenen Geräts an der
Rückseite.
Das Verhalten der direkten Zugangstaste F wird
Von Ihrer PIP- und PAP-Wahl abhängen.
11
DEUTSCH
BILD AUDIO OPTIONEN INSTAL.
SLEEP TIMER
KOPFHÖRER
PICTURE IN PICTURE (PIP)
PICTURE AND PICTURE (PAP)
MENÜ SPRACHE
EINGANGSQUELLEN-MANAGER
ENGLISH
FRANCAIS
DEUTSCH
ITALIANO
ESPANOL
PORTUGUES
NEIN
PRINCIPAL
JA
JA
FRANKREICH
AUTOM.
BILD AUDIO OPTIONEN INSTAL.
SLEEP TIMER
KOPFHÖRER
PICTURE IN PICTURE (PIP)
PICTURE AND PICTURE (PAP)
MENÜ SPRACHE
EINGANGSQUELLEN-MANAGER
ENGLISH
FRANCAIS
DEUTSCH
ITALIANO
ESPANOL
PORTUGUES
NEIN
PRINCIPAL
JA
JA
FRANKREICH
AUTOM.
BILD AUDIO OPTIONEN INSTAL.
SLEEP TIMER
KOPFHÖRER
PICTURE IN PICTURE (PIP)
PICTURE AND PICTURE (PAP)
MENÜ SPRACHE
EINGANGSQUELLEN-MANAGER
ENGLISH
FRANCAIS
DEUTSCH
ITALIANO
ESPANOL
PORTUGUES
NEIN
PRINCIPAL
JA
JA
FRANKREICH
AUTOM.
BILD AUDIO OPTIONEN INSTAL.
SLEEP TIMER
KOPFHÖRER
PICTURE IN PICTURE (PIP)
PICTURE AND PICTURE (PAP)
MENÜ SPRACHE
EINGANGSQUELLEN-MANAGER
ENGLISH
FRANCAIS
DEUTSCH
ITALIANO
ESPANOL
PORTUGUES
NEIN
PRINCIPAL
JA
JA
FRANKREICH
AUTOM.
Page 70

7. GERÄTEANSCHLÜSSE UND KONFIGURATIONEN
7.1. Anschlussempfehlungen
Ihr DLP™-Flachbildschirm bietet eine grosse Anzahl von Anschlüssen externer Geräte Ihrer Wahl.
Es wird empfohlen die Geräte nur im spannungslosen Zustand anzuschliessen.
RÜCKSEITE
SCART1 Empfohlen für den Anschluss eines DVD-Players, eines DVDR-Lese- und
Aufnahmegerätes, oder eines digitalen Decoders (Kabel, Satellit oder Terrestrisch).
SCART2 Empfohlen für den Anschluss eines analogen Decoders (z.B. Canal +), oder eines
digitalen Decoders (Kabel, Satellit oder Terrestrisch).
SCART3 Empfohlen für den Anschluss eines VHS- Videogeräts oder eines SVHS.
AV4 für den Anschluss einer Spielkonsole.
AV6 für den Anschluss eines DVD-Lesegeräts mit den Ausgängen Y Pb Pr mit
Zeilensprungabtast- modus (Dieser Anschlusstyp verbessert die Bildqualität erheblich).
AV7 für den Anschluss eines DVD-Lesegeräts mit progressiver Abtastung und Y Pb Pr
Ausgängen (Dieser Anschlusstyp verbessert die Bildqualität erheblich).
Hifi für den Anschluss eines Audio-Verstärkers mit eigenen Lautsprechern.
Beachten Sie die Farben für die rechten und linken Kanäle.
Für einen besseren Hörkomfort schalten Sie den Ton Ihres DLP™ Flachbildschims ab
(siehe Kapitel 8.2).
Die Audio-Lautstärke wird von ihrem Verstärker geregelt. Die DLP-Technik verursacht
eine leichte Verzögerung aufgrund der Bildverarbeitung, schliessen Sie ihren Verstärker
an diese Ausgänge an und nicht an die der Quelle.
PC2 IN für den Anschluss eine PC mit einem “DVI-D”-Ausgang.Verwenden Sie ausschliesslich
ein DVI-D-Kabel (Grafikkarte).
Sub woofer für den Anschluss eines Basslautsprechers (Option).
12
DVD
DVD
oder
Digital Decoder
Videospielkonsole
eC
Digital Decoder
oder
DVD
DVD
oder
C+ - Decoder
DVI D
Videorekorder
VHS
oder
(
DVD
oder
eC
Videospielkonsole
Page 71

FRONTSEITE
PC1 IN für den Anschluss eines PCs mit einem VGA-Ausgang
Mit dem 3,5 mm Audio-Jack-Eingang kann auch eine Tonquelle.
KOPFHÖRER : Anschluss eines Kopfhörers
In Kapitel 8.2 wird die Kopfhörereinstellung beschrieben.
AV5 für den Anschluss einer VHS-, S-VHS-, 8mm-, Hi-8 oder DVC Videokamera.
7.2. Quellenkonfigurationen
Drücken Sie auf die MENÜ-Taste, wählen Sie OPTIONEN
mit Hilfe der B Taste und bestätigen Sie mit OK .
Haben Sie einen anderen Code als 0000, ist ihr Bildschirm
geschützt und Sie müssen Ihren Code eingeben.
Wählen Sie “QUELLEN” und bestätigen Sie mit OK.
Dank dieser Option können Sie die von Ihnen benutzten
Quellen definieren, um ausschliesslich unter diesen bei
täglicher Benutzung auswählen zu können.
Wählen Sie den zu konfigurierenden Anschluss (W/V).
Für jeden einzelnen Anschluss können Sie:
• ein angeschlossenes Gerät bestätigen, indem Sie
mehrmals auf den roten Knopf drücken bis “JA” (“NEIN”
für nicht gebrauchte Anschlüsse) erscheint. Wählen Sie
C+, wenn Sie einen Decoder zur Codierung analoger TVProgramme an SCART 2 anschliessen. In diesem Fall
geben Sie unbedingt die Programmnummer der
Decoderschleife für analog codierte TV-Programme ein.
• Die Wahl des vorprogrammierten Namen durch
mehrfaches Drücken der grünen Taste (DVD, DVDR, C+,
DEC, VCR, SPIEL)
• Die persönliche Namenswahl durch Drücken der gelben
Taste, um in den Eingabemodus zu gelangen. Der
Durchlauf der Buchstaben mit WV, der folgende
Buchstabe mit B.
Drücken Sie auf die gelbe Taste, um zu bestätigen.
• Wahl des Bildgeräuschdämpfers. Sie können einen
Bildgeräuschdämpfer bei einigen Quellen wie z.B dem
Videorekorder einsetzen, indem Sie mehrmals
nacheinander die blaue Taste drücken (ohne, gering,
mittel, stark).
Hinweis: Zu jedem Zeitpunkt können Sie den
gewählten Sender sehen, indem Sie auf die
OOKK
Taste drücken.
Drücken Sie die MENÜ Taste zum Verlassen.
13
DEUTSCH
VGA
BILD AUDIO OPTIONEN INSTAL.
CODE
SCHUTZ
QUELLE
PC DATEN
SUCHE
EINGANG
SCART 1
SCART 2
SCART 3
AV4
AV5
AV6
AV7
PC1
PC2
QUELLE
CODE
EINGEBEN
VERROU
- - - -
CHAINE
MODIF. CODE
CONFIG. USINE
QUELLE
JA
C+
JA
NEIN
NEIN
NEIN
NEIN
NEIN
NEIN
NAME WAHL
CODE CODE
PROTECTION VERROU
SOURCES CHAINE
DONNEES PC
RECHERCHE
NAME
N˚
DEC
:04
C+
VCR
SPIEL
- - - - - -
- - - - - -
- - - - - -
- - - - - -
- - - - - -
NAME
MODIF. CODE
CONFIG. USINE
MITTEL
N.R. SEHEN
N.R.
OHNE
OHNE
OHNE
OHNE
OHNE
OHNE
OHNE
OHNE
OK
Page 72

7.3. Konfigurationen der PC-Quellen
Drücken Sie auf die MENÜ-Taste, wählen Sie “INSTAL.” mit
Hilfe der B Taste und bestätigen Sie mit OK.
Wählen Sie “PC DATEN” und bestätigen Sie mit OK.
Dank dieser Option können Sie die PC-Quelle auf einen
VGA-Modus einstellen. (Die Eingänge Im DVI D-Modus
brauchen nicht eingestellt zu werden).
Horizontale Position: Drücken Sie auf C um das Bild
nach links und auf B um es nach rechts zu verschieben.
Vertikale Position: Drücken Sie auf B oder auf C, um
das Bild nach oben oder nach unten zu verschieben.
Frequenz: Dient der Anzeigefrequenz der Daten zur
Abstimmung mit der Frequenz der Graphik-Karte Ihres PC.
Stellen Sie einen flimmernden vertikalen Strich fest, nutzen
Sie diese Funktion für die Einstellung.
Phase: Die Einstellung dient einer Fein-Synchronisierung
mit der Graphik-Karte Ihres PC.
Wenden Sie diese an sobald Sie in instabiles oder
flimmerndes Bild feststellen.
Automatischer Modus: Ja/nein - nimmt die automatischen
Einstellungen vor.
Akzeptierte Auflösungen (DVI-D-Eingänge und VGA)
Damit Ihre Projektion mit ihrem Computer richtig
funktionniert,konfigurieren Sie den Anzeige-Modus Ihrer
Grafik-Karte auf die Auflösung 1024 x 768 oder niedriger.
Hinweis: Die beste Stabilität wird mit einer 60 Hz Frequenz
erzielt (schlagen Sie in der Dokumentation Ihres PC nach,
um diese zu konfigurieren).
14
Horizontal Vertikal Hz
640 x 480 60
640 x 480 66
640 x 480 72
640 x 480 75
640 x 480 85
800 x 600 60
800 x 600 72
800 x 600 75
800 x 600 85
1024 x 768 60
1024 x 768 70
1024 x 768 75
1152 x 864 60
1152 x 864 70
1280 x 720 60
1280 x 1024 60
BILD AUDIO OPTIONEN INSTAL.
HORIZONTAL 5
CODE
SCHUTZ
QUELLE
PC DATEN
SUCHE
CODE
SAISIR
_ _ _ _
VERTIKAL 10
VERROU
FREQUENCE -3
CHAINE
PHASE 0
MODIF. CODE
MODE HP INT.
AUTOM. BILD
CONFIG. USINE
CODE CODE
PROTECTION VERROU
SOURCES CHAINE
DONNEES PC
JA
RECHERCHE
MODIF. CODE
CONFIG. USINE
Page 73

8. TÄGLICHER GEBRAUCH
8.1. Bildeinstellung
PERSÖNLICHE EINSTELLUNG DES BILDES
Dank des Modus PERSO können Sie Ihre eigenen
Parameter definieren und speichern.
KONTRAST, HELLIGKEIT, FARBE, SCHÄRFE, FARBTON
können je nach Wunsch mit den Tasten C undB
eingestellt werden.
Die Einstellung des Farbtons betrifft nur die Videoquelle
NTSC.
Die Einstellung der Farbbalance ermöglicht die Wahl der
dominierenden Farbe des Bildes. Führen Sie die
Einstellung mit C und B durch.
VOREINGESTELLTE BILDAMBIENTE
Sie können Ihre Bildpräferenzen unter den voreingestellten
Einstellungen mit Hilfe der Tasten C und B wählen.
STANDARD CINEMA STUDIO SPORT.
Wählen Sie dasjenige, das dem Programm, das Sie sehen
am besten entspricht und bestätigen Sie mit der OK-Taste.
Drücken Sie auf die MENÜ Taste zum Verlassen und auf
die BACK Taste, um zur vorhergehenden Bildschirmseite
zurückzukommen.
8.2. Toneinstellung
Sie können Ihre eigenen Parameter unter den
nachfolgenden einstellen und speichern:
TIEFEN , HÖHEN, BALANCE
Mit der Tiefeneinstellung können die tiefsten Frequenzen
hervorgehoben werden.
Mit der Höheneinstellung können die höchsten Frequenzen
unterstrichen werden.
BALANCE
Die Balanceeinstellung bezieht sich auf die Lautstärke des
rechten und linken Lautsprechers. Mit der Einstellung kann
ein Tonniveau erzielt werden, das der Hörposition
angepasst ist.
BÄSSE
Die Einstellung beeinflusst die Lautstärke, die dem
Ausgleich der rechten und linken Kanäle dienen.
HIFI-AUSGANGSLAUTSTÄRKE
Mit dieser Einstellung wird die Lautstärke Ihres DLP™Flachbildschirms fest oder über die Fernbedienung
justierbar eingestellt.
15
DEUTSCH
BILD AUDIO OPTIONEN INSTAL.
BENUTZER NORMAL KINO STUDIO SPORT
KONTRAST 55
HELLIGKEIT 45
FARBE 65
SCHÄRFE 85
FARBTON 35
FARBTEMP.
BILD AUDIO OPTIONEN INSTAL.
BENUTZER NORMAL KINO STUDIO SPORT
KONTRAST 55
HELLIGKEIT 45
FARBE 65
SCHÄRFE 85
FARBTON 35
FARBTEMP.
WARM
WARM
BILD AUDIO OPTIONEN INSTAL.
BENUTZER NORMAL KINO STUDIO SPORT
BILD AUDIO OPTIONEN INSTAL.
BASS 55
HÖHEN 45
BALANCE +10
VOL. SUBW. 35
LAUTSPR.
VOL. HIFI
VOL. KOPFH. 55
STEREO
KONSTANT
Page 74

Lautsprecher-Modus.
(interne Lautsprecher): Die Wahl hängt von der Sendung ab, die Sie sehen (STEREO, MONO).
Sie können die Lautsprecher mit (AUS) ausschalten, wenn Sie nur über Kopfhörer hören möchten.
Die Kopfhörerlautstärke kann unabhängig von der Lautsprecher-Lautstärke eingestellt werden.
Sind alle Einstellungen vorgenommen worden, drücken Sie auf die MENÜ Taste zum Verlassen oder
auf die BACK Taste, um zur vorhergehenden Bildschirmseite zurückzukehren.
8.3. Zeitschalter für Standby-Modus
Drücken Sie auf die MENÜ-Taste und wählen Sie dann
“OPTIONEN” mit Hilfe der Taste B und bestätigen Sie mit
OK.
Wählen Sie “AUTOM. STANDBY” und bestätigen Sie dann
mit OK.
Dank dieser Option können Sie eine Zeitspanne
programmieren, nach der der Fernseher automatisch in
den Standby-Modus übergeht.
Im 15 min-Intervallen können Sie den Standby-Modus bis
zu 180 min verschieben.
Eine Minute vor dem Standby-Modus erscheint der Ablauf
der letzten Minute auf dem Bildschirm. Dank dieses Bilds
können Sie den Standby-Modus eventuell verweigern.
Sie können den DLP™-Flachbildschirm immer auch vor
Ablauf der programmierten Ausschaltzeit abstellen oder
den Standby Modus neu programmieren.
8.4. Sperrung des Fernsehers
Drücken Sie auf die MENÜ-Taste, wählen Sie
anschliessend “INSTAL.” mit Hilfe der B Taste und
bestätigen Sie mit OK .
Geben Sie Ihren persönlichen Code ein und bestätigen Sie
mit Hilfe der Taste OK (es ist kein Code für den
Herstellercode 0000 notwendig).
Wählen Sie JA oder NEIN.
Ist Ihr DLP™-Flachbildschirm gesperrt, kann er nur nach
Eingabe Ihres Codes in ein Eingabefeld in Betrieb
genommen werden.
16
BILD AUDIO OPTIONEN INSTAL.
SLEEP TIMER
KOPFHÖRER
PICTURE IN PICTURE (PIP)
PICTURE AND PICTURE (PAP)
MENÜ SPRACHE
EINGANGSQUELLEN-MANAGER
ENGLISH
FRANCAIS
DEUTSCH
ITALIANO
ESPANOL
PORTUGUES
NEIN
HAUPTQUELLE
JA
JA
FRANKREICH
AUTOM.
BILD AUDIO OPTIONEN INSTAL.
CODE
SCHUTZ
QUELLE
PC DATEN
SUCHE
CODE
EINGEBEN
VERROU
CHAINE
MODIF. CODE
CONFIG. USINE
BILD AUDIO OPTIONEN INSTAL.
CODE
SCHUTZ
QUELLE
PC DATEN
SUCHE
GENERAL
CODE ÄNDERN
FABRIKKONF.
MODIF. CODE
CONFIG. USINE
CODE CODE
PROTECTION VERROU
- - - -
SOURCES CHAINE
DONNEES PC
RECHERCHE
NEIN
PROTECTION
SOURCES
DONNEES PC
RECHERCHE
MODIF. CODE
CONFIG. USINE
VERROU
CHAINE
MODIF. CODE
CONFIG. USINE
CODE
Page 75

8.5. Quellenwahl
Die Quellen konnen auf zwei verschiedene Arten gewählt
werden:
• Mit Hilfe der Tasten P+/P- auf der Frontseite. Sie
navigieren zwischen den empfangbaren terretrischen
Sendern sowie zwischen allen externen Quellen (Scart 1,
Scart 2, Scart 3, AV 4, AV 5, AV 6, AV 7, etc.).
Hinweis: Ein Sender ist empfangbar, wenn er mit der
automatischen Suche gefunden oder bei der manuellen
Suche gespeichert wurde.
Das Banner Zapping wir bei jedem Senderwechsel
eingeblendet und die Banner Info bei jedem
Quellenwechsel.
• Mit der direkten Zugangstaste b auf der
Fernbedienung.
Klicken Sie auf die gewählten Quelle, indem Sie erneut
auf b drücken bis Sie die richtige Quelle gefunden
haben.
Hinweis: Haben Sie wie vorab im Kapitel 7.2 beschrieben,
Ihre Geräteeingänge konfiguriert und benannt, werden
Ihnen nur die auf den Video-Standard konfigurierten und
angeschlossenen Quellen vorgeschlagen.
8.6. Wahl des Formats
Mit der Direkt-Zugangstaste - haben Sie einfachen und
direkten Zugang zu dieser Wahl.
Dank dieser Funktion können Sie das Bild im
grösstmöglichen Format sehen.
Drücken Sie auf die Taste - der Fernbedienung
Hinweis: Beim ersten Drücken zeigt das Info-Banner den
gegenwärtigen Zustand an ohne eine Formatänderung.
4-zu-3-FORMAT
Zeigt ein Bild im 4-zu-3-Format, in seinem ursprünglichen Format.
VERGRÖSSERTES FORMAT
Mit diesem Format können 4-zu-3-Bilder in ihrer maximalen Grösse dargestellt werden, wobei eine
Korrektur in der Bildschirmmitte stattfindet, damit die Bildverzerrung nahezu nur an der rechten und
linken Bildseite stattfindet. Die Bildgrösse hängt vom Originalsignal ab.
14-zu-9-FORMAT
Mit diesem Format können automatisch die 14-zu-9-formatierte Programme dank der WSSSignalisierung wiedergegeben werden.
Manuell eingestellt, wird dieses Format für Filme und Fernsehfilme im Kinoformat 1.66 empfohlen.
16-zu-9-FORMAT
Mit diesem Format können Sie automatisch alle 16-zu-9-formatierten Programme dank der 16/9Signalisierung, die über SCART ankommt oder dank der WSS -Signalisierung visualisieren.
KINOFORMAT
Mit diesem Format können Filme im 1.85 Format (ACADEMY FLAT) visualisiert werden, die im
Grossbildformat 4-zu-3 ohne Bildverluste und Verzerrungen gesendet werden.
Filme des Formats 2.0, 2.20 und 2.35 können ohne Verluste an dem rechten und linken Bildrand,
aber mit schwarzen Bändern am oberen und unteren Rand visualisiert werden.
17
DEUTSCH
SCART 1
16/9
DVD
4/3
SCART 2
KINO
Page 76

UNTERTITELFORMAT
Mit diesem Format können Filme im 1.85-Format (ACADEMY FLAT) visualisiert werden, die im 4-zu3 Grossbildformat ohne Bildverluste und -Verzerrungen gesendet werden und zwar dadurch, dass
das Bild nach oben verschoben wird und so gegebenenfalls die Untertitel gelesen werden können.
SCOPE FORMAT
Mit diesem Format können Filme im 2.35 Format (PANAVISION) visualisiert werden, die im 4-zu-3Grossbildformat ohne Verzerrungen mit maximaler Höhe, aber mit einem Verlust an dem rechten und
linken Bildrand gesendet werden.
8.7. Informationsprogramme
Jederzeit können Sie mit Hilfe der Taste i+ Informationen
über den Sender erhalten.
Bei der Visualisierung eines Videos von einer externen
Quelle aus wird der Quellenname angezeigt.
8.8. Wahl des Bild-im-Bild-Modus (PIP/PAP)
Inbetriebnahme des Bild-im-Bild-Modus
Wählen Sie den eingeblendeten Video-Kleinbild-Modus
(PIP) oder den zweier nebeneinander dargestellten Videos
(PAP), indem Sie mehrmals auf die Taste Fdrücken.
Im PIP- oder PAP-Modus können Sie:
Die Quellen invertieren, indem Sie auf die Taste H.
drücken.
Die Quellen auf dem Bildschirm austauschen, indem Sie
die Taste G drücken und anschliessend
• Pr+ oder Pr- um den terrestrischen Sender zu
wechseln,
• b um die Quelle zu ändern und die auf dem
Bildschirm vorgeschlagene Quelle zu wählen,
Das Format auf dem Bildschirm zu ändern , indem Sie
die Taste G drücken und dann
• - um das Format zu ändern und die gewünschte
Quelle, die der Bildschirm anbietet zu wählen.
Hinweis: Das Video-Kleinbild des PIP- Modus ist nur im
16/9-Format möglich.
Mit den Tasten CB ändert sich die Position des PIPFensters, wenn der PIP-Modus aktiviert ist.Die Navigation
kann in den 4 möglichen Positionen in folgender
Reihenfolge erfolgen: Hoch-links, hoch-rechts, runter-links,
runter-rechts.
18
SSSSEEEELLLLEEEECCCCTTTTIIIIOOOONN
NN
SELECTION
1 (TF1)
4/3
STEREO
Page 77

8.9. Wahl der Audio-Einstellung
Lautstärke: Drücken Sie auf / + oder -, um die Lautstärke zu regeln.
Ton abschalten: Drücken Sie aufb um momentan den Ton abzustellen oder wieder anzustellen.
Zweisprachige Sendung und Tonwahl: Drücken Sie auf um zwischen MONO und STEREO zu
wählen, wenn der Sender den Ton im NICAM- Stereo-Mode überträgt. Wählen Sie DUAL A und
DUAL B für zweisprachige Sendungen.
Diese Einstellung wird von dem Sender gespeichert.
8.10. Wahl des terrestrisch Programms
Wählen Sie Ihren Sender mit den Tasten 0/9. Für eine zweistellige Ziffer, geben Sie die zweite
innerhalb der nächsten 2 Sekunden ein.
Um einen einstelligen Sender direkt zu sehen, drücken Sie etwas länger auf die Zahlentaste.
Verwenden Sie die BACK-Taste, um zum vorhergehenden Sender zurückzukehren..
8.11. Standbild
Benutzen Sie die Taste K (Pause) um das Bild festzuhalten oder es wieder zu aktivieren.
19
DEUTSCH
Page 78

9. VIDEOTEXT
Die Videotextfunktionen variieren je nach Fernsehgesellschaft und sind nur verfügbar, wenn der gewählte
Sender Videotext überträgt.
• Ein- und Ausschalten des Videotextes
Drücken Sie auf die Taste , um den Videotext ohne Bild
einzuschalten.
Durch erneutes Drücken wird der Videotext in das laufende Bild
eingeblendet.
Erneutes Drücken stellt den Videotext ab.
Ist kein Videotext auf dem Sender verfügbar, den Sie sehen, wird
Ihnen dieses in Form einer Nachricht angezeigt.
• Wahl der Indexseite
Die Videotextdienste verfügen über eine Eingangsseite (im
allgemeinen Seite 100) mit der Benutzung der angebotenen
Dienstleistung.
Mit der Taste gelangen Sie direkt zu dieser Eingangsseite.
• LIST- oder FASTEXT -Modus:
Es gibt zwei Videotextmodi:
- Der LIST- Modus (Liste): In diesem Modus erscheinen vier
verschiedenfarbige Seitenzahlen auf dem unteren Bildschirm.
Jede dieser Zahlen kann geändert und gespeichert werden.
- Der FASTEXT- Modus (schneller Text): In diesem Modus
erscheinen vier Themen in verschiedenen Farben unten auf
dem Bildschirm. Um weitere Informationen zu einem dieser
Themen zu bekommen, drücken Sie auf die entsprechende
Farbtaste.
Mit dieser Funktion können Sie schnell Informationen über ein
angegebenes Thema erhalten.
Die Wahl des gewünschten Modus erfolgt mit Hilfe der Taste .
• Seitenwahl
Geben Sie die gewünschte Seitenzahl mit Hilfe der Tasten 0-9
(Seiten, die mit 0 oder 9 beginnen, sind nicht vorhanden).
Der Seitenzähler oben im Bildschirm sucht die Seite oder die Seite
erscheint sofort, wenn die Seitenzahl schon gespeichert ist.
Wird eine Seite gewählt, die nicht existiert, erscheint eine Nachricht,
dass die eingegebene Zahl nicht existiert.
Das Durchblättern der Videotextseiten erfolgt mit den Tasten P+ P-
oder VW(wobei die nicht existierenden Seitenzahlen
übersprungen werden).
Die Rückkehr zur vorhergehenden Seite erfolgt mit der BACK-Taste .
Um eine andere Seite in diesem Mode zu speichern, drücken Sie die
gewünschte Farbtaste und geben Sie die Seitenzahl ein. Im
FASTEXT - Modus kann ein gewünschtes Thema mit Hilfe der
Farbtasten, die den Optionen unten im Bildschirm entsprechen,
gewählt werden.
• Visualisierung versteckter Informationen
Drücken Sie die Taste , um versteckte Informationen aufzurufen
oder zu löschen wie Spielauflösungen oder Antworten auf Fragen.
20
Page 79

• Erhalten einer Seite
Drücken Sie die Taste K, um die Videotextseite während der
Informationssuche auf mehreren Seiten zu erhalten. Drücken Sie
erneut, um zur automatischen Aktualisierung zu gelangen.
• Doppelte Höhe
Drücken Sie die MENÜ-Taste und anschliessend die grüne Taste.
Durch häufiges Drücken kann der obere und untere Teil angezeigt
werden sowie die Rückkehr zum normalen Format.
• Blättern in den Unterseiten
Enthält eine gewählte Seitenzahl mehrere Unterseiten, erscheint
unten auf dem Bildschirm eine Hilfslinie mit den Unterseiten.
Wählen Sie mit Hilfe der Tasten CB die nachfolgende und
vorhergehende Unterseite aus.
• Wahl der Untertitel
Die Fernsehsender mit Videotext übertragen häufig einige
Programme mit Untertiteln.
Drücken Sie die Taste und klicken Sie auf die gewünschte
Untertitelseite.
Die Seite mit den Untertiteln erscheint fortlaufend auf dem
Bildschirm, wenn die laufende Sendung mit Untertiteln übertragen
wird.
21
DEUTSCH
Page 80

10. STATUSANZEIGE UND STÖRUNGEN
22
Symptome:
Nachdem Sie Ihren DLP™-Flachbildschirm bei der
ersten Inbetriebnahme angeschlossen haben, ist die
Leuchtdiode nicht rot, sondern ausgeschaltet.
Das Gerät stellt sich nicht an beim Drücken des
Knopfes ein/ Standby an der Frontseite oder bei
jenem auf der Fernbedienung.
Kein Bild
Schwarz /weisses oder zerrissenes Bild.
Kein Ton
Der Ton ist schwach und sein Empfang verzerrt.
Starres Bild
Ihr Gerät geht nicht an, wenn Sie den StandbyBetrieb mit Hilfe des Knopfes an der Frontseite oder
dem Standby-Knopf Ihrer Fernbedienung verlassen.
Kein Bild im PIP-Modus.
Die Fernbedienung funktioniert nicht mehr richtig.
Empfohlene Überprüfungen:
Überprüfen Sie das Netzkabel Ihres DLP™-Flachbildschirms, ob es
richtig am Gerät an geschlossen ist sowie der Stecker richtig in der
Steckdose ist.
Überprüfen Sie auch den Schalter, der sich auf der linken Seite des
Geräts in Position I, das heisst, gedrückt, befindet.
Überprüfen Sie das Netzkabel Ihres DLP™-Flachbildschirms, ob es
richtig am Gerät angeschlossen ist sowie der Stecker richtig in der
Steckdose ist.
Überprüfen Sie auch den Schalter, der sich auf der linken Seite des
Geräts in Position I, das heisst, gedrückt, befindet.
Die Leuchtdiode Ein/Aus leuchtet Grün und die Menüs Ihres DLP™Flachbildschirms sind verfügbar: Überprüfen Sie Ihre Videogeräte,
dass sie richtig mit Ihrem DLP™-Flachbildschirm verbunden sind und
eingeschaltet sind. Überprüfen Sie ebenso, dass Sie die richtige
Quelle für Ihren DLP™-Flachbildschirm gewählt haben (Kapitel 8.6:
Quellenwahl).
Überprüfen Sie, dass Ihr Antennenkabel richtig in der
Wandsteckdose Ihres DLP™-Flachbildschirms steckt. Überprüfen Sie
auch, dass die von Ihrem DLP™-Flachbildschirm gespeicherten
Sender sich in dem Menü Optionen/Suche/Listeneingabe befinden.
Ist dieses nicht der Fall, lösen Sie eine manuelle oder automatische
Suche aus.
Kontrollieren Sie ebenso, die Position des sich auf der linken Seite
Ihres Geräts befindenden Schalters auf der Position I(gedrückt)
befindet.
Die Leuchtanzeige der internen Temperatur des Geräts blinkt rot:
Beachten Sie die Vorsichtsmassnahmen, um einen Anstieg der
internen Temperaturen zu vermeiden. (Kapitel 1:
Vorsichtsmassnahmen).
Die Leuchtanzeige der Lampe ist rot: Die Lampe hat ihre StandardLebensdauer überschritten, ist nicht mehr funktionsfähig und muss
ausgetauscht werden.
Überprüfen Sie, ob Sie das richtige Videoforlat gewählt haben:
Beispiel Videoquelle RGB von einem DVD-Lesegerät und als S-Video
auf dem DLP™-Flachbildschirm angezeigt: Kontrollieren Sie, indem
Sie den Knopf der Bildquellenwahl drücken, wenn der gewählte
Quellentyp mit der gesandten Quelle übereinstimmt.
Überprüfen Sie, dass die Farbeinstellung nicht auf minimal steht.
Kontrollieren Sie, dass der Ton nicht auf minimal steht oder das die
Funktion Ton abschalten aktiviert ist.
Überprüfen Sie, dass die Geräte richtig an ihren
DLP™-Flachbildschirm angeschlossen sind.
Stellen Sie den Ton auf Mono.
Überprüfen Sie, dass Sie das Bild nicht fixiert haben: drücken Sie auf
“PAUSE" Taste.
Die Leuchtanzeige EIN:STANDBY blinkt 20s lang orange und geht
dann auf rot über, oder bleibt ein oranges Blinklicht; schalten Sie das
Gerät mit Hilfe des sich auf der linken Geräteseite befindenden
Schalters aus, warten Sie 30 s und starten Sie erneut entsprechend
des normalen Startvorgangs.
Überprüfen Sie, dass Sie eine aktive Quelle im PIP-Modus gewählt
haben Kapitel 8.9: Wahl des Doppelbild-Modus.
Wechseln Sie die Batterien aus.
Page 81

11. AUSTAUSCH DES LAMPENBLOCKS
Tauschen Sie den Lampenblock nur durch das zugelassenen Modell RL1080A , Sagem - Referenz
251282989 aus. Dieses erhalten Sie in den von SAGEM autorisierten Servicestützpunkten.
Der gebrauchte Lampenblock muss wiederverwendet werden (kontaktieren Sie Ihre AbfallWiederaufbereitungsanlage um die nächstliegende Depotadresse in Erfahrung zu bringen).
VORSICHT !
1. Der Austausch des Lampenblocks darf nur bei abgeschaltetem Strom und aus der
Wandsteckdose gezogenen Netzstecker erfolgen.
2. Niemals den Austausch des Lampenblock kurz nach dem Abschalten des Stroms nach der
Benutzung des Projektors vornehmen.
3. Den Lampenblock nur an dem für diesen vorgesehenen Griffanfassen. Niemals die Kabel oder die
Glühbirne selbst berühren.
4. Achten Sie darauf, dass Sie alle Schrauben wieder befestigt haben und keine Fremdkörper im
Gerät vergessen haben.
Nehmen Sie die Vorderklappe an jeder Seite
und ziehen Sie sie zu sich.
Schrauben Sie die Schutzplatte ab (verwenden
Sie einen Kreuzschraubenzieher) und nehmen
Sie die Platte ab. Achten Sie darauf, dass Sie
keine Schrauben verlieren.
23
DEUTSCH
1
2
Page 82

Lösen Sie die drei Befestigungsschrauben des
gebrauchten Lampenblocks und ziehen Sie
den Lampenblock an seinem Griff zu sich.
(Diese 3 Schrauben sind an dem Lapmenblock
fixiert und können nicht vorloren gehen. Diese
fixierten Schrauben befestigen den
Lampenblock nach Lampentausch wieder am
Gerät).
Nehmen Sie den neuen Lampenblock an
seinem Griff und setzen Sie ihn an Ort und
Stelle des vorhergehenden.
Ziehen Sie die 3 an den Block angrenzenden
Befestigungsschrauben an.
Nicht vergessen, den Griff hochzuklappen
(wobei darauf geachtet werden muss, dass die
Glühbirne nicht berührt wird).
Befestigen Sie die Schutzplatte mit Hilfe der
zwei Schrauben.
Setzen Sie die Vorderklappe unter leichtem
Druck wieder ein, sodass sie ihre
ursprüngliche Position wieder einnimmt.
24
3
4
5
6
Page 83

12. INDEX
25
DEUTSCH
A
Automatische Installation, 10
B
Bässe, 15
Bildeinfang, 19
Bildeinstellungen, 15
Bildformat,17
Bildwanderung, 11
D
Decoder, 12, 13
DVD, 12
E
Erste Schnellinstallation, 5
Externe Quellen, 13
F
Fernbedienung 7
Frontseite, 6
Frequenz 9
H
Höhen, 15
I
Inbetriebnahme des DLP™-Flachbildschirms, 4
Informatikquellen, 17
Informationen auf dem Bildschirm,18
K
Kopfhörer, 13, 16
L
Lampe 23
Länder, 9
Lautstärke, 18
Liste der terrestrischen Programme, 10
M
Manuelle Installation , 9
N
NICAM, 26
O
OSD Sprachmenü, 11
P
Programmauswahl, 19
Programmnummeränderung, 10
Programmstop, 16
S
Satellitenempfänger, 12
Scartkabel, 12
Schutzcode 8
Speichern der Fernsehsender, 8
Sperrungen, 16
Spielkonsole, 15
Sprache, 19
Statusanzeige und Störungen, 22
Stereo, 18
Suche terretrischer Sender, 8
S-VHS, 13
T
Ton abschalten, 19
Toneinstellungen, 15
U
Untertitel, 20
V
Videokamera, 13
Videorekorder, 12
Videotext, 20
Videotext-Unterseiten, 20
Vorsichtsmassnahmen, 2
W
Wartung, 3
Werkseinstellungen, 8
Z
Zeitschalter für Standby-Modus, 16
Zwei Bildschirmseiten, 11 ,18
Zweisprachige Sendung,19
Page 84

Video
Bildschirm: 127 cm
Bildformat: 16/9
Auflösung: 1280 x 720
Kontrastverhältnis: 2000: 1
Helligkeit: 500cd/m2
Betrachtungswinkel: 60/20
Tuner-Empfang
Eingangsfrequenzen: 45.5 - 862.25 MHz
Eingangsempfindlichkeit: 20 - 100 dBµV
Programmspeicherplätze: 100
PAL B, G, H, I, SECAM B, G, SECAM L/L'
VHF E2 -E12
VHF A - H (Italien)
VHF H1 - H2 (Italien)
UHF E21 - E69
CATV (S01 - S02)
CATV S11 - S20 (U1 - U10)
CATV S1 - S10 (M1 - M10)
CATV S21 - S41 (Hyper bande)
PAL D, K, SECAM D, K
VHF R1 - R2
VHF R6 - R12
VHF R3 - R5
UHF E21 - E69
Audio-Demodulation
AM 6.5 MHz / NICAM 5.85 MHz (L L')
FM 5.5 MHz 5.74 MHz (BG)
FM 5.5 MHz / NICAM 5.85 MHz (B G)
FM 6.0 MHz / NICAM 6.55 MHz (I)
FM 6.5 MHz 6.258 MHz / NICAM 5.85 MHz (D K K')
Audio Ausgänge
Maximalleistung: 2 x 15W RMS
Lautsprecheranzahl: 2 x 2 Kanäle
Vorderseite
AV5
S-Video - Eingang (Mini Din 4-Pin)
Composite Video Eingang (1 x Cinch)
Audio Eingang (2 x Cinch)
PC1
VGA Computer -Eingang (subD 15-pin)
Audio Eingang (1 x Jack 3.5)
Kopfhörer
Ausgang (Jack 3.5)
7 Tasten (on/off, P+, P-, V+, V-, Menu, OK)
3 Leuchtanzeigen (on/off, lampe, temperatur)
Anschlüsse auf der Rückseite
Scart 1 (RGB/Comp./ S-video, Audio)
Scart 2 (RGB/Comp./ S-video, Audio)
Scart 3 (S-video/Comp., Audio)
AV4
S-Video -Eingang (Mini Din 4-pin)
Composite Video Eingang (1 x Cinch)
Audio Eingang (2 xCinch)
AV6
Y, Cb, Cr Eingang (3 x Cinch)
Audio Eingang (2 x RCA)
AV7
Y, Pb, Pr Eingang ( 3 x Cinch)
Audio Eingang (2 x Cinch)
Hi-fi
Audio Ausgang (2 x Cinch)
Sub-woofer
Audio Ausgang (1 x Cinch)
PC2
DVI-D Computer Eingang
Audio Eingang (1 x Jack 3.5)
Eingangsquellen
Video Signal:
Darstellungsformate: SDTV/EDTV
(480i/480P)(576i/576P) HDTV (1080i/720P)
Computersignal:
Dartsellungsformate: VGA 640 x 480, SVGA 800 x
600, XGA 1024 x 768, SXGA 1280 x 1024
Stromversorgung
Ws 220-240 V ~50 Hz
Max. Leistungsaufnahme 250 W
(Stand-by 5 W)
Abmessungen und Gewicht netto
Abmessung (B x H x T): 1166 x 904 x 375 mm
Gewicht: 42 kg
Abmasse und Gewicht (verpackt)
Abmessung (B x H x T): 1312 x 905 x 560 mm
Gewicht: 56 kg
Zubehör
Fernbedienung TL-50
Batterien: 2 x 1.5 V (Typ AA)
Netzkabel
Antennenkabel
Bedienungsanleitung
CE-Norm
EMV (Elektromagnetische Verträglichkeit)
EN55013: 10.2001
EN55020: 2002
EN55022: 1998+A1: 2000
EN55024: 09.1998+A1: 10.2001
EB61000-3-2: 12.2000
EN61000-3-3: 01.95+A1: 06.2001
Elektroschutz
EN60065 . 1998
13. TECHNISCHE DATEN26NOTIZEN
Page 85

27
DEUTSCH
Page 86

NOTIZEN
28
Page 87

Page 88

www.sagem.com
SAGEM SA
Tél. +33 1 40 70 88 44 - Fax +33 1 40 70 66 40 - www.sagem.com
Le Ponant de Paris - 27, rue Leblanc - 75512 PARIS CEDEX 15 - FRANCE
SAGEM SA - Société anonyme à directoire et conseil de surveillance
capital : 36.044.360 € - 562 082 909 R.C.S. PARIS
Imprimé en France 251303163 C
 Loading...