

Page 1
1 COUV.fm Page 1 Lundi, 3. septembre 2007 3:24 15
User Guide
Page 2
Préliminaire.fm Page i Lundi, 3. septembre 2007 11:38 11
INTRODUCTION
Dear customer:
Thank you for purchasing a SAGEM DECT telephone; we appreciate your trust in us.
This product was manufactured with the utmost care, should you encounter any difficulties during its use, we
recommend that you refer to this user guide. You can also find information on the following site:
For your comfort and safety, we ask that you read the following paragraph carefully:
Recommendations and safety instructions
Your DECT telephone must not be installed in a humid room (wash room, bathroom, laundry room,
kitchen, etc.) unless it is 1.50 m away from a water point, or outside. Your telephone must be
operated at temperatures ranging from 5°C to 45°C.
Only use the supplied power adapter, connect it to the base socket according to the installation
instructions provided in this booklet and the indications on the identification label affixed to it
(voltage, current, electric network frequency). As a safety measure, you can use the power adaptors
to cut off the 240V current in case of danger. They must be located near to the device, and must be
easily accessible.
This telephone was designed for use on the public switched telephone network (PSTN). In case of
a problem you must first contact your reseller. Only use the supplied telephone cord.
For your personal safety, never place your handset on the base without the batteries, or without the
battery cover, you could get an electric shock.
To avoid damaging your handset, only use certified rechargeable AAA batteries NiMH 1.2 V
550 mAH, never use non rechargeable batteries. Insert the batteries in the handset battery
compartment respecting polarity.
At the end of their useful life, batteries must be disposed of according to the recycling instructions
presented in this booklet.
Your DECT telephone has an inside radio range of about 50 metres and up to 300 metres in open
space. The immediate presence of metal parts (of a television for example), or of any electric
appliance may result in range reduction.
Some sensitive medical equipment and safety equipment may be affected by the radio-frequency
transmissions of your telephone. In all cases, we ask that you respect the safety recommendations.
In areas where storms are frequent, we recommend that you protect your telephone line using a
surge protection device.
This equipment does not function in the case of an electric network shutdown: For the
emergency calls, use a self-contained cord telephone.
The CE marking certifies that the product meets the essential requirements of Directive 1999/5/CE
of the European Parliament and of the Council pertaining to microwave radio equipment and
telecommunication terminal equipment, for the safety and health of users, for electromagnetic
interference. Furthermore, it efficiently uses the frequency spectrum attributed to ground and spatial
communication to prevent damaging interference.
The declaration of compliance may be looked up on the www.sagem.com site, section "support"
or can be obtained from the following address:
SAGEM AUSTRALASIA PTY LTD
ABN: 43 003 099 812
Unit 1, 7-9 Orion Road
Lane cove NSW 2066
P.O. Box 4072
Lane Cove 1595
Australia
http://www.sagem.com/faq
Page 3

LU 252973993 D30 T V H Australie.book Page 3 Mercredi, 20. juin 2007 9:47 09
CONTENTS
Your telephone 5
Unpacking 5
Your base 5
Your handset 7
Connecting the base 8
Handset set-up 9
Handset turning on and off 10
Replacing the batteries 10
Getting started 11
Making a call 11
Receiving a call 11
During a call 11
Handsfree 11
Call transfer 12
During a call 12
Accessing the phonebook or call log 13
Secret mode 13
Ending a call 14
Communication between two handsets 14
Menu structure 15
Your phonebook 17
Viewing the phonebook 17
Creating an entry 17
Using a phonebook entry to place a call 18
Searching for a contact 18
Performing a quick search 18
Performing a refined search 19
Editing an entry 19
Deleting an entry 19
Sending a SMS from phonebook 20
SMS service 21
Sending a text message 21
Writing a text message 21
Sending an SMS 22
Reading a message 23
Managing read messages 24
Modify the SMS mode 24
Viewing the memory status 25
Emptying an SMS folder 25
SMS settings 26
Modifying the SMS centre numbers 26
Choose the SMS transmission centre 26
Modifying the terminal number 26
SMS boxes 27
Sub-Addressing 27
Creating a personal box 28
Viewing a message from a personal box 28
Modifying or removing a personal box 29
Call log 30
Viewing the received and dialled call log 30
Calling the last number dialled (Redial) 30
Calling a number listed in the dialled
and received call log 31
Viewing the events log 31
Accessories 32
Alarm clock 32
Setting the alarm clock 32
Activating or deactivating
the alarm clock 32
Modifying the alarm clock time 32
Changing the alarm clock ring tone 32
Timer 33
Changing the programmed time
of the timer 33
Changing the timer ring tone 33
Displaying or hiding the programmed
time of the timer 34
Birthday alarms 34
Adding a new birthday alarm 34
Viewing a birthday alarm 34
Modifying or deleting a birthday alarm 34
Monitoring a room 35
Ring tones 36
Changing the ring tones 36
Activating or deactivating the beeps 36
Activating/deactivating the silent mode 37
Settings 38
Programming a key 38
Modifying the date and time 38
Using the auto hang up
and pick up features 38
Modifying the Voice box number
(model D30T) 39
Modifying the language 39
Locking/unlocking the keypad 40
Programming an emergency number 40
Defining the call time limit 41
Defining forbidden prefixes - Call barring 42
Modifying the base code 42
Authorising listening in 43
Registering a new handset to a base 43
Modifying the base preference 44
Resetting the handset 44
Personal registering 45
Using a handset to put the base
in registration mode 46
Resetting the base 46
De-registering a handset 47
3
Page 4

LU 252973993 D30 T V H Australie.book Page 4 Mercredi, 20. juin 2007 9:47 09
CONTENTS
Renaming the base 47
Modifying the network type 48
Modifying the flash duration (Rkey) 48
Setting a PABX prefix 49
Answering machine
(Model D30V) 50
Enabling/disabling the answering machine 50
Modifying the OGM 51
Recording a personal outgoing message 51
Using a pre-recorded anonymous OGM 51
Deleting all your personal OGMs 51
Playing messages 52
Playing messages using the base 52
Playing messages using the handset 52
Remote access to answering machine 53
Deleting all the old messages 53
Recording a memo 53
TAM setting (Model D30V) 55
Activating and deactivating call screening 55
Modifying the remote access code 55
Setting the message duration 55
Privileged access 56
Record mode 56
Number of rings 57
Appendix 58
Care and Maintenance 58
Problems 58
Features 59
Environment 60
Packaging 60
Batteries 60
The product 60
Warranty 61
4
Page 5
LU 252973993 D30 T V H Australie.book Page 5 Mercredi, 20. juin 2007 9:47 09
YOUR TELEPHONE
Unpacking
Place the box in front of you, open it and make sure it contains the following items:
•one base,
• one handset,
• one battery compartment cover,
• one equipped power adapter,
• one telephone line cord,
• three rechargeable batteries,
• this user guide.
In the case of purchasing a duo or trio pack, you will find in addition for each additional
handset:
• a handset charger,
• an additional battery flap,
• three additional rechargeable batteries.
In the case of purchasing a single pack, you will find :
• a desk charger fitted with its power supply unit,
• one handset,
• one battery compartment cover,
• three rechargeable batteries,
• this user guide.
Your base
It fits well into your family environment.
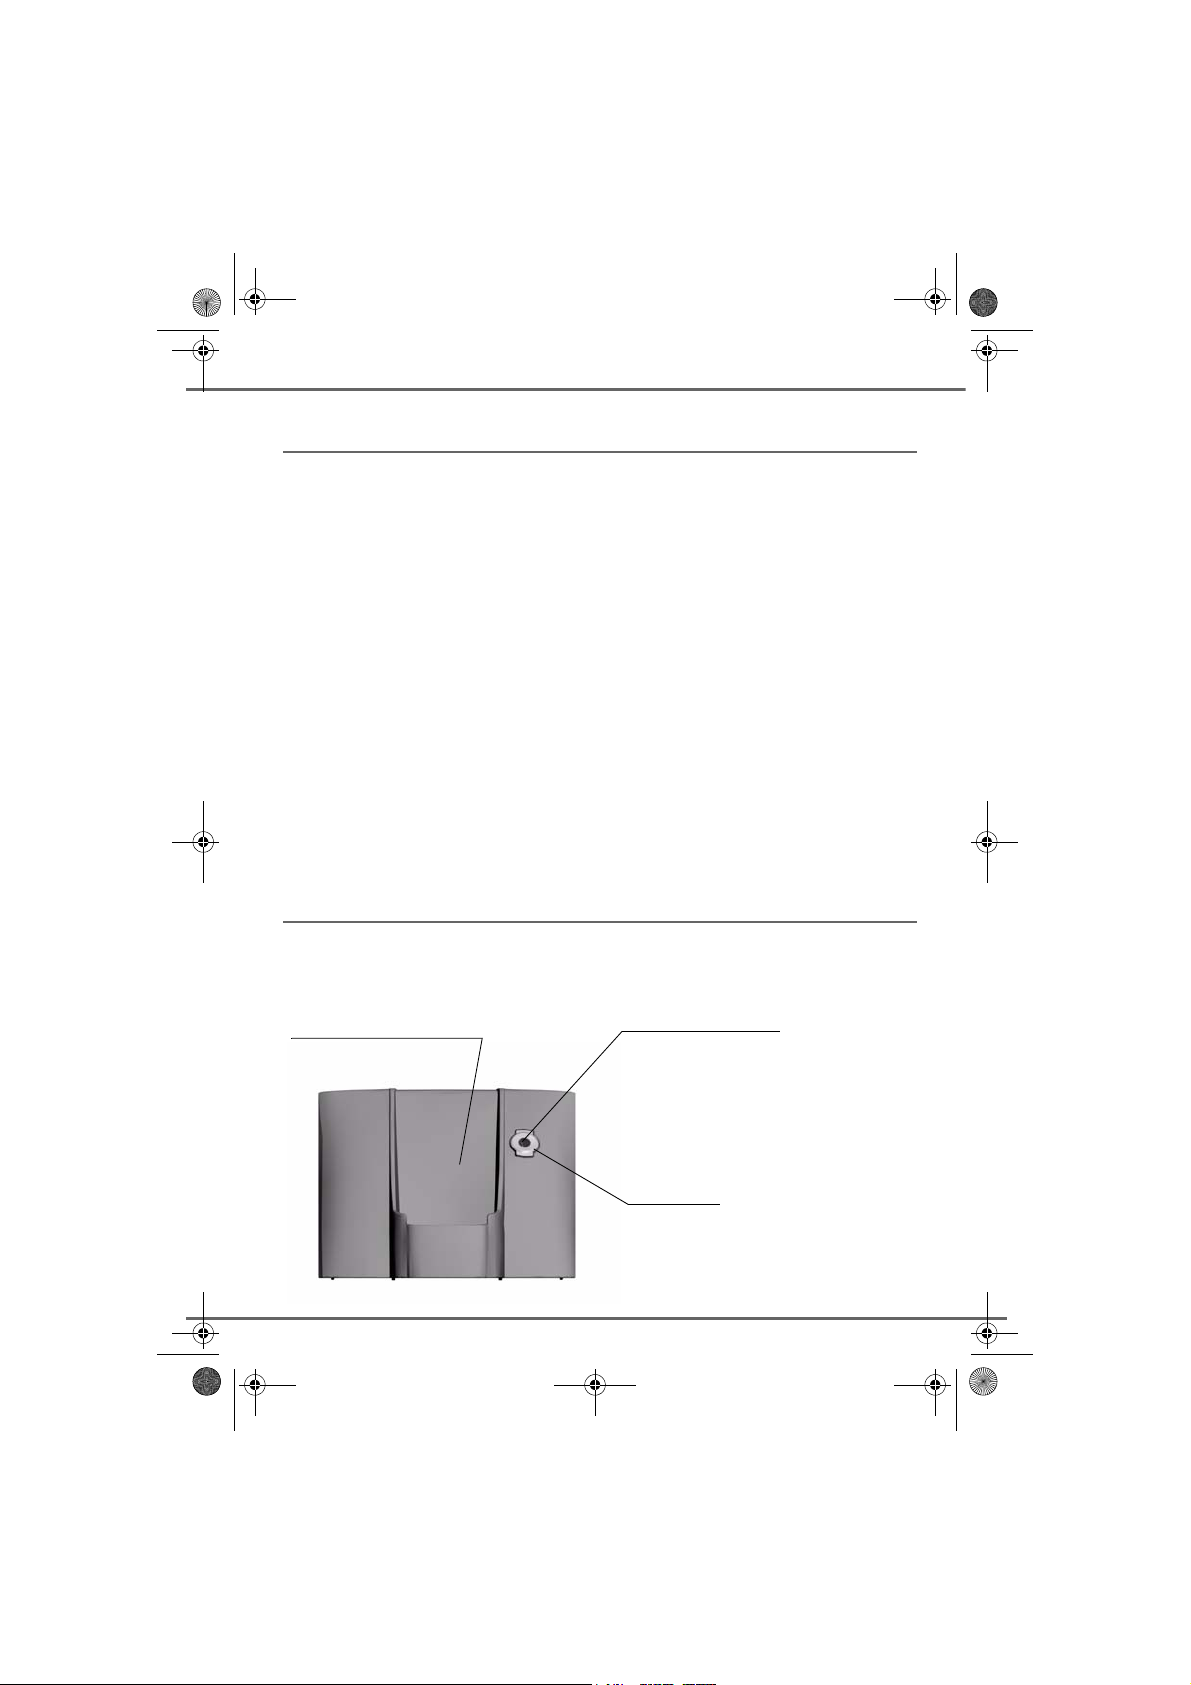
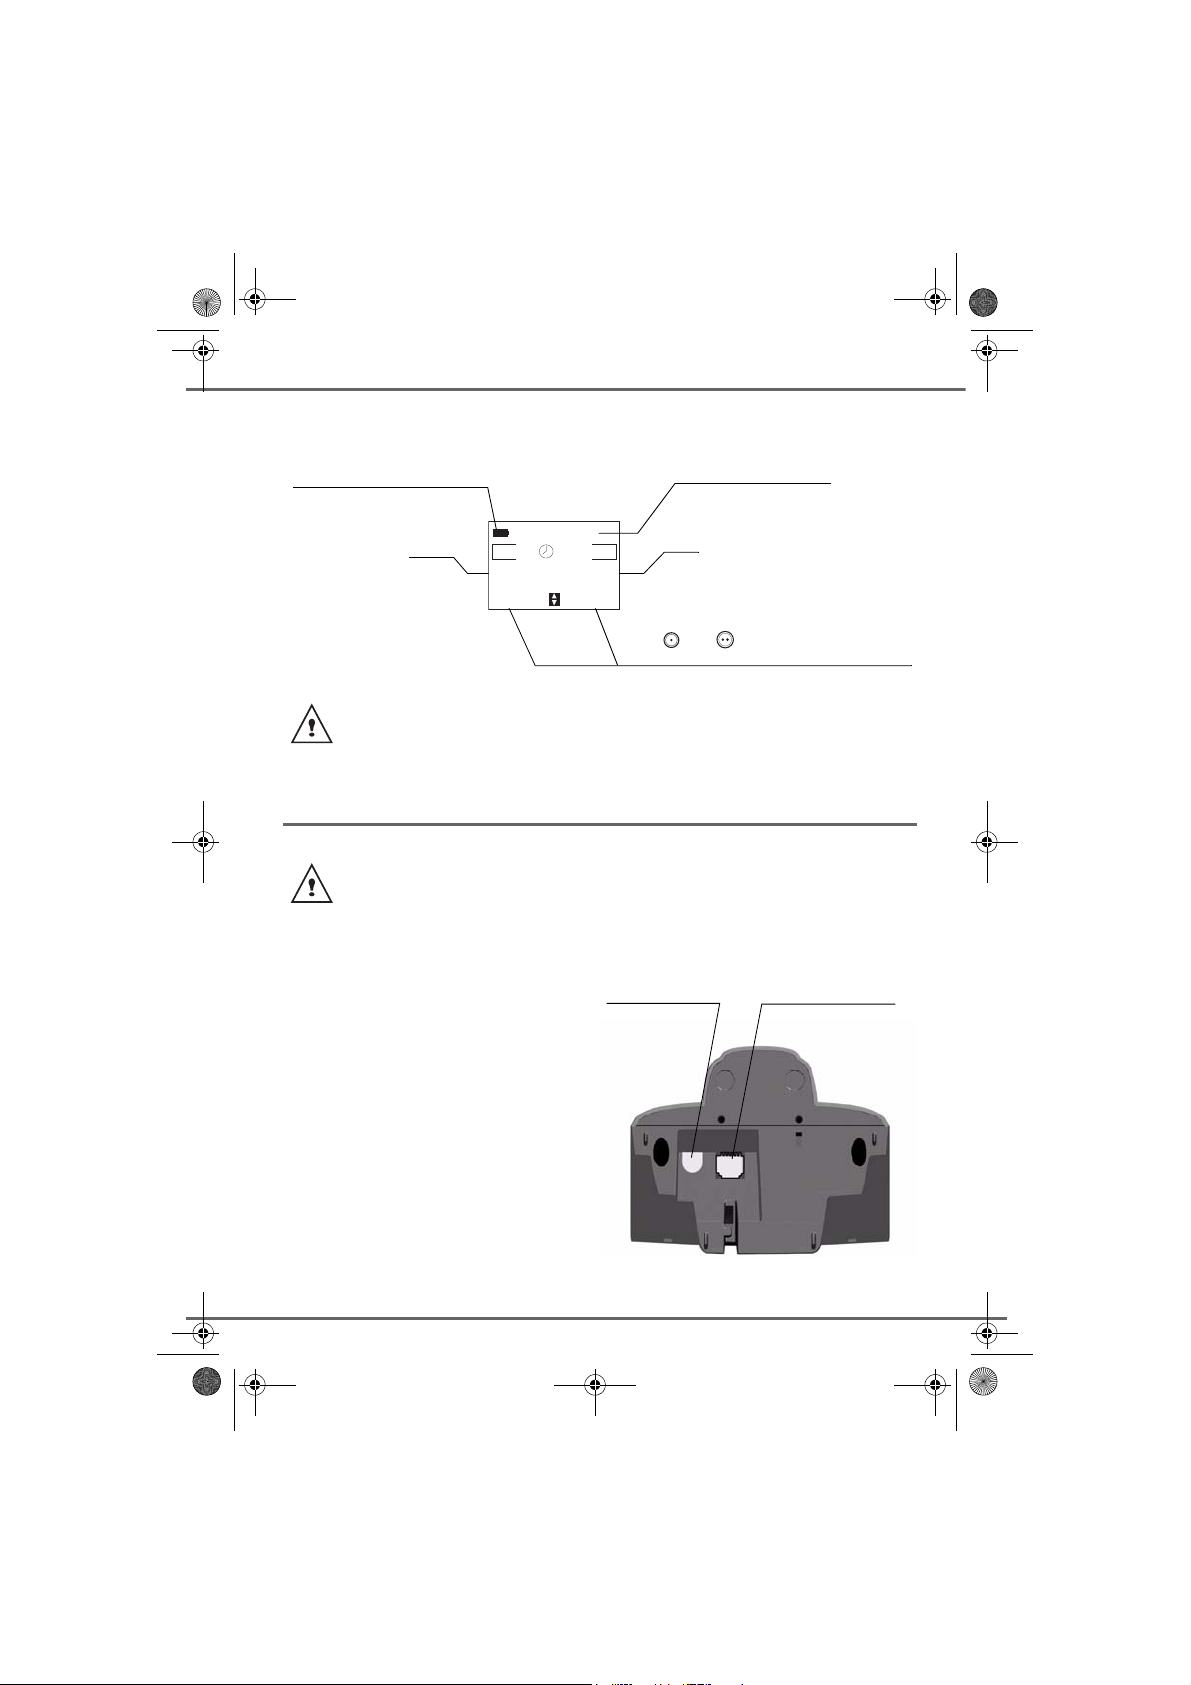
Model without answering machine (D30T):
Handset location Power indicator light
Fixed green indicator: Powered
Flashing green indicator:
- handset on line,
- handset paging,
- handset registration.
Base button
Pressed briefly:
- handset paging.
Held down:
- handset registration.
5
Page 6
Votre téléphone.fm Page 6 Lundi, 25. juin 2007 9:36 09
YOUR TELEPHONE
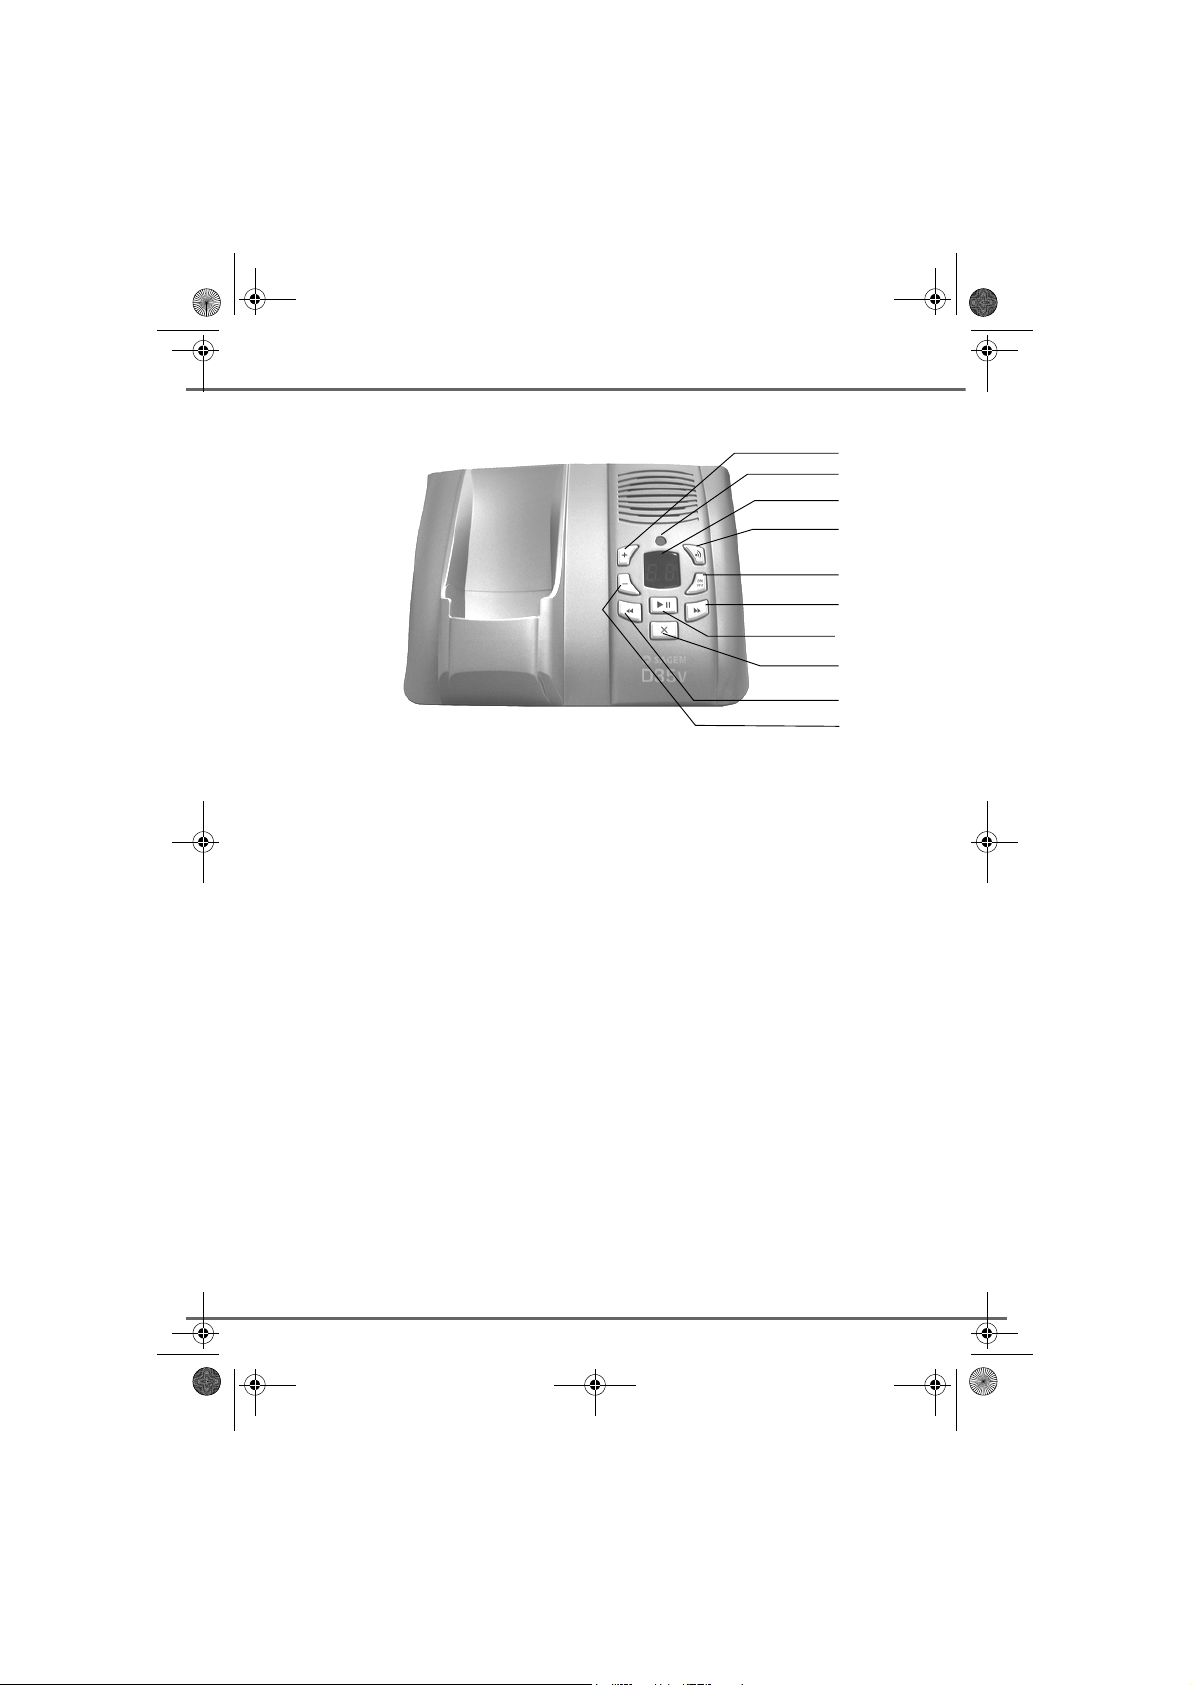
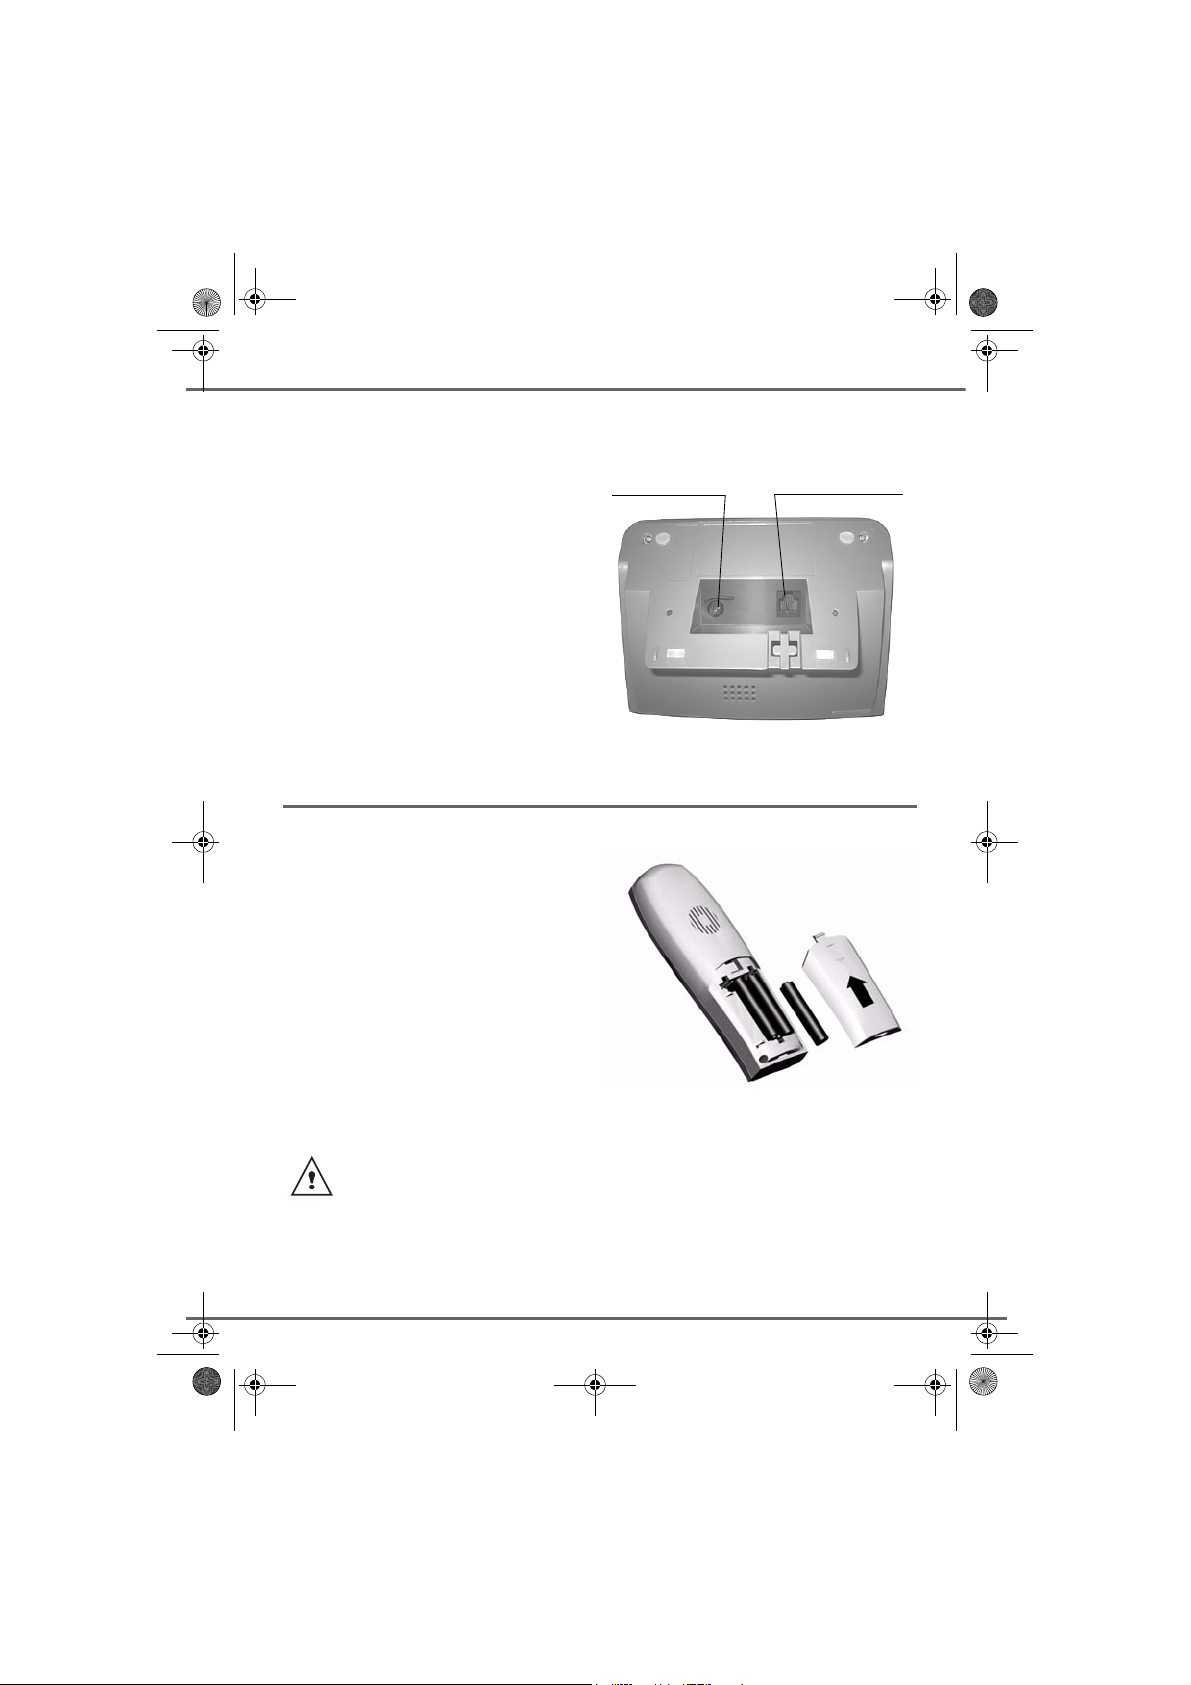
Model with answering machine (D30V):
1. Increase the volume on the base loudspeaker
2. Mains light
Fixed light
- green: On - Answering machine off.
- red: On - Answering machine activated, no message.
Flashing light
- slow red: Messages read.
- quick red: Flashes at a rate corresponding to the number of unread messages.
3. Display
Answering machine off: nothing is displayed
Simple answering machine: "oo" displayed
Answering machine recorder:
- No new messages: the message read counter is displayed
- New messages present: the unread message counter flashes
4. Paging / Pairing button:
Press and hold: Pair handsets
Short press: find handsets (Paging)
5. ON Simple recorder
OFF
ON Recorder: short press
OFF: press and hold
ON Recorder ON Simple: short press
ON Simple
ON Recorder: short press
6. Next message
7. Play messages / Pause during playback
8. Erase a message
Erase a message: Press and hold in playback mode
Erase all messages: Press and hold outside playback mode
9. Last message
10. Reduce the base loudspeaker volume
1
2
3
4
5
6
7
8
9
10
6
Page 7

LU 252973993 D30 T V H Australie.book Page 7 Mercredi, 20. juin 2007 9:47 09
YOUR TELEPHONE
Your handset
With its user-friendly design, you will appreciate how easy it is to hold and its quality during
conversations.
Speaker
Display
Program keys
LED
Incoming message
warning beeps
Pick up
Handsfree
Redial (long
press)
Phonebook key
Key 1:
hold down for quick
access to voice
messaging service
R key
The navigator key, a rapid selection tool.
Navigating
To cancel, delete or go to the
previous menu
Hang up
Turn off the handset
Navigator key
Direct SMS
access
Alphanumeric
keypad
Intercommunication
key (handset
intercom)
Microphone
To confirm or to access a sub-menu
7
Page 8
LU 252973993 D30 T V H Australie.book Page 8 Mercredi, 20. juin 2007 9:47 09
YOUR TELEPHONE
The visual display of your handset
Battery indicator
Date
I
Number of handset
Time
01/01 12:00
Sil. TAM
Name of programmed functions in
and keys.
When the battery charge icon is at m inimum, your screen will not be lit and the volume
level of the hands-free function will be decreased until the battery is recharged.
Connecting the base
Before making any connections, please refer to the safety instructions presented at
the beginning of this user guide.
Model without answering machine (D30T):
On the bottom part of the base, click in the
telephone jack in its socket (as shown on the
drawing) and connect the other end of the
lead to the wall telephone socket.
Power socket
Telephone socket
Connect the end of the mains power unit lead
to the bottom of the base and the mains
power unit to the mains socket. The mains on
indicator located on the base comes on
green.
Route the wires in the guides and put the
base where it should be.
8
Page 9
LU 252973993 D30 T V H Australie.book Page 9 Mercredi, 20. juin 2007 9:47 09
YOUR TELEPHONE
Model with answering machine (D30V):
Place the base where it should be located,
click in the telephone jack in its socket (as
shown on the drawing) and connect the other
end of the lead to the wall telephone socket.
Connect the end of the mains power unit lead
to the bottom of the base and the mains
power unit to the mains socket. The mains on
indicator located on the base comes on
green.
Route the wires in the guides and put the
base where it should be.
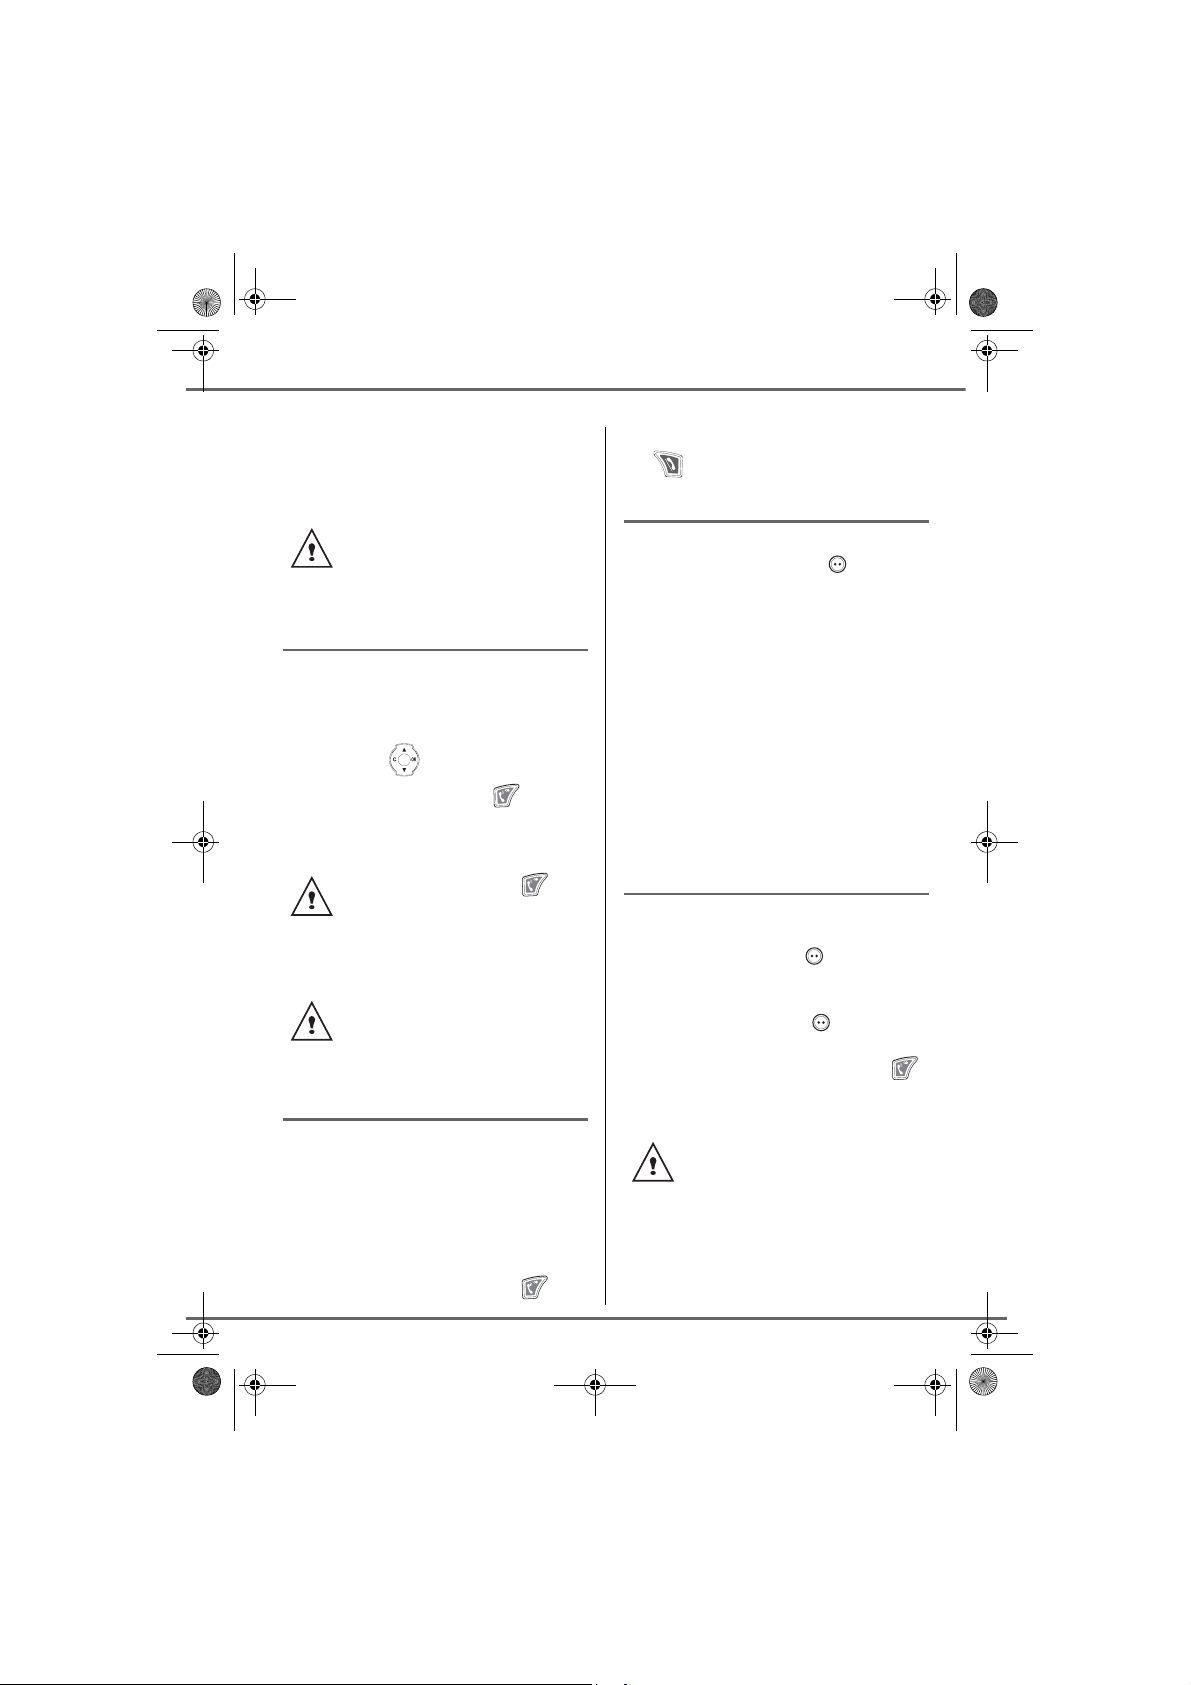
Handset set-up
Insert the batteries one after the other in
compliance with the battery polarity, as
shown on the label in the handset. Place the
cover back on the handset by pushing
upwards until it is completely closed.
Remove the protective film on the screen,
place the handset on the base to ful ly c har ge
the batteries.
The charging icon appears on the screen, it
indicates the charging status. Once the icon
is full, your batteries are charged.
Power socket
Telephone socket
Only use certified rechargeable batteries. For optimal battery charge, leave the
handset on the base for at least 12 hours during initial use. During charging, the
batteries may heat up, this is quite normal and without risk.
9
Page 10

LU 252973993 D30 T V H Australie.book Page 10 Mercredi, 20. juin 2007 9:47 09
YOUR TELEPHONE
Handset turning on and off
To turn off the handset, hold down the red key . The "POWER OFF" message is displayed
on the screen. Your handset is now switched off.
To turn on your handset, hold down the green key . The name SAGEM is displayed on the
screen.
Information is displayed on the screen, including the battery charging indicator icon, the
handset number (for example 1), the date, the time and the function keys.
Replacing the batteries
Hold down the red key to turn off the handset. Turn it around so that the battery
compartment is accessible.
Exert a pressure on the compartment battery and slip the compartment battery downwards.
Remove the old batteries, insert the new batteries one by one in compliance with the polarity
of the batteries as shown on the label fixed in the handset.
Place the cover back on the handset by pushing upward s until it is completely cl osed.
At the end of their useful life, batteries must be disposed of according to the recycling
instructions presented in this booklet.
To avoid damaging your handset, only use certified rechargeable AAA batteries NiMH
1.2 V 550 mAH, never use non rechargeable batteries.
10
Page 11
LU 252973993 D30 T V H Australie.book Page 11 Mercredi, 20. juin 2007 9:47 09
GETTING STARTED
GETTING STARTED
Contact your service provider to find
out which services are available
(caller display service, SMS, etc.)
and the charges involved.
Making a call
Enter the number of your contact using the
keypad keys.
If you enter an invalid digit, press C on the
navigator key to erase the incorrect
digit. Press the green key on your
handset to make the call.
You can also make a call by:
- Pressing the green key
access the line.
- Dialling your contact's number.
During communication, you can
increase or decrease the audio
volume of your handset by press ing
the or key on the navigator.
Receiving a call
When you receive a call your telephone
rings. If you have subscribed to a "Caller
display" service, the caller's information
appears on the screen (unless your caller
has enabled the anonymous mode),
otherwise the "UNKNOWN" screen is
displayed.
Pick up by pressing the green key .
to
At the end of the conversation, press the red
key .
During a call
During a call, numerous options are
accessible by pressing Menu .
Select the desired opti on in the following list:
- HANDSFREE: to activate the handset
speaker.
- LOUDSPEAK.BASE: to activate t he bas e
loudspeaker (
- CALL TRANSFER: to transfer the call to
another handset.
- SECOND CALL: to make a second call.
- PHONEBOOK: to access the phonebook.
- CALLS: to access the call log.
- SECRET: to mute the handset
microphone.
Handsfree
While having a conversation with your
contact, you can enable the handset
loudspeaker. Press Menu .
Select HANDSFREE or Base loudsp.
model D30V
(
model D30V
). Press Activ. .
When pressing the green key
while engaged in a conversation you
automatically activate the handsfree
mode of the handset, by pressing it
again you deactivate the handsfree
mode.
When the battery charge icon is at
minimum the hands-free function is
turned off until the battery is
recharged.
).
11
Page 12
LU 252973993 D30 T V H Australie.book Page 12 Mercredi, 20. juin 2007 9:47 09
GETTING STARTED
The message HANDSFREE ACTIVATED
appears on the screen. Increase or decrease
the audio volume using or .
Call transfer
This function is only accessible when two
handsets or more are registered to the same
base. You can now transfer the call in
progress to another hand set.
During communication, press Menu .
Select CALL TRANSFER using or .
Press Valid. .
Select the handset you want to call using
or . Press Call .
The handset called rings, once someone
picks up transfer th e cal l by pr essi ng t he re d
key .
To retake the call before it is picked up by the
handset called, press Menu .
Select HANGING UP using or . Press
Valid. .
During a call
During a call, you can receive a second
incoming call or place a call to a second
contact. You can then switch from one
contact to the other, or have a conference
(depending on your service provider and
subscription).
Receiving a second call whilst on line
During the call, a beep is transmitted to your
telephone by your service provider to let you
know that you have a second call waiting.
Press ACCEPT to take this new call.
Your other caller is then put on hold and you
can talk with your second caller.
Making a second call whilst on line.
During a call, you can put your contact on
hold and call a second one by pressing
Menu .
Select SECOND CALL using or . Press
Valid. .
Select your contact's telephone number in
the phonebook by pressing and press
Valid. or dial the number using the
keypad and press Call .
The second call is then launched, with the
first call still on hold.
To alternate from one call to the other
Press Menu .
Select SWITCH using or . Press
Valid. .
The call in progress is put on hold, and you
can then take the second call.
12
Page 13
LU 252973993 D30 T V H Australie.book Page 13 Mercredi, 20. juin 2007 9:47 09
GETTING STARTED
To end one of the calls and continue the
other one
Press Menu .
Select HANGING UP using or . Press
Valid. .
The call in progress is definitely terminated,
and you can then take the second call.
To set up a 3 way-call (the two parties and
yourself)
Press Menu .
Select 3-PARTY CONF using or . Press
Valid. .
You can then talk to both parties
simultaneously.
To end the 3 way-call, press the red
key .
Dual incoming call management can also be
done via the R key
- Accepting a second incoming call:
+ .
- Making a second call during
communication: + recipient number.
- Alternating from one call to the
other: + .
- Ending a call and switching to the call on
hold: + .
- Setting up a 3 way-call: + .
.
Accessing the phonebook or call log
During a call, you can access your
phonebook to look up a telephone number, a
name contained in an entry or information on
calls stored in your call log.
During a call, press Menu .
Select PHONEBOOK or CALLS using
or and press Valid. .
Return to the communication menu using .
Secret mode
You can switch to secret mode at any time
during your conversation. Your handset
microphone will be switched off and the other
person will not be able to hear you.
To activate secret mode:
During a call, press Menu .
Select SECRET using or . Press
Activ. .
The SECRET MODE mes sage will appear on
the screen.
To deactivate secret mode:
Press Exit .
Your correspondent will be able to hear you
again.
13
You can also choose to deactivate
the secret mode by the C key on the
navigator panel.
Page 14
LU 252973993 D30 T V H Australie.book Page 14 Mercredi, 20. juin 2007 9:47 09
GETTING STARTED
Ending a call
At the end of the conversation, press the red
key .
Communication between two
handsets
To communicate between handsets,
both handsets must be matched to a
single base, and must be within
range of the base.
To call another handset, press the key.
Select with the desired handset with the
or keys. Press Call .
The handset rings. Pick up on the second
handset using the green key .
To end the call, press the red key .
You can also easily call another
handset if you know its number.
From the idle screen, enter the
number of the handset. Then press
the green key .
14
Page 15
Synoptique des Menus.fm Page 15 Lundi, 25. juin 2007 9:52 09
MENU STRUCTURE
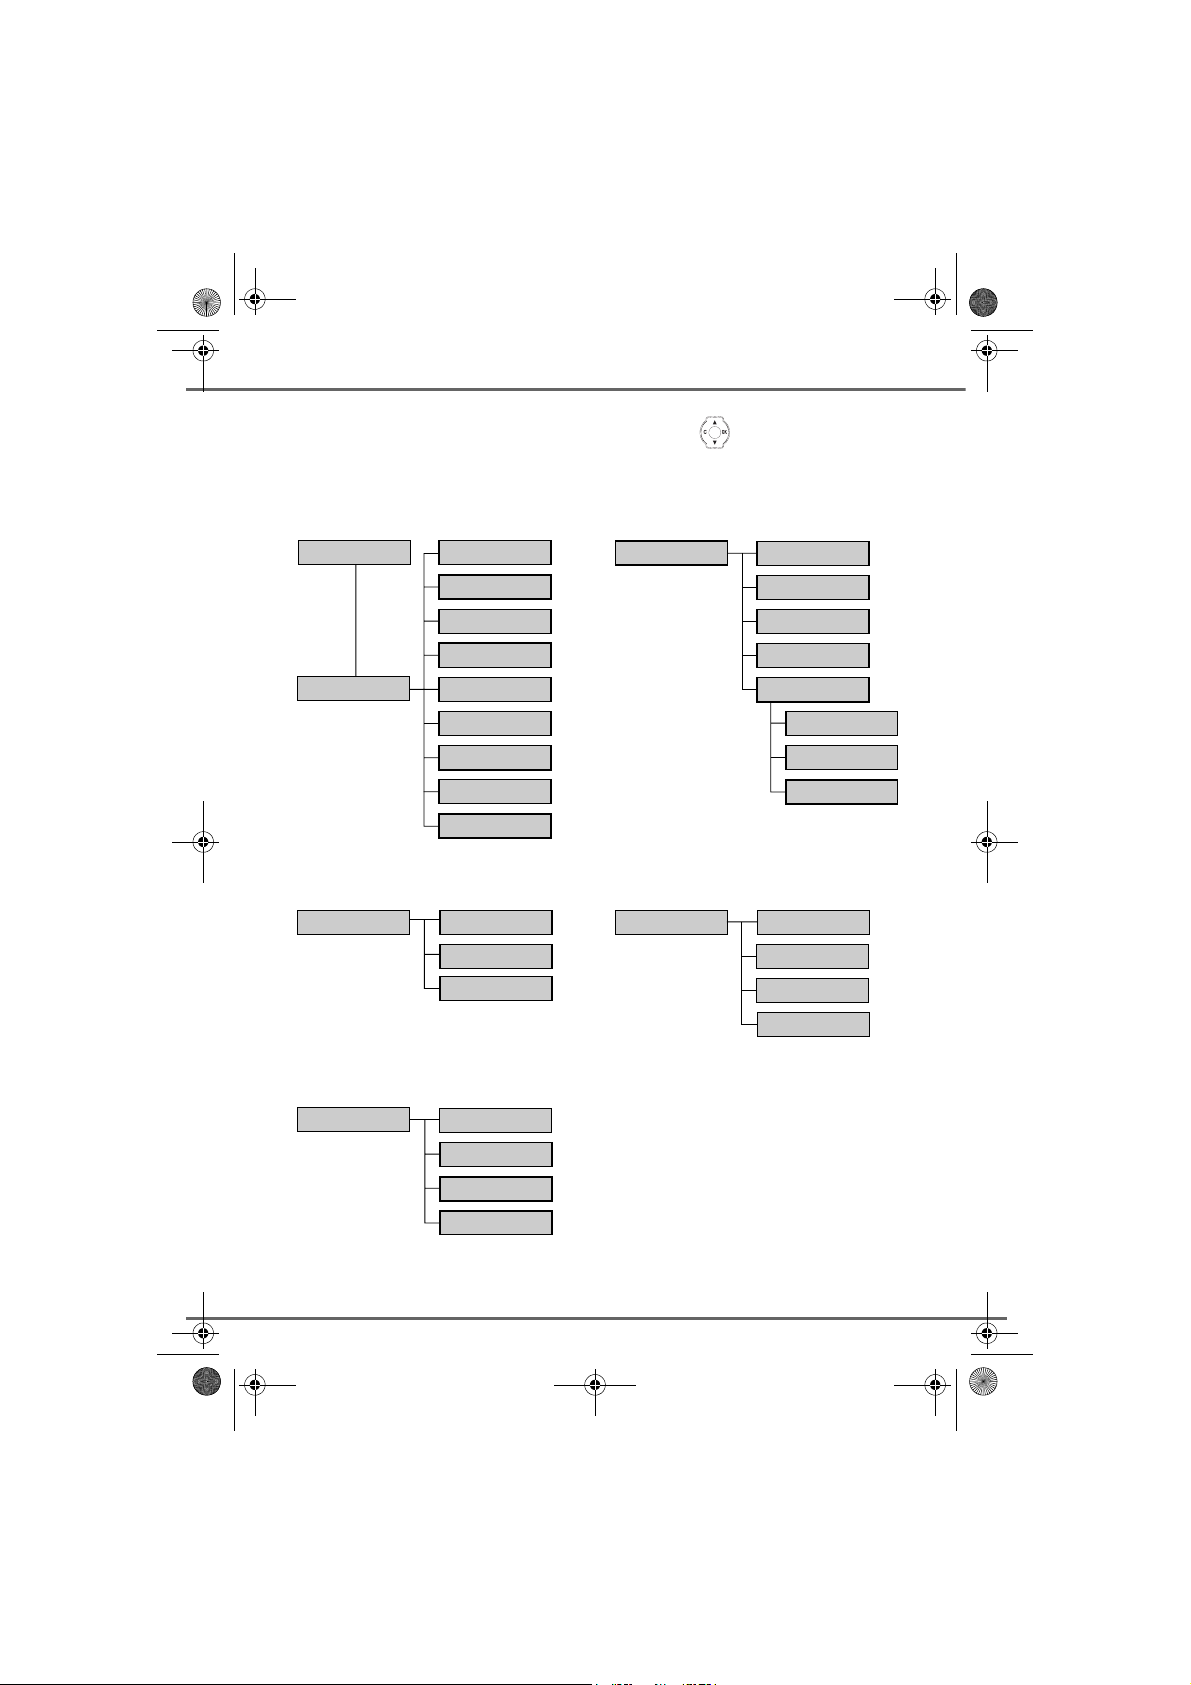
You can navigate through the menus using the navigator key .
PHONEBOOK
Option
CALLS
RING TONE
VIEW
CALL
EDIT
SEARCH
RING TONE
SEND SMS
ADD NUMBER
NEW ENTRY
DELETE
INCOMING CALLS
OUTGOING CALLS
EVENTS
EXTERNAL CALL
SMS
EDIT SMS
READ SMS
MEMORY
EMPTY BOX
SETTINGS
SMS CENTRE
SUB-ADDRESS
PRIVATE BOX
ALARMACCESSORIES
TIMER
BIRTHDAY
ROOM MONITOR.
INTERNAL CALL
BEEPS
SILENT MODE
15
Page 16
Synoptique des Menus.fm Page 16 Lundi, 25. juin 2007 9:52 09
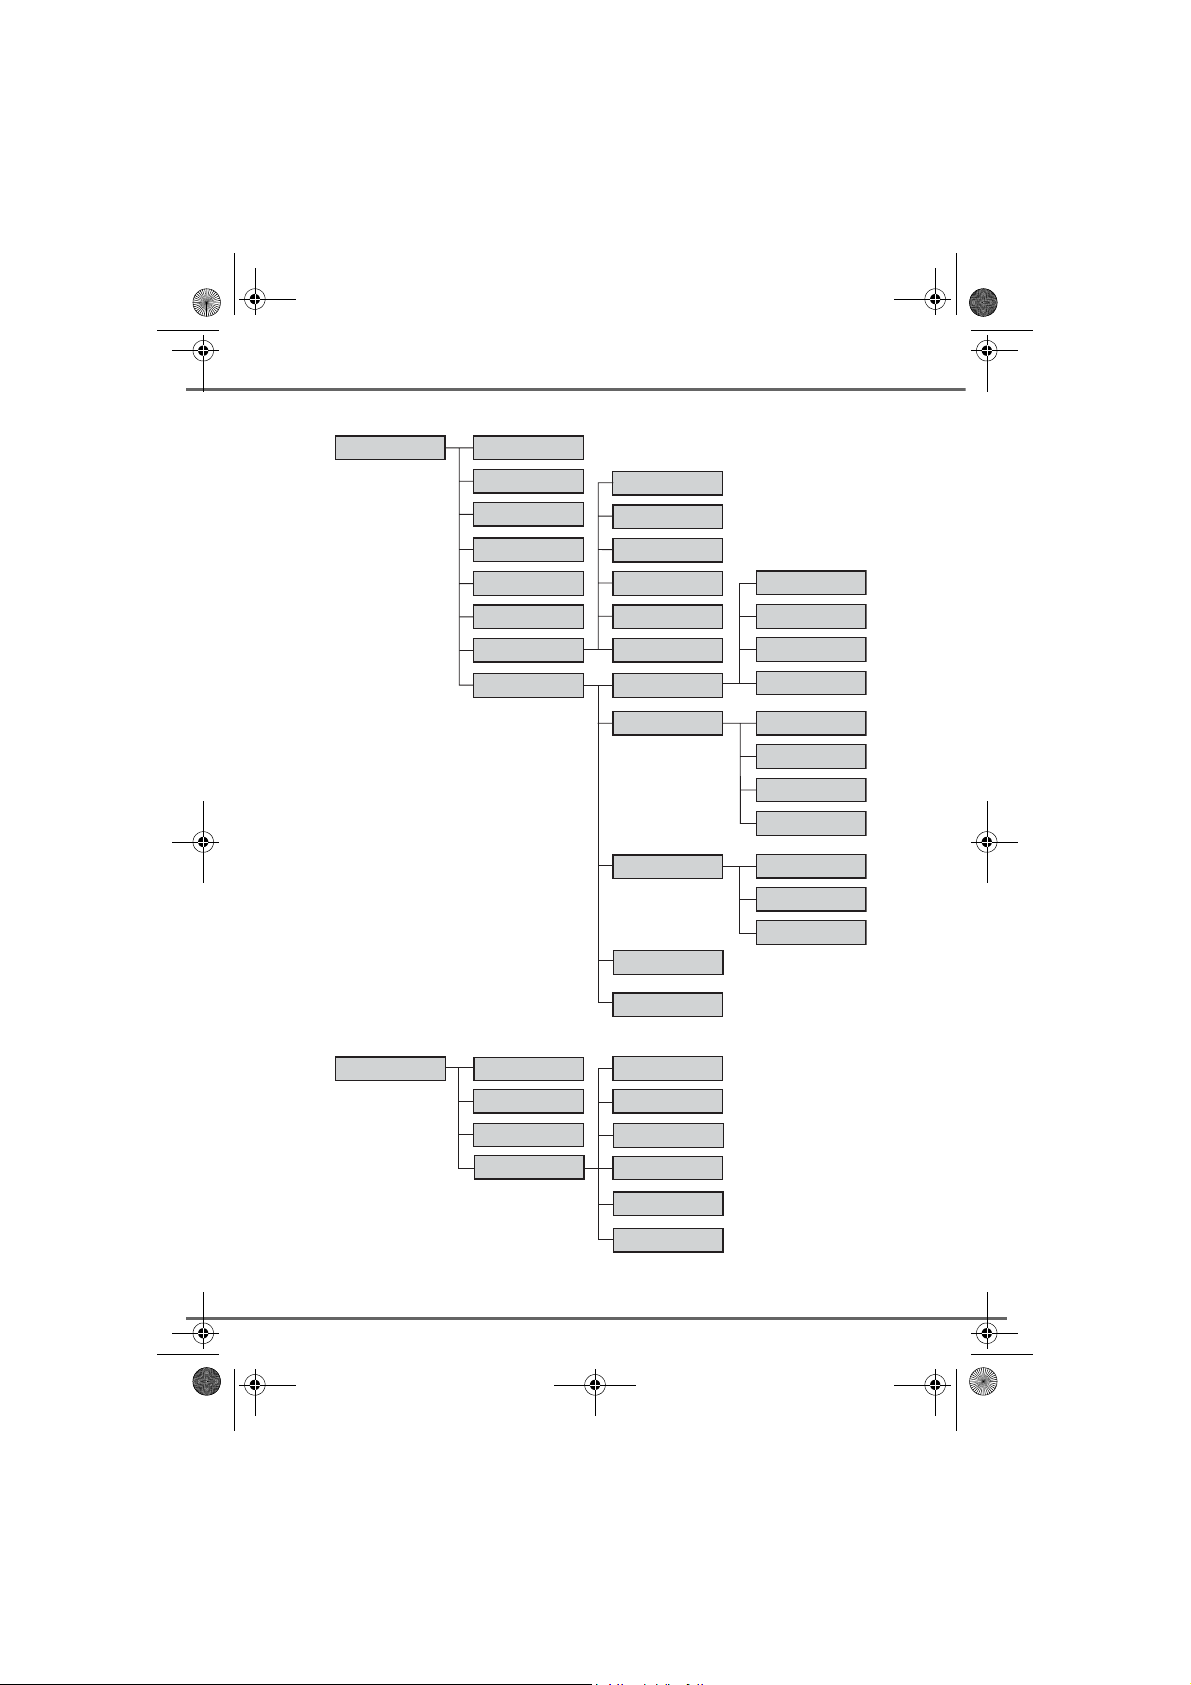
MENU STRUCTURE
PROGRAM KEYSSETTINGS
DATE/TIME
AUTO HANG UP
AUTO PICKUP
VOICE BOX No**
LANGUAGE
SECURITY
ADVANCED SET.
KEYPAD LOCK
EMERGENCY
TIME LIMIT
RESTRICTION
CHANGE CODE
INTRUSION
SET HANDSET
REGISTRATION
BASE PRIORITY
RESET HANDSET
PERSON. REGISTR
ANS. MACH*
* Model D30V
** Model D30T
MESSAGES
ON/OFF
OUTGOING MESS.
SETTINGS
SET BASE
SET LINE
SET TAM*
SET SMS
CALL SCREENING
REMOTE CODE
MESS.DURATION
PRIV.ACCES
RECORD MODE
NO OF RINGS
REGISTR. MODE
RESET BASE
DELETE HANDSET
RENAME BASE
NETWORK TYPE
FLASHING
PABX PREFIX
16
Page 17

LU 252973993 D30 T V H Australie.book Page 17 Mercredi, 20. juin 2007 9:47 09
YOUR PHONEBOOK
YOUR PHONEBOOK
You can store 100 phonebook entries in your
phonebook.
Each phonebook entry can contain the nam e
of your contact which can be a maximum of
12 characters long (spaces included), your
contact's telephone number up to 24 digits
and an icon identifying the type of number
(work, home, mobile...).
You can associate a unique ring tone to each
entry and thus create your own call groups.
(To use this service, the caller id service must
be activate on your line.)
Viewing the phonebook
On the navigator key , press or
until the PHONEBOOK screen is displayed,
press OK to confirm (you can access the
phonebook directly using the key).
The list of phonebook entries organised in
alphabetical order appears.
The first time you access your
phonebook, only the New element
appears in the list.
Once the entry appears on the screen,
press to d isplay all of the ava ilable actions
that can be executed via the phonebook
entry:
- CALL: to call the number as sociated to the
entry.
- EDIT: to edit the entry (name, number,
icon).
- SEARCH: to search for another entry.
- RING TONE: to assign a unique ring tone
to your handset that will be used each time
this number calls you (caller display
service mandatory).
- SEND SMS: to send an SMS to a number
associated to the entry.
- ADD NUMBER: to enter a new number for
the same name.
- NEW ENTRY: to create a new ent ry in th e
phonebook.
- DELETE: to delete the entry from your
phonebook.
- VIEW: to view the entry data.
Select the action you wish to perform using
or . Press Valid. .
To exit the phonebook, press the red
key .
Creating an entry
Select the entry you wan t to view using
or . Once you have selected it, press OK to
confirm.
You can call the number that is
associated to the entry directly by
pressing the green key .
Alphanumeric keypad key correspondence.
1
A, B, C, a, b, c, 2
D, E, F, d, e, f, 3
G, H, I, g, h, i, 4
J, K, L, j, k, l, 5
M, N, O, m, n, o, 6
P, Q, R, S, p, q, r, s, 7
T, U, V, t, u, v, 8
17
Page 18
LU 252973993 D30 T V H Australie.book Page 18 Mercredi, 20. juin 2007 9:47 09
YOUR PHONEBOOK
W, X, Y, Z, w, x, y, z, 9
special characters
space, +, @, -, $, &, %, 0, /
# , " . : ; ! ? ’ ( ) _
To enter text press successively on the
desired key until the letter is displ ayed on the
screen.
On the navigator key , press or
until the PHONEBOOK screen is displayed,
press OK to confirm.
Select New. Press Valid. .
The name input screen appears.
Using the keypad keys, enter the name of
your contact by pressing successively on the
corresponding keys. In case of a mistake,
press C to erase one character at a time.
Once you are done making your changes,
press Valid. .
The number input screen appears.
Now, enter the name of your contact using
the keypad keys. In case of a mistake,
press C to delete one character at a time.
Once you are done making your changes,
press Valid. .
Select an icon for this number, using or
to specify the type of number:
: HOME
: WORK
: MOBILE
: FAX
A new entry is created. It appears in the
phonebook list. The name of this entry
corresponds to the beginning of your
contact's name which is preceded by a t ype
icon.
Using a phonebook entry to
place a call
On the navigator key , press or
until the PHONEBOOK screen is displayed,
press OK to confirm.
The list of alphabetical phonebook entries
appears.
Select your contact using or .
Press the green key to make the call.
Your handset displays the number of your
contact and dials this number automatically.
Searching for a contact
When referring to your phonebook, you can
search for a contact by:
• navigating through the list using
• using quick search,
• using refined search.
,
,
Performing a quick search
Access your phonebook list, press
successively on the keypad key which
corresponds to the first letter of the name you
are searching for so as to make it appear at
the top of the screen.
Once the icon is selected, press Valid. .
Once the first letter of the name is di splayed,
wait a moment.
18
Page 19
LU 252973993 D30 T V H Australie.book Page 19 Mercredi, 20. juin 2007 9:47 09
YOUR PHONEBOOK
The phonebook selects the first name in the
list that starts with the selected letter.
Press or to select the specific e ntry that
you wish to view or call, press OK to confirm.
Performing a refined search
In the phonebook menu, press Option .
Select SEARCH using or . Press
Valid. .
Using the keypad, enter the first three letters
of the contact you are searching for.
The phonebook positions itself to the entry
which comes closest to those two characters.
Press or to select the specific e ntry that
you wish to view or call, press OK to confirm.
Editing an entry
To edit a phonebook entry (change the
name, the number and/or the number type
icon), enter the phonebook, select the entry
you want to edit and confirm using OK to
display it on the screen.
Once the entry is displaye d on the screen,
press Option .
Select EDIT using or . Press Valid. .
You enter the name input scree n. The cursor
is at the end of the name.
• The information is accurate. Press
Valid. .
• To correct the name, press C on the
navigator key to delete characters.
Make your corrections using the keypad
keys by pressing successive ly on the
corresponding keys. Once you are
finished, press Valid. .
You enter the number input screen. The
cursor is at the end of the number.
• The information is accurate. Press
Valid. .
• To correct the number, press C on the
navigator key to delete the
numbers. Enter the new number and
press Valid. .
Select the icon according to the type of
number entered using or . Press
Valid. .
To exit the menu, press the red key .
Deleting an entry
To delete an entry, enter the phonebook,
select the entry, press Option .
Select DELETE using or . Press
Valid. .
A confirmation screen asks you if yo u wish to
delete the entry.
• If you do not wish to delete the entry,
press No .
• To delete the entry, press Yes . The
entry is deleted from the phonebook.
To exit the menu, press the red key .
19
Page 20
LU 252973993 D30 T V H Australie.book Page 20 Mercredi, 20. juin 2007 9:47 09
YOUR PHONEBOOK
Sending a SMS from phonebook
On the navigator key , press or
until the PHONEBOOK screen is displayed,
press OK to confirm.
Select the contact using , keys
or keypad, enter the first three letters of the
contact. Press or to select the specific
entry then press Option .
Select SEND SMS using or . Press
Valid. .
A text input screen appears. refer to
paragraph Sending a text message,
page 21.
20
Page 21

LU 252973993 D30 T V H Australie.book Page 21 Mercredi, 20. juin 2007 9:47 09
SMS SERVICE
SMS SERVICE
You can use your DECT telephone to send,
receive and track SMS messages . You can
send SMS messages either another fixed
SMS-capable telephone or a mobile
telephone.
The SMS sending and receiving
functions of your telephone are o nly
functional if your service provider
offers the corresponding service to
its subscribers.
To send and receive SMS text
messages, you need the telephone
numbers of your Network’s SMS
Centre.
Sending a text message
On the navigator key , press or
until the SMS screen is displayed, pr ess OK
to confirm ( can als o be used to directly
access the SMS menu).
Writing a text message
Once in the SMS menu, press or until
the EDIT SMS appears. Press Valid. .
Use the , keys to select either Common
box or a personal box if one has been
created. Press Valid. .
The SMS will be sent to the box selected.
If no personal box has been created,
only the shared box is displayed on
the screen.
To create a personal box, select
PERSO BOX MENU and press
Valid. . Follow the instructions
displayed on the screen. For further
details, refer to the paragraph
Creating a personal box, page 28.
Enter the code of the box, if you have
selected a personal box. Press Valid. .
A text input screen appears.
Using the keypad keys, enter the text
message by pressing successively on the
corresponding keys.The capital letters are
accessible by long press on .
Alphanumeric keypad key correspondence
depending on the activated mode (capital
letters or small letters).
’, 1, #, ,, ., :, ?, _,*
a, b, c, 2
d, e, f, 3
g, h, i, 4
j, k, l, 5
m, n, o, 6
p, q, r, s, 7
t, u, v, 8
w, x, y, z, 9
special characters
espace, 0, /, +, @, -, $, &, %
#
21
Page 22

LU 252973993 D30 T V H Australie.book Page 22 Mercredi, 20. juin 2007 9:47 09
SMS SERVICE
To enter text press successively on the
desired key until the letter is displ ayed on the
screen.
Making a correction
If you enter the wrong letter, press C on the
navigator key to delete one character at
a time.
You can also move through the text to delete
characters or insert new ones.
Use or to move through the text. Once
you have reached the location where you
want to insert or delete a character. Press
Select .
Select INSERT CHAR. or DELETE CHAR.
using or , depending on the operation
you want to carry out. Press Valid. .
Capital letters/Small letters
When writing your message, you can enter
capital letters or small letters.
During the SMS input, press Select .
Select CAPITAL LETTER or SMALL
LETTER. Press Valid. .
Special characters
During the writing process, certain special
characters are accessible by doing the
following.
List of special characters:
Sending an SMS
Once you are done writing your text
message, press Select to select the type
of delivery.
You can choose between the following
options:
- SEND: to send a message.
- STORE: to save yo ur text as a dra ft. It can
be sent at a later time. The draft message
is archived in the "Draft" box.
- CANCEL: to permanently delete the text
message that you just entered.
To transmit message
Select SEND using or . Pre ss Valid. .
Enter or search for the receiver's number.
• Enter the number using the keypad.
Press Valid. .
or
• If the receiver is listed in the ph one boo k
as one of your contacts, press (refer
to paragraph Searching for a contact,
page 18). Press Valid. . Your
contact's number appears. Press
Valid. .
Press the button, using or and the
keypad numbers, select the desired
character, use to confirm.
A confirmation screen appears. It indicates
the type of transmission and the number to
which your message will be sent.
22
Page 23

LU 252973993 D30 T V H Australie.book Page 23 Mercredi, 20. juin 2007 9:47 09
SMS SERVICE
• If the information is accurate. Press
Confirm . A message appears on the
screen indicating that the transmission of
your SMS is in progress.
• To change the phone number, edit or
modify your text message, press Mo dify .
Press Edit .
At the end of the transmission, you can save
a copy of your message. It will be sto red in
the Sent SMS folder.
• To save the message, press Yes .
• If you do not want to save the message,
press No .
In the event of a delivery failure
An information screen appears indicating
that your service provider was unable to
deliver your message.
Press CONT. .
Different options come up on the screen:
- SAVE: to save your text in draft form. Once
it is saved, you will be able to resolve the
potential problems and send your
message at a later time without having to
enter it again.
- TRY AGAIN: to attempt a new delivery.
- DELETE SMS: to permanently delete your
SMS.
- SEE RECEIVER: to check the phone
number or send the SMS again.
- EDIT: to change the delivery type and
number or your text.
Choose an action using or . Press
Valid. .
Reading a message
Your telephone has 4 different folders in
which your SMS messages are stored.
- NEW: contains the unread messages.
- INBOX: contains the read messages that
you have chosen to keep.
- SENT: contains the copies of sent
messages that you saved.
- DRAFT: contains the messages that you
wrote and that have not been sent out.
On the navigator key , press or
until the SMS menu is displayed, press OK to
confirm.
Select READ SMS using or . Press
Valid. .
Select a send box, press Valid. .
If no personal box has been created,
only the shared box is displayed on
the screen.
To create a personal box, select
PersoBox Menu and press
Valid. . Follow the instructions
displayed on the screen. For further
details, refer to the paragraph
Creating a personal box, page 28.
Enter the code of the box, if you have
selected a personal box. Press Valid. .
A list of the different folders appears. The
number of messages contained in each
folder is displayed in brackets.
23
Page 24

LU 252973993 D30 T V H Australie.book Page 24 Mercredi, 20. juin 2007 9:47 09
SMS SERVICE
Using or , select the folder containing
the message you would like to view. Press
Valid. .
The list of messages contained in the folder
is then displayed, starting with the most
recent message to the oldest one.
The first 4 numbers indicate:
• the arrival time (in 12:00 format) for the
messages received during the current
day,
• the arrival date (in 30/01format) for
messages received previously or p rior to
the current day.
The following characters indicate the sender
of the message if he/she is known.
Select the message you would like to view
using or , press OK to confirm.
The written message is displayed on the
screen.
According to the SMS mode selected, using
and or and to scroll the text on
the screen.
To return to the beginning of the message
press .
To return to the list of messages, move to the
beginning of the message and press .
Managing read messages
Once the message has been read, press
Select and select:
- REPLY: to write an SMS in respons e to the
message received (the receiver nu mber of
the new SMS will automatically be
entered).
- ARCHIVE: to keep this messag e. It will b e
stored in the "Inbox" message folder.
- TRANSMIT: to forward this message to a
new recipient. You will be able to modify
the original message.
- DELETE: to permanently delete this SMS.
- CALL: to call the SMS sender number.
- STORE NUMBER: to save the SMS
sender number in your phonebook.
- SMS MODE: Allows to display the
message on one or two lines manually or
automatic.
Select the desired option using or .
Press Valid. .
Modify the SMS mode
You can also read your message with
different read modes. Three modes are
available :
- AUTO SCROLL: automatic scrolling,
- MANUAL SCROLL: manual scrollin g,
- 2 LINES: the text is displayed in 2 lines.
To activate one SMS mode, press Select .
Select SMS MODE using or . Press
Valid. .
Select the SMS mode using or . Press
Valid. .
24
Page 25

LU 252973993 D30 T V H Australie.book Page 25 Mercredi, 20. juin 2007 9:47 09
SMS SERVICE
Viewing the memory status
You can store 30 different SMS messages.
These can be indiscriminately distributed
between the various folders.
Once the number of stored SMS has reached
30, an information message will indicate that
no new messages can be stored.
Once the maximum storage
capacity is reached, you cannot
receive new SMS. To receive new
message, please delete some o f the
stored messages.
On the navigator key , press or
until the SMS screen is displayed, confirm
using OK.
Select MEMORY using or . Press
Valid. .
A screen informs you as to the number of
messages contained in each folder (new,
inbox, sent and draft). It also indicates the
total number of messages stored and the
amount of space available.
On the navigator key , press or
until the SMS screen is displayed, confirm
using OK.
Select EMPTY BOX using or . Press
Valid. .
Select the folder you want to empty by
pressing or . Press Valid. to delete
all messages in the selected folder.
A delete confirmation screen appears.
•Press No if you do not want to empty
the folder.
•Press Yes to empty the folder.
To exit the menu, press the red key .
To exit the memory information screen, press
Return .
Emptying an SMS folder
This function is used to delete all the
messages contained in a folder. To delete
the messages one by one refer to paragaph
Managing read messages, page 24.
When you empty an SMS folder, all
messages linked to a personal box
will not be erased.
25
Page 26

E
LU 252973993 D30 T V H Australie.book Page 26 Mercredi, 20. juin 2007 9:47 09
SMS SETTINGS
SMS SETTINGS
You can access the SETTINGS menu via the
SMS menu or the ADVANCED SET.
submenu in the SETTINGS menu.
Modifying the SMS centre
numbers
This function is used to modify the SMS
centre numbers (depending on the operat or).
You can enter up to 4 SMS centre numbers
to receive and one to send.
By default, the send number is programmed
in SMS 2 centre and the reception nu mber in
SMS 1 centre.
On the navigator key , press or
until the SMS screen is displayed, pr ess OK
to confirm.
Select
Valid.
Select
Valid.
SETTINGS
.
SMS CENTRES
.
using or . Press
using or . Press
Carry out this operation again for all other
SMS centres.
Then define the SMS centre to be used for
sending.
Choose the SMS transmission centre
Select SEND CENTRE using keys or .
Press Valid. .
• To change the send SMS centre, press
Edit . Select the required centre using
and and press Valid. .
keys
• To keep the current SMS centre, press
Confirm .
To exit the menu, press the red key .
Modifying the terminal number
If you have several SMS-type devices
connected to the same telephone line, yo u
must assign a different number ranging from
0 to 9 to each device.
Remember to give your contacts the terminal
number on which you would like to receive
your messages.
Select the SMS centre you want to enter
or modify the number using keys
Press Valid. .
An information screen gives the number of
the SMS centre.
• To change the number, press Edit .
Enter the new number in the input screen
and press Valid. .
• To keep the number, press Confirm .
or .
26
Telephone line
0123456789
Terminal
number
1 MOTHER
2 FATHER
3 SISTER
4 COLLECTIV
Page 27

LU 252973993 D30 T V H Australie.book Page 27 Mercredi, 20. juin 2007 9:47 09
SMS SETTINGS
For example, in the case of an SMS message
addressed to the device FATHER your
contact will send his SMS to:
0123456789 2
(Telephone number followed by the terminal
number)
If your contact forgets to include the
terminal number, the SMS message
will be sent to terminal 0 by default.
If no device is parameterised with
the terminal number 0, the messag e
will be sent to you in the form of a
voice message.
If you do not assign a different
number to each SMS-type device
connected on the same line, you will
not be able to receive SMS.
On the navigator key , press or
until the SMS screen is displayed, pr ess OK
to confirm.
Select SETTINGS using or . Press
Valid. .
Select SUB-ADDRESS using or . Press
Valid. .
An information screen shows the current
number of the telephone SMS terminal.
• To change the number, press Edit .
Then select the number using or
keys. Press Valid. .
• To keep the terminal number, press
Confirm .
To exit the menu, press the red key .
SMS boxes
"Personal boxes" allow you to receive
personal SMS. These SMS will arrive in the
New folder, the box owner will be able to view
them by entering the user code that he will
have defined when creating his SMS box.
You can create up to 9 "personal boxes"
which allow the different users to manage
their private SMS (transmission, reception,
archive).
Each box is protected by a code and
identified by a number representing the
corresponding sub-address.
Sub-Addressing
You have 10 sub-addresses (9 personal and
1 collective) assigned to your telephone line
(telephone number). You can assign each
one of these sub-addresses:
• to a terminal (the SMS for this subaddress arrive in the DECT base
collective box)
• or to a personal box (the SMS received
for this sub-address arrive in the private
pass-word protected SMS box)
The sub-address is a number that must be
added at the end of your telephone number
(11th digit) by thos e who wish to send you
SMS.
If you use the same sub-address
twice for the same telephone line,
your units may not receive the SMS
for this sub-address.
If you do not give a terminal number
to each SMS capable device that is
connected to the same telephone
line , you cannot receive SMS.
27
Page 28
LU 252973993 D30 T V H Australie.book Page 28 Mercredi, 20. juin 2007 9:47 09
SMS SETTINGS
Example:
MOTHER: Box 6
SMS sent to 0123456789 6
Bertrand : Box 5
SMS sent to 0123456789 5
Enter the code associated to the box again.
Press Valid. .
The user code must contain 4 digits.
PAPA : Box 7
SMS sent to 0123456789 7
Telephone line
0123456789
Sub-Address
0
Common box
0123456789 0
1
Common box
0123456789 1
Creating a personal box
On the navigator key , press or
until the SMS screen is displayed, pr ess OK
to confirm.
Select SETTINGS using or . Press
Valid. .
Select PRIVATE BOX using or . Press
Valid. .
Select NEW using or . Press Valid. .
Enter the box name. Press Valid. .
If you enter a name that already
exists, a message tells you that the
name already exists. The box name
can have no more than 6 characters.
Enter the code associated to the box. Press
Valid. .
The telephone provides you with a terminal
number associated to the box. Press
Confirm to keep this terminal number.
Press Edit to change the terminal
number. Select one of the terminal numbers
available in the list. Press Valid. .
The name is added to the personal box list.
Viewing a message from a personal
box
On the navigator key , press or
until the SMS screen is displayed, press OK
to confirm.
Select READ SMS. Press Valid. .
Select the personal box. Press Valid.
Enter the personal box code. Press
Valid. .
Select the folder NEW or INBOX using
or . Press Valid. .
Select the message using or . Press
Valid. .
28
Page 29

LU 252973993 D30 T V H Australie.book Page 29 Mercredi, 20. juin 2007 9:47 09
SMS SETTINGS
The message is displayed on the screen. For
details regarding the operations you can
perform, refer to paragraph Reading a
message, page 23.
Modifying or removing a personal
box
On the navigator key , press or
until the SMS screen is displayed, pr ess OK
to confirm.
Select SETTINGS using or . Press
Valid. .
Select PRIVATE BOX using or . Press
Valid. .
Select CANCEL or EDIT using or keys.
Press Valid. .
Select the name of the personal box you
want to modify or delete using or . Press
Cancel or Edit depending on the
choice made previously.
If an SMS is sent to a personal box
not listed on your telephone (or if
this box was removed), the SMS will
not be delivered.
If you delete a personal box, you
must confirm it at the end of the
procedure by entering the basic
code. All the messages it contains
are erased.
29
Page 30

LU 252973993 D30 T V H Australie.book Page 30 Mercredi, 20. juin 2007 9:47 09
CALL LOG
CALL LOG
This menu enables you to view the call or
event lists of your telephone.
The dialled call log presents the calls you
made.
The received call log presents the calls you
received.
The event log groups together all the new
events that took place in your absence:
• reception of an SMS,
• new messages on the answering
machine (model D30V),
• calls received during your absence,
• operator message service (mo del D30 T).
Viewing the received and dialled
call log
On the navigator key , press or
until the CALLS screen is displayed, press
OK to confirm.
Choose INCOMING CALLS or OUTGOING
CALLS, using or . Press Valid. .
The presentation screen for the last call
received or dialled appears.
This screen presents the following
information (depending on the service
provider and subscription):
• the full name of your contact,
• the telephone number, date, time and
duration of the call.
To view the previous calls, use or . The
calls are organised in chronological order,
from the most recent call to the oldest call.
By pressing Option , a list of various
executable actions appears:
- VIEW: To view the selected call again.
- CALL: To call the number.
- DELETE: To delete the call currently
viewed.
- STORE NUMBER: To store the name and
number in the phonebook.
- SEND SMS: To send an SMS to your
contact.
- DELETE ALL: To delete all calls.
To return to the call view screen, press
Return .
To exit the menu, press the red key .
Calling the last number dialled
(Redial)
Your telephone has a shortcut key that can
be used to automatically redial the last
number dialled.
From the idle screen, press and hold the
green key until the Call log screen
appears. Release , the last dialled
number appears. Press the green key
again. The number is dialled automatically.
You can view the other dialled calls
by pressing or on the navigator
key .
30
Page 31
LU 252973993 D30 T V H Australie.book Page 31 Mercredi, 20. juin 2007 9:47 09
CALL LOG
Calling a number listed in the
dialled and received call log
On the navigator key , press or
until the CALLS screen is displayed, press
OK to confirm.
Select OUTGOING CALLS or INCOMING
CALLS, using or . Press Valid. .
The presentation screen for the last call
received or dialled appears.
Use or to locate the contact you wish to
call. The calls are organised in chronological
order, from the most recent call to the oldest
call.
Once the call is displayed on the screen,
press the green key
The number is dialled automatically.
.
Viewing the events log
If one or more new events occurred during
your absence, the information screen
"NEW EVENTS !" appears.
A summary screen appears. It informs you as
to the various events that took place during
your absence:
• the new SMS received,
• new messages on the answering
machine (model D30V),
• the calls received during your absence,
• operator message service (model D30 T).
Choose the event using or . Press
Valid. .
The event appears on the screen.
• If you do not wish to view the event log at
this time,
• To view the event log, press .
press the red key
Once the event log has been
viewed, the information sc reen
disappears. You can howeve r view
it again via the "CALLS" menu.
.
31
Page 32

LU 252973993 D30 T V H Australie.book Page 32 Mercredi, 20. juin 2007 9:47 09
ACCESSORIES
ACCESSORIES
This menu offers you numerous additional
functionalities:
• Alarm clock: to use your handset as an
alarm clock.
• Timer: to remind you of an event
(programmed to sound at the end of a
few minutes or a few hours).
• Birthday: the handset will ring at the set
date and time to remind you of the name
of the person to whom you would like to
wish happy birthday.
• Monitoring a room: use a handset to
monitor a room.
If the alarm timeout expires (wake
up, timer, anniversary and agenda)
during a call, the handset will ring at
the end of the call.
Alarm clock
The alarm function enables you to activate
the handset ringer every day at a set time.
When the alarm is triggered the selected ring
tone sounds for 60 seconds through the
handset speaker and an alert screen is
displayed. To turn off the alarm press any key
on the handset.
Setting the alarm clock
On the navigator key , press or
until the ACCESSORIES screen is
displayed, press OK to confirm.
Select ALARM using or . Press
Valid. .
An information screen shows the alarm clock
status.
- the time at which the handset will ring,
- if the alarm is on or off.
• To keep these settings , press Valid. .
• To change the alarm time or status (on
or off), press Edit .
A list showing the different settings appears.
Activating or deactivating the alarm
clock
To activate or deactivate the alarm clock
without changing the time.
Select ACTIVATE or DEACTIVATE in the lis t
using or . Press Valid. .
The alarm settings information screen
appears showing the new status. Press
Valid. .
Modifying the alarm clock time
Select SET TIME in the list using or .
Press Valid. .
Enter the time at which you wo uld like the
alarm clock to sound. Press Valid. .
The activation screen appears. Press Yes
to activate the alarm.
Changing the alarm clock ring tone
To modify the alarm clock ring tone, select
RING TONE in the alarm clock menu using
or . Press Valid. .
The list of ring tones appears.
32
Page 33

LU 252973993 D30 T V H Australie.book Page 33 Mercredi, 20. juin 2007 9:47 09
ACCESSORIES
Select the desired ring tone using or .
Press Volume to access the volume
setting screen.
Press or to increase or decrease the
volume.
Once the volume is set, press Valid. .
Press Return .
An information screen shows the alarm cl ock
settings, press Valid. .
To exit the menu, press the red key .
Timer
The timer function activates the handset
ringer at a programmed time . You can view
the programmed time on the screen.
Incoming calls are displayed directly
without interrupting the timer. For
access to timer adjustment you must
stop it once it is started.
Once the specified time has elapsed, the
handset rings for 60 seconds and the alarm
screen is activated. Turn off the alarm by
pressing Stop . The handset stops ringing.
On the navigator key , press or
until the ACCESSORIES screen is
displayed, press OK to confirm.
Select TIMER using or . Press
Valid. .
• To launch the timer wi tho ut c han gi ng th e
displayed delay, press Start .
• To change the programmed time, press
Edit .
A list showing the different settings appears.
Changing the programmed time of
the timer
Select SET DURATION in the list. Press
Valid. .
Enter the desired time. Press Valid. .
Press Return
activation screen.
The timer activation screen appears with the
modification. Press Start to launch the
timer.
to display the timer
Changing the timer ring tone
To modify the timer ring tone, select RING
TONE using keys or . Press Valid. .
The list of ring tones appears, the handset
plays the ring tone.
Select the ring tone using keys or .
Press Volume to access the volume
setting screen.
Press or to increase or decrease the
volume. Once the volume is set, press
Valid. .
Press Return , the timer activation screen
appears.
Launch the timer by pressing Start .
33
Page 34

LU 252973993 D30 T V H Australie.book Page 34 Mercredi, 20. juin 2007 9:47 09
ACCESSORIES
Displaying or hiding the
programmed time of the timer
To display (or hide) the time on the screen
during its countdown, select VIEW in the
Timer menu using or . Press Valid. .
A screen appears indicating if you want to
show the timer, press Yes .
Press Return , the timer activation screen
appears.
To exit the menu, press the red key .
Birthday alarms
You can programme birthday alarms
(10 alarms) on your DECT telephone. Your
telephone will ring for 60 seconds and an
alarm screen will appear to remind you of
such events. The alarm screen will remain
displayed until one of the keypad keys is
pressed.
Adding a new birthday alarm
On the navigator key , press or
until the ACCESSORIES screen is
displayed, press OK to confirm.
Select BIRTHDAY using or . Press
Valid. .
Enter the birth date using the keypad keys.
Press Valid. .
Enter the alarm activation time. Press
Valid. .
Viewing a birthday alarm
In the birthday alarm li st screen, select the
alarm you would like to view using or ,
and press OK to confirm.
The birthday alarm entry appears on the
screen. This entry consists of:
• the name of the person concerned,
• the birth date,
• the time at which you would like to be
notified by the alarm.
Modifying or deleting a birthday
alarm
In the birthday alarm li st screen, select the
alarm you wish to edit using or . Press
Option .
The following options are available:
- VIEW: to view the alarm data.
- EDIT: to change the alarm name or date.
- DELETE: to remove a birthday or
organiser alarm.
- RING TONE: to set the ring tone that will
sound when the alarm goes off.
- NEW ENTRY: to set up a new alarm.
Select New using or . Press Valid. .
Enter the name of the person concerned
using the keypad keys. To delete a character,
press the C key. Press Valid. .
To exit the menu, press the red key .
34
Page 35

LU 252973993 D30 T V H Australie.book Page 35 Mercredi, 20. juin 2007 9:47 09
ACCESSORIES
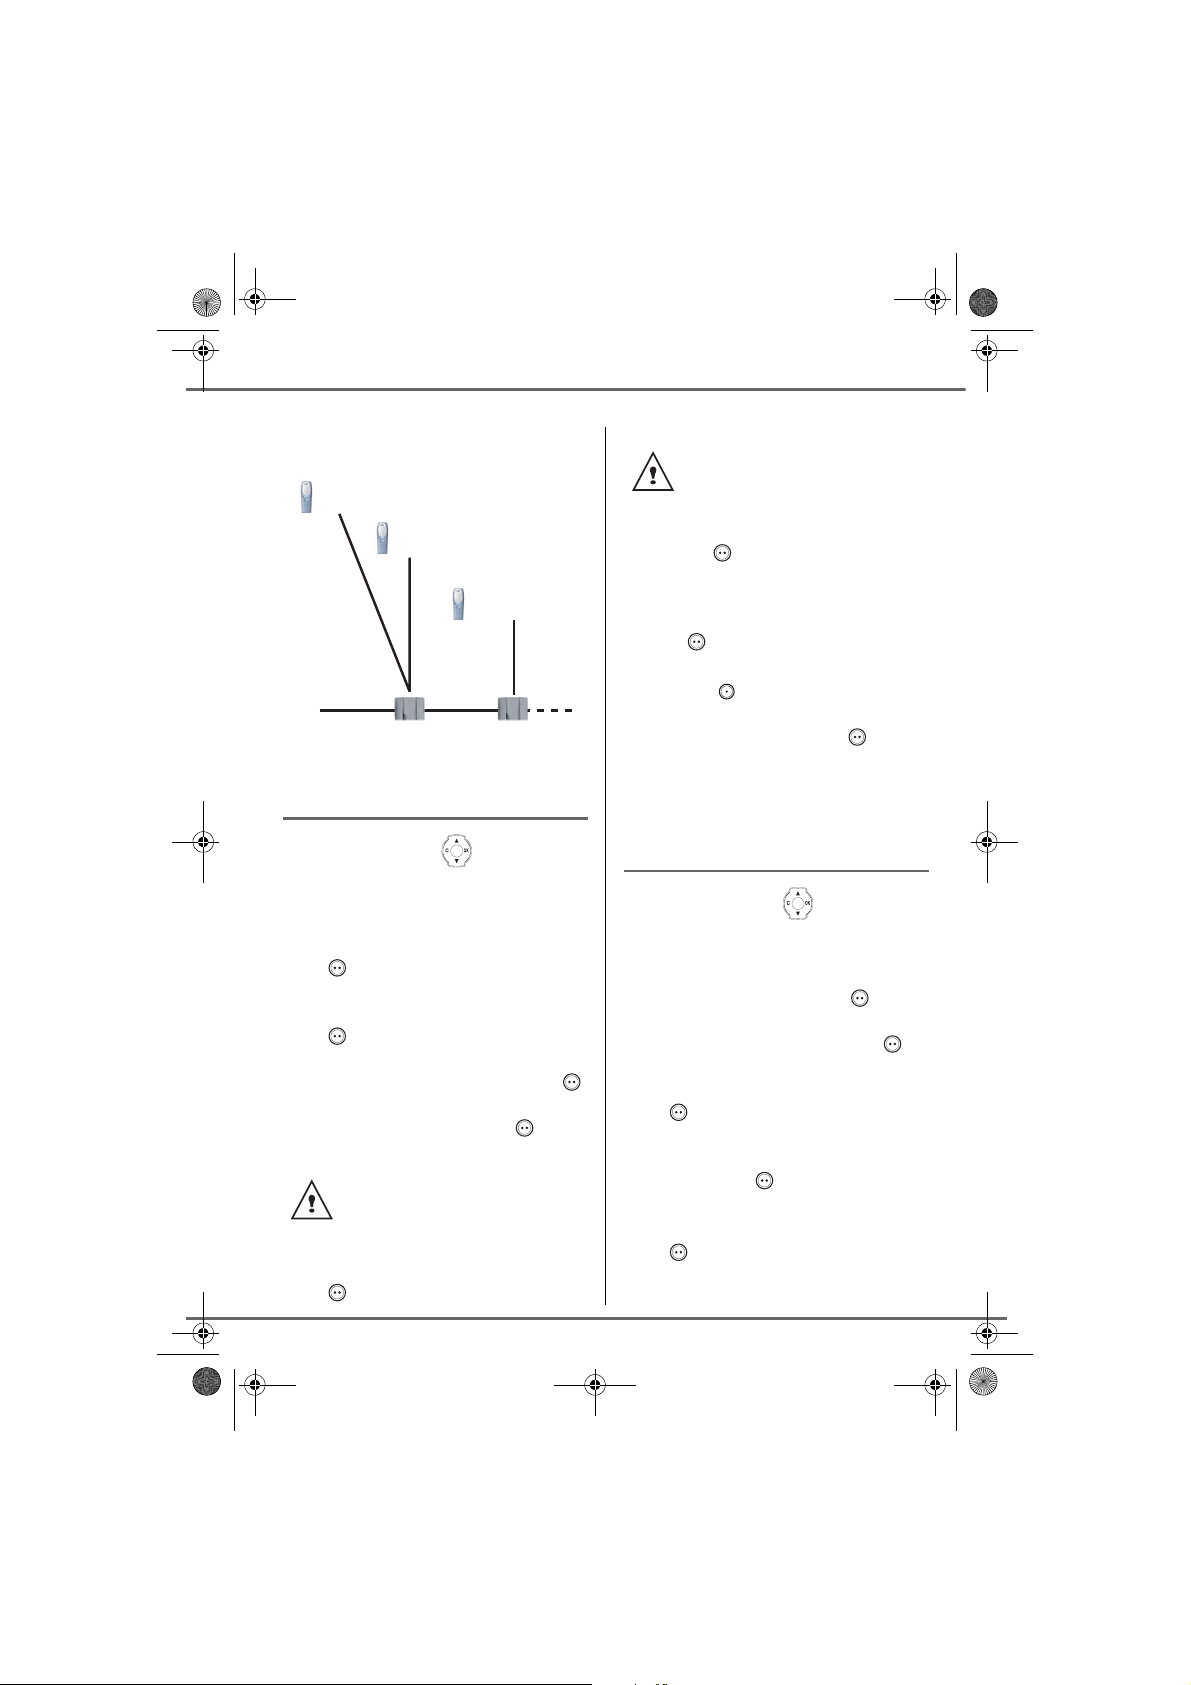
Monitoring a room
Two handsets must be registred on the same
base to use this function. You can use your
handset to monitor a room. This allows you,
for example, to monitor a baby's room.
To do so, place one of the handsets in the
room to be monitored. This unit will be in
"sender" mode.
The other handset will remain with you, it is in
"receiver" mode.
On the receiver handset:
On the navigator key , press or
until the ACCESSORIES screen is
displayed, press OK to confirm.
Select ROOM MONITOR. using or .
Press Valid. .
Select the sender handset using or .
Press Call .
The sender handset rings, pick up using the
green key .
• Keep the receiver handset with you.
When in monitor mode, the receiver
handset can be used to make calls.
To make a call: press Call and
dial the number.
To answer a call: press green
key .
At the end of the call, the handset
will automatically return in monitor
mode.
To stop monitoring:
-Press Stop on the transmitter set. The
receiver set will automatically return to the
standby screen.
-Press Stop on the receiver set an d
confirm by pressing Yes and Stop
on the transmitter handset at the same
time.
On the transmitter handset:
A screen invites you to activate the monitor
mode (sender mode). Press Yes .
Both handsets are now in monitor mode.
• Place the sender handset in the room to
be monitored.
The handset in sender mode does
not ring to notify you of incoming
calls. It can therefore be placed in a
room where someone is sleeping.
35
Page 36

LU 252973993 D30 T V H Australie.book Page 36 Mercredi, 20. juin 2007 9:47 09
RING TONES
RING TONES
This menu allows you to modify the ring
tones and particularly :
• to assign different ring tones for incoming
calls outsides or intercom (between
handsets),
• to activate or deactivate tones being
sounded when pressing the keypad
or when validating the settings
information of your handset.
• activate or deactivate silent mode.
Changing the ring tones
This menu enables you to associate a unique
ring tone to incoming calls or internal calls
(intercom).
On the navigator key , press or
until the RING TONE screen is displayed,
press OK to confirm.
Select EXTERNAL CALL or INTERNAL
CALL using or . Press Valid. .
Select the ring tone of your choice using
the or keys then press Volume .
Adjust the ringer volume using or , press
Valid. .
Activating or deactivating the
beeps
On the navigator key , press or
until the RING TONE screen is displayed,
press OK to confirm.
Select BEEPS using or . Press
Valid. .
Select the beep type using or . Press
Valid.
KEYTONE: the handset beeps when a key is
pressed.
BATTERY LOW: the handset beeps when
the battery is too low.
CHARGER: the handset beeps when you
hang up the handset.
An information screen displays the beep
status for the selected item (Active
or Inactive).
• To change the statu s, press Edit . The
• To keep the status , press Valid. .
To exit the menu, press the red key .
.
status is modified on the screen.
Valid. .
Press
To exit the menu, press the red key .
36
Page 37

LU 252973993 D30 T V H Australie.book Page 37 Mercredi, 20. juin 2007 9:47 09
RING TONES
Activating/deactivating the
silent mode
When in silent mode, the telephone ringer
and keypad beeps are inhibited.
On the navigator key , press or
until the RING TONE screen is displayed,
press OK to confirm.
Select SILENT MODE using or . Press
Valid. .
When you activate the silent mode,
your handset is muted for all timer,
organiser-type functions...
Press Yes to activate the silent mode.
To exit the menu, press the red key .
37
Page 38

LU 252973993 D30 T V H Australie.book Page 38 Mercredi, 20. juin 2007 9:47 09
SETTINGS
SETTINGS
This menu enables you to change or
customise the handset and ba se parameters.
Programming a key
This function enables you to programme the
and keys on your handset giving you
direct access to certain functions right from
the idle screen.
On the navigator key , press or
until the SETTINGS screen is displayed,
press OK to confirm.
Select PROGRAM KEYS using or .
Press Valid. .
A screen presents the function currently
assigned the key.
• To keep the function, press Valid. .
• To modify the function, press Edit .
Choose from the function list the function you
want to assign to the key. Press
select one of the following functions:
or to
Once the key is programmed, a screen
invites you to programme the key .
• To modify the function, press Edit .
• To keep the function, press Valid. .
To exit the menu, press the red key .
Modifying the date and time
On the navigator key , press or
until the SETTINGS screen is displayed,
press OK to confirm.
Select DATE/TIME using or . Press
Valid. .
A screen displays the current date.
Enter the date in DD/MM/YY format and
press Valid. .
A screen displays the current time.
Enter the time in HH/ MM format and press
Valid. .
To exit the menu, press the red key .
• SILENCE • ALARM
• TIMER • KEY LOCK
• NUMBER • REDIAL
• ANSW. MACH.
Press Valid. .
With the number function, you
associate a telephone nu mber to a
program key. You can thus quickly
call your contact.
Using the auto hang up and pick
up features
The auto hang up feature enables you to
automatically hang up by si mply putting the
handset back on its base.
If the auto hang up feature is on,
communication ends when the
handset is put back on its base.
When active, the auto pick up feature
enables you to automatically pick up as soon
as you remove the handset from its base.
38
Page 39

LU 252973993 D30 T V H Australie.book Page 39 Mercredi, 20. juin 2007 9:47 09
SETTINGS
On the navigator key , press or
until the SETTINGS screen is displayed,
press OK to confirm.
Select AUTO HANG UP (or AUTO PICKUP)
using or . Press Valid. .
A screen displays the current status (on
or off).
• To change the status , pr es s Edit .
• To keep the status, press Valid. .
To exit the menu, press the red key .
Modifying the Voice box number
(model D30T)
This function enables you to receive calls
when absent on a voice messaging service of
the switched network.
To indicate that a new message has been
received the reception indicator on the
handset is lit in red and the new event
message is displayed on the screen.
To check your voice messaging
service, hold down key .
The number of your voice messaging s ervice
is set in the factory. To change this number,
proceed as follows:
On the navigator key , press or
until the SETTINGS screen is displayed,
press OK to confirm.
The programmed number is displaye d on the
screen,
• The number is correct, press Valid. .
• To modify the number, press Edit .
Delete the numbers using the navigator
C key. Enter the number. Press Valid. .
To exit the menu, press the red key .
Modifying the language
This function enables you to change the
screen display language.
On the navigator key , press or
until the SETTINGS screen is displayed,
press OK to confirm.
Select LANGUAGE using or . Press
Valid. .
An information screen presents the current
language used.
• To keep the setting, press Valid. .
• To change the setting, press Edit .
Choose the desired language from the
language list. Press or to select the
language. Press Valid. .
The screen shows the new lan guage used.
Press Valid. .
To exit the menu, press the red key .
Select VOICE BOX No using or . Press
Valid. .
39
Page 40

LU 252973993 D30 T V H Australie.book Page 40 Mercredi, 20. juin 2007 9:47 09
SETTINGS
SECURITY
This menu enables you to change or
customise the security parameters of your
telephone. You can:
• lock the keypad,
• programme an emergency number,
• modify the base code,
• define the call time limit,
• define forbidden prefixes,
• authorise or deny communication to a
number of handsets.
Locking/unlocking the keypad
To lock/unlock the keypad, press
and hold the keypad key for
some time.
You can also lock your keypad via the
SECURITY
On the navigator key , press or
until the SETTINGS screen is displayed,
press OK to confirm.
Select SECURITY using or . Press
Valid. .
Select KEYPAD LOCK using or . Press
Valid. .
To lock the keypad, press Yes .
A screen indicates that the keypad is locked.
menu.
Programming an emergency
number
This function allows you to define an
emergency number which can be enabled or
disabled.
Once it is activated, the emergency number
will be automatically dialled when the green
key is pressed from the idle screen.
• Once activated, you can however call a
different number with pre-dialling by
dialling a number and pressing .
The following types of numbers
should not be programmed: Fire,
emergency and police rescue
services...
On the navigator key , press or
until the SETTINGS screen is displayed,
press OK to confirm.
Select SECURITY using or . Press
Valid. .
Select EMERGENCY using or . Press
Valid. .
An information screen displays the current
stored emergency number and indicates
whether it is enabled or disabled.
• To keep the setting, press Valid. .
• To modify the setting, pres s Edit .
A list of various executable actions appears:
- ACTIVATE: to activate the emergency
number.
40
Page 41

Réglages des fonctions.fm Page 41 Lundi, 25. juin 2007 9:38 09
SETTINGS
- DEACTIVATE: to deactivate the
emergency number.
- CHANGE NO: to modify the emergency
number.
To modify the emergency number, select
CHANGE NO. Press Valid. .
Enter the new number using the keypad. You
can pick a number from the phonebook.
Press , make your selection and
Val id . .
The active mode is set automatically.
An information screen presents the new
emergency number.
To activate/deactivate the emergency
number, select the corresponding option.
Press Valid. .
To exit the menu, press the red key .
The emergency number is automatically
activated. The name of the handset
displayed on the idle screen becomes
EMERGENCY.
Defining the call time limit
You can set your telephone's operating time.
Once the call time limit is used up, it is no
longer possible to make calls.
To be able to call again, you will have to
deactivate the call time limit or set a new limit.
If the time limit ends during a
telephone conversation,
communication will not be cut off.
Once you have hung up, it will not be
possible to make a new call. Calls
between handsets (internal calls)
are not affected by the call time limit.
On the navigator key , press or
until the SETTINGS screen is displayed,
press OK to confirm.
Select SECURITY using or . Press
Valid. .
Select TIME LIMIT using or . Press
Valid. .
An information screen displays the remaining
time limit and its status.
• To keep the setting, press Confirm .
• To modify the setting, press Edit .
Enter the base code (default is 0000). Press
Valid. .
A list of various executable actions appears:
- ACTIVATE:To activate the emergency
number.
- DEACTIVATE:To deactivate the
emergency number.
- EDIT TIME: To modify the emergency
number.
Select EDIT TIME using or . Press
Valid. .
Enter the new time limit using the keypad
(maximum 999 minutes). Press Valid. ,
the active mode is set automatically.
41
Page 42

LU 252973993 D30 T V H Australie.book Page 42 Mercredi, 20. juin 2007 9:47 09
SETTINGS
Once the modifications have been made, t he
information screen shows the new call time
limit.
To exit the menu, press the red key .
Defining forbidden prefixes - Call
barring
You can prohibit the use of certain prefixes
on your telephone. When a prefix is
forbidden, it becomes impossible to call
numbers that begin by this prefix.
Depending on the programmed
prefixes, certain numb ers will no
longer be accessible. For example, if
you programmed 06 as a forbidden
prefix, it will not be possible to call a
number that begins by 06.
On the navigator key , press or
until the SETTINGS screen is displayed,
press OK to confirm.
Select SECURITY using or . Press
Valid. .
Select RESTRICTION using or . Press
Valid. .
Enter the base code. Press Valid. .
The prefix screen appears. Select an empty
location (dashes) or a prefix to modify using
or . Press Valid. .
Enter the prefix using the keypad. Press
Valid. .
To eliminate a prefix, select it using
keys or and press Valid. .
When all prefixes are programmed, press
Return .
A restriction activation screen appe ars, press
Yes to activate restriction.
To exit the menu, press the red key .
You can programme up to
5 forbidden prefixes.
Modifying the base code
The base code (0000 being the default
setting) is required to access certain security
functions. It must be composed of 4 digits.
On the navigator key , press or
until the SETTINGS screen is displayed,
press OK to confirm.
Select SECURITY using or . Press
Valid. .
Select CHANGE CODE using or . Press
Valid. .
Enter the old base code using the keypad
(default is 0000). Press Valid. .
Enter the new base code using t he keypad.
Press Valid. .
Confirm by entering the new base code
again. Press Valid. .
42
Page 43
LU 252973993 D30 T V H Australie.book Page 43 Mercredi, 20. juin 2007 9:47 09
SETTINGS
To exit the menu, press the red key .
Carefully note down the base code
number. You will need this code to
change certain settings.
Authorising listening in
The intrusion function authorises or prevents
a second handset registered on the same
base from joining in a current conversatio n. If
the intrusion mode is active, it is then
possible to join a conversation in progress
using another handset.
On the navigator key , press or
until the SETTINGS screen is displayed,
press OK to confirm.
Select SECURITY using or . Press
Valid. .
Select INTRUSION using or . Press
Valid. .
A screen displays the current status (on or
off).
• To change the status , pr es s Edit .
• To keep the status, press Valid. .
To exit the menu, press the red key .
HANDSET SETTINGS
Registering a new handset to a
base
To register a new handset to a base you
must:
• put the handset in registration mode,
• put the base in registration mode.
Once this is done, the registration (mutual
recognition of the base and the new handset)
will be done automatically (registration can
take a few seconds).
If the code of the base has been
modified (different from 0000), the
registration will not be possible with
this procedure, refer to paragraph
Personal registering, page 45.
Take the handset to be registered:
On the navigator key , press or
until the SETTINGS screen is displayed,
press OK to confirm.
Select ADVANCED SET. using or .
Press Valid. .
Select SET HANDSET using or . Press
Valid. .
Select REGISTRATION. Press Valid. .
Press Yes to put the handset in
registration mode.
The handset enters the registration mode.
43
Page 44

LU 252973993 D30 T V H Australie.book Page 44 Mercredi, 20. juin 2007 9:47 09
SETTINGS
On the base:
Put the base to which you want to register the
handset in registration mode:
• For the D30T, press on the button
on the base for a few seconds.
• For the D30V, press on the button
on the base for a few seconds.
The new handset and the base are mutually
searching for each other. The registration
may take several seconds.
Once the handset is registered, the handset
automatically exits the registrati on mod e and
lets you know the registration is done.
You can also set your base to the
registration mode using a handset
already registered by selecting the
Registration function in the menu
SETTINGS/ADVANCED SET/SET
BASE.
Modifying the base preference
This function enables you to specify which
base will be used by your handset to make
calls (if your handset is registered to several
bases).
An information screen presents the current
base preference for your handset.
• To keep the preference, pres s Valid. .
• To modify the prefer ence, press Edit .
A list provides the bases among which you
can choose the preferred base to which you
want your handset to be registered. With the
automatic mode you are not required to
specify the preference.
Select the base preference using or .
Press Valid. .
To exit the menu, press the red key .
Resetting the handset
When you reset your handset, all the
parameters are reset to their initial value
(factory settings) with the exception of the
phonebook, alarms (birthdays and org aniser)
and SMS parameters.
When resetting the handset, the
security functions (forbidden
prefixes and time limit duration) are
not set back to their initial value.
On the navigator key , press or until the SETTINGS screen is displayed, press
OK to confirm.
Select ADVANCED SET.. Press Valid. .
Select SET HANDSET. Press Valid. .
Select BASE PRIORITY using or .
Press Valid. .
On the navigator key , press or
until the SETTINGS screen is displayed,
press OK to confirm.
Select ADVANCED SET.. Press Valid. .
Select SET HANDSET. Press Valid. .
Select RESET HANDSET using or .
Press Valid. .
44
Page 45

LU 252973993 D30 T V H Australie.book Page 45 Mercredi, 20. juin 2007 9:47 09
SETTINGS
A confirmation screen will prompt you to
confirm your request:
• To re-initialise your handset, press
Yes .
• If you do not wish to re-initialise your
handset, press No .
To exit the menu, press the red key .
Personal registering
To register a handset in the following cases:
• the base’s code is no longer 0000 (you
have customised the code),
• you own several bases,
• you want to choose a name for y our base
(name displayed on the welcome
screen),
• you want to choose the handset
registration number.
On the navigator key , press or
until the SETTINGS screen is displayed,
press OK to confirm.
Select ADVANCED SET.. Press Valid. .
Select SET HANDSET. Press Valid. .
Select PERSON. REGISTR using or ,
Press Valid. .
Select the required base number. Press
Valid. .
Delete the current base name using C key (if
necessary).
Enter the base code. Press Valid. .
The handset enters the registration mode,
"HANDSET IN REGISTR. MODE" is
displayed on the screen.
Put the base to which you want to register the
handset in registration mode.
Once the handset is registered, select the
required handset number. Press Valid. .
On the base:
Put the base to which you want to register the
handset in registration mode:
• For the D30T, press on the button
on the base for a few seconds.
• For the D30V, press on the button
on the base for a few seconds.
The green light blinks rapidly, the base is in
registration mode.
The new handset and the base ar e mutually
searching for each other. The registration
may take several seconds.
Once the handset is registered, the handset
automatically exits the registration m ode an d
lets you know the registration is done.
You can also set your base to the
registration mode using a handset
already registered by selecting the
Registration function in the menu
SETTINGS/ADVANCED SET/SET
BASE.
Enter the new name, press Valid. .
45
Page 46

LU 252973993 D30 T V H Australie.book Page 46 Mercredi, 20. juin 2007 9:47 09
SETTINGS
BASE SETTINGS
Using a handset to put the base
in registration mode
This function enables you to put the base in
registration mode so you can register a new
handset. To do so, the handset to be
registered must be in registration mode (refer
to paragraph Registering a new handset to
a base, page 43).
On the navigator key , press or
until the SETTINGS screen is displayed,
press OK to confirm.
Select ADVANCED SET. using or .
Press Valid. .
Select SET BASE using or . Press
Valid. .
Select REGISTR. MODE using or .
Press Valid. .
A screen prompts you to confirm the setting
of the base to the registration mode. Press
Yes to enter the registration mode. The
indicator light on your base starts to quickly
blink green.
Your base will remain in registration mode for
about 1 minute.
You can also put the base in
registration mode :
• For the D30T, press on the
button on the base for a
few seconds.
• For the D30V, press on th e
button on the base for a few
seconds.
Resetting the base
When you reset your base, all the base
parameters are reset to their initial values
(factory settings), your SMS are not deleted.
On the navigator key , press or
until the SETTINGS screen is displayed,
press OK to confirm.
Select ADVANCED SET.. Press Valid. .
Select SET BASE. Press Valid. .
Select RESET BASE using or . Press
Valid. .
A confirmation screen will prompt you to
confirm your request:
• To reset the base, press Yes .
• If you do not wish to reset the base,
press No .
Enter the base code. Press Valid. . The
RE-INIT. IN PROCESS message is
displayed on the screen.
To exit the menu, press the red key .
46
Page 47

LU 252973993 D30 T V H Australie.book Page 47 Mercredi, 20. juin 2007 9:47 09
SETTINGS
Renaming the base
When resetting the base, the base
code becomes 0000 again.
De-registering a handset
This function enables you to de-register a
handset from your base. This may be
necessary if you have lost a handset or if y ou
already have 6 handsets registered to the
same base.
On the navigator key , press or
until the SETTINGS screen is displayed,
press OK to confirm.
Select ADVANCED SET.. Press Valid. .
Select SET BASE. Press Valid. .
Select RENAME BASE using or . Press
Valid. .
On the navigator key , press or
until the SETTINGS screen is displayed,
press OK to confirm.
Select ADVANCED SET.. Press Valid. .
Select SET BASE. Press Valid. .
Select DELETE HANDSET using or .
Press Valid. .
Select the handset you wish to unregister in
the list by pressing or . Press Valid. .
A screen prompts you to confirm the
unregistration. Press Yes to unregister
the handset.
To exit the menu, press the red key .
Select the base for which you want to mo dif y
the name
Enter the new name using the keypad . Press
Valid. .
To exit the menu, press the red key .
using or . Press Valid. .
47
Page 48

LU 252973993 D30 T V H Australie.book Page 48 Mercredi, 20. juin 2007 9:47 09
SETTINGS
LINE SETTINGS
Before changing the settings of the
telephone line, contact your operator
to obtain the parameters for your
line.
Modifying the network type
Your DECT telephone can be installed on a
public or private network (when using a
PABX).
This function enables you to configure your
telephone according to the type of network.
On the navigator key , press or
until the SETTINGS screen is displayed,
press OK to confirm.
Select ADVANCED SET. using or .
Press Valid. .
Select SET LINE using or . Press
Valid. .
Select NETWORK TYPE using or .
Press Valid. .
A screen presents the current status (public
or private).
• To keep the status, press Valid. .
• To change the status , pr es s
The status is modified on the screen, press
Valid. .
Edit
.
Modifying the flash duration
(R key)
If you connect your telephone to a private
automatic branch exchange or use it in a
foreign country, you may need to modify the
flash duration in order to use your telephone
correctly with regard to the following
functionalities: outgoing 2nd call, incoming
2nd call, 3 way calling.
Contact your service provider to obtain the
correct flash duration and then modify it by
doing the following.
On the navigator key , press or
until the SETTINGS screen is displayed,
press OK to confirm.
Select ADVANCED SET.. Press Valid. .
Select SET LINE. Press Valid. .
Select FLASHING using or . Press
Valid. .
An information screen presents the current
flash duration.
• To keep the duration, press Confirm .
• To modify the duration, pres s Edit .
Select the new duration using or . Press
Valid. .
The screen presents the new flash duration.
• To keep the duration, press Confirm .
• To modify the duration, pres s Edit .
To exit the menu, press the red key .
To exit the menu, press the red key .
48
Page 49

LU 252973993 D30 T V H Australie.book Page 49 Mercredi, 20. juin 2007 9:47 09
SETTINGS
Setting a PABX prefix
If a private automatic branch exchange is
used, you can programme the ext ernal call
prefix.
With this function you can set the:
• PABX prefix number,
• dialled number length at which point the
PABX will be automatically dialled (this
length is called "digit before prefix"),
• prefix status (on or off).
On the navigator key , press or
until the SETTINGS screen is displayed,
press OK to confirm.
Select ADVANCED SET.. Press Valid. .
Select SET LINE. Press Valid. .
Select PABX PREFIX using or . Press
Valid. .
An information screen presents the PABX
setting in progress. Press or key.
Enter the prefix using the keypad, press
Valid. .
To modify the digits before prefix, select
EDIT LENGTH using or , press
Valid. .
Enter the digits before prefix using the
keypad, press Valid. .
To exit the menu, press the red key .
Press Yes , to modify this setting.
Select the desired option:
- ACTIVATE/DEACTIVATE: to select a
status.
- PREFIX: to enter the number giving you
access to the outside line.
- EDIT LENGTH: to specify the «di gi ts
before prefix».
- EXIT PABX: to exit the menu.
To modify the prefix, select PREFIX using
or , press Valid. .
49
Page 50

LU 252973993 D30 T V H Australie.book Page 50 Mercredi, 20. juin 2007 9:47 09
ANSWERING MACHINE
ANSWERING MACHINE
ODEL D30V)
(M
Your telephone's answering machine comes
with two answering modes:
- Answer only: callers cannot leave you a
message and an OGM informs them of y our
unavailability.
- Answer and record:an OGM invites your
callers to leave mess ages.
The telephone answering machine models also
offer the following functionalities:
- Anonymous mode with pre-recorded
OGMs.
- Call screening.
- Remote message retrieval.
-VIP access
Enabling/disabling the
answering machine
When your answering machine is off, the
base indicator is green.
When it is on, the indicator turns red. An icon
also appears on the handset display
according to the answering machine mode
used:
- Answer only
- Answer and record
A screen displays the current status of the
answering machine (answer only, answer
and record or off).
• To keep the displayed status, press
Valid. .
• To change the status, press Edit .
- To activate the answer and record
mode, select ANS. & RECORD.
- To activate the answer only mode,
select ANSWER ONLY.
- To turn off the answering machine,
select DEACTIV..
Press Valid. .
The OGM that will be used is play ed. At the
end of the playback, confirm the new status
of the answering machine by pressing
Valid. .
If you have not recorded a persona l
OGM, the answering machine will
automatically use the pre-recorded
OGM.
- You may deactivate your
answering machine using the keys
on the base. To do so, press the
button for a few seconds.
- To activate your answering
On the navigator key , press or
until the ANS. MACH screen is displayed.
Press OK to confirm.
Select ON/OFF using or . Press
Valid. .
machine, pressing the button
will switch the answering machine
recorder on. Pressing it again will
enable you to move from the
answering machine recorder to the
simple answering machine.
50
Page 51

LU 252973993 D30 T V H Australie.book Page 51 Mercredi, 20. juin 2007 9:47 09
ANSWERING MACHINE
Modifying the OGM
In order to modify an OGM, you
must first turn on the answering
machine. The OGM that will be
modified will be that of the
answering machine activated
(answer only or answer and record).
Recording a personal outgoing
message
On the navigator key , press or
until the ANS. MACH screen is displayed.
Press OK to confirm.
Select OUTGOING MESS. using or .
Press Valid. .
Select CHANGE using or . Press
Valid. .
Press OK to start recording your OGM.
At the sound of the beep transmitted through
the handset, start talking in the handset
microphone.
To stop recording press End .
Your outgoing message is automatically
played back.
At the end of the playback, a confirmation
screen asks you if you want to keep this new
outgoing message. Press Yes to keep
your OGM or No to record it again.
Using a pre-recorded anonymous
OGM
If you select the anonymous mode,
your personal outgoing message
will be definitely replaced by the prerecorded outgoing message. You
will however be able to record a new
personal outgoing message (see
previous paragraph).
On the navigator key , press or
until the ANS. MACH screen is displayed.
Press OK to confirm.
Select OUTGOING MESS.. Press Valid. .
Select ANONYMOUS using or . Press
Valid. .
Press Yes to replace your personal
outgoing message with the anonymous
outgoing message.
The anonymous outgoing message for the
answering machine mode used (answer
only/answer and record) is automatically
played back.
Deleting all your personal OGMs
If you delete all your personal
outgoing messages, the answering
machine will automatically be
deactivated.
On the navigator key , press or
until the ANS. MACH screen is displayed.
Press OK to confirm.
51
Page 52

LU 252973993 D30 T V H Australie.book Page 52 Mercredi, 20. juin 2007 9:47 09
ANSWERING MACHINE
Select OUTGOING MESS.. Press Valid. .
Select DELETE ALL using or . Press
Valid. .
Press Yes to delete all the personal
outgoing messages.
Playing messages
When there are messages on your
answering machine, the base indicator light
blinks. The rhythm of the flash informs you as
to the number of messages received (ex.:
4 short flashes correspond to 4 received
messages).
The new messages are played back first.
Afterwards, the messages that have already
been taken are played back in chronological
order (from the oldest messages to the most
recent messages).
The icon on the handset screen
notifies you that there are messages
that have not been played.
If you saved one or more played
messages, the icon appears on
the welcome screen.
Playing messages using the base
Press the button to start the playbac k.
Your messages are played back through the
base loudspeaker.
During playback, you can use the base
buttons to execute the following actions:
• Go to the next message : .
• Go back to the beginning of the
message : .
• Return to the previous message :
twice.
• Pause playback : .
• Start playback after pause : .
• Delete the message being played back :
long press on .
The answering machine will automatically
stop at the end of the last message.
Playing messages using the handset
On the navigator key , press or
until the ANS. MACH screen is displayed.
Press OK to confirm.
Select MESSAGES using or . Press
Valid. .
Select PLAY using or . Press Valid. .
The messages are played through the
handset speaker.
Depending on your service provide r and your
subscription, the name and number of your
contact will be displayed on the screen
(except for confidential calls).
During playback, you can use the handset
buttons to execute the following actions:
- : delete the message being played.
- : return to the previous message.
- : momentarily stop the playback
(pause).
- : go to the next message.
52
Page 53

LU 252973993 D30 T V H Australie.book Page 53 Mercredi, 20. juin 2007 9:47 09
ANSWERING MACHINE
Remote access to answering
machine
You can access your answering machine
remotely. This function enables you to
retrieve your messages and access your
answering machine from any other tele phone
located outside your home.
To remotely access your answering
machine: Dial your telephone number and
wait for the answering machine to come on.
When your outgoing message is played,
press # and enter your remote access code.
The remote access code is 0000 by
default. However, it can only be
used once it is customised, refer to
paragraph Modifying the remote
access code, page 55.
A beep will indicate access to the answer
machine. Any unread messages will be
automatically played back. At the end of
playback, a new beep will sound to let you
know that the answer machine is ready. You
can carry out the following operations:
0 : delete the message being
played
1 : go back to the beginning of the
message
1 (x2) : previous message
2 : pause/play
3 : next message
5 : message read
7 : Answer machine/recorder
operating
8 : record
9 : answering machine off
Deleting all the old messages
To delete the old messages one
message at a time, refer to the
previous paragraph and delete the
unwanted messages during their
play back.
On the navigator key , press or
until the ANS. MACH screen is displayed.
Press OK to confirm.
Select MESSAGES using or . Press
Valid. .
Select DELETE OLD using or . Press
Valid. .
To confirm the deletion of all the old
messages, press Yes .
To exit the menu, press the red key .
Recording a memo
This function enables you to leave a personal
message on your answering machine. Until
the time it is played, it will be c onsi dered like
a new message by the answering machine.
On the navigator key , press or
until the ANS. MACH screen is displayed.
Press OK to confirm.
Select MESSAGES using or . Press
Valid. .
53
Page 54

LU 252973993 D30 T V H Australie.book Page 54 Mercredi, 20. juin 2007 9:47 09
ANSWERING MACHINE
Select RECORD MEMO using or .
Press Valid. .
Press OK to start recording.
At the sound of the beep transmitted through
the handset, start talking into the handset
microphone.
To stop recording press End .
At the end of listen, you come back to the
previous menu.
To validate the memo, press Yes .
To cancel the memo or restart the recording,
press No .
Once validated, your answering machine
considers the memo as a new message until
it is played.
The message NEW EVENTS is displayed
and replace the idle screen.
54
Page 55

LU 252973993 D30 T V H Australie.book Page 55 Mercredi, 20. juin 2007 9:47 09
ANSWERING MACHINE
TAM SETTING
ODEL D30V)
(M
This menu enables you to modify the
advanced settings of your answering
machine (depending on the model) You can
access the TAM setting menu through the
Ans. Mach. menu or through the Adv.
Settings submenu of the Settings menu.
Activating and deactivating call
screening
When activated, the call screening function
enables you to listen to the message left by
your caller as it is being recorded. You can
pick up at any time.
On the navigator key , press or
until the ANS. MACH menu is displayed,
press OK to confirm.
Select SETTINGS using or . Press
Valid. .
Select CALL SCREENING using or .
Press Valid. .
A screen indicating the function status (on
or off) appears.
• To keep the current status, press
Valid. .
• To change the status, press Edit ,
then Valid. .
To exit the menu, press the red key .
Modifying the remote access
code
The remote access code enables you to
listen to the messages left on your answering
machine via another telephone.
On the navigator key , press or
until the ANS. MACH menu is displayed,
press OK to confirm.
Select SETTINGS using or . Press
Valid. .
Select REMOTE CODE. Press Valid. .
Press Yes to modify the remote access
code.
Enter your Base code (default setting
is 0000). Press Valid. .
Enter the new remote access code (4 digits
mandatory). Press Valid. .
To exit the menu, press the red key .
Setting the message duration
This duration corresponds to the recording
time that the caller will have to leave you his
message.
On the navigator key , press or
until the ANS. MACH menu is displayed,
press OK to confirm.
Select SETTINGS using or . Press
Valid. .
55
Page 56

LU 252973993 D30 T V H Australie.book Page 56 Mercredi, 20. juin 2007 9:47 09
TAM SETTING
Select MESS. DURATION using or .
Press Valid. .
A screen indicating the maximum authorised
recording time for each message appears.
• To keep the current duration, press
Confirm .
• To modify the current duration, press
Edit .
During the duration modification, a list of the
message durations appears on the screen.
Select the desired duration using or .
Press Valid. .
To exit the menu, press the red key .
Privileged access
This service enables you to switch off the
handset ringer for all incoming calls when
you do not want to be disturbed, except for
privileged calls.
During the reception of a call, the answering
machine will switch on after a certain number
of (muted) rings that you will have set and the
caller will be able to leave you a message.
You can programme your telephone in such
a way that it will only ring when specific
callers call. To achieve this, they will need to
dial
(star) key and a privileged code when
they hear the outgoing message. Once the
code has been entered, your telephone ring s.
On the navigator key , press or
until the ANS. MACH menu is displayed,
press OK to confirm.
Select SETTINGS using or . Press
Valid. .
Select PRIV. ACCESS using or . Press
Valid. .
The following information is displayed on the
screen:
• the privileged access code,
• the service status.
Press Edit to modify the information
displayed on the screen.
Enter the privileged access code.
Give the privileged access code to
your privileged callers. When calli ng
you, they can dial
privileged code when they hear the
outgoing message.
Press Confirm .
Press Yes to activate the privileged
access mode.
To exit the menu, press the red key .
(star) key and a
Record mode
The record mode enables you to modify the
recording time capacity of the answering
machine.
Two quality levels are available:
• Superior quality: for a 15 minute highquality capacity.
• Standard quality: for a 25 minute normalquality capacity.
Modifying the message reco rding
quality does not affect the quality of
the outgoing message.
56
Page 57

LU 252973993 D30 T V H Australie.book Page 57 Mercredi, 20. juin 2007 9:47 09
TAM SETTING
On the navigator key , press or
until the ANS. MACH menu is displayed,
press OK to confirm.
Select SETTINGS using or . Press
Valid. .
Select RECORD MODE using or . Press
Valid. .
Press Edit to modify the recording quality
level displayed on the screen. Press
Valid. .
To exit the menu, press the red key .
Number of rings
This parameter enables you to set the
number of times your telephone rings before
the answering machine answers a call. The
number of rings can be set between 2 and 7.
You can also select the Time saver mode.
The Time saver mode automatically
determines the number of rings based on the
number of messages left on the answering
machine.
If there are no new messages on the
answering machine, the number of rings will
be 4, otherwise the number of rings will be 2.
Select NO OF RINGS using or . Press
Valid. .
The programmed number of rings is
displayed on the screen.
Press Edit to modify the current number.
In the list, select the desired number of rings
(between 2 and 7) using or or the Time
saver mode, and press Valid. .
To exit the menu, press the red key .
On the navigator key , press or
until the ANS. MACH menu is displayed,
press OK to confirm.
Select SETTINGS using or . Press
Valid. .
57
Page 58
LU 252973993 D30 T V H Australie.book Page 58 Mercredi, 20. juin 2007 9:47 09
APPENDIX
Care and Maintenance
Use a slightly damp cloth to wipe the base and handset, do not use a dry cloth as this may
cause electrostatic charges.
Problems
Refer to the table presented below in case of an operational malfunction:
Problems Remedies
The base indicator light is not lit Make sure that :
The handset display is blank. Make sure the batteries are properly installed.
The handset does not ring
during an incoming call.
No radio link between the
handset and base.
The network indicator icon
flashes.
You obtain a "busy" dial tone for
each dialled number.
You cannot send or receive
SMSs.
• the power adapter is properly connected to a power socket.
• the power connector is properly plugged into the base.
• your fuse and circuit-breaker are in working order and that the power
socket is powered.
Place the handset on the base and fully charge the batteries.
To increase the life of your batteries, you can per form this operat ion about every
two months.
If these precautionary measures do not resolve this issue, replacement
batteries are available through your reseller.
As time goes by, you may notice a slight decrease in battery performance. Use
your handset until the battery is fully discharged, and then charge it for at least
12 hours.
Make sure that the telephone is properly connected and that you have a dial
tone.
Make sure your telephone is not set to silent mode (see pargraph Settings).
Make sure the handset is registered by moving closer to the base, if it is
registered correctly, the handset screen should display its own handse t number.
Otherwise, register the handset to the base. See “Register ing a new handset to
a base”, page 43.
Make sure no one else is using another handset (if the intrusion mode is
deactived).
Make sure that the dial mode (tone or p ulse dialling) is compatible with you r
telephone line or your automatic branch exchange.
Make sure your time limit has not run out (if activated).
Make sure you are not on call restriction (if activated)
Make sure you have subscribed to a caller display service.
Find out if the SMS service is in fact activated on your line.
Obtain the server numbers from your service provider and make sure they are
identical to the numbers on your handset.
Have you provided your contacts with the right terminal number?
58
Page 59

Caractéristiques.fm Page 59 Lundi, 3. septembre 2007 11:40 11
FEATURES
Functions Default settings Functions Default settings
SMS Language English
SMS sending centre 01983381 Security
SMS reception centre 01983391 Keypad lock Off
ACCESSORIES Emergency Off
Alarm clock Off Base code 0000
Timer Off Time limit Off
Room monitor Off Restriction Off
RING TONE Intrusion Off
Ringer (Ext/Int) Flute / Mineral Advanced settings
Silent mode Off • Line settings
Beeps All active Network type Public
SETTINGS Flashing 100 ms
Program keys Silence / TAM PABX prefix Off
Date/Time 00:00 // 01/01/07 • Base settings
Auto Hang up On Base name BASE 1
Auto Pick up Off
Telephone features
Number of channels 120 Autonomy
Radio frequency band 1,88 - 1,90 GHz standby time 150 hours
Duplex mode TDMA talk time 15 hours
Spacing between 1,728 MHz Handset range
Bit rate 1152 Kbit/s open space up to 300 m
Modulation GFSK inside building up to 50 m
Vocoding ADPCM Base dimensions 167 x 113 x 65 mm
Transmitting power 250 mW Base weight 136 g
Base operating voltage 240 V , 50/60 Hz Handset dimensions 140 x 51 x 30 mm
Charging time 12 hours Handset weight 143 g
All of this data is provided to you for information purposes only. Sagem Communication reserves the right
to make any changes without notice.
59
Page 60

LU 252973993 D30 T V H Australie.book Page 60 Mercredi, 20. juin 2007 9:47 09
ENVIRONMENT
Preservation of the environment is an essential con cern of Sagem Commun ication. The desire
of Sagem Communication is to operate sys tems observing the environment and consequently
it has decided to integrate environmental performances in the life cycle of its products, from
manufacturing to commissioning, use and elimination.
PACKAGING
The presence of the logo (green dot) means that a contribution is paid to an
approved national organisation to improve packaging recovery and recycling
infrastructures.
To facilitate recycling, please respect the sorting rules set up locally for this
kind of waste.
BATTERIES
If your product contains batteries, they must be disposed of at appropriate
collection points.
THE PRODUCT
The crossed-out waste bin stuck on the product or its accessories means that
the product belongs to the family of electrical and electronic equipments.
In this respect, the European regulations ask you to dispose of it selectively:
• At sales points in the event of the purchase of similar equipment.
• At the collection points made available to you locally (drop-off centre,
selective collection, etc.).
In this way you can participate in the re-use and upgrading of Electrical and Electronic
Equipment Waste, which can have an effect on the environment and human health.
60
Page 61

LU 252973993 D30 T V H Australie.book Page 61 Mercredi, 20. juin 2007 9:47 09
WARRANTY
Product Warranty
Sagem Guarantees your product for 12 months from date of purchase against any defect in
materials or workmanship under conditions of normal use and service and subject to proof of
the date of purchase being provided and subject to the conditions specified below.
The benefits conferred by this warranty are in addition to all other rights and remedies in
respect of the product that the consumer has und er th e Tra de Pra cti ce s Ac t an d si mi lar State
and Territory laws.
Warranty Service Conditions
Subject to your statutory rights referred to above, Sagem expressly limits its liability with
respect to its products to the person who purchases the Product from the Sagem authorised
retailer. Subject to your statutory rights referred to above, Sagem expressly limits its liability
with respect to its products to whichever is the lowest amount out of:
A. The cost of having the goods repa ired;
B. The cost of replacing the goods; or
C. The cost of obtaining equivalent goods.
Subject to your statutory rights referred to above, in the event of the goods requiring service
underwarranty, the owner is responsible for the cost of transp ortation to the authorised service
organisation. Whilst in transit the goods are at the owner’s risk. Subject to your statutory rights
referred to above, should the goods be found to be in sound working order by the authorised
service organisation the owner may be charged a service fee.
Subject to your statutory rights referred to above, the goods will not be eligible for service
under this warranty if:
A. Proof of date of purchase cannot be provided;
B. The goods are not branded Sagem;
C. The goods have been rented to another person;
D. The defect was caused by an accident, misuse, abuse, improper installation or operation,
lack of reasonable ca re, un auth orise d modif icati on, l oss of parts, tampe ring or att empte d
repair by a person not authorised by Sagem; or
E. The product has been damaged by lightning or a mains power surge.
Do you really need service?
Before calling for service under this warranty have you:
- Checked that all cables are securely connected as detailed in the User Guide?
- Referred to the User Guide to ensure that the features are being used correctly?
- If you are trying to access a network service such as Call Waiting, confirmed with your
network provider that you have access to this feature?
61
Page 62

LU 252973993 D30 T V H Australie.book Page 62 Mercredi, 20. juin 2007 9:47 09
WARRANTY
IMPORTANT
Please retain this booklet with your sales receipt as proof of the date of purchase.
© COPYRIGHT 2007 Sagem Corporation Limited
This work is copyright. All rights reserved. Other than for purposes and subject to conditions
prescribed under the Copyright Act, no part of it may in any form or by any means, mechanical ,
photocopying, scanning, recording or otherwise) be reproduced, stored in a retrieval system
or transmitted without prior permission from Sagem Corporation Limited.
ABN 43 003 099 812
SAGEM is a registred trademark of Sagem Communication (SAFRAN Group).
Copyright © Sagem Communication (SAFRAN Group)
All rights reserved
62
Page 63

Note.fm Page 1 Mercredi, 8. février 2006 5:56 17
...................................................................................................................................
...................................................................................................................................
...................................................................................................................................
...................................................................................................................................
...................................................................................................................................
...................................................................................................................................
...................................................................................................................................
...................................................................................................................................
...................................................................................................................................
...................................................................................................................................
...................................................................................................................................
...................................................................................................................................
Page 64

4 COUV.fm Page 63 Lundi, 3. septembre 2007 11:41 11
Data subject to change without notice
User Manual
*252973993C*
Sagem Communication
Société anonyme au capital de 300 272 000 € - 480 108 158 RCS PARIS
27, rue Leblanc - 75512 PARIS CEDEX 15 - FRANCE
www.sagem.com
 Loading...