

LU 252117222C_D20V_EN.book Page 1 Mercredi, 24. août 2005 11:46 11
User guide
LU 252117222C_D20V_EN.book Page 2 Mercredi, 24. août 2005 11:46 11
INTRODUCTION
Dear customer:
Thank you for purchasing a Sagem Commnication DECT telephone; we appreciate your trust in us.
This product was manufactured with the upmost care, should you encounter any difficulties during its use, we
recommend that you refer to this user guide. You can also find information on the following site:
For your comfort and safety, we ask that you read the following paragraph carefully:
Recommendations and safety instructions
Your DECT telephone must not be installed in a humid room (wash room, bathroom, laundry room,
kitchen, etc.) unless it is 1.50 m away from a water point, or outside. Your telephone must be
operated at temperatures ranging from 5°C to 45°C.
Only use the supplied power adapter, connect it to the base socket according to the installation
instructions provided in this booklet and the indications on the identification label affixed to it
(voltage, current, electric network frequency). As a precaution, in case of danger, the mains
adapters act as a disconnecting mechanism for the 230V power supply. They should be placed near
the device and should be easily accessible.
This telephone was designed for use on the public switched telephone network (PSTN). In case of
a problem you must first contact your reseller. Only use the supplied telephone cord.
For your personal safety, never place your handset on the base without the batteries, or without the
battery cover, you could get an electric shock.
To avoid damaging your handset, only use certified rechargeable AAA batteries NiMH 1.2 V
600 mAH, never use non rechargeable batteries. Insert the batteries in the handset battery
compartment respecting polarity.
At the end of their useful life, batteries must be disposed of according to the recycling instructions
presented in this booklet.
Your DECT telephone has an inside radio range of about 50 metres and up to 300 metres in open
space. The immediate presence of metal parts (of a television for example), or of any electric
appliance may result in range reduction.
Some sensitive medical equipment and safety equipment may be affected by the radio-frequency
transmissions of your telephone. In all cases, we ask that you respect the safety recommendations.
In areas where storms are frequent, we recommend that you protect your telephone line using a
surge protection device.
This equipment does not function in the case of an electric network shutdown: for
emergency calls, it is recommended to use another unit during power cuts.
The CE marking certifies that the product meets the essential requirements of Directive 1999/5/CE
of the European Parliament and of the Council pertaining to microwave radio equipment and
telecommunication terminal equipment, for the safety and health of users, for electromagnetic
interference. Furthermore, it efficiently uses the frequency spectrum attributed to ground and spatial
communication to prevent damaging interference.
The declaration of compliance may be looked up on the www.sagem.com site, section "support" or
can be obtained from the following address:
http://www.sagem.com/faq
Sagem Communication - Customer relations department
4 rue du Petit Albi - 95800 Cergy Saint-Christophe -France
2

LU 252117222C_D20V_EN.book Page 3 Mercredi, 24. août 2005 11:46 11
CONTENTS
Introduction 2
Recommendations and safety instructions 2
Contents 3
Your telephone 5
Unpacking 5
Your base 5
Your handset 6
Connecting the base 7
Handset set-up 8
Telephone set turning on and off 8
Replacing the batteries 9
Getting started 10
Making a call 10
Direct dialling 10
Using the Redial key 10
From the directory 10
Receiving a call 10
During a call 10
Ear volume 10
Handsfree 11
Secret mode 11
Call transfer 11
Ending a call 11
Intercommunication between two handsets 11
Locking / unlocking the keypad 12
Call log 12
Viewing the dialled calls 12
Viewing the received calls 12
Calling the voice box 12
Paging handset 13
Menu structure 14
Your directory 15
Viewing the directory 15
Creating an entry 15
Editing an entry 16
Deleting an entry 16
Call log 17
Viewing the dialled calls 17
Viewing the received calls 17
Adding a contact in the directory from
the list of received calls 17
Deleting a number from the call log 18
Viewing a missed call 18
Handset settings 19
Activating or deactivating the beeps 19
Modifying the default handset melody
volume 19
Modifying the handset ringtone 19
Setting the ear volume 19
Using the auto answer features 20
Change the name of the handset 20
Modifying the language 20
Modifying the date and time 21
Modifying the voice box number 21
Base settings 22
Modifying the default base ring volume 22
Modifying the base ringtone 22
Modifying the flash duration (R key) 22
Modifying the pause duration 23
Changing the dialling mode 23
Modifying the base code 23
Re-initialise the base 24
Registration 25
Registering an additional handset to
a base 25
Modifying the base preference 25
De-registering a handset 26
Answering machine 27
Switching on the answering machine 28
Switching to "recording answering
machine" mode 28
Switching to "basic answering machine"
mode 28
Switching off the answering machine 28
Modifying the announcement 28
Creating your personal announcement
for the recording answering machine 28
Returning to the pre-recorded
announcement 29
Creating your personal announcement
for the basic answering machine 29
Returning to the pre-recorded
announcement 30
Listening to your messages 30
Listen again to the current message 30
Listen again to the previous message 30
Go to the next message 30
Pause during playback 31
Stop the playback of the messages 31
Deleting messages 31
Deleting the current message 31
Deleting all messages already played
back 31
Recording a memo 31
Recording a conversation 31
Remote interrogation 32
Activating your answering machine
remotely 32
Consulting your answering machine
remotely 32
Activating the remote room surveillance 33
3
LU 252117222C_D20V_EN.book Page 4 Mercredi, 24. août 2005 11:46 11
CONTENTS
Answering machine setup 34
Selecting the answering machine
language 34
Modifying the remote access code 34
Alert Mode 35
Activating the alert mode 35
Turning off the alert mode 35
ECO Mode 35
Activating the ECO mode 36
Turning off the ECO mode 36
Memory status 36
Appendix 37
Care and Maintenance 37
Problems 37
Features 39
Environment 40
Packaging 40
Batteries 40
The product 40
Warranty 41
4
LU 252117222C_D20V_EN.book Page 5 Mercredi, 24. août 2005 11:46 11
YOUR TELEPHONE
Unpacking
Place the box in front of you, make sure it contains the following items:
• one base,
• one handset,
• one battery compartment cover,
• one equipped power adapter,
• one telephone line cord,
• three rechargeable batteries (type NiMH 1.2 V 600 mAh).
• this user guide.
If you have purchased a DUO pack or multi-set pack, you will find for each addition handset:
• an office charging unit and its power supply,
• a battery compartment cover,
• three additional rechargeable batteries (type NiMH 1.2 V 600 mAh).
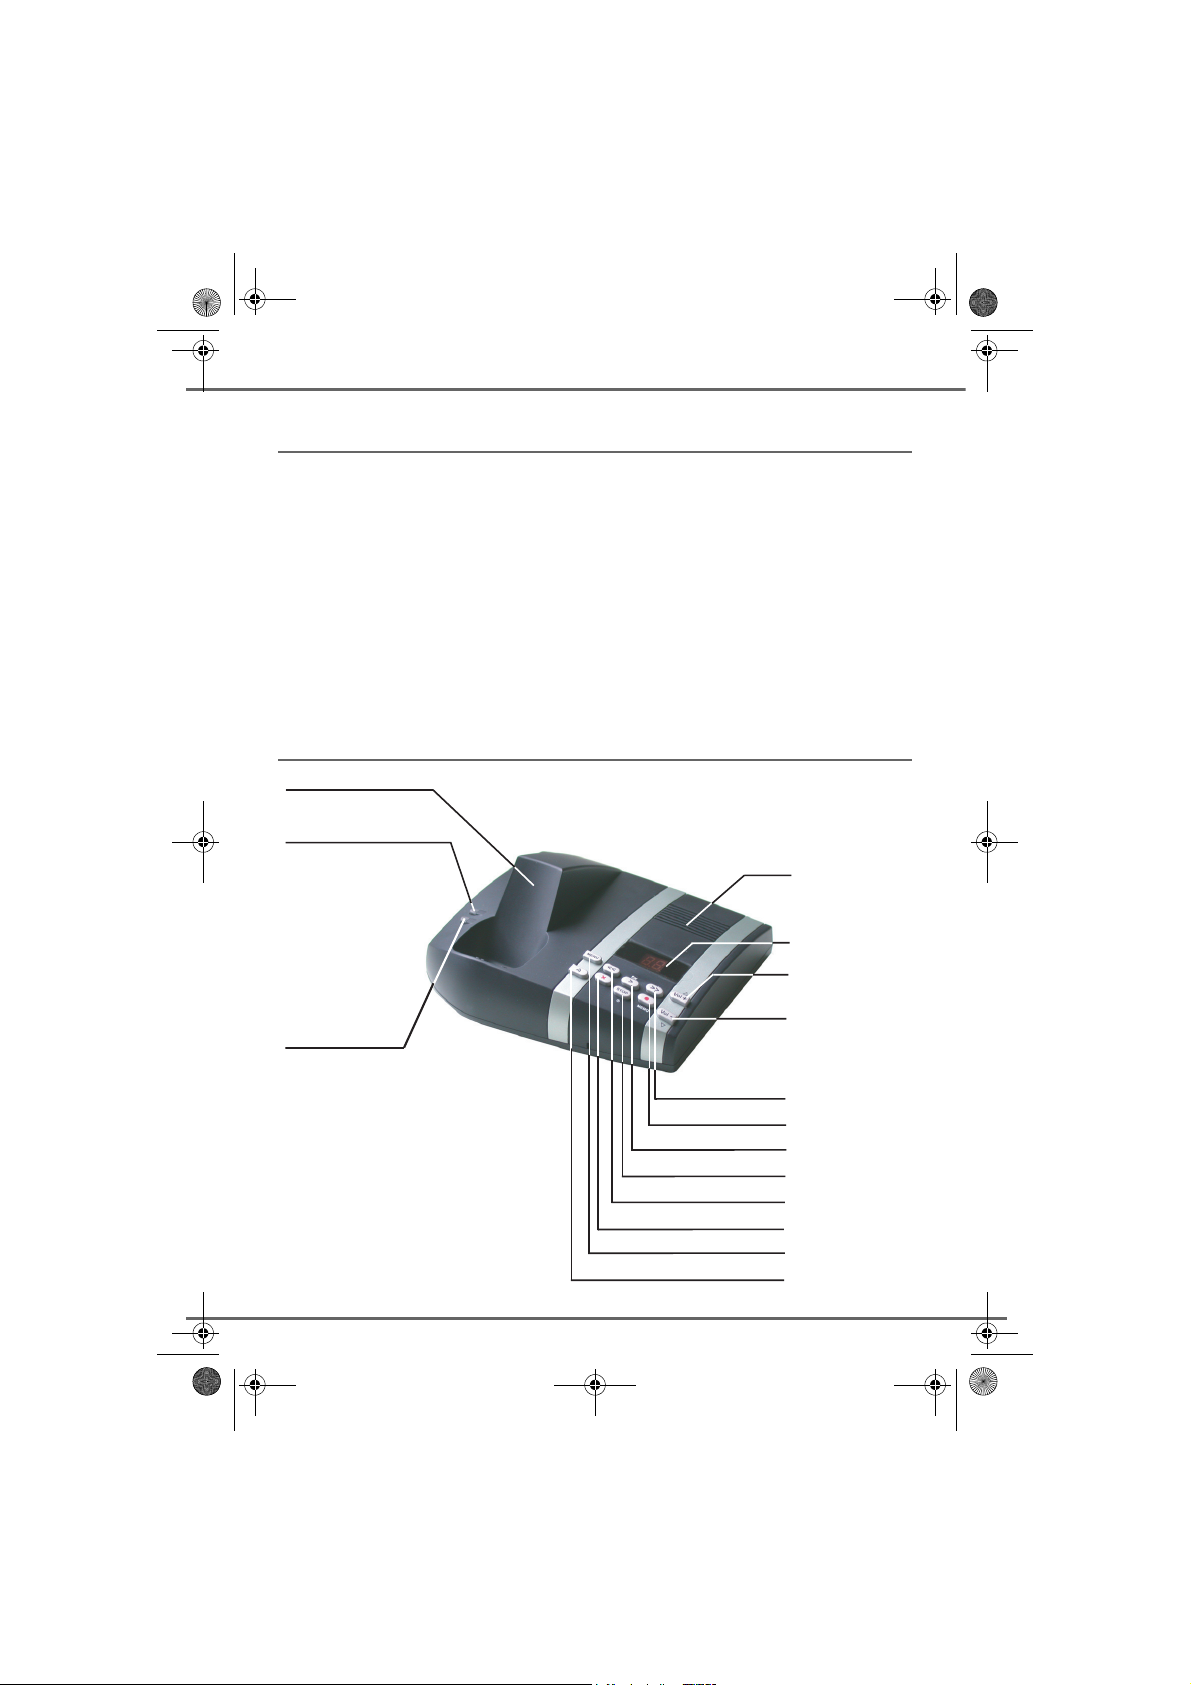
Your base
Handset location
Charge indicator
Red indicator:
handset well positioned
on base
Speaker
Power indicator light
Fixed green indicator: Powered
Flashing green indicator:
- telephone set on line (slowly flashing),
- message in the network mailbox
(rapidly flashing)
- call during absence (intermittently flashing)
Display
Vol +
Vol -
Next message
Recording
Playback
Stop
Previous message
Delete the message
Access to the menu
Page the handsets
5
LU 252117222C_D20V_EN.book Page 6 Mercredi, 24. août 2005 11:46 11
YOUR TELEPHONE
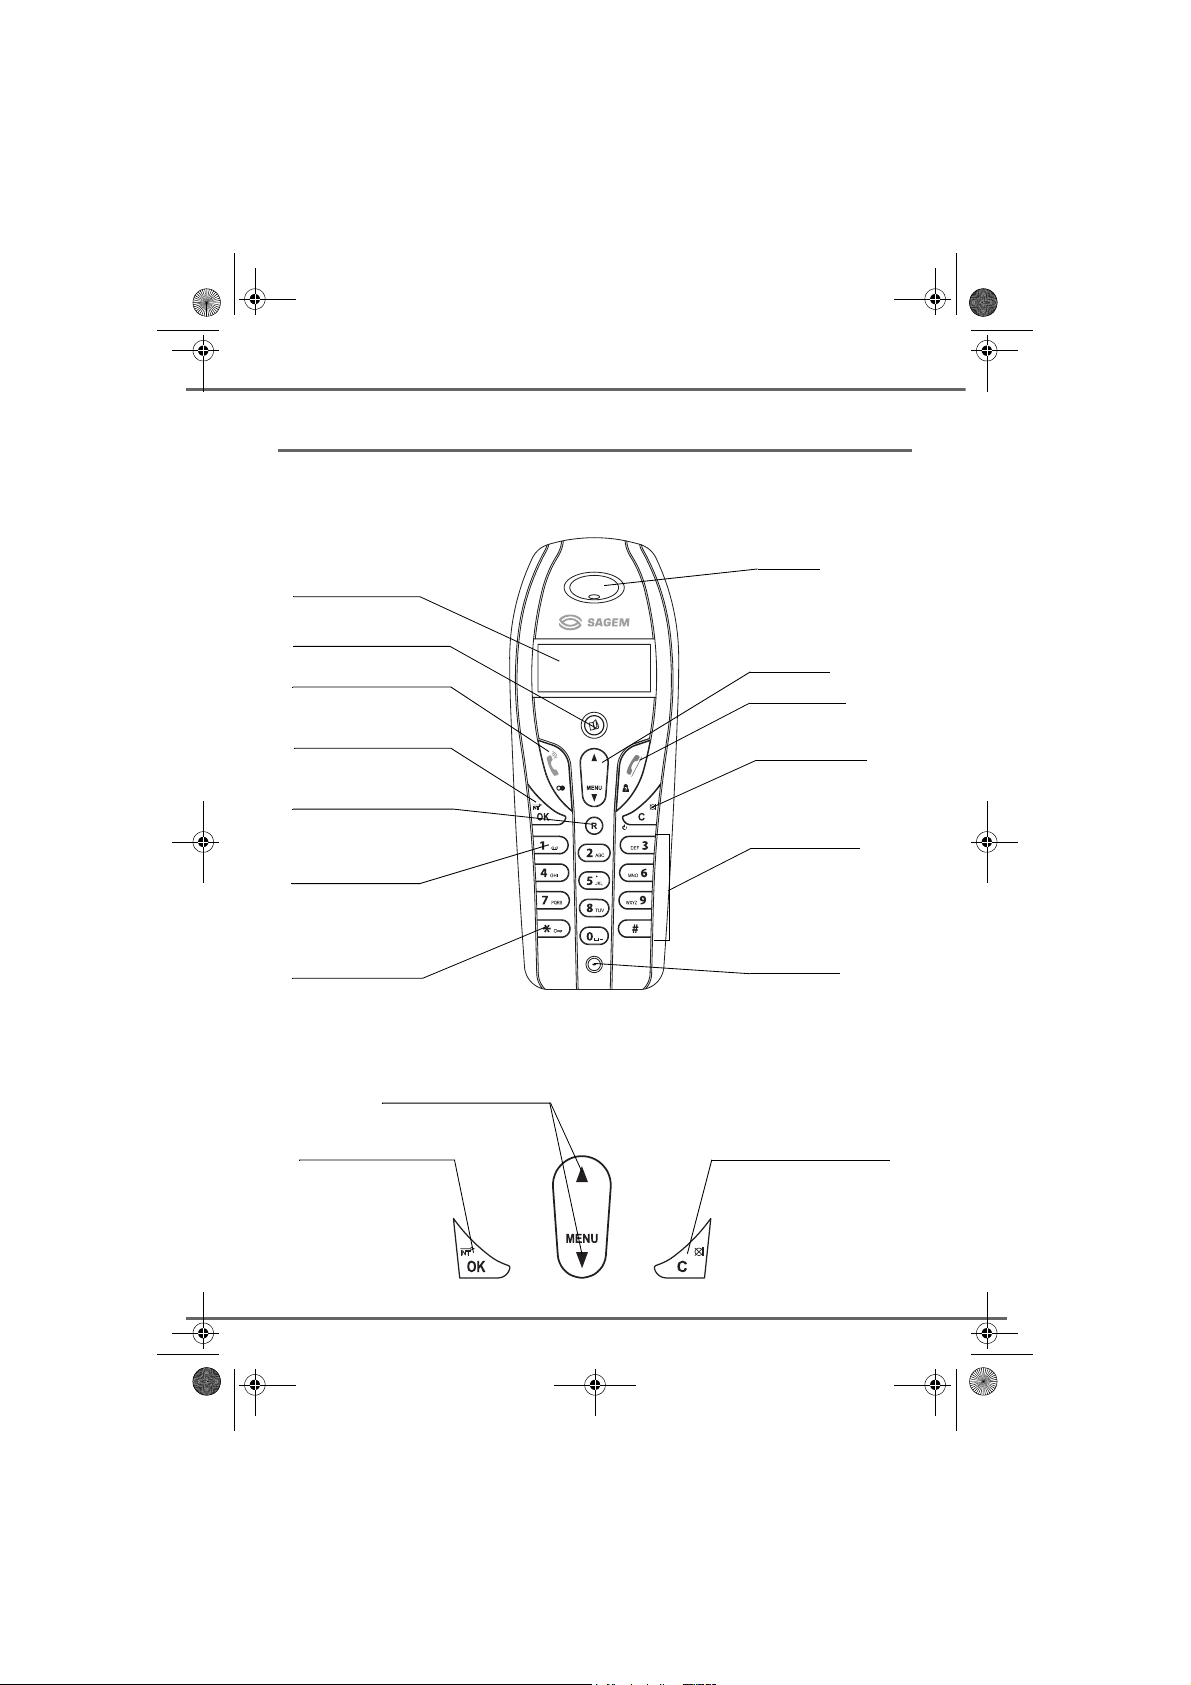
Your handset
With its user-friendly design, you will appreciate how easy it is to hold and its quality during
conversations.
Speaker
Display
Phonebook key
Pick up
Redial (long press)
OK
Internal call
R key
(Operator services)
Access to network
answer machine
messaging
(long press)
Key lock or unlock
(long press)
Navigator
Hang up
CID Review
Power ON/OFF
Cancel key
Mute key
Alphanumeric
keypad
Microphone
The navigator key and keys : a rapid selection tool.
Navigating in the menus
To confirm or to access a
sub-menu
6
To cancel or return the
previous menu
LU 252117222C_D20V_EN.book Page 7 Mercredi, 24. août 2005 11:46 11
YOUR TELEPHONE
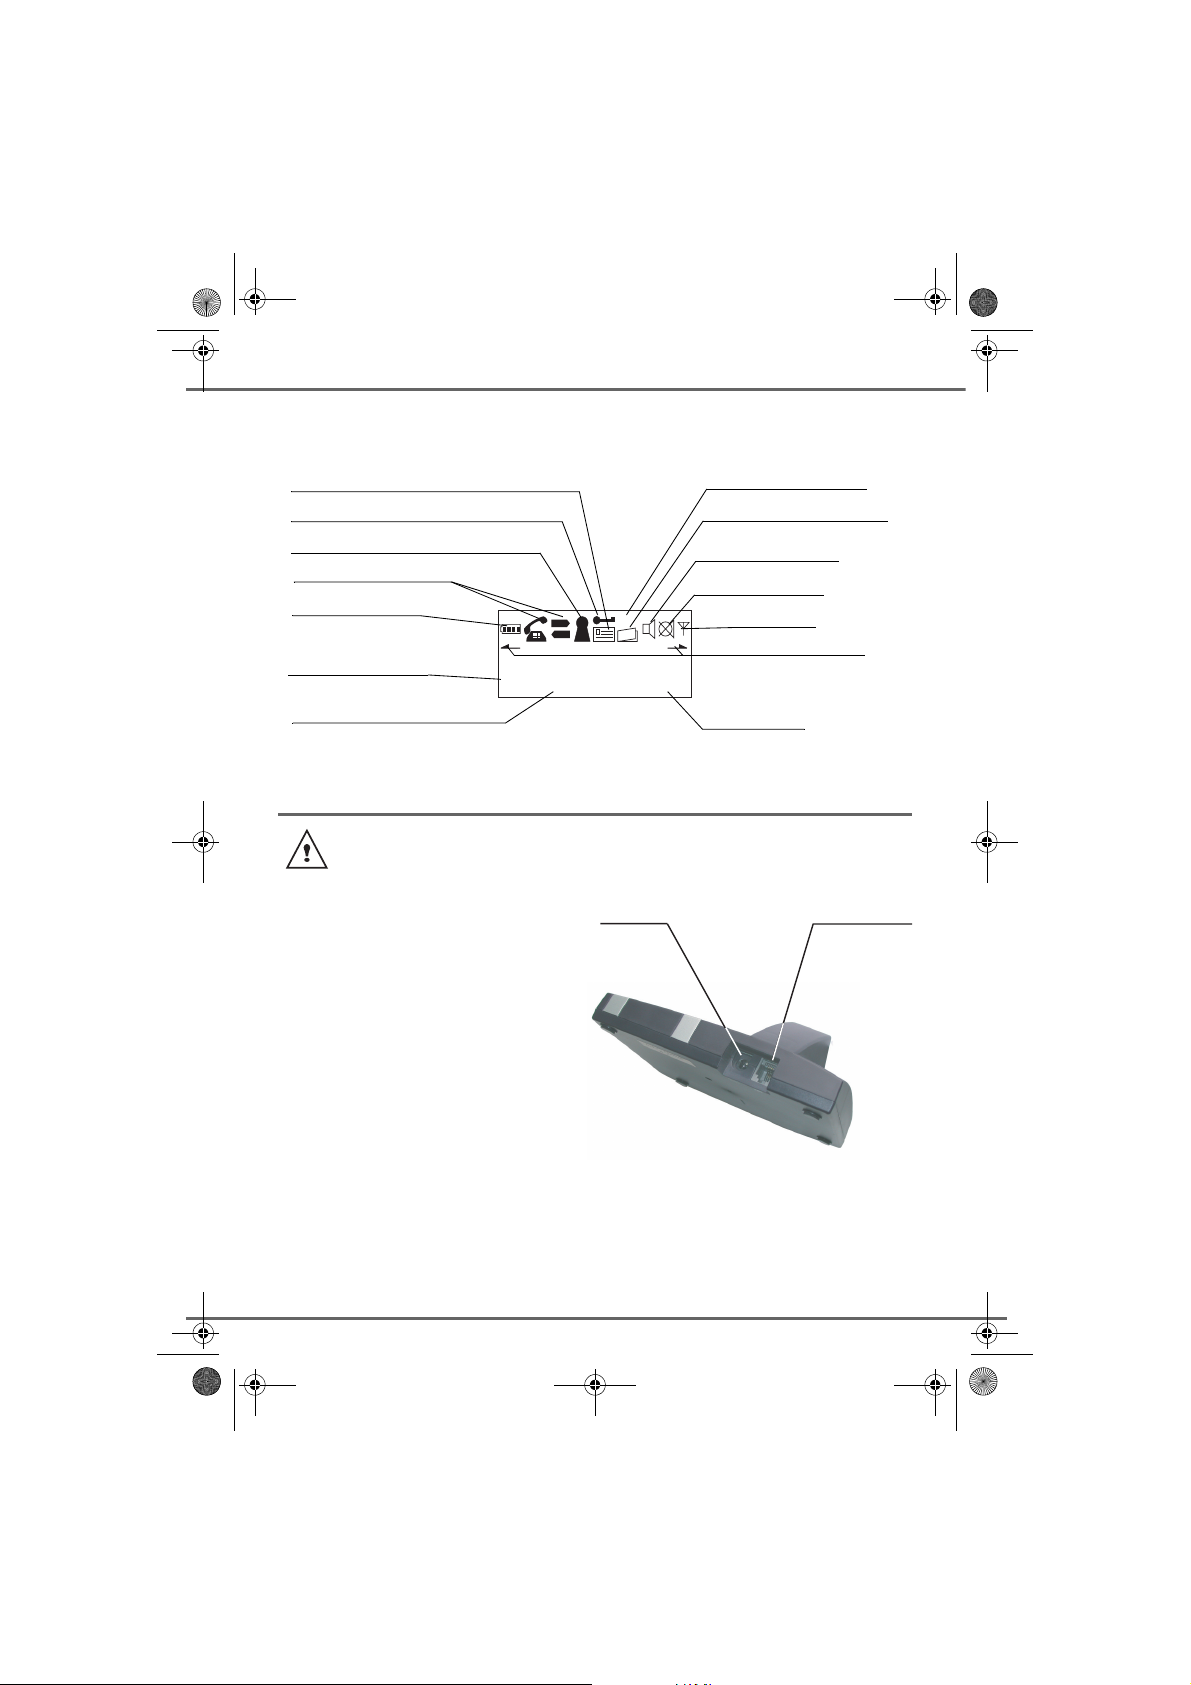
The visual display of your handset on standby mode
Message indicator in voice box (operator)
Key lock indicator
Absence calls indicator
Calls indicator
Battery indicator
EXT
Number of handset
MENU
?
INT
Menu indicator
Directory indicator
Handsfree
Secrecy
Range
Number scrolling
Indicators
1 SAGEM 15:28
Name of handset
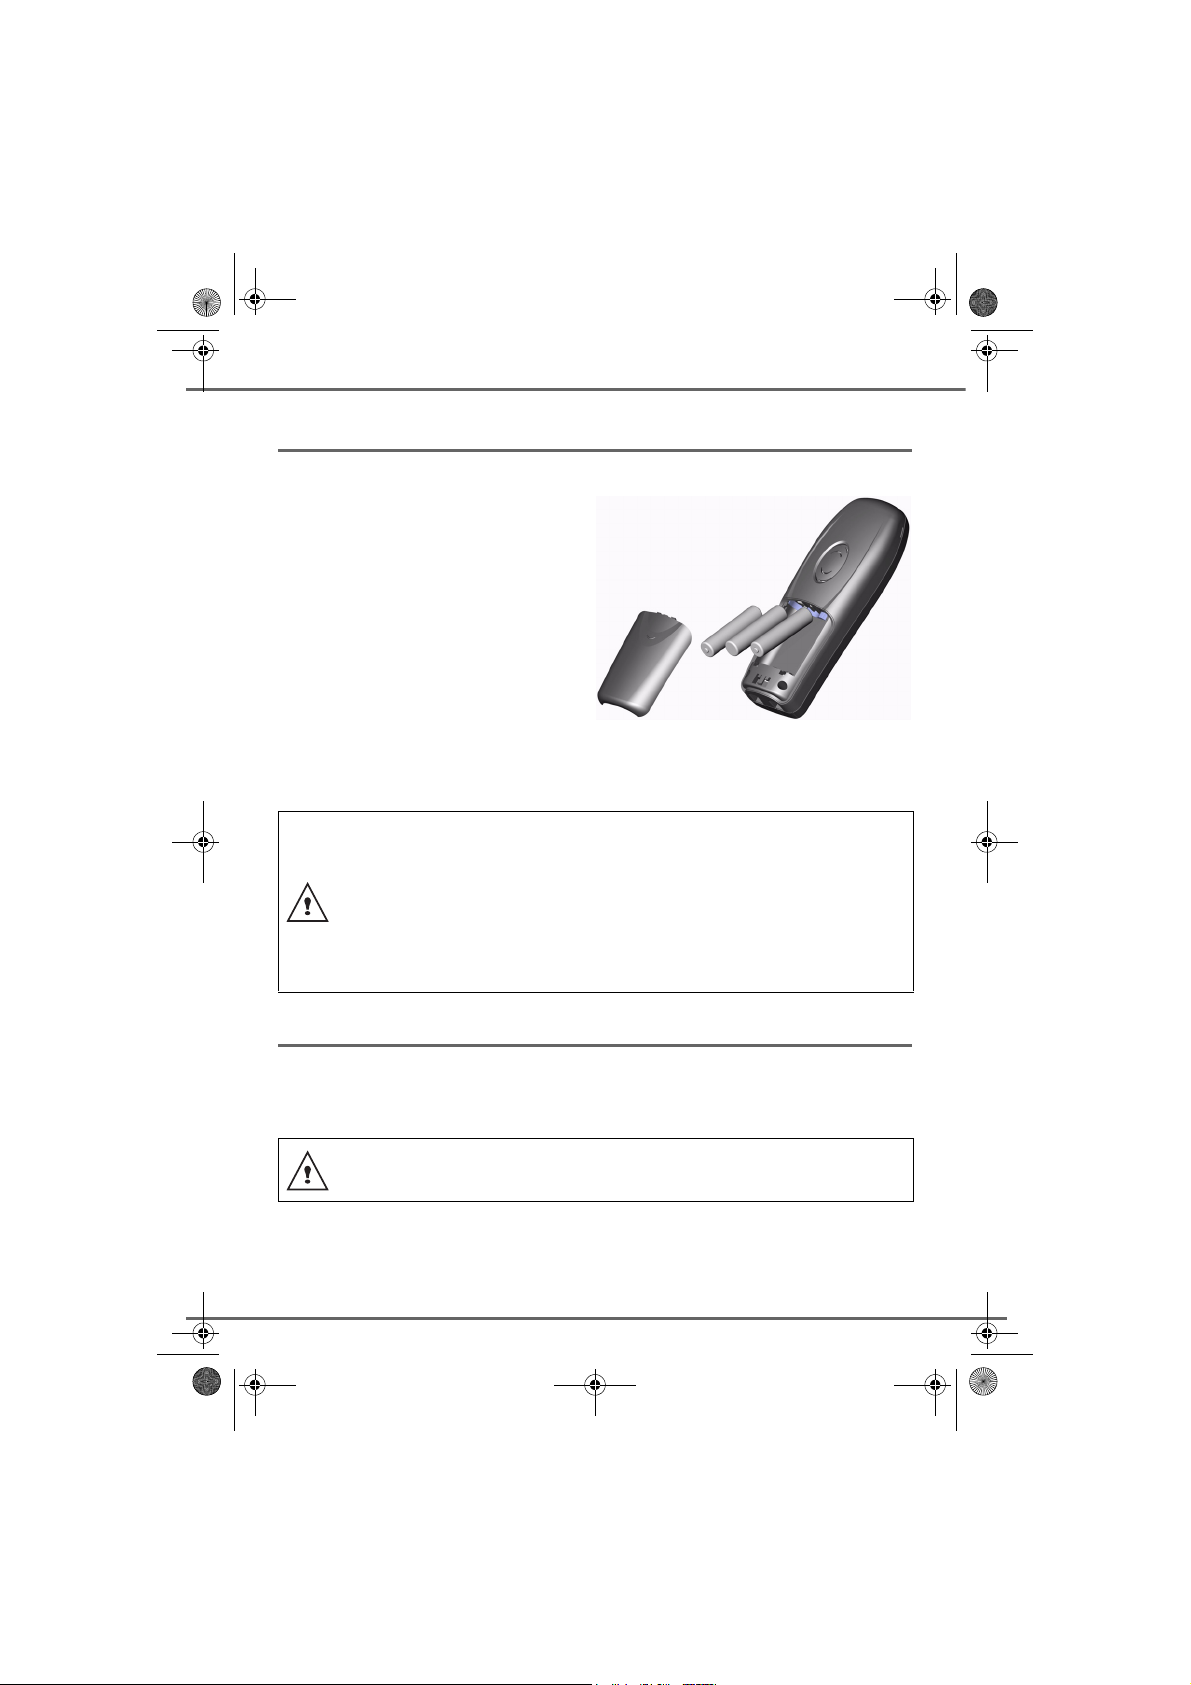
Connecting the base
Before making any connections, please refer to the safety instructions presented at
the beginning of this user guide.
On the bottom of the base, click in the
telephone jack in its socket (as shown on the
drawing) and connect the other end of the
lead to the wall telephone socket.
Connect one end of the power-supply unit
cord to the back of the base station and
connect up the power-supply unit to the
mains. You will hear a beep and the
operating status indicator on the base
station will light up green.
Power socket
Time
Telephone socket
7
LU 252117222C_D20V_EN.book Page 8 Mercredi, 24. août 2005 11:46 11
YOUR TELEPHONE
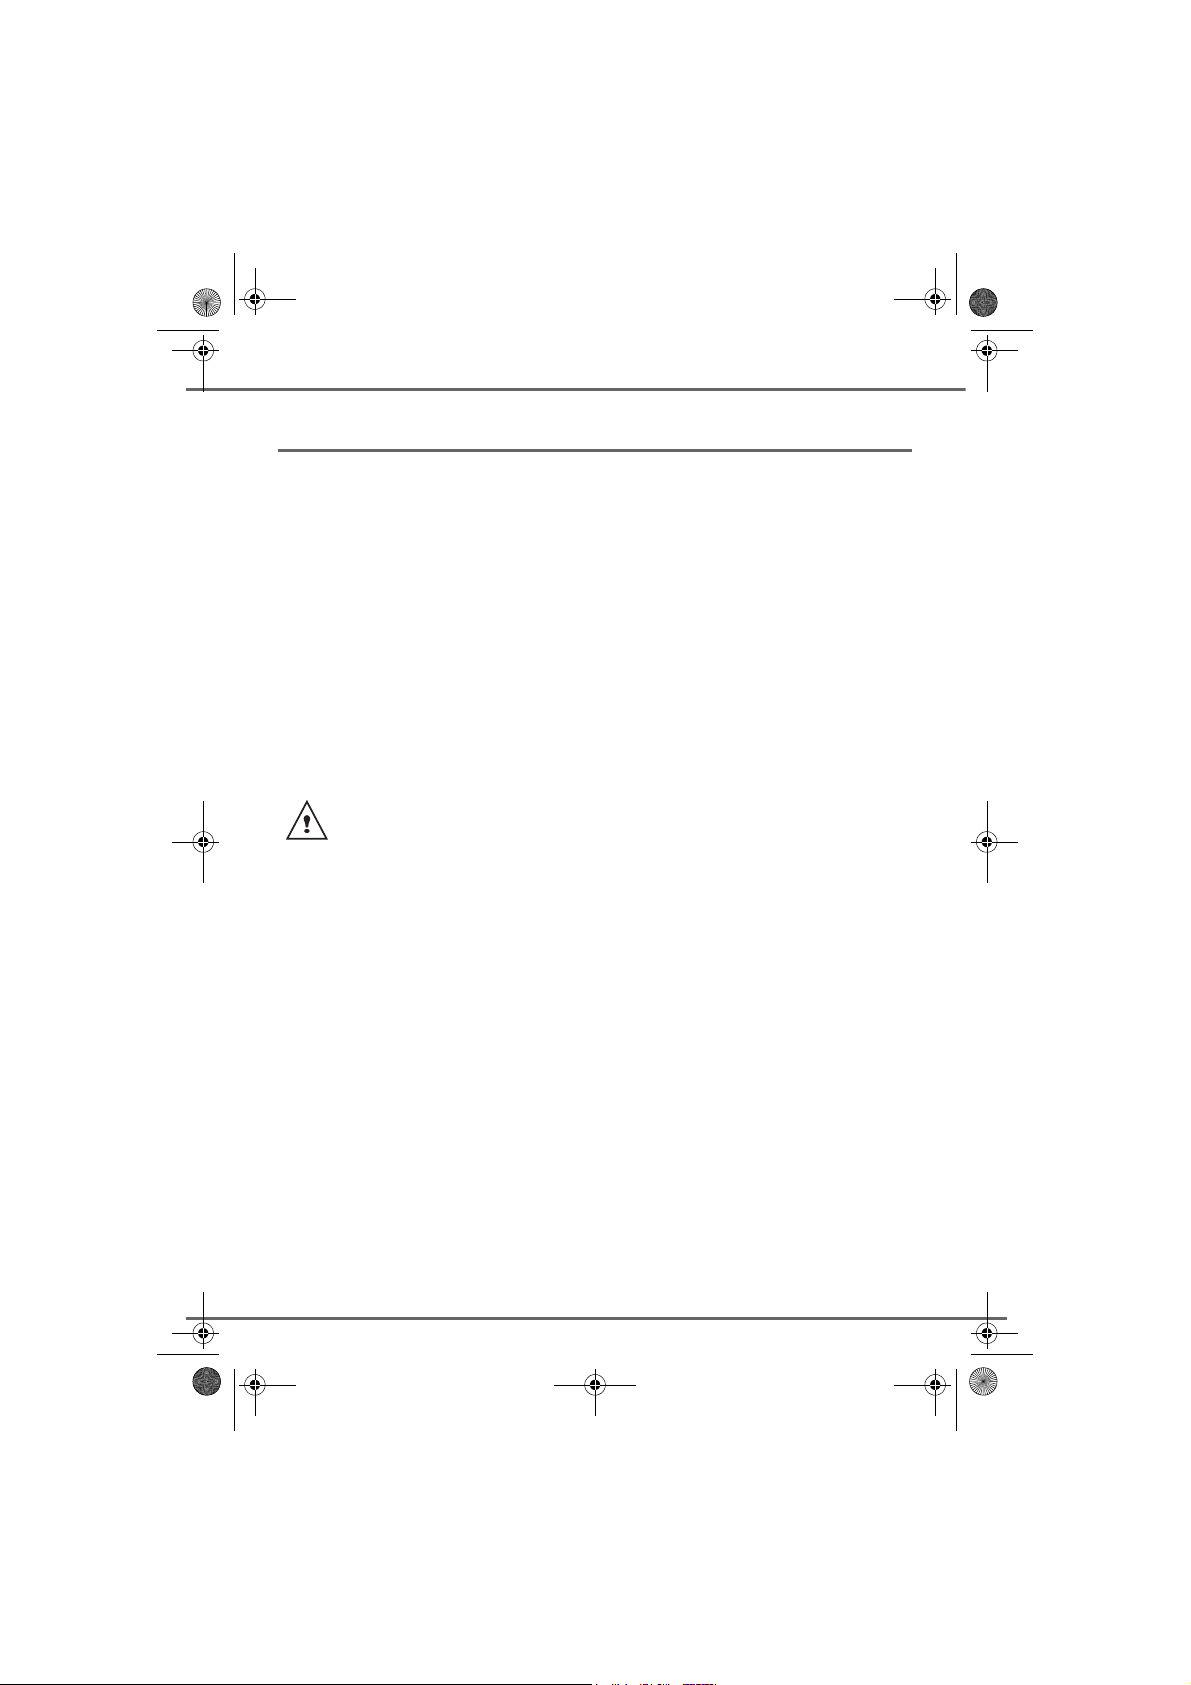
Handset set-up
Insert the batteries one after the other in
compliance with the battery polarity, as
shown on the label in the telephone set.
Place the cover back on the handset by
pushing upwards until it is completely closed.
Remove the protective film on the screen,
place the handset on the base to fully charge
the batteries.
A beep is transmitted by the handset and the
charging icon appears on the screen, it
indicates the charging status. When icon is
completely shaded (4 bars), your batteries
are charged.
Only use certified rechargeable batteries. For optimal battery charge, leave
the handset on the base for at least 6 hours during initial use. During
charging, the batteries may heat up, this is quite normal and without risk.
To keep your phone in optimised working order, we recommend, while not
giving calls, to replace the handset on the base connected to the mains.
Never put the handset without its batteries on the base.
Telephone set turning on and off
To turn off the telephone set, hold down the C key. Your telephone set is now switched off. If
you decide to switch off your handset during several days, you must remove the batteries (see
next page for more information about battery assembly/disassembly).
To avoid damaging batteries when the handset is turned off, do not let them
inside.
To turn on your telephone set, hold down the C key. Information is displayed on the screen.
The battery charging indicator icon, the telephone set number, the name of handset, the time
and the range indicator.
8
LU 252117222C_D20V_EN.book Page 9 Mercredi, 24. août 2005 11:46 11
YOUR TELEPHONE
Replacing the batteries
Hold down the C key to turn off the telephone set. Turn it around so that the battery
compartment is accessible.
Take the handset, key side on your palm and on the battery cover make a pressure
downwards.
Remove the old batteries, insert the new batteries one by one in compliance with the polarity
of the batteries as shown on the label fixed in the telephone set.
Place the cover back on the handset by pushing upwards until it is completely closed.
At the end of their useful life, batteries must be disposed of according to the recycling
instructions presented in this booklet.
If the rechargeable batteries are absolutely empty, it may take several minutes before
the handset display can be seen again.
To avoid damaging your handset, only use certified rechargeable AAA batteries NiMH
1.2 V 600 mAH, never use non rechargeable batteries.
9
LU 252117222C_D20V_EN.book Page 10 Mercredi, 24. août 2005 11:46 11
GETTING STARTED
GETTING STARTED
Making a call
Direct dialling
Enter the number of your contact using the
keypad keys.
If you enter an invalid digit, press C to erase
the incorrect digit. Press the green key on
your handset to make the call.
To enter the pause mode during dialling,
press the key until letter P appears.
You can also make a call by:
- Pressing the green key
access the line.
- Dialling your contact's number.
Using the Redial key
Press the green key and hold it down until
the last dialled number appears. Press the
, keys of the navigator to scroll the last
numbers called. Press the green key .
From the directory
Press the directory key, the list appears.
Select the contact by pressing the or
key.
Press the green key .
to
Receiving a call
When you receive a call your telephone
rings. If you have subscribed to a "Caller ID
number" or "Caller ID name" service, the
caller's information appears on the screen
(unless your caller has enabled the
anonymous mode), otherwise the
"PRIVATE" screen is displayed.
The auto answer mode is activated as the default mode and the call is activated as soon
as you remove the handset from the base.
If the auto answer mode is deactivated, the
call is activated as follows:
Answer by pressing the green key .
At the end of the conversation, press the red
key .
During a call
During a call, you can access the following
functions :
• increase the loudspeaker volume,
• activate the handsfree,
• activate the secret mode,
• transfer the call in progress to another
handset registered on the same base.
Ear volume
During communication, you can increase or
decrease the audio volume of your handset
by pressing the or key on the navigator.
10
LU 252117222C_D20V_EN.book Page 11 Mercredi, 24. août 2005 11:46 11
GETTING STARTED
Handsfree
While having a conversation with your
contact, you can enable or disable the
handset loudspeaker. Press key .
The icon appears.
During communication, you can increase or
decrease the audio volume of your handset
by pressing the or key on the navigator.
Secret mode
You can switch to secret mode at any time
during your conversation. Your handset
microphone will be switched off and the other
person will not be able to hear you.
To activate secret mode:
During communication, press C key.
The icon will appear on the screen.
To deactivate secret mode:
Press C key again. The icon disappears.
Your caller will be able to hear you again.
Call transfer
This function is accessible if two handsets
are registered to the same base.
You can now transfer the call in progress to
another handset.
During communication, press key.
Enter the handset number you want to call
(each handset has a different number that
appears at the left of the screen).
The handset called rings. Once someone
picks up, transfer the call by pressing the red
key .
To retake the call before it is picked up by the
handset called, press OK.
Ending a call
At the end of the conversation, press the red
key .
Intercommunication between
two handsets
You can access this function as soon as your
installation has two handsets registered on
and within the operating reach of the same
base.
11

LU 252117222C_D20V_EN.book Page 12 Mercredi, 24. août 2005 11:46 11
GETTING STARTED
To call another handset:
Press key, Enter the handset number
you want to call (Each handset has a different
number that appears at the left of the
screen).
The handset called rings. Press the green
key to answer the call with the second
handset.
To end the call, press the red key .
Locking / unlocking the keypad
To lock/unlock the keypad: from standby
screen, press and hold the keypad key
for some time.
The icon appears on the screen.
When the keypad is locked, you
cannot dial any number (except the
European emergency number 112).
Call log
This menu enables you to view the received
and the dialled calls list.
Viewing the dialled calls
From the idle screen, press and hold the
keypad key until the last dialled number
appears.
You can view the 10 last dialled calls by
pressing key.
You can recall one of the last dialled number.
Select the number and press the green
key .
Viewing the received calls
From the idle screen, press and hold the red
key until the last received call appears.
You can view the 24 last received calls by
pressing or key.
Calling the voice box
This function enables you to receive calls,
during your absence, in your voice box on the
Public Switched Telephone Network.
First, contact your operator who will
give you all useful information
concerning the voice box operation.
When a new message has been received
you will be notified in the following ways:
• on the base, the green indicator light
flashes.
• on the handset, the message icon
appears.
You can access you voicebox in the following
ways:
• Either by dialling the voicemail in the
same way as making a call.
• Or by pressing for a long time the
key. This method is available if the voice
box number is already registered.
The number can be modified, refer
to paragraph Modifying the voice
box number, page 21.
When the messages in the voice box
have been consulted, the message
presence indicators are turned off by
the service provider. You may hear
a short beep indicating this function.
12
LU 252117222C_D20V_EN.book Page 13 Mercredi, 24. août 2005 11:46 11
GETTING STARTED
Paging handset
This feature is very useful if you can’t
remember where you put your handset, you
can make the handset to ring (as long as the
handset is in the standby mode) by pressing
the button on your D20 base.
If several handsets are registered on the
base, all registered handsets will ring.
You can stop each handset by pressing any
key on the handset keypad or press again the
button on the base.
13
LU 252117222C_D20V_EN.book Page 14 Mercredi, 24. août 2005 11:46 11
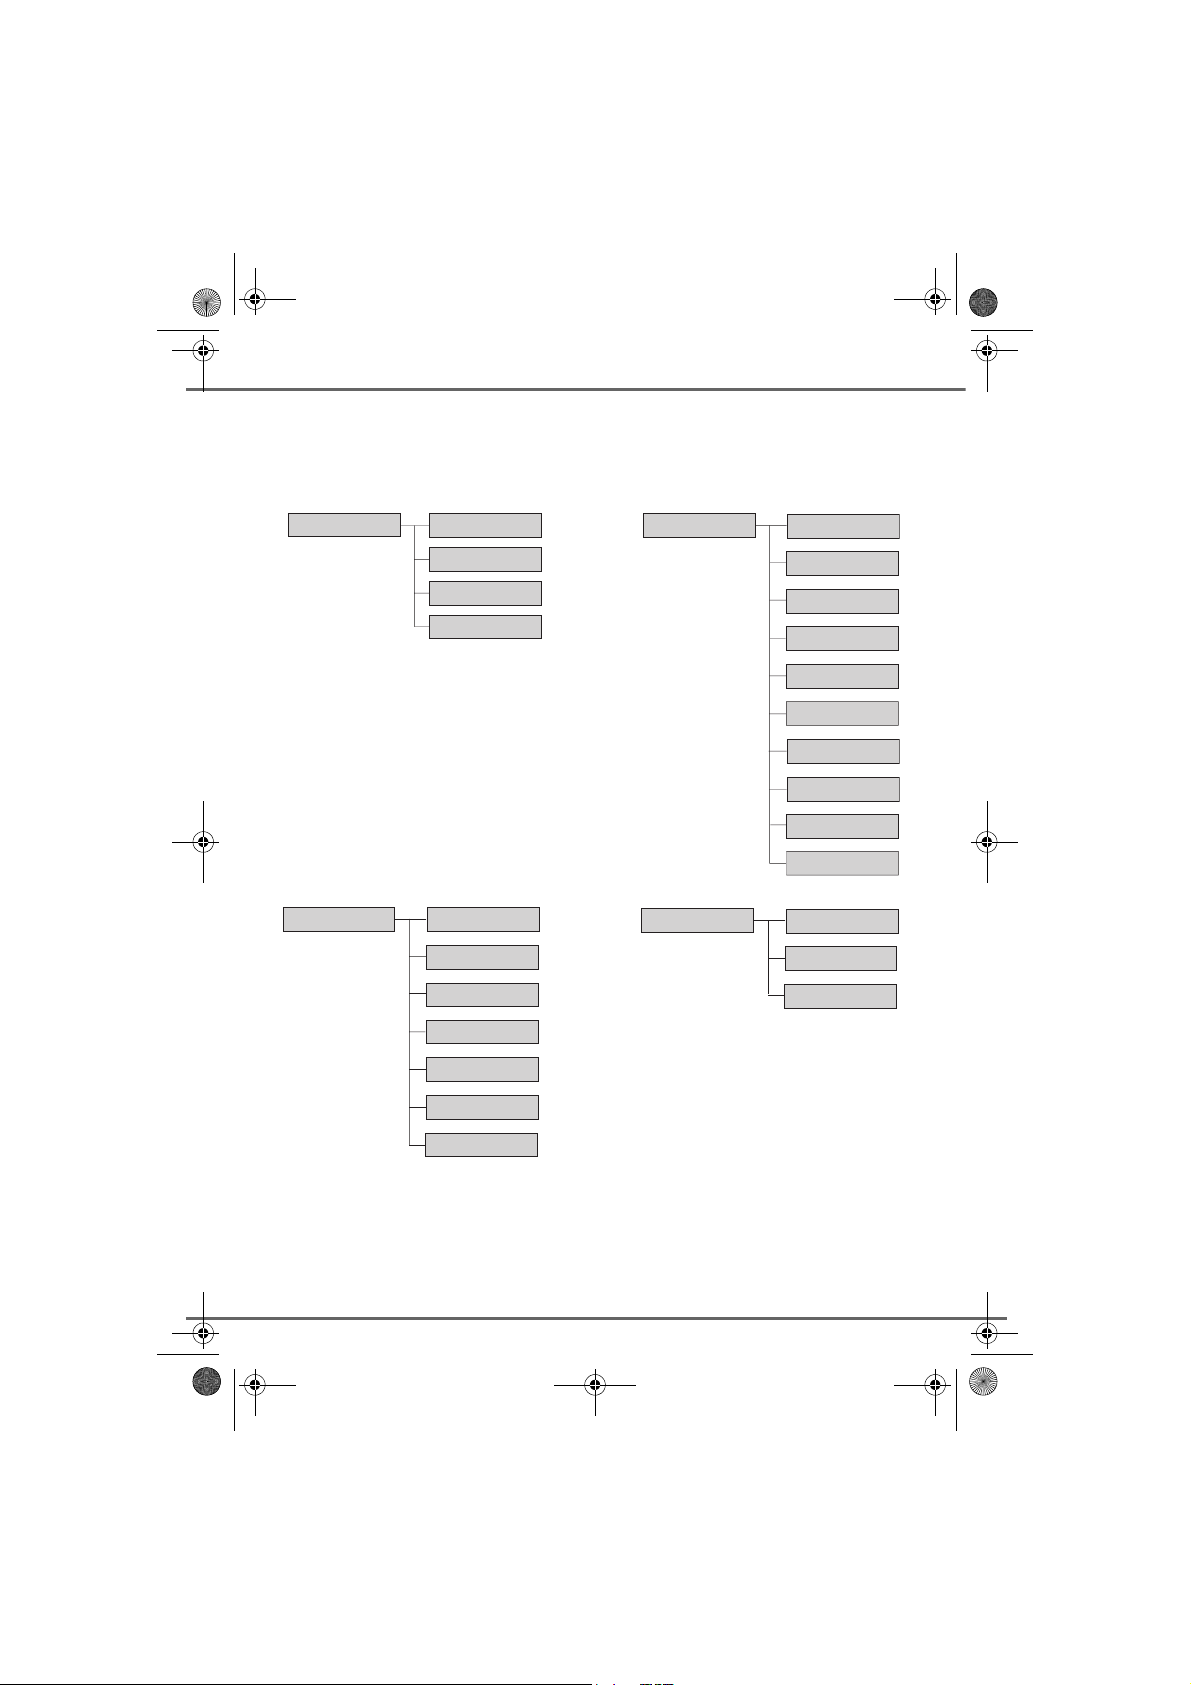
MENU STRUCTURE
You can navigate through the menus using the and keys. Press the OK key to access a
sub-menu. Press the C key to return to the previous menu.
DIRECTORY
BASE SET
NEW
EDIT
DELETE
FIND
RING VOLUME
RINGTONE
FLASH DURA
PAUSE DURA
DIAL MODE
HS SET
REGISTRATION
BEEPS
MELODY VOL
EXTERN CALL
INTERN CALL
EAR VOLUME
AUTO ANSWER
CHANGE NAME
LANGUAGE
DATE-TIME
VOICE BOX NO
REGISTER HS
SELECT BASE
DEREGIST HS
CHANGE CODE
REINIT BASE
14

LU 252117222C_D20V_EN.book Page 15 Mercredi, 24. août 2005 11:46 11
YOUR DIRECTORY
YOUR DIRECTORY
You can store 25 numbers entries in your
directory.
Each directory entry can contain the name of
your contact which can be a maximum of 12
characters long (spaces included), your
contact's telephone number up to 25 digits.
Viewing the directory
On the navigator key , press or until
the DIRECTORY screen is displayed, press
OK to confirm.
Select FIND by pressing the or key.
Press OK.
The list of directory entries organised in
alphabetical order appears.
Select the entry you want to view using or
. Once you have selected it, press OK.
You can also view the directory
simply by pressing the key. You
can then select the entry by pressing
the key corresponding to the first
letter of the name.
Creating an entry
On the navigator key , press or until
the DIRECTORY screen is displayed, press
OK to confirm.
Select NEW by pressing the or key.
Press OK.
The name input screen appears.
Using the keypad keys, enter the name of
your contact by pressing successively on the
corresponding keys (see the following table).
Key Action
1
A, B, C, 2
D, E, F, 3
G, H, I, 4
J, K, L, 5
M, N, O, 6
P, Q, R, S, 7
You can call the number that is associated to
the entry by pressing the green key .
To exit the menu, press the red key .
T, U, V, 8
W, X, Y, Z, 9
0, space, -
To enter text, press successively on the
desired key until the letter is displayed on the
screen.
15

LU 252117222C_D20V_EN.book Page 16 Mercredi, 24. août 2005 11:46 11
YOUR DIRECTORY
In case of a mistake, press C to erase one
character at a time.
Once you are done making your changes,
press OK.
The number input screen appears.
Now, enter the name of your contact using
the keypad keys.
To enter a pause mode during dialling, press
the key lengthily.
In case of a mistake, press C to delete the
last digit.
Once you are done making your changes,
press OK.
A new entry is created. It appears in the
directory list.
Editing an entry
On the navigator key , press or until
the DIRECTORY screen is displayed, press
OK to confirm.
Select EDIT using or . Press OK.
You enter the number input screen. The
cursor is at the end of the number.
• The information is accurate. Press OK.
• To correct the number, press C key to
delete the numbers. Enter the new
number and press OK.
To exit the menu, press the red key .
Deleting an entry
On the navigator key , press or until
the DIRECTORY screen is displayed, press
OK to confirm.
Select DELETE using or . Press OK.
Select the entry you want to delete using
or . Once you have selected it, press OK to
confirm.
A confirmation screen asks you if you wish to
delete the entry.
• If you do not wish to delete the entry,
press C key.
• To delete the entry, press OK. The entry
is deleted from the directory.
To exit the menu, press the red key .
Select the entry you want to edit using or
. Press OK.
You enter the name input screen. The cursor
is at the end of the name.
• The information is accurate. Press OK.
• To correct the name, press C key to
delete characters. Make your corrections
using the keypad keys by pressing
successively on the corresponding keys.
Once you are finished, press OK.
16

LU 252117222C_D20V_EN.book Page 17 Mercredi, 24. août 2005 11:46 11
CALL LOG
CALL LOG
This menu enables you to view the received
and the dialled calls list.
Viewing the dialled calls
From the idle screen, press and hold the
green key until the last dialled number
appears.
You can view the last 10 dialled calls by
pressing key.
You can recall one of the last dialled number.
Select the number and press the green
key .
Viewing the received calls
The "number Caller ID" or "name
Caller ID" function must be
activated to perform this operation,
contact your service provider for the
list of functions available.
From the idle screen, press the red key
until the last received call appears.
You can view the 24 last received calls by
pressing or key.
The presentation screen for the last call
received appears.
• the telephone number.
The number at the end of the line
shows the number of calls from the
specified telephone number.
Press the OK key to display the date and
time of the received call.
To view the previous calls, use or . The
calls are organised in chronological order,
from the most recent call to the oldest call.
To exit the menu, press the red key .
Adding a contact in the directory
from the list of received calls
Press the key to access to the list of
received calls.
Use or to select the number you wish
to add to the directory. Press OK.
The date and time of the received call are
displayed, press OK.
NEW is displayed on the screen, press OK.
The field where the name can be entered
appears. Depending on your service provider
and the service you applied for, the name can
be transmitted over the network and
displayed.
You can change it by pressing the C key.
This screen presents the following
information:
• the name of the subscriber (if the name
is in the telephone book or the CLIP
function has been activated),
or
Enter the name of the caller with the
keyboard and press OK.
The field with the name appears.
Press the OK key to confirm.
17

LU 252117222C_D20V_EN.book Page 18 Mercredi, 24. août 2005 11:46 11
CALL LOG
If a number appears under the
PRIVATE display or if it is exists in
your directory, you will not be able to
delete this number from the call log.
Deleting a number from the call
log
Press the key to access to the list of
received calls.
Use or to select the number you wish
to add to the directory. Press OK.
The date and time of the received call are
displayed, press OK.
Use or to select DELETE ?, press
OK.
CONFIRM ? appears on the screen , press
OK to validate.
Viewing a missed call
If there were one or more calls for you in your
absence, a symbol will be displayed and
the green light will constantly flash.
It informs you as to the calls received during
your absence.
In order to check the calls during your
absence, please refer to paragraph
Viewing the received calls, page 17.
?
18

LU 252117222C_D20V_EN.book Page 19 Mercredi, 24. août 2005 11:46 11
HANDSET SETTINGS
HANDSET SETTINGS
Activating or deactivating the
beeps
On the navigator key , press or until
the HS SET screen is displayed, press OK to
confirm.
Select BEEPS using or . Press OK.
Select the beep type using or . Press OK.
KEYPAD PRESS: the handset beeps when a
key is pressed.
BATTERY LOW: the handset beeps when
the battery is too low.
OUT OF RANGE: When the base station is
out of range, the handset will warn you
acoustically.
An information screen displays the beep
status (ON or OFF) for the selected item.
• To change the status, press or .
Press OK.
• To keep the status, press C.
To exit the menu, press the red key .
There are seven alternatives in succession to
choose from: :
• VOL OFF : No ringing tone.
• VOLUME : X : From 1 to 5.
• CRESCENDO : The volume of the ring
tone increases with every ringing
sequence.
Press or to increase or decrease the
default volume. Once the volume is set,
press
OK.
To exit the menu, press the red key .
Modifying the handset ringtone
This menu enables you to associate a
ringtone to incoming calls or internal calls
(intercom).
On the navigator key , press or until
the HS SET screen is displayed, press OK to
confirm.
Select EXTERNAL CALL or INTERNAL
CALL using or . Press OK.
Select the desired ringtone using or .
Press OK.
Modifying the default handset
melody volume
On the navigator key , press or until
the HS SET screen is displayed, press OK to
confirm.
Select MELODY VOL using or . Press
OK.
To exit the menu, press the red key .
Setting the ear volume
During communication, you can
increase or decrease the audio
volume of your handset by pressing
the
or key on the navigator.
19

LU 252117222C_D20V_EN.book Page 20 Mercredi, 24. août 2005 11:46 11
HANDSET SETTINGS
On the navigator key , press or until
the HS SET screen is displayed, press OK to
confirm.
Select EAR VOLUME using or . Press
OK.
Press or to increase or decrease the
default volume. Once the volume is set,
press
OK.
To exit the menu, press the red key .
Using the auto answer features
When active, the auto answer feature
enables you to automatically answer as soon
as you remove the handset from its base.
On the navigator key , press or until
the HS SET screen is displayed, press OK to
confirm.
Select AUTO ANSWER using or . Press
OK.
A screen displays the current status (ON or
OFF).
• To change the status, press or .
Press OK.
• To keep the status, press C.
To exit the menu, press the red key .
Change the name of the handset
On the navigator key , press or until
the HS SET screen is displayed, press OK to
confirm.
Select CHANGE NAME using or . Press
OK.
The current name will be displayed. Delete
the current name using the C key then enter
the new name using the keypad. Press OK.
One can put up to 5 characters for
the name of handset.
To exit the menu, press the red key .
Modifying the language
This function enables you to change the
screen display language.
On the navigator key , press or until
the HS SET screen is displayed, press OK to
confirm.
Select LANGUAGE using or . Press
OK.
An information screen presents the current
language used.
• To change the setting, press or to
select the language. Press OK.
• To keep the setting, press .
To exit the menu, press the red key .
20

LU 252117222C_D20V_EN.book Page 21 Mercredi, 24. août 2005 11:46 11
HANDSET SETTINGS
Modifying the date and time
On the navigator key , press or until
the HS SET screen is displayed, press OK to
confirm.
Select DATE-TIME using or . Press OK.
Enter the date in DD/MM format then the time
in HH/ MM format and press OK.
To exit the menu, press the red key .
Modifying the voice box number
First, contact your service provider
who will give you all information
concerning the operation of your
voice mail.
To listen to your voice box in the idle
state, press and hold the key.
A default number for your voice messaging
service is set in the factory. To change this
number, proceed as follows:
The programmed number is displayed on the
screen,
• The number is correct, press OK.
• To modify the number, press C to delete
the number. Enter the number. Press
OK.
To exit the menu, press the red key .
On the navigator key , press or until
the HS SET screen is displayed, press OK to
confirm.
Select VOICE BOX NO using or . Press
OK.
21

LU 252117222C_D20V_EN.book Page 22 Mercredi, 24. août 2005 11:46 11
BASE SETTINGS
BASE SETTINGS
Modifying the default base ring
volume
The base is equipped with a buzzer
which transmit beeps during the
reception of a call.
On the navigator key , press or until
the BASE SET screen is displayed, press
OK to confirm.
Select RING VOLUME using or . Press
OK.
Press or to increase or decrease the
default volume. Once the volume is set,
press
OK.
To exit the menu, press the red key .
Modifying the base ringtone
This menu enables you to associate a
ringtone to incoming calls and internal calls
(intercom).
Modifying the flash duration
(R key)
If you connect your telephone to a private
automatic branch exchange or use it in a
foreign country, you may need to modify the
flash duration in order to use your telephone
correctly.
Contact your service provider to obtain the
correct flash duration and then modify it by
doing the following. Five preprogrammed
durations are proposed on the list, the
correspondence between the number of the
list and the duration is the following :
number
180 ms
2 100 ms
3 180 ms
4 300 ms
5 600 ms
On the navigator key , press or until
the BASE SET screen is displayed, press
OK to confirm.
corresponding
duration
On the navigator key , press or until
the BASE SET screen is displayed, press
OK to confirm.
Select RINGTONE using or . Press OK.
Select the desired ringtone using or .
Press OK.
To exit the menu, press the red key .
Select FLASH DURA using or . Press
OK.
An information screen presents the current
flash duration.
• To keep the same time, press C key.
• To modify the time, select the new flash
time using or . Press OK.
To exit the menu, press the red key .
22

LU 252117222C_D20V_EN.book Page 23 Mercredi, 24. août 2005 11:46 11
BASE SETTINGS
Modifying the pause duration
If you connect your telephone to a private
automatic branch exchange, you may need
to modify the pause duration in order to use
your telephone correctly. Four
preprogrammed durations are proposed on
the list, the correspondence between the
number of the list and the duration is the
following.
number
1 1 second
2 1,5 second
3 2 seconds
4 3 seconds
On the navigator key , press or until
the BASE SET screen is displayed, press
OK to confirm.
Select PAUSE DURA using or . Press
OK.
An information screen presents the current
pause duration.
• To keep the same time, press C.
• To modify the time, select the new pause
time using or . Press OK.
To enter the pause mode during
dialling, press the
P appears.
corresponding
duration
key until letter
Changing the dialling mode
Your telephone can dial in the pulse or voice
frequency mode.
When operating in a network, if you
choose to dial in the pulse mode,
your telephone may not operate.
The dialling mode by default is set to
the voice frequency mode.
On the navigator key , press or until
the BASE SET screen is displayed, press
OK to confirm.
Select DIAL MODE by pressing the or .
key. Press OK.
Select PULSE or TONE by pressing the
or . key. Press OK.
To exit the menu, press the red key .
Modifying the base code
The base code (0000 by default setting) is
required to access the following functions:
• modifying the base code,
• re-initialise the base,
• registering a new handset,
• de-registering a handset.
Modify the base code only if you
really wish to protect the access to
these functions.
To exit the menu, press the red key .
On the navigator key , press or until
the BASE SET screen is displayed, press
OK to confirm.
23

LU 252117222C_D20V_EN.book Page 24 Mercredi, 24. août 2005 11:46 11
BASE SETTINGS
Select CHANGE CODE using or . Press
OK.
Enter the old base code using the keypad
(default is 0000). Press OK.
Enter the new base code using the keypad. It
must be composed of 4 digits miminum up to
8 digits maximum. Press OK.
Confirm by entering the new base code
again. Press OK.
To exit the menu, press the red key .
Note carefully the new base code on
the back cover, you will need it to
modify some parameters.
Re-initialise the base
When you re-initialise your base, all the base
parameters are reset to their initial values
(factory settings).
On the navigator key , press or until
the BASE SET screen is displayed, press
OK to confirm.
Select REINIT BASE using or . Press
OK.
Enter the base code. Press OK.
To exit the menu, press the red key .
When you re-initialise the base, the
base code becomes 0000 again and
the voice box number must be reprogrammed. “Modifying the voice
box number”, page 21.
24

LU 252117222C_D20V_EN.book Page 25 Mercredi, 24. août 2005 11:46 11
REGISTRATION
REGISTRATION
Five SAGEM D20 handsets can be
logged on to one base station.
A handset can be logged on to up to
four different base stations.
Registering an additional
handset to a base
To register an additional handset to a base
you must:
• put the handset in registration mode,
• put the base in registration mode.
Once this is done, the registration (mutual
recognition of the base and the new handset)
will be done automatically (registration can
take a few seconds).
Pick up the handset which you want to
register:
On the navigator key , press or until
the REGISTRATION screen is displayed,
press OK to confirm.
Select REGISTER HS using or . Press
OK.
Select the base station number by pressing a
corresponding key (1, 2, 3 or 4).
Enter the code of the base station (0000 by
default setting) which the handset is to be
registered on to. Press OK.
The handset enters the registration mode.
On the base:
Put the base to which you want to link the
telephone set in registration mode and press
the base button for several seconds.
The green light blinks rapidly, the base is in
link mode during 3 minutes maximum.
The new handset and the base are mutually
searching for each other. The link may take
from several seconds up to three minutes.
Once the handset is registered, you will hear
an acoustic signal and the number assigned
to the handset is displayed at the left of the
screen.
The handset and the base then automatically
quit the pairing mode.
If the handset put out an irregular
acoustic signal, pairing has aborted.
Press the red key .
Disconnect and re-connect the
power supply cord of the base and
repeat the procedure.
To exit the menu, press the red key .
Modifying the base preference
This function enables you to specify which
base will be used by your handset to make
calls (if your handset is registered to several
bases).
On the navigator key , press or until
the REGISTRATION screen is displayed,
press OK to confirm.
25

LU 252117222C_D20V_EN.book Page 26 Mercredi, 24. août 2005 11:46 11
REGISTRATION
Select SELECT BASE using or . Press
OK.
Select the base preference by pressing the
or key. Press OK.
You cannot select the base
preference if the handset is not
registered on it.
The symbol onto the base
number indicates that the base can
be selected.
To exit the menu, press the red key .
De-registering a handset
This function enables you to de-register a
handset from your base. This may be
necessary if you have lost a handset or if you
already have 5 handsets registered to the
same base.
To exit the menu, press the red key .
Regardless of the number of
handsets registered, the number 1
to 5 will scroll on the screen.
To de-register the handset from the base,
you must do the following on another handset
registered to the same base.
On the navigator key , press or until
the REGISTRATION screen is displayed,
press OK to confirm.
Select DEREGIST HS using or . Press
OK.
Enter the base code using the keypad
(default is 0000). Press OK.
Use or to s ele ct t he n umber you wish
to delete to the directory. Press OK.
26

LU 252117222C_D20V_EN.book Page 27 Mercredi, 24. août 2005 11:46 11
ANSWERING MACHINE
ANSWERING MACHINE
The answering machine function of your
telephone has two operating modes:
• Basic answering machine: an
announcement indicates that you are not
available. Your correspondent cannot
leave any messages.
• Recording answering machine: an
announcement tells your correspondents
that they can leave you a message,
which they can record after a beep.
Voice help
Voice messages, from the loudspeaker in the
base, will guide you in the use of your
answering machine.
Display
The display shows the current mode of the
answering machine:
• for the basic mode.
• for the recording/answering mode.
- If new messages have been left on the
machine in your absence, the display
blinks and the number of new messages
is displayed..
- If no new message has been recorded
in your absence, the display shows the
number of messages that you already
have listened to.
Control panel
During the setup of your answering machine:
Key Functions
Access the setup menu
MENU
Select the next setup item.
Select the previous setup item.
Select or validate a setup.
During playback of the messages:
Key Functions
Start playback of the messages.
Pause playback of the messages.
Go to the next message.
Once: go back to the beginning of
the message.
Twice: go back to the previous
message.
Stop playback of the messages.
STOP
Delete the current message.
X
Increase the sound level.
Vol
+
Decrease the sound level.
Vol
-
Other functions:
Key Functions
Start recording a voice memo.
MEMO
Enable or disable the answering
machine function.
Page the handsets.
.
.
.
27

LU 252117222C_D20V_EN.book Page 28 Mercredi, 24. août 2005 11:46 11
ANSWERING MACHINE
Switching on the answering
machine
Hold the button down until "on" is
shown on the display.
You will hear the following message:
ANSWERING MACHINE IS ON,
RECORDING MODE ACTIVATED or
ANSWERING MACHINE IS ON, ANSWER
ONLY MODE ACTIVATED, depending on
the state of the answering machine when it
was switched off.
"oo" or "00" is shown on the display
according to the currently active mode.
Switching to "recording answering
machine" mode
Press the key on the base.
Repeatedly press the key until "o1" is
shown on the base display. Press the
key to validate.
The answering machine then plays back the
announcement that your correspondent will
hear. To modify this announcement, refer to
the paragraph
"Creating your personal announcement for
the recording answering machine", page 28
Your answering machine is now in "recording
answering machine" mode. The number of
messages is shown on the display.
MENU
Switching to "basic answering
machine" mode
Press the key on the base.
Repeatedly press the key until "o2" is
shown on the base display. Press the
key to validate.
The answering machine then plays back the
announcement that your correspondent will
hear. To modify this announcement, refer to
the paragraph
"Creating your personal announcement for
the basic answering machine", page 29
Your answering machine is now in basic
answering machine mode. "oo" is shown on
the display.
MENU
Switching off the answering
machine
Press and hold down the key, until
you hear a beep.
You will hear the following message:
ANSWERING MACHINE IS OFF.
Your answering machine is now switched off.
The display is blank
Modifying the announcement
Creating your personal
announcement for the recording
answering machine
Press the key.
Repeatedly press the key until "o1" is
shown on the base display.
Press the key. The current
announcement is played back.
MENU
28

LU 252117222C_D20V_EN.book Page 29 Mercredi, 24. août 2005 11:46 11
ANSWERING MACHINE
If you want to change the announcement,
hold down the key until you hear a
beep.
You will hear the following message:
RECORD YOUR ANNOUNCEMENT
AFTER THE BEEP.
Speak clearly and close to the base to record
your announcement.
At the end of your announcement, press
the key.
STOP
Your announcement is played back
automatically.
Your recording answering machine is now
active. The number of messages is shown on
the display.
If you make a mistake while recording the
announcement, repeat the operations
described above until you are satisfied with
your announcement.
Returning to the pre-recorded
announcement
Press the key.
Repeatedly press the key until "o1" is
shown on the base display.
You will hear the following message: PRESS
OK TO ACTIVATE RECORDING MODE.
Press the key. The current
announcement is played back.
If you want to return to the pre-recorded
announcement, hold down the key
until you hear a beep.
MENU
You will hear the following message:
RECORD YOUR ANNOUNCEMENT
MESSAGE AFTER THE BEEP.
Press the key immediately after the
beep.
The pre-recorded (default) announcement is
now active again.
STOP
Creating your personal
announcement for the basic
answering machine
Press the key.
Repeatedly press the key until "o2" is
shown on the base display.
Press the key. The current
announcement is played back.
If you want to change the announcement,
hold down the key until you hear a
beep.
You will hear the following message:
RECORD YOUR ANNOUNCEMENT
MESSAGE AFTER THE BEEP.
Speak clearly and close to the base to record
your announcement.
At the end of your announcement, press
the key.
Your announcement is played back
automatically.
Your basic answering machine is now active.
"oo" is shown on the display.
MENU
STOP
29

LU 252117222C_D20V_EN.book Page 30 Mercredi, 24. août 2005 11:46 11
ANSWERING MACHINE
If you make a mistake while recording the
announcement, repeat the operations
described above until you are satisfied with
your announcement or press the key
during the playback of the announcement.
STOP
Returning to the pre-recorded
announcement
Press the key.
Repeatedly press the key until "o2" is
shown on the base display.
You will hear the following message: PRESS
OK TO ACTIVATE ANSWERING ONLY
MODE.
Press the key. The current
announcement is played back.
If you want to return to the pre-recorded
announcement, hold down the key
until you hear a beep.
You will hear the following message:
RECORD YOUR ANNOUNCEMENT
MESSAGE AFTER THE BEEP.
MENU
Listening to your messages
While listening to the messages, you
can increase the sound level by
Vol
pressing the key. To
decrease the sound level, press
Vol
-
the key.
Press the key to listen to your
messages
-If you have any new messages, only those
will be played back, from the most recent to
the most ancient one.
-If you do not have any new messages, all
the old messages will be played back, from
the most recent to the most ancient one.
To play back the new and the old
messages, hold the key
down for several moments.
The date and the time the messages were
received are announced before each
message.
+
Listen again to the current message
Press the key immediately after the
beep.
The pre-recorded (default) announcement is
now active again.
STOP
Press the key during the playback of
the message.
Listen again to the previous
message
Press the key twice to hear the
previous message again.
Go to the next message
During playback of the message, press the
key to skip to the next message.
30

LU 252117222C_D20V_EN.book Page 31 Mercredi, 24. août 2005 11:46 11
ANSWERING MACHINE
Pause during playback
Press the key to pause during the
playback. To continue the playback of your
message, press the key a second
time.
Stop the playback of the messages
Press the key to stop the playback of
the messages.
STOP
Deleting messages
Deleting the current message
During the playback of the message, hold
down the key until you hear a beep
that indicates the message has been deleted.
X
Deleting all messages already
played back
In standby mode, hold down the key
until you hear a beep. You will hear the
following message:
PRESS OK TO CONFIRM DELETION.
Press the key. A long beep indicates
that all messages already played back have
been deleted.
X
Recording a memo
This function allows you to record a voice
memo on your answering machine. This
memo will be treated as a new message.
In standby mode, hold down the key
until you hear a beep. You will hear the
following message: RECORD YOUR MEMO
AFTER THE BEEP.
After the beep, speak clearly and close to the
base to record your memo.
At the end of your memo, press the
key.
The maximum length of a memo
recording is 90 seconds.
STOP
Recording a conversation
During a communication, you can record part
or all of the conversation. Let your
correspondents know that you are making a
recording.
During the communication, hold down the
key. When you hear a beep, release
the key.
The recording starts.
To stop recording, press the key.
STOP
If the key is not pressed before
the 5th beep, the answering
machine returns to standby mode
without deleting your messages.
The maximum length of a recording
is 90 seconds.
31

LU 252117222C_D20V_EN.book Page 32 Mercredi, 24. août 2005 11:46 11
ANSWERING MACHINE
Remote interrogation
Your answering machine can be interrogated
remotely. This function lets you play back
your messages and set up your answering
machine from another telephone.
By default, the remote access code
is 0000, but you can personalise it.
Refer to the paragraph "Modifying
the remote access code", page 34
Activating your answering machine
remotely
Dial your number, let the phone ring until you
hear a beep (after about 10 rings).
Then dial your remote access code.
Press the 2 key to activate the answering
machine in recording answering machine
mode, or the 3 key to activate the answering
machine in basic answering machine mode.
Consulting your answering machine
remotely
Dial your number, wait until your answering
machine starts up.
During the playback of the initial
announcement, press the key twice.
Then dial your remote access code.
A message will indicate the various remote
access functions.
Key Functions
1
Listen to your messages
Activate the recording answering
2
machine
Activate the basic answering
3
machine
Switch OFF the answering
4
machine
Record a new announcement for
5
the recording answering machine
Record a new announcement for
6
the basic answering machine
Delete all old messages
7
Activate the remote room
8
surveillance
To end the call
Functions that can be accessed during
playback of the messages..
Key Functions
Return to the main menu
9
Stop the playback of the message
99
Repeat the playback of the
11
message
Pause the playback of the
22
message
Continue the playback of the
2
message after a pause
Skip to the next message
33
32
Return to the previous message
44
Delete the current message
00

LU 252117222C_D20V_EN.book Page 33 Mercredi, 24. août 2005 11:46 11
ANSWERING MACHINE
Activating the remote room
surveillance
This function allows you to hear on the phone
what is happening in a room where the
answering machine base is located.
Dial your number, wait until your answering
machine starts up.
During the playback of the initial
announcement, press the key twice.
Then dial your remote access code.
Press the 8 key of the handset to activate the
room surveillance.
Press the # key to stop this surveillance.
33

LU 252117222C_D20V_EN.book Page 34 Mercredi, 24. août 2005 11:46 11
ANSWERING MACHINE SETUP
ANSWERING MACHINE
SETUP
Selecting the answering machine
language
You can choose the language of your
answering machine. The messages will be
played back in the language you select.
Press the key on the base.
Repeatedly press the key until "L1" or
"L2" or "L3" is shown on the base display.
Press the key to validate.
Repeatedly press the key to select the
desired language.
• L1: English
• L2: French
• L3: German
Press the key to validate.
After an initialisation phase the display
returns to standby mode.
Modifying the remote access
code
The remote access code allows you to
consult the messages on your answering
machine by means of another telephone.
By default, the code is "0000". To change this
code, use the following procedure:
MENU
You will hear the following message: PRESS
OK TO CHANGE ACCESS CODE.
Press the key.
The display shows :
• The lefthand figure indicates that you will
be entering the first figure of the remote
access code.
• The righthand figure shows the first
figure of the remote access code.
Use the keys to select this first
figure.
Press to go to the second figure.
The display shows :
• The lefthand figure indicates that you will
be entering the second figure of the
remote access code.
• The righthand figure shows the second
figure of the remote access code.
Use the keys to select this
second figure.
Press to go to the third figure.
The display shows :
• The lefthand figure indicates that you will
be entering the third figure of the remote
access code.
• The righthand figure shows the third
figure of the remote access code.
Use the keys to select this
third figure.
Press to go to the fourth figure.
Press the key.
Press the key until "rC" is shown on
the base display.
MENU
34

LU 252117222C_D20V_EN.book Page 35 Mercredi, 24. août 2005 11:46 11
ANSWERING MACHINE SETUP
The display shows :
• The lefthand figure indicates that you will
be entering the fourth figure of the
remote access code.
• The righthand figure shows the fourth
figure of the remote access code.
Press to validate this fourth figure.
At the end of the procedure, the remote
access code is read back by the loudspeaker
in the base.
During the modification of the
remote access code, if no key is
pressed for 7 seconds, the
answering machine returns to
standby mode and the code is not
modified.
Alert Mode
Your answering machine has an alert
function, that warns you that you have one or
more new messages, without having to look
at the display. The alert is in the form of a
beep every 15 minutes.
Press the key.
The alert mode of your answering machine is
now active.
Turning off the alert mode
Press the key.
Press the key until "A" is shown on the
base display.
You will hear the following message: PRESS
OK TO DE-ACTIVATE ALERT MODE.
Press the key.
The alert mode of your answering machine is
now turned off.
MENU
ECO Mode
The ECO mode allows you to check easily
whether you have received a new message
during a remote consultation.
Activating the alert mode
Press the key.
Press the key until "Ao" is shown on
the base display.
You will hear the following message: PRESS
OK TO ACTIVATE ALERT MODE.
MENU
If there is no new message, your answering
machine will answer your call after the fifth
ring.
If you have a new message, the answering
machine will answer your call after the third
ring.
Thus, if your answering machine does not
answer your call after the third ring, you can
hang up: you do not have any new
messages.
35

LU 252117222C_D20V_EN.book Page 36 Mercredi, 24. août 2005 11:46 11
ANSWERING MACHINE SETUP
Activating the ECO mode
Press the key.
Press the key until "Eo" is shown on
the base display.
You will hear the following message: PRESS
OK TO ACTIVATE ECO MODE.
Press the key.
The ECO mode of your answering machine is
now active.
MENU
Turning off the ECO mode
Press the key.
Press the key until
"E" is shown on the base display.
You will hear the following message: PRESS
OK TO DE-ACTIVATE ECO MODE.
Press the key.
The ECO mode of your answering machine is
now turned off.
MENU
When the memory is full, your answering
machine will switch automatically from the
recording answering machine mode to the
basic answering machine mode
Memory status
Your answering machine has a capacity of 20
minutes or 59 messages.
When your answering machine reaches its
maximum recording capacity, an alarm will
sound to warn you that your memory is full.
When this happens, you will have to delete at
least some messages to allow new
recordings to be made (refer to the
paragraph "Deleting messages", page 31).
36

LU 252117222C_D20V_EN.book Page 37 Mercredi, 24. août 2005 11:46 11
APPENDIX
Care and Maintenance
Use a slightly damp cloth to wipe the base and handset as well as charging contacts, do not
use a dry cloth as this may cause electrostatic charges.
Problems
Refer to the table presented below in case of an operational malfunction:
Problems Remedies
The base indicator light is not lit Make sure that :
Handset does not function The batteries are not correctly installed:
The handset does not ring
during an incoming call
No radio link between the
handset and base
The network indicator icon
flashes
Programming not possible You have already logged in two handsets. You must delete one handset first
Interference during
communications
Entries will not be accepted in
the DIRECTORY.
Time reset to 00:00 Replace, remove the batteries, or base was reset:
• the power adapter is properly connected to a power socket.
• the power connector is properly plugged into the base.
• your fuse and circuit-breaker are in working order and that the power
socket is powered.
Ensure that the battery pack has been correctly installed. Follow the polarity
marking of the battery and the drawing on D20 handset battery compartment.
Make sure the battery is fully charged. If not, you need to charge it on the base
cradle.
If the rechargeable batteries are not being properly recharged, please change
them (refer to paragraph Replacing the batteries, page 9). In order to prevent
any damage to your handset, only use rechargeable batteries of the following
type: NiMH 1.2 V 600 mAh AAA. Do not use non-rechargeable batteries.
Make sure that the telephone is properly connected and that you have a dial
tone.
Make sure that your telephone is not set to silent mode (refer to paragraph
Modifying the default handset melody volume, page 19).
Make sure the handset is registered by moving closer to the base, if it is
registered correctly, the handset screen should display its own handset number.
Otherwise, register the handset to the base (refer to paragraph Registering an
additional handset to a base, page 25).
(refer to paragraph De-registering a handset, page 26).
Radio Interference occur during programming, retry the programming, if
possible move closer near the D20 base station.
Out of range or close to other electrical appliances :
Check the handset is not emitting the out of range warning tone. If close to
other electrical device move away. You may need to reconsider the location of
your D20 Base if this problem persists.
Directory is full :
Up to 25 names and numbers can be stored in the Directory. Delete some of the
older entries to make more space for new one.
The time will also reset.
37

LU 252117222C_D20V_EN.book Page 38 Mercredi, 24. août 2005 11:46 11
APPENDIX
D20 has unfamiliar settings Reset all the user-set features to the factory DEFAULT (refer to paragraph Re-
D20T cannot make call The base unit may not be correctly connected:
Base Station does not function Error in connection or lack of power supply:
Registration fail Wrong registration procedure:
The handset displays
"NOT REGIST"
Inopportune ringing When the messages in the voice box have been consulted, the message
initialise the base, page 24).
Ensure the base unit is correctly installed and connected. Make sure that the
power is On.
Other handset is already in communications (in multi handset user):
Make sure that, only one internal or external call can be made at the same time.
Ensure that other handset is not already in communication prior to use.
Network Failure:
Try making a call from another telephone. If unsuccessful, contact your network
supplier.
If connected to PABX:
Make sure you have entered the correct PABX settings in your D20 (refer to
paragraph Modifying the pause duration, page 23).
Make sure the dialling mode is correct (refer to paragraph Changing the dialling
mode, page 23).
Ensure that the adaptor power supply has been properly connected to the base
and the AC power plug.
Ensure the AC power match the adaptor AC voltage.
Remove and plug back the power supply.
Make sure that you know the right base code. If you are registering a new
handset to your D20 base, (refer to paragraph Registering an additional handset
to a base, page 25). Try again if possible.
Your handset is not registered on a base, (refer to paragraph Registering an
additional handset to a base, page 25).
Note: When the handset is not registered on a base, you can only access to the
REGISTRATION menu.
presence indicators are turned off by the service provider. You may hear a short
beep indicating this function.
38

LU 252117222C_D20V_EN.book Page 39 Mercredi, 24. août 2005 11:46 11
FEATURES
FEATURES
Functions Default settings Functions Default settings
Handset Base
Beeps All active Ringer
Ringer Volume 1
Volume 4 Melody EXT/INT 1
Melody EXT 1 Flash duration Depending on country
Melody INT 4 Pause duration 3 (2 sec)
Ear volume 3 Code base 0000
Auto answer On Dialling Voice frequency
Language Depending on country Answering machine
Date/Time 01-01 / 00:00 ECO mode Off
Name SAGEM Alerte mode Off
Access code 0000
Telephone features
Number of channels 120 Autonomy
Radio frequency band 1,88 - 1,90 GHz standby time up to 160 hours
Duplex mode TDMA talk time up to 13 hours
Spacing between 1,728 MHz Handset range
Bit rate 1152 Kbit/s open space up to 300 m
Modulation GFSK inside building up to 50 m
Vocoding ADPCM Base dimensions 254 x 135 x 65 mm
Transmitting power 250 mW Base weight 233 g
Base operating voltage 230 V , 50/60 Hz Handset dimensions 140 x 53 x 32 mm
Charging time 6 hours Handset weight 140 g
All of this data is provided to you for information purposes only. Sagem Communication reserves the right
to make any changes without notice.
39

LU 252117222C_D20V_EN.book Page 40 Mercredi, 24. août 2005 11:46 11
ENVIRONMENT
Preservation of the environment is an essential concern of Sagem Communication. The desire
of Sagem Communication is to operate systems observing the environment and consequently
it has decided to integrate environmental performances in the life cycle of its products, from
manufacturing to commissioning, use and elimination.
Packaging
The presence of the logo (green dot) means that a contribution is paid to an
approved national organisation to improve packaging recovery and recycling
infrastructures.
To facilitate recycling, please respect the sorting rules set up locally for this kind of
waste.
Batteries
If your product contains batteries, they must be disposed of at appropriate
collection points.
The product
The crossed-out waste bin stuck on the product or its accessories means that the
product belongs to the family of electrical and electronic equipments.
In this respect, the European regulations ask you to dispose of it selectively:
- At sales points in the event of the purchase of similar equipment.
- At the collection points made available to you locally (drop-off centre, selective
collection, etc.).
In this way you can participate in the re-use and upgrading of Electrical and Electronic
Equipment Waste, which can have an effect on the environment and human health.
40

LU 252117222C_D20V_EN.book Page 41 Mercredi, 24. août 2005 11:46 11
WARRANTY
Guarantee terms and conditions
Dear Customer,
You have just purchased a Sagem Dect phone and we thank you for your custom. This equipment was
manufactured with the greatest care and we hope that it gives you complete satisfaction.
Our helpline is at your disposal to provide you with any technical assistance you may need to operate your
Sagem Communication Dect phone at 0905 6930220 (0.15 £/min, tariff cost effective from 27/06/2005).
If the helpline advisor diagnoses a technical problem that cannot be fixed over the phone, we undertake to
remedy by repair, free of charge for labour and replacement parts , subject to the terms and conditions
below, any defects in the Dect phone during a period of twelve (12) months from the date of purchase of
the telephone, where those defects are a result of fautly workmanship. Proof of purchase will be required ;
so, please keep the receipt in a safe place.
An on-site exchange service will be performed the next working day after your call at the helpline (if call
registered by 16.00). It is strongly recommanded to save all the details in your phone directory and other
personal data.
No coverage shall be given under this warranty if the following conditions are applicable :
- the required documents have been modified or altered in order to take advantage of the warranty.
- the manufacturing numbers, product brands or labels have been altered or made illegible.
- interventions on the product have been made by an unauthorized person.
- the product has been subjected to abnormal or improper use.
- the product has been damaged from external causes such as lightning, overvoltage, moisture,
accidental deteriorations, improper care as well as all Acts of God.
This present warranty does not affect the consumer rights that you may have under the laws in effect in
your country.
41

MEMO
...................................................................................................................................
...................................................................................................................................
...................................................................................................................................
...................................................................................................................................
...................................................................................................................................
...................................................................................................................................
...................................................................................................................................
...................................................................................................................................
...................................................................................................................................
...................................................................................................................................
...................................................................................................................................
...................................................................................................................................

4 COUV.fm Page 42 Mercredi, 24. août 2005 11:54 11
Emergency number
European emergency call number
(Police - Fireman - Medical emergency)
112
Base code
Note here the code which you have entered.
Data subject to change without notice
User Manual
*252117222C*
Sagem Communication
Société anonyme au capital de 300 272 000 € - 480 108 158 RCS PARIS
27, rue Leblanc - 75512 PARIS CEDEX 15 - FRANCE
www.sagem.com
 Loading...