

de
LU 251619615_D20T_GB_SAGEM.book Page 1 Jeudi, 26. août 2004 4:54 16
er Gui
LU 251619615_D20T_GB_SAGEM.book Page I Jeudi, 26 . août 2004 4:54 16
CONTENTS
Introduction 1
Recommendations and safety instructions 1
Your telephone 2
Unpacking 2
Your base 2
Your handset 3
Connecting the base 4
Handset set-up 5
Telephone set turning on and off 5
Replacing the batteries 6
Getting started 7
Making a call 7
Direct dialling 7
Using the Redial key 7
From the directory 7
Receiving a call 7
During a call 7
Ear volume 7
Handsfree 8
Secret mode 8
Call transfer 8
Ending a call 8
Intercommunication between two handsets 8
Locking / unlocking the keypad 8
Call log 9
Viewing the dialled calls 9
Viewing the received calls 9
Calling the voice box 9
Paging handset 9
Menu structure 10
Your directory 11
Viewing the directory 11
Creating an entry 11
Editing an entry 12
Deleting an entry 12
Call log 13
Viewing the dialled calls 13
Viewing the received calls 13
Adding a contact in the directory from
the list of received calls 13
Deleting a number from the call log 14
Viewing a missing call 14
Handset settings 15
Activating or deactivating the beeps 15
Modifying the default handset melody
volume 15
Modifying the handset ringtone 15
Setting the ear volume 15
Using the auto answer features 16
Change the name of the handset 16
Modifying the language 16
Modifying the date and time 16
Modifying the voice box number 17
Base settings 18
Modifying the default base ring volume 18
Modifying the base ringtone 18
Modifying the flash duration (R key) 18
Modifying the pause duration 19
Modifying the base code 19
Re-initialize the base 19
Registration 21
Registering a second handset to a base 21
Modifying the base preference 21
De-registering a handset 22
Appendix 23
Care and Maintenance 23
Problems 23
Features 25
Environment 26
Warranty 27
Emergency number 30
Base code 30
I

LU 251619615_D20T_GB_SAGEM.book Page 1 Jeudi, 26. août 2004 4:54 16
INTRODUCTION
Dear customer:
Thank you for purchasing a SAGEM DECT telephone; we appreciate your trust in us.
This product was manufactured with the utmost care, should you encounter any difficulties during its use, we
recommend that you refer to this user guide. You can also find information on the following site:
For your comfort and safety, we ask that you read the following paragraph carefully:
Recommendations and safety instructions
Your DECT telephone must not be installed in a humid room (wash room, bathroom, laundry room,
kitchen, etc.) unless it is 1.50 m away from a water point, or outside. Your telephone must be
operated at temperatures ranging from 5°C to 45°C.
Only use the supplied power adapter, connect it to the base socket according to the installation
instructions provided in this booklet and the indications on the identification label affixed to it
(voltage, current, electric network frequency). As a precaution, in case of danger, the mains
adapters act as a disconnecting mechanism for the 230V power supply. The y should be placed near
the device and should be easily accessible.
This telephone was designed for use on the public switched telephone network (PSTN). In case of
a problem you must first contact your reseller. Only use the supplied telephone cord.
For your personal safety, never plac e your handset on the base without the batteries, or without the
battery cover, you could get an electric shock.
To avoid damaging your handset, only use certified rechargeable AAA batteries NiMH 1.2 V
600 mAH, never use non rechargeable batteries. Insert the batteries in the handset battery
compartment respecting polarity.
At the end of their useful life, batteries must be disposed of according to the recycling instructions
presented in this booklet.
Your DECT telephone has an inside radio range of about 50 metres and up to 300 metres in open
space. The immediate presence of metal parts (of a television for example), or of any electric
appliance may result in range reduction.
Some sensitive medical equipment and safety equipment may be affected by the radio-frequency
transmissions of your telephone. In all cases, we ask that you respect the safety recommendations.
In areas where storms are frequent, we recommend that you protect your telephone line using a
surge protection device.
This equipment does not function in the case of an electric network shutdown: for
emergency calls, it is recommended to use another unit during power cuts.
The CE marking certifies that the product meets the essential requirements of Directive 1999/5/CE
of the European Parliament and of the Council pertaining to microwave radio equipment and
telecommunication terminal equipment, for the safety and health of users, for electromagnetic
interference. Furthermore, it efficie ntly uses th e frequency spectru m attributed to ground a nd spatial
communication to prevent damaging interference.
The declaration of compliance may be looked up on the www.sagem.com site, section "support" or
can be obtained from the following address:
http://www.sagem.com/faq
SAGEM SA - Customer relations department
4 rue du Petit Albi - 95800 Cergy Saint-Christophe -France
1
LU 251619615_D20T_GB_SAGEM.book Page 2 Jeudi, 26. août 2004 4:54 16
YOUR TELEPHONE
Unpacking
Place the box in front of you, make sure it contains the following items:
• one base,
• one handset,
• one battery compartment cover,
• one equipped power adapter,
• one telephone line cord,
• three rechargeable batteries,
• this user guide.
If you have purchased a DUO pack, you will find in addition:
• a second handset,
• a handset charger,
• an additional battery flap,
• three additional rechargeable batteries.
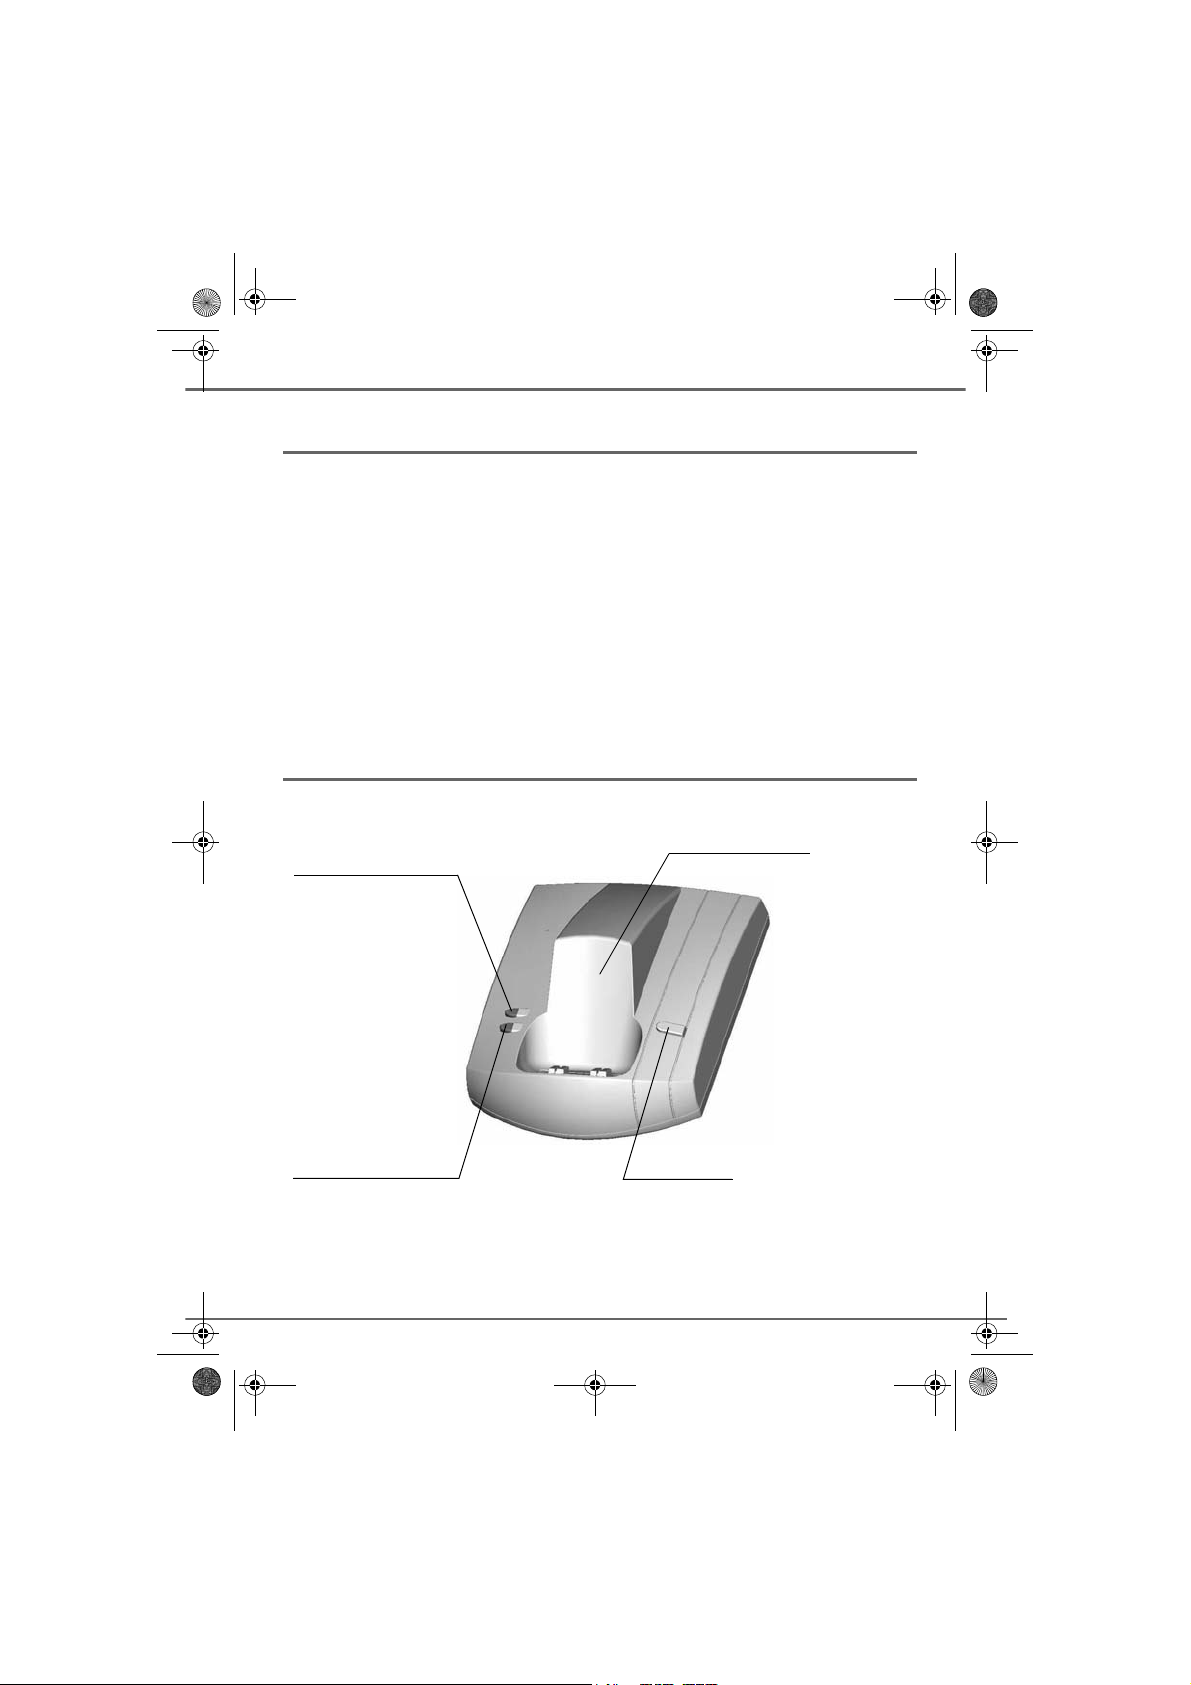
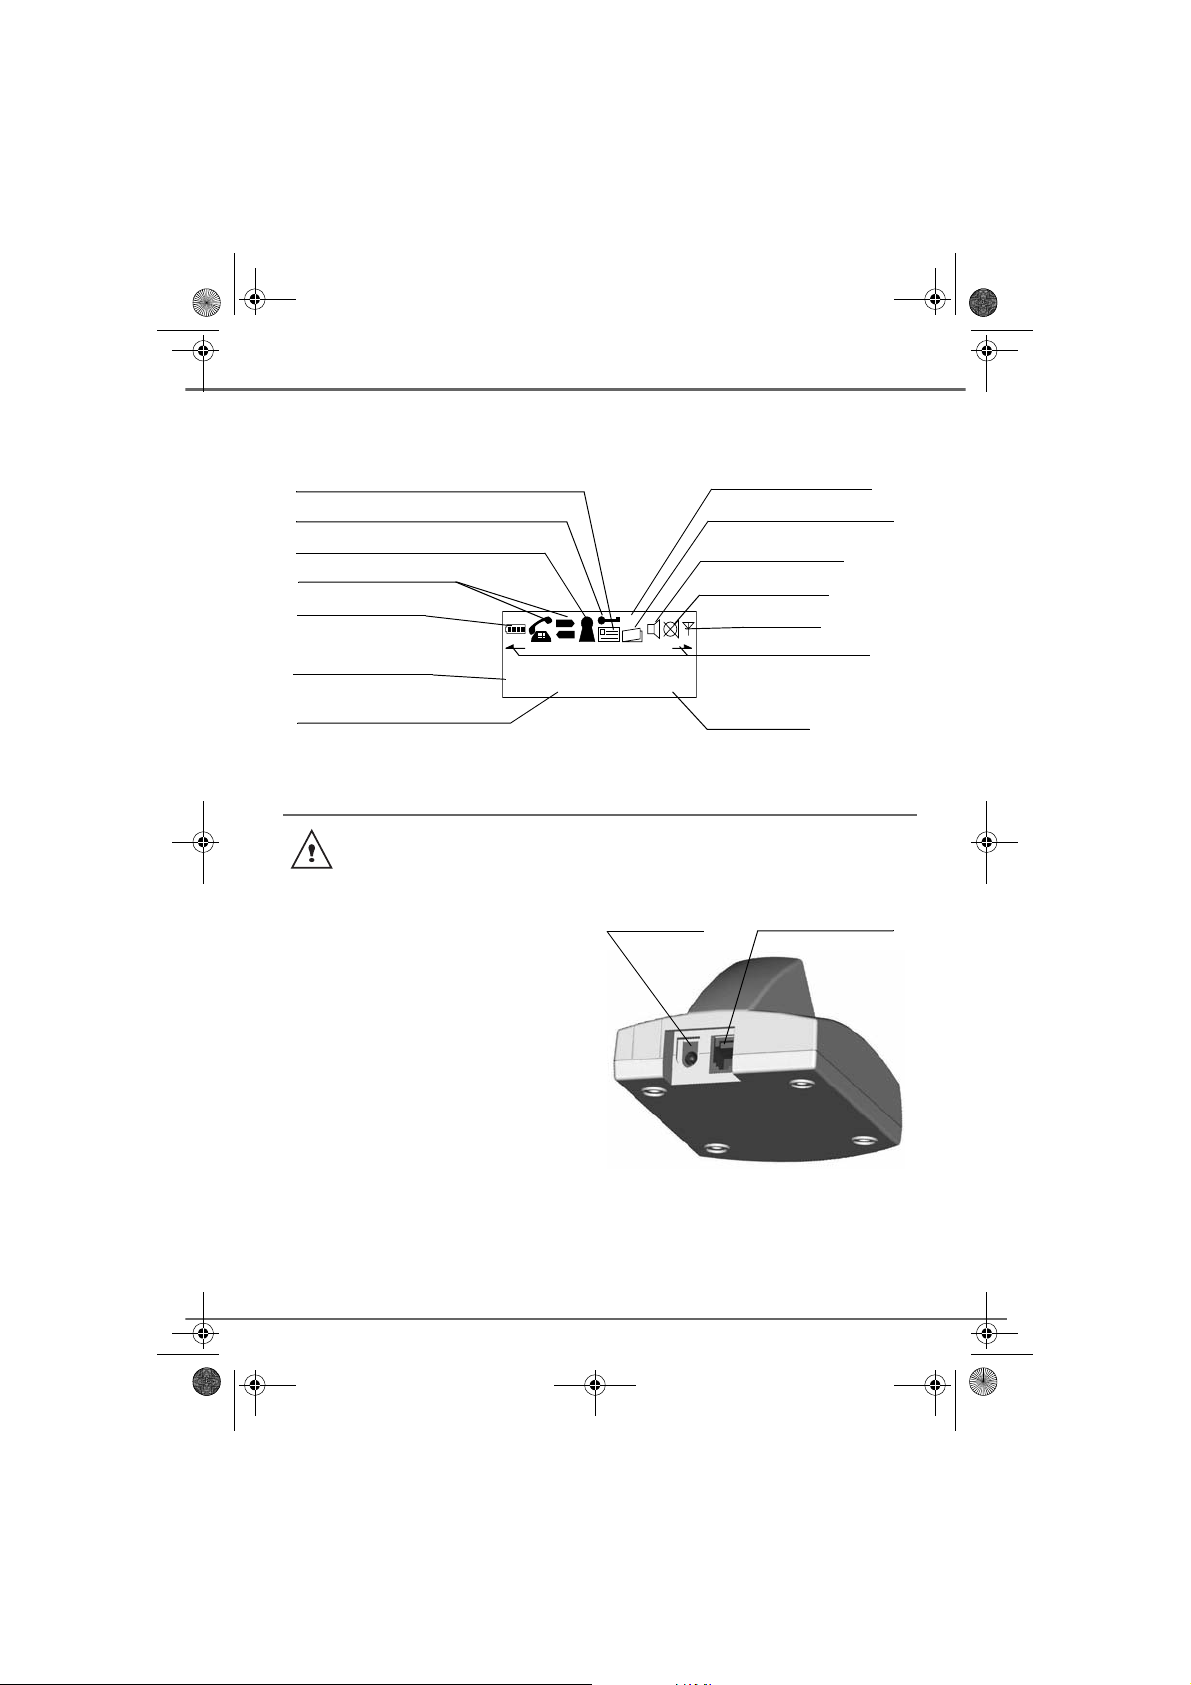
Your base
Handset location
Charge indicat or
Red indicator:
handset well positioned
on base
Power indicator light
Fixed green indicator: Powered
Flashing green indicator:
- telephone set on line (slowly flashing),
- message in the network mailbox (rapidly
flashing)
- call during absence (intermittently flashing).
2
Base button
Pressed briefly:
- telephone set paging.
Held down:
- telephone set registration.
LU 251619615_D20T_GB_SAGEM.book Page 3 Jeudi, 26. août 2004 4:54 16
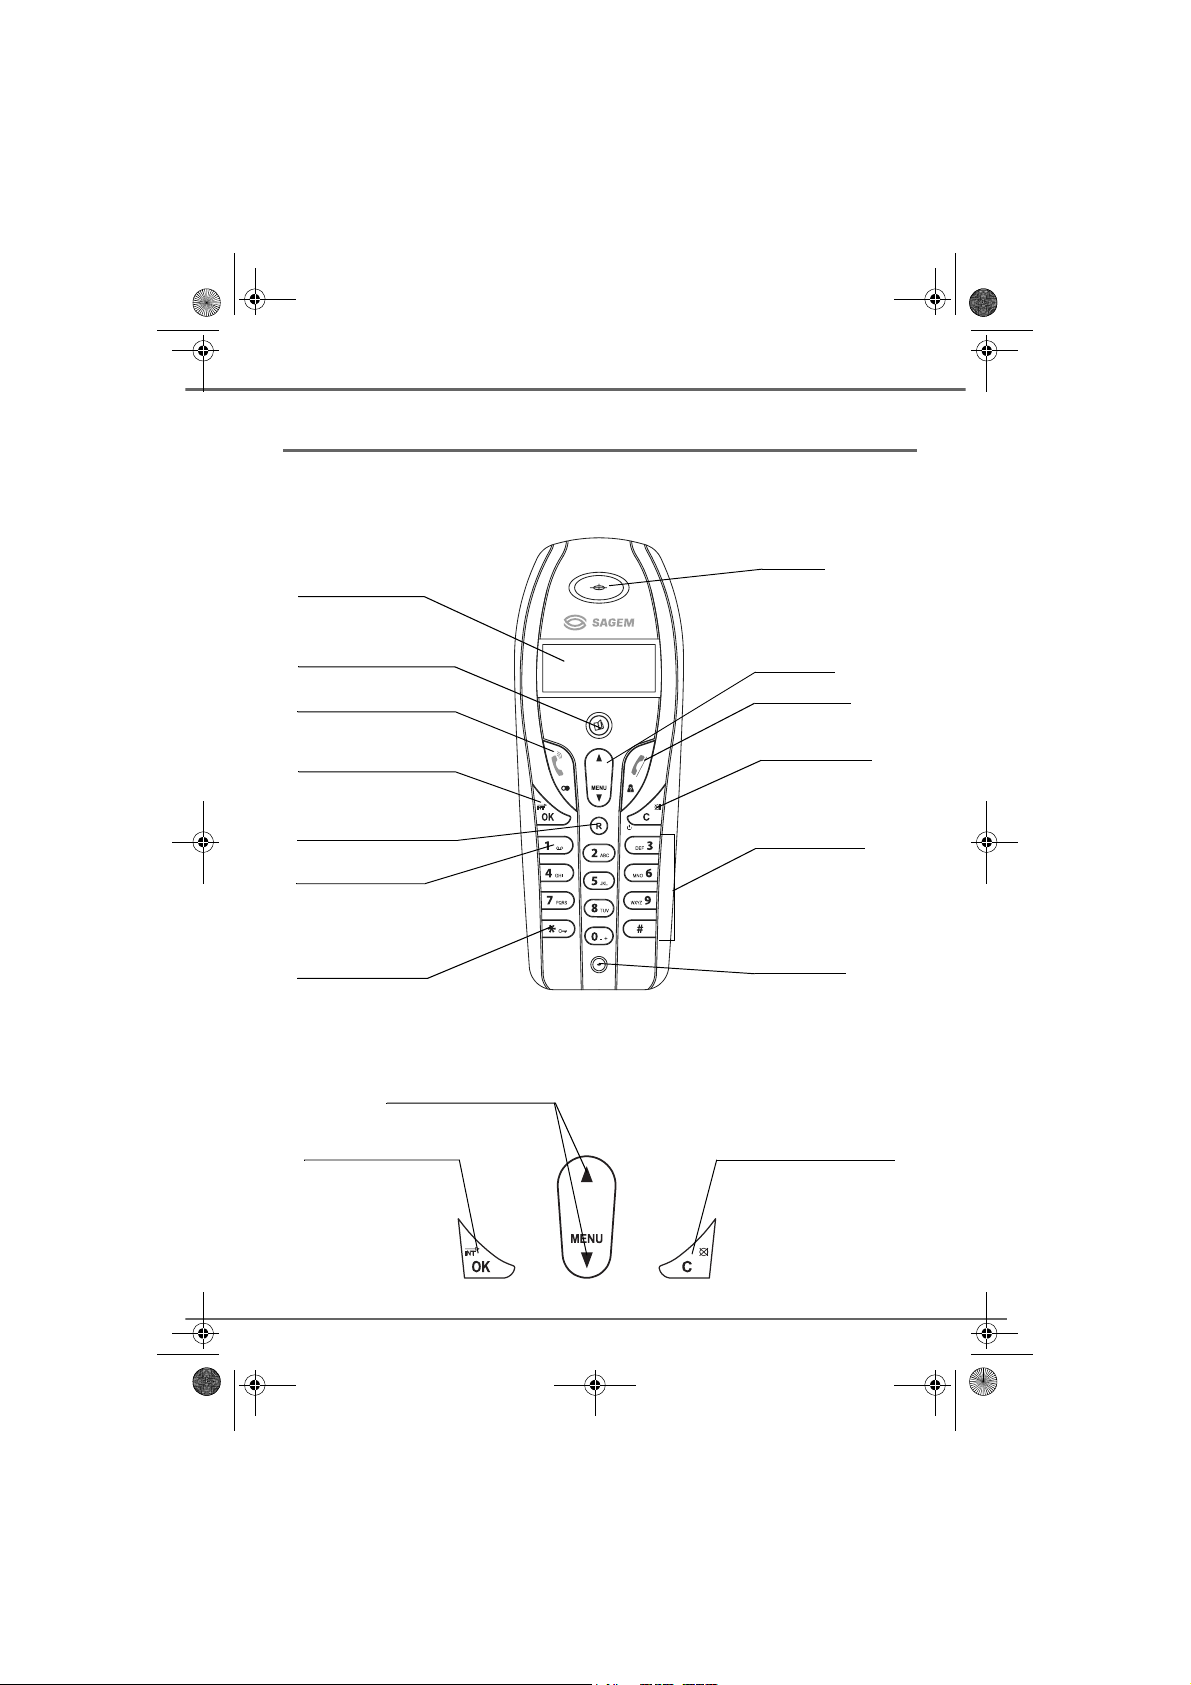
YOUR TELEPHONE
Your handset
With its user-friendly design, you will appreciate how easy it is to hold and its quality during
conversations.
Speaker
Display
Phonebook key
Pick up
Redial (long press)
OK
Internal call
R key
Access to network
answer machine
messaging
(long press)
Key lock
(long press)
The navigator key and keys : a rapid selection tool.
Navigating in the menus
To confirm or to access a
sub-menu
Navigator
Hang up
CID Review
Power ON/OFF
Cancel key
Mute key
Alphanumeric
keypad
Microphone
To cancel or return the
previous menu
3
LU 251619615_D20T_GB_SAGEM.book Page 4 Jeudi, 26. août 2004 4:54 16
YOUR TELEPHONE
The visual display of your handset on standby mode
Message indicator in voice box
Key lock indicator
Absence calls indicator
Calls indicator
Battery indicator
Number of handset
EXT
MENU
?
INT
Menu indicator
Directory indicator
Handsfree
Secrecy
Range
Number scrolling
Indicators
1 HANDSET 12:00
Name of handset
Connecting the base
Before making any connections, please refer to the safety instructions presented at
the beginning of this user guide.
On the bottom part of the base, click in the
telephone jack in its socket (as shown on the
drawing) and connect the other end of the
lead to the wall telephone socket.
Connect one end of the power-supply unit
cord to the back of the base station and
connect up the power-supply unit to the
mains. You will hear a beep and the
operating status indicato r on th e base station
will light up green.
Power socket
Time
Telephone socket
4
LU 251619615_D20T_GB_SAGEM.book Page 5 Jeudi, 26. août 2004 4:54 16
YOUR TELEPHONE
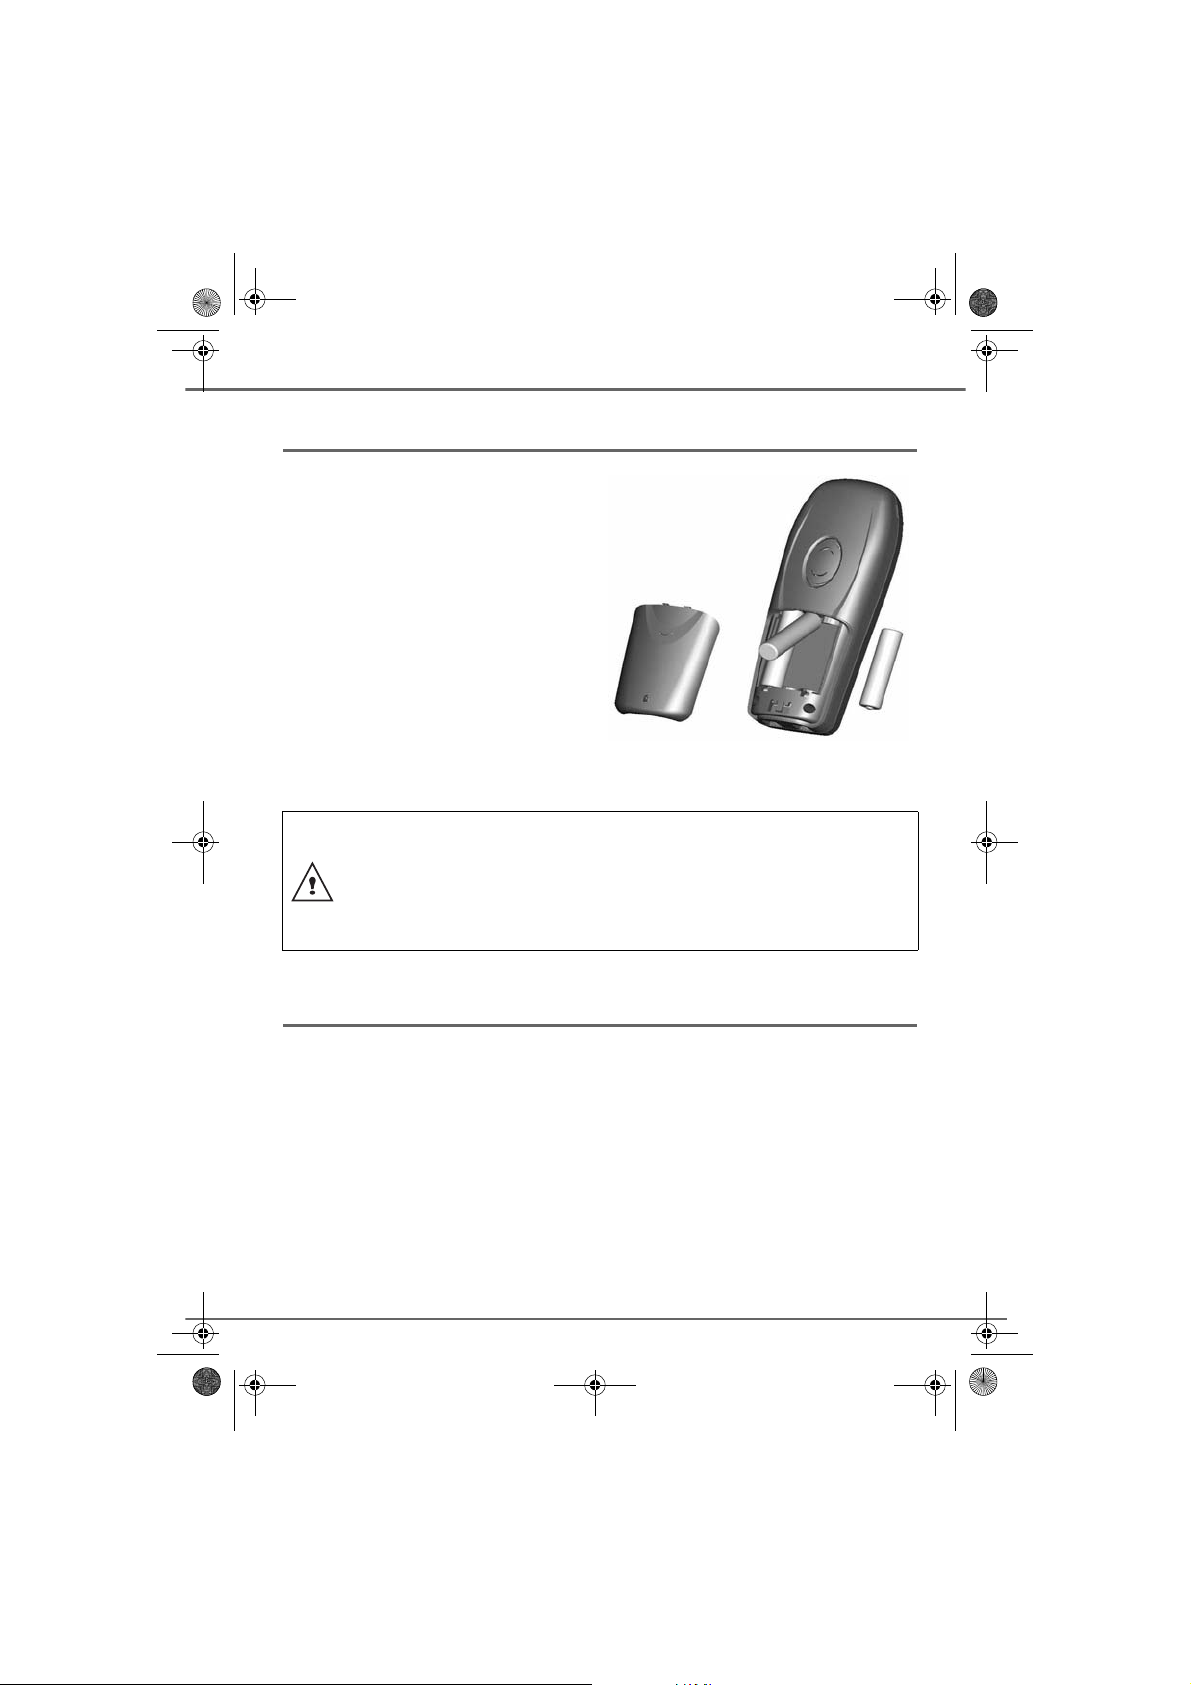
Handset set-up
Insert the batteries one after the other in
compliance with the battery polarity, as
shown on the label in the telephone set.
Place the cover back on the handset by
pushing upwards until it is com ple tel y c lo sed.
Remove the protective film on the screen,
place the handset on the base to fully charge
the batteries.
A beep is transmitted by the handset and the
charging icon appears on the screen, it
indicates the charging status. When icon is
completely shaded (4 bars), your batteries
are charged.
Only use certified rechargeable batterie s. For optimal battery charge, leave
the handset on the base for at least 6 hours during initial use. During
charging, the batteries may heat up, this is quite normal and without risk.
Never put the handset without its batteries on the base when the latter is
powered on.
Telephone set turning on and off
To turn off the telephone set, hold down the C key. Your telephone set is now switched off.
To turn on your telephone set, hold down the C key. Information is displayed on the screen.
The battery charging indicator icon, the telephone set number (1 or 2), the name of handset,
the time and the range indicator.
5
LU 251619615_D20T_GB_SAGEM.book Page 6 Jeudi, 26. août 2004 4:54 16
YOUR TELEPHONE
Replacing the batteries
Hold down t h e C k ey to turn off the telephon e
set. Turn it around so that the battery
compartment is accessible.
Take the handset, key side on your pal m an d
on the battery cover make a pressure
downwards.
Remove the old batteries, insert the new
batteries one by one in compliance with the
polarity of the batteries as show n on the label
fixed in the telephone set.
Place the cover back on the handset by
pushing upwards until it is com ple tel y c lo sed.
At the end of their useful life, batteries must
be disposed of according to the recycling
instructions presented in this booklet.
If the rechargeable batteries are absolutely empty, it may take several minutes be fore
the handset display can be seen again.
To avoid damaging your hand set, only use certifi ed rechargeable AAA ba tteries NiMH
1.2 V 600 mAH, never use non rechargeable batteries.
6
LU 251619615_D20T_GB_SAGEM.book Page 7 Jeudi, 26. août 2004 4:54 16
GETTING STARTED
GETTING STARTED
Making a call
Direct dialling
Enter the number of your contact using the
keypad keys.
If you enter an invalid digit, press C to erase
the incorrect digit. Press the green key on
your handset to make the call.
To enter the pause mode during dialling,
press the key until letter P appears.
You can also make a call by:
- Pressing the green key
access the line.
- Dialling your contact's number.
Using the Redial key
Press the green key and hold it down until
the last dialled number appears. Press the
green key .
From the directory
Press the directory key, the list appears.
Select the contact by pressing the or
key.
Press the green key .
to
Receiving a call
When you receive a call your telephone
rings. If you have subscribed to a "Caller
display" service, the caller's information
appears on the screen (unless your caller
has enabled the anonymous mode),
otherwise the "PRIVATE" screen is
displayed.
The auto answer mode is acti vated as the default mode and the call is activated as soon
as you remove the handset from the base.
If the auto answer mode is deactivated, the
call is activated as follows:
Answer by pressing the green key .
At the end of the conversation, press the red
key .
During a call
During a call, you can access the following
functions :
• increase the loudspeaker volume,
• activate the handsfree,
• activate the secret mode,
• transfer the call in progress to another
handset registered on the same base.
Ear volume
During communication, you can increase or
decrease the audio volume of your handset
by pressing the or key on the navigator.
7
LU 251619615_D20T_GB_SAGEM.book Page 8 Jeudi, 26. août 2004 4:54 16
GETTING STARTED
Handsfree
While having a conversation with your
contact, you can enable or disable the
handset loudspeaker. Press key .
The icon appears.
During communication, you can increase or
decrease the audio volume of your handset
by pressing the or key on the navigator.
Secret mode
You can switch to secret mode at any time
during your conversation. Your handset
microphone will be switched of f and the other
person will not be able to hear you.
To activate secret mode:
During communication, press C key.
The icon will appear on the screen.
To deactivate secret mode:
Press C key again. The icon disappears.
Your caller will be able to hear you again.
Call transfer
This function is accessible if two handsets
are registered to the same base.
You can now transfer the call in progress to
another handset.
During communication, press OK key.
Enter the handset number you want to call.
Press OK.
picks up, transfer the call by pr essing the r ed
key .
To retake the call before it is picked up by the
handset called, press OK.
Ending a call
At the end of the conversation, press the red
key .
Intercommunication between
two handsets
To be able to communicate with each other,
the two handsets must be registered to the
same base and be within the base range.
To call another handset:
Press key, enter the handset number
you want to call.
The handset called rings. Press the green
key to answer the call with the second
handset.
To end the call, press the red key .
Locking / unlocking the keypad
To lock/unlock the keypad, press and hold
the keypad key for some time, the
icon appears on the screen.
The handset called rings, once someone
8

LU 251619615_D20T_GB_SAGEM.book Page 9 Jeudi, 26. août 2004 4:54 16
GETTING STARTED
When the keypad is locked, you
cannot dial any number.
In order to be able to dial an
emergency number (e.g. 112), you
must unlock the keypad first.
Call log
This menu enables you to view the received
and the dialled calls list.
Viewing the dialled calls
From the idle screen, press and hold the
keypad key until the last dialled number
appears.
You can view the 10 last dialled calls by
pressing key.
You can recall one of the last di alled numbe r.
Select the number and press the green
key .
Viewing the received calls
From the idle screen, press and hold the red
key until the last received call appears.
You can view the 24 last received calls by
pressing or key.
Calling the voice box
This function enables you to receive calls,
during your absence, in your voic e box on the
Public Switched Telephone Network.
• on the base, the green indicator light
flashes.
• on the handset, the messa ge ic on
appears.
You can call your voice box according to two
methods:
• Either in dialling directly the voice box
number as when dialling a number.
• Or by pressing for a long time the
key. This method is available if th e voice
box number is already registered.
The number can be modified, refer
to paragraph Modifying the voice
box number, page 17
When the messages in the voice box
have been consulted, the message
presence indicators are tur ned off by
the service provider. You may he ar
a short beep indicating this function.
Paging handset
This feature is very useful if you can’t
remember where you put your handset, you
can make the handset to ring (as long as the
handset is in the standby mode) by pressing
the button on your D20T base.
All registered handsets will ring. You can stop
each handset by pressing any key on the
handset keypad or press again the button
in the base.
First, contact your operator who will
give you all useful information
concerning the voice box operation.
To indicate you the presence of a new message:
9

Y
a
h
LU 251619615_D20T_GB_SAGEM.book Page 10 Jeudi, 26. août 2004 4:54 16
MENU STRUCTURE
ou can navigate through the menus us in g the and keys. Press the OK key to access
igher menu. Press the C key to return to the previous menu.
DIRECTORY
NEW
EDIT
DELETE
FIND
HS SET
BEEPS
MELODY VOL
EXTERN CALL
INTERN CALL
EAR VOLUME
AUTO ANSWER
CHANGE NAME
LANGUAGE
BASE SET
RING VOLUME
REGISTRATION
RINGTONE
FLASH DURA
DATE-TIME
VOICE BOX NO
REGISTER HS
SELECT BASE
DEREGIST HS
PAUSE DURA
CHANGE CODE
REINIT BASE
10

LU 251619615_D20T_GB_SAGEM.book Page 11 Jeudi, 26. août 2004 4:54 16
YOUR DIRECTORY
YOUR DIRECTORY
You can store 25 numbers entries in your
directory.
Each directory entry can con t ain the name of
your contact which can be a maximum of 12
characters long (spaces included), your
contact's telephone number up to 25 digits.
Viewing the directory
On the navigator key , press or until
the DIRECTORY screen is displayed, press
OK to confirm (you can also use to
directly consult your directory list).
Select FIND by pressing the or key.
Press OK.
The list of directory entries organised in
alphabetical order appears.
Select the entry you want to view using or
. Once you have selected it, press OK.
You can also view the directory
simply by pressing the key. You
can then select the entry by pressing
the key corresponding to the first
letter of the name.
To exit the menu, press the red key .
Select NEW by pressing the or key.
Press OK.
The name input screen appears.
Using the keypad keys, enter the name of
your contact by pressing successivel y on the
corresponding keys (see the following ta ble).
Key Action
space, --, 1
A, B, C, 2
D, E, F, 3
G, H, I, 4
J, K, L, 5
M, N, O, 6
P, Q, R, S, 7
T, U, V, 8
W, X, Y, Z, 9
0
To enter text, press successively on the
desired key until the letter is d isplayed on the
screen.
Creating an entry
On the navigator key , press or until
the DIRECTORY screen is displayed, press
OK to confirm.
In case of a mistake, press C to erase one
character at a time.
Once you are done making your changes,
press OK.
The number input screen appears.
11

LU 251619615_D20T_GB_SAGEM.book Page 12 Jeudi, 26. août 2004 4:54 16
YOUR DIRECTORY
Now, enter the name of your contact using
the keypad keys.
To enter the pause mode during dialling,
press the key until letter P appears.
In case of a mistake, press C to delete the
last digit.
Once you are done making your changes,
press OK.
A new entry is created. It appears in the
directory list.
Editing an entry
On the navigator key , press or until
the DIRECTORY screen is displayed, press
OK to confirm.
Select EDIT using or . Press OK.
Select the entry you want to edit using or
. Press OK.
You enter the name input scr een . The c ur sor
is at the end of the name.
• The information is accurate. Press OK.
• To correct the name, press C key to
delete characters. Make your corr ections
using the keypad keys by pressing successively on the corresponding keys.
Once you are finished, press OK.
Deleting an entry
On the navigator key , press or until
the DIRECTORY screen is displayed, press
OK to confirm.
Select DELETE using or . Press OK.
Select the entry you want to delete using
or . Once you have sel ected it, press OK to
confirm.
A confirmation screen asks you if you wish to
delete the entry.
• If you do not wish to delete the entry,
press C key.
• To delete the entry, press OK. The entry
is deleted from the directory.
To exit the menu, press the red key .
You enter the number input screen. The
cursor is at the end of the number.
• The information is accurate. Press OK.
• To correct the number, press C key to
delete the numbers. Enter the new number and press OK.
To exit the menu, press the red key .
12

LU 251619615_D20T_GB_SAGEM.book Page 13 Jeudi, 26. août 2004 4:54 16
CALL LOG
CALL LOG
This menu enables you to view the received
and the dialled calls list.
Viewing the dialled calls
From the idle screen, press and hold the
green key until the last dialled number
appears.
You can view the 10 last dialled calls by
pressing key.
You can recall one of the last di alled numbe r.
Select the number and press the green
key .
Viewing the received calls
The «Number display» function
must be activated to perform this
operation, contact your service
provider for the list of functions
available.
From the idle screen, press the red key
until the last received call appears.
You can view the 24 last received calls by
pressing or key.
The presentation screen for the last call received appears.
The number at the end of the line
shows the number of calls from the
specified telephone number.
To view the previous calls, use or . The
calls are organized in chronological order,
from the most recent call to the oldest call.
After having selected your contact , press the
OK key to display the date and time of the
received call.
To exit the menu, press the red key .
Adding a contact in the directory
from the list of received calls
Press the key to access to the li st of
received calls.
Use or to select the nu mber you wish
to add to the directory. Press OK.
The date and time of the received call are
displayed, press OK.
NEW is displayed on the screen, press OK.
The field where the name can be entered
appears. Depending on y our service provider
and the service you appl ied for, the name c an
be transmitted over the network and
displayed.
This screen presents the following information (depending on the service provider and
subscription):
• the name of the subscriber (if the name
is in the telephone book or the CLIP
function has been activated),
or
• the telephone number.
You can change it by pressing the C key.
Enter the name of the caller with the
keyboard and press OK.
13

LU 251619615_D20T_GB_SAGEM.book Page 14 Jeudi, 26. août 2004 4:54 16
CALL LOG
If a number appears under the
PRIVATE display or if it is exists in
your directory, you will not be able to
delete this number from the call log.
Deleting a number from the call
log
Press the key to access to the list of
received calls.
Use or to select the number you wish
to add to the directory. Press OK.
The date and time of the received call are
displayed, press OK.
Use or to select DELETE ?, press
OK.
CONFIRM ? appears on the screen , press
OK to validate.
Viewing a missing call
IIf there were one or more calls for you in your
absence, a symbol will be displayed and
the green light will continually flash.
It informs you as to the calls received during
your absence.
In order to check the calls during your
absence, please refer to paragraph
Viewing the received calls, page 13.
?
14

LU 251619615_D20T_GB_SAGEM.book Page 15 Jeudi, 26. août 2004 4:54 16
HANDSET SETTINGS
HANDSET SETTINGS
Activating or deactivating the
beeps
On the navigator key , press or until
the HS SET screen is displ ayed, pres s OK to
confirm.
Select BEEPS using or . Press OK.
Select the beep type using or . Press OK.
KEYPAD PRESS: the handset beeps when a
key is pressed.
BATTERY LOW: the handset beeps when
the battery is too low.
OUT OF RANGE: When the base station is
out of range, the handset will warn you
acoustically.
An information screen displays the beep
status (ON or OFF) for the selected item.
• To change the status, press or .
Press OK.
• To keep the status, press C.
To exit the menu, press the red key .
There are seven alternatives i n succession to
choose from: :
• VOL OFF : No ringing tone.
• VOLUME : X : From 1 to 5.
• CRESCENDO : The volume of the ring
tone increases with every ringing
sequence.
Press or to increase or decrease the
default volume. Once the volume is set,
OK.
press
To exit the menu, press the red key .
Modifying the handset ringtone
This menu enables you to associate a
ringtone to incoming calls or internal calls
(intercom).
On the navigator key , press or until
the HS SET screen is dis played, pres s OK to
confirm.
Select EXTERNAL CALL or INTERNAL
CALL using or . Press OK.
Select the desired ringtone using or .
Press OK.
Modifying the default handset
melody volume
On the navigator key , press or until
the HS SET screen is displ ayed, pres s OK to
confirm.
Select MELODY VOL using or . Press
OK.
To exit the menu, press the red key .
Setting the ear volume
During communication, you can
increase or decrease the audio
volume of your handset by pr ess ing
or key on the navigator.
the
15

LU 251619615_D20T_GB_SAGEM.book Page 16 Jeudi, 26. août 2004 4:54 16
HANDSET SETTINGS
On the navigator key , press or until
the HS SET screen is displ ayed, pres s OK to
confirm.
Select EAR VOLUME using or . Press
OK.
Press or to increase or decrease the
default volume. Once the volume is set,
OK.
press
To exit the menu, press the red key .
Using the auto answer features
When active, the auto answer feature
enables you to automatically a nswer as s oon
as you remove the handset from its base.
On the navigator key , press or until
the HS SET screen is displ ayed, pres s OK to
confirm.
Select AUTO ANSWER using or . Press
OK.
A screen displays the current status (ON or
OFF).
• To change the status, press or .
Press OK.
• To keep the status, press C.
Select CHANG E NAME using or . Press
OK.
The current name will be displayed. Delete
the current name using the C key then enter
the new name using the keypad. Press OK.
One can put that 5 characters for the
name of handset.
To exit the menu, press the red key .
Modifying the language
This function enables you to change the
screen display language.
On the navigator key , press or until
the HS SET screen is dis played, pres s OK to
confirm.
Select LANGUAGE using or . Press
OK.
An information screen presents the current
language used.
• To change the setting, press or to
select the language. Press OK.
• To keep the setting, press .
To exit the menu, press the red key .
To exit the menu, press the red key .
Change the name of the handset
On the navigator key , press or until
the HS SET screen is displ ayed, pres s OK to
confirm.
Modifying the date and time
On the navigator key , press or until
the HS SET screen is dis played, pres s OK to
confirm.
Select DATE-TIME using or . Press OK.
16

LU 251619615_D20T_GB_SAGEM.book Page 17 Jeudi, 26. août 2004 4:54 16
HANDSET SETTINGS
Enter the date in DD/MM format then the time
in HH/ MM format and press OK.
To exit the menu, press the red key .
Modifying the voice box number
First, contact your service provider
who will give you all information
concerning the operation of your
voice mail.
To listen to your voice box i n the idle
state, give the key a long press.
A default number for your voice messaging
service is set in the factory. To change this
number, proceed as follows:
On the navigator key , press or until
the HS SET screen is displ ayed, pres s OK to
confirm.
Select VOICE BOX NO using or . Press
OK.
The programmed number is d isplayed o n the
screen,
• The number is correct, press OK.
• To modify the number, press C to delete
the number. Enter the number. Press
OK.
To exit the menu, press the red key .
17

LU 251619615_D20T_GB_SAGEM.book Page 18 Jeudi, 26. août 2004 4:54 16
BASE SETTINGS
BASE SETTINGS
Modifying the default base ring
volume
On the navigator key , press or until
the BASE SET screen is displayed, press
OK to confirm.
Select RING VOLUME using or . Press
OK.
Press or to increase or decrease the
default volume. Once the volume is set,
OK.
press
To exit the menu, press the red key .
Modifying the base ringtone
This menu enables you to associate a
ringtone to incoming calls and internal calls
(intercom).
On the navigator key , press or until
the BASE SET screen is displayed, press
OK to confirm.
Modifying the flash duration
(R key)
If you connect your telephone to a private
automatic branch exchange or use it in a
foreign country, you may need to modify the
flash duration in order to use your telephone
correctly.
Contact your service provider to obtain the
correct flash duration and then modify it by
doing the following. Five preprogrammed
durations are proposed on the list, the
correspondence between the number of the
list and the duration is the following :
number
1 80 ms
2 100 ms
3 180 ms
4 300 ms
5 600 ms
On the navigator key , press or until
the BASE SET screen is displayed, press
OK to confirm.
corresponding
duration
Select RINGTONE using or . Press OK.
Select the desired ringtone using or .
Press OK.
To exit the menu, press the red key .
Select FLASH DURA us ing or . Press
OK.
An information screen presents the current
flash duration.
• To keep the same time, press C key.
• To modify the time, press OK. Select the
new flash time using or . Press OK.
To exit the menu, press the red key .
18

LU 251619615_D20T_GB_SAGEM.book Page 19 Jeudi, 26. août 2004 4:54 16
BASE SETTINGS
Modifying the pause duration
If you connect your telephone to a private
automatic branch exchange, you may need
to modify the pause duration in orde r to use
your telephone correctly. Four
preprogrammed durations are proposed on
the list, the correspondence between the
number of the list and the duration is the
following.
number
11 second
2 1,5 second
3 2 seconds
4 3 seconds
On the navigator key , press or until
the BASE SET screen is displayed, press
OK to confirm.
Select PAUSE DURA using or . Press
OK.
An information screen presents the current
pause duration.
• To keep the same time, press C.
• To modify the time, press OK. Select the
new pause time using or . Press
OK.
To enter the pause mode during
dialling, press the
P appears.
To exit the menu, press the red key .
corresponding
duration
key until letter
Modifying the base code
The base code (0000 being the default
setting) is required to access certain security
functions. It must be composed of 4 digits
miminum up to 8 digits maximum.
On the navigator key , press or until
the BASE SET screen is displayed, press
OK to confirm.
Select CHANGE CODE using or . Press
OK.
Enter the old base code using the keypad
(default is 0000). Press OK.
Enter the new base code using the keypad.
Press OK.
Confirm by entering the new base code
again. Press OK.
To exit the menu, press the red key .
Note carefully the new base cod e on
the back cover, you will need it to
modify some parameters.
Re-initialize the base
When you re-initialize your base, all the bas e
parameters are reset to their initial values
(factory settings).
On the navigator key , press or until
the BASE SET screen is displayed, press
OK to confirm.
19

LU 251619615_D20T_GB_SAGEM.book Page 20 Jeudi, 26. août 2004 4:54 16
BASE SETTINGS
Select REINIT BASE using or . Press
OK.
Enter the base code. Press OK.
To exit the menu, press the red key .
When you re-initialize the base, the
base code becomes 0000 again.
20

LU 251619615_D20T_GB_SAGEM.book Page 21 Jeudi, 26. août 2004 4:54 16
REGISTRATION
REGISTRATION
Two SAGEM D20 handsets can be
logged on to one base station.
A handset can be logged on to u p to
four different base stations.
Registering a second handset to
a base
To register a second handset to a base you
must:
• put the handset in registration mode,
• put the base in registration mode.
Once this is done, the registration (mutual
recognition of the base and the new handset )
will be done automatically (registration can
take a few seconds).
Pick up the handset which you want to
register:
On the navigator key , press or until
the REGISTRATION screen is displayed,
press OK to confirm.
Select REGISTER HS using or . Press
OK.
On the base:
Put the base to which you want to link the
telephone set in registration mode and press
the base button for several seconds.
The green light blinks rapidly, the base is in
registration mode during 3 minutes.
The new handset and the base are mutually
searching for each other. The registration
may take several seconds.
Once the handset is registered, the handset
automatically exits the registration mode.
You will here an acoustic signal and the
number which it was given during the log-on
will be displayed.
To exit the menu, press the red key .
The green light will continue to light up for
three minutes.
Modifying the base preference
This function enables you to specify which
base will be used by your handset to make
calls (if your handset is registered to several
bases).
Select the base station number by pre ssing a
corresponding key (1, 2, 3 or 4).
Enter the code of the base station which the
handset is to be registered on to. Press OK.
The handset enters the registration mode.
You cannot select the base
preference if the handset is not
registered on it.
The symbol opposite the base
number indicates that the base can
be selected.
On the navigator key , press or until
the REGISTRATION screen is displayed,
press OK to confirm.
21

LU 251619615_D20T_GB_SAGEM.book Page 22 Jeudi, 26. août 2004 4:54 16
REGISTRATION
Select SELECT BASE using or . Press
OK.
Select the base preference ( indi ca ted by the
icon) using or . Press OK.
To exit the menu, press the red key .
De-registering a handset
This function enables you to de-register a
handset from your base. This may be
necessary if you have lost a hands et or if y ou
already have 2 handsets registered to the
same base.
To de-register the handset 1 from
the base, you can do she the
following : on the handset 2 and
conversely register the handset 2.
On the navigator key , press or until
the REGISTRATION screen is displayed,
press OK to confirm.
Select DEREGIST HS using or . Press
OK.
Enter the base code using the keypad
(default is 0000). Press OK.
A screen prompts you to confirm the
unregistration. Press OK to unregister the
handset.
To exit the menu, press the red key .
22

LU 251619615_D20T_GB_SAGEM.book Page 23 Jeudi, 26. août 2004 4:54 16
APPENDIX
Care and Maintenance
Use a slightly damp cloth to wipe the base and handset as well as charging contacts, do not
use a dry cloth as this may cause electrostatic charges.
Problems
Refer to the table presented below in case of an operational malfunction:
Problems Remedies
The base indicator light is not lit Make sure that :
The handset display is blank Make sure that the batteries are properly installed.
The handset does not ring
during an incoming call
No radio link between the
handset and b ase
The network indicator ic on
flashes
Programming not possible You have already logged in two handsets. You must delete one handset first
Interference during
communications
Entries will not be accepted in
the DIRECTORY.
• the power adapter is properly connected to a power socket.
• the power connector is properly plugged into the base.
• your fuse and circuit-breaker are in working order and that the power
socket is powered.
Place the handset on the base and fully charge the batteries.
To increase the life of your batteries, you can perform this operation about every
two months.
If these precautionary measures do not resolve this issue, replacement
batteries are available through your reseller.
As time goes by, you may notice a slight decrease in battery performance. Use
your handset until the battery is fully discharged, and then charge it for at least
6 hours.
Note: as time goes by, you may notice a slight decrease in battery performance.
Use your battery until the battery is fully discharged, then char ge it for at least 6
hours. Fully discharging the batteries at least once every two months will help
them to last as long as possible.
Make sure that the telephone is properly connected and that you have a dial
tone.
Make sure that your telephone is not set to silent mode (refer to paragraph
Modifying the default handset melody volume, page 15).
Make sure the handset is registered by moving closer to the base, if it is
registered correctly, the handset screen should display its own handset numb er.
Otherwise, register the handset to the base (refer to paragraph Registering a
second handset to a base, page 21).
(refer to paragraph De-registering a handset, page 22).
Radio Interference occur during programming, retry the programming, if
possible move closer near the D20T base station.
Out of range or close to other electrical appliances :
Check the handset is not emitting the out of range warning tone. If close to
other electrical device move away. You may need to reconsider the location of
your D20T Base if this problem persists.
Directory is full :
Up to 25 names and numbers can be stor ed in the D20T Directory . Delete some
of the older entries to make more space for new one.
23

LU 251619615_D20T_GB_SAGEM.book Page 24 Jeudi, 26. août 2004 4:54 16
APPENDIX
Time reset to 12:00 The base power was removed or base was reset :
D20T is in strange mode Reset all the user-set features to the factory DEFAULT (refer to paragraph Re-
D20T cannot make call The base unit may not be correctly connected:
Base Station does not function Error in connection or lack of power supply:
Handset does not function Battery may not be installed correctly:
Registration fail Wrong registration procedure:
The handset displays "non
enregist"
The base if power was interrupted, the time will also reset or perform Default.
Please set the time again.
Replace or remove the batteries
initialize the base, page 19).
Ensure the base unit is correctly installed and connected. Make sure that the
power is On.
Other handset are already in communications (in multi handset user):
Make sure that, only one internal or external call can be made at the same time.
Ensure that other handset is not already in communication prior to use.
Network Failure:
Try making a call from another telephone. If unsuccessful, contact your network
supplier.
If connected to PABX:
Make sure you have entered the correct PABX code in PBX feature of D20T.
Ensure that the Adaptor power sup ply has been connected to the D 20T and and
the adaptor is properly plug in to the AC power plug. Ensure that the AC power
should match the Adapotr AC voltage.
Make a power off / on reset of the base by removing and plug-in back the power
supply.
Ensure that the battery pack has been correctly installed. Follow the polarity
marking of the baterry and the drawi ng on D20T handse t batte ry comp artme nt.
Make sure the battery is fully charge. If not, need to charge it on the base cradle.
If the rechargeable batteries are not being properly recharged, please change
them (refer to chapter Erreur ! Source du renvoi introuva ble., Fehler! Textm arke
nicht definiert.). In order to prevent any damage to your handset, only use
rechargeable batteries of the following type: NiMH 1.2 V 600 mAh AAA. Do not
use non-rechargeable batteries.
Make sure that you know your D20T system CODE. If you are registering a new
handset to your D20T base, (refer to paragraph Registering a second handset
to a base, page 21). Try again if possible.
Your handset is not registered on a base, (refer to paragraph Registering a
second handset to a base, page 21).
Note: When the handset is not registered on a base, you can access only to the
REGISTRATION menu.
24

LU 251619615_D20T_GB_SAGEM.book Page 25 Jeudi, 26. août 2004 4:54 16
FEATURES
Functions Default settings Functions Default settings
Handset Date/Time 12:00 // 01/01/01
Beeps All active Name D20T
Ringer Base
Volume 4 Ringer
Melody EXT 3 Volume 4
Melody INT 1 Melody EXT/INT 3
Ear volume 4 Flash duration 4 (300 ms)
Auto answer On Pause duration 4 (3 sec)
Language Depending on country Base code 0000
Telephone features
Number of channels 120 Autonomy
Radio frequency band 1,88 - 1,90 GHz s tandby time up to 160 hours
Duplex mode TDMA talk time up to 13 hours
Spacing between 1,728 MHz Handset range
Bit rate 1152 Kbit/s open space up to 300 m
Modulation GFSK inside building up to 50 m
Vocoding ADPCM Base dimensions 140 x 88 x 60 mm
Transmitting power 250 mW Base weight 130 g
Base operating voltage 230 V , 50/60 Hz Handset dimensions 140 x 53 x 32 mm
Charging time 6 hours Handset weight 140 g
All of this data is provided to you for information purposes only. SAGEM SA reserves the right to make
any changes without notice.
25

LU 251619615_D20T_GB_SAGEM.book Page 26 Jeudi, 26. août 2004 4:54 16
ENVIRONMENT
Preservation of the environment as part of a sustainable development logic is an essential
concern of SAGEM SA.
The desire of SAGEM SA is to ope rate systems observing the envi ron ment and con sequentl y
it has decided to integrate environmental performances in the life cycle of its products, from
manufacturing to commissioning, use and elimination.
During the development of the D20 product, the concern for the environment was
incorporated, amongst other occasions, by:
• Optimization of the choice of materials to minimize/reduce depletion of resources:
- Use of recycled paper for these u sers instructions,
- Use of recycled material for pa ckaging.
• Participation in collection organizations:
- The presence of the green spot means that SAGEM SA pays a subscription to
an approved national organization. This subscription makes it possible to
develop infrastructures conjointly with local communities to improve recovery
and recycling of packaging.
- The product and consumables (batteries) with the barred dustbin logo must
not, in any case whatsoever be thrown away randomly or put inside dustbins
with other wastes (batteries must be removed before disposing of the product
at the end of its life cycle in compliance with instructions in this brochure).
Collection points are made available by the town halls or by distributors.
Also, observe the sorting rules defined for packaging waste.
• An improvement to the recyclable nature of the product:
- Decrease to the number of different types of material used in the product.
- Intentional marking of the plastic parts (if technically possible), to facilitate their
handling.
- Reduction in the use of materials dangerous for the environment (no PBB and
PBDE based fire retardants; NiMH batteries without heavy metals, etc.).
26

LU 251619615_D20T_GB_SAGEM.book Page 27 Jeudi, 26. août 2004 4:54 16
WARRANTY
Warranty Conditions for the SAGEM D20 Dectphones
The new equipment attached hereto (the "Equipment") is warranted (spare-parts and maintenance) by
SAGEM Communication UK Ltd ("SAGEM" ), su bject always to the following co nditi ons, agains t al l m anufacturing defects for a period of twelv e (12) months from t he date o f purchase of the equipment (the " Warranty"). The Warranty is subject always to proof of purchase being provided to SAGEM's reasonable
satisfaction. Therefore, we would recommend that you keep your purchase invoice or proof of purchase
in a safe place in order to avoid any future problems. To avoi d any doubt any accessorie s intended for use
with the Equipment (such as batteries, li ne cords etc .) shall be warrant ed for the shorte r of (i) the warranty
period stipulated in documentation accompan ying such accessories or (ii) three (3) months from the date
of purchase (as identified by valid proof of purchase).
Any and all Equipment which has required to be repaired during the above Warranty is thereinafter warranted (spare-parts and labour only) * by SAGEM until the later of (i) Expiry of the above warranty period
set out above or (ii) three (3) months from the date on which SAGEM carried out the intervention.
This Warranty applies only if the Equipment has been used in normal conditions, in accordance with all
relevant instructions and provided that the Equipment is used properly for its intended purpose and has
not been subject to misuse or abuse.
In the unlikely event that you suffer any technical problems during the Warranty period, you must come
back to your reseller who will organise an intervention for the repair of your equipment via the Sagem's
Authorised Service Centre. Alternatively, please send your machine for repair directly at the Sagem's
Authorised Service Centre placing your product in a suitable packaging with the following indications:
Please state the following licence number on the right end top of your packaging for the transportati on to
be at Sagem's expenses: SEA9898
Under this Warranty, provided that we have received notification of any warranty claim during the period
of the Warranty set out above, your Equipment will be sent by yourself via the process described above,
repaired and shipped back to your address in the mainland UK at no expense to you. No replacement
equipment will be provided during the repair process.
Prior to any repair of the faulty Equipment, please ensure that the following are performed:
• Save all the details/ information/ data in your DECT directory as they maybe erased. SAGEM shall
be under no liability in the event of damage caused to your data and shall not under any circumstances reinstall the data in the Equipment.
• Remove all personal data from the Equipment. SAGEM shall perform its obligations hereunder in
accordance with the Data Protection Act 1984 and 1998 and all other relevant regulations.
• Include in the packing your name, address and telephone number.
• Make sure that all the accessories are included with the Equipment and, if possible, into the original
package.
• Include also a copy of the proof of purchase of your Equipment or the warranty card duly completed
by your retailer.
The statutory rights of consumers under mandatory provisions of law remain in force and are not in any way
affected by thi s g ua ran te e. Without prejudic e to the foregoing, If you are a c on su m er a s d efi ned in Section
12 of the Unfair Contract Ter ms Act 1977 nothing in these conditions shall affect your statutory rights.
Without prejudice to any other limitation state d in this respect the abov e Warranty shal l not cover and SAGEM shall have no obligation with respect to the following: -
Sagem Service Centre
FREEPOST SEA9898
Caldicot
NP26 5BR
27

LU 251619615_D20T_GB_SAGEM.book Page 28 Jeudi, 26. août 2004 4:54 16
WARRANTY
1) Defects breakdown or malfunctions due to:
• failure to properly follow the installation process, the operating manual and/or the instruc tions for
use; or
• an external cause to the Equipment (including but not limited to, shock, lightening, fire, vanda-
lism, malevolent action, contacts with various liquids or vermin or water damage of any nature,
inappropriate electric voltage); or
• modifications to the Equipment made without the written approval of SAGEM; or
• a lack of every day maintenance (as described in the documentation supplied with the Equip-
ment) or to a lack of supervision or care; or
• bad storage or environmental conditions, particularly those related to temperature and hygro-
metry, effects of variations of electric voltage, parasites from the electric network or from the
earth; or
• repair, work (opening or attempt to open the Equipm ent), alt eration, tamper ing or main tenance of
the Equipment by persons not authorised by SAGEM.
2) Damage due to insufficient or bad packaging of Equipment when returned to the Authorised Repair
Centre.
3) Wear and tear from normal daily use of the Equipment and its accessories.
4) Communication problems related to an unsuitable environment, including in particular:
• problems related to access to the telephone network such as interruptions by access networks or
malfunction of the line used by the subscriber or his correspondent, poor line telephone quality,
• transmission faults (for example, poor geographical coverage by radio transmitter line quality, or
any interference between the environment and the radio transmitter),
• modifications of parameters of telephone network carried out after the sale of the Equipment.
5) Supply of new versions of software.
6) Work in connection with normal use: delivery, installation or exchange of consumable supplies,…
7) Work on any Equipment or software modified or added without the consent of SAGEM.
8) Malfunction due to the use of products, consumables or accessories, which are not compatible with
the Equipment and which have not been approved by SAGEM.
9) Equipment returned to the Call Centre or the Authorised Service Centre without its prior consent.
To avoid any doubt, Charges (repair and delivery costs) will apply - which will be advised in advance by
SAGEM - for service requested by you where the Equipment is excl uded as above from the Warranty and
for service provided after expiry of the 12 month warranty period (3 months for accessories) and must be
paid in advance of the Equipment arriving at the Authorised Service Centre.
WARNING:
1. Defective spare-parts will become property of SAGEM. You hereby agree to SAGEM retaining any
and all defective spare parts.
2. Subject to legal mandatory provisions, the express warranties set forth in this document are in lieu of
all other warranties express or implied to the fullest extent permitted by law. Especially, SAGEM makes no representations or warranty as to quality or fitness of the Equipment f or any particular purpos e.
SAGEM's liability in respe ct o f any c laim by the C ustome r or any third party for direct loss o r dam age,
whether arising in contract, tort or otherwise or from SAGEM's negligence or otherwise in respect of
its supply or services shall not exceed the price paid by the Customer for the Equipment . In no event
shall SAGEM be liable for indirect, special or consequential damage of any kind to you or any third
party (including but not limited to loss of orders, loss of profits, damage to goodwill or reputation, interruption of service and any other financial or commerci al damage ) whether bas ed on warranty contract or tort.
28

LU 251619615_D20T_GB_SAGEM.book Page 29 Jeudi, 26. août 2004 4:54 16
WARRANTY
The foregoing shall apply only for the UK. If any provision of this warranty shall be held to be in whole or
in part invalid or illegal due to an obligatory rule applicable to consumers pursuant to English legislation,
such invalidity or illegality shall not impair or affect the remaining provisions or parts of this warranty.
Any dispute arising from the terms of these Warranty Conditions shall be governed by English law.
The operation of the provisions of the Con tracts (Rights of Third Parties) Act 19 99 sh all be exc luded fr om
this Warranty.
To avoid any doubt, this warranty is not assignable to third parties.
29

4 COUV.fm Page 30 Mercredi, 13. octob re 2004 2:10 14
Emergency number
In order to be able to dial an emergency number (e.g. 112), you must unlock the keypad first.
To unlock the keypad, give the key a long press.
European emergency call number
(Police - Fireman - Medical emergency)
112
Base code
Note here the code which you have entered.
Data subject to change without notice
User Manual
*251619615A*
Société anonyme à directoire et conseil de surveillance au capital de 36.405.229 € - 562 082 909 R.C.S. PARIS
27, rue Leblanc - 75512 PARIS CEDEX 15 - FRANCE
E
http://www.sagem.com
 Loading...