

Page 1

Registered in England & Wales No. 8223512. Due to continued product improvement, the products illustrated or photographed
in this document may vary slightly from the actual product.
Copyright BRG Appliances 2015.
BGR840 UKM Issue - A15
Freephone (UK Landline): 0808 178 1650
Mobile Calls (National Rate): 0333 0142 970
www.sageappliances.co.uk
customerservice@sageappliances.co.uk
Register your product and get
more from your purchase
Product registration takes only a few
minutes and ensures a record of your
purchase. Registration also makes it
easier to get support and advice on any
questions or issues that you might have
in the future. If you wish, we can also send
you free recipes and additional hints and
tips on making the best of your appliance.
Go to www.sageappliances.co.uk
and click on ‘Product Registration’.
What’s on your mind?
Our constant aim is to improve the quality
and features of our appliances.
We welcome your comments and ideas in
assisting our ongoing development.
Go to www.sageappliances.co.uk
and click on ‘Support’.
Sage™ by Heston Blumenthal‰
Customer Service Centre
BGR840
the Smart Grill
™
Pro
Instruction Booklet
Page 2

2 3
CONTENTS WE RECOMMEND SAFETY FIRSTCONTENTS
3 We recommend safety first
7 Getting to know your new appliance
9 Assembling your new appliance
10 Operating your new appliance
16 Grilling tips
17 Care & cleaning
19 Troubleshooting
20 Starter recipes from Sage
READ ALL INSTRUCTIONS
BEFORE USE AND SAVE FOR
FUTURE REFERENCE
• Before using for the first
time please ensure that
your electricity supply is the
same as shown on the rating
label on the underside of the
appliance. If you have any
concerns please contact your
local electricity company.
• Your Sage™ by Heston
Blumenthal
‰
appliance
includes a BS 13 amp
moulded mains plug on the
supply cord.
• Should you need to change
this plug, please complete
the rewiring as follows
(after safe disposal of the
moulded plug).
• Please note that a cut off plug
inserted into a socket is a
serious danger risk
• Wires are coloured as follows:
−Blue = Neutral
−Brown = Live
−Green & Yellow = Earth
• As the colours of the wire
may not correspond with the
coloured markings which
identify the terminals in
your plug, please refer to
the following:
−The Blue wire must be
connected to the terminal
which is marked ‘N’.
−The Brown wire must be
connected to the terminal
which is marked with the
letter ‘L’.
−The Green & Yellow wire
must be connected to the
terminal which is marked
with the letter E or the earth
symbol
.
• Please note that if a 13 amp
plug is used, a 13 amp fuse
should be used.
IMPORTANT SAFEGUARDS
At Sage™ by Heston Blumenthal‰ we are very safety conscious.
We design and manufacture consumer products with the safety of
you, our valued customer, foremost in mind. In addition we ask that
you exercise a degree of care when using any electrical appliance
and adhere to the following precautions.
Page 3

4 5
WE RECOMMEND SAFETY FIRST WE RECOMMEND SAFETY FIRST
• Remove and safely discard
any packaging material
and promotional labels
before using the grill for
the first time.
• To eliminate a choking
hazard for young children,
remove and safely discard the
protective cover fitted to the
power plug of this appliance.
• Do not place the grill near
the edge of a bench or table
during operation. Ensure
the surface is level, clean
and free of water and
other substances.
• Do not use the grill on a sink
drain board.
• Do not place the grill on or
near a hot gas or electric
burner, or where it could
touch a heated oven.
• Position the grill at a
minimum distance of 20cm
away from walls, curtains,
cloths and other heat
sensitive materials.
• Always operate the grill on
a stable and heat resistant
surface. Do not use on a clothcovered surface, near curtains
or other flammable materials.
SAVE THESE INSTRUCTIONS
• Always ensure the grill is
properly assembled before
use. Follow the instructions
provided in this book.
• The appliance is not intended
to be operated by means of
an external timer or separate
remote control system.
• The lid and the outer
surface will be hot when the
appliance is operating.
• The temperature of accessible
surfaces will be high when
the appliance is operating
and for some time after use.
• Do not place anything on
top of the grill when the lid
is closed, when in use and
when stored.
• Always switch to the
appliance to the off position,
switch off at the power outlet,
then unplug the power cord
and cool completely when
the appliance is not in use or
before cleaning, attempting
to move, assembling,
disassembling and storing.
• Keep the grill clean. Follow
the cleaning instructions
provided in this book.
• The connector must be
removed before the appliance
is cleaned and that the
appliance inlet must be
dried before the appliance
is used again.
This appliance is marked with
a hot surface symbol, the lid
and the outer surface will be hot
when the appliance is operating
and for some time after use.
IMPORTANT SAFEGUARDS
FOR ALL ELECTRICAL
APPLIANCES
• Fully unwind the power cord
before use.
• Do not let the power cord
hang over the edge of a
bench or table, touch hot
surfaces or become knotted.
• Keep the appliance and its
cord out of reach of children
less than 8 years.
• To protect against electric
shock do not immerse the
power cord, power plug or
appliance in water or any
other liquid.
• This appliance can be used
by children aged from 8 years
and above and persons with
reduced physical, sensory
or mental capabilities or
lack of experience and
knowledge if they have
been given supervision or
instruction concerning use
of the appliance in a safe
way and understand the
hazards involved.
• Children shall not play with
the appliance. Cleaning and
user maintenance shall not
be made by children without
supervision unless they are
aged from 8 years and above
and supervised.
Page 4
6 7
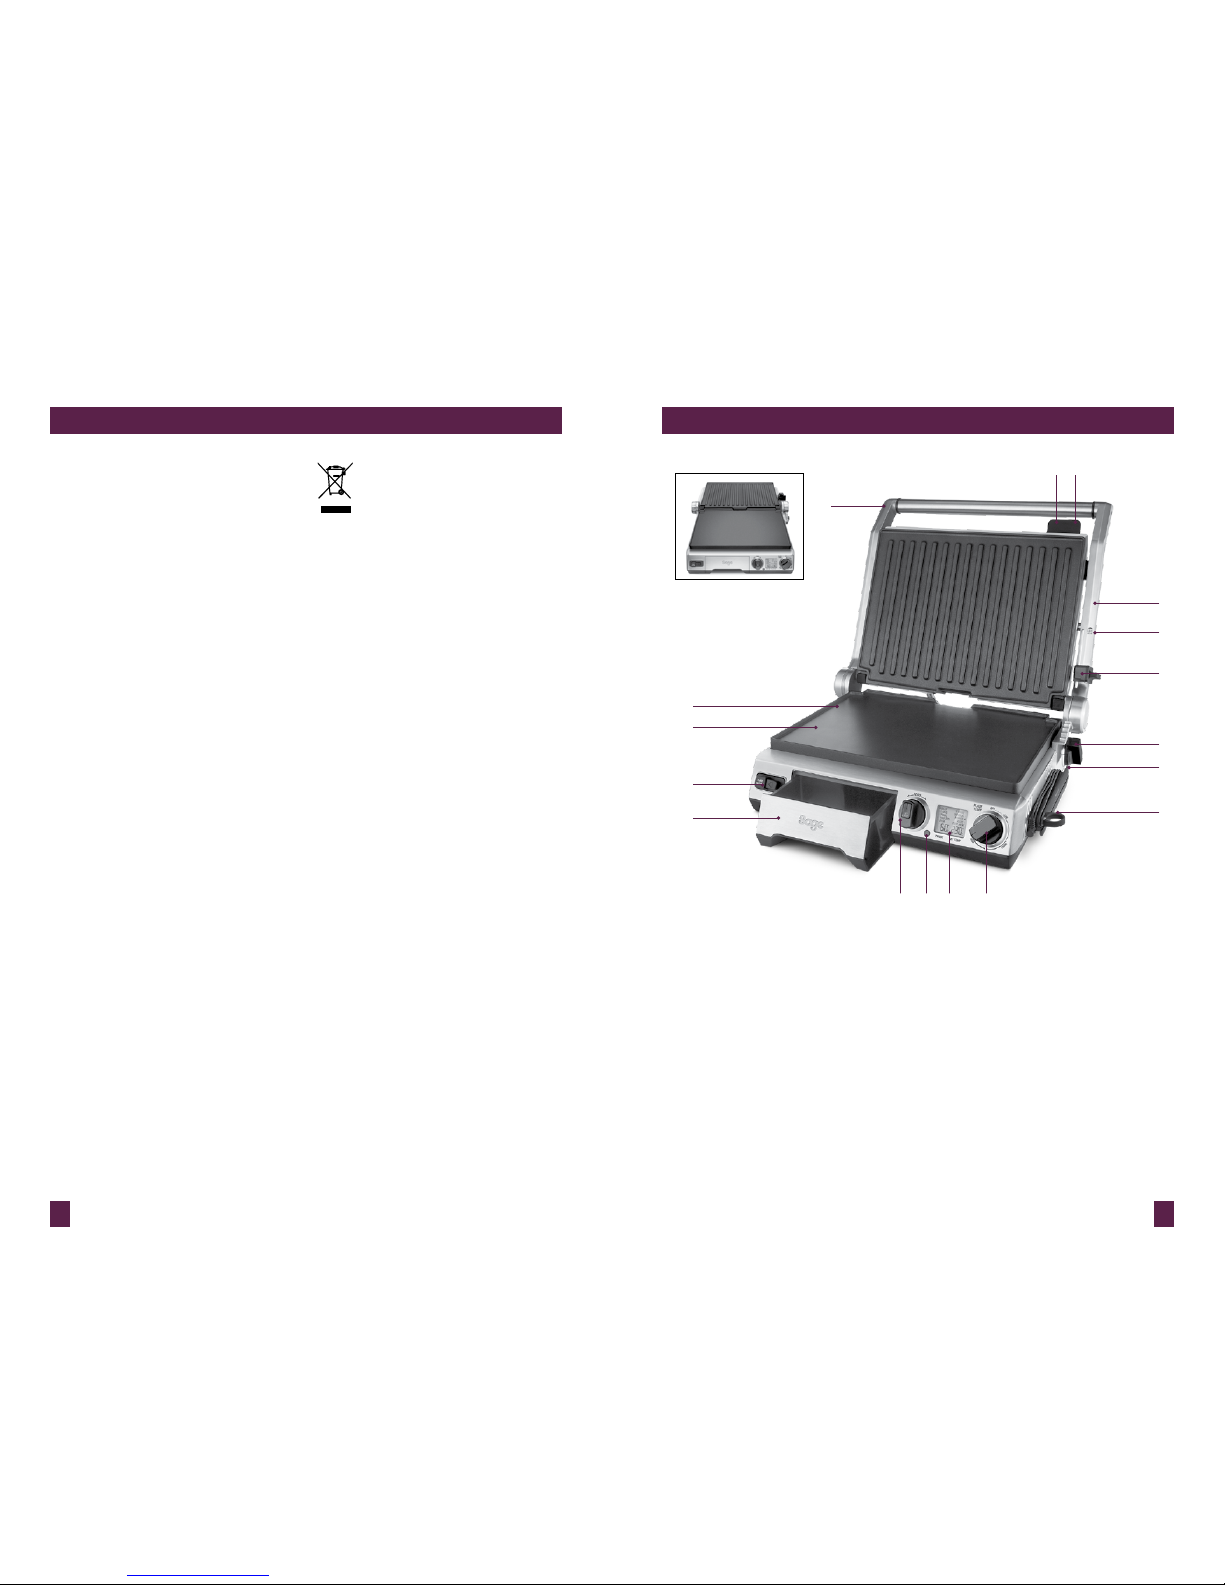
WE RECOMMEND SAFETY FIRST GETTING TO KNOW YOUR NEW APPLIANCE
A. Stainless Steel Housing with
Die-Cast Arms
B. Cast Aluminium, Non-Stick Plates
Coated with PFOA-free titanium infused
Quantanium™ for scratch resistance
and oil free cooking.
C. Removable, Interchangeable and
Dishwasher Safe Plates
Flat plate for eggs and panca kes, ribbed
plate to sear meats .
D. Food type selection dial with Sound Alert
Pressing t he centre button of the dial
toggles through the S et Temp
(Doneness) list.
E. Temperature Conversion But ton
Converts the d efault Celsius reading
to Fahrenheit.
F. Smart Settings with Rest Indicator
5 meat setting s have programmed
temperature s for your chosen donenes s.
G. Temperature Dial (160°C–230°C)
With Low, Pani ni (sandwich) and Sear
modes.
H. Integrated Probe wit h Sage Assist™ Loop
& Probe Storage
For precision cooking and e asy storage.
A
B
C
P
O
ED F G
H
Q
I
J
K
L
N M
Open Flat BBQ Mode
Opens flat into a
1650 sq. cm grilling
surface.
• It is recommended to
regularly inspect the
appliance. Do not use the
appliance if power cord,
power plug or appliance
becomes damaged in
any way. If damaged or
maintenance other than
cleaning is required, please
contact Sage Customer
Service on 0808 178 1650 |
0333 0142 970 or go to
sageappliances.co.uk.
• This appliance is for
household use only.
Do not use this appliance
for anything other than its
intended use. Do not use in
moving vehicles or boats.
Do not use outdoors.
Misuse may cause injury.
• The installation of a residual
current device (safety switch)
is recommended to provide
additional safety protection
when using electrical
appliances. It is advisable that
a safety switch with a rated
residual operating current not
exceeding 30mA be installed
in the electrical circuit
supplying the appliance.
See your electrician for
professional advice.
The symbol shown
indicates that this
appliance should not be
disposed of in normal
household waste. It should be
taken to a local authority waste
collection centre designated
for this purpose or to a dealer
providing this service.
For more information, please
contact your local council office.
Page 5

8 9
GETTING TO KNOW YOUR NEW APPLIANCE
I. Adjustable Plate Ti lt
Adjusts the a ngle of the bottom cook ing
plate to drain fat s, or can be made flat for
eggs and panca kes.
J. Height Control & Locking Storage Clip
Locks the plate s into different height
positions during cooking & closed for
upright storag e.
K. BBQ Lock Release
L. 6 Adjustable Height Settings
Reduces the weight of t he top plate on
delicate foods or ca n be set high enough
for open melts.
M. Le velling Support
Integrated i nto the top plate release ,
use to adjust the po sition of the floating
top plate.
N. Top Plate Release
Removes the top cooking plate.
Independently remo ve the top and bottom
cooking plates for ea sy cleaning or to
interchange plate positions .
O. Bottom Plate Release
Removes the bot tom cooking plate.
P. Integrated, Removable Drip Tray
Catches excess fat for hea lthier cooking.
In BBQ mode, the u nique design
drains fat from both plates i nto the
same drip t ray.
Q. Cord Storage
Located on the unde rside of the grill.
1-Hour auto shut-off automatically stops
heating the cooking plates after 1 hour
of inactivity.
ELEMENT IQ™
Sensors detect when the cooking plates drop in
temperature and compensate by injecting heat
for rapid recovery back to the selected cooking
temperature. 2400 watt embedded heating
elements ensure consistently high heat for
faster cooking and reduced preheating time.
ASSEMBLING YOUR NEW APPLIANCE
PREPARING THE GRILL FOR USE
1. Remove and safely discard any packing
material and promotional labels from
the grill.
2. Wipe the cooking plates and drip tray with
a soft damp sponge. Dry thoroughly.
3. Ensure the drip tray is correctly inserted
into the grill.
4. Ensure the cooking plates are correctly
inserted and securely locked into position.
5. Place the grill on a flat, dry surface. Ensure
there is a minimum distance of 10cm of
space on both sides of the appliance.
6. Remove probe from packaging and insert
jack into the socket on the front face of the
Probe Storage area located on the right
hand side of the grill. When not in use,
wrap probe cord around Probe Storage.
7. Unwind the power cord completely and
insert the power plug into a grounded
wall outlet.
8. The grill alert will sound and the LCD
screen will display OFF.
9. The grill is now ready for the
preheating cycle.
The grill features 2 x PLATE RELEASE. These
allow you to independently remove the top and
bottom cooking plates for easy cleaning, or to
interchange plate positions.
USING THE PLATE RELEASE
• To use the PLATE RELEASE:
− Always ensure the grill is completely cool.
Use the handle to open the top plate to a
90 degree position.
− Use the ‘Plate Release’ on the front, right
side of the top plate to remove the top
cooking plate, and the ‘Plate Release’
on the left side of the control panel to
remove the bottom cooking plate.
Once released, gently slide the plates
off the grill.
• If the cooking plates are incorrectly
inserted, the LCD screen will display Er1.
Use the 2 x PLATE RELEASE to remove
the plates then re-insert so they securely
lock into position. Always ensure the grill
is completely cool before releasing and
removing the cooking plates.
• When the grill is turned on and heating
for the first time, it may emit a fine
smoke haze. This is due to the protective
substances on the heating elements.
It is safe and not detrimental to the
performance of the grill.
Page 6

10 11
OPERATING YOUR NEW APPLIANCE OPERATING YOUR NEW APPLIANCE
PREHEATING THE GRILL
1. Ensure the top plate of the grill is in the
closed position, with the Height Control
Clip in the OPEN position. This will ensure
faster, more efficient preheating
2. Turn the PLATE TEMP dial to adjust the
temperature in 5°C increments. Rotate
the dial to SEAR (210°C–230 °C) for fast
preheating, PANINI (sandwich) (180°C–
205°C), LOW (160°C –175°C) or select an
alternative temperature.
3. The grill will start to heat and the LCD
screen will illuminate orange. Selected
temperature that corresponds to PLATE
TEMP will flash.
4. Once the grill has preheated to the selected
temperature, one alert will sound and the
selected PLATE TEMP will stop flashing.
NOTE
Always al low the grill to completely
preheat to the sele cted temperature
before cooking.
The temperat ure corresponding to
PLATE TEMP o n the LCD may flash
during the co oking process. This i s
normal , indicating that the corre ct
temperature i s being maintained .
ADJUSTABLE HEIGHT CONTROL
This feature reduces the weight of the top plate
on delicate foods like fish and accommodates
varying thicknesses of food like artisan breads.
Located on the right side of the top plate, the
clip fixes the top plate to a range of positions
above the bottom plate. To set the adjustable
height control, use the handle to lift the top
plate and simultaneously move the adjustable
height control clip to the desired height. Then
slowly lower the top plate until it rests on the
adjustable height control clip.
ADJUSTABLE TILT CONTROL
The angle of the cooking plates can be
adjusted by turning the PLATE TILT dial.
The PLATE TILT dial is located on the lower
back, right side of the grill. The unique indent
between the two cooking plates channels juices
from both plates into the same drip tray while
cooking.
We recommend using:
• The angle position to drain fats for
healthier cooking
• The flat position for cooking eggs,
pancakes, Turkish bread, focaccias and
leaner meats.
TEMPERATURE CONVERSION
BUTTON
• The grill features a temperature conversion
button on the left side of the LCD screen.
The temperature reading on the grill is
preset to Celsius. Pressing the temperature
conversion button converts the Celsius
temperature reading into Fahrenheit. The
corresponding °C or °F symbol will be
displayed on the LCD screen.
• If you have changed the default Celsius
temperature reading to Fahrenheit, the
setting will remain in the memory of the
grill until the Temperature Conversion
Button is pressed a second time or the
grill is unplugged from the wall outlet.
When the grill is plugged back into the
wall outlet, the temperature reading will
automatically return to the preset
Celsius setting.
OPERATING YOUR NEW APPLIANCE
INTEGRATED PROBE WITH SMART
SETTINGS
The integrated probe with smart settings is
designed to help achieve consistent doneness
results when cooking different meats.
5 meat settings have pre-programmed
temperatures to suit your desired doneness.
The set temperatures for each meat are
displayed in the chart below.
DONENESS SET TEMPERATURES
Rare Medium Rare Medium Well Done
Beef 55˚C 60˚C 65˚C 75˚C
Lamb 55˚C 60˚C 65˚C 75˚C
Pork 65˚C 75˚C
Poultry 65˚C 75˚C
Fish 45˚C 50˚C 55˚C 65˚C
REST INDICATOR
Resting meat for 3–5 minutes once it is taken
off the grill is important as it allows the muscle
fibres to relax and the juices to spread evenly
throughout the meat, preventing juices and
flavour being lost as it is cut open.
When cooking to a desired doneness, it
is important to remove the meat from the
grill before it reaches the desired internal
temperature as residual heat will continue to
cook the meat during the rest phase.
The Smart Grill Pro™ has a REST MEAT
indicator, which alerts you to remove your meat
before the SET TEMP is reached to prevent
over cooking.
NOTE
The probe and sm art settings hav e
been optim ised for cooking in contact
mode with the P LATE TEMP dial
turned to S EAR (230°C).
Page 7

12 13
OPERATING YOUR NEW APPLIANCE OPERATING YOUR NEW APPLIANCE
USE AS A CONTACT GRILL WITH
SMART SETTINGS AND PROBE
1. Repeat Preparation and Preheating Steps
on pages 8 & 9. For best results, set PLATE
TEMP dial to SEAR (230°C).
2. While the grill is preheating, adjust the
angle of the cooking plates to the desired
position by turning the PLATE TILT dial.
The PLATE TILT dial is located on the
lower back, right side of the grill.
3. Ensure probe is installed correctly as per
point 6 in the section PREPARING THE
GRILL FOR USE on page 8. Unwrap probe
from Probe Storage.
4. Insert probe gently into the side of the
meat, ensuring that it is positioned in the
thickest part and directly in the centre of
the meat.
5. To select meat type, rotate the FOOD
dial to scroll through food menu. An
arrow indicator will show alongside
selected meat.
SET TEMP PLATE TEMP
FOOD
SET
TEMP
6. Once meat type is selected, press the
SET TEMP button to scroll through
doneness settings. An arrow indicator
will show alongside selected doneness.
FOOD
SET
TEMP
SET TEMP PLATE TEMP
7. To open the grill:
a) Ensure the grill has completely preheated
and the LCD screen no longer flashes
PLATE TEMP.
b) Ensure the top cooking plate is closed.
The Height Control Clip, located on the
right side of the top plate, should be in the
OPEN position.
c) Use the handle to open the top plate to a
90 degree position.
d) Place meat with probe inserted on the
bottom cooking plate. For best results,
ensure PLATE TEMP dial is set on SEAR
(230°C).
8. Use the handle to close the top cooking
plate. When cooking with the probe it is
recommended that the top plate of the grill
is in the closed position, with the Height
Control Clip in the OPEN position.
9. During cooking 3 alerts will sound and
REST MEAT and selected doneness will
flash to indicate it is time to remove the
meat from the grill to rest.
10. When food is cooked, remove meat from
grill using heatproof plastic or wooden
utensils. Pull out probe and place meat
onto a plate or tray. Cover loosely with foil.
Allow to rest for a minimum of 5 minutes
before serving.
11. To turn off grill, turn PLATE TEMP dial to
the OFF position.
NOTE
The gril l does not automatically stop
cooking once R EST MEAT flashes.
If meat is not remov ed you risk over
cooking.
FOR BEST RESULTS
• For even results, select meat with
even thickness.
• When cooking cuts of meat with irregular
thicknesses such as chicken breast, edges
can remain slightly pink. After cooking is
complete, sear any undercooked edges on
the hot cooking plates.
• Do not use spray-on, non-stick coatings
as these will affect the performance of the
non-stick cooking plates.
• Never use metal or sharp utensils as these
can cause damage to the non-stick coating
of the cooking plates.
USE IN OPEN FLAT BBQ MODE
The grill opens flat into a 1650 sq. cm grilling
surface. The ribbed cooking plate is perfect for
searing meats while the flat cooking plate is
ideal for eggs, pancakes and vegetables.
1. Repeat Preparation and Preheating Steps
on pages 8 & 9.
2. While the grill is preheating, adjust the
angle of the cooking plates to the desired
position by turning the PLATE TILT dial.
The PLATE TILT dial is located on the
lower back, right side of the grill.
3. To open the grill into BBQ mode:
a) Ensure the grill has completely preheated
and the LCD screen no longer flashes
PLATE TEMP.
b) Ensure the top cooking plate is in the
closed position, with the Height Control
Clip in the OPEN position.
c) With your left hand, grip the handle.
With your right hand, pull the Height
Control Clip on the right side of the grill
towards you, into the BBQ mode position.
Continue to pull the clip forward and
simultaneously lift the handle to open,
then gently lower the top plate into the
horizontal BBQ mode position.
4. Place food on either or both of the cooking
plates. Refer to grilling tips (page 15) and
recipes (page 19).
5. If using the probe, repeat steps 3–6 on
page 11 to insert the probe and select
desired doneness setting before placing
meat on the grill.
NOTE
The probe and sm art settings hav e been
optimise d for cooking in contact mode.
As a result , additional cooking time
may be requi red when using the probe
in BBQ mode. For bes t results, it is
recommende d to flip meat regularly.
Page 8

14 15
OPERATING YOUR NEW APPLIANCE OPERATING YOUR NEW APPLIANCE
6. During cooking 3 alerts will sound and
REST MEAT and selected doneness will
flash to indicate it is time to remove the
meat from the grill to rest.
7. When food is cooked, remove meat from
grill using heatproof plastic or wooden
utensils. Pull out probe and place meat
onto a plate or tray. Cover loosely with foil.
Allow to rest for a minimum of 5 minutes
before serving..
8. To turn off grill, turn PLATE TEMP dial to
the OFF position.
USE AS A SANDWICH OR
PANINI PRESS
1. Repeat Preparation and Preheating Steps
on pages 8 & 9.
2. While the grill is preheating, adjust the
angle of the cooking plates to the desired
position by turning the PLATE TILT dial.
The PLATE TILT dial is located on the
lower back, right side of the grill.
NOTE
If the probe is con nected, food and
doneness menus w ill be displayed. I f
the probe is dis connected, the LCD w ill
only display temp erature that responds
to PLATE TEM P.
3. To open the grill:
a) Ensure the grill has completely preheated
and the LCD screen no longer flashes
PLATE TEMP.
b) Ensure the top cooking plate is closed. The
Adjustable Height Control Clip, located on
the right side of the top plate, should be in
the OPEN position.
c) Use the handle to open the top plate to a
90 degree position.
4. Place food on the bottom cooking plate.
5. Use the handle to close the top cooking
plate. When cooking open melts it is
recommended that the top plate of the grill
is in the closed position, with the Height
Control Clip in the HIGH position.
6. When the food is cooked, remove from the
cooking plates using heat proof plastic or
wooden utensils.
7. To turn off grill, turn PLATE TEMP dial to
the OFF position.
FOR BEST RESULTS
When toasting sandwiches on the PANINI
setting:
• Always place sandwiches in the centre
bottom plate.
• Toasting should take approximately
5–8 minutes. Exact toasting time will be a
matter of preference and the type of bread
and fillings used. For more tips and tricks,
refer to grilling tips (page 15) and recipes
(page 19).
• Never use metal or sharp utensils as these
can cause damage to the non-stick coating
of the cooking plates.
WARNING
• The surfaces of the grill are hot during and
after operation. Always use the integrated
leveling support/PLATE RELEASE on the
front, right side of the top cooking plate
when adjusting the position of the top plate.
Alternatively, use protective hot pads or
insulated oven mitts.
• Never grip the levelling support or use it
to open the top cooking plate. Always use
the grill handle to open and close the top
cooking plate.
• The levelling support may get hot during
and after operation. Always use the levelling
support as pictured.
• Fully unwind the power cord from the cord
storage before use.
Page 9

16 17
CARE & CLEANINGGRILLING TIPS
GRILLING TIPS
Meats
Recommended cuts:
• Beef - sirloin (New York), rump, rib eye
(scotch fillet), fillet.
• Lamb - trim lamb leg steaks, fillet eye of
loin and cutlets.
• Pork - butterfly loin steaks, spare ribs, leg
steaks, fillets, diced pork.
• It is not recommended to cook items with
thick bones such as T-bone steaks.
• If using a marinade recipe or pre-
marinated meats from your meat retailer,
drain excess marinade off and dab the
meat with paper towel before placing on
the grill. Some marinades contain high
sugar levels which can scorch on the
cooking plate.
• Do not pierce meat with a fork or cut
meat while cooking. This will let the juices
escape, resulting in a tougher, dry steak.
Use tongs instead
• When removing fish pieces from the grill,
use a flat heat resistant plastic spatula to
support the food.
CARE & CLEANING
Ensure the grill is turned OFF by turning the
PLATE TEMP dial to the OFF position. The
grill is OFF when the LCD screen displays
OFF. Remove the power plug from the wall
outlet. Allow the grill to cool completely before
disassembling and cleaning.
Always clean the probe, outer body, drip tray
and cooking plates after each use to prevent a
build-up of ingredients.
CLEANING THE PROBE
Wipe the metal probe and cord with a soft,
damp sponge. A non-abrasive liquid cleanser
or mild spray solution may be used to avoid
build-up of stains. Apply the cleanser to the
sponge, not the probe, before cleaning.
CLEANING THE OUTER BODY
Wipe the outer body with a soft, damp sponge.
A non-abrasive liquid cleanser or mild spray
solution may be used to avoid build-up of
stains. Apply the cleanser to the sponge, not
the grill surface, before cleaning. Rinse. Let all
surfaces dry thoroughly prior to inserting the
power plug into a wall outlet.
CLEANING THE DRIP TRAY
After each use, slide out the drip tray and
discard contents. Wash the tray in warm soapy
water with a soft, damp sponge. A non-abrasive
liquid cleanser may be used to avoid build-up
of stains. Apply the cleanser to the sponge,
not the tray, before cleaning. Rinse and dry
thoroughly. Always ensure to re-insert the drip
tray into the grill after cleaning and prior to
inserting the power plug into a wall outlet.
WARNING
Extreme caution must be used when handling
the drip tray containing hot fats and juices.
Do not immerse the body, power cord or power
plug in water or any other liquid as this may
cause electrocution.
CLEANING THE COOKING PLATES
1. Wipe the cooking plates with a soft cloth to
remove food residue.
2. Alternatively, release and remove the
cooking plates:
• Always ensure the grill is completely cool.
• Use the handle to open the top plate to a
90 degree position.
• Use the PLATE RELEASE on the front,
right side of the top plate to remove the top
cooking plate, and the PLATE RELEASE
on the left side of the control panel to
remove the bottom cooking plate.
• Once released, gently slide the plates off
the grill.
3. Place the cooking plates in the dishwasher
(top shelf only).
4. Alternatively, wash the cooking plates in
hot soapy water with a soft, damp sponge.
A non-abrasive liquid cleanser may be
used to avoid build-up of stains. Apply the
cleanser to the sponge, not the plate, before
cleaning. Remove stubborn residue with a
non-abrasive plastic scouring pad or nylon
washing brush.
5. Rinse and dry thoroughly. Always ensure
the cooking plates are correctly re-inserted
and securely locked back into position
after cleaning and prior to inserting the
power plug into a wall outlet.
Page 10

18 19
CARE & CLEANING TROUBLESHOOTING
NOTE
Do not use abrasive cleansers or metal
scouring pads on any of the interior or
exterior surfaces of the grill. These will
scratch the surfaces and damage the
non-stick coating on the cooking plates.
The underside of the cooking plate
may discolour over time and can form a
layer of corrosion. This is normal. Any
discolouration that may occur to either
side of the cooking plate will only detract
from the appearance of the plate and will
not affect the cooking performance.
To remove discolouration or corrosion,
use a non-abrasive plastic scouring pad
or nylon washing brush. Rinse and dry
thoroughly.
Ensure the round pad on the underside
of the plate is clean.
STORAGE
1. Ensure the grill is turned OFF by turning
the PLATE TEMP dial to the OFF position.
The grill is OFF when the LCD screen
displays OFF. Remove the power plug from
the wall outlet.
2. Allow the grill, cooking plates and drip tray
to cool completely.
3. Ensure the grill, cooking plates and drip
tray are clean and dry.
4. Ensure the drip tray is correctly
re-inserted into the grill.
5. Ensure the cooking plates are correctly
re-inserted and securely locked
into position.
6. Ensure the cooking plates are locked
together by sliding the adjustable
height control away from you, into
the LOCK position.
7. Wrap the probe cord around the PROBE
STORAGE on the right side of the grill,
then locate the probe into the recess on
the face of the PROBE STORAGE.
8. Store on a flat, dry, level surface.
Alternatively, the grill may be stored in an
upright position.
TROUBLESHOOTING
ERROR MODES
Er1 - Cooking Plates are inserted incorrectly.
When the LCD screen displays ‘Er1’ error mode:
1. Ensure the cooking plates are correctly and
securely inserted into position.
2. The LCD screen should no longer display
‘Er1’ error Mode.
3. If the problem continues, call Sage
Customer Service on 0808 178 1650 | 0333
0142 970 or go to sageappliances.co.uk.
Er2 - Probe temperature has exceeded 180°C.
When the LCD screen displays ‘Er2’ error mode:
1. Unplug the grill from the wall outlet.
2. Ensure the probe is not contacting the
heating plates.
3. Allow probe to cool.
4. Re-insert the plug into the wall outlet.
5. The LCD screen should no longer display
‘Er2’ error Mode.
6. If the problem continues, call Sage
Customer Service on 0808 178 1650 | 0333
0142 970 or go to sageappliances.co.uk.
Er3 - Overheat Protection.
When the LCD screen displays ‘Er3’ error mode:
1. Unplug the grill from the wall outlet
2. Ensure the grill is completely cool.
3. Re-insert the plug into the wall outlet.
4. The LCD screen should no longer display
‘Er3’ error Mode.
5. If the problem continues, call Sage
Customer Service on 0808 178 1650 | 0333
0142 970 or go to sageappliances.co.uk.
Page 11

21
STARTER RECIPES FROM SAGE
STARTER RECIPES
FROM SAGE
STARTER RECIPES FROM SAGE
MARINATED NEW YORK CUT STEAK
Serves 4
INGREDIENTS
125ml cup red wine
2 tablespoons olive oil
1 tablespoon Dijon mustard
1 small clove garlic, crushed
4 New York cut steaks – cut 3cm thick
METHOD
1. Combine all red wine, oil, mustard and
garlic ingredients and mix well. Add
steaks and allow to marinate for as long
as time permits.
2. Repeat Preparation and Preheating Steps
on pages 8 & 9. For best results, set PLATE
TEMP dial to SEAR (230°C).
3. While the grill is preheating, adjust the
angle of the cooking plates to the desired
position by turning the PLATE TILT dial.
4. Remove meat from marinade and
drain well.
5. Insert probe gently into the side of the
meat, ensuring that it is positioned in the
centre of the thickest part of the meat.
6. Rotate the FOOD dial to BEEF setting on
the food menu. An arrow indicator will
show alongside selected meat.
7. Once meat type is selected, use SET TEMP
button to scroll through doneness settings.
An arrow indicator will show alongside
selected doneness.
8. Place steak with probe inserted on the
bottom cooking plate. Ensure the top
cooking plate is closed.
9. Alerts will sound and REST MEAT and
selected doneness will flash to indicate it
is time to remove the meat from the grill
to rest.
10. Place steak onto a plate, cover loosely with
foil and rest for 3–5 minutes.
Serve with creamy m ashed potato and
a crisp salad .
Page 12

22 23
STARTER RECIPES FROM SAGE STARTER RECIPES FROM SAGE
OREGANO LAMB
Serves 4
INGREDIENTS
1 tablespoon olive oil
1 tablespoon lemon juice
1 tablespoon chopped fresh oregano
1 small clove garlic, crushed
600g lamb leg fillets, trimmed
METHOD
1. Combine oil, lemon juice, oregano, and
garlic in shallow dish and mix well.
2. Add lamb fillets and toss to coat evenly.
Marinate for 1 hour or as long as time
permits.
3. Repeat Preparation and Preheating Steps
on pages 8 & 9. For best results, set PLATE
TEMP dial to SEAR (230°C).
4. While the grill is preheating, adjust the
angle of the cooking plates to the desired
position by turning the PLATE TILT dial.
5. Remove meat from marinade and drain
well. Insert probe gently into the side of the
meat, ensuring that it is positioned in the
centre of the thickest part of the meat.
6. Rotate the FOOD dial to LAMB setting
on the food menu. An arrow indicator will
show alongside selected meat.
7. Once meat type is selected, use SET TEMP
button to scroll through doneness settings.
An arrow indicator will show alongside
selected doneness.
8. Place lamb with probe inserted on the
bottom cooking plate. Ensure the top
cooking plate is closed.
9. Alerts will sound and REST MEAT and
selected doneness will flash to indicate it
is time to remove the meat from the grill
to rest.
10. Place lamb onto a plate, cover loosely with
foil and rest for 3–5 minutes.
Serve with cr usty bread and a Greek salad .
TERIYAKI CHICKEN FILLETS
Serves 4
INGREDIENTS
2 tablespoons mirin
60ml Japanese soy sauce
1 tablespoon caster sugar
1 tablespoon cooking sake
4 single chicken breast fillets
METHOD
1. Combine mirin, soy, sugar and sake in
a bowl and mix well. Pour over chicken
breast fillets and toss to coat evenly.
Marinate for 1 hour or as long as
time permits.
2. Repeat Preparation and Preheating Steps
on pages 8 & 9. For best results, set PLATE
TEMP dial to SEAR (230°C).
3. While the grill is preheating, adjust the
angle of the cooking plates to the desired
position by turning the PLATE TILT dial.
4. Remove meat from marinade and drain
well. Insert probe gently into the side of
the chicken, ensuring that it is positioned
in the centre of the thickest part of the
chicken.
5. Rotate the FOOD dial to CHICKEN
setting on the food menu. An arrow
indicator will show alongside
selected meat.
6. Once meat type is selected, use SET TEMP
button to scroll through doneness settings.
An arrow indicator will show alongside
selected doneness.
7. Place chicken with probe inserted on the
bottom cooking plate. Ensure the top
cooking plate is closed.
8. Alerts will sound and REST MEAT and
selected doneness will flash to indicate it is
time to remove the chicken from the grill
to rest.
9. Place chicken onto a plate, cover loosely
with foil and rest for 5 minutes.
Serve with lemon we dges steamed rice.
Page 13

24 25
STARTER RECIPES FROM SAGE STARTER RECIPES FROM SAGE
LEMON AND SOY MARINATED
SALMON
Serves 4
INGREDIENTS
4 x 300g piece salmon fillet, skin removed
3 tablespoons light soy sauce
1–2 teaspoons wasabi paste
3 tablespoons lemon juice
2 teaspoons sesame oil
METHOD
1. Place salmon fillets into a shallow dish. Mix
soy, wasabi, lemon juice and sesame oil
together and mix well. Pour over salmon
and toss to coat evenly.
2. Repeat Preparation and Preheating Steps
on pages 8 & 9. For best results, set PLATE
TEMP dial to SEAR (230°C).
3. While the grill is preheating, adjust the
angle of the cooking plates to the desired
position by turning the PLATE TILT dial.
4. Remove fish from marinade and drain well.
Insert probe gently into the side of the fish,
ensuring that it is positioned in the centre
of the thickest part of the fish.
5. Rotate the FOOD dial to FISH setting on
the food menu. An arrow indicator will
show alongside selected meat.
6. Once meat type is selected, use SET TEMP
button to scroll through doneness settings.
An arrow indicator will show alongside
selected doneness.
7. Place fish with probe inserted on the
bottom cooking plate. Ensure the top
cooking plate is closed.
8. 3 alerts will sound and REST MEAT and
selected doneness will flash to indicate it is
time to remove the fish from the grill
to rest.
9. Place fish onto a plate, cover, loosely with
foil and rest for 5 minutes before serving.
BAGEL WITH SMOKED SALMON
AND CAPERS
Serves 4
INGREDIENTS
4 bagels – split
4 tablespoons cream cheese
8 slices smoked salmon
2 green onions, peeled and sliced finely
1 tablespoon drained capers, chopped
1 lemon
Freshly ground black pepper
METHOD
1. Repeat Preparation and Preheating Steps
on pages 8 & 9. For best results, set PLATE
TEMP dial to PANINI (160°C).
2. While the grill is preheating, adjust the
angle of the cooking plates to the desired
position by turning the PLATE TILT dial.
The PLATE TILT dial is located on the
lower back, right side of the grill.
3. Ensure the grill has completely preheated
and the LCD screen no longer flashes the
selected temperature that corresponds to
PLATE TEMP.
4. Spread base of bagels with cream cheese.
Lay salmon slices over, divide shallots
between the 4 bagels, sprinkle over capers
and squeeze with lemon juice. Season with
pepper and place top on bagel.
5. Place in pre–heated grill and allow top
plate to gently rest on bagels using the
adjustable height control.
6. Allow to toast for 2–3 minutes or until
required doneness. Remove from grill
and serve immediately.
PASTRAMI ON TURKISH WITH
MUSTARD MAYONNAISE
Serves 6
INGREDIENTS
Turkish bread cut into 6 equal sections
butter
18 slices pastrami
6 tablespoons djionase
2 vine–ripened tomatoes, sliced
120g baby spinach leaves
12 slices Swiss style cheese
Freshly ground black pepper
METHOD
1. Repeat Preparation and Preheating Steps
on pages 8 & 9. For best results, set PLATE
TEMP dial to PANINI (160°C).
2. While the grill is preheating, adjust the
angle of the cooking plates to the desired
position by turning the PLATE TILT dial.
The PLATE TILT dial is located on the
lower back, right side of the grill.
3. Ensure the grill has completely preheated
and the LCD screen no longer flashes the
selected temperature that corresponds to
PLATE TEMP.
4. Cut each section of Turkish bread through
the centre and set aside top pieces. Lightly
spread Turkish bread with butter. Divide
the pastrami between the Turkish bread.
Spread with djionaise.
5. Arrange tomato slices over and then baby
spinach leaves. Place cheese over each
Turkish bread and then top with reserved
bread slices.
6. Place Turkish bread in preheated grill and
allow grill to gently rest on bread
7. Allow to cook until Turkish bread is lightly
browned and cheese has melted slightly.
Page 14

26 27
NOTES NOTESNOTES
 Loading...