

Page 1

Registered in England & Wales No. 8223512. Due to continued product improvement, the products illustrated or
photographed in this document may vary slightly from the actual product.
Copyright BRG Appliances 2013.
BJE520UK Issue - B13
Phone: 0844 334 5110
www.sageappliances.co.uk
customerservice@sageappliances.co.uk
Register your product and
get more from your purchase
Product registration takes only a few
minutes and ensures both a record
of your purchase and your warranty.
Registration also makes it easier to get
support and advice on any questions or
issues that you might have in the future.
If you wish, we can also send you free
recipes and additional hints and tips on
making the best of your appliance.
Go to www.sageappliances.co.uk
and click on ‘Product Registration’.
What’s on your mind?
Our constant aim is to improve the
quality and features of our appliances.
We welcome your comments and ideas
in assisting our ongoing development.
Go to www.sageappliances.co.uk
and click on ‘Support’.
Sage™ by Heston Blumenthal‰
Customer Service Centre
Page 2
BJE520UK
the Nutri Juicer
™
Plus
Instruction Booklet
Page 3

2
PAge heAder.....
CONTENTS
3 We recommend safety first
8 Getting to know your
new appliance
10 Assembling your new appliance
14 Operating your new appliance
18 Disassembling your
new appliance
20 Care & cleaning
22 Troubleshooting
24 Tips on juicing
26 Fruit and vegetable facts
Page 4

3
PAge heAder.....
WE RECOMMEND SAFETY FIRST
READ ALL INSTRUCTIONS
BEFORE USE AND SAVE
FOR FUTURE REFERENCE
• Before using for the first
time please ensure that
your electricity supply is the
same as shown on the rating
label on the underside of the
appliance. If you have any
concerns please contact your
local electricity company.
• Your Sage™ by Heston
Blumenthal
‰
appliance
includes a BS 13 amp
moulded mains plug on the
supply cord.
• Should you need to change
this plug, please complete
the rewiring as follows
(after safe disposal of the
moulded plug).
• Please note that a cut off plug
inserted into a socket is a
serious danger risk.
• Wires are coloured as follows:
−Blue = Neutral
−Brown = Live
• As the colours of the wire
may not correspond with the
coloured markings which
identify the terminals in
your plug, please refer to
the following:
−The Blue wire must be
connected to the terminal
which is marked ‘N’.
−The Brown wire must be
connected to the terminal
which is marked with the
letter ‘L’.
• Please note that if a 13 amp
plug is used, a 13 amp fuse
should be used.
IMPORTANT SAFEGUARDS
At Sage™ by Heston Blumenthal‰ we are very safety conscious.
We design and manufacture consumer products with the safety
of you, our valued customer, foremost in mind. In addition we
ask that you exercise a degree of care when using any electrical
appliance and adhere to the following precautions.
Page 5

4
PAge heAder.....
WE RECOMMEND SAFETY FIRST
• Carefully read all instructions
before operation and save for
future reference.
• Remove any packaging
material and promotional
stickers and labels before
using the juicer for the
first time.
• Do not place the juicer near
the edge of a bench or table
during operation.
Ensure that the surface is
level, clean and free of water,
flour, etc. Vibration during
operation may cause the
appliance to move.
• Any significant spillage onto
the surface under or around
the appliance, or onto the
appliance itself, should be
cleaned and dried before
continuing to use
the appliance.
• Do not place the juicer on
or near a hot gas or electric
burner, or where it could
touch a heated oven.
• Always ensure the juicer is
properly assembled before
use. The appliance will not
operate unless properly
assembled. Refer to assembly.
• Do not leave the juicer
unattended when in use.
• Always ensure the juicer
is turned OFF by pressing
the OFF/ON switch on the
control panel to OFF. Then
switch the appliance OFF at
the power outlet and unplug
the cord. Make sure the
stainless steel filter basket
has stopped rotating and
the motor has completely
stopped before releasing
the safety locking arm and/
or attempting to move the
appliance, when the juicer
is not in use, and before
disassembling, cleaning
and storing.
• Do not operate the Juice
Extractor continuously
with heavy loads for more
than 10 seconds. Allow the
motor to rest for 1 minute
between each use. Recipes
in this instruction book are
not considered a heavy load.
However, hard fruits and
vegetables will put excess
strain onto the motor if a low
speed is selected. Please refer
to the juicing guide on page
12 to determine the correct
speed for the fruits and
vegetables selected
for juicing.
Page 6

5
WE RECOMMEND SAFETY FIRST
• When using the Froojie™
Disc and insert, always use
speed 1 and remove seeds
core and skin from fruit
before processing (seeds of
passionfruit, berries and kiwi
fruit are acceptable).
• Keep hands, fingers, hair,
clothing, as well as spatulas
and other utensils away
from the appliance
during operation.
• Do not push food into the
feed chute with your fingers
or other utensils. Always use
the food pusher provided. Do
not place hand or fingers into
food chute when it is attached
to the appliance.
• Be careful when handling the
stainless steel filter basket as
the small cutting blades at the
base of the filter basket are
very sharp. Mishandling may
cause injury.
• Do not use the juicer for
anything other than food
and/or beverage preparation.
• Keep the appliance clean.
Refer to Care, Cleaning
and Guarantee.
• Do not use appliance if the
rotating sieve (filter basket)
is damaged.
• Do not touch the small sharp
teeth and blades in the centre
of the juice disc.
• Do not touch the blade in the
feed chute.
• Do not run ice or hard fruit/
vegetables such as raw
beetroot and carrots through
the juicer when using the
Nutri Juicer™ Plus extractor.
• Remove rind from all citrus
fruit before juicing.
WARNING
Extra wide feed chute. Do not
place hands or foreign objects
down feed chute. Always use
the food pusher provided.
Page 7

6
IMPORTANT SAFEGUARDS
FOR ALL ELECTRICAL
APPLIANCES
• Fully unwind the power cord
before use.
• Do not use the appliance if
the filter basket is damaged.
• Do not let the power cord
hang over the edge of a
bench or table, touch hot
surfaces or become knotted.
• To protect against electric
shock do not immerse the
power cord, power plug or
appliance in water or any
other liquid.
• Children should be
supervised to ensure that
they do not play with
the appliance.
• Do not use the appliance if
power cord, power plug or
appliance becomes damaged
in any way. If damaged or
maintenance other than
cleaning is required, please
contact Sage™ by Heston
Blumenthal
‰
Customer
Service on 0844 334 5110 or
go to sageappliances.co.uk.
• This appliance is for
household use only. Do
not use this appliance for
anything other than its
intended use. Do not use in
moving vehicles or boats. Do
not use outdoors.
Misuse may cause injury.
• The installation of a residual
current device (safety switch
is recommended to provide
additional safety protection
when using electrical
appliances. It is advisable that
a safety switch with a rated
residual operating current not
exceeding 30mA be installed
in the electrical circuit
supplying the appliance.
See your electrician for
professional advice.
WE RECOMMEND SAFETY FIRST
Page 8

7
• This appliance can be used
by children aged from 8 years
and above and persons with
reduced physical, sensory or
mental capabilities or lack of
experience and knowledge
if they have been given
supervision or instruction
concerning use of the
appliance in a safe way
and understand the hazards
involved. Children shall
not play with the appliance.
Cleaning and user
maintenance shall not
be made by children
without supervision.
WARNING
Always make sure juicer cover
is clamped securely in place
before motor is turned on. Do
not unfasten interlock arm
while juicer is in operation.
The symbol shown
indicates that this
appliance should not be
disposed of in normal
household waste. It
should be taken to a
local authority waste
collection centre
designated for this
purpose or to a dealer
providing this service.
For more information,
please contact your local
council office.
WE RECOMMEND SAFETY FIRST
SAVE THESE
INSTRUCTIONS
Page 9
8
GETTING TO KNOW YOUR NEW APPLIANCE
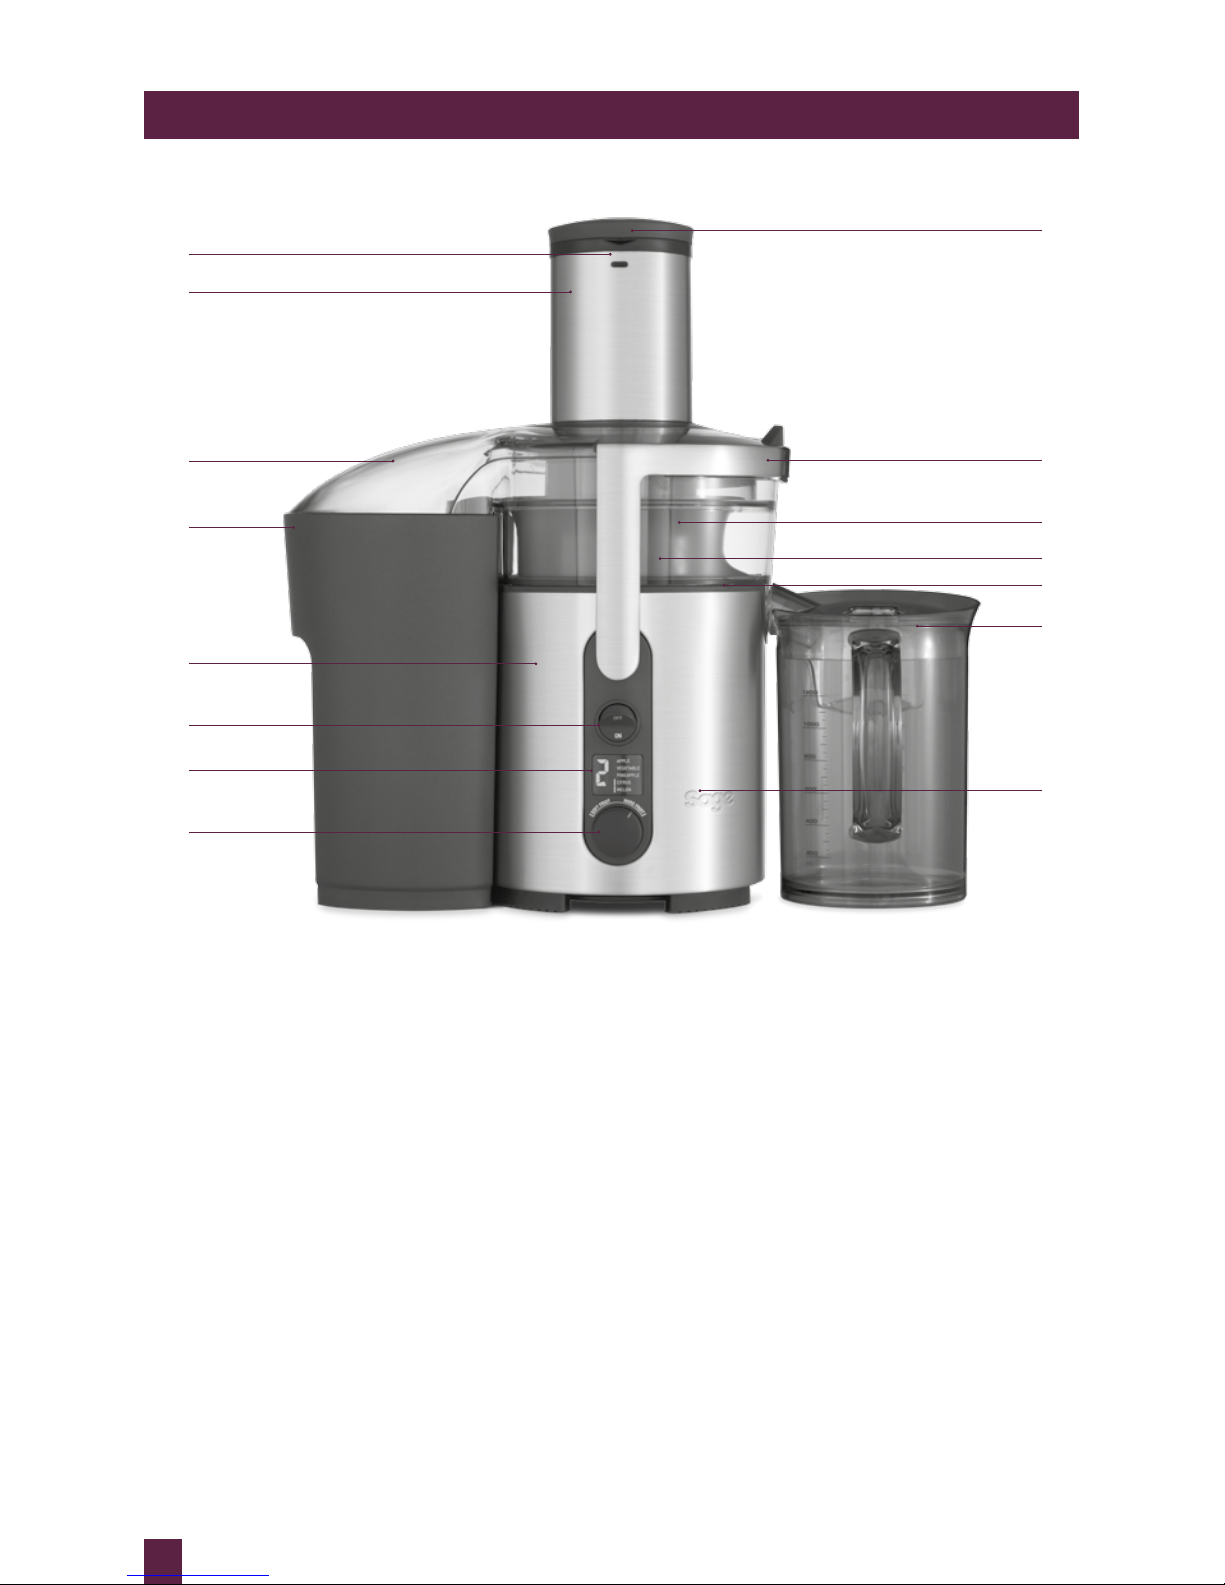
A. Unique Direct Central Feed System
Ensures maximum juice extraction.
B. 84mm extra wide feed chute
Fits larger fruit and vegetables whole.
C. Juicer cover (Top shelf dishwasher safe).
D. 3 litre pulp container (Top shelf
dishwasher safe).
E. Stylish stainless steel design
F. ON/OFF switch
G. LCD speed indicator
With juicing speed guide.
H. Electronic variable speed control dial
I. Food pusher
For pushing whole fruit and vegetables
down the feed chute (top shelf
dishwasher safe).
A
B
C
D
E
F
G
H
I
J
K
L
M
N
O
J. Die-cast metal interlocking safety arm
Stops the juicer operating without the
juicer cover locked in place.
K. Filter basket
Stainless steel, titanium reinforced
micro mesh filter basket (top shelf
dishwasher safe).
L. Motor drive coupling
M. Filter bowl surround (Top shelf
dishwasher safe).
N. 1.2 litre juice jug and lid
With in-built froth separator (top shelf
dishwasher safe).
O. Heavy duty motor
With five year motor warranty.
P. Custom designed juice nozzle
Perfect for mess free juicing straight into
a glass (top shelf dishwasher safe).
Page 10

9
GETTING TO KNOW YOUR NEW APPLIANCE
Q. Cleaning Brush
Flat end of brush assists in removal
of pulp from the pulp container when
juicing large quantities, nylon brush
end makes for easy cleaning of the
stainless steel filter basket (top shelf
dishwasher safe).
R. Nutri Juicer™ Plus Insert
For processing softer fruits such as
bananas, mangoes and strawberries.
Integrated handle for left and right
handed use.
S. Froojie™ Disc
For processing softer fruits such as
bananas, mangoes and strawberries.
T. Nutri Disc™
Allows you to extract only the juice from
fruit and vegetables.
U. Built in froth separator
Ensures juice froth is separated from
juice when poured into a glass (if
preferred).
V. Juice jug lid
Allows juicer to operate with the lid on,
therefore eliminating any splatter during
operation. Place lid onto juice jug to
store juice in refrigerator.
NOT SHOWN
Cord Exits at rear of juicer and wraps
around feet.
NOTE
To retain froth in the juice jug
simply remove the lid before pouring
the juice.
QP
R
U
V
S
T
Page 11

10
PAge heAder.....
ASSEMBLING YOUR NEW APPLIANCE
BEFORE FIRST USE
Before using your juicer for the first time,
remove any packaging material and
promotional stickers and labels. Ensure the
appliance is switched off at the power outlet
and the power cord is unplugged.
Wash the filter bowl surround, Nutri Disc™,
juicer cover, Froojie™ Disc, Nutri Juicer™
Plus insert, food pusher, pulp container and
juice jug and lid in warm, soapy water with
a soft cloth. Rinse and dry thoroughly. The
motor base can be wiped with a damp cloth.
Dry thoroughly.
FOR USE WITH JUICE EXTRACTOR
1. Place the motor base on a flat, dry
surface such as a bench top. Ensure
that the motor base is switched OFF
at the control panel, then switch the
appliance off at the power outlet and
unplug the cord.
2. Place the filter bowl surround on top
of the motor base.
3. Align the arrows at the base of the
Nutri Disc™ with the arrows on the
motor drive coupling and push down
until it clicks into place. Ensure the
Nutri Disc™ is fitted securely inside
the filter bowl surround and onto the
motor base.
4. Place the juicer cover over the filter
bowl surround, positioning the feed
chute over the juice disc and lower
into position.
Page 12

11
PAge heAder.....
ASSEMBLING YOUR NEW APPLIANCE
5. Raise the safety locking arm up and
locate it into the two grooves on
either side of the juicer cover. The
safety locking arm should now be in
a vertical position and locked into
place on top of the juicer cover.
6. Slide the food pusher down the
feed chute by aligning the groove
of the food pusher, with the small
protrusion on the inside top of the
feed chute. Continue to slide the
food pusher down into the
feed chute.
7. Place the pulp container into
position by tilting the base of the
pulp container away from the motor
base and slide the top of the pulp
container over the bottom of the
juice cover. Tilt the base of the pulp
container back into the motor base
ensuring it is supported by the
container support extending from
under the motor base.
NOTE
To minimise cleaning, line the pulp
container with a plastic freezer bag to
collect the pulp. Pulp can then be used
in other dishes, or as compost for the
garden or discarded.
8. Place the juice jug provided under
the spout on the right-hand side of
the juicer. The juice jug lid can be
used to avoid any splatter.
Alternatively you can fit the
custom-designed juice nozzle over
the juice spout and place a glass
underneath. The juice nozzle will
prevent splatter, ensuring mess
free juicing.
Page 13

12
PAge heAder.....
ASSEMBLING YOUR NEW APPLIANCE
FOR USE WITH NUTRI JUICER™
PLUS EXTRACTOR
1. Place the filter bowl surround on the top
of the motor base.
2. Place the Froojie™ Disc into the filter
bowl surround and onto the motor
drive coupling push down until it
clicks into place. Ensure the Froojie™
Disc is fitted securely inside the
filter bowl surround and onto the
motor base.
NOTE
Never use Froojie™ Disc without Nutri
Juicer™ Plus insert. They must always
be used together.
3. Place the Nutri Juicer™ Plus insert
into the filter bowl surround, making
sure the warning label on the handle
is facing upwards.
4. Place the juicer cover over the Nutri
Juicer™ Plus Insert and filter bowl
surround and lower into position.
Page 14

13
PAge heAder.....
ASSEMBLING YOUR NEW APPLIANCE
5. Raise the safety locking arm up
and lock into the two grooves on
either side of the juicer cover. The
safety locking arm should now be in
a vertical position and locked into
place on top of the juicer cover.
6. Slide the food pusher down the
feed chute by aligning the groove
in the food pusher with the small
protrusion on the inside of the top of
the feed chute.
NOTE
There is no need to use pulp
container when using Nutri Juicer™
Plus Extractor.
7. Place the juice jug provided under
the spout on the right-hand side of
the juicer. The juice jug lid can be
used to avoid any splatter.
Page 15

14
PAge heAder.....
OPERATING YOUR NEW APPLIANCE
PREPARATION OF FRUIT AND
VEGETABLES FOR NUTRI JUICER™
PLUS EXTRACTOR
• Only soft fruits should be used with the
Nutri Juicer™ Plus Extractor.
• When using fruits with hard inedible
skins, such as mangoes, pineapple or
kiwi fruit, always peel before juicing.
• When using fruits with a hard core such
as pineapple, always remove this
before juicing.
• All fruits with pits, hard seeds or stones
such as nectarines, peaches, mangoes
and apricots must be pitted or deseeded
before juicing.
• Passionfruit pulp, peeled kiwi fruit
and berries can be processed without
removing seeds.
NOTE
When using the Nutri Juicer™ Plus
Extractor, use low speeds (speed 1 or
2). Always ensure motor is running
before adding fruit and/or vegetables
to feed tube.
NUTRI JUICER™ PLUS EXTRACTOR SPEED
Apricots (stone removed) 1
Bananas (peeled) 1
Kiwi fruit (peeled) 1
Mangoes (peeled, stone removed) 1
Melons (peeled) 1
Pears soft (stalk and core removed) 1
Pineapple (peeled and cored) 1
Raspberries 1
Strawberries (stalks removed) 1
Watermelon (peeled, seeds removed) 1
Use speed 2 to push out any remaining
fruit pulp in juice collector
2
WITH JUICE EXTRACTOR OR NUTRI
JUICER™ PLUS EXTRACTOR
1. Wash selection of fruit and vegetables to
be juiced.
NOTE
Most fruit and vegetables such as
apples, carrots and cucumbers will not
need to be cut or trimmed to size as
these will fit whole into the feed chute.
Ensure vegetables such as beetroot,
carrots, etc. have all soil removed, are
well washed and trimmed of leaves
before juicing.
2. Based on the type of fruit or
vegetable you are juicing/pureeing
select either the Juice Extractor or
the Nutri Juicer™ Plus Extractor.
WARNING
Do not put hard fruit and vegetables
(i.e. Carrots, apples, fresh beetroot,
etc.) or ice through juicer when using
Nutri Juicer™ Plus Extractor. This
could damage parts of the unit.
3. Ensure the juicer is correctly
assembled. Refer to Assembling
your juicer. Ensure the juice jug (or
a glass) is placed under the spout
and the pulp container is in position
before commencing juicing.
4. Plug the power cord into a 230V
power outlet. Turn the power on at
the power outlet. The LCD display
will illuminate.
Page 16

15
PAge heAder.....
OPERATING YOUR NEW APPLIANCE
NOTE
The LCD display will illuminate
continuously for 3 minutes before
going into a sleep mode, where it will
switch off automatically to
conserve power.
The screen will come back on after
activating the ON/OFF switch, the
speed control dial, or the safety
locking arm.
When the safety locking arm is not
locked into place on top of the juicer
cover, the LCD display will illuminate
and flash with an “L”, indicating that
the safety locking arm should be
locked into place.
When the safety locking arm is locked
into place on top of the juicer cover,
the LCD display will illuminate and
display the selected speed setting. The
speed can be changed by adjusting the
variable speed control dial. For a quick
juicing speed reference, use the speed
guide displayed on the LCD screen,
the speed selector table located on the
pulp container, or refer to the speed
selector table.
Hard fruits and vegetables will put
excess strain onto the motor if a low
speed is selected. Please refer to the
speed selector table to determine
the correct speed for the fruits and
vegetables being juiced.
PREPARATION OF FRUIT
AND VEGETABLES FOR JUICE
EXTRACTOR SPEED
SELECTOR TABLE
FRUIT / VEGETABLES
SUGGESTED
SPEED
Apples 5
Apricots (stone removed) 2
Beetroot (cleaned, trimmed) 5
Blueberries 1
Broccoli 4
Brussel Sprouts (trimmed) 5
Cabbage 4
Carrots (cleaned) 5
Cauliflower 4
Celery 5
Cucumber (peeled) 2
Cucumber - soft skinned 4
Fennel 5
Grapes (seedless) 1
Kiwi fruit (peeled) 2
Mangoes (peeled, stone
removed)
2
Melons (peeled) 1
Nectarines (stone removed) 2
Oranges (peeled) 3
Peaches (stone removed) 2
Pears - hard (stalks removed) 5
Pears - soft (stalks removed) 2
Pineapple (peeled) 5
Plums (stone removed) 2
Raspberries 1
Tomatoes 1
Watermelon 1
Page 17

16
PAge heAder.....
OPERATING YOUR NEW APPLIANCE
NOTE
Use the speed selector table located
on the pulp container for a quick and
convenient juicing reference.
5. Press the ON/OFF switch on the
control panel to ON. The juicer will
start to operate at the selected speed.
The speed can be changed at any
time during the juicing process
by adjusting the variable speed
control dial.
NOTE
After 3 minutes, the LCD display will
automatically turn off if the ON/OFF
switch is not turned ON, or a speed is
not selected.
6. With the motor running, place food
into the feed chute and use the food
pusher to gently guide food down.
To extract the maximum amount of
juice, always push the food pusher
down slowly.
NOTE
The juicer will automatically stop
operating if the motor is stalled for
more than 10 seconds. This is a safety
feature. Either too much food is being
processed at one time or the pieces
are not small enough. Try trimming
food, cutting food into smaller pieces
of even size and/or processing a
smaller amount per batch.
To continue juicing, reset the Juicer
by pressing the ON/OFF switch on
the control panel to OFF, switch off at
power outlet and remove power cord
from power outlet, then clear the feed
chute, finally plug power cord back
into power point and switch on at
power outlet. Turn the appliance back
on by pressing the ON/OFF switch
to ON.
7. As fruit and vegetables are processed,
juice will flow into the juice jug and the
separated pulp will accumulate in the
pulp container.
The pulp container can be emptied
during juicing by turning the juicer OFF
at the control panel and then carefully
removing the pulp container. Replace
the empty pulp container into position
before continuing to juice.
NOTE
Do not allow the pulp container
to overfill as this may affect the
operation of the appliance.
To minimise cleaning, line the pulp
container with a plastic freezer bag to
collect the pulp. Pulp can then be used
in other dishes, or as compost for the
garden or discarded.
To include the froth in with your juice,
simply remove the lid of the juice jug
when pouring juice into the glass.
Page 18

17
PAge heAder.....
OPERATING YOUR NEW APPLIANCE
USING THE NUTRI JUICER™ PLUS
EXTRACTOR
1. When using the Nutri Juicer™ Plus
Extractor Nutri Juicer™ Plus will flow
into the juice jug. There will be no pulp
extracted into pulp container.
NOTE
Some fruit may be left in the juice
collector. This is normal. The amount
left over will vary depending on
ripeness and hardness of fruit.
WARNING
Never use fingers, hands or other
utensils to push food down the feed
chute or to clear the feed chute
during operation. Always use the
food pusher provided.
Page 19

18
PAge heAder.....
DISASSEMBLING YOUR NEW APPLIANCE
JUICE EXTRACTOR
1. Ensure the juicer is turned off by
pressing the ON/OFF switch on the
control panel to OFF. Then switch the
appliance off at the power outlet and
unplug the cord.
2. Remove the pulp container by tilting
the base away from the motor base,
then unlatch it from under the juicer
cover and the container support
extending from under the motor base.
3. Use the grip handle located on the
safety locking arm to lift the locking
arm from the juicer cover and lower
down out of position.
4. Lift the juicer cover off the juicer.
5. Remove the filter bowl surround with
the Nutri Disc™ still in place.
6. To remove the Nutri Disc™ from the
filter bowl surround, insert fingers
under the grooves marked ‘Lift
Basket’ and lift the juice disc up.
For easy cleaning, it is recommended
to remove the Nutri Disc™ over
the sink.
WARNING
The Nutri Disc™ contains small sharp
blades to cut and process fruits and
vegetables. Avoid touching blades
when handling the filter basket.
Page 20

19
PAge heAder.....
DISASSEMBLING YOUR NEW APPLIANCE
NUTRI JUICER™ PLUS EXTRACTOR
1. Switch the ON/OFF button on the
control panel of the juicer to turn off.
Then switch the appliance OFF at the
power outlet and unplug the cord.
2. Place both hands on either side of
the Locking Arm and pull back and
lift over the grooves on either side of
the juicer cover.
3. Lift the Nutri Juicer™ Plus insert
from the filter bowl surround.
4. Lift the Froojie™ Disc out of the filter
bowl surround. (Be careful not to
touch the sharp cutting teeth).
CAUTION
Ultra sharp stainless steel cutting disc
and teeth.
WARNING
The Nutri Juicer™ Plus cutting disc
has super sharp blades and teeth.
Do not touch teeth and blade when
handling the Froojie™ Disc.
Page 21

20
PAge heAder.....
CARE & CLEANING
Ensure the juicer is turned off by pressing
the ON/OFF button on the control panel to
OFF. Then switch the appliance off at the
power outlet and unplug the cord.
Ensure the juicer is correctly disassembled.
Refer to Disassembling your juicer.
NOTE
FOR EASIER CLEANING:
Clean as you go and avoid dried on
juice or pulp residue.
Immediately after each use, rinse
removable parts in hot water to
remove wet pulp. Allow parts to
air dry.
To minimise cleaning, line the pulp
container with a plastic freezer bag to
collect the pulp. Pulp can then be used
in other dishes or as compost for the
garden or discarded.
CLEANING THE MOTOR BASE
1. Wipe the motor base with a soft,
damp cloth then dry thoroughly.
2. Wipe any excess food particles from
the power cord.
NOTE
Do not use abrasive scouring pads
or cleaners when cleaning the parts or
motor base as they may scratch
the surface.
CLEANING THE FILTER BOWL
SURROUND, JUICER COVER,
NUTRI JUICER™ PLUS INSERT,
FOOD PUSHER, PULP CONTAINER
Wash all parts in warm soapy water with a
soft cloth. Rinse and dry thoroughly.
NOTE
The filter bowl surround, juicer cover
and pulp container are dishwasher
safe (top shelf only).
The Nutri Juicer™ Plus insert is not
dishwasher safe. Please wash in
warm water.
CLEANING THE JUICE DISC
For consistent juicing results always ensure
that the juice disc is thoroughly cleaned
using the supplied cleaning brush.
1. Soak the juice disc in hot soapy water for
approximately 10 minutes immediately
after juicing is completed. If pulp is
left to dry on the filter it may clog the
fine pores of the filter mesh thereby
lessening the effectiveness of the juicer.
2. Using the cleaning brush, hold the
juice disc under running water and
brush from the inside of the basket
to the outer rim. Avoid touching
the small sharp blades in the centre
of the juice disc. After cleaning the
juice disc, hold it up towards a light
to ensure the fine mesh holes are
not blocked. If the holes are blocked,
soak the juice disc in hot water
with 10% lemon juice to loosen the
blocked holes. Alternatively, wash
the juice disc in the dishwasher.
Page 22

21
PAge heAder.....
CARE & CLEANING
NOTE
The juice disc is dishwasher safe
(top shelf only).
• Do not soak the juice disc in bleach or
other abrasive cleansers.
• Always treat the juice disc with care as it
can be easily damaged.
CLEANING THE JUICE JUG
1. Rinse the juice jug and lid with froth
attachment under running water.
2. Wash both parts in warm soapy
water with a soft cloth.
Rinse and dry thoroughly.
NOTE
The juice jug and lid are dishwasher
safe (top shelf only).
REMOVING STUBBORN OR STRONG
FOOD STAINS AND ODOURS
Discolouration of the plastic may occur with
strongly coloured fruit and vegetables. To
help prevent this, wash parts immediately
after use. If discolouration does occur, the
plastic parts can be soaked in water with
10% lemon juice or they can be cleaned with
a non abrasive cleaner.
WARNING
Do not immerse the motor base in
water or any other liquid.
The centre of the juice disc and feed
chute contains small sharp blades to
process fruit and vegetables during the
juicing function. Do not touch blades
when handling the juice disc or
feed chute.
SAGE™ BY HESTON BLUMENTHAL‰
5 YEAR MOTOR GUARANTEE
The juicer is constructed with a heavy duty
motor. So heavy duty, we have given the
motor a 5 year guarantee against faulty
materials or manufacture. The warranty
does not cover damage caused by accident,
misuse, or being used in a manner not
stated in the instruction book.
Page 23

22
PAge heAder.....
TROUBLESHOOTING
POSSIBLE PROBLEM EASY SOLUTION
Machine will not work
when switched ON
• The safety locking arm may not be correctly engaged
in the vertical operating position with the locking arm
located into the two grooves on either side of the
juicer cover.
Motor appears to stall
when juicing
• Wet pulp can build up under the juicer cover if the
juicing action is too vigorous. Try slower juicing action
by pushing the food pusher down more slowly. Follow
Disassembling and Cleaning instructions and clean the
filter bowl surround, the juice disc and the juicer cover.
• The juicer will automatically stop operating if the motor
is stalled for more than 10 seconds. Either too much food
is being processed at one time or the pieces are not small
enough. Try trimming the food or cutting into smaller
pieces of even size and processing a smaller amount per
batch. To continue juicing, reset the juicer by pressing the
ON/OFF switch on the control panel to OFF then turn the
appliance back on by pressing ON/OFF switch to ON.
• Hard fruits and vegetables will put excess strain onto the
motor if a low speed is selected. Please refer to the juicing
guide to determine the correct speed for the fruits and
vegetables selected for juicing.
Excess pulp building
up the stainless steel
filter disc
• Stop the juicing process and follow Disassembling
Instructions. Remove the juicer cover, scrape off pulp,
reassemble and begin juicing again. Try alternating (soft
and hard) vegetable and fruit varieties.
Pulp too wet and
reduced extracted
juice
• Try a slower juicing action.
• Remove juice disc and thoroughly clean mesh walls with a
cleaning brush. Rinse the juice disc under hot water. If the
fine mesh holes are blocked, soak the basket in a solution
of hot water with 10% lemon juice to unblock the holes or
wash in the dishwasher. This will remove excess fibre build
up (from fruit or vegetables) which could be inhibiting the
juice flow.
Juice leaks between
the rim of the
juicer cover
• Try a slower juicing speed and push the food pusher down
the feed chute more slowly.
Page 24

23
PAge heAder.....
TROUBLESHOOTING
POSSIBLE PROBLEM EASY SOLUTION
Juice sprays out
from spout
• Use juice jug and lid provided, or if juicing into a glass use
the custom designed juice nozzle.
• Try using fruits with more water content to help flush
through the contents. Additionally, try a slower juicing
action by feeding one piece in at a time and by pushing
the food pusher down more slowly.
When using the
Nutri Juicer™ Plus
Extractor, the filter
bowl surround
becomes full and clogs
its spout
• Try using fruits with more water content to help flush
through the contents. Additionally, try a slower juicing
action by feeding one piece in at a time and by pushing
the food pusher down more slowly.
Page 25

24
PAge heAder.....
TIPS ON JUICING
THE INSIDE INFORMATION
ON JUICING
Although the juice drinks contained in this
booklet were developed with flavour, texture
and aroma at the forefront, the health
benefits certainly add to the pleasurable
taste experience.
70% of the nutrient content of fruit and
vegetables is found in the juice. Liquids
extracted from fresh fruits and vegetables
form an important part of a well-balanced
healthy diet. Fresh fruit and vegetable juices
are an easy source of vitamins and minerals.
Juices are rapidly absorbed into the blood
stream therefore being the quickest way in
which the body can digest nutrients.
When you make your own fruit and
vegetable juices, you have complete control
over what is included. Select the ingredients
and decide if you need to add sugar, salt
or other flavouring agents after juicing.
Freshly extracted juices should be consumed
immediately after they have been processed
to avoid a loss of vitamin content.
PURCHASING AND STORAGE OF
FRUIT AND VEGETABLES
• Always wash fruit and vegetables
before juicing.
• Always use fresh fruit and vegetables
for juicing.
• To save money and obtain fresher
produce, purchase fruit or vegetables
that are in season. Refer to the Fruit and
Vegetable Facts chart.
• Keep your fruit and vegetables ready
for juicing by washing and drying them
before storing.
• Most fruits and hardier type vegetables
can be stored at room temperature. The
more delicate and perishable items such
as tomatoes, berries, leafy greens, celery,
cucumbers and herbs should be stored
in the refrigerator until required.
PREPARATION OF FRUIT AND
VEGETABLES FOR JUICER
ATTACHMENT
• If using fruits with hard or inedible
skins such as mangoes, citrus, melons or
pineapple, always peel before juicing.
• Some vegetables, such as cucumbers,
can be processed un-peeled depending
on the softness of the skin and the
juicing requirements.
• All fruits with large pits, hard seeds
or stones such as nectarines, peaches,
mangoes, apricots, plums and cherries
must be pitted before juicing.
• Ensure vegetables such as beetroot,
carrots, etc. have all soil removed, are
well washed and trimmed of leaves
before juicing.
• Ensure fruits such as strawberries are
hulled before juicing and pears have
their stalks removed.
• Citrus fruit can be juiced in the juicer
but remove the skin and excess pith
before juicing.
• A small amount of lemon juice can
be added to apple juice to reduce
discolouration.
NOTE
Your juicer makes invigorating,
frothy orange juice. Simply peel the
oranges and remove any excess pith
before juicing. It is best to refrigerate
oranges before juicing.
Page 26

25
PAge heAder.....
TIPS ON JUICING
PREPARATION OF FRUIT AND
VEGETABLES FOR NUTRI JUICER™
PLUS EXTRACTOR
• Only soft fruits should be used with the
Nutri Juicer™ Plus Extractor.
• When using fruits with hard inedible
skins, such as mangoes, pineapple or
kiwi fruit, always peel before juicing.
• When using fruits with a hard core such
as pineapple, always remove this
before juicing.
• All fruits with pits, hard seeds or stones
such as nectarines, peaches, mangoes
and apricots must be pitted or deseeded
before juicing.
• Passionfruit pulp, peeled kiwi fruit
and berries can be processed without
removing seeds.
NOTE
When using the Nutri Juicer™ Plus
Extractor, use lower speeds (speed 1
or 2). Always ensure motor is running
before adding fruit and/or vegetables
to feed tube.
Page 27

26
PAge heAder.....
FRUIT & VEGETABLE FACTS
FRUIT AND
VEGETABLES
BEST SEASON
TO BUY
STORAGE NUTRITIONAL
VALUE
KILOJOULE/
CALORIE
COUNT
Apples Autumn/
Winter
Vented plastic
bags in refrigerator
High in Dietary
Fibre and Vitamin C
166g Apple
=338kj (80 cals)
Apricots Summer Unwrapped
in crisper of
refrigerator
High in Dietary
Fibre
Contains Potassium
55g Apricot =80kj
(19 cals)
Bananas Autumn/
Spring
Room temperature Vitamins B6 & C,
Potassium, Dietary
Fibre
100g Banana
=378kj (90 cals)
Beetroot Winter Cut off tops,
then refrigerate
unwrapped
Good source Folate
and Dietary Fibre
Vitamin C and
Potassium
160g Beetroot
=332kj (79cals)
Blueberries Summer Cover in the
refrigerator
Vitamin C 100g Blueberries
=220kj (52 cals)
Broccoli Autumn/
Winter
Plastic bag in
refrigerator
Vitamin C, Folate,
B2, B5, E, B6 and
Dietary Fibre
100g Broccoli
=131kjs (31 cals)
Brussel Sprouts Autumn/
Winter
Unwrapped
in crisper of
refrigerator
Vitamin C, B2, B6, E,
Folate and Dietary
Fibre
100g Brussel
Sprouts =156kj
(37 cals)
Cabbage Winter Wrapped, trimmed
in the refrigerator
Vitamin C, Folate,
Potassium B6 and
Dietary Fibre
100g Cabbage
=93kj (22 cals)
Carrots Winter Uncovered in
refrigerator
Vitamin A, C, B6 and
Dietary Fibre
100g Carrots
=140kj (33 cals)
Cauliflower Autumn/
Winter
Remover outer
leaves, store in
plastic bag in
refrigerator
Vitamin C, B5, B6
Folate Vitamin 5 and
Potassium
100g Cauliflower
=103kj (24.5 cals)
Celery Autumn/
Winter
Refrigerate in
plastic bag
Vitamin C and
Potassium
100g stick
=64kjs (15 cals)
Cucumber Summer Crisper in
refrigerator
Vitamin C 100g Cucumber
=50kj (12 cals)
Fennel Autumn to
Spring
Refrigerate Vitamin C, Dietary
Fibre, Folate
100g Fennel
=80kj (19 cals)
Grapefruit All year round Room temperature Vitamin C =,
Bioflavornoids,
Lycopene, Dietary
Fibre
100g Grapefruit
=140kj (33 cals)
Page 28

27
PAge heAder.....
FRUIT & VEGETABLE FACTS
FRUIT AND
VEGETABLES
BEST SEASON
TO BUY
STORAGE NUTRITIONAL
VALUE
KILOJOULE/
CALORIE
COUNT
Grapes
(Seedless)
Summer Plastic bag in
refrigerator
Vitamin C, B6 and
Potassium
100g Grapes
=250-350kj (6083 cals)
Kiwi Fruit Winter/ Spring Crisper in
refrigerator
Vitamin C and
Potassium
100g Kiwi Fruit
=219kj (52 cals)
Mangoes Summer Covered in
refrigerator
Vitamin A, C, B1, B6
and Potassium
207g Mango
=476kj (113 cals)
Melons
including
Watermelon
Summer/
Autumn
Crisper in
refrigerator
Vitamin C, Folate,
Dietary Fibre and
Vitamin A
200g Melon
=210kj (50 cals)
Nectarines Summer Crisper in
refrigerator
Vitamin C, B3,
Potassium and
Dietary Fibre
151g Nectarines
=277kj (66 cals)
Oranges Winter/
Autumn/
Spring
Cool, dry place for
1 week, transfer
to refrigerator to
keep longer
Vitamin C 131g Orange
=229kj (54 cals)
Peaches Summer Ripen at room
temperature then
refrigerate
Vitamin C,
Potassium, Dietary
Fibre, Beta Carotene
100g Peaches
=175kj (42 cals)
Pears Autumn/
Winter
Ripen at room
temperature then
refrigerate
Vitamin C & E
Dietary Fibre
161g Pear =391kj
(93 cals)
Pineapple Spring/
Summer
Store in a cool
place
Vitamin C & E
Dietary Fibre
100g Pineapple
=180kj (43 cals)
Spinach All year round Refrigerate Vitamin B6, C,
E, Beta carotene,
Folate, Magnesium,
Potassium, Dietary
Fibre
100g Spinach
=65kj (15 cals)
Sweet Potato All year round Store in cool place Vitamins C, E, Beta
Carotene, Dietary
Fibre
100g Sweet
Potato =275kj
(65 cals)
Tomatoes Late Winter to
early Summer
Ripen at room
temperature then
refrigerate
Lycopene, Vitamin
C, E, Folate, Dietary
Fibre
100g Tomatoes
=65-75kj
(15-17 cals)
 Loading...