

Page 1
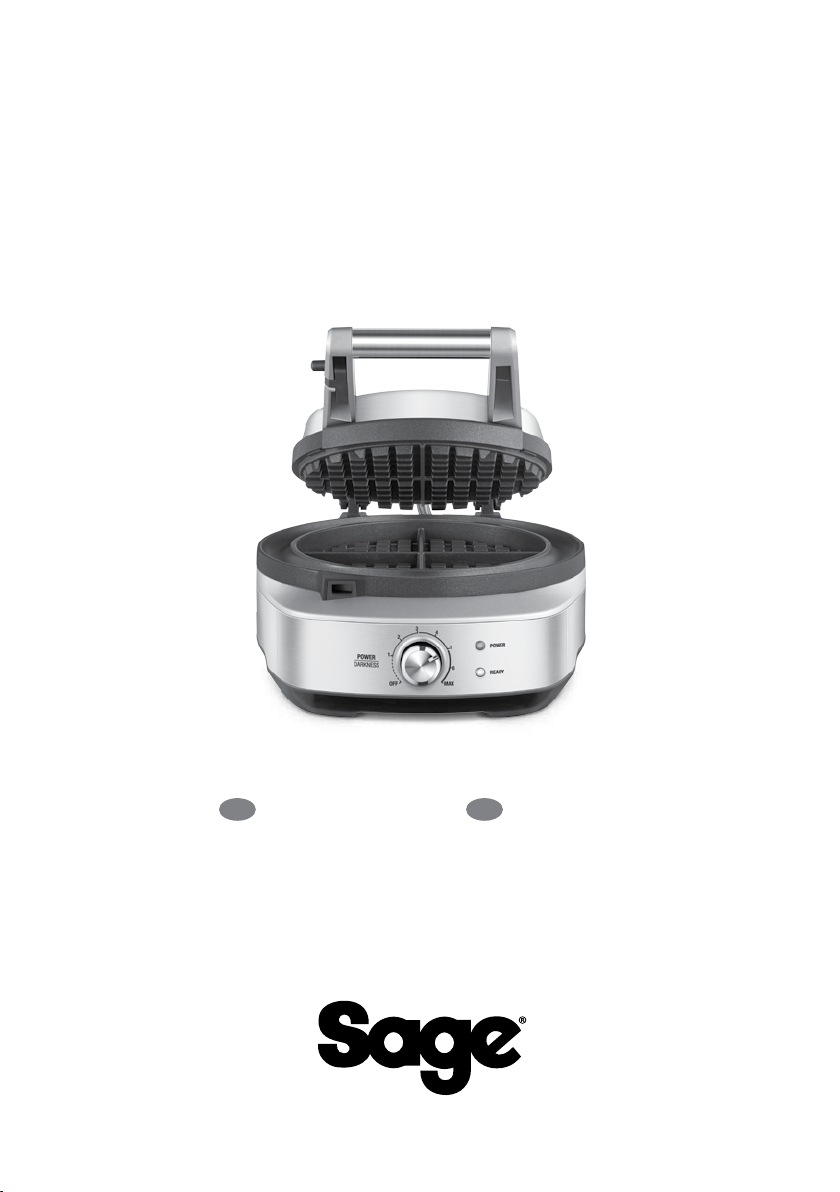
the No-Mess Waffle
BWM520
™
EN
QUICK GUIDE
DE
KURZANLEITUNG
Page 2

CONTENTS
2 We recommend safety rst
4 Getting to know your new appliance
5 Operating your new appliance
6 Care & Cleaning
SAGE®
RECOMMENDS
SAFETY FIRST
At Sage® we are very safety
conscious. We design and
manufacture consumer
products with the safety
of you, our valued customer,
foremost in mind. In addition
we ask that you exercise
a degree of care when
using any electrical
appliance and adhere to
the following precautions.
IMPORTANT
SAFEGUARDS
READ ALL INSTRUCTIONS
BEFORE USE AND SAVE
FOR FUTURE REFERENCE
• The full information book
is available at
sageappliances.com
• Before using the rst time
ensure your electricity
supply is the same as
shown on the label on the
underside of the appliance.
2
• The appliance is for household
use only. Do not use the
appliance for anything other
than its intended use.
Do not use in moving vehicles
or boats. Do not use outdoors.
Misuse may cause injury.
• Fully unwind the power cord
before operating.
• Position the appliance on
a stable, heat resistant, level,
dry surface away from the edge
and do not operate on or near
a heat source such as a hot
plate, oven or gas hob.
• Do not let the power cord hang
over the edge of a bench or
table, touch hot surfaces or
become knotted.
• Position the appliance at least
20cm from walls or heat/steam
sensitive materials and provide
adequate space above and on
all sides for air circulation.
• Ensure the power cord does
not become trapped between
the upper and lower hot plates
of the appliance during use
or storage.
• Do not leave the appliance
unattended when in use.
The appliance is marked
with a HOT surface
symbol. The lid and other
surfaces will be hot when
the appliance is operating and for
some time after use. To prevent
Page 3
WE RECOMMEND SAFETY FIRST
EN
burns always use insulated oven
mitts or use handles or knobs
where appropriate.
• Always ensure the appliance
is turned OFF, unplugged at
the power outlet and has been
allowed to cool before cleaning,
moving or storing.
• Do not use the appliance if the
power cord, plug, or appliance
becomes damaged in any way.
If damaged or maintenance
other than cleaning is
required, please contact
®
Sage
Customer Service or
go to sageappliances.com
• Any maintenance other
than cleaning should be
performed by an authorised
Sage service centre.
• Children shall not play with
the appliance.
• The appliance can be used
by children aged 8 or older
and persons with reduced
physical, sensory or mental
capabilities or a lack of
experience and knowledge,
only if they have been given
supervision or instruction
concerning use of the appliance
in a safe way and understand
the hazards involved.
• Cleaning of the appliance
should not be carried out
by children unless they are
8 year or older and supervised
• The appliance and it’s cord
should be kept out of reach
of children aged 8 years
and younger.
• The installation of a residual
current safety switch is
recommended to provide
additional safety when using
all electrical appliances.
Safety switches with a rated
operating current not more
than 30mA are recommended.
Consult an electrician for
professional advice.
The symbol shown
indicates that this appliance
should not be disposed of
in normal household waste.
It should be taken to a local
authority waste collection centre
designated for this purpose or to
a dealer providing this service.
For more information please
contact your local council oce.
Do not immerse the power
plug, cord or appliance
in water or any liquid.
SAVE THESE INSTRUCTIONS
3
Page 4
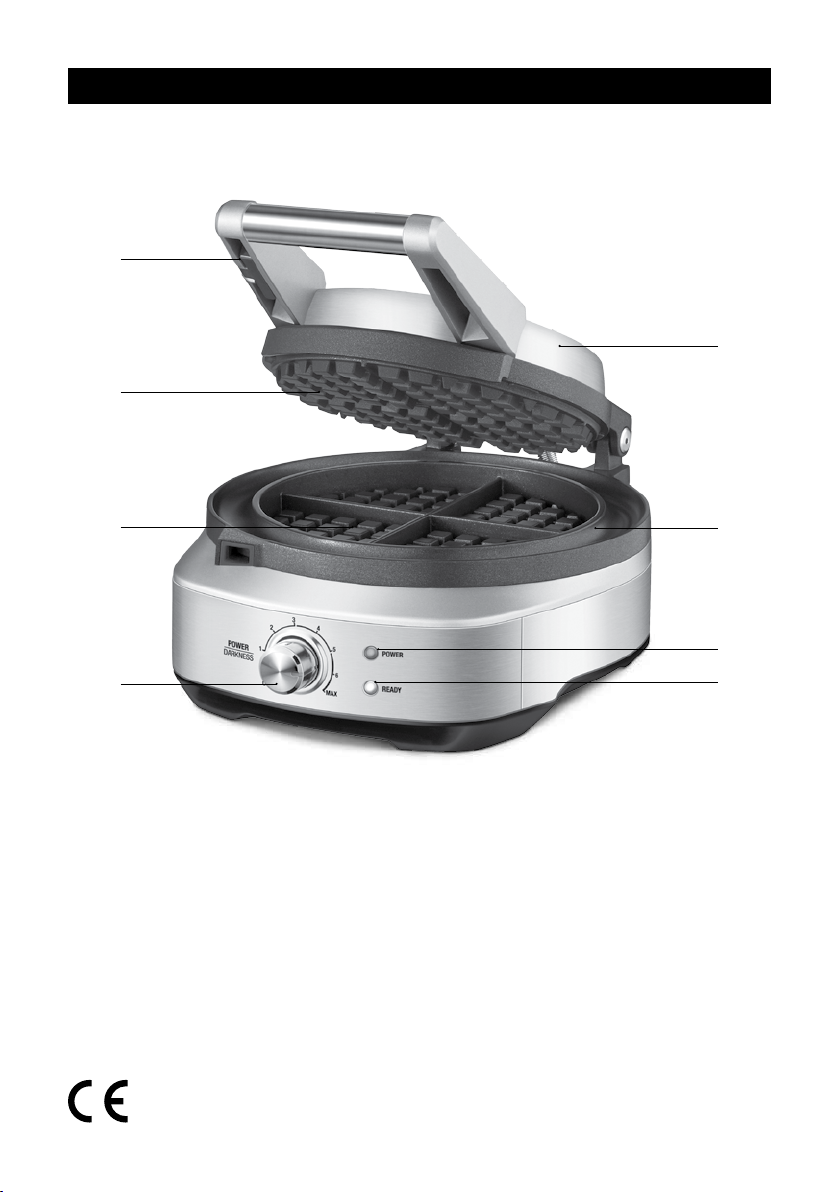
GETTING TO KNOW YOUR NEW APPLIANCE
F
B
E
C
A
A. POWER / DARKNESS Control dial
B. Die-cast aluminum cooking plate
C. PFOA-free non-stick
D. Integrated moat
Rating Information
220–240V~ 50–60Hz 750–900W
D
G
H
E. Stainless steel housing
F. Locking latch
G. POWER light
H. READY light
4
Page 5
OPERATING YOUR NEW APPLIANCE
EN
Before rst use, remove and safely discard any
packing material, promotional labels and tape
from the wae maker.
1. Wipe the wae maker cooking plates with
a damp sponge or cloth. Dry thoroughly and
close the lid.
2. Place the wae maker on a at, dry surface.
Ensure there is a minimum distance of 20cm
of space on all sides of the wae maker.
Do not place anything on top of the
wae maker.
3. Unwind the power cord completely and insert
the power plug into a grounded 220–240V
power outlet.
4. Turn the POWER / DARKNESS Control Dial
clockwise to the desired setting to start
pre-heating the wae maker. The POWER
light will be illuminated.
5. Use the POWER / DARKNESS control dial to
adjust the brownness of your wae. There are
7 darkness settings ranging from 1 (lightest)
to MAX (darkest). Rotate the dial clockwise
to increase the brownness or counterclockwise
to decrease it.
6. Once the wae maker has completed
preheating, three audible alerts will sound
and the READY light will illuminate.
7. Open the lid and pour approximately 125ml
of batter evenly on the center of the wae
plate. The batter should cover the peaks of
the wae plate.
NOTE
There can be slight variations between
cooking cycles. If your waes are not at
your desired darkness, close the lid and
cook for an additional minute.
10. For the most consistent results, add the next
batch of batter immediately after removing the
cooked wae and repeat steps 7 through 8.
NOTE
If the next batch of batter is not added
immediately after removing the cooked
wae, close the lid and allow the wae
maker to properly reheat (the READY light
will switch o and then back on) before
adding batter.
11. If you are not cooking any more waes,
turn the POWER / DARKNESS control dial
to the OFF position.
NOTE
When using the wae maker for the rst
time you may notice a ne smoke haze.
This is caused by the initial heating
of some of the components and is not
a cause for concern.
8. Close the lid but keep the locking latch open.
As the cooking cycle progresses the READY
light will switch o.
9. At the end of the cooking cycle, three audible
alerts will sound and the READY light will
illuminate. Open the lid and carefully remove
your waes.
5
Page 6

CARE & CLEANING
CARE & CLEANING
1. Before cleaning, ensure the
POWER / DARKNESS control dial is set to the
OFF position and then remove the power plug
from the power outlet.
2. Allow your wae maker to cool slightly before
cleaning. The wae maker is easier to clean
when slightly warm.
3. Always clean your wae maker after each
use to prevent a build-up of baked-on foods.
Wipe cooking plates and overow moat with
a soft cloth to remove food residue.
PFOA-FREE NON-STICK COATING
The cooking plates, hinges and overow moat
are coated with a PFOA-FREE non-stick nish.
This minimises the need for oil, prevents food
from sticking, and makes cleaning easier.
Do not use metal or other abrasive cleaning
tools on non-stick surfaces as they will damage
the coating. Use only warm soapy water and
remove stubborn residue with a non-abrasive
plastic scouring pad or nylon brush.
NOTE
Do not use non-stick cooking sprays as
they can impact the performance of the
non-stick surface on the cooking plates.
STORAGE
To store your wae maker:
1. Ensure the POWER / DARKNESS control dial
is set to the OFF position and then unplug
power cord from the power outlet.
2. Allow the wae maker to cool completely.
3. Set the locking latch to the locked position.
4. Wrap the power cord in the cord wrap
area below the wae maker.
5. Store the wae maker on a at,
dry level surface.
6
Page 7

EN
7
Page 8

INHALT
9 Wir empfehlen: Sicherheit geht vor
11 Lernen Sie Ihr Gerät kennen
12 Bedienung ihres neuen geräts
13 Pege und Reinigung
SAGE®
EMPFIEHLT:
SICHERHEIT
GEHT VOR
Wir bei Sage® sind sehr
sicherheitsbewusst.
Beim Design und bei der
Herstellung unserer Geräte
denken wir zu allererst an
Ihre Sicherheit. Darüber
hinaus bitten wir Sie, bei
der Verwendung jedes
Elektrogeräts angemessene
Sorgfalt anzuwenden und
sich an die folgenden
Vorsichtsmaßnahmen
zu halten.
WICHTIGE
SICHERHEITS
-HINWEISE
BITTE ALLE ANWEISUNGEN
VOR DEM GEBRAUCH
LESEN UND ZUR
SPÄTEREN BEZUGNAHME
AUFBEWAHREN.
8
• Die komplette
Informationsbroschüre ist unter
sageappliances.com verfügbar.
• Vor dem ersten Gebrauch
prüfen, dass Ihre Netzspannung
mit der auf dem Etikett
an der Unterseite des
Geräts übereinstimmt.
• Dieses Gerät ist nur für den
Haushaltsgebrauch bestimmt.
Gerät nur bestimmungsgemäß
verwenden. Nicht in fahrenden
Fahrzeugen oder Booten
verwenden. Nicht im Freien
verwenden. Missbrauch kann
Verletzungen nach sich ziehen.
• Netzkabel vor dem Gebrauch
vollständig entrollen.
• Gerät in sicherem Abstand
von Kanten auf eine stabile,
hitzebeständige, ebene und
trockene Fläche stellen.
Nicht auf oder neben einer
Wärmequelle wie einem Gasoder Elektroherd oder einem
heißen Ofen betreiben.
• Netzkabel nicht über
Arbeitsplatten oder Tischkanten
hängen lassen, von heißen
Oberächen fern halten,
Kabelgewirr vermeiden.
• Zwischen dem Gerät und
Wänden oder hitze- bzw.
dampfempndlichen Materialien
mindestens 20 cm Abstand
halten und nach allen Seiten
Page 9

WIR EMPFEHLEN: SICHERHEIT GEHT VOR
DE
und oberhalb des Geräts
stets ausreichend Platz zur
Luftzirkulation lassen.
• Sicherstellen, dass das
Netzkabel beim Gebrauch
oder während der Lagerung
des Geräts nicht zwischen der
oberen und unteren Heizplatte
eingeklemmt werden kann.
• Gerät während des Betriebs
nicht unbeaufsichtigt lassen.
Das Gerät trägt das
Symbol für HEIßE
Oberächen. Der Deckel
und andere Oberächen
werden beim Betrieb des Geräts
heiß und bleiben dies für einige
Zeit nach dem Gebrauch. Zur
Vermeidung von Verbrennungen
immer Ofenhandschuhe
verwenden und gegebenenfalls
Grie und Knöpfe nutzen.
• Gerät immer AUSschalten,
Netzstecker ziehen und
abkühlen lassen, ehe Sie es
bewegen, reinigen oder lagern.
• Alle Wartungsarbeiten außer
Reinigung nur von autorisierten
Sage-Kundendienststellen
vornehmen lassen.
• Kinder nicht mit dem Gerät
spielen lassen.
• Dieses Gerät kann von Kindern
im Alter ab 8 Jahren und von
Personen mit eingeschränkten
körperlichen, sensorischen
oder geistigen Fähigkeiten oder
mit mangelnder Erfahrung und
fehlenden Kenntnissen genutzt
werden, sofern sie beaufsichtigt
werden oder in den sicheren
Gebrauch des Geräts
eingewiesen wurden und sich
der entsprechenden Risiken
bewusst sind.
• Reinigung des Geräts nicht
von Kindern unter 8 Jahren
und nur unter Aufsicht
vornehmen lassen.
• Gerät und Netzkabel für
Kinder bis zu 8 Jahren
unzugänglich aufbewahren.
• Gerät nicht verwenden,
wenn das Netzkabel, der
Netzstecker oder das Gerät
selbst in irgendeiner Weise
beschädigt ist. Wenden Sie
sich bei Schäden oder zur
Wartung (außer Reinigung) bitte
an den Sage
®
-Kundendienst
oder besuchen Sie
sageappliances.com
• Die Installation eines Schutzoder Sicherheitsschalters
wird bei der Verwendung
von Elektrogeräten als
zusätzliche Schutzmaßnahme
empfohlen. Es wird ein
Sicherheitsschalter mit maximal
30 mA Nennleistung empfohlen.
Fachgerechte Beratung erhalten
Sie von Ihrem Elektriker.
9
Page 10

WIR EMPFEHLEN: SICHERHEIT GEHT VOR
Dieses Symbol zeigt, dass
das Gerät nicht im normalen
Hausmüll entsorgt werden
sollte. Es sollte stattdessen
bei einem entsprechenden
kommunalen Wertstohof oder
Fachhändler zur Entsorgung
abgegeben werden. Weitere
Einzelheiten erfahren Sie von
Ihrer Kommunalbehörde.
Netzstecker, Netzkabel oder
Gerät nicht in Wasser oder
sonstige Flüssigkeiten tauchen.
ANWEISUNGEN BITTE AUFBEWAHREN
10
Page 11

LERNEN SIE IHR GERÄT KENNEN
F
B
DE
E
C
A
A. Drehregler POWER / DARKNESS
(AN / BRÄUNUNGSGRAD)
B. Backplatte aus Aluminiumguss
C. PFOA-freie Antihaftbeschichtung
D. Integrierte Auangumrandung
Leistungsangaben
220–240V~ 50–60Hz 750–900W
D
G
H
E. Gehäuse aus Edelstahl
F. Sperrriegel
G. POWER-Licht für AN
H. READY-Licht für BEREIT
11
Page 12

BEDIENUNG IHRES NEUEN GERÄTS
Vor der Inbetriebnahme das gesamte
Verpackungsmaterial, Werbeetiketten und
Klebeband vom Waeleisen entfernen und
sicher entsorgen.
1. Waeleisenbackplatten mit einem feuchten
Schwamm oder Lappen abwischen. Gründlich
abtrocknen und den Deckel schließen.
2. Waeleisen auf eine ache, trockene
Oberäche stellen. Vergewissern Sie sich,
dass an allen Seiten des Waeleisens ein freier
Mindestabstand von 20 cm besteht. Stellen Sie
keine Gegenstände auf das Waeleisen.
3. Das Netzkabel komplett abwickeln und den
Stecker in eine geerdete Stromsteckdose mit
220–240 V stecken.
4. Den Drehregler POWER/DARKNESS im
Uhrzeigersinn auf die gewünschte drehen, um
das Vorheizen des Waeleisens zu starten. Das
POWER-Licht leuchtet auf.
5. Benutzen Sie den Drehregler
POWER / DARKNESS, um die Waelbräune
einzustellen. Die 7 Bräunungseinstellungen
reichen von 1 (hellste Einstellung) bis
MAX (dunkelste Einstellung). Drehen
Sie den Regler im Uhrzeigersinn, um die
Bräune zu erhöhen oder entgegen dem
Uhrzeigersinn, um sie zu reduzieren.
6. Wenn das Waeleisen den Vorheizzyklus
beendet hat, ertönen drei akustische Signale
und das READY-Licht leuchtet auf.
7. Önen Sie den Deckel und gießen Sie ca.
125 ml Teig gleichmäßig auf die Mitte der
Waelplatte. Der Teig sollte die Spitzen der
Waelplatte bedecken.
HINWEIS
Wenn Sie das Waeleisen das erste
Mal benutzen, entsteht eventuell ein
feiner Rauchnebel; dies wird durch die
erstmalige Erhitzung der Komponenten
verursacht und ist kein Grund
zur Besorgnis.
8. Den Deckel schließen, aber den Sperrriegel
oenlassen. Mit laufendem Backzyklus wird
sich das READY-Licht ausschalten.
9. Am Ende des Backzyklus sind drei Tonsignale
zu hören und das EADY-Licht beginnt
aufzuleuchten. Den Deckel önen und die
Waeln vorsichtig herausnehmen.
HINWEIS
Backergebnisse können für jeden
Backzyklus unterschiedlich ausfallen. Falls
Ihre Waeln nicht die gewünschte Bräune
haben, schließen sie den Deckel und
verlängern Sie den Backprozess um eine
weitere Minute.
10. Für konsistente Ergebnisse, die nächste
Teigportion sofort nach dem Entnehmen der
fertig gebackenen Waeln eingießen und
Schritte 7 bis 8 wiederholen.
HINWEIS
Wird die nächste Portion Teig nicht
sofort nach der Entnahme der fertig
gebackenen Waeln zubereitet, schließen
Sie den Deckel und und lassen Sie das
Waeleisen entsprechend aufheizen
(das READY-Licht wird sich ab- und
dann wieder anschalten) bevor Sie den
Teig einfüllen.
11. Wenn keine weiteren Waeln mehr
gekocht werden, den Drehregler
POWER / DARKNESS auf die OFF-Position
ausdrehen.
12
Page 13

PFLEGE UND REINIGUNG
DE
PFLEGE UND REINIGUNG
1. Vor der Reinigung den Drehregler
POWER / DARKNESS mit der OFF-
Position ausschalten und den Netzstecker
aus der Netzsteckdose ziehen.
2. Das Waeleisen vor der Reinigung leicht
abkühlen lassen. Das Waeleisen lässt sich
einfacher reinigen, wenn es noch ein bisschen
warm ist.
3. Das Waeleisen immer sofort nach jeder
Nutzung reinigen, um ein Verkrusten von
angebackenen Lebensmitteln zu vermeiden.
Backplatten und Auangumrandung mit
einem weichen Lappen abwischen, um
Lebensmittelrückstände zu entfernen.
PFOA-FREIE
ANTIHAFTBESCHICHTUNG
Die Backplatten, Scharniere und
Auangumrandung sind mit einer PFOA-freien
Antihaftbeschichtung versehen.
Kochen, bzw. Backen mit Antihaftbeschichtung
minimiert den Ölbedarf, die Lebensmittel haften
nicht fest und es erleichtert das Reinigen.
Beim Reinigen der Oberächen mit
Antihaftbeschichtung keine Metalschwämme
oder andere scheuernden Schwämme
benutzen; sie beschädigen die Beschichtung.
Nur mit warmem Seifenwasser waschen
und hartnäckige Überreste mit einem nichtscheuerndem Topfreiniger aus Plastik oder mit
einer Nylonbürste entfernen.
HINWEIS
Keine Koch-, bzw. Backsprays mit
Antihaft aufsprühen; dies kann die
Leistung der Antihaftoberäche der
Backplatten beeinträchtigen.
AUFBEWAHRUNG
Für die Aufbewahrung des Waeleisens:
1. Vergewissern Sie sich, dass die Taste
POWER / DARKNESS auf der OFF-Position
für AUS steht und ziehen Sie dann den
Netzstecker aus der Steckdose.
2. Das Waeleisen vollständig abkühlen lassen.
3. Den Aufbewahrungsclip in die
Schließposition bringen.
4. Das Netzkabel auf die Vorrichtung unter dem
Waeleisen wickeln.
5. Auf acher, ebener und trockener
Oberäche aufbewahren.
13
Page 14

NOTES / NOTIZEN
14
Page 15

NOTES / NOTIZEN
15
Page 16

DE AT
Sage Appliances GmbH
Johannstraße 37, 40476 Düsseldorf, Deutschland
Für den Kundendienst besuchen
Sie bitte www.sageappliances.com
UK IE
BRG Appliances Limited
Unit 3.2, Power Road Studios, 114 Power Road, London, W4 5PY
Freephone (UK Landline): 0808 178 1650
Mobile Calls (National Rate): 0333 0142 970
www.sageappliances.com
Registered in Germany No. HRB 81309 (AG Düsseldorf).
Aufgrund kontinuierlicher Produktverbesserungen kann das auf dieser Verpackung dargestellte Produkt leicht vom tatsächlichen Produkt abweichen.
Due to continued product improvement, the products illustrated or photographed in this document may vary slightly from the actual product.
Registered in England & Wales No. 8223512.
Copyright BRG Appliances 2017.
BWM520 A17
 Loading...