

Page 1
the Smart Oven
BOV860 / SOV860
TM
Air Fryer
EN
QUICK GUIDE
FR
GUIDE RAPIDE
IT
GUIDA RAPIDA
PT
MANUAL RÁPIDO
DE
KURZANLEITUNG
NL
SNELSTARTGIDS
ES
GUÍA RÁPIDA
Page 2

Contents
IMPORTANT
SAFEGUARDS
2 Sage® recommends safety rst
7 Components
9 Functions
11 Quick Start Guide
14 Care & Cleaning
15 Troubleshooting
17 Guarantee
SAGE®
RECOMMENDS
SAFETY FIRST
At Sage® we are very safety
conscious. We design and
manufacture consumer
products with the safety of
you, our valued customer,
foremost in mind. In addition
we ask that you exercise a
degree of care when using
any electrical appliance
and adhere to the following
precautions.
READ ALL INSTRUCTIONS
BEFORE USE AND SAVE
FOR FUTURE REFERENCE
• A downloadable version of this
document is also available at
sageappliances.com
• Before using for the rst
time please ensure that your
electricity supply is the same as
shown on the rating label on the
underside of the appliance.
• Remove and safely discard
any packing materials and
promotional labels before using
the oven for the rst time.
• To avoid choking hazard for
young children, remove and
safely dispose the protective
cover tted on the power plug.
• Do not use the appliance near
the edge of a benchtop or table.
Ensure the surface is stable,
level, heat-resistant and clean.
• A re may occur if the oven is
covered or touches ammable
material, including curtains,
draperies, walls, and the like,
when in operation.
• Do not use the appliance on (or
close to) a hot gas or electric
burner, or where it could touch a
heated oven or surface.
• Do not let the power cord hang
over the edge of a table or
counter, or touch hot surfaces.
2
Page 3

EN
• The oven is not suitable to
be used in a small appliance
enclosure. Ensure to leave
adequate space all around the
oven. Minimum space of 10cm
is recommended.
• The outer housing of the oven
may be hot during and after
cooking. Please do not touch
hot surfaces. Always keep the
power cord of this oven, and
those of other appliances near
the oven, clear from the oven
housing.
• Do not touch hot surfaces.
To avoid burns, use extreme
caution when removing pans,
dishes and accessories such
as the included grilling rack and
roasting pan, that contain hot oil
or other hot liquids.
• Do not lay cooking utensils,
roasting pans or dishes on the
glass door.
• Do not leave the door standing
open for extended periods
of time.
• Do not store any item on top
of the oven when in operation
except those described on
page 13 of this book.
• Do not place cardboard, plastic,
paper, or other ammable
materials in the oven.
• Do not cover crumb tray or any
part of the oven with metal foil.
This will cause overheating of
the oven.
• Caution should be exercised
when using pans and dishes
constructed of materials other
than metal. Ensure pans and
dishes are oven safe before
using in the oven.
• Caution should be exercised
when using lids in the oven, as
pressure build up in a covered
pan or dish may cause hot
ingredients to expel or the dish
to crack. Do not place sealed or
airtight containers in the oven.
• Oversized foods and metal
utensils must not be inserted in
the oven as they may create re
or risk of electric shock.
• The use of accessories and
attachments not recommended
or supplied with this oven may
cause injuries.
• This appliance is for household
use only. Do not use in any type
of moving vehicles. Do not use
the appliance outdoors, or for
anything other than its intended
use. Misuse can cause injury.
• If the appliance is to be: left
unattended, cleaned, moved,
assembled or stored, always
switch the unit o and unplug
the cord from the power outlet
and allow to cool completely.
• Do not clean with metal
scouring pads. Pieces can
break o the pad and touch
electrical parts, creating a risk of
electric shock.
3
Page 4

• The appliance can be used
by children aged from 8 years
and above and persons with
reduced physical, sensory or
mental capabilities, or lack of
experience and knowledge,
if they have been given
supervision or instruction
concerning use of the appliance
in a safe way and understand the
hazards involved.
• Children shall not play with
the appliance.
• Cleaning and user maintenance
shall not be made by children
unless they are older than 8
and supervised.
• The appliance and its cord
should be kept out of reach
of children aged 8 years and
younger.
• It is recommended to regularly
inspect the appliance. Do not
use the appliance if power
cord, power plug or appliance
becomes damaged in any way. If
damaged or maintenance other
than cleaning is required, please
contact Sage Customer Service
or go to sageappliances.com
• The appliance is not intended
to be operated by means of
external timer or separate
remote control system.
• The appliance must be used on
a properly grounded outlet.
If you are unsure the power
outlets are properly grounded,
please consult an electrician.
• Do not, under any
circumstance, modify the power
plug or use an adapter.
• Consult a qualied electrician
if the grounding instructions are
not completely understood, or
if doubt exists as to whether the
appliance is properly grounded.
• The installation of a residual
current device (safety switch)
is recommended to provide
additional safety protection
when using electrical
appliances. It is advisable that
a safety switch with a rated
residual operating current not
exceeding 30mA be installed
in the electrical circuit supplying
the appliance. See your
electrician for professional
advice.
SPECIFIC INSTRUCTIONS
FOR SOV860
• We recommend the oven
is operated on a dedicated
circuit separated from other
appliances. Consult a licensed
and qualied electrician if you
are unsure.
• To turn o the oven, press the
Start/Cancel button on
the control panel. The oven is
o when the button back-lights
turn o.
4
Page 5

EN
• Regularly clean the crumb tray.
To clean the crumb tray:
−Turn OFF the oven,
−Allow the oven to cool
completely and then remove
the power cord from the
power outlet.
−Remove the crumb tray and
clean with warm soapy water.
−Dry the tray completely before
inserting it securely back
in place.
NOTICE TO CUSTOMERS
REGARDING MEMORY
STORAGE
Please note that in order to better
serve our customers, internal
memory storage has been
imbedded into your appliance.
This memory storage consists
of a small chip to collect certain
information about your appliance
including the frequency of
use of the appliance and the
manner in which your appliance
is being used. In the event your
appliance is returned for service,
the information collected from
the chip enables us to quickly
and eciently service your
appliance. The information
collected also serves as a
valuable resource in developing
future appliances to better serve
the needs of our consumers.
The chip does not collect any
information regarding the
individuals who use the product
or the household where the
product is used. If you have any
questions regarding the memory
storage chip please contact us at
privacy@sageappliances.com.
WARNING
TO REDUCE THE RISK OF
FIRE, ELECTRIC SHOCK,
EXPOSURE TO EXCESSIVE
UV RADIATION, OR INJURY
TO PERSONS:
• Always unplug the oven and
let all parts (including the bulb
housing, glass cover and
enclosure) cool completely
before replacing bulb.
• Only use a 25 Watt, 220–240V,
G9 type oven bulb.
• Always use a soft cloth when
handling the bulb and do not
directly touch the surface as oil
from your skin can damage
the bulb.
• Do not look directly at
a glowing bulb.
• Do not remain in the light if skin
feels warm.
• Keep bulb away from materials
that may burn.
• The bulb gets hot quickly.
Only ever use the light button
to turn on the light.
• Do not operate the light if the
bulb housing, glass cover,
UV lter or enclosure are
missing or damaged.
5
Page 6
The symbol shown
indicates that this
appliance should not be
disposed of in normal
household waste. It should be
taken to a local authority waste
collection centre designated for
this purpose or to a dealer
providing this service. For more
information, please contact your
local council oce.
This symbol indicates,
temperature of accessible
surfaces may be high when
the appliance is operating
and for some time after use.
To protect against electric
shock, do not immerse the
power cord, power plug or
appliance in water or any liquid.
SAVE THESE INSTRUCTIONS
6
Page 7
EN
TEMP
Darkness
TIME
Slices
FUNCTION
START/CANCEL
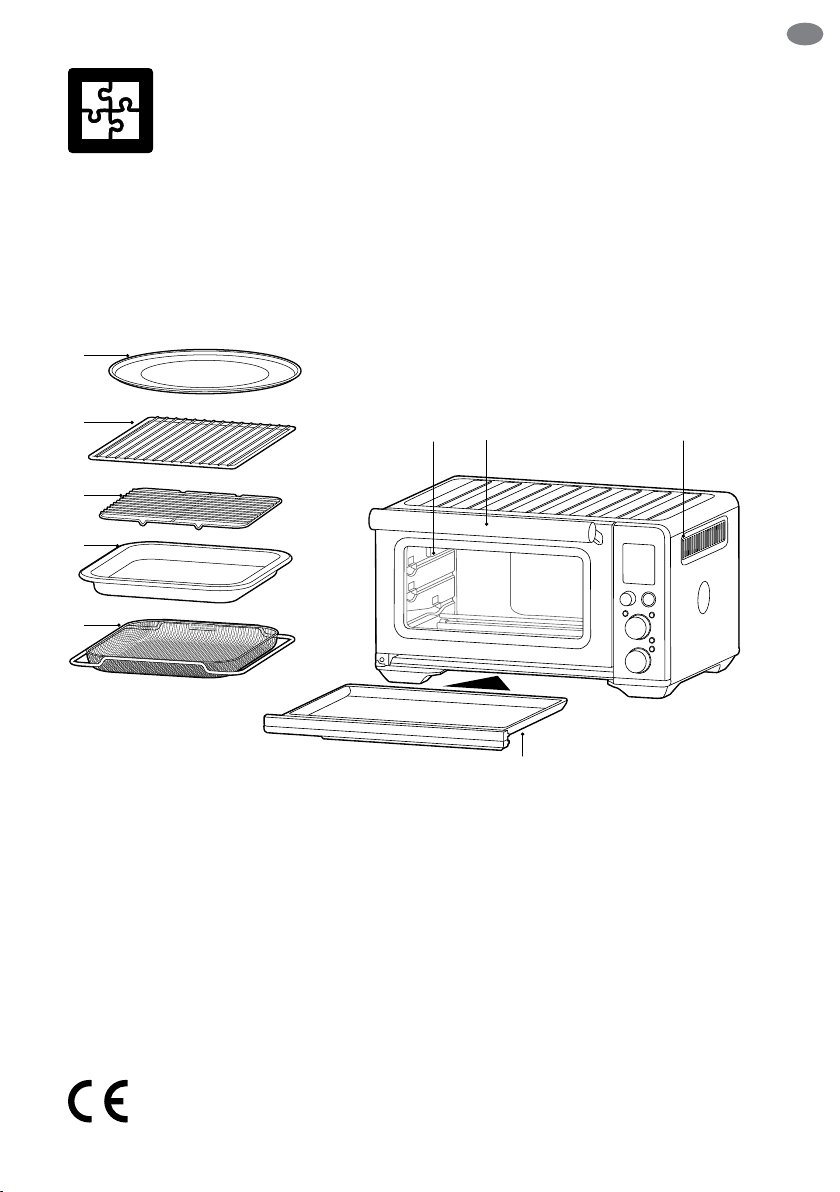
Components
A
B
C
D
E
A. 30cm non-stick pizza pan
B. Wire rack
C. Grilling rack
D. 28 x 33.5cm enamel roasting pan
E. Air Fry basket
G H
F
I
F. Oven light
G. Door handle
H. Ventilation slots
I. Crumb tray
Rating Information
220–240V ~ 50Hz 2000–2400W
7
Page 8

K
MSHM
L
S
M
N
Accessories sold separately:
O
P
Q
R
K. LCD screen
L.
Function Dial
M.
Temperature Dial/Toast and Bagel
Darkness Control
N.
Time Dial/Toast and Bagel Selection
O.
Start/Cancel Button
P.
Oven Light Button
Q.
Convection Button
R.
Frozen Button
S.
Temperature Conversion Button
Bamboo Cutting Board
Pizza Stone Pizza Crisper Pan
8
Page 9

Functions
SHMMSHM
EN
PREPARING THE OVEN
Before rst use, please run the oven empty for
20 minutes to remove protective substances from
the heating elements. Ensure the area is well
ventilated as the oven may emit vapors. These
vapors are safe and are not detrimental to the
performance of the oven.
1. Remove and safely discard any packing
material, promotional labels and tape from
the oven.
2. Remove the crumb tray, wire racks, grilling rack,
roasting pan, air fry basket and pizza pan from
the polyfoam packaging. Wash them with a
soft sponge in warm, soapy water then rinse
and dry thoroughly.
3. Wipe the interior of the oven with a soft,
damp sponge. Dry thoroughly.
4. Place the oven on a at, dry surface. Ensure
there is a minimum distance of 10cm of space
on both sides of the appliance and 15cm above.
5. Insert the crumb tray into the oven.
6. Unwind the power cord completely and insert
the power plug into a grounded power outlet.
7. The oven alert will sound and the LCD screen
will illuminate. Set desired language. Go to page
12 for guide on language selection.
8. Turn the
indicator reaches the PIZZA function.
Start/Cancel dial to the right until the
9. Press the Start/Cancel button. The button
backlight will illuminate red, the LCD screen will
illuminate orange and the oven alert will sound.
10. The LCD screen will indicate a blinking
‘PREHEATING’. Once the oven has completed
the preheating cycle, an alert will sound.
11. The timer will be displayed and automatically
begin to count down.
12. At the end of the cooking cycle, the oven
alert will sound, the
backlight will go out and the LCD screen will
illuminate blue.
13. The oven is now ready to use.
ELEMENT IQ
The Sage Smart OvenTM Air Fryer features
Element IQTM, a cooking technology that creates
the ideal environment for the food you’re cooking.
It steers power where and when it’s needed and
creates the right kind of heat, whether even
or intense.
Each of the oven’s functions is preset with our
recommended heating element congurations
and temperatures, that are based on recipes and
testing. However, we suggest experimenting with
these depending on the recipe, amount of food and
your personal taste.
Start/Cancel button
TM
M
9
Page 10

OVEN FUNCTIONS OVERVIEW
Function
Toast
Bagel
Pizza
Grill
Bake
Roast
Air Fry
Reheat
Keep Warm
Slow Cook
SUGGESTED
RACK
OPTIONAL
SETTINGS
POSITION
Frozen
Middle
Middle
Middle
Frozen
Super
Convection
Convection
Temperature
Conversion
Frozen
Top HI
Bottom
Super
Convection
Convection
Temperature
Conversion
Bottom
Super
Convection
Convection
Temperature
Conversion
Top
Bottom
Bottom
Bottom
Super
Convection
Temperature
Conversion
Frozen
Convection
Temperature
Conversion
Convection
Temperature
Conversion
Convection
PRESETS PREHEAT RANGE
Darkness 4
Slices 4
Darkness 4
Slices 4
210°C
Convection
Frozen
20 MINS
10 MINS
160°C
Convection
30 MINS
180°C
Convection
1:00 HRS
220°C
15 MIN
Super Convection
160°C
Convection
15 MINS
70°C
KEEP WARM
1:00 HRS
HI
Convection
4:00 HRS
No Darkness 1-7
Slices 1-6
No Darkness 1-7
Slices 1-6
Yes 160°C - 230°C
Up to 2 HRS
No HI-MED-LO
Up to 20 MINS
Yes 120°C and above =
1 MIN up to 2 HRS
120°C and below =
1 MIN up to 10 HRS
Yes 120°C and above =
1 MIN up to 2 HRS
120°C and below =
1 MIN up to 10 HRS
No 160°C-230°C
Up to 1:00 HR
Yes 70°C - 160°C
Up to 2:00 HRS
No 50°C–120°C
Up to 2:00 HRS
No LO = 4 to 10 HRS
HI = 2 to 8 HRS
10
Page 11

i
TIME
TIME
TIME
EN
Quick Start
Guide
OPERATING YOUR SAGE OVEN
1. Position the wire rack so the spokes face
upward and insert it into the desired rack
position. The rack positions are conveniently
printed on the oven door window.
2. Turn the Function dial until the indicator on
the LCD screen reaches the desired setting.
3. The screen indicates the preset cooking
temperature for the selected setting.
Turn the
reduce the temperature or to the right to
increase the temperature.
Temperature dial to the left to
TEMPERATURE
DIAL
ROTATE
REDUCE
4. The screen indicates the preset cooking time
for the selected setting. Turn the
the left to reduce the cooking time or to the right
to increase the cooking time.
DIAL
INCREASE
Time dial to
ROTATE
REDUCE
INCREASE
5. For settings without a preheat cycle
(TOAST, BAGEL, GRILL, KEEP WARM, SLOW
COOK), place the food directly on the wire rack
or on the included air fry basket, pizza pan,
grilling rack and/or roasting pan. Ensure the
food is centered in the oven for the most even
cooking.
6. Close the oven door.
7. Press the
The button backlight will illuminate red, the
oven alert will sound, and the LCD screen
will illuminate orange.
8. The timer will be displayed and begin to count
down. The cooking temperature and time can
be adjusted during the cooking cycle.
9. For settings that feature a preheat cycle (BAKE,
ROAST, PIZZA, AIR FRY), press the
Cancel button before placing food in the oven.
The button backlight will illuminate red, the
oven alert will sound and the LCD screen will
indicate a blinking ‘PREHEATING’ while the
oven is heating up.
a) When the oven is ready for use, the blinking
‘PREHEATING’ will go out, the oven alert
will sound and the timer will start counting
down. Place the food directly on the wire
rack, or on the included air fry basket, pizza
pan, grilling rack and/or roasting pan. Ensure
the food is centered in the oven for the most
even cooking.
b) Close the oven door.
c) The timer will continue to count down.
The cooking temperature and time can be
adjusted during the cooking cycle.
10. At the end of the cooking cycle, the oven
alert will sound, the
backlight will go out and the LCD screen will
illuminate blue.
Start/Cancel button.
Start/Cancel button
Start/
11
Page 12

NOTE
The cooking cycle can be stopped at any time by
pressing the Start/Cancel button. This will
cancel the cycle and the button backlight will
illuminate blue.
NOTE
Press the Convection button to choose
between no convection, convection and super
convection. Convection and super convection
may adjust the temperature to compensate for
the faster air ow. Super convection will deliver
a crispier food result.
MAGNETIC AUTO-EJECT RACK
When the wire rack is inserted into the middle rack
position, it will automatically eject halfway out of the
oven when the door is opened so you can easily
remove your food.
Always open the door slowly when the wire rack
is in this position to prevent the rack from ejecting
too quickly.
LANGUAGE SELECTION
When the oven is being operated for the rst time,
it will allow you to select the desired language.
Turn the
(clockwise or anticlockwise) to select the desired
language, then press the Start/Cancel button
to conrm your selection. If the desired language
is not conrmed within 5 minutes, the oven will
automatically save the default language.
In the event the selected language needs to
be changed, press the
3 seconds. The LCD screen will display the
languages selection. Turn the Temperature or
the desired language, then press the
Start/Cancel button to conrm your selection.
If the desired language is not conrmed within 5
minutes, the oven will automatically go back to the
previously saved language.
The check mark icon
language.
Temperature or Time dials
Frozen button for
Time dials (clockwise or anticlockwise) to select
indicates selected
12
Page 13
EN
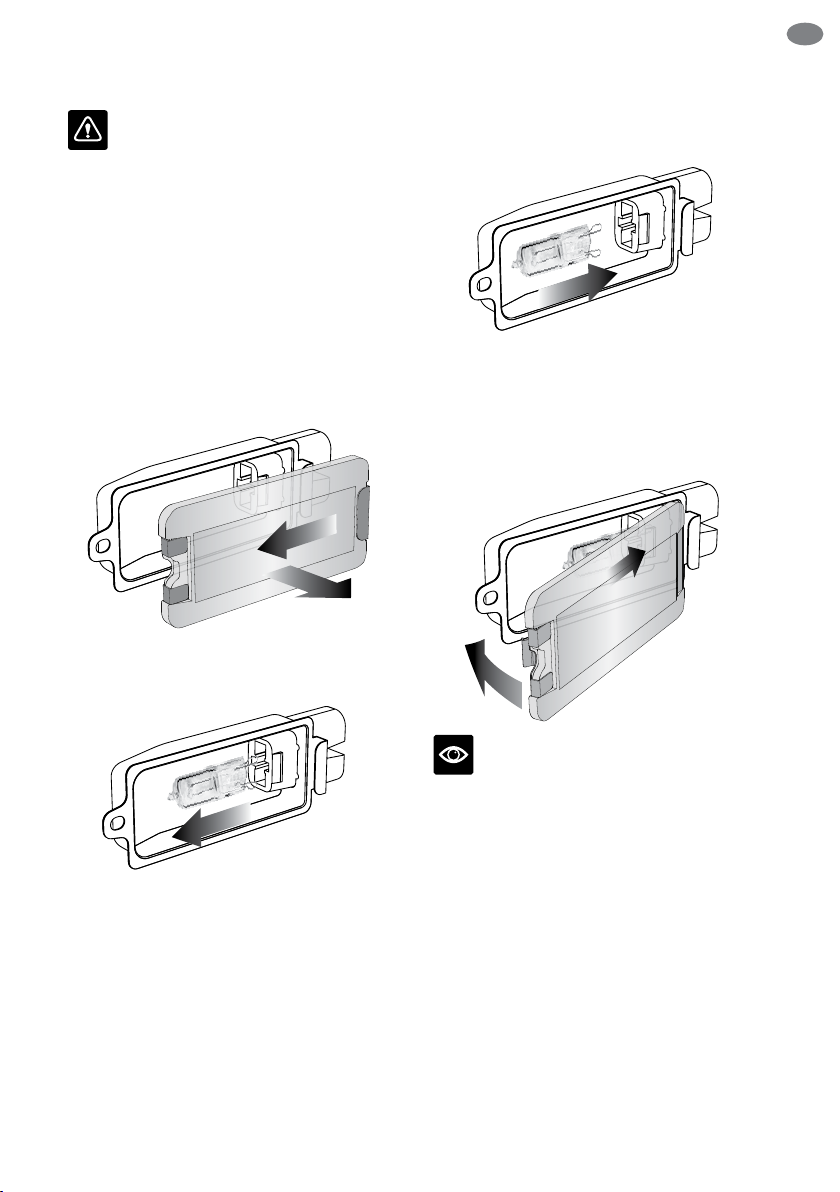
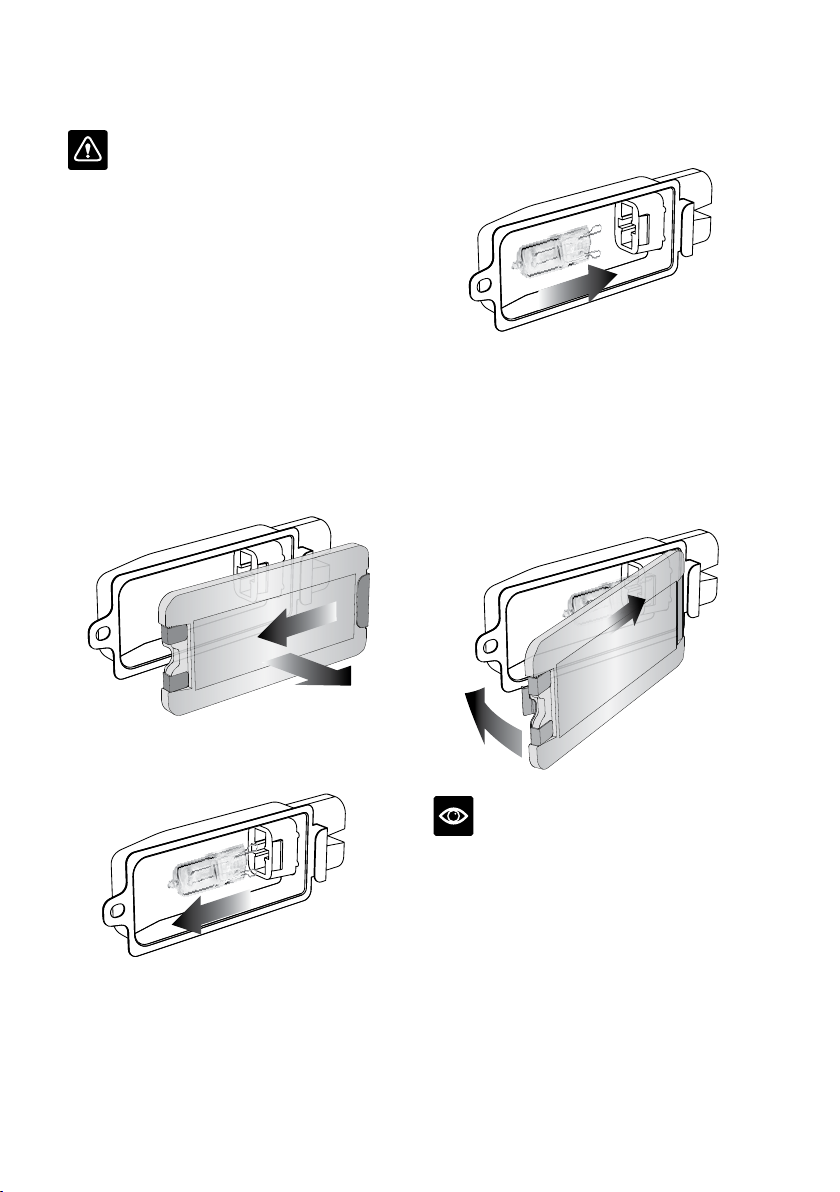
REPLACING THE OVEN LIGHT
WARNING
Always unplug oven and let cool before replacing
bulb. Only use a 25-Watt, 220-240V, G9 type
oven bulb.
1. Remove the wire rack from the oven before
replacing the light.
2. The light is positioned on the lefthand side of
the oven cavity. Position your ngers on the
outside of the light housing and gently pull the
glass cover away from the oven wall to remove
it. If you are unable to pull the cover o, slide a
spoon into the left side of the light housing and
gently lever the glass cover o. Always hold the
glass cover with the other hand to prevent the
cover from falling and breaking.
3. Remove the used bulb by pulling it directly
out of its holder.
4. Use a soft cloth to insert the new bulb.
Do not directly touch the surface of the bulb
with your ngers as oil from your skin can
damage the bulb.
5. To reattach the glass cover, align the metal
hook with the left side of the light housing. Slide
the opposite end of the glass cover into the
metal bracket on the right side of the housing,
then push the metal hook into the left side of the
housing until it snaps securely into position.
NOTE
The top of the oven is very hot during and after
operation. As a result, storing items on top of the
oven is not recommended.
The only exception is the optional Sage Bamboo
Cutting Board and Serving Tray that fits in the
ribbed section on top of the oven. Visit
www.sageappliances.com for more information.
13
Page 14
Care & Cleaning
Before cleaning, ensure the oven is turned
o by removing the power plug from the power
outlet. Allow the oven and all accessories to cool
completely before disassembling and cleaning.
Cleaning the outer body and door
1. Wipe the outer body with a soft, damp sponge.
A non-abrasive liquid cleanser or mild spray
solution may be used to avoid build-up of
stains. Apply the cleanser to the sponge, not
the oven surface, before cleaning.
2. To clean the glass door, use a glass cleaner or
mild detergent and a soft, damp sponge or soft
plastic scouring pad. Do not use an abrasive
cleanser or metal scouring pad as these will
scratch the oven surface.
3. Wipe the LCD screen with a soft damp cloth.
Apply cleanser to the cloth and not the LCD
surface. Cleaning with dry cloth or abrasive
cleaners may scratch the surface.
4. Let all surfaces dry thoroughly prior to inserting
the power plug into a power outlet and turning
the oven on.
WARNING
Do not immerse the body, power cord or power
plug in water or any other liquid as this may cause
electrocution.
Cleaning the interior
The walls on the inside of the oven feature a
non-stick coating for easy cleaning. To clean any
splattering that may occur while cooking, wipe the
walls with a soft, damp sponge. A non-abrasive
liquid cleanser or mild spray solution may be used
to avoid build-up of stains. Apply the cleanser to
the sponge, not the oven surface, before cleaning.
Avoid touching the quartz heating elements.
WARNING
Use extreme caution when cleaning the quartz
heating elements. Allow the oven to cool
completely, then gently rub a soft, damp sponge
or cloth along the length of the heating element.
Do not use any type of cleanser or cleaning agent.
Let all surfaces dry thoroughly prior to inserting
the power plug into a power outlet and turning the
oven on.
Cleaning the crumb tray
1. After each use, slide out the crumb tray and
discard crumbs. Wipe the tray with a soft, damp
sponge. A non-abrasive liquid cleanser may
be used to avoid build-up of stains. Apply the
cleanser to the sponge, not the tray, before
cleaning. Dry thoroughly.
2. Always reinsert the crumb tray into the oven
with the oven door closed after cleaning and
prior to inserting the power plug into a power
outlet and turning the oven on.
3. Always reinsert the crumb tray into the oven
with the oven door closed after cleaning and
prior to inserting the power plug into a power
outlet and turning the oven on.
Cleaning the wire rack, grilling rack,
roasting pan and pizza pan
1. Wash all accessories in warm soapy water
with a soft sponge or soft plastic scouring pad.
Rinse and dry thoroughly. Do not use abrasive
cleansers, metal scouring pads or metal
utensils to clean any of the accessories as they
may damage the surfaces.
2. To extend the life of your accessories,
we do not recommend that these be placed
in the dishwasher.
Storage
1. Ensure the oven is turned o by removing the
power plug from the power outlet.
2. Allow the oven and all accessories to cool
completely before disassembling and cleaning.
3. Ensure the oven and all accessories are clean
and dry.
4. Ensure the crumb tray is inserted into the oven;
the broiling rack is inserted into the roasting pan
and resting on the wire rack in the middle rack
height position.
5. Ensure the door is closed.
6. Store the appliance in an upright position
standing level on its support legs. Do not store
anything on top. The only exception is the
optional Sage Bamboo Cutting Board and
Serving Tray.
14
Page 15

Troubleshooting
POSSIBLE PROBLEM EASY SOLUTION
EN
Oven will not switch "ON"
The LCD display light has
gone out
The pizza does not cook
evenly
The Magnetic Auto-Rack
Eject comes out too far
when I open the door
I cannot select the
Frozen button
Steam is coming out from
the oven door
The heating elements
appear to be pulsing
• Check that the power plug is securely inserted into the outlet.
• Insert the power plug into an independent outlet.
• Insert the power plug into a dierent outlet.
• Reset the circuit breaker if necessary.
• The oven goes into standby mode if not used for 10 minutes. When
in standby mode, the LCD screen will cease to illuminate, however
all function options will still be visible.
• To re-activate the oven out of standby mode, press the
Start/Cancel button on the control panel, or turn any dial.
The LCD screen will re-illuminate.
• Some large pizzas may brown unevenly in compact ovens. Open the
oven door half way through the cooking time and turn the pizza 180
degrees for more even darkness.
• Always open the door slowly and in a controlled manner when the
wire rack is inserted into the middle rack height position to prevent
the wire rack from ejecting too quickly.
• The
• This is normal. The door is vented to release steam created from
• Element IQ
Frozen button is only selectable for the following functions:
TOAST, BAGEL, BAKE, PIZZA, AIR FRY. When selecting the
Frozen button, this will automatically adjust the cooking time for
an optimised food result.
high moisture content foods such as frozen breads. Be mindful that
the steam can be hot.
TM
the power and adjusting the power level in the heating elements in
short bursts to give accurate temperature control. This is normal.
accurately controls the heat inside the oven by pulsing
Water is dripping onto
counter from under door
The temperature reading
on the LCD screen doesn’t
match the temperature
measured inside the oven
• This is normal. The condensation created from high moisture
content foods such as frozen breads will run down the inside of the
door and can drip onto the counter.
• To ensure the measurements are standardized, the oven
temperatures have been calibrated in the TOAST position (center
of the middle rack with no tray in place). Re-check the temperature
in this position, ensuring not to open the oven door for 30 minutes
as heat will escape each time the door is opened. Note that the
‘preheat’ alert sounds at 75% of the target temperature.
15
Page 16

POSSIBLE PROBLEM EASY SOLUTION
The ‘preheat’ alert sounds
at a lower temperature than
what is displayed on the
LCD screen
The LCD screen displays
‘E01’
The LCD screen displays
‘E02’
The LCD screen displays
‘E03’
The LCD screen displays
‘E05’
• The ‘preheat’ alert sounds at 75% of the target temperature. This
provides the fastest, combined preheating and cooking time.
• This is because when the ‘preheating’ alert sounds, signaling
the user to open the oven door and insert food, there is dramatic
temperature loss inside the oven. If the alert sounded at 100%
of the target temperature, opening the door would mean a lot of
this waiting time is “wasted”. We have calculated that by sounding
the alert at 75% of the target temperature, followed by the oven
door being opened to place food inside the oven, that we still
recover to the target temperature up to 2 minutes faster. This is
why the temperature on the LCD screen does not match the target
temperature at the ‘preheat’ alert. Depending on the set temperature,
it can take the oven approximately 8–10 minutes from start-up,
including opening the oven door when the ‘preheat’ alert sounds, to
reach the target temperature.
• The LCD screen will display ‘E01’ when there is a non-resettable
issue with the appliance. Should this occur, immediately remove the
power cord from the power outlet and call Sage Consumer Support.
• The LCD screen will display ‘E02’ when there is a non-resettable
issue with the appliance. Should this occur, immediately remove the
power cord from the power outlet and call Sage Consumer Support.
• The LCD screen will display ‘E03’ if the oven temperature is above
the set maximum limit. Remove the plug from the power outlet, allow
the oven to cool for 15 minutes, then plug back in.
• Call Sage Consumer Support if the ‘E03’ message continues.
• The LCD screen will display ‘E05’ when there is a non-resettable
issue with the appliance. Should this occur, immediately remove the
power cord from the power outlet and call Sage Consumer Support.
Temperature are changing
when convection button is
pressed
16
• This is normal. The temperature is calibrated to compensate for the
convection fan increasing cooking rates.
Page 17

Guarantee
2 YEAR LIMITED GUARANTEE
Sage Appliances guarantees this product
for domestic use in specied territories for
2 years from the date of purchase against
defects caused by faulty workmanship and
materials. During this guarantee period Sage
Appliances will repair, replace, or refund any
defective product (at the sole discretion of
Sage Appliances).
All legal warranty rights under applicable
national legislation will be respected and will
not be impaired by our guarantee. For full terms
and conditions on the guarantee, as well as
instructions on how to make a claim, please
visit www.sageappliances.com.
EN
17
Page 18

Notes
18
Page 19

the Smart Oven
TM
Air Fryer
DE
KURZANLEITUNG
Page 20

Inhalt
HINWEISE ZUR
SICHERHEIT
20 Bei Sage® steht Sicherheit an
erster Stelle
26 Komponenten
28 Funktionen
30 Quick Start Guide
33 Pege und Reinigung
35 Störungsbehebung
37 Garantie
BEI SAGE® STEHT
SICHERHEIT AN
ERSTER STELLE
Wir bei Sage® sind sehr
sicherheitsbewusst.
Beim Design und bei
der Herstellung denken
wir zuallererst an Ihre
Sicherheit. Wir bitten Sie,
bei der Verwendung aller
Elektrogeräte angemessene
Sorgfalt walten zu lassen
und sich an die folgenden
Vorsichtsmaßnahmen
zu halten.
BITTE ALLE ANWEISUNGEN
VOR GEBRAUCH LESEN
UND ZUM SPÄTEREN
NACHSCHLAGEN
AUFBEWAHREN
• Dieses Dokument ist auch
zum Download verfügbar unter
sageappliances.com
• Bitte vergewissern Sie sich
vor dem ersten Gebrauch,
dass die Netzspannung der
Angabe auf der Unterseite
des Geräts entspricht.
• Entfernen und entsorgen Sie
jegliches Verpackungsmaterial
sowie Aufkleber vor der
Inbetriebnahme des Ofens.
• Die Schutzhülle des
Netzsteckers muss sicher
entsorgt werden, da diese
eine Erstickungsgefahr für
Kleinkinder darstellt.
• Stellen Sie das Gerät nicht am
Rand einer Arbeitsplatte oder
eines Tisches auf. Die Fläche,
auf der das Gerät aufgestellt
wird, muss stabil, eben,
hitzebeständig und sauber sein.
• Sollte der Ofen während
Inbetriebnahme mit entamm-
baren Materialien wie
Vorhängen oder Stoen zugedeckt sein oder mit Wänden
oder ähnlichem in Berührung
kommen, kann es zu einem
Brand kommen.
20
Page 21

DE
• Stellen Sie das Gerät nicht
in der Nähe eines heißen
Gaskochers, eines elektrischen
Kochelements oder Ofens auf.
• Achten Sie darauf, dass das
Kabel nicht über die Kante
eines Tisches oder einer
Arbeitsäche hängt oder eine
heiße Oberäche berührt.
• Dieser Ofen kann nicht komplett
eingebaut werden. Bitte sorgen
Sie dafür, dass um den Ofen
herum ausreichend Raum
für die Luftzirkulation bleibt.
Wir empfehlen einen Abstand
von mindestens 10 cm.
• Während des Garvorgangs
und auch danach kann das
Gehäuse des Ofens heiß sein.
Heiße Oberächen dürfen nicht
berührt werden. Bitte halten Sie
die Kabel dieses und anderer
Geräte vom Gehäuse des
Ofens fern.
• Heiße Oberächen dürfen nicht
berührt werden. Um Verbrennungen zu vermeiden, muss mit
Gegenständen, die heißes Öl
oder andere heiße Flüssigkeiten
enthalten, besonders vorsichtig
umgegangen werden. Dazu
gehören zum Beispiel Pfannen,
Geschirr und Zubehör wie der
mitgelieferte Grillrost oder das
Backblech.
• Kochutensilien, Bratpfannen
oder Geschirr müssen von der
Glastür ferngehalten werden.
• Lassen Sie die Tür nicht über
einen längeren Zeitraum
geönet.
• Legen Sie keine Gegenstände
auf den Ofen, wenn das Gerät
in Betrieb ist. Ausnahmen dazu
nden Sie auf Seite 34 dieser
Anleitung.
• Legen Sie keine Gegenstände
aus Karton, Kunststo, Papier
oder sonstigen entammbaren
Materialien in den Ofen.
• Decken Sie die Krümelschublade oder andere Teile des
Ofens nicht mit Metallfolie ab.
Dies kann zu seiner Überhitzung
führen.
• Lassen Sie Vorsicht walten,
wenn Sie Pfannen und
Geschirr aus nicht-metallischen
Materialien verwenden.
Vergewissern Sie sich,
dass Pfannen und Geschirr
backofenfest sind, bevor Sie
diese im Ofen verwenden.
• Bei der Verwendung von
Deckeln im Ofen ist Vorsicht
geboten, da ein Druckaufbau
in einer abgedeckten Pfanne
oder Schale dazu führen kann,
dass heiße Zutaten austreten
oder die Schale bricht. Stellen
Sie keine verschlossenen oder
luftdichten Behälter in den Ofen.
• Übergroße Lebensmittel
und Metallgegenstände
dürfen nicht im Ofen platziert
werden, da sie ein Brand- oder
Stromschlagrisiko darstellen.
21
Page 22

• Die Verwendung von nicht
empfohlenem bzw. nicht
im Lieferumfang des Ofens
enthaltenem Zubehör
und Zusatzteilen kann
zu Verletzungen führen.
• Dieses Gerät ist nur für den
Hausgebrauch bestimmt.
Verwenden Sie das Gerät
niemals in einem fahrenden
Fahrzeug. Verwenden Sie das
Gerät ausschließlich zu seinem
Bestimmungszweck und niemals im Freien. Fehlgebrauch
kann zu Verletzungen führen.
• Wenn Sie den Ofen unbeaufsichtigt stehen lassen, reinigen,
umstellen, zusammenbauen
oder aufbewahren möchten,
schalten Sie ihn zuerst aus,
ziehen Sie den Stecker und
lassen Sie ihn vollständig
abkühlen.
• Verwenden Sie zur Reinigung
keine Topfreiniger aus Metall.
Teile davon könnten sich lösen,
mit Elektroteilen in Kontakt
kommen und so ein Risiko
für Stromschläge darstellen.
• Dieses Gerät darf von Kindern
ab 8 Jahren und Personen mit
eingeschränkten körperlichen,
sensorischen oder geistigen
Fähigkeiten oder Personen,
denen es an Erfahrung und
Kenntnis mangelt, nur unter
Beaufsichtigung benutzt
werden oder wenn sie in die
sichere Handhabung des
Geräts eingewiesen wurden
und die damit verbundenen
Gefahren verstehen.
• Das Gerät ist kein Spielzeug
für Kinder.
• Die Reinigung und Instandhaltung darf nicht von Kindern
unter 8 Jahren durchgeführt
werden, es sei denn, sie werden
dabei beaufsichtig.
• Das Gerät und das Netzkabel
müssen außerhalb der
Reichweite von Kindern unter
8 Jahren aufbewahrt werden.
• Wir empfehlen, das Gerät
regelmäßig auf Schäden zu
überprüfen. Benutzen Sie das
Gerät nicht, wenn das Stromkabel, der Netzstecker oder
das Gerät selbst in irgendeiner
Weise beschädigt sind. Im Falle
von Beschädigungen oder
Wartungsarbeiten, die über die
gewöhnliche Reinigung hinausgehen, kontaktieren Sie den
Sage Kundendienst oder besuchen Sie sageappliances.com
• Dieses Gerät ist nicht dafür
gedacht, über einen externen
Zeitschalter oder eine separate
Fernbedienung bedient
zu werden.
• Das Gerät muss an eine
korrekt geerdete Steckdose
angeschlossen werden.
Sollten Sie sich nicht sicher
sein, ob Ihre Steckdose korrekt
geerdet ist, wenden Sie sich
bitte an einen Elektriker.
22
Page 23

DE
• Unter keinen Umständen darf
die Steckdose manipuliert oder
ein Adapter verwendet werden.
• Wenden Sie sich an einen
qualizierten Elektriker, falls Sie
die Erdungsanweisungen nicht
vollständig verstanden oder
Zweifel haben, ob das Gerät
richtig geerdet ist.
• Als zusätzliche Schutzmaßnahme bei der Verwendung
von Elektrogeräten wird die
Installation eines Schutzoder Sicherheitsschalters
empfohlen. Es ist ratsam,
in dem Stromkreis, an den
das Gerät angeschlossen ist,
einen Schutz- oder Sicherheitsschalter zu installieren, dessen
Bemessungsfehlerstrom 30 mA
nicht überschreitet. Wenden
Sie sich an einen Elektriker für
fachgerechte Beratung.
BESONDERE ANWEISUNGEN
FÜR SOV860
• Wir empfehlen, den Ofen
an einer getrennten Steckdose
anzuschließen, an der keine
anderen Geräte angeschlossen
sind. Wenden Sie sich im Zweifelsfall an einen zugelassenen
und qualizierten Elektriker.
• Um den Ofen auszuschalten,
drücken Sie die Taste
„Start/
Cancel“ auf dem Bedienfeld.
Der Ofen ist ausgeschaltet,
wenn die Hintergrundbeleuchtung dieser Taste ausgeht.
• Reinigen Sie die Krümelschublade regelmäßig. Folgendes
müssen Sie beim Reinigen der
Krümelschublade beachten:
−Schalten Sie den Ofen aus
(„OFF“).
−Versichern Sie sich, dass der
Ofen vollständig abgekühlt ist,
bevor Sie den Netzstecker aus
der Steckdose entfernen.
−Entfernen Sie die Krümel-
schublade und reinigen Sie
sie mit warmer Seifenlauge.
−Trocknen Sie die Schublade
komplett ab, bevor Sie sie
wieder ordnungsgemäß
einsetzen.
23
Page 24

KUNDENMITTEILUNG
BEZÜGLICH DES SPEICHERS
Bitte beachten Sie, dass
in Ihrem Gerät ein internes
Speichermedium enthalten ist,
um die Benutzerfreundlichkeit
unserer Produkte zu steigern.
Dabei handelt es sich um einen
kleinen Chip, der bestimmte
Geräteinformationen aufzeichnet,
beispielsweise wie häug
und auf welche Art das Gerät
verwendet wird. Falls Ihr Gerät
gewartet werden muss, können
wir mögliche Problemquellen
dank der Informationen auf
diesem Chip schnell und ezient
beheben. Zudem helfen uns die
gesammelten Informationen,
unsere Geräte in Zukunft noch
besser an die Wünsche und
Bedürfnisse unserer Kunden
anzupassen. Informationen
über die Personen, die ein Gerät
verwenden, oder den Haushalt,
in dem es sich bendet, werden
nicht gesammelt. Falls Sie Fragen
zu dem Speicherchip haben,
kontaktieren Sie uns bitte unter
privacy@sageappliances.com
WARNUNG
MINIMIEREN SIE DAS RISIKO
FÜR FEUER, ELEKTRISCHEN
SCHOCK, EXTREME
UV-STRAHLUNG UND
VERLETZUNGEN:
• Stecken Sie den Ofen stets
aus und lassen Sie alle Teile
(darunter auch den Lampensockel, die Glasabdeckung und
das Gehäuse) komplett abkühlen, bevor Sie eine Glühbirne
auswechseln.
• Verwenden Sie nur 25 Watt,
220-240 V, G9-Ofenglühbirnen.
• Verwenden Sie immer ein
weiches Tuch, wenn Sie die
Glühbirne berühren, da das
Hautfett die Glühbirne bei
direktem Kontakt beschädigen
kann.
• Schauen Sie nicht direkt in eine
leuchtende Glühbirne.
• Wenn sich Ihre Haut warm
anfühlt, sollten Sie nicht im
Lichtstrahl stehen bleiben.
• Halten Sie die Glühbirne von
brennbarem Material fern.
• Die Glühbirne wird schnell heiß.
Verwenden Sie immer nur den
Lichtschalter, um das Licht
einzuschalten.
• Schalten Sie das Licht nicht ein,
wenn der Lampensockel, die
Glasabdeckung, der UV-Filter
oder das Gehäuse beschädigt
sind oder fehlen.
24
Page 25

Dieses Symbol bedeutet,
dass das Gerät nicht mit
dem gewöhnlichen
Haushaltsmüll entsorgt werden
darf. Stattdessen muss es
zu einer für diesen Zweck
eingerichteten behördlichen
Sammelstelle oder zu einem
Händler gebracht werden,
der Entsorgung anbietet.
Weitere Informationen dazu
erhalten Sie bei Ihrem
Gemeindeamt.
Dieses Symbol zeigt an, dass
manche Bereiche des Geräts
heiß werden können, sowohl
während es in Gebrauch ist
als auch einige Zeit danach.
DE
Um sich vor Stromschlägen
zu schützen, tauchen Sie
das Netzkabel, den Netzstecker
oder das Gerät nicht in Wasser
oder eine andere Flüssigkeit ein.
ANLEITUNG BITTE AUFBEWAHREN
25
Page 26

Komponenten
TEMP
Darkness
TIME
Slices
FUNCTION
START/CANCEL
A
B
C
D
E
A. Antihaftbeschichtetes Pizza-Backblech
mit Ø 30 cm
B. Drahtgitterrost
C. Grillrost
D. 28 x 33,5 cm Emaille-Bratform
E. Heißluft-Frittiergitter
G H
F
I
F. Ofen-Innenbeleuchtung
G. Türgri
H. Belüftungsschlitze
I. Krümelschublade
26
Leistungsinformationen
220–240 V ~ 50 Hz, 2000–2400 W
Page 27

DE
K
MSHM
L
S
M
N
Zusätzlich erhältliches Zubehör:
O
P
Q
R
K. LCD-Display
L.
„Function“-Drehregler
M.
„Temperature“-Drehregler/
Bräunungsstufe für Toast
und Bagels
N.
„Time“-Drehregler/Toast- und Bagel
O.
Taste „Start/Cancel“
P.
Taste für die Ofen-Innenbeleuchtung
Q.
Taste für Umluft
R.
Taste für Gefrorenes
S.
Taste zur Einstellung der Gradangaben
Schneidebrett aus Bambus
Pizzastein Pizzablech
27
Page 28

Funktionen
SHMMSHM
VORBEREITUNG DES OFENS
Vor dem ersten Gebrauch sollten Sie den
Ofen 20 Minuten lang leer laufen lassen,
um Schutzstoe von den Heizelementen zu
entfernen. Stellen Sie sicher, dass die Umgebung
gut belüftet ist, da der Ofen möglicherweise
Dämpfe abgibt. Diese Dämpfe sind nicht gefährlich
und schränken die Leistung des Ofens in keiner
Weise ein.
1. Entfernen und entsorgen Sie jegliches Verpa-
ckungsmaterial, Aufkleber und Klebeband
vom Ofen.
2. Entnehmen Sie Krümelschublade,
Drahtgitterrost, Grillrost, Bratform,
Heißluft-Frittiergitter und Pizzapfanne aus der
Polyschaum-Verpackung. Waschen Sie das
Zubehör mit warmem Seifenwasser und einem
weichen Schwamm, spülen Sie es aus und
trocknen Sie es gründlich ab.
3. Reinigen Sie die Innenseite des Ofens mit
einem weichen, feuchten Schwamm. Trocknen
Sie alles gründlich ab.
4. Stellen Sie den Ofen auf eine ebene, trockene
Fläche. Achten Sie auf einen Mindestabstand
von 10 cm auf beiden Seiten und 15 cm
oberhalb des Gerätes.
5. Legen Sie die Krümelschublade in den
Ofen ein.
6. Entrollen Sie das Stromkabel vollständig
und schließen Sie den Netzstecker an eine
geerdete Steckdose an.
7. Dadurch wird der Ofenalarm aktiviert und das
LCD-Display beleuchtet. Stellen Sie die von
Ihnen gewünschte Sprache ein. Auf Seite 31
nden Sie weitere Informationen zur
Spracheinstellung.
8. Drehen Sie den
solange, bis „PIZZA“ angezeigt wird.
Drehregler für „Start/Cancel“
9. Drücken Sie die Taste „Start/Cancel“.
Die Hintergrundbeleuchtung der Taste wird
nun rot, das LCD-Display orange und der
Ofenalarm wird aktiviert.
10. Auf dem LCD-Display wird der blinkende
Schriftzug „PREHEATING“ angezeigt.
Sobald der Ofen fertig vorgeheizt hat,
ist ein Alarm zu hören.
11. Der Timer wird angezeigt und beginnt einen
automatischen Countdown.
12. Am Ende eines Garzyklus ertönt der Ofenalarm,
die Hintergrundbeleuchtung der
Cancel“ geht aus und das LCD-Display leuchtet
blau.
13. Der Ofen ist nun betriebsbereit.
ELEMENT IQ
The Smart OvenTM Air Fryer bietet Ihnen
Element IQTM, eine Technologie, die für eine ideale
Garumgebung sorgt. Diese Technologie leitet
Energie dorthin, wo und wann sie benötigt wird
und erzeugt jederzeit die richtige Temperatur, egal
ob gleichmäßig oder in intensiven Schüben.
Für jede Ofenfunktion werden das Heizelement
und empfohlene Temperaturen voreingestellt,
basierend auf Rezepten und Tests. Wir raten Ihnen
dennoch, diese Einstellungen auszuprobieren
und je nach Rezept, Menge und persönlichen
Vorlieben zu ändern.
™
Taste „Start/
M
28
Page 29
ÜBERSICHT DER OFENFUNKTIONEN
DE
Funktion
Toast
Bagel
Pizza
Grillen
Backen
Braten
Heißluft-
frittieren
Auf wärmen
Warm halten
Schon garen
EMPFOHLENE ROSTPOSITION
Mitte
Mitte
Mitte
OPTIONALE
EINSTELLUNGEN
Gefroren
Gefroren
Super-umluft
Umluft
Temperatur-
Anzeigewandler
Gefroren
Oben HI
Unten
Super-umluft
Umluft
Temperatur-
Anzeigewandler
Unten
Super-umluft
Umluft
Temperatur-
Anzeigewandler
Oben
Super-umluft
Temperatur-
Anzeigewandler
Gefroren
Unten
Umluft
Temperatur-
Anzeigewandler
Unten
Umluft
Temperatur-
Anzeigewandler
Unten
Umluft
VOREINSTELLUNGEN
Bräunungsgrad 4
Scheiben 4
Bräunungsgrad 4
Scheiben 4
210 °C
Umluft
Gefroren
20 Min.
10 Min.
160 °C
Umluft
30 Min.
180 °C
Umluft
1:00 Std.
220 °C
15 Min.
Super-umluft
160 °C
Umluft
15 MIN.
70 °C
WARMHALTEN
1:00 Std.
HI
Umluft
4:00 Std.
VOR-
BEREICH
HEIZEN
Nein Bräunungsgrad 1-7
Nein Bräunungsgrad 1-7
Ja 160 °C - 230 °C
Nein HI-MED-LO
Ja 120 °C und darüber =
Ja 120 °C und darüber =
Nein 160 °C - 230 °C
Ja 70 °C - 160 °C
Nein 50 °C - 120 °C
Nein LO = 4 bis 10 Std.
Scheiben 1-6
Scheiben 1-6
Bis zu 2 Stunden
Bis zu 20 Min.
1 Min. bis zu 2 Std.
120 °C und darunter =
1 Min. bis zu 10 Std.
1 Min. bis zu 2 Std.
120 °C und darunter =
1 Min. bis zu 10 Std.
Bis zu 1 Std.
Bis zu 2 Std.
Bis zu 2 Std.
HI = 2 bis 8 Std.
29
Page 30
„TEMPERATURE“-
„TIME“-
i
Quick Start
Guide
VERWENDUNG IHRES SAGE OFENS
1. Halten Sie Ihren Drahtgitterrost so, dass die
Stäbe nach oben zeigen und schieben Sie
ihn auf der gewünschten Rostposition ein.
Besonders praktisch: Die Rostpositionen sind
außen auf der Ofentür abgebildet.
2. Drehen Sie den „Function“-Drehregler so
lange, bis das LCD-Display die gewünschte
Einstellung anzeigt.
3. Das LCD-Display zeigt die voreingestellte
Backtemperatur für die gewählte Einstellung
an. Drehen Sie den
Drehregler nach links, um die Temperatur zu
verringern und nach rechts, um sie zu erhöhen.
„Temperature“-
DREHREGLER
DREHEN
TEMPERATUR
4. Das LCD-Display zeigt die voreingestellte
Backzeit für die gewählte Einstellung an.
Drehen Sie den „Time“-Drehregler nach
links, um die Garzeit zu verringern und nach
rechts, um sie zu erhöhen.
DREHREGLER
TEMPERATUR
DREHEN
TEMPERATUR
SENKEN
TEMPERATUR
ERHÖHEN
5. Für Einstellungen ohne Vorheizzyklus
(TOAST, BAGEL, GRILLEN, WARMHALTEN,
SCHONGAREN) platzieren Sie das Essen
direkt auf dem Drahtgitterrost, dem Grillrost
oder dem enthaltenen Heißluft-Frittiergitter
oder in der Pizza- bzw. Bratpfanne. Stellen
Sie sicher, dass die Speisen sich in der Mitte
des Ofens benden, damit sie möglichst
gleichmäßig durchgaren.
6. Schließen Sie die Ofentür.
7. Drücken Sie die Taste
Die Hintergrundbeleuchtung der Taste wird
nun rot, das LCD-Display orange und der
Ofenalarm wird aktiviert.
8. Der Timer wird angezeigt und beginnt einen
Countdown. Backtemperatur und -zeit können
während eines Garzyklus angepasst werden.
9. Bei Einstellungen mit Vorheizzyklus (BACKEN,
BRATEN, PIZZA, HEISSLUFTFRITTIEREN)
drücken Sie die
bevor Sie das Essen in den Ofen stellen.
Die Hintergrundbeleuchtung der Taste wird
nun rot, der Ofenalarm wird aktiviert und
auf dem LCD-Display wird „PREHEATING“
blinken, während der Ofen sich aufheizt.
a) Wenn der Ofen betriebsbereit ist, erlischt
der blinkende Schriftzug „PREHEATING“,
der Ofenalarm ertönt und der Timer beginnt
einen Countdown. Platzieren Sie nun das
Essen direkt auf Drahtgitterrost, Grillrost,
dem enthaltenen Heißluft-Frittiergitter HeißluftFrittiergitter oder in der Pizza- oder Bratpfanne.
Stellen Sie sicher, dass die Speisen sich in der
Mitte des Ofens benden, damit sie möglichst
gleichmäßig durchgaren.
b) Schließen Sie die Ofentür.
c) Der Countdown des Timers wird fortgesetzt.
Backtemperatur und -zeit können während
eines Garzyklus angepasst werden.
10. Am Ende eines Garzyklus ertönt der
Ofenalarm, die Hintergrundbeleuchtung
der
„Start/Cancel“-Taste geht aus und das
LCD-Display leuchtet blau.
„Start/Cancel“.
Taste „Start/Cancel“,
30
Page 31
HINWEIS
Sie können den Garzyklus jederzeit anhalten,
indem Sie die Taste „Start/Cancel“ drücken.
Dadurch wird der Zyklus abgebrochen und die
Hintergrundbeleuchtung der Taste leuchtet blau.
HINWEIS
Drücken Sie die Umluft Taste, um zwischen
Umluft, Super-umluft oder Garen ohne Umluft
auszuwählen. Umluft und Super-umluft passen
eventuell die Temperatur an, um die stärkere
Luftzirkulation auszugleichen. Mit Super-umluft
werden die Ergebnisse knuspriger.
MAGNETISCHER ROST MIT AUTOMATISCHER AUSFAHRFUNKTION
Wenn der Drahtgitterrost in die mittlere Rostposition
eingelegt wird, wird er automatisch halb aus dem
Ofen ausgefahren, sobald Sie die Tür önen,
damit Sie Ihr Essen leichter entnehmen können.
Önen Sie die Tür immer langsam, wenn der
Drahtgitterrost in dieser Position ist, damit er nicht
zu schnell ausgefahren wird.
SPRACHAUSWAHL
Wenn der Ofen zum ersten Mal in Betrieb
genommen wird, können Sie die gewünschte
Sprache auswählen.
Drehen Sie die Drehregler
oder „Time“ (im oder gegen den Uhrzeigersinn),
um die gewünschte Sprache auszuwählen und
drücken Sie die Taste „Start/Cancel“, um Ihre
Auswahl zu bestätigen. Wenn die Sprachauswahl
nicht innerhalb von 5 Minuten bestätigt wird, stellt
der Ofen automatisch die Standardsprache ein.
Falls Sie die gewählte Sprache ändern möchten,
drücken Sie die
3 Sekunden. Auf dem LCD-Display wird nun
die Sprachauswahl angezeigt. Drehen Sie die
Drehregler „Temperature“ oder „Time“
(im oder gegen den Uhrzeigersinn), um die
gewünschte Sprache auszuwählen und drücken
Sie die Taste „Start/Cancel“, um Ihre Auswahl
zu bestätigen. Wenn die Sprachauswahl nicht
innerhalb von 5 Minuten bestätigt wird, stellt der
Ofen automatisch die zuvor verwendete Sprache
wieder ein.
Das Häkchen-Symbol
Sprache an.
Taste für Gefrorenes für
„Temperature“
zeigt die ausgewählte
DE
31
Page 32
DIE OFENBELEUCHTUNG
AUSTAUSCHEN
WARNUNG
Stecken Sie den Ofen stets aus und lassen Sie ihn
auskühlen, bevor Sie eine Glühbirne austauschen.
Verwenden Sie nur 25 Watt, 220-240 V,
G9-Ofenglühbirnen.
1. Entfernen Sie den Drahtgitterrost aus dem
Ofen, bevor Sie die Glühbirne austauschen.
2. Die Beleuchtung bendet sich auf der linken
Seite des Garraums. Setzen Sie Ihre Finger
vorne und hinten auf das Lampengehäuse
und ziehen Sie die Glasabdeckung vorsichtig
aus der Ofenwand. Wenn Sie die Abdeckung
nicht bewegen können, stecken Sie einen
Löel in die linke Seite des Gehäuses und
benutzen Sie Ihn vorsichtig als Hebel, um die
Glasabdeckung zu entfernen. Halten Sie die
Glasabdeckung immer mit der anderen Hand
fest, damit sie nicht herunterfällt und zerbricht.
4. Verwenden Sie ein weiches Tuch, um die neue
Glühbirne einzusetzen.
Berühren Sie die Glühbirne nicht direkt,
da Hautfett diese bei direktem Kontakt
beschädigen kann.
5. Um die Glasabdeckung wieder anzubringen,
bringen Sie den Metallhaken mit der linken
Seite des Gehäuses auf eine Höhe. Schieben
Sie das andere Ende der Glasabdeckung
in die Metallklammer auf der rechten Seite des
Gehäuses und drücken Sie den Metallhaken
dann in die linke Seite des Gehäuses,
bis er sicher eingerastet ist.
3. Entfernen Sie die gebrauchte Glühbirne, indem
Sie sie direkt aus ihrer Halterung herausziehen.
32
HINWEIS
Die Oberseite des Ofens ist während und
nach dem Betrieb sehr heiß. Daher ist es nicht
empfehlenswert, Gegenstände auf dem Ofen
zu lagern.
Die einzigen Ausnahmen sind das zusätzlich
erhältliche Bambus-Schneidebrett von Sage und
das Serviertablett, das auf den gerielten Bereich
oben auf den Ofen passt. Weitere Informationen
nden Sie auf www.sageappliances.com.
Page 33

Pege und
Reinigung
DE
Vergewissern Sie sich vor der Reinigung, dass der
Ofen ausgeschaltet ist, indem Sie den Stecker aus
der Steckdose ziehen. Lassen Sie den Ofen und
sämtliches Zubehör komplett auskühlen, bevor Sie
Teile entfernen und reinigen.
Reinigung des Gehäuses und der Tür
1. Wischen Sie die äußeren Teile mit einem weichen, feuchten Schwamm ab. Verwenden Sie
einen nicht scheuernden Flüssigreiniger oder
ein mildes Reinigungsspray, um Ablagerungen
zu verhindern. Tragen Sie das Reinigungsmittel
vor dem Reinigen auf den Schwamm und nicht
auf die Oberäche des Ofens auf.
2. Verwenden Sie zur Reinigung der Glastür einen
Glasreiniger oder ein mildes Reinigungsmittel
und einen weichen, feuchten Schwamm
oder einen weichen Scheuerschwamm aus
Kunststo. Verwenden Sie keine scheuernden
Reinigungsmittel bzw. keinen Scheuer-
schwamm aus Metall, da diese die Oberäche
des Ofens zerkratzen.
3. Verwenden Sie zum Reinigen des
LCD-Displays ein weiches, feuchtes Tuch.
Bei Verwendung eines Reinigungsmittels
tragen Sie dieses auf das Tuch und nicht direkt
auf das LCD-Display auf. Trockene Tücher und
scheuernde Reinigungsmittel können die Ober-
äche verkratzen.
4. Lassen Sie alle Oberächen gründlich
austrocknen, bevor Sie den Netzstecker
an eine Steckdose anschließen und den Ofen
einschalten.
WARNUNG
Die äußeren Teile, das Netzkabel oder der
Netzstecker dürfen niemals in Wasser oder
andere Flüssigkeiten getaucht werden, da dies
Stromschläge verursachen kann.
Den Innenbereich reinigen
Die Wände auf der Innenseite des Ofens sind zur
einfachen Reinigung mit einer Antihaftbeschichtung versehen. Um etwaige Spritzer zu entfernen,
wischen Sie die Wände mit einem weichen,
feuchten Schwamm ab. Verwenden Sie einen
nicht scheuernden Flüssigreiniger oder ein mildes
Reinigungsspray, um Ablagerungen zu verhindern.
Tragen Sie das Reinigungsmittel vor dem Reinigen
auf den Schwamm und nicht auf die Oberäche
des Ofens auf. Vermeiden Sie es, die QuarzHeizelemente zu berühren.
WARNUNG
Seien Sie beim Reinigen der Quarz-Heizelemente
äußerst vorsichtig. Lassen Sie den Ofen vollständig auskühlen und reiben Sie die Heizelemente
dann vorsichtig mit einem weichen, feuchten
Schwamm oder Tuch ab. Verwenden Sie hierfür
kein Reinigungsmittel, egal welcher Art. Lassen Sie
alle Oberächen gründlich austrocknen, bevor Sie
den Netzstecker an eine Steckdose anschließen
und den Ofen einschalten.
Die Krümelschublade reinigen
1. Ziehen Sie die Krümelschublade nach jeder
Benutzung heraus und leeren Sie die Krümel
aus. Wischen Sie die Schublade mit einem
weichen, feuchten Schwamm aus. Verwenden
Sie einen nicht scheuernden Flüssigreiniger,
um Ablagerungen zu verhindern. Tragen Sie
das Reinigungsmittel vor dem Reinigen auf den
Schwamm und nicht auf die Schublade auf.
Trocknen Sie alles gründlich ab.
2. Setzen Sie die Krümelschublade nach der
Reinigung bei geschlossener Ofentür wieder
in den Ofen ein. Erst danach sollten Sie ihn
wieder an die Steckdose anschließen und
einschalten.
3. Setzen Sie die Krümelschublade nach der
Reinigung bei geschlossener Ofentür wieder
in den Ofen ein. Erst danach sollten Sie ihn
wieder an die Steckdose anschließen und
einschalten.
33
Page 34

Drahtgitterrost, Grillrost, Bratform und
Pizzapfanne reinigen
1. Waschen Sie alle Zubehörteile in warmer
Seifenlauge mit einem weichen Schwamm
oder einem weichen Scheuerschwamm
aus Kunststo. Spülen und trocknen Sie
die Schublade gründlich ab. Verwenden Sie
keine Scheuermittel, Scheuerschwämme aus
Metall oder Metallutensilien für die Reinigung
von Zubehör, da Sie so die Oberäche
beschädigen könnten.
2. Um die Lebensdauer Ihres Zubehörs zu
verlängern, empfehlen wir Ihnen, es nicht
in der Spülmaschine zu reinigen.
Aufbewahrung
1. Vergewissern Sie sich, dass der Ofen ausgeschaltet ist, indem Sie den Stecker ziehen.
2. Lassen Sie den Ofen und sämtliches Zubehör
komplett auskühlen, bevor Sie Teile entfernen
und reinigen.
3. Stellen Sie sicher, dass der Ofen und sämtliches Zubehör sauber und trocken sind.
4. Überprüfen Sie, ob die Krümelschublade im
Ofen eingesetzt ist und sich der Grillrost in der
Bratform auf dem Drahtgitterrost in der mittleren
Rostposition bendet.
5. Die Tür muss geschlossen sein.
6. Bewahren Sie das Gerät in einer aufrechten
Position auf. Stellen Sie sicher, dass die
vier Stützbeine gleichmäßig den Boden
berühren. Stellen Sie keine Gegenstände auf
das Gerät. Einzig das zusätzlich erhältliche
Sage Schneidebrett aus Bambus und das
Serviertablett sind davon ausgenommen.
34
Page 35

Störungsbehebung
DE
MÖGLICHES
PROBLEM
Der Ofen lässt sich nicht
einschalten
Die Beleuchtung des LCDDisplays ist ausgegangen
Pizza wird ungleichmäßig
gebacken
Der magnetische Rost mit
automatischer Ausfahr-
funktion fährt beim Önen
der Tür zu weit aus
Ich kann die
für Gefrorenes nicht
auswählen
Taste
EINFACHE LÖSUNG
• Überprüfen Sie, ob der Netzstecker richtig an der Steckdose
angeschlossen ist.
• Schließen Sie den Netzstecker an einer separaten Steckdose an.
• Schließen Sie den Netzstecker an einer anderen Steckdose an.
• Setzen Sie den Schutzschalter ggf. zurück.
• Der Ofen schaltet sich nach 10 Minuten Nichtbenutzung in den
Standby-Modus. Im Standby-Modus wird das LCD-Display nicht
mehr beleuchtet, alle Funktionsoptionen sind aber noch verfügbar.
• Um den Ofen aus dem Standby-Modus heraus anzuschalten,
müssen Sie auf dem Bedienfeld nur die
drücken oder einen beliebigen Drehregler betätigen.
Dadurch wird das LCD-Display erneut beleuchtet.
• In kompakten Öfen kann es vorkommen, dass große Pizzen nicht
gleichmäßig braun werden. Um eine gleichmäßigere Bräunung
zu erreichen, können Sie die Ofentür nach der Hälfte der Backzeit
önen und die Pizza um 180° drehen.
• Önen Sie die Tür immer langsam und vorsichtig, wenn der
Drahtgitterrost in der mittleren Rostposition eingelegt ist,
damit er nicht zu schnell ausgefahren wird.
• Die Taste für Gefrorenes kann nur für die folgenden Funktionen
ausgewählt werden: TOAST, BAGEL, BACKEN, PIZZA, AIR FRY.
Wenn die Taste für Gefrorenes ausgewählt wird, wird die Garzeit
für ein optimales Ergebnis automatisch angepasst.
Taste „Start/Cancel“
Dampf tritt durch die
Ofentür aus
Die Heizelemente scheinen
zu pulsieren
Unter der Tür tropft Wasser
auf die Arbeitsäche
• Dies gehört zum normalen Betrieb. Die Tür ist so belüftet, dass sie
Dampf, der durch Lebensmittel mit hohem Feuchtigkeitsgehalt,
z.B. gefrorenes Brot, erzeugt wird, entlässt. Denken Sie daran,
dass dieser Dampf sehr heiß sein kann.
TM
• Element IQ
Energie und Anpassung des Energielevels in den Heizelementen
mittels kurzer Impulse, um genaueste Temperaturregelung zu
ermöglichen. Dies gehört zum normalen Betrieb.
• Dies gehört zum normalen Betrieb. Kondenswasser, das bei der
Zubereitung von Lebensmitteln mit hohem Feuchtigkeitsgehalt wie
z.B. gefrorenem Brot entsteht, läuft an der Innenseite der Tür ab und
kann auf die Arbeitsäche tropfen.
kontrolliert die Hitze im Ofen durch Pulsieren der
35
Page 36

MÖGLICHES
PROBLEM
EINFACHE LÖSUNG
Die Temperaturanzeige auf
dem LCD-Display stimmt
nicht mit der im Ofen
gemessenen Temperatur
überein
Der Alarm für den Vorheizzyklus ertönt bei einer
geringeren Temperatur
als der im LCD-Display
angezeigten
Das LCD-Display zeigt
die Meldung „E01“ an
• Um Messungen standardisieren zu können, wurden die Ofentemperaturen in der TOAST-Position, also in der Mitte der mittleren
Schiene ohne Pfanne, kalibriert. Überprüfen Sie die Temperatur in
dieser Position erneut und achten Sie darauf, die Ofentür 30 Minuten
lang nicht zu önen, da bei jedem Önen der Tür Hitze entweicht.
Beachten Sie, dass der Alarm für den Vorheizzyklus bei 75 % der
Solltemperatur ertönt.
• Der Alarm für den Vorheizzyklus ertönt bei 75 % der Solltemperatur.
Dadurch wird die zusammengefasste Vorheiz- und Backzeit so kurz
wie möglich.
• Dies liegt daran, dass beim Önen der Tür und Einstellen von
Lebensmitteln enorm viel Hitze im Ofen verloren geht. Würde der
Alarm für den Vorheizzyklus bei 100 % der Solltemperatur ertönen
und dem Benutzer dadurch signalisieren, dass er die Tür önen
muss, so würde dadurch eine längere Wartezeit entstehen. Laut
unseren Berechnungen wird die Solltemperatur bis zu 2 Minuten
früher erreicht, wenn der Alarm bei 75 % der Solltemperatur ertönt
und daraufhin die Tür geönet und Lebensmittel eingestellt werden.
Daher stimmt die Temperatur auf dem LCD-Display nicht mit der
Solltemperatur überein, wenn der Alarm für den Vorheizzyklus
ertönt. Abhängig von der eingestellten Temperatur kann es nach
dem Einschalten ca. 8-10 Minuten dauern, bis die Solltemperatur
erreicht ist. Das Önen der Tür nach dem Vorheizzyklus ist darin
bereits miteinberechnet.
• Das LCD-Display zeigt „E01“ an, wenn das Gerät ein Problem hat,
das nicht zurückgesetzt werden kann. Ist dies der Fall, entfernen Sie
den Netzstecker sofort aus der Steckdose und wenden Sie sich an
den Sage-Kundenservice.
Das LCD-Display zeigt
die Meldung „E02“ an
Das LCD-Display zeigt
die Meldung „E03“ an
Das LCD-Display zeigt
die Meldung „E05“ an
Die Temperatur ändert
sich, wenn die Umluft Taste
gedrückt wird
36
• Das LCD-Display zeigt „E02“ an, wenn das Gerät ein Problem hat,
das nicht zurückgesetzt werden kann. Ist dies der Fall, entfernen Sie
den Netzstecker sofort aus der Steckdose und wenden Sie sich an
den Sage-Kundenservice.
• Auf dem LCD-Display wird „E03“ angezeigt, wenn die Ofentemperatur über dem eingestellten Maximalwert liegt. Entfernen Sie in
diesem Fall den Netzstecker aus der Steckdose und lassen Sie den
Ofen 15 Minuten lang auskühlen, bevor Sie ihn erneut einstecken.
• Wenden Sie sich an den Sage-Kundenservice, wenn die Meldung
„E03“ weiterhin angezeigt wird.
• Das LCD-Display zeigt „E05“ an, wenn das Gerät ein Problem hat,
das nicht zurückgesetzt werden kann. Ist dies der Fall, entfernen Sie
den Netzstecker sofort aus der Steckdose und wenden Sie sich an
den Sage-Kundenservice.
• Dies gehört zum normalen Betrieb. Das Gerät ist so kalibriert,
dass die Temperatur an den umluft ventilator und die dadurch
gesteigerte Backleistung angepasst wird.
Page 37

Garantie
2 JAHRE BESCHRÄNKTE
GARANTIE
Sage Appliances bietet für dieses Produkt
für den häuslichen Gebrauch in bestimmten
Bereichen ab Kaufdatum eine 2-jährige
Garantie gegen Mängel, die durch fehlerhafte
Verarbeitung und Materialien verursacht
wurden. Während dieser Garantiezeit repariert,
ersetzt oder erstattet Sage Appliances ein
defektes Produkt (nach eigenem Ermessen von
Sage Appliances).
Alle gesetzlichen Gewährleistungsrechte
nach geltendem nationalem Recht werden
eingehalten und durch unsere Garantie nicht
beeinträchtigt. Vollständige Bedingungen
für die Garantie sowie Anweisungen zur
Geltendmachung von Ansprüchen nden Sie
unter www.sageappliances.com.
DE
37
Page 38

Notizen
38
Page 39

the Smart Oven
TM
Air Fryer
GUIDE RAPIDE
FR
Page 40

Table
des matières
40 Sage® recommande la sécurité
avant tout
45 Composants
47 Fonctions
49 Guide de démarrage rapide
52 Entretien et nettoyage
54 Dépannage
56 Garantie
SAGE®
RECOMMANDE
LA SÉCURITÉ
AVANT TOUT
Chez Sage®, la sécurité est
une priorité. Nous concevons
et fabriquons des produits
de consommation en mettant
la sécurité de nos précieux
clients, c'est-à-dire vous,
au premier plan. Nous vous
demandons également
de faire attention lorsque
vous utilisez un appareil
électrique et de respecter
les consignes suivantes.
CONSIGNES
DE SÉCURITÉ
IMPORTANTES
LISEZ TOUTES LES INSTRUCTIONS AVANT UTILISATION
ET CONSERVEZ-LES POUR
RÉFÉRENCE ULTÉRIEURE
• Une version téléchargeable
de ce document est
également disponible sur
sageappliances.com.
• Avant une première utilisation,
assurez-vous que votre alimentation électrique est identique
à celle illustrée sur l'étiquette
située en dessous de l'appareil.
• Retirez et jetez en lieu sûr les
emballages et les étiquettes
promotionnelles avant d'utiliser
le four pour la première fois.
• Pour éviter tout risque d'étouffement pour les jeunes enfants,
éliminez de manière sûre
le couvercle de protection sur
la prise d'alimentation.
• N'utilisez pas l'appareil près
du bord d'un plan de travail
ou d'une table. Assurez-vous
que la surface est stable, plane,
résistante à la chaleur et propre.
• Un incendie peut se déclarer
si le four est recouvert ou en
contact avec des matériaux
inammables, y compris des
rideaux ou des murs, lorsqu'il
est en marche.
40
Page 41

FR
• N'utilisez pas l'appareil sur
(ou à proximité de) un brûleur
à gaz chaud ou électrique,
ou à un endroit où il pourrait
entrer en contact avec un four
ou une surface chaude.
• Ne laissez pas le cordon d'alimentation suspendu au bord
d'un plan de travail ou d'une
table, ni entrer en contact avec
une surface chaude.
• Le four ne doit pas être utilisé
dans un espace étroit. Prévoyez
un espace susant tout autour
du four. Un espace minimum
de 10 cm est recommandé.
• Le boîtier extérieur du four peut
être chaud pendant et après
la cuisson. Ne touchez pas les
surfaces chaudes. Tenez toujours le cordon d'alimentation,
ainsi que ceux d'autres appareils se trouvant près du four,
à l'écart des surfaces du four.
• Ne touchez pas les surfaces
chaudes. An d'éviter toute
brûlure, procédez avec
précaution lorsque vous retirez
les plats et les accessoires, tels
que la grille de cuisson et le plat
à rôtir fournis, qui contiennent
de l'huile chaude ou d'autres
liquides chauds.
• Ne posez pas d'ustensiles
de cuisine, de plats à rôtir ou
de plats sur la porte vitrée.
• Ne laissez pas la porte ouverte
pendant de longues périodes.
• Ne rangez aucun objet sur le
dessus du four lorsque celui-ci
est en marche, sauf ceux qui
sont décrits à la page 53 de
ce livret.
• Ne placez pas de carton,
de plastique, de papier ou autres
matériaux inammables dans
le four.
• Ne recouvrez pas le tiroir
ramasse-miettes ou toute partie
du four d'une feuille métallique.
Cela provoquerait une
surchaue du four.
• Procédez avec précaution lors
de l'utilisation de plats composés de matériaux autres que
du métal. Assurez-vous que
les plats sont adaptés à une
utilisation au four.
• Faites preuve de précaution
lorsque vous placez un
couvercle dans le four, car
l'accumulation de pression dans
un plat couvert peut entraîner
la propulsion d'ingrédients
chauds ou le craquement du
plat. Ne placez pas de récipients
hermétiques dans le four.
• Les aliments de taille importante
et les ustensiles métalliques
ne doivent pas être insérés dans
le four car ils peuvent entraîner
un risque d'incendie ou de choc
électrique.
• L'utilisation d'accessoires non
recommandés ou non fournis
avec ce four peut entraîner
des blessures.
41
Page 42

• Cet appareil est destiné à un
usage domestique uniquement.
Ne l'utilisez pas dans des véhicules en mouvement. N'utilisez
pas l'appareil en extérieur
ou pour toute autre n que son
utilisation prévue. Une mauvaise
utilisation pourrait entraîner
des blessures.
• Si vous devez laisser sans
surveillance, nettoyer, déplacer,
assembler ou ranger l'appareil,
mettez-le hors tension, débranchez le cordon de la prise
électrique et laissez-le refroidir
entièrement.
• Ne le nettoyez pas avec des
éponges à récurer métalliques.
Au contact de l'éponge,
les pièces peuvent se détacher,
toucher les composants électriques et présenter un risque
de choc électrique.
• Cet appareil peut être utilisé
par des enfants âgés de 8 ans
ou plus et des personnes aux
capacités mentales, sensorielles
ou physiques réduites, ou ayant
peu d'expérience et de connaissances, uniquement sous
supervision ou s'ils ont reçu
des instructions sur l'utilisation
sécuritaire de l'appareil et qu'ils
comprennent les risques
impliqués.
• Les enfants ne doivent pas jouer
avec l'appareil.
42
• Le nettoyage et l'entretien ne
doivent pas être eectués par
des enfants, sauf s'ils sont
âgés de plus de 8 ans et sous
surveillance d'un adulte.
• L'appareil et son cordon doivent
être conservés hors de portée
des enfants de moins de 8 ans.
• Il est recommandé d'inspecter
régulièrement l'appareil.
N'utilisez pas l'appareil si le
cordon d'alimentation, la prise
ou l'appareil sont endommagés
de quelque manière que ce soit.
En cas de dommages,
ou si un entretien autre que
le nettoyage est nécessaire,
veuillez contacter le service
client Sage ou consulter le site
sageappliances.com
• L'appareil ne doit pas être utilisé
avec une minuterie externe
ou un système de commande
à distance séparé.
• L'appareil doit être branché
à une prise de courant correctement reliée à la terre. Si vous
n'êtes pas certain que les prises
de courant sont correctement
mises à la terre, veuillez consulter un électricien.
• Ne modiez en aucun cas
la prise d'alimentation ni n'utilisez d'adaptateur.
• Consultez un électricien qualié
si les instructions de mise à la
terre ne sont pas entièrement
comprises ou s'il existe un
doute quant à la mise à la terre
correcte de l'appareil.
Page 43

FR
• L'installation d'un commutateur
de sécurité de courant résiduel
est recommandée pour fournir
une sécurité supplémentaire
lors de l'utilisation d'appareils
électriques. Il est recommandé
d'installer un interrupteur
diérentiel avec un courant
de fonctionnement résiduel
nominal maximal de 30 mA
dans le circuit électrique
alimentant l'appareil. Consultez
votre électricien pour obtenir
des conseils professionnels.
INSTRUCTIONS SPÉCIFIQUES
POUR LE SOV860
• Nous recommandons de brancher le four sur un circuit dédié
diérent des autres appareils.
En cas de doute, consultez
un électricien agréé et qualié.
• Pour éteindre le four, appuyez
sur le bouton Start/Cancel
(Démarrer/Annuler)
sur
le panneau de commandes.
Le four est éteint lorsque le
bouton n'est plus rétroéclairé.
• Nettoyez régulièrement le tiroir
ramasse-miettes. Pour le nettoyer :
−Éteignez le four.
−Laissez-le refroidir complè-
tement, puis débranchez
le cordon de la prise.
−Retirez le tiroir ra-
masse-miettes et nettoyez-le
avec de l'eau tiède savonneuse.
−Laissez-le sécher avant de
le remettre en place.
AVIS AUX CLIENTS
CONCERNANT LE STOCKAGE
DE LA MÉMOIRE
Veuillez noter qu'an de
mieux servir nos clients, une
mémoire interne a été intégrée
à votre appareil. Cette mémoire
se compose d'une petite
puce recueillant certaines
informations sur votre appareil,
dont sa fréquence d'utilisation
et la façon dont il est utilisé.
Dans l'éventualité où votre
appareil serait renvoyé pour
réparation, les renseignements
recueillis à partir de la puce
nous permettront de le réparer
rapidement et ecacement.
Les informations recueillies
constituent également une
ressource précieuse pour
le développement de futurs
appareils électroménagers
an de mieux répondre aux
besoins de nos clients. La puce
ne recueille aucune information
concernant les personnes
qui utilisent le produit ou le
foyer dans lequel il est utilisé.
Si vous avez des questions
sur la puce de stockage de
mémoire, veuillez nous contacter
à privacy@sageappliances.com.
43
Page 44

AVERTISSEMENT
FIN DE RÉDUIRE LES
RISQUES D'INCENDIE,
DE CHOC ÉLECTRIQUE,
D'EXPOSITION À UN
RAYONNEMENT UV EXCESSIF
OU DE BLESSURES :
• Débranchez toujours le four
et laissez toutes les pièces
(y compris le boîtier de
l'ampoule, le couvercle en verre
et le compartiment) refroidir
complètement avant de remplacer l'ampoule.
• Utilisez uniquement une
ampoule de four de type G9,
25 W, 220 - 240 V.
• Utilisez toujours un chion
doux pour manipuler l'ampoule
et ne touchez pas directement
la surface de l'ampoule car votre
sébum peut endommager
l'ampoule.
• Ne regardez pas directement
une ampoule incandescente.
• Ne restez pas près de la lumière
si vous sentez que votre peau
chaue.
• Tenez l'ampoule éloignée des
matériaux susceptibles de
s'enammer.
• L'ampoule chaue rapidement.
Utilisez le bouton d'éclairage
pour allumer la lampe uniquement.
• N'utilisez pas la lampe si le
boîtier de l'ampoule, le cou-
vercle en verre, le ltre UV ou
le boîtier ne sont pas en place
ou sont endommagés.
Le symbole illustré indique
que cet appareil ne doit
pas être jeté aux ordures
ménagères habituelles.
Il doit être coné à un centre de
collecte de déchets des autorités
locales désigné à cette n
ou à un revendeur proposant
ce service. Pour en savoir plus,
veuillez contacter le secrétariat
de votre municipalité.
Ce symbole indique que
la température des surfaces
accessibles peut être élevée
lorsque l'appareil est en
marche et pendant quelque
temps après son utilisation.
An d'éviter tout risque
de décharge électrique,
n'immergez pas le cordon
électrique, la prise électrique
ou l'appareil dans l'eau ou dans
tout autre liquide.
CONSERVEZ CES INSTRUCTIONS
44
Page 45

FR
TEMP
Darkness
TIME
Slices
FUNCTION
START/CANCEL
Composants
A
B
C
D
E
A. Plat à pizza antiadhésif 30 cm
B. Grille métallique
C. Grille de cuisson
D. Plat à rôtir en émail 28 x 33,5 cm
E. Panier pour friture à l'air chaud
G H
F
I
F. Lampe du four
G. Poignée de porte
H. Grille de ventilation
I. Tiroir ramasse-miettes
Informations sur la tension nominale
220 - 240 Volts ~50 Hz 2000 - 2400 Watts
45
Page 46

K
MSHM
L
S
M
N
Accessoires vendus séparément :
O
P
Q
R
K. Écran LCD
L.
Bouton FUNCTION (fonction)
M.
Réglage de la température/
contrôle du brunissage du pain
grillé et des petits pains
N.
Réglage de la durée/sélection du pain
grillé et des petits pains
O.
Bouton Start/Cancel (Démarrer/Annuler)
P.
Bouton Oven Light (lampe du four)
Q.
Bouton Convection
R.
Bouton Frozen (congelé)
S.
Bouton convertisseur de température
Planche à découper en bambou
Pierre à pizza Plat à pizza spécial croustillance
46
Page 47

Fonctions
SHMMSHM
FR
PRÉPARATION DU FOUR
Avant la première utilisation, veuillez faire
fonctionner le four à vide pendant 20 minutes
an d'éliminer les substances protectrices des
éléments chauants. Veillez à ce que la zone soit
bien ventilée car le four peut émettre des vapeurs.
Ces vapeurs ne présentent aucun danger et
ne nuisent pas aux performances de l'appareil.
1. Retirez et jetez en lieu sûr les emballages,
adhésifs et étiquettes promotionnelles.
2. Retirez le plateau à miettes, les grilles
métalliques, la grille de cuisson, le plat à rôtir,
le panier de friture à l'air chaud et le plat à pizza
de l'emballage en polyfoam. Lavez-les avec
une éponge douce à l'eau tiède savonneuse,
puis rincez et séchez-les soigneusement.
3. Essuyez l'intérieur du four avec une éponge
douce et humide. Séchez soigneusement.
4. Placez le four sur une surface plane et sèche.
Respectez une distance minimale de 10 cm
de chaque côté de l'appareil et de 15 cm
au-dessus.
5. Insérez le tiroir ramasse-miettes dans le four.
6. Déroulez complètement le cordon d'alimentation et insérez-le dans une prise murale mise
à la terre.
7. Le four émet un signal sonore et l'écran LCD
s'allume. Dénissez la langue souhaitée.
Rendez-vous page 50 pour en savoir plus
sur la sélection de la langue.
8. Tournez la molette Start/Cancel (Démarrer/
Annuler)
l'indicateur atteigne la fonction PIZZA.
vers la droite jusqu'à ce que
9. Appuyez sur le bouton Start/Cancel
(Démarrer/Annuler) . Le rétroéclairage
du bouton s'allume en rouge, l'écran LCD
s'allume en orange et le four émet un signal
sonore.
10. L'écran LCD ache un message
« PREHEATING » (préchauage) clignotant.
Lorsque le four a terminé le cycle de préchauffage, une alerte retentit.
11. La minuterie s'ache et se lance.
12. À la n du cycle de cuisson, l'alarme du four
retentit, le rétroéclairage du bouton Start/
Cancel (Démarrer/Annuler)
LCD s'allume en bleu.
13. Le four est désormais prêt à l'emploi.
ELEMENT IQ
Le four Sage Smart OvenTM Air Fryer est doté
de la technologie de cuisson Element IQTM, qui crée
l'environnement idéal pour les aliments que vous
cuisinez. Il dirige l'énergie à l'endroit et au moment
requis et crée la chaleur appropriée, qu'elle soit
uniforme ou intense.
Chacune des fonctions du four est préréglée selon
nos congurations et températures recommandées pour les éléments chauants, déterminées
à partir des recettes et tests eectués. Toutefois,
nous suggérons de les essayer et de les adapter
en fonction de la recette, de la quantité de nourriture et de vos goûts personnels.
TM
s'éteint et l'écran
M
47
Page 48
APERÇU DES FONCTIONS DU FOUR
Fonction
Toast
Petit pain
(Bagel)
Pizza
Griller
Cuire
Rôtir
Frire à l'air
chaud
(Air Fry)
Réchauer
Maintien
au chaud
Cuisson
lente
POSITION
DE LA GRILLE
RÉGLAGES
FACULTATIFS
CONSEILLÉE
Milieu
Milieu
Milieu
Frozen
Frozen
Super
Convection
Convection
Temperature
Conversion
Frozen
Haut HI
Bas
Super
Convection
Convection
Temperature
Conversion
Bas
Super
Convection
Convection
Temperature
Conversion
Haut
Super
Convection
Temperature
Conversion
Frozen
Bas
Convection
Temperature
Conversion
Bas
Convection
Temperature
Conversion
Bas
Convection
PRÉRÉGLAGES
Brunissage 4
Tranches 4
Brunissage 4
Tranches 4
210 ˚C
Convection
Frozen
20 MIN
10 MIN
160 ˚C
Convection
30 MIN
180 °C
Convection
1 h
220 ˚C
15 MIN
Super
Convection
160 ˚C
Convection
15 MIN
70 ˚C
KEEP WARM
(maintien au chaud)
1 h
HI
Convection
4 h
PRÉCHAUF-
PLAGE
FAGE
Non Brunissage 1-7
Non Brunissage 1-7
Oui 160°C - 230°C
Non HI-MED-LO
Oui 120 °C et plus =
Oui 120 °C et plus =
Non 160 °C - 230 °C
Oui 70 °C - 160 °C
Non 50 °C – 120 °C
Non LO = 4 à 10 h
Tranches 1-6
Tranches 1-6
Jusqu'à 2 h
Jusqu'à 20 MIN
1 min à 2 h
120 °C et moins =
1 min à 10 h
1 min à 2 h
120 °C et moins =
1 min à 10 h
Jusqu'à 1 h
Jusqu'à 2 h
Jusqu'à 2 h
HI = 2 à 8 h
48
Page 49

LA TEMPÉRATURE
LA TEMPÉRATURE
RÉGLAGE DE
LA DURÉE
R
LA DURÉE
RÉGLAGE DE
i
FR
Guide de
démarrage rapide
FONCTIONNEMENT DE VOTRE
FOUR SAGE
1. Positionnez la grille métallique de façon à ce
que les barreaux soient orientés vers le haut
et insérez-la au niveau souhaité. Les niveaux
sont imprimés sur la porte du four.
2. Tournez la molette Function (Fonction)
jusqu'à ce que l'indicateur sur l'écran LCD
atteigne le réglage souhaité.
3. L'écran indique la température de cuisson
prédénie pour le paramètre sélectionné.
Tournez la molette Temperature
gauche pour réduire la température ou vers
la droite pour l'augmenter.
LA TEMPÉRATURE
vers la
TOURNER
RÉDUIRE
4. L'écran indique le temps de cuisson prédéni
pour le paramètre sélectionné. Tournez la
molette Time (durée) vers la gauche pour
réduire le temps de cuisson ou vers la droite
pour l'augmenter.
LA DURÉE
AUGMENTER
TOURNER
RÉDUIRE
AUGMENTE
5. Pour les paramètres sans cycle de
préchauage (TOAST, PETIT PAIN, GRILLER,
MAINTIEN AU CHAUD, CUISSON LENTE),
placez les aliments directement sur la grille
métallique ou sur le panier de friture à l'air
chaud, le plat à pizza, la grille de cuisson et/
ou le plat à rôtir fournis. Assurez-vous que les
aliments sont placés au centre du four pour
une cuisson uniforme.
6. Fermez la porte du four.
7. Appuyez sur le
(Démarrer/Annuler). Le rétroéclairage
du bouton s'allume en rouge, le four émet
un signal sonore et l'écran LCD s'allume
en orange.
8. La minuterie s'ache et se lance. La tempé-
rature et le temps de cuisson peuvent être
ajustés pendant le cycle de cuisson.
9. Pour les paramètres nécessitant un cycle de
préchauage (CUIRE, RÔTIR, PIZZA, FRIRE
À L'AIR CHAUD), appuyez sur la touche Start/
Cancel (Démarrer/Annuler)
les aliments dans le four. Le rétroéclairage
du bouton s'allume en rouge, le four émet
un signal sonore et l'écran LCD ache
un message « PREHEATING » clignotant
pendant le préchauage du four.
a) Lorsque le four est prêt pour utilisation,
le message clignotant « PREHEATING »
disparaît, l'alarme du four retentit et la minuterie
se lance. Placez les aliments directement sur
la grille métallique ou sur le panier de friture
à l'air chaud, le plat à pizza, la grille de cuisson
et/ou le plat à rôtir fournis. Assurez-vous que
les aliments sont placés au centre du four pour
une cuisson uniforme.
b) Fermez la porte du four.
c) La minuterie se poursuit.
La température et le temps de cuisson
peuvent être ajustés pendant le cycle
de cuisson.
10. À la n du cycle de cuisson, l'alarme du four
retentit, le rétroéclairage du bouton Start/Cancel
(Démarrer/Annuler)
s'allume en bleu.
bouton Start/Cancel
avant de placer
s'éteint et l'écran LCD
49
Page 50
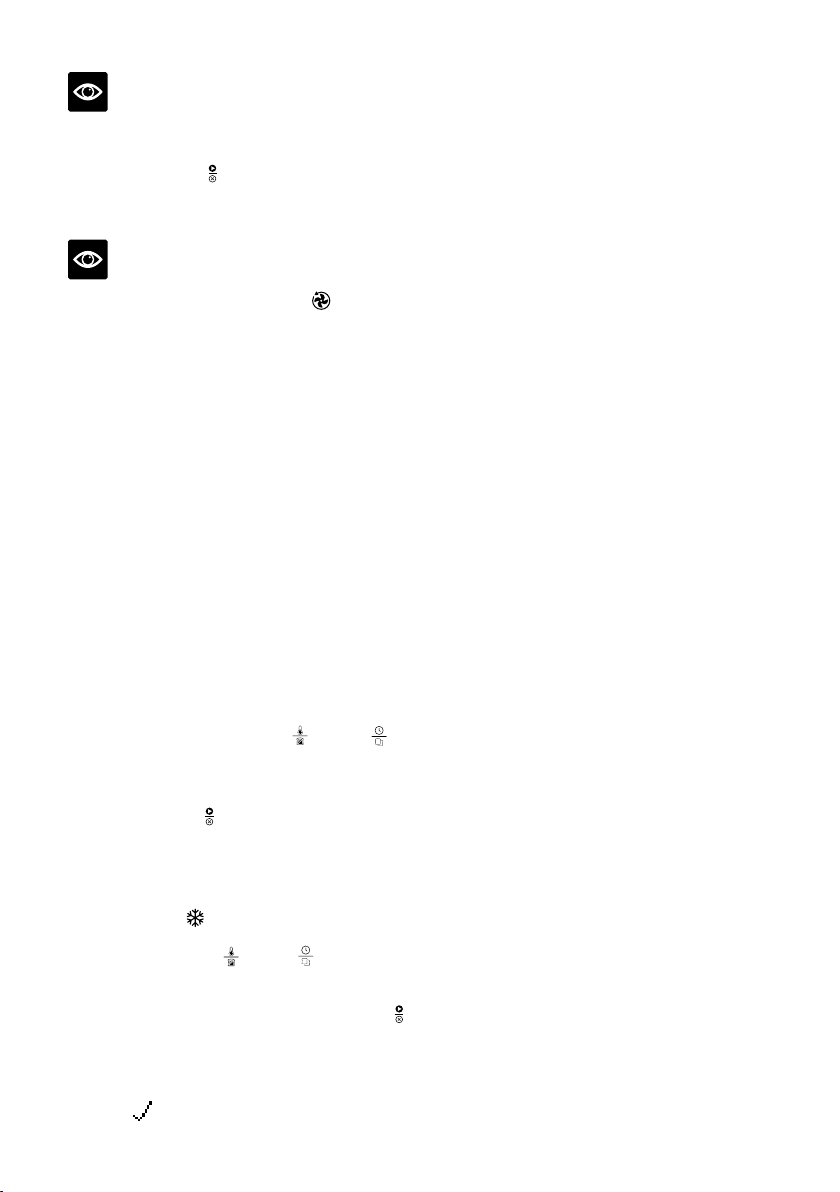
REMARQUE
Le cycle de cuisson peut être arrêté à tout
moment en appuyant sur le bouton Start/Cancel
(Démarrer/Annuler)
le rétroéclairage du bouton s'allume en bleu.
. Ceci annule le cycle et
REMARQUE
Appuyez sur le bouton Convection pour
sélectionner l'absence de convection, la convection
ou la super convection. La convection et la super
convection peuvent ajuster la température pour
compenser le débit d'air plus rapide. La super
convection permet d'obtenir des aliments plus
croustillants.
GRILLE D'AUTO-ÉJECTION
MAGNÉTIQUE
Lorsque la grille métallique est insérée sur
la position centrale, elle s'éjecte automatiquement
à mi-distance hors du four lorsque la porte est
ouverte, ce qui facilite le retrait de vos aliments.
Ouvrez toujours lentement la porte lorsque la grille
métallique est dans cette position pour éviter
qu'elle ne s'éjecte trop vite.
SÉLECTION DE LA LANGUE
Lors de la première utilisation, le four vous permet
de sélectionner la langue souhaitée.
Tournez la molette Temperature
(dans le sens des aiguilles d'une montre ou dans
le sens inverse) pour sélectionner la langue
souhaitée, puis appuyez sur le bouton Start/Cancel
(Démarrer/Annuler) pour conrmer votre sélec-
tion. Si la langue souhaitée n'est pas conrmée
dans les 5 minutes, le four enregistre automatiquement la langue par défaut.
Pour changer la langue sélectionnée, appuyez sur
le bouton Frozen
LCD ache la sélection de langues. Tournez
la molette Temperature ou Time (dans le sens
des aiguilles d'une montre ou dans le sens inverse)
pour sélectionner la langue souhaitée, puis appuyez
sur le bouton Start/Cancel (Démarrer/Annuler)
pour conrmer votre sélection. Si la langue
souhaitée n'est pas conrmée dans les 5 minutes,
le four revient automatiquement à la langue
enregistrée précédemment.
La coche
pendant 3 secondes. L'écran
indique la langue sélectionnée.
ou Time
50
Page 51

FR
REMPLACEMENT DE LA LAMPE
DU FOUR
AVERTISSEMENT
Débranchez toujours le four et laissez-le refroidir
avant de remplacer l'ampoule. Utilisez uniquement une ampoule de four de type G9 25 Watts,
220 - 240 Volts.
1. Retirez la grille du four avant de remplacer
la lampe.
2. La lampe est positionnée sur le côté gauche
à l'intérieur du four. Placez vos doigts sur
l'extérieur du boîtier de la lampe et détachez
doucement le couvercle en verre de la paroi
du four pour le retirer. Si vous n'arrivez pas
à retirer le couvercle, glissez une cuillère
à gauche du boîtier de la lampe et soulevez
doucement le couvercle en verre. Tenez
toujours le couvercle en verre de l'autre main
pour éviter qu'il tombe et casse.
4. Insérez l'ampoule neuve à l'aide d'un
chion doux.
Ne touchez pas directement la surface
de l'ampoule avec vos doigts car votre
sébum peut endommager l'ampoule.
5. Pour remettre en place le couvercle en verre,
alignez le crochet métallique avec le côté
gauche du boîtier de la lampe. Glissez l'extrémité opposée du couvercle en verre dans
le support métallique à droite du boîtier, puis
enfoncez le crochet métallique dans le côté
gauche du boîtier jusqu'à ce qu'il soit bien
enclenché dans son emplacement.
3. Retirez l'ampoule usagée en la sortant
directement de son support.
REMARQUE
Le dessus du four est très chaud pendant et après
le fonctionnement. Par conséquent, il est déconseillé de ranger des objets sur le dessus du four.
Seuls la planche à découper en bambou et le
plateau de service facultatifs peuvent être posés
sur la section crénelée sur le dessus du four.
Rendez-vous sur www.sageappliances.com pour
plus d'informations.
51
Page 52

Entretien
et nettoyage
Avant le nettoyage, assurez-vous que le four
est éteint en débranchant le cordon d'alimentation
de la prise électrique. Laissez le four et tous
les accessoires refroidir complètement avant
de les démonter et de les nettoyer.
Nettoyage du corps extérieur et de
la porte
1. Essuyez le corps extérieur avec une éponge
douce et humide. Un nettoyant liquide doux
ou une solution douce en spray peuvent être
utilisés pour éviter l'accumulation de taches.
Appliquez le nettoyant sur l'éponge, et non sur la
surface du four, avant de procéder au nettoyage.
2. Pour nettoyer la porte vitrée, utilisez un
nettoyant à vitre ou un détergent doux et une
éponge douce et humide ou une éponge
à récurer en plastique souple. N'utilisez pas
de nettoyant abrasif ni d'éponge à récurer
en métal, car cela risque de rayer la surface
du four.
3. Essuyez l'écran LCD avec un chion doux
et humide. Appliquez le nettoyant sur le chion
et non sur la surface de l'écran LCD.
Le nettoyage avec un chion sec ou des
nettoyants abrasifs peut rayer la surface.
4. Laissez toutes les surfaces sécher complètement avant d'insérer le cordon d'alimentation
dans une prise électrique et d'allumer le four.
AVERTISSEMENT
N'immergez pas le corps, le cordon électrique
ou la prise dans l'eau ou tout autre liquide,
car cela pourrait provoquer une électrocution.
Nettoyage de l'intérieur
Les parois intérieures du four sont recouvertes
d'un revêtement antiadhésif destiné à faciliter
le nettoyage. Pour nettoyer les éventuelles éclaboussures dues à la cuisson, essuyez les parois
avec une éponge douce et humide. Un nettoyant
liquide doux ou une solution douce en spray
peuvent être utilisés pour éviter l'accumulation
de taches. Appliquez le nettoyant sur l'éponge,
et non sur la surface du four, avant de procéder
au nettoyage. Évitez de toucher les éléments
chauants en quartz.
AVERTISSEMENT
Soyez extrêmement prudent lors du nettoyage
des éléments chauants en quartz. Laissez le four
refroidir complètement, puis frottez délicatement
une éponge ou un chion doux et humide le long
de l'élément chauant. N'utilisez aucun type de
produit nettoyant ou de détergent. Laissez toutes
les surfaces sécher complètement avant d'insérer
le cordon d'alimentation dans une prise électrique
et d'allumer le four.
Nettoyage du tiroir ramasse-miettes
1. Après chaque utilisation, faites glisser le tiroir
ramasse-miettes et jetez les miettes. Essuyez-le
avec une éponge douce et humide. Un nettoyant
liquide doux peut être utilisé pour éviter l'accumulation de taches. Appliquez le nettoyant sur
l'éponge, et non sur le tiroir, avant de procéder
au nettoyage. Séchez soigneusement.
2. Assurez-vous toujours de remettre le tiroir
ramasse-miettes dans le four avec la porte
du four fermée après le nettoyage et avant
de brancher le cordon d'alimentation à une
prise électrique et d'allumer le four.
3. Assurez-vous toujours de remettre le tiroir
ramasse-miettes dans le four avec la porte
du four fermée après le nettoyage et avant
de brancher le cordon d'alimentation à une
prise électrique et d'allumer le four.
Nettoyage de la grille métallique,
de la grille de cuisson, du plat à rôtir
et du plat à pizza
1. Nettoyez tous les accessoires dans de l'eau
chaude savonneuse avec une éponge douce
ou une éponge à récurer en plastique souple.
Rincez et séchez soigneusement. N'utilisez
pas de nettoyants abrasifs, d'éponges à récurer
en métal ou d'ustensiles métalliques pour
nettoyer les accessoires, car ils peuvent endommager les surfaces.
2. Pour prolonger la durée de vie de vos
accessoires, nous vous déconseillons l'usage
du lave-vaisselle.
52
Page 53

Rangement
1. Assurez-vous que le four est éteint en débranchant le cordon d'alimentation de la prise
électrique.
2. Laissez le four et tous les accessoires refroidir
complètement avant de les démonter et de
les nettoyer.
3. Vériez que le four et tous les accessoires
sont propres et secs.
4. Assurez-vous que le tiroir ramasse-miettes
est inséré dans le four, que la grille de cuisson
est insérée dans le plat à rôtir et repose sur
la grille métallique placée sur la position
centrale.
5. Vériez que la porte est fermée.
6. Rangez l'appareil en position verticale,
droit et stable sur ses pieds de support.
Ne rangez rien au-dessus de l'appareil.
Seuls la planche à découper en bambou
et le plateau de service facultatifs peuvent
être posés sur le four.
FR
53
Page 54

Dépannage
PROBLÈME POSSIBLE SOLUTION FACILE
Le four ne s'allume pas • Vériez que le cordon d'alimentation est bien inséré dans la prise.
• Insérez le cordon d'alimentation dans une prise indépendante.
• Insérez le cordon d'alimentation dans une autre prise.
• Réinitialisez le disjoncteur si nécessaire.
Le voyant de l'écran LCD
s'est éteint
La pizza ne cuit pas
uniformément
La grille d'auto-éjection
magnétique ressort trop
rapidement quand j'ouvre
la porte
Je ne peux pas sélectionner
le bouton Frozen
De la vapeur sort par
la porte du four
Les éléments chauants
semblent bouger
• Le four passe en mode veille s'il n'est pas utilisé pendant
10 minutes. En mode veille, l'écran LCD n'est plus éclairé, mais
toutes les options des diérentes fonctions restent visibles.
• Pour réactiver le four suite au mode veille, appuyez sur le bouton
Start/Cancel (Démarrer/Annuler)
ou tournez l'un des boutons.
L'écran LCD s'allume à nouveau.
• Il arrive que certaines grandes pizzas brunissent de manière inégale
dans les fours compacts. Ouvrez la porte du four à mi-cuisson
et tournez la pizza de 180 degrés pour une cuisson plus uniforme.
• Ouvrez toujours lentement et avec précaution la porte lorsque
la grille métallique est insérée en position centrale pour éviter
qu'elle ne s'éjecte trop vite.
• Le bouton Frozen
suivantes : TOAST, PETIT PAIN, CUIRE, PIZZA, FRIRE À L'AIR
CHAUD. Lorsque vous sélectionnez le bouton Frozen
de cuisson s'ajuste automatiquement pour une cuisson des
aliments optimisée.
• Il s'agit d'un procédé normal. La porte est ventilée pour libérer la
vapeur créée par les aliments à forte teneur en humidité, comme
le pain congelé. Procédez avec précaution car la vapeur peut
être chaude.
• La fonction Element IQ
du four en conduisant l'électricité et en ajustant le niveau de puis-
sance dans les éléments chauants sous forme de saccades,
an de contrôler précisément la température. Il s'agit d'un procédé
normal.
ne peut être sélectionné que pour les fonctions
TM
contrôle précisément la chaleur à l'intérieur
du panneau de commande
, le temps
De l'eau s'égoutte sur
le plan de travail par
dessous la porte
54
• Il s'agit d'un procédé normal. La condensation créée par les aliments
à forte teneur en humidité, comme le pain congelé, peut s'écouler
à l'intérieur de la porte et s'égoutter sur le plan de travail.
Page 55

PROBLÈME POSSIBLE SOLUTION FACILE
FR
La température indiquée
sur l'écran LCD ne correspond pas à la température
mesurée à l'intérieur du four
L'alerte de préchauage
retentit à une température
inférieure à celle indiquée
sur l'écran LCD
L'écran LCD ache « E01 » • L'écran LCD ache « E01 » lorsque l'appareil ne peut pas être
• Pour des raisons de normalisation des mesures, les températures
du four ont été calibrées en position TOAST (au centre de la grille
du milieu et sans tiroir). Vériez à nouveau la température dans
cette position, en vous assurant de ne pas ouvrir la porte du four
pendant 30 minutes, car la chaleur s'échappe chaque fois que
la porte est ouverte. Notez que l'alerte de préchauage retentit
à 75 % de la température voulue.
• L'alerte de préchauage retentit à 75 % de la température voulue.
Ceci garantit le meilleur résultat en termes de temps de préchauffage et de cuisson combinés.
• En eet, lorsque l'alerte de préchauage retentit, indiquant
à l'utilisateur d'ouvrir la porte du four et d'insérer les aliments,
une perte de température importante se produit à l'intérieur du four.
Si l'alerte retentit à 100 % de la température voulue, ouvrir la porte
impliquerait que ce temps d'attente est en grande partie gaspillé.
D'après nos calculs, en déclenchant l'alerte à 75 % de la température
voulue, puis en ouvrant la porte du four pour placer les aliments
à l'intérieur, on observe que la température voulue est atteinte jusqu'à
2 minutes plus vite. C'est la raison pour laquelle la température
sur l'écran LCD ne correspond pas à la température voulue lorsque
l'alerte de préchauage retentit. En fonction de la température
dénie, environ 8 à 10 minutes peuvent être nécessaires pour
que le four atteigne la température voulue depuis le démarrage,
en tenant compte de l'ouverture de la porte du four lorsque l'alerte
de préchauage retentit.
réinitialisé. Si cela se produit, débranchez immédiatement le cordon
d'alimentation de la prise électrique et appelez le service client Sage.
L'écran LCD ache « E02 » • L'écran LCD ache « E02 » lorsque l'appareil ne peut pas être
L'écran LCD ache « E03 » • L'écran LCD ache « E03 » si la température du four est supérieure
L'écran LCD ache « E05 » • L'écran LCD ache « E05 » lorsque l'appareil ne peut pas être
La température change
lorsque vous appuyez sur
le bouton de convection
réinitialisé. Si cela se produit, débranchez immédiatement le cordon
d'alimentation de la prise électrique et appelez le service client Sage.
à la limite maximale dénie. Débranchez le cordon de la prise
électrique, laissez le four refroidir pendant 15 minutes, puis
rebranchez-le.
• Appelez le service client Sage si le message « E03 » continue
à s'acher.
réinitialisé. Si cela se produit, débranchez immédiatement le cordon
d'alimentation de la prise électrique et appelez le service client Sage.
• Il s'agit d'un procédé normal. La température est calibrée pour
compenser l'augmentation du taux de cuisson par le ventilateur
de convection.
55
Page 56

Garantie
GARANTIE LIMITÉE DE 2 ANS
Sage Appliances garantit ce produit pour un usage
domestique sur les territoires spéciés pendant
2 ans à compter de la date d'achat, contre les
défauts de fabrication et de matériaux. Au cours
de cette période de garantie, Sage Appliances
s'engage à réparer, remplacer ou rembourser
tout produit défectueux (à sa seule discrétion).
Tous les droits de garantie légaux en vertu de
la législation nationale applicable seront respectés
et ne seront pas compromis par notre garantie.
Pour connaître les conditions générales complètes
relatives à la garantie ou pour obtenir des instructions sur la manière de déposer une réclamation,
rendez-vous sur www.sageappliances.com.
56
Page 57

the Smart Oven
TM
Air Fryer
SNELSTARTGIDS
NL
Page 58

Inhoud
58 Sage® stelt veiligheid voorop
63 Onderdelen
65 Functies
67 Snelstartgids
70 Onderhoud en reiniging
71 Probleemoplossing
73 Garantie
SAGE® STELT
VEILIGHEID
VOOROP
Bij Sage® gaan we
zeer veiligheidsbewust
te werk. Bij het ontwerpen
en produceren van onze
consumentenproducten
staat de veiligheid van
onze gewaardeerde
klanten voorop. Daarnaast
vragen wij u voorzichtig
om te gaan met elektrische
apparaten en de volgende
voorzorgsmaatregelen in acht
te nemen.
58
BELANGRIJKE
VEILIGHEIDSMAATREGELEN
LEES ALLE INSTRUCTIES
VÓÓR GEBRUIK EN BEWAAR
DEZE VOOR TOEKOMSTIGE
NASLAG
• Een downloadbare versie van
dit document is ook beschikbaar
op sageappliances.com
• Zorg er vóór het eerste
gebruik voor dat uw
elektriciteitsvoorziening dezelfde
is als die op het label aan de
onderkant van het apparaat.
• Verwijder het verpakkingsmateriaal en eventuele promotielabels en gooi ze op een veilige
manier weg voordat u de oven
voor het eerst gebruikt.
• Gooi het beschermkapje op
de stekker op een veilige manier
weg om verstikkingsgevaar bij
jonge kinderen te voorkomen.
• Plaats het apparaat niet aan
de rand van een aanrecht
of tafel. Zorg ervoor dat het
oppervlak stabiel, waterpas,
hittebestendig en schoon is.
• Er kan brand ontstaan als
de oven tijdens gebruik bedekt
is of in aanraking komt met
ontvlambaar materiaal, zoals
gordijnen, tafelkleden, muren
enz.
• Gebruik dit apparaat niet
op (of in de buurt van) een
hete gasbrander, elektrisch
Page 59

NL
element of op een plek waar het
apparaat in contact zou kunnen
komen met een verwarmde
oven of verwarmd oppervlak.
• Zorg dat het netsnoer niet
over de rand van een tafel
of aanrecht hangt en geen hete
oppervlakken raakt.
• De oven is niet geschikt
voor gebruik in een kleine
ruimte. Zorg voor voldoende
ruimte rondom de oven.
Een minimumafstand van
10 cm is raadzaam.
• De buitenkant van de oven kan
zowel tijdens als na gebruik
heet zijn. Raak geen hete
oppervlakken aan. Houd het
netsnoer van de oven en dat van
andere apparaten die zich dicht
bij de oven bevinden, altijd uit
de buurt van de oven.
• Raak geen hete oppervlakken
aan. Om brandwonden te
voorkomen, moet u uiterst voorzichtig zijn bij het verwijderen
van pannen, schalen en accessoires zoals het meegeleverde
grillrooster en de braadpan,
die hete olie of andere hete
vloeistoen kunnen bevatten.
• Leg geen kookgerei,
braadpannen of borden
op de glazen deur.
• Laat de deur niet gedurende
langere tijd openstaan.
• Bewaar geen items bovenop
de oven wanneer deze in
gebruik is, behalve de items
die op pagina 70 worden
beschreven.
• Plaats geen karton, plastic,
papier of andere ontvlambare
materialen in de oven.
• Bedek de kruimellade of andere
delen van de oven niet met
metaalfolie. Dit veroorzaakt
oververhitting van de oven.
• Wees voorzichtig bij het gebruik
van pannen en schalen van
andere materialen dan metaal.
Zorg ervoor dat de pannen
en schalen ovenbestendig zijn
voordat u ze in de oven gebruikt.
• Wees voorzichtig bij het gebruik
van deksels in de oven: door
de druk in een afgedekte
pan of schaal kunnen hete
ingrediënten overstromen
of kan de schaal barsten. Plaats
geen afgesloten of luchtdichte
verpakkingen in de oven.
• Etenswaren die te groot zijn
en metalen keukengerei
mogen niet in de oven worden
geplaatst, aangezien dat brand
of elektrische schokken kan
veroorzaken.
• Het gebruik van accessoires
en hulpstukken die niet worden
aanbevolen of niet bij deze oven
worden geleverd, kan letsel
veroorzaken.
• Dit apparaat is alleen voor
huishoudelijk gebruik. Gebruik
het niet in bewegende
voertuigen. Gebruik het
apparaat niet buitenshuis
59
Page 60

en alleen voor het beoogde
gebruik. Verkeerd gebruik kan
tot letsel leiden.
• Als het apparaat moet worden
achtergelaten, gereinigd,
verplaatst, gemonteerd
of opgeslagen, schakel het
apparaat dan altijd uit, haal
de stekker uit het stopcontact
en laat het apparaat volledig
afkoelen.
• Gebruik geen metalen
schuursponsjes om het
apparaat schoon te maken.
Er kunnen stukjes afbreken
die de elektrische onderdelen
aanraken, wat tot elektrische
schokken kan leiden.
• Het apparaat mag alleen
worden gebruikt door kinderen
van 8 jaar of ouder en personen
met beperkte fysieke, zintuiglijke
of mentale capaciteiten of een
gebrek aan ervaring en kennis,
als zij worden begeleid
of instructies hebben gekregen
over het veilige gebruik van het
apparaat en de gevaren ervan
begrijpen.
• Laat kinderen niet met het
apparaat spelen.
• Kinderen mogen het apparaat
niet reinigen of onderhouden
tenzij zij ouder zijn dan 8 jaar
en begeleid worden.
• Het apparaat en het snoer
moeten buiten het bereik van
kinderen jonger dan 8 jaar
worden gehouden.
• Het wordt aanbevolen om
het apparaat regelmatig
te inspecteren. Gebruik het
apparaat niet als het netsnoer,
de stekker of het apparaat
op enigerlei wijze beschadigd
is. Neem contact op met
de klantenservice van Sage
of ga naar sageappliances.
com als er sprake is van schade
of er ander onderhoud dan
reiniging is vereist
• Dit apparaat is niet ontworpen
om te worden bediend met
behulp van een externe
timer of een afzonderlijk
afstandsbedieningssysteem.
• Het apparaat moet op een goed
geaard stopcontact worden
gebruikt. Raadpleeg een
elektricien als u niet zeker weet
of de stopcontacten correct zijn
geaard.
• U mag in geen geval de stekker
veranderen of een adapter
gebruiken.
• Raadpleeg een gekwaliceerde
elektricien als u de aardingsinstructies niet volledig begrijpt,
of twijfelt of het apparaat correct
geaard is.
• Het wordt aanbevolen een
aardlekschakelaar te installeren
voor extra veiligheid bij het
gebruik van elektrische
apparaten. Het is raadzaam
om een veiligheidsschakelaar
met een aardlekstroom
van niet meer dan 30mA
60
Page 61

NL
te installeren in het elektrische
circuit dat het apparaat voedt.
Raadpleeg uw elektricien voor
professioneel advies.
SPECIFIEKE INSTRUCTIES
VOOR SOV860
• We raden aan dat de oven
wordt gebruikt op een eigen
circuit dat gescheiden is van
andere apparaten. Raadpleeg
bij twijfel een bevoegde en
gekwaliceerde elektricien.
• Schakel de oven uit door op
de
Start/Cancel-knop op het
bedieningspaneel te drukken.
De oven staat uit als de knop
niet langer oplicht.
• Maak de kruimellade regelmatig
schoon. De kruimellade
schoonmaken:
−Zet de oven UIT.
−Laat de oven volledig afkoelen
en haal vervolgens de stekker
uit het stopcontact.
−Trek de kruimellade uit de
oven en was deze af met warm
zeepsop.
−Droog de lade grondig
af voordat u deze stevig
terugplaatst.
KENNISGEVING AAN
KLANTEN OVER GEHEUGENOPSLAG
Uw apparaat beschikt over
interne geheugenopslag
zodat we onze klanten beter
van dienst kunnen zijn.
Deze geheugenopslag bestaat
uit een kleine chip waarmee
informatie over uw apparaat
wordt verzameld, waaronder de
frequentie waarmee en de manier
waarop uw apparaat wordt
gebruikt. Als uw apparaat voor
onderhoud wordt geretourneerd,
kunnen we uw apparaat op
basis van de informatie op de
chip snel en eciënt herstellen.
Bovendien is deze informatie
waardevol in de ontwikkeling
van nieuwe apparaten om beter
tegemoet te komen aan de
behoeften van onze klanten.
Er wordt geen informatie
verzameld over de personen
die het product gebruiken of het
huishouden waarin het product
wordt gebruikt. Neem voor
vragen over de geheugenchip
contact met ons op via
privacy@sageappliances.com.
61
Page 62
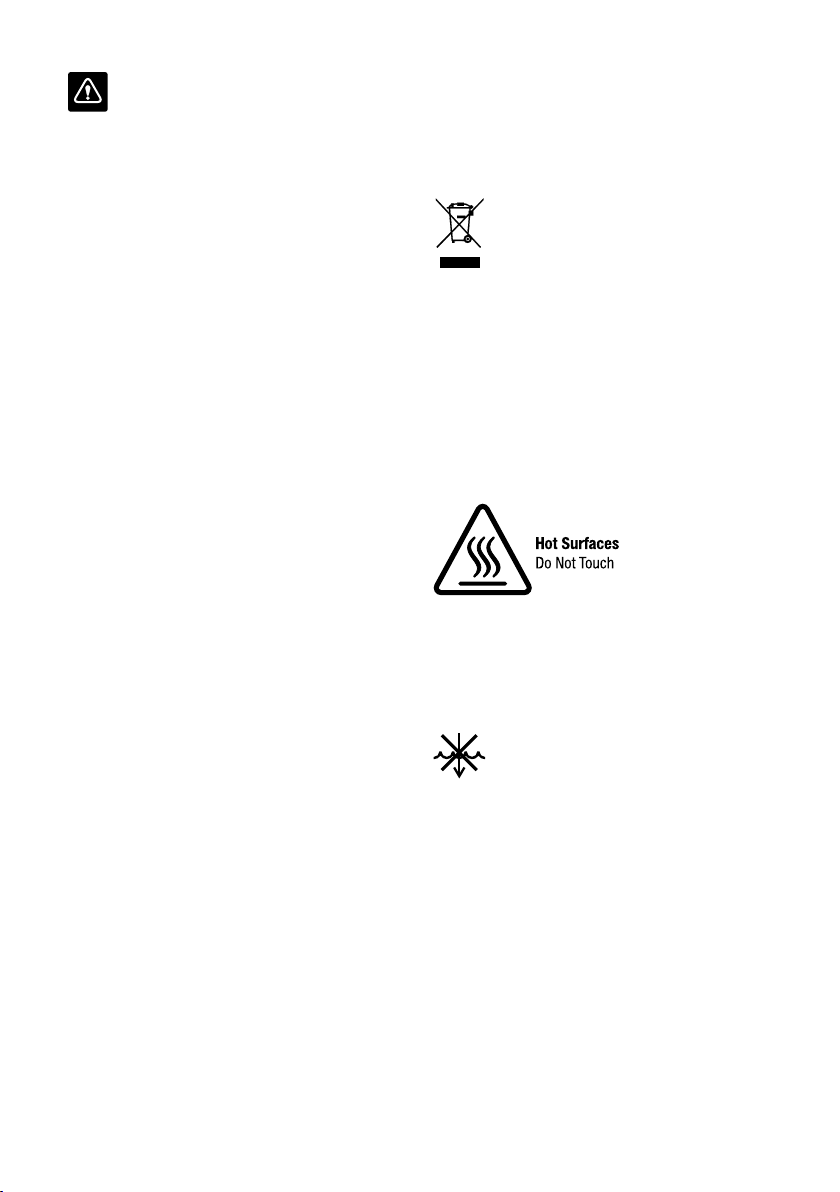
WAARSCHUWING
OM HET RISICO OP BRAND,
ELEKTRISCHE SCHOKKEN,
BLOOTSTELLING AAN
OVERMATIGE UV-STRALING
OF LETSEL AAN PERSONEN
TE VERMINDEREN:
• Haal altijd de stekker uit
het stopcontact en laat
alle onderdelen (inclusief
de lamphouder, de glazen
afdekking en de behuizing)
volledig afkoelen voordat
u de lamp vervangt.
• Gebruik alleen een ovenlamp
van 25 watt, 220 - 240 V,
type G9.
• Gebruik altijd een zachte doek
bij het hanteren van de lamp
en raak het oppervlak niet
rechtstreeks aan omdat olie
van uw huid de lamp kan
beschadigen.
• Kijk niet rechtstreeks in een
brandende gloeilamp.
• Blijf niet in het licht als de huid
warm aanvoelt.
• Houd de lamp uit de buurt van
brandbare materialen.
• De lamp wordt snel heet.
Gebruik de lampknop alleen
om de lamp aan te zetten.
• Gebruik de lamp niet als de
lamphouder, glazen afdekking,
UV-lter of behuizing ontbreken
of beschadigd zijn.
Het weergegeven symbool
geeft aan dat dit apparaat
niet met het normale
huishoudelijke afval mag worden
weggegooid. Het moet naar
een geschikt plaatselijk afvalverwerkingscentrum worden
gebracht of naar een provider die
deze service biedt. Neem voor
meer informatie contact op met
uw gemeente.
Het symbool geeft aan dat
sommige gemakkelijk bereikbare
oppervlakken gedurende en enige
tijd na gebruik heet kunnen zijn.
Dompel het netsnoer,
de stekker of het apparaat
niet onder in water of een andere
vloeistof om elektrische schokken
te vermijden.
BEWAAR DEZE INSTRUCTIES
62
Page 63
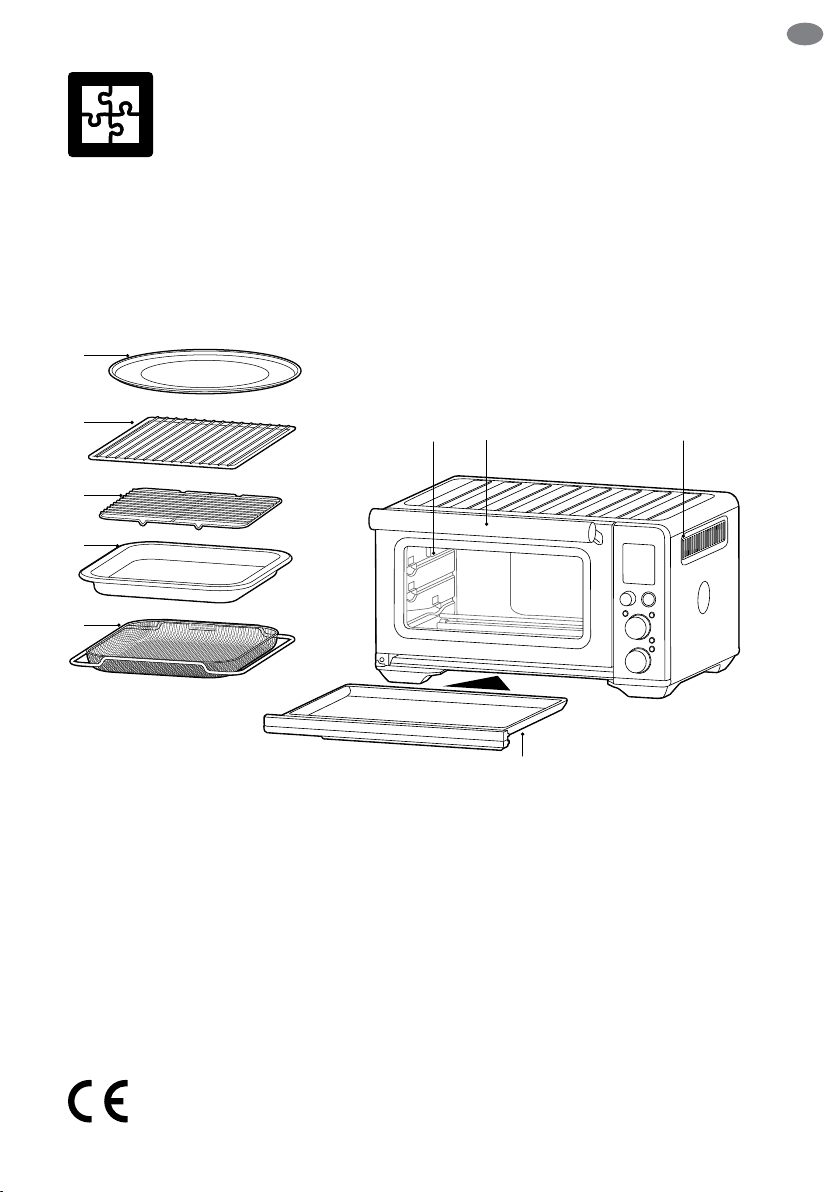
NL
TEMP
Darkness
TIME
Slices
FUNCTION
START/CANCEL
Onderdelen
A
B
C
D
E
A. Pizzaplaat van 30 cm met antiaanbaklaag
B. Rooster
C. Grillrooster
D. Emaillen braadpan van 28 x 33,5 cm
E. Mandje voor luchtfrituren
G H
F
I
F. Ovenlamp
G. Handgreep
H. Ventilatieopeningen
I. Kruimellade
Classicatiegegevens
220 – 240 V ~ 50 Hz 2000 – 2400 W
63
Page 64
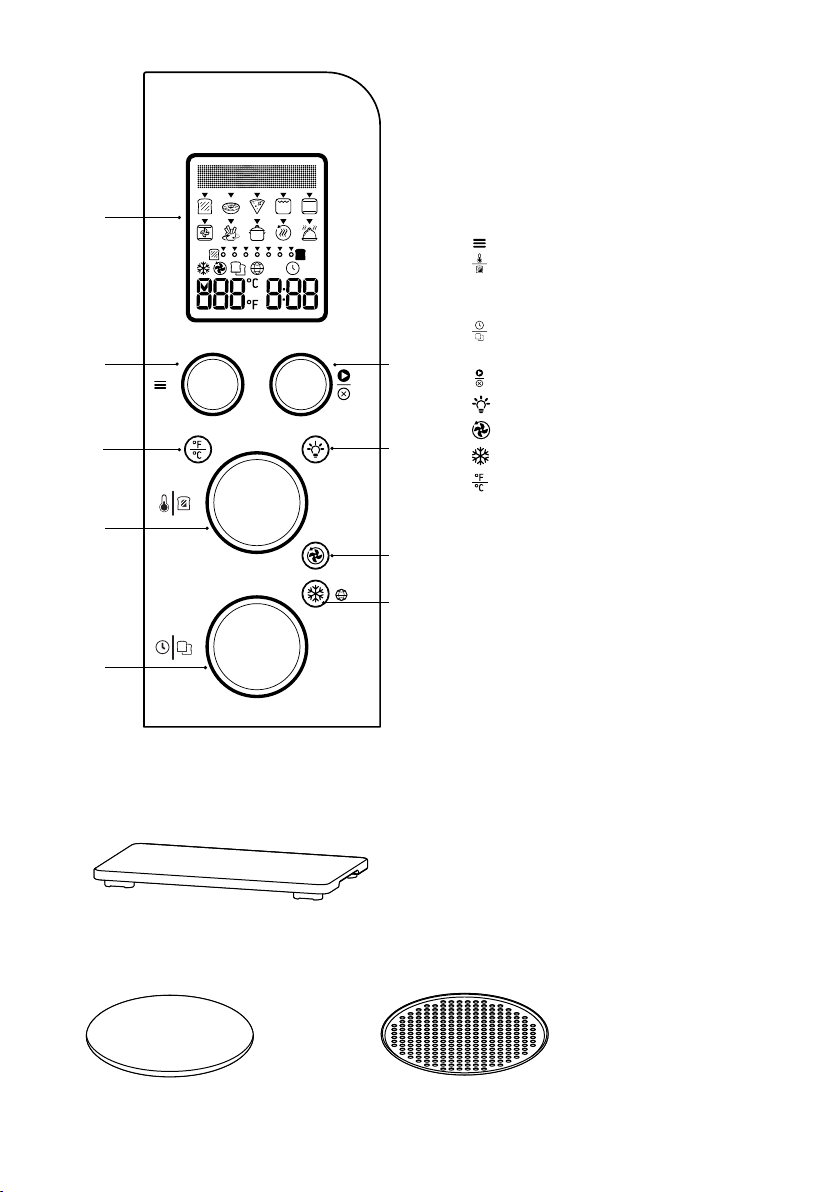
K
MSHM
L
S
M
N
Apart verkochte accessoires:
O
P
Q
R
K. Lcd-scherm
L.
Draaiknop Function
M.
Draaiknop Temperature/
kleurregeling voor toast
en bagel
N.
Draaiknop Time/selectieknop
voor toast en bagel
O.
Knop Start/Cancel
P.
Knop Ovenlamp
Q.
Knop Convectie
R.
Knop Bevroren etenswaren
S.
Knop voor temperatuurconversie
Bamboesnijplank
Pizzasteen Pizza-crisperpan
64
Page 65

Functies
SHMMSHM
NL
DE OVEN VOORBEREIDEN
Laat de oven voor het eerste gebruik gedurende
20 minuten leeg draaien om beschermende stoen
van de verwarmingselementen te verwijderen.
Zorg dat de ruimte goed geventileerd is, aangezien
de oven dampen kan uitstoten. Deze dampen zijn
veilig en doen geen afbreuk aan de prestaties van
de oven.
1. Verwijder verpakkingsmaterialen,
promotielabels en tape van de oven gooi
ze op een veilige manier weg.
2. Haal kruimellade, roosters, grillrooster,
braadpan, mandje voor luchtfrituren
en pizzapan uit de polyfoamverpakking.
Was ze af met een zachte spons in warm
zeepsop en spoel en droog ze grondig af.
3. Veeg de binnenkant van de oven schoon
met een zachte, vochtige spons. Droog deze
grondig af.
4. Plaats de oven op een vlak, droog oppervlak.
Houd minimaal 10 cm ruimte vrij aan
weerszijden van het apparaat en 15 cm boven
het apparaat.
5. Plaats de kruimellade in de oven.
6. Wikkel het netsnoer volledig af en steek
de stekker in een geaard stopcontact.
7. Het ovensignaal klinkt en het lcd-scherm
licht op. Stel de gewenste taal in. Raadpleeg
pagina 68 voor taalselectie.
8. Draai de knop
de pijl bij de instelling PIZZA staat.
Start/Cancel naar rechts totdat
9. Druk op de Start/Cancel-knop. De knop licht
rood op, het lcd-scherm wordt oranje en het
ovensignaal klinkt.
10. Het lcd-scherm geeft knipperend de melding
PREHEATING. Zodra de oven is voorverwarmd,
klinkt een signaal.
11. De timer zal afgebeeld worden en zal
automatisch beginnen met aftellen.
12. Aan het einde van de bereidingscyclus klinkt
het ovensignaal, gaat het lampje op de knop
Start/Cancel uit en licht het lcd-scherm
blauw op.
13. De oven is nu klaar voor gebruik.
ELEMENT IQ
De Sage Smart OvenTM Air Fryer is uitgerust met
Element IQTM, een bereidingstechnologie waarmee
de ideale omgeving wordt verkregen voor het
voedsel dat u bereidt. Het brengt de warmte
op het juiste moment naar de juiste plek en creëert
de juiste soort warmte, gelijkmatig of intens.
Alle ovenfuncties zijn vooraf ingesteld op de door
ons aanbevolen verwarmingselementconguraties
en temperaturen, die zijn gebaseerd op recepten
en testen. We raden u echter aan met deze
instellingen te experimenteren, afhankelijk van het
recept, hoeveelheden en uw persoonlijke smaak.
TM
M
65
Page 66

OVERZICHT VAN OVENFUNCTIES
FUNCTIE
Toast
Bagel
Pizza
Grillen
Bakken
Braden
Luchtfrituren
Opwarmen
Warm houden
Slowcooking
VOORGESTELDE
OPTIONELE IN-
STELLINGEN
ROOSTERPOSITIE
Midden
Midden
Midden
Bevroren
Bevroren
Super convectie
Convectie
Temperatuur-
conversie
Bevroren
Bovenste HI
Onderste
Super convectie
Convectie
Temperatuur-
conversie
Onderste
Super convectie
Convectie
Temperatuur-
conversie
Bovenste
Super convectie
Temperatuur-
conversie
Bevroren
Onderste
Convectie
Temperatuur-
conversie
Onderste
Convectie
Temperatuur-
conversie
Onderste
Convectie
VOORINSTELLINGEN
Kleuring 4
Sneetjes 4
Kleuring 4
Sneetjes 4
210°C
Convectie
Bevroren
20 MIN
10 MINS
160°C
Convectie
30 MIN
180 °C
Convectie
1 UUR
220°C
15 MIN
Superconvectie
160°C
Convectie
15 MIN
70°C
KEEP WARM
1 UUR
HI
Convectie
4 UUR
VOORVER-
BEREIK
WARMEN
Nee Kleuring 1-7
Nee Kleuring 1-7
Ja 160 °C - 230 °C
Nee HI-MED-LO
Ja 120 °C en hoger = 1
Ja 120 °C en hoger = 1
Nee 160 °C - 230 °C
Ja 70 °C - 160 °C
Nee 50 °C - 120 °C
Nee LO = 4 tot 10 UUR
Sneetjes 1-6
Sneetjes 1-6
Tot 2 uur
Tot 20 MIN
MIN tot 2 UUR
120 °C en lager = 1
MIN tot 10 UUR
MIN tot 2 UUR
120 °C en lager = 1
MIN tot 10 UUR
Tot 1 UUR
Tot 2 UUR
Tot 2 UUR
HI = 2 tot 8 UUR
66
Page 67
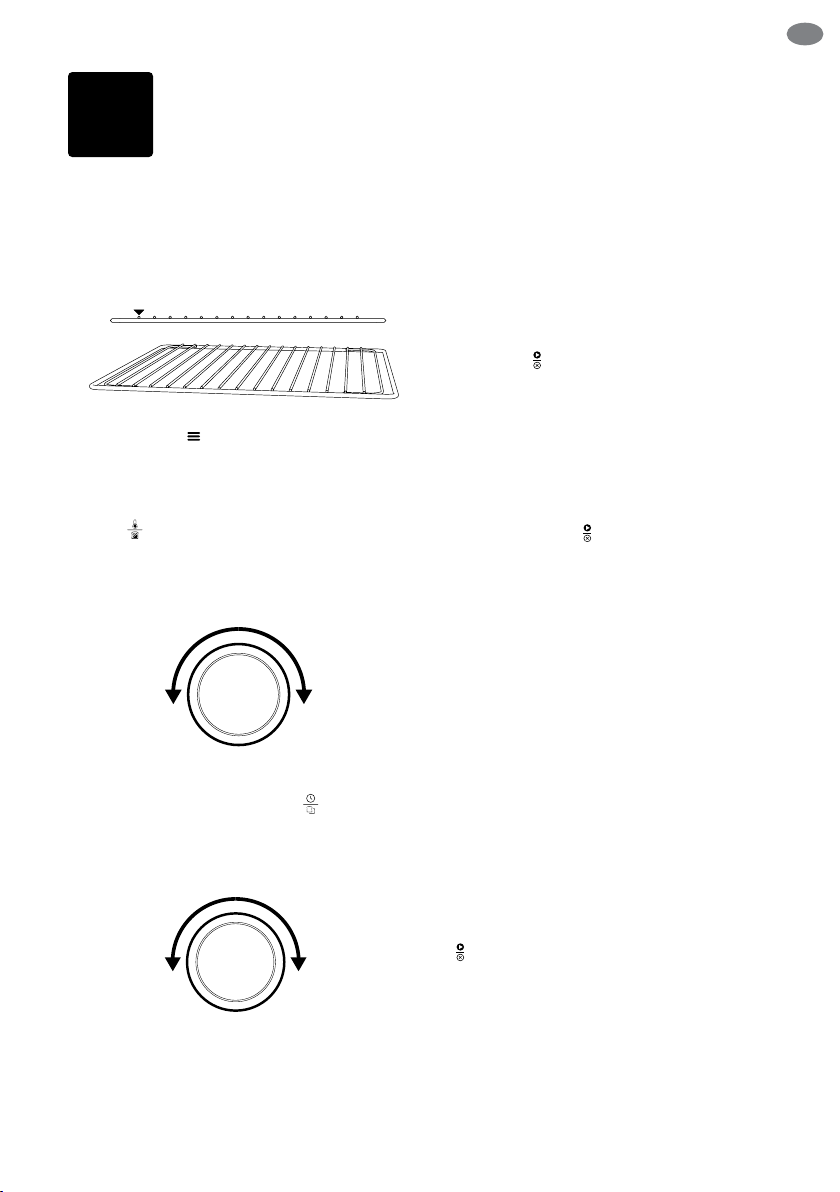
NL
LAGER HOGER
DRAAIKNOP
DRAAIKNOP
i
Snelstartgids
UW SAGE-OVEN GEBRUIKEN
1. Plaats het rooster zodanig dat de spaken
omhoog wijzen en plaats het op de gewenste
hoogte. De roosterposities staan ter referentie
op het venster van de ovendeur.
2. Draai de knop Function totdat de pijl op het
lcd-scherm bij de gewenste instelling staat.
3. Op het scherm wordt de vooringestelde
bereidingstemperatuur voor de geselecteerde
instelling weergegeven. Draai de temperatuurknop
naar links om de temperatuur te
verlagen of naar rechts om de temperatuur
te verhogen.
TEMPERATUUR
DRAAIEN
4. Op het scherm wordt de vooringestelde
bereidingstijd voor de geselecteerde instelling
weergegeven. Draai de tijdknop naar links
om de kooktijd te verlagen of naar rechts om
de kooktijd te verhogen.
TIJD
DRAAIEN
5. Voor instellingen zonder voorverwarmingscyclus (TOAST, BAGEL, GRILL, KEEP WARM,
SLOW COOK) plaatst u de etenswaren
rechtstreeks op het rooster, in het mandje
voor luchtfrituren, op de grillplaat en/of in de
braadpan (meegeleverd). Plaats etenswaren
in het midden van de oven voor de meest
gelijkmatige gaarheid.
6. Sluit de ovendeur.
7. Druk op de
De knop licht rood op, het ovensignaal klinkt
en het lcd-scherm wordt oranje.
8. De timer wordt afgebeeld en begint automatisch
af te tellen. De bereidingstemperatuur en -tijd
kunnen tijdens de bereidingscyclus worden
aangepast.
9. Voor instellingen met een voorverwarmingscyclus (BAKE, ROAST, PIZZA, AIR FRY)
drukt u op de knop
voordat u etenswaren in de oven plaatst.
De knop licht rood op, het ovensignaal klinkt
en het lcd-scherm geeft knipperend de
melding PREHEATING terwijl de oven wordt
voorverwarmd.
a) Wanneer de oven klaar is voor gebruik,
verdwijnt de knipperende melding
PREHEATING, klinkt het ovensignaal en begint
de timer af te tellen. Plaats de etenswaren
rechtstreeks op het rooster of in het mandje
voor luchtfrituren, op de grillplaat en/of in de
braadpan (meegeleverd). Plaats etenswaren
in het midden van de oven voor de meest
gelijkmatige bereidingstijd.
b) Sluit de ovendeur.
c) De timer gaat door met aftellen.
De bereidingstemperatuur en -tijd kunnen
tijdens de bereidingscyclus worden aangepast.
10. Aan het einde van de bereidingscyclus klinkt
het ovensignaal, gaat het lampje op de knop
Start/Cancel uit en licht het lcd-scherm
blauw op.
Start/Cancel-knop.
Starten/annuleren
KORTER LANGER
67
Page 68

OPMERKING
De bereidingscyclus kan op elk moment worden
gestopt door op de knop
De cyclus wordt dan geannuleerd en de knop licht
blauw op.
Start/Cancel te drukken.
OPMERKING
Druk op de knop Convection om geen convectie,
convectie en superconvectie te selecteren.
Bij convectie en superconvectie kan de temperatuur
worden aangepast om te compenseren voor de
snellere luchtstroom. Superconvectie levert een
krokanter resultaat op.
MAGNETISCH ROOSTER
MET AUTOMATISCHE
UITSCHUIFFUNCTIE
Wanneer het rooster zich in de middenpositie
bevindt, schuift het automatisch halverwege uit
de oven wanneer de deur wordt geopend zodat
u de etenswaren er gemakkelijk uit kunt halen.
Open de deur altijd langzaam wanneer het rooster
zich op deze plek bevindt om te voorkomen dat het
te snel naar voren schuift.
TAALKEUZE
Wanneer u de oven voor het eerst gebruikt, kunt
u de gewenste taal selecteren.
Draai aan de knop
(met de klok mee of tegen de klok in) om de
gewenste taal te selecteren. Druk vervolgens
op de knop Start/Cancel om uw selectie
te bevestigen. Als de gewenste taal niet binnen
5 minuten wordt bevestigd, slaat de oven
automatisch de standaardtaal op.
Wilt u de geselecteerde taal wijzigen, houd
dan de knop
De beschikbare talen worden op het lcd-scherm
weergegeven. Draai aan de knop Temperature
of Time (met de klok mee of tegen de klok in)
om de gewenste taal te selecteren. Druk vervolgens
op de knop Start/Cancel om uw selectie
te bevestigen. Als de gewenste taal niet binnen
5 minuten wordt bevestigd, blijft automatisch
de eerder opgeslagen taal bewaard.
Het vinkje
Temperature of Time
Frozen 3 seconden ingedrukt.
geeft de geselecteerde taal aan.
68
Page 69

NL
OVENLAMP VERVANGEN
WAARSCHUWING
Haal altijd de stekker uit het stopcontact en laat
de oven afkoelen voordat u de lamp vervangt.
Gebruik alleen een ovenlamp van 25 watt,
220 - 240 V, type G9.
1. Haal het rooster uit de oven voordat u de lamp
vervangt.
2. De lamp bevindt zich links aan de binnenkant
van de oven. Houd de behuizing van de lamp
tussen uw vingers vast en trek het glazen
plaatje voorzichtig weg van de ovenwand
om deze te verwijderen. Als dat niet lukt, schuift
u een lepel in de linkerkant van de behuizing
en haalt u het glas er zo voorzichtig af. Houd
het glazen plaatje altijd met uw andere hand
vast om te zorgen dat het niet valt en breekt.
4. Gebruik een zachte doek om de nieuwe lamp
te plaatsen. Raak het oppervlak van de lamp
niet direct met uw vingers aan, omdat de olie
van uw huid de lamp kan beschadigen.
5. Om het glas weer vast te zetten, zorgt u dat
het metalen haakje met de linkerkant van
de behuizing is uitgelijnd. Schuif het andere
uiteinde van het glas in de metalen beugel aan
de rechterkant van de behuizing, en druk het
metalen haakje links in de behuizing tot het
stevig op zijn plaats klikt.
3. Verwijder de gebruikte lamp door deze direct uit
de houder te trekken.
OPMERKING
De bovenkant van de oven is tijdens en na gebruik
erg heet. Het wordt daarom niet aanbevolen iets
bovenop de oven te bewaren.
De enige uitzonderingen zijn de afzonderlijk
verkrijgbare Sage Bamboo Cutting Board
en Serving Tray die in het geribbelde
gedeelte bovenop de oven passen. Ga naar
www.sageappliances.com voor meer informatie.
69
Page 70
Onderhoud
en reiniging
Vóór het reinigen moeten de oven worden uitgezet
door de stekker uit het stopcontact te halen. Laat
de oven en alle toebehoren volledig afkoelen
voordat u ze uit elkaar haalt en reinigt.
De buitenkant en deur reinigen
1. Reinig de buitenkant met een zachte,
vochtige spons. Een niet-schurend vloeibaar
schoonmaakmiddel of milde spray kan gebruikt
worden om hardnekkige vlekken te verwijderen.
Breng het schoonmaakmiddel aan op een
spons (niet op het oppervlak van de oven).
2. Gebruikt een glasreiniger of een mild
afwasmiddel en een zachte, vochtige spons
of een zacht synthetisch schuursponsje om
de glazen deur schoon te maken. Gebruik
geen schurend reinigingsmiddel of metalen
schuursponsje, aangezien deze krassen op het
oppervlak van de oven kunnen veroorzaken.
3. Veeg het lcd-scherm schoon met een zachte,
vochtige doek. Breng het reinigingsmiddel op de
doek aan en niet op het lcd-scherm. Een droge
doek of schurende reinigingsmiddelen kunnen
krassen op het oppervlak veroorzaken.
4. Laat alle oppervlakken voldoende drogen
voordat u de stekker in het stopcontact steekt
en de oven aanzet.
WAARSCHUWING
Dompel de oven zelf, het netsnoer of de stekker
niet onder in water of een andere vloeistof. Dit kan
elektrocutie veroorzaken.
De binnenkant reinigen
De wanden aan de binnenkant van de oven zijn
voorzien van een antikleeaag voor eenvoudige
reiniging. Veeg de wanden schoon met een
zachte, vochtige spons om eventuele spatten
te verwijderen. Een niet-schurend vloeibaar
schoonmaakmiddel of milde spray kan gebruikt
worden om hardnekkige vlekken te verwijderen.
Breng het schoonmaakmiddel aan op een
spons (niet op het oppervlak van de oven). Raak
de verwarmingselementen van kwarts niet aan.
WAARSCHUWING
Wees uiterst voorzichtig wanneer u de verwarmingselementen van kwarts schoonmaakt. Laat de oven
volledig afkoelen en wrijf voorzichtig met een zachte,
vochtige spons of doek langs het verwarmings-
70
element. Gebruik geen schoonmaakmiddelen
of reinigingsproducten. Laat alle oppervlakken
voldoende drogen voordat u de stekker in het
stopcontact steekt en de oven aanzet.
De kruimellade schoonmaken
1. Na elk gebruik moet de kruimellade
uitgeschoven en geleegd worden. Veeg
de kruimellade schoon met een zachte,
vochtige spons. Een niet-schurend vloeibaar
schoonmaakmiddel kan gebruikt worden
om hardnekkige vlekken te verwijderen. Breng
het schoonmaakmiddel aan op een spons
(niet op de lade zelf). Droog deze grondig af.
2. Na reiniging moet de kruimellade altijd
eerst in de oven worden geplaatst, met
de ovendeur gesloten, voordat u de stekker
in het stopcontact steekt en de oven aanzet.
3. Na reiniging moet de kruimellade altijd
eerst in de oven worden geplaatst, met
de ovendeur gesloten, voordat u de stekker
in het stopcontact steekt en de oven aanzet.
Rooster, grillrooster, bakplaat
en pizzaplaat reinigen
1. Was alle onderdelen af in warm
zeepwater met een zachte spons of
zacht synthetisch schuursponsje. Spoel
en droog alles goed af. Gebruik geen
schurende schoonmaakmiddelen, metalen
schuursponsjes of metalen keukengerei
om onderdelen te reinigen; deze kunnen de
oppervlakken beschadigen.
2. Om de levensduur van uw toebehoren te
verlengen, raden we af deze in de vaatwasser
te reinigen.
Opbergen
1. Zorg dat de oven uit staat door de stekker uit
het stopcontact te halen.
2. Laat de oven en alle toebehoren volledig
afkoelen voordat u ze uit elkaar haalt en reinigt.
3. Zorg ervoor dat de oven en alle toebehoren
schoon en droog zijn.
4. Zorg dat de kruimellade in de oven is geplaatst,
het grillrooster in de braadpan zit, bovenop het
rooster in de middenpositie.
5. Zorg dat de ovendeur gesloten is.
6. Berg het apparaat op in rechtopstaande positie
op de steunpootjes. Plaats niets bovenop
het apparaat. De enige uitzonderingen zijn
de afzonderlijk verkrijgbare Sage Bamboo
Cutting Board en Serving Tray.
Page 71

Probleemoplossing
NL
MOGELIJK
EENVOUDIGE OPLOSSING
PROBLEEM
De oven gaat niet aan • Controleer of de stekker goed in het stopcontact zit.
• Steek de stekker in een apart stopcontact.
• Steek de stekker in een ander stopcontact.
• Stel de stroomonderbreker indien nodig opnieuw in.
De verlichting op het
lcd-scherm is uitgegaan
De pizza wordt niet
gelijkmatig gebakken
Het magnetische rooster
met automatische
uitschuiunctie komt
te ver naar voren wanneer
ik de deur open
Ik kan de knop
(Bevroren) niet selecteren
Er komt stoom uit
de ovendeur
De verwarmingselementen
lijken te pulseren
Water druppelt op het
aanrecht van onder de deur
De temperatuur op het lcdscherm komt niet overeen
met de temperatuur die in
de oven wordt gemeten
Frozen
• De oven gaat in de stand-bymodus als deze gedurende 10 minuten niet
wordt gebruikt. In de stand-bymodus gaat de verlichting van het lcdscherm uit, maar alle functie-opties blijven zichtbaar.
• Wilt u de oven uit de stand-bymodus halen, druk dan op de
Cancel-knop op het bedieningspaneel of draai aan een willekeurige knop.
Het lcd-scherm licht opnieuw op.
• Soms worden grote pizza's in compacte ovens ongelijkmatig bruin. Open
de ovendeur halverwege de bereidingstijd en draai de pizza 180 graden
om deze gelijkmatiger te bakken.
• Open de deur altijd langzaam en op een gecontroleerde manier wanneer
het rooster zich in middenpositie bevindt om te voorkomen dat het te snel
naar voren schuift.
• De knop Frozen kan alleen voor de volgende functies worden
geselecteerd: ROOSTEREN, BAGEL, BAKKEN, PIZZA, FRITUREN
MET LUCHT. Wanneer u de knop Frozen selecteert, wordt de kooktijd
automatisch aangepast voor een optimaal resultaat.
• Dit is normaal. De deur heeft een luchtopening om stoom te laten
ontsnappen die afkomstig is uit etenswaren met een hoog vochtgehalte,
zoals bevroren brood. De stoom kan heet zijn, dus wees voorzichtig.
• Element iQ
in de oven door de stroom te pulseren en het vermogensniveau in de
verwarmingselementen in korte stoten aan te passen. Dit is normaal.
• Dit is normaal. De condens die wordt veroorzaakt door etenswaren met
een hoog vochtgehalte, zoals bevroren brood, loopt langs de binnenkant
van de deur naar beneden en kan op het aanrecht druppelen.
• Om voor gestandaardiseerde metingen te zorgen, zijn de oventemperaturen gekalibreerd in de TOAST-positie (midden van het middelste rooster wanneer er geen plaat in de oven zit). Controleer de temperatuur opnieuw op deze plaats en houd de ovendeur gedurende 30 minuten
gesloten aangezien warmte anders telkens ontsnapt wanneer de deur
wordt geopend. U hoort het voorverwarmingssignaal wanneer 75% van de
doeltemperatuur is bereikt.
TM
zorgt voor een nauwkeurige temperatuurregeling
Start/
71
Page 72

MOGELIJK
PROBLEEM
Het voorverwarmingssignaal klinkt bij een
lagere temperatuur dan wat
er op het lcd-scherm wordt
weergegeven
Op het lcd-scherm wordt
E01 weergegeven
Op het lcd-scherm wordt
E02 weergegeven
Op het lcd-scherm wordt
E03 weergegeven
Op het lcd-scherm wordt
E05 weergegeven
De temperatuur verandert
wanneer de convectieknop
wordt ingedrukt
EENVOUDIGE OPLOSSING
• U hoort het voorverwarmingssignaal wanneer 75% van de
doeltemperatuur is bereikt. Dit levert de snelste gecombineerde
voorverwarmings- en bereidingstijd.
• Wanneer het voorverwarmingssignaal klinkt en de gebruiker het eten
in de oven plaatst, zorgt het openen van de deur voor een drastisch
temperatuurverlies. Als het signaal bij 100% van de doeltemperatuur
klinkt, zou het openen van de deur betekenen dat een groot deel van deze
wachttijd verloren gaat. Volgens onze berekeningen kunnen we door het
signaal bij 75% van de doeltemperatuur te laten klinken en daarna de
ovendeur te openen om het eten in de oven te plaatsen, de doeltemperatuur
2 minuten sneller bereiken. Daarom komt de temperatuur op het lcd-scherm
niet overeen met de doeltemperatuur wanneer het voorverwarmingssignaal
klinkt. Afhankelijk van de ingestelde temperatuur kan het ongeveer 8 tot 10
minuten duren totdat de oven de doeltemperatuur heeft bereikt vanaf het
moment dat deze is aangezet, inclusief het openen van de deur wanneer
het voorverwarmingssignaal klinkt.
• Op het lcd-scherm wordt E01 weergegeven wanneer er een probleem
optreedt dat niet kan worden verholpen door het apparaat te resetten.
Haal in dit geval onmiddellijk de stekker uit het stopcontact en bel de
klantenservice van Sage.
• Op het lcd-scherm wordt E02 weergegeven wanneer er een probleem
optreedt dat niet kan worden verholpen door het apparaat te resetten.
Haal in dit geval onmiddellijk de stekker uit het stopcontact en bel de
klantenservice van Sage.
• Op het lcd-scherm wordt E03 weergegeven als de oventemperatuur
hoger is dan de ingestelde maximumlimiet. Haal de stekker uit het
stopcontact, laat de oven 15 minuten afkoelen en sluit deze vervolgens
weer aan.
• Bel de klantenservice van Sage als E03 nog steeds wordt weergegeven.
• Op het lcd-scherm wordt E05 weergegeven wanneer er een probleem
optreedt dat niet kan worden verholpen door het apparaat te resetten.
Haal in dit geval onmiddellijk de stekker uit het stopcontact en bel de
klantenservice van Sage.
• Dit is normaal. De temperatuur wordt gekalibreerd om te compenseren
voor de hogere bereidingssnelheden van de convectieventilator.
72
Page 73

Garantie
BEPERKTE GARANTIE VAN 2 JAAR
Sage Appliances biedt een garantie op dit
product voor huishoudelijk gebruik in genoemde
gebieden gedurende 2 jaar vanaf de datum
van aankoop voor defecten veroorzaakt door
gebrekkige afwerking en materialen. Gedurende
deze garantieperiode zal Sage Appliances
defecte producten repareren, vervangen
of terugbetalen (naar eigen goeddunken van
Sage Appliances).
Alle wettelijke garantierechten onder
de toepasselijke nationale wetgeving worden
gerespecteerd en onze garantie doet geen
afbreuk aan deze rechten. Voor de algemene
voorwaarden van de garantie, evenals instructies
over hoe u aanspraak maakt op de garantie, gaat
u naar www.sageappliances.com.
NL
73
Page 74

Opmerkingen
74
Page 75

the Smart Oven
TM
Air Fryer
GUIDA RAPIDA
IT
Page 76

Sommario
76 Sage® consiglia: la sicurezza
prima di tutto
81 Componenti
83 Funzioni
85 Guida rapida
88 Manutenzione e pulizia
90 Risoluzione dei problemi
92 Garanzia
SAGE®
CONSIGLIA:
LA SICUREZZA
PRIMA DI TUTTO
In Sage® abbiamo molto
a cuore la sicurezza. Creiamo
e commercializziamo prodotti
di consumo tenendo sempre
presente la sicurezza dei
nostri clienti. Inoltre, invitiamo
i clienti a prestare molta
attenzione durante l'utilizzo
degli apparecchi elettrici
e a osservare le seguenti
precauzioni.
NORME
DI SICUREZZA
IMPORTANTI
LEGGERE TUTTE LE
ISTRUZIONI PRIMA DELL'USO
E CONSERVARLE PER
CONSULTARLE IN FUTURO
• Sul sito sageappliances.com è
disponibile anche una versione
scaricabile di questo documento.
• Prima di usare l'apparecchio
per la prima volta, vericare che
la tensione della rete corrisponda
a quella indicata sull'etichetta
dei valori nominali sotto il
dispositivo.
• Rimuovere e smaltire in sicurezza
tutti i materiali di imballaggio o
le etichette promozionali prima
di utilizzare l'apparecchio per
la prima volta.
• Per evitare il rischio di sooca-
mento per i bambini, rimuovere
e smaltire in sicurezza la copertura protettiva della spina.
• Non utilizzare l'apparecchio
vicino al bordo di un banco
o di un tavolo. Utilizzare su
una supercie stabile, piana,
resistente al calore e pulita.
• Se il forno è coperto o a contatto
con materiali inammabili, come
tende, tendaggi, pareti e simili,
quando è in funzione potrebbe
vericarsi un incendio.
• Non utilizzare l'apparecchio
sopra o vicino a un fornello a gas
o elettrico caldo o dove potrebbe
entrare in contatto con un forno
o una supercie riscaldata.
• Evitare che il cavo di
zione rimanga sospeso
bordo di un tavolo o del piano
cucina o che venga in contatto
con superci calde.
• Il forno non può essere utilizzato
in spazi riservati ai piccoli
elettrodomestici. Vericare
che ci sia spazio suciente in
tutte le direzioni intorno al forno.
Si consiglia di lasciare almeno
10 cm di spazio.
alimenta-
oltre il
76
Page 77

IT
• L'alloggiamento esterno del
forno potrebbe essere caldo
durante e dopo la cottura.
Evitare il contatto con le superc
calde. Tenere sempre il cavo
di alimentazione del forno e di
altri apparecchi che potrebbero
trovarsi nelle vicinanze lontano
dall'alloggiamento.
• Evitare il contatto con le superci
calde. Per evitare ustioni, usare
la massima cautela nel rimuovere
teglie, piatti e accessori quali
il grill da forno e la teglia, che
contengono oli o altri liquidi caldi.
• Non posare utensili da cucina,
teglie o piatti sullo sportello
in vetro.
• Non lasciare lo sportello aperto
per lunghi periodi di tempo.
• Non collocare nessun oggetto
sopra il forno durante il funzionamento, eccetto quelli descritti
a pagina 89 di questo
manuale.
• Non posizionare cartone,
plastica, carta o altri materiali
inammabili nel forno.
• Non coprire il vassoio raccoglibriciole o qualsiasi parte del
forno con fogli di alluminio.
Ciò causerebbe il surriscaldamento del forno.
• Fare attenzione quando si
usano teglie e piatti realizzati
in materiali diversi dal metallo.
Assicurarsi che le teglie e i piatti
siano adatti all'uso in forno prima
di utilizzarli.
• Fare attenzione quando si usano
i coperchi nel forno, poiché la
pressione accumulata in una
teglia o in un piatto coperti può
causare l'espulsione di ingredienti caldi o la rottura del piatto.
i
Non mettere contenitori sigillati
o a chiusura ermetica nel forno.
• Non inserire alimenti troppo
grandi e utensili di metallo nel
forno poiché potrebbero creare
rischio di incendio o di scosse
elettriche.
• L'uso di accessori ed estensioni
non consigliati o forniti con questo apparecchio può provocare
lesioni.
• Questo apparecchio è
destinato esclusivamente
all'uso domestico. Non utilizzare
su veicoli in movimento di
qualsiasi tipo. Non utilizzare
l'elettrodomestico all'aperto
o per usi diversi da quello
previsto. L'uso non corretto
può causare lesioni.
• Nel caso sia necessario pulire,
spostare, montare, riporre
o lasciare incustodito l'apparecchio, spegnerlo, scollegare
il cavo dalla presa di alimentazione
e lasciare rareddare com-
pletamente l'elettrodomestico.
• Non pulire con pagliette
metalliche. Possono staccarsi
dei pezzi dai lati e toccare
parti elettriche, creando il rischio
di scossa elettrica.
• L'elettrodomestico può essere
utilizzato da bambini di età
superiore a 8 anni e persone
con disabilità siche o mentali
o prive di esperienza o conoscenza dell'elettrodomestico
stesso, a condizione che queste
77
Page 78

ultime lo utilizzino sotto la supervisione di qualcuno o secondo
speciche istruzioni ricevute
in merito all'uso in sicurezza
dell'elettrodomestico e che
comprendano i rischi associati.
• Non lasciare che i bambini
giochino con l'elettrodomestico.
• La pulizia e la manutenzione
possono essere eseguite da
bambini solo se di età superiore
a 8 anni e sotto la supervisione
di qualcuno.
• Tenere l'elettrodomestico
e il cavo fuori dalla portata dei
bambini di età pari o inferiore
agli 8 anni.
• Si raccomanda di ispezionare
regolarmente l'apparecchio.
Non utilizzare l'elettrodomestico
se il cavo di alimentazione, la
spina di alimentazione o l'apparecchio stesso subiscono danni.
Se l'elettrodomestico è danneggiato o richiede un intervento
di manutenzione diverso dalla
pulizia, contattare il Servizio
clienti Sage o visitare il sito Web
sageappliances.com.
• L'apparecchio non è destinato
ad essere utilizzato per mezzo di
un timer esterno o di un sistema
di controllo remoto separato.
• L'apparecchio deve essere
collegato utilizzando una presa
con messa a terra.
In caso di dubbio rispetto alla
corretta messa a terra, consultare un elettricista.
• Non modicare per nessun
motivo la presa di alimentazione
e non utilizzare adattatori.
• Consultare un elettricista qua
cato se le istruzioni riguardanti
la messa a terra non sono
completamente chiare o in caso
di dubbio rispetto alla corretta
messa a terra dell'apparecchio.
• Si consiglia l'installazione di un
interruttore salvavita per una
maggiore sicurezza durante
l'utilizzo di tutti i dispositivi
elettrici. È consigliabile che nel
circuito elettrico che alimenta
l'apparecchio sia installato un
interruttore di sicurezza con una
corrente di esercizio nominale
residua non superiore a 30 mA.
Consultare un elettricista per
un parere professionale.
ISTRUZIONI SPECIFICHE
PER SOV860
• Si consiglia di utilizzare il forno
su un circuito dedicato separato
da altri apparecchi. Consultare
un elettricista qualicato e
abilitato in caso di dubbi.
• Per spegnere il forno, premere
il tasto
START/CANCEL
(avvia/annulla) sul pannello
di controllo. Il forno è spento
quando il pulsante non è più
retroilluminato.
• Pulire regolarmente il vassoio
raccoglibriciole. Per pulire il
vassoio raccoglibriciole:
−Spegnere il forno;
−Lasciare che l'elettrodomestico
si rareddi completamente,
quindi rimuovere il cavo di
alimentazione dalla presa
di corrente.
li-
78
Page 79

IT
−Rimuovere il vassoio
raccoglibriciole e lavarlo
con acqua calda e sapone.
−Asciugare completamente
il vassoio prima di reinserirlo
saldamente in posizione.
AVVISO AI CLIENTI IN
MERITO AI DISPOSITIVI
DI ARCHIVIAZIONE
Al ne di orire un servizio
migliore ai nostri clienti, nei nostri
prodotti è stato inserito un
dispositivo di archiviazione
interno. Questo dispositivo di
archiviazione è costituito da
un piccolo chip che raccoglie
determinate informazioni sul
tuo apparecchio, tra cui la
frequenza e il modo in cui lo
utilizzi. Se il prodotto necessita
di assistenza, le informazioni
raccolte dal chip ci permetteranno
di ripararlo in modo rapido
ed eciente. Le informazioni
raccolte costituiscono inoltre una
risorsa preziosa per lo sviluppo
di futuri elettrodomestici che
ci consentiranno di soddisfare
al meglio le esigenze dei
nostri consumatori. Il chip non
raccoglie alcuna informazione
riguardante le persone che
utilizzano il prodotto o il nucleo
familiare in cui viene utilizzato. In
caso di domande relative al chip
del dispositivo di archiviazione,
è possibile contattarci all'indirizzo
privacy@sageappliances.com.
ATTENZIONE
PER RIDURRE IL RISCHIO
DI INCENDIO, SCOSSA
ELETTRICA, ESPOSIZIONE
A ECCESSIVE RADIAZIONI
UV O LESIONI:
• Scollegare sempre il forno
e lasciare rareddare completamente tutti i componenti
(compreso
l'alloggiamento della
lampadina, la copertura in vetro
e l'involucro) prima di sostituire
la lampadina.
• Utilizzare solo lampadine di
tipo G9 da 25 Watt, voltaggio:
220-240 V.
• Utilizzare sempre un panno
morbido quando si maneggia
la lampadina e non toccare
direttamente la supercie, poiché
il sebo presente sulla pelle può
danneggiare la lampadina.
• Non guardare direttamente
la lampadina incandescente.
• Non continuare a esporre
la pelle alla luce se si avverte
calore.
• Tenere la lampadina lontana
da materiali che potrebbero
incendiarsi.
• La lampadina si scalda
rapidamente.
Per accendere la luce, usare
sempre l'apposito pulsante.
CONSERVARE QUESTE ISTRUZIONI
79
Page 80

• Non utilizzare la luce se
l'alloggiamento della lampadina,
la copertura in vetro, il ltro UV
o l'involucro sono danneggiati
o non si trovano nella posizione
corretta.
Questo simbolo indica
che l'apparecchio non può
essere smaltito con i riuti
domestici comuni. Deve essere
conferito presso un centro di
smaltimento locale specializzato
o presso un rivenditore che
fornisce questo servizio.
Per ulteriori informazioni,
contattare l'ucio comunale
locale.
Questo simbolo indica che
la temperatura delle superci
accessibili potrebbe essere
elevata quando l'apparecchio
è in funzione e anche per un certo
periodo di tempo dopo l'utilizzo.
Per proteggersi dalle
scariche elettriche, non
immergere la spina, il cavo di
alimentazione o l'elettrodomestico
in acqua o in qualsiasi liquido.
80
Page 81

IT
TEMP
Darkness
TIME
Slices
FUNCTION
START/CANCEL
Componenti
A
B
C
D
E
A. Teglia antiaderente per pizza da 30 cm
B. Griglia
C. Grill da forno
D. Teglia smaltata 28 x 33,5 cm
E. Cestino per la frittura ad aria
G H
F
I
F. Luce del forno
G. Maniglia sportello
H. Prese di ventilazione
I. Vassoio raccoglibriciole
Informazioni sui valori nominali
220-240 V ~ 50 Hz 2000-2400 W
81
Page 82

K
MSHM
L
S
M
N
Accessori venduti separatamente:
K. Display LCD
L.
Manopola FUNCTION (funzione)
M.
Manopola TEMP (temperatura)/
Controllo doratura toast e bagel
N. Manopola TIME (tempo)/Selezione toast
o bagel
O.
O
P
Q
R
Pulsante START/CANCEL (avvia/annulla)
P.
Pulsante LUCE FORNO
Q.
Pulsante CONVEZIONE
R.
Pulsante SURGELATI
S.
Pulsante di conversione della temperatura
Bamboo Cutting Board
Pietra per pizza Teglia per pizza croccante
82
Page 83

Funzioni
SHMMSHM
IT
PREPARAZIONE DEL FORNO
PER L'USO
Prima di utilizzare il prodotto per la prima volta,
lasciare acceso il forno vuoto per 20 minuti per
rimuovere eventuali sostanze protettive sugli
elementi riscaldanti. Assicurarsi che l'ambiente
sia ben ventilato poiché il forno potrebbe emettere
vapori. Si tratta di vapori innocui che non
pregiudicano le prestazioni dell'elettrodomestico.
1. Rimuovere e smaltire in sicurezza tutti
i materiali di imballaggio e le etichette
promozionali dal forno.
2. Rimuovere il vassoio raccoglibriciole, la griglia,
il grill da forno, la teglia, il cestino per la frittura
ad aria e la teglia per pizza dalla confezione
di polistirolo. Lavare con acqua tiepida
e sapone usando una spugna morbida,
quindi sciacquare e asciugare a fondo.
3. Pulire l'interno del forno con una spugna
morbida e umida. Asciugare a fondo.
4. Posizionare il forno su una supercie piana
e asciutta. Assicurarsi che vi sia una distanza
minima di 10 cm di spazio su entrambi i lati
dell'apparecchio e di 15 cm al di sopra di esso.
5. Inserire il vassoio raccoglibriciole nel forno.
6. Svolgere completamente il cavo di alimentazione
e inserire la spina di alimentazione in una presa
di corrente.
7. I
l forno emetterà un segnale acustico e il
display LCD si illuminerà. Imposta la lingua
desiderata. Per istruzioni su come selezionare
la lingua, consultare l'apposita sezione
a pagina 86.
8. Ruotare la manopola
(avvia/annulla) verso destra nché l'indicatore
non raggiunge la funzione PIZZA.
START/CANCEL
9. Premere il pulsante START/CANCEL (avvia/
annulla). La retroilluminazione del pulsante
si illuminerà in rosso, il display LCD si illuminerà
in arancione e il forno emetterà un segnale
acustico.
10. Sul display LCD lampeggerà la scritta
"PREHEATING" (preriscaldamento). Una
volta terminata la fase di preriscaldamento,
il forno emetterà un segnale acustico.
11. Il timer viene visualizzato e inizia
automaticamente il conteggio alla rovescia.
12. Al termine del ciclo di cottura, il forno emette
un segnale acustico, il pulsante
CANCEL (avvia/annulla) si spegne e il display
LCD si illumina in blu.
13. Il forno è ora pronto per l'uso.
ELEMENT IQ
Il forno Smart OvenTM Air Fryer di Sage presenta
Element IQTM, una tecnologia di cottura che crea
l'ambiente più adatto alla ricetta che stai preparando.
Indirizza il calore nei punti e nei tempi giusti per
raggiungere la temperatura ideale e ottenere
un calore omogeneo o intenso.
Ciascuna delle funzioni del forno è preimpostata
con le congurazioni degli elementi riscaldanti
consigliate e le temperature più adatte, basate
su ricette e test. È consigliabile comunque
sperimentare le impostazioni a seconda della
ricetta, della quantità di cibo e del gusto personale.
TM
START/
M
83
Page 84

PANORAMICA DELLE FUNZIONI DEL FORNO
Funzione
Toast
(tostatura)
Bagel
Pizza
Grill
(griglia)
Bake
(cottura al forno)
Roast (arrosto)
Air Fry
(frittura ad aria)
Reheat
(riscalda)
Keep warm
(mantieni caldo)
Slow cook
(cottura lenta)
POSIZIONE
CONSIGLIATA PER LA
IMPOSTAZIONI
OPZIONALI
PRE-IMPOSTAZIONI
GRIGLIA
Media
Media
Media
Surgelati
Surgelati
Super
convezione
Convezione
Conversione
della
temperatura
Doratura 4
Fette 4
Doratura 4
Fette 4
210 °C
Convezione
Surgelati
20 MIN
Surgelati
Sopra HI (alto)
Sotto
Super
convezione
Convezione
10 MIN
160 °C
Convezione
30 MIN
Conversione
della
temperatura
Sotto
Super
convezione
Convezione
180 °C
Convezione
1 ORA
Conversione
della
temperatura
Sopra
Super
convezione
Conversione
della
temperatura
220 °C
15 MIN
Super
convezione
Surgelati
Sotto
Sotto
Sotto
Convezione
Conversione
della
temperatura
Convezione
Conversione
della
temperatura
Convezione
160 °C
Convezione
15 MIN
70 °C
Impostazione
KEEP WARM
(mantieni caldo)
1 ORA
HI (alto)
Convezione
4 ORE
PRE-
INTERVALLO
RISCALDAMENTO
No Doratura 1-7
No Doratura 1-7
Sì 160 °C - 230 °C
No HI-MED-LO (alto,
Sì Fino a 120 °C
Sì Sopra i 120 °C =
No 160 °C - 230 °C
Sì 70 °C - 160 °C
No 50 °C - 120 °C
No LO (basso) =
Fette 1-6
Fette 1-6
Fino a 2 ORE
medio, basso)
Fino a 20 MIN
e oltre = da 1 MIN
a 2 ORE
Sotto i 120 °C =
da 1 MIN
a 10 ORE
da 1 MIN a 2 ORE
Sotto i 120
°C = da 1 MIN
a 10 ORE
Fino a 1 ORA
Fino a 2 ORE
Fino a 2 ORE
da 4 a 10 ORE
HI (alto) = da 2
a 8 ORE
84
Page 85

IT
MANOPOLA
i
Guida rapida
UTILIZZO DEL FORNO SAGE
1. Posizionare la griglia in modo che i raggi
siano rivolti verso l'alto e inserirla nel ripiano
desiderato. I ripiani sono identicati da pratiche
indicazioni stampate sullo sportello del forno.
2. Ruotare la manopola FUNCTION (funzione)
no a quando l'indicatore sul display LCD mostra
l'impostazione desiderata.
3. Il display indica la temperatura di cottura
predenita per l'impostazione selezionata.
Ruotare la manopola della temperatura
verso sinistra per ridurre la temperatura o verso
destra per aumentarla.
MANOPOLA
TEMPERATURA
RUOTA
RIDUCI
4. Il display indica il tempo di cottura predenito
per l'impostazione selezionata. Ruotare la
manopola del tempo verso sinistra per
ridurre il tempo di cottura o verso destra
per aumentarlo.
TEMPO
AUMENTA
RUOTA
RIDUCI
AUMENTA
5. P
er le impostazioni che non prevedono un ciclo
di preriscaldamento (TOAST, BAGEL, GRILL,
KEEP WARM, SLOW COOK), posizionare
il cibo direttamente sulla griglia o nel cestino
per la frittura ad aria, sulla teglia per pizza, sul
grill da forno e/o sulla teglia per arrosto inclusi.
Assicurarsi che gli alimenti siano posizionati
al centro nel forno per ottenere la cottura più
uniforme possibile.
6. Chiudere lo sportello del forno.
7. Premere il pulsante
(avvia/annulla).
La retroilluminazione del pulsante si illuminerà
in rosso, il forno emetterà un segnale acustico
e il display LCD si illuminerà in arancione.
8. Il timer viene visualizzato e inizia il conteggio
alla rovescia. La temperatura e il tempo di cottura
possono essere regolati durante il ciclo di cottura.
9. Per le impostazioni che prevedono un ciclo
di preriscaldamento (BAKE, ROAST, PIZZA,
AIR FRY), premere il tasto START/CANCEL
(avvia/annulla) prima di inserire gli alimenti
nel forno. La retroilluminazione del pulsante
si illuminerà di rosso, il forno emetterà un
segnale acustico e il display LCD mostrerà
la scritta "PREHEATING" (preriscaldamento)
lampeggiante mentre il forno si riscalda.
a) Quando il forno è pronto per l'uso, la scritta
lampeggiante "PREHEATING" si spegne,
il forno emette un segnale acustico e il timer
inizia il conto alla rovescia. Posizionare il cibo
direttamente sulla griglia o nel cestino per la
frittura ad aria, sulla teglia per pizza, sul grill
da forno e/o sulla teglia inclusi. Assicurarsi che
gli alimenti siano posizionati al centro nel forno
per ottenere la cottura più uniforme possibile.
b) Chiudere lo sportello del forno.
c) Il timer proseguirà il conteggio alla rovescia.
La temperatura e il tempo di cottura possono
essere regolati durante il ciclo di cottura.
10. Al termine del ciclo di cottura, il forno emette un
segnale acustico, il pulsante
(avvia/annulla) si spegne e il display LCD
si illumina in blu.
START/CANCEL
START/CANCEL
85
Page 86

NOTA
Il ciclo di cottura può essere sosp
momento premendo il pulsante START/CANCEL
(avvia/annulla). In questo modo il ciclo viene
annullato e il pulsante retroilluminato diventa blu.
eso in qualsiasi
NOTA
Premere il pulsante CONVEZIONE per
scegliere tra le opzioni senza convezione, con
convezione o super convezione. La convezione
e la super convenzione permettono di regolare la
temperatura per compensare la velocità del usso
d'aria. La super convezione permette di ottenere
risultati più croccanti.
ESPULSIONE AUTOMATICA
DELLA GRIGLIA
Se inserita nel ripiano centrale, la griglia verrà
spinta automaticamente per metà fuori dal forno
all'apertura dello sportello, in modo da permettere
di rimuovere facilmente il cibo cotto.
Aprire lo sportello sempre lentamente quando
la griglia è inserita in questo ripiano per evitare
che venga spinta fuori troppo rapidamente.
SELEZIONE LINGUA
Quando il forno viene utilizzato per la prima volta,
è possibile selezionare la lingua desiderata.
Ruotare le manopole
o TIME (tempo), in senso orario o antiorario,
per selezionare la lingua desiderata, quindi
premere il tasto START/CANCEL per confermare
la selezione. Se la lingua desiderata non viene
confermata entro 5 minuti, il forno salverà
automaticamente la lingua predenita.
Per modicare la lingua selezionata, premere
il tasto
LCD visualizzerà le lin
Ruotare le manopole TEMP (temperatura)
o TIME (tempo), in senso orario o antiorario,
per selezionare la lingua desiderata, quindi
premere il tasto START/CANCEL per confermare
la selezione. Se la lingua desiderata non viene
confermata entro 5 minuti, il forno tornerà
automaticamente all'ultima lingua salvata.
Il segno di spunta
SURGELATI per 3 secondi. Il display
TEMP (temperatura)
gue da selezionare.
indica la lingua selezionata.
86
Page 87

IT
SOSTITUIRE LA LAMPADINA
DEL FORNO
ATTENZIONE
Scollegare sempre il forno e lasciarlo rareddare
prima di sostituire la lampadina. Utilizzare solo
lampadine di tipo G9 da 25 Watt con voltaggio
220-240 V.
1. Rimuovere la griglia dal forno prima di sostituire
la lampadina.
2. La lampadina è collocata sul lato sinistro della
cavità del forno. Posizionare le dita all'esterno
dell'alloggiamento della lampadina e tirare
delicatamente allontanando la copertura in
vetro dalla parete del forno per rimuoverla.
Se non si riesce a rimuovere la copertura,
far scorrere un cucchiaio nel lato sinistro
dell'alloggiamento della lampadina e sollevare
delicatamente la copertura in vetro. Reggere
sempre la copertura in vetro con una mano
per evitare che cada e si rompa.
4. Utilizzare un panno morbido per inserire la
lampadina nuova.
Non toccare direttamente la supercie della
lampadina con le dita poiché il sebo presente
sulla pelle può danneggiarla.
5. Per reinserire la copertura in vetro, allineare
il gancio di metallo con il lato sinistro
dell'alloggiamento della lampadina. Far
scorrere l'estremità opposta della copertura
in vetro nel supporto metallico sul lato destro
dell'alloggiamento, quindi spingere il gancio
di metallo nel lato sinistro dell'alloggiamento
no a udire uno scatto.
3. Rimuovere la lampadina usata tirandola
direttamente fuori dal supporto.
NOTA
Durante e dopo il funzionamento, la parte
superiore
si sconsiglia di collocare oggetti sopra il forno.
L'unica eccezione è costituita dagli accessori
o
di Sage che si inserisce nella sezione dedicata
sopra il forno. Per ulteriori informazioni visitare
il sito
del forno è molto calda. Di conseguenza,
pzionali Bamboo Cutting Board e da Serving Tray
www.sageappliances.com.
87
Page 88

Manutenzione
e pulizia
Prima di eseguire la pulizia, assicurarsi che il forno
sia spento staccando la spina dalla presa
alimentazione. Lasciare rareddare completamente
il forno e tutti gli accessori prima di smontarli e pulirli.
di
Pulizia del corpo esterno e dello sportello
1. Pulire il corpo esterno con una spugna morbida
e umida. Per evitare l'accumulo di macchie
è possibile utilizzare un detergente liquido
non abrasivo o una soluzione spray leggera.
Applicare il detergente sulla spugna, non sulla
supercie del forno, prima di pulire.
2. Per pulire lo sportello in vetro, utilizzare un
detergente per vetri o un detergente delicato
e una spugna morbida inumidita o un panno
morbido in plastica. Non utilizzare detergenti
abrasivi o spugne metalliche in quanto
potrebbero danneggiare la supercie del forno.
3. Pulire il display LCD con un panno morbido
umido. Applicare il detergente sul panno, non
sulla supercie del display LCD. La pulizia con
un panno asciutto o detergenti abrasivi può
graare la supercie.
4. Lasciare asciugare completamente tutte
le superci prima di inserire la spina di
alimentazione in una presa di corrente
e accendere il forno.
ATTENZIONE
Non immergere il corpo del prodotto, il cavo di
alimentazione o la spina in acqua o in altro liquido;
ciò potrebbe causare una scossa elettrica mortale.
Pulizia dell'interno
Le pareti interne del forno sono dotate di un
rivestimento antiaderente per facilitare la pulizia.
Per pulire eventuali schizzi che si possono vericare
durante la cottura, pulire le pareti con una spugna
morbida e umida. Per evitare l'accumulo di macchie
è possibile utilizzare un detergente liquido non
abrasivo o una soluzione spray leggera. Applicare
il detergente sulla spugna, non sulla supercie del
forno, prima di pulire. Evitare di toccare gli elementi
riscaldanti al quarzo.
ATTENZIONE
Usare estrema cautela durante la pulizia degli
elementi riscaldanti al quarzo. Lasciare che il
forno si rareddi completamente, quindi stronare
delicatamente una spugna o un panno morbidi e
umidi lungo l'elemento riscaldante. Non utilizzare
detergenti di alcun tipo. Lasciare asciugare
completamente tutte le superci prima di inserire
la spina di alimentazione in una presa di corrente
e accendere il forno.
Pulizia del vassoio raccoglibriciole
1. Dopo ogni utilizzo, estrarre il vassoio
raccoglibriciole e svuotarlo. Pulire il vassoio
con una spugna morbida e umida. Per evitare
l'accumulo di macchie è possibile utilizzare
un detergente liquido non abrasivo. Applicare
il detergente sulla spugna, non sul vassoio,
prima di pulire. Asciugare a fondo.
2. Assicurarsi sempre di reinserire il vassoio
raccoglibriciole nel forno con lo sportello
chiuso, dopo averlo pulito e prima di inserire
la spina di alimentazione in una presa di
corrente e accendere il forno.
3. Assicurarsi sempre di reinserire il vassoio
raccoglibriciole nel forno con lo sportello
chiuso, dopo averlo pulito e prima di inserire la
spina di alimentazione in una presa di corrente
e accendere il forno.
Pulizia della griglia, del grill da forno,
della teglia e della teglia per pizza
1. Lavare tutti gli accessori in acqua calda
e sapone con una spugna morbida o un panno
di plastica morbido. Sciacquare e asciugare
completamente. Non utilizzare detergenti
abrasivi, spugne metalliche o utensili di metallo
per pulire gli accessori in quanto potrebbero
danneggiare le superci.
2. Per prolungare la durata degli accessori
si sconsiglia di lavarli in lavastoviglie.
88
Page 89

Conservazione
1. Assicurarsi che il forno sia spento staccando la
spina di alimentazione dalla presa di corrente.
2. Lasciare rareddare completamente il forno
e tutti gli accessori prima di smontarli e pulirli.
3. Assicurarsi che il forno e tutti gli accessori
siano puliti e asciutti.
4. Assicurarsi che il vassoio raccoglibriciole
sia inserito nel forno e che il grill da forno sia
collocato all'interno della teglia e posizionato
sulla griglia nel ripiano centrale.
5. Assicurarsi che lo sportello sia chiuso.
6. Conservare l'elettrodomestico in posizione
verticale e piana sulle gambe di supporto.
Non riporre nulla sopra l'apparecchio. L'unica
eccezione è costituita dagli accessori opzionali
Bamboo Cutting Board e Serving Tray di Sage.
IT
89
Page 90
Risoluzione
dei problemi
POSSIBILE
SOLUZIONE SEMPLICE
PROBLEMA
Il forno non si accende • Vericare che la spina sia inserita correttamente nella presa
Il display LCD si è spento • Il forno entra in modalità standby se non viene utilizzato per
La pizza non cuoce
in modo uniforme
La griglia viene spinta
troppo fuori all'apertura
dello sportello
Non è possibile selezionare
il pulsante
SURGELATI
di alimentazione.
• Inserire la spina di alimentazione in una presa di corrente
indipendente.
• Inserire la spina di alimentazione in una presa di corrente diversa.
• Resettare il quadro elettrico, se necessario.
10 minuti. In modalità standby il display LCD si spegnerà, tuttavia
tutte le opzioni delle funzione saranno comunque visibili.
• Per riattivare il forno, premere il tasto
annulla) sul pannello di controllo o ruotare una manopola qualsiasi.
Il display LCD si illuminerà nuovamente.
• Alcune pizze di grandi dimensioni possono cuocersi in modo
non uniforme in forni compatti. Aprire lo sportello del forno a metà
del tempo di cottura e ruotare la pizza di 180 gradi per una doratura
più uniforme.
• Aprire lo sportello sempre lentamente e con cautela quando
la griglia è inserita nel ripiano centrale per evitare che venga spinta
fuori troppo rapidamente.
• Il pulsante
seguenti funzioni: TOSTURA, BAGEL, COTTURA AL FORNO,
PIZZA, FRITTURA AD ARIA. Selezionando il pulsante
SURGELATI, il tempo di cottura viene regolato automaticamente per
ottenere il risultato migliore.
SURGELATI può essere selezionato solo con le
START/CANCEL (avvia/
Dalla parte superiore dello
sportello fuoriesce vapore
Gli elementi riscaldanti
sembrano pulsare
Da sotto lo sportello
gocciola acqua sul ripiano
90
• Questo fa parte del normale funzionamento dell'apparecchio.
Lo sportello è dotato di prese d'aria per liberare il vapore generato
da alimenti ad alto contenuto di umidità come il pane surgelato.
Attenzione: il vapore può essere molto caldo.
TM
• Il sistema Element IQ
del forno inviando in maniera intermittente brevi scariche
di energia negli elementi riscaldanti. Questo fa parte del normale
funzionamento dell'apparecchio.
• Questo fa parte del normale funzionamento dell'apparecchio.
La condensa creata da alimenti ad alto contenuto di umidità come
il pane surgelato scivola lungo la supercie interna dello sportello
e può gocciolare sul ripiano dove poggia l'elettrodomestico.
controlla accuratamente il calore all'interno
Page 91

IT
POSSIBILE
SOLUZIONE SEMPLICE
PROBLEMA
La temperatura mostrata
sul display LCD non
corrisponde alla
temperatura rilevata
all'interno del forno.
Il segnale acustico del
preriscaldamento viene
emesso a una temperatura
più bassa di quella
mostrata sul display LCD.
Il display LCD mostra "E01" • IL display LCD mostrerà "E01" quando l'apparecchio rileva un
• Per garantire che le misurazioni siano standardizzate, le temperature
del forno sono state calibrate sulla posizione TOAST (al centro
del ripiano centrale senza vassoio). Ricontrollare la temperatura in
questa posizione, assicurandosi di non aprire lo sportello del forno
per 30 minuti poiché il calore si disperde ogni volta che viene aperto
lo sportello. Si noti che il segnale acustico del preriscaldamento viene
emesso una volta raggiunto il 75% della temperatura desiderata.
• Il segnale acustico di preriscaldamento suona al 75% della
temperatura desiderata. Ciò garantisce la combinazione più rapida
per il tempo di preriscaldamento e di cottura.
• Infatti, quando il segnale acustico di preriscaldamento viene emesso
segnalando all'utente di aprire lo sportello del forno e inserire gli
alimenti, all'interno del forno si verica un forte calo di temperatura.
Se il segnale acustico venisse emesso al 100% della temperatura
desiderata, l'apertura dello sportello determinerebbe un grosso
spreco in termini di tempo di attesa. È stato calcolato che se
l'apertura dello sportello e il posizionamento degli alimenti
all'interno del forno avvengono al 75% della temperatura
desiderata, è possibile raggiungere la temperatura desiderata più
velocemente, risparmiando no a due minuti. Questo è il motivo per
cui quando viene emesso il segnale acustico di preriscaldamento
la temperatura sul display LCD non corrisponde alla temperatura
desiderata. A seconda della temperatura selezionata, il forno
impiega circa 8-10 minuti dall'avvio per raggiungere la temperatura
desiderata, considerando anche l'apertura dello sportello quando
suona il segnale di preriscaldamento.
errore non ripristinabile. In questo caso, scollegare subito il cavo
di alimentazione dalla presa di corrente e contattare il servizio
di assistenza Sage.
Il display LCD mostra "E02" • Il display LCD mostrerà "E02" quando l'apparecchio rileva un
Il display LCD mostra "E03" • Il display LCD mostrerà "E03" quando la temperatura del forno
Il display LCD mostra "E05" • Il display LCD mostrerà "E05" quando l'apparecchio rileva
La temperatura cambia
quando si preme il pulsante
di convezione
errore non ripristinabile. In questo caso, scollegare subito il cavo
di alimentazione dalla presa di corrente e contattare il servizio
di assistenza Sage.
supera il limite massimo impostato. Scollegare il cavo di alimentazione
dalla presa di corrente, lasciare che l'elettrodomestico si rareddi
per 15 minuti, quindi collegarlo nuovamente alla presa.
• Se il messaggio "E03" non scompare, contattare il servizio
di assistenza Sage.
un errore
di alimentazione
di assistenza Sage.
• Questo fa parte del normale funzionamento dell'apparecchio.
La temperatura è calibrata per compensare la ventola di convezione
e ottenere una cottura ottimale.
non ripristinabile. In questo caso, scollegare subito il cavo
dalla presa di corrente e contattare il servizio
91
Page 92

Garanzia
GARANZIA LIMITATA DI 2 ANNI
Sage Appliances ore una garanzia per l'utilizzo
domestico di questo prodotto in speciche aree
geograche; la copertura è di 2 anni a partire
dalla data di acquisto. La garanzia copre eventuali
malfunzionamenti causati da difetti di fabbricazione
o dei materiali. Durante il periodo coperto dalla
garanzia, Sage Appliances sarà tenuta a riparare
o sostituire i prodotti difettosi o a rimborsare l'importo
a essi corrispondente (a sola discrezione di Sage
Appliances).
Tutti i diritti di garanzia previsti dalla legislazione
nazionale applicabile verranno rispettati
e non possono essere annullati dalla presente
garanzia. Per tutti i termini e le condizioni della
garanzia e per istruzioni su come inviare
una richiesta di risarcimento, visitare il sito
www.sageappliances.com.
92
Page 93
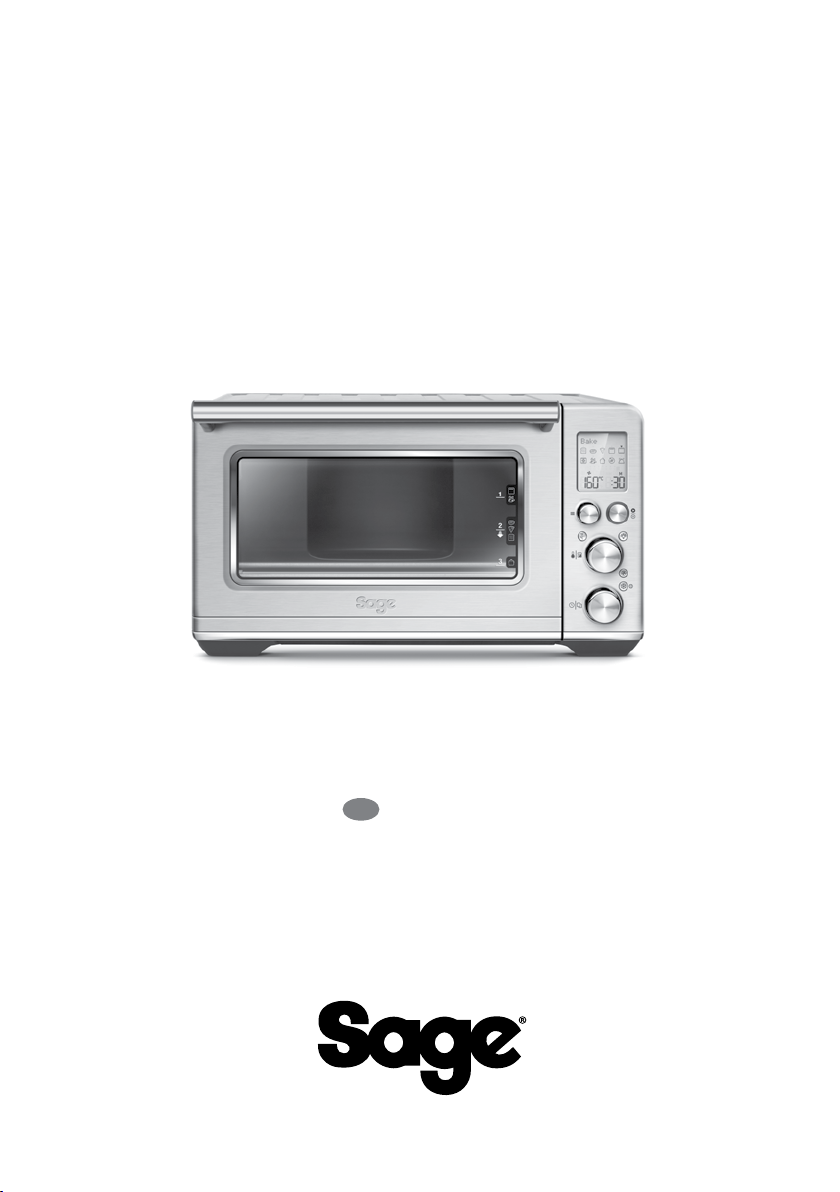
the Smart Oven
TM
Air Fryer
ES
GUÍA RÁPIDA
Page 94

Índice
94 Sage® recomienda seguridad
ante todo
99 Componentes
101 Funciones
103 Guía de inicio rápido
106 Cuidado y limpieza
108 Resolución de problemas
110 Garantía
SAGE®
RECOMIENDA
SEGURIDAD
ANTE TODO
En Sage® nos preocupa
mucho la seguridad.
Para el diseño y la fabricación
de nuestros productos de
consumo tenemos en cuenta
antes que nada la seguridad
de nuestros clientes, como
tú. También te rogamos que
actúes cuidadosamente
al usar cualquier aparato
eléctrico y que tomes las
precauciones siguientes.
MEDIDAS
DE SEGURIDAD
IMPORTANTES
LEE TODAS LAS INSTRUCCIONES ANTES DEL USO
Y GUÁRDALAS
• Hay una versión de este
documento disponible en
sageappliances.com para
descargar.
• Antes de usar el producto
por primera vez, asegúrate
de que la tensión de la toma
de corriente coincida con la que
gura en la etiqueta en la base
del aparato.
• Retira y desecha de forma
segura cualquier material
de embalaje y etiquetas
promocionales antes de usar
el horno por primera vez.
• Para evitar riesgos de asxia
de niños pequeños, retira
y desecha de forma segura
la cubierta protectora colocada
en el enchufe de alimentación.
• No uses el aparato cerca del
borde de una mesa de trabajo
o mesa. Asegúrate de que la
supercie sea estable, nivelada,
resistente al calor y que esté
limpia.
• Puede producirse un incendio
si el horno está cubierto
o en contacto con materiales
inamables, como cortinas,
paredes empapeladas
94
Page 95

ES
y similares, mientras está
en funcionamiento.
• No uses el aparato cerca de
un quemador de gas o eléctrico,
ni donde pueda entrar en
contacto con un horno o super-
cie caliente.
• Evita que el cable de alimentación sobresalga del borde
de una encimera o de una
mesa, o que toque supercies
calientes.
• Este horno no es apto para
usarse en módulos o armarios
diseñados para aparatos
pequeños. Asegúrate de dejar
el espacio adecuado alrededor
del horno. Se recomienda un
espacio mínimo de 10 cm.
• El exterior del horno podría
estar caliente durante el funcionamiento e incluso una vez
nalizada la cocción. No toques
las supercies calientes.
Mantén en todo momento los
cables de alimentación de este
y cualquier otro aparato alejados
de la carcasa del horno.
• No toques las supercies
calientes. Para evitar quemaduras, ten mucho cuidado
al retirar las fuentes, los platos
y los accesorios, como la rejilla
y la fuente para horno incluidas,
que contengan aceite caliente
u otros líquidos calientes.
• No coloques utensilios de
cocina, bandejas para horno o
platos sobre la puerta de vidrio.
• No dejes la puerta abierta
durante largos períodos
de tiempo.
• No almacenes ningún artículo
sobre el horno cuando esté
en funcionamiento, excepto
los que se describen en la
página 107 de este manual.
• No coloques cartón, plástico,
papel u otros materiales
inamables en el horno.
• No cubras la bandeja recogemigas ni ninguna parte del horno
con papel de aluminio.
Esto haría que el horno se
sobrecaliente.
• Se debe tener precaución
al usar fuentes y platos hechos
de materiales que no sean de
metal. Asegúrate de que las
fuentes y los platos sean aptos
para el horno antes de usarlos
en el horno.
• Se debe tener precaución
al usar tapas en el horno, ya que
el aumento de presión en una
bandeja o plato cubierto puede
hacer salir los ingredientes
calientes o que el plato se
rompa. No coloques recipientes
sellados o herméticos en el
horno.
• No deben introducirse en
el horno alimentos de gran
tamaño ni utensilios metálicos,
ya que pueden provocar un
incendio o riesgo de descarga
eléctrica.
95
Page 96

• El uso de accesorios no
recomendados o suministrados
con este horno puede causar
lesiones.
• Este aparato es solo para
uso doméstico. No lo uses
en ningún tipo de vehículo en
movimiento. No uses el aparato
en exteriores, ni para nes
distintos al de su uso previsto.
El uso inapropiado podría
causar lesiones.
• Antes de limpiar, mover,
ensamblar, guardar o dejar el
aparato desatendido, siempre
debes apagarlo, desenchufarlo
de la toma de corriente
y esperar hasta que se haya
enfriado por completo.
• No lo limpies con estropajos
metálicos. Podrían desprenderse trocitos del estropajo
y entrar en contacto con los
componentes eléctricos, lo que
crearía un riesgo de descarga
eléctrica.
• El aparato puede ser utilizado
por niños mayores de 8 años
y personas con discapacidades
físicas o mentales, o sin experiencia ni conocimientos de
uso, siempre y cuando reciban
supervisión o instrucciones
para el uso seguro del aparato
y comprendan los riesgos implicados.
• No permitas que los niños
jueguen con el aparato.
• Los niños no deben limpiar
el aparato ni realizar tareas
de mantenimiento a menos
que sean mayores de 8 años
y lo hagan bajo la supervisión
de un adulto.
• El aparato y el cable deben
mantenerse fuera del alcance
de los niños menores de 8 años.
• Se recomienda inspeccionar
el aparato regularmente.
No utilices el aparato si el cable
de alimentación, el enchufe
o el aparato propiamente dicho
están dañados. Ante cualquier
daño o si se requiere algún tipo
de mantenimiento (que no sea
la limpieza), ponte en contacto
con el servicio de atención
al cliente de Sage o visita
sageappliances.com.
• Este aparato no está diseñado
para utilizarse con un temporizador externo u otro sistema
de control remoto.
• El aparato debe enchufarse
en una toma de corriente
con conexión a tierra.
Si no sabes si la toma de
corriente está conectada a tierra,
consulta con un electricista.
• Jamás debes modicar el
enchufe ni usar un adaptador.
• Ante cualquier duda con respecto a las instrucciones sobre
conexión a tierra o si no sabes
si el aparato está correctamente
puesto, consulta con un electri-
cista calicado.
96
Page 97

ES
• Se recomienda la instalación
de un interruptor diferencial
de seguridad para ofrecer
protección adicional al usar
todos los aparatos eléctricos.
Se recomienda instalar en el
circuito eléctrico que alimenta
el aparato un interruptor de
seguridad con una corriente
de funcionamiento residual
nominal no superior a 30 mA.
Solicita asesoramiento
profesional a un electricista.
INSTRUCCIONES ESPECÍFICAS PARA EL MODELO
SOV860
• Recomendamos que el horno
funcione en un circuito exclusivo,
separado de otros aparatos.
Consulta a un electricista auto-
rizado y calicado si no estás
seguro.
• Para apagar el horno, pulsa
el botón
Iniciar/Cancelar en el
panel de control. El horno está
apagado cuando se apaga la
retroiluminación de los botones.
• Limpia regularmente la bandeja
recogemigas. Para limpiar
la bandeja recogemigas:
−APAGA el horno.
−Deja que el horno se enfríe por
completo y luego desenchúfalo.
−Retira la bandeja recogemigas
y límpiala con agua tibia y jabón.
−Seca completamente
la bandeja antes de volver
a colocarla en su sitio.
AVISO A LOS CLIENTES
SOBRE EL ALMACENA-
MIENTO DE MEMORIA
Ten en cuenta que hemos
equipado el aparato con
almacenamiento de memoria
interna a n de ofrecer un
mejor servicio a nuestros
clientes. Este almacenamiento
de memoria consta de un
pequeño chip que recopila
cierta información sobre tu
aparato, incluidas frecuencia
y forma de uso. En el caso de
ser devuelto para su reparación,
la información recopilada del
chip nos permite brindar a tu
aparato un mantenimiento
rápido y eciente. La información
recopilada también nos ayuda
a desarrollar futuros aparatos
que satisfagan mejor las
necesidades de nuestros
clientes. El chip no recopila
ninguna información sobre los
usuarios o la vivienda donde
se usa el producto. Si tienes
alguna pregunta sobre el chip
de almacenamiento de memoria,
contáctanos escribiendo
a privacy@sageappliances.com.
97
Page 98

ADVERTENCIA
PARA REDUCIR EL RIESGO
DE INCENDIO, DESCARGA
ELÉCTRICA, EXPOSICIÓN
A RADIACIÓN UV EXCESIVA
O LESIONES A PERSONAS:
• Enchufa siempre el horno y deja
que todas las piezas (incluida
la carcasa de la bombilla,
la cubierta de vidrio y la carcasa)
se enfríen completamente antes
de sustituir la bombilla.
• Utiliza únicamente una
bombilla de horno de 25 vatios,
220–240 V, tipo G9.
• Usa siempre un paño suave
para manipular la bombilla
y no toques directamente
la supercie, ya que los aceites
naturales de la piel podrían
dañarla.
• No mires directamente a una
bombilla encendida.
• No permanezcas en la luz
si sientes la piel caliente.
• Mantén la bombilla alejada
de materiales que puedan
quemarse.
• La bombilla se calienta
rápidamente.
Para encenderla, usa únicamente el botón de la luz del
horno.
• No enciendas la luz si faltan
o están dañadas las carcasas,
la cubierta de vidrio o el ltro UV.
Este símbolo indica
que el aparato no debe
desecharse con la basura
doméstica normal. Debe llevarse
a un centro de recogida de
residuos designado por las
autoridades locales para ese n
o a una empresa que preste ese
servicio. Para obtener más
información, ponte en contacto
con los servicios municipales.
Este símbolo indica que la
temperatura de las supercies
accesibles puede ser alta
cuando el aparato está
funcionando y durante algún
tiempo después de su uso.
Para protegerte contra
una descarga eléctrica,
no sumerjas el cable de
alimentación, el enchufe o el
aparato en agua ni en ningún
líquido.
GUARDA ESTAS INSTRUCCIONES
98
Page 99

ES
TEMP
Darkness
TIME
Slices
FUNCTION
START/CANCEL
Componentes
A
B
C
D
E
A. Placa para pizza antiadherente de 30 cm
B. Rejilla
C. Rejilla para fuente
D. Fuente para horno esmaltada de 28 x 33,5 cm
E. Bandeja para fritura con aire
G H
F
I
F. Luz del horno
G. Asa de la puerta
H. Ranuras de ventilación
I. Bandeja recogemigas
Datos técnicos
220–240 V ~ 50 Hz 2000–2400 W
99
Page 100

K
MSHM
L
S
M
N
O
P
Q
R
Los accesorios se venden por separado:
K. Pantalla LCD
L.
Dial Función
M.
Dial de Temperatura, y nivel de
tostado para tostadas y bagels
N.
Dial de Tiempo, y selección de tostadas
y bagels
O.
Botón para Iniciar/Cancelar
P.
Botón para la luz del horno
Q.
Botón de convección
R.
Botón para congelados
S.
Botón de conversión de temperatura
Tabla de cortar de bambú
Piedra para pizza Placa para pizzas crujientes
100
 Loading...