

Safety 1st Guide 65, XRS 65, MightyFit 65 Instructions Manual
Guide
®
65, XRS 65, MightyFit 65
Convertible Car Seat
4358-6853 (2.16.16)
Read all instructions BEFORE USING
this child restraint.
KEEP INSTRUCTIONS FOR FUTURE USE.
rear-facing child restraint 2.3-18 kg (5-40 lb)
48-91 cm (19-36 in.)
forward-facing child restraint 10-30 kg (22-65 lb)
74-132 cm (29-52 in.)
and over 1 year old
12
F-1 Prepare to Install Rear-Facing
F-2 Prepare UAS for Rear-Facing Use
F-3 Install Rear-Facing with UAS
F-4 Install Rear-Facing with Vehicle Belts
F. Install Rear-Facing................................Pages 37-46
B. Safety Information ...........................Pages 9-11
B-1 Vehicle Seating Position
B-2 Installation in Vehicle
B-3 Child Restraint Use
B-4 Transport Canada Regulations
A. Before You Begin .................................Pages 3-8
A-1 Thank You...
A-2 DJG Consumer Relations Contact Information
A-3 Registration and Safety Notices
A-4 Understanding Your Child Restraint
C. Basic Use .............................................Pages 12-30
D. General Vehicle Installation .....Pages 31-35
D-1 Understanding Your Vehicle
D-2 Vehicle Seating Position
D-3 Choosing UAS or Vehicle Belts
D-4 Knowing Your Vehicle Belts
C-1 Choose Position for Your Child
C-2 Preparing Child Restraint to Fit Your Child
C-3 Securing Child in Child Restraint
C-4 Removing Child from Child Restraint
C-5 Accessories on Select Models
C-6 Reclining Child Restraint
C-7 Removing Harness System
C-8 Removing Seat Pad for Cleaning
C-9 Install Harness System
E. Aircraft Installation ..................................Pages 36
H. Using the Locking Clip ....................Pages 56-58
G. Install Forward-Facing..................Pages 47-55
G-1 Prepare to Install Forward-Facing
G-2 Adjusting the Tether Strap
G-3 Prepare UAS for Forward-Facing Use
G-4 Install Forward-Facing With UAS
G-5 Install Forward-Facing with Vehicle Belts
Important Information .........................Pages 59-62
Warranty
Replacement Parts Order Form
©2016 Dorel Juvenile
3
Thank you for choosing this car seat, referred to throughout
this manual as a child restraint. Dorel Juvenile Group, (DJG)
is committed to creating convenient, comfortable, and
dependable products for children.
No one can predict if use of a child restraint will prevent injury
or death in a particular crash. However, combined with careful
driving, proper use of a child restraint can lower a child’s risk
of injury or death in most crashes.
Your child’s safety is worth the time it will take to read,
understand and follow the instructions and warnings.
After reading if you still have questions or concerns with
the child restraint please contact our Consumer Relations
Department.
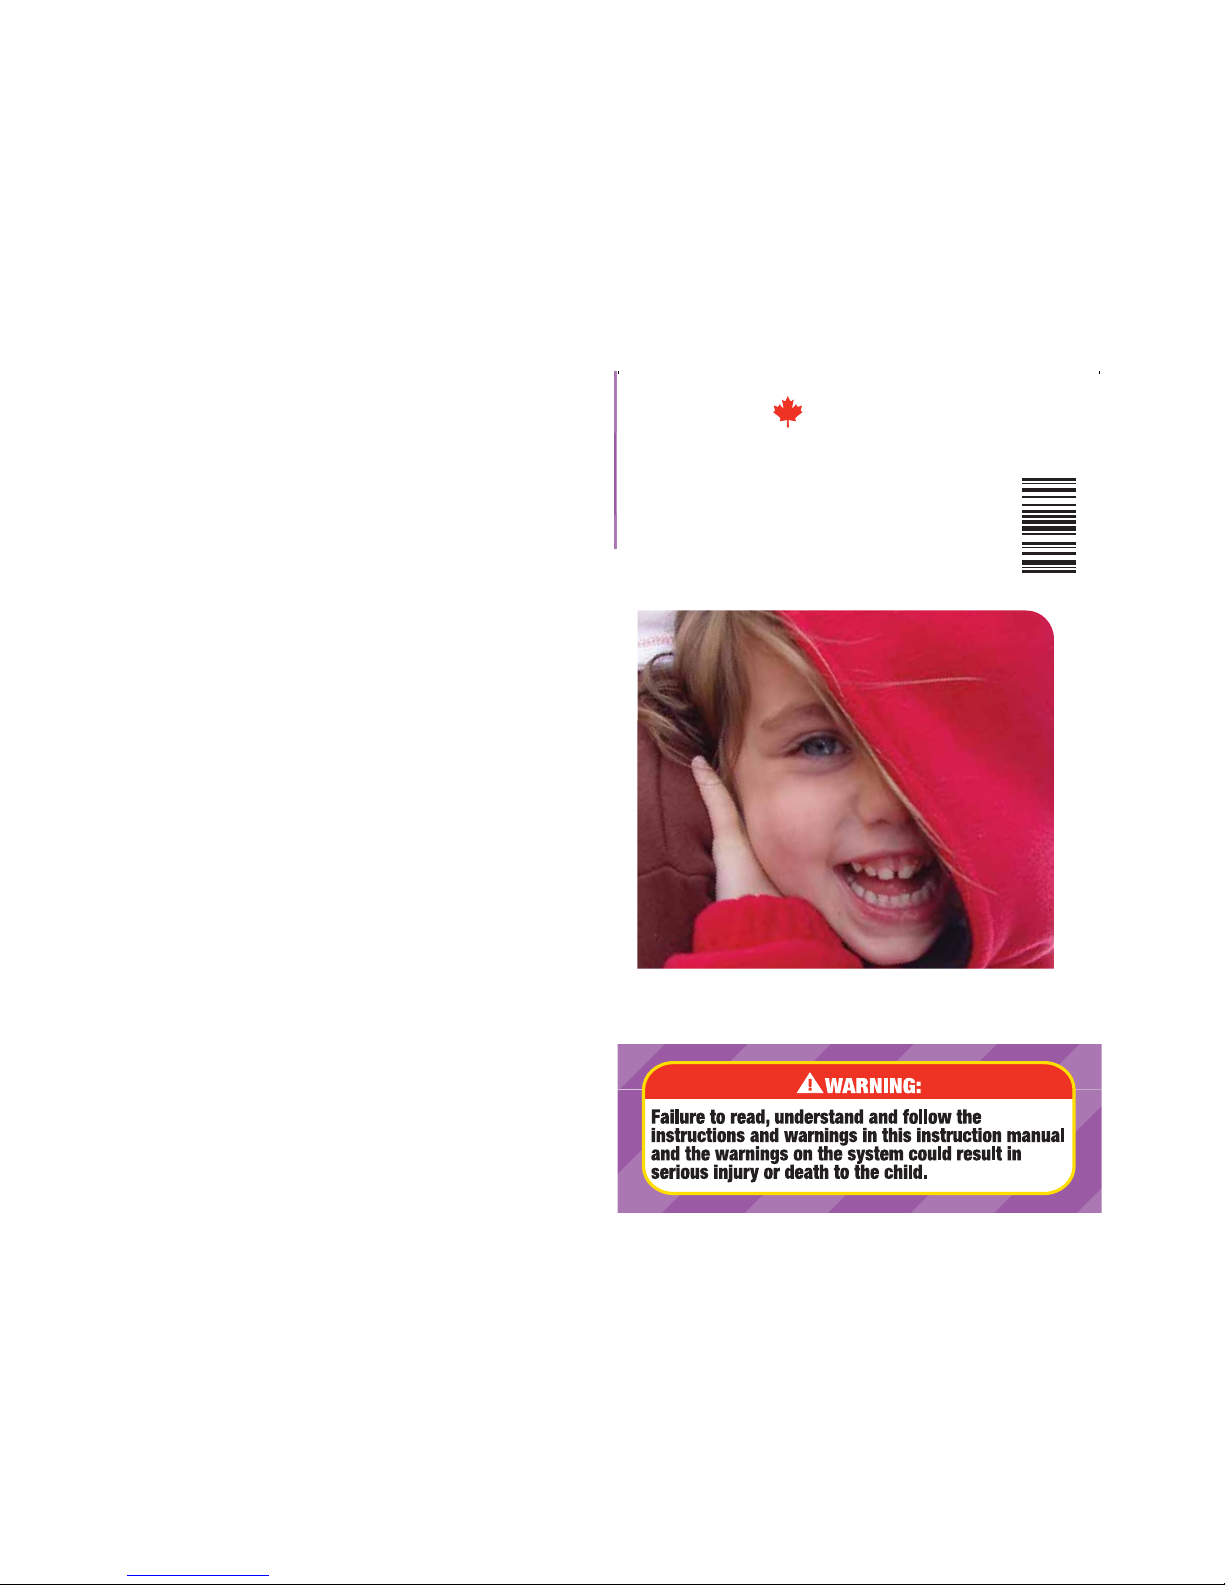
On the back of the shell there is an expiry date for use of this
child restraint. Do not use this seat after the expiry date.
Dorel Juvenile Group, Inc.
Website: www.djgusa.com
Fax: 1-800-207-8182
Mailing Address: Dorel Juvenile Group, Inc.
Attn: Consumer Relations
P.O. Box 2609
Columbus, IN 47202-2609
Telephone: 1-800-544-1108
8 A.M. to 6 P.M. EST M-TH
8 A.M. to 4:30 P.M. EST FRI
A-1 Thank You...
A-2 Dorel Juvenile Group Consumer
Relations Contact Information
4359-4117C
Consumer: Just fill in your name, address and email. Please print.
Client: Simplement inscrire votre nom, adresse et courriel. S.V.P. imprimez.
Tear Off and Mail This Part or Register Online
Your Name/Votre nom:
Your Street Address/Votre adresse:
City/Ville:
Province
Postal Code/Code Postal:
Email Address (optional)/Courriel (optionnel):
Détachez et postez cette partie ou enregistrez en ligne
Although child restraints are tested, evaluated and certified
by the manufacturer and tested by Transport Canada, it
is possible that a safety-related problem may be found. If
there is ever a safety issue with your child restraint, we use
registration information to reach owners.
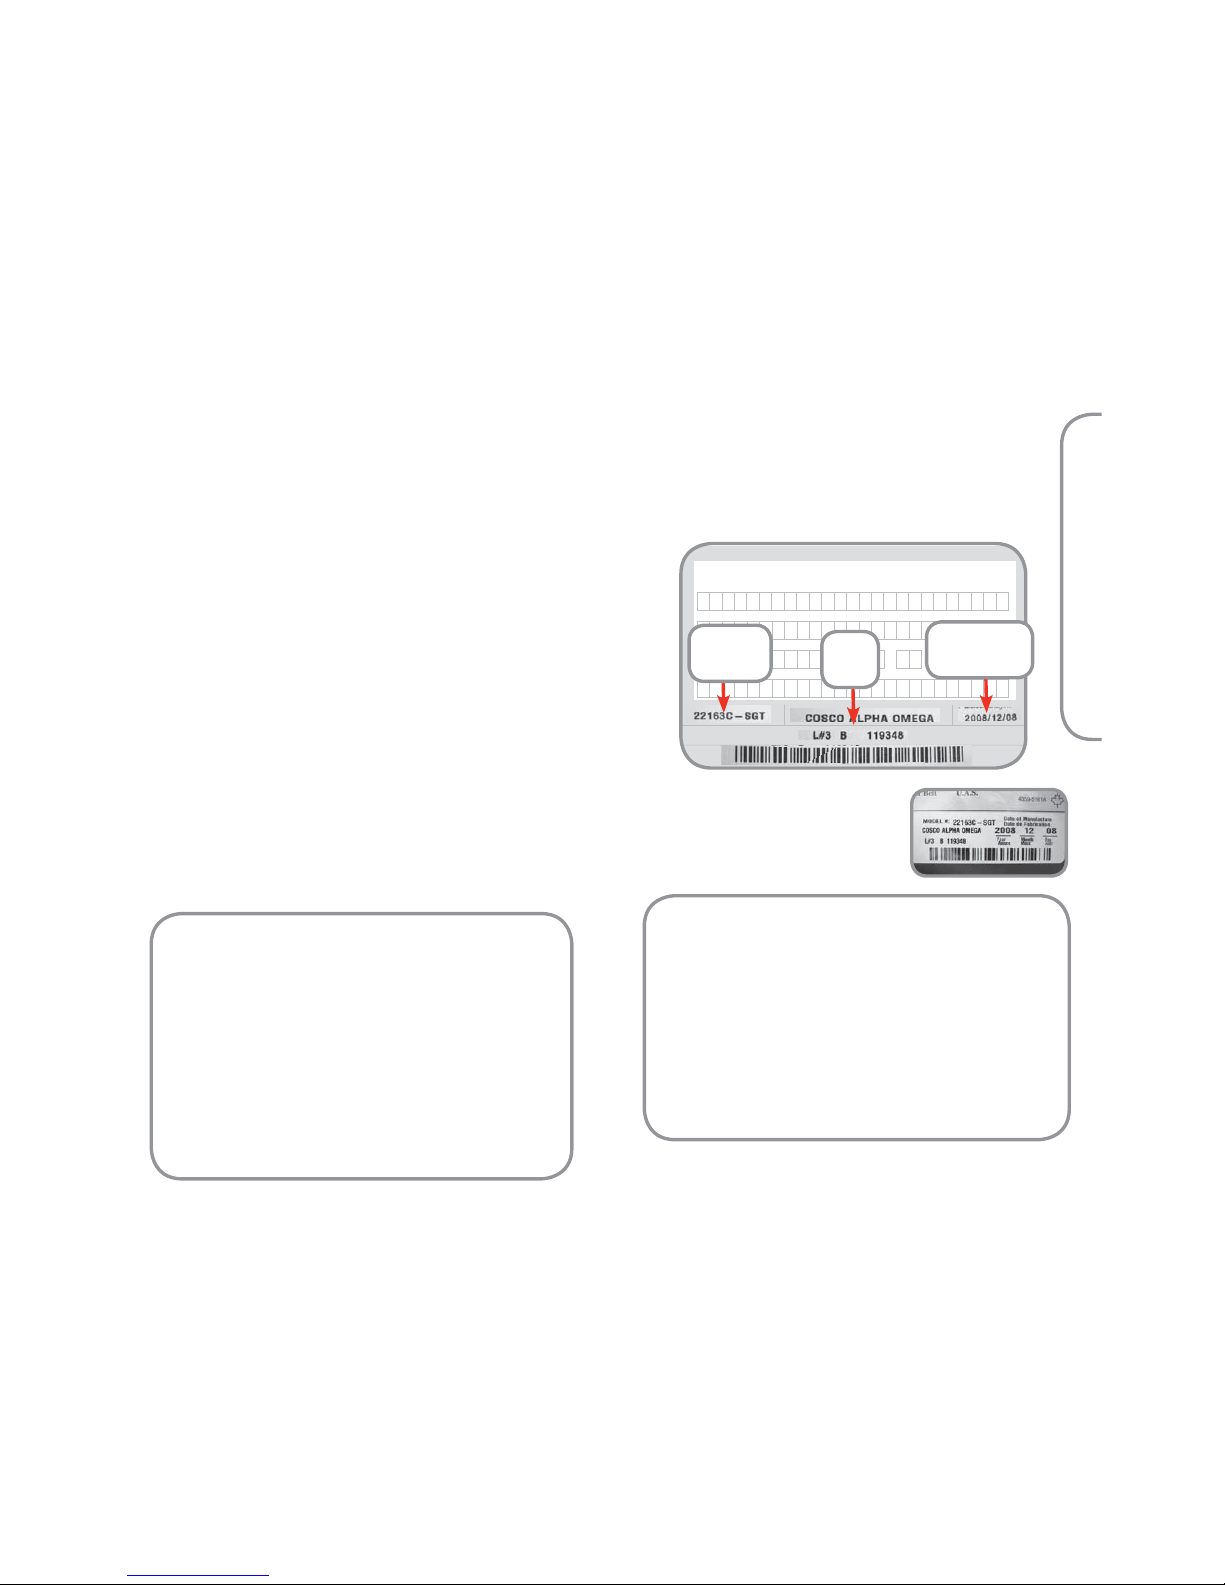
If you don’t have the card or if your
address changes, you will find the
model number and manufactured date
on the label located on the back of
shell. There are three additional ways
to register your information:
A-3 Registration and Safety Notices
For information on safety-related problems, you can also call
Transport Canada’s Road Safety Dept. at: 1-800-333-0371.
Online: www.djgusa.com/registration/carseat/can
Telephone: 1-800-544-1108
Mail: Send your name, address and your child
restraint’s model number and
manufactured date to:
Dorel Juvenile Canada
2855 Argentia Road, Unit 4
Mississauga, ON L5N 8G6
Attn: Consumer Relations
Please do not send in your registration card if you have
registered your child restraint online.
4
A. Before You Begin
Model
Number
Manufacture
Date
Line
Code
56
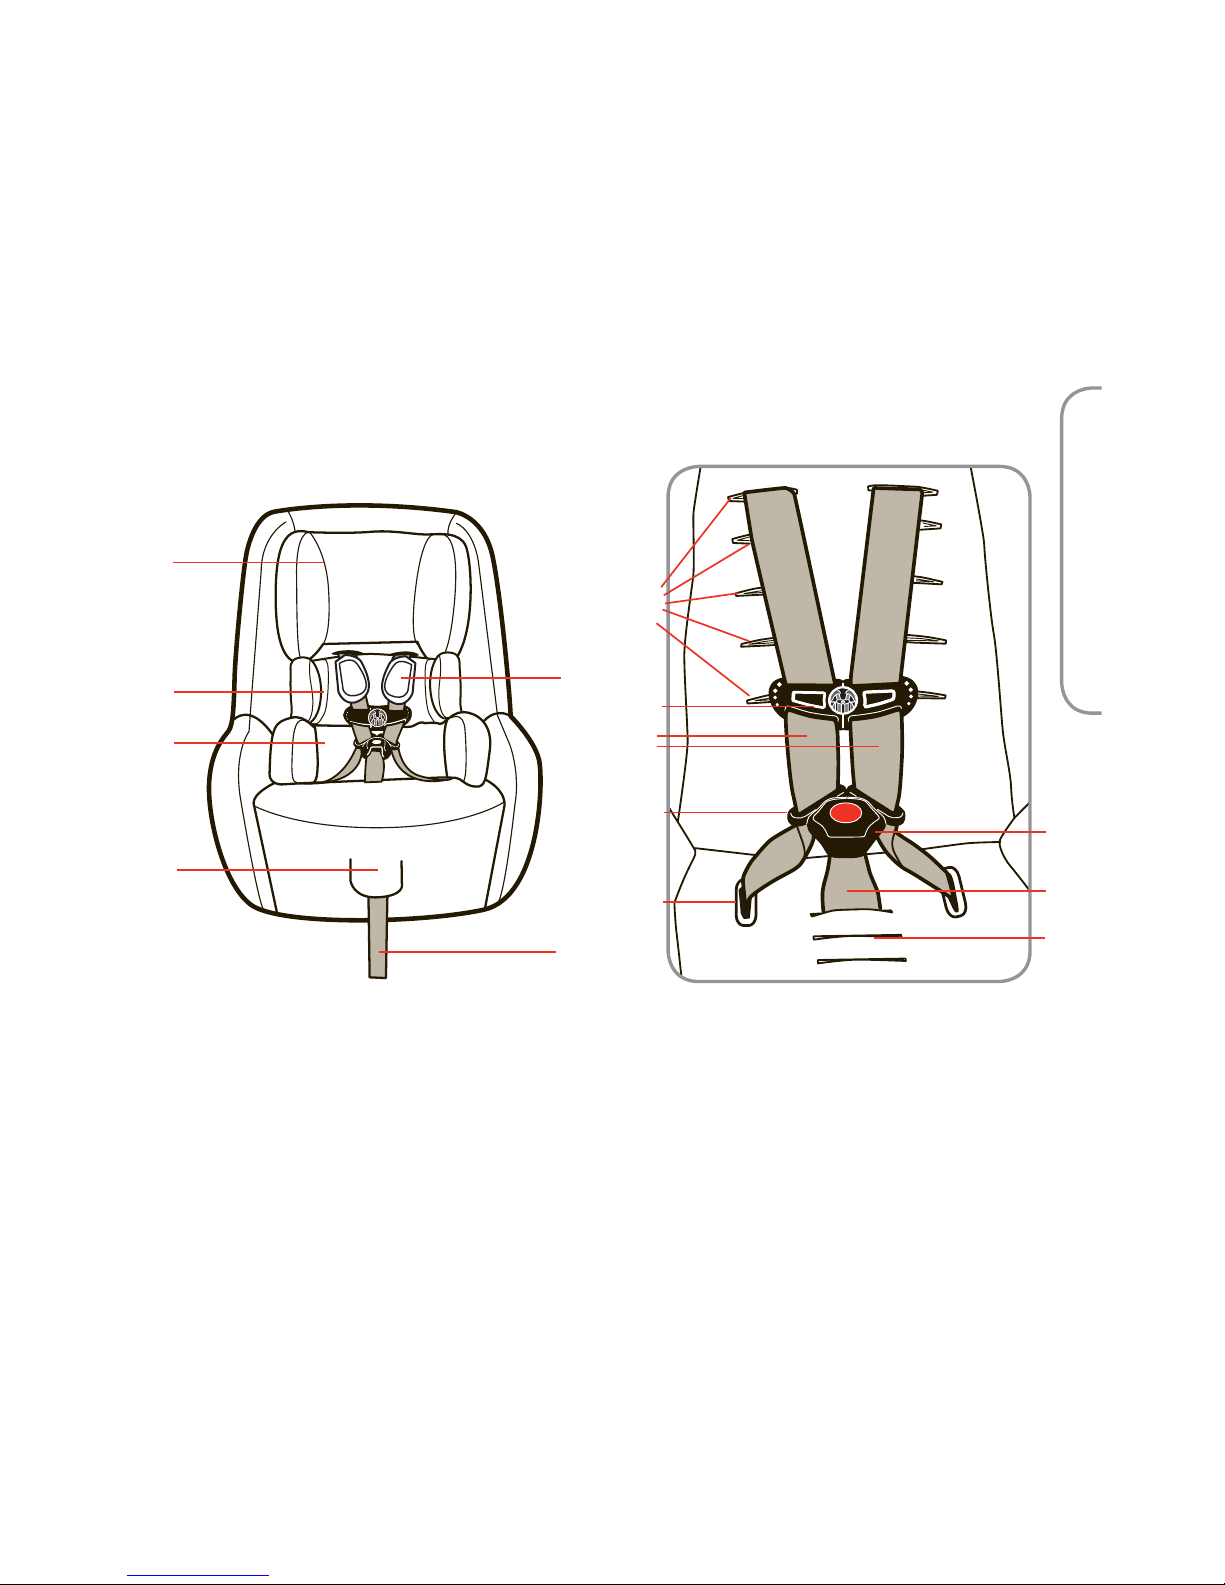
A-4 Understanding Your Child Restraint
continued on next page.
G. Upper Harness Slots
H. Chest Clip
I. Harness Straps
J. Buckle Tongue
K. Buckle
L. Lower Harness Guides
M. Buckle Strap
N. Buckle Strap
Slots
Harness System Detail
A. Before You Begin
A. Adjustable Headrest
B. Harness Covers
(on select models)
C. Body Pillow
(on select models)
D. Lumbar Support
(on select models)
E. Harness Adjustment
Lever (under flap)
F. Harness
Adjustment Strap
Front View
G.
H.
J.
L.
K.
N.
M.
I.
C.
B.
D.
E.
F.
A.
Pad layout may not be the same as shown. See section C-5 for other possible
accessory options.

78
H. UAS* Attachment for
Storage
(behind pad)
I. Forward-Facing Belt
Path
J. Shell
K. Rear-Facing Belt
Path
L. UAS* Belt
M. UAS* Adjuster
N. UAS* Hook
O. Rear Facing Level To
Ground Lines
(on side of shell)
Back View
A. Tether Strap
with Adjuster
and Hook
B. Metal Headrest
Adjustment Bar
C. Locking Clip
(behind harness straps)
D. Splitter Plate
E. Tether Attachment for
Storage
F. Instruction Manual
Storage
(in recline stand)
G. Recline Stand
A.
H.
K.
I.
O.
J.
L.
C.
D.
F.
Side View
G.
E.
B.
*Universal Anchorage System (UAS)
Tether Adjuster
Tether Hook
A.
M.
L.
N.
O.
A. Before You Begin
E.

9
10
In a crash or sudden stop, an unsecured
child restraint could injure the driver or other
occupants in the vehicle.
Always check vehicle owner’s manual for
proper use of vehicle seat belts and the
universal anchorage system (UAS) with your
child restraint.
In very few vehicles, the child restraint
cannot be properly installed because of the type
of seat belt system, airbag system and/or lack
of location to anchor the tether strap. Always
read and follow the vehicle owner’s manual
instructions for child restraint use.
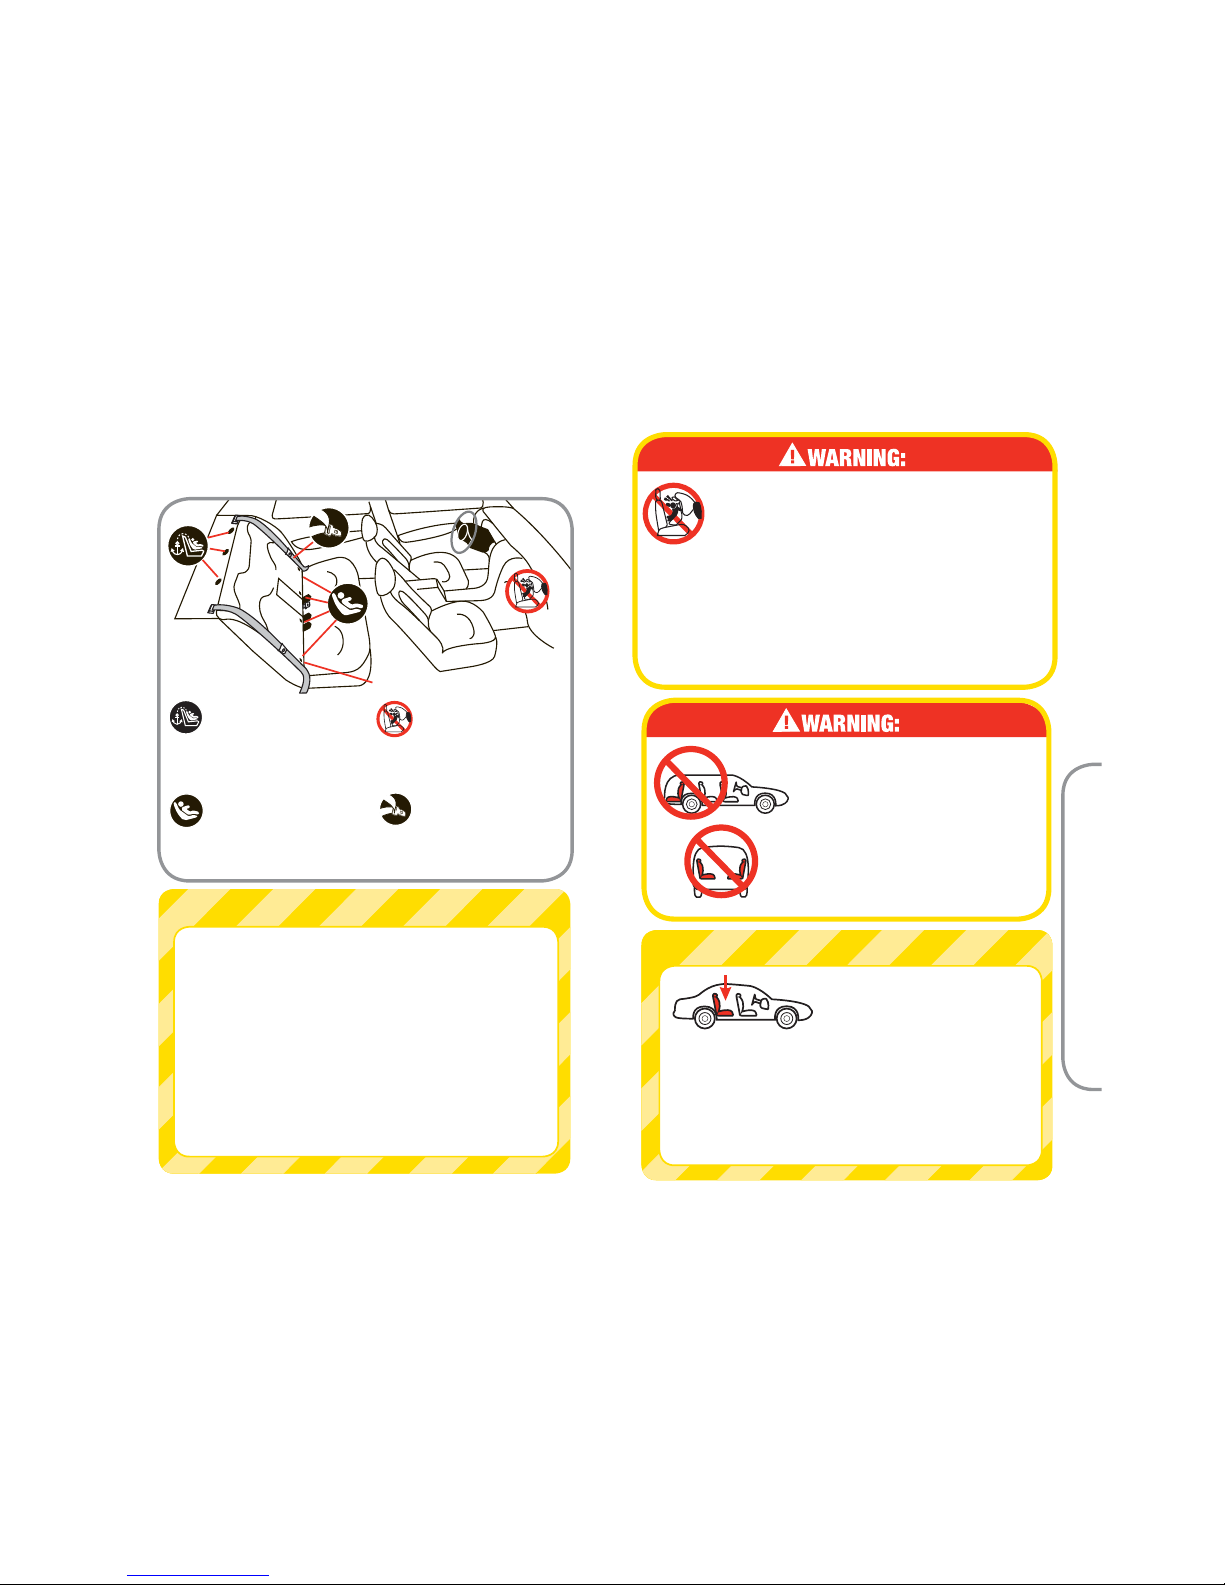
B-1 Vehicle Seating Position
Never install a rear-facing child
restraint in the front seat of a vehicle
equipped with an active passenger side
frontal airbag.
Always check vehicle owner’s manual for
child restraint use with side air bags.
For vehicles with no rear seats, check the
vehicle owner’s manual for location and
installation of a child restraint.
Failure to read, understand and follow the
instructions and warnings in this instruction
manual and the warnings on the system could
result in serious injury or death to the child.
B-2 Installation in Vehicle
Check the vehicle belt or UAS belt before each
use. Use only if the belt is tightened properly and
securely.
When unoccupied the rear-facing child
restraint must be firmly secured to the vehicle
with a lower universal anchorage system if
available or with a vehicle seat belt. The tether
strap must be stored as described in the
instruction manual.
When unoccupied, the forward-facing child
restraint must be firmly secured to the vehicle
with a lower universal anchorage system if
available or with a vehicle seat belt and the
tether strap.
B-3 Child Restraint Use
Do not use a child restraint that has been in
a crash or a collision. The system must be
replaced.
Do not use a child restraint if you do not
know the history of the restraint.
Never take your child out of the child
restraint or attend to the child’s needs while
the vehicle is moving.
Never leave a child unattended in the child
restraint.
To avoid the child being seriously burned,
always check for hot seat and buckles before
using this child restraint.
Do not use a child restraint with missing or
damaged parts.
continued on next page.
B. Safety Information
11 12
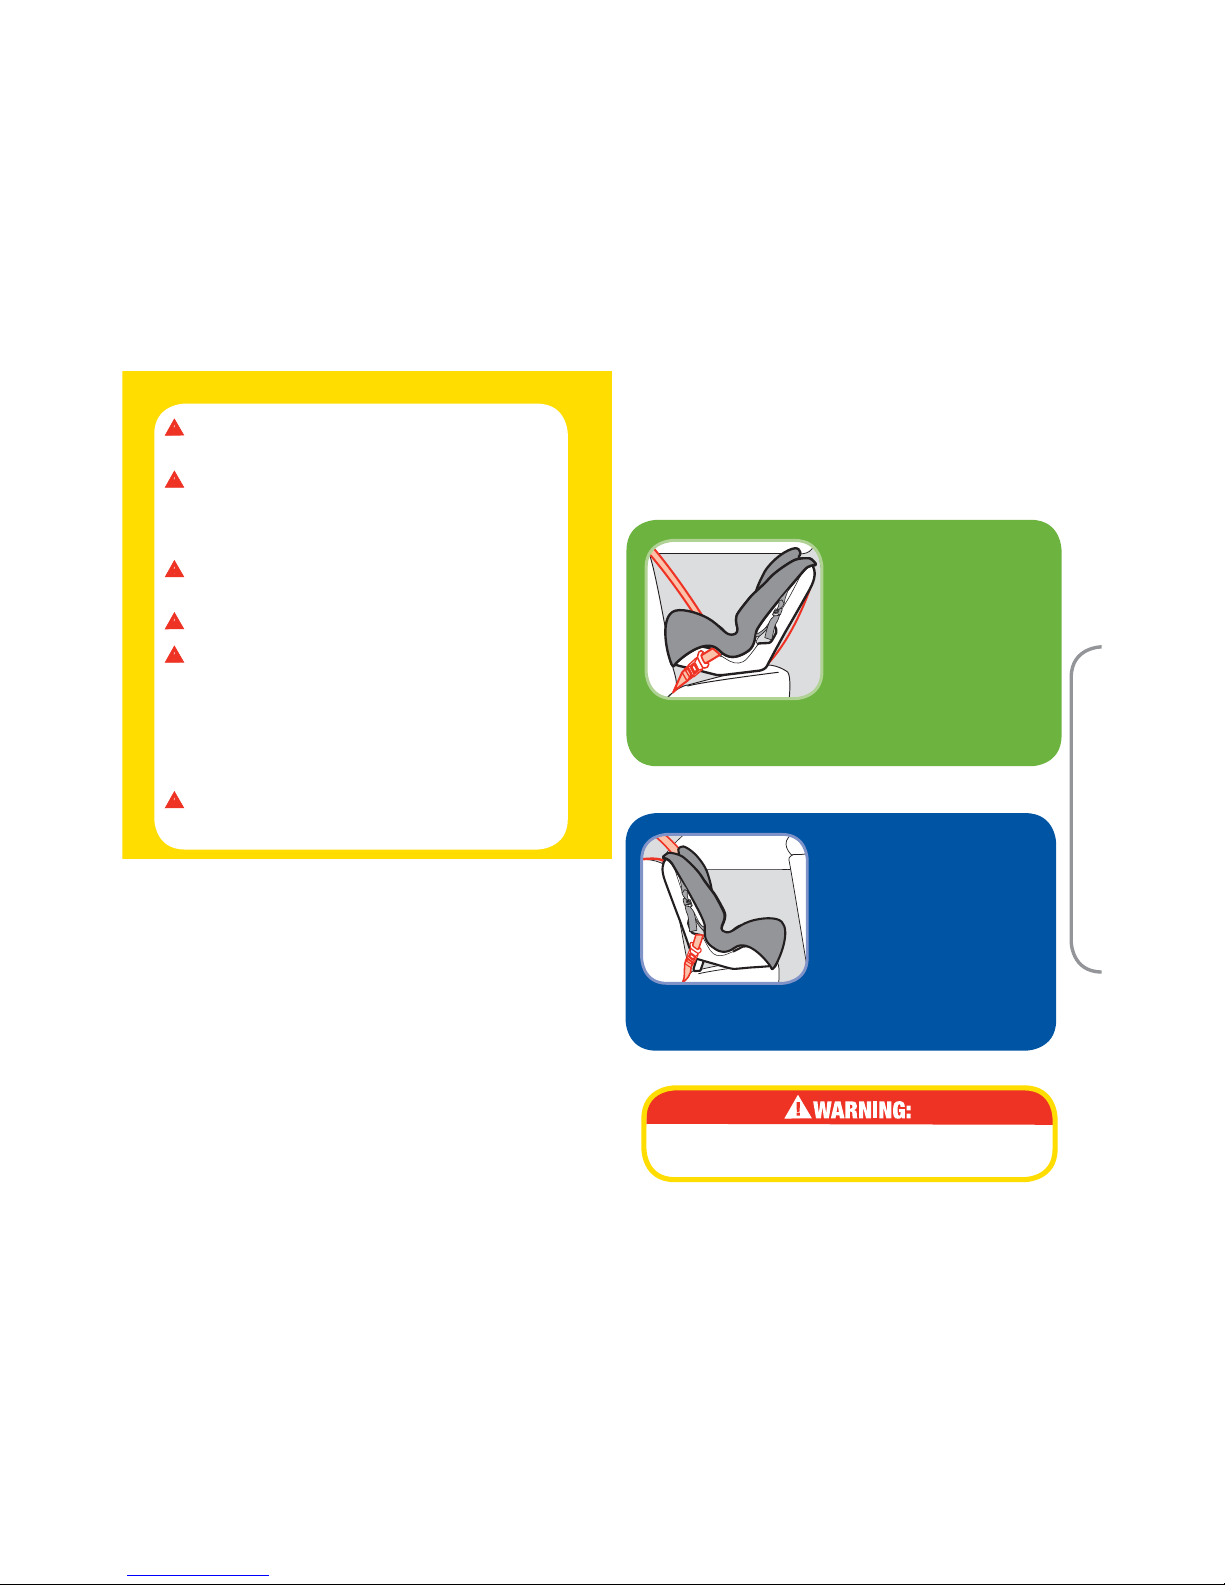
10-30 kg (22-65 lb.)
74-132 cm (29-52 in.) Over
1 Year Old
Forward-Facing using
5-point harness
Child and child restraint are
placed in the back seat and
face the front of the vehicle.
NOTE: Children must be 1 year old or older for forward-
facing position.
Transport Canada Road Safety Directorate regulates children’s
restraint systems under the Motor Vehicle Restraint Systems
Safety Regulations (RSSR). The regulations require the
manufacturer and/or importer to certify the child restraint to the
applicable safety standards and place specified warnings and
information on the labels fastened to each child restraint and in
this instruction manual.
B-4 Transport Canada Regulations
C-1 Choose Position for Your Child
Your child’s height, weight and age determine how your child
restraint should be placed in the vehicle and which restraint
should be used.
2.3-18 kg (5-40 lb.)
48-91 cm (19-36 in.)
Rear-Facing using 5-point
harness
Infant and infant restraint are
placed in the back seat and
face the rear of the vehicle.
NOTE: Infants MUST be rear-
facing until they are at least
1 year of age, weigh 10 kg (22 lbs) AND are able to walk
unassisted.
C. Basic Use
Verify your child’s weight and height (do not guess)
before choosing the child restraint’s position.
Do not lubricate the buckles, harness
system or fasteners for any reason.
DJG does not recommend the use of
accessories or add-ons that have not been
certified with this child restraint at original
purchase date.
Never allow any child to play with this child
restraint. It is not a toy.
Do not remove the warning labels.
This child restraint has been certified for
use in passenger vehicles and aircraft. Do not
use in a boat, on a motorcycle or in a cargo
van or bus where there are no seat belts or
tether anchors. Do not modify for use as a crib
or a swing. Do not leave on stove top or any
other hot surface.
Read all instructions and warning labels for
additional warnings.
13 14
Adjust Headrest to the
Highest Position
Pull the metal headrest adjustment
bar on the back of the seat and
slide the headrest all the way up.
Release metal headrest adjustment
bar into slot to lock. Make sure metal headrest adjustment bar
is securely locked into place.
This will expose all the upper harness slots.
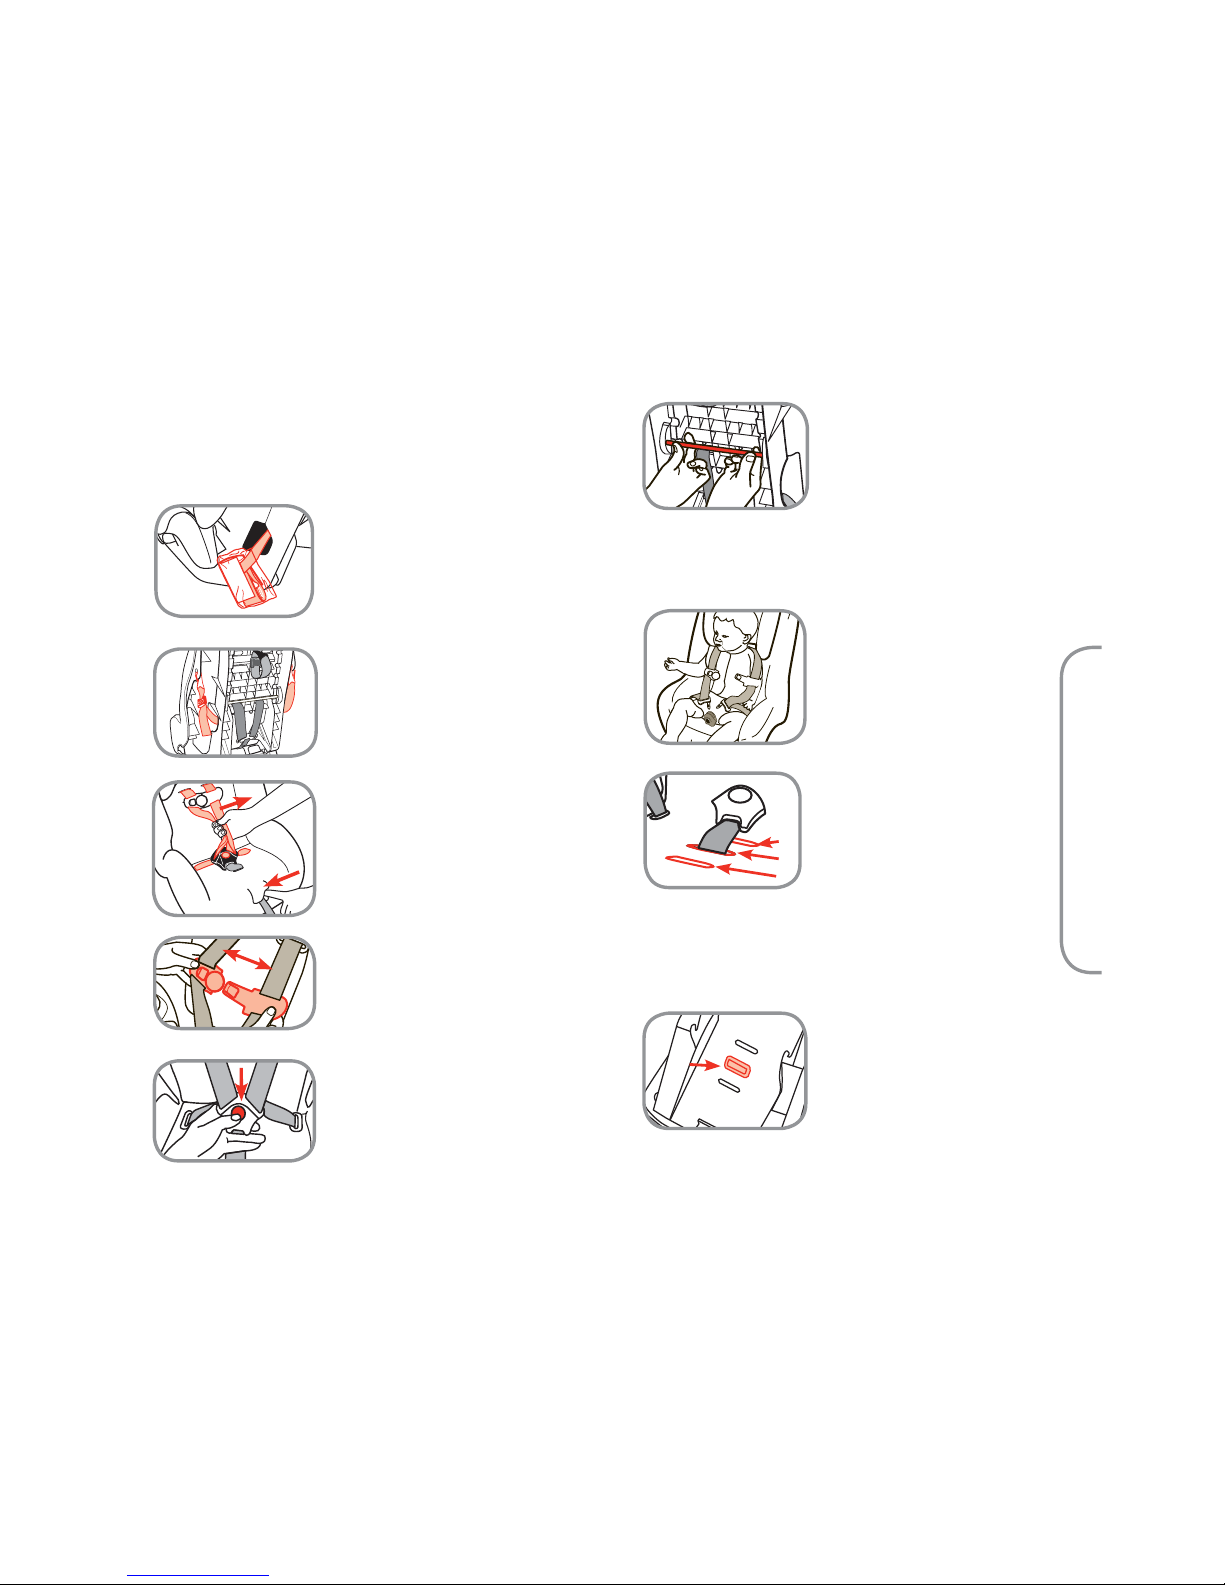
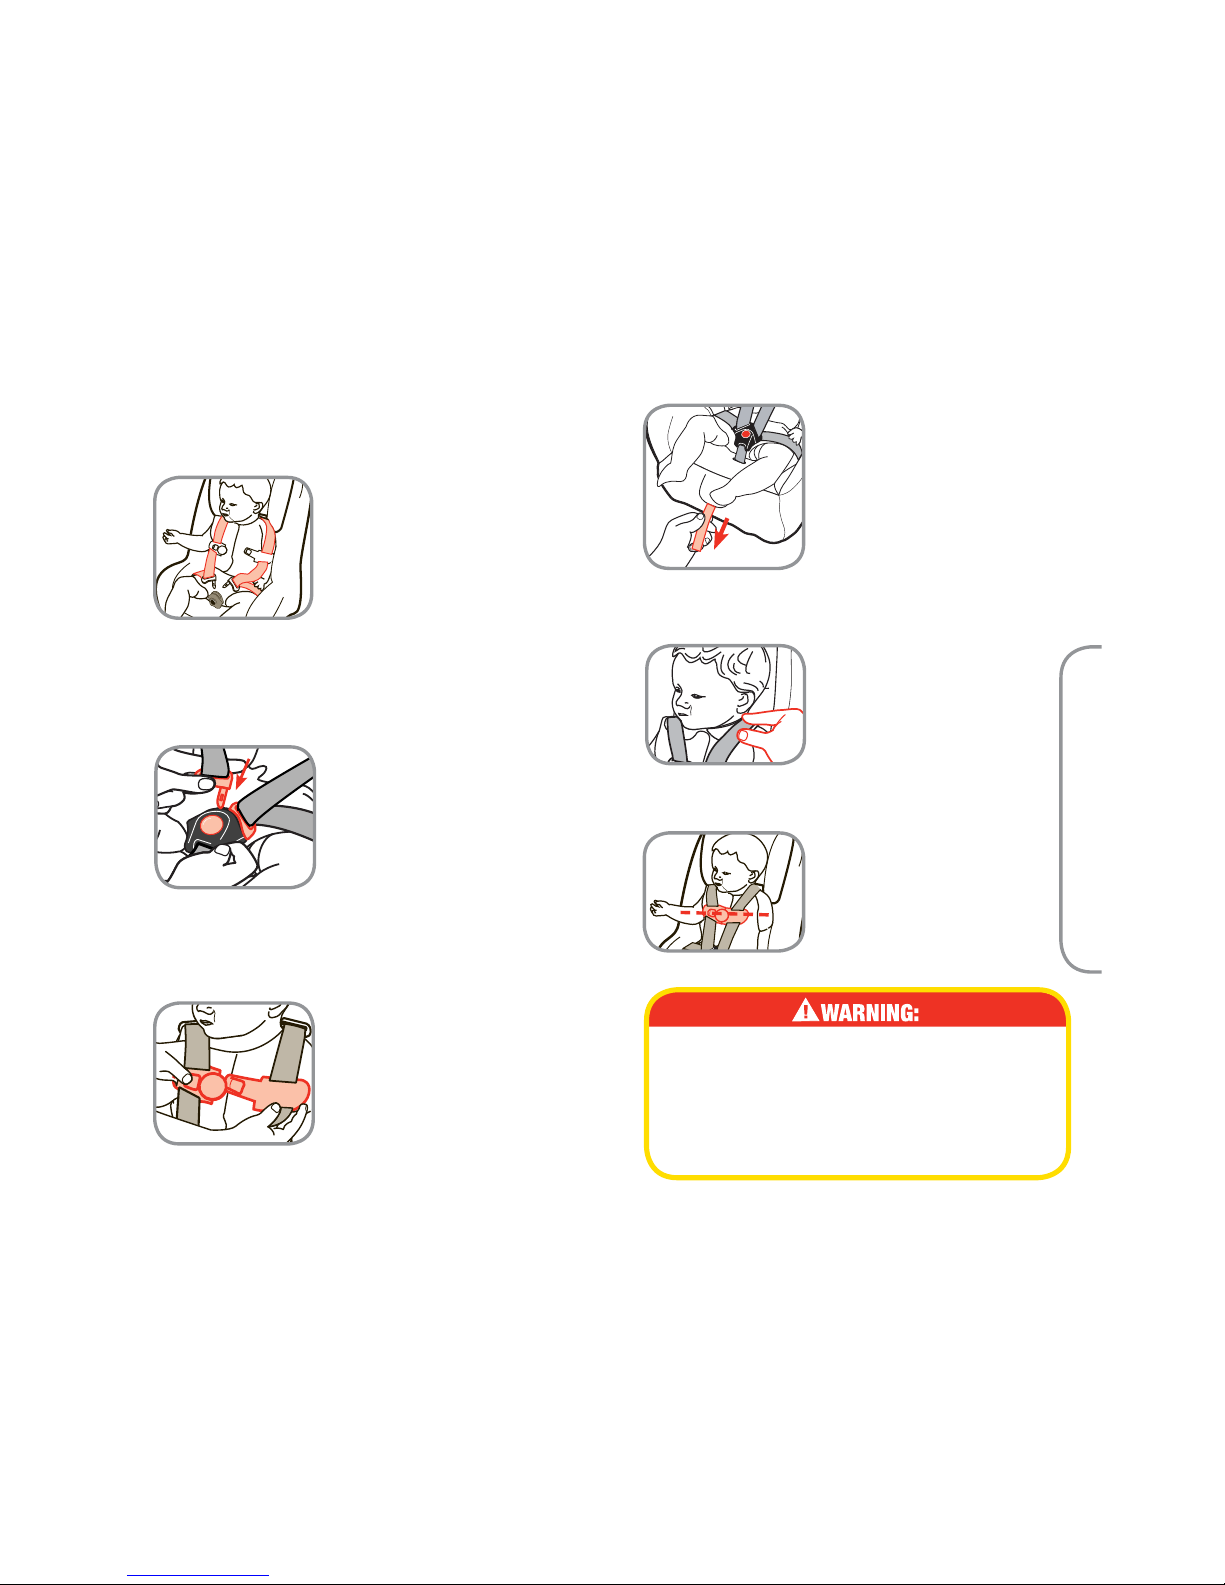
C-2 Preparing Child Restraint to Fit
Your Child
Release Chest Clip
Press on chest clip release button
and pull apart.
Loosen Harness Straps
Push in on the harness adjustment
lever under the flap. Pull out on
harness straps just above buckle
tongues.
You
MUST make these adjustments with your child before
you install the child restraint in the vehicle.
continued on next page.
3.
4.
Pull UAS Belt Packaging Out
from the Shell
Remove UAS from any packaging.
Discard the packaging.
1.
2.
Secure UAS
You
MUST attach the UAS hooks
to the UAS attachments as shown
when not in use.
C. Basic Use
6.
Place Child in Child
Restraint
Place the child’s bottom and
back flat against the child
restraint. This will increase
comfort and allow the harness
straps to be properly tightened.
7.
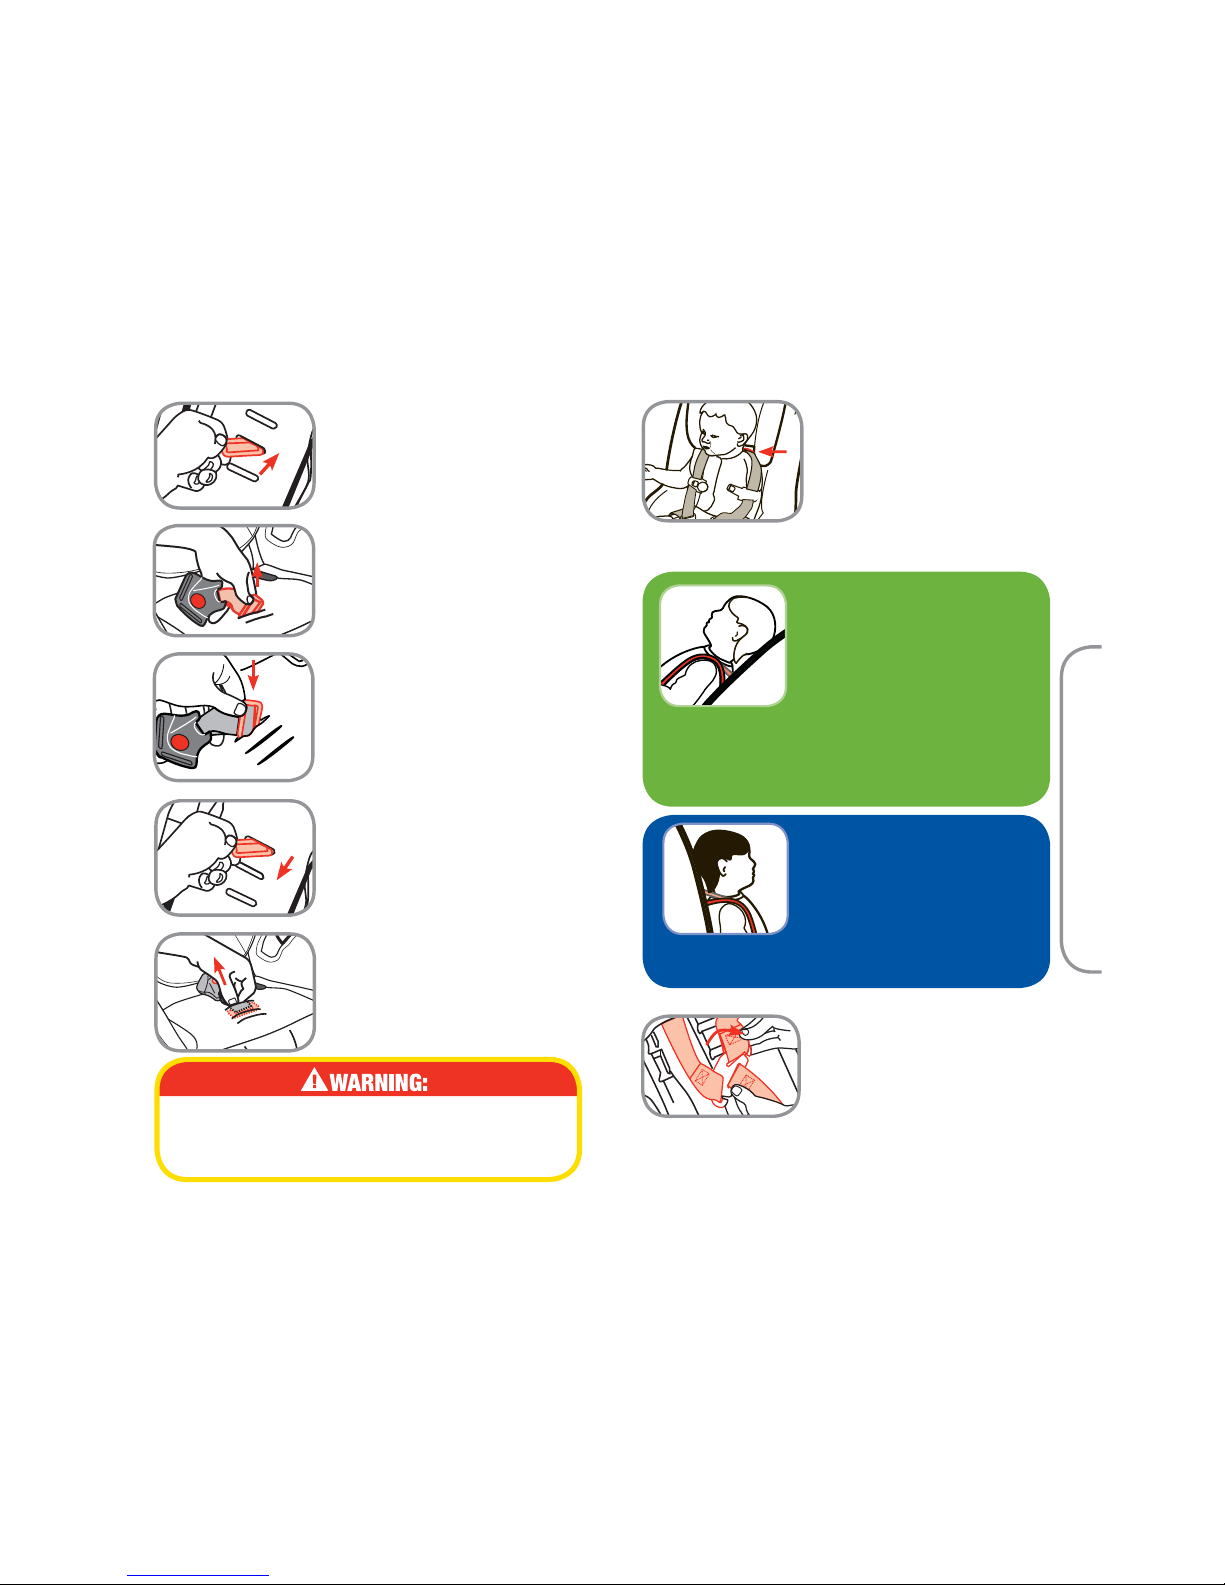
Unbuckle Harness
Press down on the red buckle
release button to release the
buckle tongues. Place harness
straps over sides of child restraint.
5.
Check Buckle Position
Determine which of the three
buckle strap slots that is both
comfortable and snug to use.
NOTE: Thread buckle strap
through the slot closest to
child.
You MUST use the 1st or 2nd buckle strap
slots when rear-facing. Any slot can be used
for forward-facing.
1
2
3
8.
To Change Buckle Position
Remove child from child
restraint.
Turn the child restraint over
and locate buckle strap’s
metal retainer.
9.
15 16
Choose one of the three buckle
slots that is closest to child. From
the front of child restraint, push
the metal retainer through pad and
shell. Make sure that the buckle is
facing out.
c.
d.
e.
Pull up on buckle strap to make
sure it is secured.
The buckle must not pull out.
From the bottom of child restraint
pull metal retainer completely
through pad and shell.
Failure to place buckle strap’s metal retainer
completely through pad and shell can result in
serious injury or death.
From the front, pull buckle strap
free from shell and pad.
b.
a.
Rotate the metal retainer, then
insert retainer up through the shell
and pad.
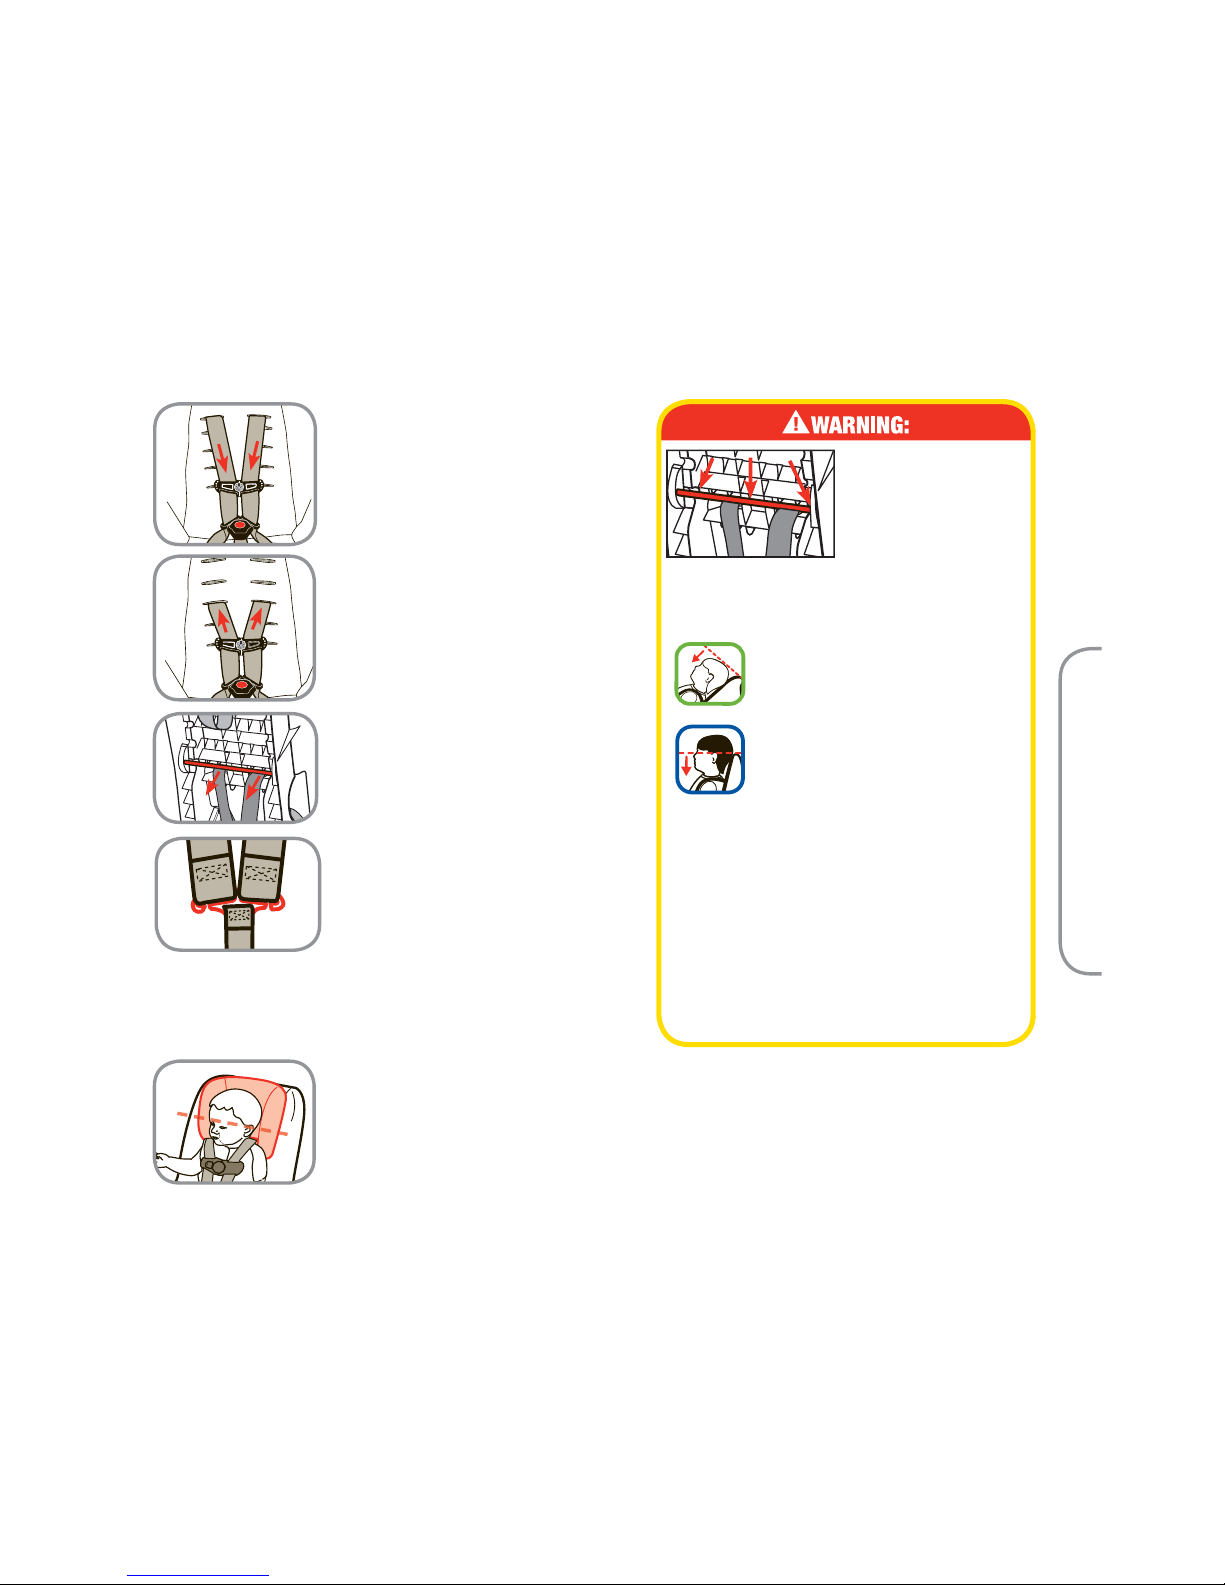
Forward-Facing Position
Upper harness slots must be
even with or just above the
shoulders.
If the upper harness slots are
below the child’s shoulders with the headrest in the
highest position, do not use this child restraint.
Rear-Facing Position
Upper harness slots must be even
with or just below the shoulders.
If the upper harness slots are
above the child’s shoulders with
the headrest in the lowest position,
do not use this child restraint.
Children have a tendency
to want to slouch. Make sure the child’s bottom and back
are flat against the child restraint. If harness height is still
incorrect, call Consumer Relations for more detailed help.
Check Harness Height
With child in the child restraint,
check the location of the upper
harness slots.
Follow the guidelines below to
determine the correct harness
height.
10.
To Change Harness Strap
Location
With harness system loosened,
from the back, unhook harness
strap loops from the splitter
plate.
11.
continued on next page.
C. Basic Use
17 18
From the front of child restraint,
pull harness straps out of the
upper harness slots.
a.
Rethread harness straps into new
upper harness slot location.
NOTE: DO NOT twist the
harness straps.
b.
Thread Harness Straps
BELOW Metal Bar
DO NOT twist harness straps.
12.
Position Headrest
Position headrest behind the
child’s head. Align the mid-point
of the child’s ears with the midpoint of the headrest.
14.
Attach Harness Straps to
Splitter Plate
From the back of the child
restraint, fit the harness strap
loops onto the splitter plate.
NOTE: Make sure sewn end of
the harness strap loops faces towards you. DO NOT twist
harness straps or harness adjustment strap and make
sure the harness straps are COMPLETELY ON the splitter
plate.
Make sure metal
bar is locked into
position. Failure to
do this can result
in serious injury or
death.
Harness straps MUST be threaded below
the metal headrest adjustment bar.
Do not use this child restraint
rear-facing if the top of your
child’s head is above the top of
the child restraint’s headrest.
Do not use this child restraint
forward-facing if the midpoint
of your child’s ears are above
the top of the child restraint’s
headrest.
Make sure the harness height is correct
for your child’s size.
Incorrect use of the harness system is
the most common mistake people make.
Verify frequently that the harness height
is correct for your child’s size. It is
very important to read, understand and
follow all instructions and warnings.
Failure to follow these steps can result in
serious injury or death.
C. Basic Use
13.
19 20
Tighten Harness Straps
Pull on harness adjustment
strap to tighten harness
snugly.
NOTE: A snug harness is not
loose and lies flat against the
child without sagging. It does
not press on the child’s flesh
or push the child’s body into
an unnatural position.
4.
Position Chest Clip
Slide chest clip up or down so
that it is at mid-chest (even
with armpits) and away from
the child’s neck.
6.
Failure to fasten and tighten the harness system
correctly may allow the child to be ejected from
the child restraint in a crash or sudden stop
causing serious injury or death.
Do not mistake comfort for safety. Harness
system must be snugly adjusted.
Check Harness Tightness
Try to pinch the harness
straps at the shoulders. If you
can pinch the harness strap,
tighten more. If your fingers
slip off, the harness is tight
enough.
5.
C. Basic Use
C-3 Securing Child in Child Restraint
Position Harness Straps Over
the Child’s Shoulders
Place the child’s bottom and
back flat against the child
restraint. This will increase
comfort and allow the harness
straps to be properly tightened.
1.
Buckle Harness
Push each buckle tongue into
buckle until you hear a “click.”
Remember to always pull up
on harness straps to make sure
buckle is locked.
2.
Close Chest Clip
Insert right half of chest clip into
left half and snap together.
3.
21 22
C-5 Accessories on Select Models
C. Basic Use
C-4 Removing Child From Child Restraint
Loosen Harness Straps
Push in on the harness adjustment
lever under the flap. Pull out on
harness straps just above buckle
tongues.
1.
Release Chest Clip
Push in the release button and pull
apart.
2.
Unbuckle Harness
Press down on the red buckle
release button to release the
buckle tongues. Place harness
straps over sides of child restraint
and remove the child.
3.
Lumbar Support
The lumbar support provides
extra comfort for your child.
To remove the lumbar
support, slide out from behind
the harness straps.
Harness Covers
The harness covers help to
provide comfort to the infant’s
neck. For harness covers to fit
correctly you may have to push
the ends of the covers through
the upper harness slots.
To remove harness covers from
straps, separate fastening strips
and remove.
Body Pillow
The body pillow provides extra
comfort for your child.
To remove the body pillow,
slide out from behind the
harness straps.

23 24
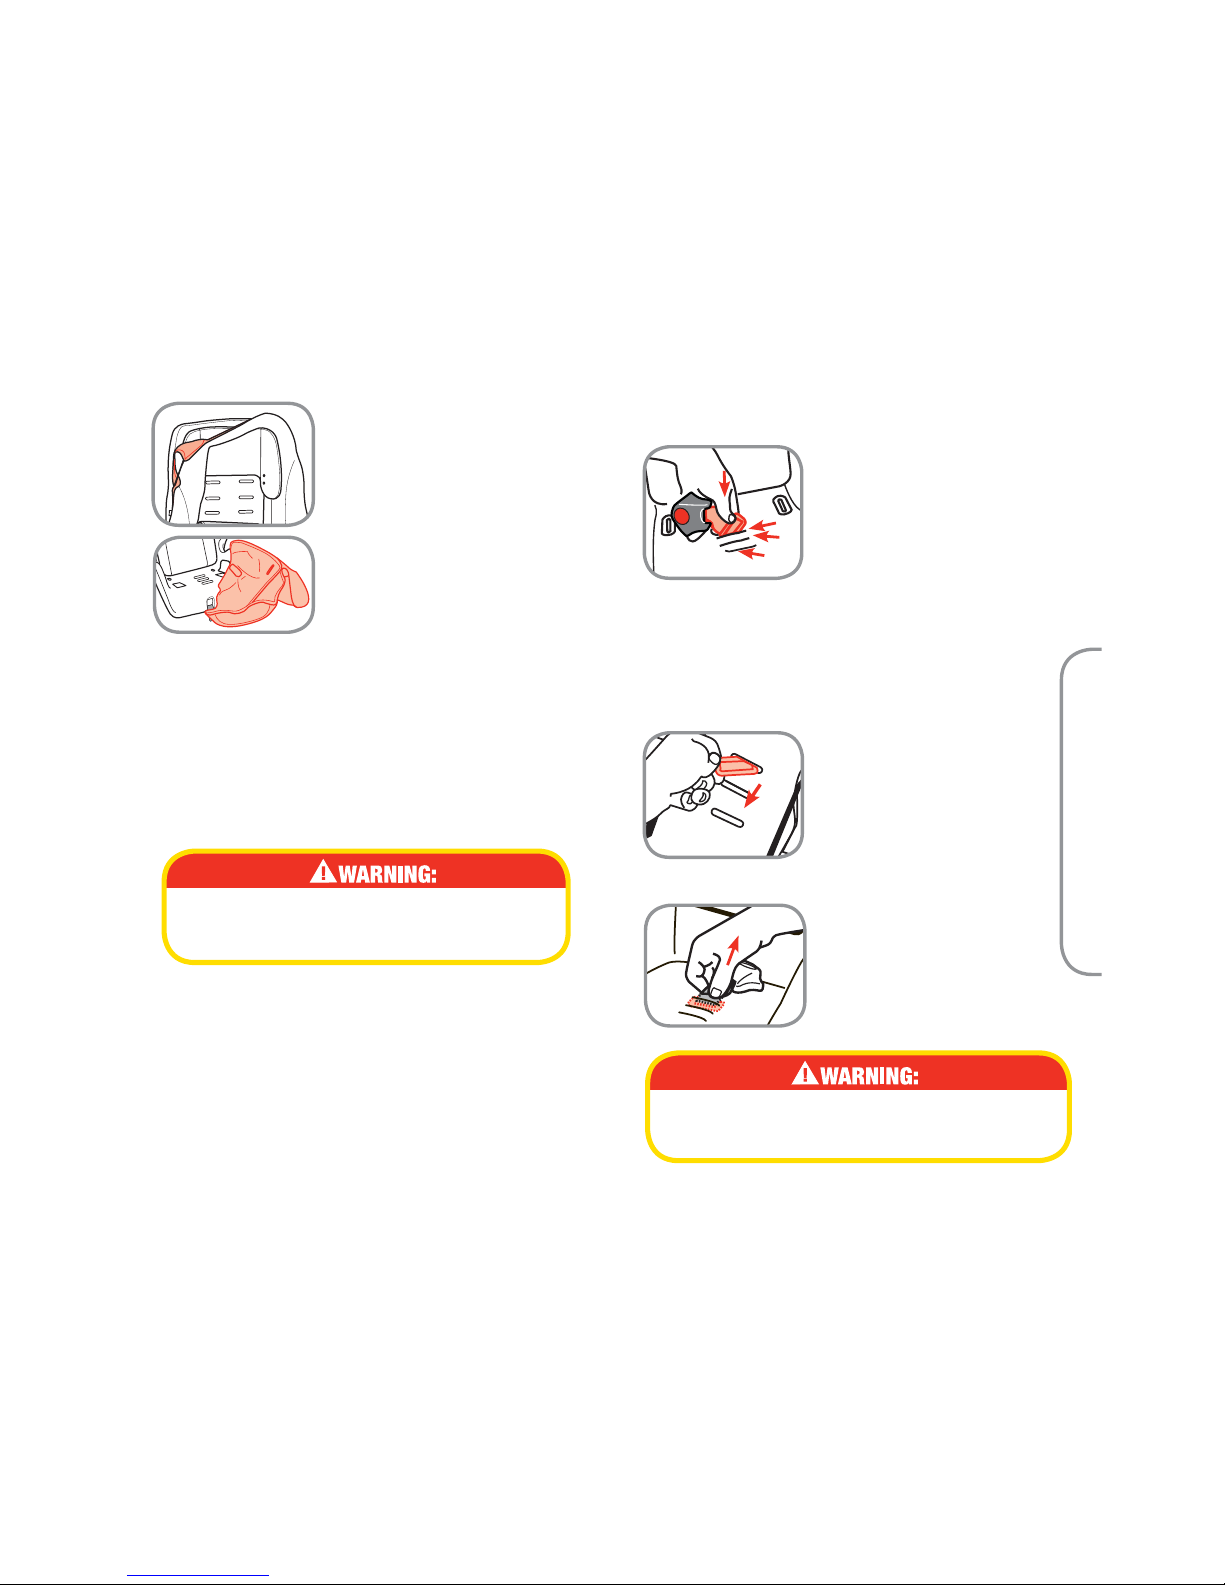
Only remove the harness system to clean the seat pad.
Unhook Harness Straps
from Splitter Plate
Fully loosen harness straps.
Starting in the back of the
child restraint, unhook
harness strap loops from
splitter plate.
1.
Remove Harness Straps
From the front, pull harness
straps through the upper
harness slots
(1).
Unthread harness straps from
the chest clip
(2).
Unthread harness straps from
the buckle tongues
(3).
Holding one harness strap,
pull harness completely out of
lower harness guides
(4).
NOTE: You do not need to fully
remove the harness straps
from the shell to clean the
seat pad.
2.
C-7 Removing Harness System
1
2
3
C. Basic Use
continued on next page.
This child restraint has 2
positions:
Rear-facing -
1 You MUST
recline the child restraint so the
lower level to ground line is level
with the ground, OR for older
children, rotate the child restraint
between the top and bottom level
to ground lines on the side of the
shell.
Forward-Facing -
2 MUST be
upright.
C-6 Reclining Child Restraint
Upright
For upright position, pull recline
stand out from under seat and
push up to lock in place.
To Recline
To recline, pull down to unlock
recline stand and fold under seat.
1
2
Locate Buckle Strap’s
Metal Retainer
Turn the child restraint over
and locate buckle strap’s
metal retainer.
3.
4

25 26
C-8 Removing Seat Pad for Cleaning
You must remove the harness system to remove the
pad from the shell. See section C-7.
continued on next page.
Remove Headrest Pad
Remove headrest pad by pulling
the pad from the top of the
headrest down.
1.
C. Basic Use
5.
4.
Remove Buckle from Child
Restraint
From the front, pull buckle strap
free from shell and pad.
Insert Metal Retainer
Through Shell and Pad
Rotate buckle strap’s metal
retainer, then insert retainer up
through the shell and pad.
2.
A
Remove Lower Harness
Guides from Bottom of Seat
From the back, locate the lower
harness guides
(A).
Lower Harness Guides
Place the screw driver’s tip
between shell and lower
harness guide, then twist the
screw driver while pulling
the harness guide from the
front. Repeat for other side.
a.
Remove Elastic Straps
(on select models)
From the bottom of shell,
release the elastic straps.
NOTE: The positions of the
elastic straps may vary by
model.
3.
Undo Fastening Strip Behind
Headrest (on select models)
Lower headrest to lowest
position and undo the fastening
strip behind the headrest.
4.
27 28
Installing Pad
Replace seat pad by reversing order for your particular model.
Slip headrest pad on shell. Make sure pad is behind headrest
and backrest.
Attach all of the elastic straps if required.
Install lower harness guides.
Install harness system (see section C-9).
Cleaning Pad and Accessories
Machine wash all pieces separately with cold water on a gentle
cycle. Make sure harness covers are closed so fastening strips
are not exposed. Do not use bleach. Tumble dry separately for
10-12 minutes on low heat. Remove immediately.
Harness Straps: Spot clean only. Do not machine or hand
wash.
Do not use this child restraint without the seat
pad. Failure to do this can result in serious
injury.
Remove Seat Pad
Pull pad off the top of child
restraint and around headrest.
Remove pad from shell.
5.
Check Buckle
Pull up on buckle strap to
make sure it is secured.
The buckle must not pull
out.
3.
2.
Failure to place buckle strap’s metal retainer
completely through pad and shell can result in
serious injury or death to the child.
C-9 Install Harness System
From bottom of child
restraint, pull buckle strap’s
metal retainer completely
through pad and shell.
Install Buckle Strap
Choose one of the three
slots that is closest to
child. From the front of
child restraint, push buckle
strap’s metal retainer
through pad and shell.
Make sure that buckle is facing out.
You MUST use the 1st or 2nd buckle strap slots
when rear-facing. Any slot can be used for
forward-facing.
1.
1
2
3
continued on next page.
C. Basic Use
29 30
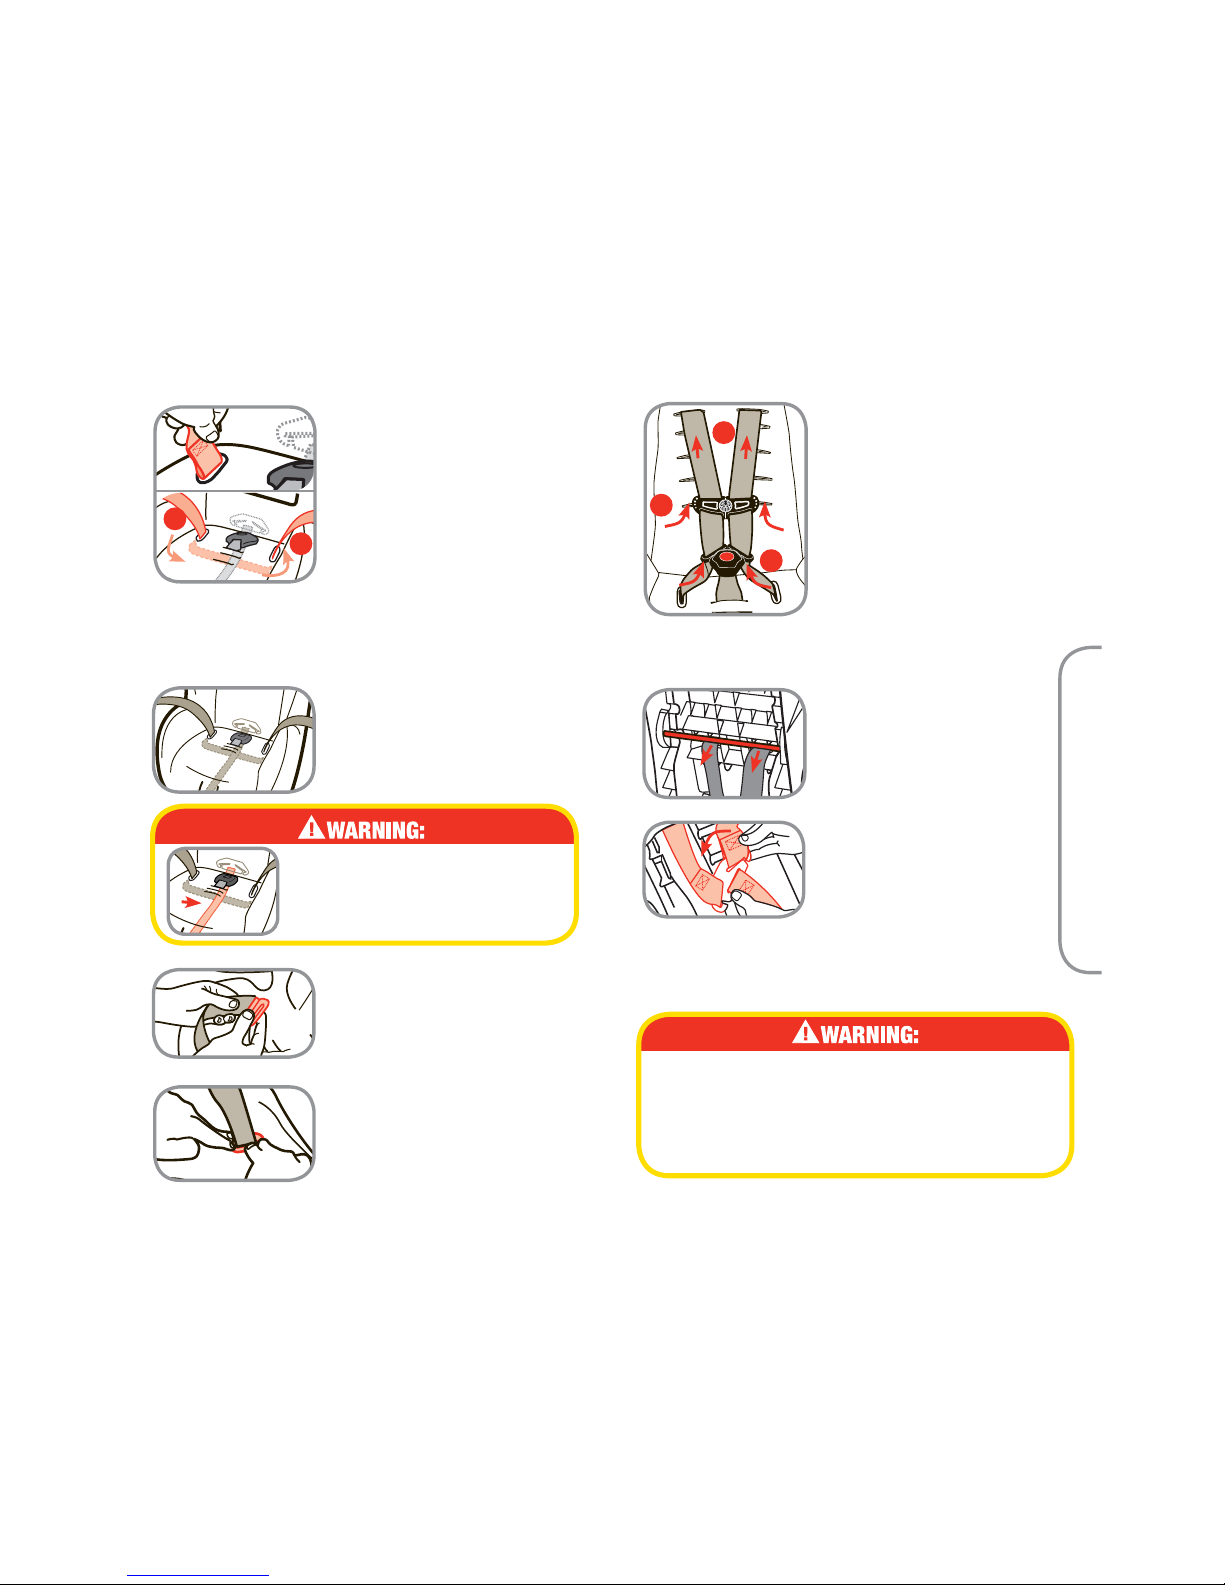
Make Harness Straps Even
Take both ends of the harness strap
and make them even in length.
Do not twist harness straps.
Thread Harness Guides on
Harness Strap
Slide one harness guide on each
harness strap end.
6.
5.
Thread Harness Strap
NOTE: If you have fully removed
the harness straps, make sure
sewn end of the harness strap
loop faces the buckle before
starting.
Thread the harness strap down
through lower harness guide
on left side of shell
(1) across
bottom of shell and up through lower harness guide on right
side (2).
NOTE: For easier assembly, remove the harness guides. See
section C-8, step 2.
4.
1
2
C. Basic Use
Secure Harness Guides
Press harness guides into the holes
in the pad and shell.
7.
Attach Harness Straps to
Splitter Plate
From the back of the child
restraint, fit the harness strap
loops onto the splitter plate.
10.
Harness straps MUST be threaded below the
metal headrest adjustment bar.
You must install the harness system properly.
Failure to follow these warnings can result in
serious injury or death.
NOTE: Make sure sewn end of the harness strap loops
faces towards you. DO NOT twist harness straps or
harness adjustment strap and make sure the harness
straps are COMPLETELY ON the splitter plate.
Thread left harness strap
through left buckle tongue
and right harness strap
through right buckle tongue.
(3) Make sure to push
through from the back of
buckle tongue.
Thread the chest clip from
front to back as shown
(4).
Do not twist harness straps.
Push left harness strap through
left upper harness slot and right
harness strap through right
upper harness slot
(5).
8.
Thread Harness Straps
BELOW Metal Bar
DO NOT twist harness
straps.
9.
3
4
5
Failure to place the harness
adjustment strap between shell
and the harness straps as shown
can result in serious injury or
death.
31 32
D-2 Vehicle Seating Position
Safety Tip:
Children are safer when
properly restrained in
a rear seating position
than in the front seating
position.
According to accident statistics, children
in rear seating positions are statistically
safer, whether you have airbags, advanced
airbags, or no airbags at all.
Never install a rear-facing child
restraint in the front seat of a vehicle
equipped with an active passenger
side frontal airbag.
In very few vehicles, the child restraint cannot
be properly installed because of the type of
seat belt system, airbag system and/or lack
of location to anchor the tether strap. Always
read and follow the vehicle owner’s manual
instructions for child restraint use.
Use the child restraint only
on vehicle seats that face
forward. Do not use on
seats that face the sides
or rear of the vehicle. For
vehicles with an airbag, but
without a back seat, refer
to your vehicle owner’s
manual.
D. General Vehicle Installation
Your vehicle’s features may be considerably different than
those pictured here. Consult your vehicle owner’s manual to
help identify your vehicle’s specific features and locations.
D-1 Understanding Your Vehicle
Anchor Brackets
For Tether Strap
(Forward-Facing Only)
UAS Anchor Bars
Located in the seat
bight.
Airbags
Consult your vehicle
owner’s manual for
all air bag locations.
Seat Bight
Vehicle Seat Belts
Consult your vehicle
owner’s manual for
vehicle belt use.
Safety Tip:
To help protect your vehicle seat’s upholstery from
damage, use a car seat mat or a single layered towel
underneath and behind child restraint.
To avoid your child being seriously burned,
take the following precautions:
1. Park in the shade or where sun does not directly
hit the child restraint.
2. Cover the child restraint with a sheet or blanket
when not in use.
3. Check for hot seat and buckles before placing
child in child restraint seat.
33 34
Not all vehicle belts will work with this child restraint. This
child restraint must be tightly locked in place at all times,
during travel. You must determine if your vehicles belts are
compatible with this child restraint.
Vehicle Belts
• Automatic/Passive vehicle seat belts
You MUST have a lap belt to install any child restraint. An
automatic (passive) shoulder belt may or may not have a
separate lap belt. Consult your vehicle owner’s manual.
• Vehicle belts in center of the
door or side panel
You must move the child restraint to
another seating location. Consult your
vehicle owner’s manual.
• Vehicle belts that are in front of
the seat bight
You may need to move the child
restraint to another seating location.
Consult your vehicle owner’s manual.
• Do Not Use with inflatable seat belts
You may need to move the child restraint to another
seating location or use UAS belts only.
• ELR (Emergency Locking
Retractor) vehicle belts
These lap and shoulder belts only lock
in a sudden stop or crash, and do not
properly secure a child restraint alone.
Consult your vehicle owner’s manual.
To learn if you have this type of belt, gently pull the belt
all the way out of the retractor (spool), let it return several
inches, then pull on it again.
D-4 Knowing Your Vehicle Belts
Review your vehicle’s owner manual for vehicle seat belt use
with child restraints. This is your best source for information
concerning your vehicle.
D. General Vehicle Installation
D-3 Choosing UAS or Vehicle Belts
When installed properly, either the UAS or Vehicle Belts will
secure the child restraint equally.
The UAS
The Universal Anchorage
System (UAS) is for
installing child restraints
without using vehicle seat
belts.
The UAS can ONLY be
used in vehicles that have
the UAS anchor bars
installed and designated UAS seating positions. Most vehicles
manufactured after September 2002 are equipped with UAS.
Check your vehicle owner’s manual to see which seating
positions may be equipped with UAS.
UAS Anchor Bars
Do not use both the UAS belt and vehicle belt
at the same time.
Vehicle Belts
If UAS is not an
option, you must use
the vehicle seat belt
system to install the
child restraint. There
are some vehicle belts
that will not work with a child restraint or will require special
attention.
See next page and check your vehicle’s owner’s manual for
specific instructions.
continued on next page.
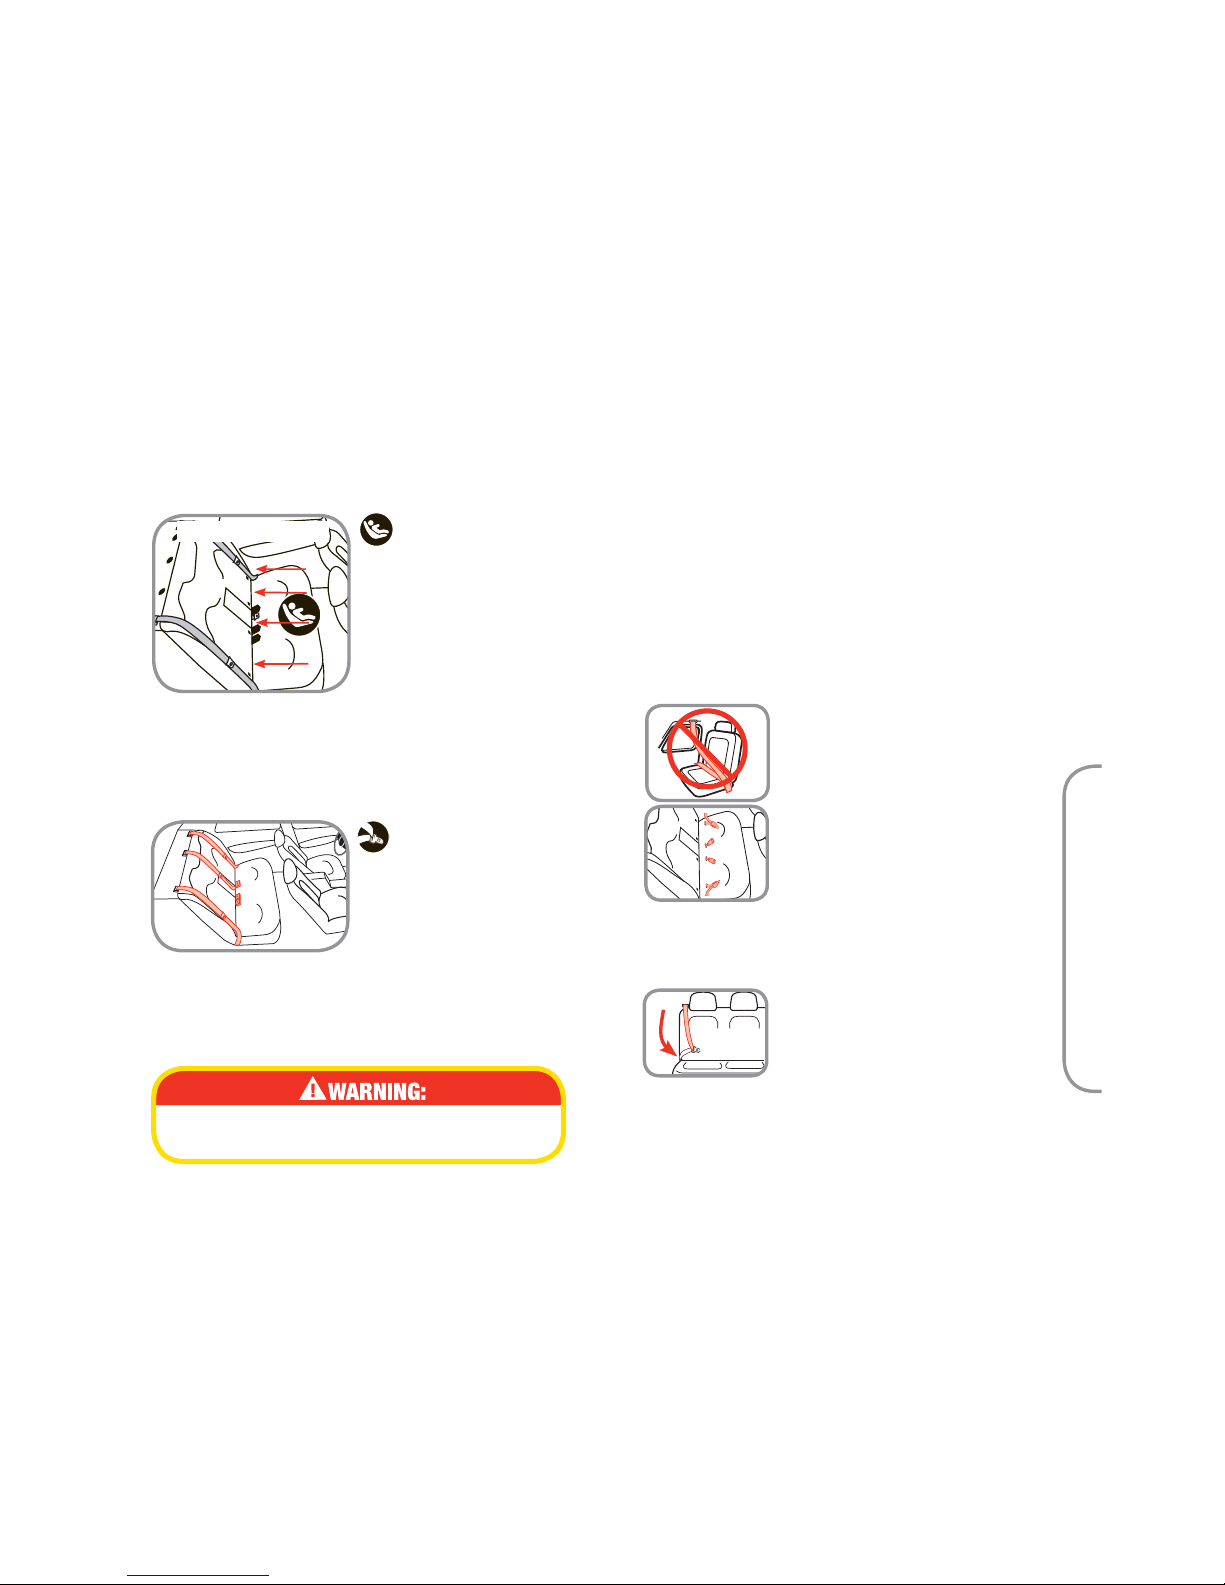
35 36
• Switchable retractor
These belts switch from ELR to ALR (Automatic Locking
Retractor). You must have the vehicle belts in the
locking mode to use them. Follow the instructions in the
installation sections.
• ALR (Automatic Locking Retractor)
These belts lock after pulling the webbing out and letting
the belt go back into the retractor an inch or two. Follow
the instructions in the installation sections.
Vehicle Latch Plates
• Check the Latch
Plates
Buckle the lap/shoulder
belt. Pull on the lap belt
portion. If the vehicle
belt does not loosen or
slip, you have a locking
latch plate. You should
not need to use a locking
clip. Consult your vehicle
owner’s manual.
If the belt loosens or slips, you have a sliding latch plate.
If you have an ELR retractor and a sliding latch plate, you
MUST use a locking clip to install the child restraint or
move to another seating location. You may not need to use
the locking clip with a switchable or ALR retractor. Consult
your vehicle owner’s manual.
Sliding
Latch
Plate
ELR lap-only belts MUST NOT be used with this
child restraint.
Locking
Latch
Plate
If it moves freely, it is an ELR belt. If it is locked and will not
allow any more belt to come out, it is a switchable retractor.
If you have an ELR lap and shoulder belt, review the “Vehicle
Latch Plate” section to see if you need a locking clip.
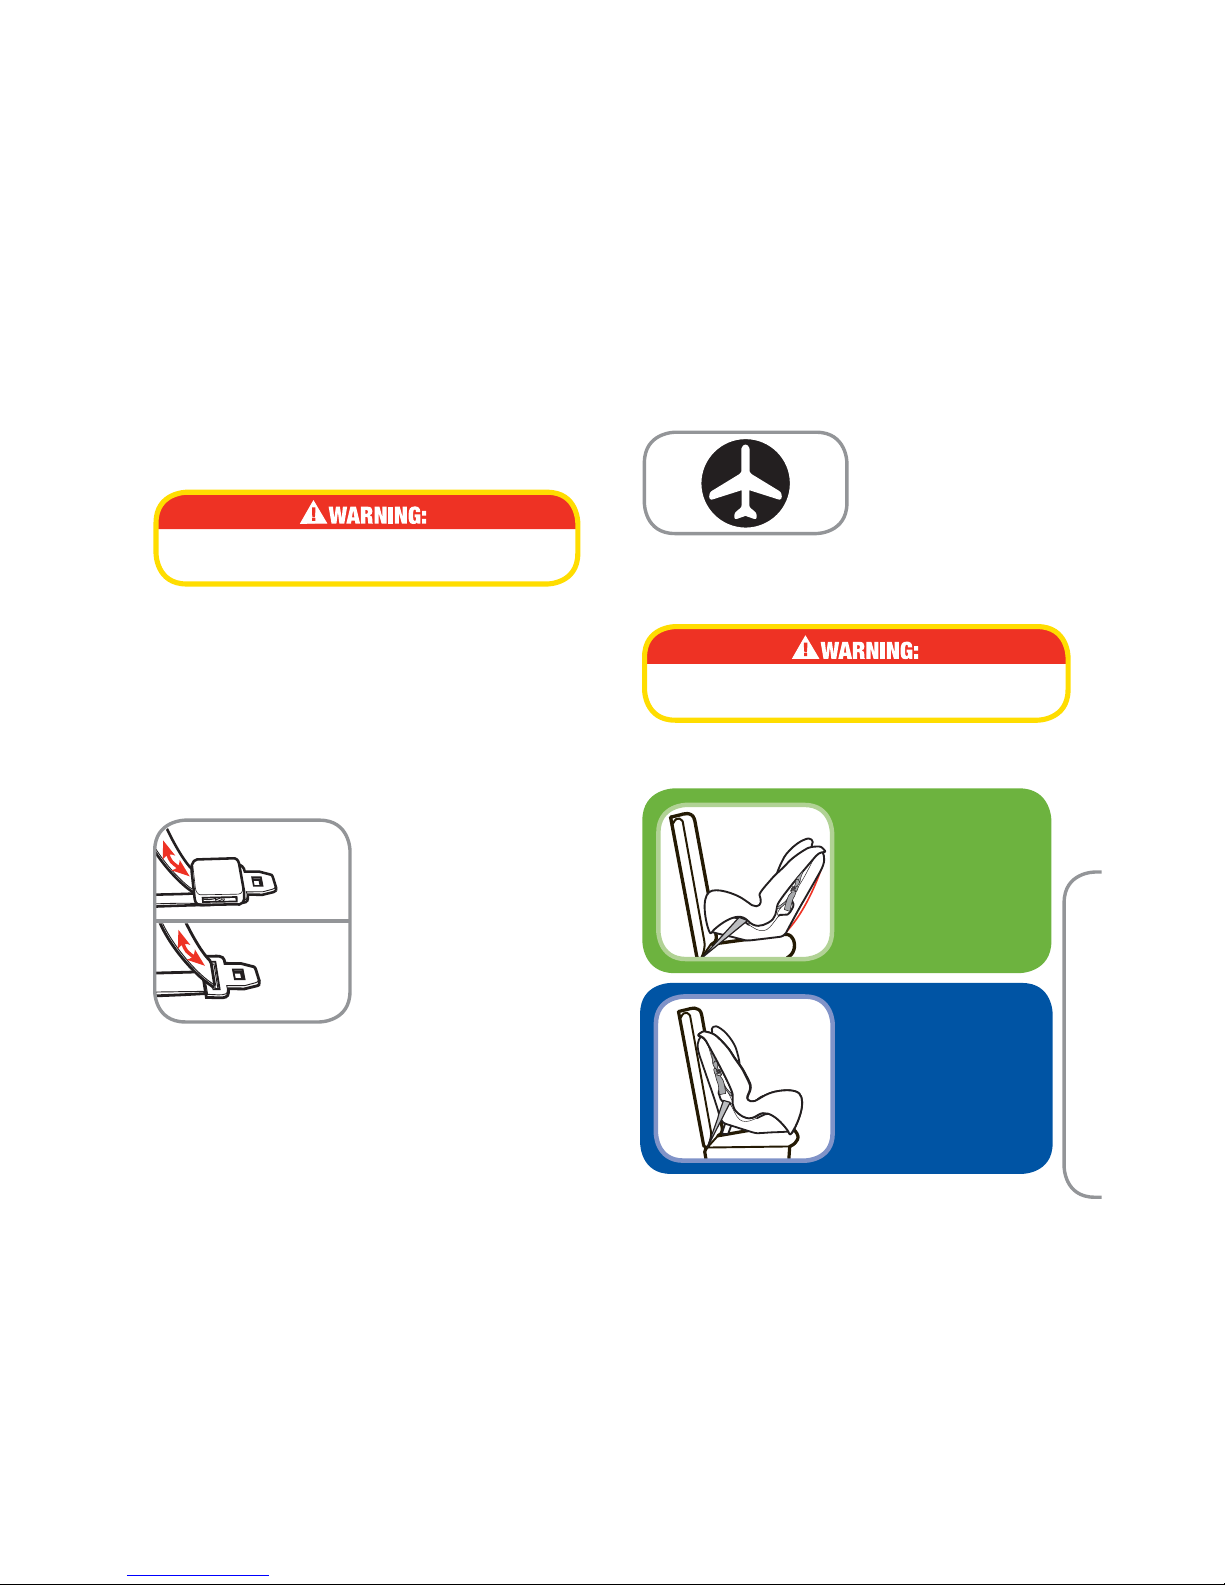
This child restraint is
certified for aircraft use
only when used with the
internal harness. Use only
on forward-facing seats and
in a position where the seat
belt can be tightened securely. The installation is the same
as in your vehicle. Use only with F.A.A. certified equipment.
Contact the airline before taking the child restraint on an
aircraft in order to comply with their regulations.
E. Aircraft Installation
Secure UAS belts and tether strap when using
the aircraft belts.
NOTE: Install the child restraint in a window seat to avoid
blocking the aisle. If the aircraft lap belt is too short, ask the
flight attendant for a belt extender.
Rear-Facing Aircraft
Installation
For rear-facing
installation, follow section
F-4 Install Rear-Facing
with Vehicle Belts.
Forward-Facing
Aircraft Installation
For forward-facing
installation follow, section
G-5 Install Forward Facing
with Vehicle Belts.
E. Aircraft Installation

UAS Belt
Lap Belt
Lap/Shoulder Belt
2.3-18 kg (5-40 lb.), 48-91 cm (19-36 in.)
Rear-Facing using 5-point harness
F-1 Prepare to Install Rear-Facing
Never install a rear-facing child restraint
in the front seat of a vehicle equipped
with an active passenger side frontal
airbag.
This child restraint must always face the rear of
the vehicle and be in the reclined position until
the child is at least 1 year old, weighs 10 kg (22
lbs) AND is able to walk unassisted.
Pull Pad Off Corners of
Child Restraint
Pull the pad off the front
corners of shell.
1.
2.
Routing UAS
Insert the UAS hook through
the rear-facing belt path.
The UAS adjuster can be on
either side, but the belt should
not be twisted.
3.
Pull UAS Hook Across to
Opposite Side
Reach under pad and pull the
UAS hook across the shell and
out the rear-facing belt path on
opposite side. UAS belt MUST
be under pad and in front of buckle strap as shown. Do
not place belt over child’s legs.
NOTE: You must use the 1st or 2nd buckle strap slots
when rear-facing.
Replace Pad Over Corners
Make sure the UAS belt is not
twisted.
5.
Adjuster
1
2
F-2 Prepare UAS for Rear-Facing Use
Unhook UAS
Remove the UAS from the
forward-facing belt path, so
both UAS hooks are on one
side of the child restraint.
4.
F. Prepare UAS for Rear-Facing Use
37 38
 Loading...