

Safety 1st TH051, TH081 User Manual
Quick Read Ear Thermometer
TH051
TH081 User Guide
Termómetro de oído de lectura rápida
TH051
TH081 Guía para el usuario
©2012 Cosco Management, Inc. All Rights Reserved. Todos derechos reservados.
www.djgusa.com (800) 544-1108 www.safety1st.com Made in CHINA. Hecho en CHINA.
Styles and colors may vary. Los estilos y los colores pueden variar.
Distributed by distribuido por) Dorel Juvenile Group, Inc., 2525 State St., Columbus, IN 47201-7494
Dorel Distribution Canada, 873 Hodge, St. Laurent, QC H4N 2B1
03/13/15 4358-5932
1
Dorel Juvenile Group, Inc., warrants to the original
purchaser that this product (Quick Read Ear Thermometer),
is free from material and workmanship defects when used
under normal conditions for a period of one (1) year from
the date of purchase. Should the product contain defects
in material or workmanship Dorel Juvenile Group, Inc., will
repair or replace the product, at our option, free of charge.
Purchaser will be responsible for all costs associated with
packaging and shipping the product to Dorel Juvenile
Group Consumer Relations Department at the address
noted on the front of this document and all other freight
or insurance costs associated with the return. Dorel
Juvenile Group will bear the cost of shipping the repaired
or replaced product to the purchaser. Product should be
returned in its original package accompanied by a proof
of purchase, either a sales receipt or other proof that the
product is within the warranty period. This warranty is void
if the owner repairs or modifies the product or the product
has been damaged as a result of misuse.
This warranty excludes any liability other than that
expressly stated previously, including but not limited to, any
incidental or inconsequential damages.
SOME STATES DO NOT ALLOW THE EXCLUSION OR
LIMITATION OF INCIDENTAL OR CONSEQUENTIAL
DAMAGES, SO THE ABOVE LIMITATION OR EXCLUSION
MAY NOT APPLY TO YOU.
THIS WARRANTY GIVES YOU SPECIFIC LEGAL RIGHTS,
AND YOU MAY ALSO HAVE OTHER RIGHTS THAT MAY
VARY FROM STATE TO STATE.
One (1) Year Limited Warranty Garantía Limitada Aurante Un (1) Año
Troubleshooting Solución de Problemas
La firma Dorel Juvenile Group, Inc., asegura al comprador original que
este producto (Termómetro de oído de lectura rápida), está garantizado
contra materiales defectuosos o mano de obra deficiente durante
un (1) año a partir de la fecha de compra, si se utiliza en condiciones
normales. Si el producto presentara materiales defectuosos o mano
de obra deficiente, Dorel Juvenile Group, Inc. reparará o sustituirá
el producto, a nuestra discreción, de manera gratuita. El comprador
cubrirá todos los costes relacionados con el envase y envío del
producto al Departamento de Relaciones con el Consumidor de Dorel
Juvenile Group, a la dirección que aparece al inicio de este documento,
y los demás costes de transportación
o aseguramiento relacionados
con el envío. Dorel Juvenile Group cubrirá los costes de devolución
al comprador del producto reparado o sustituido. El producto debe
enviarse en su envase original junto con una prueba documental de la
compra, ya sea el recibo de venta u otro medio demostrativo de que
el producto aún esté dentro del período de garantía. Esta garantía
quedará anulada si el propietario hubiera reparado o modificado el
producto, o si éste se hubiera dañado como consecuencia del uso
incorrecto.
Esta garantía excluye cualesquiera otras responsabilidades ajenas
a la expresada más arriba, entre otras los daños incidentales o
consecuentes.
EN ALGUNOS ESTADOS NO SE PERMITEN LAS EXCLUSIONES
O LIMITACIONES REFERENTES A LOS DAÑOS INCIDENTALES O
CONSECUENTES
, DE MODO QUE LA LIMITACIÓN O EXCLUSIÓN
ANTES EXPUESTA QUIZÁS NO SE APLIQUE EN SU CASO
PARTICULAR.
ESTA GARANTÍA LE OTORGA DERECHOS LEGALES ESPECÍFICOS Y
ES POSIBLE QUE USTED TAMBIÉN CUENTE CON OTROS DERECHOS
QUE PUDIERAN VARIAR EN DISTINTOS ESTADOS.
Technical Specifications Especificaciones Técnicas
Measurement Range: 93.2°F to 109.4°F.
Measurement Accuracy: Technical: +/- 0.4°F.
Operation Environment: 60.8°F to 104°F.,
Storage Environment: -4°F to 122°F.
Límites de medición: 34°C a 43°C.
Precisión de la medición: Técnicas: +/- 0.2°C.
Entorno de operación: 16°C a 40°C,
Entorno de almacenamiento: -20°C a 50°C,
How Does it Work?
The Quick Read Ear Thermometer
obtains a reading in 1 second by
measuring the infrared heat given off by
the eardrum and surrounding tissues.
Temperature From The Ear
Clinical research has shown that the
ear is an ideal site for taking body
temperature. The eardrum shares
the same blood supply with the
hypothalamus, the part of the brain that
controls body temperature. Therefore,
the ear is an accurate indicator of core
body temperature.
¿Cómo funciona?
El termómetro de oído de lectura rápida
toma la temperatura en 1 segundo
midiendo el calor infrarrojo emitido por el
tímpano y los tejidos que lo rodean.
Temperatura del oído
La investigación clínica ha demostrado
que el oído es un sitio ideal para tomar
la temperatura del cuerpo. El oído medio
comparte la misma provisión de sangre que
e
l hipotálamo, la porción del cerebro que
controla la temperatura corporal. Por lo
tanto, el oído es un indicador preciso de la
temperatura principal del cuerpo.
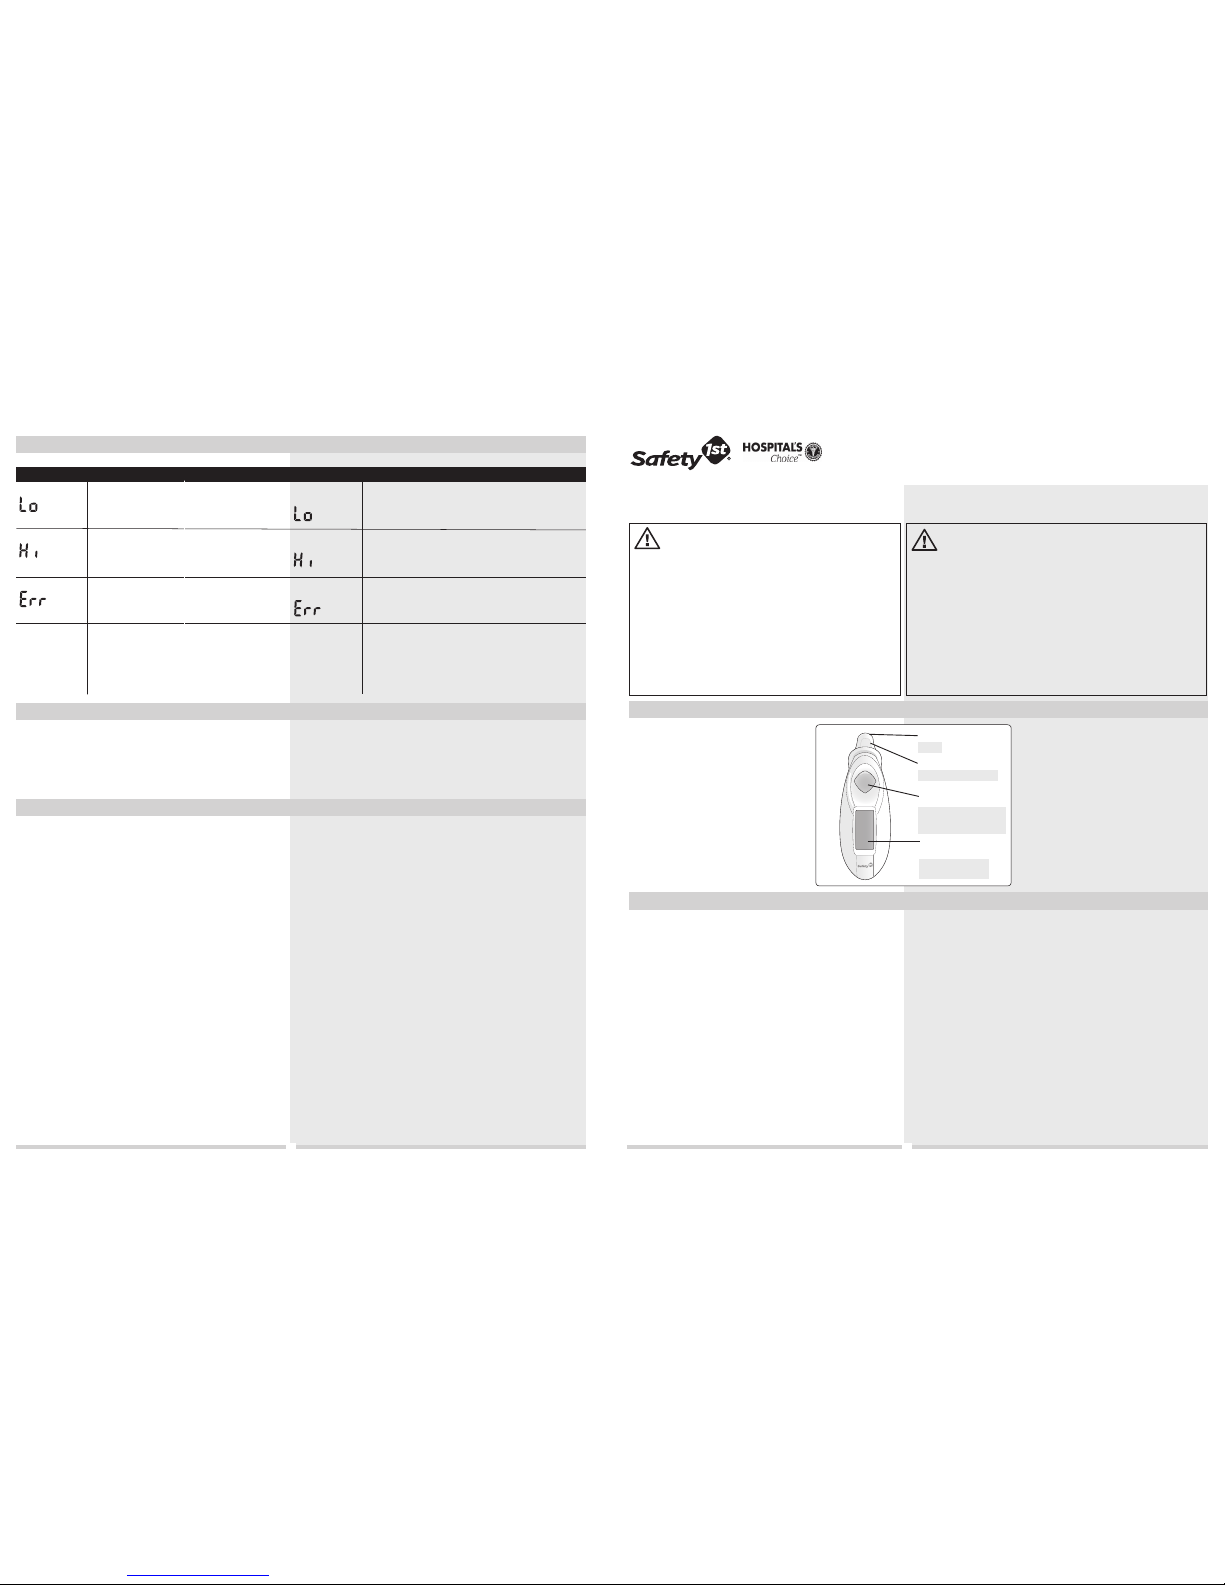
Pantalla LCD
con iluminación
Botón de encendido
/medición con
apagado automático
LCD Display
with Illumination
On/Scan Button
with Auto Shut-Off
Punta de la sonda
Tapa
Probe Tip
Cap
Know Your Unit Conozca Su Unidad
• Read these instructions carefully to ensure accurate
temperature readings. Temperature readings are affected
by many factors, including exercise, drinking hot or cold
beverages prior to taking a reading, and technique.
• High or prolonged fever requires medical attention,
especially for young children. Contact your physician.
Fever chart included on package.
• Clean probe tip before and after each use.
• Keep in mind that the thermometer will automatically
shut-off after one minute.
• Do not expose the thermometer to extreme
temperatures, humidity, direct sunlight or shock. Store
the thermometer in a dry place at room temperature.
• Do not return this product to the place of purchase.
If any parts are missing, email consumer@djgusa.com,
call Consumer Relations at (800) 544-1108, or fax at
(800) 207-8182. You can also visit our website at
www.safety1st.com. Have the model number (TH051)
and date code (manufacture date located on back of
thermometer) ready.
Important Information Información Importante
• Lea atentamente estas instrucciones para asegurar lecturas de
temperatura precisas. Las lecturas de temperatura son afectadas por
muchos factores, tales como el ejercicio físico o el beber bebidas
calientes o frías, si se los realiza antes de medir la temperatura. Los
resultados también dependen de la técnica empleada.
• La fiebre alta y prolongada requiere atención médica,
especialmente en el caso de niños pequeños. Consulte a su médico.
El paquete incluye una tabla de valores de fiebre.
• Limpie la punta de sonda antes y después de cada medición.
• Tenga en cuenta que el termómetro se apagará automáticamente
al cab
o de un minuto.
• No exponga el termómetro a temperaturas extremas, humedad, luz
directa del sol ni golpes. Guarde el termómetro en un lugar seco a
temperatura ambiente.
• No devuelva este producto al lugar donde lo compró. Si falta
alguna pieza, envíe un correo electrónico a consumer@djgusa.com,
llame al Departamento de Relaciones con el Consumidor al
(800) 544-1108, o envíe un fax al (800) 207-8182. También puede
visitar nuestro sitio web en www.safety1st.com. Tenga a mano
el número de modelo (TH051) y el código de fecha (fecha de
fabricación en la parte posteri
or del termómetro) a mano.
ADVERTENCIA:
• NUNCA permita que los niños jueguen con este termómetro. No
es un juguete. Es un dispositivo electrónico delicado que se puede
dañar si no se utiliza correctamente bajo supervisión de los padres.
• SIEMPRE supervise al niño cuando use el termómetro.
• Evite los golpes bruscos y el polvo.
• NUNCA permita que un niño lo use por sí solo o sin
supervisión de los padres.
• NO permita que el niño camine o corra mientras se le
toma la temperatura. La sonda podría causarle daño.
WARNING:
• NEVER allow a child to play with this thermometer. It is
not a toy. It is a sensitive electronic device and may be
damaged if not used properly under parental supervision.
• ALWAYS supervise your child when using thermometer.
• Avoid sudden impact and dust.
• NEVER allow your child to use it alone or without
close parental supervision.
• DO NOT allow child to walk or run during
temperature taking. Probe could present a hazard.
Problem What to Do Problema Qué debe hacer
Display reads La pantalla
muestra
Temp reading
doesn’t seem
accurate
La medición de
temperatura no
es precisa.
Display reads La pantalla
muestra
Display reads La pantalla
muestra
• Measured temperature is above 109.4°F. Turn
off thermometer. Wait one minute and then
turn on. Listen for two beeps before placing
probe in ear. Re-take temperature.
• La temperatura medida es superior a 43 °C.Apague el
termómetro. Espere un minuto y vuelva a encenderlo.
Debe oír los dos “bips” antes de colocar la sonda en el
oído. Vuelva a medir la temperatura.
• Thermometer’s probe tip may be dirty. Clean
with alcohol swab and reta
ke temperature.
• Ear canal may have excessive wax build-up.
Clean ears per your pediatrician’s advice.
• La punta de la sonda del termómetro puede estar sucia.
Límpiela con un paño embebido en alcohol y vuelva a
medir la temperatura.
• El conducto auditivo puede tener una acumulación
excesiva de cera. Limpie los oídos siguiendo las
recomendaciones de su pediatra.
• Measured temperature is below 93.2°F. Probe
may have been inserted incorrectly. Review
correct positioning instructions and retake
measurement.
• La temperatura medida es inferior a 34 °C. La sonda
se pu
ede haber insertado incorrectamente. Lea las
instrucciones para colocar la sonda correctamente y
vuelva a medir la temperatura.
• Thermometer has been in a hot or cold environment and must be allowed to reach room
temperature. Wait at least an hour before
attempting again to use this thermometer.
• El termómetro ha estado en un ambiente caliente o frío
y debe permitirle alcanzar la temperatura ambiente.
Espere al menos una hora antes de volver a usar este
termómetro.
4
2
3
To switch the display between °F and °C: While
the thermom eter is off, press and hold the On/Sc an
Button for about 5 seconds un til you see the °F or
°C. Release button.
Changing from Fahrenheit to Celsius Cambio de grados Fahrenheit a grados Celsius
Positioning Thermometer Cómo Posicionar la Termómetro
Memory Function Función de Memoria
The thermometer’s memory stores the last reading.
It will appear after thermometer runs its built-in test
at startup. This feature allows you to compare your
most recent measurement to the next one.
When the “low battery” icon appears (Figure 1),
the battery is nearly exhausted, but a few
measurements may still be taken. When the “Lo”
appears (Figure 2), the battery is exhausted and
needs replacing.
1
Use a small screwdriver to loosen screw. Slide
cover off (Figure 3).
2
Press release tab with finger to remove battery
(Figure 3). If battery does not easily remove,
use wooden toothpick to help lift it from battery
compartment.
3
Insert a new 3-volt battery (CR2032 or
equivalent), correctly positioned with the
positive “+” side facing up (Figure 4) and
gently press into place.
4
Place the battery cover on the thermometer
and secure the screw.
To Replace Battery (CR2032 or equiv.) Para Reemplazar la Batería (CR2032 o equiva-
• Very important! To ensure accurate readings, clean the
probe and tip with an alcohol swab before and after
each measurement.
• Use a soft, dry cloth to clean thermometer body. Never
use abrasive cleaning agents, thinners or benzene for
cleaning. Do not scratch the surface of the probe lens or
the display.
Care and Cleaning Cuidado y Limpieza
1
4
Tornillo
Batería
Screw
Battery
Para cambiar la pantalla de °F a °C: Mientras el
termómetro se encuentr e apagado, mantenga presionado
el botón de encendi do/medición durante un os 5
segundos ha sta que el símbolo °F o °C aparezca en la
pantalla. S uelte el botón.
La memoria del termómetro almacena la última medición. Esta
aparecerá después de que el termómetro finalice la prueba
incorporada al activarlo. Esta función le permite comparar su
medición más reciente con la siguiente.
Cuando la pantalla muestra el símbolo de batería
baja (Figura 1), la batería está casi agotada, pero
aún permite tomar varias mediciones adicionales.
Si se muestra el indicador “Lo” (Figura 2), la
batería está agotada y debe reemplazarse.
1
Utilice un destornillador pequeño para aflojar el
tornillo. Deslice la tapa para retirarla (Figura 3).
2
Presione la lengüeta de liberación con el dedo
para quitar la batería (Figura 3). Si la batería no
sale fácilmente, utilice un palillo de madera para
ayudar a levantarla y sacarla del compartimiento
de la batería.
3
Inserte una batería de 3 voltios nueva (CR2032
o equivalente), colocándola adecuadamente
con el lado positivo “+” hacia arriba (Figura 4) y
presione suavemente para que encaje en el lugar.
4
Ponga la tapa en el termómetro y asegúrela el
tornillo.
• “¡Muy importante! Para asegurarse de que la lectura de
temperatura sea precisa, limpie la sonda y la punta con
un hisopillo embebido en alcohol antes y después de
cada medición.
• Use un paño suave y seco para limpiar el cuerpo del
termómetro. No utilice nunca productos de limpieza
abrasivos, solventes o bencina. No raye la superficie de la
lente de la sonda o la pantalla.
PRECAUCIÓN: Reemplácelas únicamente por
baterías de litio de CR2032 de 3V o su equivalente directo. El uso de otros tipos de baterías
puede presentar riesgo de incendio o rotura.
AVISO:
• Mantenga la batería fuera del alcance de los niños. Tragarse una
batería puede resultar fatal. La batería no debe volver a cargarse
ni exponerse a temperaturas muy altas, ya que podría explotar.
• Las baterías usadas se deben desechar correctamente. No
deseche las baterías arrojándolas al fuego, no las recargue, no las
ponga al revés, no las desarme ni las mezcle con baterías usadas
o de otro tipo, ya que podrían explotar o desarrollar pérdidas y
causar lesiones.
CAUTION: Replace only with 3V “CR2032” or
direct equivalent lithium battery. Use of other
types of batteries may present a risk of fire
or rupture.
WARNING:
• Keep battery out of child’s reach. Swallowing battery could
be fatal. Battery should not be charged or placed into
extreme heat as it may explode.
• Used batteries should be disposed of properly. Do not
dispose of batteries in fire, recharge, put in backwards,
disassemble, mix with used or other battery types – they
may explode or leak and cause injury.
Operating Thermometer Cómo Utilizar el Termómetro
1 Turn On: Press and release the On/
Scan Button. All segments are displayed for 1 second (Figure 1). A
short beep will occur and the last
temperature measured appears
until next temperature is taken
(Figure 2).
2 Backlight goes off after 3 seconds
and the thermometer is ready to
measure temperature.
3 Position ear for thermometer:
• Under 1 Year:
Gently pull ear straight back
• 1 Year to Adult:
Gently pull ear up and back
(See “To Position Thermometer”)
4 Insert thermometer until the probe
tip seals the ear canal.
5 Press and hold the On/Scan Button
for 1 second. During measuring the
icon will appear (Figure 3).
After 1 second, release button. One
beep will sound. The temperature
with
or icon will display for 1
minute (Figure 4).
ICONS:
= No Fever
= Fever (99.5 °F or above)
FEVER ALERT NOTE: If patient has
a fever, thermometer will sound
multiple beeps in addition to
displaying the icon.
6 Auto-shut off will occur after
1 minute.
Todos los
segmentos
All segments
Temp. anterior
Previous Temp.
Medición en
curso
Measuring in
Progress
1
2
3
2
Temperatura
Temperature
4
1 Para activar: Oprima y suelte el botón
de encendido/medición. Se mostrarán
durante 1 segundo todos los segmentos
de la pantalla (Figura 1). Se oirá un
“bip” breve y se mostrará la última
medida de temperatura (Figura 2).
2 La luz de fondo se apagará al cabo de
3 segundos y el termómetro está listo
para medir otra vez la temperatura.
3 Posicione el oído para colocar el
termómetro:
• Menores de 1 año: Tire de la oreja
suavemente hacia atrás.
• Mayores de 1 año hasta adultos: Tire
de la oreja suavemente hacia arriba y
atrás. (Ver la sección “Cómo Posicionar
la Termómetro”)
4 Inserte el termómetro hasta que la punta
de la sonda selle el conducto auditivo.
5 Mantenga oprimido el botón de
encendido/medición durante 1 segundo.
Durante la medición, la pantalla
mostrará el símbolo
(Figura 3).
Al cabo de 1 segundo, suelte el botón.
Se oirá un “bip.” La pantalla mostrará
la temperatura y el símbolo o
durante 1 minuto (Figura 4).
SÍMBOLOS:
= Sin fiebre
= Fiebre (99.5 °F o más)
NOTA DE ALERTA SOBRE LA FIEBRE:
Si el paciente tiene fiebre, además de
mostrar el símbolo , el termómetro
sonará varias veces.
6 Al cabo de 1 minuto, el termómetro se
apaga automáticamente.
• For an infant, it is best to have the child lying flat
with his head sideways so the ear is facing upwards.
For an older child or adult, it is best to stand behind
and slightly to the side of the child. It is recommended
that three temperatures in the same ear be taken
and the highest one used as the reading.
• Proper placement within the ear canal is
essential for an accurate reading. If the
thermometer is not inserted properly
and firmly into the ear canal, a lower
reading might be obtained. Remember to
always use the same ear. The temperature
between the right and the left ear may
differ.
• Para niños menores de un año, es mejor que el niño esté
acostado con la cabeza hacia un lado de manera que
el oído mire hacia arriba. Para niños mayores de un año
o adultos, es mejor pararse detrás y levemente hacia el
costado. Se recomienda tomar tres temperaturas en el
mismo oído y considerar la más alta como
lectura final.
• La colocación correcta en el conducto
auditivo es esencial para una lectura precisa.
Si el termómetro no se inserta correctamente
y con firmeza en el conducto, la temperatura
medida puede ser más baja. Recuerde usar
siempre el mismo oído. La temperatura entre
el oído derecho y el izquierdo puede diferir.
To Position Thermometer
6-12 months
Gently pull
ear straight
back
1 year +
Gently pull
ear up and
back
To Position Thermometer
Para situar la Termómetro
6-12 months
Gently pull
ear straight
back
1 year +
Gently pull
ear up and
back
6-12 meses
Tire suavemente
de la oreja
hacia atrás
1 año+
Tire suavemente
de la oreja hacia
arriba y atrás
6-12 months
6-12 meses
1 year
+
1 año +
3
Lengüeta
Tab
 Loading...