

Safety 1st onBoard 35 LT Instruction Manual
onBoard 35 LT
Infant Car Seat
4-35 lb (1.8-15.9 kg) and 19-32 in. (48-81.3 cm)
Only use this car seat with a compatible
onBoard 35 LT base. For more information
go to safety1st.com/car-seat-base
KEEP INSTRUCTIONS
FOR FUTURE USE.
Read all instructions
before using this
child restraint.
™
4358-6925
1.19.16
Failure to follow the warnings on the labels and in the
instruction manual can result in serious injury or death
to your child.
To see installation videos, scan the QR Code
or visit www.safety1st.com
©2016 Dorel Juvenile.

Important Symbols
Lower Anchor Belt
See page 33 for lower anchor information and
storage location.
Vehicle Belts
See pages 35-36 for vehicle belt information.
Instruction Manual Storage
See page 3 for storage location.
To help you recognize instructions which are most
critical to your child’s safety, we use this symbol.
Failure to follow these warnings can result in the
serious injury or death of your child.
Lower Anchor Belt
Install Page 39
Vehicle Belt Install
Page 43
Install with
Base
Install without
Base
Vehicle Belt Install
Page 48
REAR FACING
4-35 lb (1.8-15.9 kg)
19-32 in. (48-81.3 cm)
See page 4 to
adjust internal
harness system
WARNING: Verify your child’s weight and height
(do not guess) before using the child restraint.

Table of Contents
Getting Started..................................... 1
Parts of the Child Restraint .......................................1
Prepare Child Restraint to Fit Your Child .................... 4
How Does Your Child Fit? .........................................5
Changing Position of Buckle ..................................... 6
Changing Position of Shoulder Harness Strap ............8
Harness System Adjustment for Smaller Infants .........10
Securing Child in Child Restraint ...............................13
General Use ........................................... 16
Removing and Installing to Base ...............................16
Adjusting the Base ..................................................17
Carrier Use .............................................................18
Removing Harness System ....................................... 19
Removing Seat Pad for Cleaning ...............................22
Installing Harness System ........................................24
Canopy Use and Removal .........................................27
Accessories on Select Models .................................. 29
Safety Information ............................... 30
Child Restraint Use ..................................................30
Installation in Vehicle ............................................... 30
Vehicle Seating Position ...........................................31
Vehicle Information ............................. 32
Understanding Your V ehicle ......................................32
Choosing Lower Anchor Belt or Vehicle Belts .............33
Knowing Your V ehicle Belts .......................................35
Aircraft Information .................................................37
Rear Facing with Base ........................ 38
Lower Anchor Belt Installation with Base .............39
Vehicle Belt Installation with Base ...................... 43
Rear Facing without Base .................. 47
Vehicle Belt Installation without Base ..................48
Important Information ........................ 51
Using a Locking Clip ................................................51
Dorel Juvenile Group Information... ...........................53
Registration and Safety Notices ................................54
Troubleshooting... ....................................................55
Replacement Parts Order Form .................................66
Warranty .................................................................58
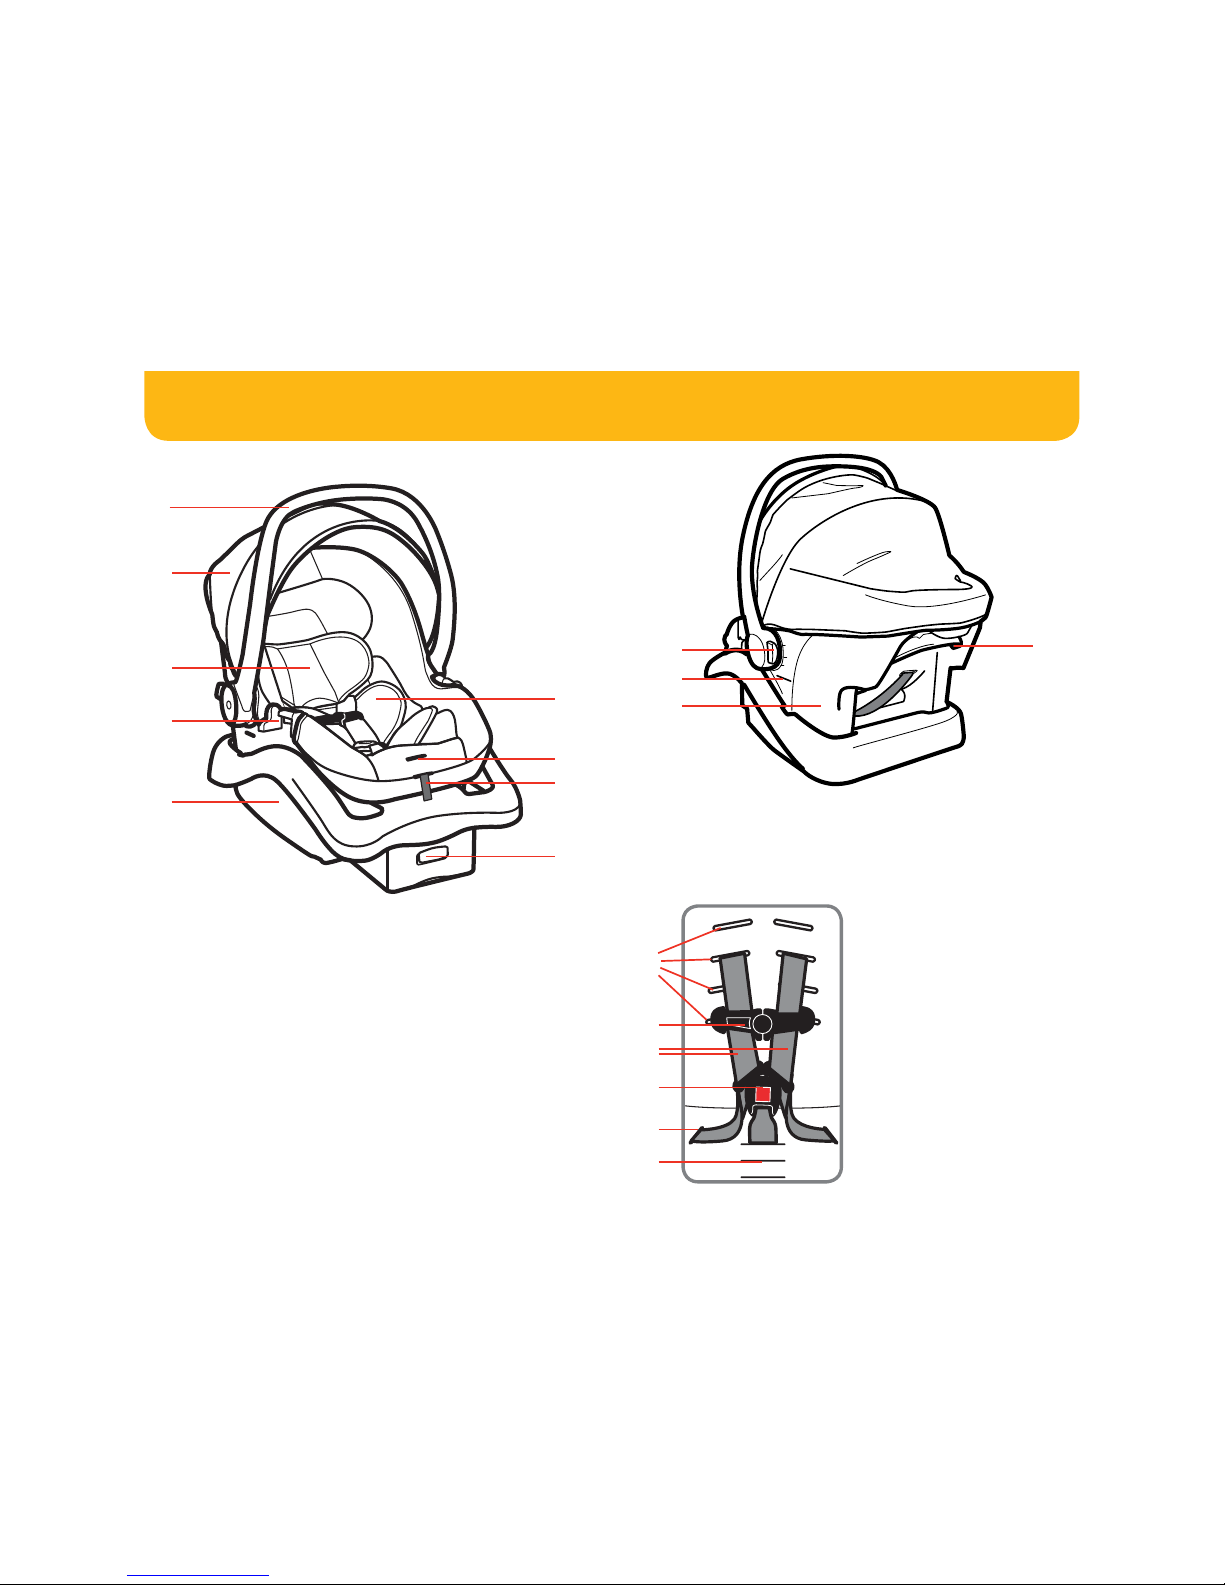
J. Carry Handle
Adjustment Button
K. Rear-Facing Level Line
L. Shell (child restraint)
M. Base Release Handle
Parts of the Child Restraint
1 2
A. Carry Handle
B. Canopy
C. Head Pillow
(see page 29)
D. Vehicle Belt Path Guide
(when used without the
base)
E. Adjustable Base
F. Body Pillow
(see page 29)
G. Harness Release Lever
(through opening in pad)
H. Harness Adjustment
Strap
I. Recline Foot Release
Button
Back ViewFront View
A
B
C
F
G
H
I
M
J
K
L
D
E
N
P
O
Q
R
S
Harness System Detail
N. Shoulder Harness
Slots
O. Chest Clip
P. Harness Strap
Q. Buckle
R. Hip Harness Slots
S. Buckle Slots
continued on next page
4
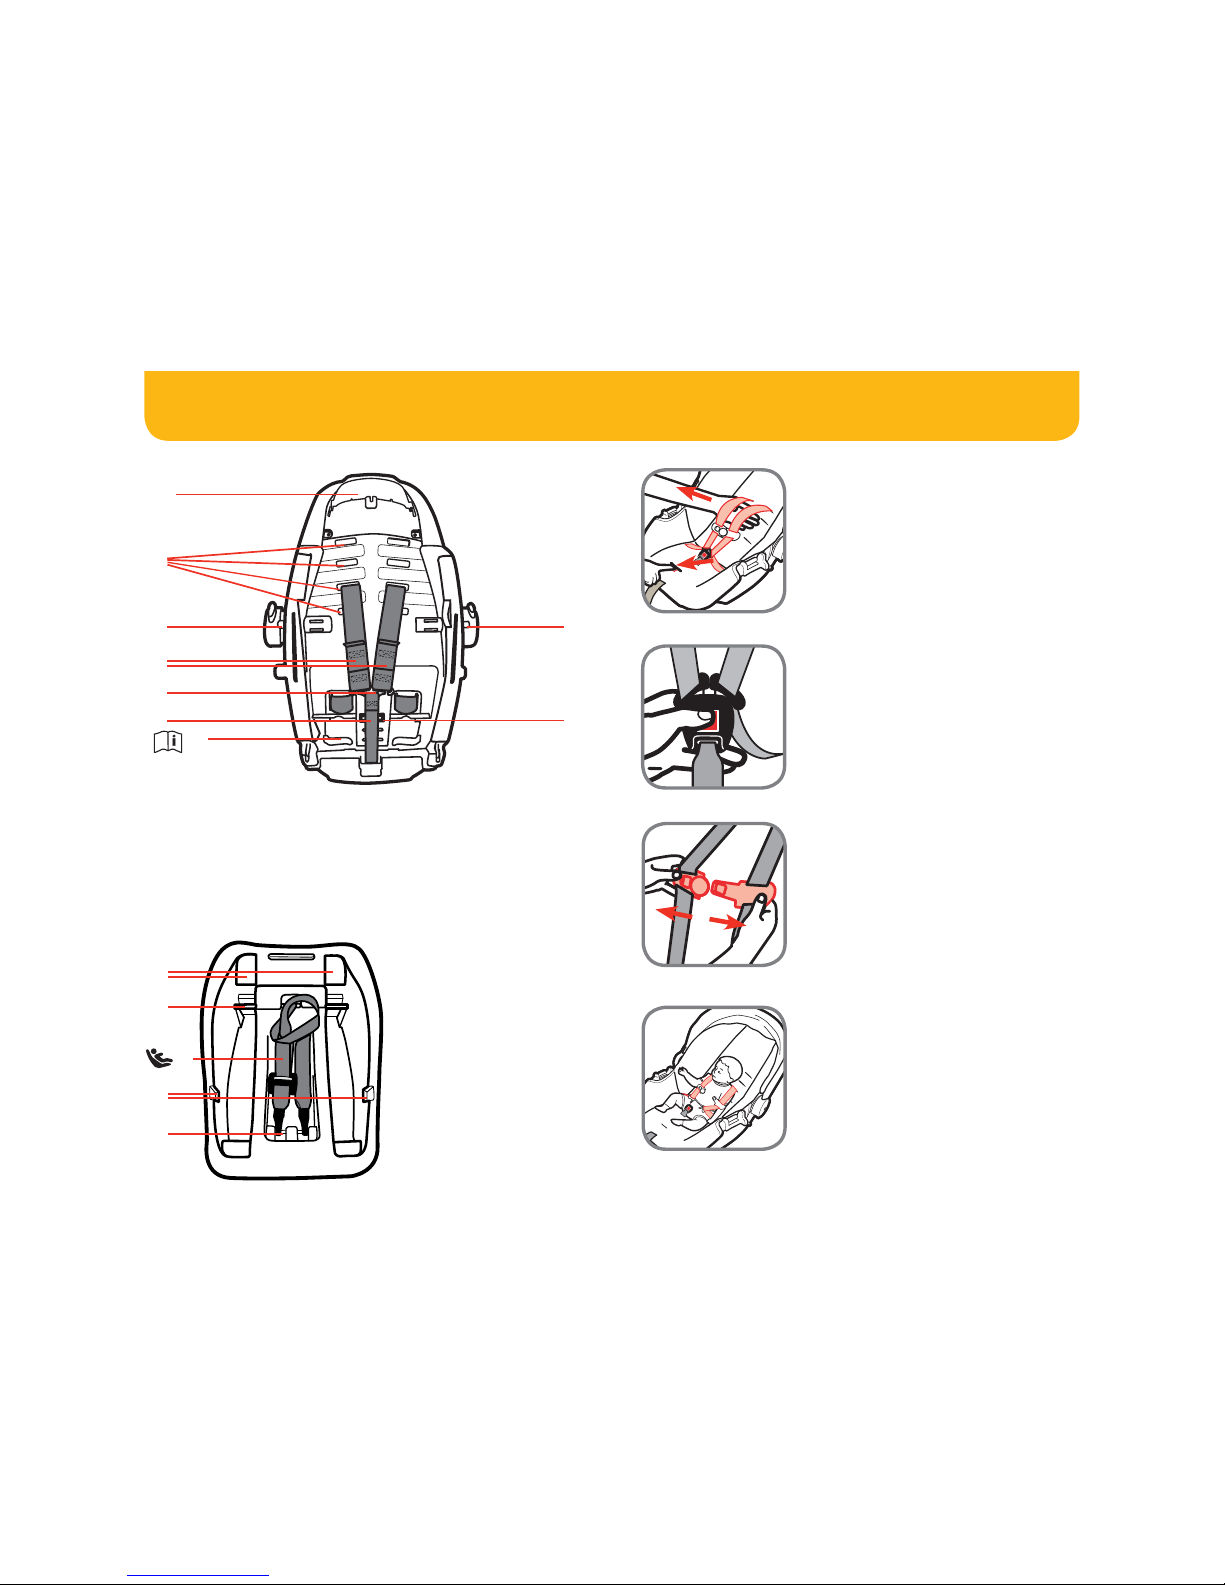
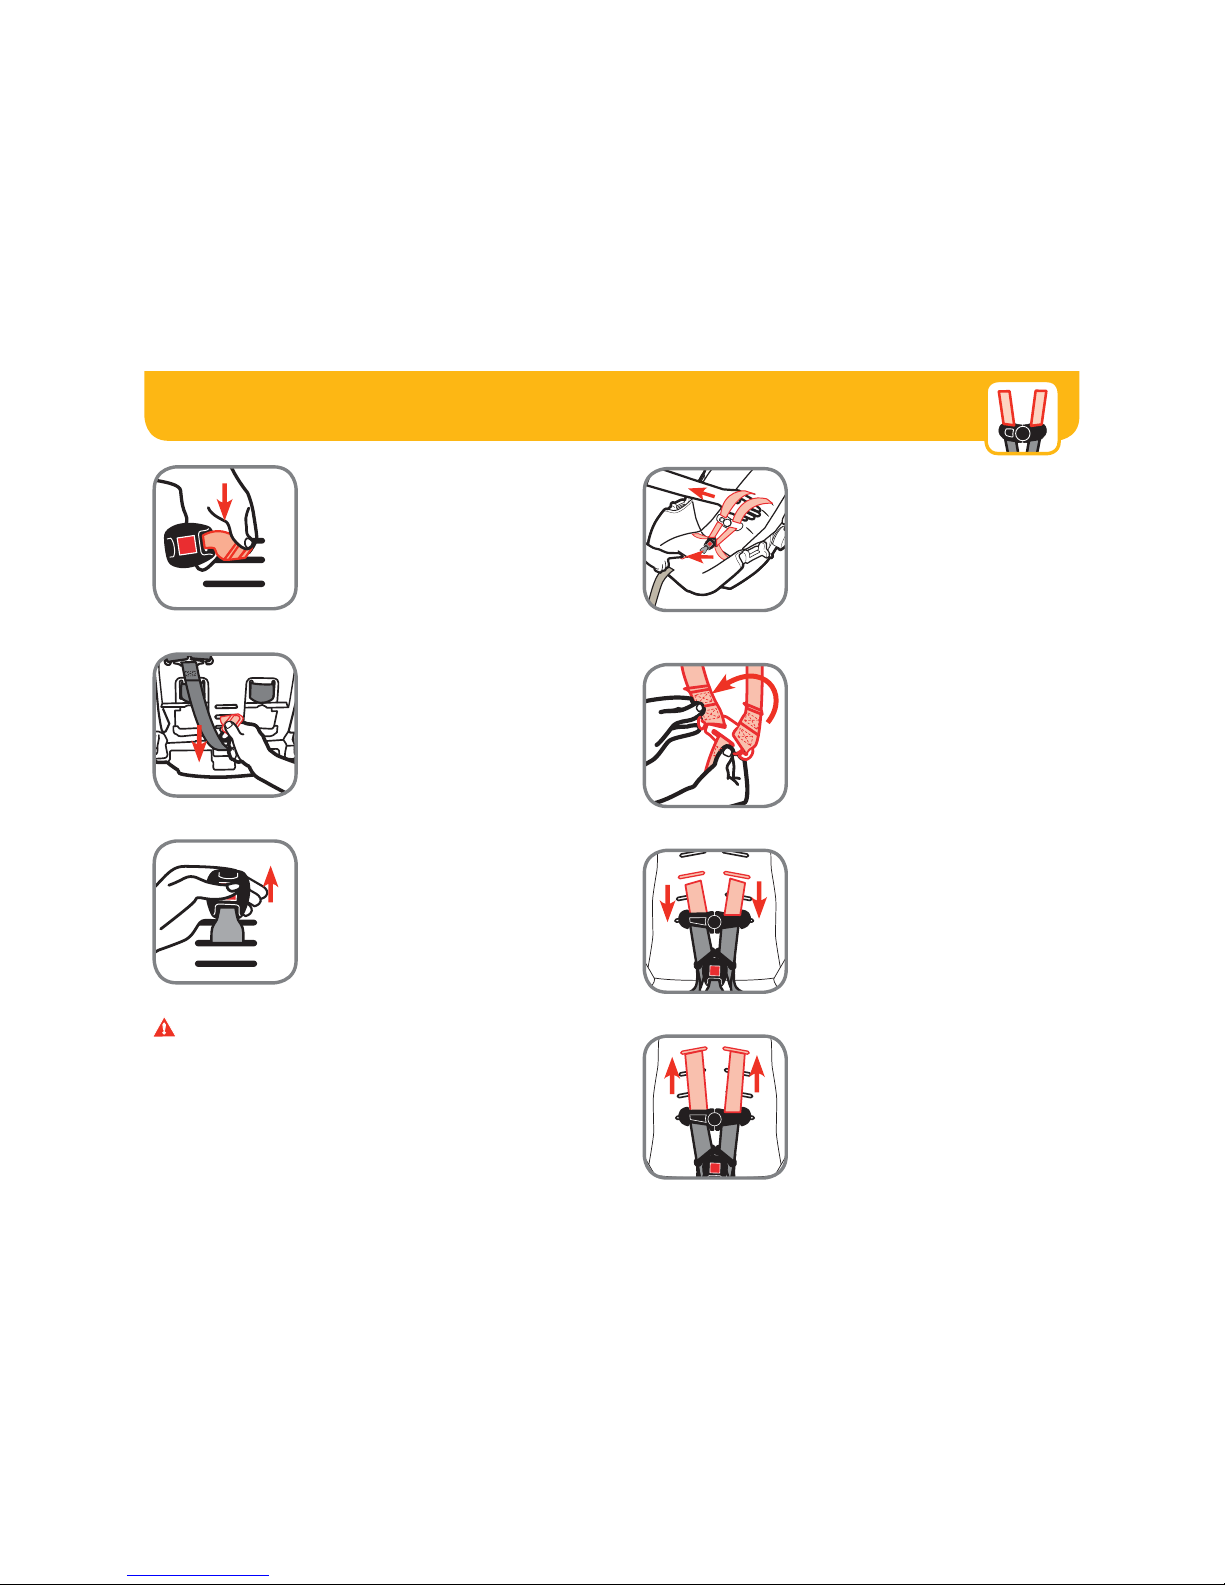
Prepare Child Restraint to Fit Your Child
3
1. Fully Loosen Harness
Straps
Push down on harness release
lever (through opening on front of
seat pad) while pulling out on harness straps as shown.
3. Release Chest Clip
Press on chest clip release button
and pull apart.
2. Unbuckle Harness
Press in on the red button.
Pull buckle tongues out.
4. Place Child in Child
Restraint to Determine
Proper Harness Fit
The child’s bottom and back should
be fl at against the child restraint.
See page 5 for fi t guidelines.
A. Base Release Handle
B. Shoulder Harness Slots
C. Stroller Attachment Pins
D. Harness Strap
E. Splitter Plate
F. Harness Adjustment
Strap
G. Instruction Manual
Storage
H. Buckle’s Metal Retainer
Bottom of Child Restraint
B
G
F
E
C
D
C
H
A
Top of Base
I. Base Belt Path
J. Lock Bars
K. Lower Anchor Belt
L. Base Alignment Slots
M. Lower Anchor Belt
Storage
I
J
K
L
M
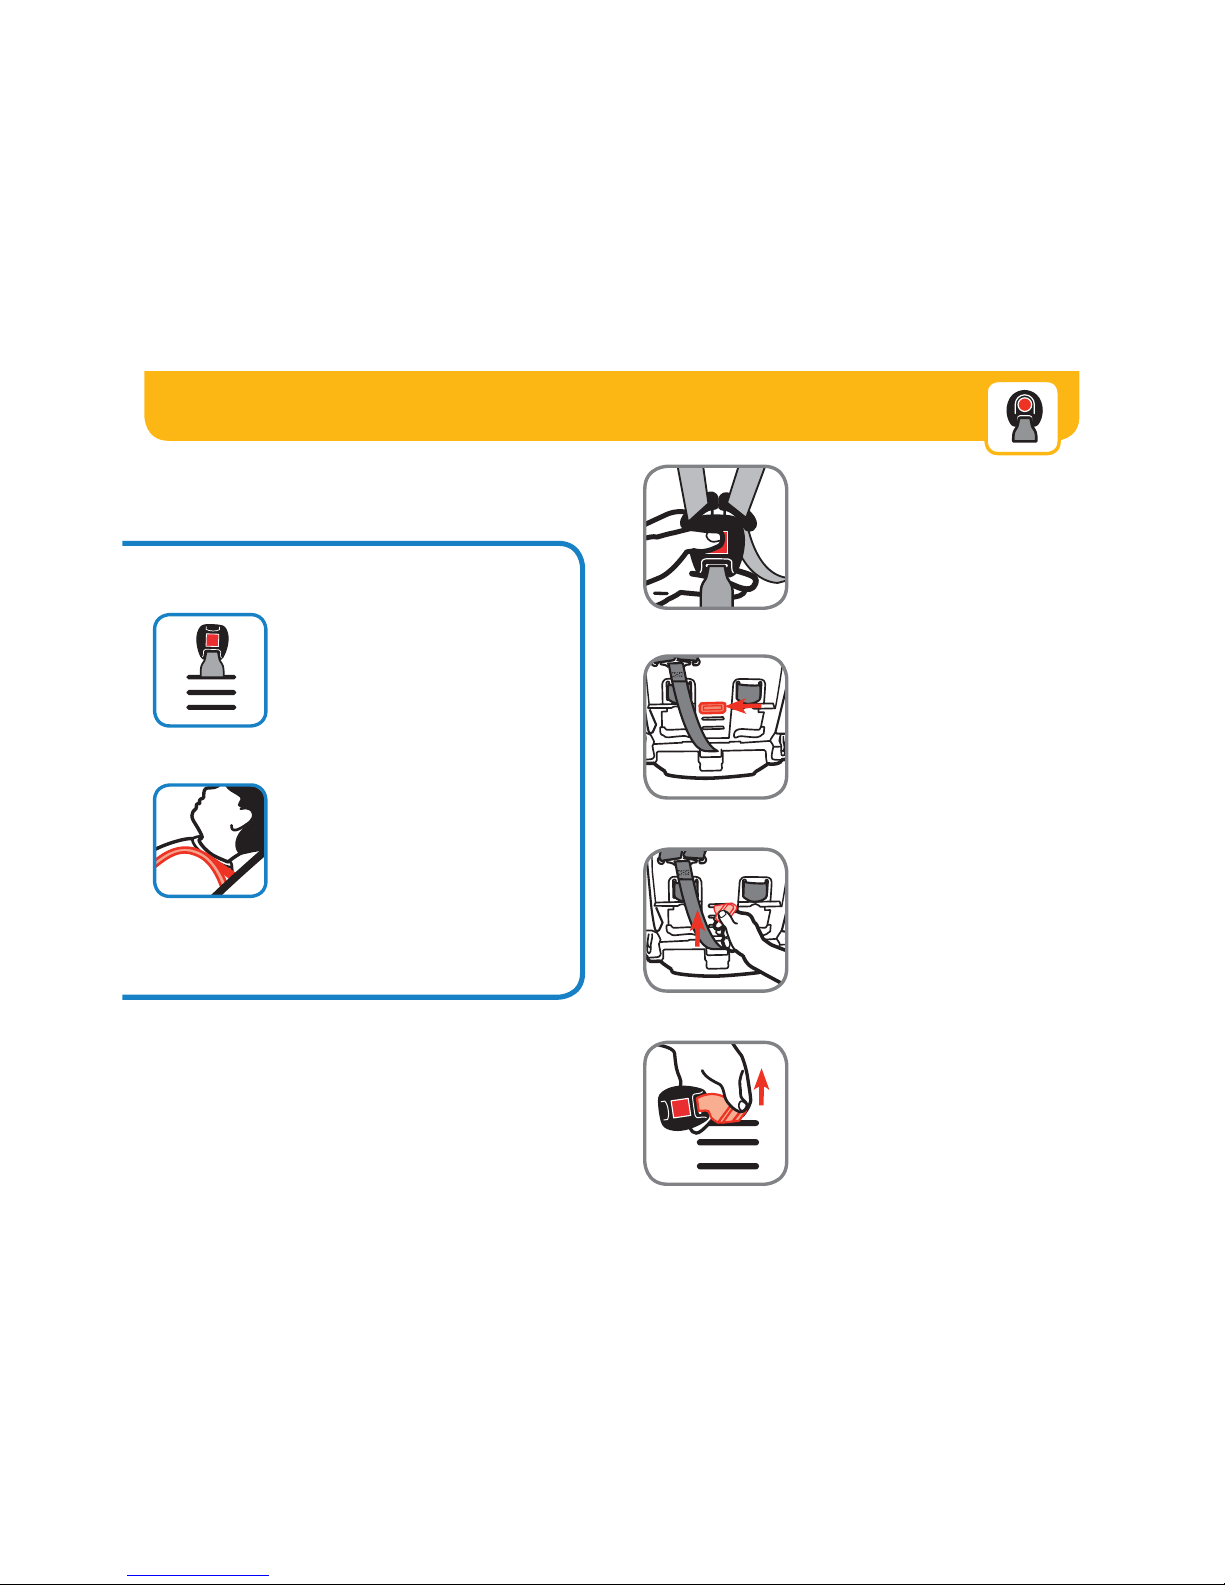
Start in the 1st slot and adjust outward as
your child grows.
Buckle should be used in the slot closest to
your child. It should not be underneath or
behind your child.
Always choose the shoulder harness slots
that are closest to your child’s shoulder
height.
Harness strap MUST be at or slightly
below shoulders.
If the lowest shoulder harness slots are
above the child’s shoulders, do not use
this child restraint.
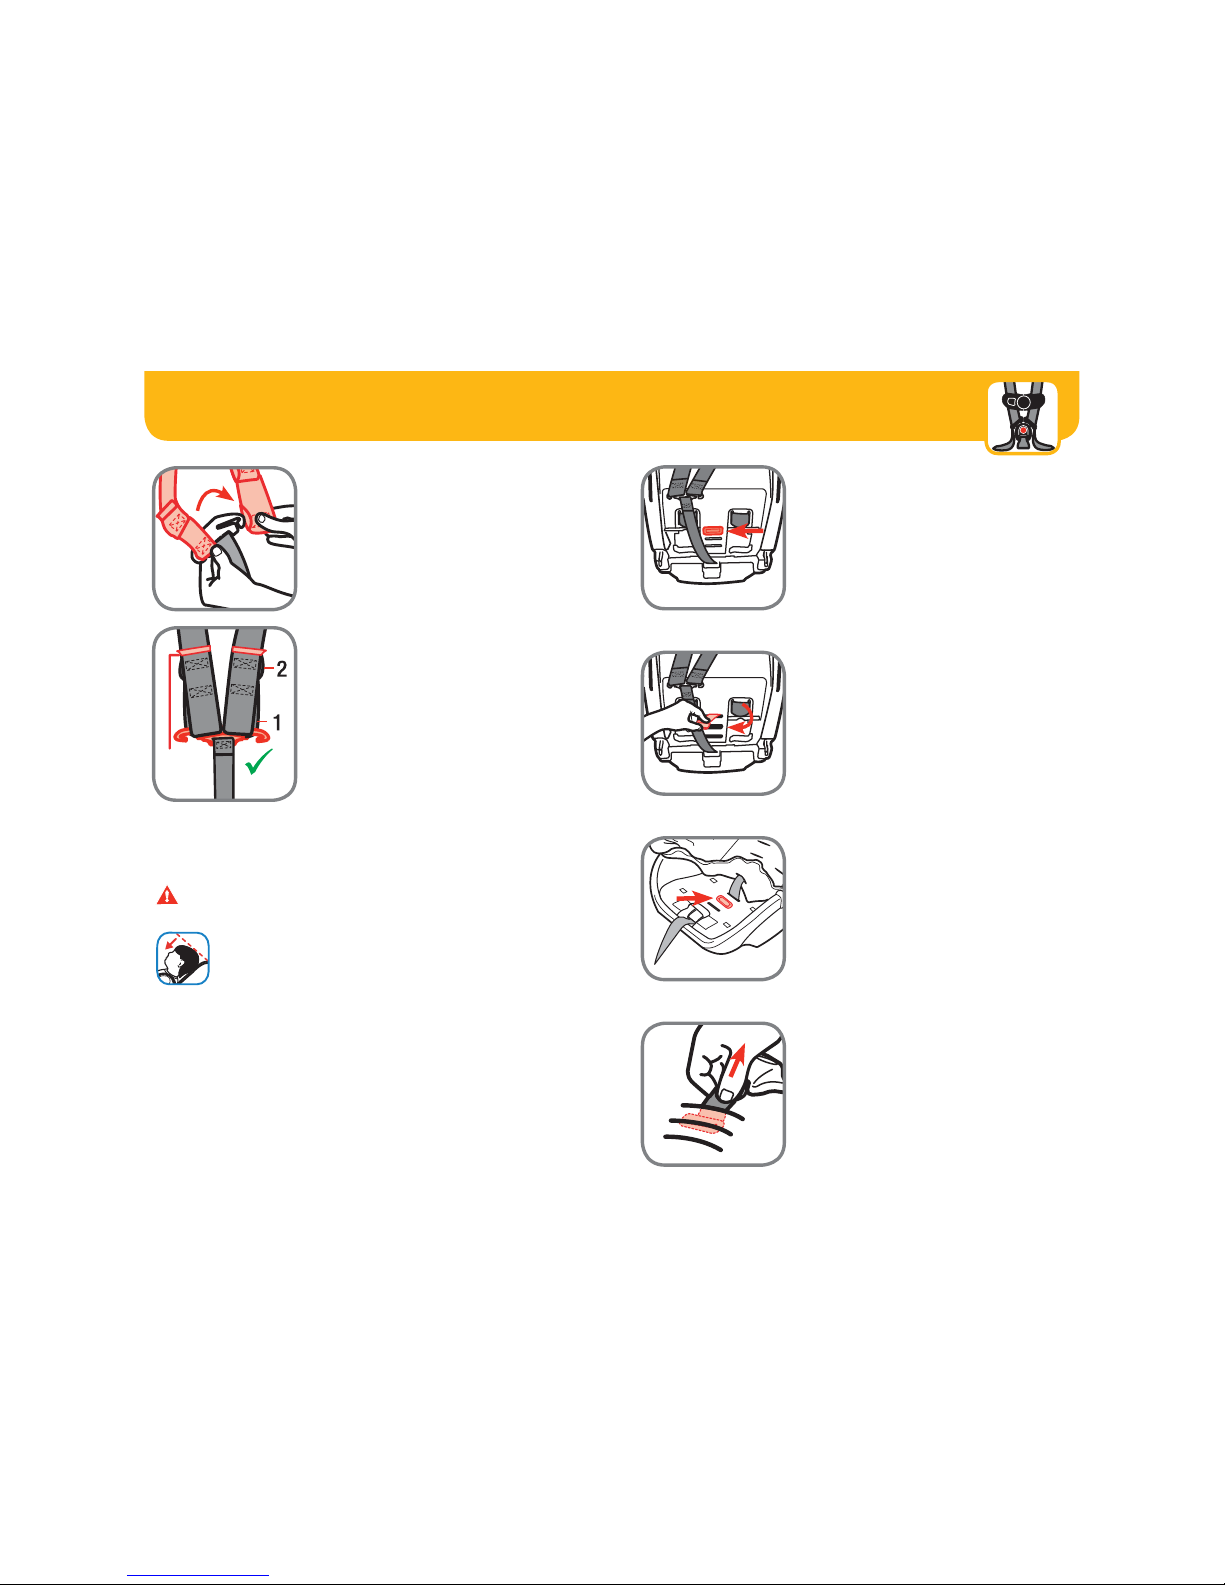
How Does Your Child Fit? Changing Position of Buckle
65
1. Unbuckle Harness
Press in on the red button.
Pull buckle tongues out.
2. Turn Seat Over
Locate buckle’s metal retainer on
bottom of shell.
3. Rotate Metal Retainer
and Push It Up Through
Shell and Pad
REAR FACING
To change buckle position, see pages 6-7.
To change harness strap position, see pages 8-9.
To adjust harness system for smaller infants, see pages
10-12.
Use the guidelines below to determine if the buckle and harness
strap are in the right place for your child.
1
2
3
continued on next page
4. From Top of Seat,
Pull Buckle Out of Shell
and Pad
7 8
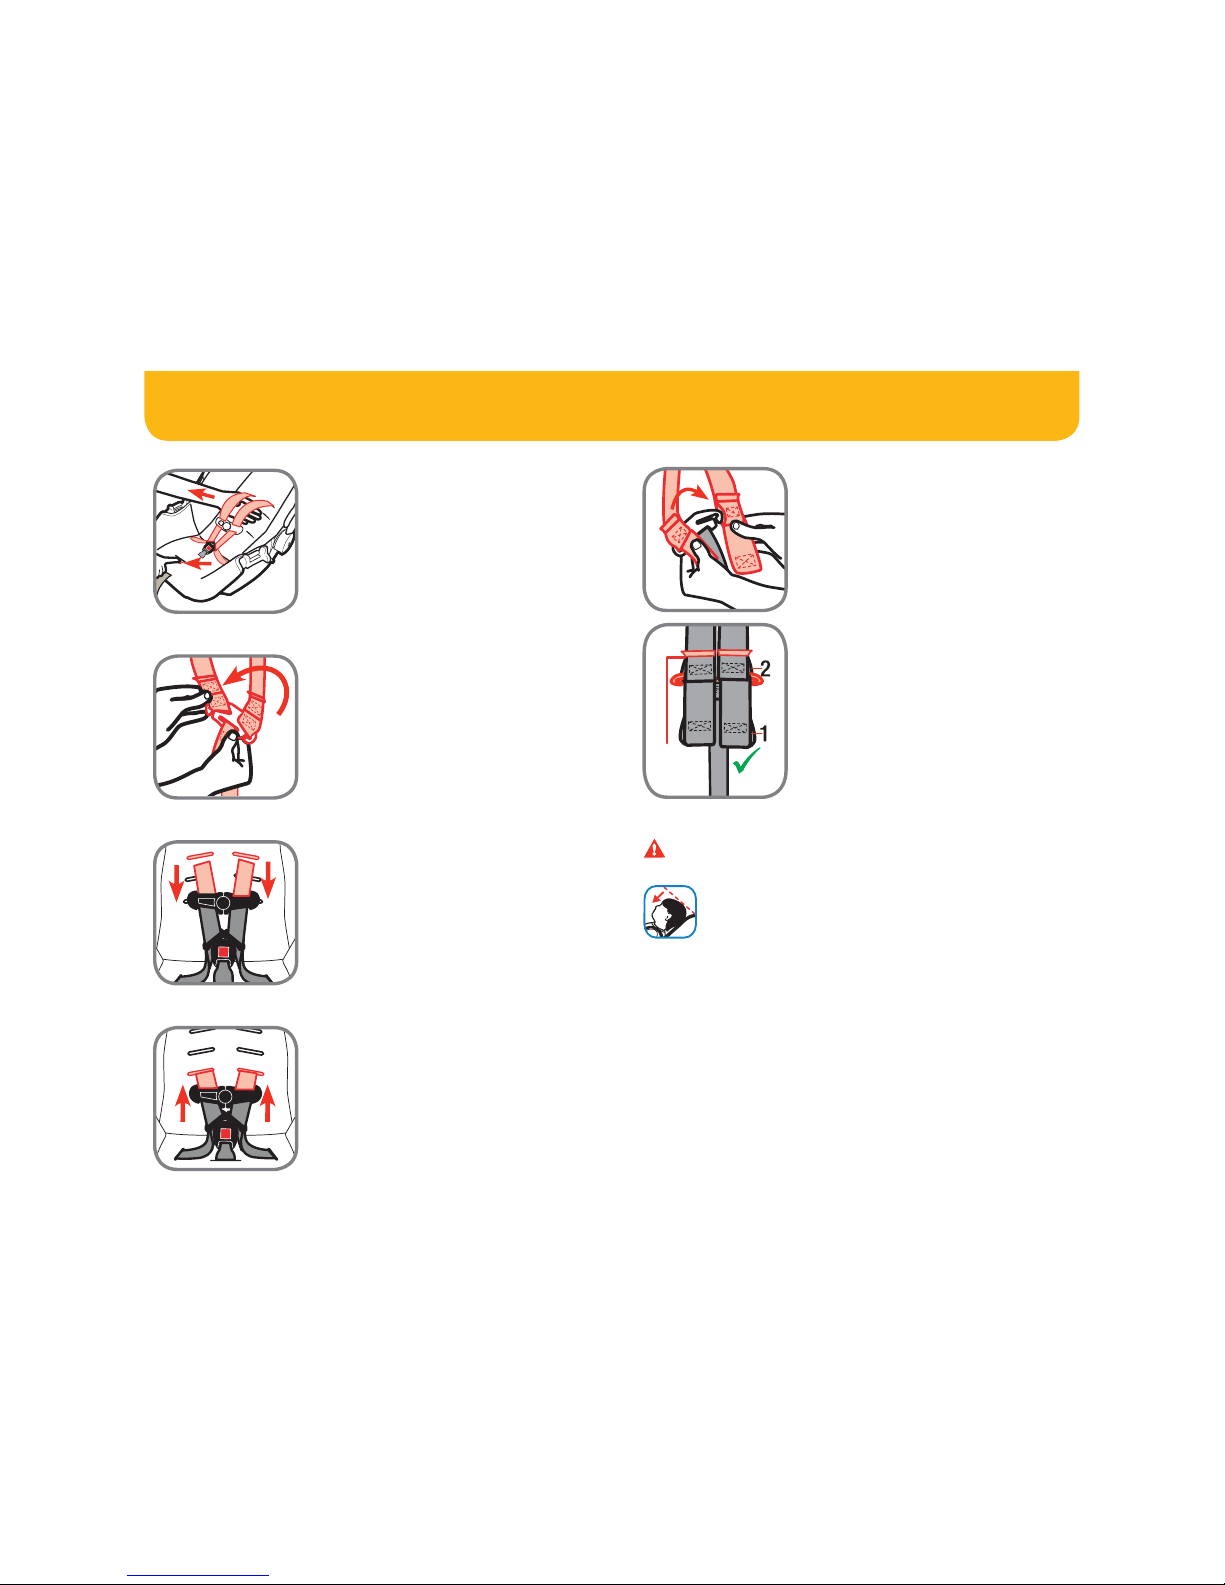
Changing Position of Shoulder
Harness Strap
5. Insert Buckle’s Metal
Retainer into Slot
Closest to Child
Buckle
MUST face out.
6. Pull Metal Retainer
Completely Through
Pad and Shell
7. Check Buckle
Pull up on buckle to make sure it
is secured.
The buckle
MUST not pull out.
WARNING: Failure to place buckle’s metal retainer
completely through pad and shell can result in serious
injury or death.
1
2
3
1. Fully Loosen Harness
Straps
Push down on harness release lever
(through opening on front of seat
pad) while pulling out on harness
straps as shown.
2. From Back of Seat,
Remove Harness
Strap Loops From
Splitter Plate
3. Pull Harness Strap Out of
Shoulder Harness Slots
4. Rethread Harness Strap
Into Correct Shoulder
Harness Slots For Your
Child
continued on next page
9 10
Harness System Adjustments for
Smaller Infants
sewn
end
4. Replace Pad and
Check Buckle
Pull up on buckle to make sure it
is secured.
The buckle
MUST not pull out.
2. From Bottom of Seat,
Pull Metal Retainer
Towards You and Push
It Up into 2nd Slot As
Shown
3. From Top of Seat,
Lift Pad Up and Lay
the Metal Retainer Flat
Against the Shell As
Shown
1. With Buckle in the
1st Slot As Shown,
Turn the Seat Over
If you need to move the buckle to
the 1st slot, see pages 6-7.
continued on next page
WARNINGS: Make sure that the harness height is
correct for your child’s size.
Do not use this child restraint rear facing unless
the top of your child’s head is at least 1 in. (2.5
cm) below the top of the child restraint.
Failure to follow these steps can result in serious injury or
death.
5. Attach 1st Harness Strap
Loops to Splitter Plate
Sewn ends of the harness strap
loops
MUST face towards you.
DO NOT twist harness strap or
harness adjustment strap.
Make sure the same harness strap
loops are fitted COMPLETELY ON
both sides of the splitter plate.
sewn
end
1211
5. Fully Loosen Harness
Strap
Push down on harness release lever
(through opening on front of seat
pad) while pulling out on harness
straps as shown.
6. From Back of Seat,
Remove Harness
Strap Loops From
Splitter Plate
7. Pull Harness Strap Out of
Shoulder Harness Slots
8. Rethread Harness Strap
Into Correct Shoulder
Harness Slots For Your
Child
WARNINGS: Make sure that the harness height is
correct for your child’s size.
Do not use this child restraint rear facing unless
the top of your child’s head is at least 1 in. (2.5
cm) below the top of the child restraint.
Failure to follow these steps can result in serious injury or
death.
9. Attach 2nd Harness Strap
Loops to Splitter Plate
Sewn ends of the harness strap
loops
MUST face towards you.
DO NOT twist harness strap or
harness adjustment strap.
Make sure the same harness strap
loops are fitted COMPLETELY ON
both sides of the splitter plate.
13 14
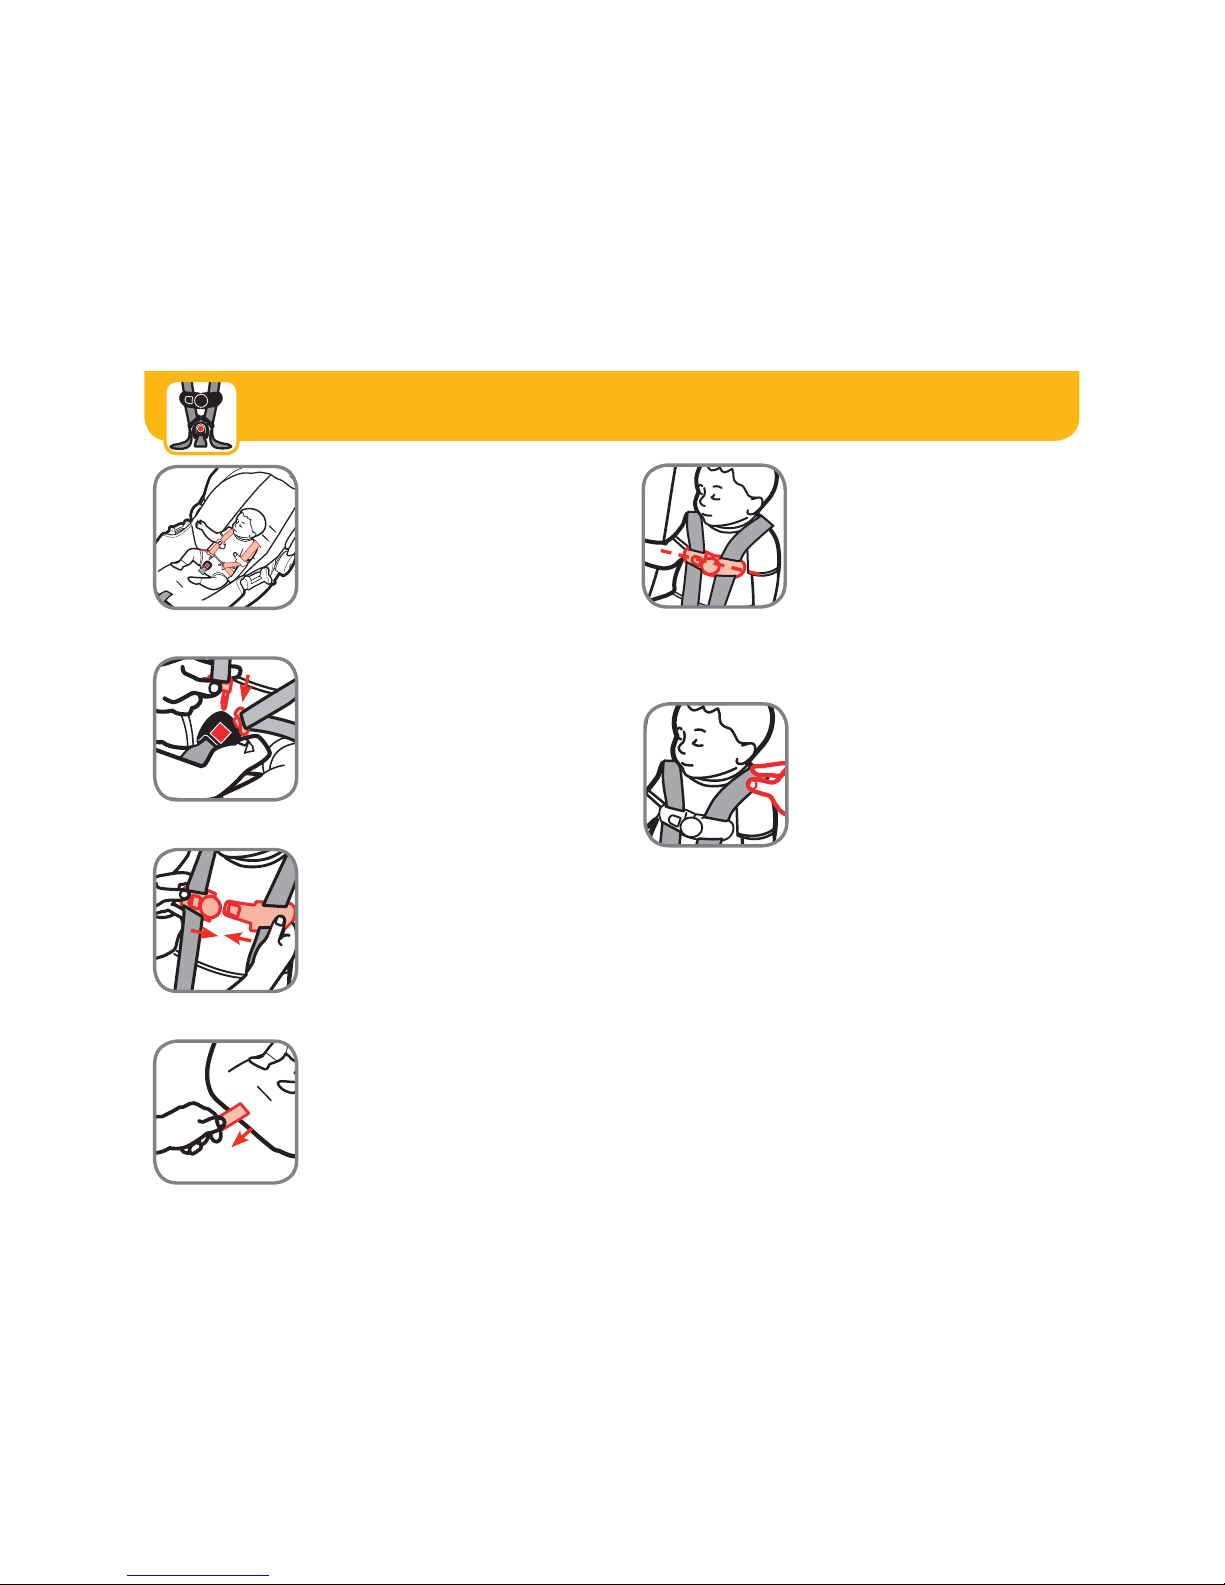
Securing Child in Child Restraint
1. Place Child in Child
Restraint
The child’s bottom and back should
be flat against the child restraint.
Position harness strap over child’s
shoulders and upper thighs.
3. Close Chest Clip
Insert right half of chest clip into
left half and snap together.
2. Buckle Harness
Push buckle tongues into buckle
until you hear them “click.”
Pull up on harness strap to make
sure buckle is locked.
4. Tighten Harness
Pull on harness adjustment strap
to tighten harness snugly.
5. Position Chest Clip
The chest clip must be placed at
mid-chest (even with armpits) and
away from the child’s neck.
6. Check Harness Tightness
Try to pinch the harness at the
shoulders vertically between index
finger and thumb as shown.
If your fingers slip off, the
harness is tight enough.
If you can pinch the harness
strap, tighten more. The harness
straps should be snug throughout
their length.
A snug harness strap should
not allow any slack. It lies in a
relatively straight line without
sagging.
It does not press on the child’s
flesh or push the child’s body into
an unnatural position.
continued on next page
 Loading...