

Safety 1st IH282, IH284, IH283 User Manual
Ultrasonic 360° Humidifier
IH282, IH283, IH284
User Guide
©2013 Dorel Juvenile Group. All Rights Reserved. Todos derechos reservados.
www.djgusa.com (800) 544-1108 www.safety1st.com
Made in CHINA. Hecho en CHINA.
Styles and colors may vary. Los estilos y los colores pueden variar.
Distributed by (Distribuido por) Dorel Juvenile Group, Inc., 2525 State St., Columbus, IN 47201-7494
Dorel Distribution Canada, 873 Hodge, St. Laurent, QC H4N 2B1
11/06/13 4358-4834E
READ ALL INSTRUCTIONS BEFORE ASSEMBLY AND USE.
KEEP INSTRUCTIONS FOR FUTURE REFERENCE.
CAUTION
• Adult assembly is required. Keep small parts away
from children.
WARNING
When using electrical appliances, basic precautions should always
be followed to reduce the risk of fire, electric shock and injury to
person, including the following:
• Use appliance only as described in this manual. Any other
use not recommended by the manufacturer may cause fire,
electric shock, or injury to persons. The use of attachments not
recommended or sold by the manufacturer may cause hazards.
DO NOT use outdoors.
• To avoid fire or shock hazard, plug the appliance directly into
a 120V AC electrical outlet. DO NOT plug in the cord with wet
hands.
• Keep the cord out of heavy traffic areas. To avoid fire hazard,
NEVER put the cord under rugs or near heat registers.
• DO NOT operate any appliance with a damaged cord or plug,
after the appliance malfunctions, or if it has been dropped or
damaged in any manner. Return appliance to manufacturer for
examination, electrical or mechanical adjustment, or repair.
• DO NOT attempt to repair or adjust any electrical or mechanical
functions on this unit. Doing so will void your warranty. The
inside of the unit contains no user serviceable parts. All servicing
should be performed by qualified personnel only.
• Humidifier should be unplugged when not in use.
• DO NOT place humidifier near heat sources such as stoves,
radiators, and heaters. DO locate your humidifier on an inside
wall near an electrical outlet. The humidifier should be at least 4
inches (10 cm) away from the wall for best results. DO NOT allow
the mist outlets to directly face the wall. Moisture could cause
damage, particularly to wallpaper.
• NEVER place humidifier in an area where it is accessible to children.
NEVER use humidifier in a closed room, particularly where a child
may be sleeping, resting, or playing (a closed room may result in
excessive humidity).
• DO NOT attempt to refill humidifier without first unplugging the unit
from its electrical outlet. Failure to heed this warning may cause
personal injury. Be sure to unplug the unit by pulling on the plug and
not the cord. NEVER tilt, move, or attempt to empty unit while it is
operating. Shut off and unplug before removing the water tank and
moving the unit. Use both hands when carrying full tank of water.
• DO NOT block air inlet or outlet while unit is running.
• Always place humidifier on a firm, flat, level surface. A waterproof
mat or pad is recommended for use under the humidifier. NEVER
place it on a rug or carpet, or on a finished floor that may be
damaged by exposure to water or moisture. To prevent damage to
surfaces, DO NOT place humidifier under overhanging surfaces.
• DO NOT use humidifier in an area where humidity level is in
excess of 50%. Use a hygrometer, available at your local retailer,
to measure the humidity. Turn humidifier off if excessive humidity
occurs.
• DO NOT pour water in any openings other than the water tank.
• NEVER place base under water flow or immerse in liquids.
• NEVER operate unit without water in the tank.
• NEVER touch exposed metal diaphragm in base after use. Metal will
be HOT.
• This humidifier requires daily and weekly maintenance to operate
appropriately. Refer to daily and weekly cleaning procedures. Use only
cleaners recommended by the manufacturer.
• NEVER drop or insert any object into any openings.
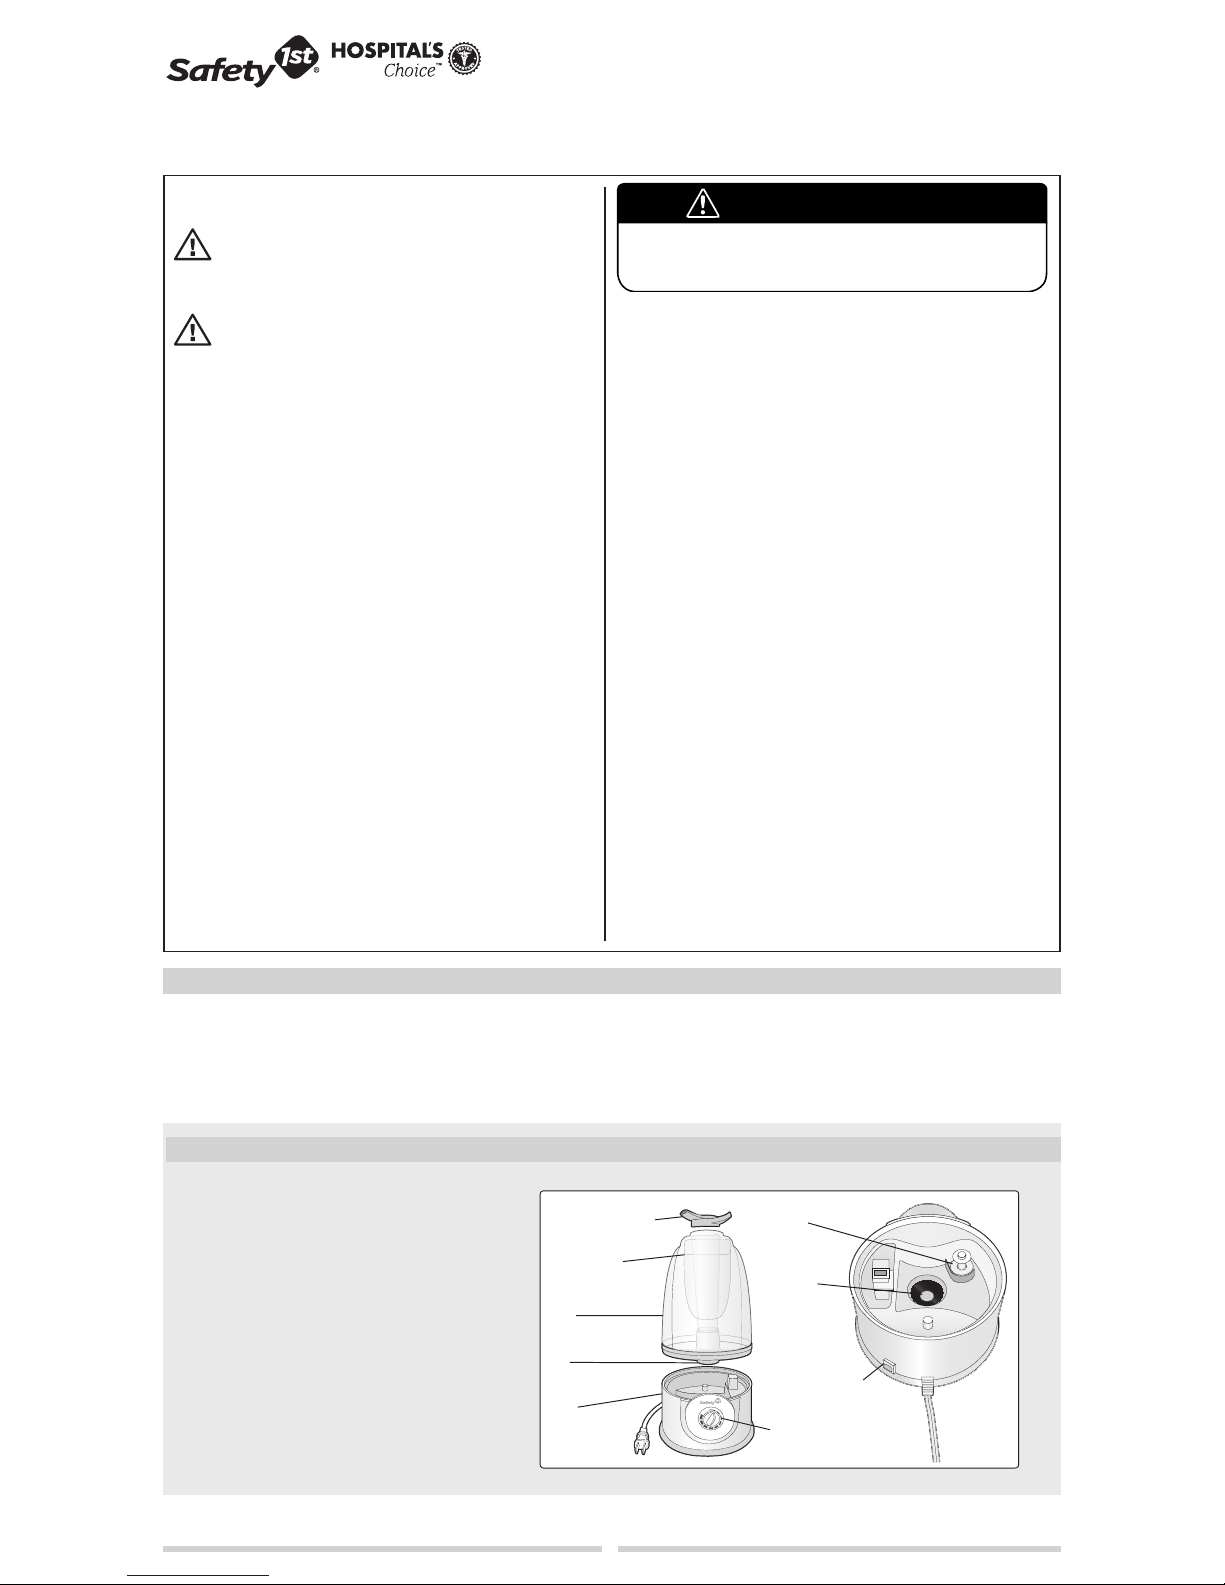
1
On/Off Button
Float
Sensor
Tank
Tank Handle
(on back side
of tank)
360° Mist Outlets
Base
Mist Adjustment Knob
Cap
NOTE: The recommended humidity level is between 35%50%. A humidity level below 20% can be unhealthy and
uncomfortable.
Under normal conditions, it is preferable to use a lower
setting on this humidifier. The mist will not be visible at a
low setting. Only when the humidity level is extremely low
should the higher settings be used. A white mist may be
visible at higher settings and there is an increased risk of
moisture damage, particularly to objects near the humidifier.
NOTE: If moisture forms on the walls or windows of the room, turn off the humidifier. The room already has plenty of humidity and additional moisture may cause damage.
Consumer Information
• Do not return this product to the place of purchase. If any parts are missing, e-mail consumer@djgusa.com, call Consumer Relations at
(800) 544-1108, or fax at (800) 207-8182. You can also visit our web site at www.safety1st.com. Have ready the model number (IH282, IH283, IH284) and
date code (manufacture date located on product label).
How Does it Work?
Humidifiers provide comfort by adding moisture to dry indoor
air. The Ultrasonic 360° Humidifier uses ultrasonic technology.
A metal diaphragm silently vibrates at a very high frequency
to create droplets, producing a cool fog or mist.
The humidifier should be placed with the mist outlets
directed away from any nearby walls or furniture. Ideally, the
humidifier is only projecting a modest amount of moisture
into the air to gently increase the humidity level.
Know Your Unit
STRANGULATION HAZARD! Children have STRANGLED in cords.
NEVER place camera or cords within 6 feet of the crib. Do not use
with an extension cord. Only use the AC adapters provided.
WARNING!
STRANGULATION HAZARD! Children have STRANGLED in cords.
NEVER place Baby Unit or cords within 6 feet of the crib. Do not use
with an extension cord. Only use the AC adapters provided.
WARNING!
Video Monitor instruction warning
Audio Monitor instruction warning
STRANGULATION HAZARD! Children have STRANGLED in cords.
NEVER place cords within 6 feet of the crib.
Do not use with extension cord.
WARNING!
2
Troubleshooting
Meaning Action
Problem Cause Action
• Unit does not turn on
• White powder coming
out of humidifier
• Dampness in rooms on
walls or windows
• Mist output is minimal or
not visible
• Unit turns on and off
• Bubbles in the water or a
gurgling sound
• Water leakage
• Plug in power cord or
re-seat tank
• Adjust the setting
to reduce mist output
• Use distilled or filtered
water instead of tap water
• Turn unit off or adjust the
setting to reduce mist
output
• No action required, as mist
at lower settings is not
visible
• Refill tank
• Clean float (see Care &
Cleaning section)
• Clean gasket (see Care &
Cleaning section)
• Put humidifier on a level
surface and refill tank
• No action necessary
• Discard humidifier, as it
cannot be repaired
• Unit is not plugged in
or tank is not seated
properly
• High setting
(mist can
look like white powder)
•
Some chemicals used
in safe water treatment
could become white
powder as the water
vaporizes. This is not a
humidifier malfunction.
• High setting
• Low setting
• Tank is almost empty
• The float inside base
unit is dirty
• Gasket in bottom of
tank is dirty
• Humidifier is not on a
level surface so float
is not able to operate
properly
• Normal operation. As
water enters reservoir in
base, air is displaced and
creates bubbles in tank
and possibly a gurgling
sound.
• Product may have
been mishandled.
Each unit was tested
after production and
confirmed to be free of
leaks.
Question Answer
• What are the variables
that affect run time?
• How do I remove film on
the tank?
• How can I extend run
time?
• The estimated run time for this humidifier is based on
average room conditions and is dependent on numerous
variables such as:
- Air exchange in the room.
- Room construction where the humidifier is placed.
- Temperature of the room.
- Humidity levels in the room.
- Movement of occupants and the opening and closing of
doors in the room.
- Home furnishings in the room.
• See “Daily Maintenance” section. Regular cleaning is
recommended.
• Run your unit on the lowest setting.
• Fill tank all the way full and place on the base. Let water
empty into the base until it stops bubbling, then refill and
re-seat tank again. This ensures maximum water capacity
and will extend run time.
Operating Your Humidifier
PRE-OPERATING INSTRUCTIONS
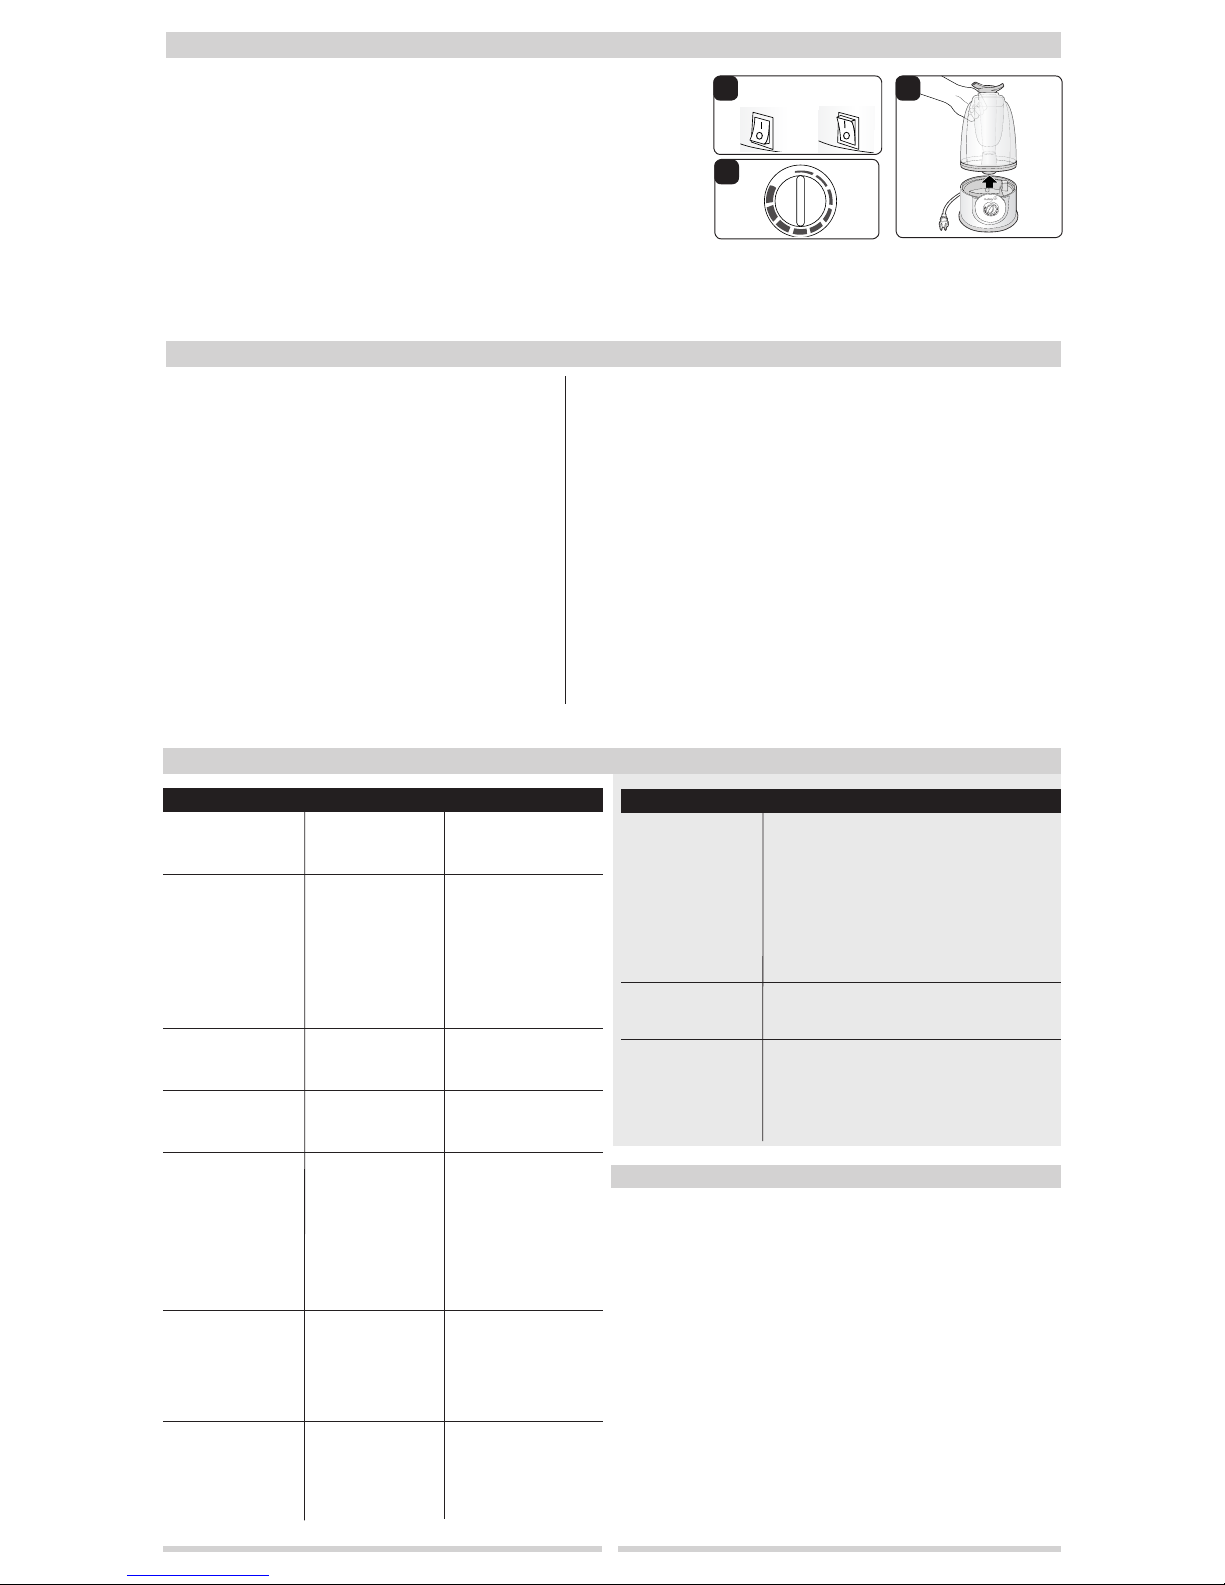
1 Be sure the humidifier is switched OFF (Figure 1).
2 Select a location for your humidifier, on a flat and level surface about 4 inches away from
the wall. DO NOT place the humidifier on a finished floor or near furniture which can be
damaged by too much moisture or water. Place on a moisture-resistant surface.
3 Remove tank by holding the tank handle and lifting straight upward (Figure 2). Bring tank to
the sink. Twist off cap at the bottom of the tank and fill tank with clean, cool water, ideally
distilled water. Additives are NOT recommended. Replace cap by firmly turning clockwise and
then replace tank on the base. The tank will immediately begin to empty into the base.
OPERATING INSTRUCTIONS
1 Plug the humidifier into a 120VAC electrical outlet.
2 To start the humidifier, push the ON/OFF button at the back of the humidifier.
3 Adjust mist direction by rotating the 360° mist outlets to the desired positions. Set the desired output level using mist adjustment knob (Figure 3).
4 When water level is low, the misting function will automatically shut off. To turn the humidifier completely OFF, push the ON/OFF button again.
1
2
ON
OFF
3
Dorel Juvenile Group, Inc., warrants to the original purchaser that this product
(Ultrasonic 360° Humidifier), is free from material and workmanship defects
when used under normal conditions for a period of one (1) year from the date of
purchase. Should the product contain defects in material or workmanship Dorel
Juvenile Group, Inc., will repair or replace the product, at our option, free of
charge. Purchaser will be responsible for all costs associated with packaging and
shipping the product to Dorel Juvenile Group Consumer Relations Department at
the address noted on the front of this document and all other freight or insurance
costs associated with the return. Dorel Juvenile Group will bear the cost of
shipping the repaired or replaced product to the purchaser. Product should be
returned in its original package accompanied by a proof of purchase, either a sales
receipt or other proof that the product is within the warranty period. This warranty
is void if the owner repairs or modifies the product or the product has been
damaged as a result of misuse.
This warranty excludes any liability other than that expressly stated previously,
including but not limited to, any incidental or inconsequential damages.
SOME STATES DO NOT ALLOW THE EXCLUSION OR LIMITATION OF
INCIDENTAL OR CONSEQUENTIAL DAMAGES, SO THE ABOVE LIMITATION OR
EXCLUSION MAY NOT APPLY TO YOU.
THIS WARRANTY GIVES YOU SPECIFIC LEGAL RIGHTS, AND YOU MAY ALSO
HAVE OTHER RIGHTS THAT MAY VARY FROM STATE TO STATE.
One (1) Year Limited Warranty
Care and Maintenance
WEEKLY MAINTENANCE
Remove Mineral Buildup/Scale:
1 Repeat steps 1-3 above.
2 Visually inspect electronic sensor and float inside the base unit. If any scale
build-up is noted, double-check that unit is unplugged and that sensor has had
adequate time to cool, then wipe isopropyl alcohol or vinegar directly on sensor
and/or float with a paper towel, cloth or safety swab to clean. Do not attempt to
remove float to clean.
3 Clean the tank by partially filling it with one 8-ounce cup of undiluted white
vinegar. Leave this solution in the tank for at least 30 minutes, occasionally
swishing the vinegar around inside the tank, then gently clean all interior tank
surfaces with a soft brush. Scale on the exterior of the tank may be removed by
wiping it with a cloth dampened with undiluted white vinegar.
4 Rinse tank thoroughly with clean water to remove the mineral and vinegar residue.
Rinse a second time to ensure that all residue has been removed.
Disinfect Tank:
1 Fill tank 1/2 full with water and 1/2 teaspoon of chlorine bleach. DO NOT place
tank on base unit while it contains the bleach/water.
2 Let the solution stand for 30 minutes, swishing every few minutes. Wet all
surfaces.
3 Carefully empty the tank and rinse with warm water until you can not detect any
bleach smell. Dry with a clean cloth or paper towel.
NOTE: This is an electrical appliance and requires attention when in use.
Follow the recommended guidelines to help prevent micro-organisms
from growing in the humidifier.
DAILY MAINTENANCE
1 Before cleaning, be sure the humidifier is OFF and is unplugged
from the electrical outlet.
2 Remove the tank from the base and place in sink.
3 Drain tank of remaining water and rinse thoroughly to remove any
sediment or dirt. Wipe clean and dry with a clean cloth or paper
towel.
4 DO NOT place base under water. WIPE CLEAN ONLY.
STORAGE INSTRUCTIONS
When not using your humidifier for an extended period of time:
1 Clean, rinse and thoroughly dry the humidifier as directed in weekly
maintenance. DO NOT leave any water in the unit when storing.
Leaving water in the unit may render the unit inoperable for the
following season.
2 Place the humidifier in the original carton and store in a cool, dry
place.
 Loading...