

Safety 1st Grow and Go Sport, Grow and Go MultiFit, Grow and Go EverFit Instructions Manual

Grow and Go
Grow and Go Sport, EverFit, MultiFit
3-in-1
rear-facing child restraint
2.3-18 kg (5-40 lb) and 48-102 cm (19-40 in.)
forward-facing child restraint
10-30 kg (22-65 lb) and 74-125 cm (29-49 in.)
and at least 2 years old
booster seat
18-45 kg (40-100 lb) and 110-132 cm
(43-52 in.) and at least 4 years old
KEEP INSTRUCTIONS FOR
FUTURE USE.
Read all instructions
before using this
child restraint and
booster seat.
™
™
4358-6825A
2.25.16
Failure to read, understand, and follow the instructions
and warnings in this instruction manual and the
warnings on the system could result in serious injury
or death to the child.

Important Symbols
Choosing Rear Facing, Forward Facing, or
Booster Seat
Your child’s height, weight, and age determine how your child
restraint should be placed in the vehicle.
UAS
See page 30 for UAS information and storage
location.
Vehicle Belts
See pages 31-32 for vehicle belt information.
Tether
See page 43 for Tether information.
Instruction Manual Storage
See page 2 for storage location.
To help you recognize instructions which are most
critical to your child’s safety, we use this symbol.
Failure to follow these warnings can result in the
serious injury or death of your child.
UAS Install Page 44
Vehicle Belt Install Page 47
UAS Install Page 35
Vehicle Belt Install Page 39
Lap and Shoulder Belt
Install Page 50
+
+
FORWARD FACING
10-30 kg (22-65 lb)
74-125 cm (29-49 in.)
At least 2 years old
REAR FACING
2.3-18 kg (5-40 lb)
48-102 cm (19-40 in.)
BOOSTER SEAT
18-45 kg (40-100 lb)
110-132 cm (43-52 in.)
At least 4 years old
See page 3 to
adjust internal
harness system
See page 15 to
store internal
harness system
WARNING: Verify your child’s weight and height (do
not guess) before choosing the child restraint’s position.
Table of Contents
Getting Started ..................................... 1
Parts of the Child Restraint .......................................1
Prepare Child Restraint to Fit Your Child ....................3
How Does Your Child Fit? .........................................5
Changing Position of Buckle .....................................6
Adjusting Headrest/Harness Height ............................8
Harness System Adjustments for Smaller Infants ........9
Securing Child in Child Restraint ...............................12
General Use ........................................... 14
Reclining Child Restraint ..........................................14
Storing Harness System ...........................................15
Removing Seat Pad for Cleaning ...............................18
Installing Harness System ........................................21
Accessories on Select Models ..................................24
Safety Information ............................... 26
Child Restraint and Booster Seat Use ........................26
Installation in Vehicle ...............................................26
Vehicle Seating Position ...........................................27
Transport Canada Regulations ..................................28
Storing Child Restraint .............................................28
Vehicle Information ............................. 29
Understanding Your V ehicle ......................................29
Choosing UAS or Vehicle Belts ..................................30
Knowing Your V ehicle Belts .......................................31
Aircraft Information .................................................33
Rear Facing ........................................... 34
UAS Installation ................................................35
Vehicle Belt Installation .....................................39
Forward Facing .................................... 42
Tether Use ........................................................43
UAS Installation ................................................44
Vehicle Belt Installation .....................................47
Booster Seat ......................................... 49
Lap and Shoulder Belt Installation ......................50
Important Information ........................ 52
Using a Locking Clip ................................................52
Dorel Juvenile Group Information... ...........................54
Registration and Safety Notices ................................55
Replacement Parts Order Form .................................56
Warranty .................................................................58
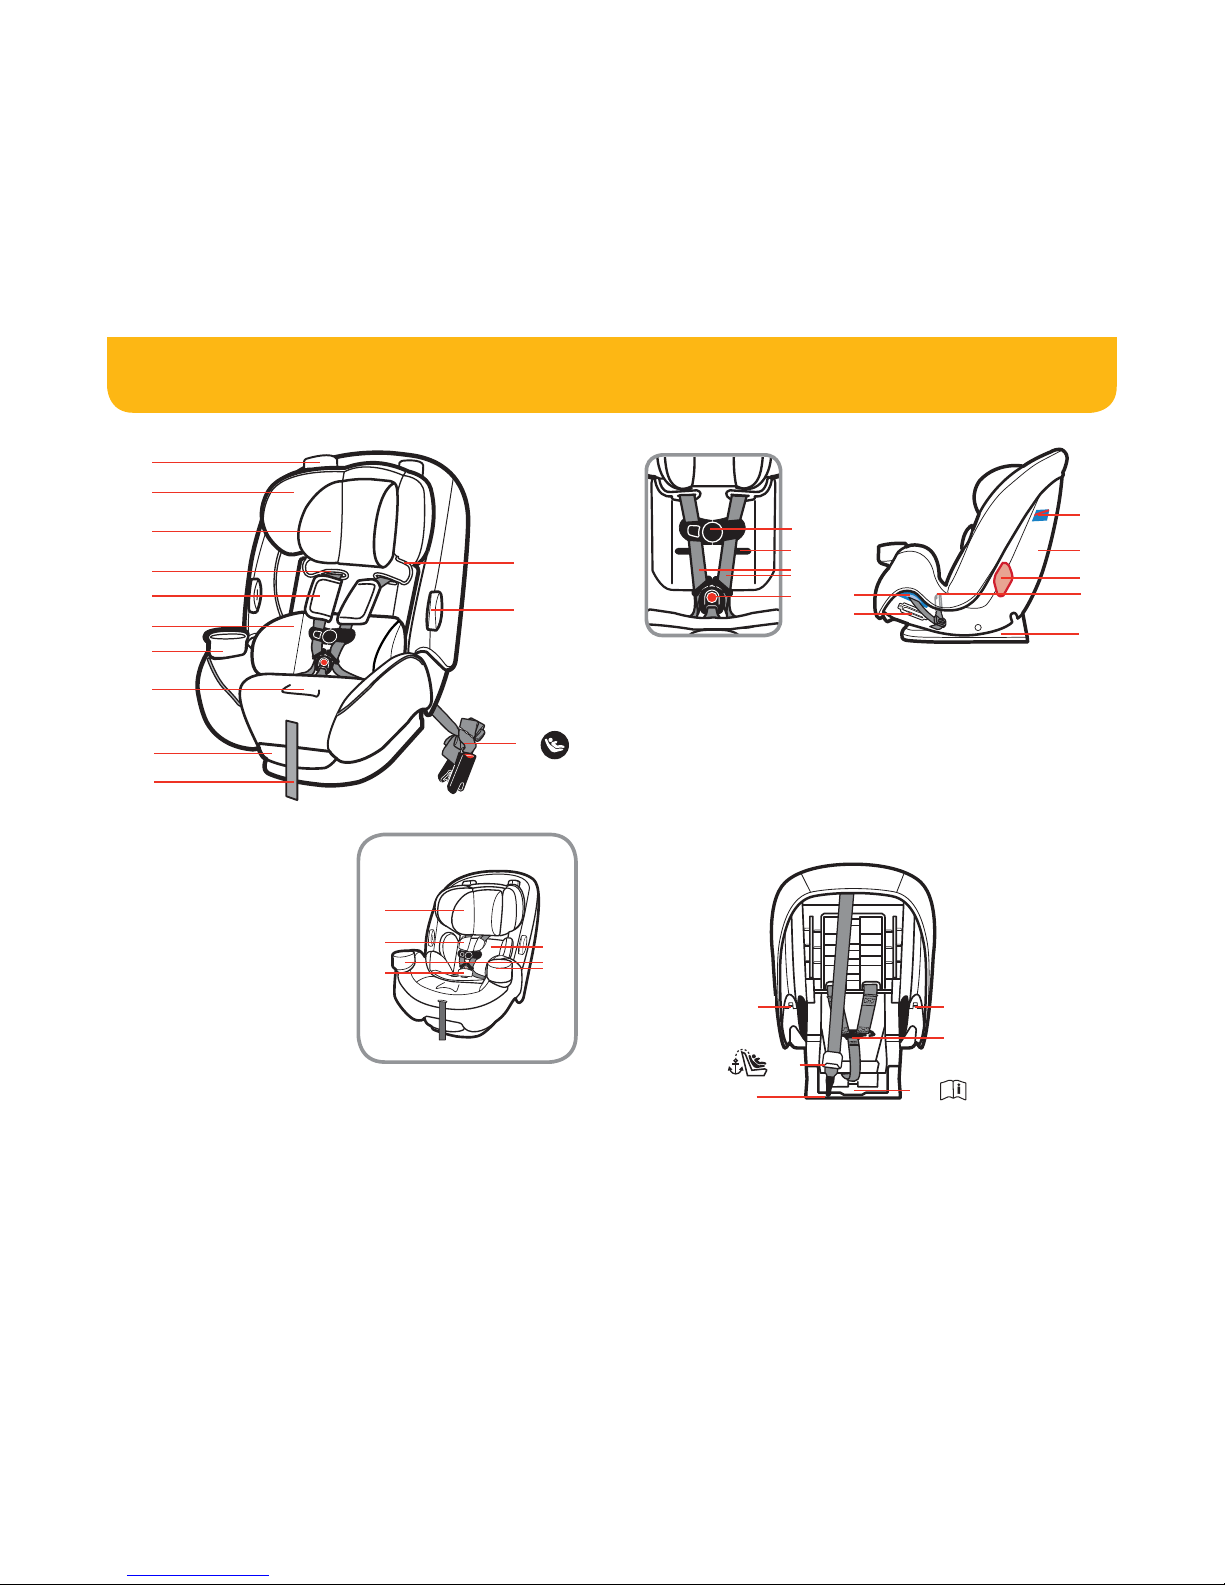
A. Headrest/Harness
Adjustment Levers
B. Adjustable Headrest
C. Head Pillow (see page 24)
D. Upper Shoulder Harness
Slots
E. Harness Covers
(see page 24)
F. Body Pillow
(see page 24-25 )
G. Removable Cup Holder
H. Harness Release Lever
(under fl ap)
I Recline Handle
J. Harness Adjustment Strap
K. Shoulder Belt-Positioning
Guide (behind headrest pad)
L. Easy Out Harness Holders
M. UAS* (see page 30)
N. Buckle Cover (see page 25)
O. Non-Removable Cup
Holders
*Universal Anchorage System
Parts of the Child Restraint
1 2
Side ViewFront View Harness System Detail
A
B
C
D
E
G
F
E
C
F
N
O
H
I
J
K
M
L
P. Chest Clip
Q. Lower Shoulder Harness
Slots for Smaller Infants
R. Harness Straps
S. Buckle
T. Rear-Facing Belt Path
U. Rear-Facing Belt-
Positioning Guide
V. Rear-Facing Level
Line
W. Shell (child restraint)
X. Forward-Facing Belt
Path
Y. UAS* Attachment for
Storage
Z.
Base
T
V
W
X
Y
Z
U
P
Q
R
S
DD
BB
CC
Y
AA
Y
Back View
AA. T ether (see page 43)
BB. Tether Attachment for
Storage
CC. Splitter Plate
DD. Instruction Manual Storage
(in bottom of base)
*Universal Anchorage System
4
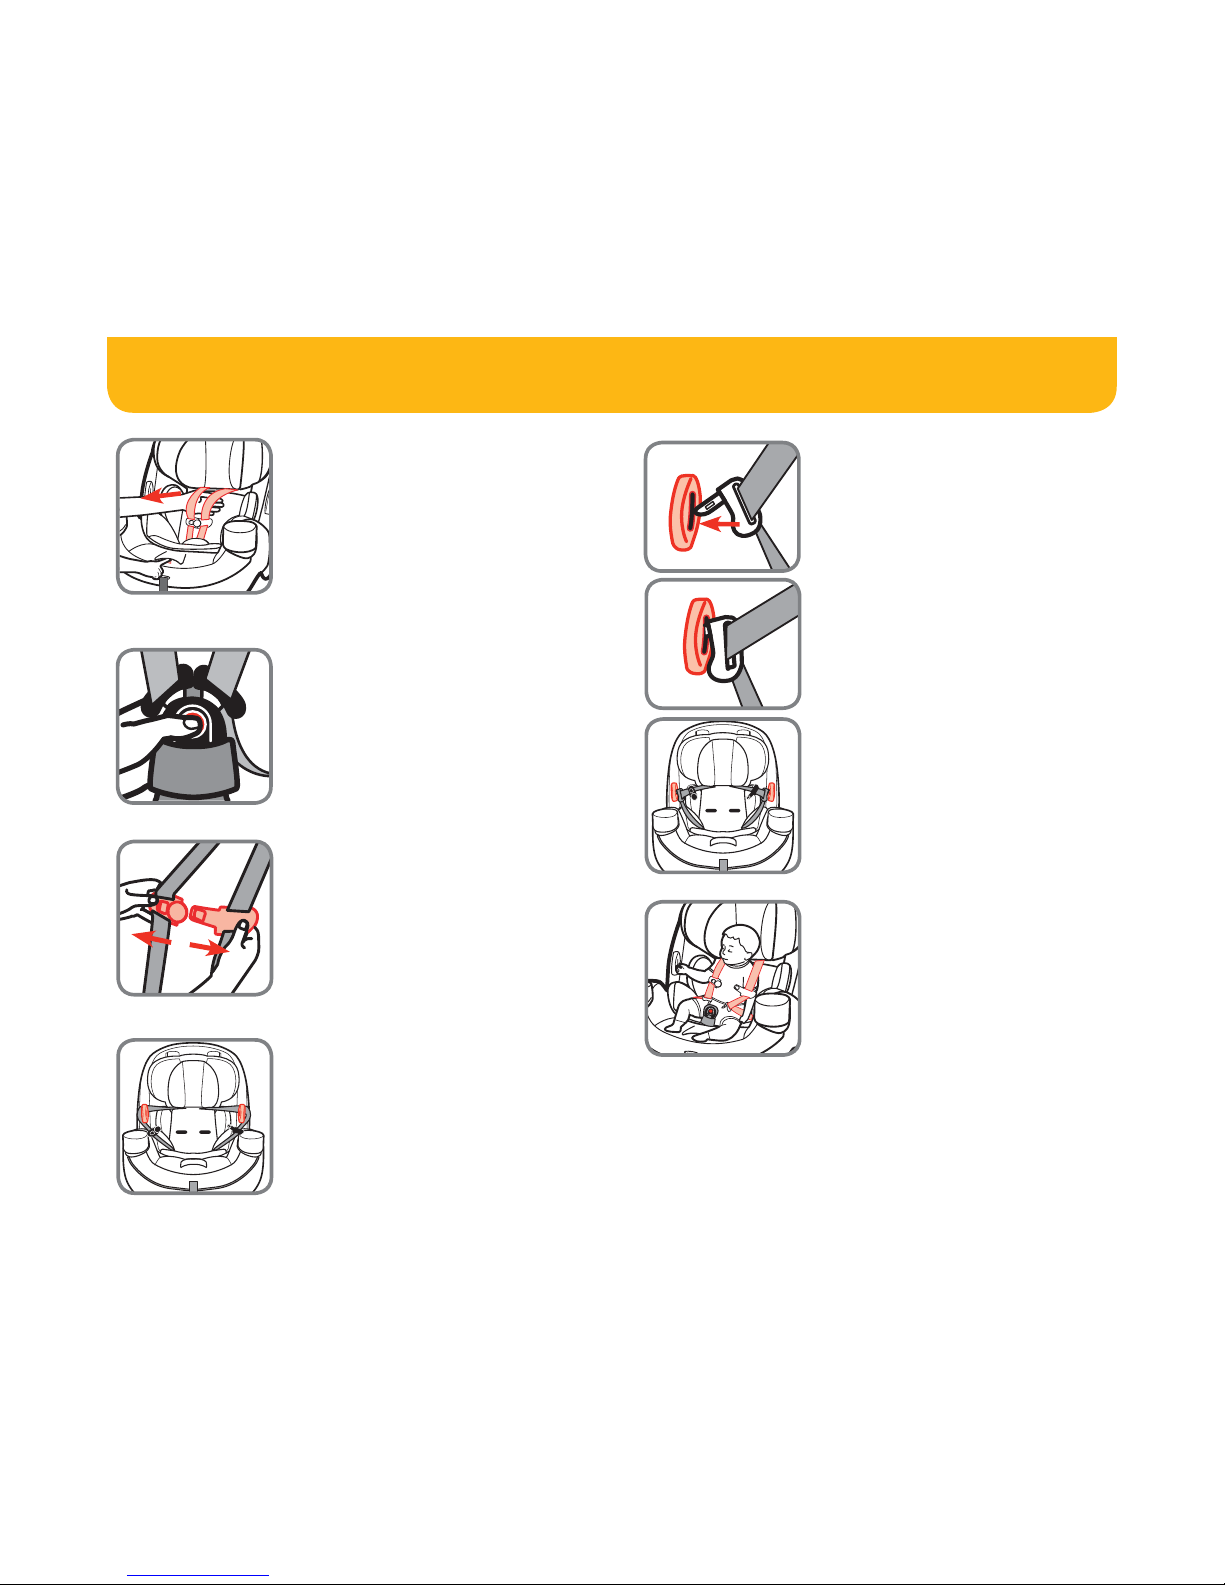
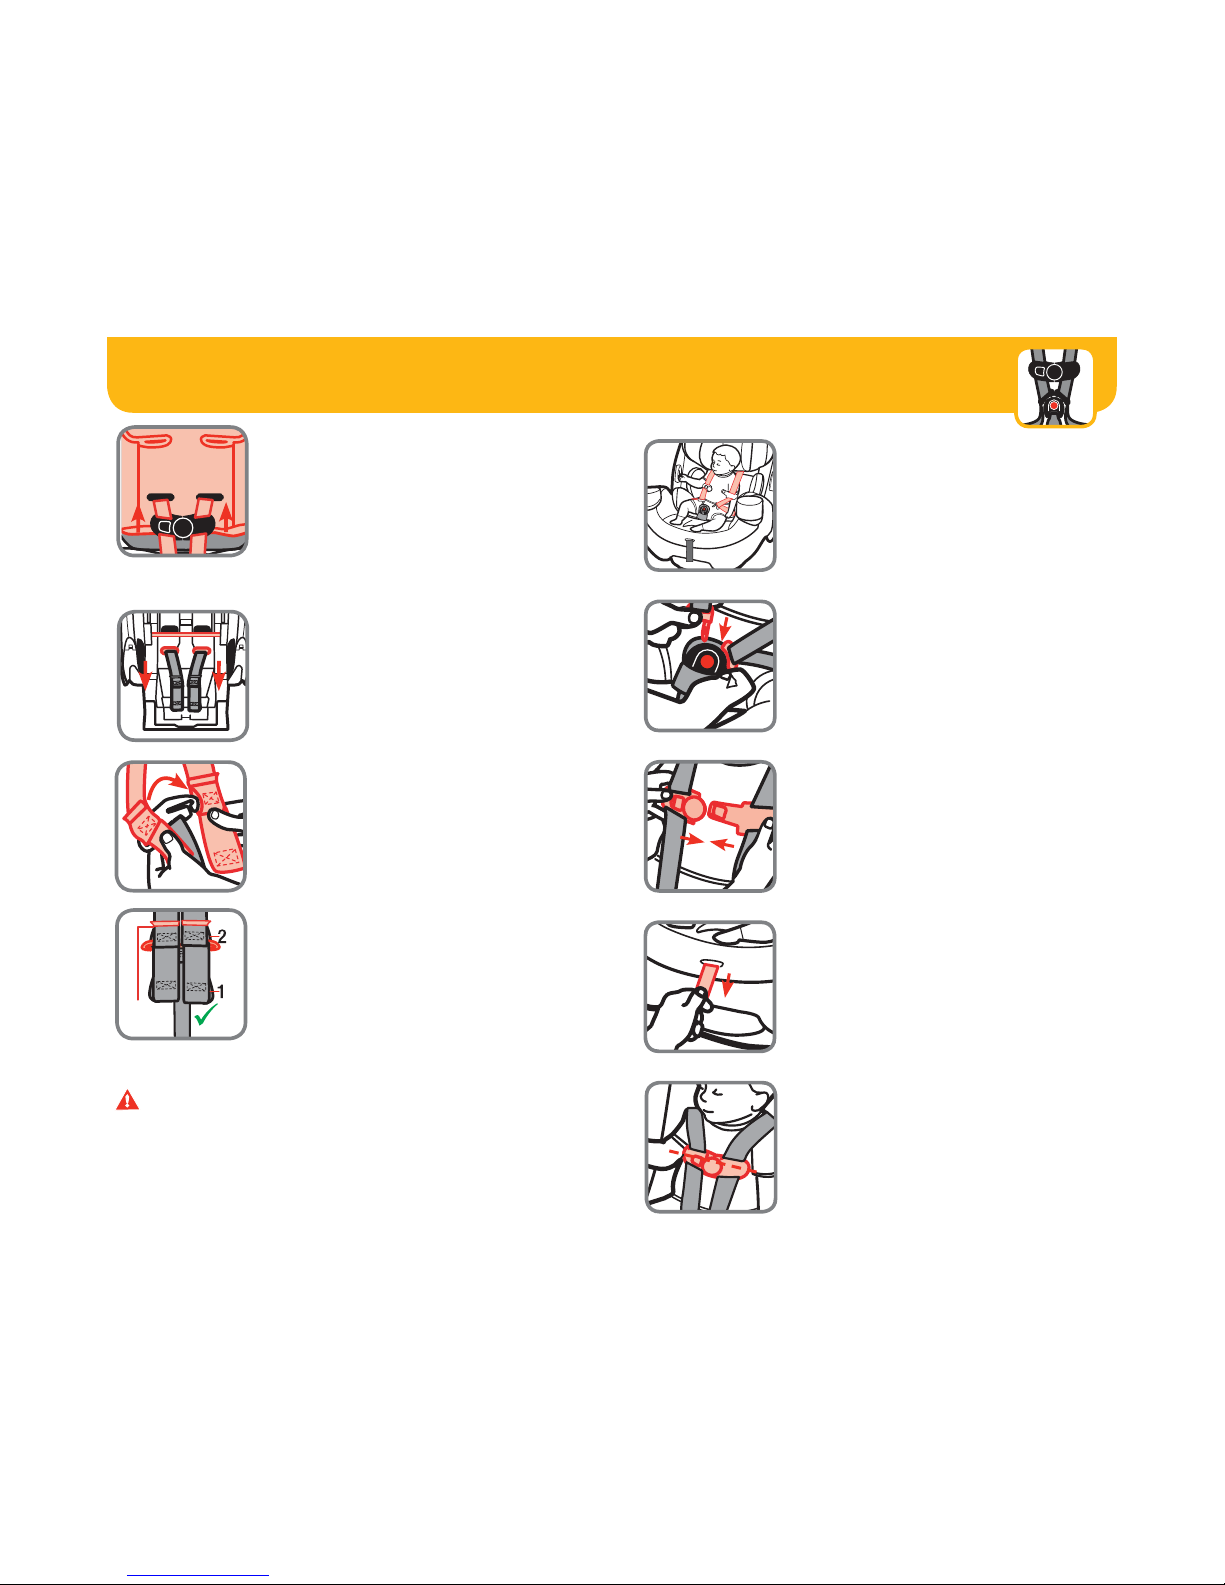
Prepare Child Restraint to Fit Your Child
3
1. Fully Loosen Harness
Straps
Push down on harness release lever
(under fl ap on front of seat pad) while
pulling out on harness straps as
shown.
3. Release Chest Clip
Press on chest clip release button and
pull apart.
2. Unbuckle Harness
Press in towards the top of the red
button.
Pull buckle tongues out.
2. Or
the buckle tongues can be placed
into the slots in the harness holders as
shown.
5. Place Child in Child
Restraint to Determine
Proper Harness Fit
The child’s bottom and back should be
fl at against the child restraint.
See page 5 for fi t guidelines.
4.
Place Harness Straps
Out of Way
The Easy Out Harness Holders can be
used two ways.
1. You can secure the harness straps
around them as shown.
2

How Does Your Child Fit? Changing Position of Buckle
65
2. Fully Recline the Child
Restraint
Pull out on recline handle and push top
of child restraint back.
1. Unbuckle Harness
Press in towards the top of the red
button.
Pull buckle tongues out.
3. Locate Buckle’s Metal
Retainer
Reach under the seat between the
base and shell and through the recline
handle.
4. Rotate Metal Retainer
and Push It Up Through
Shell and Pad
REAR FACING
FORWARD FACING
Start in the 1st slot and adjust outward as your child
grows. Buckle should be used in the slot closest to
your child. The buckle should not be underneath or
behind your child. Any slot can be used.
Always choose the shoulder harness slots that are
closest to your child’s shoulder height. Harness strap
MUST be at or slightly above shoulders.
If the upper shoulder harness slots are below the
child’s shoulders with the headrest in the highest
position and the child weighs at least 18 kg (40 lb) and is at least 4
years old, you must convert the child restraint to a booster seat.
To change buckle position, see pages 6-7.
To adjust headrest/harness height, see page 8.
To make adjustments for smaller infants, see pages 9-11.
Use the guidelines below to determine if the buckle and harness strap
are in the right place for your child.
1
2
3
continued on next page
Start in the 1st slot and adjust outward as your child
grows. Buckle should be used in the slot closest to
your child. The buckle should be not underneath or
behind your child. 1st or 2nd slot MUST be used.
Always choose the shoulder harness slots that are
closest to your child’s shoulder height. Harness strap
MUST be at or slightly below shoulders.
If the lower shoulder harness slots for smaller infants
are above the child’s shoulders with the headrest in
the lowest position, do not use this child restraint.
1
2
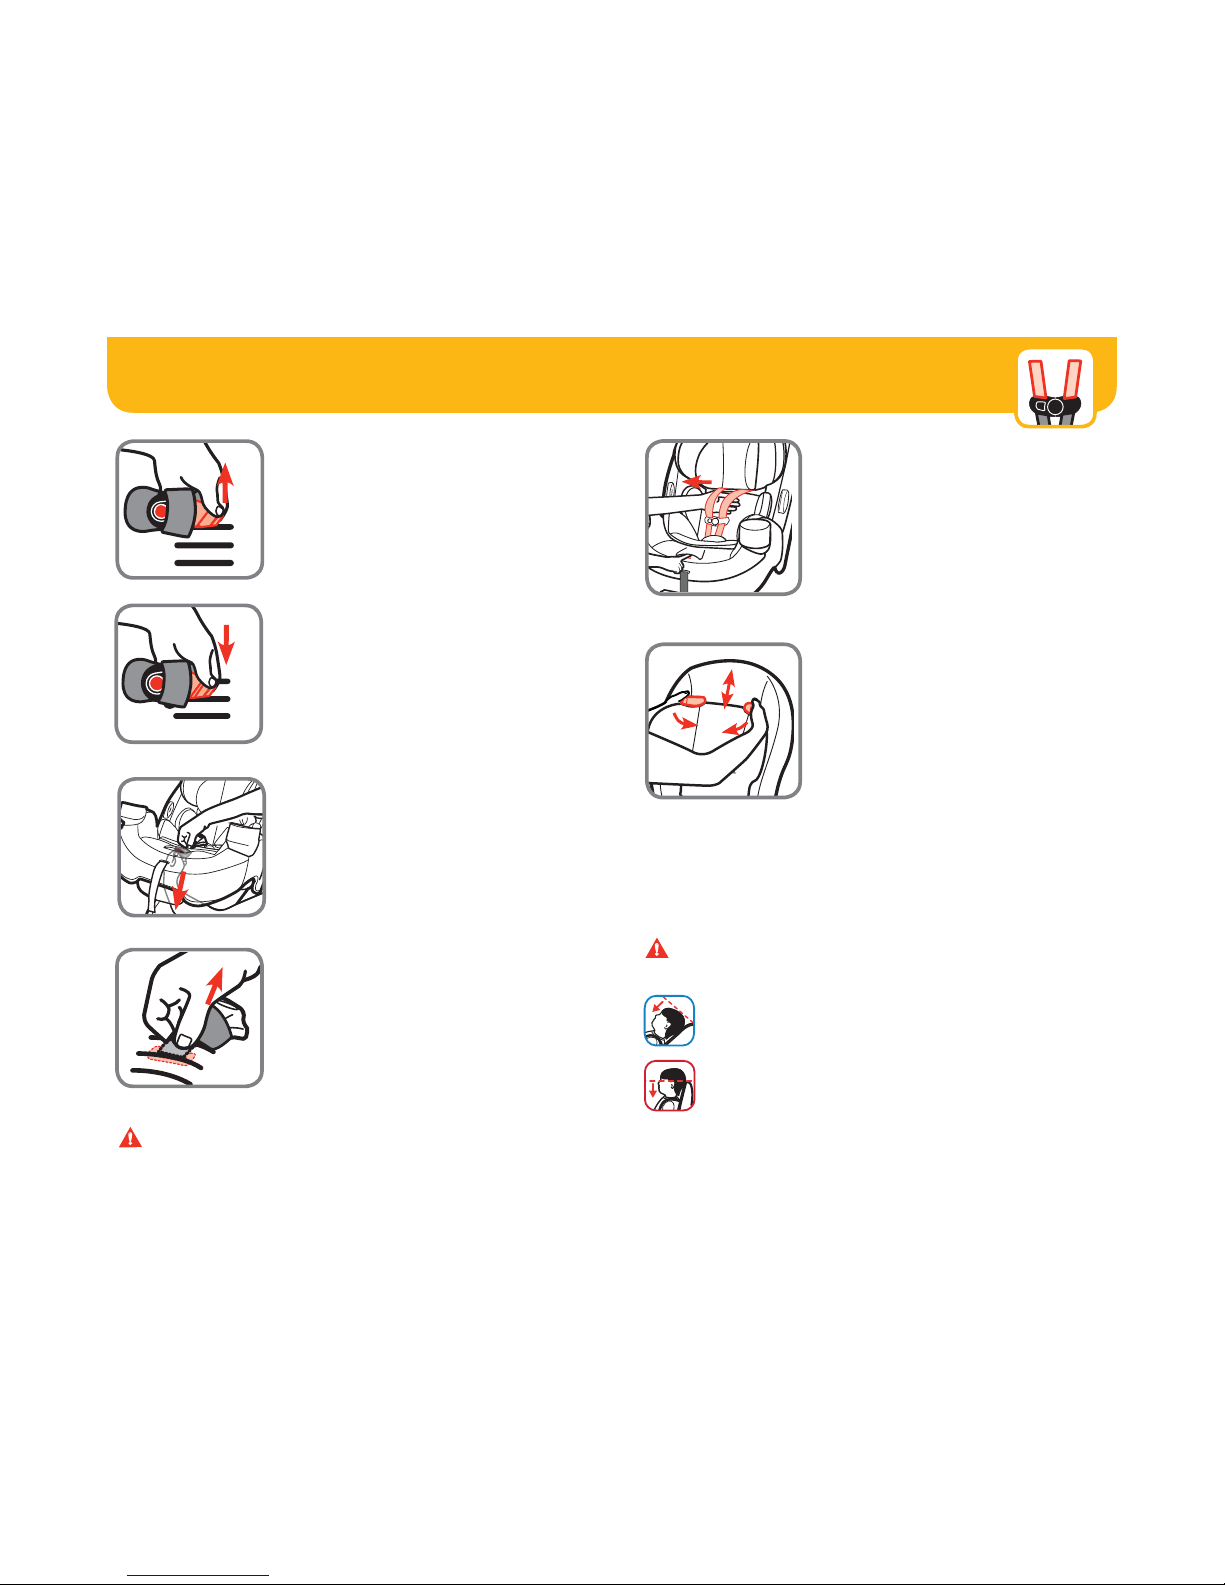
Adjusting Headrest/Harness Height
7
6. Insert Buckle’s Metal
Retainer into Slot
Closest to Child
Buckle
MUST face out. You MUST use
the 1st or 2nd buckle slots when child
restraint is used rear facing. Any slot
can be used when forward facing.
1
2
3
7. Reach Under the Seat
Between Base and Shell
and Through Recline
Handle
Pull metal retainer completely through
pad and shell.
8. Check Buckle
Pull up on buckle to make sure it is
secured. The buckle
MUST not pull
out.
WARNING: Failure to place buckle’s metal retainer
completely through pad and shell can result in serious injury or
death.
WARNINGS: Make sure the harness height is correct for
your child’s size.
Do not use this child restraint rear facing if the top of
your child’s head is above the top of the child restraint’s
headrest.
Do not use this child restraint forward facing if the
tops of your child’s ears are above the top of the child
restraint’s headrest in its highest position.
Failure to follow these steps can result in serious injury or death.
8
1. Fully Loosen Harness
Straps
Push down on harness release lever
(under fl ap on front of seat pad) while
pulling out on harness straps as
shown.
2. To Adjust Headrest/
Harness Height
Rotate headrest/harness adjustment
levers inward.
Move the headrest up or down to
the proper height for your child.
See
page 5 for fi t guidelines.
Release it into slot to lock. Make sure
it is securely locked into place.
5. From Top of Seat,
Pull Buckle and Buckle
Cover Out of Shell and
Pad

Harness System Adjustments for
Smaller Infants
10
7. Fully Loosen Harness
Straps
Push down on harness release lever
(under fl ap on front of seat pad) while
pulling out on harness straps as shown.
6. Adjust the Headrest to the
Lowest Position
The headrest
MUST be in the lowest
position.
8. From Back, Remove Harness
Strap Loops From Splitter
Plate
9. Pull Harness Straps Out of
Upper Shoulder Harness
Slots
10. Pull Body Pillow Forward
Away from Seat (on select
models
Thread harness straps through slots in
pillow.
You
MUST use the body pillow.
continued on next page
9
1. With Buckle in the 1st Slot,
Fully Recline the Child
Restraint
If you need to move the buckle to the 1st
slot, see pages 6-7.
5. Replace Pad and Check
Buckle
Pull up on buckle to make sure it is
secured. The buckle
MUST not pull out.
2. Lift Pad Off of Front of
Child Restraint
4. From Top of Seat, Lay the
Metal Retainer Flat Against
the Shell As Shown
3. From Bottom of Seat, Pull
Metal Retainer Down and
Push It Up into Middle Slot
As Shown
When using the lower shoulder harness slots for smaller infants,
you
MUST use the body pillow and the headrest MUST be in the
lowest position.
Securing Child in Child Restraint
11
12. From the Back, Pull
Harness Straps Through
Shell
Harness straps
MUST be in shoulder
harness slots BELOW the metal bar as
shown. DO NOT twist harness straps.
13. Attach 2nd Harness Strap
Loops to Splitter Plate As
Shown
Sewn ends of the harness strap loops
MUST face towards you.
DO NOT twist harness straps or harness
adjustment strap.
Make sure the same harness strap loops
are fitted COMPLETELY ON both sides
of the splitter plate.
Replace headrest pad around bottom
of headrest.
sewn
end
12
1. Place Child in Child
Restraint
The child’s bottom and back should be
flat against the child restraint.
Position harness strap over child’s
shoulders and upper thighs.
3. Close Chest Clip
Insert right half of chest clip into left half
and snap together.
2. Buckle Harness
Push buckle tongues into buckle until you
hear them “click.”
Pull up on harness strap to make sure
buckle is locked.
4. Tighten Harness
Pull on harness adjustment strap to
tighten harness snugly.
continued on next page
Correct
WARNINGS: Harness system must be installed correctly. The
harness strap must be returned to the upper shoulder harness slots
as your child grows.
Failure to follow these steps can result in serious injury or death.
11. Pull Bottom of Headrest
Pad Off of Headrest
Thread harness straps through slots in
headrest pad.
Thread harness straps through lower
shoulder harness slots in headrest and
through the slots in seat back (shell).
5. Position Chest Clip
The chest clip must be placed at midchest (even with armpits) and away from
the child’s neck.
14
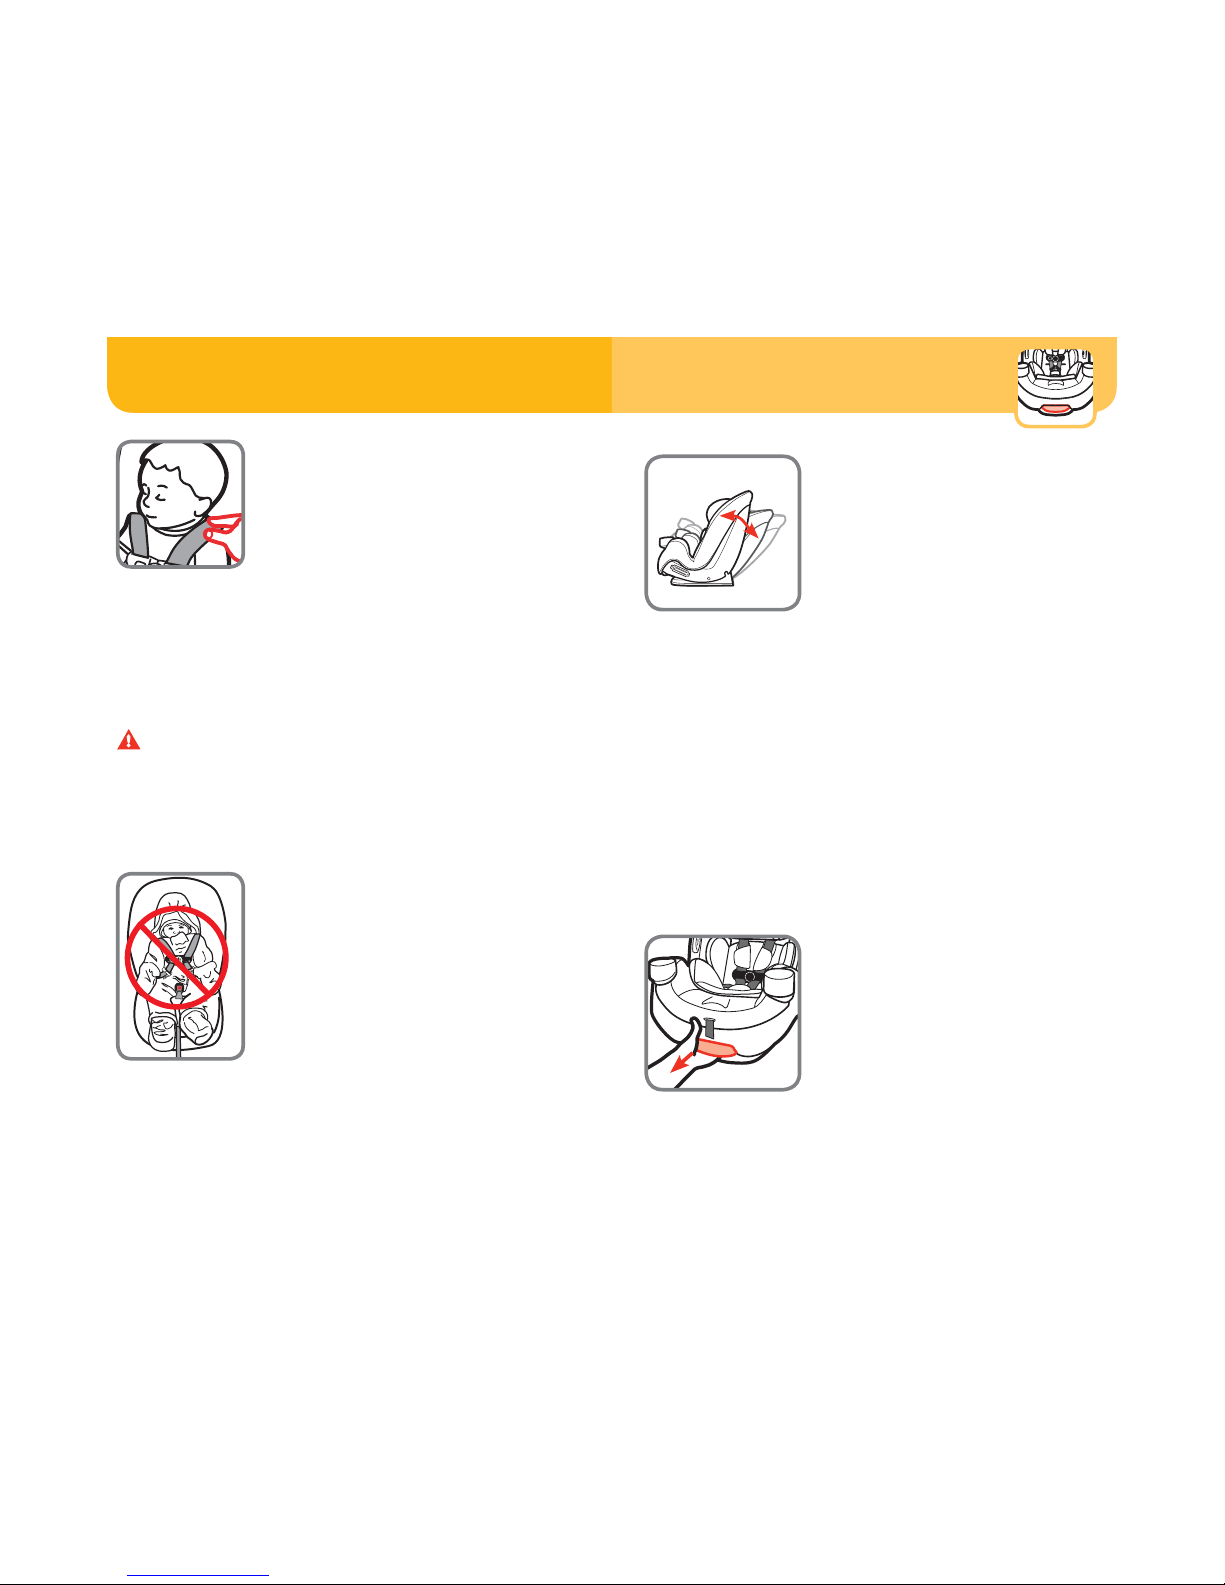
Reclining Child Restraint
13
6. Check Harness Tightness
Try to pinch the harness at the shoulders
vertically between index finger and thumb as
shown.
If your fingers slip off, the harness is tight
enough.
If you can pinch the harness strap, tighten more. The harness
straps should be snug throughout their length.
A snug harness strap should not allow any slack. It lies in a relatively
straight line without sagging. It does not press on the child’s flesh or
push the child’s body into an unnatural position.
WARNINGS: Failure to fasten and tighten the harness
system correctly may allow the child to be ejected from the child
restraint in a crash or sudden stop causing serious injury or
death.
Do not mistake comfort for safety. Harness system must be
snugly adjusted.
DO NOT put snowsuits or bulky garments
on your child when placing them in the
child restraint.
Bulky clothing can prevent the harness
straps from being tightened properly.
To keep infant warm, buckle your child
in the child restraint and place a blanket
around the child or place the child’s coat
on backwards after buckling in.
To Remove Child From Child Restraint:
1. Loosen Harness Strap
2. Unbuckle Harness
3. Release Chest Clip
4. Remove Child
How to Change Positions
To recline, pull out on recline handle
and push top of child restraint back.
For upright, pull out on recline handle
and pull top of child restraint forward.
This child restraint has 3 positions:
Rear Facing -
3 or 2
The level line on shell MUST be parallel
with the ground using either position
3
or 2
.
Forward Facing -
1 Upright
Booster Seat -
1 Upright
NOTE: When forward facing, the reclined
positions are to be used only to install
the child restraint and booster seat flush
against the vehicle seat back. Vehicle
seat back must be upright.
3
2
1
 Loading...