

Safety 1st Grow and Go Comfort Cool User Manual
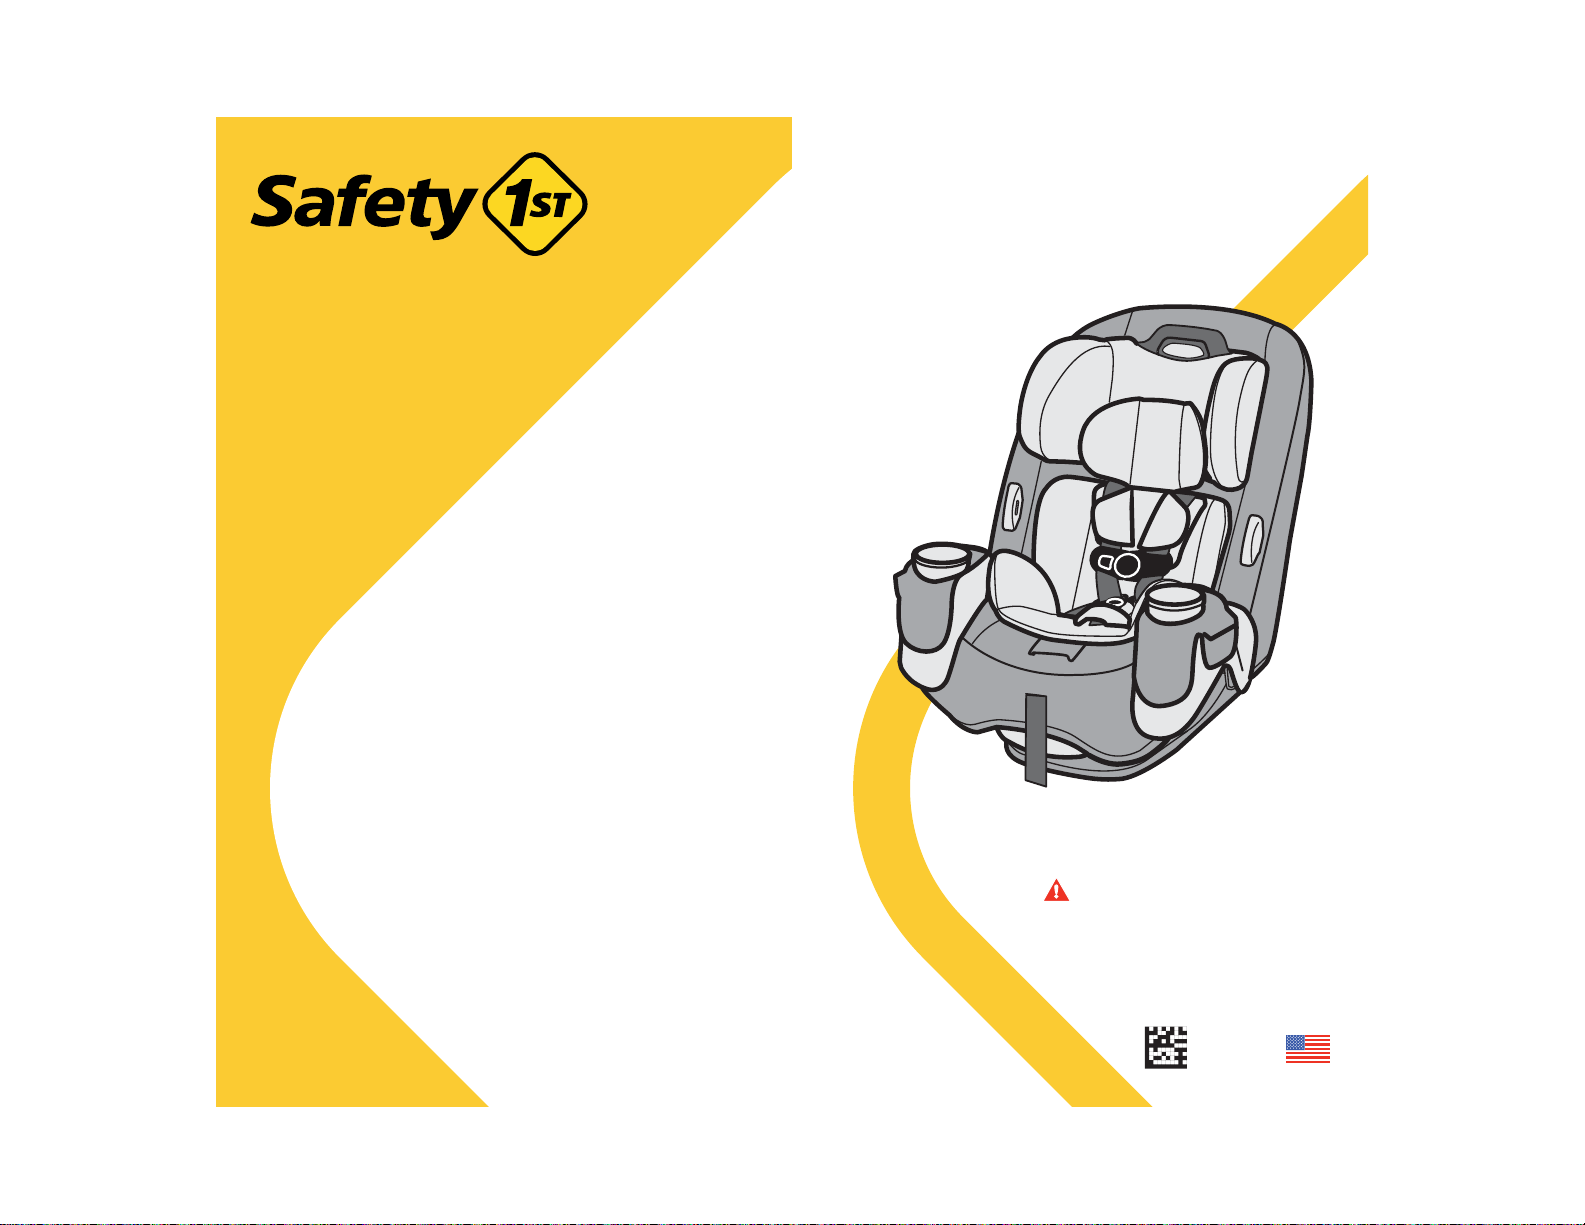
Grow and Go Comfort Cool
3-in-1 Car Seat
©2019 Dorel Juvenile.
KEEP INSTRUCTIONS FOR FUTURE USE.
Read all instructions before using this car seat.
WARNING: Failure to follow the
warnings on the labels and in the
instruction manual can result in
serious injury or death
to your child.
4358-7673
2.6.19

Welcome to the Safety 1st family and thank you for choosing this
car seat, also known as a child restraint!
To help you get started using your child’s new car seat, here are the
4 main tasks you’ll need to complete.
Measure Your Child
REAR-FACING
5-40 lb (2.3-18 kg)
and
19-40 in.
(48-101.6 cm)
PAGE 6
Quick NavigationOverview
FORWARD-FACING
22-65 lb (10.1-29 kg)
and
29-49 in. (73.6-125 cm)
And at least 1 year old
PAGE 6
BOOSTER SEAT
40-100 lb (18.1-45.4 kg)
and
43-52 in.
(110.1-132.1 cm)
PAGE 6
Adjust the Car Seat to Fit Your Child
Install the Car Seat into Your Vehicle
Secure Your Child in the Car Seat
Your child’s safety is worth the time it will take to read and follow
these instructions.
Ready? Let’s go!
Pages 1-5 will introduce you to the parts of the car seat.
Page 78 has our contact information. If at any point you would like
assistance, please feel free to reach out to us.
Rear-Facing
Child Fit
PAGE 9
Vehicle
Belt
PAGE 29
Adjusting
Car Seat
PAGES 11-19
Lower
Anchor
PAGE 34
Securing
Child
PAGE 49
Forward-
Facing
Child Fit
PAGE 10
Vehicle
Belt +
Tether
PAGE 40
Storing
Harness
System
PAGE 53
Booster Seat
Child Fit
PAGE 57
LATCH +
Tether
PAGE 44
Lap/Shoulder
Belt
PAGE 58

Contents
Getting Started
Parts of the Car Seat .......................................................1
Accessory Use ............................................................... 3
Choosing Car Seat Mode ...............................................6
Preparing Car Seat for Child Fit ......................................... 7
Rear-Facing Child Fit ......................................................9
Forward-Facing Child Fit ........................................................10
Making Adjustments to Car Seat
Changing Headrest/Harness Height ............................... 11
Changing Buckle Position ............................................... 12
Harness System Adjustments for Smaller Infants .............15
Reclining the Car Seat ....................................................19
Choosing LATCH or Vehicle Belt
LATCH: Lower Anchor Use ..............................................20
Vehicle Belts ..................................................................22
Tether Use ...................................................................... 26
Installation in Vehicle
Rear-Facing Mode .........................................................28
Rear-Facing
Rear-Facing
Forward-Facing Mode ...................................................39
Forward-Facing Vehicle Belt + Tether Install ....................40
Forward-Facing
Vehicle Belt Install........................................29
LATCH: Lower Anchor Install ........................34
LATCH: Lower Anchor + Tether Install .....44
Securing Child in Car Seat ................................... 49
Booster Seat
Booster Seat Mode ........................................................52
Storing Harness System ................................................ 53
Booster Seat Child Fit .................................................... 57
Lap/Shoulder Belt Use ................................................... 58
Car Seat Pad Use and Care
Removing Seat Pad Set for Cleaning .................................60
Cleaning and Installing Seat Pad Set ............................ 64
Installing Harness System ............................................. 67
Safety Information
Aircraft Information ......................................................70
Replacement and Expiration of Car Seat ........................71
Child Restraint Use ........................................................... 72
Installation in Vehicle ........................................................72
Vehicle Seating Position ...................................................73
Registration and Safety Notices ......................................... 74
Additional Information
Warranty .........................................................................75
Troubleshooting ...............................................................76
Replacement Parts List ....................................................77
Dorel Juvenile Group Information.......................................78
1
Headrest/
Harness Adjustment
Handle
Adjustable
Headrest
Harness
Covers
*
Body
Pillows
*
Harness
Adjustment
Strap
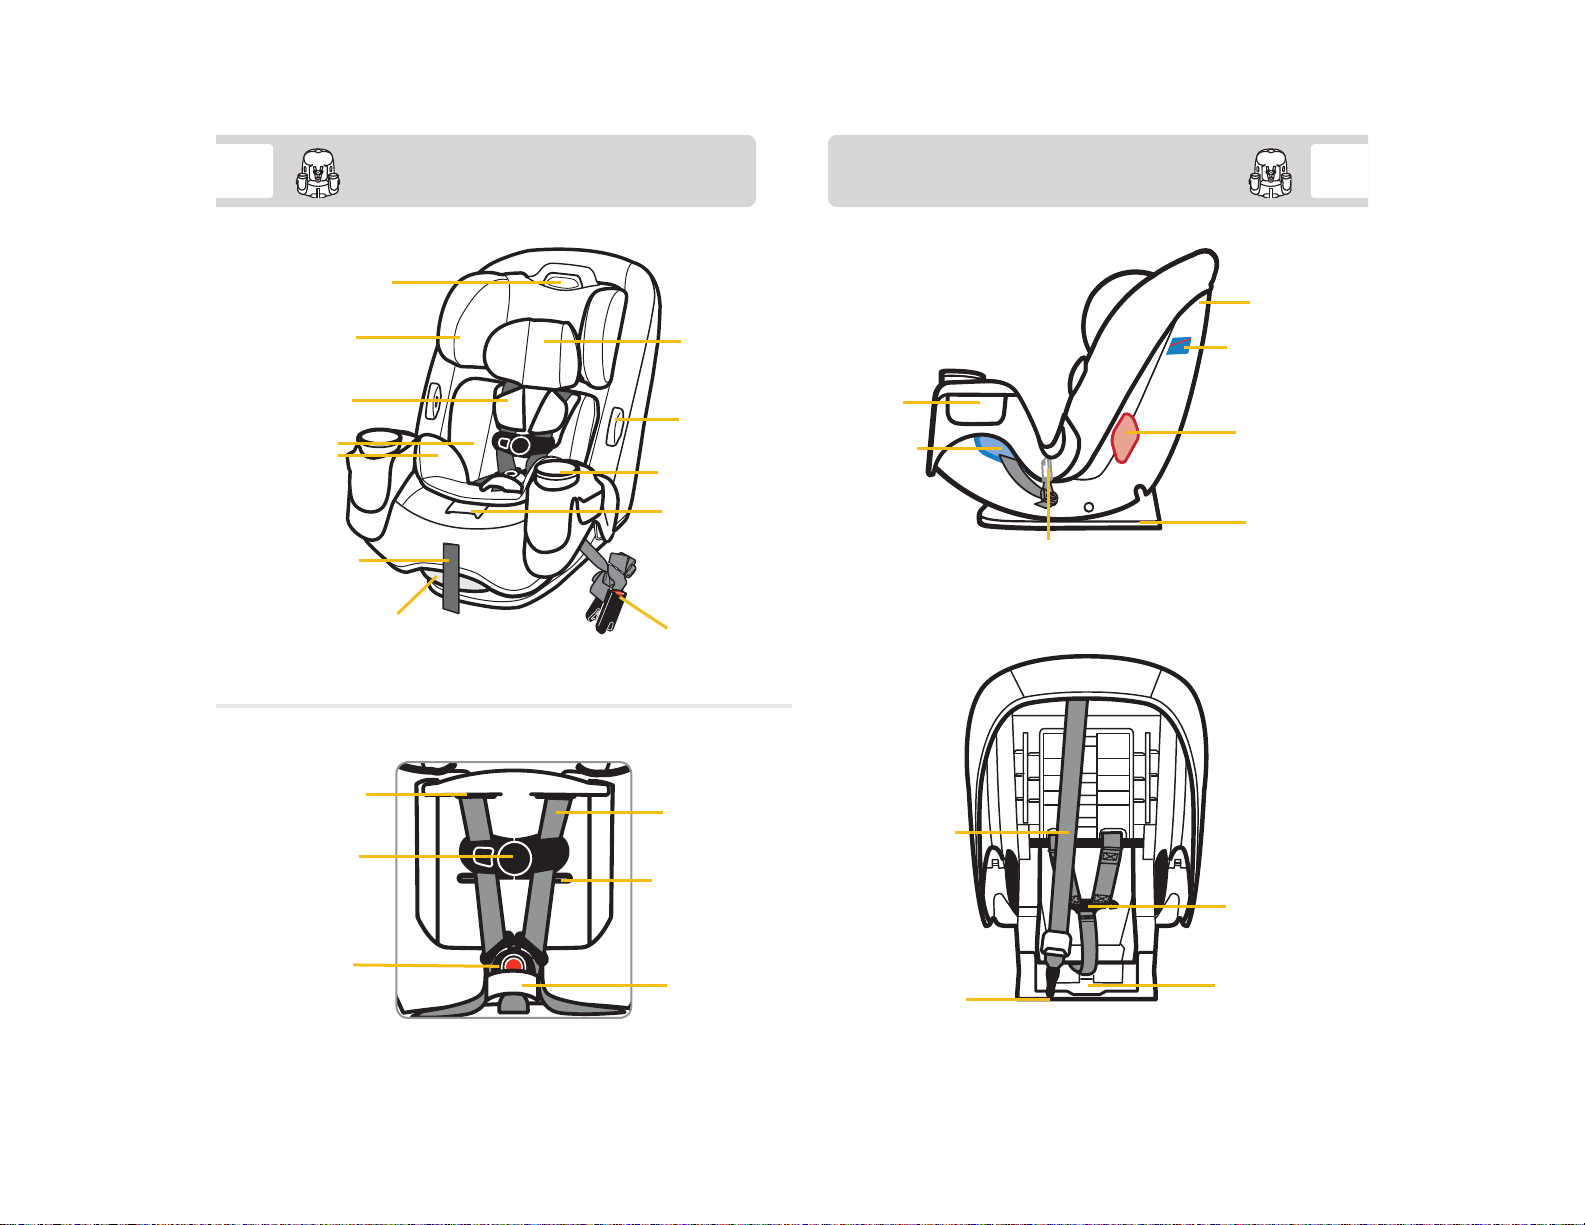
Parts of the Car Seat
Head
Pillow
*
In and Out
Harness
Holders
Cup Holders
Harness
Release Lever
(under fl ap)
2
Shell
(child restaint)
Rear-Facing
Storage
Pocket
Rear-Facing
*
Belt Path
LATCH: Lower Anchor
Belt Storage
Level Line
Forward-
Facing
Belt Path
Base
Upper
Shoulder
Harness Slots
Chest Clip
Buckle
Recline
Handle
Harness System Detail
See pages 3-5 for Accessory Use.
*
LATCH: Lower
Anchor Belt
Harness
Straps
Lower Shoulder
Harness Slots
for Smaller
Infants
Buckle
Cover
*
Tether Strap
Tether Storage
Splitter Plate
Instruction
Manual Storage
3
Accessory Use
4
For Use in Rear-Facing
or Forward-Facing Mode
Harness Covers
Harness covers help provide comfort to
the neck.
If the harness covers will not allow
proper positioning of the chest clip or
interfere with getting a tight enough
harness fi t for a smaller baby, remove
and do not use.
Store until your child is large enough
to use these harness covers while
maintaining a properly fi tting harness.
To remove harness covers, pull the
fastening strips apart and pull them off
of the harness strap.
For Use in Rear-Facing
or Forward-Facing Mode
Buckle Cover
To remove buckle cover, slide the ends
out of the buckle strap slot in pad. Pull
up and off of the buckle.
To install buckle cover, slide buckle
cover over buckle and tuck ends of
buckle cover into buckle strap slot in
pad.
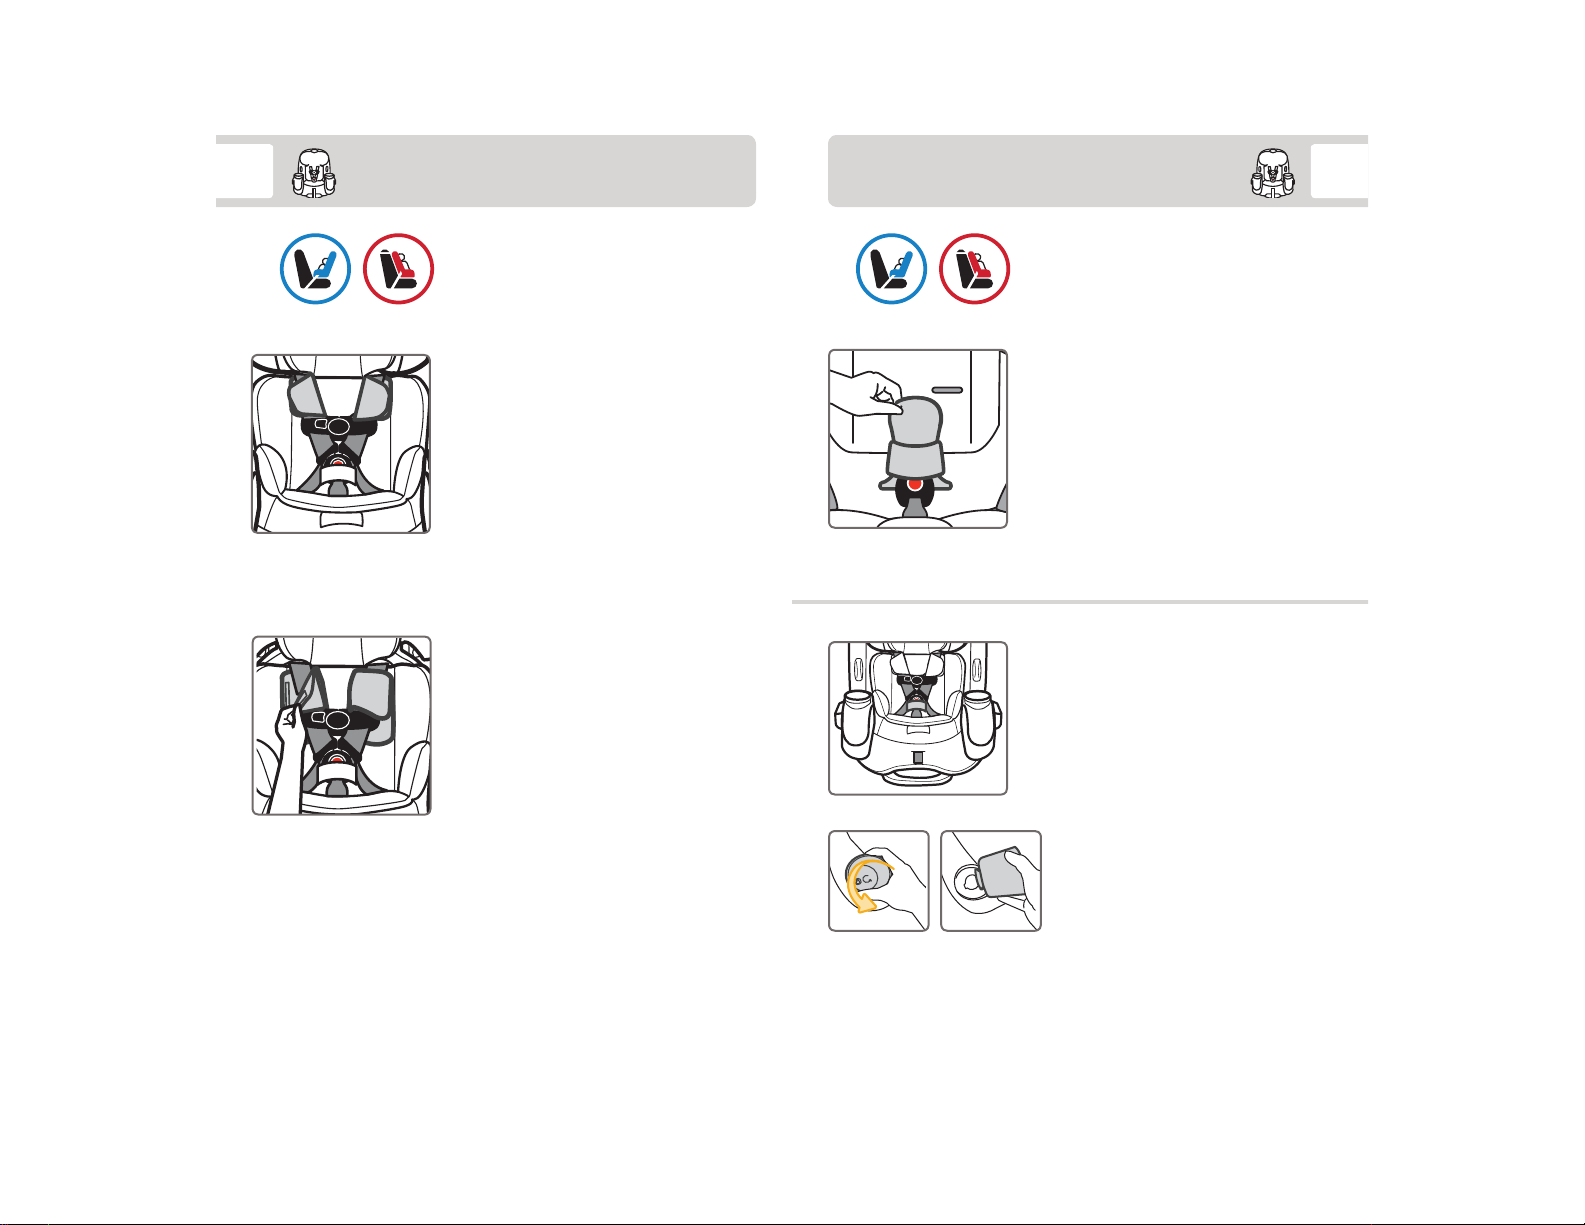
Cup Holders
The removable cup holders are
top-rack dishwasher safe.
To remove cup holder, twist the
cup holder counterclockwise. Pull it
out of slot in shell.
To install cup holder, align tabs
on bottom of cup holder with slots
in shell. Twist clockwise to lock in
place.
continued on next page
Choosing Car Seat Mode
65
For Use in Rear-Facing Mode Only
Head Pillow
To remove head pillow, pull it up from
behind the back body pillow.
You must use the body pillows in order to use
the head pillow.
Body Pillows
The body pillows are two separate pieces:
back and bottom.
When using upper harness slots:
To remove the body pillows: Undo the buckle and pull buckle
through the slot in bottom pillow. Slide back pillow out from behind the
harness straps.
To install the body pillows: Slide back pillow in behind harness
straps and pull buckle through buckle slot in bottom pillow.
Back and bottom body pillows must always be used together.
When using lower harness slots for smaller infants:
To remove the body pillows: From the back of seat, remove harness
strap loops from splitter plate. From the front, pull harness straps out
of shell and back pillow. Undo the buckle. Pull buckle through slot in
bottom pillow and pull pillows out of seat.
Rethread harness for upper harness slots, see page 69.
To install the body pillows: From the back of seat, remove harness
strap loops from splitter plate. From the front, pull harness straps out
of shoulder slots. Place bottom pillow in seat and pull buckle through
buckle slot in pillow. Place back pillow in seat. Rethread harness
straps through the harness slots for smaller infants in back pillow and
shell, see pages 15-18.
Back and bottom body pillows must always be used together.
Your child’s height, weight, and age determine how the car seat
should be placed in the vehicle. Please talk to your doctor about the
best option for your child.
WARNING: Verify your child’s weight and height (do not
guess) before choosing the car seat’s mode.
REAR-FACING MODE
5-40 lb (2.3-18 kg) and
19-40 in. (48-101.6 cm)
Children up to 1 year of age must ride rear-facing.
The American Academy of Pediatrics recommends that children
remain rear-facing until they are at least 2 years old.
In this child restraint, your child can remain rear-facing up to
40 lb (18 kg) and up to 40 in. (101.6 cm).
FORWARD-FACING MODE
22-65 lb (10.1-29 kg) and
29-49 in. (73.6-125 cm) and
At least 1 year old
BOOSTER SEAT MODE
40-100 lb (18.1-45.4 kg) and
43-52 in. (110.1-132.1 cm)
The American Academy of Pediatrics recommends that children
remain in a fi ve-point harness until they outgrow their forwardfacing harnessed child restraint.
This typically occurs around age 4, but some children outgrow
them sooner and others not until later.
7
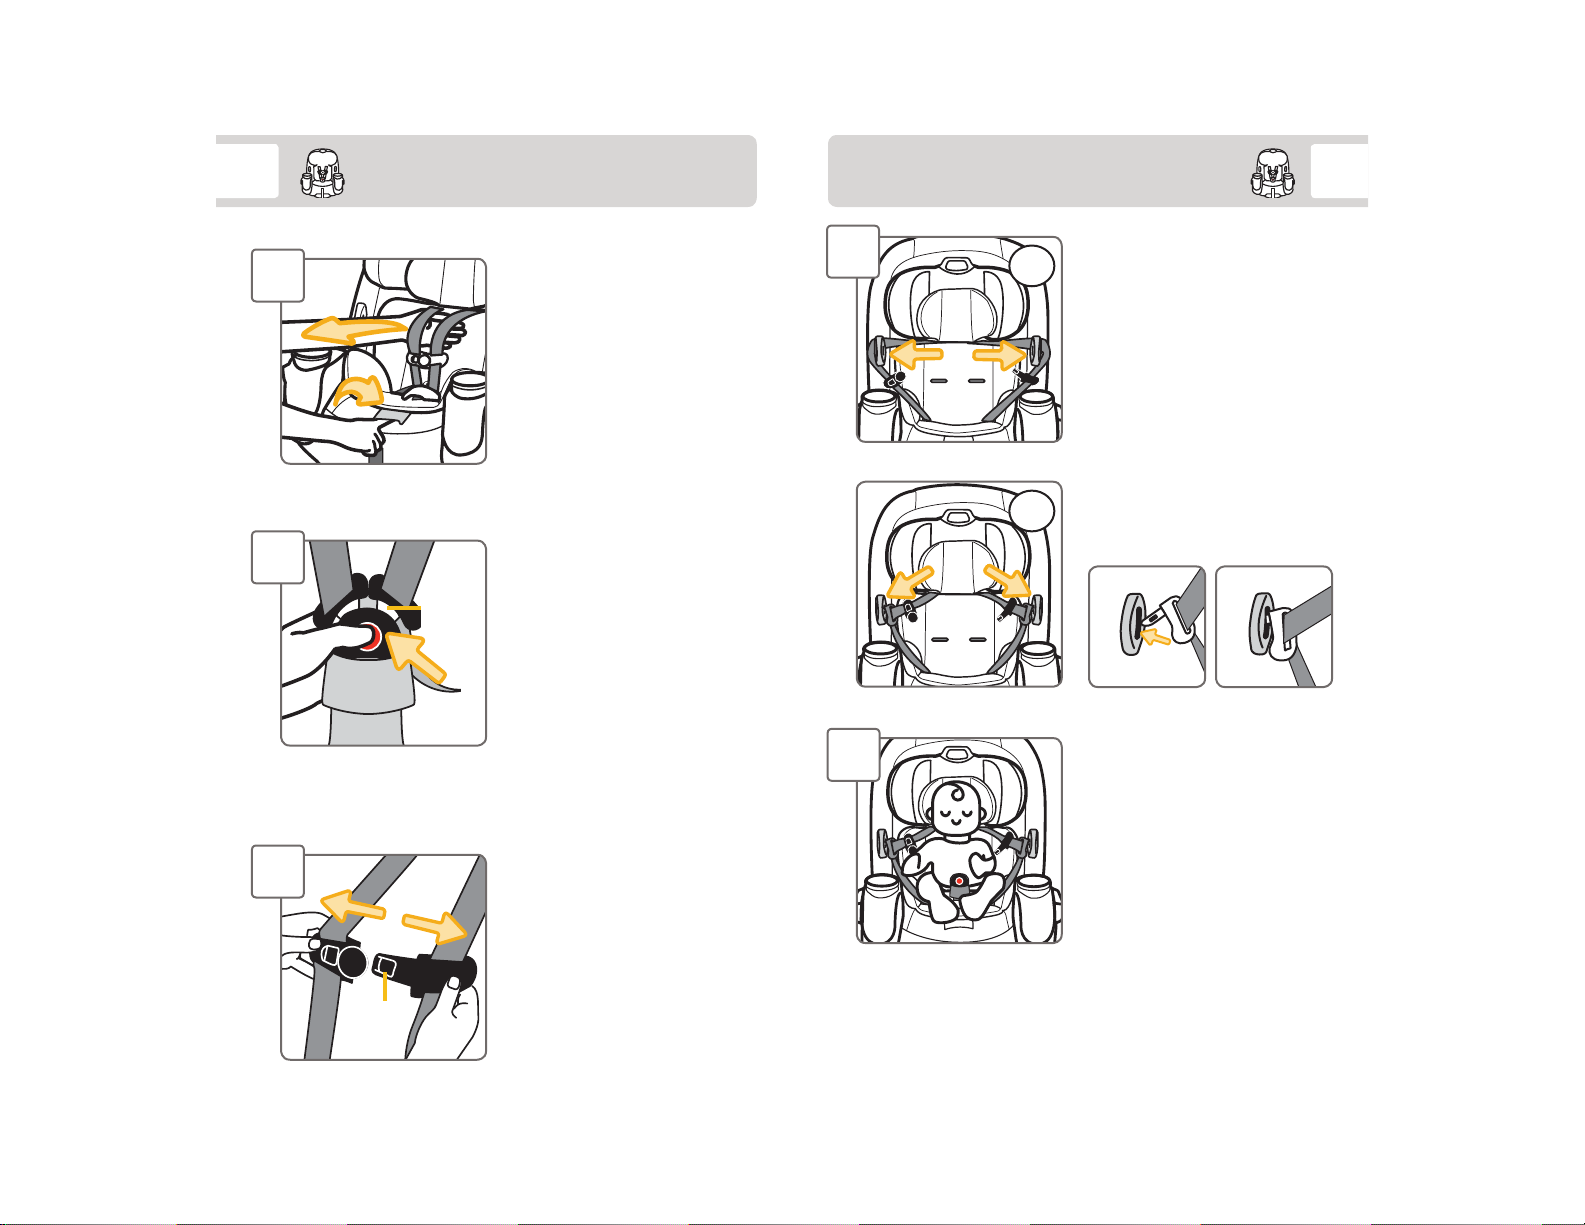
Preparing Car Seat for Child Fit
8
1
2
3
Buckle
Tongue
Fully Loosen Harness
Straps
Push down on harness release
lever (through opening in pad)
while pulling out on harness
straps as shown.
Unbuckle Harness
Press in towards the top of the
red button to release the buckle
tongues.
Release Chest Clip
Hold each side of the chest clip
and press on the release button
with your thumb and pull apart.
4
5
1
2
Place Harness Straps Out
of the Way
The In and Out Harness Holders
can be used two ways:
1. You can secure the harness
straps around them as shown.
2. Or the buckle tongues can
be placed into the slots in the
harness holders as shown.
Place Child in Car Seat
to Determine Proper
Harness Fit
The child’s bottom and back
should be fl at against the
car seat.
Release
Button
For Rear-Facing child fi t, see page 9.
For Forward-Facing child fi t, see page 10.
9
1
2
3
1
2
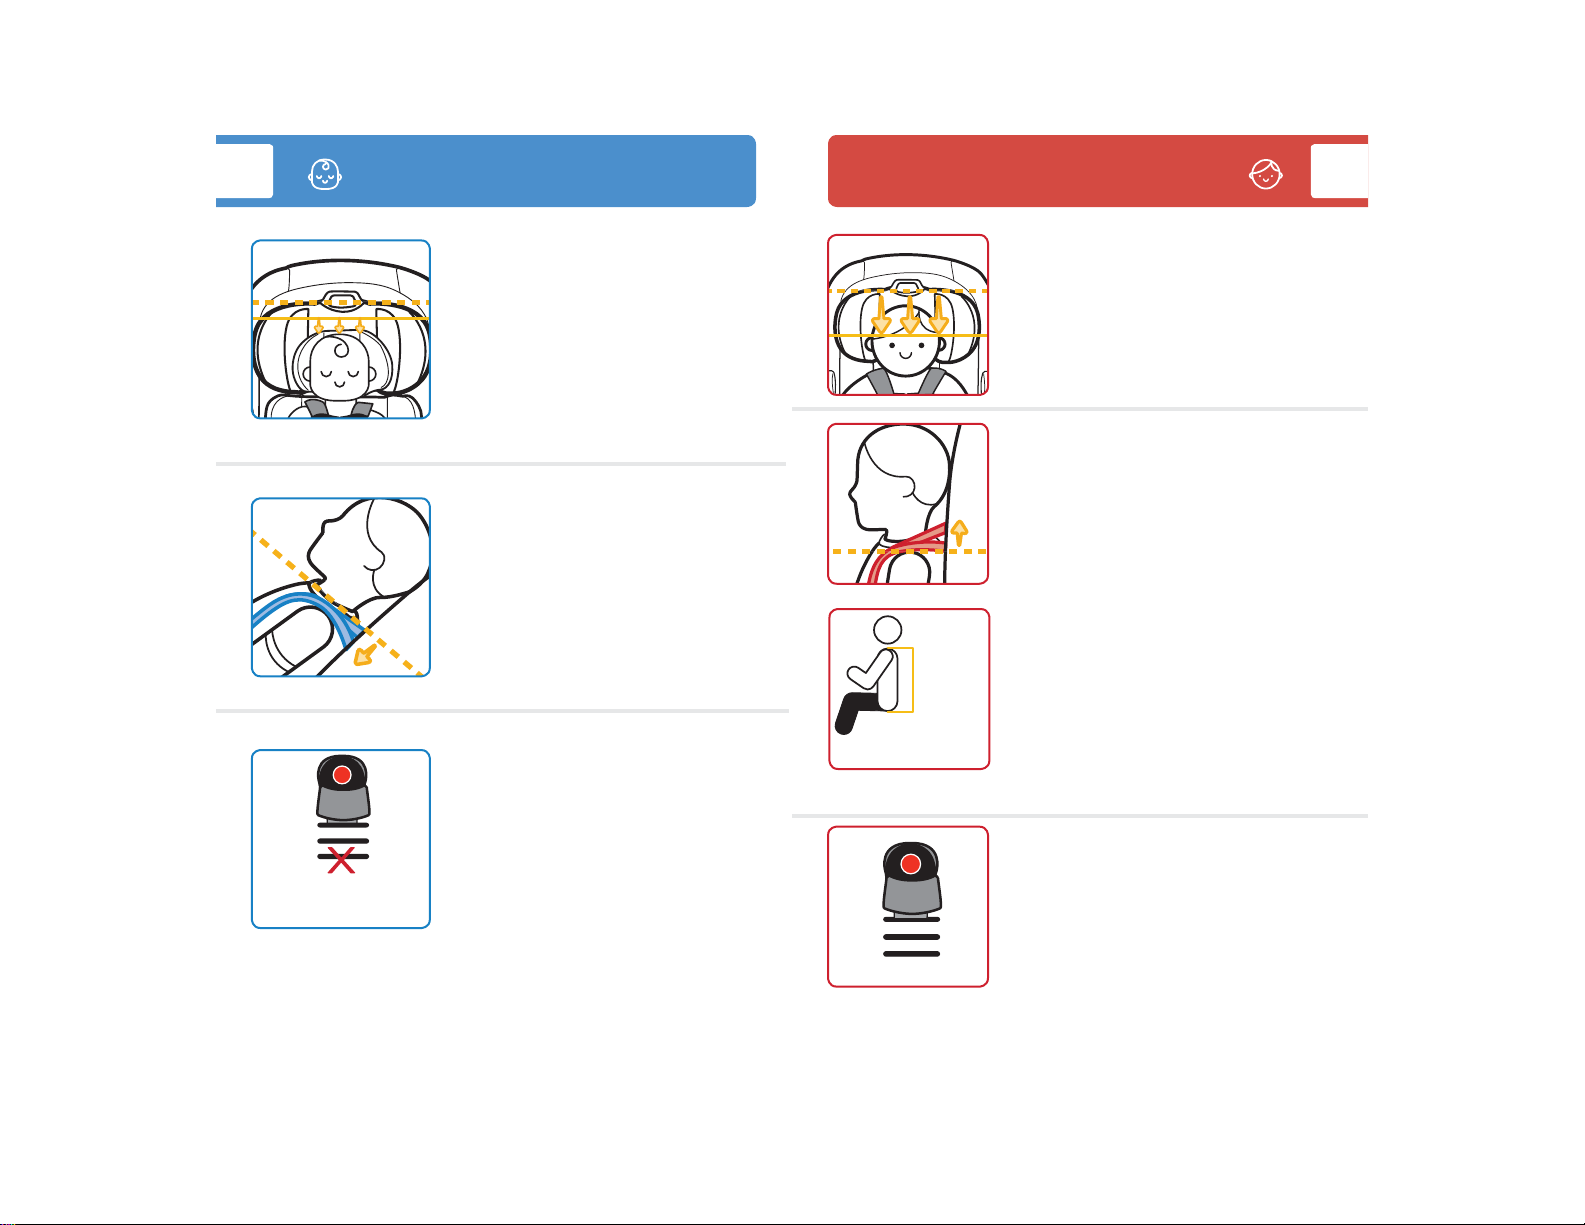
Rear-Facing Child Fit
Forward-Facing Child Fit
10
Head Position
The top of your child’s head
must be at least 1 in.
(2.5 cm) below the top of the
car seat’s headrest.
Harness Strap Position
The harness strap must be at or
slightly below the shoulders;
never above.
Buckle Position
Buckle must be used in either the
1st or 2nd slot. Choose the slot
closest to your child.
Do not use 3rd slot in
Rear-Facing mode.
Need to make adjustments?
To change headrest/harness height, see page 11.
To change buckle position, see pages 12-14.
The buckle should not be
underneath or behind your child.
Head Position
The tops of your child’s ears
must be below the top of the
car seat’s headrest.
Harness Strap Position
The harness strap must be at or
slightly above the shoulders;
never below.
Max Seated Shoulder Height
16.5 in.
(42 cm)
Max Seated
Height
Need to make adjustments?
To change headrest/harness height, see page 11.
To change buckle position, see pages 12-14.
In this car seat, the maximum seated
shoulder height is 16.5 in. (42 cm).
To measure your child’s seated
shoulder height: have them sit on
the fl oor with their back fl at against a
wall. Then measure from the fl oor up
to the top of their shoulder.
Buckle Position
Buckle can be used in any slot.
Choose the slot closest to your child.
The buckle should not be
underneath or behind your child.
11
Changing Headrest/
Harness Height
Changing Buckle Position
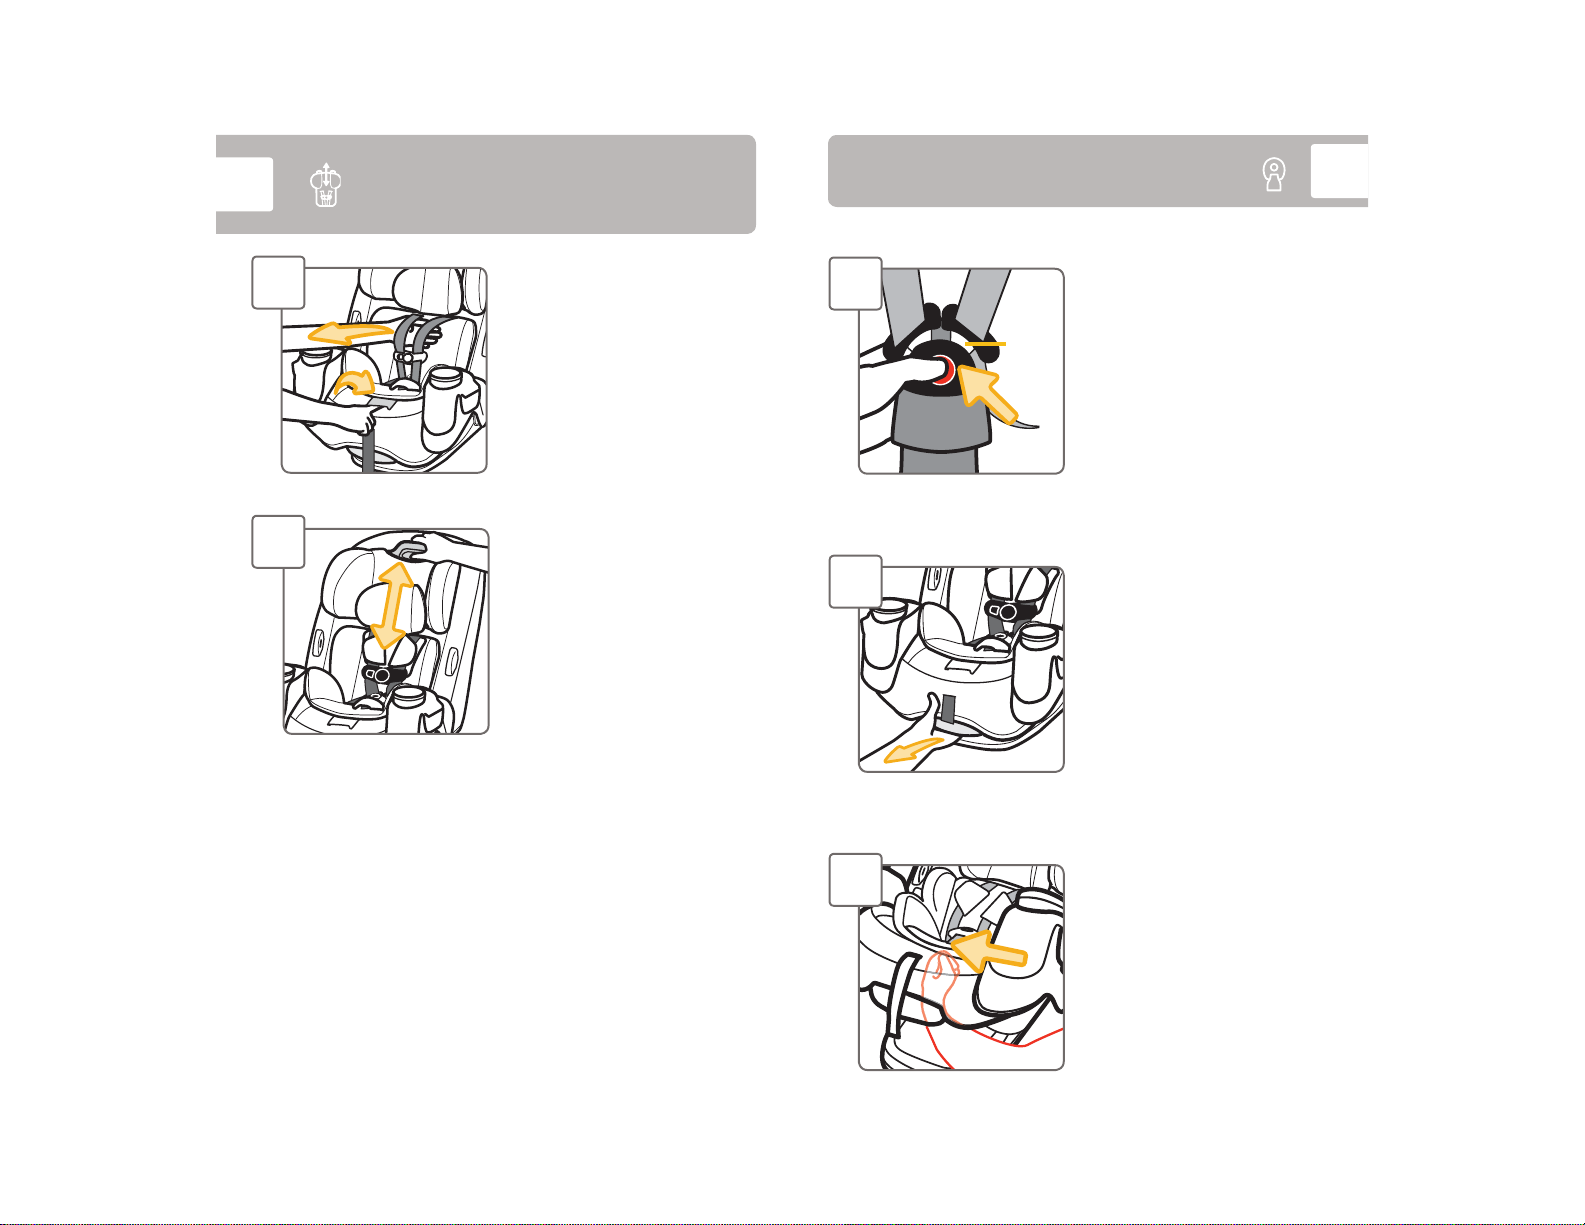
12
1
2
Fully Loosen Harness
Straps
Push down on harness
release lever (through
opening in pad) while pulling
out on harness straps as
shown.
Changing Headrest/
Harness Height
Squeeze the button on the
headrest/harness adjustment
handle.
Move the headrest up or
down to the proper height
for your child.
Make sure it is locked
securely.
1
2
Buckle
Tongue
Unbuckle Harness
Press in towards the top of
the red button to release the
buckle tongues.
Fully Recline the Car
Seat
Pull out on recline handle and
push top of child restraint
back.
If you cannot achieve a snug harness fit for your child,
see pages 15-18.
To learn how to check harness tightness, see pages
49-51.
For Rear-Facing child fi t, see page 9.
For
Forward-Facing child fi t, see page 10.
3
Locate the Buckle’s
Metal Retainer
Reach under the seat
between the base and
shell and through the
recline handle.
continued on next page
continued on next page

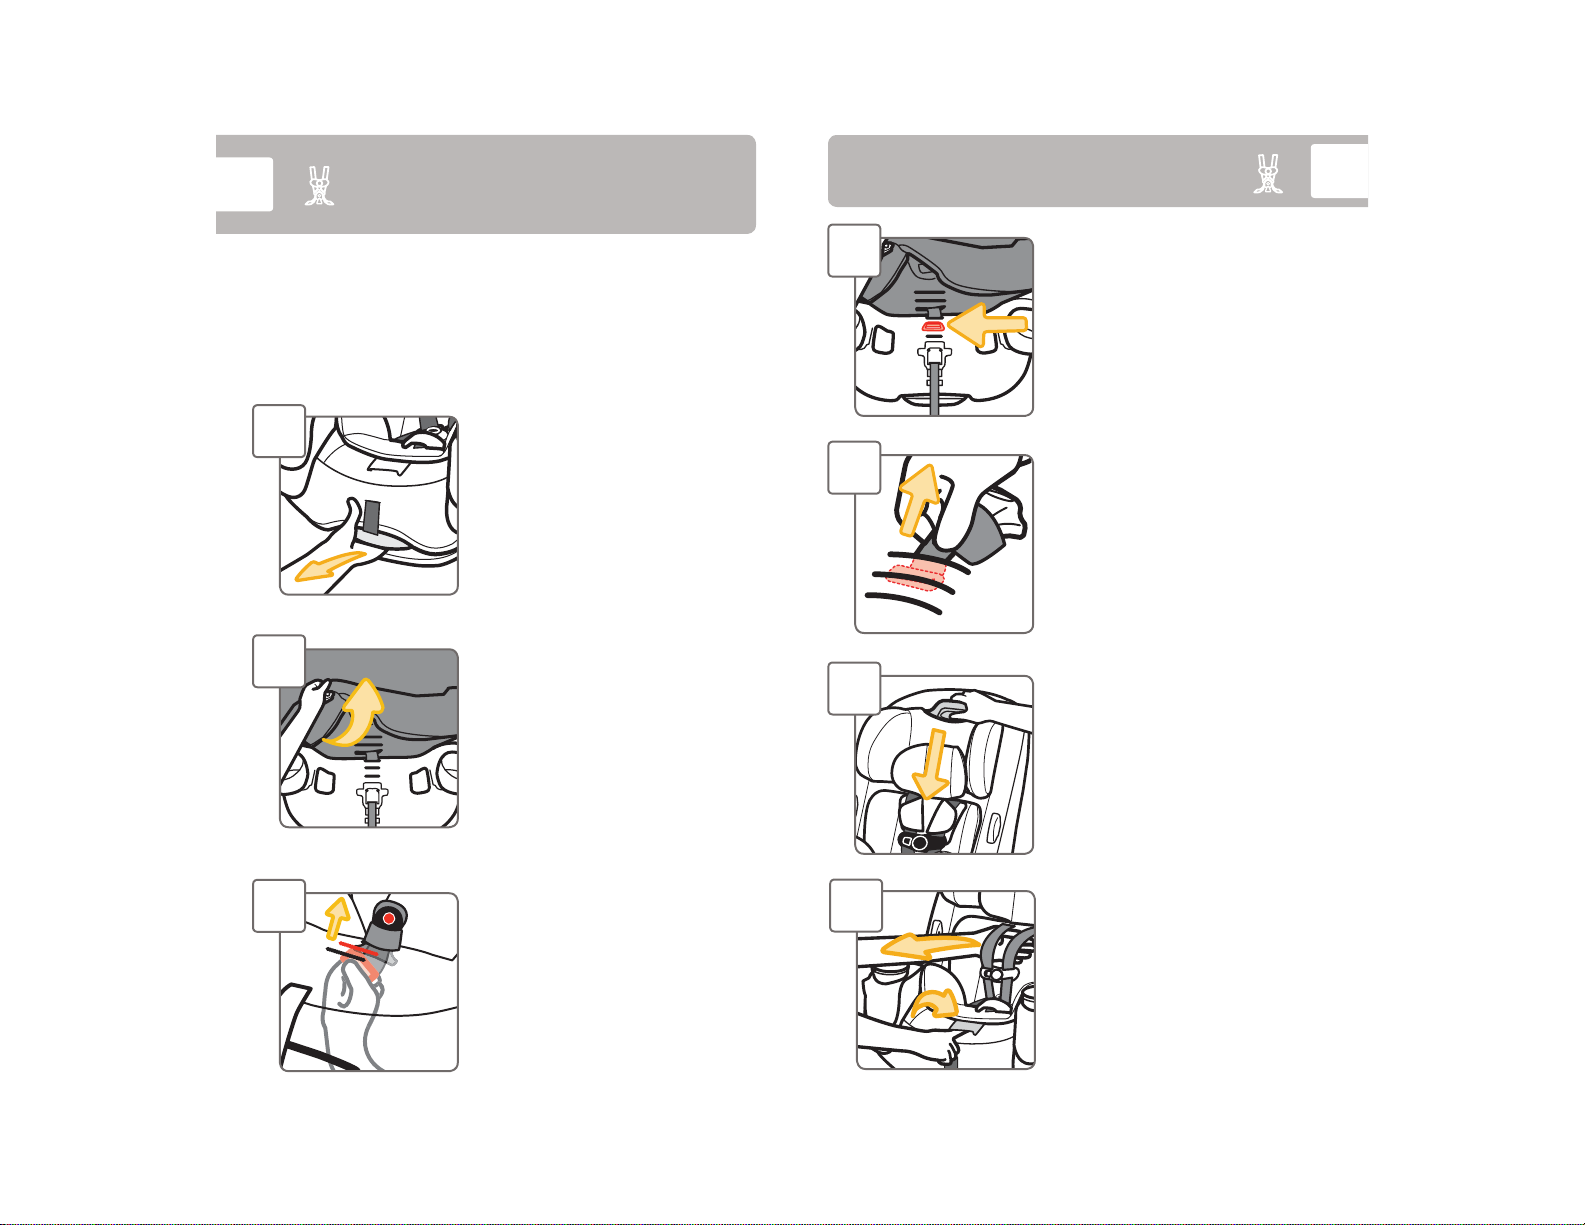
1413
1
2
3
4
5
6
Rotate Metal Retainer
and Push It Up Through
Buckle Slot in Shell
From Top of Seat,
Pull Buckle Out of
Shell and Pad
Insert Buckle’s Metal
Retainer into Slot
Closest to Child
Buckle must face out.
Rear-Facing Mode:
You must use the 1st or 2nd
buckle slots.
Forward-Facing Mode:
Any slot can be used.
7
8
If you cannot achieve a snug harness fi t for your child, see
pages 15-18.
To learn how to check harness tightness, see pages 49-51.
WARNING: Failure to place buckle’s metal retainer
completely through pad and shell can result in serious
injury or death.
Reach Under the Seat
Between Base and Shell
and Through Recline
Handle
Pull buckle’s metal
retainer completely
through pad and shell.
Check Buckle
Pull up on buckle to make sure
it is secured.
The buckle must not pull out.
15
Harness System Adjustments
for Smaller Infants
16
If you cannot achieve a snug harness fi t for your child,
make these adjustments.
When using the lower shoulder harness slots for smaller
children, you MUST use the body pillows and the headrest
MUST be in the lowest position.
1
2
With Buckle in the 1st Slot,
Fully Recline the Car Seat
If you need to move the buckle to
the 1st slot, see pages 12-14.
Pull Up Front of Car Seat Pad
4
5
6
From Top of Seat, Lay
the Metal Retainer Flat
Against the Shell As Shown
Tuck Car Seat Pad Back
Around Front of Car Seat and
Check Buckle
Pull up on buckle to make sure it
is secured.
The buckle must not pull out.
Adjust the Headrest to the
Lowest Position
The headrest must be in the
lowest position.
3
From Bottom of Seat, Pull
Metal Retainer Down and
Push It Up into Middle Slot
As Shown
7
Fully Loosen Harness Straps
Push down on harness release
lever (through opening in pad)
while pulling out on harness
straps as shown.
continued on next page

1817
sewn
end
8
9
10
From Back of Seat,
Remove Harness Strap
Loops From Splitter Plate
Pull Harness Straps Out of
Upper Shoulder Harness
Slots
Pull Back Body Pillow
Forward Away from Seat
Thread harness straps through slots
in back body pillow.
You must use the back and bottom
body pillows.
12
13
From Back of Seat, Pull
Harness Straps Through
Shell
Harness straps must be in shoulder
harness slots below the metal bar
as shown.
Do not twist harness straps.
Attach 2nd Harness Strap
Loops to Splitter Plate As
Shown
Sewn ends of the harness strap loops
must face towards you.
Do not twist harness straps or
harness adjustment strap.
Make sure the same harness strap
loops are fitted completely on both
sides of the splitter plate.
Check your child’s fit often.
The harness strap must be returned
to the upper shoulder harness slots
as your child grows.
11
Thread Harness Straps
Through Lower Shoulder
Harness Slots For Smaller
Infants in Seat Pad and Shell
WARNINGS: Harness system must be installed
correctly.
Failure to follow these steps can result in serious injury
or death.
19
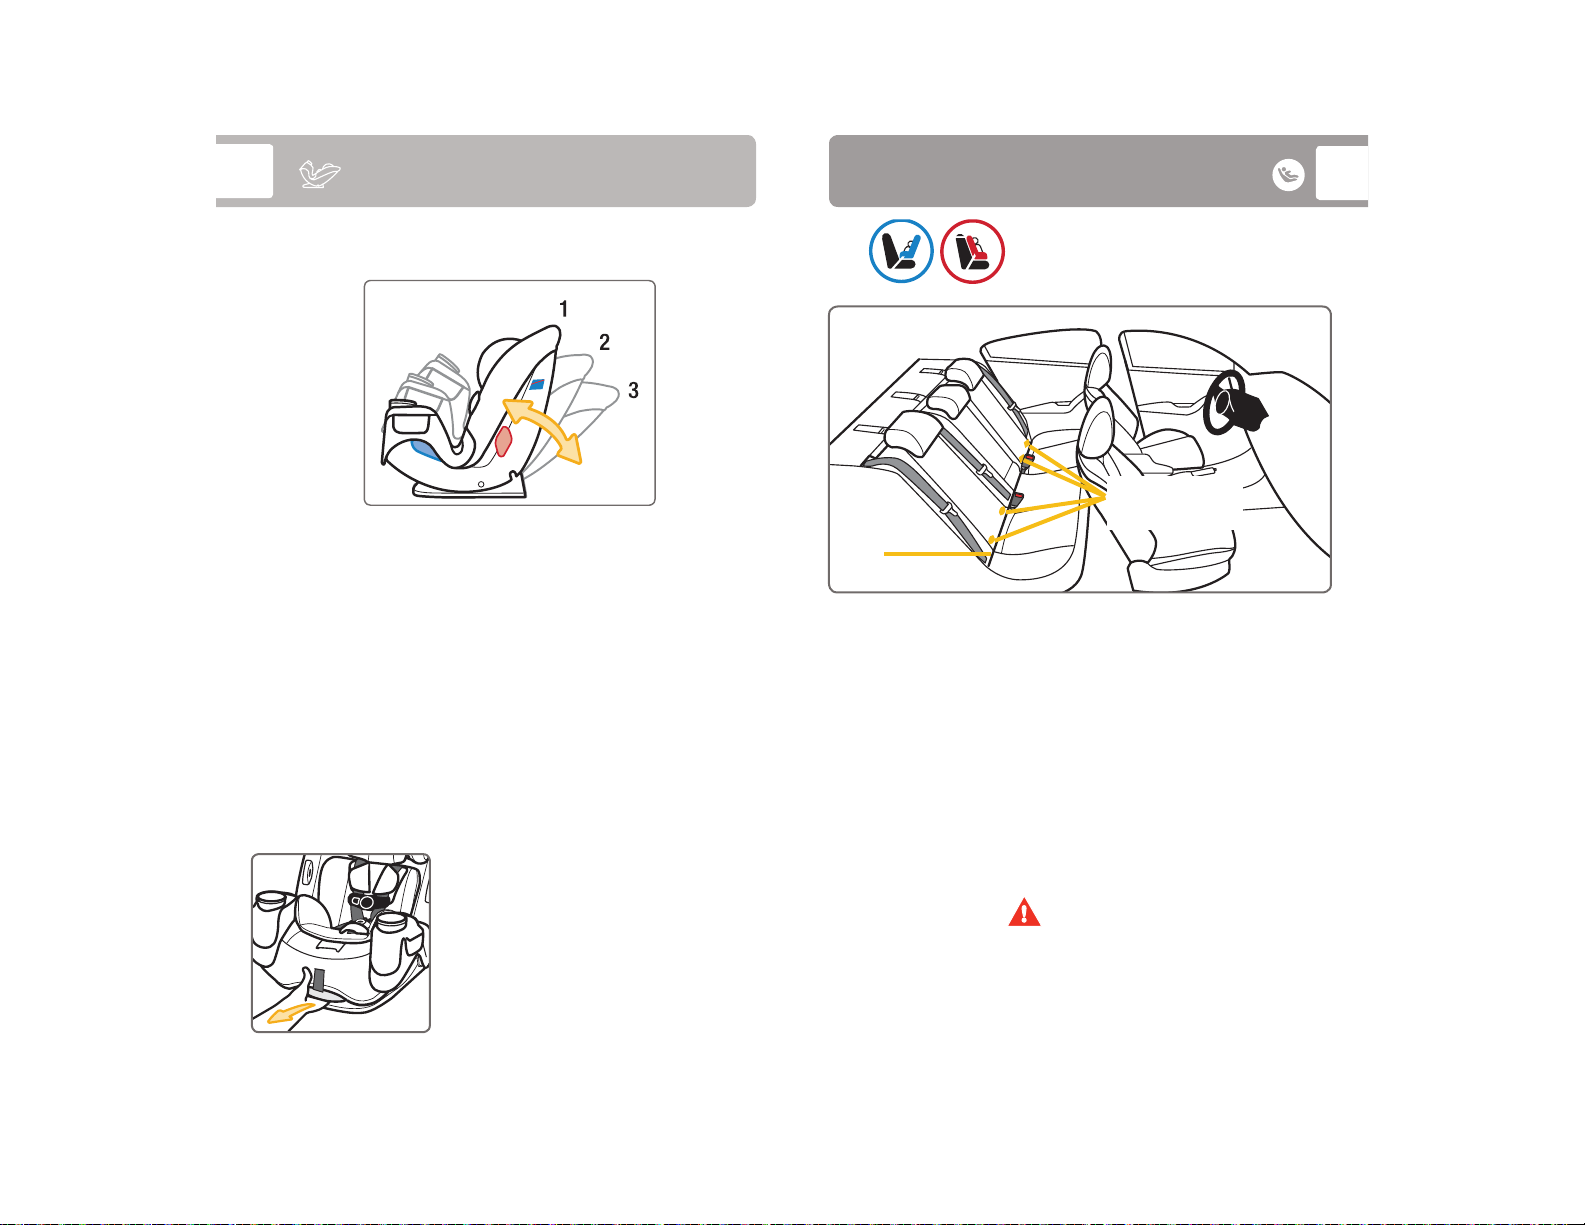
Reclining the Car Seat
LATCH: Lower Anchor Use
20
This car seat has 3 positions.
Rear-Facing Mode - 3 Reclined or 2 Semi-reclined
For children who cannot sit up unassisted, the level line on
shell must
3 or 2.
For children who can sit up unassisted, you may rotate the
child restraint to be more upright in Position 2.
Forward-Facing Mode - 1 Upright or 2 Semi-reclined
Booster Seat Mode - 1 Upright or 2 Semi-reclined
NOTE: When used in Forward-Facing or Booster Seat mode,
the semi-reclined position is to be used only to install the child
restraint or booster seat fl ush against the vehicle seat back.
Vehicle seat back must be upright.
be parallel with the ground using either Position
To Recline: Pull out on recline handle
and push top of child restraint back.
For More Upright: Pull out on recline
handle and pull top of child restraint
forward.
For Use in Rear-Facing
or Forward-Facing
Lower Anchor
Bars
Vehicle
Seat
Bight
Your vehicle’s features may be considerably different
than those pictured here.
The lower anchors of LATCH (Lower Anchors and Tethers for
CHildren) is a universal system for installing child restraints without
using vehicle seat belts.
The lower anchor can ONLY be used in vehicles that have the
lower anchor bars installed in designated seating positions. Most
vehicles manufactured after September 2002 are equipped with
lower anchor bars.
Check your vehicle owner’s manual to see which seating positions
may be equipped with LATCH: lower anchor bars.
Mode
WARNINGS
Do not use both the lower anchor belt and vehicle belt at the
same time.
When used correctly the lower anchor belt or vehicle belts
are equally safe.
continued on next page
 Loading...