

Safety 1st Acella LX, Acella Alumilite Travel System, Acella Alumilite, Acella LX Travel System, 1621 User Manual
...
User Guide
Questions? Comments?
Missing Parts? Contact Us:
www.safety1st.com
©2006 Dorel Juvenile Group
Made in CHINA
www.safety1st.com
(800) 544-1108
Styles and colors may vary.
Distributed by Dorel Juvenile Group, Inc.,
2525 St
at
e Str
eet,
Columbus, IN 47201-7494
Dorel Canada,
Dorel Distribution Canada,
873 Hodge St., St-Laur
ent,
QC Canada H4N 2B1
08/22/06 4358-3714B
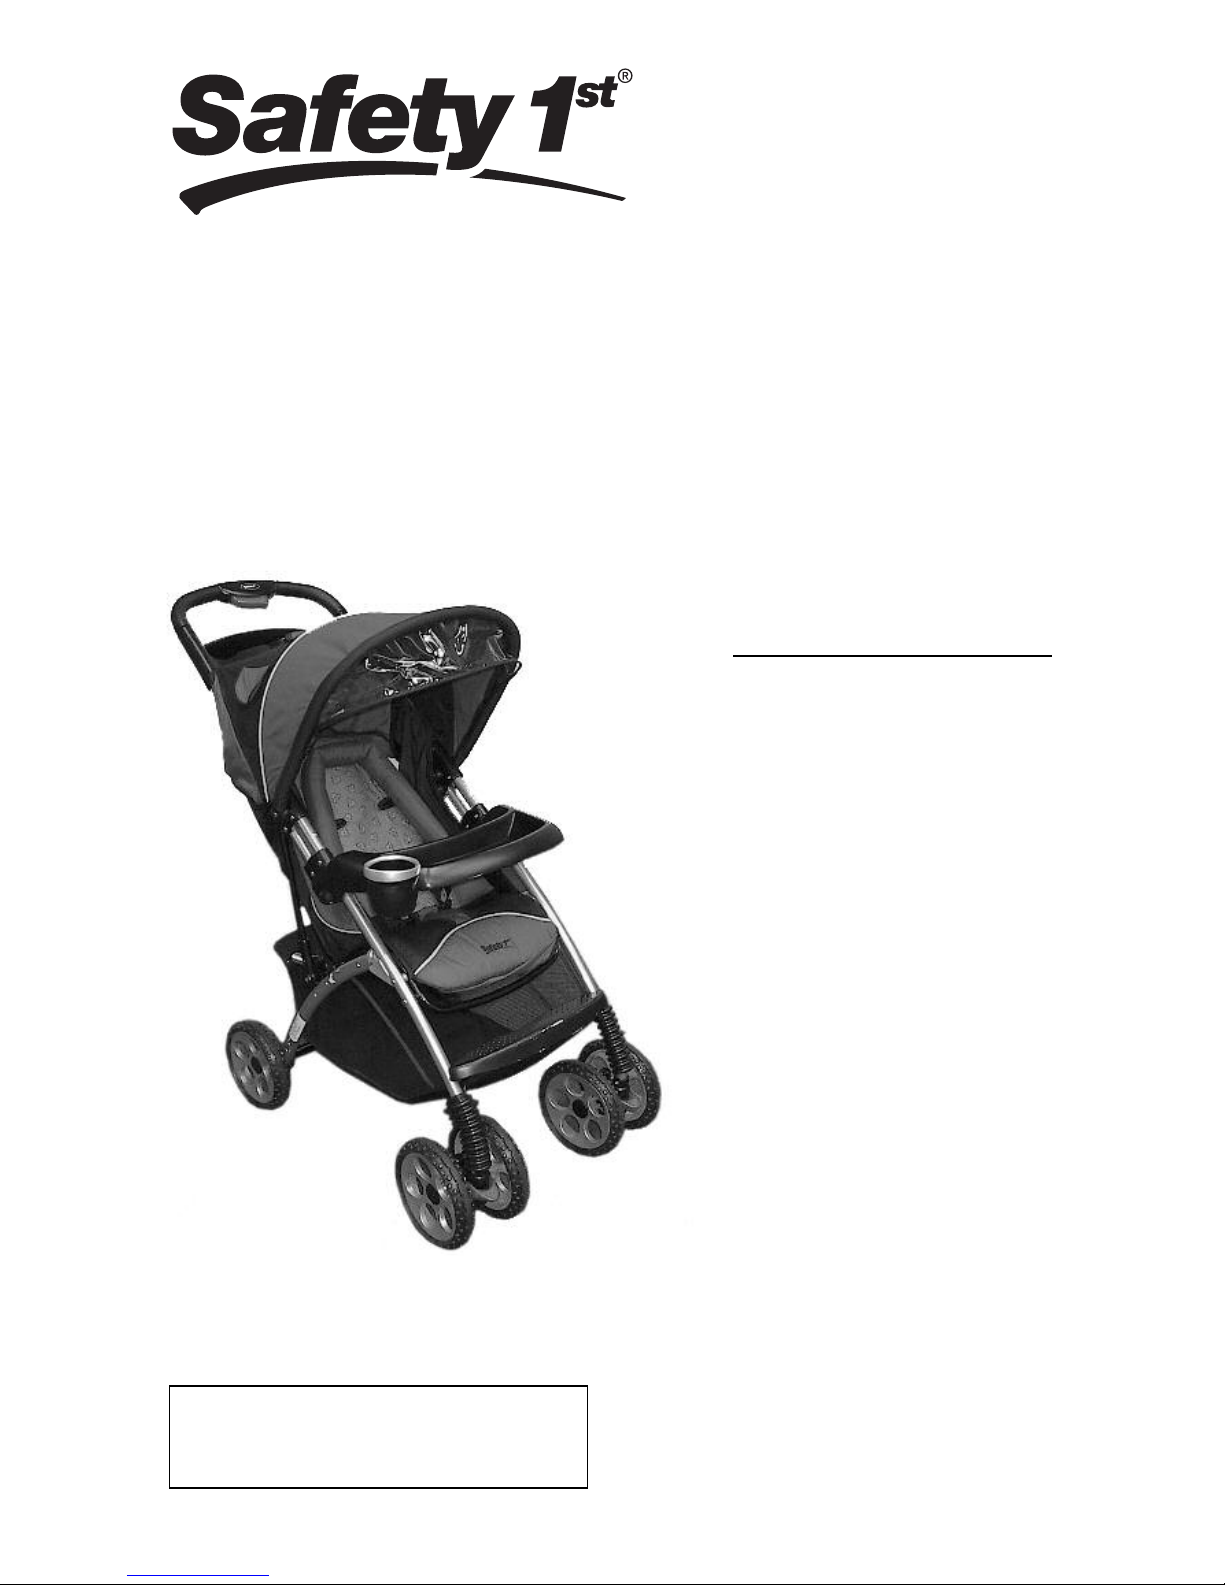
Acella LX Stroller
Acella Alumilite Stroller
Acella LX Travel System
Acella Alumilite Travel System
Models 01621, 01901, 01902, 01905, 01908, 01909, 01915, 01921
Spanish Guide: page 25
Guía en español: página 25

FOR THE SAFETY OF YOUR CHILD, PLEASE READ THE
FOLLOWING WARNINGS AND ASSEMBLY INSTRUCTIONS AND
KEEP FOR FUTURE REFERENCE.
• Adult assembly required. The product contains small parts which
are for adult assembly only.
•
NEVER LEAVE CHILD UNATTENDED. ALWAYS keep child in
view when in stroller.
•
AVOID SERIOUS INJURY from falling or sliding out. ALWAYS use
seat belt. Check frequently to make sure it is secure.
•
ALWAYS keep child away from moving parts, when folding,
unfolding or adjusting stroller to prevent finger entrapment.
•
ALWAYS make sure stroller is FULLY OPEN AND LOCKED
before using.
•
ALWAYS use the brakes when stroller is stopped.
•
ALWAYS remove protective material and poly bags and dispose
before assembly.
•
NEVER put hot liquids in the parent’s tray.
•
NEVER use stroller on stairs or escalators.
•
NEVER allow children to play with or hang onto the stroller.
•
NEVER allow children to climb into the stroller unassisted. Stroller
may tip over and injure child.
•
NEVER place or hang parcels, bags or accessories on the handle
or canopy. The stroller may tip over or the canopy may collapse.
• This product will become unstable if a parcel bag or rack is used
when there is no provision for one.
• This product may become unstable if a parcel bag, other than the
one recommended by the manufacturer is used.
• This product will become unstable if the manufacturer’s
recommended load is exceeded.
•
DO NOT carry additional children, goods or accessories in or on
this product except as recommended in the manufacturer’s
instructions.
•
NEVER place more than 2 lbs. (0.91 kg) in parent’s tray to prevent
tipping.
•
NEVER place more than 10 lbs. (4.5 kg) in the storage basket. If
weight is exceeded, hazardous unstable conditions may exist.
•
STROLLER is only for use with children up to 40 lbs. (18 kg), and
WHEN SEATED, the midpoint of the child’s head is at or below the
top of the stroller seat.
•
ONLY use this stroller with ONE child at a time.
• Stroller in its most upright position is
NOT recommended for
newborns.
WARNING
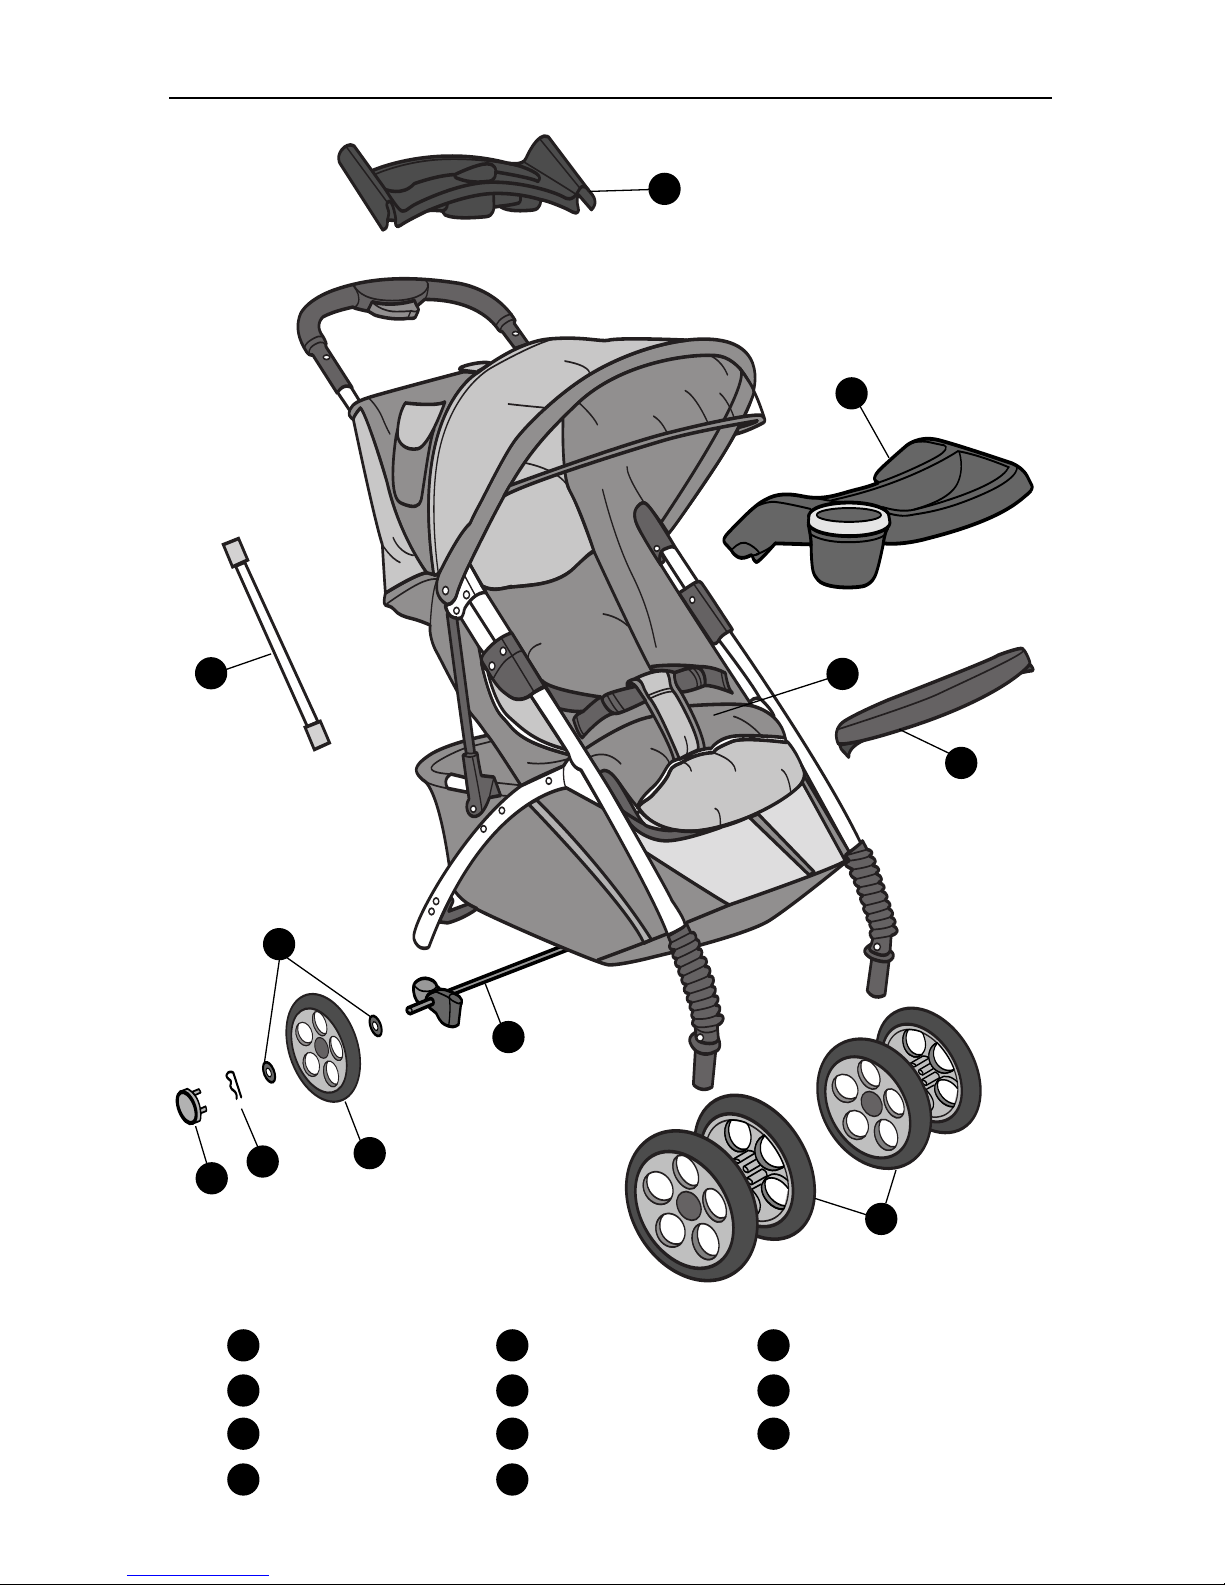
Parts List
1 Rear axle
2 Rear wheels
4 Washers
2 Cotter pins
1
2 Hubcaps
2 Front wheels
Child’s tr
ay
Par
ent’s tr
ay
A
A
B
B
C
C
D
Footrest
Seat pad
Adapter bar
I
J
K
D
E
E
F
F
I
J
K
G
G
H
H

• Lay out and identify all parts.
• Do not return this product to the place of purchase. If any parts are missing, call
Consumer Relations at (800) 544-1108. Or visit our web site at www.safety1st.com.
• Include the model number and manufacture date (found on the stroller)
and a brief description of the part.
• We will ship replacement parts within two working days (in the United States).
Assembling Your Stroller
Keep these instructions for future use
2
Unfold Stroller
1
1.
Hold and lift the handlebar.
Stroller will click when completely
open and locked.
Assembling Your Stroller
3
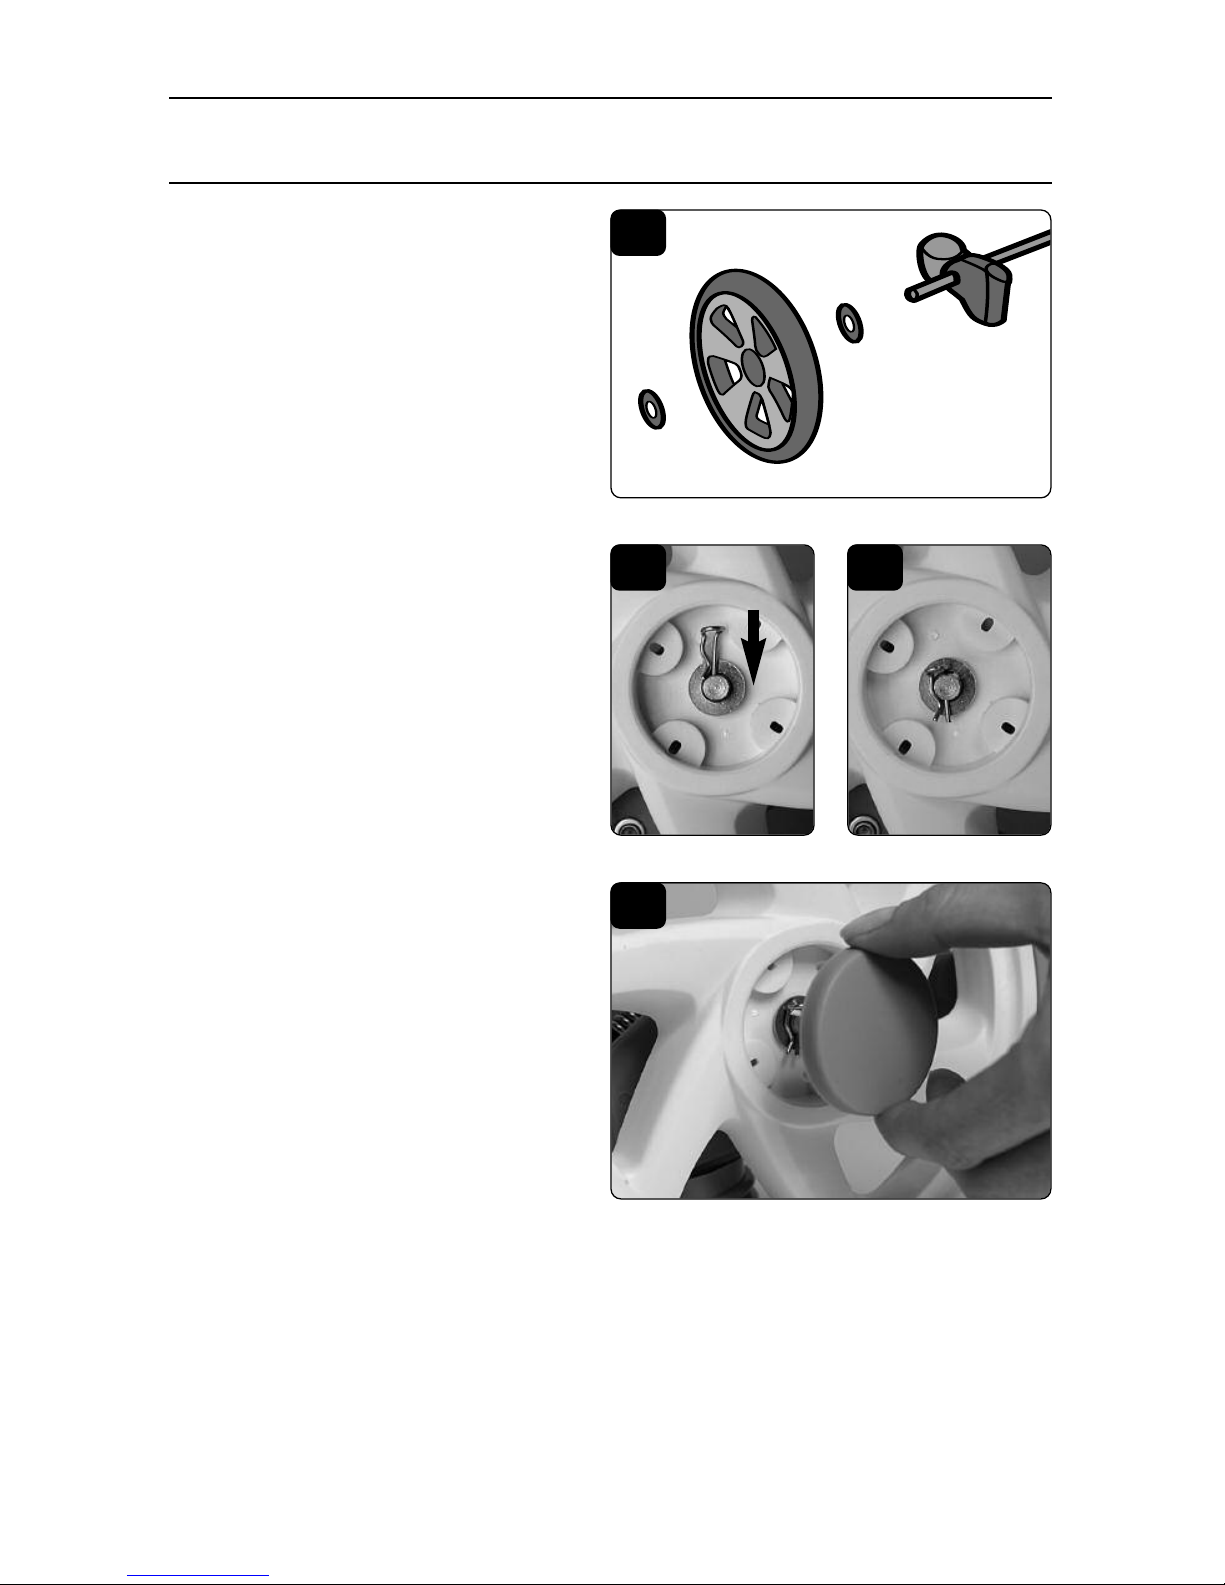
Install Rear Wheels
1. Remove cotter pin and one washer
from axle leaving one washer on the
axle. With the spokes facing out,
slide a wheel onto the axle. Slide on
a second washer.
1
2
2a
2. Insert straight side of cotter pin
through hole in axle.
3
3. Repeat steps to attach
other wheel.
Snap hub caps onto
both wheels.
4
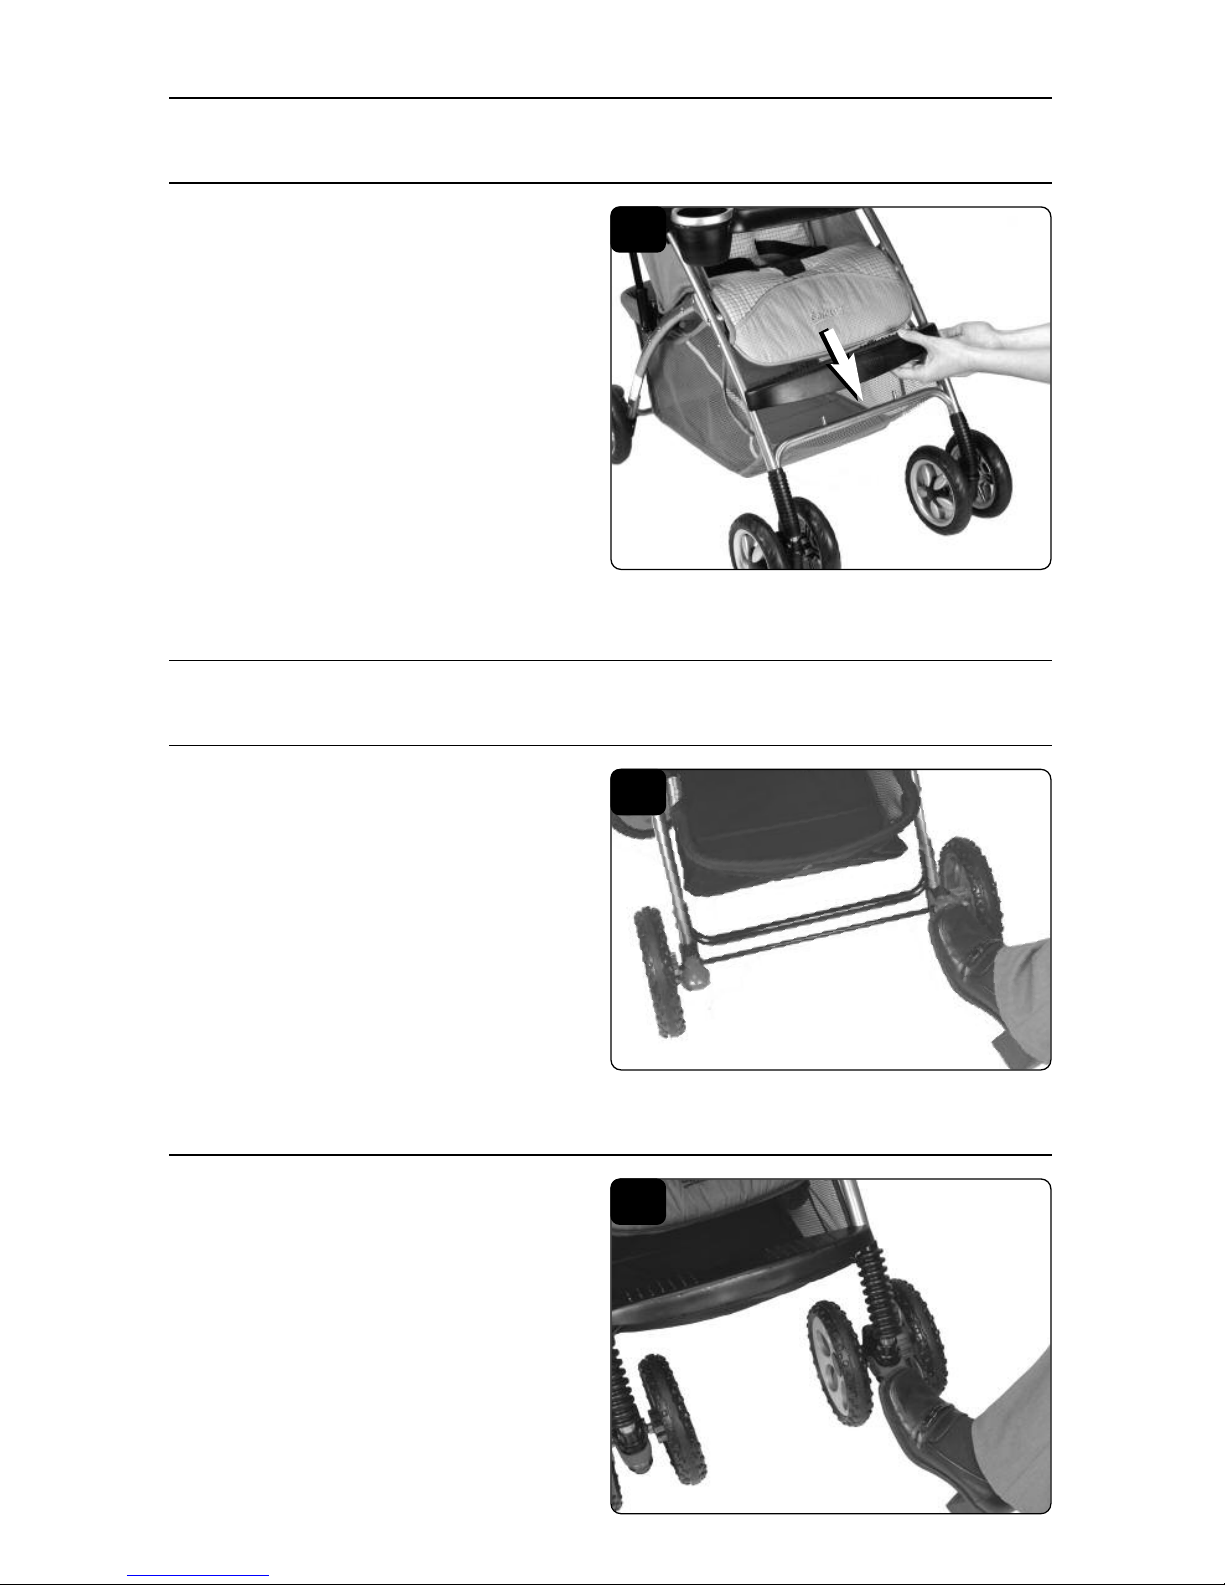
Assembling Your Stroller
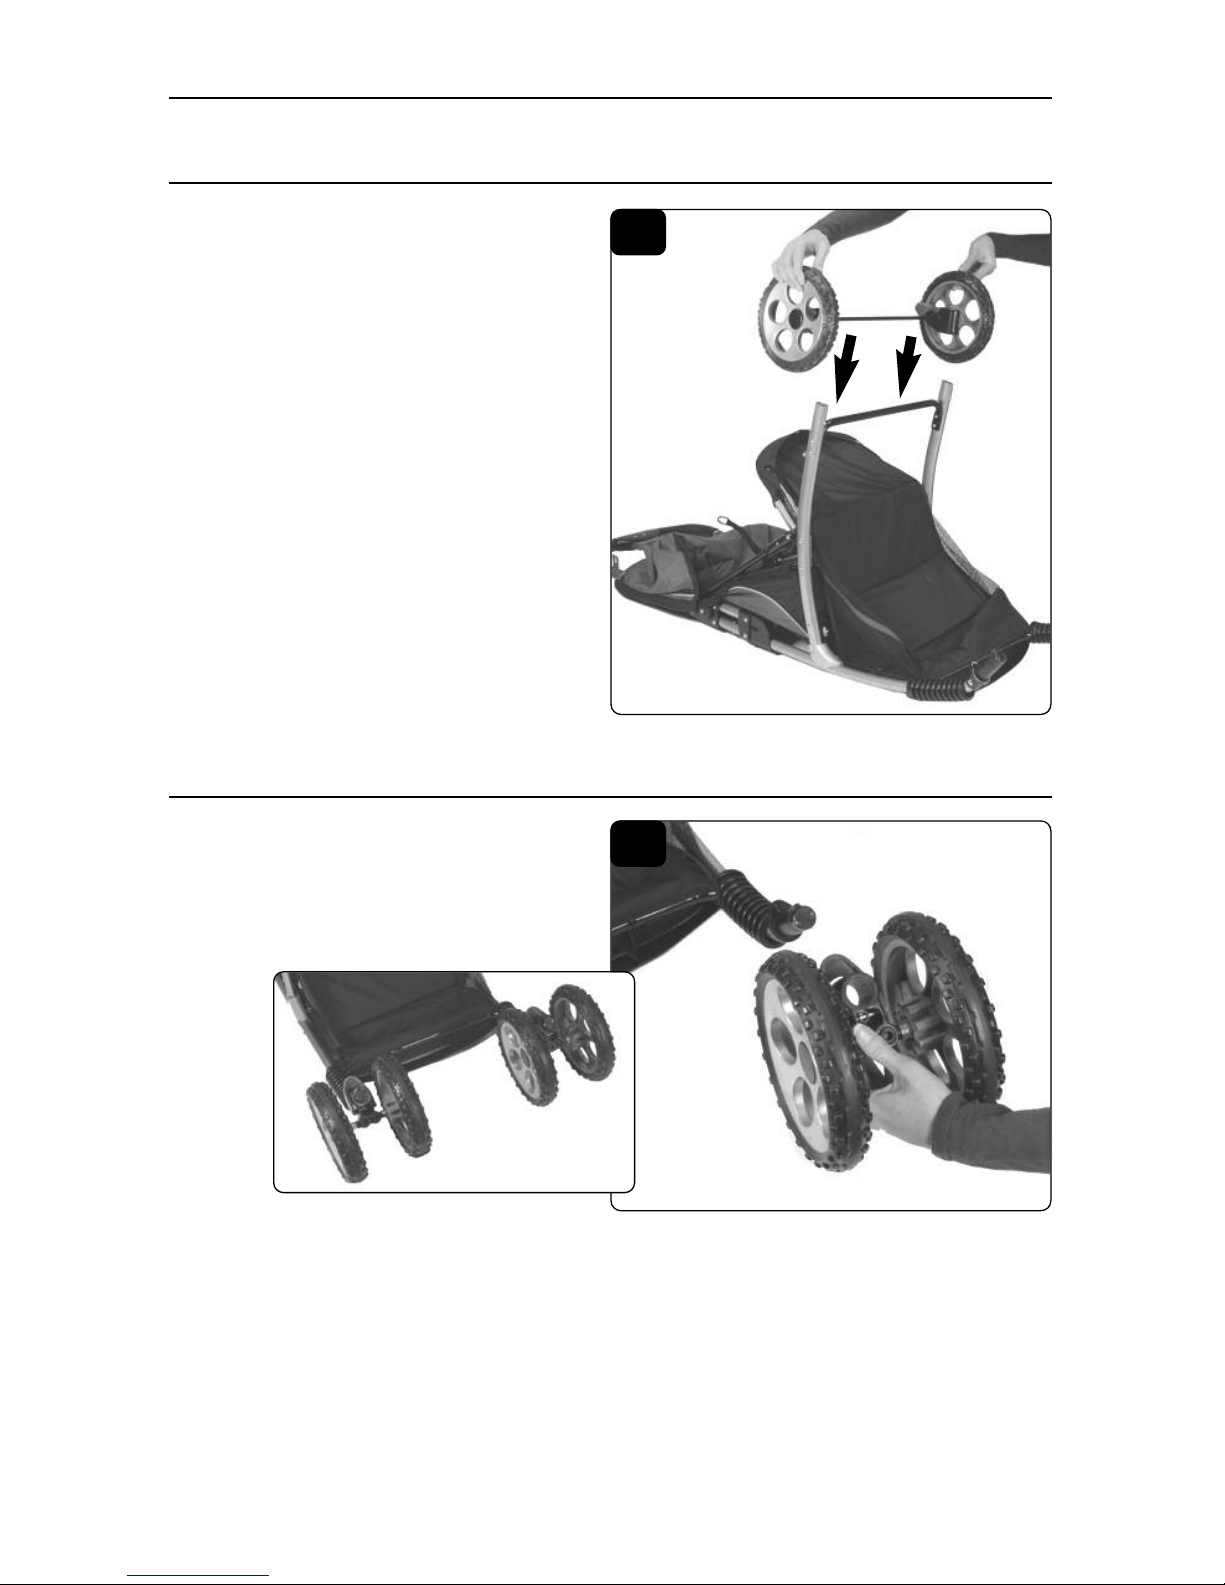
1
Install Front Wheels
1. Slide front wheel onto frame
tube. Wheel will click when
installed properly. Repeat for
other front wheel.
4
4. Turn stroller upside down. Hold
the axle assembly with the brakes
toward the handlebars. Push onto
frame until buttons snap into place.
Install Rear Wheels
5
Assembling Your Stroller
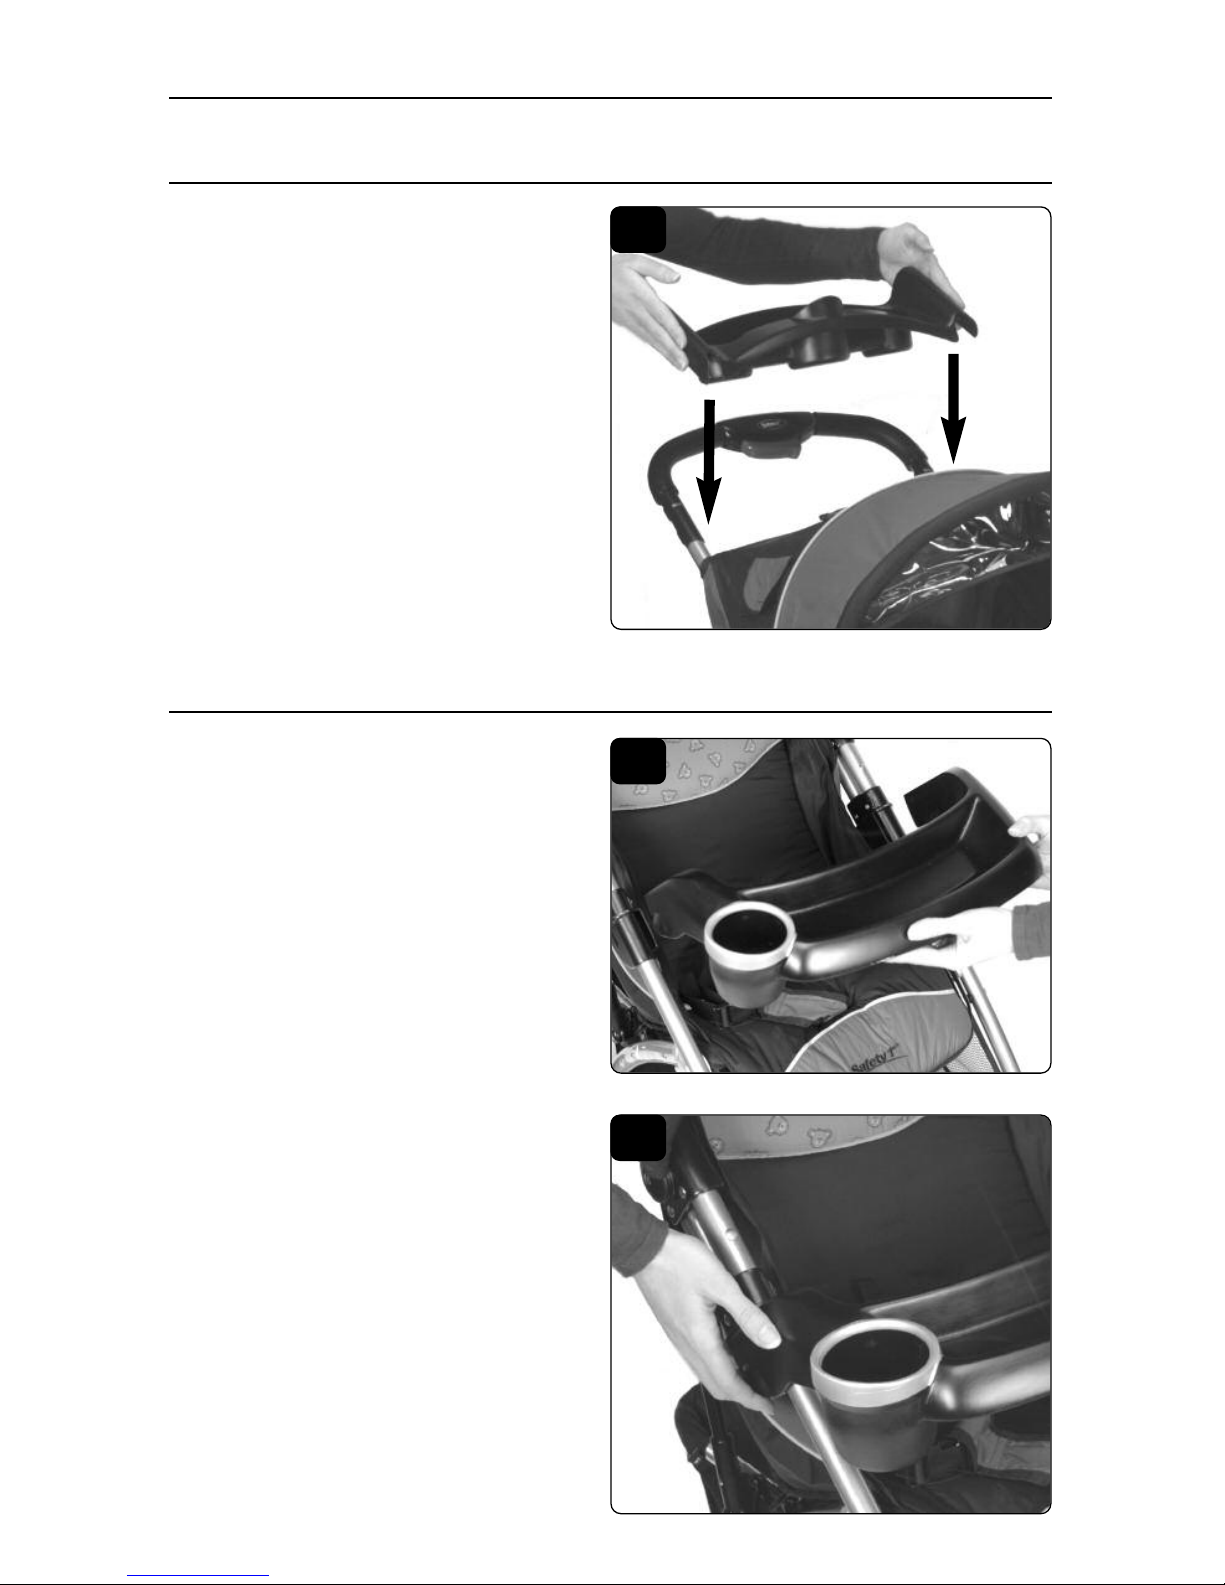
1
1. Open canopy. Slide bottom edge
of parent tray onto the frame above
the canopy and snap onto
handlebar tubes.
1
1. Guide tray tabs into slots on
stroller frame. Push until tray clicks
into place.
2
2. To remove tray, pull out finger tabs
on both sides and slide tray out.
Install Parent’s Tray
Install Child’s Tray
6
Assembling Your Stroller
Using Your Stroller
1
1. Step down onto red levers on both
rear wheels. To park stroller, BOTH
BRAKES MUST BE LOCKED. Lift
up levers to unlock brakes.
1
1.
Step down on levers to keep dual
wheels from swiveling. Flip up to
swivel.
NOTE: Ideal for travel over rocky
or une
ven sur
faces.
To Use Swivel Locks
To Use Brakes
Install Footrest
1
1. Align pins on lower crossbar with
holes on underside of footrest. Snap
footrest over crossbar. Push down.
7
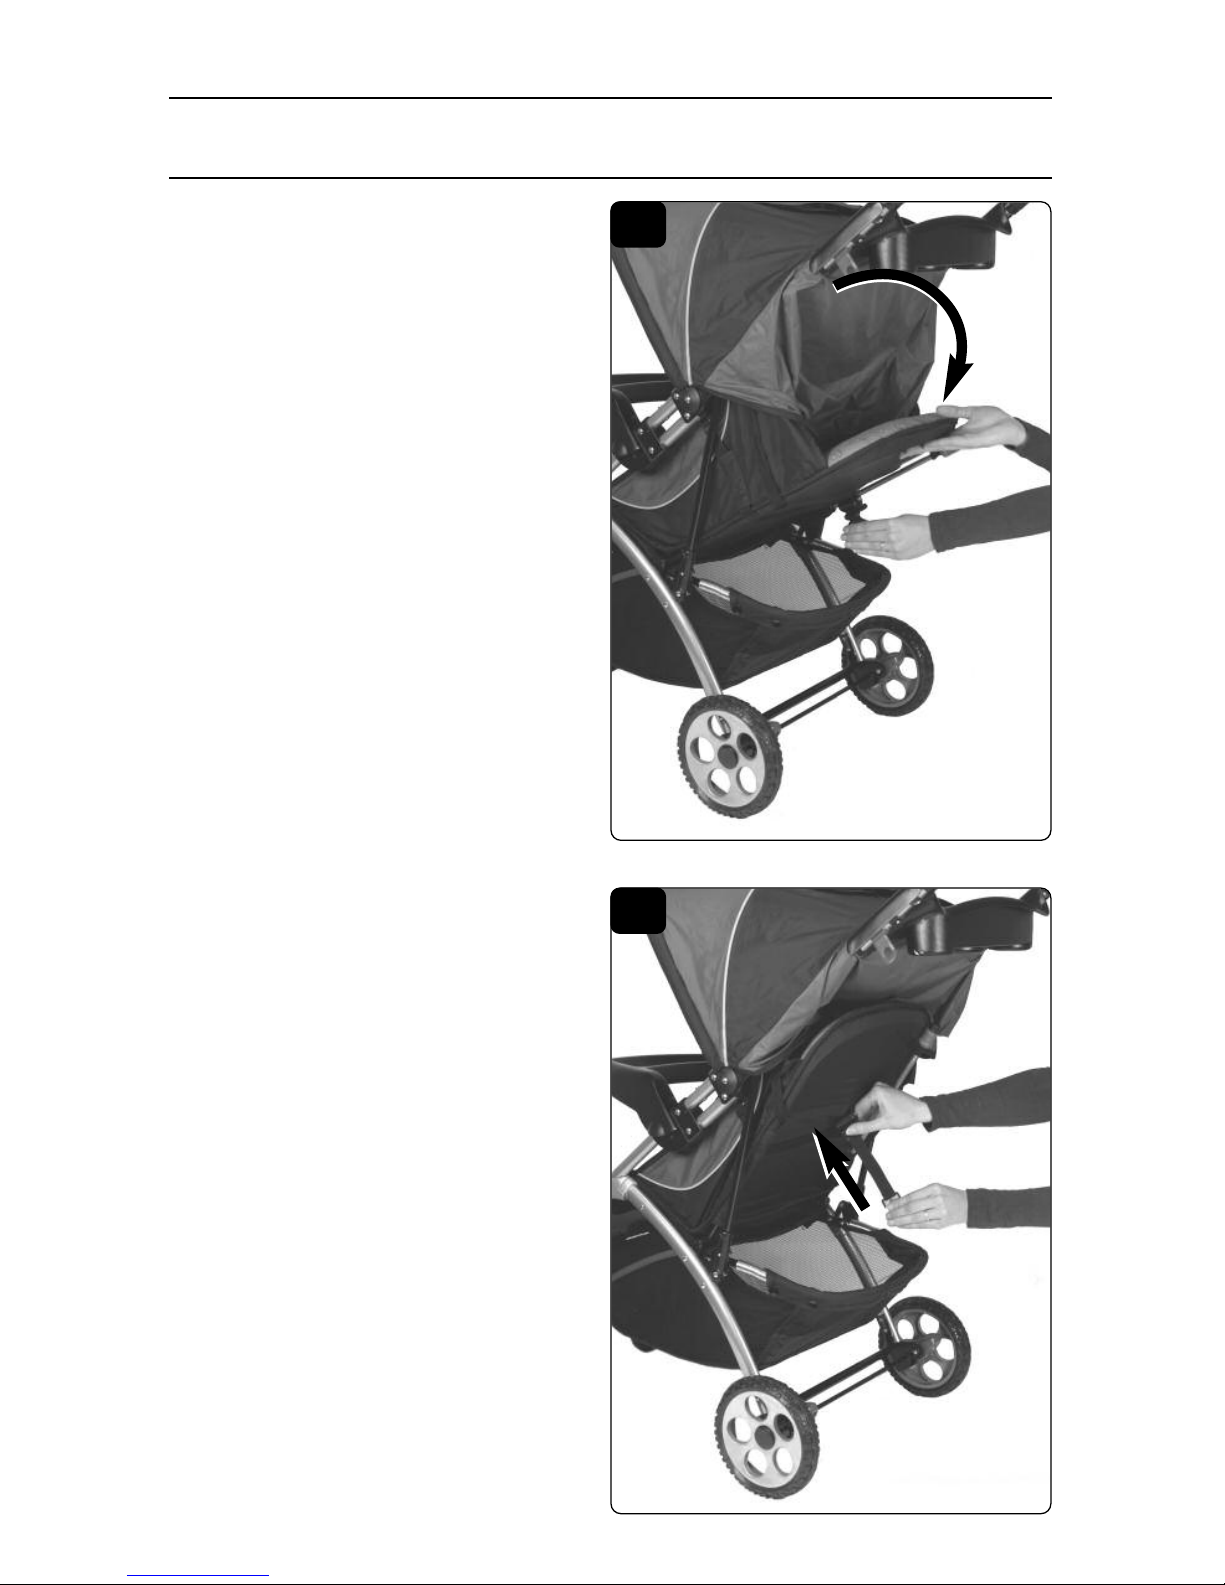
Using Your Stroller
1
1.
To Lower Seat Back–Locate
release clip behind backrest.
Squeeze release clip, pull away
from the stroller and lower
seat back.
2
2.
To Raise Seat Back–
Holding the
ring on the strap, squeeze release
clip and push toward the seat back.
NOTE: Do not adjust the seat
when your child is in the stroller.
To Adjust Seat Position
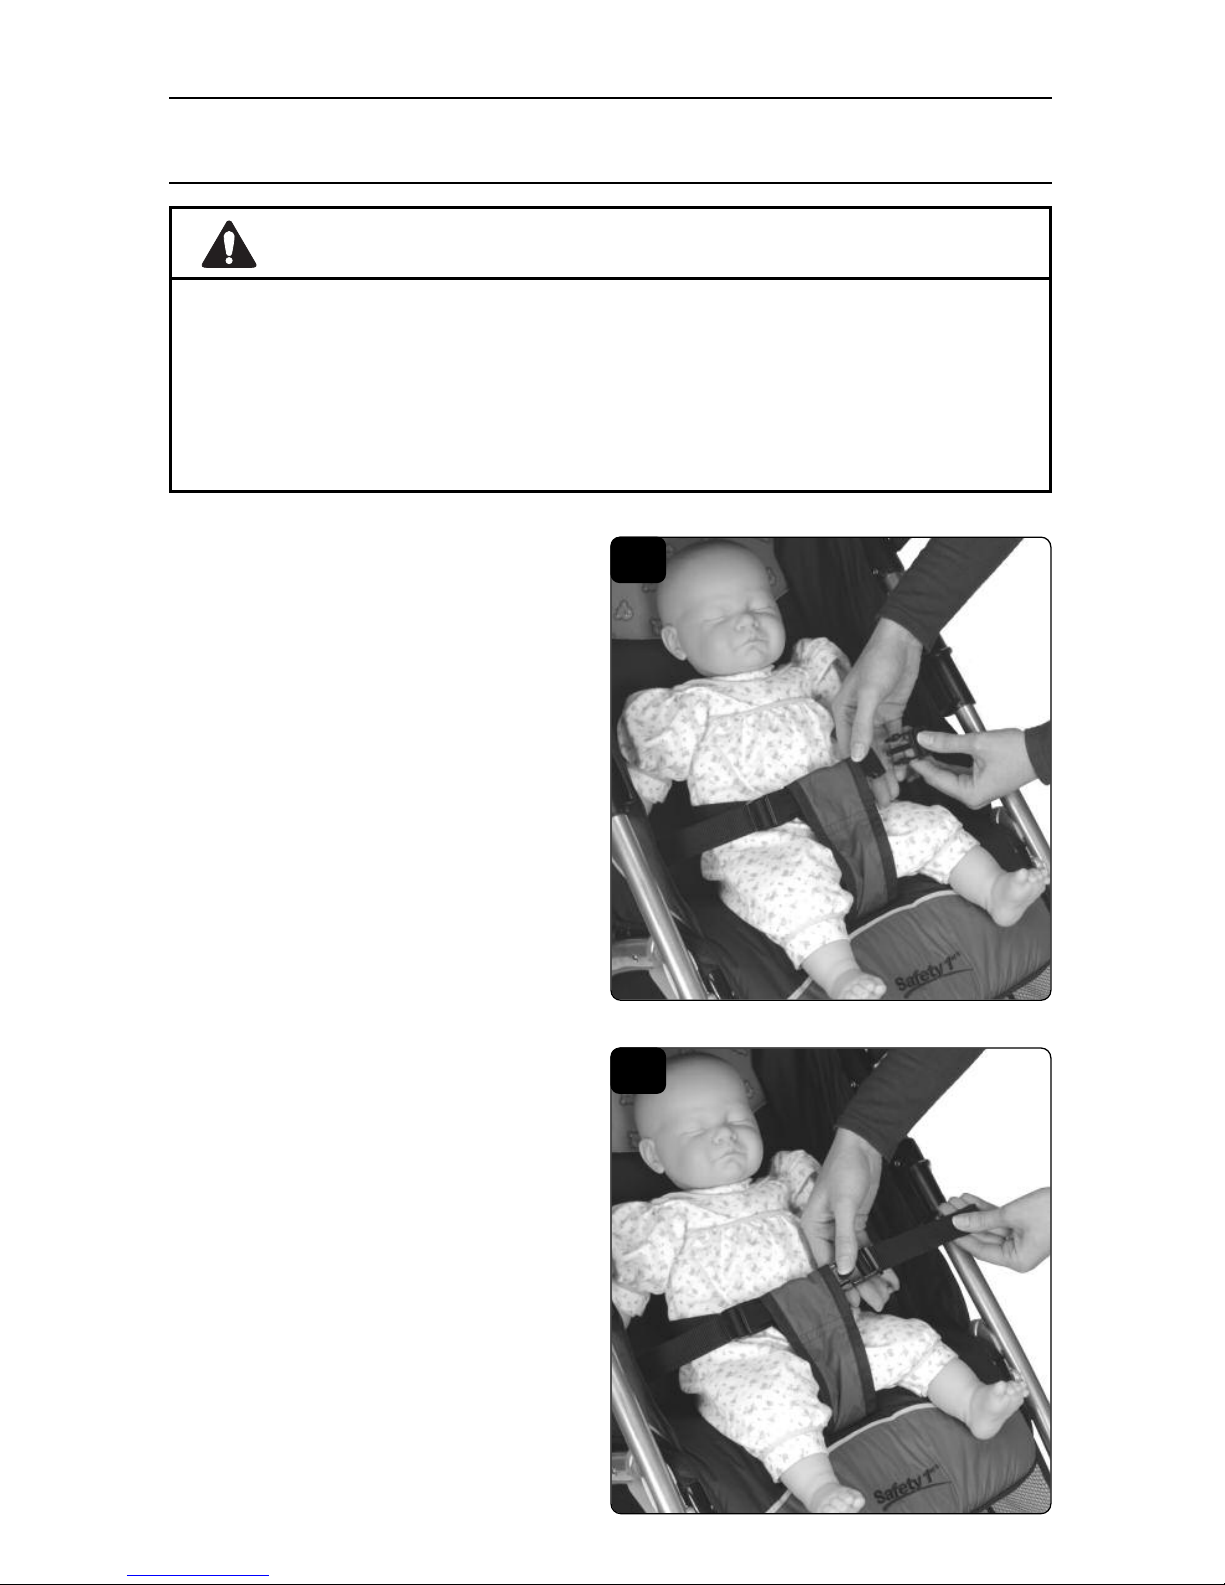
Using Your Stroller
1
1. Place your child in the stroller, with
the crotch strap between the child’s
legs. Fasten both buckles.
2
2. Tighten straps snugly around
your child.
To Use Restraint System
• NEVER LEAVE CHILD UNATTENDED.
• AVOID SERIOUS INJURY from falling or sliding out. Always use seat belt.
Check frequently to make sure it is secure. Belts must be threaded
exactly as shown.
• Failure to follow these instructions could result in the serious injury or
death of your child.
WARNING
8
9
Using Your Stroller
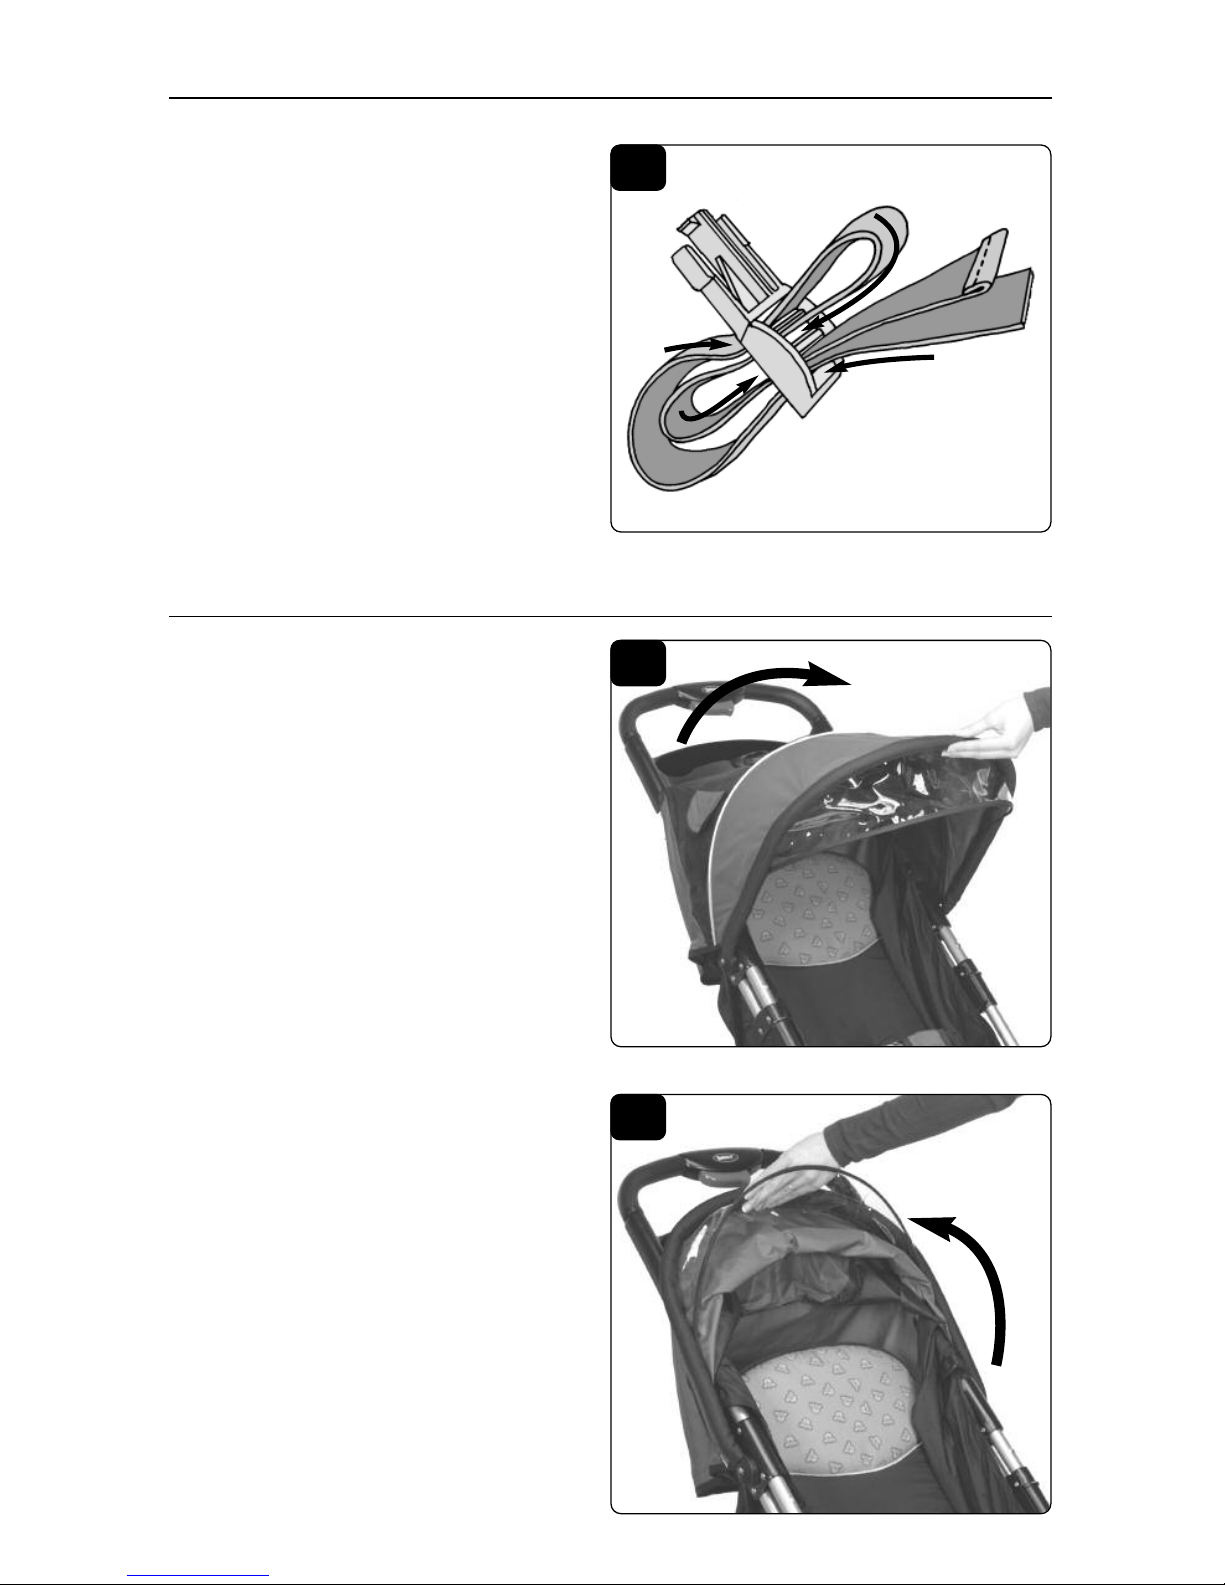
3
3. To tighten straps, pull out bottom
loop (B) then pull on strap end. To
loosen straps, pull out top loop (C)
then pull out on buckle. If the straps
should come out of the buckle,
rethread as shown.
1
1. Pull canopy out to open.
2
2. Push to close.
To Use Canopy
A
B
C
D
Using Your Stroller
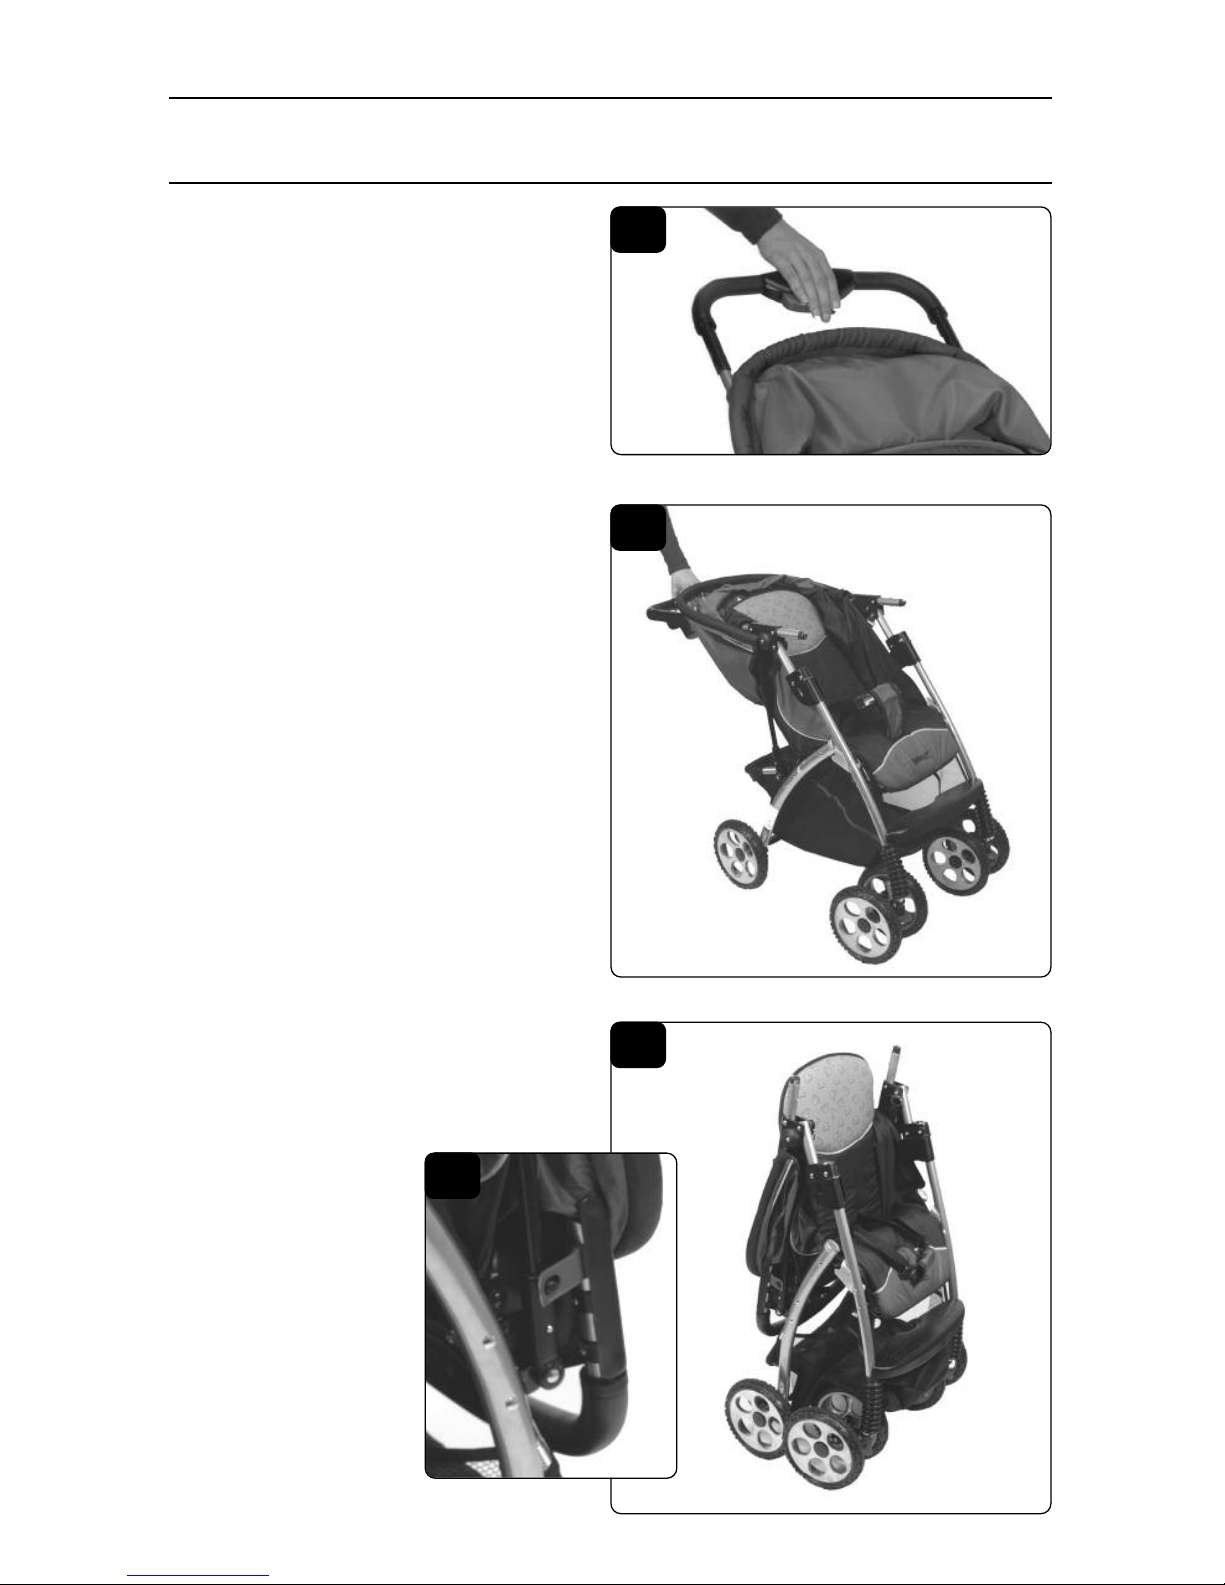
1
1. Lock rear brakes and remove your
baby. Close canopy. Slide the red
button on handlebar to the left
and squeeze.
2
2. Hold the button in and push
the handlebar down.
3a
3
3. Hook tab on the left of the
handlebar onto post on stroller
frame tube. Stroller will stand alone.
To Fold Stroller
10

Using Your Stroller
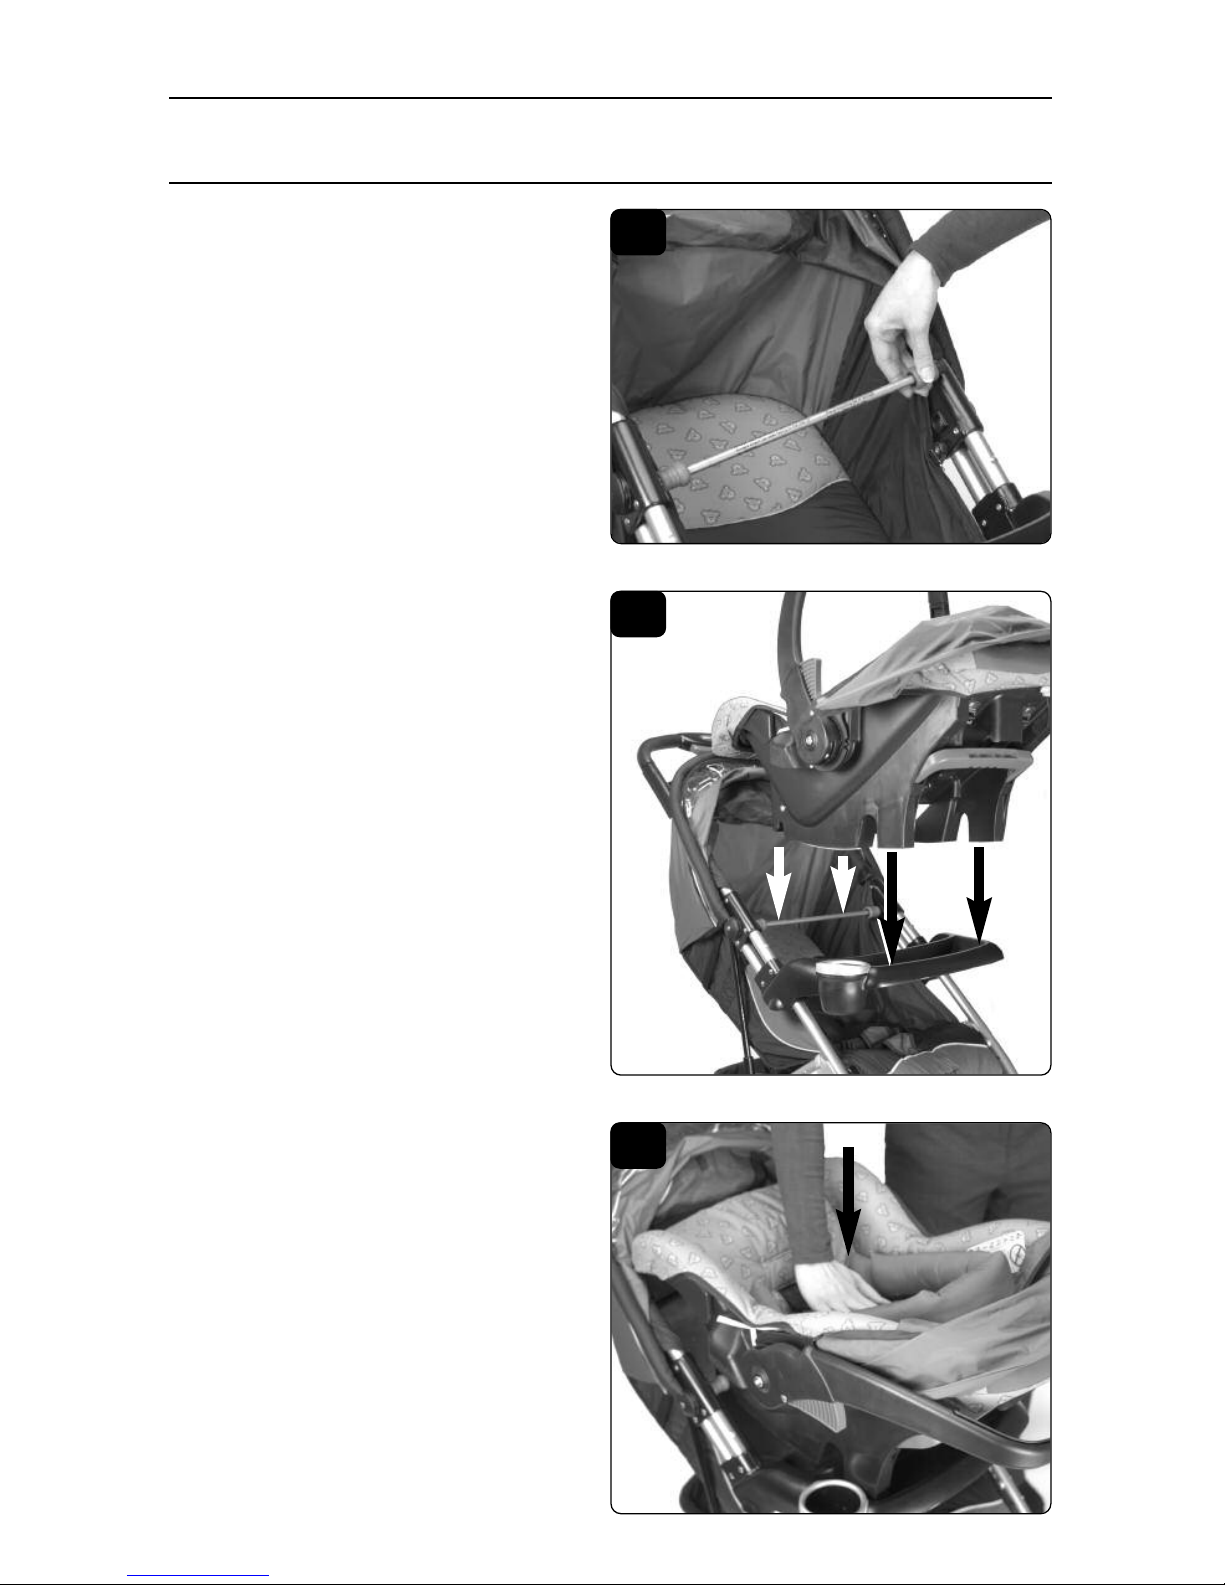
1
1.
Remove adapter bar from behind
seat back. Recline seat back to
lowest position. Close canopy.
To Install Infant Car Seat
To Install Safety 1st or Eddie Bauer Designer 22 Infant Car Seats
11
To avoid serious injury:
• Use
ONLY Safety 1st or Eddie Bauer Designer 22 infant car seats with
the Acella Travel System or the Acella Alumilite Travel System.
• Use ONLY Safety 1st or Eddie Bauer Designer 22 infant car seats, or
Graco®SnugRide®infant car seat with the Acella or the Acella Alumilite
strollers.
• Please refer to the manufacturer’s instructions for the use of your infant
car seat.
• ALWAYS use child’s tray when car seat is installed.
• ALWAYS install car seat facing to the rear of the stroller.
• ALWAYS use the restraint system in the car seat.
• Place adapter bar in storage position behind seat back when not in use.
WARNING
1a
1b
12
2
2.
Insert the rigid end of adapter bar
through hole in fabric and into
hole inside stroller frame.
Push in spring end and insert
through hole in fabric, then into
the hole on the other side. Test to
make sure bar is securely installed.
NOTE: Make sure no fabric is
caught between the ends of the
adapter bar and holes in frame.
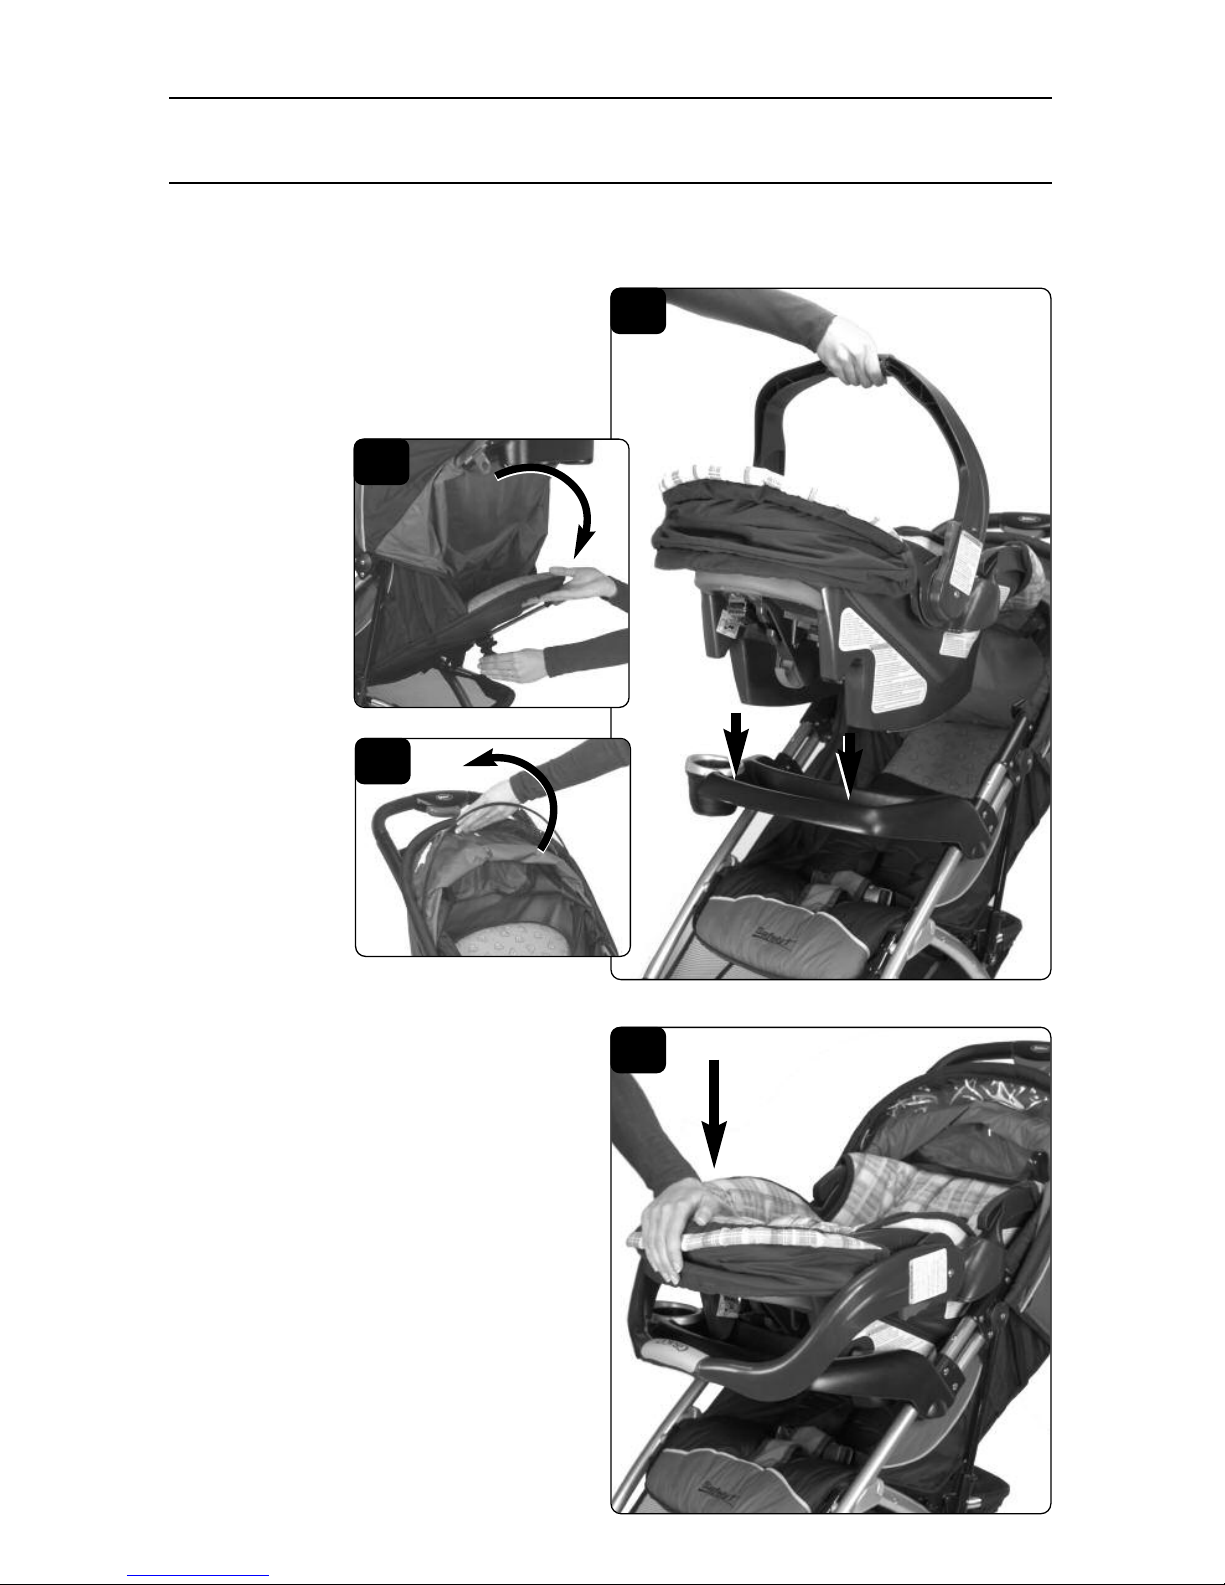
3
3.
Car seat must be in rear-facing
position. Lower the car seat down
so the rear rests inside the child’s
tray. The channel at the front of
the car seat should rest on the
adapter bar.
4
4.
Press down in the well of the
car seat onto the adapter bar.
Car seat will click when locked
in place.
Using Your Stroller
To Install Safety 1st or Eddie Bauer Designer 22 Infant Car Seats
13
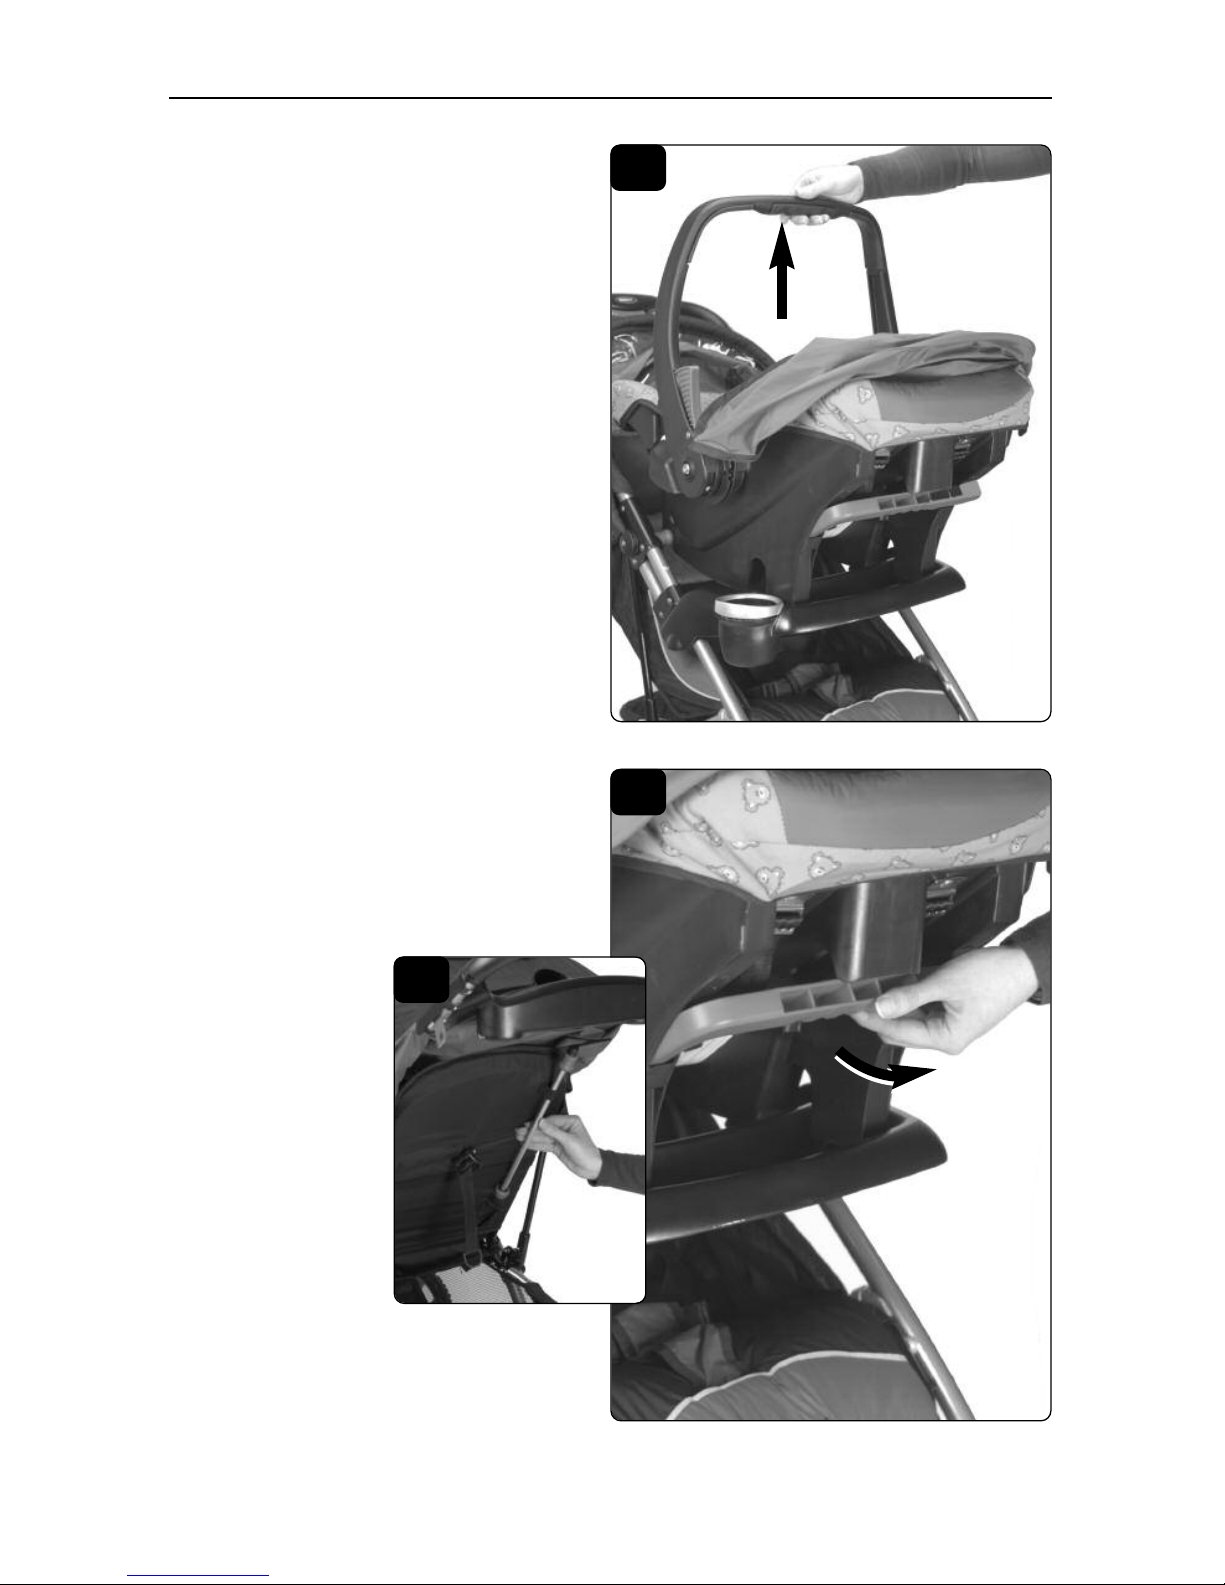
5
5.
Pull up on car seat to make sure it
is securely installed.
6
6.
To remove the car seat, pull up on
the release button underneath the
head rest. Remove the adapter bar
and replace in storage position
behind the seat back.
Using Your Stroller
6a
1
NOTE: Do not use the adapter bar.
1.
Recline seat back to lowest
position. Close stroller canopy.
Car seat must be in rear-facing
position.
Lower the
car seat
down so
the mounting notches
snap onto
the child’s
tray.
Using Your Stroller
To Install Graco®SnugRide®Infant Car Seat
NOTE: Use ONLY with Acella and Acella Alumilite strollers.
(The trade name or trademark of Graco is the trademark of its respective owner.)
1a
1b
2
2.
Press down to lock the car seat
onto the child’s tray. Car seat will
click when locked in place.
14
 Loading...