

Page 1
3-Shelf Value Mate® Bookcase
Thank you for purchasing this Safco Product.
We hope that you will enjoy using it.
SHOULD YOU NEED ASSISTANCE WITH YOUR PRODUCT,
PLEASE DO NOT RETURN YOUR
PRODUCT TO THE STORE!
For all questions, concerns or assistance, please call
Safco Consumer Hot Line
1-800-664-0042
available Monday-Friday 8:00 AM to 4:30 PM (Central Time)
(English-speaking operators)
NOTE: When corresponding about parts,
be sure to specify color (Black, Gray,
Sand, Medium Oak or Walnut)
MODEL
NUMBER
Registered U.S. Patent 5,944,439
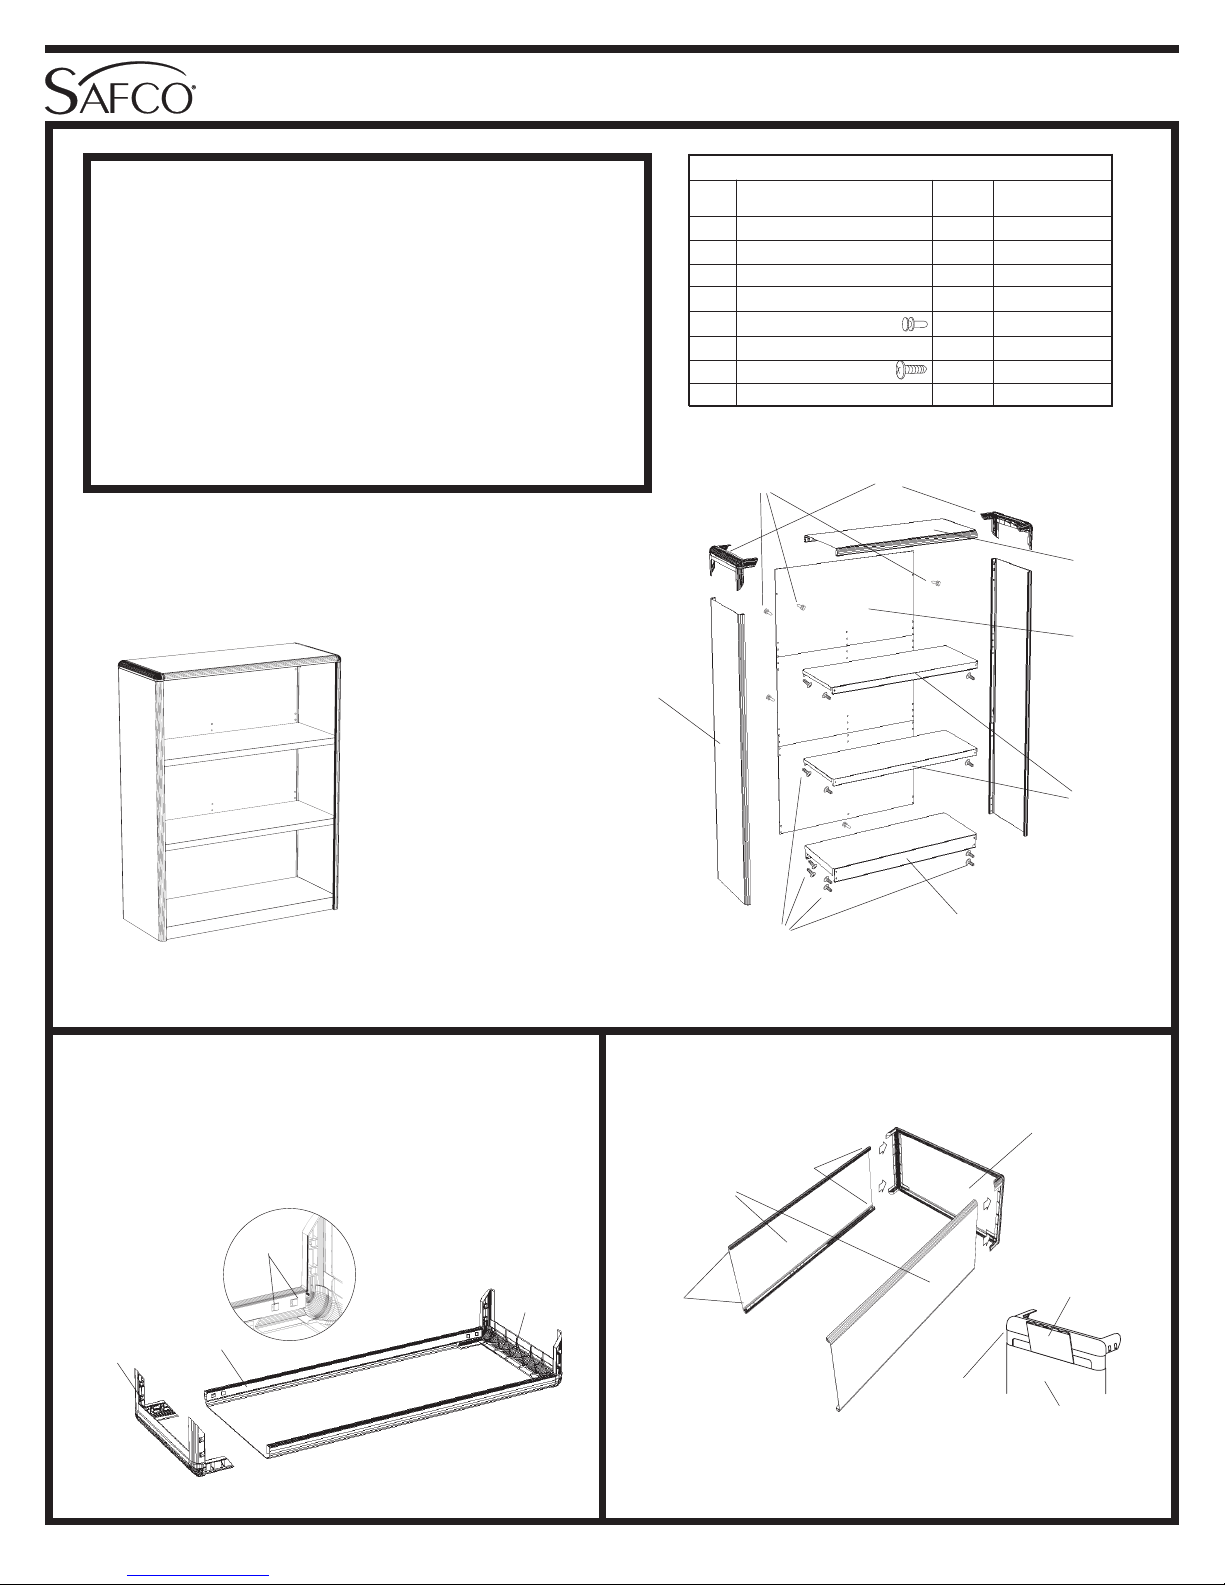
PARTS LIST
LETTER
CODE
A
Q
B
Q
C
Q
D
Q
E
Q
F
Q
G
Q
H
Q
TOOLS REQUIRED: Phillips Screwdriver,
DESCRIPTION
Corner Connector 2 7111-07
Top Shelf 1 7110-02
Side Panel 2 7171-01
Back Panel (Fiber) 1 7171-04
Plastic Push Fastener 5 7170-11
Bottom Shelf (Thick) 1 7170-02
Sheet Metal Screw 16 9226
Middle Shelf (Thin) 2 7170-03
Small Hammer or Mallet
E
QQ
Q
QQ
A
QQ
Q
QQ
QTY.
PART NO.
7171
B
QQ
Q
QQ
D
QQ
Q
QQ
ASSEMBLED UNIT
Model 7171
CAUTION: Steel edges may be SHARP; use care during assembly.
(Once assembled, edges are hidden.)
Insert a A Corner Connector into each end of the
1
B Top Shelf. Carefully line up the prongs on the
QQ
Q
QQ
connector with the openings on the shelf ends, and
gently push in until the connector snaps into place.
A
QQ
Q
QQ
7171-37: 1 of 4; Rev. 5; 07/00
QQ
Q
QQ
QQ
Q
QQ
SNAPS
B
Safco Products Company, New Hope, MN 55428
A
QQ
Q
QQ
C
QQ
Q
QQ
F
QQ
Q
G
QQ
Q
QQ
Gently slide the connector prongs of the top shelf
2
assembly into the TOP ends of the C Side Panels
until it snaps into place.
TOP:
SQUARE
HOLES
C
QQ
Q
QQ
BOTTOM:
ROUND
HOLES
Hint: Tear off a carton flap, and use it as a guide to help the
corner connector slide past the edge of the steel, as shown.
Once the edge of the connector slides inside the steel,
remove the flap and finish pushing the connector into place.
QQ
QQ
Q
QQ
FLAP FROM CARTON
CORNER
CONNECTOR
TOP SHELF
ASSEMBLY
H
QQ
Q
QQ
SIDE PANEL
Page 2
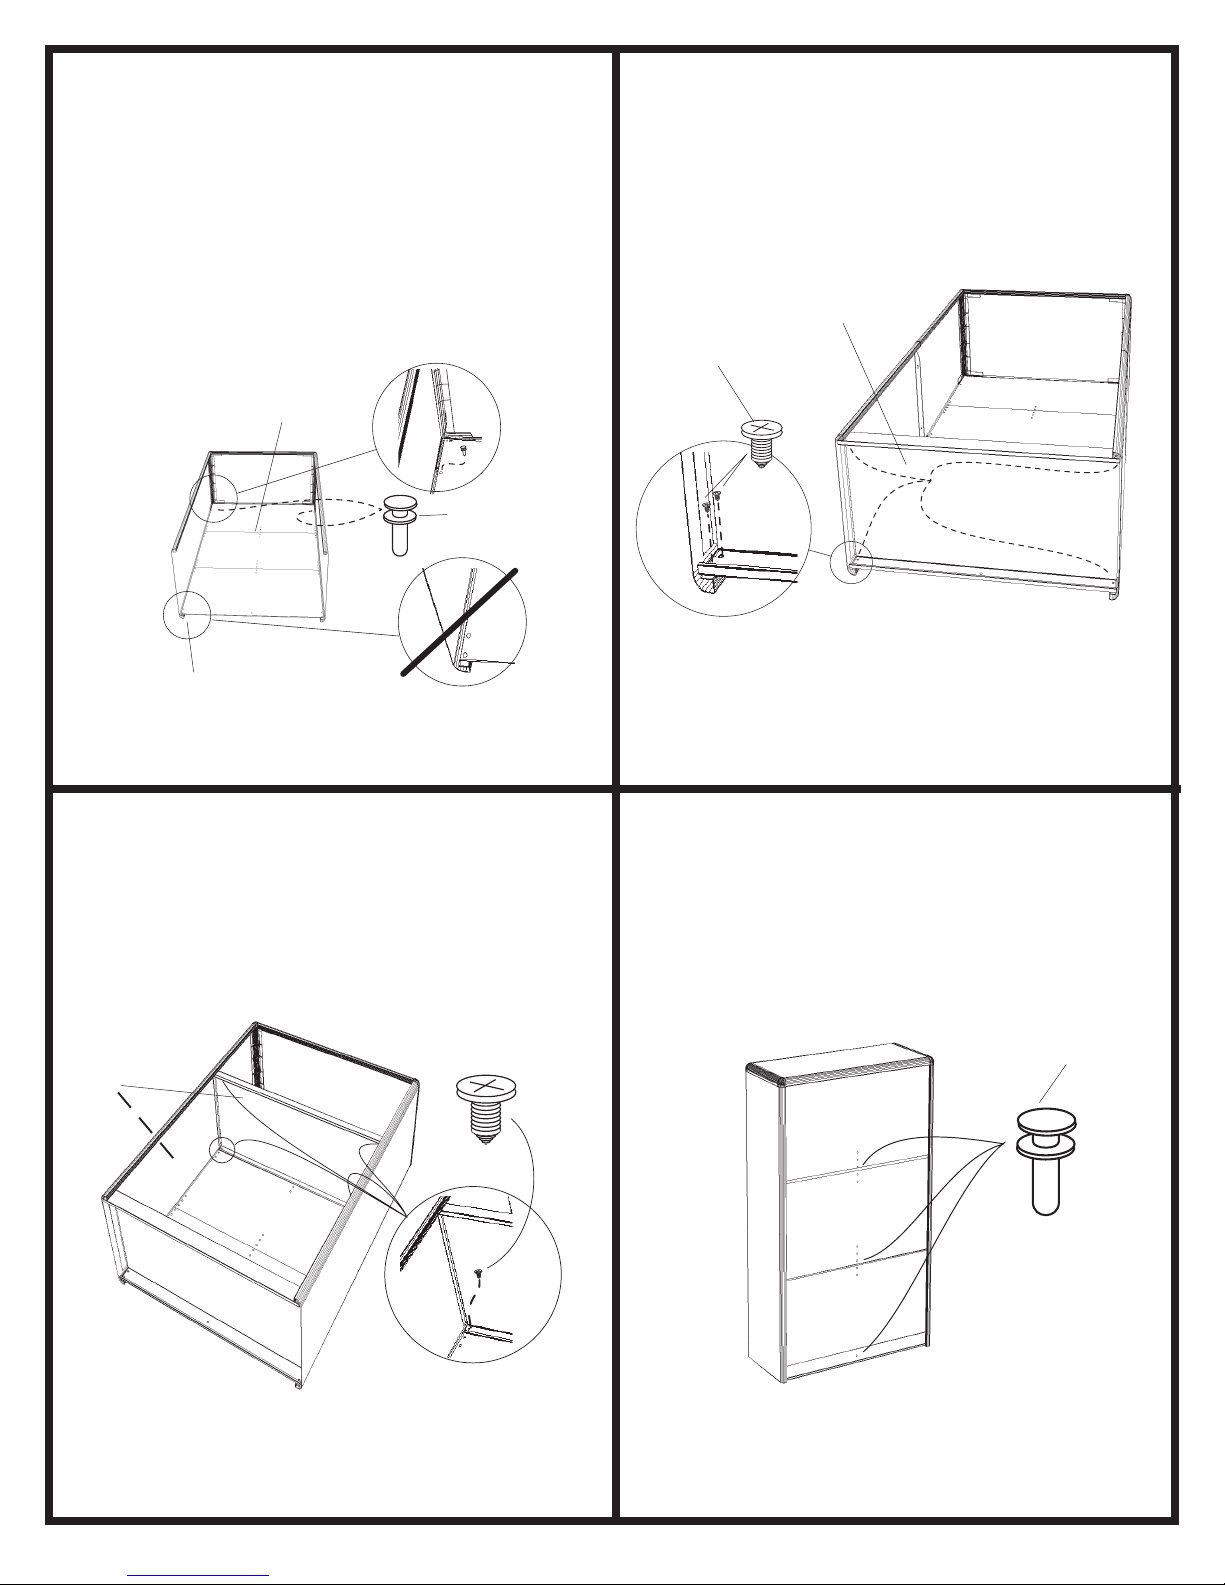
Unfold the D Back Panel and lay it out flat INSIDE
3
between the two side panels, with the end having
two holes near each corner toward the BOTTOM of
the unit. Line up the holes in the back panel with
the holes in the steel side panels. Insert E Plastic
Push Fasteners through the TOP holes in each
corner (ONLY) of the back panel, into the holes in
the side panels, and tap the fastener heads gently
with a small hammer or mallet until seated.
QQ
Q
QQ
D
QQ
Q
QQ
E
QQ
Q
QQ
QQ
Q
QQ
Place the F Bottom Shelf (Thick) into position at the
4
bottom of the unit (the back has the hole in the center
of the long edge), line up all corner holes, and fasten
with G Sheet Metal Screws (two per corner).
G
QQ
Q
QQ
QQ
Q
QQ
QQ
Q
QQ
F
QQ
Q
QQ
TWO SCREWS
PER CORNER
TWO HOLES
NO FASTENER
Install H Middle Shelves in desired locations, the
QQ
Q
5
H
QQ
Q
QQ
QQ
center hole in the long edge of each toward the back
(center hole in each group of five holes in back
panels will produce equally spaced shelves). Use a
sheet metal screw in each of four corners per shelf,
making sure the shelves are lined up with the proper
holes.
Set the unit upright and, from the back side, insert
6
a E Plastic Push Fastener into the BOTTOM
QQ
Q
QQ
center hole of the back panel. Tap gently to set the
fastener. Now insert a fastener into the appropriate
center hole for each middle shelf, and tap into
place.
E
QQ
Q
QQ
7171-37: 2 of 4; Rev. 5; 07/00
Safco Products Company, New Hope, MN 55428
Page 3

Bibliothèque Value Mate® à Trois Tablettes
LISTE DES PIÈCES
CODE
ALPHABÉTIQUE
Joint d’angle 2 7111-07
A
Q
Tablette supérieure 1 7110-02
B
Q
Panneau latéral 2 7171-01
C
Q
Panneau arrière (de fibres) 1 7171-04
D
Q
Attache-poussoir en plastique 5 7170-11
E
Q
Tablette inférieure (épaisse) 1 7170-02
F
Q
Vis à tôle 16 9226
G
Q
Tablette du milieu (mince) 2 7170-03
H
Q
OUTILS REQUIS : tournevis à pointe
cruciforme, petit marteau ou maillet
QUANTITÉDESCRIPTION
No DE PIÈCE
NUMÉRO
DE MODÈLE
Brevet américain enregistré 5,944,439
NOTA : En écrivant au sujet des pièces,
ne pas oublier d’en préciser la couleur
(noir, gris, sable, chêne moyen ou noyer).
ENSEMBLE MONTÉ
Modèle 7171
7171
ATTENTION : Les bords en acier peuvent être
TRANCHANTS. Effectuer le montage avec
soin. (Les bords sont cachés lorsque le
classeur est monté.)
Insérer un joint d’angle A dans chaque extrémité de la
1
tablette supérieure B . Aligner soigneusement les broches
du joint d’angle avec les ouvertures de l’extrémité de la
tablette, puis faire rentrer le joint doucement jusqu’à ce qu’il
se bloque en position avec un bruit sec.
Glisser les broches des joints d’angle de l’assemblage de
2
tablette supérieure dans les extrémités SUPÉRIEURES des
panneaux latéraux C , et les pousser jusqu’à ce qu’elles se
bloquent en position avec un bruit sec.
Conseil : Détacher un rabat de carton et l’utiliser
comme guide pour aider le joint d’angle à rentrer en
glissant du côté de l’acier, comme l’indique le dessin.
Une fois rentré le joint d’angle, enlever le rabat, puis
pousser le joint en position.
Déplier le panneau arrière D et le mettre à plat entre les
deux panneaux latéraux et À L’INTÉRIEUR de ceux-ci,
3
avec l’extrémité ayant deux trous près de chaque coin
orientée vers LE BAS de la bibliothèque. Aligner les trous
sur le panneau arrière avec les trous des panneaux
latéraux en acier. Insérer des attaches-poussoirs en
plastique E UNIQUEMENT à travers le trou SUPÉRIEUR
dans chaque coin du panneau arrière, puis les rentrer dans
les trous des panneaux latéraux. À l’aide d’un petit maillet
ou marteau, frapper la tête de chaque attache-poussoir
jusqu’à ce qu’elle soit solidement rentrée.
Mettre la tablette inférieure F (épaisse) en position dans la
4
partie inférieure de la bibliothèque (le trou sur le côté long
de la tablette doit être tourné vers l’arrière), aligner tous les
trous aux coins, puis fixer la tablette en position à l’aide de
vis à tôle G (il y en a deux pour chaque coin).
Installer les tablettes du milieu H dans les positions
5
voulues, avec le trou sur le côté long de chaque tablette
tourné vers l’arrière (le trou au milieu de chaque série de
cinq trous du panneau arrière assurera un espacement
égal des tablettes). Fixer chaque tablette en position à
l’aide d’une vis à tôle dans chacun des quatre coins, en
s’assurant que la tablette est alignée sur les bons trous.
Redresser la bibliothèque et, de l’arrière, insérer une
6
attache-poussoir E dans le trou central INFÉRIEUR du
panneau arrière. Frapper l’attache-poussoir doucement
pour la rentrer en position. Insérer une attache-poussoir
dans le trou au milieu qui convient pour chaque tablette du
milieu, et la rentrer en tapant.
QQ
Q
QQ
QQ
Q
QQ
QQ
Q
QQ
QQ
Q
QQ
QQ
Q
QQ
QQ
Q
QQ
QQ
Q
QQ
QQ
Q
QQ
QQ
Q
QQ
SNAPS = BOUTONS-PRESSION
TOP SHELF ASSEMBLY = ASSEMBLAGE DE TABLETTE SUPÉRIEURE
TOP:SQUARE HOLES = DESSUS : TROUS CARRÉS
BOTTOM: ROUND HOLES = DESSOUS : TROUS RONDS
FLAP FROM CARTON = RABAT DE CARTON
CORNER CONNECTOR = JOINT D’ANGLE
SIDE PANEL = PANNEAU LATÉRAL
TWO HOLES = DEUX TROUS
NO FASTENER = PAS D’ATTACHE
TWO SCREWS PER CORNER = DEUX VIS PAR COIN
Merci d’avoir acheté ce produit de Safco.
Nous espérons que vous aimerez l’utiliser.
SI VOUS AVEZ BESOIN D’ASSISTANCE CONCERNANT VOTRE PRODUIT,
VEUILLEZ NE PAS LE RETOURNER
AU MAGASIN!
Pour toutes vos questions, problèmes et demandes d’assistance,
veuillez appeler la
Service d’aide à la clientèle Safco
7171-37: 3 of 4; Rev. 5; 07/00
Safco Products Company, New Hope, MN 55428
1-800-664-0042
ouvert du lundi au vendredi entre 8h00 et 16h30 (heure centrale)
(représentants anglophones)
Page 4

Estante Value Mate® de 3 Repisas
CLAVE
ALFABÉTICA
Q
Q
Q
Q
Q
Q
Q
Q
HERRAMIENTAS NECESARIAS: Destornillador Phillips,
DESCRIPCIÓN
Conector de esquina 2 7111-07
A
Repisa superior 1 7110-02
B
Panel lateral 2 7171-01
C
Panel posterior (de fibra) 1 7171-04
D
Remache plástico de presión 5 7170-11
E
Repisa inferior (gruesa) 1 7170-02
F
Tornillo autorroscante 16 9226
G
Repisa intermedia (delgada) 2 7170-03
H
pequeño martillo o mazo de goma.
LISTA DE PIEZAS
CANTIDAD NO. DE PIEZA
NÚMERO
DE MODELO
Patente 5,944,439 registrade en EE.UU.
NOTA: Cuando nos escriba acerca de las piezas,
asegúrese de especificar el color (Negro, Gris, Arena,
Roble pálido o Nogal)
UNIDAD ENSAMBLADA
Modelo 7171
7171
PRECAUCIÓN: Las orillas de acero pueden estar
AFILADAS; ensamble la unidad con mucho
cuidado. (Las orillas quedan ocultas una vez
ensamblada la unidad.)
Inserte un conector de esquina, A , en cada extremo de la
repisa superior, B . Alinee las puntas del conector con las
1
salidas en los extremos de la repisa y empuje ligeramente el
conector hasta que quede totalmente asentado a presión.
Con cuidado deslice las puntas del conector ya colocado en
2
la repisa superior en el extremo SUPERIOR de cada panel
lateral, C , hasta que quede totalmente asentado a presión.
Sugerencia: Desprenda un trozo de la caja de cartón y
deslícelo entre el panel y el conector de esquina para
que el conector se deslice más allá de la orilla del acero,
como se muestra en la ilustración. Una vez que la orilla
del conector se deslice dentro de la parte de acero,
retire el cartón y empuje el conector hasta que quede
completamente asentado.
Desdoble el panel posterior, D , y colóquelo ENTRE los dos
3
paneles laterales, con el extremo que tiene dos orificios
cerca de cada esquina hacia la parte INFERIOR de la
unidad. Alinee los orificios del panel posterior con los de los
paneles laterales de acero. Inserte los remaches plásticos de
presión, E , a través de los orificios SUPERIORES
(únicamente) en cada esquina del panel posterior, en los
orificios de los paneles laterales. Utilice un pequeño martillo
o mazo de goma para golpear los remaches ligeramente
hasta que queden bien sentados.
Coloque la repisa inferior (gruesa), F , en la parte inferior de
4
la unidad (la parte trasera tiene un orificio en el centro del
lado más largo). Alinee todos los orificios de las esquinas, y
use los tornillos autorroscantes, G , (dos en cada esquina)
para fijar la repisa.
Coloque cada una de las repisas intermedias, H , en donde
5
desee, de manera que el orificio de la orilla más larga quede
hacia la parte posterior (si usa el orificio del centro del grupo
de cinco orificios en el panel posterior obtendrá el mismo
espacio entre las repisas). Atornille cada una de las cuatro
esquinas de cada repisa con un tornillo autorroscante,
asegurándose que las repisas queden alineadas con los
orificios correspondientes.
Coloque la unidad verticalmente y, desde atrás, inserte un
remache plástico de presión, E , en el orificio INFERIOR del
6
centro del panel posterior. Fije el remache golpeándolo
ligeramente. Para instalar las repisas intermedias, inserte un
remache en el orificio apropiado de los orificios del centro y
martille para fijarlo en cada una de las repisas.
QQ
Q
QQ
QQ
Q
QQ
QQ
Q
QQ
QQ
Q
QQ
QQ
Q
QQ
QQ
Q
QQ
QQ
Q
QQ
QQ
Q
QQ
QQ
Q
QQ
SNAPS = PERFORACIONES
TOP SHELF ASSEMBLY = REPISA SUPERIOR CON
CONECTORES DE ESQUINA
TOP: SQUARE HOLES = PARTE SUPERIOR: ORIFICIOS
CUADRADOS
BOTTOM: ROUND HOLES = PARTE INFERIOR: ORIFICIOS
REDONDOS
FLAP FROM CARTON = TROZO DE LA CAJA DE CARTÓN
CORNER CONNECTOR = CONECTOR DE ESQUINA
SIDE PANEL = PANEL LATERAL
TWO HOLES = DOS ORIFICIOS
NO FASTENER = NO USE REMACHE
TWO SCREWS PER CORNER = DOS TORNILLOS EN CADA
ESQUINA
Gracias por comprar este producto de SAFCO.
Esperamos que lo disfrute.
SI NECESITA AYUDA CON ESTE PRODUCTO,
NO LO DEVUELVA A LA TIENDA.
Para resolver cualquier pregunta o inquietud sobre el producto,
servicio al cliente de SAFCO al
1-800-664-0042
Disponible de lunes a viernes desde
las 8:00 AM hasta las 4:30 PM (hora central)
(Operadoras angloparlantes)
7171-37: 4 of 4; Rev. 5; 07/00
Safco Products Company, New Hope, MN 55428
 Loading...