

Page 1
ISTRUZIONI PER L'USO
OPERATING INSTRUCTIONS
MODE D’EMPLOI
BEDIENUNGSANLEITUNG
INSTRUCCIONES DE USO
INSTRUÇÕES PARA USO
GEBRUIKSAANWIJZING
LEGGERE ATTENTAMENTE QUESTE ISTRUZIONI D'USO PRIMA DI UTILIZZARE LA MACCHINA
READ THESE OPERATING INSTRUCTIONS CAREFULLY BEFORE USING THE MACHINE
LIRE ATTENTIVEMENT CE MODE D’EMPLOI AVANT D’UTILISER LA MACHINE
DIESE BEDIENUNGSANLEITUNG IST VOR DEM ERSTEN GEBRAUCH DER
MASCHINE AUFMERKSAM ZU LESEN
LEER ATENTAMENTE ESTAS INSTRUCCIONES DE USO ANTES DE UTILIZAR LA MÁQUINA
LER ATENTAMENTE ESTAS INSTRUÇÕES DE USO ANTES DE UTILIZAR A MÁQUINA
TYPE SIN 013ATYPE SIN 013A
TYPE SIN 013ATYPE SIN 013A
TYPE SIN 013A
YY
YY
Y
Page 2

3
Page 3
5
A C E T O
A C I D O
A C I D
V I N E G A R
D E C A L C I F I C A N T E
Page 4
Le illustrazioni corrispondenti al testo si trovano nel risvolto di copertina.
Tenere questa pagina aperta durante la lettura delle istruzioni per l’uso.
1.2 Impiego di queste istruzioni per l’uso
Conservare queste istruzioni per l’uso in un luogo sicuro e allegarle alla macchina
per caffè qualora un’altra persona dovesse utilizzarla.
Per ulteriori informazioni o nel caso di problemi, non trattati del tutto o soltanto insufficientemente nelle presenti istruzioni, rivolgetevi agli specialisti competenti.
2 DATI TECNICI
Tensione nominale Vedi targhetta posta sull’apparecchio
Potenza nominale Vedi targhetta posta sull’apparecchio
Materiale corpo Termoplastico
Dimensioni (l x a x p) 230 x 295 x 242
Peso 4,1 kg
Lunghezza cavo 1,2 m
Pannello di comando Frontale
Portafiltro Crema
(variabili in funzione dei modelli) Ottone
Pannarello Speciale per cappuccini (opzionale) e
cappuccinatore (opzionale)
Serbatoio Estraibile
Alimentazione Vedi targhetta
Serbatoio acqua 1,4 l
Pressione pompa 13-15 bar
Caldaia Sin013AX Inox
Sin013AL Alluminio
Dispositivi di sicurezza Valvola di sicurezza pressione caldaia
Termostato di sicurezza
Con riserva di modifiche di costruzione ed esecuzione dovute al progresso tecnologico.
Macchina conforme alla Direttiva Europea 89/336/CEE (Decreto legislativo 476 del
04/12/92), relativa all’eliminazione dei disturbi radiotelevisivi.
Il triangolo d’avvertimento indica tutte le istruzioni importanti
per la sicurezza dell’utente. Attenersi scrupolosamente a tali
indicazioni per evitare ferimenti gravi!
GENERALITÁ DATI TECNICI
Indice
5.2 Con portafiltro in ottone................................ 13
6 SCELTA DEL TIPO DI CAFFÈ - CONSIGLI 13
7 EROGAZIONE ACQUA CALDA ............... 14
8 EROGAZIONE DEL VAPORE/ PRE-
PARAZIONE DEL CAPPUCCINO ............. 14
9 PULIZIA ................................................. 14
10 DECALCIFICAZIONE ..............................15
11 SERVIZIO AD INTERVALLI REGOLARI ...... 16
12 INFORMAZIONI DI CARATTERE
GIURIDICO ............................................ 16
13 SMALTIMENTO ...................................... 16
14 INCONVENIENTI, CAUSE E RIMEDI ........ 17
Page 5

3 NORME DI SICUREZZA
Mai mettere a contatto dell’acqua le parti
sotto corrente: pericolo di cortocircuito!
Il vapore surriscaldato e l’acqua calda
possono provocare scottature! Mai dirigere il getto di vapore o dell’acqua calda verso parti del corpo, toccare con precauzione il beccuccio vapore / acqua calda: pericolo di scottature!
Destinazione d’uso
La macchina per caffè è prevista esclusivamente per l’impiego domestico.
È vietato apportare modifiche tecniche e
ogni impiego illecito, a causa dei rischi che
essi comportano!
La macchina per caffè deve essere utilizzata solo da adulti.
Alimentazione di corrente
Allacciare la macchina per caffè soltanto
ad una presa di corrente adeguata.
La tensione deve corrispondere a quella
indicata sulla targhetta dell’apparecchio.
Cavo d’alimentazione
Mai usare la macchina per caffè se il cavo
d’alimentazione è difettoso.
Far sostituire subito da specialisti competenti i cavi e le spine difettosi.
Non far passare il cavo d’alimentazione per
angoli e su spigoli vivi, sopra oggetti molto caldi e proteggerlo dall’olio.
Non portare o tirare la macchina per caffè
tenendola per il cavo.
Non estrarre la spina tirandola per il cavo
oppure toccarla con le mani bagnate.
Evitare che il cavo d’alimentazione cada
liberamente da tavoli o scaffali.
Protezione d’altre persone
Assicurarsi che nessun bambino abbia la possibilità di giocare con la macchina per caffè.
I bambini non si rendono conto del pericolo connesso agli elettrodomestici.
Non lasciare alla portata dei bambini i materiali utilizzati per imballare la macchina
Pericolo d’ustioni
Evitare di dirigere contro se stessi e/o altri
il getto di vapore surriscaldato e/o d’acqua calda.
Usare sempre le apposite maniglie o manopole.
Toccare i beccucci soltanto nella zona provvista di protezioni anti-scottature.
Non disinserire (togliere) mai il portafiltro
durante l’erogazione del caffè.
Durante la fase di riscaldamento dal gruppo erogazione caffè possono uscire gocce
d’acqua calda.
Ubicazione
Sistemare la macchina per caffè in un posto sicuro, dove nessuno può rovesciarla o
venirne ferito.
Acqua calda o vapore surriscaldato potrebbero fuoriuscire: pericolo di scottature!
Non usare la macchina per caffè all’aperto.
Non posare la macchina su superfici molto calde e nelle vicinanze di fiamme aperte
per evitare che la carcassa fonda o comunque si danneggi.
Pulizia
Prima di pulire la macchina, è indispensabile disinserire tutti i tasti e poi staccare la
spina dalla presa di corrente.
Inoltre, aspettare che la macchina si raffreddi.
Mai immergere la macchina nell’acqua!
È severamente vietato cercare d’intervenire all’interno della macchina.
NORME DI SICUREZZA
NORME DI SICUREZZA
Misure in millimetri
2
0
0
4
0
0
2
0
0
NORME DI SICUREZZA
Page 6
Proteggerla dalla polvere e dallo sporco.
Riparazioni / Manutenzione
Nel caso di guasti, difetti o sospetto di difetto dopo una caduta, staccare subito la
spina dalla presa.
Mai mettere in funzione una macchina difettosa.
Soltanto gli specialisti competenti possono
effettuare interventi e riparazioni.
Le riparazioni vanno eseguite unicamente
da un centro di assistenza autorizzato.
Nel caso di interventi non eseguiti a regola
d’arte, si declina ogni responsabilità per
eventuali danni.
Antincendio
In caso di incendio utilizzare estintori ad
anidride carbonica (CO2). Non utilizzare
acqua o estintori a polvere.
Accessori (variabili in funzione del modello)
Portafiltro Crema
Filtro per portafiltro Crema
(Unico per l’erogazione di 1o 2 caffè)
Portafiltro in ottone
Filtro 1 caffè per portafiltro in ottone
Filtro 2 caffè per portafiltro in ottone
Misurino per caffè
4 INSTALLAZIONE
Per la propria sicurezza e quella di terzi
attenersi scrupolosamente alle “Norme
di sicurezza” riportate alle pagine 9-10.
4.1 Imballaggio
L’imballaggio originale è stato progettato
e realizzato per proteggere la macchina durante la spedizione.
Si consiglia di conservarlo per un eventuale trasporto futuro.
4.2 Avvertenze di Installazione
Prima di installare la macchina, attenersi
alle seguenti prescrizioni di sicurezza:
• sistemare la macchina in un luogo sicuro;
• accertarsi che i bambini non abbiano la
possibilità di giocare con la macchina;
• evitare che la macchina venga collocata
su superfici molto calde o vicino a fiamme aperte.
La macchina per caffè è ora pronta per
essere collegata alla rete elettrica.
4.3 Collegamento alla rete elettrica
La corrente elettrica può essere
pericolosa! Di conseguenza, attenersi sempre scrupolosamente alle
norme di sicurezza.
Non usare mai cavi difettosi!
I cavi e le spine difettosi devono
essere sostituiti immediatamente da
specialisti autorizzati.
La macchina per caffè deve essere collegata ad una presa di corrente adeguata.
La tensione dell’apparecchio è stata impostata in fabbrica.
Verificare che la tensione della rete corrisponda alle indicazioni riportate sulla
targhetta d’identificazione posta sul fondo dell’apparecchio.
• Srotolare dal fondo dell’apparecchio la
quantità di cavo necessario per il collegamento alla rete elettrica.
• Verificare che l’interruttore generale sia
posto su “0” prima di collegare la macchina alla rete elettrica.
• Inserire la spina in una presa di corrente
di tensione adeguata.
4.4 Riempimento del serbatoio acqua
• Togliere il coperchio del serbatoio (2)
• Estrarre il serbatoio dell’acqua (1) sollevandolo, facendo attenzione a non danneggiare i tubi che si trovano inseriti nel
serbatoio.
• Sciacquarlo e riempirlo con acqua
fresca, evitando di immetterne una quantità eccessiva.
• Reinserire il serbatoio nella sua sede
e reinserire i tubi sfilati in precedenza.
Nota bene!
Alcuni modelli sono provvisti di serbatoio con valvola di aspirazione acqua.
Questa valvola si chiude automaticamente quando il serbatoio viene estratto per impedire la fuoriuscita dell’acqua.
Una volta inserito il serbatoio effettuare
una leggera pressione.
• Rimettere il coperchio sul serbatoio.
Immettere nel serbatoio sempre
e soltanto acqua fresca non gassata. Acqua calda nonché altri liquidi
possono danneggiare il serbatoio.
Non mettere in funzione la macchina
senza acqua: accertarsi che ve ne sia a
sufficienza all’interno del serbatoio.
4.5 Caricamento del circuito
Prima di ogni messa in funzione, dopo
che la macchina non è stata usata per molto
tempo, dopo aver esaurito l’acqua e dopo
NORME DI SICUREZZA MESSA IN FUNZIONE
Page 7
• Inserire dal basso il portafiltro Crema nel gruppo erogazione (7),
ruotandolo da sinistra verso destra fino
al suo bloccaggio.
• Lasciare la presa dal manico del
portafiltro.
Un sistema automatico riporta ora leggermente il manico verso sinistra. Questo movimento garantisce il perfetto funzionamento del portafiltro.
• Posizionare una tazza sotto al
portafiltro.
Preriscaldare il portafiltro e la tazza premendo l’interruttore caffè (4); l’acqua comincerà ad uscire dal portafiltro (questa
operazione si rende necessaria solo per
il primo caffè).
• Quando la tazza sarà sufficientemente
piena premere nuovamente l’interruttore caffè (4).
• Togliere il portafiltro dalla macchina
ruotandolo da destra verso sinistra e vuotare l’acqua residua.
• Con lo speciale portafiltro Crema (11) di
cui è dotata la macchina, non occorre cambiare filtro per ottenere uno o due caffè.
• Versare 1 o 2 misurini rasi di caffè
macinato nel filtro per ottenere uno o due
caffè.
• Pulire il bordo del portafiltro da eventuali residui di caffè.
• Inserire dal basso il portafiltro Crema (11) nel gruppo erogazione (7),
ruotandolo da sinistra verso destra, fino
al suo bloccaggio completo come visto
in precedenza.
• Prelevare 1 o 2 tazzine preriscaldate
e posizionarle sotto al portafiltro; verificare che siano correttamente sistemate
sotto ai fori di uscita caffè.
• Premere il tasto caffè. Attendere che le
tazzine siano sufficientemente piene.
• Premere nuovamente il tasto caffè per fer-
mare l’erogazione del caffè.
• Al termine dell’erogazione attendere
qualche secondo, estrarre il portafiltro e
vuotarlo dai fondi residui.
Nota di pulizia: mantenere puli-
to il filtro del portafiltro “Crema”
estraendolo dalla propria sede e lavandolo con acqua potabile.
5.2 Con portafiltro in ottone
• Inserire il filtro (14 o 15, da 1 o 2 tazze
secondo il numero di caffè da realizzare)
nel portafiltro in ottone (13).
• Inserire dal basso il portafiltro in ot-
tone nel gruppo erogazione (7),
ruotandolo da sinistra verso destra fino
al suo bloccaggio.
• Posizionare una tazza sotto al
portafiltro.
• Preriscaldare il portafiltro e la tazza pre-
mendo l’interruttore caffè (4); l’acqua comincerà ad uscire dal portafiltro (questa
operazione si rende necessaria solo per
il primo caffè).
• Quando la tazza sarà sufficientemente
piena premere nuovamente l’interruttore caffè (4).
• Togliere il portafiltro dalla macchina
ruotandolo da destra verso sinistra.
• Versare 1 o 2 misurini rasi di caffè
macinato, in funzione del filtro montato
precedentemente, per ottenere uno o due
caffè.
• Premere leggermente il caffè, utilizzando
la parte inferiore del misurino, ed eliminare ogni residuo di caffè dal bordo del
portafiltro.
• Inserire dal basso il portafiltro in ot-
tone (13) nel gruppo erogatore (7),
ruotandolo da sinistra verso destra, fino
al suo bloccaggio completo.
• Prelevare 1 o 2 tazzine preriscaldate
e posizionarle sotto al portafiltro; verificare che siano correttamente sistemate
sotto ai fori di uscita caffè.
• Premere il tasto caffè. Attendere che le
tazzine siano sufficientemente piene.
• Premere nuovamente il tasto caffè per fermare l’erogazione del caffè.
• Al termine dell’erogazione estrarre il
portafiltro e vuotarlo dai fondi residui.
Nota di pulizia: mantenere puli-
to il filtro del portafiltro estraendolo dalla propria sede e lavandolo con
acqua potabile.
6 SCELTA DEL TIPO DI CAFFÈ
- CONSIGLI
In linea di massima si possono utilizzare
tutti i tipi di caffè esistenti in commercio.
Tuttavia, il caffè è un prodotto naturale ed
il suo gusto cambia in funzione dell’origine e della miscela; è preferibile quindi provarne vari tipi, al fine di trovare quello che
meglio si addice ai gusti personali.
Per migliori risultati si consiglia comunque
di utilizzare miscele espressamente preparate per macchine espresso.
Il caffè dovrebbe sempre fuoriuscire regolarmente dal portafiltro senza gocciolare.
La velocità di fuoriuscita del caffè può essere modificata cambiando leggermente la
dose, il grado di macinatura e/o di
pressatura del caffè nel filtro.
PRIMA DI ESEGUIRE QUALSIASI
OPERAZIONE RELATIVA ALL’EROGAZIONE DEL VAPORE O DELL’ACQUA CALDA VERIFICARE CHE IL TUBO
VAPORE (PANNARELLO) SIA ORIENTATO SOPRA LA VASCA RECUPERO ACQUA.
EROGAZIONE DEL CAFFÈ EROGAZIONE DEL CAFFÈ - SCELTA DEL TIPO DI CAFFÈ
Page 8
posta al suo interno si illuminerà. Si spegne la spia di pronto macchina situata
all’interno dell’interruttore caffè (4).
• Attendere che la spia di pronto macchina situata all’interno dell’interruttore (4)
si riaccenda, a questo punto la macchina è pronta per l’erogazione del vapore.
• Dirigere il tubo vapore (pannarello)
sopra la vasca raccogligocce, aprire il
pomello (6) “Acqua calda/vapore” per
qualche istante, in modo da far uscire
l’acqua residua dal tubo vapore
(pannarello); in breve tempo comincerà
ad uscire solo vapore.
• Chiudere il pomello (6).
• Immergere il tubo vapore (pannarello) nel liquido da riscaldare e aprire il pomello (6); far ruotare il recipiente
con lenti movimenti dal basso verso l’alto
per rendere uniforme il riscaldamento.
• Dopo aver utilizzato il vapore per il tempo desiderato chiudere il pomello (6) e
riportare in posizione iniziale l’interruttore (5) “Vapore”.
Utilizzando questo sistema con il
latte si procede alla preparazio-
ne del cappuccino.
• Procedere con il caricamento del circuito descritto nel par. 4.5 per rendere operativa la macchina.
• Pulire, dopo questa operazione il tubo vapore (pannarello) con un panno umido.
9 PULIZIA
La manutenzione e la pulizia possono essere effettuate soltanto quando la macchina è fredda e scollegata dalla rete elettrica.
• Non immergere la macchina nell’acqua
e non inserire i componenti nella lavastoviglie.
• Non utilizzare oggetti acuminati o prodotti chimici aggressivi (solventi) per la
pulizia.
• Si consiglia di pulire quotidianamente
il serbatoio dell’acqua e di riempirlo con
acqua fresca.
• Dopo aver riscaldato il latte, prelevare
una piccola quantità di acqua calda per
la pulizia del tubo e pulirlo esternamente con un panno umido.
• Per la pulizia dell’apparecchio utilizzare un panno morbido inumidito di acqua.
• Per la pulizia del portafiltro procedere come segue:
• Estrarre il filtro, immergerlo in acqua
calda e lavarlo con cura.
• Lavare l’interno del portafiltro.
• Non asciugare la macchina e/o i suoi
componenti utilizzando un forno a
microonde e/o un forno convenzionale
• Pulire, quando è presente, il pannarello
situato sopra il tubo vapore.
Per fare questo occorre svitare la ghiera
ed estrarre il pannarello dal tubo vapore,
smontare il corpo esterno del pannarello.
Lavare con acqua corrente e rimontare il
pannarello.
Si consiglia di serrare la ghiera
in modo adeguato; il pannarello
potrebbe sfilarsi durante il suo utilizzo.
10 DECALCIFICAZIONE
La formazione di calcare avviene con
l’uso dell’apparecchio; la decalcificazione
è necessaria ogni 3-4 mesi di utilizzo della
macchina e/o quando si osserva una riduzione della portata dell’acqua
Qualora si voglia eseguirla personalmente, si può utilizzare un
prodotto decalcificante per macchine
da caffè di tipo non tossico e/o nocivo,
comunemente reperibile in commercio.
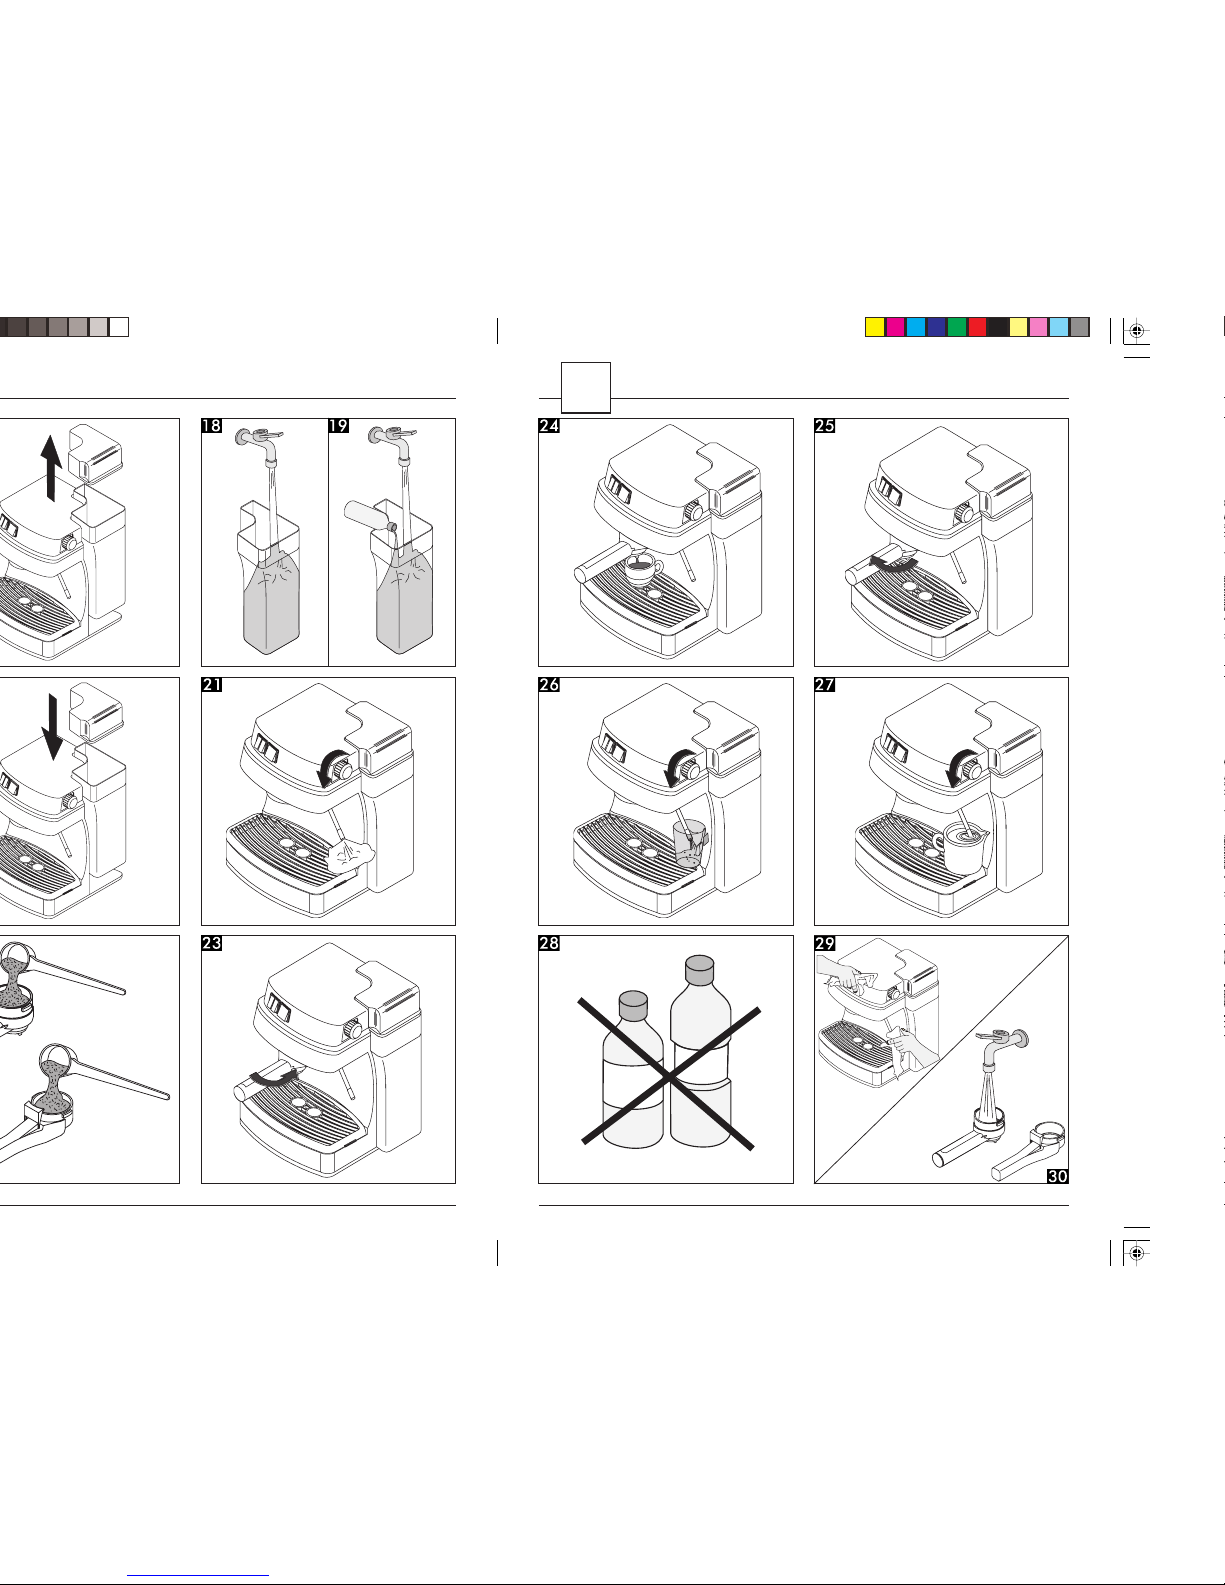
Attenzione! Non utilizzare in nessun caso l’aceto come decal-
cificante.
• Togliere il serbatoio dell’acqua e vuotarlo dall’acqua residua.
• Miscelare il decalcificante con acqua
come specificato sulla confezione del
prodotto decalcificante e riempire il serbatoio dell’acqua; inserire il serbatoio
nella macchina.
• Accendere la macchina premendo l’interruttore generale.
• Dirigere il tubo vapore sulla vasca
raccogligocce.
• Prelevare ad intervalli (una tazza per volta) l’intero contenuto del serbatoio dell’acqua ruotando il pomello vapore (6)
in senso antiorario e premendo l’interruttore caffè (4); per fermare l’erogazione
premere nuovamente l’interruttore caffè
(4) e ruotare il pomello vapore (6) in senso orario.
• Durante i singoli intervalli si deve lasciare agire il decalcificante per circa 10-15
minuti, scollegando la macchina per
mezzo dell’interruttore generale (3).
• Terminata la soluzione decalcificante,
estrarre il serbatoio dell’acqua, sciacquarlo e riempirlo con acqua fresca potabile.
• Reinserire il serbatoio nella machina;
vuotare 2/3 del contento del serbatoio
dell’acqua ruotando il pomello vapore
(6) in senso antiorario e premendo l’interruttore caffè (4); per fermare
l’erogazione premere nuovamente l’interruttore caffè (4) e ruotare il pomello
vapore (6) in senso orario.
• Lasciare riscaldare la macchina e vuotare il rimanente contenuto del serbatoio
EROGAZIONE DELL’ACQUA CALDA - VAPORE - PULIZIA PULIZIA - DECALCIFICAZIONE
Page 9

Guasto
La macchina non si accende
La pompa è molto rumorosa
Il caffè é troppo freddo
Non si forma la schiuma del latte
Il caffè sgorga troppo
velocemente, non si for-
ma la crema
Il caffè non sgorga o
sgorga solo a gocce
Il caffè sgorga dai bordi
Cause possibili
Macchina non collegata alla rete elettrica
Manca acqua nel serbatoio (par.4.4)
La spia dell’interruttore caffè (4) era
spenta quando è stato premuto l’interruttore (4).
Portafiltro non inserito per il
preriscaldamento (par. 5.1-5.2)
Latte non adatto
Troppo poco caffè nel portafiltro/
macinatura troppo grossa
Caffè vecchio o non adatto
Mancanza di acqua
Macinatura troppo fine
Caffè premuto nel portafiltro
Troppo caffè nel portafiltro
Pomello (6) “Acqua calda/vapore”
aperto
Macchina calcificata
Doccia otturata
Filtro nel portafiltro otturato
Portafiltro inserito male nel gruppo
erogazione caffè
Bordo superiore del portafiltro spor-
co
Guarnizione della caldaia sporca o
usurata
Troppo caffè nel portafiltro.
Rimedio
Collegare la macchina alla rete
elettrica
Rabboccare con acqua.
Attendere che la spia si illumini
Preriscaldare il portafiltro
Controllare il tenore del grasso
Aggiungere il caffè (par. 5.1-5.2)
Usare una miscela diversa (cap.6)
Rabboccare con acqua (par.4.4)
Sostituire il tipo di caffè
Smuovere il caffè macinato
Ridurre la quantità di caffè utiliz-
zando il misurino
Chiudere il pomello
Decalcificare la macchina
(cap.10)
Pulire l’elemento filtrante
Pulire il filtro (cap.9)
Inserire correttamente il portafiltro
(par.5.1-5.2)
Pulire il bordo del portafiltro
Pulire o sostituire la guarnizione
Ridurre la quantità di caffè utilizzando il misurino
INFORMAZIONI DI CARATTERE GIURIDICO - SMALTIMENTO INCONVENIENTI, CAUSE E RIMEDI
14 INCONVENIENTI, CAUSE E RIMEDI
Per i guasti non contemplati dalla suddetta tabella o in caso che i rimedi suggeriti non li
risolvano, rivolgersi ad un centro assistenza.
alla ditta costruttrice.
• Inoltre facciamo notare che il contenuto
di queste istruzioni d’uso non è parte di
una convenzione precedente o già esistente, di un accordo o di un contratto legale
e che non ne cambiano la sostanza.
• Tutti gli obblighi del costruttore si basano sul relativo contratto di compravendita che contiene anche il regolamento
completo ed esclusivo riguardo alle prestazioni di garanzia.
Le norme di garanzia contrattuali non
vengono né limitate né estese in base alle
presenti spiegazioni.
• Le istruzioni per l’uso contengono informazioni protette dal diritto d’autore.
• Non è permesso fotocopiarle o tradurle
in un’altra lingua senza previo accordo
scritto da parte del Costruttore.
13 SMALTIMENTO
• Rendere inutilizzabile gli apparecchi non
più in uso.
• Staccare la spina dalla presa e tagliare il
cavo elettrico.
• Consegnare gli apparecchi fuori uso a
un centro di raccolta idoneo.
Page 10

The diagrams referred to in the leaflet are placed in the inside cover flap.
Keep these pages open while reading the instructions.
1.2 How to use these instructions
Keep the instructions in a safe place or attach them to the machine for easy
consultation by others.
If you desire any further information or have a problem not sufficiently covered by this
leaflet please contact our qualified experts.
2 TECHNICAL SPECIFICATIONS
Rated voltage See rating plate on appliance
Rated output See rating plate on appliance
Body material Thermoplastic
Dimensions (l x h x w) 230 x 295 x 242
Weight 4.1 kg
Cable length 1.2 m
Control panel Frontal
Filter holder “Crema”
(depending on model) Brass
“Pannarello” Cappuccino optional extra and “cappuccino”
maker (optional)
Tank Removable
Power supply See rating plate
Water tank 1.4 l
Pump pressure 13-15 bar
Boiler Sin013AX Stainless steel
Sin013AL Aluminium
Safety requirements Pressure safety valve in boiler
Safety thermostat
The manufacturer reserves the right to change the make up of the machine in the
light of any technological breakthrough.
The machine complies to the European Standard 89/336/EEC (legislative decree 476
04.12.92), referring to the elimination of broadcasting disturbance.
The warning triangle indicates all the personal safety instructions.
Follow these instructions carefully to avoid injury.
GENERAL TECHNICAL SPECIFICATIONS
Contents
5.1 Using the “Crema” filter holder...................... 24
5.2 Using the brass filter holder ........................... 25
6 ADVICE ON CHOICE OF COFFEE ..........25
7 HOT WATER JET .....................................25
8 HOW TO PREPARE A CAPPUCCINO
COFFEE USING THE STEAM TUBE ..........26
9 CLEANING INSTRUCTIONS ...................26
10 DESCALING........................................... 27
11 SERVICING ............................................27
12 LEGAL INFORMATION ...........................27
13 DISPOSAL OF THE APPLIANCE ............... 28
14 TROUBLESHOOTING .............................29
Page 11

SAFETY REGULATIONS
3 SAFETY REGULATIONS
All electrical parts must be kept dry, as
the machine may short circuit on contact
with water.
Steam and boiling water can cause
burning.
Always point the steam or hot water jet
away from any part of the body and be
careful when touching the steam/hot
water nozzle as it may be hot: danger of
burning.
Use of machine
The coffee machine is designed exclusively
for domestic use.
Technical alterations or misuse are strictly
forbidden owing to the risks that they
involve.
The coffee maker must be used by adults
only.
Electrical requirements
The coffee machine must be connected to
a suitable wall socket.
The voltage used must be that indicated
on the rating plate.
Mains cable
The coffee maker must not be used if the
mains cable flex is defective.
If a plug or cable is defective it must be
changed immediately by a qualified
specialist.
Do not locate the mains cable over hot
surfaces or round sharp corners and keep
it away from oil.
Do not carry or pull the machine by the
mains cable.
Do not unplug the machine by pulling the
mains cable or with wet hands.
Do not allow the flex to dangle from a shelf
or table.
Safeguarding others
Ensure that the machine is out of the reach
of children.
Children are not aware of the risks involved
in electrical appliances.
Packing materials must not be left within
children’s reach as they represent a
potential source of danger.
Burning precautions
Always point the steam/hot water jet away
from you.
Always use the correct handles or knobs.
Only touch the nozzle in the part where it
has been insulated for your protection.
Do not remove the filter holder while the
machine is in use.
While the machine is warming up, hot water
may drip from the coffee outlet.
Location
The machine must be positioned in a safe
place where it cannot be knocked over or
cause injury.
Hot water or steam may leak, causing
possible burning.
Do not use the coffee machine outdoors.
Do not place the machine near hot surfaces
or naked flames as this may damage or
melt the cover.
Cleaning Instructions
Before cleaning the machine, all switches
must be in the “off” position, and the machine
must be unplugged from the wall socket.
You must wait for the machine to cool
down.
Never immerse the machine in water.
It is strictly forbidden to tamper with the
inside of the machine.
Sizes in millimetres
2
0
0
4
0
0
2
0
0
SAFETY REGULATIONS
Page 12
SAFETY REGULATIONS START-UP
Repairs/Maintenance
If the machine stops working, is in any way
defective or has been knocked over unplug
it immediately from the wall socket.
Never use a faulty machine.
Repairs or alterations must only be carried
out by qualified experts.
Repairs or alterations must only be carried
out by an authorised service centre.
The company will accept no responsibility
for damage caused by repairs attempted
by unauthorised persons.
Fire risks
If the machine should catch fire use a
carbon dioxide extinguisher.
Do not use water or a powder extinguisher.
Accessories (the accessories vary
depending on the model)
“Crema” filter holder
Filter for “Crema” filter holder
(A single unit for making 1 or 2 cups
of coffee)
Brass filter holder
Single cup filter for brass filter holder
Twin cup filter for brass filter holder
Coffee measure
4 INSTALLMENT
For personal safety follow the “Safety
regulations” found on pages 21-22.
4.1 Packaging
The original packaging has been designed
to protect the appliance during
transportation.
You are recommended to keep it for later
use.
4.2 Installment requirements
Before installing the machine read the
following safety instructions carefully:
• Locate the machine in a safe place;
• Make sure that it is out of the reach of
children;
• Do not place the machine on a hot
surface or near a naked flame.
The machine is now ready to be connected
to the house electricity supply.
4.3 Connecting the appliance to
the power supply
Electricity can be dangerous, so
always follow the safety
regulations carefully.
Never use a faulty cable.
Faulty plugs and cables must be
changed immediately by authorised
personnel.
The coffee maker must be connected to a
suitable wall socket.
The voltage of the appliance has been
factory-set. The voltage on the rating plate
(positioned on the bottom of the appliance)
must correspond to that of your house
electricity supply.
• Uncoil a length of cable from the cable
wind found underneath the appliance,
sufficient for the plug to reach the wall
socket.
• Check that the main switch is in the “0”
position before inserting the plug in the
wall socket.
• Plug the appliance into a wall socket
carrying the correct voltage.
4.4 Filling the water tank
• Remove the water tank lid (2).
• Lift out the water tank (1), making sure
you do not damage any of the tubes
inside it.
• Rinse and fill the tank with fresh water
without overfilling.
• Put the water tank back in its right
place, making sure that the tubes
removed previously are all immersed in
water.
Warning! The tanks of some
models are equipped with a
water inflow valve. This valve closes
automatically when the tank is removed
to prevent water leakage. When putting
the tank back, press lightly on it to open
the valve.
• Put the lid back on the tank.
Always fill the tank with fresh, not
carbonised water: hot water or
other liquids may damage the tank.
Do not use the coffee maker without
water, always check that there is
enough water in the tank.
4.5 Priming
Before using the machine for the first
time, after the appliance has been left
unused for a long period or when the water
Page 13
COFFEE FLOW CHOICE OF COFFEE - HOT WATER JET
in the dispenser unit (7) from below,
turning it from left to right until it locks
into place.
• Let go of the filter holder handle.
Automatically the handle will move slightly
to the left. This movement guarantees the
perfect functioning of the filter holder.
• Place a cup under the filter holder.
To warm up the filter holder and the cup,
press the coffee switch (4); water will begin
to drip from the filter holder (this operation
is only necessary for the first cup of coffee).
• When the cup is sufficiently full, press the
coffee switch (4) again.
• Remove the filter holder from the
machine by turning it to the left and pour
out any water that is left inside.
• With the special “Crema” filter holder (11)
supplied with the machine, it is not
necessary to change the filter to obtain
one or two cups of coffee.
• To make one or two cups of coffee,
add 1 or 2 even measures of ground
coffee to the filter.
• Clean the edges of the filter holder from
any excess of coffee grounds.
• Insert the “Crema” filter holder (11)
in the dispenser unit (7) from below,
turning it from left to right until it locks
into place as directed above.
• Position two warmed cups under the
filter holder, making sure that they are
directly under the coffee spouts.
• Press the coffee switch. Wait until the cups
are sufficiently filled.
• Press the coffee switch again to stop the
coffee flow.
• When the coffee flow has ceased,
remove the filter holder and empty out
the excess coffee grounds.
Cleaning hint: always keep the
“Crema” filter holder clean by
removing it and washing it with drinking
water.
5.2 Using the brass filter holder
• Place the filter (14 or 15, single or twin
cup, depending on the number of
coffees you wish to make) in the brass
filter holder (13).
• Fit the filter holder into the coffee
outlet socket (7), pushing it upwards
and turning it to the right until it locks
into place.
• Place a cup under the filter holder.
• To warm up the filter holder and the cup,
press the coffee switch (4); water will
begin to drip from the filter holder (this
operation is only necessary for the first
cup of coffee).
• When the cup is sufficiently full, press the
coffee switch (4) again.
• Remove the filter holder from the
machine by turning it to the left.
• To make one or two cups of coffee,
add 1 or 2 even measures of ground
coffee to the filter, depending on whether
you are using the single or twin cup filter.
• Tamp the coffee down lightly using the
press included with the coffee maker and
brush off any excess coffee from the edge
of the filter holder.
• Fit the brass filter holder (13) into the
coffee outlet socket (7), as explained
above, pushing it upwards and turning it
to the right until it locks into place.
• Position two warmed cups under the
filter holder, making sure that they are
directly under the coffee spouts.
• Press the coffee switch. Wait until the cups
are sufficiently filled.
• Press the coffee switch again to stop the
coffee flow.
• When the coffee flow has ceased,
remove the filter holder and empty out
the excess coffee grounds.
Cleaning hint: when cleaning the
filter take it right out of the filter
holder and rinse thoroughly.
6 ADVICE ON CHOICE OF
COFFEE
Practically any type of ground coffee on the
market can be used with this machine.
Coffee is a natural product and its taste
varies, depending on its origin and blend.
It is therefore advisable to try a number of
different types to discover your own personal preference.
For best results use blends specifically
ground for espresso machines.
The coffee flow should be constant and
should not drip.
The speed of the coffee flow can be
regulated by changing the dosage, the
fineness of the grinding and/or by how
heavily you tamp down the coffee in the
filter.
BEFORE USING THE HOT
WATER/STEAM JET, MAKE SURE
THAT THE STEAM TUBE (“PANNARELLO”) IS POSITIONED OVER THE
DRIP TRAY.
7 HOT WATER JET
Danger of burning! When water
begins to flow out, it may be very
hot. The steam tube does get very hot,
so avoid touching it in any way.
• If the machine is not already on, turn it on
at the main switch (3) which will light up.
• Wait for the coffee switch, „machine
Page 14

STEAMING FUNCTION - CLEANING INSTRUCTIONS DESCALING - LEGAL INFORMATION
temperature close the knob (6) and turn
off the “steam” switch (5).
To make a cappuccino heat milk
using the method explained
above.
• Proceed following the priming instructions
found in para. 4.5.
• When you have finished using the steam
tube clean with a damp cloth.
9 CLEANING INSTRUCTIONS
Before cleaning the machine, let it cool
down and unplug it.
• Do not immerse the coffee maker in water
and do not put any of the components in
a dishwasher.
• Do not use sharp objects or abrasive
chemical products (solvents) to clean the
machine.
• Clean the water tank and fill it with
fresh water daily.
• After heating milk, release a small
quantity of hot water to clean out the
steam tube and wipe the outside of it with
a damp cloth.
• Use a damp cloth to wipe down the
appliance.
• Clean the filter holder as follows:
• Remove the filter, place it in hot water
and wash it carefully.
• Clean the inside of the filter holder.
• Do not dry the machine and/or any of its
parts using a microwave and/or
conventional oven.
• Clean the “Pannarello” located over the
steam tube, if it is fitted on your machine.
To do this, unscrew the ring nut, remove
the “Pannarello” from the steam tube and
take off the external casing.
Rinse the “Pannarello” under running
water and then put it back together again.
The ring nut must be closed
properly as otherwise the
“Pannarello” may come loose during
use.
10 DESCALING
Scale normally forms while the machine
is being used; descaling is necessary every
3-4 months of use or whenever you observe
a decrease in water flow.
If you wish to descale the
appliance yourself, use a descaler
especially made for coffee machines.
Use a product normally available on the
market, that is neither toxic nor harmful.
Warning! Never use vinegar as a
descaler.
• Remove the water container and
empty out any remaining water.
• Mix the descaling agent with water
as directed on the package and pour the
solution into the water container; place
the water container inside the machine.
• Turn on the machine by pressing the main
switch.
• Position the steam tube over the drip
tray.
• Empty the entire contents from the water
container at intervals (one cup at a time)
by turning the steam knob (6)
counterclockwise and pressing the coffee
switch (4); to cut off flow press the coffee
switch (4) again and turn the steam knob
(6) clockwise.
• Every time a cup of descaler is released
the machine should be turned off at the
main switch (3) and left for 10-15 minutes
to give the descaling solution time to act.
• When all the descaling agent has
been used up, take out the water
container, rinse it out and fill it with fresh
drinking water.
• Place the container back inside the
machine; empty out 2/3 of the water in
the container by turning the steam knob
(6) counterclockwise and pressing the
coffee switch (4); to cut off flow press the
coffee switch (4) again and turn the steam
knob (6) clockwise.
• Let the machine heat up and empty out
the water remaining in the water container
by turning the steam knob (6)
counterclockwise and pressing the coffee
switch (4); to cut off flow press the coffee
switch (4) again and turn the steam knob
(6) clockwise.
If a descaling product that has not
been recommended is used, we
do advise the client to follow the
manufacturer’s instructions found on
the packet.
11 SERVICING
Regular servicing carried out by an
authorised service centre will prolong the
life and efficiency of the machine.
Keep the original packaging as it may prove useful in protecting the machine at a
later date.
12 LEGAL INFORMATION
• These instructions include information on
how to use the machine correctly, its
functions and its maintenance.
• If these instructions are followed closely
no risks should be run in using the
appliance and all necessary safety
requirements regarding function and
maintenance should be upheld.
Page 15
Problem
The machine does not
work
The pump is too noisy
The coffee is too cold
The milk does not froth
up
The coffee flow is too
fast, and it does not
make a creamy coffee
The coffee does not flow
or only drips
Coffee is leaking from
the filter edges
Possible causes
The machine is not properly
connected to the power supply
There is not enough water in the tank
(para. 4.4)
The „coffee“ switch light (4) was off when
the „coffee“ switch (4) was pressed.
The filter holder was not in place while
heating up the machine (para. 5.1-5.2)
You are using the wrong type of milk
There is not enough coffee in the filter
holder or the coffee is not ground
finely enough
The coffee is old or unsuitable
There is not enough water in the
machine
The coffee is too finely ground
Coffee is stuck in the filter holder
There is too much coffee in the filter
holder
The “Hot water/steam” knob (6) is
open
The machine needs descaling
The upper filter is blocked
The filter in the filter holder is blocked
The filter holder has not been fitted
correctly into the coffee outlet socket
The top edge of the filter holder is dirty
The boiler washer is dirty or worn out
There is too much coffee in the filter
holder
Rimedio
Connect the machine correctly to
the power supply
Fill up the tank
Wait until the ready light comes
on
Warm up the filter holder
Check the fat content of the milk
Add coffee (para. 5.1-5.2)
Try a different blend (Ch.6)
Add water (para.4.4)
Change type of coffee
Loosen it
Scoop some of it out using the
coffee measure
Close it
Descale it (Ch.10)
Clean the filter element
Clean the filter (Ch.9)
Insert the filter holder correctly
(para.5.1-5.2)
Clean the edges of the filter holder
Clean or change the washer
Scoop some of it out using the
coffee measure
DISPOSAL OF THE APPLIANCE TROUBLESHOOTING
14 TROUBLESHOOTING
If you should have a problem that is not dealt with in the above table or is not resolved by
any of these solutions please contact an authorised service centre.
Page 16

Les illustrations citées dans le texte se trouvent sur le volet de couverture du mode d’emploi.
Lisez ce mode d’emploi en ayant sous les yeux les illustrations.
1.2 Comment lire ce mode d’emploi
Conservez ce mode d’emploi dans un lieu sûr et à proximité de la machine à café,
au cas où un autre personne doit l’utiliser.
Si vous souhaitez plus d’informations ou si vous vous trouvez face à un problème non
envisagé par cette notice d’instruction, adressez-vous aux techniciens compétents.
2 CARACTERISTIQUES TECHNIQUES
Tension nominale Voir plaquette signalétique de l’appareil
Puissance nominale Voir plaquette signalétique de l’appareil
Matériau du corps Thermoplastique
Dimensions (l x h x p) 230 x 295 x 242
Poids 4,1 kg
Longueur du câble 1,2 m
Panneau de commande Frontal
Porte-filtre “Crème”
(variables en fonction des modèles) Laiton
“pannarello” Dispositif spécial pour “cappuccino” (en option)
et “cappuccinatore” (en option)
Réservoir Amovible
Alimentation Voir plaquette signalétique
Réservoir d’eau 1,4 l
Pression de la pompe 13-15 bars
Réchauffeur Sin013AX Inox
Sin013AL Aluminium
Dispositifs de sécurité Valve de sécurité pression réchauffeur
Thermostat
Sous réserve de modifications de construction et d’exécution dues au progrès
technologique.
Machine conforme à la Directive Européenne 89/336/CEE (Décret législatif 476 du 04/
12/92), relative à l’élimination des perturbations radiotechniques.
Le triangle d’attention indique toutes les instructions importantes,
relatives à la sécurité de l’utilisateur. Nous vous prions de suivre
scrupuleusement ces indications pour prévenir des accidents graves!
GENERALITE CARACTERISTIQUES TECHNIQUES
5.2 Avec porte-filtre en laiton .............................. 37
6 CHOIX DU CAFÉ - QUELQUES CONSEILS . 37
7 DISTRIBUTION D’EAU CHAUDE ............. 37
8 DISTRIBUTION DE LA VAPEUR / PRÉPA-
RATION D’UN “CAPPUCCINO” ................ 38
9 NETTOYAGE .......................................... 38
10 DÉTARTRAGE ......................................... 39
11 MAINTENANCE PÉRIODIQUE ................40
12 INFORMATIONS À CARACTÈRE JURIDIQUE 40
13 MISE À LA DÉCHARGE ........................... 40
14 DETECTION DE PANNES ET CORRECTIONS . 41
Page 17

NORMES DE SECURITE
3 NORMES DE SECURITE
Ne mettez jamais une pièce sous tension
au contact de l’eau: danger de courtcircuit! Le vapeur à haute température
et l’eau chaude peuvent être à l’origine
de brûlure! Ne dirigez jamais le jet de
vapeur ou d’eau chaude vers les parties
du corps, touchez avec précaution le
tube vapeur/eau chaude: danger de
brûlure!
Destination d’emploi
Cette machine à café a été conçue
uniquement pour un usage domestique.
Toute modification technique et tout usage
illicite sont interdits, vu les risques qu’ils
comportent!
Cette machine à café doit être utilisée
exclusivement par des adultes.
Alimentation en énergie électrique
Branchez la machine à café après avoir
vérifié la prise de courant.
Vérifiez la tension: elle doit correspondre
à celle indiquée sur la plaquette
signalétique.
Cordon d’alimentation
N’utilisez jamais la machine à café si le
cordon d’alimentation est défectueux. Faites
remplacer les câbles et fiches défectueux
immédiatement par des techniciens
compétents. Ne faites pas passer le câble
d’alimentation par des coins ou sur des
arêtes vives, au dessus d’objets très chauds
et le protéger contre l’huile. Ne déplacez
jamais la machine en la tirant par son cordon
d’alimentation. N’enlevez pas la prise en la
tirant par le cordon. Ne touchez jamais la
fiche avec des mains mouillées.
Ne laissez pas pendre le cordon
d’alimentation librement d’un table ou
d’une étagère.
Sécurité des personnes à
proximité
Assurez-vous qu’aucun enfant n’ait la
possibilité de jouer avec la machine à café.
Les enfants ne se rendent pas compte des
dangers liés aux appareils électroménagers.
Les composants de l’emballage ne doivent
pas être laissés à la portée des enfants car
ils représentent une source de danger
potentiel.
Danger de brûlure
Evitez de diriger le jet de vapeur à haute
température et/ou d’eau chaude vers vous
ou toute autre personne.
Utilisez toujours les poignées ou les boutons
prévus à cet effet. Ne touchez les becs qu’aux
endroits équipés de protection anti-brûlure.
N’ôtez jamais le porte-filtre pendant la
distribution du café.
Pendant la phase de réchauffement du
distributeur de café, des gouttes d’eau
chaude peuvent s’écouler.
Emplacement
Placez la machine à café dans un lieu sûr,
où personne ne peut la renverser et où elle
ne peut blesser personne.
De l’eau chaude et de la vapeur à haute
température peuvent s’échapper de la
machine: danger de brûlure!
N’utilisez pas la machine à café à ciel
ouvert.
Ne placez pas la machine sur une surface
très chaude ou à proximité de flammes
nues: la chaleur risque de faire fondre son
habillage ou de l’abîmer.
Nettoyage
Avant de nettoyer la machine, désenfoncez
tous les boutons et ôtez la fiche de la prise
Mesures en millimètres
2
0
0
4
0
0
2
0
0
NORMES DE SECURITE
Page 18

NORMES DE SECURITE MISE EN SERVICE
l’accès est interdit aux enfants.
Protégez-la contre la poussière et la saleté.
Réparations / Maintenance
En cas de pannes, vices, défaillances ou
après une chute, retirez la fiche de la prise.
Ne mettez jamais en marche une machine
défectueuse.
Seuls des techniciens compétents sont
autorisés à intervenir sur la machine et à la
réparer.
Les réparations doivent être effectuées
exclusivement par un Centre d’Assistance
Agréé.
En cas d’interventions non effectuées dans
les règles de l’art, le Fabricant décline toute
responsabilité pour d’éventuels dommages.
Anti-incendie
En cas d’incendie, utilisez des extincteurs à
anhydride carbonique (CO2). N’utilisez ni
eau, ni extincteur à poudre.
Accessoires (variables en fonction du
modèle)
Porte-filtre “Crème”
Filtre pour porte-filtre “Crème”
(Un seul pour la distribution d’1 ou 2
cafés)
Porte-filtre en laiton
Filtre 1 café pour porte-filtre en laiton
Filtre 2 cafés pour porte-filtre en laiton
Mesure pour café
4 INSTALLATION
Pour votre sécurité et celle des tiers,
respectez scrupuleusement les «Normes
de sécurité» (voir p. 33-34).
4.1 Emballage
L’emballage d’origine a été conçu et
fabriqué pour protéger la machine au cours
de son expédition.
Nous vous conseillons de le conserver ; il
peut vous être encore utile.
4.2 Installation: quelques conseils
Avant d’installer la machine, suivez les
conseils de sécurité suivants:
• placez la machine dans un lieu sûr ;
• assurez-vous qu’aucun enfant n’ait la
possibilité de jouer avec la machine ;
• ne posez pas la machine sur une surface
très chaude ou à proximité de flammes nues.
La machine à café est maintenant prête à
être branchée sur le réseau électrique.
4.3 Branchement
Le courant électrique peut être
dangereux. Par conséquent, nous
vous prions de suivre toujours et
scrupuleusement les normes de sécurité.
N’utilisez jamais de câbles
défectueux! Les câbles et les fiches
défectueuses doivent être immédiatement
remplacés par des techniciens agréés.
La machine à café doit être branchée sur
une prise de courant appropriée.
La tension de l’appareil est fixée en usine.
Vérifiez si la tension du secteur correspond
aux indications reportées sur la plaquette
signalétique, sur le fond de l’appareil.
• Déroulez du fond de l’appareil la longueur
de câble nécessaire pour raccorder la
machine au réseau électrique.
• Vérifiez si l’interrupteur général est sur
«0» avant de raccorder la machine au
réseau électrique.
• Enfoncez la fiche dans une prise de
courant après avoir vérifié la tension.
4.4 Remplissage du réservoir d’eau
• Retirez le couvercle du réservoir (2).
• Extrayez le réservoir d’eau (1) en le tirant
par le haut; faites attention à ne pas
abîmer les tubes à l’intérieur du réservoir.
• Rincez-le et remplissez-le d’eau
froide: ne le remplissez pas à ras bord.
• Remontez le réservoir dans son
logement: vérifiez si les tubes qui ont
été démontés sont complètement
recouverts d’eau.
Attention: Certains modèles sont
équipés d’un réservoir avec une
valve qui aspire l’eau.
Cette valve se ferme automatiquement quand le réservoir est
démonté pour empêcher l’eau de
s’écouler. Après avoir remonté le
réservoir, exercez une légère pression.
• Remettez le couvercle sur le réservoir.
Remplissez le réservoir toujours
et uniquement avec de l’eau
froide, non pétillante: de l’eau chaude
ou d’autres liquides peuvent abîmer
le réservoir.
Ne mettez pas la machine en marche
sans eau: assurez-vous qu’elle dispose
d’assez d’eau pour fonctionner avant de
la mettre en marche.
4.5 Amorçage du circuit
Avant la mise en service de l’appareil, après
une longue période d’inactivité, après avoir
terminé l’eau et après la prise de vapeur, le
Page 19

DISTRIBUTION DU CAFÉ CHOIX DU CAFÉ - DISTRIBUTION D’EAU CHAUDE
“Crème” (11).
• Introduire par le bas le porte-filtre
“Crème” (11) dans le distributeur (7), et
le faire tourner de gauche à droite pour
le bloquer.
• Lâchez le manche du porte-filtre. Un
système automatique reconduit
doucement le manche vers la gauche.
Ce mouvement garantit le parfait
fonctionnement du porte-filtre.
• Positionnez une tasse en dessous du
porte-filtre. Préchauffez le porte-filtre et
la tasse en pressant l’interrupteur “café”
(4); l’eau commencera à s’écouler du
porte-filtre (cette opération n’est
nécessaire que pour le premier café).
• Quand la tasse sera suffisamment pleine,
pressez à nouveau l’interrupteur “café” (4).
• Retirez le porte-filtre de la machine
en le tournant de la droite vers la gauche
et videz l’eau résiduelle.
• Avec le porte-filtre spécial “Crème” (11)
de la machine, le même filtre peut servir
pour un ou deux cafés.
• Versez 1 ou 2 mesures remplies à
ras bord de café moulu dans le filtre pour
obtenir un ou deux cafés.
• Eliminez les résidus de café sur le bord
du porte-filtre.
• Introduire par le bas le porte-filtre
“Crème” (11) dans le distributeur (7), et
le faire tourner de gauche à droite pour
le bloquer, comme vu supra.
• Prenez 1 ou 2 tasses préchauffées et
positionnez-les en dessous du porte-filtre;
vérifiez si elles sont bien placées en
dessous des becs distributeurs de café.
• Pressez la touche café. Attendez que le
distributeur remplisse les tasses.
• Pressez la touche café à nouveau pour
arrêter la distribution de café.
• A la fin de la distribution, attendez
quelques secondes, extrayez le porte-filtre
et videz-le de son fond de café.
Note de nettoyage: conserver le
filtre du porte-filtre “Crème”
propre: l’extraire de son logement et
le laver avec de l’eau potable.
5.2 Avec porte-filtre en laiton
• Insérez le filtre (14 ou 15, à 1 ou 2 tasses
suivant le nombre de cafés souhaité) dans
le porte-filtre en laiton (13).
• Introduisez le porte-filtre en laiton par
le bas dans le distributeur (7) et tournez-le
de la gauche vers la droite pour le bloquer.
• Positionnez une tasse en dessous du
porte-filtre.
• Pressez l’interrupteur “café” (4) pour
préchauffer le porte-filtre et la tasse ; de
l’eau commencera à s’écouler du portefiltre (cette opération n’est nécessaire que
pour le premier café).
• Quand la tasse sera suffisamment pleine,
pressez à nouveau l’interrupteur “café” (4).
• Retirez le porte-filtre de la machine
en le tournant de la droite vers la gauche.
• Versez 1 ou 2 mesures remplies à
ras bord de café moulu, en fonction du
filtre monté précédemment, pour obtenir
un ou deux cafés.
• Pressez légèrement le café avec le dos
de la mesure et éliminez les résidus de
café sur le bord du porte-filtre.
• Introduisez le porte-filtre en laiton
(13) par le bas dans le distributeur (7) et
tournez-le, de la gauche vers la droite,
pour le bloquer.
• Prenez 1 ou 2 tasses préchauffées et
positionnez-les en dessous du porte-filtre;
vérifiez si elles sont bien placées en
dessous des becs distributeurs de café.
• Pressez la touche café. Attendez que le
distributeur remplisse les tasses.
• Pressez la touche café à nouveau pour
arrêter la distribution de café.
• A la fin de la distribution, extrayez le
porte-filtre et videz-le de son fond de café.
Note de nettoyage: conservez le filtre
du porte-filtre propre: extrayez-le de
son logement et lavez-le à l’eau potable.
6 CHOIX DU CAFÉ -
QUELQUES CONSEILS
En général, vous pouvez utiliser n’importe
quel café en vente dans le commerce.
Le café est toutefois un produit naturel
et son goût change en fonction de l’origine et du mélange; il est donc préférable
d’en essayer plusieurs afin de trouver
celui qui convient le mieux à votre palais.
Nous vous conseillons d’utiliser des
mélanges spécialement préparés pour
des machines expresso: ils vous offriront
à coup sûr de meilleurs résultats. Le café
doit toujours s’écouler régulièrement du
porte-filtre sans goutter.
La vitesse d’écoulement du café peut être
modifiée en variant légèrement la dose,
le degré de mouture et/ou de tassement
du café dans le filtre.
AVANT D’EFFECTUER UNE
QUELCONQUE OPERATION RELATIVE A LA DISTRIBUTION DE VAPEUR
OU D’EAU CHAUDE, VERIFIEZ SI LE
TUBE VAPEUR (“PANNARELLO”) EST
BIEN ORIENTE AU-DESSUS DE LA
CUVETTE D’ECOULEMENT.
7 DISTRIBUTION D’EAU
CHAUDE
Danger de brûlure! De petits jets
d’eau chaude peuvent s’échapper
du distributeur au début du
fonctionnement.
Le tube du distributeur peut atteindre des
températures élevées: ne le touchez
Page 20

DISTRIBUTION DE LA VAPEUR - NETTOYAGE DÉTARTRAGE
au-dessus de la cuvette d’écoulement,
ouvrez le robinet «eau chaude/vapeur»
(6) pendant quelques instants, pour
laisser s’écouler l’eau résiduelle du tube
vapeur (“pannarello”); très vite, de la
vapeur commencera à sortir du tube.
• Fermez le robinet (6).
• Plongez le tube vapeur (“pannarello”)
dans le liquide à réchauffer et ouvrez le
robinet (6); faites tourner le récipient
lentement du bas vers le haut pour bien
répartir la chaleur.
• Après quoi, fermez le robinet (6) et
remettez l’interrupteur “vapeur” (5) dans
sa position initiale.
Si vous utilisez ce système avec du
lait, vous préparez un “cappuccino”.
• Procédez à l’amorçage du circuit (voir
par.4.5) pour rendre la machine
opérationnelle.
• Pour terminer, nettoyez le tube vapeur
(pannarello) avec un chiffon humide.
9 NETTOYAGE
Pour la maintenance et le nettoyage, la
machine doit être froide et débranchée du
réseau électrique.
• Ne plongez pas la machine dans l’eau
et ne lavez pas ses composants dans un
lave-vaisselle.
• N’utilisez pas d’objets pointus ou de
produits chimiques agressifs (solvants)
pour le nettoyage.
• Nous vous conseillons de nettoyer
quotidiennement le réservoir d’eau et de
le remplir avec de l’eau froide.
• Après avoir chauffé du lait, prenez une
petite quantité d’eau chaude pour le
nettoyage du tube et nettoyez la partie
externe avec un chiffon humide.
• Pour nettoyer l’appareil, utilisez un
chiffon doux, imbibé d’eau.
• Pour le nettoyage du porte-filtre,
procédez comme suit:
• Extrayez le filtre, plongez-le dans de
l’eau chaude et lavez-le soigneusement.
• Lavez l’intérieur du porte-filtre.
• N’utilisez pas de four à micro-ondes et/
ou un four traditionnel pour sécher la
machine et/ou ses composants
• Nettoyez également le “pannarello”, situé
au-dessus du tube vapeur, si la machine
en est équipée, naturellement. Pour ce
faire, dévissez la bague et extrayez le
“pannarello” du tube vapeur, démontez
le corps externe du “pannarello”.
Lavez le “pannarello” à l’eau courante
et remontez-le.
Nous vous conseillons de bien
serrer la bague; le “pannarello”
pourrait se dévisser en cours d’usage.
10 DÉTARTRAGE
Avec le temps, du tartre se forme à
l’intérieur de l’appareil; un détartrage est
nécessaire tous les 3-4 mois d’utilisation
de la machine et/ou quand l’utilisateur
observe une réduction du débit d’eau.
Si l’utilisateur souhaite effectuer
le détartrage de la machine
personnellement, il peut utiliser un
produit détartrant pour machines à café,
de type non toxique et/ou nocif, en vente
libre dans le commerce.
Attention! Ne jamais utiliser du
vinaigre comme détartrant.
• Retirer le réservoir d’eau et vider l’eau
résiduelle.
• Mélanger le produit détartrant à de
l’eau en suivant les instructions sur
l’emballage du produit et remplir le
réservoir avec cette solution; remettre le
réservoir en place dans la machine.
• Mettre la machine sous tension avec
l’interrupteur général.
• Diriger le tube vapeur sur la cuvette
d’écoulement.
• Prendre une tasse à intervalle régulier et
vider tout le contenu du réservoir d’eau
en tournant le robinet de la vapeur (6)
dans le sens inverse des aiguilles d’une
montre et en pressant l’interrupteur de
café (4); pour arrêter la distribution,
presser à nouveau l’interrupteur de café
(4) et tourner le robinet de la vapeur (6)
dans le sens des aiguilles d’une montre.
• Entre chaque intervalle, laissez le
décalcifiant agir pendant environ 10-15
minutes après avoir mis la machine hors
tension avec l’interrupteur général (3).
• La solution détartrante terminée,
extraire le réservoir d’eau, le rincer et le
remplir d’eau froide potable.
• Remettre le réservoir en place dans
la machine; vider 2/3 du réservoir en
tournant le robinet de la vapeur (6) dans
le sens inverse des aiguilles d’une montre
et presser l’interrupteur du café (4); pour
arrêter la distribution, presser à nouveau
l’interrupteur du café (4) et tourner le
robinet de la vapeur (6) dans le sens des
aiguilles d’une montre.
• Laisser la machine chauffer et vider le
reste du réservoir en tournant le robinet
de la vapeur (6) dans le sens inverse des
aiguilles d’une montre et en pressant
l’interrupteur du café (4); pour arrêter la
distribution, presser à nouveau
l’interrupteur du café (4) et tourner le
robinet de la vapeur (6) dans le sens des
aiguilles d’une montre.
Si vous utiliser un produit
différent du produit préconisé, il
Page 21

Symptôme
La machine ne s’allume
pas.
La pompe est très
bruyante.
Le café est trop froid
Le lait ne mousse pas.
Le café coule trop vite,
la crème ne se forme pas
Le café ne coule pas ou
ne coule qu’à gouttes
Le café coule par les
bords
Causes possibles
Elle n’est pas branchée.
Le réservoir n’a pas assez d’eau
(par. 4.4).
Le témoin de l’interrupteur “café” (4)
est éteint quand l’interrupteur (4) est
pressé.
Le porte-filtre n’est pas inséré pour le
préchauffement (par. 5.1-5.2).
Le type de lait ne convient pas.
Le porte-filtre ne contient pas assez
de café. La mouture est trop grosse.
Le café est vieux ou ne convient pas
Plus d’eau
Mouture trop fine
Café tassé dans le porte-filtre
Trop de café dans le porte-filtre
Robinet «eau chaude/vapeur» (6)
ouvert
Trop de calcaire.
Filtre colmaté
Filtre du porte-filtre colmaté
Le porte-filtre est mal mis dans le
distributeur de café.
Le bord supérieur du porte-filtre est
sale
Le joint du réchauffeur est sale ou usé
Trop de café dans le porte-filtre
Remède
Branchez la machine
Faites l’appoint du réservoir d’eau
Attendez que le témoin s’allume
Préchauffez le porte-filtre
Contrôlez la teneur en graisse du
lait
Ajoutez du café (par. 5.1-5.2)
Utilisez un autre mélange (chap.6)
Faites l’appoint d’eau (par.4.4)
Remplacez le type de café
Secouez le café pour l’aérer
Réduisez la quantité de café en
utilisant la mesure
Fermez le robinet
Décalcifiez la machine (chap.10)
Nettoyez le filtre
Nettoyez le filtre (chap.9)
Remontez correctement le porte-
filtre (par.5.1-5.2)
Nettoyez le bord du porte-filtre.
Nettoyez ou remplacez le joint
Réduisez la quantité de café en
utilisant la mesure
INFORMATIONS À CARACTÈRE JURIDIQUE - MISE À LA DÉCHARGE DETECTION DE PANNES ET CORRECTIONS
14 DETECTION DE PANNES ET CORRECTIONS
Si vous ne trouvez pas la description du symptôme que vous recherchez ou si le remède
conseillé est inefficace, veuillez vous adressez à un Centre d’Assistance Agréé.
d’emploi ne peuvent ni limiter, ni étendre
les normes de garantie contractuelles.
• Ce mode d’emploi est une œuvre
protégée par les droits d’auteur.
• Toute reproduction par xérographie ou
toute traduction dans une autre langue
est interdite sans l’autorisation écrite
préalable du Fabricant.
13 MISE À LA DÉCHARGE
• Mettez hors d’usage les appareils hors
service.
• Débranchez l’appareil et coupez le
cordon électrique.
• Mettez les appareils hors d’usage à la
décharge suivant la réglementation en
vigueur.
Page 22

Die Abbildungen, die sich auf den Text beziehen, befinden sich auf der ausklappbaren
Innenseite des Umschlags. Diese Innenseite ist beim Lesen der vorliegenden
Bedienungsanleitung aufgeklappt zu halten.
1.2 Benutzung dieser Bedienungsanleitung
Diese Bedienungsanleitung an einem sicheren Ort aufbewahren und sie immer der
Maschine beifügen, wenn diese von anderen Personen benutzt wird.
Für weitere Informationen oder bei Problemen, die nicht oder nur ungenügend in der
vorliegenden Bedienungsanleitung erläutert sind, wenden Sie sich bitte an die
entsprechenden Fachhändler.
2 TECHNISCHE DATEN
Nennspannung Siehe Schild auf der Maschine
Nennleistung Siehe Schild auf der Maschine
Gehäusematerial Thermoplastisch
Abmessungen (L x B x H) 230 x 295 x 242
Gewicht 4,1 kg
Kabellänge 1,2 m
Bedientafel Vorne
Filterhalter “Crema”
(je nach Modell verschieden) Messing
“Pannarello” Spezialzubehör für Cappuccino (optional) und
Cappuccinatore (optional)
Tank Herausziehbar
Spannungsversorgung Siehe Schild
Wasserbehälter 1,4 l
Pumpendruck 13-15 bar
Heizelement Sin013AX Rostfreier Stahl
Sin013AL Aluminium
Sicherheitsvorrichtungen Überdruckventil
Sicherheitsthermostat
Änderungen an der Konstruktionsweise und Ausführung aufgrund technologischen
Fortschritts möglich.
Diese Maschine entspricht der Europäischen Direktive 89/336/CEE (Gesetzesdekret 476
vom 04.12.92) über die Funkentstörung.
Das Warndreieck deutet auf alle Informationen hin, die für die
Sicherheit des Bedieners wichtig sind. Diese Hinweise sind
strengstens einzuhalten, um schwere Unfälle zu vermeiden.
ALLGEMEINES TECHNISCHE DATEN
5.1 Mit Filterhalter ”Crema” ................................ 48
5.2 Mit Filterhalter aus Messing ........................... 49
6 TIPS FÜR DIE WAHL DES RICHTIGEN
ESPRESSOS ............................................49
7 HEIßES WASSER MACHEN ..................... 50
8 DAMPF -/CAPPUCINOZUBEREITUNG ..... 50
9 REINIGUNG .......................................... 51
10 ENTKALKUNG ....................................... 51
11 REGELMÄßIGER KUNDENDIENST ........... 52
12 RECHTLICHE INFORMATIONEN ............. 52
13 ENTSORGUNG ......................................52
14 FEHLERSUCHE .......................................53
Page 23

SICHERHEITSVORSCHRIFTEN
3 SICHERHEITSVORSCHRIFTEN
Die unter Spannung stehenden Teile
dürfen niemals mit Wasser in Berührung
kommen: Kurzschlußgefahr! Der heiße
Dampf und das heiße Wasser können
zu Verbrennungen führen! Den Dampf
bzw. Heißwasserstrahl nie auf Körperteile richten, das Dampf- bzw. Heißwasserrohr nur vorsichtig anfassen:
Verbrennungsgefahr!
Gebrauch der Maschine
Diese Espressomaschine ist nur für den
Hausgebrauch konzipiert worden.
Die Durchführung technischer Modifikationen sowie unsachgemäßer Gebrauch
sind verboten, da diese zu gefährlichen
Situationen führen können!
Die Espressomaschine darf nur von
Erwachsenen bedient werden.
Spannungsversorgung
Die Maschine darf nur an eine geeignete
Stromquelle angeschlossen werden.
Dabei muß die Spannung mit derjenigen
übereinstimmen, die auf dem Schild der
Maschine angegeben ist.
Spannungsversorgungskabel
Die Espressomaschine niemals benutzen,
wenn das Spannungsversorgungskabel
defekt ist. Die defekten Kabel und Stecker
sofort vom Fachmann austauschen lassen.
Das Spannungsversorgungskabel nicht
stark knicken, um scharfe Kanten oder heiße
Flächen legen; darüberhinaus ist es vor Öl
zu schützen. Die Espressomaschine nicht
am Kabel anheben oder ziehen.
Den Stecker nicht durch Ziehen am Kabel
abziehen oder es mit nassen Händen
anfassen. Ein Herabhängen des Spannungsversorgungskabels von Tischen oder
Regalen ist zu vermeiden.
Schutz anderer Personen
Sicherstellen, daß keine Kinder mit der
Espressomaschine spielen können.
Kinder können die Gefahrensituationen,
die durch Haushaltsgeräte entstehen
können, nicht abschätzen.
Die Teile der Verpackung dürfen nicht in der
Reichweite von Kindern gelassen werden, da
sie potentiell für Kinder eine Gefahr darstellen.
Verbrennungsgefahr
Wenden Sie den Dampf- bzw. Heißwasserstrahl nie auf sich selbst oder andere. Immer
die vorgesehenen Griffe und Drehknöpfe
verwenden.
Das Dampf- bzw. Heißwasserrohr nur an der
vor Verbrennungen geschützten Zone anfassen.
Niemals den Filterhalter abziehen, wenn
gerade Espresso zubereitet wird.
Während des Aufheizens der Baugruppe
Espressozubereitung können Tropfen heißen
Wassers austreten.
Aufstellung
Die Espressomaschine an einem sicheren
Ort aufstellen, an dem sie niemand umstößt
oder sich verletzen kann.
Es könnten Dampf und heißes Wasser
austreten: Verbrennungsgefahr!
Die Espressomaschine nicht im Freien
verwenden. Die Espressomaschine nicht
auf heiße Flächen stellen oder in die Nähe
von offenem Feuer, um ein Schmelzen des
Gehäuses bzw. dessen Beschädigung zu
vermeiden.
Reinigung
Bevor die Maschine gereinigt wird, müssen
alle Tasten auf “Aus” gestellt und dann die
Spannungsversorgung der Maschine
unterbrochen werden. Dann warten, bis sich
die Maschine abkühlt.
Die Maschine nie in Wasser tauchen!
Maße in Milimeter
2
0
0
4
0
0
2
0
0
SICHERHEITSVORSCHRIFTEN
Page 24

SICHERHEITSVORSCHRIFTEN INBETRIEBNAHME
Ort aufzubewahren. Die Maschine muß vor
Staub und Schmutz geschützt werden.
Reparaturen/Wartungsarbeiten
Sollten Defekte, Funktionsstörungen oder
Hinweise auf Defekte auftauchen, nachdem die
Maschine fallengelassen wurde, so ist sofort
das Spannungsversorgungskabel abzuziehen.
Niemals ein defekte Maschine einschalten.
Nur Fachleute dürfen Reparaturen und
Eingriffe vornehmen.
Reparaturen dürfen nur bei einem
autorisierten Fachhändler durchgeführt
werden. Sollten Eingriffe nicht ordnungsgemäß durchgeführt worden sein, so
verweigern wir jegliche Verantwortung für
auftretende Schäden.
Brandschutzvorschriften
Bei einem Brand sind Kohlendioxyd(CO2)Feuerlöscher zu verwenden. Niemals
Wasser oder Trocken-Feuerlöscher benutzen.
Zubehör (je nach Modell)
Filterhalter ”Crema”
Filter für Filterhalter ”Crema”
(baugleich für 1 oder 2 Tassen Espresso)
Filterhalter aus Messing
Filter 1 Espresso für Filterhalter aus
Messing
Filter 2 Espresso für Filterhalter aus
Messing
Meßlöffel für Espresso
4 INSTALLATION
Für Ihre eigene Sicherheit und die der
anderen müssen Sie sich strengstens
an die “Sicherheitsvorschriften” auf den
Seiten 45-46 halten.
4.1 Verpackung
Die Originalverpackung ist so konzipiert
worden, daß sie die Maschine während des
Transportes am besten schützt.
Wir empfehlen, sie für einen eventuellen
zukünftigen Transport aufzubewahren.
4.2 Installationshinweise
Bevor man zur Installation der Maschine
übergeht, muß man die folgenden
Sicherheitsvorschriften beachten:
• die Maschine an einem sicheren Ort
aufstellen;
• sicherstellen, daß Kinder keinen Zugriff
auf die Maschine haben;
• die Maschine nicht auf heiße Flächen oder
in die Nähe von offenem Feuer stellen;
Die Kaffeemaschine kann jetzt an die
Spannungsversorgung angeschlossen
werden.
4.3 Anschluß an die Stromversorgung
Elektrischer Strom ist sehr
gefährlich! Deshalb sind diese
Sicherheits-vorschriften strengstens
einzuhalten.
Niemals defekte Spannungsver-
sorgungskabel benutzen. Die
defekten Kabel und Stecker sofort vom
Fachmann austauschen lassen.
Die Kaffeemaschine muß an eine geeignete
Spannungsversorgung angeschlossen
werden.
Die Spannung der Maschine ist werksseitig
eingestellt worden.
Überprüfen, ob die Netzspannung mit den
Angaben auf dem Identifikationsschild
hinten auf der Maschine übereinstimmt.
• Vom Boden der Maschine die bis zur
Steckdose nötige Kabellänge abwickeln.
• Sicherstellen, daß der Hauptschalter auf
“0” steht, bevor man die Maschine an
die Spannungsversorgung anschließt.
• Den Stecker in eine Steckdose mit
geeigneter Spannung einstecken.
4.4 Auffüllen des Wasserbehälters
• Den Deckel des Wasserbehälters (2)
abnehmen
• Den Wasserbehälter (1) leicht anheben
und herausnehmen. Achten Sie dabei
darauf, die Schläuche, die sich im
Behälter befinden, nicht zu beschädigen.
• Durchspülen und mit kaltem Wasser
füllen, wobei nicht zu viel eingefüllt
werden darf.
• Den Wasserbehälter wieder in seine
Position bringen. Dabei sollten die Schläuche,
die vorher abgezogen worden waren,
vollständig ins Wasser eingetaucht werden.
Achtung! Einige Modelle sind mit
einem Wasserbehälter mit
Ansaug-ventil ausgestattet. Dieses
Ventil schließt sich automatisch, wenn
der Wasserbehälter entfernt wird, um
das Auslaufen von Wasser zu
verhindern. Nach Einsetzen des
Behälters, diesen leicht andrücken.
• Den Deckel wieder auf den Wasser-
behälter legen.
Es darf nur kaltes, nicht
kohlensäure-haltiges Wasser in
den Wasser-behälter eingefüllt werden:
warmes Wasser oder andere
Flüssigkeiten könnten den
Wasserbehälter beschädigen.
Die Maschine niemals ohne Wasser
betreiben: immer erst kontrollieren, ob
sich genügend Wasser im Behälter
befindet.
Page 25

48 49
ESPRESSOZUBEREITUNG WAHL DES RICHTIGEN ESPRESSOS
4.5 Laden des Kreislaufs
Bevor man die Maschine in Betrieb
nimmt, wenn sie längere Zeit nicht betrieben
wurde, der Wasservorrat aufgebraucht ist
oder nachdem Dampf produziert wurde,
muß man den Kreislauf der Maschine
nachfüllen.
• Den Hauptschalter (3) betätigen, die
Kontrolleuchte im Hauptschalter leuchtet auf.
• Das Dampfrohr (“Pannarello”) über die
Tropfwanne bringen.
• Den Drehgriff (6) “Heißes Wasser/
Dampf” öffnen, indem man ihn gegen
den Uhrzeigersinn dreht, und dann die
Espressotaste (4) drücken.
• Warten, bis aus dem Dampfrohr (“Pannarel-
lo”) ein regelmäßiger Wasserstrahl austritt.
• Erneut die Espressotaste (4) drücken und
Drehgriff “Heißes Wasser/Dampf” (6)
schließen, indem man ihn im Uhrzeiger-
sinn dreht.
Die Maschine ist nun für die Espressozubereitung bereit.
5 ESPRESSOZUBEREITUNG
Achtung!
Während der Espresso-zubereitung
darf der Filterhalter nicht durch Drehen
im Uhrzeigersinn ausgerastet werden.
Verbrennungsgefahr.
• Während dieses Vorgangs kann sich die
Betriebsbereitschafts-Anzeige, die sich im
Kaffee-Schalter (4) des Geräts befindet,
an- und ausschalten. Dabei handelt es
sich nicht um eine Betriebsstörung,
sondern um eine normale Funktionsweise.
• Vor dem Gebrauch sicherstellen, ob der
Drehgriff “Heißes Wasser/Dampf (6)
geschlossen ist und der Wasserbehälter
eine ausreichende Menge Wasser enthält.
• Die Maschine mit dem Hauptschalter (3)
einschalten, wenn sie noch nicht in Betrieb
ist, wonach die Kontrolleuchte im
Hauptschalter aufleuchtet.
• Warten Sie, bis die, im Kaffee-Schalter
befindliche Betriebsbereitschafts-Anzeige
(4) aufleuchtet, die Maschine ist jetzt zum
Kaffee-Ausschank bereit.
5.1 Mit Filterhalter ”Crema”
• Den Filter (12) in den Filterhalter “Crema” (11) einsetzen.
• Von unten den Filterhalter “Crema”
in die Zubereitungseinheit (7) einsetzen,
indem er von links nach rechts gedreht
wird, bis er blockiert.
• Den Griffs des Filterhalters loslassen. Eine
Automatik bringt den Griff nun sanft in
die linke Stellung zurück.
Diese Bewegung garantiert die
ordnungsgemäße Funktion des
Filterhalters.
• Eine Tasse unter der Filterhalter
stellen. Den Filterhalter und die Tasse
vorwärmen, indem man die Espressotaste
(4) drückt; das Wasser beginnt aus dem
Filterhalter auszutreten (dieser Vorgang
ist nur bei dem ersten Espresso
durchzuführen).
• Wenn die Tasse voll genug ist, erneut die
Espressotaste (4) drücken.
• Den Filterhalter von der Maschine
durch Drehen von rechts nach links
abziehen und das überflüssige Wasser
ausschütten.
• Mit dem speziellen Filterhalter “Crema”
(11), mit dem die Maschine ausgerüstet
ist, ist kein Filterwechsel für die Zubereitung
von 1 oder 2 Tassen Kaffee erforderlich.
• 1 oder 2 gestrichene Meßlöffel
gemahlenen Espresso in den Filter
geben, um einen oder zwei Espresso
zuzubereiten.
• Den Rand des Filterhalters von
eventuellen Kaffeeresten reinigen.
• Von unten den Filterhalter “Crema” (11)
in die Zubereitungseinheit (7) einsetzen,
indem er von links nach rechts bis zu seiner
vollständigen Blockierung gedreht wird, wie
bereits oben beschrieben.
• 1 bis 2 vorgewärmte Tassen nehmen
und unter den Filterhalter stellen;
überprüfen, ob sie richtig unter den
Espressoaustrittsdüsen positioniert sind.
• Die Espressotaste drücken. Warten, bis
die Tassen voll sind.
• Erneut die Espressotaste drücken, um die
Espressozubereitung zu stoppen.
• Nach der Espressozubereitung einige
Sekunden warten, den Filterhalter
abziehen und den Kaffeesatz entfernen.
Reinigungshinweis: den Filter des
Filterhalters “Crema” säubern,
indem er aus der Halterung gezogen
und mit Trinkwasser ausgespült wird.
5.2 Mit Filterhalter aus Messing
• Den Filter (14 oder 15, je nachdem,
ob 1 oder 2 Tassen gemacht werden
sollen) in den Filterhalter aus Messing
(13) einsetzen.
• Den Filterhalter aus Messing von
unten in die Baugruppe Espressozubereitung (7) einsetzen, indem man ihn
von links nach rechts bis zum Anschlag
dreht.
• Eine Tasse unter der Filterhalter stellen.
• Den Filterhalter und die Tasse vorwärmen,
indem man die Espressotaste (4) drückt;
das Wasser beginnt aus dem Filterhalter
auszutreten (dieser Vorgang ist nur bei
dem ersten Espresso durchzuführen).
• Wenn die Tasse voll genug ist, erneut die
Espressotaste (4) drücken.
• Den Filterhalter von der Maschine
durch Drehen von rechts nach links
abziehen.
• 1 oder 2 gestrichene Meßlöffel in den
Filter geben, je nach eingesetztem Filter,
um einen oder zwei Espresso zuzubereiten.
• Den Kaffee mit der Unterseite des
Meßlöffels leicht festdrücken und alle
Kaffeespuren vom Rand des
Filterhalters entfernen.
• Den Filterhalter aus Messing (13) von
unten in die Baugruppe Espressozubereitung (7) einsetzen, indem man ihn
von links nach rechts dreht, bis er
komplett eingerastet ist.
• 1 bis 2 vorgewärmte Tassen nehmen
und unter den Filterhalter stellen;
überprüfen, ob sie richtig unter den
Espressoaustrittsdüsen positioniert sind.
• Die Espressotaste drücken. Warten, bis
die Tassen voll sind.
• Erneut die Espressotaste drücken, um die
Espressozubereitung zu stoppen.
• Nach der Espressozubereitung einige
Sekunden warten, den Filterhalter
abziehen und den Kaffeesatz entfernen.
Reinigungshinweis: den Filter des
Filterhalters reinigen, indem man
ihn aus seinem Sitz zieht und mit
Wasser spült.
6 TIPS FÜR DIE WAHL DES
RICHTIGEN ESPRESSOS
Es können alle Arten im Handel erhältlichen
Arten von Kaffee verwendet werden.
Da Kaffee jedoch ein Naturprodukt ist und
sein Geschmack je nach Ursprung und
Mischung unterschiedlich ist, sollten Sie
verschiedene Kaffeesorten probieren, bis Sie
diejenige finden, die Ihrem Geschmack am
besten entspricht.
Für optimale Ergebnisse empfehlen wir, nur
ausdrücklich für die Zubereitung in
Espressomaschinen zusammengestellte
Mischungen zu verwenden.
Der Espresso sollte immer regelmäßig aus
Sin013a 165925300 Rev01.PMD 23/05/2002, 18.3948-49
Page 26

50 51
HEIßES WASSER MACHEN - DAMPF -/CAPPUCINOZUBEREITUNG REINIGUNG - ENTKALKUNG
dem Filterhalter austreten ohne zu tropfen.
Die Austrittsgeschwindigkeit kann verändert
werden, indem man die Menge, die
Mahlstufe oder den Anpreßdruck im Filter
leicht verändert.
BEVOR SIE DAMPF ODER
HEISSES WASSER AUSTRETEN
LASSEN, MÜSSEN SIE ÜBERPRÜFEN,
OB DAS DAMPFROHR (“PANNARELLO”) AUF DIE TROPFWANNE
GERICHTET IST.
7 HEIßES WASSER MACHEN
Verbrennungsgefahr!
Wenn das heiße Wasser austritt,
können am Anfang heiße Spritzer
verursacht werden. Das Dampfrohr kann
sehr heiß werden; er darf nicht mit
bloßen Händen berührt werden.
• Die Maschine mit dem Hauptschalter (3)
einschalten, wenn sie noch nicht in Betrieb
ist, wonach die Kontrolleuchte im
Hauptschalter aufleuchtet.
• Warten Sie, bis die Betriebsbereitschafts-
Anzeige, die sich im Kaffee-Schalter (4)
befindet, aufleuchtet.
• Eine Tasse oder ein Teeglas unter das
Dampfrohr stellen.
• Den Drehgriff “Heißes Wasser/Dampf (6)
öffnen, indem man ihn gegen den
Uhrzeigersinn dreht und dann die
Espressotaste (4) drückt, wobei man die
gewünschte Menge an Wasser austreten
läßt.
• Erneut die Espressotaste (4) drücken und
den Drehgriff “Heißes Wasser/Dampf (6)
schließen, indem man ihn mit dem
Uhrzeigersinn dreht, um das Ablassen von
heißem Wasser zu stoppen.
8 DAMPF -/CAPPUCINOZU-
BEREITUNG
Verbrennungsgefahr! Wenn das
heiße Wasser austritt, können am
Anfang heiße Spritzer verursacht
werden. Das Dampfrohr kann sehr heiß
werden; er darf nicht mit bloßen Händen
berührt werden.
• Die Maschine mit dem Hauptschalter (3)
einschalten, wenn sie noch nicht in Betrieb
ist, wonach die Kontrolleuchte im
Hauptschalter aufleuchtet.
• Den Dampf-Schalter (5) drücken, so daß
die darin angebrachte Leuchtanzeige sich
einschaltet. Die BetriebsbereitschaftsAnzeige, die sich im Kaffee-Schalter (4)
befindet, schaltet sich aus.
• Warten Sie, bis sich die Betriebsbereitschafts-
Anzeige, die sich im Kaffee-Schalter (4)
befindet, neu einschaltet. Die Maschine ist
jetzt zum Ausstoß von Dampf betriebsbereit.
• Das Dampfrohr (Pannarello) über die
Tropfwanne bringen, den Drehgriff
“Heißes Wasser/Dampf (6) kurz öffnen,
damit das restliche Wasser aus dem
Dampfrohr kommt; nach kurzer Zeit tritt
dann reiner Dampf aus.
• Den Drehgriff wieder zudrehen.
• Das Dampfrohr (Pannarello) in die zu
erhitzende Flüssigkeit tauchen und den
Drehgriff “Heißes Wasser/Dampf (6)
öffnen; die Tasse oder das Glas langsam
von unten nach oben drehen, damit de
Flüssigkeit gleichmäßig erhitzt wird.
• Nachdem genügend Dampf eingelassen
wurde, den Drehgriff “Heißes Wasser/
Dampf (6) wieder schließen und erneut
die Dampftaste (5) betätigen.
Wenn man das gleiche mit Milch
als Flüssigkeit macht, so erhält
man einen Cappuccino.
• Nun den Kreislauf der Maschine füllen,
wie auf par.4.5 beschrieben, wonach die
Maschine wieder betriebsbereit ist.
• Nach diesem Vorgang das Dampfrohr
(Pannarello) mit einem feuchten Tuch reinigen.
9 REINIGUNG
Die Wartung und Reinigung der Maschine
können nur durchgeführt werden, wenn
diese abgekühlt und die Spannungsversorgung unterbrochen ist.
• Die Maschine nie in Wasser tauchen oder
in die Geschirrspülmaschine geben.
• Keine scharfen Gegenstände oder aggressive chemische Mittel (Lösungsmittel)
zum Reinigen verwenden.
• Wir empfehlen, den Wasserbehälter
regelmäßig zu reinigen und mit kaltem
Wasser zu füllen.
• Nach dem Erhitzen der Milch sollte man
eine kleine Menge heißes Wasser
ablaufen lassen, um das Rohr zu reinigen;
danach das Rohr außen mit einem
feuchten Tuch reinigen.
• Die Maschine mit einem feuchten
Tuch reinigen.
• Bei der Reinigung des Filterhalters
geht man folgendermaßen vor:
• Den Filter herausnehmen, in heißes
Wasser tauchen und sorgfältig reinigen.
• Das Innere des Filterhalters reinigen.
• Die Maschine bzw. ihre Bauteile nie mit
Hilfe einer Mikrowelle bzw. eines
herkömmlichen Herdes trocknen.
• Den “Pannarello” oberhalb des
Dampfrohres reinigen, falls dieser
vorhanden ist.
Dazu muß man den Zahnkranz abschrauben
und den “Pannarello” aus dem Dampfrohr
herausziehen, dann das äußere Gehäuse
des Pannarello abmontieren.
Unter fließendem Wasser waschen und
dann den “Pannarello” wieder montieren.
Wir empfehlen, den Zahnkranz
wieder gut festzuziehen;
ansonsten könnte der (“Pannarello”)
während des Gebrauchs lose werden.
10 ENTKALKUNG
Durch den Gebrauch des Gerätes kommt
es zu Kalkablagerungen; die Entkalkung ist
nach jeweils 3-4 Monaten, während der die
Maschine in Gebrauch ist und/oder dann
erforderlich, wenn eine Reduzierung der
Wasserleistung bemerkt wird.
Wenn sie das Entkalken selber
durchführen wollen, dann
können Sie ein handels-übliches,
ungiftiges Entkalkungsmittel für
Kaffeemaschinen verwenden.
Achtung! Auf keinen Fall Essig zum
Entkalken verwenden.
• Den Wassertank herausnehmen und
das restliche Wasser ausleeren.
• Das Entkalkungsmittel wie auf der
Verpackung des Entkalkungsproduktes
beschrieben mit Wasser mischen und in
den Wassertank füllen; den Wassertank
wieder in die Maschine einsetzen.
• Durch Drücken des Hauptschalters die
Maschine einschalten.
• Das Dampfrohr über die
Auffangwanne richten.
• In Intervallen (jeweils eine Tasse) den
gesamten Inhalt des Wassertankes durch
Drehen des Dampfknopfes (6) gegen den
Uhrzeigersinn und Drücken des
Kaffeeschalters (4) entleeren; erneut den
Kaffeeschalter (4) drücken, um die Abgabe
zu beenden und den Dampfknopf (6) im
Uhrzeigersinn drehen.
Sin013a 165925300 Rev01.PMD 23/05/2002, 18.3950-51
Page 27

52 53
Fehler
Die Maschinen kann nicht
eingeschaltet werden
Die Pumpe ist sehr laut
Der Espresso ist zu kalt
Die Milch wird nicht
aufgeschäumt
Der Espresso kommt zu
schnell heraus, es bildet
sich keine Kaffecreme
Der Espresso kommt nicht
heraus oder kommt nur
tropfenweise heraus
Der Espresso läuft an den
Rändern des Filterhalters
aus
Behebung
Die Maschine an die Spannungsversorgung anschließen
Wasser nachfüllen.
Warten, bis die Kontrolleuchte erlischt
Den Filterhalter vorwärmen
Den Fettgehalt überprüfen
Mehr Espressopulver zufügen (par.
5.1-5.2)
Eine andere Espressosorte verwenden
(Abschn.6)
Wasser nachfüllen (par.4.4)
Eine andere Espressosorte verwenden
Espressopulver auflockern
Espressopulver mit Hilfe des Meßlöffels
aus dem Filterhalter nehmen
Den Drehgriff zudrehen
Maschine entkalken (Abschn.10)
Das Filterelement reinigen
Den Filter reinigen (Abschn.9)
Den Filterhalter richtig einsetzen
(par.5.1-5.2)
Den Rand des Filterhalters reinigen
Dichtungen reinigen oder austauschen
Espressopulver mit Hilfe des Meßlöffels
aus dem Filterhalter nehmen
RECHTLICHE INFORMATIONEN - ENTSORGUNG FEHLERSUCHE
14 FEHLERSUCHE
Mögliche Ursache
Maschine nicht an die Spannungsversorgung angeschlossen
Kein Wasser im Wasserbehälter (par.4.4)
Die Leuchtanzeige des „Kaffee“ Schalters
(4) war ausgeschaltet, als der Schalter (4)
betätigt wurde.
Filterhalter zum Vorwärmen nicht
eingerastet (par. 5.1-5.2)
Milch ist nicht geeignet
Zu wenig Espressopulver im Fiterhalter/zu
grob gemahlen
Espresso alt oder nicht geeignet
Kein Wasser vorhanden
Espressopulver zu fein gemahlen
Espressopulver im Filterhalter zu stark
festgedrückt
Zuviel Espressopulver im Filterhalter
Drehgriff (6) “Heißes Wasser/Dampf” offen
Maschine verkalkt
Düse verstopft
Filter im Filterhalter verstopft
Filterhalter nicht richtig in die Baugruppe
Espressozubereitung eingesetzt
Oberer Rand des Filterhalters verschmutzt
Dichtungen des Heizkessels verschmutzt
oder verschlissen
Zuviel Espressopulver im Filterhalter.
Bei Defekten, die nicht in der obigen Tabelle aufgeführt sind, bzw. wenn die vorgeschlagenen
Behebungsmethoden nicht funktionieren sollten, wenden Sie sich bitte an einen autorisierten
Fachhändler.
• Während der einzelnen Intervalle muß man
das Entkalkungsmittel ca. 10-15 Minuten
einwirken lassen, indem man die Maschine
mit dem Hauptschalter (3) ausschaltet.
• Wenn die Entkalkung beendet ist, den
Wassertank herausziehen, ausspülen und
mit frischem Trinkwasser füllen.
• Den Tank wieder in die Maschine
einsetzen, 2/3 des Wassertankinhalts
entleeren, indem der Dampfknopf (6)
gegen den Uhrzeigersinn gedreht und der
Kaffeeschalter (4) gedrückt wird; zum
Beenden der Abgabe erneut den
Kaffeeschalter (4) drücken und den
Dampfknopf (6) im Uhrzeigersinn drehen.
• Die Maschine abkühlen lassen und den
verbleibenden Inhalt des Wassertankes
entleeren, indem der Dampfknopf (6)
gegen den Uhrzeigersinn gedreht und der
Kaffeeschalter (4) gedrückt wird; zum
Beenden der Abgabe erneut den
Kaffeeschalter (4) drücken und den
Dampfknopf (6) im Uhrzeigersinn drehen.
Wenn ein anderes als das
empfohlene Produkt verwendet
wird, so sollten die Hinweise des Herstellers
auf der Verpackung des Entkalkungsmittels
strengstens befolgt werden.
11 REGELMÄßIGER KUNDEN-
DIENST
Der regelmäßige Kundendienst durch einen
autorisierten Fachhändler verlängert die
Lebensdauer der Maschine und erhöht ihre
Zuverlässigkeit.
Die Original-Verpackung aufbewahren, da
sie zum Schutz während des Transports
benutzt werden kann.
12 RECHTLICHE INFORMATIONEN
• Die vorliegende Bedienungsanleitung
enthält alle für den ordnungsgemäßen
Gebrauch der Maschine, alle ihre
Funktionen sowie die vorschriftsmäßige
Wartung notwendigen Informationen.
• Die Kenntnis der vorliegenden
Bedienungsanleitung ist unter Beachtung
aller Sicherheitsvorschriften grundlegend
für den gefahrenfreien Gebrauch und die
Wartung der Maschine.
• Wenn weitere Informationen benötigt
werden, oder wenn spezielle Probleme
auftauchen sollten, die in der vorliegenden
Bedienungsanleitung nicht ausreichend
erläutert wurden, so bitten wir Sie, sich an
den örtlichen Fachhändler oder direkt an
den Hersteller zu wenden.
• Des weiteren weisen wir darauf hin, daß der
Inhalt der vorliegenden Bedienungsanleitung kein Bestandteil einer vorherigen
oder vorher existierenden Konvention ist,
einer Übereinkunft oder eines rechtskräftigen
Vertrags und dessen Inhalt somit nicht ändert.
• Alle Verpflichtungen des Herstellers
beziehen sich auf den entsprechenden
Kaufvertrag, der auch die kompletten und
ausschließlichen Bedingungen über die
Garantie enthält.
Die vertraglichen Garantiebedingungen
werden durch die vorliegenden Erläuterungen
weder beschnitten noch erweitert.
• Die Bedienungsanleitung enthält
Informationen, die urheberrechtlich
geschützt sind.
• Das Fotokopieren oder Übersetzen in eine andere
Sprache ohne vorherige schriftliche
Genehmigung seitens des Herstellers ist verboten.
13 ENTSORGUNG
• Die nicht mehr in Gebrauch befindlichen
Maschinen müssen unbrauchbar
gemacht werden.
• Den Stecker aus der Steckdose ziehen
und das Spannungsversorgungskabel
durchschneiden.
• Die nicht mehr in Gebrauch befindlichen
Maschinen bei einer geeigneten
Sondermülldeponie abgeben.
Sin013a 165925300 Rev01.PMD 23/05/2002, 18.3952-53
Page 28

54 55
Las ilustraciones correspondientes al texto se encuentran en el dorso de la portada.
Tener esta página abierta durante la lectura de las instrucciones de uso.
1.2 Uso de este manual de instrucciones de uso
Conservar estas instrucciones de uso en un lugar seguro y adjuntarlo a la máquina
de café en caso que deba ser utilizada por otra persona.
Para ulterior información, o en caso de problemas, no tratados, o tratados parcialmente,
en el presente manual de instrucciones, dirigirse a especialistas competentes.
2 DATOS TECNICOS
Tensión nominal Ver tarjeta sobre el aparato
Potencia nominal Ver tarjeta sobre el aparato
Material cuerpo Termoplástico
Dimensiones (I x a x p) 230 x 295 x 242
Peso 4,1 kg
Longitud cable 1,2 m
Panel de control Frontal
Portafiltro Crema
(variables en función de los modelos) Latón
“Pannarello” Especial para capuchinos (opcional) y
capuchinador (opcional)
Depósito Extraible
Alimentación Ver tarjeta
Depósito agua 1,4 l
Presión bomba 13-15 bar
Caldera Sin013AX Inox
Sin013AL Aluminio
Dispositivos de seguridad Válvula de seguridad presión caldera
Termostato de seguridad
Se reserva la facultad de eventuales cambios debido a los avances del progreso
tecnológico.
Máquina conforme a la Directiva Europea 89/336/CEE (Decreto legislativo 476 del 04/
12/92), relativa a la eliminación de las molestias radiotelevisivas.
1 GENERALIDADES
La máquina de café está indicada para la preparación de 1 ó 2 tazas de café expreso y
está dotada de un tubo orientable para el suministro del vapor y del agua caliente.
Los mandos en la parte delantera del aparato están indicados con símbolos de fácil
interpretación. El cuerpo de la máquina, de elegante diseño, ha sido proyectado para
uso doméstico y no está concebido para un funcionamiento continuo de tipo profesional.
Atención. La empresa está exenta de toda responsabilidad en caso de posibles
daños debido a las causas siguientes:
• Uso indebido o diverso del fin para el cual la máquina ha sido diseñada;
• Reparaciones efectuadas en centros de asistencia no autorizados;
• Manipulación del cable de alimentación;
• Manipulación de cualquier componente de la máquina;
• Uso de piezas de recambio y accesorios no originales;
En tales casos la garantía pierde su validez.
1.1 Para facilitar la lectura
El triángulo de advertencia indica todas aquellas instrucciones
importantes para la seguridad del usuario. ¡Atenerse
escrupulosamente a tales indicaciones para evitar graves lesiones!
Este símbolo pone en evidencia la información que hay que leer con mayor
atención, para un mejor uso de la máquina.
Las referencias hechas a ilustraciones, a partes del aparato en particular o a elementos de
control, etc., están indicadas con números o letras; en tal caso consultar las ilustraciones
correspondientes.
GENERALIDADES DATOS TECNICOS
Índice
1 GENERALIDADES ................................... 54
1.1 Para facilitar la lectura .................................. 54
1.2 Uso de este manual de instrucciones de uso ... 55
2 DATOS TECNICOS ................................. 55
3 NORMAS DE SEGURIDAD ......................57
4 INSTALACIÓN ....................................... 59
4.1 Embalaje ..................................................... 59
4.2 Advertencia para la instalación ...................... 59
4.3 Conexión a la red eléctrica ........................... 59
4.4 Relleno del depósito agua ............................. 59
4.5 Recargar el circuito ....................................... 60
5 SUMINISTRO DEL CAFÉ ......................... 60
5.1 Con portafiltro “Crema”................................ 60
5.2 Con portafiltro en latón ................................ 61
6 SELECCIÓN DEL TIPO DE CAFÉ -
CONSEJOS ............................................ 61
7 SUMINISTRO DEL AGUA CALIENTE ........ 62
8 SUMINISTRO DEL VAPOR/PREPARACIÓN
DEL CAPUCHINO ..................................62
9 LIMPIEZA ............................................... 63
10 DECALCIFICACIÓN ............................... 63
11 SERVICIO A INTERVALOS REGULARES ....64
12 INFORMACIÓN DE CARÁCTER JURÍDICO 64
13 DESGUACE ............................................64
14 SOLUCIÓN DE LAS ANOMALÍAS ........... 65
Sin013a 165925300 Rev01.PMD 23/05/2002, 18.3954-55
Page 29

56 57
NORMAS DE SEGURIDAD
3 NORMAS DE SEGURIDAD
No poner nunca en contacto con el agua
las partes por las que pasa corriente
eléctrica: ¡peligro de cortocircuito! ¡el
vapor a elevada temperatura y el agua
caliente pueden provocar quemaduras!
No dirigir nunca el chorro de vapor o
del agua caliente a partes del cuerpo,
tocar con precaución el pitón vapor/agua
caliente: ¡peligro de quemaduras!
Destinación de uso
La máquina de café ha sido diseñada
exclusivamente para uso doméstico.
A causa de los peligros que comporta, está
prohibido efectuar cambios técnicos a la
máquina así como usarla de manera
indebida. La máquina de café debe ser
utilizada solamente por adultos.
Alimentación de corriente
Conectar la máquina de café únicamente
a un enchufe de corriente adecuada.
La tensión debe corresponder con aquella
indicada en la tarjeta del aparato.
Cable de alimentación
No usar nunca la máquina de café si el
cable de alimentación presenta algún
defecto. Proceder inmediatamente a la
sustitución de los cables y los enchufes
defectuosos por parte de personal competente. No hacer pasar el cable de
alimentación por ángulos y cantos
pronunciados, ni por encima de objetos
muy calientes; protegerlo de las
salpicaduras de aceite. No llevar ni tirar
de la máquina de café por el cable.
No extraer el enchufe tirando del cable ni
tocarlo con manos mojadas.
Evitar que el cable de alimentación cuelgue
libremente de mesas o estanterías.
Protección de otras personas
Cerciorarse de que ningún niño use la
máquina de café como un juego. Los niños
no se dan cuenta del peligro que entrañan los
electrodomésticos. Los elementos del embalaje
no deben ser dejados al alcance de los niños
ya que representan un peligro en potencia.
Peligro de quemaduras
Evitar dirigir el chorro de vapor a elevada
temperatura y/o agua caliente sobre si
mismos y/u otras personas.
Utilizar siempre las asas correspondientes
o manoplas. Tocar el pitón únicamente en
las zonas expresamente dotadas de
protecciones antiquemaduras.
No desenchufar (quitar) nunca el portafiltro
durante el suministro del café.
Durante la fase de calentamiento del grupo
de suministro del café pueden derramarse
gotas de agua caliente.
Ubicación
Encontrar un lugar seguro para la máquina
de café donde nadie pueda tumbarla o
hacerse daño. Posibilidad de que se
produzcan escapes de agua caliente o de
vapor a elevada temperatura: ¡peligro de
quemaduras! No utilizar la máquina de
café al aire libre. No colocar la máquina
en superficies muy calientes o cerca de
flamas abiertas con el fin de evitar que la
superficie se derrita o resulte dañada.
Limpieza
Antes de efectuar la limpieza es
indispensable desactivar todos los mandos
y seguidamente desenchufar la toma de
corriente del enchufe correspondiente.
Por último, esperar a que la máquina se
enfríe.
Medidas en milímetros
2
0
0
4
0
0
2
0
0
2
0
0
NORMAS DE SEGURIDAD
Sin013a 165925300 Rev01.PMD 23/05/2002, 18.3956-57
Page 30

58 59
NORMAS DE SEGURIDAD PUESTA EN MARCHA
¡No introducir nunca la máquina en el
agua!
Está severamente prohibido manipular el
interior de la máquina.
Espacio para uso y
manutención
Para un buen funcionamiento de la
máquina de café se aconseja tener en
cuenta los siguientes puntos:
• Escoger un plano de apoyo bien
nivelado;
• Escoger un ambiente suficientemente
iluminado, higiénico y con tomas de
corriente de fácil acceso;
• Mantener una distancia mínima entre las
paredes y la máquina como se indica en
la figura.
Almacenamiento de la máquina
Cuando la máquina no se utiliza durante
un largo periodo de tiempo, apagar la
máquina y desenchufarla.Guardar la
máquina en un lugar seco fuera del alcance
de los niños.Protegerla del polvo y de la
suciedad.
Reparaciones: Manutención
Después de una caída, en caso de avería,
en caso de observar algún defecto o ante
la sospecha de un posible defecto,
desenchufar en seguida el aparato.
No poner nunca en funcionamiento una
máquina defectuosa.
Solamente especialistas realmente
componentes pueden intervenir en la
máquina y efectuar reparaciones.
Las reparaciones se efectúan únicamente
en centros de asistencia autorizados.
En caso de intervenciones que no respeten
tales indicaciones, se revocará cualquier
responsabilidad en caso de posibles daños.
Antincendio
En caso de incendio utilizar extintores de
anhídrido carbónico (CO2).
No utilizar agua caliente o extintores a
polvo.
Leyenda de los componentes de la
máquina
Depósito de agua
Tapadera depósito agua
Interruptor general
Interruptor café con indicador
máquina lista incorporado
Interruptor vapor
Pomo grifo agua caliente/vapor
Grupo suministrador café
Tubo vapor
Cable alimentación
Recipiente reciclaje agua + rejilla
Accesorios (variables en función del
modelo)
Portafiltro “Crema”
Filtro para portafiltro “Crema”
(único para el suministro de 1 ó 2
cafés)
Portafiltro de latón
Filtro 1 café para portafiltro de latón
Filtro 2 café para portafiltro de latón
Dosificador para el café
4 INSTALACIÓN
Para la propia seguridad y la seguridad
de terceros atenerse escrupulosamente
a las “Normas de seguridad” indicadas
en las páginas 57-58.
4.1 Embalaje
El embalaje original ha sido proyectado y
realizado para proteger la máquina durante
el envío. Es aconsejable guardarlo para
futuros transportes.
4.2 Advertencia para la instalación
Antes de instalar la máquina, seguir
rigurosamente las siguientes indicaciones
para garantizar la total seguridad:
• Encontrar un lugar seguro para la
máquina;
• Cerciorarse de que ningún niño use la
máquina de café como un juego
• No colocar la máquina sobre superficies
demasiado calientes o cerca de flamas
abiertas
La máquina de café ahora está lista para
ser conectada a la red eléctrica.
4.3 Conexión a la red eléctrica
¡La corriente eléctrica puede ser
peligrosa! Por lo tanto, seguir
siempre minuciosamente las normas de
seguridad.
¡No utilizar nunca cables
defectuosos! Los cables y los
enchufes defectuosos deben ser
sustituidos inmediatamente por parte de
especialistas autorizados.
La máquina de café debe ser conectada a
una toma de corriente eléctrica.
La tensión del aparato ha sido determinada
en fábrica.
Controlar que la tensión de la red
corresponda a las indicaciones señaladas
en la tarjeta de identificación colocada en
el fondo del aparato.
• Desenrollar del fondo del aparato la
cantidad de cable necesario para la
conexión a la red eléctrica.
• Controlar que el interruptor general esté
en la posición “0” antes de conectar la
máquina a la red eléctrica.
• Introducir el enchufe en una toma de
corriente de tensión adecuada.
4.4 Relleno del depósito agua
• Quitar la tapadera del depósito (2)
• Extraer el depósito del agua (1)
levantándolo, poniendo atención en no
dañar los tubos que se encuentran
presentes en el interior del depósito.
• Aclararlo y llenarlo con agua fresca,
evitando llenarlo excesivamente.
• Colocar el depósito nuevamente en
su lugar, poniendo especial atención a
la hora de sumergir los tubos,
previamente separados, en el agua.
Nótese bien que algunos
modelos están provistos de
depósito con válvula de aspiración
agua. Esta válvula se cierra
automáticamente cuando se extrae el
depósito para evitar un escape de
agua. Una vez introducido el depósito,
efectuar una ligera presión.
• Colocar la tapadera de nuevo sobre el
depósito.
Llenar el depósito única y
exclusivamente con agua sin
gas. El agua caliente, así como otros
líquidos pueden provocar averías al
depósito. No poner nunca en funcionamiento la máquina sin agua: controlar
Sin013a 165925300 Rev01.PMD 23/05/2002, 18.3958-59
Page 31

60 61
SUMINISTRO DEL CAFÉ SELECCIÓN DEL TIPO DE CAFÉ
que haya siempre suficiente agua en
el interior del depósito.
4.5 Recargar el circuito
Antes de cada puesta en funcionamiento, después que la máquina no haya
sido utilizada durante un largo periodo de
tiempo, después de haber agotado el agua
y después de haber extraído el vapor de
agua, el circuito de la máquina debe ser
recargado.
• Presionar el interruptor general (3), el
piloto colocado en su interior se
encenderá.
• Dirigir el tubo vapor (“Pannarello”) sobre
el recipiente recogegotas.
• Abrir el pomo (6) “agua caliente/vapor”
haciéndolo girar en dirección contraria
a las manecillas del reloj, y presionar el
interruptor café (4).
• Esperar que del tubo vapor (“Pannarello”)
salga un chorro de agua regular.
• Presionar de nuevo el interruptor café (4)
y cerrar el pomo (6) “agua caliente/
vapor) haciéndolo girar en el sentido de
las manecillas del reloj.
La máquina ahora está lista para el
suministro del café.
5 SUMINISTRO DEL CAFÉ
¡Atención!
Durante el suministro del café está
prohibido desactivar el portafiltro
haciéndolo girar manualmente en
sentido contrario a las manecillas del
reloj. Peligro de quemaduras.
• Durante la mencionada operación, el pi-
loto de máquina lista, situado en el
interior del interruptor café (4) puede
encenderse o apagarse; tal funcionamiento debe ser considerado como
normal y no como una anomalía.
• Controlar, antes del uso, que el pomo (6)
agua caliente/vapor esté cerrado y que
el depósito del agua de la máquina contenga una cantidad de agua suficiente.
• Encender la máquina, si ésta no está
activada, con el interruptor general (3),
el piloto colocado en su interior se
iluminará.
• Esperar a que el piloto de máquina lista,
situado en el interior del interruptor café
(4), se encienda; ahora la máquina está
lista para el suministro del café.
5.1 Con portafiltro Crema
• Introducir el filtro (12) en el portafiltro
“Crema” (11).
• Introducir desde abajo el portafiltro
“Crema” en el grupo suministro (7),
girándolo de izquierda a derecha hasta
alcanzar el bloqueo.
• Dejar el mango del portafiltro.
Un sistema automático mueve ahora
ligeramente el mango hacia la izquierda.
Este movimiento garantiza el perfecto
funcionamiento del portafiltro.
• Colocar una taza de café bajo el
portafiltro.
Calentar previamente el portafiltro y la taza
presionando el interruptor café (4); el agua
empezará a subir por el portafiltro (esta
operación se hace necesaria solamente
para el primer café ).
• Cuando la taza esté suficientemente llena
presionar nuevamente el interruptor café (4).
• Quitar el portafiltro de la máquina
girando de derecha a izquierda y vaciar
el agua que sobra.
• Con el portafiltro especial “Crema” (11),
incluido en la máquina, no es necesario
cambiar filtro para obtener uno o dos cafés.
• Verter 1 ó 2 dosis rasas de café
molido en el filtro para obtener uno o
dos cafés.
• Eliminar todos los residuos de café del
borde del portafiltro.
• Introducir de abajo hacia arriba el
portafiltro “Crema” (11) en el grupo
suministro (7), girándolo de izquierda a
derecha, hasta alcanzar el bloqueo completo, como se ha visto anteriormente.
• Coger 1 - 2 tacitas calentadas
previamente y colocarlas bajo el portafiltro;
controlar que estén correctamente situadas
bajo los orificios de la salida del café.
• Presionar el pulsador café. Esperar que
las tacitas estén lo suficientemente llenas.
• Presionar de nuevo el pulsador café para
parar el suministro de café.
• Al término del suministro, esperar
algunos segundos, extraer el portafiltro
y vaciarlo de los residuos situados en el
fondo.
Nota sobre la limpieza: mante-
ner limpio el filtro del portafiltro
“Crema” extrayéndolo de la propia
sede y lavándolo con agua potable.
5.2 Con portafiltro en latón
• Introducir el filtro (14 ó 15, de 1 ó 2 tazas,
según el número de cafés que hay que
preparar) en el portafiltro en latón (13).
• Introducir por la parte inferior el
portafiltro en latón en el grupo suministro
(7), girándolo de izquierda a derecha
hasta que se bloquee.
• Colocar una taza de café bajo el
portafiltro.
• Calentar previamente el portafiltro y la taza
presionando el interruptor café (4); el agua
empezará a subir por el portafiltro (esta
operación se hace necesaria solamente
para el primer café ).
• Cuando la taza esté suficientemente
llena, presionar nuevamente el
interruptor café (4).
• Quitar el portafiltro de la máquina
girándolo de derecha a izquierda.
• Verter 1 ó 2 dosis rasas de café molido,
en función del filtro montado previamente,
para obtener uno o dos cafés.
• Presionar ligeramente el café, utilizando
la parte inferior del dosificador, y eliminar cualquier residuo de café del borde
del portafiltro.
• Introducir por la parte inferior el
portafiltro en latón (13) en el grupo
suministro (7), girando de izquierda a
derecha, hasta que se bloquee completamente.
• Coger 1 - 2 tacitas calentadas
previamente y colocarlas bajo el
portafiltro; controlar que estén
correctamente situadas bajo los orificios
de la salida del café.
• Presionar el pulsador café. Esperar que
las tacitas estén lo suficientemente llenas.
• Presionar de nuevo el pulsador café para
parar el suministro de café.
• Al término del suministro, esperar
algunos segundos, extraer el portafiltro
y vaciarlo de los residuos situados en el
fondo.
Nota sobre la limpieza: mante-
ner limpio el filtro del portafiltro
extrayéndolo de la propia sede y
lavándolo con agua potable.
6 SELECCIÓN DEL TIPO DE
CAFÉ - CONSEJOS
Por regla general puede utilizarse cualquier
tipo de café existente en comercio.
Sin embargo, el café es un producto
natural, y su gusto cambia en función de
su origen y de la mezcla; es preferible
probar diversos tipos con el fin de encontrar
el que se ajuste al gusto personal.
Para mejores resultados se aconseja, de todos
modos, el uso de mezclas expresamente
preparadas para máquinas de café expreso.
Sin013a 165925300 Rev01.PMD 23/05/2002, 18.3960-61
Page 32

62 63
SUMINISTRO DEL AGUA CALIENTE - SUMINISTRO DEL VAPOR LIMPIEZA - DECALCIFICACIÓN
El café debería subir regularmente del
portafiltro sin gotear.
La velocidad de subida del café puede
modificarse cambiando ligeramente la
dosis, el grado de molido y/o de
presurizado del café en el filtro.
ANTES DE LLEVAR A CABO
NINGUNA OPERACIÓN RELATIVA AL SUMINISTRO DEL VAPOR O DEL
AGUA CALIENTE CONTROLAR QUE EL
TUBO VAPOR (“PANNARELLO”) ESTÉ
DIRIGIDO ENCIMA DEL RECIPIENTE DE
RECICLAJE DEL AGUA.
7 SUMINISTRO DEL AGUA
CALIENTE
¡Peligro de quemaduras!
Al inicio del suministro pueden
producirse breves salpicaduras de agua
caliente. El tubo de suministro puede
alcanzar temperaturas elevadas: evitar
tocarlo directamente con las manos.
• Encender la máquina, si ésta no está
activada , con el interruptor general (3), el
piloto colocado en su interior se iluminará.
• Esperar a que el piloto , situado en el
interior del interruptor café (4), se
encienda.
• Colocar una taza o un vaso de té
bajo el tubo vapor (“Pannarello”).
• Abrir el pomo (6) “Agua caliente/vapor”
girándolo en sentido contrario a las
manecillas del reloj y presionar el
interruptor café (4) para la salida del
agua hasta que alcance la cantidad
deseada.
• Presionar nuevamente el interruptor café (4)
y cerrar el pomo (6) haciéndolo girar en el
sentido de las manecillas del reloj para
interrumpir el suministro de agua caliente.
8 SUMINISTRO DEL VAPOR/
PREPARACIÓN DEL CAPUCHINO
¡Peligro de quemaduras!
Al inicio del suministro pueden
producirse breves salpicaduras de agua
caliente. El tubo de suministro puede
alcanzar temperaturas elevadas: evitar
tocarlo directamente con las manos.
• Encender la máquina, si ésta no está
activada, con el interruptor general (3), el
piloto colocado en su interior se iluminará.
• Presionar el interruptor (5) vapor, el pilo-
to situado en el interior se iluminará. Se
apaga el piloto de máquina lista, situado
en el interior del interruptor café (4).
• Esperar a que el piloto máquina lista, situado
en el interior del interruptor (4), se encienda
nuevamente, a este punto la máquina está
lista para el suministro del vapor.
• Dirigir el tubo vapor (“Pannarello”)
encima del recipiente recogegotas, abrir
el pomo (6) “Agua caliente/vapor” durante algunos instantes, para que suba
el agua residual del tubo vapor
(“Pannarello”); en un breve periodo
empezaría a salir solo vapor.
• Cerrar el pomo (6).
• Introducir el tubo vapor (“Pannarello”)
en el líquido por calentar y abrir el pomo
(6); hacer girar el recipiente con lentos
movimientos de bajo a arriba para hacer
que el calentamiento sea uniforme.
• Una vez utilizado el vapor durante el
tiempo deseado, cerrar el pomo (6) y
colocar nuevamente el interruptor en la
posición inicial (5) “Vapor”.
Utilizando este sistema con la
leche, se procede a la
preparación del capuchino.
• Pasar a cargar el circuito descrito en
párr.4.5 para hacer que la máquina sea
operativa.
• Limpiar el tubo vapor (pannarello) con
un paño húmedo después de efectuar
esta operación.
9 LIMPIEZA
La manutención y la limpieza pueden ser
efectuadas únicamente cuando la máquina
está fría y desconectada de la corriente
eléctrica.
• No introducir la máquina en el agua y
no introducir sus componentes en el
lavavajillas.
• No utilizar objetos puntiagudos o
productos químicos agresivos
(disolventes) para la limpieza.
• Se aconseja la limpieza cotidiana del
depósito del agua y llenarlo con agua
fresca.
• Después de haber calentado la leche,
extraer una pequeña cantidad de agua
caliente para la limpieza del tubo y
limpiarlo externamente con un paño
húmedo.
• Para la limpieza del aparato, utilizar
un paño suave humedecido con agua.
• Para la limpieza del portafiltro, proceder tal y como se indica a
continuación:
• Extraer el filtro, introducirlo en agua
caliente y lavarlo con atención.
• Lavar el interior del portafiltro.
• No secar la máquina y/o sus
componentes utilizando un horno
microondas y/o un horno convencional.
• Limpiar, en caso que esté presente, el
“Pannarello” situado sobre el tubo vapor.
Para hacer esto hay que destornillar la
abrazadera y extraer el “Pannarello” del
tubo vapor, desmontar el cuerpo externo
del “Pannarello”.
Lavar con agua corriente y montar de
nuevo el “Pannarello”.
Se aconseja apretar la abrazadera
de forma adecuada; el “Pannarello”
podría aflojarse durante el uso.
10 DECALCIFICACIÓN
La formación de cal se manifiesta con
el uso continuado del l aparato; la
descalcificación es necesaria cada 3 - 4
meses y/o cuando se observe una
reducción de la cantidad del agua.
Si se desea efectuar la limpieza
personalmente, se puede utilizar
un producto decalcificador para
máquinas de café de tipo atóxico de
los diversos que ofrece el mercado.
¡Atención! No utilizar nunca
vinagre como decalcificador.
• Extraer el depósito del agua y vaciar
el agua residual contenida.
• Mezclar el descalcificador con agua,
tal y como se especifica en el envase del
producto descalcificador, y llenar el
depósito de agua; introducir el depósito
en la máquina.
• Encender la máquina presionando el
interruptor general.
• Dirigir el tubo vapor sobre el reci-
piente recogegoteo.
• Extraer a intervalos (una taza a la vez) el
entero contenido del depósito del agua,
girando la manecilla vapor (6) en el
sentido contrario a las manecillas del reloj
manteniendo presionado el interruptor
café (4); para interrumpir el suministro
presionar de nuevo el interruptor café (4)
y girar la manecilla vapor (6) en el sentido
de las manecillas del reloj.
• Durante los varios intervalos hay que
dejar actuar al decalcificador durante
unos 10-15 minutos, desconectando
previamente la máquina mediante el
Sin013a 165925300 Rev01.PMD 23/05/2002, 18.3962-63
Page 33

64 65
Avería
La máquina no se
enciende
La bomba hace mucho
ruido
El café sale demasiado
frío
No se forma la espuma
El cafè sube con
demasiada rapidez, no
se forma la crema
El cafè no sale o sale
sólo gota a gota
El cafè se sale por los
bordes
Causas posibles
Máquina no conectada a la red
eléctrica
Falta agua en el depósito (párr.4.4)
El indicador del interruptor “café” (4)
estaba apagado cuando se presionó
el interruptor (4).
Portafiltro no introducido para el
calentamiento previo (párr. 5.1-5.2)
Leche inadecuada
Demasiado poco cafè en el
portafiltro/ molido demasiado grueso
Cafè viejo o inadecuado
Falta agua
Molido demasiado fino
Cafè presionado en el portafiltro
Demasiado cafè en el portafiltro
Pomo (6) “Agua caliente/ vapor”
abierto
Máquina calcificada
Ducha obstruida
Filtro en el portafiltro obstruido
Portafiltro mal introducido en el grupo
suministro cafè
Borde superiore del portafiltro sucio
Guarnición de la caldera sucia o
gastada
Demasiado café en el portafiltro
Remedio
Conectar la máquina a la red
eléctrica
Rellenar con agua
Esperar que el indicador se
ilumine
Calentar previamente el portafiltro
Controlar el nivel de grasa
Añadir cafè (párr. 5.1-5.2)
Usar una mezcla distinta (cap.6)
Rellenar con agua (párr.4.4)
Sustituir el tipo de cafè
Remover el cafè molido
Reducir la cantidad de cafè
utilizando el dosificador
Cerrar el pomo
Decalcificar la máquina
(cap.10)
Limpiar el elemento filtrador
Limpiar el filtro (cap.9)
Introducir correctamente el
portafiltro (párr.5.1-5.2)
Limpiar el borde del portafiltro
Limpiar o sustituir la guarnición
Reducir la cantidad de cafè
utilizando el dosificador
INFORMACIÓN DE CARÁCTER JURÍDICO - DESGUACE SOLUCIÓN DE LAS ANOMALÍAS
14 SOLUCIÓN DE LAS ANOMALÍAS
Para averías que no estén contempladas en la tabla descrita o en caso que los remedios
sugeridos no las resuelvan, dirigirse a un centro de asistencia.
interruptor general (3).
• Terminada la solución descalcificadora,
extraer el depósito del agua, secarlo y llenarlo
de nuevo de agua fresca potable.
• Introducir de nuevo el depósito en el
aparato; vaciar 2/3 de su contenido en
agua girando la manecilla vapor (6) en
el sentido contrario a las manecillas del
reloj y presionando el interruptor café (4);
para interrumpir el suministro de café,
presionar de nuevo el interruptor café (4)
y girar la manecilla vapor (6) en el sentido
de las manecillas del reloj.
• Dejar calentar la máquina y vaciar el
contenido restante en el depósito del
agua girando la manecilla vapor (6) en
el sentido contrario a las manecillas del
reloj, y presionando el interruptor café
(4); para interrumpir el suministro,
presionar de nuevo el interruptor café (4)
y girar la manecilla vapor (6) en el sentido
de las manecillas del reloj.
Si se utiliza un producto distinto
del aconsejado, se recomienda
respetar siempre las instrucciones de la
empresa productora que se indican en
el envase del producto decalcificador.
11 SERVICIO A INTERVALOS
REGULARES
El servicio a intervalos regulares por parte
de un Centro de Asistencia Autorizado
prolonga la duración y la fiabilidad de la
máquina.
Conservar el embalaje original de la
máquina que podrá ser útil como
protección durante el transporte.
12 INFORMACIÓN DE CARÁC-
TER JURÍDICO
• El presente manual de instrucciones para el
uso contiene la información necesaria para
un uso correcto, para las funciones operativas
y la manutención detallada del aparato.
• Tales contenidos, sumados a la aplicación
de los mismos, representan el punto de
partida para un uso sin peligro de la máquina,
respetando en todo momento las normas de
seguridad durante el funcionamiento y la
manutención del aparato.
• Si se desea obtener ulterior información,
o si se observa que en el presente manual
de instrucciones de uso no hayan sido
explicados con suficiente claridad
algunos puntos que se retienen de interés,
se ruega que lo comuniquen a su
vendedor local o directamente a la
empresa fabricante.
• Además, queremos subrayar que el
contenido del presente manual no forma parte de una convención anterior o
ya existente, ni tampoco de un acuerdo
o de un contrato legal los cuales no
cambian el sentido.
• Cada una de las obligaciones del
constructor se basan en el contrato de compra-venta que contiene también un
reglamento completo y exclusivo por lo que
concierne las condiciones de la garantía.
Las normas de garantía contractuales no
se limitan ni se prolongan en base a las
presentes explicaciones.
• El manual de instrucciones de uso contiene información protegida de derechos
de autor.
• No está permitido fotocopiar ni traducirlo
a otro idioma sin previo acuerdo por
parte del Constructor.
13 DESGUACE
• Inutilizar los aparatos en desuso
• Desenchufar el aparato de la corriente y
cortar el cable eléctrico.
• Entregar los aparatos en desuso a un
centro de recogida idóneo.
Sin013a 165925300 Rev01.PMD 23/05/2002, 18.3964-65
Page 34

66 67
As figuras correspondentes ao texto encontram-se nas orelhas da sobrecoberta.
Mantenha esta página aberta durante a leitura do manual de instruções.
1.2 Uso destas instruções
Conserve estas instruções num lugar seguro e anexe-as à máquina de café se
esta tiver que ser utilizada por outra pessoa.
Para outras informações ou no caso de problemas não tratados ou não suficientemente
tratados no manual, dirija-se a um técnico qualificado.
2 DADOS TECNICOS
Tensão nominal Consulte a chapa que se encontra no aparelho
Potência nominal Consulte a chapa que se encontra no aparelho
Material corpo Termoplástico
Dimensões (lxhxp) 230 x 295 x 242
Peso 4,1 Kg
Comprimento do cabo de alimentação 1,2 m
Painel de comando Frontal
Suporte do filtro Crema
(variável em função dos modelos) Latão
“Pannarello” Especial para cappuccino (opção) e dispositivo
para “cappuccino” (opção)
Depósito Amovível
Alimentação Consulte a chapa que se encontra no aparelho
Depósito água 1,4 l
Pressão bomba 13-15 Bar
Caldeira Sin013AX Aço Inox
Sin013AL Alumínio
Dispositivos de segurança Válvula de segurança pressão da caldeira
Termostato de segurança
Reservamos o direito de modificar a concepção e a realização da máquina se o
progresso tecnológico assim o exigir.
Aparelho conforme à Directiva Europeia 89/336/CEE (Decreto Lei 476 de 04/12/92),
relativa à eliminação de interferências radiotelevisivas.
1 GENERALIDADE
A máquina de café é indicada para preparar 1 ou 2 chávenas de café expresso e possui
um tubo orientável para fornecer vapor e água quente.
Os comandos que se encontram na parte da frente do aparelho estão assinalados com
símbolos de fácil interpretação.
O corpo da máquina apresenta um “design” elegante concebido para uso doméstico e
não é indicado para um funcionamento contínuo de tipo profissional.
Atenção. Não se assume qualquer responsabilidade por eventuais danos
ocasionados por:
• Uso errado ou não conforme às finalidades previstas;
• Reparações não efectuadas nos centros de assistência autorizados;
• Manipulação do cabo de alimentação;
• Manipulação de qualquer componente da máquina;
• Uso de peças sobresselentes e acessórios não originais;
Nestes casos a garantia perde a sua validade.
1.1 Para facilitar a leitura
O sinal de aviso triangular fornece todas as instruções importantes
para a segurança do utilizador. Respeite escrupulosamente estas
instruções para evitar ferimentos graves!.
Este símbolo evidencia as informações a serem consideradas com maior
atenção para uma melhor utilização da máquina.
As referências às ilustrações, partes do aparelho ou elementos de comando, etc.,
são indicadas por números ou letras; neste caso remete-se às figuras.
GENERALIDADE DADOS TECNICOS
Índice
1 GENERALIDADE ..................................... 66
1.1 Para facilitar a leitura .................................... 66
1.2 Uso destas instruções .................................... 67
2 DADOS TECNICOS................................ 67
3 NORMAS DE SEGURANÇA .....................69
4 INSTALAÇÃO .........................................71
4.1 Embalagem ................................................. 71
4.2 Advertências para a instalação ...................... 71
4.3 Ligação à rede eléctrica ................................ 71
4.4 Enchimento do depósito de água .................. 71
4.5 Carregamento do circuito ............................. 71
5 TIRAGEM DO CAFÉ................................ 72
5.1 Com suporte do filtro “Crema” ...................... 72
5.2 Com suporte do filtro de latão ....................... 73
6 ESCOLHA DO TIPO DE CAFÉ -
CONSELHOS .........................................73
7 FORNECIMENTO DE ÁGUA QUENTE ........ 74
8 FORNECIMENTO DE VAPOR/
PREPARAÇÃO DO CAPPUCCINO ...........74
9 LIMPEZA ................................................ 74
10 DESCALCIFICAÇÃO ...............................75
11 MANUTENÇÃO PERIÓDICA ...................76
12 INFORMAÇÕES DE CARÁCTER JURÍDICO . 76
13 DESACTIVAÇÃO DA MÁQUINA ............. 76
14 PROBLEMAS E REMEDIOS ...................... 77
Sin013a 165925300 Rev01.PMD 23/05/2002, 18.3966-67
Page 35

68 69
NORMAS DE SEGURANÇA
3 NORMAS DE SEGURANÇA
Não mergulhe em água as partes com
corrente eléctrica: perigo de curto-circuito! O vapor e a água quente podem
provocar queimaduras!
Nunca dirija o jacto de vapor ou da água
quente para qualquer parte do corpo,
tome precauções quando tiver que tocar
o tubo do vapor/água quente, pois corre o risco de se queimar!
Destinação de uso
A máquina de café está prevista
exclusivamente para uso doméstico.
É expressamente proibido fazer modificações técnicas ou utilizá-la para usos
ilícitos, devido aos riscos que daí advêm!
A máquina de café deve ser utilizada
somente por adultos.
Alimentação de corrente
Ligue a máquina de café a uma tomada
de corrente adequada.
A tensão de alimentação deve
corresponder à indicada na chapa de
identificação do aparelho.
Cabo de alimentação
Não utilize a máquina de café se o cabo
de alimentação estiver defeituoso.
Proceda imediatamente à substituição do
cabo e da ficha defeituosos.
Não deixe o cabo de alimentação passar
por ângulos ou cantos cortantes, sobre
objectos muito quentes e não o suje de
óleo.
Não pegue ou puxe a máquina de café
pelo cabo.
Não retire a ficha puxando-a pelo fio ou
com as mãos molhadas.
Evite que o cabo penda livremente das
mesas ou das prateleiras.
Protecção de terceiros
Mantenha a máquina de café fora do
alcance das crianças e assegure-se que
nenhuma delas tenha a possibilidade de
brincar com a máquina.
As crianças não têm a noção do perigo
ligado ao uso dos electrodomésticos.
Os elementos da embalagem não devem
ser deixados ao alcance das crianças por
serem fontes de possíveis perigos.
Perigo de queimaduras
Não dirija para si e/ou para outros o jacto
de vapor e/ou de água quente.
Use sempre as pegas apropriadas.
Toque nos bicos exclusivamente através das
partes protegidas.
Nunca retire o suporte do filtro durante a
tiragem do café.
Durante a fase de aquecimento do grupo
de tiragem do café podem sair algumas
gotas de água quente.
Localização
Coloque a máquina de café num lugar
seguro de modo a não poder ser derrubada
nem ferir ninguém.
A água quente e o vapor poderão sair e
provocar queimaduras!
Não utilize a máquina de café ao ar livre
Não pouse a máquina em superfícies muito
quentes e/ou perto do fogo, para evitar que
o corpo da máquina se funda ou se danifique.
Limpeza
Antes de limpar a máquina, é indispensável
desactivar todos os botões e retirar a ficha
da corrente.
Além disso, espere que a máquina arrefeça.
Nunca imirja a máquina na água!
Medida en Milímetros
2
0
0
4
0
0
2
0
0
2
0
0
NORMAS DE SEGURANÇA
Sin013a 165925300 Rev01.PMD 23/05/2002, 18.3968-69
Page 36

70 71
NORMAS DE SEGURANÇA COLOCAR EM FUNÇAO E EMPREGO
É taxativamente proibido fazer
modificações no interior da máquina.
Espaço para a utilização e
manutenção
Para um correcto funcionamento da
máquina de café, aconselha-se o seguinte:
• Escolha um plano de apoio bem
nivelado.
• Escolha um ambiente suficientemente
iluminado, higiénico e com tomada facilmente acessível.
• Mantenha uma distância mínima da
máquina, como indicado na figura.
Conservação da máquina
Quando a máquina não está a ser utilizada,
desligue-a e retire a ficha da tomada.
Guarde-a num lugar seco e fora do
alcance das crianças.
Protege-a da poeira e da sujidade.
Reparações / Manutenção
No caso de avarias, defeitos ou suspeita
de defeitos após uma queda, retire
imediatamente a ficha da tomada.
Nunca ponha a funcionar um aparelho
defeituoso.
Intervenções e reparações só podem ser
efectuadas por técnicos competentes.
As reparações devem ser feitas exclusivamente
num centro de assistência autorizada.
No caso de intervenções mal efectuadas,
não assumimos qualquer responsabilidade
por eventuais danos.
Normas anti-incêndio
Em caso de incêndio, utilize um extintor de
dióxido de carbono (CO2). Nunca utilize
água ou extintor de pó.
Legenda componentes máquina
Depósito da água
Tampa do depósito da água
Interruptor geral
Interruptor café com indicador luminoso pronto máquina incorporada
Interruptor vapor
Torneira água quente / vapor
Grupo de tiragem do café
Tubo do vapor
Cabo de alimentação
Depósito apara gotas + grelha
Acessórios (variáveis em função do
modelo)
Suporte do filtro “Crema”
Filtro para suporte “Crema”
(Único no caso de tiragem de 1 ou 2
cafés)
Suporte do filtro em latão
Filtro para suporte de latão para 1 café
Filtro para suporte de latão para 2
cafés
Doseador para café
4 INSTALAÇÃO
Para a sua segurança e a dos outros,
siga escrupulosamente as “Normas de
segurança” que se encontram nas
páginas 69-70.
4.1 Embalagem
A embalagem foi concebida para proteger
o aparelho durante a sua expedição.
Aconselha-se a guardá-la para uma futura utilização.
4.2 Advertências para a instalação
Antes de instalar a máquina, observe as
seguintes indicações de segurança:
• coloque a máquina num lugar seguro;
• mantenha-a fora do alcance das
crianças;
• não coloque a máquina perto de
superfícies muito quentes ou perto de
chamas.
A máquina de café está pronta para ser
ligada à rede de energia.
4.3 Ligação à rede eléctrica
A corrente eléctrica pode ser
perigosa! Observe sempre
escrupulosamente as normas de
segurança.
Nunca utilize cabos defeituosos!
Os cabos e as fichas defeituosos
devem ser imediatamente substituídos
por especialistas autorizados.
A máquina de café tem que ser ligada em
uma tomada adequada. A tensão do
aparelho é estabelecida pela fábrica.
Verifique que a tensão de rede
corresponda às indicações da chapa que
se encontra debaixo do aparelho.
• Puxe do fundo do aparelho a
quantidade de cabo necessária para a
ligação à rede eléctrica.
• Verifique que o interruptor geral se
encontre na posição “0” antes de ligar o
aparelho à rede.
• Introduza a ficha numa tomada de corrente com tensão apropriada.
4.4 Enchimento do depósito de
água
• Retire a tampa do depósito (2)
• Extrair o recipiente de água (1) erguendoo, prestando atenção para não danificar
os tubos que estão enfiados no recipiente.
• Enxagúe o depósito e encha-o com
água fresca, tendo o cuidado de não
enchê-lo demasiado.
• Recolocar o recipiente no lugar
tomando o cuidado de imergir os tubos,
retirados antes, na água.
Note bem! Alguns modelos tem
um recipiente com válvula de
aspiração de água. Esta válvula fechase automaticamente quando o recipiente
é retirado para impedir que a água saia.
Depois de inserir o recipiente exercer
uma ligeira pressão.
• Volte a colocar a tampa no depósito.
Coloque sempre água fresca no
depósito e nunca gaseificada:
água quente ou outros líquidos podem
danificar o depósito.
Não ponha a máquina a funcionar sem
água. Verifique sempre se o depósito tem
água suficiente.
4.5 Carregamento do circuito
Depois de um longo período de
inactividade, ou de ter acabado a água
ou utilizado o vapor e antes de pôr a
Sin013a 165925300 Rev01.PMD 23/05/2002, 18.3970-71
Page 37

72 73
TIRAGEM DO CAFÉ ESCOLHA DO TIPO DE CAFÉ
máquina novamente a funcionar deve
recarregar o seu circuito.
• Prima o interruptor geral (3); a lâmpada
de controlo acender-se-á.
• Dirija o tubo de saída do vapor (“Pannarello”) para o depósito apara gotas.
• Abra a torneira (6) “água quente / vapor ”
rodando-a em sentido anti-horário e prima o interruptor café (4).
• Espere até que saia um jacto regular de
água do “Pannarello”.
• Prima novamente o interruptor “café” (4)
e feche a torneira (6) “água quente /
vapor” rodando-a em sentido horário.
A máquina está pronta para tirar o café.
5 TIRAGEM DO CAFÉ
Atenção! Durante a tiragem do
café nunca desengate o suporte
do filtro rodando-o manualmente em
sentido horário. Perigo de queimaduras
• Durante esta operação o indicador de
pronto máquina auxiliado pelo
interruptor café (4) pode se acender e se
apagar; isto deve ser considerado normal
e não uma anomalia.
• Antes do uso, certifique-se que a torneira
(6) “água quente / vapor” esteja fechada
e que o depósito da água da máquina
tenha uma quantidade suficiente de água.
• Ligue a máquina mediante o interruptor
geral (3); a lâmpada de controlo
acender-se-á.
• Aguardar o acendimento do indicador
luminoso de pronto da máquina do
interruptor café (4); agora a máquina
está pronta para a distribuição do café.
5.1 Com suporte do filtro “Crema”
• Coloque o filtro (12) no suporte “Cre-
ma” (11).
• Encaixe o suporte do filtro “Crema”
debaixo do grupo de saída do café (7),
rodando-o da esquerda para a direita
até que se bloqueie.
• Deixe a pega do suporte do filtro. Um
sistema automático roda ligeiramente a
pega para a esquerda.
Este movimento garante o perfeito
funcionamento do suporte do filtro.
• Coloque uma chávena debaixo do
suporte do filtro.
Aqueça previamente o suporte do filtro
premendo o interruptor “café” (4); a
água começará a sair do suporte do filtro (esta operação é necessária só para
a tiragem do primeiro café).
• Quando a chávena estiver cheia, prima
novamente o interruptor “café” (4).
• Retire o suporte do filtro da máquina,
rodando-o da direita para a esquerda e
deite fora a água residual.
• Com o especial suporte do filtro “Crema” (11), não é necessário mudar de
filtro para a tiragem de um ou de dois
cafés.
• Deite 1 ou 2 doses de café moído
no filtro para tirar um ou dois cafés.
• Limpar eventuais resíduos de café na
borda do suporte do filtro.
• Encaixe o suporte do filtro “Crema”
(11) debaixo do grupo de saída do café
(7), rodando-o da esquerda para a
direita até que se bloqueie completamente, como atrás indicado.
• Apanhe 1 ou 2 chávenas
previamente aquecidas e coloque-as por
baixo do suporte do filtro; certifique-se
que se encontrem debaixo dos furos de
saída do café.
• Prima o botão “café”. Espere que as
chávenas estejam suficientemente
cheias.
• Prima novamente o botão “café” para
interromper a saída do café.
• No fim da operação de tiragem,
espere alguns segundos, desencaixe o
suporte do filtro e esvazie-o dos fundos
de café resíduos.
Nota de limpeza: manter limpo
o filtro do suporte do filtro “Crema”, extraindo-o e lavando-o com
água potável.
5.2 Com suporte do filtro de latão
• Coloque o filtro (14 ou 15, de 1 ou 2
chávenas conforme o número de
chávenas a tirar) no suporte do filtro de
latão (13).
• Encaixe o suporte do filtro de latão
debaixo do grupo de saída do café (7)
rodando-o da esquerda para a direita
até que se bloqueie.
• Coloque uma chávena debaixo do
suporte do filtro.
• Aqueça previamente o suporte do filtro
premindo o interruptor “café” (4); a água
começará a sair do suporte do filtro (esta
operação é necessária só para a tiragem
do primeiro café).
• Quando a chávena estiver cheia, prima
novamente o interruptor “café” (4).
• Retire o suporte do filtro da
máquina, rodando-o da direita para a
esquerda.
• Deite 1 ou 2 doses de café
moído, conforme o filtro precedentemente montado, para tirar um ou
dois cafés.
• Apertar ligeiramente o café, utilizando
a parte inferior do dosador, e eliminar
os resíduos de café da borda do porta-filtro.
• Encaixe o suporte do filtro em latão
(13) no grupo de saída do café (7), rodando-o da esquerda para a direita até
que se bloqueie completamente.
• Apanhe 1 ou 2 chávenas
previamente aquecidas e coloque-as por
baixo do suporte do filtro; certifique-se
que se encontrem debaixo dos furos de
saída do café.
• Prima o botão “café”. Espere que as
chávenas estejam suficientemente cheias.
• Prima novamente o botão “café” para
interromper a saída do café.
• No fim da operação de tiragem,
retire o suporte do filtro e esvazie-o dos
fundos de café resíduos.
Nota de limpeza: mantenha
limpo o filtro retirando-o do
suporte e lavando-o com água potável.
6 ESCOLHA DO TIPO DE CAFÉ
- CONSELHOS
Em geral pode-se utilizar qualquer tipo de
café que se encontra à venda.
O café é um produto natural e o seu
gosto muda em função da origem e da
mistura; é pois preferível experimentar
vários tipos de café até encontrar o que
mais lhe agradar.
Para um melhor resultado, aconselhamos a
utilizar misturas preparadas especialmente
para máquinas de café expresso.
O café deveria sair sempre regularmente
pelo suporte do filtro, sem gotejar.
A velocidade de saída do café pode ser
modificada mudando ligeiramente a dose,
o grau de moagem e/ou de prensagem
do café no filtro.
ANTES DE EXECUTAR
QUALQUER OPERAÇÃO RELATIVA À UTILIZAÇÃO DO VAPOR OU DA
ÁGUA QUENTE, VERIFIQUE QUE O
TUBO DO VAPOR (“PANNARELLO”)
ESTEJA ORIENTADO POR CIMA DO RECIPIENTE APARA GOTAS.
Sin013a 165925300 Rev01.PMD 23/05/2002, 18.3972-73
Page 38

74 75
FORNECIMENTO DE VAPOR - FORNECIMENTO DE VAPOR - LIMPEZA DESCALCIFICAÇÃO -INFORMAÇÕES DE CARÁCTER JURÍDICO
7 FORNECIMENTO DE ÁGUA
QUENTE
Perigo de queimaduras! No início da
saída da água podem-se verificar
borrifos de água quente. O tubo da saída
da água pode alcançar temperaturas
elevadas; evite de tocá-lo directamente com
as mãos.
• Ligue a máquina mediante o interruptor
geral (3); a lâmpada que se encontra no
seu interior acender-se-á.
• Esperar que o indicador luminoso do
interruptor café (4) se acenda.
• Coloque uma chávena ou um copo
de chá debaixo do tubo do vapor
(“Pannarello”).
• Abra a torneira (6) “Água quente / vapor ”
rodando-a em sentido anti-horário, prima o interruptor “café” (4) e deixe sair a
quantidade de água desejada.
• Volte a premir o interruptor “café” (4) e
feche a torneira (6) rodando-a em
sentido horário para interromper a saída
da água quente.
8 FORNECIMENTO DE VAPOR/
PREPARAÇÃO DO CAPPUCCINO
Perigo de queimaduras! No início da
saída da água podem-se verificar
borrifos de água quente. O tubo da saída
da água pode alcançar temperaturas
elevadas; evite de tocá-lo directamente com
as mãos.
• Ligue a máquina mediante o interruptor
geral (3); a lâmpada colocada no seu
interior acender-se-á.
• Apertar o interruptor (5) vapor, o
indicador posto sobre este se iluminará.
Apaga-se o indicador de pronto máquina
do interruptor café (4).
• Esperar que o indicador luminoso de
pronto máquina do interruptor (4) se
acenda novamente; a esta altura a
máquina está pronta para a distribuição
do vapor.
• Coloque o tubo do vapor por cima
do depósito apara gotas, abra a torneira
(6) “água quente / vapor” por alguns
instantes de modo a deixar sair a água
residual do tubo do vapor (“Pannarello”);
em breve começará a sair só vapor.
• Feche a torneira (6).
• Imirja o tubo do vapor (“Pannarello”)
no líquido que deseja aquecer e abra a
torneira (6); rode lentamente o recipiente e, contemporaneamente, mexa-o com
movimentos verticais para aquecer uniformemente o líquido.
• Depois de ter utilizado o vapor pelo tempo necessário, feche a torneira (6) e volte a pôr na posição inicial o interruptor
(5) “Vapor”.
O cappuccino prepara-se
utilizando este sistema com o
leite.
• Carregue o circuito como indicado na
par.4.5 para que a máquina fique
operacional.
• Depois desta operação, limpe o tubo do
vapor (pannarello) com um pano
húmido.
9 LIMPEZA
A manutenção e a limpeza do aparelho só
podem ser feitas quando o aparelho estiver
frio e desligado da tomada de corrente.
• Não mergulhe o aparelho na água e
nunca o meta na máquina de lavar a
louça.
• Não utilize objectos aguçados ou
produtos químicos agressivos na sua
limpeza.
• Aconselha-se a limpar todos os dias
o depósito de água e a enchê-lo com
água fresca.
• Depois de ter aquecido o leite, pode-se
tirar um pouco de água quente para
limpar o tubo. Use um pano húmido
para limpá-lo externamente.
• Para a limpeza do aparelho, utilize
um pano macio e húmido.
• Para a limpeza do suporte do filtro,
proceda do seguinte modo:
• Retire o filtro, imirja-o em água quente
e lave-o cuidadosamente.
• Limpe o interior do suporte do filtro.
• Não enxugue a máquina e/ou os seus
componentes num forno de microondas
e/ou convencional.
• Limpe, quando existe, o “Pannarello”
colocado sôbre o tubo do vapor. Para
isso, deve desaparafusar o anel de
retenção para tirar o “Pannarello” do
tubo de vapor e desmontar o corpo
externo do tubo.
Lave com água corrente e volte a montar o “Pannarello”.
Aconselha-se a apertar o anel de
retenção com cuidado, pois o
“Pannarello” pode cair durante a sua
utilização.
10 DESCALCIFICAÇÃO
A formação de calcário acontece com
o uso do aparelho; a descalcificação é
necessária a cada 3 ou 4 meses de
utilização da máquina e/ou quando se
observa uma redução do volume de água.
Querendo executar pessoalmente
a descalcificação do aparelho,
utilize um produto descalcificante para
máquinas de café à venda nos
estabelecimentos.
Atenção! Nunca utilize o vinagre
como descalcificante.
• Misturar o produto para
descalcificação com água, como
especificado na embalagem e encher o
reservatório de água; introduzir o
reservatório na máquina.
• Ligar a máquina apertando o interruptor
geral.
• Direcionar o tubo de vapor sobre o
recipiente recolhe-gotas.
• Retirar em intervalos (uma xícara por vez)
o conteúdo total do reservatório de água,
girando o botão do vapor (6) em sentido
anti-horário e apertando o interruptor
café (4); para interromper o fornecimento
apertar novamente o interruptor do café
(4) e girar o botão do vapor (6) em
sentido horário.
• Em cada intervalo deixe actuar o
descalcificante durante cerca de 10-15
minutos, desligando o aparelho através
do interruptor geral (3).
• Terminada a solução para
descalcificação retirar o reservatório de
água, enxaguá-lo e enchê-lo com água
fresca potável.
• Recolocar o reservatório na
máquina; esvaziar 2/3 do conteúdo do
reservatório de água girando o botão do
vapor (6) em sentido anti-horário e
apertando o interruptor do café (4); para
interromper o fornecimento apertar
novamente o interruptor do café (4) e
girar o botão do vapor (6) em sentido
horário.
• Deixar aquecer a máquina e esvaziar o
conteúdo restante do reservatório de
água, girando o botão do vapor (6) em
Sin013a 165925300 Rev01.PMD 23/05/2002, 18.3974-75
Page 39

76 77
Problemas
O aparelho não acende
A bomba faz muito
barulho
O café está muito frio
Não se forma espuma
no leite
O café sai muito rapidamente, não se forma
o creme
O café não sai ou sai
às gotas
O café sai pelos bordos
Causas possíveis
O aparelho não está ligado à rede
eléctrica
Falta água no depósito (par.4.4)
O indicador do interruptor “café” (4)
estava apagado quando o interruptor
(4) foi accionado.
O suporte do filtro não está inserido
para o pré-aquecimento (par. 5.1-5.2)
Leite não apropriado
Demasiado café no suporte do filtro
/ moagem demasiado grossa
Café velho ou não apropriado
Falta de água
Moagem demasiado fina
Café premido no suporte do filtro
Demasiado café no suporte do filtro
Torneira (6) “Água quente / vapor”
aberta
Aparelho com calcário
Filtro da cabeça distribuidora obstruído
Filtro do suporte do filtro obstruído
Suporte do filtro mal encaixado no
grupo de tiragem café
Borda superior do suporte do filtro
suja
Junta da caldeira suja ou usada
Demasiado café no suporte do filtro
Soluções
Ligue o aparelho à rede eléctrica
Encha com água
Aguarde até que a lâmpada se
acenda
Aqueça previamente o suporte do
filtro
Controle o teor de gordura
Acrescente café (par. 5.1-5.2)
Use outra mistura de café (cap.6)
Encha com água (par.4.4)
Substitua o tipo de café
Mexa o café moído
Reduza a quantidade de café,
utilizando o doseador
Feche a torneira
Descalcifique o aparelho (cap.10)
Limpe o filtro
Limpe o filtro (cap.9)
Encaixe correctamente o suporte
do filtro (par.5.1-5.2)
Limpe a borda do suporte do fil-
tro
Limpe ou substitua a junta
Reduza a quantidade de café,
utilizando o doseador
DESACTIVAÇÃO DA MÁQUINA PROBLEMAS E REMEDIOS
14 PROBLEMAS E REMEDIOS
Para as avarias não contempladas na tabela indicada ou no caso que as sugestões
dadas não as resolvam, dirija-se a um centro de assistência.
sentido anti-horário e apertando o
interruptor do café (4); para interromper
o fornecimento apertar novamente o
interruptor do café (4) e girar o botão
do vapor em sentido horário.
Caso prefira utilizar um produto
diferente do aconselhado,
respeite sempre as instruções da Casa
produtora que se encontram na
embalagem do produto descalcificante.
11 MANUTENÇÃO PERIÓDICA
A manutenção feita a intervalos regulares,
junto de um Centro de Assistência
Autorizado, prolonga a duração e a
eficiência da máquina.
Guarde a embalagem original que poderá
servir como protecção durante o transporte.
12 INFORMAÇÕES DE CARÁC-
TER JURÍDICO
• Estas instruções contêm as informações
necessárias para o uso correcto do
aparelho, das suas funções operativas e
da sua manutenção cuidadosa.
• Estas informações e o cumprimento das
instruções permitem usar sem perigo e
em segurança o aparelho.
• Se desejar mais informações ou no caso
de se verificarem problemas que julgue
não terem sido tratados com clareza,
contacte o revendedor local ou
directamente a Casa construtora.
• Note-se que estas instruções não são
parte duma convenção precedente ou já
existente, de um acordo ou contrato legal
e que não alteram o seu conteúdo.
• Todas as obrigações do construtor
baseiam-se no relativo contrato de compra-venda, que contém também o
regulamento completo e exclusivo da
garantia.
Estas instruções não limitam nem
alargam as normas de garantia
contratual.
• As instruções contêm informações
protegidas pelos direitos de autor.
• É proibido fotocopiá-las ou traduzi-las
numa outra língua sem o prévio acordo
escrito por parte do Construtor.
13 DESACTIVAÇÃO DA
MÁQUINA
• Inutilize os aparelhos fora de uso.
• Retire a ficha da tomada e retire o cabo
eléctrico.
• Entregue os aparelhos assim inutilizados
num centro de recolha autorizado.
Sin013a 165925300 Rev01.PMD 23/05/2002, 18.3976-77
Page 40

78 79
De illustraties die corresponderen met de tekst bevinden zich op de flap van de kaft.
Houd deze pagina open tijdens het lezen van het instructieboekje.
1.2 Gebruik van deze gebruiksinstructies
Bewaar deze gebruiksinstructies op een veilige plaats en doe hen bij het
koffiezetapparaat als iemand anders hem zou gebruiken.
Wendt u zich voor nadere informatie of in het geval van problemen, die helemaal niet of
onvoldoende behandeld zijn in deze instructies tot vakspecialisten.
2 TECHNISCHE SPECIFICATIES
Nominale spanning Zie plaatje op het apparaat
Nominaal vermogen Zie plaatje op het apparaat
Materiaal lichaam Thermoplastisch
Afmetingen (b x h x d) 230 x 295 x 242
Gewicht 4,1 kg
Kabellengte 1,2 m
Bedieningspaneel Frontaal
Filterhouder Crema
(verschillend afhankelijk van de modellen) Messing
“Pannarello” Speciaal voor cappuccino (optie) en cappucci-
no-maker (optie)
Reservoir Uittrekbaar
Voeding Zie plaatje
Waterreservoir 1,4 l
Pompdruk 13-15 bar
Verwarmingselement Sin013AX Inox
Sin013AL Aluminium
Beveiliging veiligheidsklep druk verwarmingselement
Veiligheidsthermostaat
Wijzigingen in de constructie en de uitvoering, ingegeven door de technologische
vooruitgang, voorbehouden.
Machine in overeenstemming met de Europese richtlijn 89/336/EEG (Wetsbesluit 476
van 04/12/92), betreffende de opheffing van radio-/televisiestoringen.
1 KENMERKEN
Het koffiezetapparaat is geschikt voor het zetten van 1 of 2 kopjes espresso en is voorzien
van een verstelbaar buisje voor afgifte van stoom en heet water.
De bedieningen op het front van het apparaat zijn voorzien van gemakkelijk te interpreteren
symbolen. Het machinelichaam heeft een elegant design, is ontworpen voor huishoudelijk
gebruik, en niet geschikt voor continu, professioneel gebruik.
Let op. Er wordt geen aansprakelijkheid aanvaard voor eventuele schade in
het geval van:
• verkeerd gebruik dat niet in overeenstemming is met de beoogde doelen;
• reparaties die niet uitgevoerd zijn bij erkende servicecentra;
• onklaar gemaakte voedingskabel;
• onklaar gemaakte componenten van de machine;
• gebruik van niet-originele vervangingsonderdelen en accessoires.
In deze gevallen vervalt de garantie.
1.1 Om het lezen te vergemakkelijken
De waarschuwingsdriehoek geeft alle instructies aan die van belang
zijn voor de veiligheid van de gebruiker. Houdt u zich nauwgezet
aan deze aanwijzingen om ernstig letsel te vermijden!
Dit symbool geeft de informatie aan die nodig is voor een optimaal gebruik
van het apparaat.
Verwijzingen naar illustraties, delen van het apparaat of bedieningselementen enz.
bestaan uit cijfers of letters; in dit geval wordt verwezen naar de illustratie.
KENMERKEN TECHNISCHE SPECIFICATIES
Inhoudsopgave
1 KENMERKEN .......................................... 78
1.1 Om het lezen te vergemakkelijken ................. 78
1.2 Gebruik van deze gebruiksinstructies .............. 79
2 TECHNISCHE SPECIFICATIES .................. 79
3 VEILIGHEIDSMAATREGELEN ................... 81
4 INSTALLATIE .......................................... 83
4.1 Verpakking ................................................... 83
4.2 Waarschuwingen m.b.t. de installatie ............. 83
4.3 Aansluiting op het elektriciteits-net ................ 83
4.4 Het waterreservoir vullen ............................... 83
4.5 Het circuit vullen ........................................... 84
5 AFGIFTE VAN DE KOFFIE ....................... 84
5.1 Met “Crema” filterhouder .............................. 84
5.2 Met messing filterhouder ............................... 85
6 KEUZE VAN HET TYPE KOFFIE - ADVIEZEN 85
7 AFGIFTE VAN HEET WATER .................... 86
8 AFGIFTE VAN DE STOOM /
BEREIDING VAN EEN CAPPUCCINO .......86
9 REINIGING ............................................ 86
10 ONTKALKING ........................................87
11 REGELMATIGE SERVICE .......................... 87
12 INFORMATIE VAN JURIDISCHE AARD .....88
13 VERWERKING ALS AFVAL ....................... 88
14 PROBLEEMOPLOSSING ..........................89
Sin013a 165925300 Rev01.PMD 23/05/2002, 18.3978-79
Page 41

80 81
VEILIGHEIDSMAATREGELEN
3 VEILIGHEIDSMAATREGELEN
Laat nooit water in aanraking komen met
de onderdelen die onder stroom staan:
gevaar voor kortsluiting! De oververhitte
stoom en het hete water kunnen
brandwonden veroorzaken! Richt nooit
stralen stoom of heet water op delen van
het apparaat, wees voorzichtig bij het
aanraken van het stoom-/
heetwatermondstuk: gevaar voor
brandwonden!
Bestemd gebruik
Het koffiezetapparaat is uitsluitend bedoeld
voor huishoudelijk gebruik.
Het is verboden technische wijzigingen aan
te brengen of het apparaat te gebruiken
voor ongeoorloofde doeleinden, want dat
brengt risico’s met zich mee!
Het koffiezetapparaat mag uitsluitend
worden gebruikt door volwassenen.
Stroomvoeding
Sluit het koffiezetapparaat alleen aan op
een geschikt stopcontact.
De spanning moet corresponderen met de
spanning die wordt aangegeven op het
plaatje van het apparaat.
Voedingskabel
Gebruik het koffiezetapparaat nooit als de
voedingskabel defect is.
Laat defecte kabels en stekkers onmiddellijk
vervangen door specialisten.
Laat de voedingskabel niet over hoeken of
scherpe randen of over hete voorwerpen
lopen, en bescherm hem tegen olie.
Draag het koffiezetapparaat niet aan de
kabel en trek er niet aan. Haal de stekker
niet uit het stopcontact door aan de kabel
te trekken en raak hem niet aan met natte
handen. Zorg ervoor dat de voedingskabel
vrij omlaag loopt van tafels of schappen.
Bescherming van derden
Vergewis u ervan dat kinderen niet de
mogelijkheid hebben met het koffiezetapparaat te spelen. Kinderen realiseren zich
de gevaren die samenhangen met
elektrische apparaten niet. De onderdelen
van het verpakkingsmateriaal mogen niet
binnen het bereik van kinderen worden
gelaten aangezien deze een potentiële bron
van gevaar kunnen opleveren.
Gevaar voor verbrandingen
Richt de straal verhitte stoom en/of heet
water niet op uzelf of op anderen.
Gebruik altijd de handgrepen of knoppen.
Raak het mondstuk alleen aan in het gebied
waar het beschermd is tegen brandwonden.
Verwijder nooit de filterhouder terwijl de koffie
uit het apparaat komt. Tijdens het verwarmen
van de koffie-afgiftegroep kunnen er druppels
heet water naar buiten komen.
Plaatsing
Zet het koffiezetapparaat op een veilige
plek, waar niemand het kan laten omvallen
of erdoor verwond kan raken.
Heet water of verhitte stoom zouden naar
buiten kunnen komen: gevaar voor
brandwonden! Gebruik het koffiezetapparaat niet in de buitenlucht.
Zet het apparaat niet op erg warme
oppervlakken of in de buurt van open vuur,
om te vermijden dat het frame smelt of
anderszins beschadigd raakt.
Reiniging
Alvorens het apparaat schoon te maken,
moeten alle toetsen worden uitgeschakeld
en moet de stekker uit het stopcontact
worden gehaald.
Wacht bovendien tot het apparaat is
afgekoeld.
Afstanden in mm
2
0
0
4
0
0
2
0
0
2
0
0
VEILIGHEIDSMAATREGELEN
Sin013a 165925300 Rev01.PMD 23/05/2002, 18.3980-81
Page 42

82 83
VEILIGHEIDSMAATREGELEN EERSTE GEBRUIK
Dompel het apparaat nooit in water onder!
Het is streng verboden te proberen
reparaties te verrichten in het apparaat zelf.
Ruimte voor het gebruik en
onderhoud
Voor een correcte en goede werking van
het koffiezetapparaat wordt het volgende
geadviseerd:
• Kies een vlakke ondergrond;
• Kies een voldoende verlichte, hygiënische
omgeving, met een gemakkelijk te
bereiken stopcontact;
• Houd het apparaat op een
minimumafstand tot de wanden, zoals
aangegeven op de afbeelding.
Bewaren van de apparaat
Als het apparaat lange tijd ongebruikt blijft,
moet de machine uitgeschakeld worden en
de stekker uit het stopcontact worden
gehaald. Bewaar hem op een droge plaats,
met de aanwijzingen op het identificatieplaatje
op de onderkant van het apparaat.
• Wikkel uit de bodem van het apparaat
de hoeveelheid kabel af die nodig is voor
de aansluiting op het elektriciteitsnet.
• Controleer of de hoofdschakelaar op “0”
staat voordat u de machine aansluit op
het elektriciteitsnet.
• Steek de stekker in een stopcontact met
de juiste spanning.
4.4 Het waterreservoir vullen
• Verwijder het deksel van het reservoir (2).
• Til het waterreservoir (1) eruit, en let erop
dat de leidingen die in het reservoir zitten
niet beschadigd raken.
• Spoel het reservoir en vul het met
vers water, maar maak hem niet te vol.
• Zet het reservoir weer op zijn plaats
en let erop dat de tevoren weggehaalde
leidingen in het water worden
gedompeld.
N.B: enkele modellen hebben een
reservoir met wateraanzuigklep.
Deze klep sluit automatisch wanneer het
reservoir wordt weggehaald, om te
verhinderen dat het water naar buiten
loopt. Druk het reservoir op zijn plaats vast.
• Doe het deksel weer op het reservoir.
Vul het reservoir altijd en uitsluitend
met koud, niet koolzuurhoudend
water: warm water of andere vloeistoffen
kunnen het reservoir beschadigen. Zet het
apparaat nooit aan zonder dat er water
in zit: vergewis u ervan dat er voldoende
water in het reservoir zit.
4.5 Het circuit vullen
Als u het apparaat weer wilt aanzetten
nadat het lange tijd niet gebruikt is, moet,
nadat het water verbruikt is en er stoom is
buiten bereik van kinderen.
Bescherm het tegen stof en vuil.
Reparaties / Onderhoud
In geval van storingen, defecten of als er een
defect vermoed wordt nadat het apparaat
gevallen is, moet de stekker onmiddellijk uit
het stopcontact worden gehaald.
Zet een defect apparaat nooit aan. Alleen
specialisten mogen ingrepen verrichten. De
reparaties mogen uitsluitend worden
uitgevoerd in een erkend servicecentrum.
In geval van ingrepen die niet zijn
uitgevoerd volgens de regels der kunst,
wordt alle aansprakelijkheid voor eventuele
schade afgewezen.
Brand
In geval van brand moeten blusapparaten
met kooldioxyde (CO2) worden gebruikt.
Gebruik geen water of poederblusapparaten.
Legenda van de onderdelen van het
apparaat
Waterreservoir
Deksel waterreservoir
Hoofdschakelaar
Koffieschakelaar met ingebouwd
lampje “apparaat gereed”
Stoomschakelaar
Knop heetwater-/stoomkraan
Koffie-afgiftegroep
Stoompijp
Voedingskabel
Wateropvangbakje + roster
Accessoires (verschillen afhankelijk van
het model)
“Crema” filterhouder
Filter voor “Crema” filterhouder
(Eén voor afgifte van 1 of 2 kopjes
koffie)
Messing filterhouder
Filter 1 kopje koffie voor messing
filterhouder
Filter 2 kopjes koffie voor messing
filterhouder
Maatschepje voor koffie
4 INSTALLATIE
Neem, voor uw eigen veiligheid en die van
anderen de “Veiligheidsvoorschriften” van
pag. 81-82 nauwgezet in acht.
4.1 Verpakking
De oorspronkelijke verpakking is ontworpen
en gemaakt om het apparaat te
beschermen tijdens het transport.
Het wordt geadviseerd deze verpakking te
bewaren voor eventueel transport in de
toekomst.
4.2 Waarschuwingen m.b.t. de
installatie
Houdt u zich voor het installeren van het
apparaat aan de volgende veiligheidsvoorschriften:
• zet het apparaat op een veilige plek;
• vergewis u ervan dat kinderen niet met
het apparaat kunnen spelen;
• zet het apparaat niet op erg warme
oppervlakken of in de buurt van open vuur.
Het koffiezetapparaat is nu gereed voor
aansluiting op het elektriciteitsnet.
4.3 Aansluiting op het elektriciteits-
net
Elektriciteit kan gevaarlijk zijn!
Houdt u zich daarom nauwgezet
aan de veiligheidsvoorschriften.
Gebruik nooit defecte kabels!
Defecte kabels en stekkers moeten
onmiddellijk worden vervangen door
erkende specialisten.
Het koffiezetapparaat moet worden
aangesloten op een geschikt stopcontact.
De spanning van het apparaat is in de
fabriek ingesteld.
Controleer of de netspanning correspond-eert
Sin013a 165925300 Rev01.PMD 23/05/2002, 18.3982-83
Page 43

84 85
AFGIFTE VAN DE KOFFIE KEUZE VAN HET TYPE KOFFIE
afgenomen, het circuit van het apparaat
weer worden gevuld.
• Druk op de hoofdschakelaar (3), het
lampje zal gaan branden.
• Richt het stoompijpje (“Pannarello”) op
het druppelbakje.
• Draai de knop (6) “heet water/stoom”
tegen de klok in open, en druk op de
koffieschakelaar.
• Wacht tot er een regelmatige waterstroom
uit het stoompijpje komt (“Pannarello”).
• Druk nogmaals op de koffieschakelaar
(4) en draai de knop (6) “heet water/
stoom” met de klok mee dicht.
Het apparaat is nu gereed voor de afgifte
van koffie.
5 AFGIFTE VAN DE KOFFIE
Let op. Het is verboden om terwijl
de koffie naar buiten komt de
filterhouder weg te halen door hem met
de hand met de klok mee te draaien.
Gevaar voor brandwonden.
• Tijdens deze handeling kan het lampje
“apparaat gereed” in de koffie-schakelaar
(4) gaan branden en weer doven; dit is
gewoon en duidt niet op een storing.
• Vergewis u ervan vòòr het gebruik, dat
de knop (6) heet water/stoom
dichtgedraaid is en dat het waterreservoir
van het apparaat voldoende water bevat.
• Zet het apparaat aan, als dat nog niet
gebeurd is, met de hoofdschakelaar (3),
het lampje in de schakelaar gaat
branden.
• Wacht tot het lampje “apparaat gereed” in
de koffieschakelaar (4) gaat branden; het
apparaat is nu gereed op koffie af te geven.
5.1 Met “Crema” filterhouder
• Plaats de filter (12) in de “Crema”
filterhouder (11).
• Steek de “Crema” filterhouder van
onderaf in de afgiftegroep (7), door de
houder van links naar rechts te draaien
tot hij vast zit.
• Laat het handvat van de filterhouder los.
Een automatisch systeem breng het
handvat nu nog iets meer naar links. Deze
beweging garandeert de perfecte werking
van de filterhouder.
• Zet een kopje onder de filterhouder.
Laat de filterhouder en het kopje
opwarmen door op de koffieschakelaar
(4) te drukken; het water begint uit de
filterhouder te komen (dit is alleen nodig
voor het eerste kopje koffie).
• Druk opnieuw op de koffieschakelaar (4)
als het kopje voldoende gevuld is.
• Verwijder de filterhouder uit het
apparaat door hem van rechts naar links
te draaien, en laat het resterende water
weglopen.
• Met de speciale “Crema” filterhouder
(11) waarover het apparaat beschikt, is
het niet nodig een nieuwe filter te
gebruiken om één danwel twee kopjes
koffie te zetten.
• Doe 1 of 2 afgestreken maatschepjes
gemalen koffie in het filter voor één of
twee kopjes koffie.
• Reinig de rand van de filterhouder,
verwijder eventuele koffieresten.
• Steek de “Crema” filterhouder (11)
van onderaf in de afgiftegroep (7) door
de houder van links naar rechts te draaien
tot hij vast zit, zoals eerder is uitgelegd.
• Neem 1 of 2 voorverwarmde kopjes
en zet hen onder de filterhouder:
controleer of ze goed onder de
openingen staan waar de koffie uit komt.
• Druk op de koffietoets. Wacht tot de
kopjes voldoende vol zijn.
• Druk opnieuw op de koffietoets om de
afgifte van koffie te stoppen.
• Wacht na de afgifte een paar
seconden, neem de filterhouder weg en
verwijder de koffie eruit.
Opmerking m.b.t. de reiniging:
houd de filter van de “Crema”
filterhouder schoon door deze naar
buiten te trekken en met leidingwater
om te spoelen.
5.2 Met messing filterhouder
• Breng het filter aan (14 of 15, voor 1 of
2 kopjes naar gelang het aantal kopjes
dat u wilt zetten) in de messing
filterhouder (13).
• Breng de messing filterhouder van
beneden af aan in de koffie-afgiftegroep
(7) door hem van links naar rechts te
draaien tot hij blokkeert.
• Zet een kopje onder de filterhouder.
• Verwarm de filterhouder en het kopje voor
door op de koffieschakelaar (4) te
drukken; het water begint uit de
filterhouder te komen (dit is alleen nodig
voor het eerste kopje koffie).
• Druk opnieuw op de koffieschakelaar (4)
als het kopje voldoende vol is.
• Verwijder de filterhouder uit het
apparaat door hem van rechts naar links
te draaien.
• Doe 1 of 2 afgestreken maatschepjes
gemalen koffie in het filter, afhankelijk van
het eerder gemonteerde filter, om één of
twee kopjes koffie te zetten.
• Druk de koffie een beetje aan met de
onderkant van het maatschepje, en
verwijder koffieresten van de rand van de
filterhouder.
• Breng de messing filterhouder (13)
van beneden af aan in de kofiieafgiftegroep (7), door hem van links naar
rechts te draaien, totdat hij helemaal
blokkeert.
• Neem 1 of 2 voorverwarmde kopjes
en zet hen onder de filterhouder;
controleer of ze goed onder de
openingen staan waar de koffie uit komt.
• Druk op de koffietoets. Wacht tot de
kopjes voldoende vol zijn.
• Druk nogmaals op de koffietoets om de
afgifte van koffie te stoppen.
• Neem na de afgifte de filterhouder
weg en verwijder de koffie eruit.
Opmerking betreffende de
reiniging: houd het filter in de
filterhouder schoon door hem van zijn
plaats te halen en met water te wassen.
6 KEUZE VAN HET TYPE
KOFFIE - ADVIEZEN
In principe kunnen alle in de handel
verkrijgbare soorten koffie worden gebruikt.
Koffie is echter een natuurlijk product, en
de smaak ervan verandert naar gelang de
herkomst en de samenstelling; het verdient
derhalve de voorkeur verschillende soorten
te proberen te gebruiken, om het type
koffie te vinden dat het meest naar uw
smaak is.
Voor de beste resultaten wordt hoe dan ook
aanbevolen koffie te gebruiken die
uitdrukkelijk bereid is voor espressoapparaten.
De koffie dient altijd regelmatig uit de
filterhouder te komen, zonder te druppelen.
De snelheid waarmee de koffie naar buiten
komt kan worden gewijzigd door de
dosering of de grofheid van de maling iets
te veranderen en/of de koffie meer of
minder aan te duwen in het filter.
VOORDAT U WERKZAAM-HEDEN
GAAT VERRICHTEN MET
BETREKKING TOT DE AFGIFTE VAN
STOOM OF HEET WATER, MOET U
CONTROLEREN OF DE STOOMPIJP
(“PANNARELLO”) OP HET WATEROPVANGBAKJE GERICHT IS.
Sin013a 165925300 Rev01.PMD 23/05/2002, 18.3984-85
Page 44

86 87
AFGIFTE VAN HEET WATER - AFGIFTE VAN DE STOOM - REINIGING REINIGING - ONTKALKING
7 AFGIFTE VAN HEET WATER
Gevaar voor brandwonden!
Aan het begin van de afgifte
kunnen er spatten heet water naar
buiten komen. De afgiftebuis kan erg
heet worden: raak hem niet rechtstreeks
met de hand aan.
• Zet het apparaat aan, als dat nog niet is
gebeurd, met de hoofdschakelaar (3), het
lampje in de schakelaar gaat branden.
• Wacht tot het lampje in de
koffieschakelaar (4) gaat branden.
• Zet een kopje of een theeglas onder
het stoompijpje (“Pannarello”).
• Draai de knop (6) “Heet water/stoom”
tegen de klok in open en druk op de
koffieschakelaar (4) om de gewenste
hoeveelheid water naar buiten te laten
komen.
• Druk nogmaals op de koffieschakelaar
(4) en draai de knop (6) dicht met de
klok mee om de afgifte van heet water te
stoppen.
8 AFGIFTE VAN DE STOOM /
BEREIDING VAN EEN CAPPUCCINO
Gevaar voor brandwonden!
Aan het begin van de afgifte
kunnen er spatten heet water naar
buiten komen. De afgiftebuis kan erg
heet worden: raak hem niet rechtstreeks
met de hand aan.
• Zet het apparaat aan, als dat nog niet is
gebeurd, met de hoofdschakelaar (3), het
lampje in de schakelaar zal gaan
branden.
• Druk op de stoomschakelaar (5), het
lampje in de schakelaar zal gaan
branden. Het lampje “apparaat gereed”
dat in de koffieschakelaar (4) zit, dooft.
• Wacht tot het lampje “apparaat gereed”
in de koffieschakelaar (4) gaat branden,
op dit punt is het apparaat gereed om
stoom af te geven.
• Richt de stoompijp (“Pannarello”) op
het druppelbakje, draai de knop (6) “Heet
water/stoom” enkele ogenblikken open,
zodat het resterende water uit het
stoompijpje komt; kort daarna zal er
alleen stoom naar buiten komen.
• Draai de knop (6) dicht.
• Steek het stoompijp (“Pannarello”) in
de vloeistof die verwarmd moet worden
en draai de knop (6) open; beweeg de
houder van de vloeistof met een
langzame beweging op en neer om de
vloeistof gelijkmatig te verwarmen.
• Na zolang als gewenst stoom te hebben
gebruikt, moet de knop (6) worden
dichtgedraaid en de stoomschakelaar (5)
in de beginstand worden teruggebracht.
Door dit systeem toe te passen
met melk, kunt u een cappucci-
no bereiden.
• Vul het circuit zoals beschreven op par.
4.5 om het apparaat te kunnen
gebruiken.
• Maak de stoompijp (pannarello) daarna
schoon met een vochtige doek.
9 REINIGING
Het onderhoud en de reiniging mogen
uitsluitend plaatsvinden als het apparaat is
afgekoeld en afgekoppeld van het
elektriciteitsnet.
• Dompel het apparaat nooit onder in
water en zet de componenten niet in de
vaatwasmachine.
• Gebruik geen scherpe voorwerpen of
agressieve chemische stoffen
(oplosmiddelen) om het apparaat schoon
te maken.
• Het wordt geadviseerd het
waterreservoir dagelijks schoon te maken
en met vers water te vullen.
• Na melk te hebben opgewarmd, dient een
kleine hoeveelheid warm water te worden
afgenomen om de pijp schoon te maken,
en moet de pijp aan de buitenkant worden
afgenomen met een vochtige doek.
• Gebruik voor het schoonmaken van
het apparaat een in water vochtig
gemaakte zachte doek.
• Ga als volgt te werk om de
filterhouder schoon te maken:
• Neem het filter, dompel het onder in
warm water en maak het zorgvuldig
schoon.
• Maak de filterhouder aan de
binnenkant schoon.
• Droog het apparaat en/of de componenten
ervan nooit in een magnetronoven en/of een
traditionele oven.
• Maak, indien aanwezig, de “Pannarello”
schoon die boven de stoompijp zit.
Hiervoor moet de ringmoer worden
losgedraaid en de “Pannarello” worden
weggehaald van de stoompijp, en moet
het externe lichaam van het “Pannarello”
worden gedemonteerd.
Afwassen onder stromend water en het
“Pannarello” terugplaatsen.
Het wordt geadviseerd de
ringmoer voldoende aan te
draaien; het “Pannarello” zou tijdens
het gebruik los kunnen raken.
10 ONTKALKING
De kalkvorming vindt plaats tijdens het
gebruik van het apparaat. Het is nodig
iedere 3-4 maanden van gebruik het
apparaat te ontkalken en/of wanneer men
een afname van de waterafgifte opmerkt.
Als u het apparaat zelf wilt
ontkalken, kunt u een niet-giftig
en/of onschadelijk ontkalkingsmiddel
voor koffiezetapparaten gebruiken dat
in de handel verkrijgbaar is.
Let op! Gebruik in geen geval azijn
als ontkalkingsmiddel.
• Verwijder het waterreservoir en spoel
het overtollige water weg.
• Meng het ontkalkingsproduct met
water, zoals op de verpakking van het
product wordt aangeduid, en vul er het
waterreservoir mee. Plaats het reservoir
weer in het apparaat.
• Zet het apparaat aan met de
hoofdschakelaar.
• Richt het stoompijpje op de
druppelopvangbak.
• Laat nu met tussenpozen (een kopje per
keer) de gehele inhoud van het
waterreservoir naar buiten komen, door
de knop (6) tegen de wijzers van de klok
in te draaien en op de koffieschakelaar
te drukken (4). Om de afgifte te stoppen
drukt men opnieuw op de
koffieschakelaar (4) en draait men de
knop (6) met de wijzers van de klok mee.
• Laat het ontkalkingsmiddel tijdens de
intervallen gedurende 10-15 minuten
inwerken, door het apparaat uit te zetten
met de hoofdschakelaar (3).
• Is de ontkalkingsoplossing geheel
afgevoerd, verwijder dan het
waterreservoir, spoel het en vul het met
vers drinkwater.
• Plaats het reservoir weer in het
apparaat. Leeg 2/3 van de inhoud van
het reservoir door de stoomknop (6) tegen
Sin013a 165925300 Rev01.PMD 23/05/2002, 18.3986-87
Page 45

88 89
Defect
Het apparaat gaat niet
aan
De pomp maakt veel
lawaai
De koffie is te koud
Er komt geen schuim
De koffie komt te snel
naar buiten, er ontstaat
geen crème
De koffie komt niet of
slechts in druppels naar
buiten
De koffie komt langs de
rand naar buiten
Mogelijke oorzaken
Apparaat niet aangesloten op het
elektriciteitsnet
Geen water in het reservoir (par.4.4)
Verklikkerlichtje “klaar voor werking”
brandt niet als de drukknop “koffie”
is ingedrukt.
Filterhouder niet aangebracht voor
voorverwarming (par. 5.1-5.2)
Melk niet geschikt
Te weinig koffie in de filterhouder/ te
grove maling
Koffie oud of niet geschikt
Te weinig water
Te fijne maling
Koffie aangedrukt in de filterhouder
Te veel koffie in filterhouder
Knop (6) “Heet water/ stoom” open
Kalkaanslag in apparaat
Douche verstopt
Filter in filterhouder verstopt
Filterhouder slecht in de koffie-
afgiftegroep geplaatst
Bovenrand van filterhouder vuil
Pakking verwarmingselement vuil of
versleten
Te veel koffie in filterhouder
Oplossing
Sluit het apparaat aan op het
elektriciteitsnet
Water toevoegen
Wachten tot het verklikkerlichtje
aangaat.
Filterhouder voorverwarmen
Controleer het vetgehalte op de
melk
Koffie toevoegen (par. 5.1-5.2)
Gebruik andere koffie (Hfdst.6)
Water toevoegen (par.4.4)
Gebruik andere koffie
Maak de gemalen koffie los
Doe er minder koffie in gebruik
het maatschepje
Draai de knop dicht
Apparaat ontkalken (Hfdst.10)
Filterelement reinigen
Maak het filter schoon (Hfdst.9)
Breng de filterhouder correct aan
(par.5.1-5.2)
Rand van filterhouder schoon-
maken
Pakking schoonmaken of
vervangen
Doe er minder koffie in Gebruik
het Maatschepje
INFORMATIE VAN JURIDISCHE AARD - VERWERKING ALS AFVAL PROBLEEMOPLOSSING
14 PROBLEEMOPLOSSING
Voor storingen die niet in bovenstaande tabel te vinden zijn of in het geval de geadviseerde
oplossingen geen effect hebben, dient u contact op te nemen met een servicecentrum.
de wijzers van de knop in te draaien en
door op de koffieschakelaar te drukken
(4). Om de afgifte te stoppen drukt men
opnieuw op de koffieschakelaar en draait
men de knop (6) met de wijzers van de
klok mee.
• Laat het apparaat opwarmen en voer het
overtollige water in het reservoir af door
de stoomknop (6) tegen de wijzers van
de klok in te draaien, en door op de
koffieschakelaar (4) te drukken. Om de
afgifte te stoppen drukt men opnieuw op
de koffieschakelaar (4), en draait men
de stoomknop (6) met de wijzers van de
klok mee.
Als er een ander product gebruikt
wordt dan is aanbevolen, wordt
hoe dan ook geadviseerd de instructies
van de fabrikant op de verpakking van
het ontkalkings-middel op te volgen.
11 REGELMATIGE SERVICE
Regelmatige service door een Erkend
Servicecentrum verlengt de levensduur en
de betrouwbaarheid van het apparaat.
Bewaar de oorspronkelijk verpakking die
kan dienen als bescherming tijdens het
transport.
12 INFORMATIE VAN JURIDI-
SCHE AARD
• Deze gebruiksinstructies bevatten de
informatie die nodig is voor een correct
gebruik, voor de bediening en zorgvuldig
onderhoud van het apparaat.
• Deze kennis, en het in acht nemen van
deze instructies vormen een voorwaarde
om het apparaat zonder risico’s in
volledig veilige omstandigheden te
kunnen gebruiken en onderhouden.
• Als nadere informatie gewenst wordt, of
als er bijzondere problemen ontstaan
waarvan men denkt dat die in de
gebruiksinstructies niet duidelijk genoeg
zijn uitgelegd, verzoeken wij u contact op
te nemen met de plaatselijke dealer of
rechtstreeks met de fabrikant.
• Wij wijzen er verder op dat de inhoud
van deze gebruiksinstructies geen deel
uitmaakt van een vorige of al bestaande
conventie, overeenkomst of juridisch
contract en dat ze er de substantie niet
van veranderen.
• Alle plichten van de fabrikant zijn
gebaseerd op het betreffende
verkoopcontract dat ook het volledige en
exclusieve regelement bevat met
betrekking tot de garantievoorwaarden.
De contractuele garantievoorschriften
worden noch beperkt, noch uitgebreid op
grond van deze uitleg.
• De gebruiksinstructies bevatten informatie
die beschermd wordt door het
auteursrecht.
• Het is verboden hen te fotokopiëren of in
een andere taal te vertalen, zonder
voorafgaande schriftelijke toestemming
van de fabrikant.
13 VERWERKING ALS AFVAL
• Maak het apparaat dat niet meer gebruikt
wordt, onbruikbaar.
• Haal de stekker uit het stopcontact en
snijd de elektrische kabel door la.
• Overhandig het niet meer gebruikte
apparaat aan een afvalverzamelcentrum.
Sin013a 165925300 Rev01.PMD 23/05/2002, 18.3988-89
Page 46

90 91
NOTA - NOTE - BEMERKUNG - NOTE - NOTA - NOTA - OPMERKING NOTA - NOTE - BEMERKUNG - NOTE - NOTA - NOTA - OPMERKING
___________________________________________________________
___________________________________________________________
___________________________________________________________
___________________________________________________________
___________________________________________________________
___________________________________________________________
___________________________________________________________
___________________________________________________________
___________________________________________________________
___________________________________________________________
___________________________________________________________
___________________________________________________________
___________________________________________________________
___________________________________________________________
___________________________________________________________
___________________________________________________________
___________________________________________________________
___________________________________________________________
___________________________________________________________
___________________________________________________________
___________________________________________________________
___________________________________________________________
___________________________________________________________
___________________________________________________________
___________________________________________________________
___________________________________________________________
___________________________________________________________
___________________________________________________________
___________________________________________________________
___________________________________________________________
___________________________________________________________
___________________________________________________________
___________________________________________________________
___________________________________________________________
___________________________________________________________
___________________________________________________________
___________________________________________________________
___________________________________________________________
___________________________________________________________
___________________________________________________________
___________________________________________________________
___________________________________________________________
___________________________________________________________
___________________________________________________________
___________________________________________________________
___________________________________________________________
___________________________________________________________
___________________________________________________________
___________________________________________________________
___________________________________________________________
___________________________________________________________
___________________________________________________________
___________________________________________________________
___________________________________________________________
___________________________________________________________
___________________________________________________________
___________________________________________________________
___________________________________________________________
___________________________________________________________
___________________________________________________________
___________________________________________________________
___________________________________________________________
___________________________________________________________
___________________________________________________________
___________________________________________________________
___________________________________________________________
___________________________________________________________
___________________________________________________________
___________________________________________________________
___________________________________________________________
___________________________________________________________
___________________________________________________________
Sin013a 165925300 Rev01.PMD 23/05/2002, 18.3990-91
Page 47

 Loading...