

Saeco Caoouccino Primea touch Plus, Prime Touch Plus Cappuccino Operation And Maintenance Manual

TABLE OF CONTENTS
Espresso Italia PTY LTD
www.espressoitalia.com.au
Freecall 1300 660 976
Operation and maintenance manual
Before using the machine, please read the attached operating instructions.
(notamment les consignes de sécurité) avant d'utiliser l'appareil.
FOR HOUSEHOLD USE ONLY
USAGE DOMESTIQUE SEULEMENT
Carefully read the safety rules
Mode d'emploi
Veuillez lire attentivement le mode d'emploi

IMPORTANT SAFEGUARDS
Espresso Italia PTY LTD
www.espressoitalia.com.au
Freecall 1300 660 976
When using electrical appliances, basic safety precautions should always be
followed to reduce the risk of fire, electric shock, and/or injury to persons,
including the following:
1 Read all instructions and information in this instruction book and any
other literature included in this carton referring to this product before
operating or using this appliance.
2 Do not touch hot surfaces. Use handles or knobs.
3 To protect against fire, electric shock and personal injury do not immerse
cord, plugs or appliance in water or other liquid.
4 Close supervision is necessary when any appliance is used by or near
children.
5 Unplug from outlet when not in use and before cleaning. Allow to
cool before putting on or taking off parts, and before cleaning the
appliance.
6 Do not operate any appliance with a damaged cord or plug or after
the appliance malfunctions or has been damaged in any way. Return
appliance to the nearest authorized service centre for examination,
repair or adjustment.
7 The use of accessory attachments not recommended by the appliance
manufacturer may result in fire, electric shock or personal injury.
8 Do not use outdoors.
9 Do not let cord hang over edge of table or counter, or touch hot
surfaces.
10 Do not place on or near a hot gas or electric burner, or in a heated
oven.
11 Always turn appliance “OFF”, then plug cord into the wall outlet. To
disconnect, turn switch to “OFF”, then remove plug from wall outlet.
12 Do not use appliance for other than intended household use.
13 Use extreme caution when using hot steam.
SAVE THESE INSTRUCTIONS

CAUTION
Espresso Italia PTY LTD
www.espressoitalia.com.au
Freecall 1300 660 976
This appliance is for household use only. Any servicing, other than cleaning
and user maintenance, should be performed by an authorized service
centre. Do not immerse machine in water. To reduce the risk of fire or
electric shock, do not disassemble the machine. There are no parts inside
the machine serviceable by the user. Repair should be done by authorized
service personnel only.
1 Check voltage to be sure that the voltage indicated on the nameplate
corresponds with your voltage.
2 Never use warm or hot water to fill the water tank. Use cold water only.
3 Keep your hands and the cord away from hot parts of the appliance
during operation.
4 Never clean with scrubbing powders or harsh cleaners. Simply use a soft
cloth dampened with water.
5 For optimal taste of your coffee, use purified or bottled water. Periodic
descaling is still recommended every 2-3 months.
6 Do not use caramelized coffee
INSTRUCTIONS FOR THE POWER
SUPPLY CORD
A A short power-supply cord is provided to reduce risks of tangling or
tripping over a longer cord.
B Longer extension cords are available and may be used if care is exercised in
their use.
C If a long extension cord is used:
1 the marked electrical rating of the extension cord should be at least as great
as the electrical rating of the appliance.
2 if the appliance is of the grounded type, the extension cord should be a
grounding type
3 the cord should not hang from the table to avoid the risk of tangling or
tripping.

2
Espresso Italia PTY LTD
www.espressoitalia.com.au
Freecall 1300 660 976
TABLE OF CONTENTS
GENERAL INFORMATION.................................................................................................................................3
MACHINE........................................................................................................................................................4
ACCESSORIES ....................................................................................................................................................................4
INSTALLATION................................................................................................................................................5
STARTING THE MACHINE ........................................................................................................................................................5
MANUAL PRIMING OF THE WATER CIRCUIT ....................................................................................................................................6
SETTING THE LANGUAGE AND THE CLOCK ....................................................................................................................................6
"AQUA PRIMA" FILTER ..........................................................................................................................................................7
DISPLAY .........................................................................................................................................................8
CHOOSE COFFEE AROMA ........................................................................................................................................................8
ADJUSTMENTS...............................................................................................................................................9
COFFEE INTENSITIY ..............................................................................................................................................................9
ADJUSTING THE HEIGHT OF THE DRIP TRAY. .................................................................................................................................9
FILLING THE MILK CONTAINER..................................................................................................................................................9
BEVERAGE DISPENSING................................................................................................................................10
ESPRESSO / COFFEE / LONG COFFEE .......................................................................................................................................10
DISPENSING BEVERAGES WITH GROUND COFFEE ...........................................................................................................................11
HOT WATER DISPENSING ......................................................................................................................................................12
LATTE MACCHIATO .............................................................................................................................................................12
DISPENSING HOT MILK ........................................................................................................................................................13
ESPRESSO MACCHIATO ........................................................................................................................................................14
CAPPUCCINO ...................................................................................................................................................................14
BEVERAGE PROGRAMMING ..........................................................................................................................15
BEVERAGE PROGRAMMING MENU ............................................................................................................................................15
ESPRESSO / COFFEE / LONG COFFEE PROGRAM ........................................................................................................................... 15
PROGRAMMING MILK BEVERAGES ............................................................................................................................................16
MACHINE SETTINGS ..................................................................................................................................... 18
PROGRAMMING THE MACHINE ................................................................................................................................................18
LANGUAGE MENU ............................................................................................................................................................. 19
CUP ILLUMINATION MENU .................................................................................................................................................... 19
AQUA PRIMA FILTER MENU ................................................................................................................................................... 19
WATER HARDNESS MENU .................................................................................................................................................... 20
RINSE MENU ................................................................................................................................................................... 20
CUP WARMING PLATE MENU ................................................................................................................................................. 21
ACCOUSTIC TONES AND ALARMS MENU.................................................................................................................................... 21
DISPLAY MENU ................................................................................................................................................................ 21
BEVERAGE SETTINGS ..........................................................................................................................................................22
ADJUSTMENT OF THE COFFEE BREW TEMPERATURE ..................................................................................................................... 22
AROMA ADJUSTMENT FOR COFFEE BREWING.............................................................................................................................. 23
PREBREWING ADJUSTMENT (ONLY COFFEE BEVERAGES) ................................................................................................................ 23
ADDITIONAL FUNCTIONS ......................................................................................................................................................24
COFFEE OF THE WORLD FUNCTION ......................................................................................................................................... 24
DEMO MODE ................................................................................................................................................................... 26
BEVERAGE COUNTER FUNCTION .............................................................................................................................................26
MAINTENANCE..................................................................................................................................................................27
MILK CIRCUIT RINSE CYCLE .................................................................................................................................................. 27
MILK CIRCUIT WASH CYCLE ..................................................................................................................................................28
COFFEE CIRCUIT CLEANING CYCLE (BREW GROUP WASH CYCLE) ....................................................................................................... 31
BLOCK DISPLAY .............................................................................................................................................................. 31
DESCALING .................................................................................................................................................................... 32
CLOCK SETTINGS ..............................................................................................................................................................34
TIME SETTING .................................................................................................................................................................34
AUTOMATIC TIMER SETTINGS................................................................................................................................................ 35
ENERGY SAVING SETTINGS ................................................................................................................................................... 37
SPECIAL .........................................................................................................................................................................38
FACTORY SETTINGS ...........................................................................................................................................................38
CLEANING AND MAINTENANCE ....................................................................................................................39
GENERAL MACHINE CLEANING ................................................................................................................................................39
MILK CONTAINER MAINTENANCE AND CLEANING...........................................................................................................................40
CLEANING THE BREW GROUP .................................................................................................................................................42
GRINDER MAINTENANCE ......................................................................................................................................................43
ERROR CODES ..............................................................................................................................................44
TECHNICAL DATA..........................................................................................................................................45
SAFETY RULES .............................................................................................................................................46
3
Espresso Italia PTY LTD
www.espressoitalia.com.au
Freecall 1300 660 976
GENERAL INFORMATION
The coffee machine is intended for preparing espresso by using either coffee beans or ground coffee. It
includes an automatic device for preparing milk beverage and a hot water dispenser.
The machine is elegantly designed for domestic use and is not suitable for continuous heavy duty or
professional use.
Warning: no liability is assumed for any damage caused by:
• Incorrect use not in accordance with the intended uses;
• Repairs not carried out by authorized customer service centers;
• Tampering with the power cord;
• Tampering with any part of the machine;
• The use of non-original spare parts and accessories;
• Failure to descale the machine or use at temperatures below 0°C.
IN THESE CASES, THE WARRANTY IS NOT VALID.
A WARNING TRIANGLE DRAWS ATTENTION TO ALL THE INSTRUCTIONS THAT
ARE IMPORTANT FOR USER SAFETY. PLEASE FOLLOW THESE INSTRUCTIONS
CAREFULLY TO AVOID SERIOUS INJURY!
HOW TO USE THESE OPERATING INSTRUCTIONS
Keep these operating instructions in a safe place and make them available to anyone else who may use the coffee
machine. For further information or if you experience problems not completely or sufficiently addressed in these
instructions, please contact an Authorized Customer Service Center.
KEEP THESE INSTRUCTIONS
4
Espresso Italia PTY LTD
www.espressoitalia.com.au
Freecall 1300 660 976
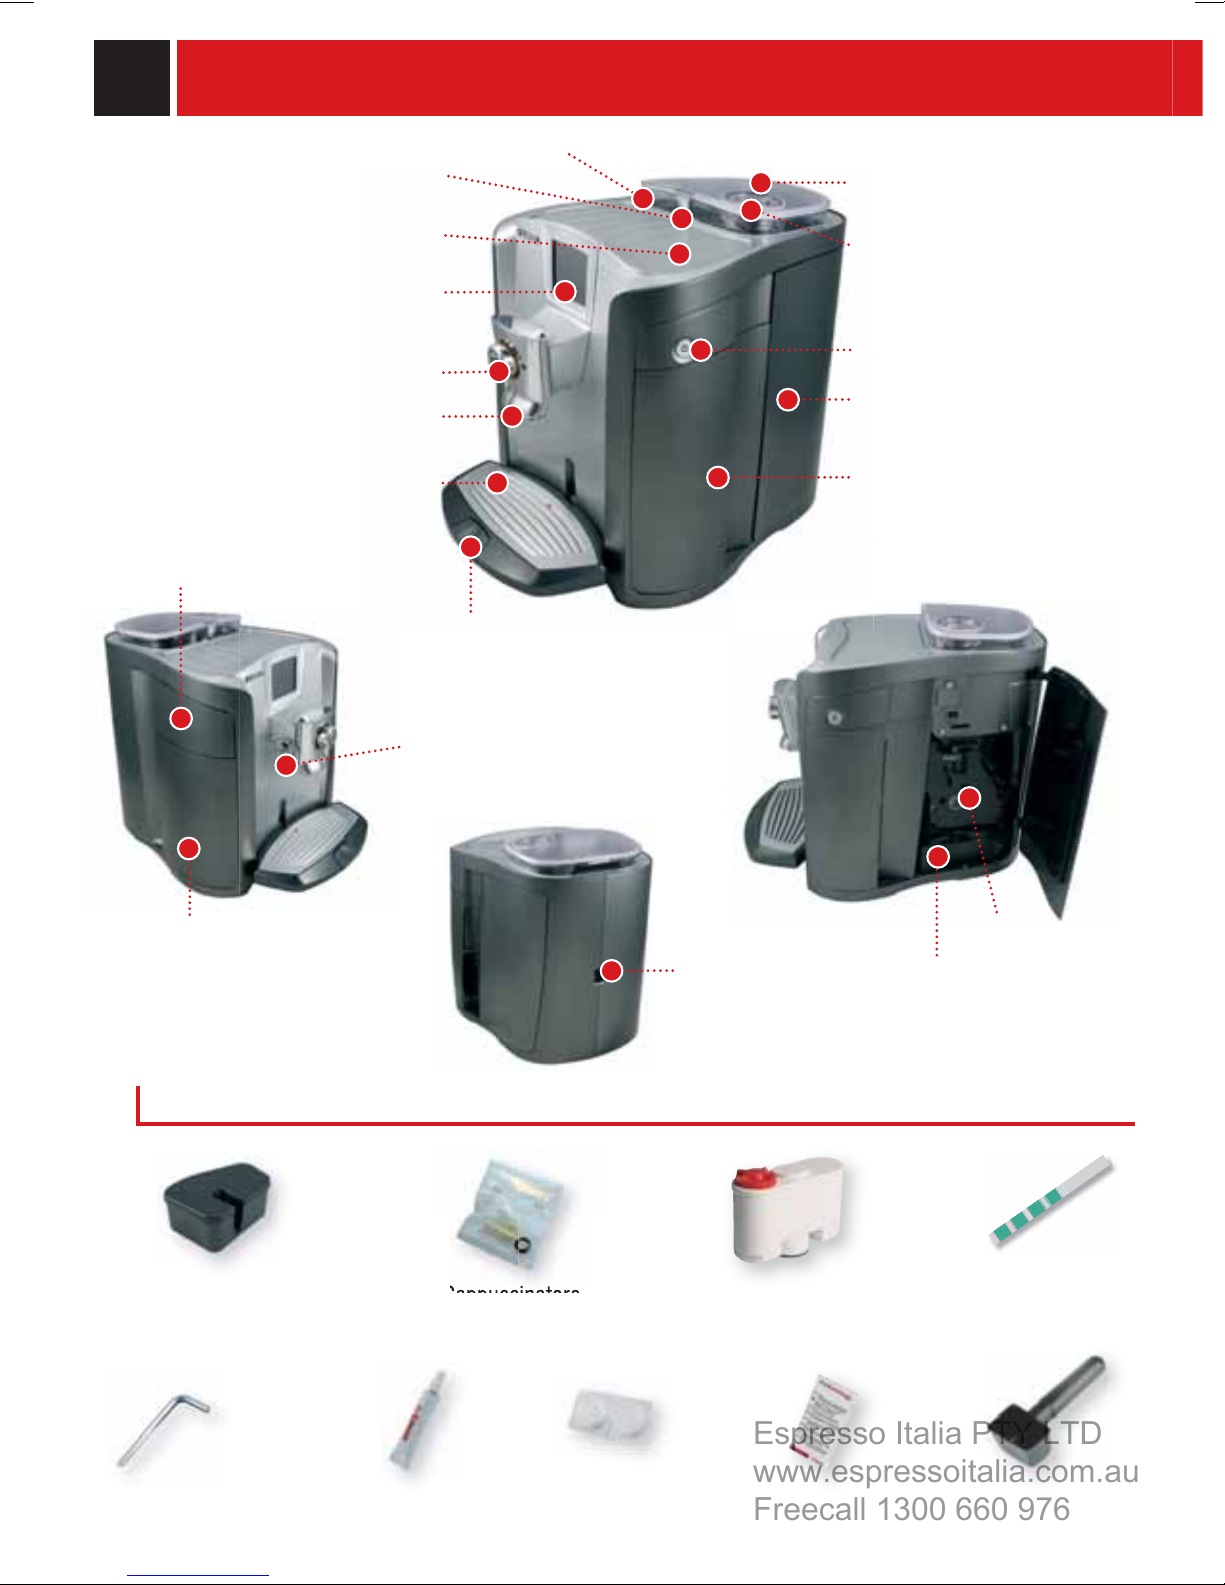
MACHINE
Open coffee bean hopper
Cup warming plate
TOUCH SCREEN Display
Dispensing head
Drip tray + grill and fl oat
Compartment for milk
container
button
SBS
Coffee bean hopper
Coffee bean hopper cover
Compartment for preground coffee
Main switch
Service door
Coffee grounds drawer
Button for raising/lowering
the drip tray
Water tank
ACCESSORIES
Additional milk container
(without cappuccinatore)
Hot water spout
Cappuccinatore
maintenance kit
Socket for
power cord
"Aqua Prima" Filter
Brew group
Drip tray
Water hardness
tester
Grinder
adjustment key
Lubricant for the
brew group
Cleaning detergent
(Brew group)
Detergent for cleaning
milk container
Ground coffee
measuring scoop
5
INSTALLATION
Espresso Italia PTY LTD
www.espressoitalia.com.au
Freecall 1300 660 976
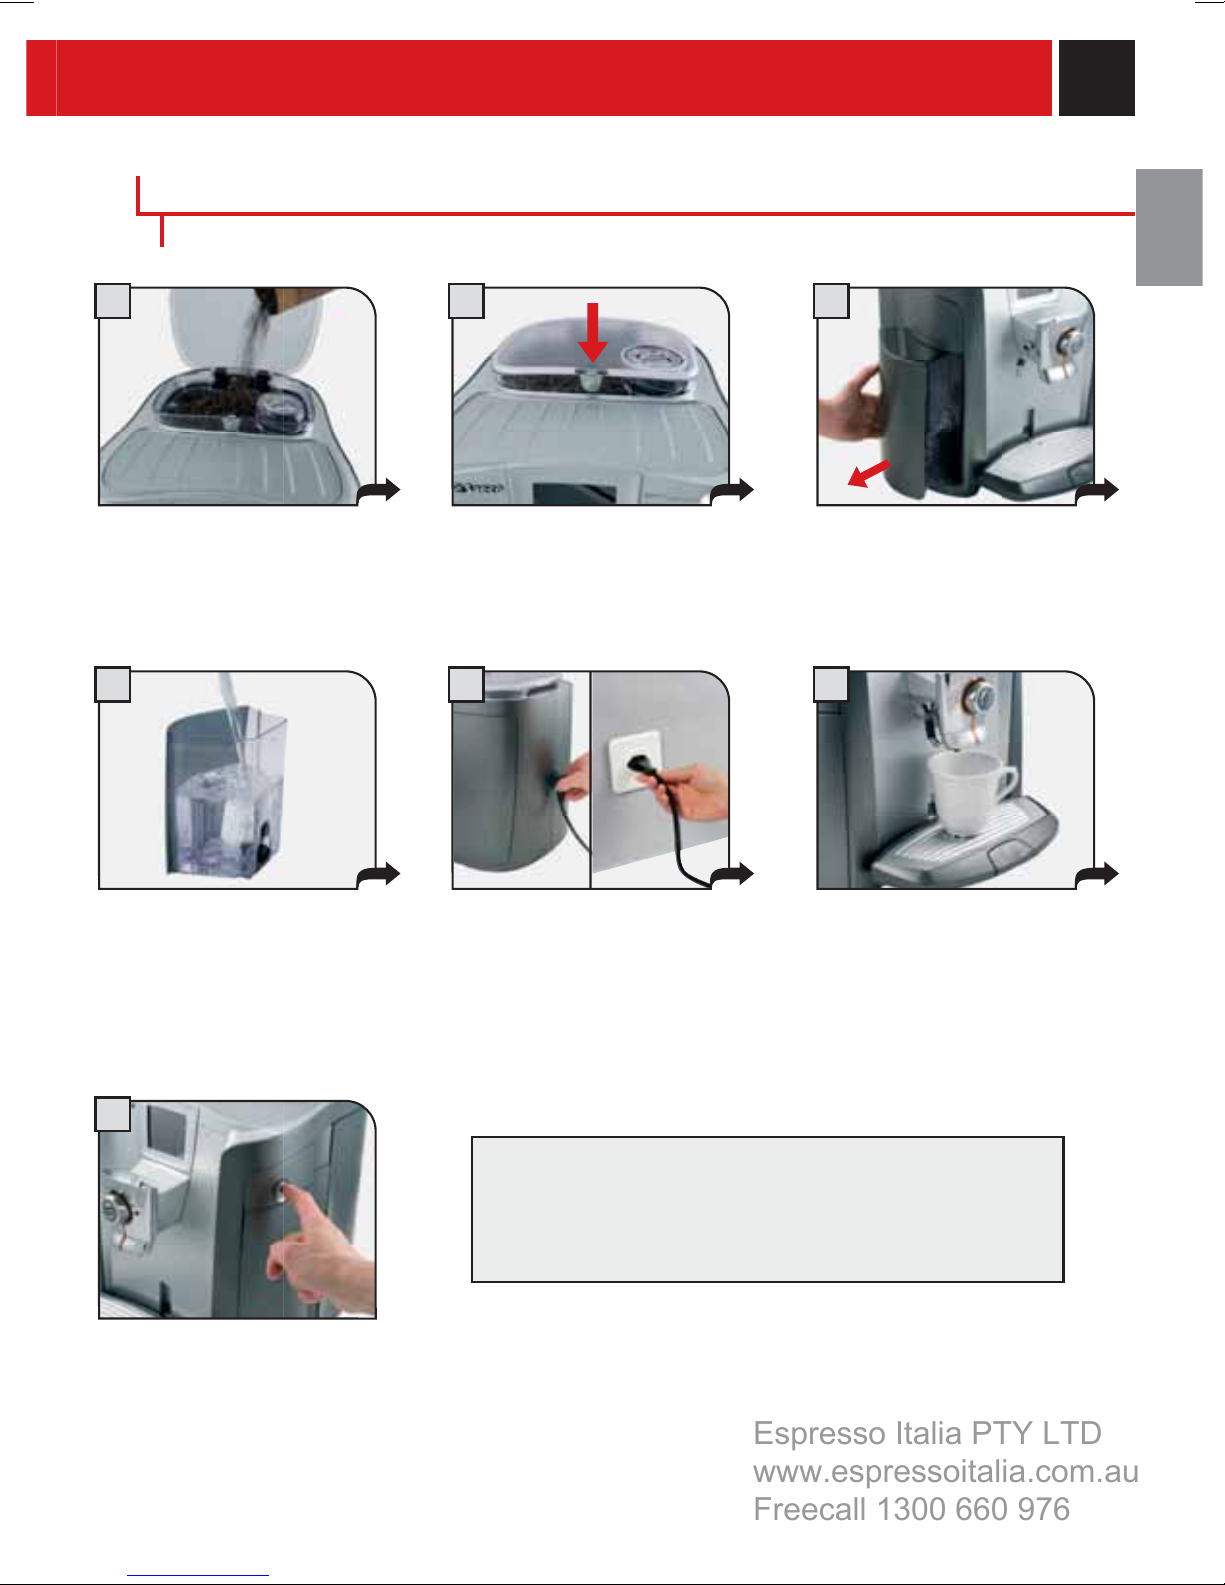
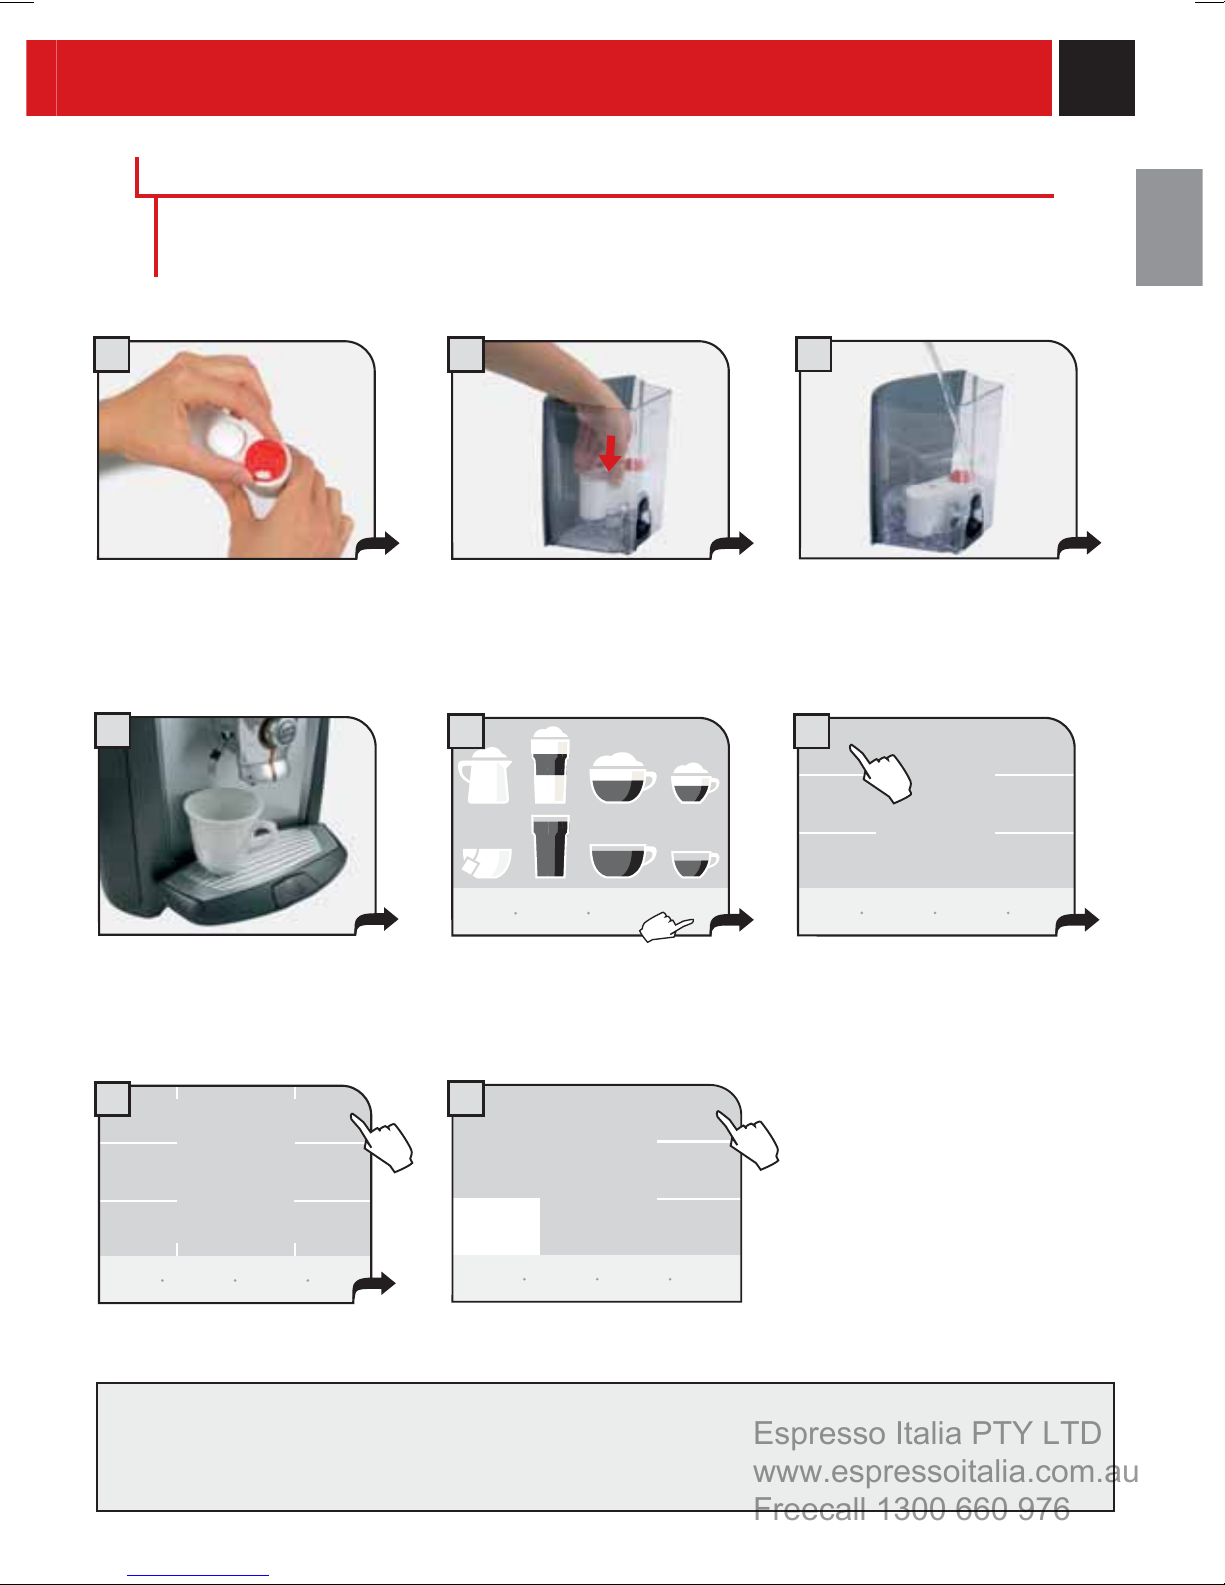
STARTING THE MACHINE
Make sure that the main power button is not switched to the “ON” position.
1 2 3
Press the button on the coffee
hopper to open the cover. Fill the
hopper with coffee beans.
4
Fill the tank with fresh drinking
water. Do not exceed the “max”
level indicated on the water tank.
Once fi lled place the tank back
into the machine.
Close the cover pushing it down
completely.
Attach the female end of the
power cord to the machine. Insert
the male end into the power
outlet.
Remove the water tank.
We recommend installing the "Aqua
Prima" fi lter (see page 7).
65
Place a container beneath the hot
water spout.
7
Press the main switch once to turn
on the machine. The appliance
automatically performs a diagnosis
of its functions. This test is
performed each time the machine
is turned on.
The machine automatically
primes the water circuit.
The machine is now ready
for use.
Water may not be dispensed
into the glass.
This should not be considered
a malfunction.
TO ASSESS WATER HARDNESS, SEE "WATER
HARDNESS MENU" ON PAGE 20.
6
Espresso Italia PTY LTD
www.espressoitalia.com.au
Freecall 1300 660 976
INSTALLATION
MANUAL PRIMING OF THE WATER CIRCUIT
Manually prime the water circuit only when the following
display appears.
Note: fi rst make sure that the water tank is full.
1 2 3
priming the machine
start
priming the machine
avv io
Position a container under the hot
water spout (it is possible that
water will not come out of the
spout).
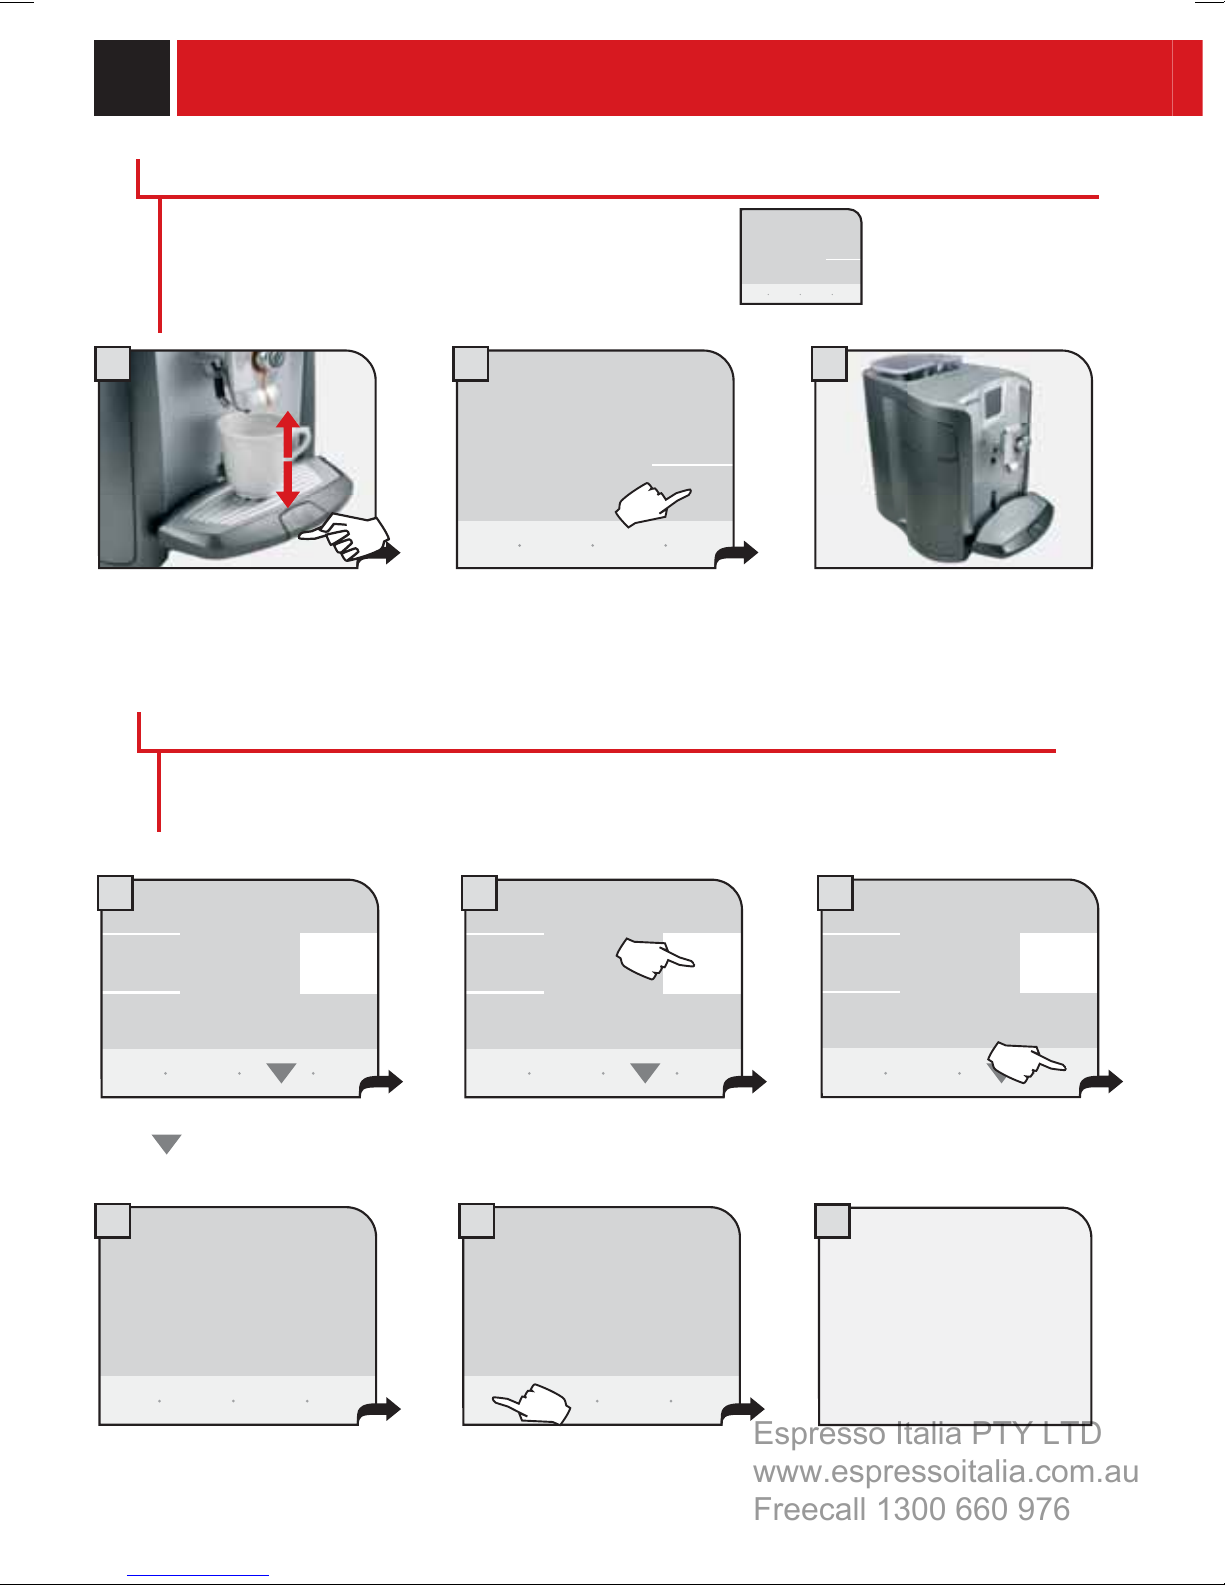
SETTING THE LANGUAGE AND THE CLOCK
When the machine is switched-on for the fi rst time, it requires the selection of the desired language.
This allows you to adjust the parameters of the beverages to the typical parameters of the country
where the machine is used. This is why some languages are differentiated also by country.
1
deutsch
français
italiano (ch)
language
1/2
Select the desired language.
Press
for the other languages.
Italiano (i)
english
nederlands
ok
Press the display once and the
machine will begin priming the
water circuit.
2
deutsch
français
italiano (ch)
language
1/2
Italiano (i)
english
nederlands
ok
Press to select the desired
language.
When the prime circuit cycle is
fi nished, remove the container.
The machine is now ready for
use.
3
deutsch
français
italiano (ch)
language
1/2
Italiano (i)
english
nederlands
ok
Press “ok”.
4
self-test
demo
The machine starts and displays
the menu in the selected
language.
4
self-test
5
See manual on page 34 to
adjust the clock.
demo
If desired, the “demo” function (see page 26)
may be activated by pressing the key, each time
the machine carries out a self-diagnosis.
7
«AQUA PRIMA» FILTER
Espresso Italia PTY LTD
www.espressoitalia.com.au
Freecall 1300 660 976
To improve the quality of the water used, install the "Aqua Prima" fi lter. After installation, go to the
fi lter activation program (see programming). In this mode the machine advises the user when the
fi lter must be replaced.
1 2
Remove the "Aqua Prima" fi lter
from its packaging. Enter the date
of the current month.
4
Place a container beneath the
hot water spout.
Insert the fi lter in its place within
the empty tank (see fi gure).
Press down until it clicks into
place.
5
show icon
explanation
my custom
coffee
program-
ming
menu
Press "programming menu".
3
Fill the tank with fresh water. Let
the fi lter soak for 30 minutes. After
30 minutes discard the water in the
tank and refi ll with fresh water.
6
machine
settings
specials
main-
tenance
energy
saving
main
menu
beverage
settings
extras
clock
settings
back to
coffee
menu
Press "machine settings".
7
language
display
alerts &
acoustic
settings
go back
illumination
machine
settings
restore
default
settings
cup
cup
warmer
water
¿OWHU
water
hardness
rinsing
back to
menu
Press "water fi lter".
The machine then activates the "Aqua Prima" fi lter. Wait for the cycle to fi nish automatically.
When the activation cycle ends, the machine proceeds to the choose beverage menu.
NOTE: occasionally, the machine may not dispense the desired quantity of water for the correct water
fi lter initialization. In this case, repeat the operations described from point 6 and following.
8
water
¿OWHU
not
inserted
go back
restore
default
settings
save
settings
Press "activate fi lter".
activate
¿OWHU
inserted
back to
menu
8
Espresso Italia PTY LTD
www.espressoitalia.com.au
Freecall 1300 660 976
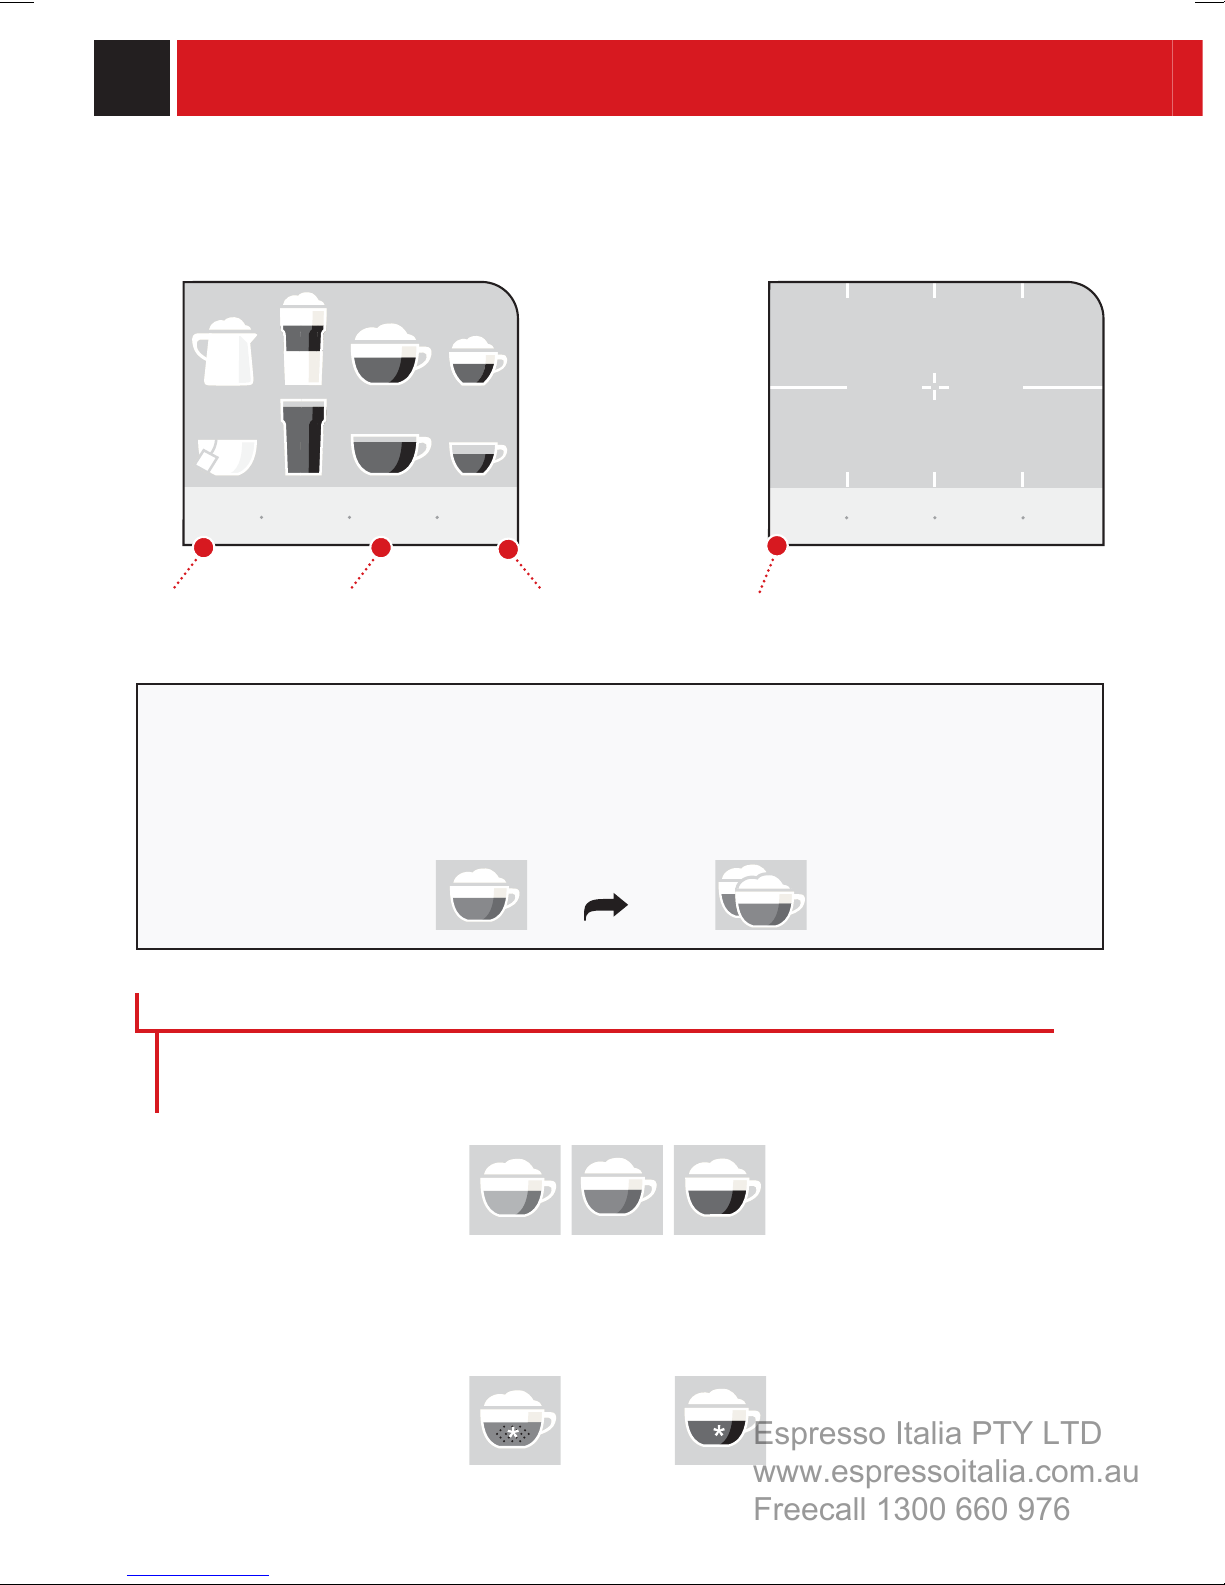
DISPLAY
It is possible to change the type of display and choose between " icon format" and "text format"
ICON FORMAT
show icon
explanation
Go to the "text
format" menu
Beverage
programming
my custom
coffee
• To get the desired beverage, press the corresponding symbol on the display.
The machine automatically performs all the necessary operations.
• To make 2 cups, press the beverage symbol twice.
program-
ming
menu
Accessing the
programming menu
Go to the "icon
format" menu
hot
milk
hot
water
show
icon
TEXT FORMAT
latte
macchiato
coffee
long
cappuccino
medium strongmedium
coffee espresso
medium strongmedium
my custom
coffee
espresso
macchiato
program-
ming
menu
press twice
CHOOSE COFFEE AROMA
The intensity of the color on the cup icon (only valid for coffee beverages) indicates the aroma, or
quantity of coffee to be ground, for preparing the beverage. The greater the quantity of coffee
ground the stronger the coffee will taste.
weak medium strong
When the machine is programmed to use pre-ground coffee or when a beverage is customized, the
icon is displayed in a different way and/or accompanied by an asterisk (see section on
“programming beverages”.)
pre-ground customization

9
ADJUSTMENTS
Espresso Italia PTY LTD
www.espressoitalia.com.au
Freecall 1300 660 976
COFFEE INTENSITIY
The SBS system has been carefully designed to give your coffee the intense taste you desire. Simply
turn the dial and you will notice that the coffee goes from mild intensity to strong intensity.
SBS – SAECO BREWING SYSTEM
SBS adjusts the intensity of the brewed coffee,
and can even be adjusted while brewing. Any
adjustment has an immediate effect on the
brewing coffee.
ADJUSTING THE HEIGHT OF THE DRIP TRAY.
Adjust the drip tray before dispensing any beverages.
Height adjustable drip tray.
To raise the drip tray, press lightly on the lower part of the button. To lower the tray,
press lightly on the upper part of the button; when the desired height is reached,
release the button.
Note: There is a red fl oater in the drip tray. When it rises, the tray must be emptied
and washed.
MILD
COFFEE
MEDIUM
COFFEE
STRONG
COFFEE
FILLING THE MILK CONTAINER
Only the container with the cappuccinatore must be fi lled before preparing beverages with milk. Do not
use milk after the best-before date. (Important! Refer to the instructions for maintenance and cleaning
of the cappuccinatore on page 40).
Open the milk compartment and
remove the container located
within.
21
We recommend using the other
supplied container to store any
remaining milk in the refrigerator.
Clean the circuits using only the
container with the cappuccinatore.
Remove the container cover and pour in the milk. DO NOT
EXCEED THE MAXIMUM LEVEL shown in the fi gure. Close
the container and place it back in the milk compartment.
Make sure to carefully close the compartment.
10
Espresso Italia PTY LTD
www.espressoitalia.com.au
Freecall 1300 660 976
BEVERAGE DISPENSING
DISPENSING COFFEE, HOT WATER AND MILK CAN BE INTERRUPTED AT ANY TIME BY
SELECTING THE "STOP ... DISPENSING" BUTTON.
THEDISPENSED MILKCANREACHHIGHTEMPERATURES: THEREISADANGEROF
SCALDING. DO NOT TOUCH IT WITH BARE HANDS.
THE MILK USED MUST HAVE BEEN PROPERLY PRESERVED.
DONOTUSEITAFTERTHEEXPIRATIONDATEONTHEPACKAGE.
Check that all the containers are clean. To do this operation, follow the instructions in the "Cleaning and
Maintenance" (see page 39).
WHEN YOU HAVE FINISHED PREPARING BEVERAGES CONTAINING MILK, PROCEED WITH
CLEANING THE CONTAINER AND THE MACHINE'S CIRCUIT.
To brew 2 cups, the machine dispenses half of the entered quantity and briefly interrupts dispensing in
order to grind the second serving of coffee. Coffee dispensing is then restarted and completed.If a milk
beverage has been chosen, the machine automatically dispenses the milk. If the first coffee is interrupted,
the second will not be dispensed.
ESPRESSO / COFFEE / LONG COFFEE
This procedure shows how to dispense an espresso. To dispense another type of coffee, press the
appropriate icon. Use appropriate espresso or coffee cups so that the coffee will not overflow.
1 2
show icon
explanation
my custom
coffee
Choose the beverage and press
the corresponding icon on the
program-
ming
menu
The machine begins grinding the
quantity of coffee entered.
display: once for 1 cup and twice
for 2 cups.
The machine ends dispensing automatically according to the quantity determined by the manufacturer. It is
possible to customize this quantity. See page 15.
3
espresso
stop
coffee
dispensing
Begin dispensing the selected
beverage.
If you wish to interrupt the dispensing cycle, press the " stop coffee dispensing" button.
11
Espresso Italia PTY LTD
www.espressoitalia.com.au
Freecall 1300 660 976
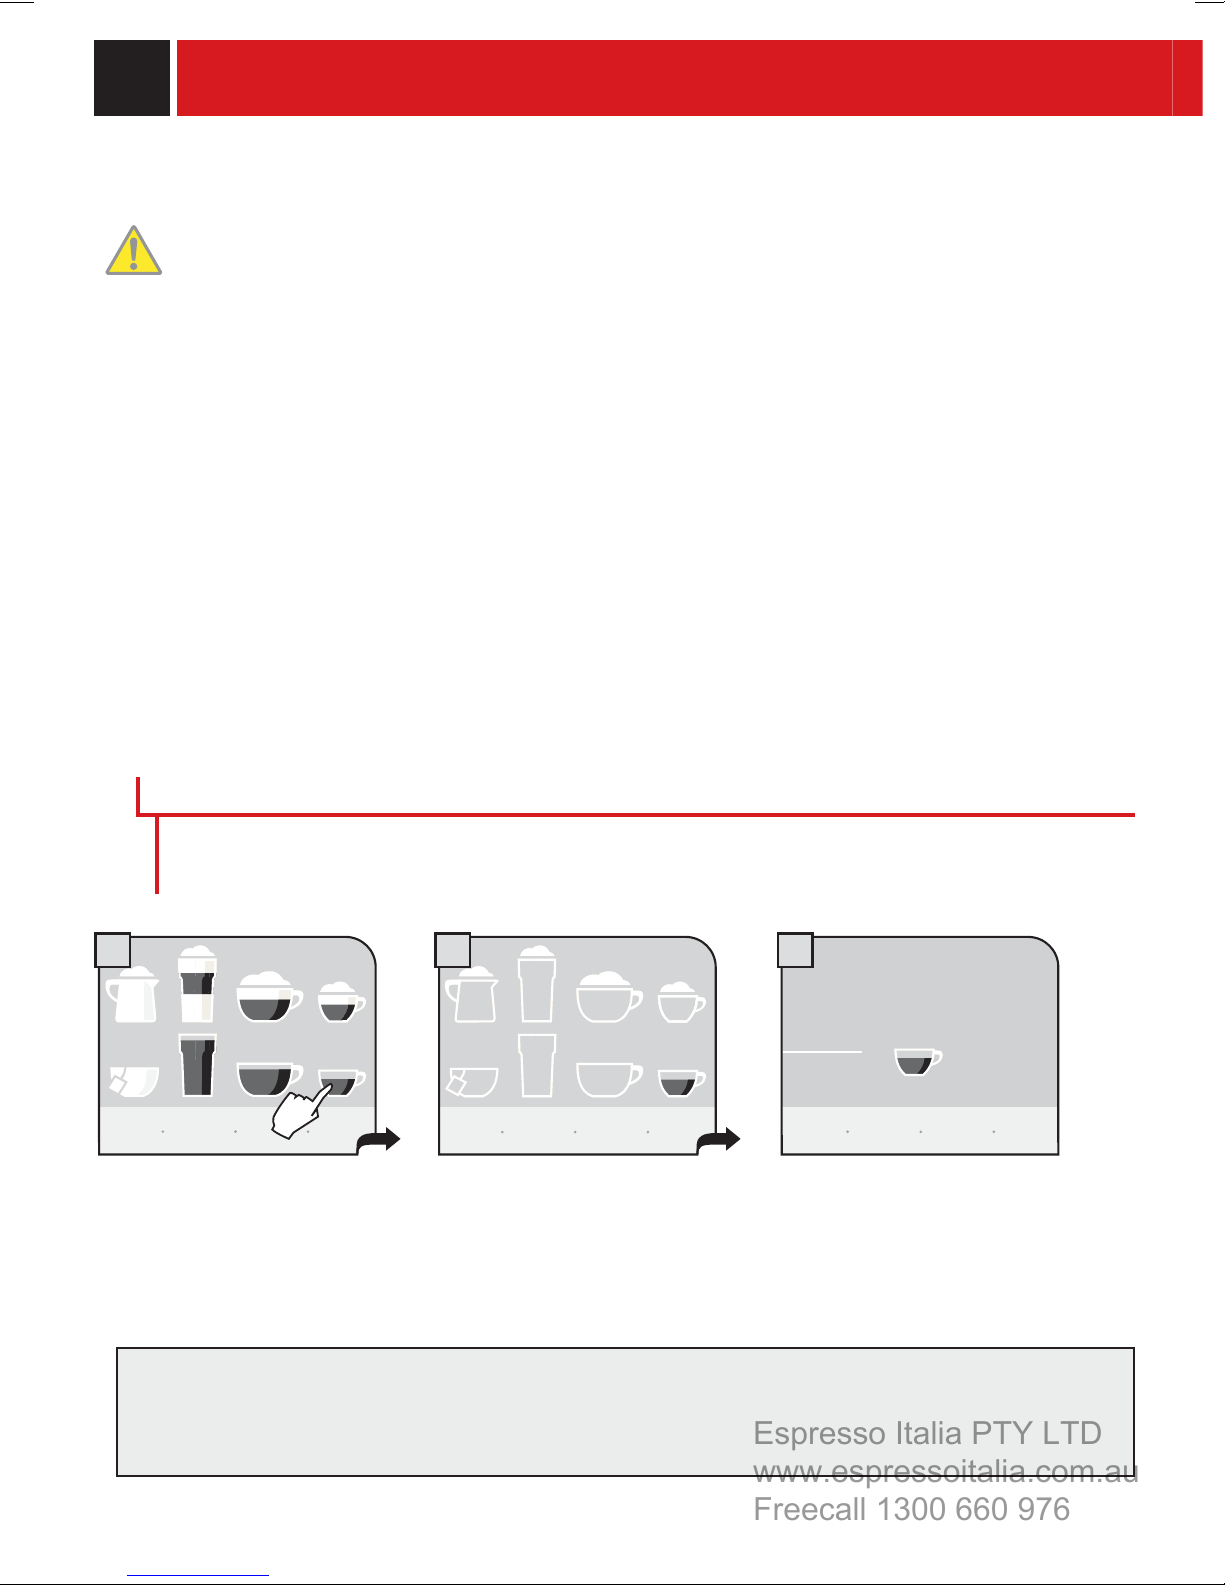
DISPENSING BEVERAGES WITH GROUND COFFEE
Pre-ground coffee must be poured into the appropriate compartment positioned next to the coffee bean
hopper. Pour in only coffee ground for espresso machines and never coffee beans or instant coffee. (see the
"Beverage programming" chapter on page 15).
WARNING: PUT PRE-GROUND COFFEE IN THE COMPARTMENT ONLY WHEN YOU WISH TO
DISPENSE THIS TYPE OF BEVERAGE.
INSERT ONLY ONE SCOOP OF GROUND COFFEE AT A TIME. TWO CUPS OF COFFEE CANNOT BE
DISPENSED AT THE SAME TIME.
In the example given below, we chose to dispense a long coffee using pre-ground coffee.
The customized choice of using pre-ground coffee is shown on the display with an asterisk next to the
chosen beverage.
1 2 3
show icon
explanation
my custom
coffee
Press the appropriate button and
the display will show:
program-
ming
menu
A message appears, reminding
the user ground coffee in the
add preground
go
back
coffee
start!
appropriate compartment.
4 5
add preground
go
back
coffee
start!
stop
coffee
dispensing
long
coffee
Pour ground coffee into the preground coffee compartment using
the measuring scoop provided
with the accessories.
Press the "start! "button to start
dispensing.
Note:
• After 1 minute from when the message appears (2), if brewing has not started the machine will return to
the main menu and dump any inserted coffee into the coffee grounds drawer.
• If no pre-ground coffee is poured into the compartment, only water will be dispensed.
• If 2 or more scoops of coffee are added, the machine will not dispense the beverage and the coffee in the
compartment will be dumped into the coffee grounds drawer.
Begins dispensing the selected
beverage.
12
Espresso Italia PTY LTD
www.espressoitalia.com.au
Freecall 1300 660 976
BEVERAGE DISPENSING
HOT WATER DISPENSING
WHEN THE HOT WATER BEGINS TO DISPENSE, SHORT SPURTS OF HOT WATER MAY BE
DISPENSED WHICH POSE A RISK OF SCALDING. THE HOT WATER SPOUT CAN REACH
HIGH TEMPERATURES: AVOID TOUCHING IT WITH BARE HANDS.
1
show icon
explanation
my custom
coffee
program-
ming
menu
Press the hot water icon once.
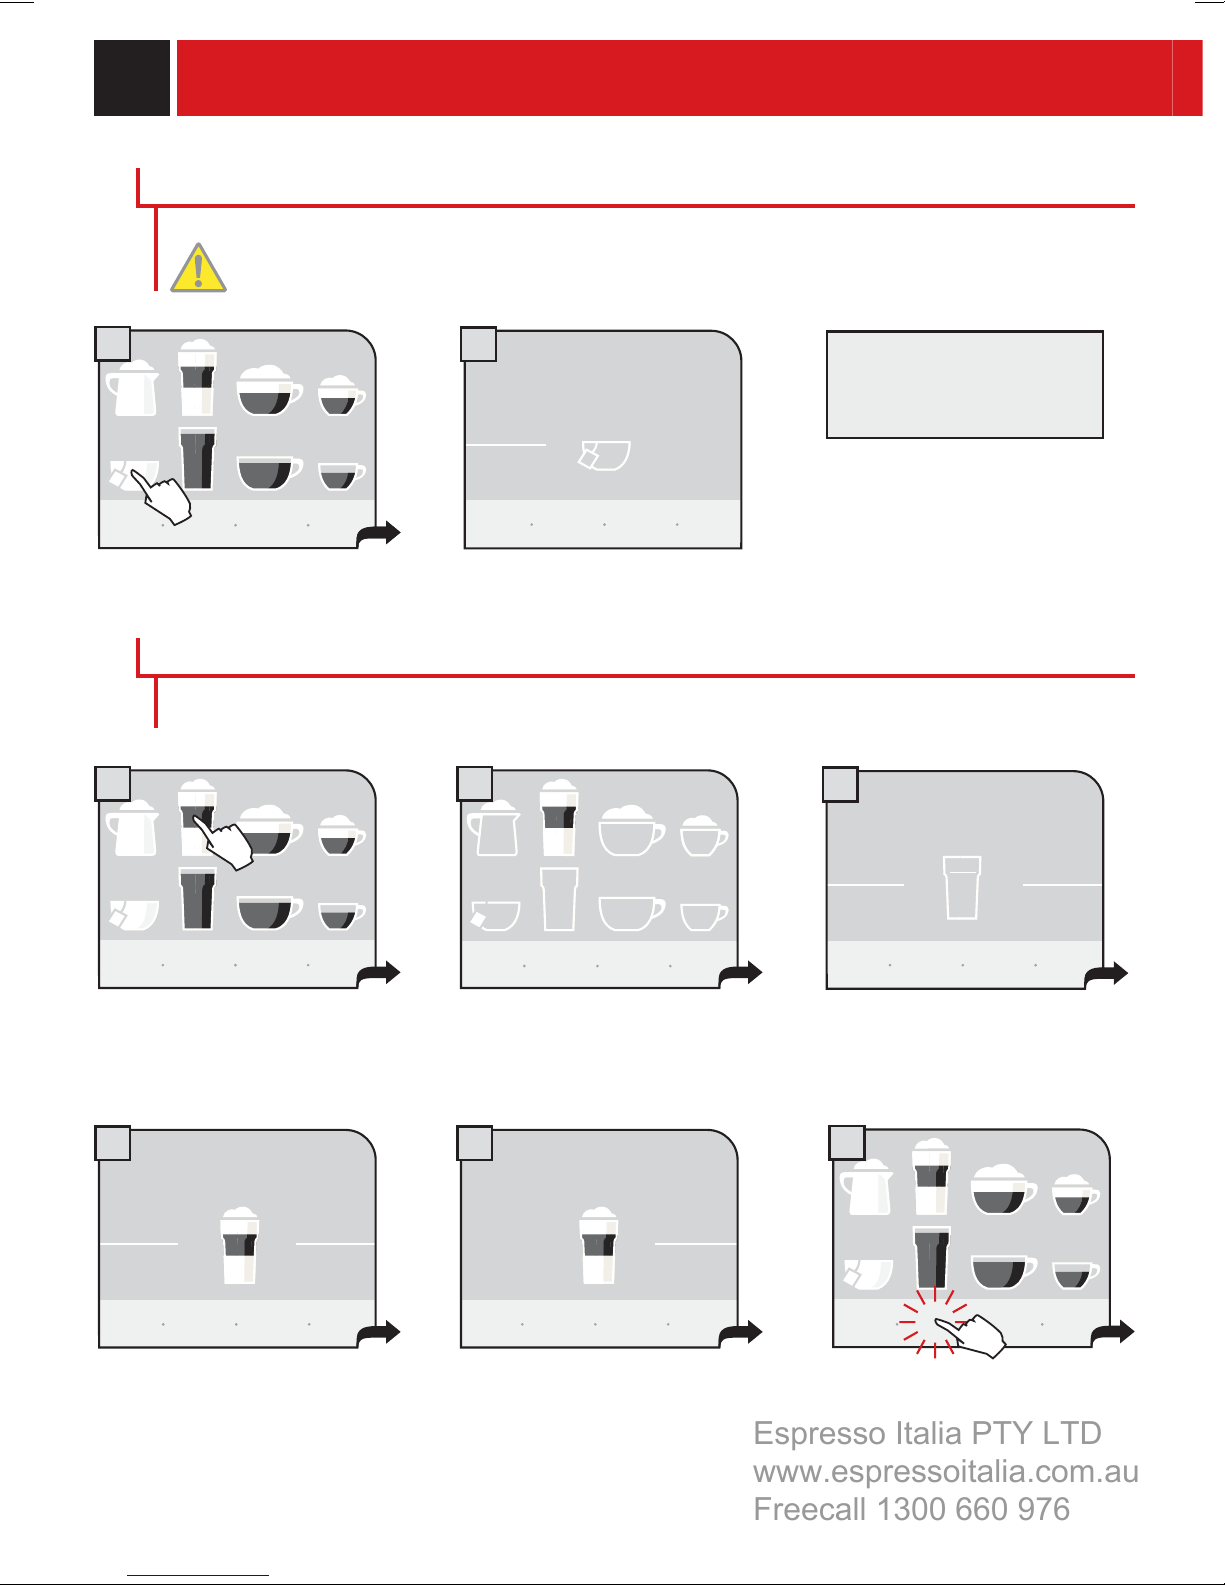
LATTE MACCHIATO
SEE INSTRUCTIONS ON PAGE 40 FOR OPTIMAL MILK DISPENSING
Fill the milk container
1
show icon
explanation
my custom
coffee
program-
ming
menu
2
hot
water
stop
water
dispensing
Begin hot water dispensing.
2
To dispense another cup of
hot water, repeat this
operation.
3
stop
coffee
dispensing
latte
macchiato
stop
milk
dispensing
Select the beverage and press the
corresponding icon on the
display: once for 1 cup and twice
for 2 cups.
4 5
stop
coffee
dispensing
latte
macchiato
stop
milk
dispensing
Once milk has been dispensed, the
machine automatically prepares the
coffee.
The machine begins grinding the
quantity of coffee entered.
latte
macchiato
add
milk
After this, the machine allows you to
dispense more milk if you wish. This
option remains active for
approximately 2 seconds. To activate,
press the “add milk” button.
When the coffee finishes grinding,
the machine will automatically
dispense the programmed quantity
of hot milk.
6
show icon
explanation
milk
rinsing
my custom
coffee
program-
ming
menu
The “milk rinsing” icon will flash
once the machine is done
dispensing in order to clean the
milk circuit. Press the “milk
rinsing” icon to clean the internal
milk circuit.
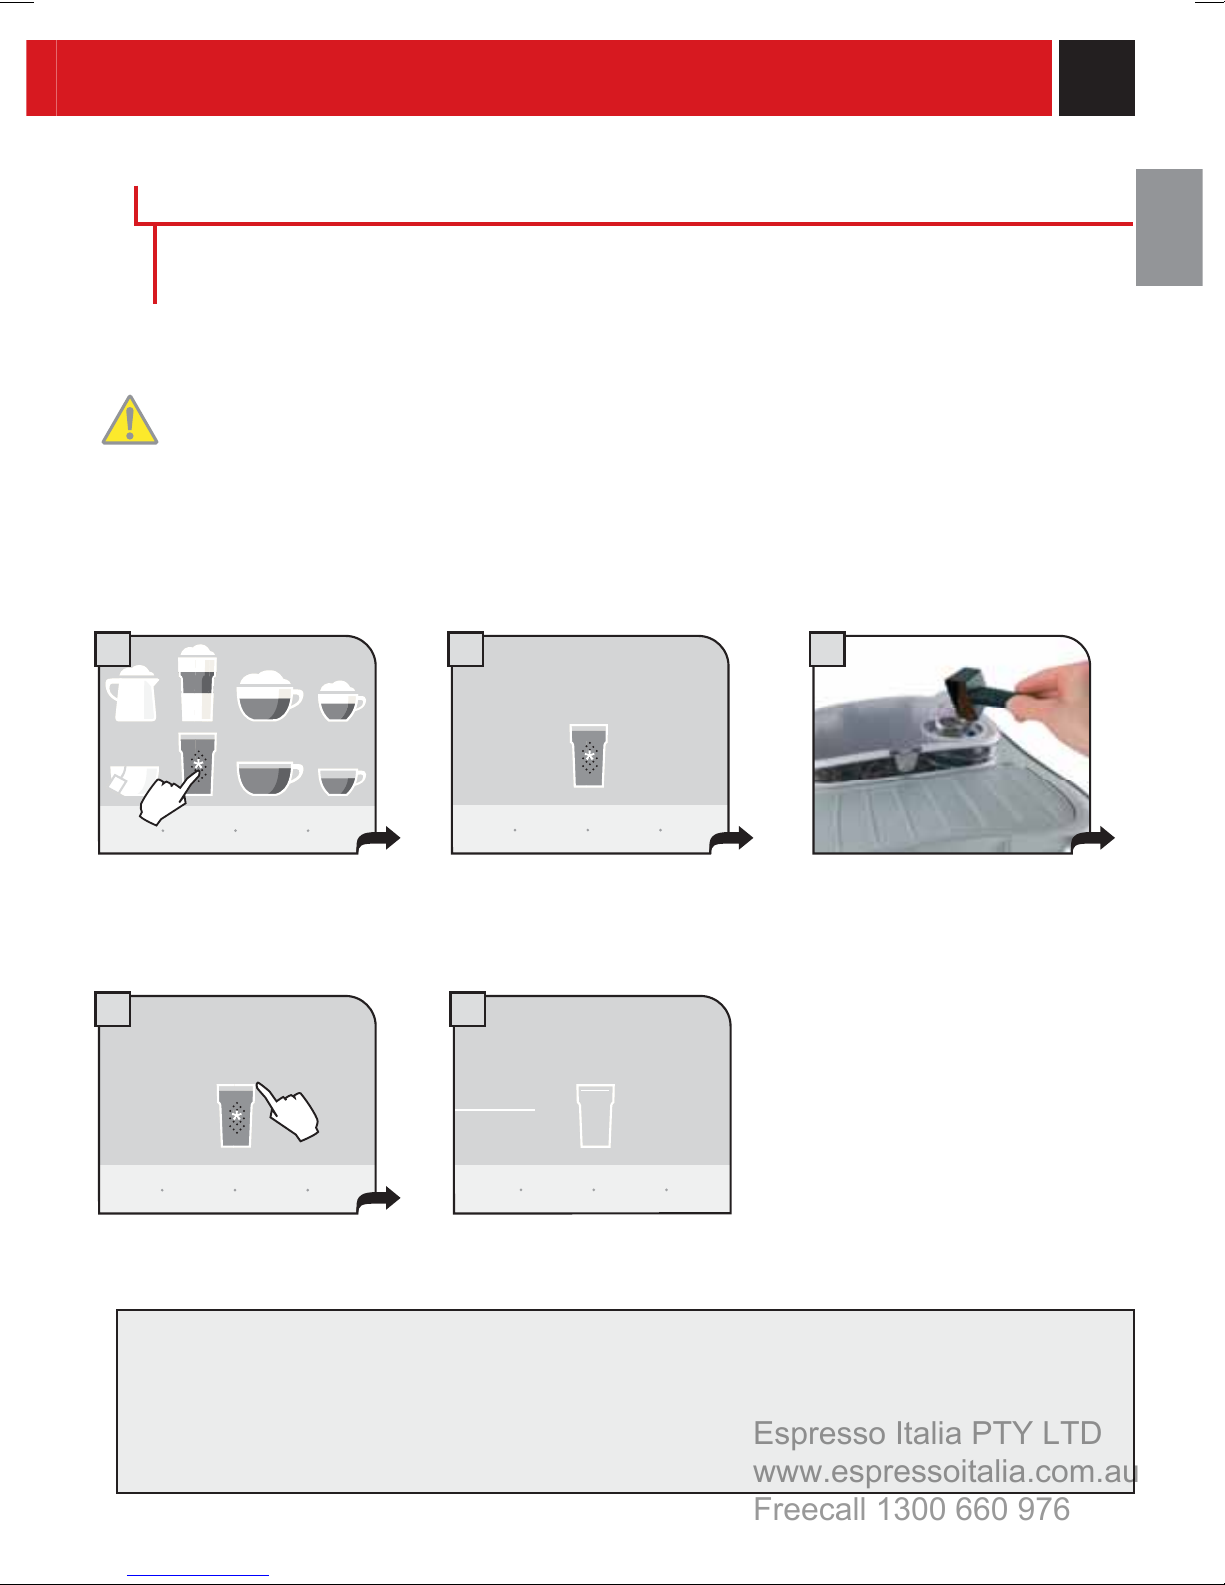
13
If the user wishes to continue preparing other drinks the machine
Espresso Italia PTY LTD
www.espressoitalia.com.au
Freecall 1300 660 976
will keep the “milk rinsing” signal active.
After 20 minutes of inactivity, the machine requires the user to
perform a rinsing cycle as described in Step 7. If the machine is
turned off immediately after dispensing a milk beverage, the next
time the machine is turned on it will require the user to perform a
rinsing cycle.
Note: Before performing the “milk rinsing” function make sure that:
1. an adequate sized container is placed under the dispensing head
2. the milk container with the cappuccinatore is fi lled with fresh
drinking water and inserted in the machine.
3. the water tank is full of fresh water.
show icon
explanation
milk
cleaning
my custom
coffee
After 14 days from the fi rst dispensing
of a milk-based beverage, the message
“milk cleaning” is displayed; it is
advisable to clean the milk circuits as
shown on page 28.
After another 7 days the machine stops
dispensing milk-based beverages and
the milk circuits must be washed;
during this phase, coffee and hot water
may be brewed.
program-
ming
menu
7
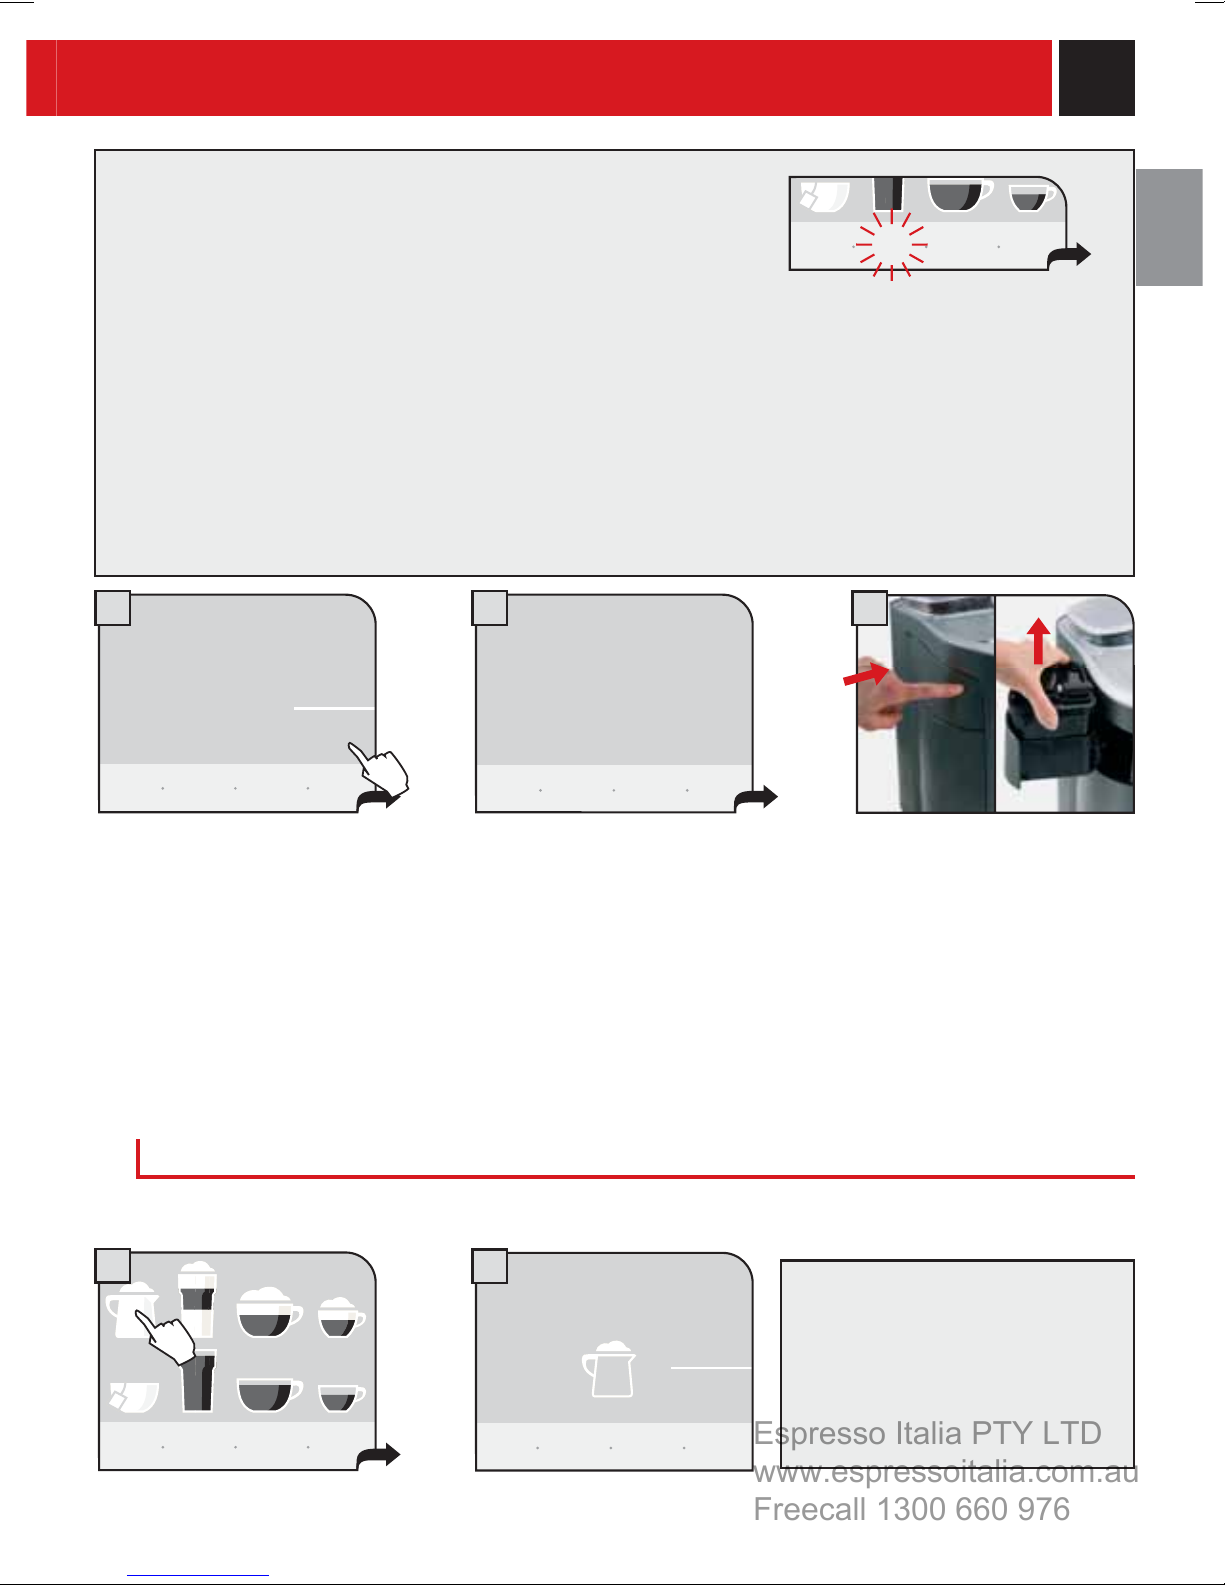
milk rinsing cycle
rinse the milk container
start
rinsing
Remove the milk container from
the machine. If it still contains
milk, pour the milk in the
additional container, to store in the
refrigerator for future use. Rinse
the container with the
cappuccinatore and fi ll it with
fresh water; place it in the
machine and press the “start
rinsing” key.
DISPENSING HOT MILK
8
While the machine is rinsing the
user cannot interrupt the cycle,
rinsing milk circuit-
please wait
rinsing...
9
Remove the container, rinse
and dry.
but must wait until the cycle is
completed. Once completed the
machine returns to the main menu.
THIS PROCEDURE MUST BE PERFORMED FOR ALL
MILK BEVERAGES!
Fill the milk container
1
show icon
explanation
Press the hot milk icon once. The hot milk is dispensed.
my custom
coffee
program-
ming
menu
2
hot
milk
To dispense another cup of milk,
repeat this operation.
When the "milk rinsing" symbol
stop
milk
dispensing
fl ashes, clean the milk circuits as
described for latte macchiato (see
page 12, Step 6).
 Loading...