

Page 1
Leggere attentamente queste istruzioni d’uso prima di utilizzare la macchina
ISTRUZIONI PER L’USO
Read these operating instructions carefully before using the machine
OPERATING INSTRUCTIONS
Bedienungsanleitung ist vor dem ersten Gebrauch der Maschine
aufmerksam zu lesen
BEDIENUNGSANLEITUNG
Lire attentivement ce mode d’emploi avant d’utiliser la machine
MODE D’EMPLOI
Leer atentamente estas instrucciones de uso antes de utilizar la máquina
INSTRUCCIONES DE USO
Ler atentamente estas instruções de uso antes de utilizar a máquina
INSTRUÇÕES PARA USO
Lees deze INSTRUCTIES aandachtig door, alvorens het apparaat te gebruiken
Lees deze INSTRUCTIES aandachtig door, alvorens het apparaat te gebruiken
GEBRUIKSAANWIJZING
Przeczytać uważnie niniejsze instrukcje obsługi przed
użytkowaniem urządzenia.
INSTRUKCJE OBSŁUGI
Odea
Cappuccino
Page 2

CAPPUCCINO
Italiano
2
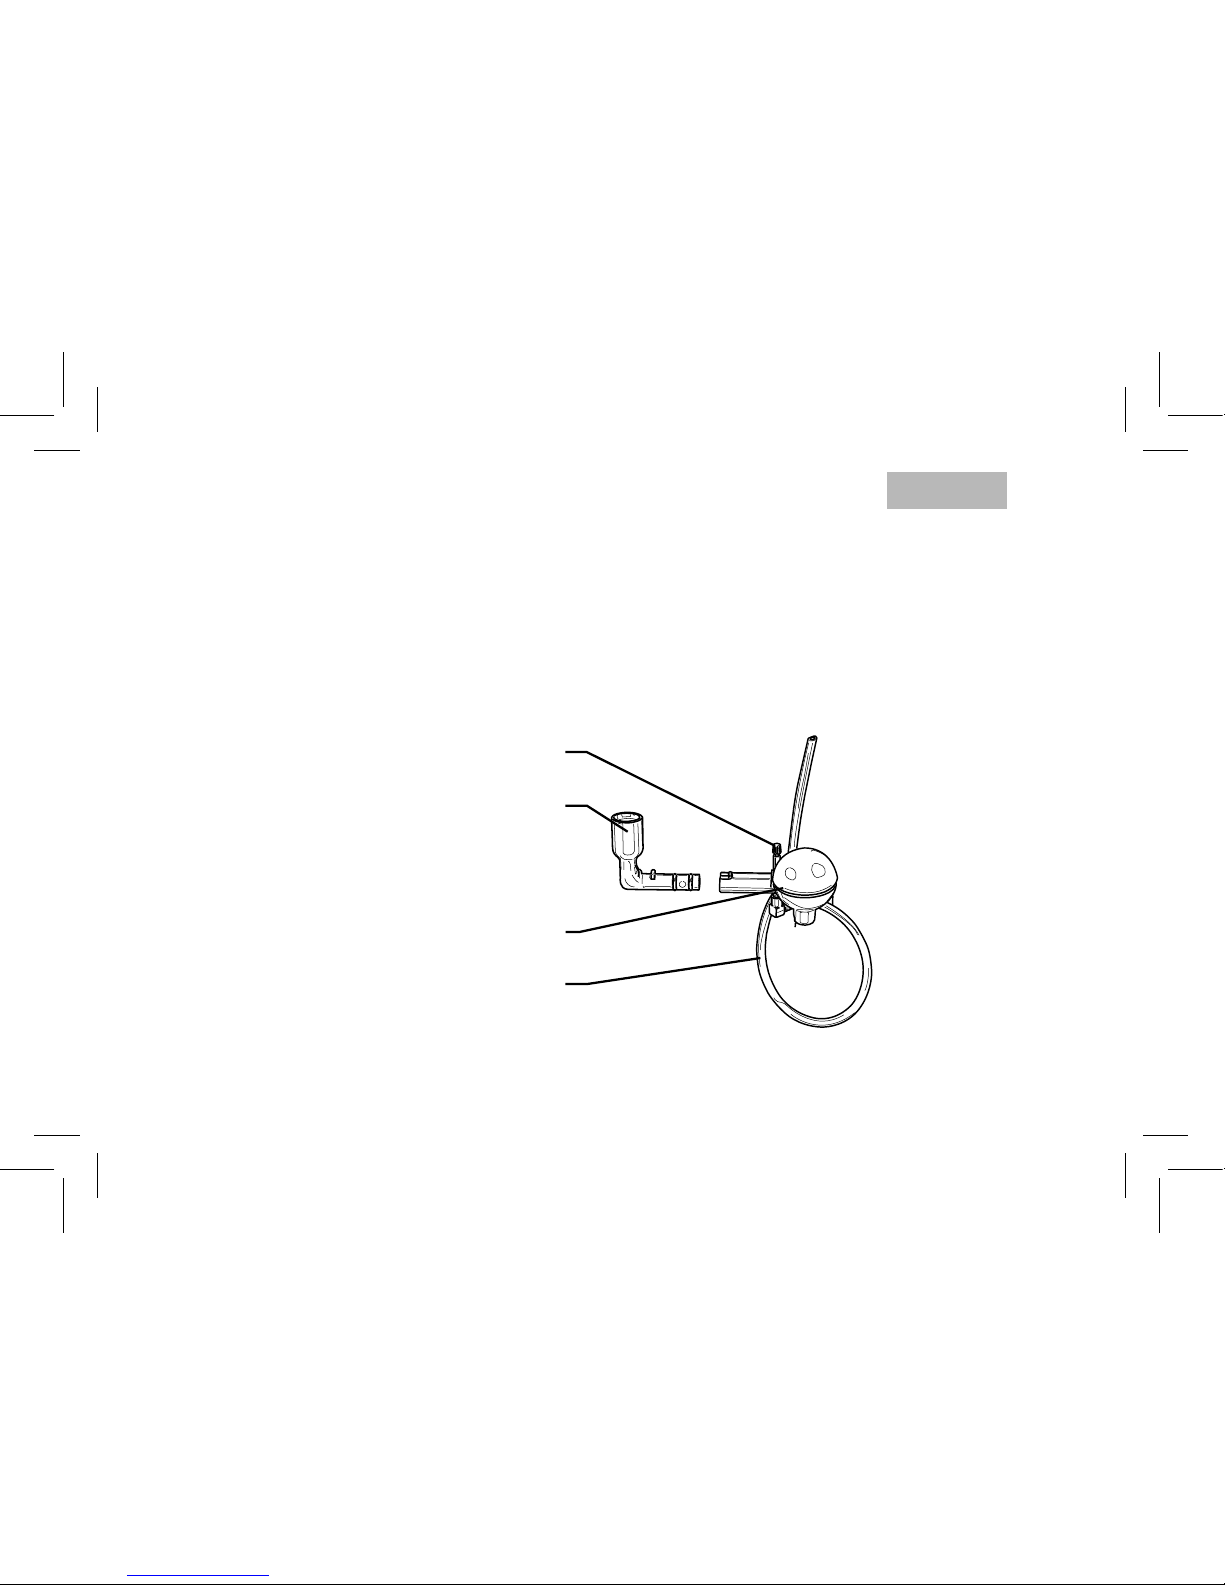
Raccordo
Regolazione schiuma
Tubo aspirazione latte
Norme di sicurezza:
Non dirigete il vapore contro voi stessi e/o altre persone.
Non utilizzate il solo raccordo (senza cappuccinatore) per l’erogazione del vapore.
Operazioni preliminari
Seguite le indicazioni riportate nel manuale istruzioni della vostra macchina:
1 erogate un pò d’acqua calda per lavare il cappuccinatore;
2 preparate la macchina per l’erogazione del vapore.
INSTALLAZIONE
Cappuccinatore
Nota: questo cappuccinatore ha un attacco appositamente sviluppato per essere utilizzato con l’Odea
cappuccino line.
Page 3

1 2 3
CAPPUCCINO
1 2 3
3
Montate il cappuccinatore
con il raccordo.
Rimuovere il pannarello
Inserire completamente il
cappuccinatore.
INSTALLAZIONE
Aprite il rubinetto ed erogate
il latte nella tazza.
Inserite il tubo nel contenitore del latte.
Regolate la schiuma.
In alto = schiuma più densa.
Quando fi nito chiudete il ru-
binetto.
Page 4

LAVAGGIO
1 2
3
Attenzione. Non utilizzare il vapore quando la parte terminale del cappuccinatore non è inserita
nella sua sede.
4
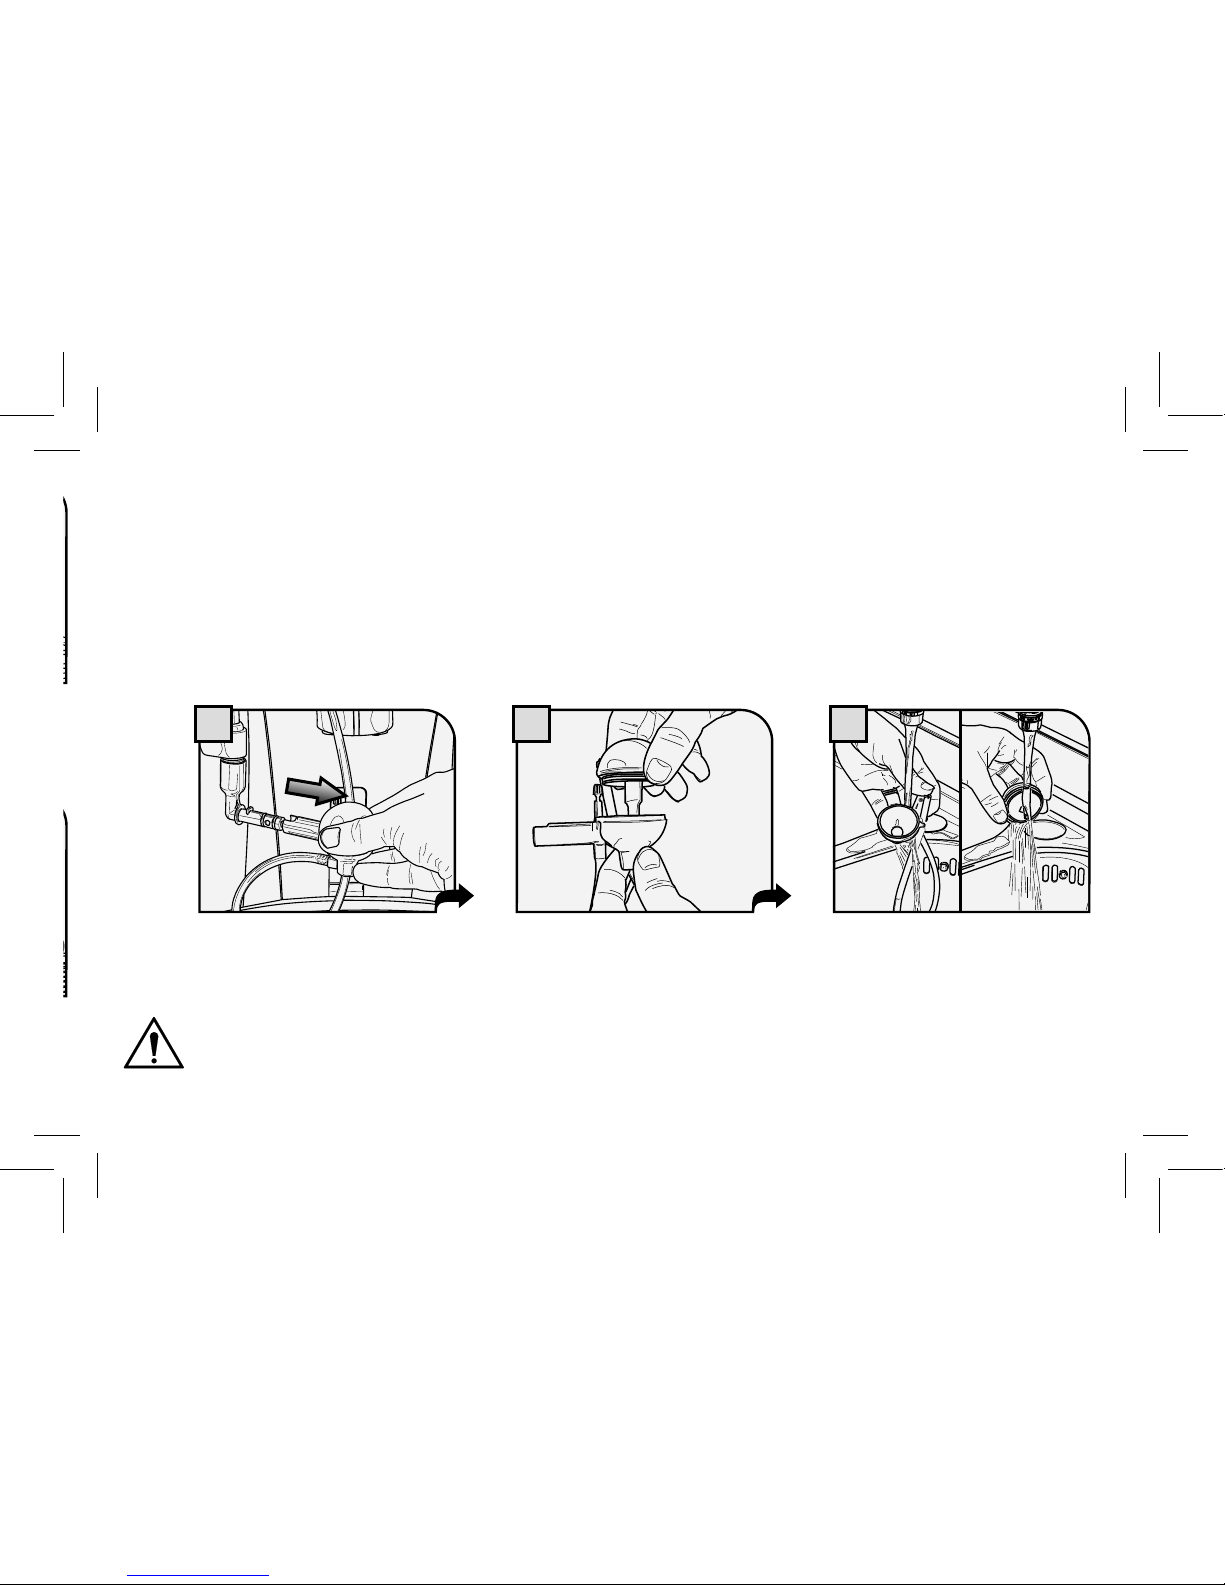
Pulizia
Procedete alla pulizia interna del cappuccinatore; inserite il tubo d’aspirazione in un contenitore d’acqua ed
erogate vapore. Lasciate scorrere l’acqua in un contenitore fi no a far uscire solo acqua chiara.
Quando avete terminato le operazioni riportate la macchina nel modo di funzionamento normale come
descritto nel manuale della vostra macchina.
Per una pulizia più approfondita, spegnete la macchina e smontate il cappuccinatore in ogni sua parte.
Lavate ogni componente con acqua. Non asciugate in un forno convenzionale e/o a microonde.
Separate i componenti del
cappuccinatore.
Sfi late la parte terminale.
Lavate con acqua fresca corrente tutti i componenti.
Page 5
English
5
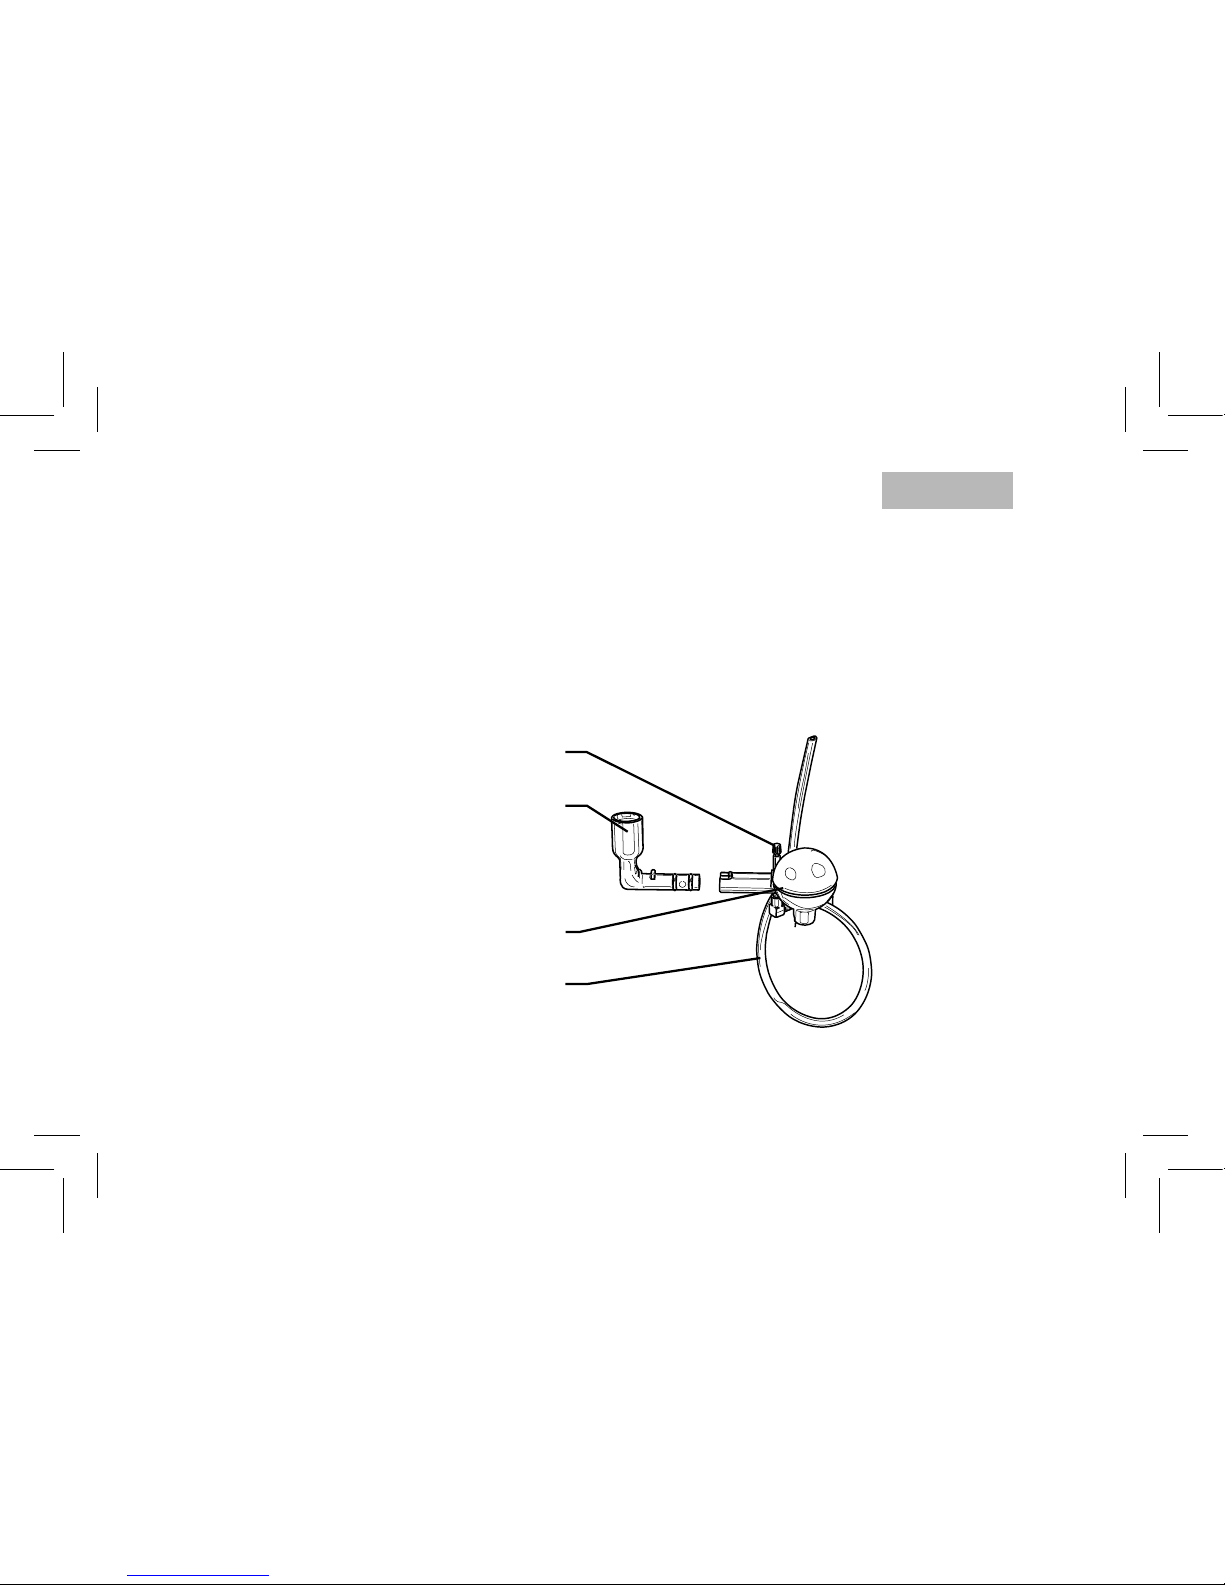
Union
Froth adjustment
Milk suction tube
Safety regulations:
Never direct steam towards yourself and/or others.
Never use the union alone (without cappuccinatore) for steam dispensing.
Preliminary Operations
Follow the directions given in the instruction manual of your machine:
1 dispense a small amount of hot water to wash the cappuccinatore;
2 prepare the machine for steam dispensing.
Cappuccinatore
Note: the union of this cappuccinatore has been especially designed to be used with the Odea Cappuccino
line.
Page 6

WASH
1 2 3
CAPPUCCINO
1 2 3
6
C
C
w
O
i
n
F
W
Assemble the cappuccinatore with the union.
Remove the Pannarello
Fully insert the cappuccinatore.
INSTALLATION
Open the knob and dispense
milk in the cup.
Insert the tube into the
milk container.
Adjust the froth.
High = tighter froth.
Once finished, close the
knob.
Page 7
WASH
1 2 3
Warning. Do not use steam when the end part of the cappuccinatore is not inserted in its seat.
7
Cleaning
Clean the cappuccinatore internally: insert the suction tube in a water tank and dispense steam. Let the
water fl ow in a container until clean water is dispensed.
Once the operations above are completed, bring the machine back to normal operation mode as described
in the instruction manual of your machine.
For a thorough cleaning, turn off the machine and disassemble all the components of the cappuccinatore.
Wash every component with water. Do not dry the components using a standard oven and/or microwave.
Separate the components of
the cappuccinatore.
Remove the end part.
Wash all the components under fresh running water.
-
Page 8
Deutsch
CAPPUCCINO
8
Anschlussstück
Einstellung des Schaums
Milchansaugschlauch
Sicherheitsvorschriften:
Der Dampfstrahl sollte nicht auf Personen gerichtet werden.
Das Anschlussstück darf nicht allein (ohne Cappuccinatore) für die Dampfausgabe verwendet werden.
Vorbereitende Arbeiten
Die im Bedienungshandbuch der Maschine ausgeführten Hinweise sind zu beachten:
1 Heißes Wasser für die Reinigung des Cappucinatore ausgeben;
2 Die Maschine für die Dampfausgabe vorbereiten.
Cappuccinatore
Hinweis: Dieser Cappuccinatore verfügt über einen Anschluss, der eigens für die Verwendung mit dem Odea
Cappuccino Line entwickelt wurde.
INSTALLATION
Page 9

1 2 3
CAPPUCCINO
1 2 3
9
Den Cappuccinatore mit dem
Anschlussstück montieren.
Den Pannarello abnehmen.
Den Cappuccinatore vollständig aufstecken.
INSTALLATION
Den Hahn öffnen und die
Milch in die Tasse ausgeben.
Den Schlauch in den
Milchbehälter einstecken.
Den Schaum einstellen.
Oben = dichterer Schaum.
Nach Abschluss der Ausgabe
den Hahn schließen.
Page 10

REINIGUNG
1 2 3
Achtung. Den Dampf nicht verwenden, wenn das Endstück des Cappuccinatore nicht in die
Aufnahme eingesetzt ist.
10
Reinigung
Für die Reinigung des Cappuccinatore innen, den Ansaugschlauch in einen Wasserbehälter einstecken und
Dampf ausgeben. Das Wasser in einen Behälter abfl ießen lassen, bis nur noch klares Wasser austritt.
Nach Abschluss der Reinigung wird die Maschine wieder in den Status des normalen Betriebs versetzt.
Dabei ist gemäß der Beschreibung im Handbuch der Maschine vorzugehen.
Für eine gründlichere Reinigung wird die Maschine ausgeschaltet und der Cappuccinatore in alle Einzelteile
zerlegt. Jedes Teil mit Wasser abwaschen. Nicht in einem herkömmlichen Ofen und/oder im Mikrowellenherd trocknen.
Die Bestandteile des Cappuccinatore auseinandernehmen.
Das Endstück herausziehen.
Alle Teile unter laufendem
frischem Wasser reinigen.
Page 11

Français
11
Raccord
Réglage de la mousse
Tuyau d’aspiration lait
Consignes de sécurité :
Ne jamais diriger la vapeur contre vous-mêmes et/ou vers d’autres personnes.
Ne pas utiliser le raccord tout seul (sans cappuccinatore) pour la distribution de la vapeur.
Opérations préliminaires
Suivre les indications fi gurant dans le mode d’emploi de votre machine :
1 distribuer de l’eau chaude pour laver le cappuccinatore ;
2 préparer la machine pour la distribution de la vapeur.
Cappuccinatore
Remarque : ce cappucinatore est pourvu d’un raccord spécialement conçu pour l’utilisation avec Odea
Cappuccino line.
Page 12

LAVAGE
1 2 3
CAPPUCCINO
1 2 3
12
N
P
d
m
c
P
c
Monter le cappuccinatore
avec le raccord.
Enlever le Pannarello.
Insérer à fond le cappuccinatore.
MISE EN PLACE
Ouvrir le robinet et verser le
lait dans la tasse.
Mettre le tuyau dans le
réservoir à lait.
Régler la mousse.
En haut = mousse plus épaisse.
Une fois terminé, fermer le robinet.
Page 13

LAVAGE
1 2 3
Attention. Ne pas utiliser la fonction vapeur lorsque la partie terminale du cappuccinatore n’est
pas insérée dans son logement.
13
Nettoyage
Procéder au nettoyage interne du cappuccinatore ; mettre le tuyau d’aspiration dans un récipient à eau et
distribuer de la vapeur. Laisser l’eau s’écouler dans un bac, jusqu’à ce que l’eau qui sort ne soit parfaitement propre. Une fois ces opérations terminées, rétablir le mode de fonctionnement normal de la machine,
conformément au mode d’emploi de votre machine.
Pour un nettoyage plus soigné, éteindre la machine et démonter entièrement le cappuccinatore. Laver
chaque pièce avec de l’eau. Ne pas laisser sécher dans un four traditionnel et/ou four à micro-ondes.
Séparer les composants du
cappuccinatore.
Ôter la partie terminale. Laver tous les composants à
l’eau fraîche courante.
-
-
Page 14

Español
CAPUCHINO
14
Racor
Regulación de la crema
Tubo de aspiración de la leche
Normas de seguridad:
No dirigir el vapor hacia sí mismo o hacia otras personas.
No utilizar sólo el racor (sin cappuccinatore) para el suministro de vapor.
Operaciones preliminares
Seguir las indicaciones proporcionadas en el manual de instrucciones de la máquina:
1 suministrar un poco de agua caliente para lavar el cappuccinatore;
2 preparar la máquina para el suministro de vapor.
Cappuccinatore
Nota: este cappuccinatore tiene un racor especialmente diseñado para ser utilizado con la máquina de
café Odea Cappuccino line.
INSTALACIÓN
Page 15

1 2 3
CAPUCHINO
1 2 3
15
Montar el cappuccinatore
con el racor.
Retirar el pannarello.
Introducir completamente el
cappuccinatore.
INSTALACIÓN
Abrir el mando y suministrar
leche en la taza.
Introducir el tubo en el
contenedor de la leche.
Regular la crema.
Hacia arriba = crema más densa.
Una vez fi nalizada la operación,
cerrar el mando.
Page 16

LAVADO
1 2 3
¡Atención! No utilizar vapor cuando la parte terminal del cappuccinatore no está insertada en su
alojamiento.
16
Limpieza
Limpiar el interior del cappuccinatore; introducir el tubo de aspiración en un recipiente con agua y suministrar
vapor. Dejar correr el agua en un recipiente hasta que salga sólo agua clara.
Cuando se haya fi nalizado con las operaciones indicadas, volver a poner la máquina en el modo de
funcionamiento normal, tal y como se describe en el manual de la máquina.
Para una limpieza más completa, apagar la máquina y desmontar todas las piezas del cappuccinatore.
Lavar todas las piezas con agua. No secar en un horno convencional o de microondas.
Separar los componentes
del cappuccinatore.
Extraer la parte terminal.
Lavar con agua corriente fresca todos los componentes.
Page 17

Português
17
Junção
Ajuste da espuma
Tubo de aspiração do leite
Normas de segurança:
Não dirija o vapor para si próprio e/ou outras pessoas.
Não utilize apenas a junção (sem cappuccinatore) para distribuir o vapor.
Operações preliminares
Siga as indicações descritas no manual de instruções da sua máquina:
1 distribua um pouco de água quente para lavar o cappuccinatore;
2 prepare a máquina para distribuir o vapor.
Cappuccinatore
Obs.: este cappuccinatore está dotado de um engate desenvolvido de propósito para ser utilizado com a
Odea Cappuccino line.
Page 18

LAVAGEM
1 2 3
CAPPUCCINO
1 2 3
18
L
P
d
Q
d
P
L
Monte o cappuccinatore
com a junção.
Remova o pannarello.
Introduza completamente o
cappuccinatore.
INSTALAÇÃO
Abra a torneira e distribua
o leite na chávena.
Introduza o tubo no recipiente de leite.
Ajuste a espuma.
Para cima = espuma mais densa.
Depois de terminado, feche a
torneira.
Page 19

LAVAGEM
1 2 3
Atenção. Não utilize o vapor quando a parte terminal do cappuccinatore não está introduzida na
sua sede.
19
Limpeza
Proceda à limpeza interna do cappuccinatore; introduza o tubo de aspiração num recipiente de água e
distribua vapor. Deixe correr a água num recipiente até sair apenas água clara.
Quando terminar as operações coloque novamente a máquina no modo de funcionamento normal como
descrito no manual da sua máquina.
Para uma limpeza mais profunda, desligue a máquina e desmonte o cappuccinatore em cada sua parte.
Lave todos os componentes com água. Não seque num forno convencional e/ou no microondas.
Separe os componentes do
cappuccinatore.
Retire a parte terminal.
Lave com água fresca corrente cada componente.
.
Page 20

Nederlands
CAPPUCCINO
20
Aansluiting
Instelling van de schuim
Melk-aanzuigbuisje
Veiligheidsvoorschriften:
Richt de stoom niet op uzelf en/of andere personen.
Gebruik niet alleen de aansluiting (zonder cappuccinatore) voor de afgifte van de stoom.
Voorbereidende handelingen
Volg de aanwijzingen die in de instructiehandleiding van uw machine zijn opgenomen:
1 schenk wat heet water om de cappuccinatore schoon te maken;
2 maak de machine gereed voor de afgifte van de stoom.
Cappuccinatore
Opmerking: deze cappuccinatore heeft een aansluiting die speciaal is ontwikkeld om samen met de Odea
Cappuccino line te worden gebruikt.
INSTALLATIE
Page 21

1 2 3
CAPPUCCINO
1 2 3
21
Monteer de cappuccinatore
met de aansluiting.
Verwijder de pannarello.
Steek de cappuccinatore er
helemaal in.
INSTALLATIE
Open het kraantje en schenk
melk in het kopje.
Plaats het buisje in de
melkhouder.
Stel de schuim af.
Omhoog = dikkere schuim.
Sluit het kraantje na beëindiging.
Page 22

REINIGING
1 2 3
Let op. Gebruik geen stoom wanneer het uiteinde van de cappuccinatore er niet in zit.
22
Reiniging
Reinig de binnenkant van de cappuccinatore; plaats het aanzuigbuisje in een bak water en laat stoom
afgeven. Laat het water doorstromen in een bak totdat er alleen helder water uitkomt.
Wanneer de genoemde handelingen beëindigd zijn, zet de machine weer terug in de normale functioneringsstand zoals beschreven in de handleiding van uw machine.
Zet de machine uit en demonteer alle onderdelen van de cappuccinatore voor grondige reiniging. Was elk
onderdeel met water af. Droog de machine niet in een traditionele oven en/of in een magnetron.
Haal de onderdelen van de
cappuccinatore uit elkaar.
Haal het uiteinde weg.
Was alle onderdelen met vers
stromend water af.
Page 23

Polski
23
Złączka
Regulacja pianki
Rurka zasysająca mleko
Normy bezpieczeństwa:
Nie należy kierować pary na siebie ani w stronę innych osób.
Nie stosować samej złączki (bez cappuccinatore) do wytwarzania pary.
Operacje wstępne
Należy zastosować się do wskazówek zamieszczonych w instrukcjach obsługi Państwa urządzenia:
1 nalać trochę gorącej wody by umyć cappuccinatore;
2 przygotować urządzenie do wytwarzania pary.
Cappuccinatore
Uwaga: cappuccinatore ma zaczep specjalnie przygotowany do użycia z Odea Cappuccino line.
Page 24

MYCIE
1 2 3
CAPPUCCINO
1 2 3
24
C
P
p
P
w
c
k
Zmontować cappuccinatore
ze złączką.
Usunąć przystawkę pannarello.
Całkowicie wprowadzić cappuccinatore.
INSTALACJA
Otworzyć wylot i nalać mleko
do fi liżanki.
Włożyć rurkę do pojemnika na mleko.
Dokonać regulacji pianki.
W górę = pianka gęściejsza.
Po zakończeniu zamknąć
wylot.
Page 25

MYCIE
1 2 3
Uwaga. Nie stosować pary, kiedy części końcowe cappuccinatore nie zostały umieszczone w ich
gniazdach.
25
Czyszczenie
Przystąpić do czyszczenia wnętrza cappuccinatore; włożyć rurkę zasysającą do pojemnika z wodą i wytworzyć
parę. Wypływanie wody powinno odbywać się aż do momentu otrzymania jedynie wody o jasnym kolorze.
Po zakończeniu wykonywania tych czynności należy ustawić maszynę na normalny tryb funkcjonowania
w sposób podany w książeczce instrukcji Państwa urządzenia. W celu przeprowadzenia dokładniejszego
czyszczenia, wyłączyć urządzenie i rozmontować cappuccinatore na pojedyncze części. Należy umyć wodą
każdy element. Nie należy suszyć w piekarniku ani w kuchence mikrofalowej.
Rozdzielić komponenty cappuccinatore.
Wyciągnąć końcową
część.
Umyć świeżą, bieżącą wodą
wszystkie części.
-
.
Page 26

26
Page 27

27
Page 28

Saeco International Group S.p.A. - Via Torretta, 240
40041 Gaggio Montano - Bologna - Italy
Tel. +39 0534.771.111 - Fax. +39 0534.31025
www.saeco.com
Cod. 15001534 Rev.00 del 15-04-09
 Loading...